

Page 1
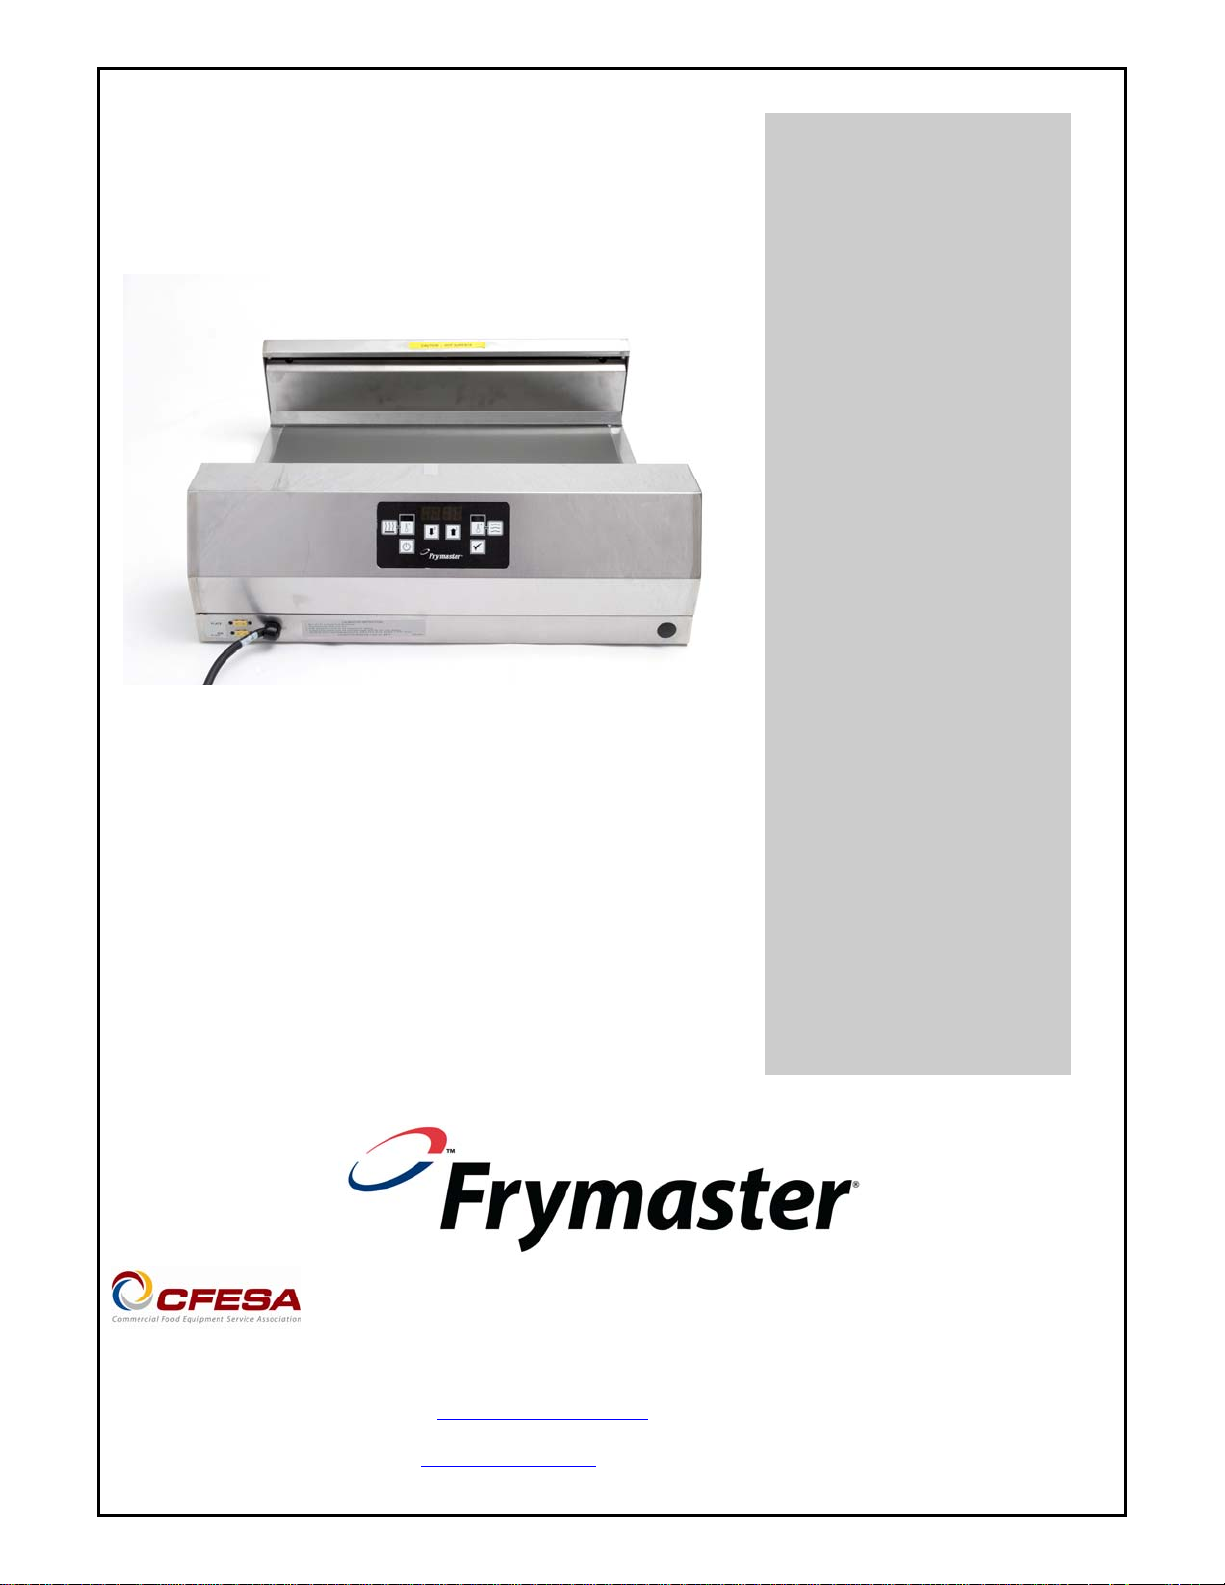
Sandwich Holding Station
Installation & Operation Manual
Frymaster, a member of the Commercial Food Equipment Service Association, recommends
using CFESA Certified Technicians.
24-Hour Service Hotline 1-800-551-8633
JAN 2013
E-mail: [email protected]
*8196981*
www.frymaster.com
Page 2
THIS OPERATOR’S MANUAL SUPERCEDES ALL PREVIOUS EDITIONS OF THE SHS OPERATOR’S
MANUAL.
FOR YOUR SAFETY, DO NOT STORE OR USE GASOLINE OR OTHER FLAMMABLE
VAPORS AND NEAR THIS OR ANY OTHER APPLIANCE.
DANGER
Safe and satisfactory operation of your equipment depends on its proper installation.
Installation must conform to local codes or, in the absence of local codes, with the latest
edition of your national electrical code, i.e. National Electrical Code, NFPA 70 (USA);
Canadian Electrical Code Part 1, CSA-C22.1; or European Community standards (CE).
If this appliance is equipped with a three-prong grounding plug for your protection
against electrical shock, it must be plugged directly into a properly grounded three-
prong outlet. DO NOT CUT OR REMOVE THE GROUNDING PRONG FROM THIS UNIT!
THIS APPLIANCE IS INTENDED FOR INDOOR USE ONLY. IT IS NOT SUITABLE FOR
OUTDOOR USE.
DO NOT USE WATER JETS TO CLEAN THIS EQUIPMENT. THE EQUIPMENT WILL BE
DESTROYED AND ALL WARRANTIES VOIDED.
DO NOT STORE OR USE GASOLINE OR OTHER FLAMMABLE VAPORS/LIQUIDS NEAR
ANY COOKING APPLIANCE.
HAZARD COMMUNICATION STANDARD, (HCS) - THE PROCEDURES IN THIS MANUAL
INCLUDE THE USE OF CHEMICAL PRODUCTS. THESE CHEMICAL PRODUCTS WILL
BE PRINTED IN BOLD FACE, FOLLOWED BY THE ABBREVIATION (HCS) IN THE TEXT
PORTION OF THE PROCEDURE. SEE THE HAZARD COMMUNICATION STANDARD
(HCS) MANUAL FOR THE APPROPRIATE MATERIAL SAFETY DATA SHEET (MSDS).
Page 3
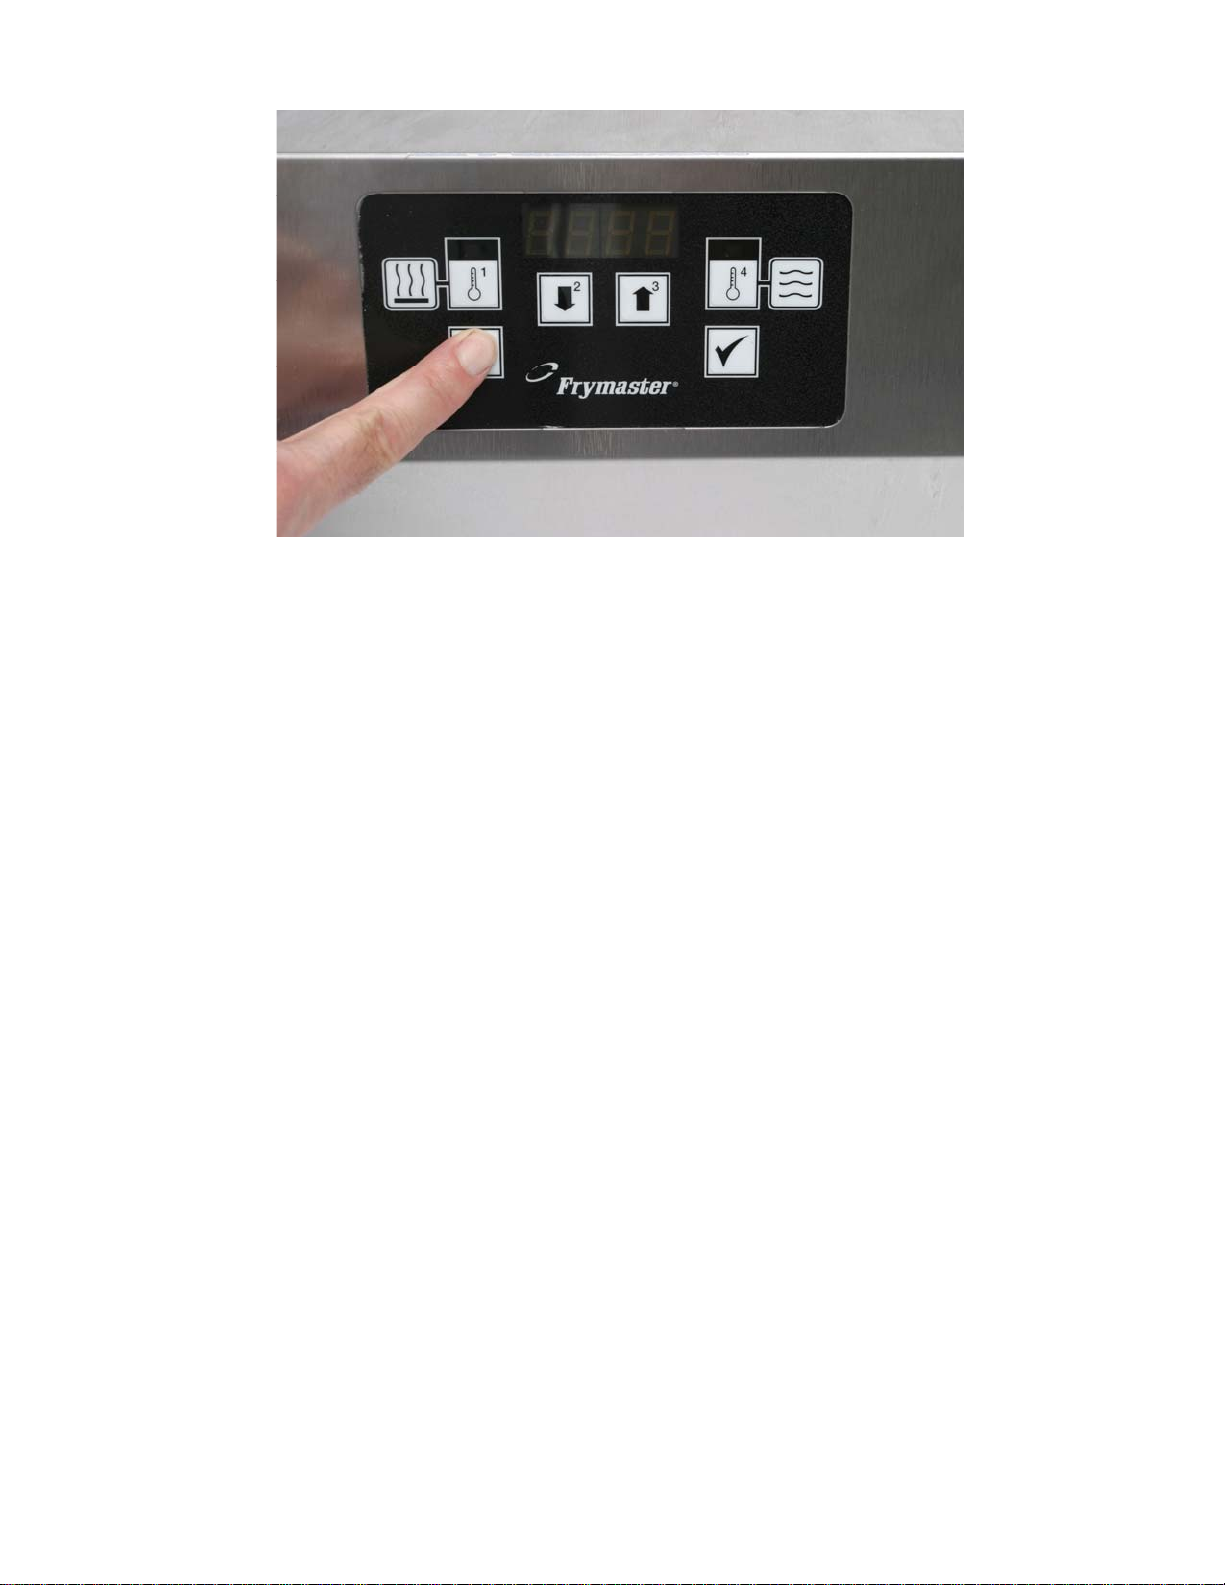
TABLE OF CONTENTS
1. WARRANTY INFORMATION ............................................................................................ 1
1.1 Warranty Provisions - Sandwich Holding Station ....................................................... 1
1.2 Parts Return ............................................................................................................... 1
1.3 Warranty Exclusions .................................................................................................. 1
2. PARTS ORDERING AND SERVICE INFORMATION ....................................................... 2
2.1 Ordering Parts ............................................................................................................ 2
2.2 Service Information .................................................................................................... 2
3. INSTALLATION AND OPERATION .................................................................................. 3
3.1 SHS Installation/Setup ............................................................................................... 3
3.2 SHS Operation ........................................................................................................... 3
4. SHS MODEL/COMPONENT IDENTIFICATION ................................................................ 4
5. COMPUTER OPERATION AND PROGRAMMING ........................................................... 5
5.1 Programming Temperature ........................................................................................ 5
5.2 Computer Operation ................................................................................................... 6
5.2 Fahrenheit to Celsius Display Change ....................................................................... 7
6. OPERATOR TROUBLESHOOTING .................................................................................. 8
Page 4

SANDWICH HOLDING STATION
CHAPTER 1: WARRANTY INFORMATION
The Frymaster Corporation makes the following limited warranties to the original purchaser only for this
equipment and its replacement parts:
1.1 Warranty Provisions – Sandwich Holding Station (SHS)
A. The Frymaster Corporation warrants all components against defects in material and workmanship for a period
of 1 year.
B. All parts, with the exception of fuses, are warranted for 1 year after installation date of cabinet.
C. If any parts, except fuses, become defective during the first year after installation date, Frymaster will also pay
straight-time labor costs to replace the part, plus up to 100 miles/160 km of travel (50 miles/80 km each way).
1.2 Parts Return
All defective in-warranty parts must be returned to a Frymaster Authorized Factory Service Center within 60 days
for credit. After 60 days, no credit will be allowed.
1.3 Warranty Exclusions
This warranty does not cover equipment that has been damaged due to misuse, abuse, alteration, or accident
such as:
improper or unauthorized repair;
failure to follow proper installation instructions and/or scheduled maintenance procedures, improper
maintenance;
damage in shipment;
abnormal use;
removal, alteration, or obliteration of the rating plate;
This warranty also does not cover:
transportation or travel over 100 miles/160 km (50 miles/80 km each way), or travel time over two (2)
hours;
overtime or holiday charges;
consequential damages (the cost of repairing or replacing other property which is damaged), loss of time,
profits, use or any other incidental damages of any kind.
There are no implied warranties or merchantability or fitness for any particular use or purpose.
For international warranty, the above procedures apply, except that the customer is responsible for freight and
duty charges.
1
Page 5

SANDWICH HOLDING STATION
CHAPTER 2: PARTS/SERVICE INFORMATION
2.1 Ordering Parts
Parts orders may be placed directly with your local Frymaster Factory Authorized Servicer (FAS)/distributor. Your
nearest Frymaster FAS is accessible at www.frymaster.com
Department at 1-800-551-8633 or 1-318-865-1711.
To speed up your order, the following information is required:
Model Number ______________________
Serial Number ______________________
Voltage ___________________________
Item Part Number ___________________
Quantity Needed ____________________
2.2 Service Information
Service may be obtained by contacting your local Frymaster Authorized Service Center/Distributor. Service
information may be obtained by calling the Frymaster Service Department. The following information will be
needed in order to assist you quickly and efficiently:
Model Number _________________________
Serial Number _________________________
Nature of the Problem ___________________
_____________________________________
_____________________________________
_____________________________________
Additional information (i.e. cooking environment, time of day) may be helpful in solving your service
problem. Contact your service technician.
RETAIN AND STORE THIS MANUAL IN THE EQUIPMENT MANUAL FOR FUTU RE USE.
or you can contact the Frymaster Service
2
Page 6
SANDWICH HOLDING STATION
CHAPTER 3: INSTALLATION AND OPERATION
The Sandwich Holding Station or SHS is designed to hold assembled sandwiches. By circulating
heated air evenly across the open staging area, the Sandwich Holding Station keeps sandwiches hot
without drying or cooking.
3.1 SHS Installation/Setup
Upon arrival, inspect the SHS for concealed damage. Immediately report any damage to the delivering
freight company. Claims must be filed within 15 days after receipt of the unit.
Make sure that the unit is placed on an even surface and that the area surrounding the SHS is free of
clutter that would interfere with airflow.
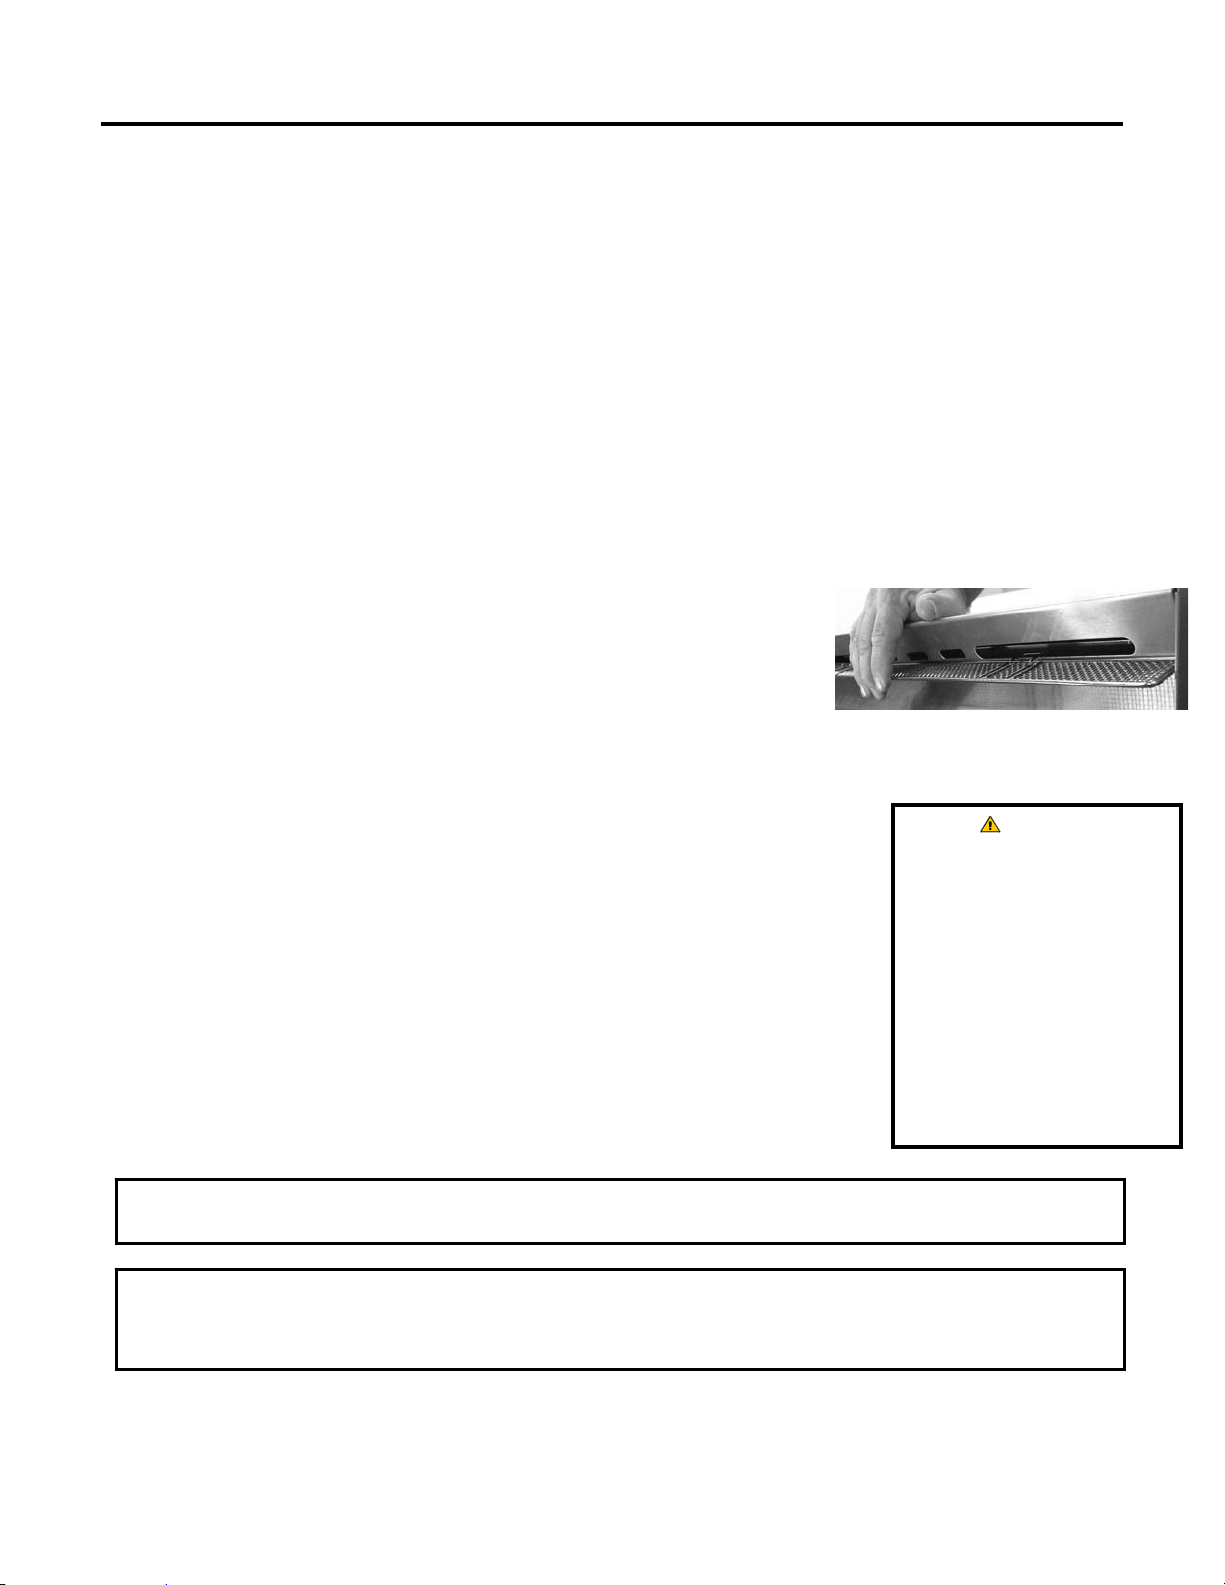
The filter screen is design to prevent debris from entering the computer cowl assembly and clogging the
blower assembly. Simply fit the part on to the vent opening of the
computer cowl assembly. The filter screen will snap into position. If
equipped with an optional holding screw, tighten screw to pull the filter
screen snug into position.
Voltage – Two models are available: 208 VAC and 240 VAC*
Frequency - 60 Hz
Power Requirements
Install Filter Screen
The filter screen snaps into place on
rear of the air-intake tower.
Single Phase
20 amp Service
3.2 SHS Operation
1. Plug the unit into the power source.
2. See Chapter 5, Computer Operation and Programming, for proper computer
setup and operation.
3. Place product in the SHS in accordance with the restaurant’s established
procedures.
4. When closing the store, remove all product from the SHS and perform daily
preventive maintenance. Turn the computer OFF.
If the 240 VAC model is
operated on 208 VAC, the
unit will heat slowly and
may not reach maximum
temperature. If the 208
VAC model is operated on
240 VAC, component
damage is likely. To
ensure proper operation,
the power source should
match the voltage on the
rating plate on the bottom
of the SHS.
DANGER
ALL UNITS (CORD CONNECTED OR PERMANENTLY CONNECTED) SHOULD BE
CONNECTED TO A GROUNDED POWER SUPPLY SYSTEM.
THIS APPLIANCE IS EQUIPPED WITH A GROUNDING PLUG FOR YOUR PROTECTION
AGAINST SHOCK HAZARD AND MUST BE PLUGGED INTO A PROPERLY GROUNDED
RECEPTACLE. DO NOT CUT OR REMOVE THE GROUNDING PRONG FROM THIS PLUG.
3
Page 7
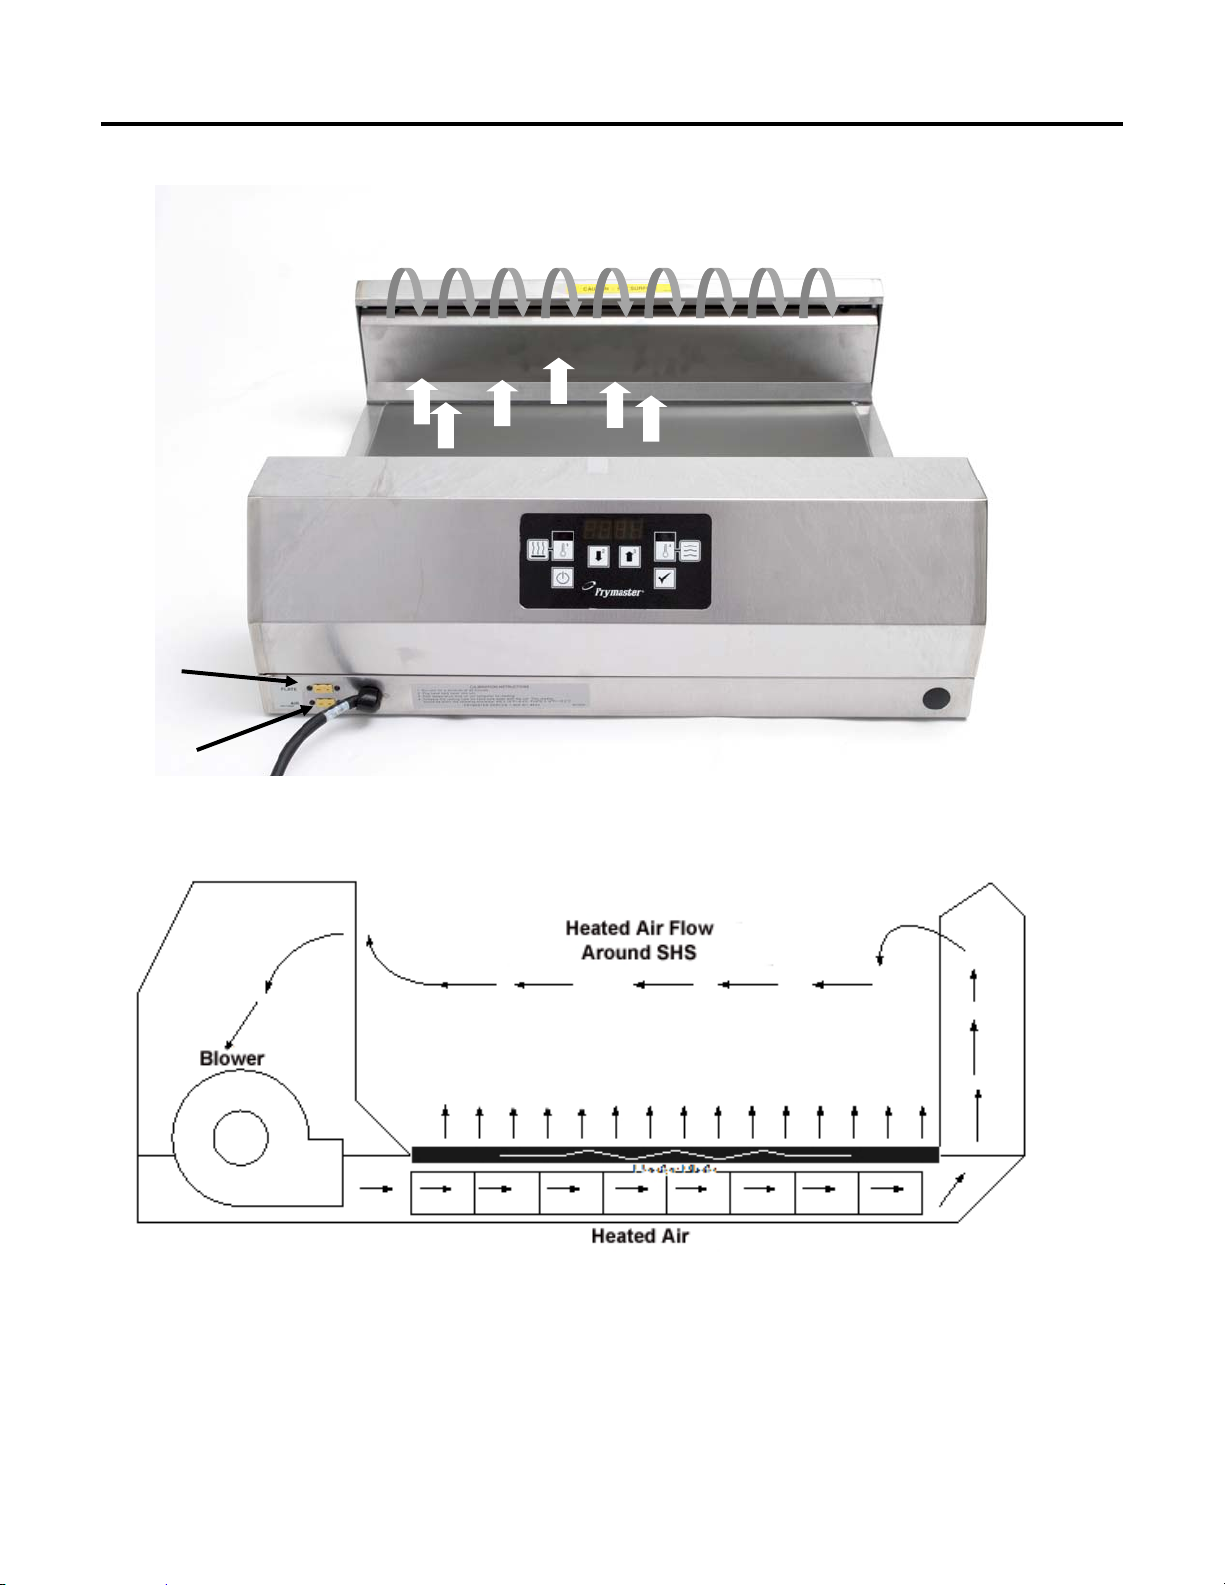
CHAPTER 4: SHS MODEL/COMPONENT IDENTIFICATION
Heated air flows
from the tower and
rises from the
heater plate.
SANDWICH HOLDING STATION
Heater Plate
Controller
Plate Heater
Calibration Socket
Air Heater
Calibration Socket
4
Page 8
SANDWICH HOLDING STATION
CHAPTER 5: COMPUTER OPERATION AND PROGRAMMING
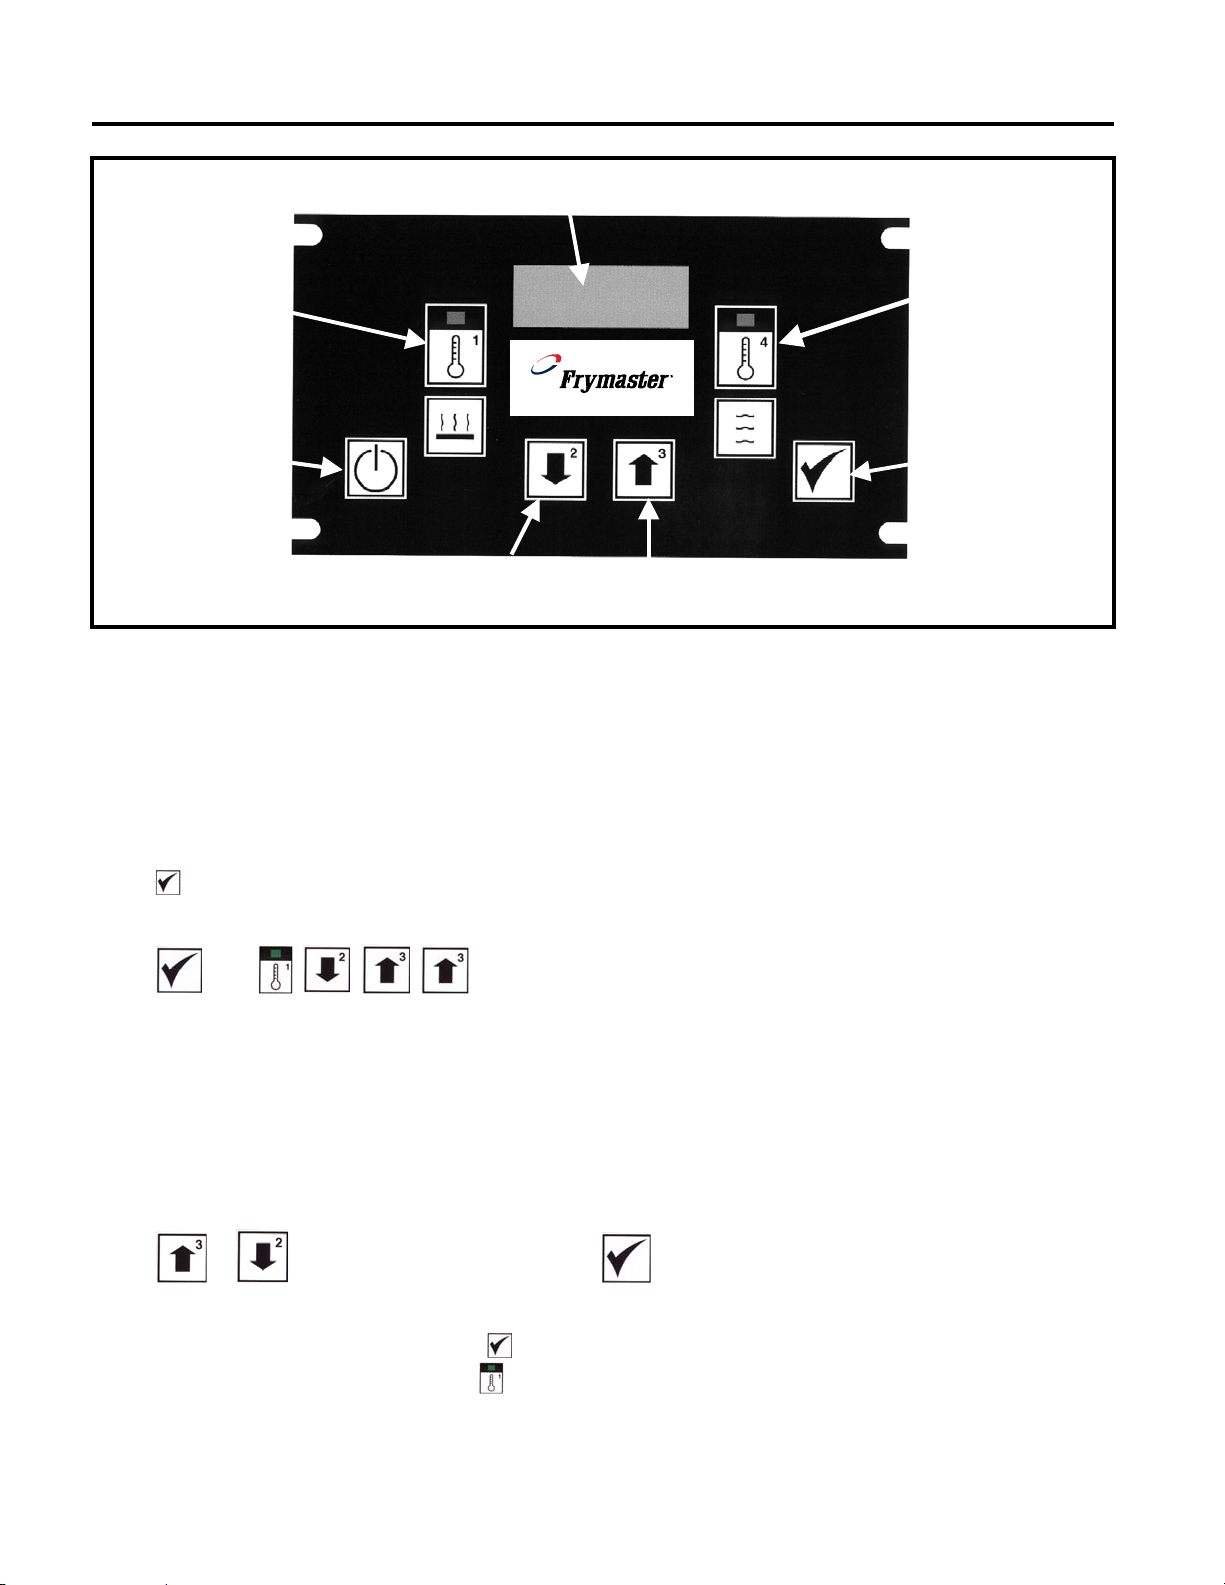
Display
Heater Plate
Temperature
Switch (1)
Air Heater
Temperature
Switch (4)
ON/OFF Switch
Swi
Down
5.1 Programming Temperatures
You are able to program the setpoint temperature of both the air heater and the heater plate via the computer
interface. The heater plate factory default setting is 1
(110°C). If th
re that the SHS com
Ensu
Press
e factory default temperature settings are acceptable, skip to Section 5.2, Page 6.
puter is in the OFF position (nothing in the display).
, then enter 1, 2, 3, 3. Use the numerals in the upper right-hand corner of each key.
tch (2)
SHS Computer.
Up Switch (3)
70F
(77°C). The air heater factory default setting is 230F
Check or
Program Switch
Press
The display will read SET and the LEDs on both the Heater Plate button (1) and the Air Heater button (4) will
light (see previous diagram, SHS Computer). Press the button that corresponds to the heater you wish to
program.
Press the Up and Down Arrow Keys to achieve the desired set-point temperature, then press the Check button
once. Both heater LEDs will again light.
Press
When both heaters are programmed, press
programming mode OR press either of the
Program as previously described.
, then , , , .
or to get desired setpoint, then press to lock the temperature in.
again to store the programmed setpoints and exit the
buttons (1 or 4) to change the setpoint temperature for a heater.
5
Page 9
SANDWICH HOLDING STATION
CHAPTER 5: COMPUTER OPERATION AND PROGRAMMING
5.2 Operation
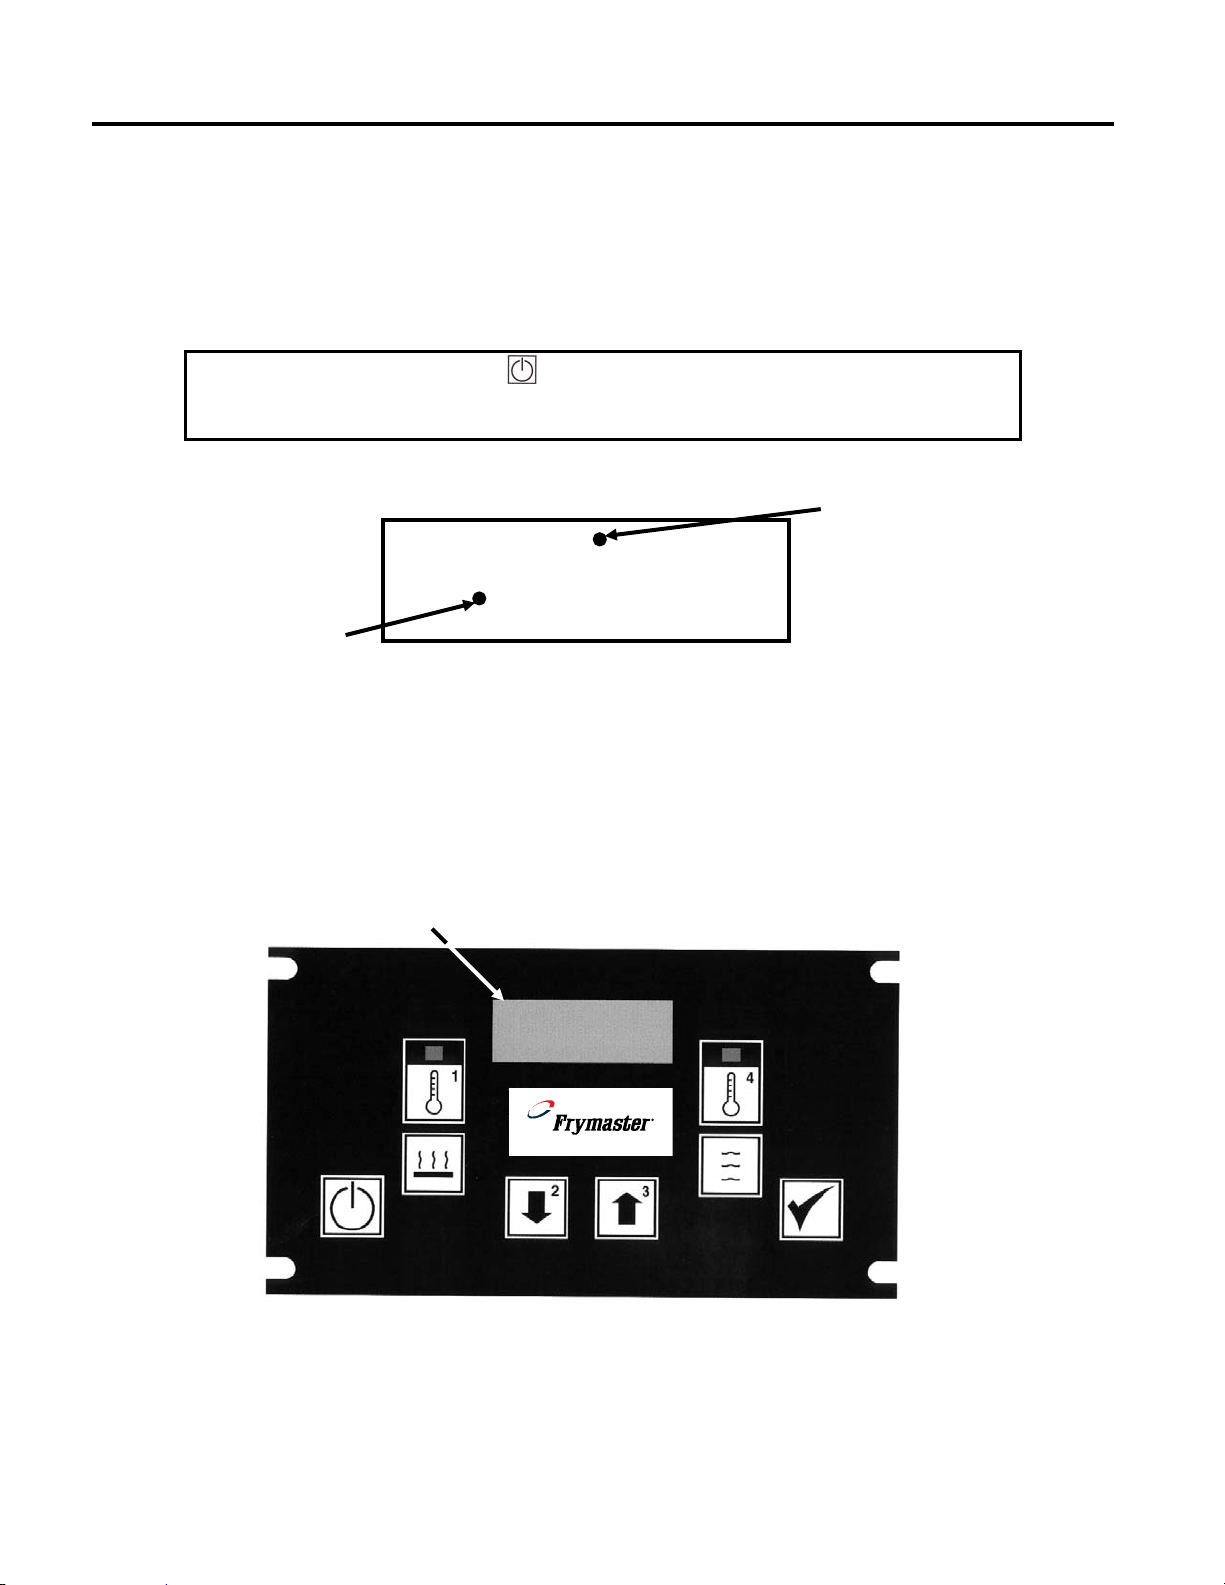
1. Press the power button, turning the SHS on (the display will light and cycle through an initialization
sequence). The display will read -LO- until the air heater and heater plate are within 15F (9°C) of setpoint.
It will take approximately 10 minutes for the SHS to achieve operating temperature.
NOTE: A small LED will light in the display when the heater plate or air heater is energized.
Press
The display will read LO until both heaters are within 15° F of setpoint.
When the SHS is ready for operation, the display reads R E d y (ready). Place product in the SHS in
accordance with the restaurant’s established procedures.
NOTE: To check the actual temperature of a heater, press the corresponding Temperature button once.
To check the setpoint temperature of a heater, press the button twice (an indicator will light when the
setpoint is displayed).
Heater Plate
Temperature
Setpoint Indicator
R E y
to turn on the computer.
Air Heater Activation
¡
d
220F
6
Page 10

SANDWICH HOLDING STATION
CHAPTER 5: COMPUTER OPERATION AND PROGRAMMING
5.3 Switching Between Fahrenheit and Celsius Temperature Scales
Follow these steps to switch between Fahrenheit and Celsius temperature displays (refer to diagram, SHS
Computer, on Page 5-1):
1. Unplug unit from power supply.
2. Press and hold either temperature bulb button.
3. Plug unit back into power supply with button depressed.
4. S T O R will be shown in the display.
5. Release the temperature button.
6. Press the power button.
Now, the unit will display the temperature in Celsius rather than Fahrenheit.
7
Page 11
SANDWICH HOLDING STATION
CHAPTER 6: OPERATOR TROUBLESHOOTING
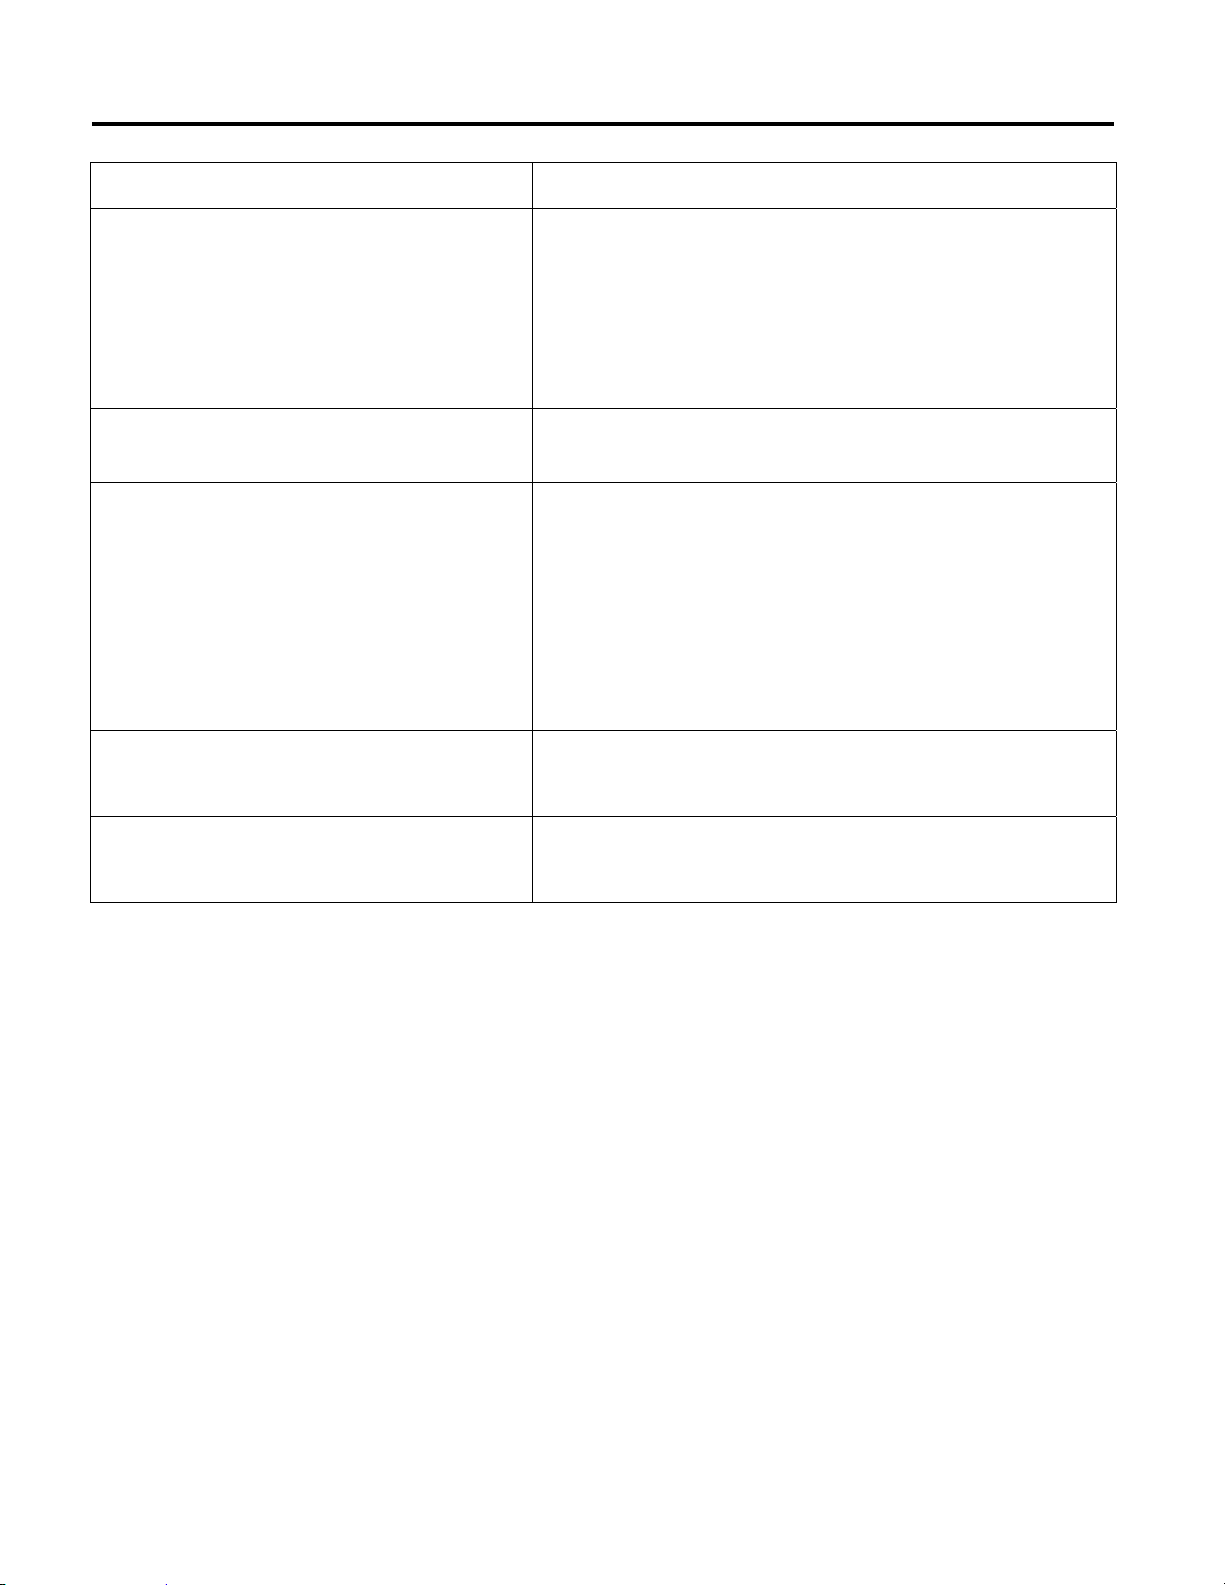
Symptom Possible Cause
No power
Circuit breaker out
No computer display; no flow from
air tower
Low voltage
Bad fuse
Bad transformer
Hi-limit out
No flow from air tower
After 20 minutes of operation
computer display shows PROB
After 20 minutes of operation
computer display shows HI
After 20 minutes of operation
computer display shows LO
Bad latching relay
RTD probe has failed. Isolate failed component
by checking temperature of air and heater plate
with the temperature display keys on the
computer. The plate temperature should be
within ± 15°F (9°C) of setpoint. The air heat
should be within ± 25°F (14°C) of setpoint. If both
temperatures are good, the computer is likely
bad.
Plate heater, plate heater relay or RTD are faulty.
Air heater, air heater relay or RTD are faulty
8
Page 12

Frymaster, L.L.C., 8700 Line Avenue, Shreveport, Louisiana 71106
TEL 1-318-865-1711 FAX (Parts) 1-318-219-7140 (Tech Support) 1-318-219-7135
PRINTED IN THE UNITED STATES
SERVICE HOTLINE
1-800-551-8633
819-6981
JAN 2013
 Loading...