

Page 1
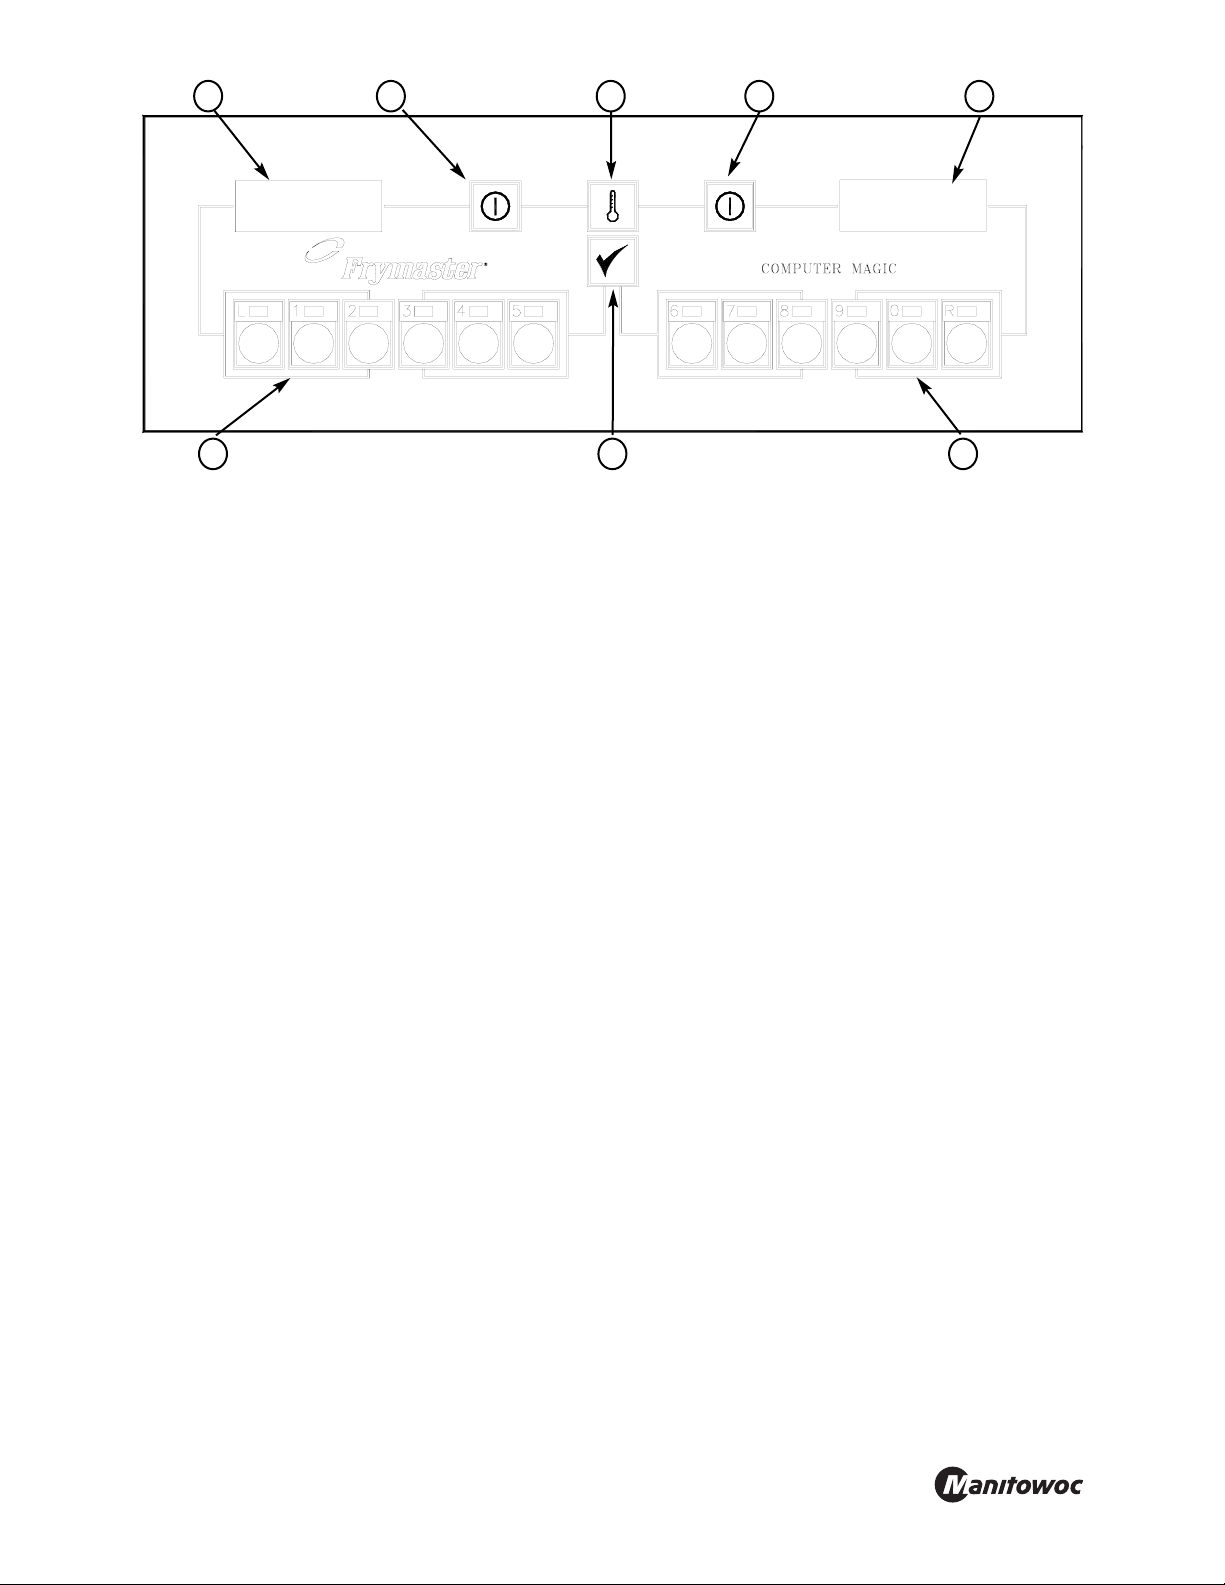
1. Lighted Display -- left side display of various functions and operations.
2. Lighted Display -- right side display of various functions and operations.
3. Thermometer Button -- locks in program after set up is complete and displays frypot oil temperature.
4. ON/OFF Button -- controls power supply for left side of split frypot.*
5. ON/OFF Button -- controls power supply for right side of split frypot.*
6/7.Product and Coding Buttons -- allows access to the computer and programming functions.
8. Programming Button -- locks in the programming selected for product buttons.
*On full frypot, either left or right button will control power.
Complies with the limits of a class B computing device pursuant to sub-part J of part 15 of FCC Rules.
WARNING - FRYER MUST BE FILLED WITH OIL, SHORTENING, OR WATER
BEFORE TURNING ON COMPUTER.
COMPUTER MAGIC
OPERATING INSTRUCTIONS
1
23
4
5
6
78
OPERATING INSTRUCTIONS
A. Turn the computer on by pressing the ON/OFF button (Item 4 or 5). This will turn computer (fryer) on. One of the
following will be displayed:
1. “CYCL” indicating that the burner is operating in the melt cycle mode (slow heat up). Fryer will remain in the
melt cycle mode until it reaches 180°F or it is canceled manually (See B below).
2. “HI” indicating that the vessel temperature is 16°F higher than the set point.
3. “Lo” indicating that the vessel temperature is 16°F or more lower than the set point.
4. “----” indicating that the fryer temperature is in the cooking range. NOTE: For best results, cooking should not
be attempted unless display indicates “----”.
5. “Help” indicating that there has been a heating problem.
6. “Hot” indicating that the vessel temperature is in excess of 385°F.
7. “Prob” indicating that the computer has detected a problem in the temperature measuring circuits, including
probe.
NOTE: The decimal point “.” between digits 1 and 2 in either display area indicates that the burners/elements are
on.
8700 Line Avenue
Shreveport, LA 71106-6814
USA
Tel: 318-865-1711
Tel: 1-800-221-4583
Fax: 318-868-5987
E-mail: info@frymaster.com
www.frymaster.com
Bulletin No. 818-5032 2/09
Litho in U.S.A. ©Frymaster
Page 2

B. Melt Cycle Cancel Feature. Caution: Melt cycle SHOULD NOT be canceled if solid shortening is used. The
computer will display “CYCL” during melt cycle operation. To cancel melt cycle, depress “L” button for left fry vessel and “R” button for right fry vessel, or single fry vessel. “CYCL” will be replaced by “Lo”. The decimal point
between digits 1and 2 will illuminate indicating that the burners are on.
C. The cook cycle operation is initiated by pressing a PRODUCT/PROGRAMMING button: NOTE: For single fry ves-
sel, use “L” thru “R” buttons for cooking product. For double fry vessel, use “L” thru “5” buttons for cooking product in left fry vessel and “6” thru “R” buttons for cooking product in right fry vessel.
1. The basket lift (on fryers so equipped) will lower the product into the oil.
2. The display will indicate the previously programmed cook time and begin countdown.
3. If shake time is programmed, the operator will be notified of the need to shake the product “X” seconds after
the cook cycle has begun (X-amount of time programmed). A beeper will sound, and the display will read “SH”. The blank will be the PRODUCT/PROGRAMMING button number. If no shake time has been programmed,“SH-” will not appear during the cook cycle. The beeper is self canceling after 3 seconds.
4. At the end of cooking cycle, a beeper will sound, “COOC” will be displayed, and the associated PRODUCT/PROGRAMMING button indicator will flash. To cancel the cook alarm, the PRODUCT/
PROGRAMMING button must be pressed.
5. At this time, the HOLD time will be displayed (if programmed greater than 0), and countdown to zero at which
time a beeper will sound and “Hd-” will be displayed. The blank will be the PRODUCT/PROGRAMMING button number. Hold alarm is canceled by pushing CODE button (Item 8). If display is in use, hold time will count
down invisibly until display is free.
CHECKING TEMPERATURE
A. Check the oil temperature at any time by pressing STORAGE/TEMPERATURE CHECK button (Item 3) once.
Check the set point by pressing STORAGE/TEMPERATURE CHECK button (Item 3) twice.
B. During the idle periods when the fryer is on but not in use, “----” should appear in both displays (Item 1 and 2) on
a single fry vessel computer. “----” will appear in the display of the side that is turned on in a double vessel computer. If not, check actual temperature and set point.
C. Should you suspect the probe is defective, check oil temperature with a thermometer to verify that computer read-
out is reasonably close to your measured reading.
NOTE: The electronic circuitry can be affected adversely by current fluctuations and electrical storms. Should the computer
not function or program properly for no apparent reason, it should be reset by unplugging fryer and plugging it back in. This
could eliminate a service call.
8700 Line Avenue
Shreveport, LA 71106-6814
USA
Tel: 318-865-1711
Tel: 1-800-221-4583
Fax: 318-868-5987
E-mail: info@frymaster.com
www.frymaster.com
Bulletin No. 818-5032 2/09
Litho in U.S.A. ©Frymaster
 Loading...