

Page 1

USER MANUAL
FryMac
FryMacFryMac
FryMac
MKII
Mounting, operating and service.
Original language – English
V1.0.
Page 2

1
Contents
1. General Product Description ................................................................................................................. 2
2. Installation procedure ................................................................................................................... 4
2.1. Unpacking ...................................................................................................................................... 4
2.2. Installation ..................................................................................................................................... 4
2.3. Height requirements above machine ............................................................................................ 5
2.4. Ventilation holes ............................................................................................................................ 6
2.5. Exhaust .......................................................................................................................................... 6
2.6. Ambient temperature .................................................................................................................... 6
2.7. Electrical connection ..................................................................................................................... 7
2.8. Earthing terminal for external equipotential bonding. ................................................................. 7
2.9. Important note .............................................................................................................................. 7
2.10. Important ....................................................................................................................................... 8
2.11. Warning ......................................................................................................................................... 8
3. Daily use ......................................................................................................................................... 9
3.1. Turning on machine ....................................................................................................................... 9
3.2. Warming up ................................................................................................................................... 9
3.3. Operation ..................................................................................................................................... 10
3.4. Standby ........................................................................................................................................ 11
3.5. Cooling ......................................................................................................................................... 12
3.6. Opening of lid and removal of parts to be cleaned ..................................................................... 12
3.7. Warnings ...................................................................................................................................... 14
4. Cleaning ....................................................................................................................................... 15
4.1. Cleaning of removable parts........................................................................................................ 15
4.2 Cleaning of internal oven surfaces .............................................................................................. 17
4.3 Cleaning of external surfaces ...................................................................................................... 17
4.4. Cleaning of the exhaust channel ................................................................................................. 18
4.5 Warning ....................................................................................................................................... 19
5 Programs ...................................................................................................................................... 20
5.5 Recipe programs .......................................................................................................................... 20
6 Adjustment of settings ................................................................................................................ 20
6.5 Adjustment of time and temperature ......................................................................................... 20
6.6 Changing language ....................................................................................................................... 21
7 Audit values ................................................................................................................................. 22
7.5 Reading audit values .................................................................................................................... 22
8 Function testing ........................................................................................................................... 24
8.5 Making functional test of motors and fans ................................................................................. 24
9 Transport ..................................................................................................................................... 25
9.5 Precautions for transport ............................................................................................................ 25
10 Outdoor use ................................................................................................................................. 25
10.5 Precautions for outdoor use ........................................................................................................ 25
11 Maintenance ................................................................................................................................ 25
12 Faultfinding .................................................................................................................................. 25
13 Technical data .............................................................................................................................. 26
14 Disposal of old equipment ........................................................................................................... 26
15 Guarantee .................................................................................................................................... 27
Page 3

2
1. General Product Description
FryMac MKII is designed for preparation of french fries and other fast food products. The machine
prepares portioned frozen food in a cooking process resembling barbecuing without the use of ordinary
cooking oil or lard.
• Low fat content
• God taste
• Shortened cooking time (1.45 minutes - about 2 minutes for French fries of 100 g).
• No oil / lard purchase and therefore no problems with disposal of used oil / lard.
FryMac MKII has been tested for preparation of Mom’s products only. If other products are used, the
result might not be satisfactory. If damage should occur due to usage of products not Recommended
by your supplier or on www.frymac.com, this is not part of the guarantee.
FryMac MKII cooks using 6x halogen lamps as a heat source.
Page 4

3
Portioned French fries or other products are entered through a manually operated filling lid.
The French fries fall onto a metal conveyor that turns during the cooking process to enable the French
fries to tumble.
When the cooked cycle is complete, the conveyor direction is reversed to dispense the French fries into
a collection tray.
Air is circulated through the machine to remove moisture from the product and to simultaneously cool
the working components and external surfaces.
Page 5

4
2. Installation procedure
2.1. Unpacking
Unpack the machine, remove all packaging
materials and look for any visible damages as a
result of mishandling during transportation. If any
damages are visible, contact your local agent
immediately. Never install a machine that has been
visibly damaged.
2.2. Installation
The machine
should
be
placed
indoors on a
stable
and level surface. The machine should be placed
on a table at ordinary kitchen table height.
The minimum space shown must be available. This
is to allow access to locking clips for lid, power
cable and to ensure that the ventilation holes are
not covered.
Rear = 5cm.
Left side = 12cm
Right side = 12cm
If the machine is installed next to a hot appliance
that emits radiant heat (such as a radiant fries
warmer, toaster, oven or similar), there should be
a minimum distance of 30 cm between FryMac
MKII and the hot appliance. This goes for the left
and right side of FryMac MKII.
Left side = 30 cm
Right side = 30 cm
Page 6

5
2.3. Height requirements above machine
It is recommended that there is free space above
the machine to allow the hot exhaust air to escape.
Preferably in the vicinity of an air extractor to
remove the exhaust air from the room.
If however the machine is placed below a surface,
the minimum distance of 1 meter from the base of
the machine must be observed.
The materials above the machine must also be able
to withstand a constant working temperature of
80°C.
Side view
Do not install any extraction directly on the
machine.
If you wish to have any extraction pipe above the
machine a minimum safety distance of 15 cm must
be observed.
Side view
Page 7

6
2.4. Ventilation holes
The outer lid surfaces are cooled by a controlled
airflow within the machine. The air enters in the
machine in the gap between the lid and the
machine`s plastic sides.
It flows through the machine and exits via the
exhaust tube.
Do not block ventilation holes / openings.
Reduced ventilation can result in overheating of
the machine. Consequently a safety device will
close the heating lamps down. The machine
cannot be used until it has cooled down to within
its normal working temperature and the thermal
protection switch has been reset.
2.5. Exhaust
As a standard, t
he machine
exhaust tube
is
configured so that exhaust is facing upwards.
Note: The position of the exhaust tube can also be
reconfigured so that exhaust is facing the rear of
the machine.
The air leaving the machine during operation is
maximum 170°C just above the exhaust.
Ensure that the machine is not placed directly
beneath materials that could be affected by the
hot air leaving the exhaust.
It is possible to
reconfigure the exhaust tube so
that exhaust is from the rear of the machine.
If this configuration is used, precautions must be
made to ensure that heat from the exhaust air
does not cause a hazard.
2.6. Ambient temperature
The machine must not be
used
, if temperatures are
below +10 °C or above +40°C and the relative
humidity is above 85% RH.
Page 8

7
2.7. Electrical connection
The machine
must be connected to
230V AC, 50
Hz and a fuse of minimum 13A. Va
riations in the power supply must not be more
than +10%, -10%.
For legal and safety reasons the machine must be
connected to ground.
2.8. Earthing terminal for external equipotential bonding.
The machine
is provided with
a grounding
terminal (M5 thread) on the rear side that can be
used for the connection of an equipotential
bonding conductor.
The terminal is marked by the equipotential
bonding symbol (5021 of IEC 60417-1).
2.9. Important note
Do not place
the machine
on surfaces
or
near
walls, partitions or kitchen furniture and the like –
unless they are made of non-combustible
material or clad with non-combustible heat
insulating material, and pay attention to fire
prevention regulations.
Page 9
8
2.10. Important
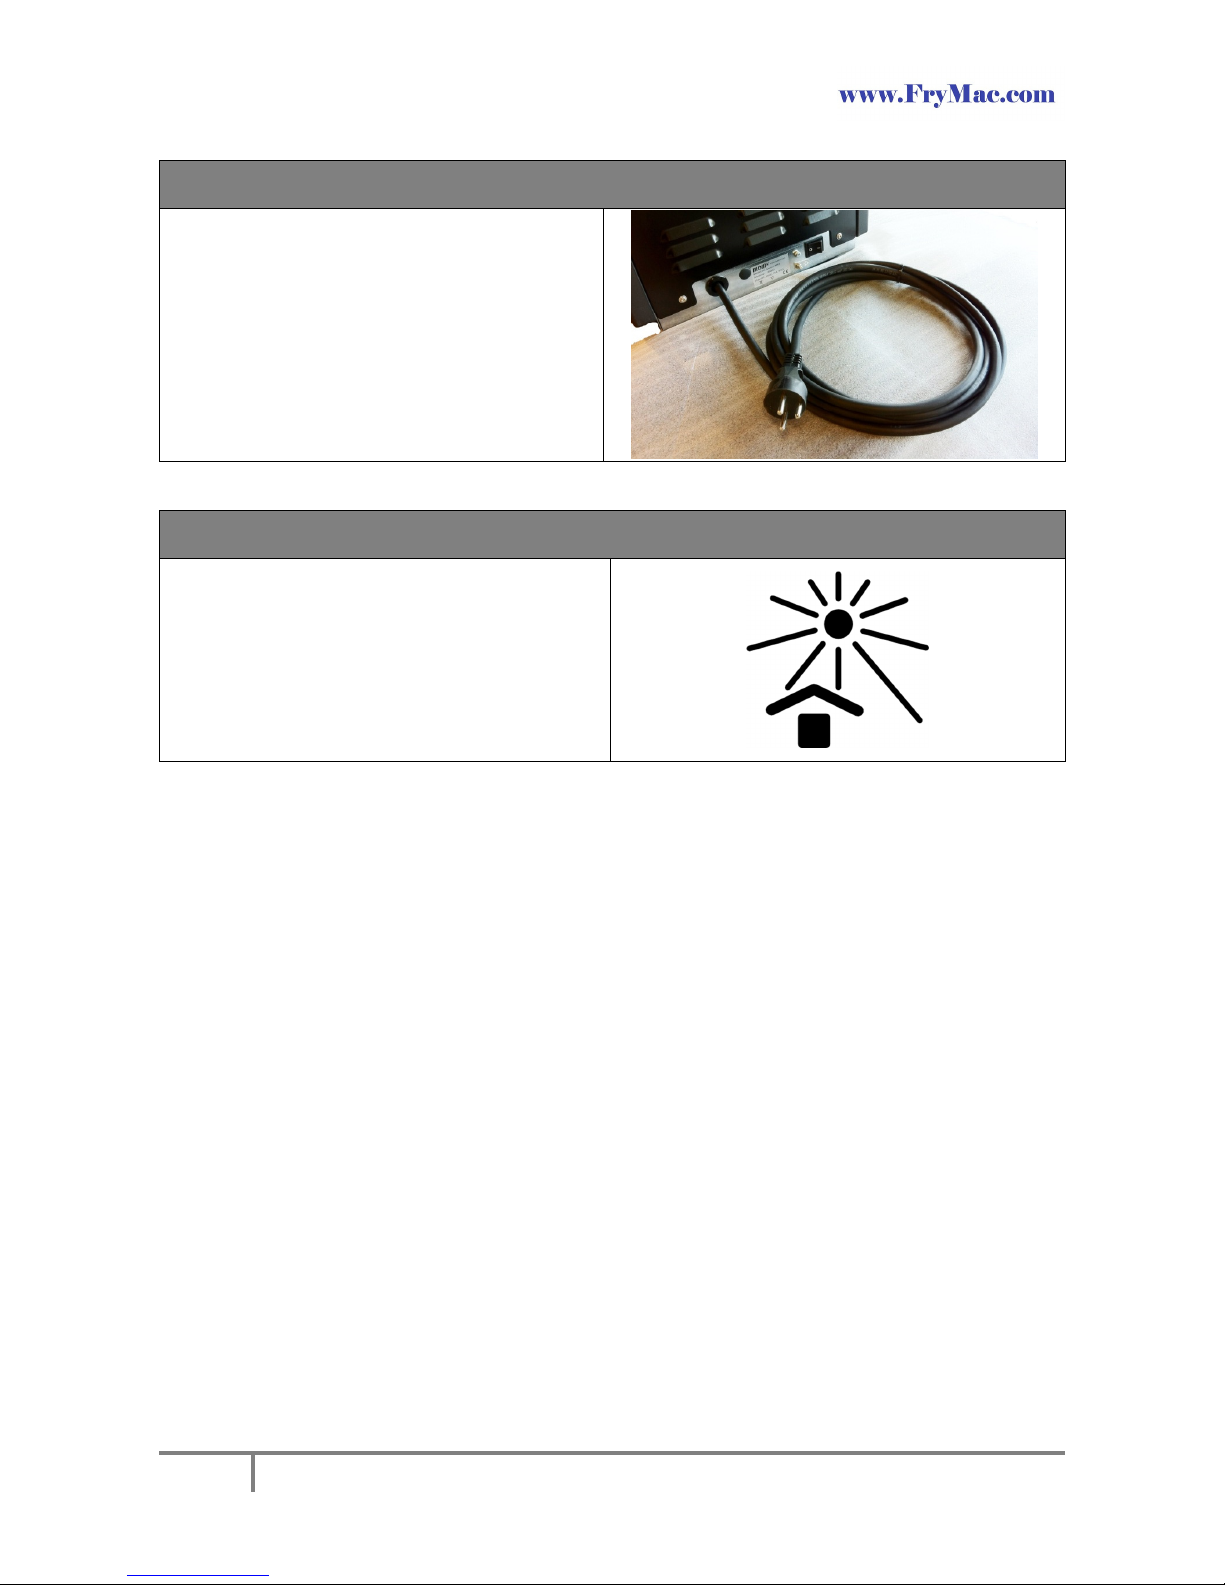
If the supply cord is damaged, it must be replaced
by the manufacturer, its service agent or similarly
qualified persons in order to avoid a hazard.
2.11. Warning
Do not expose the machine to direct sunlight
Page 10
9
3. Daily use
3.1. Turning on machine
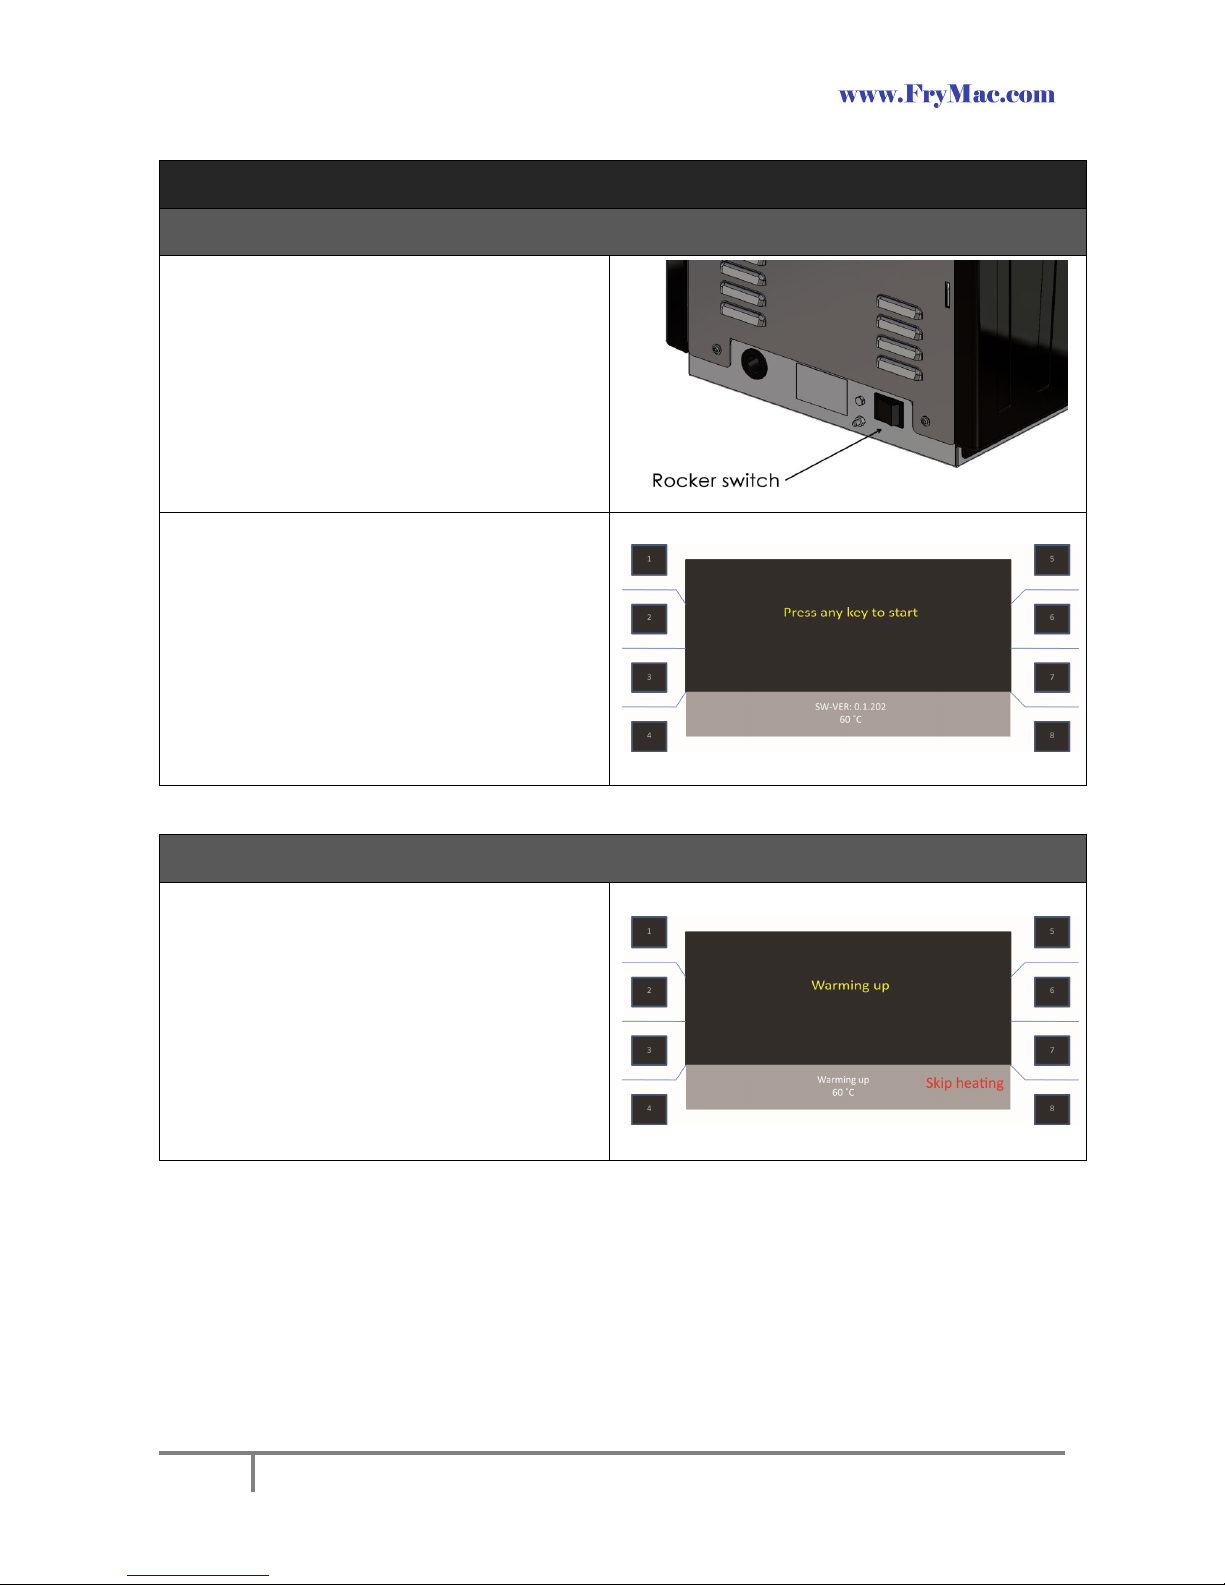
Before turning on the machine ensure that the
following parts are mounted correctly.
• Cradle
• Collection tray
• Drip tray
The machine is turned on by using the rocker
switch located on the rear of the machine.
Press any button next to the display
to start
the
warming up cycle.
3.2. Warming up
When the machine is powered up from cold start
,
allow approx. 10 minutes for the machine to reach
its correct idle temperature.
During the warming up cycle the text ‘warming up’
will show in the display.
The lower grey area displays menu name and
current temperature in the machine.
Page 11

10
3.3. Operation
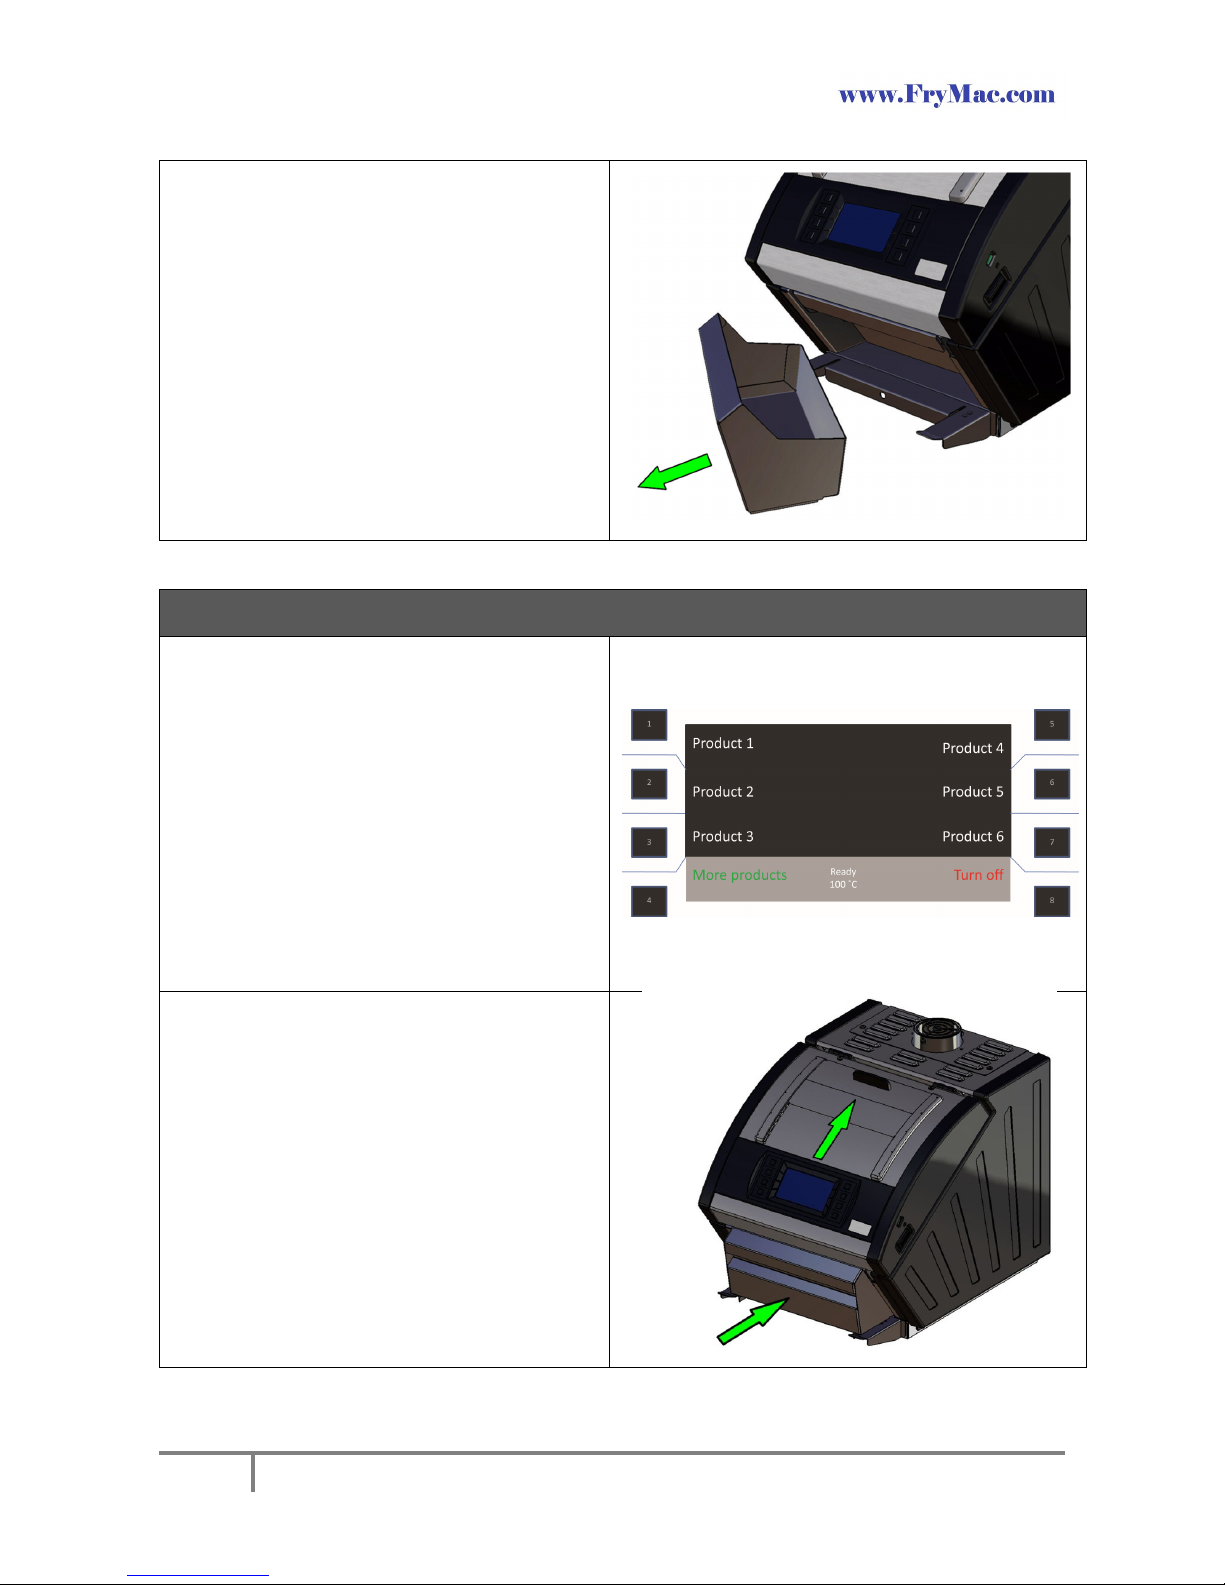
Each of the upper 6 buttons can be pre
-
set for
preparation of a product.
Up to 30 products can be pre-set.
The buttons 1, 2, 3, - 5, 6 and 7 form a ‘selection
group’ each consisting of 6 products.
Button 4 ‘more products’ toggles between the
various ‘selection groups’.
Press button 4 to recall the next ‘selection group’
in display, totally 5 times.
Starting cycle:
To start a cooking cycle, press the button
corresponding to the wanted product. The display
will now show ‘enter product’.
Further pre-set products are available by pressing
button 4 ‘More products’.
Filling:
Slide open the filling lid and enter the product in
the filling chute.
Close the filling lid.
The cooking cycle will start automatically.
Cooking cycle
:
During the cycle a timer will show the cooking time
in the display.
Do not open the filling lid or remove the collection
tray during the cycle.
The cooking time can be increased / decreased
during the process.
The cooking cycle can be stopped at any time by
pressing the ‘stop button’.
Page 12
11
Delivery:
At the end of the cooking cycle, the product will
be automatically delivered into the collection tray.
Three beep tones will be audible.
When the display no longer shows ‘delivering
product’, the collection tray can be removed from
the shelf.
Fill the product into a serving plate and return the
collection tray to the machine.
Ensure that the collection tray is relocated on its
shelf as soon as possible.
3.4. Standby
When the machine has
warmed up and is not
making a cooking cycle, it will enter standby mode.
In standby mode the machine will maintain a
temperature of 95°C – 105°C, while at the same
time it will regulate fans / lamps to use as little
energy as possible. This will vary from 130W –
700W.
In standby mode the machine is always ready to
start a cooking cycle. For the very first cooking
cycle, when the standby temperature is below
120°C, the machine will automatically add extra
time to the cooking time to ensure that the
cooking quality is consistent.
Important :
When the machine is in standby mode, it is
important that the filling lid is closed and the
collection tray is in correct position.
If they are not in position, a text will show in the
display to remind user to relocate the collection
tray and close the filling lid. A beep tone will also be
audible.
Page 13

12
3.5. Cooling
Before turning off the machine
, it is necessary to
use a cooling function to remove heat from the
internal components.
Press button 8 “turn off” to run the cooling
program. When the temperature of the machine is
below 40˚ C, the machine will enter standby mode.
Use the rocker switch on rear of machine to switch
off the machine.
When the machine is switched off, the lid can be
opened for daily cleaning.
3.6. Opening of lid and removal of parts to be cleaned
Press
the 2 locking clips on the side
s of the lid and
lift lid up to open.
2 gas springs will aid lifting and keep the lid in an
upright position.
Page 14

13
The cradle can be removed by sliding forwards.
The drip tray can be removed and separated for
cleaning.
Slide forwards using handle.
Page 15

14
3.7. Warnings
The internal parts of the machine contain moving
parts and can be hot!
Do not place hands inside the machine while the
machine is switched on, or if the machine is
switched off before the cooling function has been
activated .
Warning: The internal parts of the filling chute
can be hot. Do no place hands in inside the filling
chute.
Do not open the lid while the machine is powered
up. If the lid is opened by accident, the heating
lamps will automatically be turned off, but
internal components will remain hot.
The appliance is not intended for use by persons
(including children) with reduced physical,
sensory or mental capabilities, or lack of
experience and knowledge, unless they have
been given supervision or instruction concerning
use of the appliance by a person responsible for
their safety.
Children sh
ould be supervised to ensure that they
do not play with the appliance.
Page 16

15
4. Cleaning
4.1. Cleaning of removable parts
Cradle
Collection tray
Drip tray
Introduction
To ensure an optimum performance of the FryMac MKII machine,
the following
cleaning instruction must be observed.
Cleaning intervals
The cradle, the drip tray with grill and the collection tray should be cleaned every day.
The filter plate and lamp grid (if installed) must be cleaned minimum every second week.
Cleaning agent
Clean the cradle and the grill for drip tray:
Greasestrip Plus from Ecolab or
Suma Grill from Diversey - a part of Sealed Air - or
other recommended strong detergent.
Clean the collection tray and the lower drip tray in a washing solution with an ordinary dishwashing detergent for household use.
Necessary precautions
Always use protective gloves (ordinary rubber gloves) and safety goggles when using strong detergents.
See description on the back of the label on the original packaging of the detergents.
Restrictions due to local rules and regulations regarding storage and use of cleaning chemicals
Always only use detergents that are allowed to store and use in the area where the machine is operated.
Prerequisites
You must use:
A pair of rubber gloves
A pair of safety goggles
A container with lid for storage of the cradle and the grill for drip
tray during cleaning.
A spray bottle or an atomizer for the strong detergent
Greasestrip Plus, Suma Grill or other recommended strong
detergent.
Important
The strong detergent to be sprayed direct on the components, only, when these are placed inside the
storage container for cleaning.
Cleaning of the Cradle
Page 17

16
•
Place the cradle and the grill for drip tray in the storage
container.
• Spray the cradle on all sides /places – if possibly, lift the
cradle slightly in order to allow all surfaces to be covered
in the detergent.
• Place lid on container.
• Let the cradle and the grill for drip tray be in the container
for 4 hours.
Clean the cradle and the grill for drip tray in a dishwasher –
alternatively rinse the components thoroughly in ample water to
ensure safe removal of the cleaning agent.Repeat cleaning, if the
cradle is not clean.
Removable belt tensioner.
If the machine is equiped with a cradle as shown in the picture,
then the internal belt tensioner can be removed to aid cleaning.
1. Pres spring release arm.
1. Rotate belt tensioner.
2. Slide out to remove.
Page 18

17
4.2 Cleaning of internal oven surfaces
The internal stainless steel oven surfaces should
be wiped down daily using an ordinary household
detergent.
Note:
Be careful not to touch the halogen lamps.
Chemicals for cleaning ovens or any other
cleaning agents must never be splashed into the
machine because of the halogen lamps.
4.3 Cleaning of external surfaces
The external surfaces can be wiped down with a
soft damp cloth containing a mild soap solution.
Do not splash water to the external surfaces, as
the water may then pass through the ventilations
holes.
Page 19

18
4.4. Cleaning of the exhaust channel
A
fter every 500
0 cycles the exhaust channel
should be cleaned to remove build up fat
deposits.
The message shown here will be displayed after
every 5000 cycles. The message can be removed
temporarily by pressing button 8.
The message will reappear again following 25
cycles.
To permanently remove message see below.
Remove the filter plate. The plate is fixed with
screws.
Remove the Lamp Grid. Please gently slide the
lamp grid to your right.
Remove the cover for exhaust and upper
exhaust box. The covers are fixed with screws.
Page 20

19
Clean the internal exhaust channel surfaces and
fan impellor.
Oven cleaning agent can be used to remove fat
deposits on the stainless steel surfaces.
Clean the internal upper exhaust channel
surfaces. Oven cleaning agent can be used to
remove fat deposits on the stainless steel
surfaces.
Refit covers
and filter plate.
To permanently remove the message, press
button 5 & 6 for one second.
The message will be displayed again after
another 5.000 cycles.
4.5 Warning
Appliance is not to be cleaned with a water jet.
Page 21
20
5 Programs
5.5 Recipe programs
Di
splay. The display contains pre
-
defined cycles with the name of the product next to
relevant
push
button.
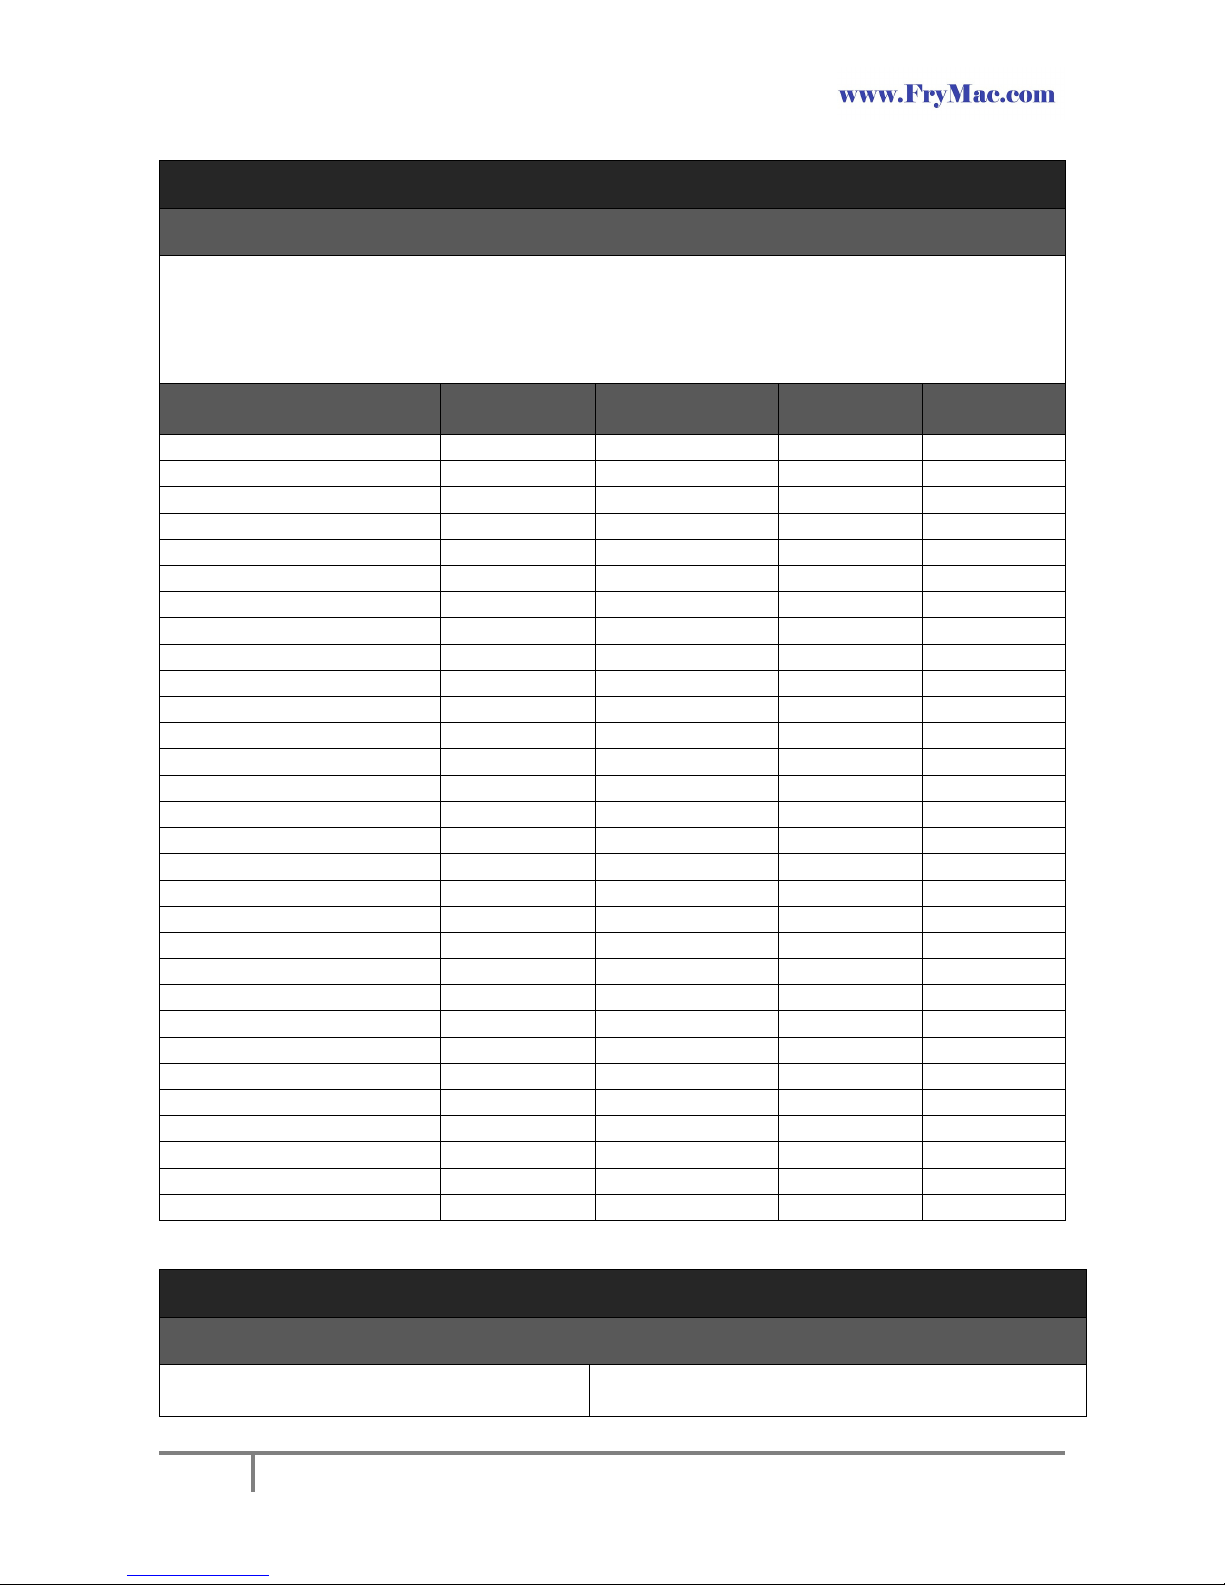
Standard programs. The machine has the following programs included as a default. Some programs
require the product to be defrosted prior to cooking. See table below as an example.
Standard programs
Quantity
Frozen / Defrosted
Cooking time
(minutes)
Power
(Watts)
Fries 100g
100g
Frozen
2:00 3.000
Fries 200g
200g
Frozen
2:30 3.000
Fries 45
0g 450g
Frozen
4:20 3.000
Nuggets 5 pcs
5
Frozen
4:10
2.200
Beef 2 Frozen
3:00
3.000
Tip in menu
- -
00:10
0
Tip in menu
- -
00:10
0
Tip in menu
- -
00:10
0
Tip in menu
- -
00:10
0
Tip in menu
- -
00:10
0
Tip in menu
- -
00:10
0
Tip in menu
- -
00:10
0
Menu 1
- -
00:10
0
Menu 2
- -
00:10
0
Menu 3
- -
00:10
0
Menu 4
- -
00:10
0
Menu 5
- -
00:10
0
Menu 6
- -
00:10
0
Menu 7
- -
00:10
0
Menu 8
- -
00:10
0
Menu 9
- -
00:10
0
Menu 10
- -
00:10
0
Menu 11
- -
00:10
0
Menu 12
- -
00:10
0
Menu 13
- -
00:10
0
Menu 14
- -
00:10
0
Menu 15
- -
00:10
0
Menu 16
- -
00:10
0
Menu 17
- -
00:10
0
Menu 18
- -
00:10
0
6 Adjustment of settings
6.5 Adjustment of time and temperature
The following procedure applies to all
products:
Page 22

21
Press and hold button 1, simultaneously as
button 4 is pressed.
This makes the menu change to menu for
adjusting time (seconds) and power (Watts) for
Product 1 (see next slide).
Pressing button 1 :
The color of the text "Time: 2.10 sec." is
changed to blue.
(Simultaneously "Power 3000 W" is shown in
white).
Use buttons 2, 3, 6 and 7 for adjusting the time.
Pressing button 5 :
The color of the text "Power 3000 w" is
changed to red.
(Simultaneously "Time: 2.00 sec." is shown in
white).
Use buttons 2, 3, 6 and 7 for adjusting the
power.
Note: The maximum power is 3000 watts.
Pressing button 8 :
The system returns to the previous menu.
Pressing button 4 :
The system enters the menu for changing the
text "Product 1".
6.6 Changing language
Press and hold button 4 for more than 5
seconds.
The display shows a count-down from 5, after
which the menu changes to the menu for
counters and settings.
Page 23

22
Press button 2 “
S
ettings”.
Press button 1 “Language”.
Press button corresponding to desired
language.
7 Audit values
7.5 Reading audit values
Press and hold button 4 for more than 5
seconds.
The display shows a count-down from 5, after
which the menu changes to the menu for
counters and settings.
Press button 1 ‘
C
ounters
’.
Page 24

23
Press button 1 “S
how
counters”.
Press button 5 “Reset counters” to reset
counters to 0.
Note: The total count cannot be reset.
Total counters are shown in
the
left column.
The second column can be reset to 0 for
periodic readings.
Page 25

24
8 Function testing
8.5 Making functional test of motors and fans
Press and hold button 4 for more than 5
seconds.
The display shows a count-down from 5,
after which the menu changes to the
menu for counters and settings.
Press button 3 ‘T
est’.
Motors and
fans can be turned on / off to
see if they are functioning. Fans run at
maximum speed when on.
If any motors or fans do not turn on / off,
contact a technician.
The flap can be run down / up to see if it is
functioning correctly.
If flap is not run down / up, contact a
technician.
Page 26

25
9 Transport
9.5 Precautions for transport
W
hen the original packaging has been
disposed of
,
transport must be done with care so that the machine
is not subject to vibrations or shock. The machine
must be cold before being moved.
10 Outdoor use
10.5 Precautions for outdoor use
E.g. at fairs, festivals or the like.
If the machine is placed outdoor, it has to be properly
covered and protected so that it will not be wet
because of rain or the like.
11 Maintenance
See Cleaning, chapter 4.
12 Faultfinding
Fault
Possible reason
What to do about it
Explanations
The machine does
not power up.
The machine is not
properly connected to
electricity.
Switch on rear side has
not been turned on.
Connect to electricity.
Turn on.
Fuses blow when
starting up machine.
The fuse is too small.
Ensure
that
plug has
a
fuse of minimum
13A/230V.
French
fries are black
at ends.
The filter is blocked.
Temperature is too high.
Cooking time is too long.
Quantity of French fries
used is too small
compared to program
selected.
Clean filter.
Adjust temperature or
time.
Note: Always clean filter
before adjusting
temperature settings.
Page 27

26
Outer surface of
filling lid or outer lid
cover hot.
The filter is blocked. A
blocked filter restricts the
cooling air flow in the lid.
Clean filter.
Product is cold after
cooking.
The thermal overheating
protection fuse has been
triggered.
Call a technician. Do not
reset the thermal fuse
without first calling a
technician to investigate
the cause of the
overheating.
Heating lamps do
not turn on during
cooking process.
The
thermal overheating
protection fuse has been
triggered.
Call a technician. Do not
reset the thermal fuse
without first calling a
technician to investigate
the cause of the
overheating.
13 Technical data
Width = 36 cm
Height = 40 cm
Depth = 48 cm
Weight = 29 kg
Power supply = AC 230V, 50 Hz
Power consumption during operation = 2800W
Power consumption during standby = 130 – 750W
Noise output = below 60 dB (A)
14 Disposal of old equipment
Protecting the environment: This product must not be disposed
of
with normal household waste. Should you find one day that your
Mom-s machine needs replacement, or if it is of no further use to
you, do not dispose of it with household waste. This product must
be available for separate collection.
Mom-s provides a facility for the collection of electrical products
once they have reached the end of their working life. Contact Moms A/S for instructions.
Page 28

27
15 Guarantee
There is a 12 month guarantee with the machine
, covering
manufacturing defects, faulty design, workmanship or materials.
This guarantee is valid, subject to that cleaning and servicing
instructions are followed and complied with in accordance with the
instructions, including the environmental conditions under which the
machine is located.
We reserve the right, subject to the following conditions, to repair
the defective appliance (or any part thereof) or, at our discretion
replaced free of charge.
The guarantee is no longer valid in case of breach of contract or if the
machine is used for any other purposes than stated in the manual.
The following parts are not covered by the guarantee:
• Halogen lamps
• Conveyor
!
Damages caused by mishandling, fire, accident, misuse, wear
and tear, neglect, incorrect adjustment or repair, to damage
caused through installation, adaption or modifications.
Repairs covered by guarantee are made within normal working hours.
All servicing of the machine must be done by authorized personnel.
Guarantee may be vary depending on agreement between purchaser
and distributor.
Mom´s A/S
Sivlandvaenget 3, DK- 5260 Odense S.
Vat.no. 28130139
 Loading...