

Page 1

Ⅰ IMPORTANT SAFEGUARDS
When using electrical appliances, basic safety precautions should
always be followed including the
following:
1. Read all instructions
2. Do not touch hot surfaces. Use handles or knobs.
3. To protect against electrical shock do not immerse cord, plugs,
or (state specific part or parts in question) in water or other
liquid.
4. Close supervision is necessary when any appliance is used by
or near children.
5. Unplug from outlet when not in use and before cleaning. Allow
to cool before putting on or taking off parts.
6. Do not operate any appliance with a damaged cord or plug or
after the appliance malfunctions or has been damaged in any
manner. Return appliance to the nearest authorized service
facility for examination, repair, or adjustment.
7. The use of accessory attachments not recommended by the
appliance manufacturer may cause injuries.
8. Do not use outdoors (this item may be omitted if the product is
specifically intended for outdoor use).
9. Do not let cord hang over edge of table or counter, or touch hot
surfaces.
10. Do not place on or near a hot gas or electric burner, or in a
heated oven.
11. Extreme caution must be used when moving an appliance
containing hot oil or other hot liquids.
12. Always attach plug to appliance first, then plug cord into the
wall outlet( For the detached power cord).To disconnect, turn
any control to off, then remove plug from wall outlet.
13. Do not use appliance for other than intended use.
14. Do not immerse in water.
15. A short power-supply cord(or detached power supply cord) is
to be provided to reduce the risk resulting from becoming
entangled in or tripping over a longer cord.
16. Longer detached power supply cord or extension cords are
available and may be used if care is exercised in their use.
17. If a longer detached power supply cord or extension cords
power-supply cord is used,
a) The marked electrical rating of the extension cord should be at
least as great as the electrical rating of the appliance, and
Page 2

b) The cord should be arranged so that it will not drape over the
1. Before turning on the power, make sure the cookware is on the
2. Now press the ON/OFF switch ,the control lamp of “HEAT” and
countertop or tabletop where it can be pulled on by children or
tripped over unintentionally.
18. Do Not Cook on Broken Cook-Top – If cook-top should break,
cleaning solutions and spillovers may penetrate the broken
cook-top and create a risk of electric shock.
19. Clean Cook-Top with Caution – If a wet sponge or cloth is used
to wipe spills on a hot cooking area, be careful to avoid steam
burn, some cleaners can produce noxious fumes if applied to
a hot surface.
20. Do not heat the pot empty or overheat it.
21. Do not place metallic objects such as knives, forks, spoons,
lids, cans and aluminum foils on the top plate.
22. Allow sufficient space around the cooking area.
23. Never use the unit on low-heat-resistant materials (carpet,
vinyl).
24. Do not place a sheet of paper between the pot or the pan and
the unit. The paper may get burnt.
25. Be aware that the unit surface will remain hot for a short period
of time.
26. Items with a magnetic field, such as: radios, televisions,
automatic-banking cards and cassette tapes, can affect the
unit.
27. An appliance provided with a 2-wire polarized attachment plug
shall include the following or equivalent wording:” This
appliance has a polarized plug (one blade is wider than the
other). To reduce the risk of electric shock, this plug is
intended to fit into a polarized outlet only one way. If the plug
does not fit fully into the outlet, reverse the plug. If it still does
not fit, contact a qualified electrician. Do not attempt modify
the plug in any way.”
SAVE THESE INSTRUCTIONS.
Ⅲ HOW TO USE
ceramic plate with ingredients inside.
“TEMP” blinks and an acoustic signal sounds. If do not press
Page 3

“HEAT” or “TEMP” key, the unit will enter the standby mode
3. Press the “HEAT” or “TEMP” button to turn on the unit.
4. To select the proper heat setting (defaults=5), press the “+” or
5. To select temperature setting, press the” Temp” button
6. To select automatic timer setting, press the” Timer” button
7. If the timer is not settled, after the cooking time reach 180 mins,
8. After cooking is completed, press the ON/OFF button again to
Compatible Pans:
Non- compatible Pans:
after 30 seconds.
“-” until the correct heat setting is achieved.( the heating level
is 1, 2, 3, 4, 5, 6, 7, 8, 9, 10)
(defaults=270℉) ,the temperature light will turn a steady
red ,and press the “+” or “-” until the correct temperature
setting is achieved (The Temp level is 150, 180, 210, 240, 270,
300, 330, 360, 390, 420, 450℉).
(defaults =0mins),the timer light will turn a steady red ,and
press the “+” or “-” until the correct timer setting is achieved
(+5mins, -1min). You can press “+” or “-” in seconds to
increase or reduce the timer setting fast. The max is 180 mins.
the LED will show “EE” and sound, and then the unit will enter
the standby mode. Press the ON/OFF button to restart the unit.
turn off the unit.
Notice:
If using the unit in TEMP or HEAT Function, not setting the TIMER
Function, but when the unit is used 180 mins, the LED display
shows EE code and sound. The unit will stop automatically.
If using the unit in TEMP or HEAT Function 10 mins, and then set
the TIMER, the max Timer is 170 mins. During timer operation,
you can change the duration at any time with the “+” and “-“ keys.
NOTE:
The power will completely shut off with 10 second if either (a) the
wrong type of cookware is applied or (b) no cookware is placed on
the unit, when the machine is on standby model.
Ⅳ USABLE AND NON-USABLE UTENSILS:
Steel or cast iron, enameled iron, stainless steel, flat-bottom
pan/pots with diameter of 12 to 26 cm.
Page 4

Heat-resistant glass, ceramic container, copper, aluminum
Clean after each use. Disconnect plug and wait until the unit
If the pots/pans are used without being cleaned, as this may
Do not use benzene, thinner, scrubbing brush or polishing
Wipe down the unit using a dish washing agent and a damp
Use vacuum cleaner to suck up dirt from the air intake and
Never run water over the unit (If water gets inside it may
pan/pots. Rounded-bottom pan/pots with the base measuring
less than 12cm.
Ⅴ HOW TO CLEAN:
has cooled down.
result in discoloration or stains.
powder to clean the induction cooker.
cloth
exhaust vent.
cause malfunction).
WARNING: any other servicing should be performed by an
authorized service representative.
Page 5
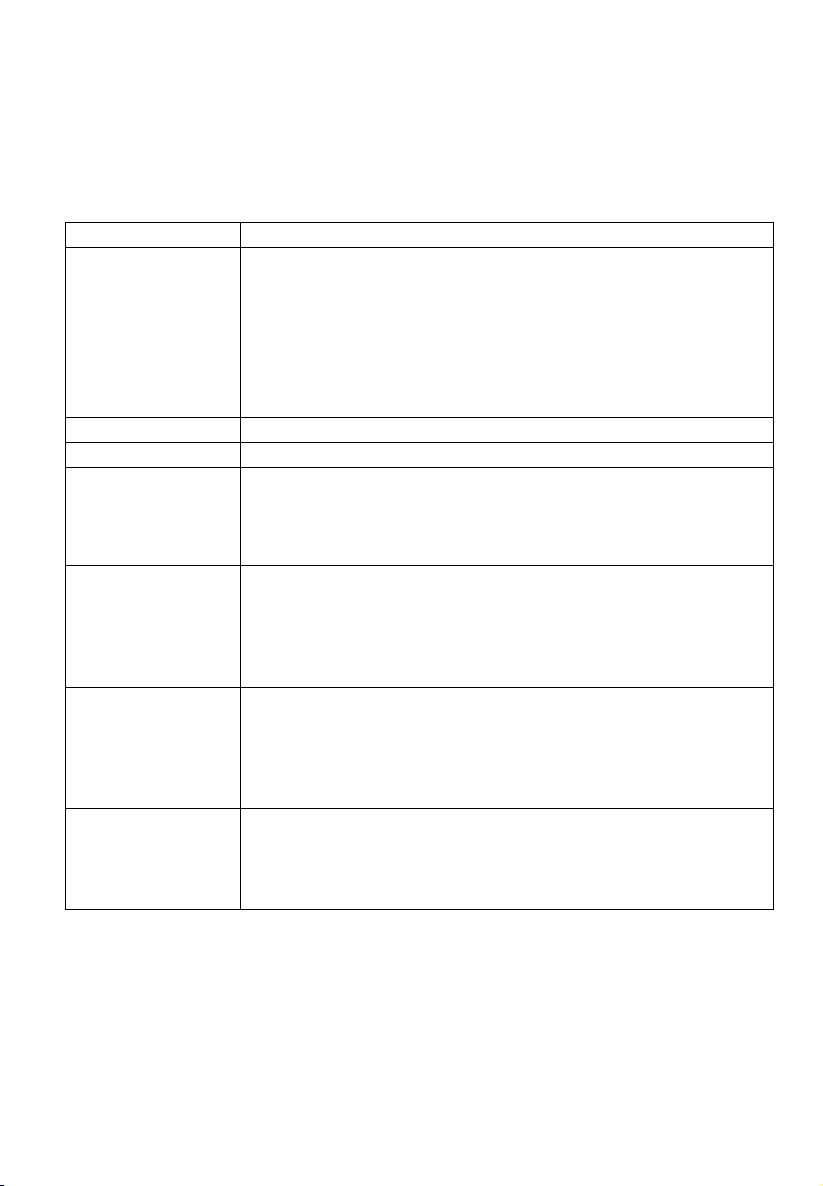
Error Code List:
– If LED-display shows the error code, please reference to the
Error Code Cause and Solution
The unit is in
standby mode,
but the LEDdisplay shows “--
-“, and the unit
sounds “Dee,
Dee, …”
You are using the cookware without the magnetism
bottom or the diameter of the bottom is less than 12cm.
Please use the cookware with magnetic and flat base,
such as the iron or cast iron cookware, the cookware
with a 18/0 stainless steel base. And all cookware with a
base whose diameter is 12 to 22cm. Once you use the
suitable cookware, the device will automatically restart.
E1 Voltage is under 75V
E2 Voltage is over 145V
E3 IGBT in short circuit. The accessory and spare parts
are damaged, please contact the nearest authorized
service facility for trouble shooting, repair and
adjustment.
E4 The temperature sensor underneath the cooking area
is defective. The accessory and spare parts are
damaged, please contact the nearest authorized
service facility for trouble shooting, repair and
adjustment.
E5 The temperature sensor underneath the cooking area
is there is a short circuit. The accessory and spare
parts are damaged, please contact the nearest
authorized service facility for trouble shooting, repair
and adjustment.
E6 The appliance is too hot. The cooking temperature is
over 450℉. Please unplug the plug and cool down the
unit, and then, plug the plug to the socket and restart
the unit.
solution as following.
This device complies with part 18 of the FCC Rules.
Operation is subject to the following
two conditions :(1)This device may not cause harmful
interference, and (2)this device must accept any
interference received, including interference that may
cause undesired operation.
 Loading...