

FrosTek 115 Owner's Manual
2245 Wyecroft Road #5, Oakville, Ontario Canada L6L 5L7
Ph: 905-827-6157 Toll Free: 1-877-427-2266 Fax: 905-827-2027
www.PropaneFridge.com
Manufactures Model: Frostek 115
Sold as: UGP 4.0
12/13/07

NOTICE TO INSTALLER/CUSTOMER
Please read carefully before hook-up!
1. The dwelling must have an adequate air supply and access to fresh air/oxygen in order to operate safely. Propane fridges/freezers,
like any other gas appliance, must have access to fresh air/oxygen. This unvented appliance must not be used in an air-
tight application.
2. This refrigerator must be installed by a licensed gas fitter.
3. The propane gas supply pressure regulator must be set at 11” water column.
4. The left side heat shield (facing front of the refrigerator) must be installed. The heat shield is shipped in the refrigerator carton.
5. For safety & efficient operation the proper clearances on all sides and top must be maintained. The clearances are listed in the
Owner’s Manual.
6. For proper and efficient operation the refrigerator must be level, both side to side and front to back (use bubble type level).
7. The Combination Carbon Monoxide (CO) Alarm & Safety Shut-Off must be installed and connected (CM Models only) with the Alarm
mounted as indicated in the Carbon Monoxide Alarm (Monitor) Installation Manual.
NOTE: It is illegal to operate this refrigerator in Canada without the Combination Carbon Monoxide Alarm & Safety
Shut-Off installed, and will void the Canadian Standards Association Certification. Non compliance will void the
Canadian certification and void household/cottage insurance coverage. This refrigerator vents combustion products
directly into the living space. The CO Alarming Device with Safety Shut-Off has been added to this refrigerator to guard against
potentially high levels of Carbon Monoxide, which can kill you. Once unsafe levels of CO are detected, an alarm will sound and the
refrigerator will be shut off.
WARNING: Actuation of this device indicates the presence of unsafe levels of carbon monoxide (CO) which can KILL YOU. If
alarm signal sounds:
a. Immediately move to fresh air --- outdoors or by an open door or window. Check that all persons are accounted for. Do not
re-enter the premises or move away from the open door/window until the emergency services responders have arrived, the
premises have been aired out, and your alarm remains in its normal condition;
b. Call emergency local service telephone number, fire department or 911.
c. The following symptoms may be related to CARBON MONOXIDE POISONING and should be discussed with ALL members of the
household:
Mild Exposure: Headaches, running nose, sore eyes, often described as “flu”-like symptoms;
Medium Exposure: Dizziness, drowsiness, vomiting;
Extreme Exposure: Unconscious, brain damage, death.
d. Read the Instructions for complete Information on Alarms Signals.
8. NOTE: The Combination Carbon Monoxide Alarm & Safety Shut-Off Instructions (CM Model), battery, Owners/Installation Manual
are stored inside the refrigerator.
For Unique Gas Products Support, Call Toll Free 1-877-427-2266
9. Regular maintenance of the fridge is critical to prevent unsafe levels of Carbon Monoxide. Before lighting the refrigerator at any
time, clean the flue tube as per the Owner’s Manual & make sure the burner and areas around the burner are free from any lint,
spider webs or any other debris. Please record your appliance maintenance on the SERVICE RECORD label located at the back of
your appliance.
WARNING -- Test the Combination Carbon Monoxide & Safety Shut-Off device operation after the refrigerator has been in storage,
before each start up , and at least once per week during use.
The installation of the refrigerator must conform to the Local Codes. In the absence of a local code:
USA: Nation Fuel Gas Code
Canada: CSA B149.1 Natural Gas & Propane Installation Code
CSA B149.2 Propane Storage and Handling Code

Table of Contents
INSTALLATION INSTRUCTIONS
PROPANE GAS CONNECTION
LIGHTING INSTRUCTIONS
LOADING THE FREEZER
MAINTENANCE
CLEANING INSTRUCTIONS
DEFROSTING
TROUBLESHOOTING
LIMITED GUARANTEES
PERFORMANCE GUARANTEES
WHAT IS A CHEST FREEZER
TROUBLESHOOTING QUESTIONNAIRE
PARTS LIST
CARBON MONOXIDE INSTRUCTIONS (CM Model)
WARRANTY
OWNER'S MANUAL
For installation, lighting, maintenance & cleaning.
Propane Chest Freezer
TO BE KEPT WITH THE APPLIANCE
The propane chest freezer is a 4 cu ft (115 litre) food, frozen food and beverage appliance, which
operates on propane. The interior dimensions of the food storage is: 115 litre (left side depth: 26 1/2" x width: 8 1/2" and
length of 16 3/4") (right side depth: 17", width: 11 3/4" and length of 16 3/4"). . The
It is equipped with an orifice, diameter of 0.34mm, and consumes 17 gr. of propane per hour (approximately 23 hours of
operation per pound of propane gas.)
OPERATE AT ALTITUDES OF UP TO 2500 FEET.
THE ORIFICE SUPPLIED WITH THE IS MADE TO
* WARNINGS *
FOR YOUR SAFETY - If you smell gas:
1. OPEN WINDOWS
2. CLOSE PROPANE MANUAL VALVE
3. DO NOT TOUCH ELECTRICAL SWITCHES
4. EXTINGUISH ANY OPEN FLAME
5. IMMEDIATELY CALL YOUR GAS SUPPLIER
weights 150lbs (68Kg).
HAVE THE FREEZER CHECKED BY A QUALIFIED TECHNICIAN BEFORE RESTARTING WITH GAS, OR
CHECK GAS LINE CONNECTION FOR LEAKS, WITH SOAPY WATER, AS DESCRIBED IN THE INSTALLATION
INSTRUCTIONS.
FOR YOUR SAFETY:
Do not store or use gasoline or other
flammable vapours and liquids in the
vicinity of this, or any other appliances.
Issued by: AMF - ATLANTIC MINI-FRIDGE CO LTD.
688 Babin Street
Dieppe, N.B., Canada
E1A 5M1
E-mail:
Web site:
Fax: (506) 858-9920
techsupport@atlanticminifridge.com
www.frostek.com
2
HIGHLIGHTS
1) Read full manual before using the freezer and record the serial # and the date of purchase on page 9.
Please take the time to fill out and send in the warranty card, warranty issues may not be answered if
the warranty card has not been received.
2) The
3) Not intended for public areas (SUCH AS A STORE).
4) At a MAX setting, the chest freezer consumes 1lbs of propane per 23 hrs of use. (The
consumption of propane can be reduced after content is frozen, by reducing the thermostat setting.)
5) Before transporting the freezer to a remote location, test the operation of the freezer with propane for
at least 24 hrs. (TRANSPORT CHARGES ARE NOT INCLUDED IN THE GUARANTEE).
6) Cooling down and loading of the freezer - see page 6
7) IGNITING FREEZER: The first lighting will require a little more time, because gas has to flow
through the thermostat, gas valve and down to the burner. See instructions on page 5.
If you have difficulties lighting the freezer, turn the thermostat knob down to MIN, keep it there for 5
minutes after lighting the freezer, to warm the flue tube, then return thermostat knob to MAX.
chest freezer requires 11" WC of propane pressure.
115G
Revised: September 1, 2006
3
TABLE OF CONTENTS
PAGE #
INSTALLATION INSTRUCTIONS 4
PROPANE GAS CONNECTION 4
LIGHTING INSTRUCTIONS 5
LOADING THE FREEZER 6
MAINTENANCE 6
CLEANING INSTRUCTIONS 6
DEFROSTING 6
TROUBLESHOOTING 7
LIMITED GUARANTEES 9
PERFORMANCE GUARANTEES 9
WHAT IS A
TROUBLESHOOTING QUESTIONNAIRE 11
PARTS LIST 12
FIGURE 1 - VIEW OF BACK AREA OF FREEZER 8
VIEW OF BURNER 12
BREAKDOWN FRONT OVERVIEW 13
BREAKDOWN BACK VIEW 14
BREAKDOWN PROPANE PARTS 15
CHEST FREEZER 10
FIGURES
VIEW OF CONTROL PANEL 5
115G
Revised: September 1, 2006
4
INSTALLATION, CLEANING & MAINTENANCE INSTRUCTIONS.
INSTALLATION INSTRUCTIONS:
To obtain the maximum performance, install the refrigerator on a firm, level floor. The freezer must be level to operate. It is
very important to check the level with a bubble level. Then, remove the transparent protective plastic, which covers the
freezer.
Avoid installation in a high temperature area, such as close to heat source or direct sun. To protect the continuous propane
burning, avoid installing in drafty areas. For efficient air circulation the rear of the chest freezer must remain 7 inches (18cm)
away from the wall. This appliance consumes air when operating.
ATTENTION: It is most important that a qualified technician install this freezer. Installation must conform to the
current CAN/CGA B149 Gas Installation Codes if installed in Canada. If installed in USA, the installation must conform to
the National Fuel Gas Code ANSI Z223.1.
PROPANE GAS CONNECTION:
This freezer is built to be connected to a propane tank having a pressure of 11” on the WC (30mbar). The connection should
be made with a CGA or AGA approved tubing. The following list of approved regulators can be used: REGO - 302,
MARSHAL BRASS - 210, PRECIMEX - 3001. IMPORTANT: Operating the FROSTEK with the wrong gas pressure can
destroy the cooling unit and void the guarantee.
Check that nothing is obstructing the top end of the flue tube. After the connection is completed, open the gas valve
on the propane tank and apply some soapy water on the connections. Any gas leak will result in bubbles. Should this happen,
tighten the connection, or change the connectors, as required to completely eliminate any gas leak.
This appliance is equipped with a manual shut off valve, at the entrance of the appliance. When installing, or
working on the appliance, make sure that the manual valve is closed.
The appliance must be isolated from the gas supply piping system by closing its individual manual shut off valve
during any pressure testing of the gas supply. The test pressure should be equal to or less than 1/2 psig (3.5kPa).
ATLANTIC MINI-FRIDGE CO LTD. WILL NOT ACCEPT THE RESPONSIBILITY FOR ANY DAMAGE OR PROBLEM
RESULTING FROM IMPROPER CONNECTIONS, OR THE USE OF MATERIAL NOT MEETING THE STANDARDS OF
THE AREA IN WHICH THE INSTALLATION IS MADE.
* WARNING * : improper installation, adjustment,
alteration, service or maintenance can cause
injury or property damage. Refer to this manual.
For assistance or additional information,
consult a qualified installer, service agency or
the gas supplier.
115G
Revised: September 1, 2006
5
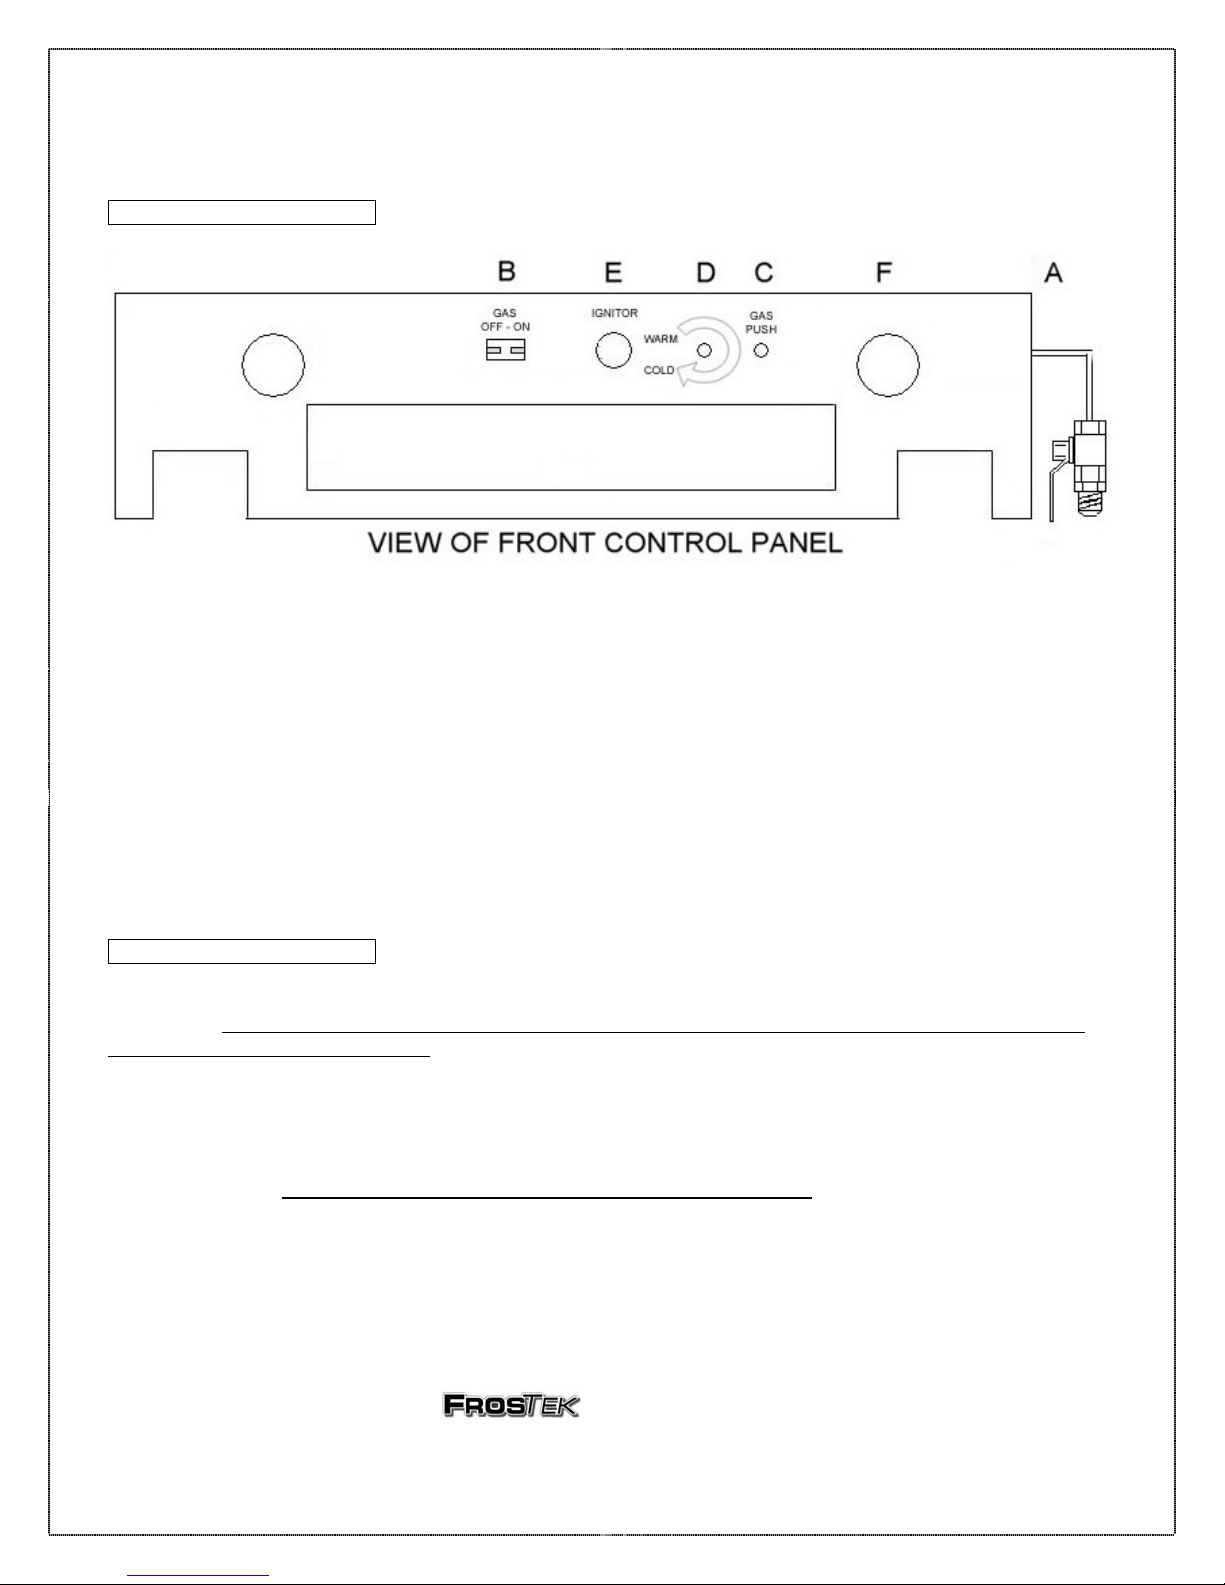
LIGHTING INSTRUCTIONS:
A. is the manual shut off gas valve.
B. is the gas indicator: when on the green position, it indicates that the gas is flowing and the chest freezer is lit. Should the
chest freezer flame shut off, or the propane flow be cut, the indicator will move to the white position. This indicator
should be on the green position when the freezer is operating on propane.
C. is the gas valve. The knob to this valve has to be pushed in and held there when lighting is taking place.
D. is the thermostat knob. Turning clockwise increase the degree of refrigeration, while turning counterclockwise reduces
the degree of refrigeration.
E. is the gas igniter.
F. is the temperature indicator. (Thermometer)
LIGHTING INSTRUCTIONS:
Open the gas valve on the propane tank or from whatever source of propane is being used. Open the manual gas
valve ("A") at the entrance to the appliance. Press the red knob on the gas valve ("C") and while keeping it pressed wait for 5
to 10 seconds, then push the piezo electric igniter ("E"), flicking it every second or faster, until the indicator on the control
panel ("B") moves to the green position. After lighting, keep the red knob pressed for at least 10 seconds. When it is released,
the propane should stay lit, and this will be seen with the indicator on the green position. Note that you can also check to see
the flame through the hole in the back of the freezer, near the burner. Should the flame not stay lit, the indicator will move
back to the white position. Should this happen, wait 5 minutes before repeating the lighting procedures.
After 6 hours, check the thermometer ("F") to see what temperature the freezer has reached, to determine if it is
functioning properly. Complete cooling down of an empty freezer requires 24 hours.
To shut off the propane operation, simply shut off the manual gas valve ("A"). You can check that the flame is out
through the hole near the burner. The gas valve installed on this freezer will shut off the propane flow automatically should
the flame extinguish itself.
115G
Revised: September 1, 2006
6
LOADING THE FROSTEK-115G:
After 24 hours of operation, check the thermometer to see the inside temperature of the freezer. When it has
reached -10 degree Celsius or colder, you can start putting in the food, at a rate of 12 lbs every 24 hours. Note: The
is best suited for keeping frozen food frozen. It may take several days to totally freeze food that is
room temperature. But once partially filled with frozen food, up to 12 lbs (5Kg) of non-frozen food can be added per
12 hours. The freezer should never be loaded with warm food in one loading.
MAINTENANCE:
Periodically, the gas components should be checked for cleanliness. The flue system should be kept clean,
the gas orifice should be cleaned, and the freezer defrosted periodically.
The gas orifice is located inside the gas burner assembly. It can get dirty and reduce the propane flow. To
clean it, remove the burner from the bottom of the flue tube, then unscrew the gas entry screw using supplied wrench,
and clean the orifice (see diag. page 12) by rinsing it in alcohol, and by blowing it out with air to dry it. Never use a
pin or sharp object in cleaning the orifice to avoid enlarging and damaging it. The flue should be clean and free of
soot. Therefore, it is necessary to clean it periodically (every 3 months, or when the flame turns yellow). To clean,
extinguish the burner flame, and let the flue tube cool down. Remove the screw holding the burner to the bottom of
the flue tube (to avoid damaging the burner, always remove the burner assembly from the bottom of the flue
tube before doing work); remove the burner away from the bottom of the tube. Pull the wire deflector baffle up,
and remove. Using the cleaning brush supplied or a rag tied to a wire, push it through the flue tube to clean it.
Remove the dirt, which falls on the bottom metal plate, and then re-install both the baffle and the burner.
CLEANING INSTRUCTIONS:
All the refrigerators/freezers are checked and cleaned at the end of the production line, after the factory
testing is completed. At installation, the exterior protective transparent plastic should be removed. The interior
should be cleaned with a cloth soaked in soda bicarbonate solution (one teaspoonful for each litre of warm water)
after final installation, before putting any food in it. Do not use powdered soap or scouring powder on the interior,
and do not wash the plastic with hot water. Clean the outer parts with a moist cloth and soap. Dry well with a clean
and dry cloth. To clean the back and bottom of the chest freezer use a vacuum cleaner or a duster, repeat as often as
required, depending on the dust conditions of the installation area.
Should the freezer not be required for a period of time, it should be shut off, leaving the door a bit open. To
shut off a propane-operated freezer, make sure the propane valve is safely closed at the tank.
DEFROSTING:
The freezer must be defrosted periodically. Defrosting is needed when there is sufficient ice built-up on the
evaporator fins. Empty the freezer then extinguish the burner flame, and place a pan with hot water in the freezer in
order to speed up the defrosting. The melting ice should flow through the bottom drain, once the cap has been
removed. Make sure a container is placed under the front-positioned hole to catch the water.
Note that excessive ice accumulation on the evaporator fins reduces the performance of the freezer.
115G
Revised: September 1, 2006
7
TROUBLESHOOTING AN ABSORPTION FREEZER:
Absorption systems have the advantage of operating without electric power, and have a relatively silent
operation, as there is no compressor. Its refrigerant does not contain ozone-depleting substance. However, the system
is smoother and slower, and does not have the brute cooling down force of Freon. Many minor malfunctions or bad
installation, etc. can cause the freezer to not reach its desired -17C (0F) or colder temperature. Absorption is a slow
system. It will take longer to cool down than a compressor system. This appliance is not meant to be installed in a
public area (such as a restaurant) where the door would be open every few minutes.
All freezers are fully tested before leaving the factory, and have reached the desired temperature. The
following checkpoints should be followed if the freezer does not reach its desired temperature after transport and reinstallation in its new home.
1. Freezer must be level in all directions. There are 2 adjustable legs under the freezer to assist in levelling. Use a
"bubble" level to adjust legs. Installation on a weak floor could cause the freezer to become off level when fully
loaded. Check level after loading.
2. To operate, the refrigerant must flow down to the reservoir through gravity, after having returned to liquid inside
the evaporator pipe. The serpentine (coil) of pipes on the cooling unit (as shown in figure 1) must be of such a
position that the liquid will flow downward from left to right in the outside row of pipes, and from right to left in
the rows of pipe touching the back of the freezer. If these pipes are not as described above, the refrigerant will
remain in the pipes, and the system will eventually cease to operate.
3. The highest point of the system is point "A" (Figure 1), which must be higher than point "B". This little pipe
should be around the pipe "B", but not touching it.
4. When operating effectively, point "B" should be very warm to the touch. When putting your hand at point "B",
you will feel too much heat to leave it there... but it should not burn you. If the pipe is cold, or cool, the system
is not working, because of blockage or too low a source of heat.
When working well, the bottom 3 rows of the serpentine will be warmer than the 4 top rows.
5. To verify if the thermostat is functioning properly:
Make sure the setting of the thermostat is at "high" on the panel. With someone looking directly at the
flame, slowly reduce the thermostat setting: the flame should suddenly reduce in intensity if the thermostat is
functioning properly; then by slowly turning the thermostat higher, the flame should again increase. If the sensor
wire has been damaged (having leaked its gas or being kinked), the freezer would operate at its lowest setting
only.
6. Make sure no dirt, burnt paint, or insulation material fell on the burner. This would result in lack of heat at the
burner. Check that the burner did not come off the flue tube during transportation. Make sure the propane
pressure is 11" on the WC.
7. The freezer has a 0.34mm diameter orifice installed at the factory. When operating in very high altitude (on
mountains), a different, smaller orifice size will be required to compensate for the change in altitude pressure. In
certain cases, at very high altitudes, a new burner with a larger air hole may be required. INPUT RATINGS
ARE SHOWN IN BTU PER HOUR AND ARE FOR ELEVATIONS UP TO 2500 FEET. FOR
ELEVATIONS ABOVE 2500 FEET, INPUT SHOULD BE REDUCED 4 % FOR EACH 1000 FEET
ABOVE SEA LEVEL.
A new orifice will have to be ordered.
8. Check to make sure the baffle is inside the flue tube.
115G
Revised: September 1, 2006
 Loading...