

Page 1
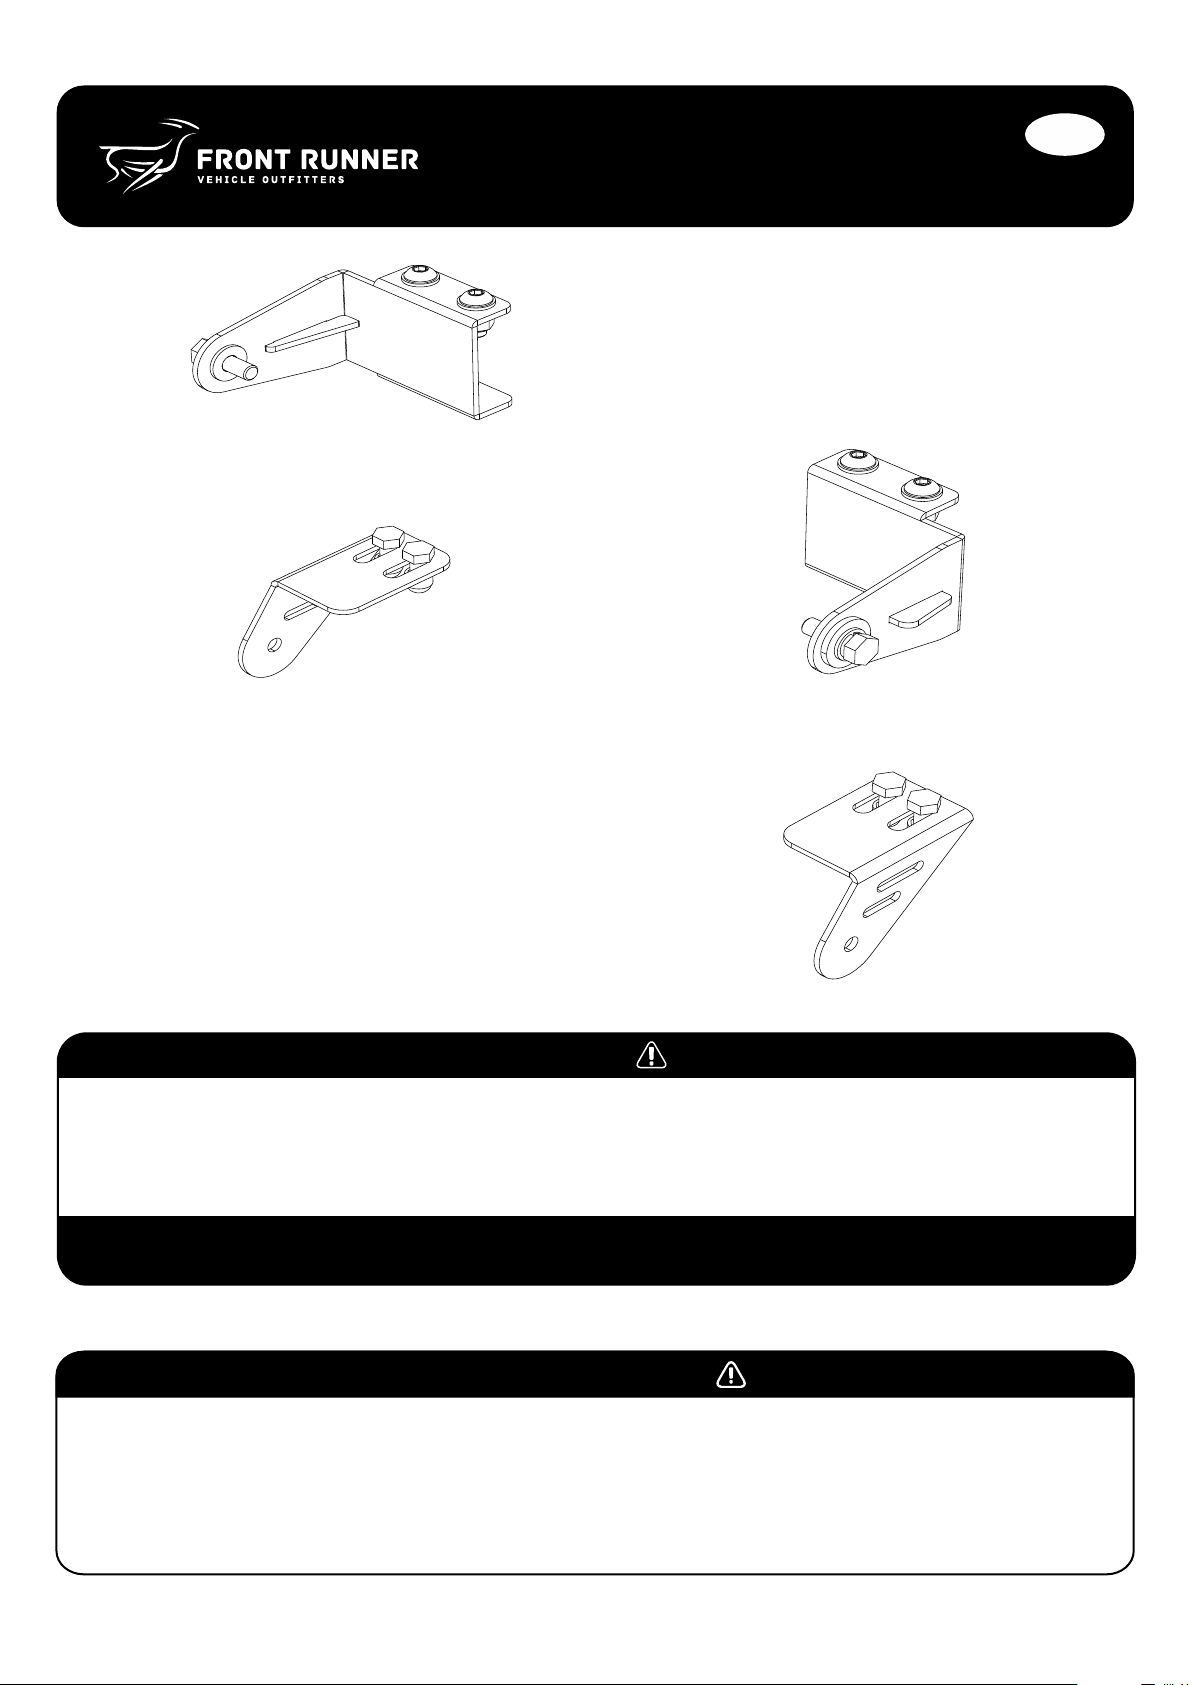
LED Light Bar Rack
Mount Brackets
ENG
RRAC124
READ ME !
Thank you for purchasing a Front Runner LED Light Bar Rack Mount Brackets.
Before you start, take a moment to familiarize yourself with the Fitting Instructions and the components received.
Refer to Page 2 for a list of all the components, quantities and tools required.
NOTE: Front Runner will not be responsible for any damage caused by the failure to install the product according to these instructions.
Please call us if you have any questions about the installation of this product.
IMPORTANT WARNING!
FRONT RUNNER CAN NOT RECOMMEND A MAXIMUM LOAD CARRYING CAPACITY. PLEASE REFER TO YOUR VEHICLE MANUFACTURER'S RECOMMENDATIONS. IT IS CRITICAL
THAT ALL FRONT RUNNER PRODUCTS BE PROPERLY AND SECURELY ASSEMBLED AND ATTACHED TO YOUR VEHICLE. IMPROPER ATTACHMENT COULD RESULT IN AN
AUTOMOBILE ACCIDENT, AND COULD CAUSE SERIOUS BODILY INJURY OR DEATH. YOU ARE RESPONSIBLE FOR ASSEMBLING AND SECURING ALL FRONT RUNNER PRODUCTS
TO YOUR VEHICLE. CHECKING THE ATTACHMENTS PRIOR TO USE, AND PERIODICALLY INSPECTING THE PRODUCTS FOR ADJUSTMENT, WEAR AND DAMAGE. THEREFORE YOU
MUST READ AND UNDERSTAND ALL OF THE INSTRUCTIONS AND PRECAUTIONS SUPPLIED WITH YOUR FRONT RUNNER PRODUCT PRIOR TO INSTALLATION OR USE. IF YOU
DO NOT UNDERSTAND ALL OF THE INSTRUCTIONS AND CAUTIONS, OR IF YOU HAVE NO MECHANICAL EXPERIENCE AND ARE NOT THOROUGHLY FAMILIAR WITH THE
INSTALLATION PROCEDURES, YOU SHOULD HAVE THE PRODUCT INSTALLED BY A PROFESSIONAL INSTALLER OR OTHER QUALIFIED PERSONNEL.
RRAC124_REV_A01
1
© COPYRIGHT 2017 FRONT RUNNER VEHICLE OUTFITTERS
Page 2
1
GET ORGANIZED
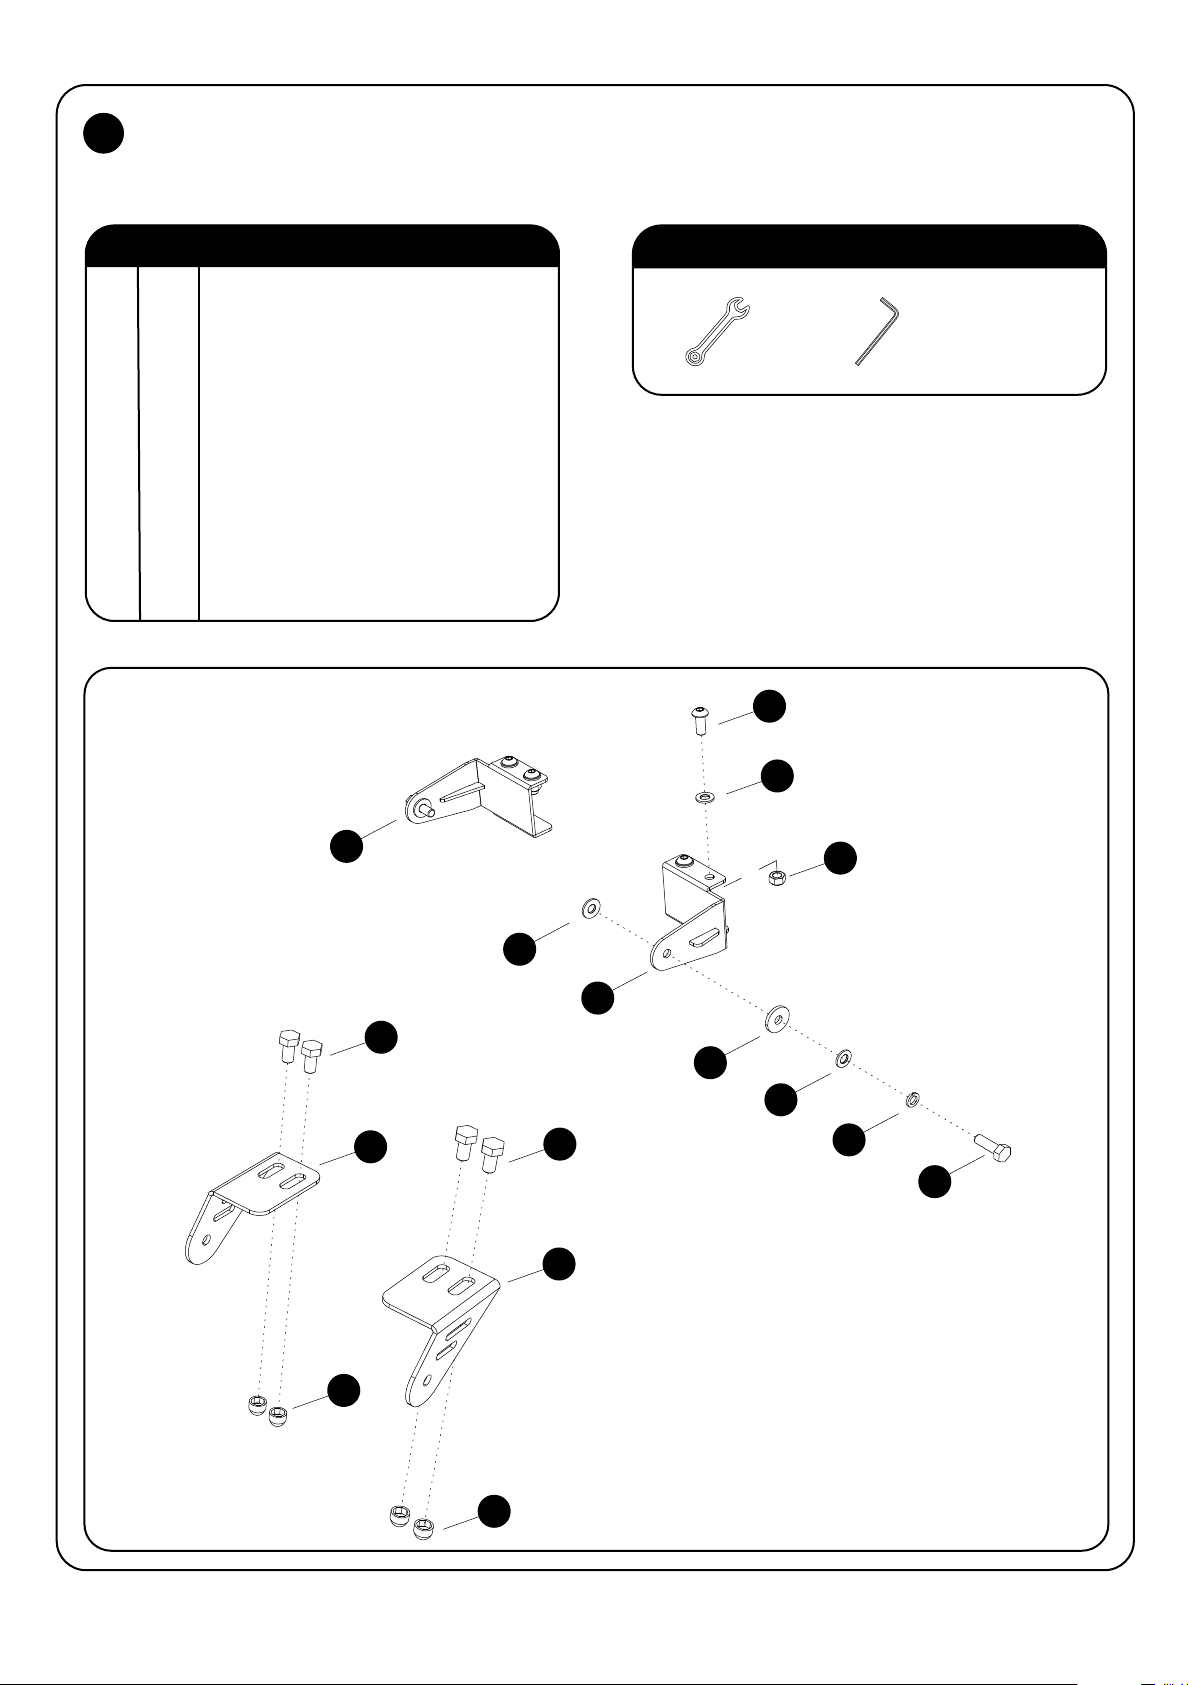
IN THE BOX
1 1 X LH Front Mount Bracket
2 1 X RH Front Mount Bracket
3 1 X LH Under Rack Mount Bracket
4 1 X RH Under Rack Mount Bracket
5 6 X M8 x 20 Button Head Bolt
6 8 X M8 x 16 x 1.6SS Flat Washer
7 6 X M8 Nyloc Nut
8 2 X M8 x 19 x 2SS Flat Washer
9 2 X Spacer
10 2 X M8 SS Spring Washer
11 2 X M8 x 25 Hex Bolt
12 4 X M8 x 16 Hex Bolt
13 6 X M8 Nut Cap
FIGURE 1.1
TOOLS NEEDED
13MM
4mm
5mm
5
6
13
2
8
1
12
9
4
12
3
7
6
10
11
RRAC124_REV_A01
13
2
© COPYRIGHT 2017 FRONT RUNNER VEHICLE OUTFITTERS
Page 3
2
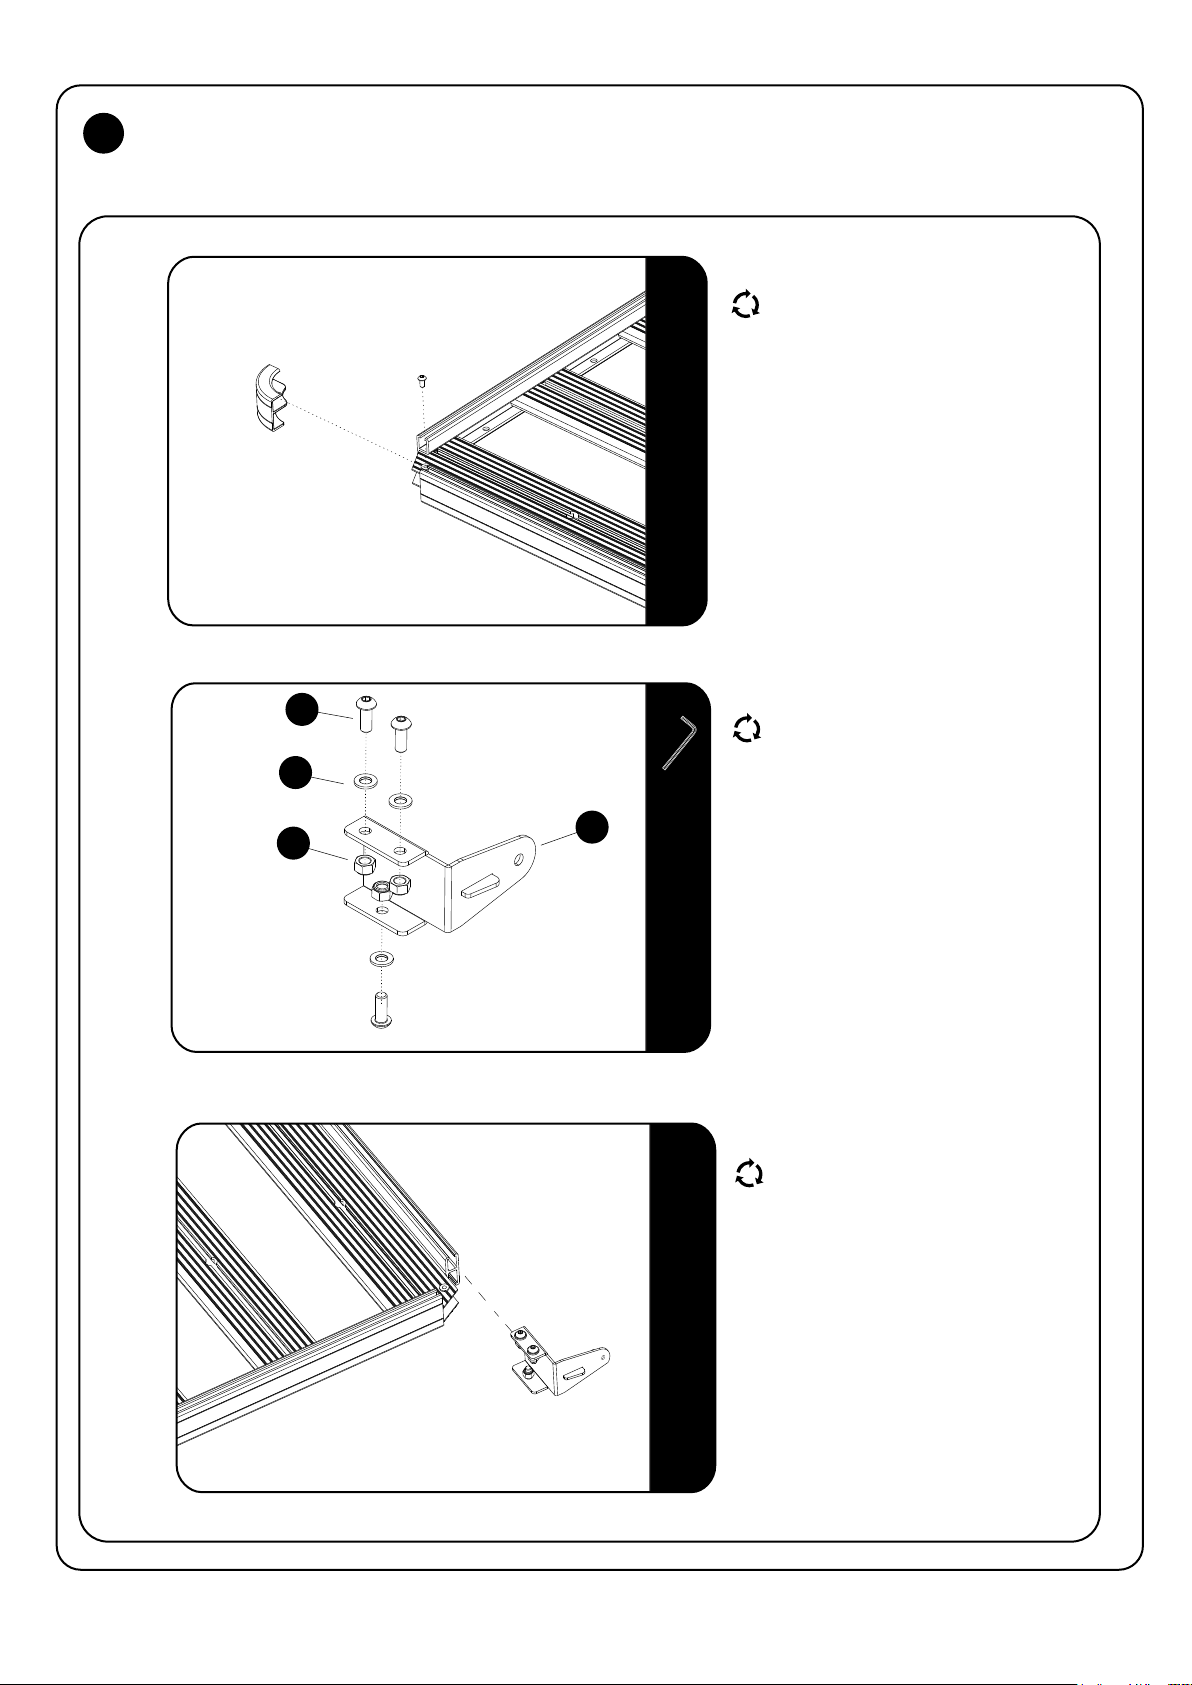
FIT AND SECURE THE FRONT MOUNT BRACKETS
2.1
2.2
Remove the front right hand side corner
piece.
5
6
2
7
4mm
Decide where you want to fit a light bar, on
the front, side or in the front or rear of the
Slimline II Rack.
If you fit the light on the front or rear of the
Rack, assemble three M8 x 20 Button Head
Bolts, three M8 x 16 x 1.6SS Flat Washers
and three Nyloc Nuts (Items 5, 6 & 7) to the
LH and RH Front Mount Brackets
(Items 1 & 2) as shown.
2.3
If you fit the light bar on the side, assemble
only the two top Button Head Bolts with
Washers and Nyloc Nuts as shown.
Slide the LH and RH Front Mount Brackets
into the Profile.
RRAC124_REV_A01
3
© COPYRIGHT 2017 FRONT RUNNER VEHICLE OUTFITTERS
Page 4
2
FIT AND SECURE THE FRONT MOUNT BRACKETS FRONT MOUNT BRACKETS
2.4
2.5
4MM
5MM
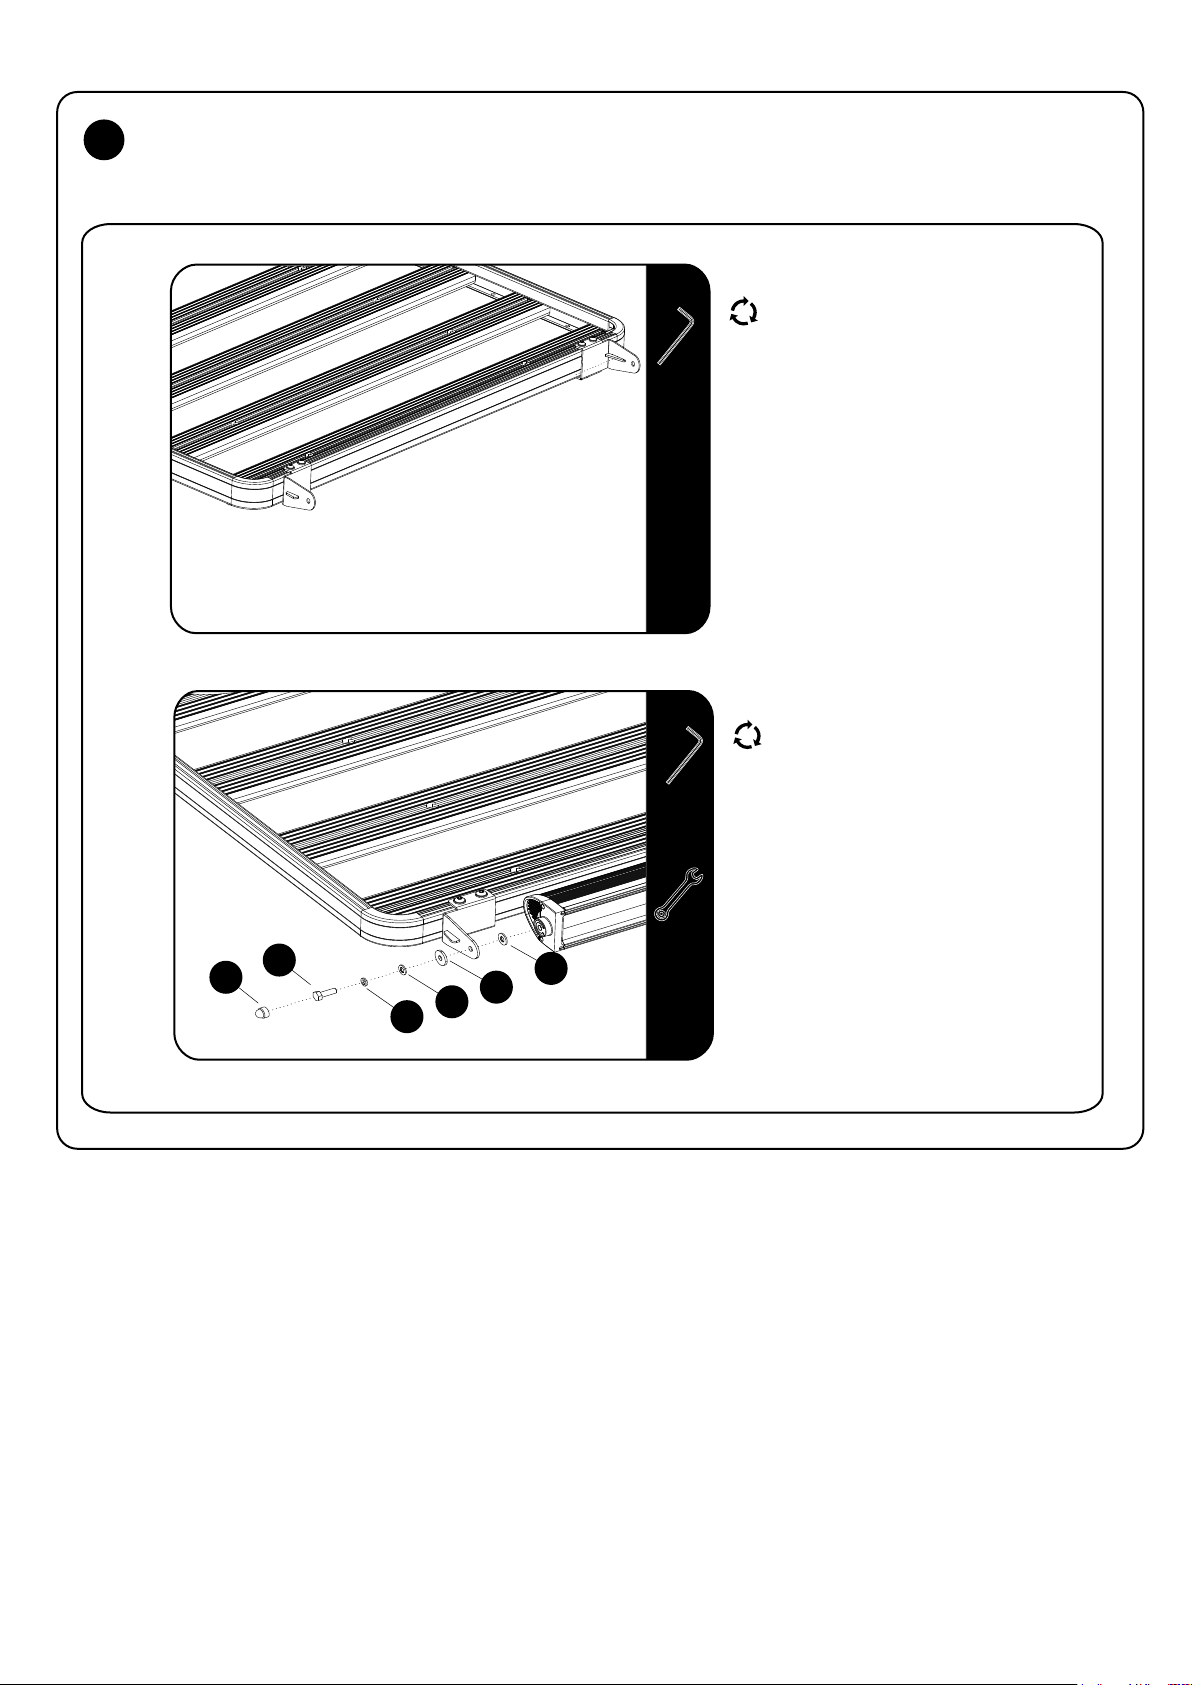
Using a tape measure, space the Brackets
accordingly to suite the length of the light
bar you will be fitting.
Fully tighten the LH and RH Front Mounting
Brackets to the Rack.
Refit the front right hand corner piece.
Secure the light bar to the Mounting
Brackets using two M8 x 25 Hex Bolts, two
M8 Spring Washers, two M8 x 16 x 1.6SS
Flat Washers, the Spacer and M8 x 19 x 2SS
Flat Washers (Items 11, 10, 6, 9 & 8) as shown.
Finish of by placing M8 Nut Caps (Item 13)
over the M8 Hex Bolts.
13
11
10
8
9
6
13MM
RRAC124_REV_A01
4
© COPYRIGHT 2017 FRONT RUNNER VEHICLE OUTFITTERS
Page 5
3
FIT AND SECURE THE UNDER RACK MOUNT BRACKETS
3.1
3.2
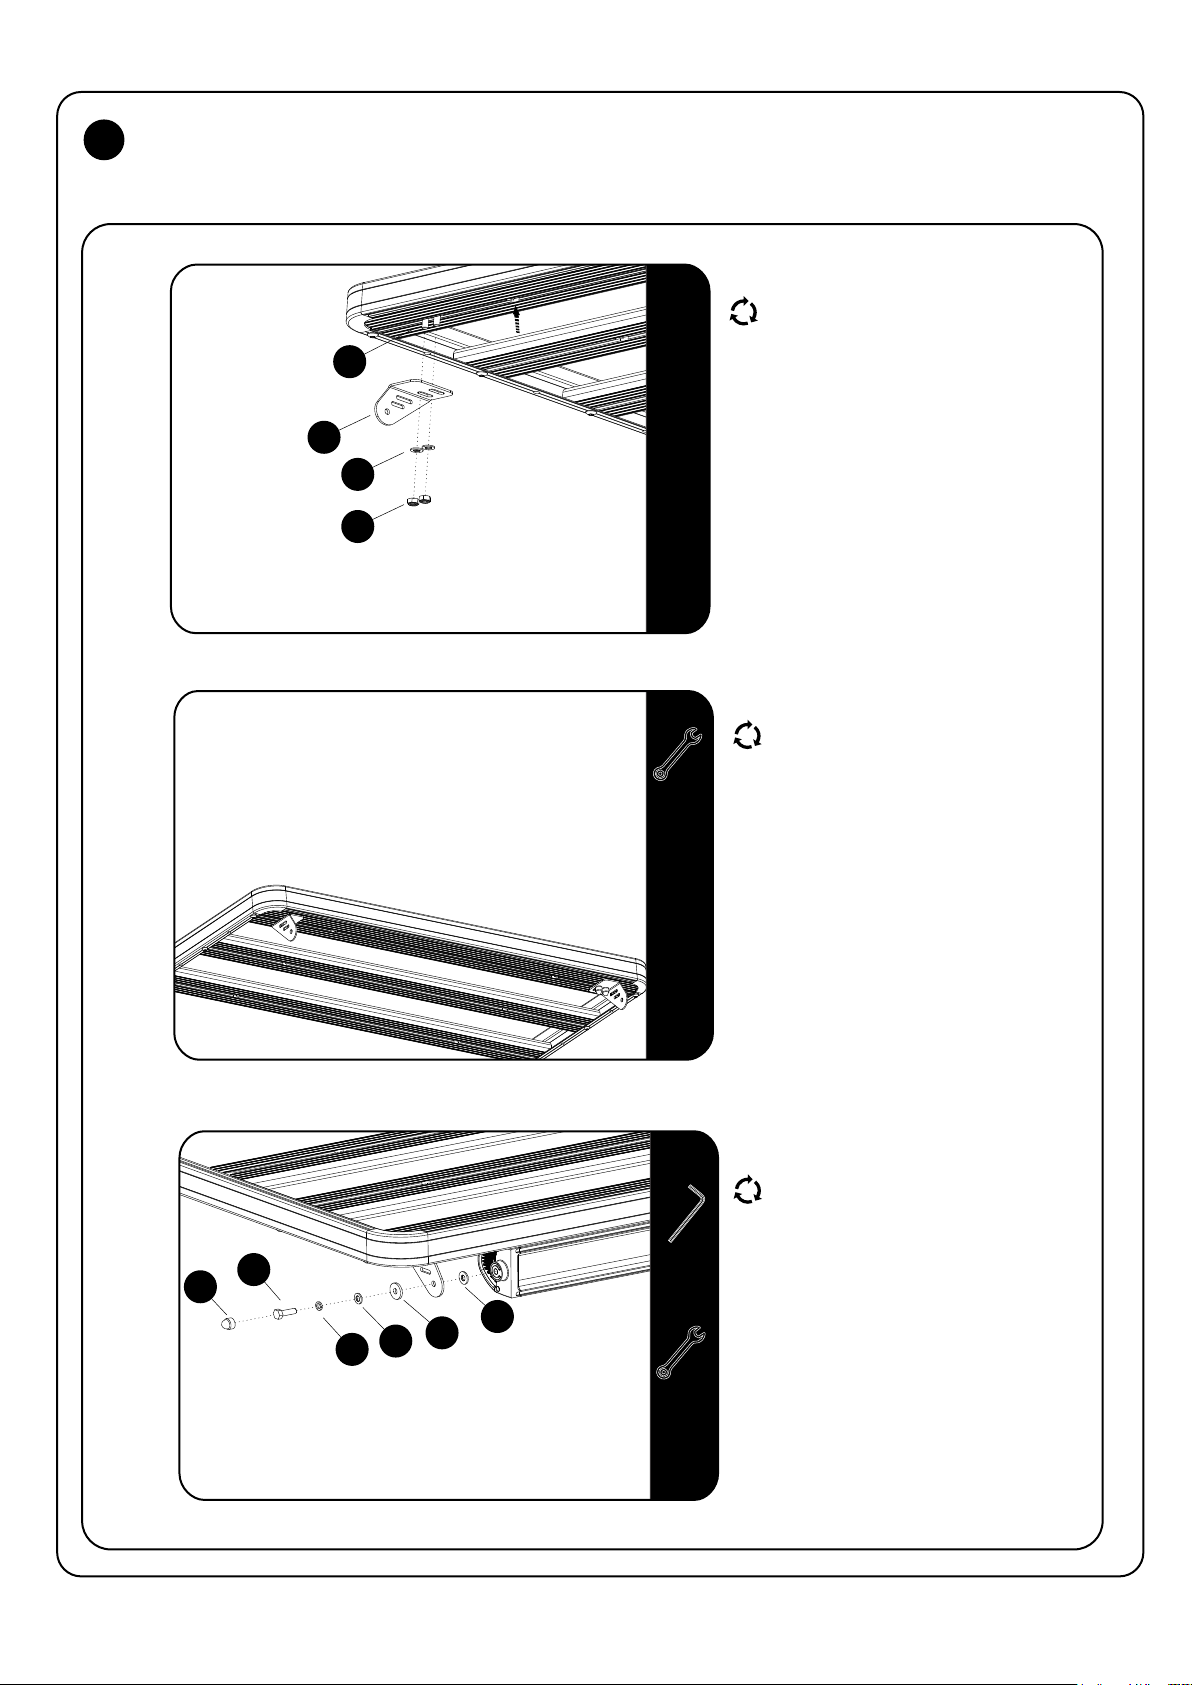
Loosen and remove the wind deflector from
the Rack if it is already fitted.
12
4
6
7
13MM
Insert two M8 x 20 Hex Bolts (Item 12) into
the front slat using the machined slots
as shown.
Loosely fasten the two Under Rack Mount
Brackets (Items 3 & 4) to the M8 x 20 Hex
Bolts using M8 x 16 x 1.6SS Flat Washers
and M8 Nyloc Nuts (Items 6 & 7).
Using a tape measure, space the Brackets
accordingly to suite the length of the light
bar you will be fitting.
Fully tighten the LH and RH Front Mounting
Brackets to the Rack.
3.3
RRAC124_REV_A01
13
11
10
Secure the light bar to the Mounting
Brackets using two M8 x 25 Hex Bolts, two
M8 Spring Washers, two M8 x 16 x 1.6SS
Flat Washers, the Spacer and M8 x 19 x 2SS
Flat Washers (Items 11, 10, 6, 9 & 8) as shown.
5MM
8
9
6
13MM
5
Finish of by placing M8 Nut Caps (Item 13)
over the M8 Hex Bolts.
© COPYRIGHT 2017 FRONT RUNNER VEHICLE OUTFITTERS
Page 6
4
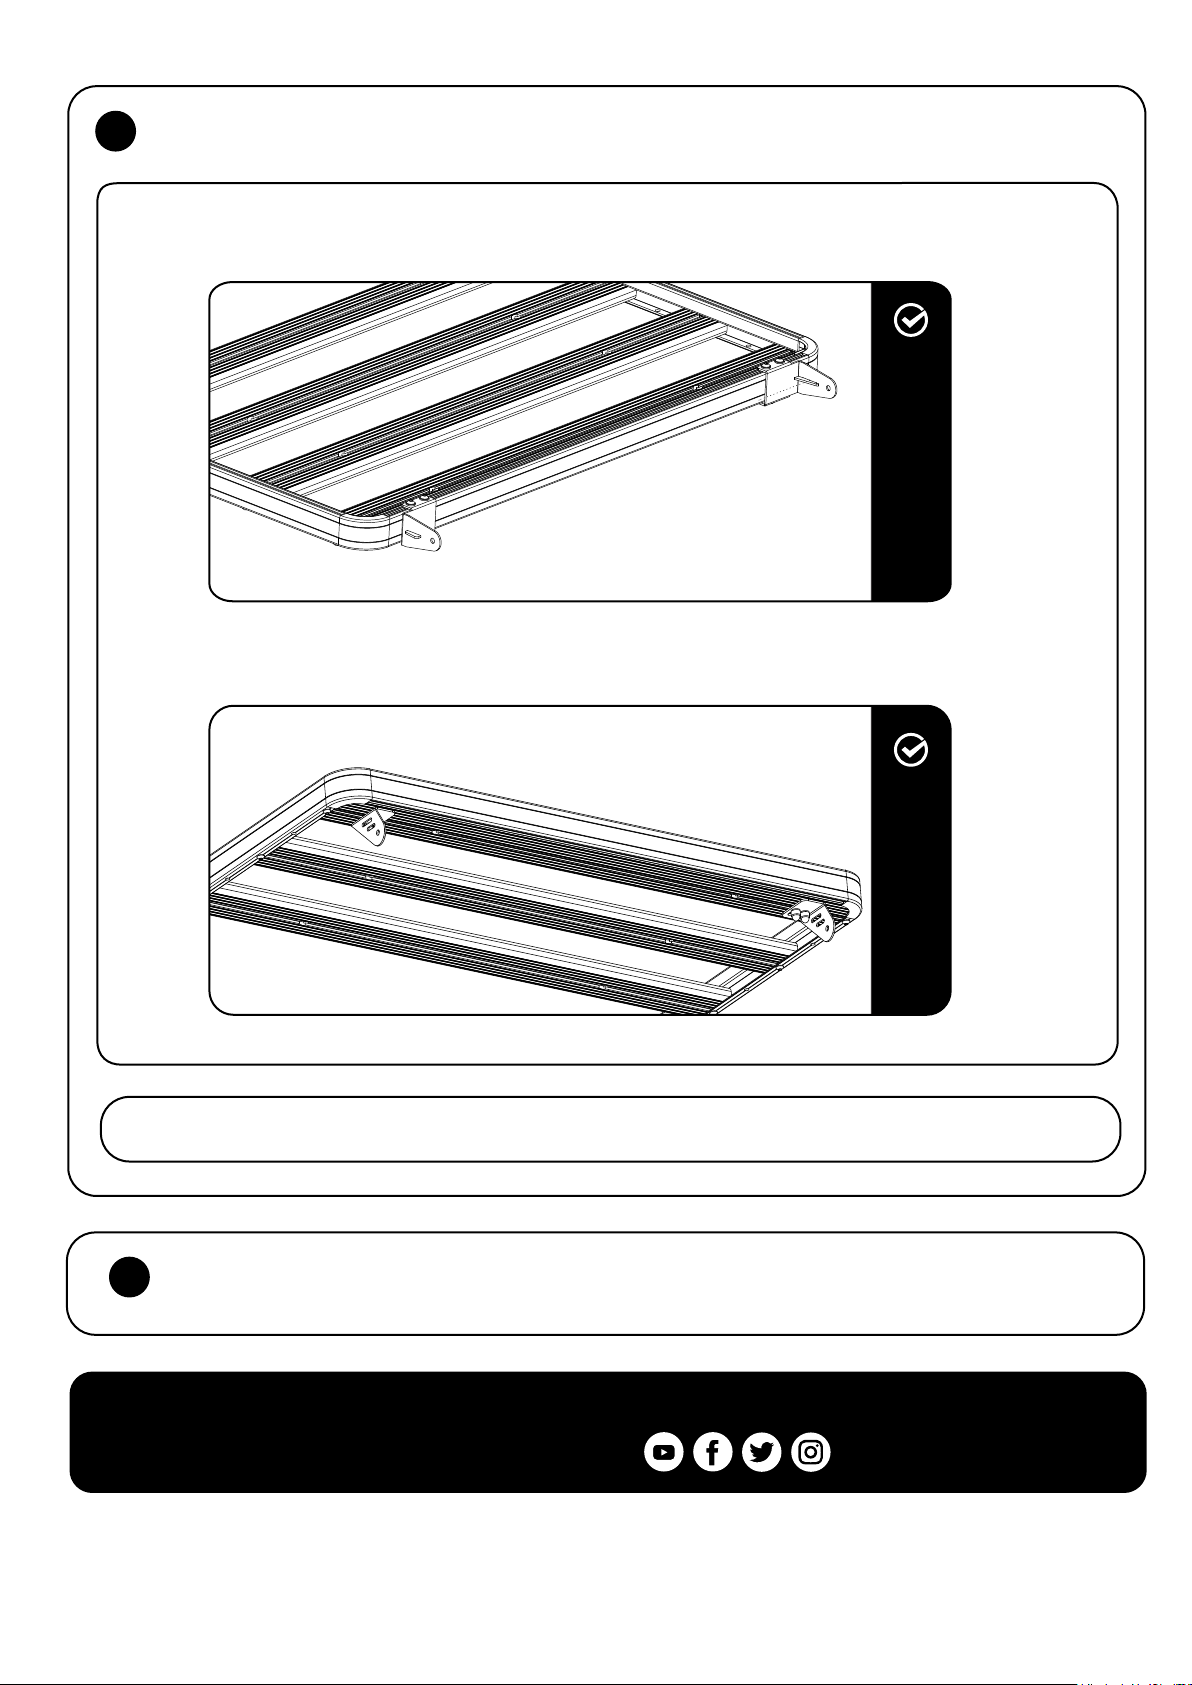
COMPLETION
4.1
4.1
4.2
FRONT MOUNT BRACKETS
UNDER RACK MOUNT BRACKETS
INSTALL OTHER VEHICLE AND RACK ACCESSORIES
5
Now's the time to visit your favorite Front Runner Dealer in person or Online.
Be sure to tag us. We love to see our gear in action! #FrontRunnerOutfitters #BornToRoam
RRAC124_REV_A01
9
10mm
Congratulations! You did it. Take a step back and admire your work!
Share your adventures on:
6
© COPYRIGHT 2017 FRONT RUNNER VEHICLE OUTFITTERS
 Loading...