

Page 1
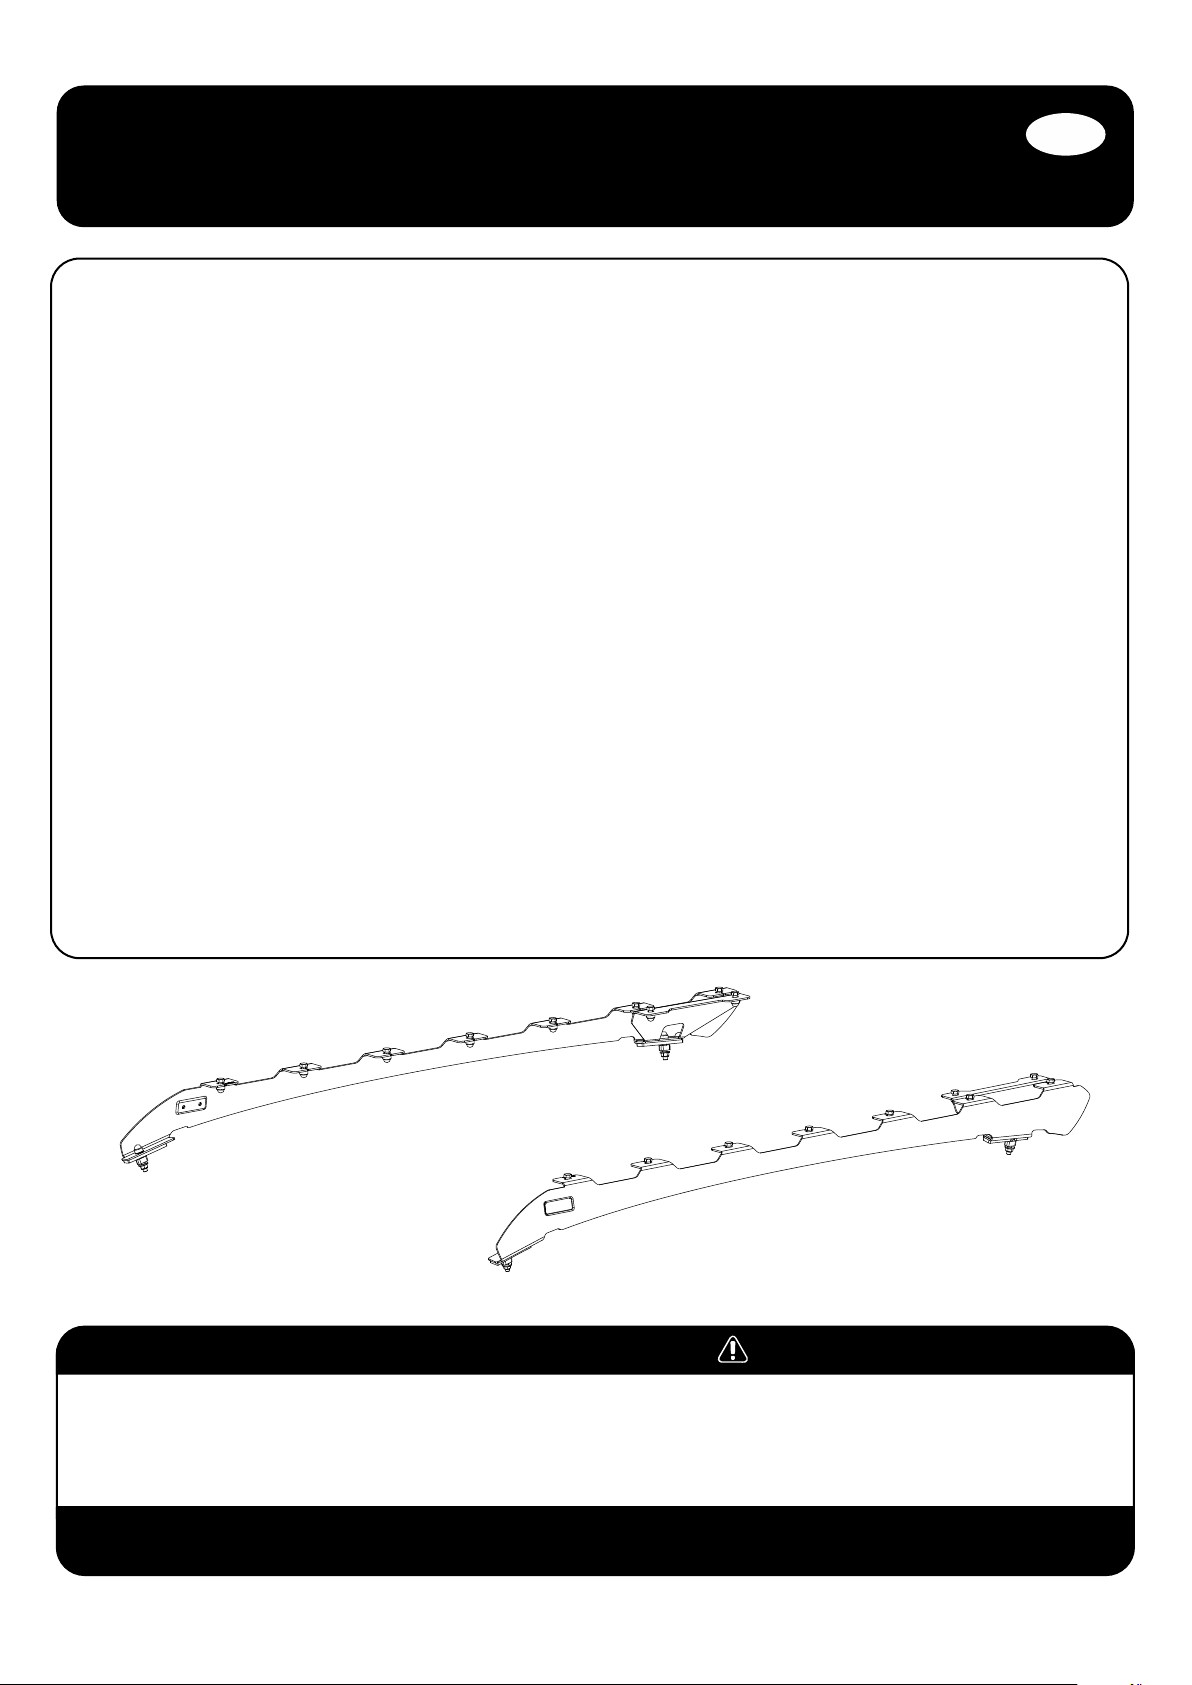
front runner
Ford Ranger T6.2 (2022-Current)/
VW Amarok (2023-Current) Double Cab
Low Profile Foot Rails
ENG
FAFR012
START HERE!
READ ME FIRST
Don’t be a hero and muscle through this installation without reading these fitting instructions first! Improper installation of this gear may void certain
aspects of your warranty.
Before you begin, take a moment and open all your Front Runner rack kit boxes and gather the assembly instructions for the various components.
A complete kit will contain:
1. A Front Runner Mounting System specific to your vehicle
2. A Front Runner Rack Tray or Load Bar Slats
This document will guide you through the assembly of the mounting system and assist you in fitting the roof rack tray or load bars to your specific
vehicle.
Please refer to the next page for a list of all the components, quantities and tools required.
IMPORTANT WARNING!
IT IS CRITICAL THAT ALL FRONT RUNNER PRODUCTS BE PROPERLY AND SECURELY ASSEMBLED AND ATTACHED TO YOUR VEHICLE. IMPROPER ATTACHMENT COULD
RESULT IN AN AUTOMOBILE ACCIDENT, AND COULD CAUSE SERIOUS BODILY INJURY OR DEATH. YOU ARE RESPONSIBLE FOR ASSEMBLING AND SECURING ALL FRONT
RUNNER PRODUCTS TO YOUR VEHICLE, CHECKING THE ATTACHMENTS PRIOR TO USE, AND PERIODICALLY INSPECTING THE PRODUCTS FOR ADJUSTMENT, WEAR AND
DAMAGE. THEREFORE, YOU MUST READ AND UNDERSTAND ALL OF THE INSTRUCTIONS AND PRECAUTIONS SUPPLIED WITH YOUR FRONT RUNNER PRODUCT PRIOR TO
INSTALLATION OR USE. IF YOU DO NOT UNDERSTAND ALL OF THE INSTRUCTIONS AND CAUTIONS, OR IF YOU HAVE NO MECHANICAL EXPERIENCE AND ARE NOT THOROUGHLY
FAMILIAR WITH THE INSTALLATION PROCEDURES, YOU SHOULD HAVE THE PRODUCT INSTALLED BY A PROFESSIONAL INSTALLER OR OTHER QUALIFIED PERSONNEL.
NOTE: Front Runner will not be responsible for any damage caused by the failure to install the product according to these instructions.
Please call us if you have any questions about the installation of this product.
FAFR012_REV_A04
1
© 2023 FRONT RUNNER VEHICLE OUTFITTERS
Page 2
CHECK ONLINE FOR LATEST FITMENT GUIDE WWW.FRONTRUNNEROUTFITTERS.COM
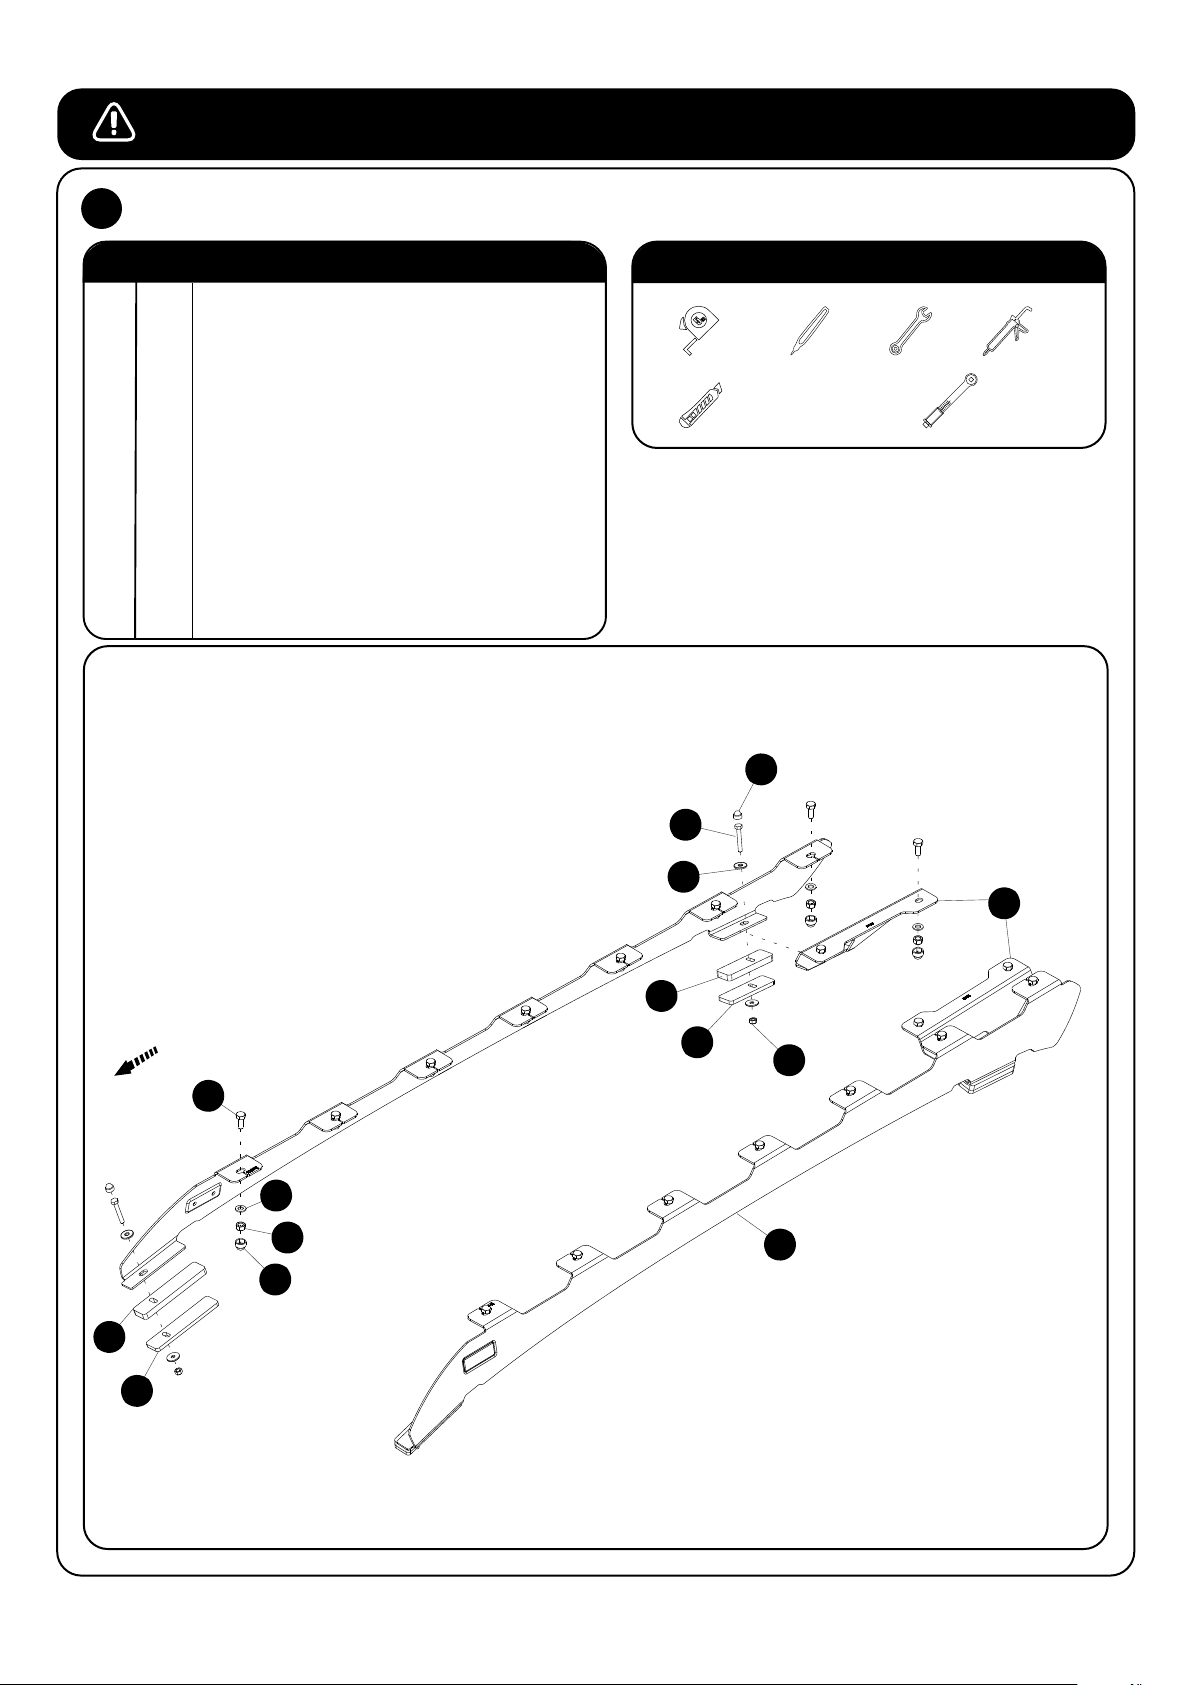
GET ORGANIZED - FOR USA SPEC FITMENT ONLY1
IN THE BOX
1 2 X Foot Rail 1LH + 1RH
2 18 X M68 x 20 Hex Bolt
3 18 X M8 x 16 x 1.6 Flat Washer
4 18 X M8 Nyloc Nut
5 18 X M8 Nut Cap
6 2 X Stiffener Bracket 1LH & 1 RH
7 2 X Front Spacer 10mm
8 2 X Front Spacer 6mm
9 2 X Rear Spacer 10mm
10 2 X Rear Spacer 6mm
11 8 X M6 x 20 x 2 Flat Washe
12 4 X M6 x 40 Hex Bolt
13 4 X M6 Nut Cap
14 4 X M6 Nyloc Nut
FIGURE 1.1
TOOLS NEEDED
Utility
Knife
FOR USA SPEC FITMENT ONLY
12
13
Marker
13mm
Sealant
Torque Wrench
FRONT OF VEHICLE
7
8
11
6
9
10
2
3
4
5
14
1
FAFR012_REV_A04
2
© 2023 FRONT RUNNER VEHICLE OUTFITTERS
Page 3
2
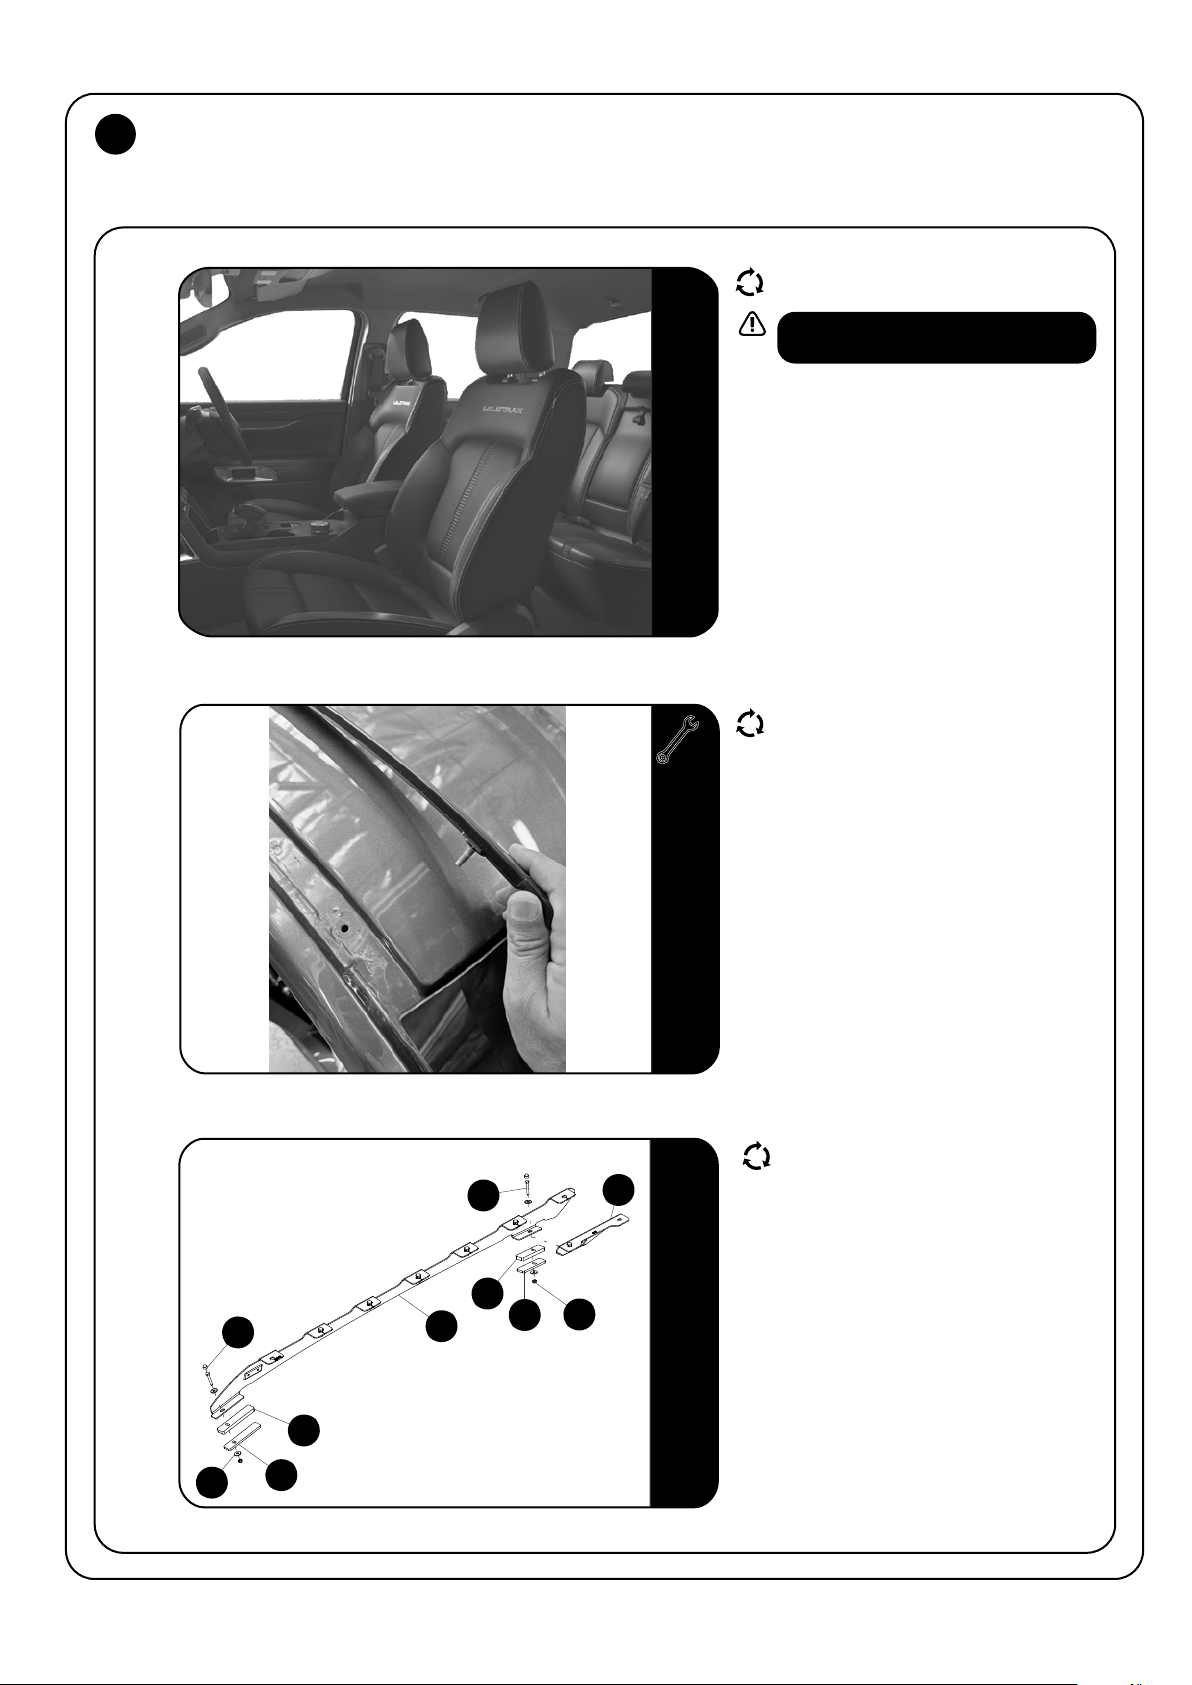
FIT AND SECURE - FOR USA SPEC FITMENT ONLY
2.1
2.2
10mm
Drop the vehicle's roof lining.
Look online for videos to assist.
After the Roof Lining is droped, Loosen the
M6 nuts on the inside of the Roof holding the
Ditch trim in place and remove the Ditch trim
from the Roof.
2.3
FAFR012_REV_A04
11
13
Apply a bead of sealant on the threads of
the M6 x 40 Hex Bolts and secure the Foot
12
9
1
7
8
10
6
14
3
Rail (Item 1) together with the Support
Bracket (Item 6) and the Front and Rear
Spacers (Item 7,8 & 9,10) to the Roof using
M6 x 40 Hex Head Bolts, M6 x 20 x 2 Flat
Washers and M6 Nyloc Nuts (Items 12,13 &
14).
Place M6 Nut Caps (Item 14) over all M6
Hex bolt heads.
© 2023 FRONT RUNNER VEHICLE OUTFITTERS
Page 4
3
FIT AND SECURE
2.1
2.4
3.1
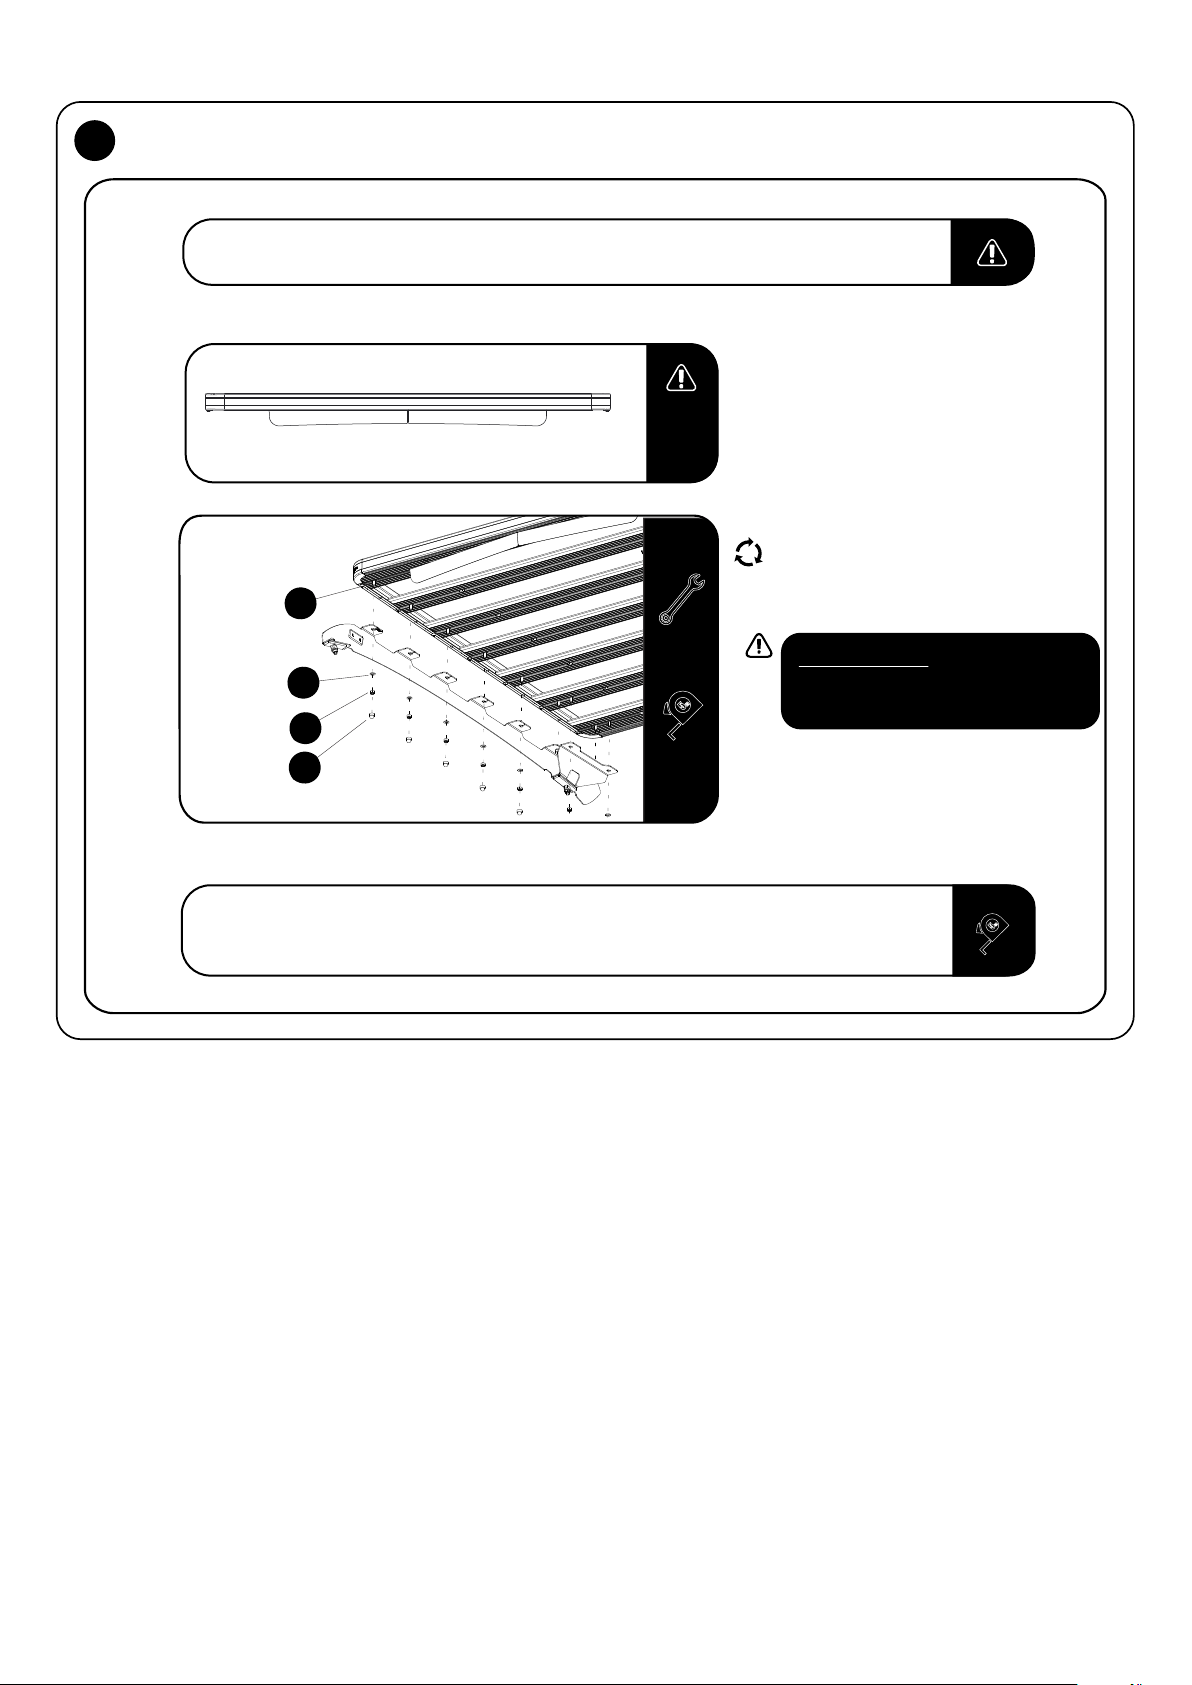
Refer to RRSTUNI when assembling your Slimline II Tray.
2.2
3.2
3.3
3.4
4MM
2
13mm
3
4
5
Center the rack and tighten fully. Use M8 Nut Caps (Items 5) to finish off the nuts.
Make sure that the wind deflector is
installed before you proceed to the next
step.
Fit your roof rack to the Foot Rails using
M8 x 20 Hex Bolts, M8 x 16 x 1.6 Flat
Washers and M8 Nyloc Nuts (Items 2, 3
& 4 ) as shown.
Tightening Torque:
M8 : 15-20Nm / 11.06 ft lb - 14.75 ft lb
Refit the Roof Lining.
FAFR012_REV_A04
4
© 2023 FRONT RUNNER VEHICLE OUTFITTERS
Page 5
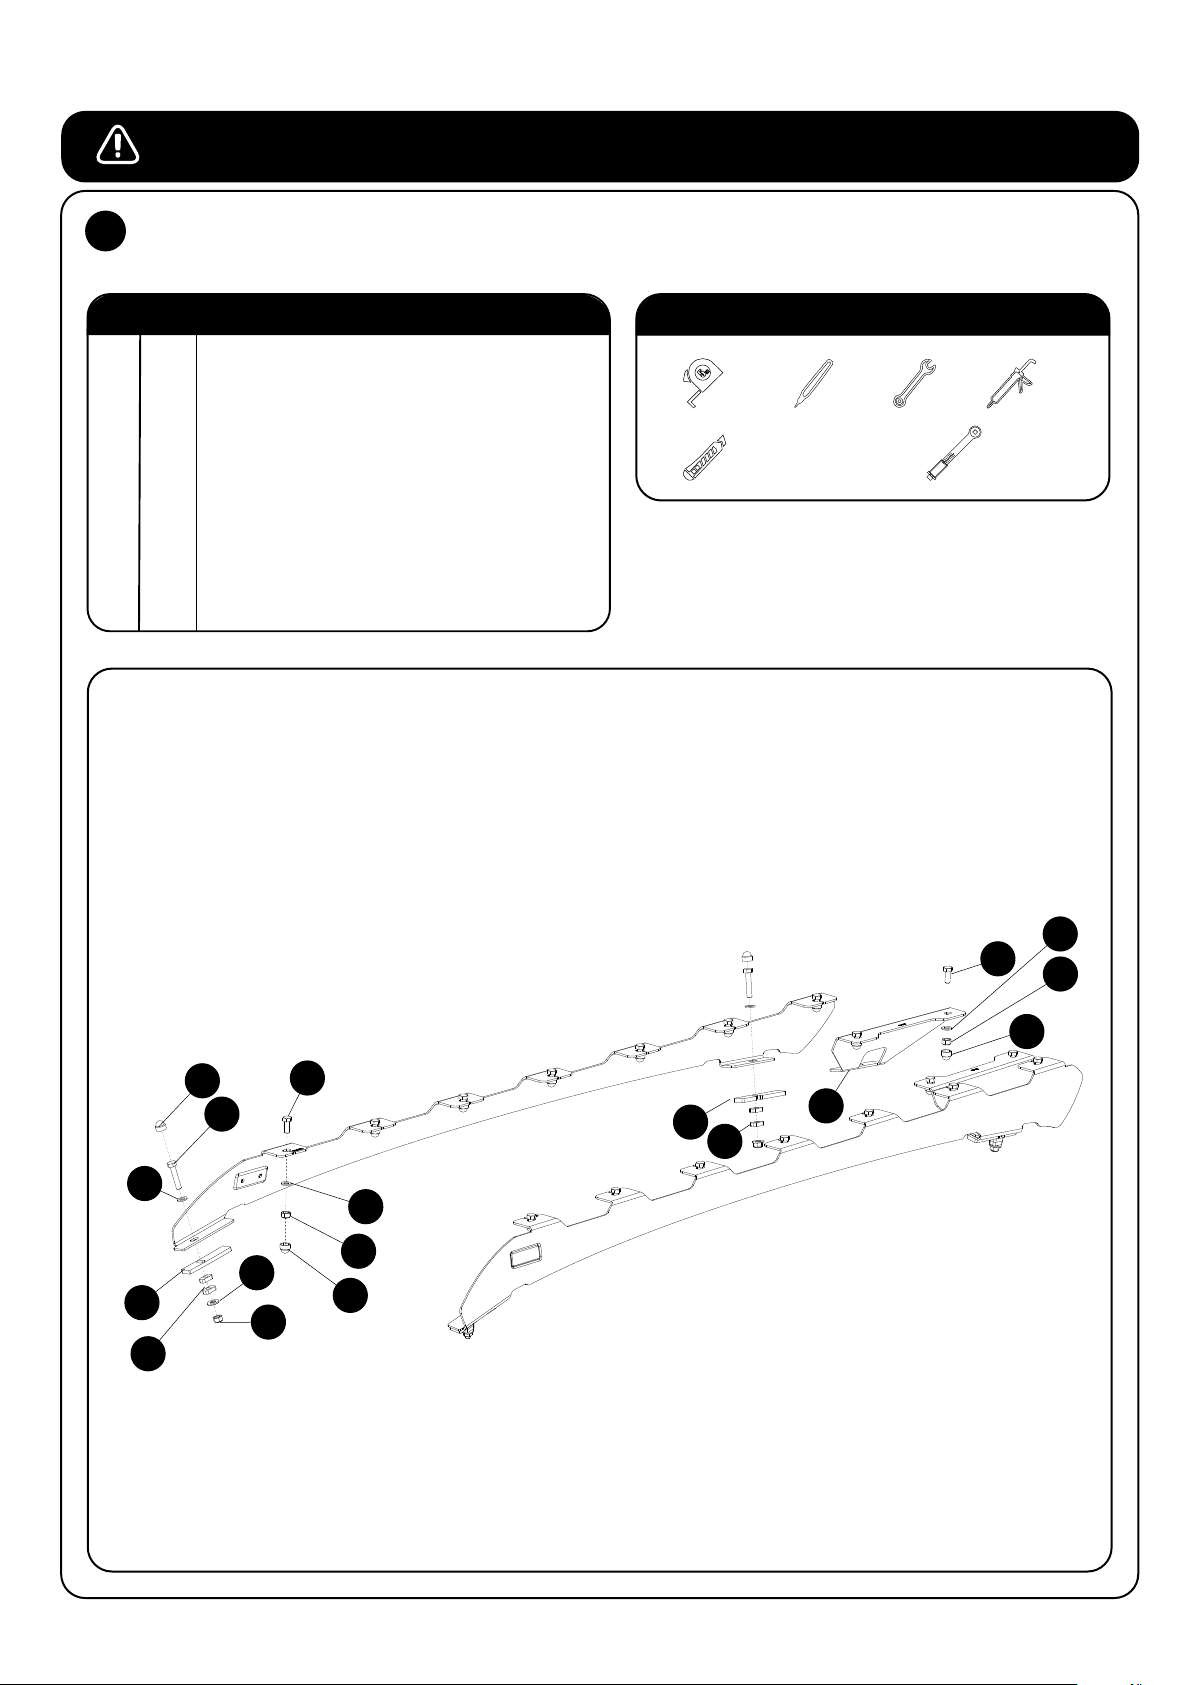
CHECK ONLINE FOR LATEST FITMENT GUIDE WWW.FRONTRUNNEROUTFITTERS.COM
GET ORGANIZED1
IN THE BOX
1 2 X Foot Rail 1LH + 1RH
2 4 X M8 x 45 Hex Bolt
3 22 X M8 Nut Cap
4 18 X M8 x 20 Hex Bolt
5 22 X M8 x 16 x 1.6 Flat Washer
6 22 X M8 Nyloc Nut
7 2 X Front Spacer
8 2 X Rear Spacer
9 4 X Bottom Spacer
10 4 X M8 x 19 x 2SS Flat Washer
11 2 X Support Bracket
FIGURE 1.1
TOOLS NEEDED
Utility
Knife
Marker
13mm
Sealant
Torque Wrench
10
7
5
4
3
2
9
4
11
8
9
5
6
10
3
6
6
3
FAFR012_REV_A04
5
© 2023 FRONT RUNNER VEHICLE OUTFITTERS
Page 6
2
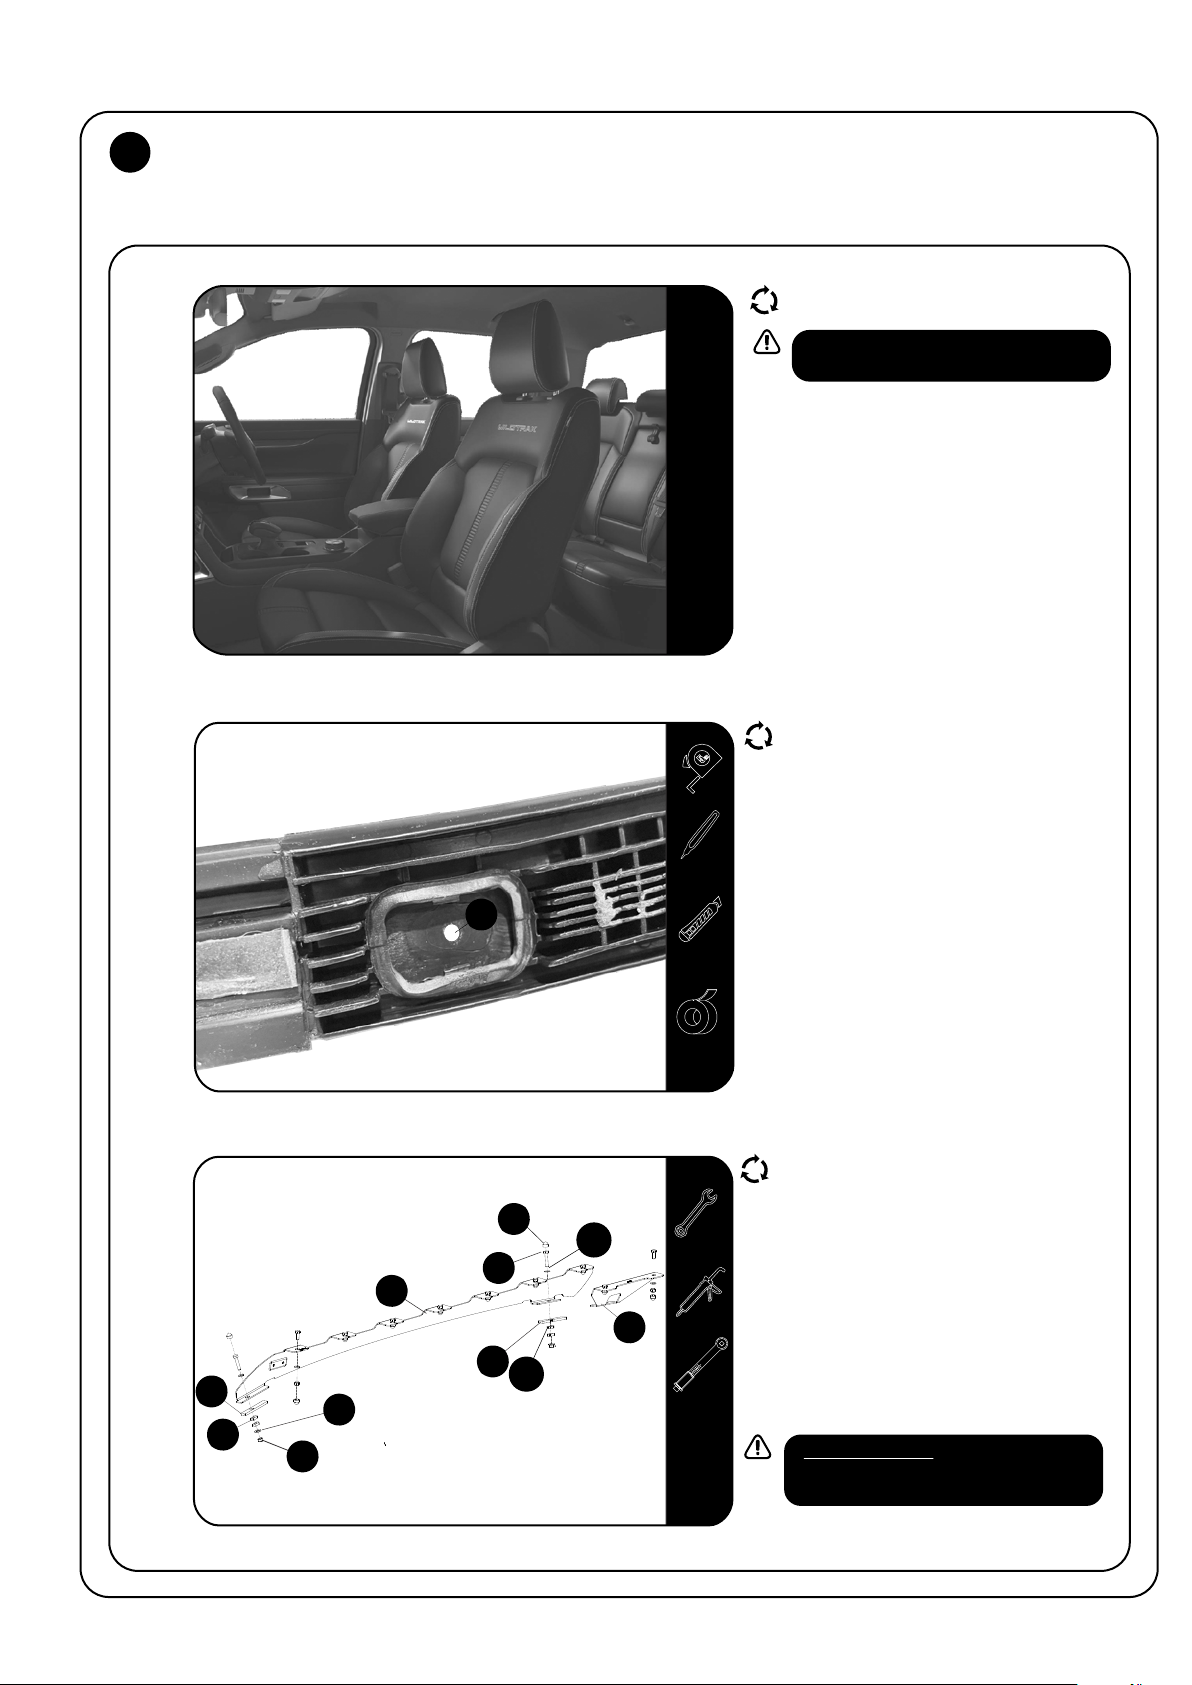
FIT AND SECURE - MODELS WITHOUT FACTORY ROOF RAILS
2.1
2.2
Drop the vehicle's roof lining.
Look online for videos to assist.
Peel back the weather strip enough so that
you can remove the weather strip retaining
bolt, Remove the Stud insert from the plastic
trim and place the Bottom Spacer (Item 9)
into the opening and mark the center of the
hole (A).
Drill a 6mm Pilot hole and open it to a 8.5mm
Hole.
A
Refit the Ditch Trim with the two Bottom
Spacers (Item 9) in place.
2.3
FAFR012_REV_A04
Apply a bead of sealant on the threads of the
M8 x 45 Hex Bolts and secure the Foot Rail
(Item 1) together with the Support Bracket
3
10
2
1
11
8
7
10
9
6
9
6
13mm
(Item 11) and the Front and Rear Spacers
to the Roof using M8 x 45 Hex Head Bolts,
M8 x 19 x 2 Flat Washers and M8 Nyloc Nuts
(Items 2, 6 & 10).
Place M8 Nut Caps (Item 6) over all M8 Hex
bolt heads.
Tightening Torque:
M8 : 15-20Nm / 11.06 ft lb - 14.75 ft lb
© 2023 FRONT RUNNER VEHICLE OUTFITTERS
Page 7
3
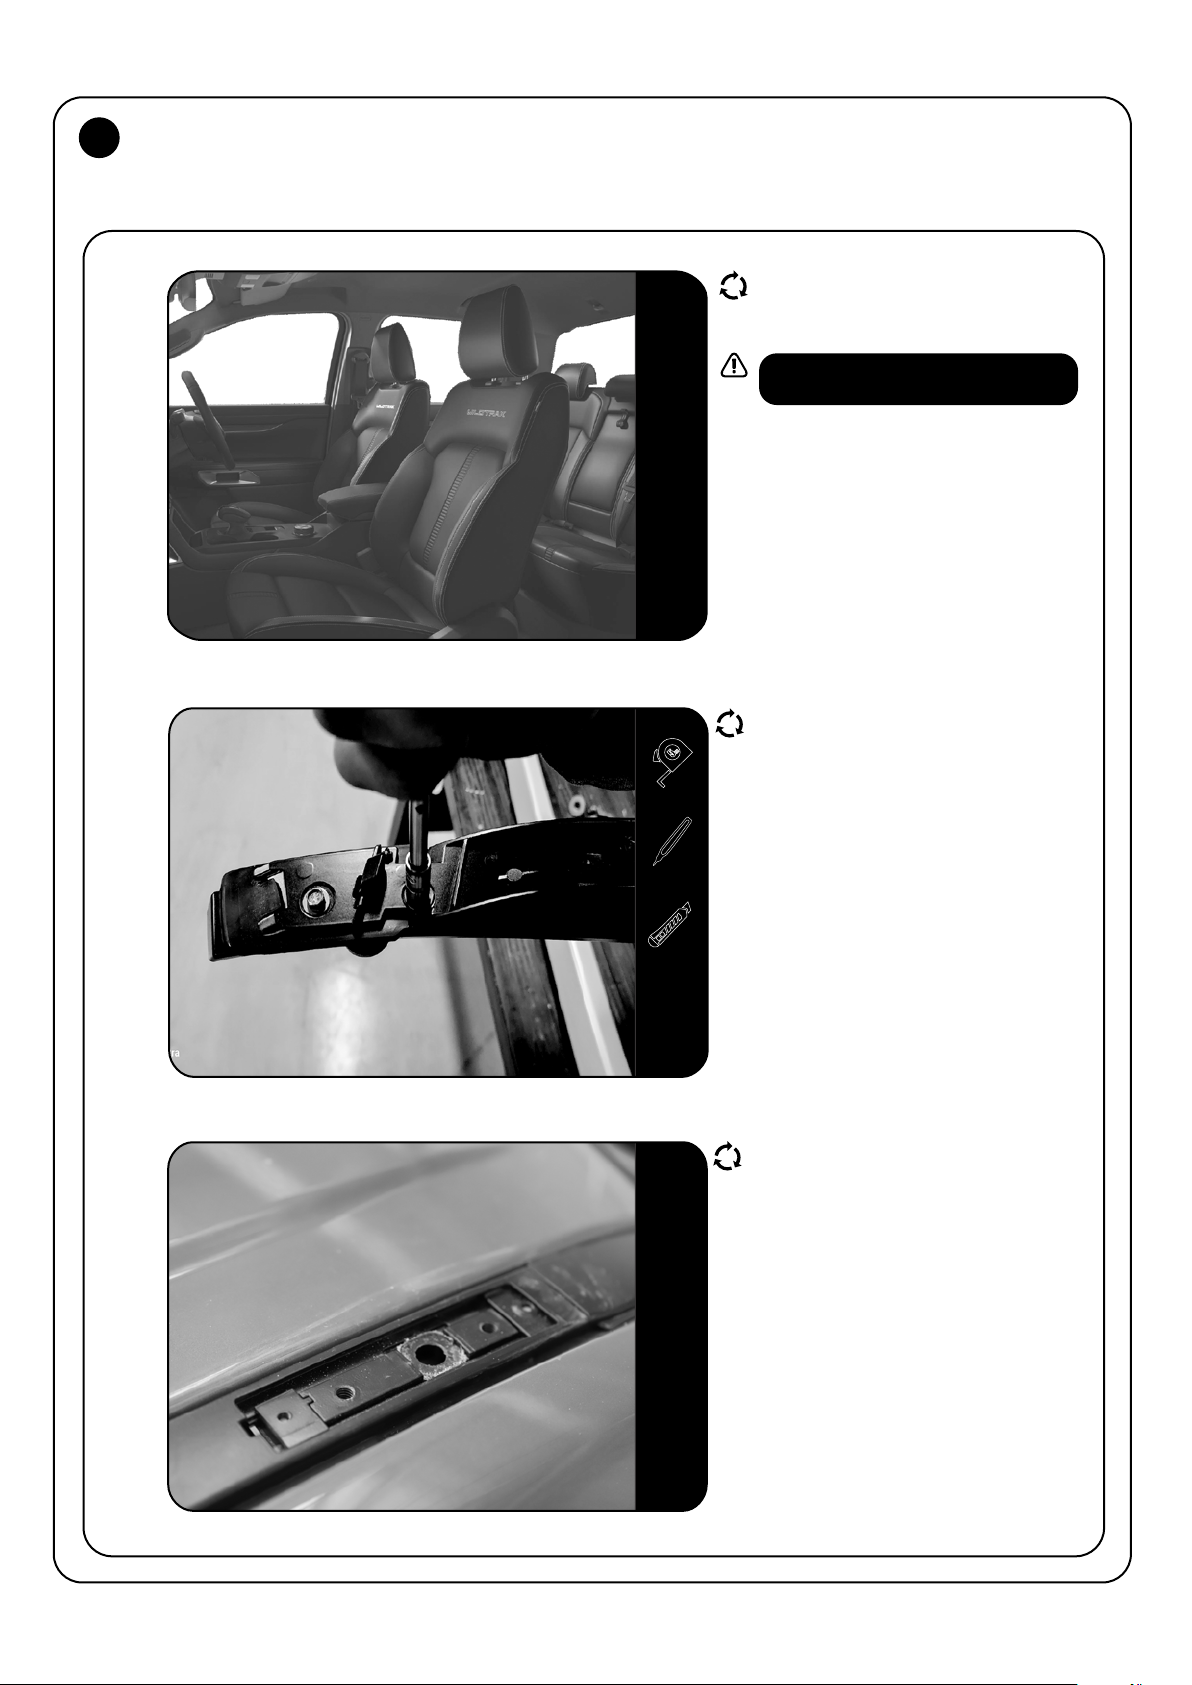
FIT AND SECURE - MODELS WITH FACTORY ROOF RAILS
3.1
3.2
Drop the vehicle's roof lining.
Look online for videos to assist.
Remove the OEM Rails with Ditch Trim from
the vehicles roof by unbolting the nut on the
inside of the roof.
Remove the EOM rails from the Ditch Trim.
3.3
Models with factory Roof Rails.
Place the Ditch Trim back into the vehicles
ditch.
In 3.4 you will use the supplied hardware to
secure the Foot Rial onto the Ditch Trim.
FAFR012_REV_A04
7
© 2023 FRONT RUNNER VEHICLE OUTFITTERS
Page 8
3
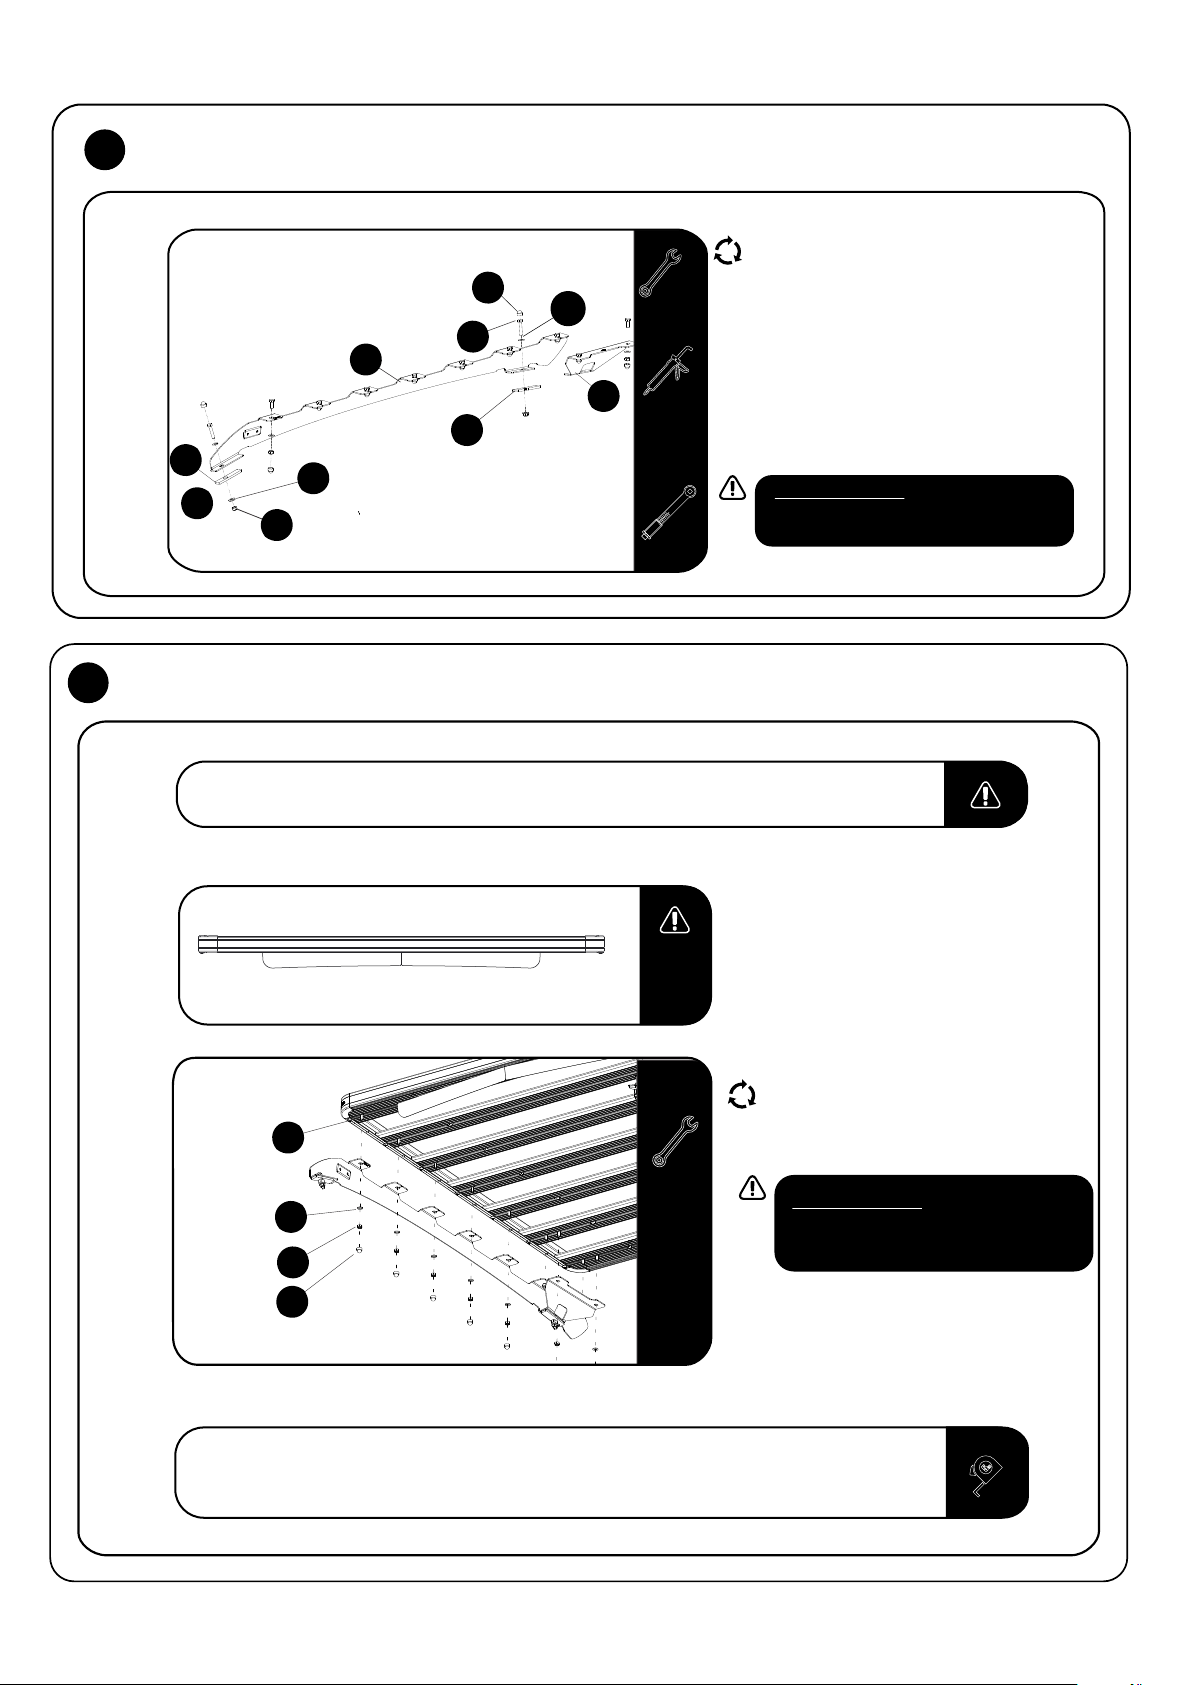
FIT AND SECURE - MODELS WITH FACTORY ROOF RAILS
3.4
3
10
2
1
11
8
7
9
4
FIT AND SECURE
2.1
2.4
4.1
Refer to RRSTUNI when assembling your Slimline II Tray.
10
6
13mm
Place the Spacers (Item 7 & 8) over the
mounting holes in the Ditch Trim.
Apply a bead of sealant on the threads of the
M8 x 45 Hex Bolts and secure the Foot Rail
(Item 1) together with the Support Bracket
(Item 11) to the Roof using M8 x 45 Hex Head
Bolts, M8 x 19 x 2 Flat Washers and M8 Nyloc
Nuts (Items 2, 10 & 6).
Place M8 Nut Caps (Item 3) over all M8 Bolt
heads
Tightening Torque:
M8 : 15-20Nm / 11.06 ft lb - 14.75 ft lb
2.2
4.2
4.3
4.4
4MM
4
13mm
5
6
3
Center the rack and tighten fully. Use M8 Nut Caps (Items 3) to finish off the nuts.
Make sure that the wind deflector is
installed before you proceed to the next
step.
Fit your roof rack to the Foot Rails using
M8 x 20 Hex Bolts, M8 x 16 x 1.6 Flat
Washers and M8 Nyloc Nuts (Items 4, 5
& 6 ) as shown.
Tightening Torque:
M8 : 15-20Nm / 11.06 ft lb - 14.75 ft lb
Refit the Roof Lining.
FAFR012_REV_A04
8
© 2023 FRONT RUNNER VEHICLE OUTFITTERS
Page 9
5
INSTALL OTHER VEHICLE AND RACK ACCESSORIES
Now's the time to visit your favorite Front Runner dealer in person or online.
IMPORTANT!
FRONT RUNNER RACK KITS OFTEN HAVE A HIGHER LOAD RATING THAN THE VEHICLES THEY ARE MOUNTED TO. PLEASE REFER TO YOUR SPECIFIC VEHICLE MANUFACTURER
FOR A RECOMMENDED ROOF RATING. FRONT RUNNER CANNOT BE RESPONSIBLE FOR IMPROPER LOADING BEYOND THE VEHICLE MANUFACTURER'S STATED LOAD CAPACITY.
Be sure to tag us. We love to see our gear in action! #FrontRunnerOutfitters #BornToRoam
Share your adventures on:
FAFR012_REV_A04
9
© 2023 FRONT RUNNER VEHICLE OUTFITTERS
Page 10

 Loading...