

Page 1
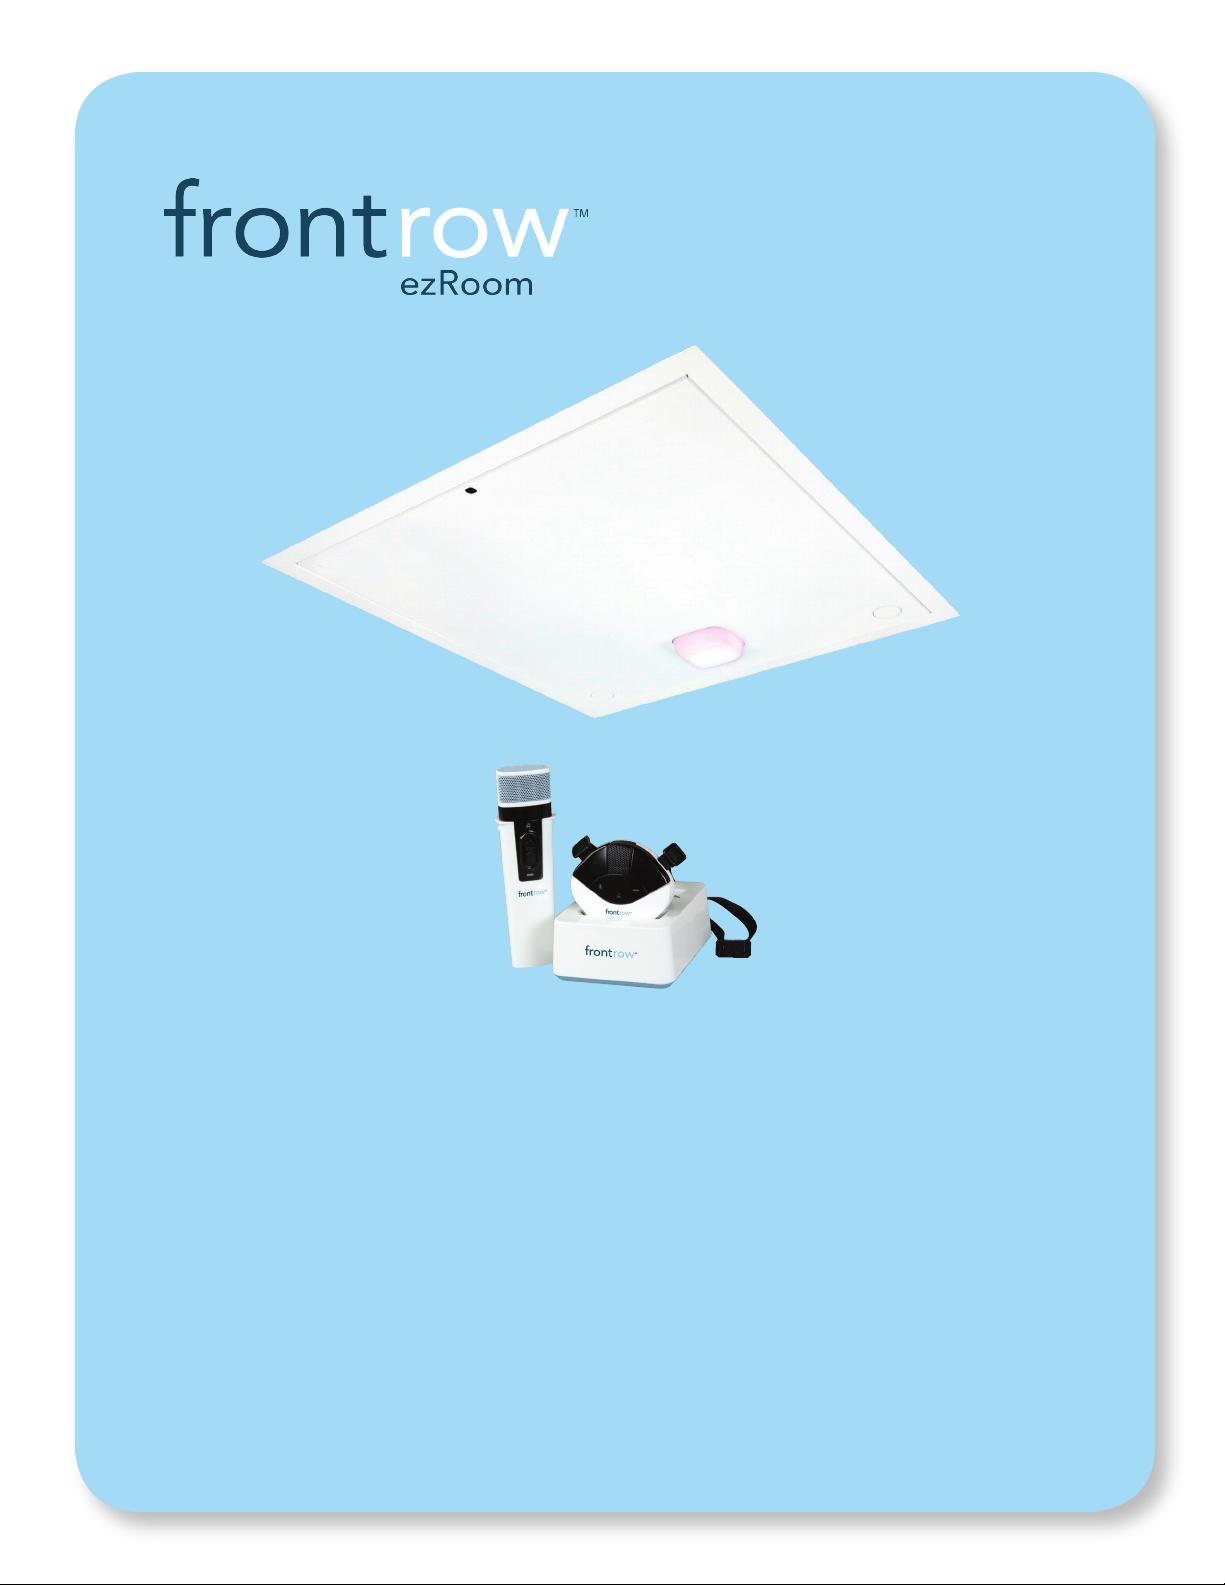
USER GUIDE
ICR-01 Smart Receiver
ITM-02 Pendant Microphone
ISM-02 Pass-Around Microphone
IMC-01 Microphone Charger
Page 2

CONTENTS
Important Safety Instructions ..........................................................................1
Electrical Warnings . . . . . . . . . . . . . . . . . . . . . . . . . . . . . . . . . . . . . . . . . . . . . . . . . . . . . . . . . . . . . . . . . . . . . . . . . . . . . . . . . . . . 2
ITM-02 Pendant Microphone ...........................................................................3
ISM-02 Pass-Around Microphone .......................................................................4
Vol ume ...............................................................................................5
Voice Command .......................................................................................6
Beacon LED Status Indicator ...........................................................................7
ITM-02 Pendant Microphone ...........................................................................8
Battery..............................................................................................9
Charging ...........................................................................................10
ISM-02 Pass-Around Microphone ......................................................................11
Labeling ...........................................................................................12
Battery.............................................................................................13
Charging ...........................................................................................14
Microphone Configuration ............................................................................15
Using Multiple Microphones.........................................................................16 -17
IMC-01 Microphone Charger ..........................................................................18
Troubleshooting................................................................................... 19-20
Regulatory...........................................................................................21
Batteries.............................................................................................22
Page 3

Important Safety Instructions
1. Read these instructions.
2. Keep these instructions.
3. Heed all warnings.
4. Follow all instructions.
5. Do not use this apparatus near water.
6. Clean only with dry cloth.
7. Do not block any ventilation openings. Install in accor-
dance with the manufacturer’s instructions.
8. Do not install near any heat sources such as radiators,
heat registers, stoves, or other apparatus (including
amplifiers) that produce heat.
9. Do not defeat the safety purpose of the polarized or
grounding-type plug. A polarized plug has two blades
with one wider than the other. A grounding type plug
has two blades and a third grounding prong. The wide
blade or the third prong are provided for your safety. If
the provided plug does not fit into your outlet, consult an
electrician for replacement of the obsolete outlet.
10. Protect the power cord from being walked on or pinched
particularly at plugs, convenience receptacles, and the
point where they exit from the apparatus.
11. Only use attachments/accessories specified by the
manufacturer.
12. Use only with the cart, stand, tripod, bracket, or table
specified by the manufacturer, or sold with
the apparatus. When a cart is used, use
caution when moving the cart/apparatus
combination to avoid injury from tip-over.
13. Unplug this apparatus during lightning storms or when
unused for long periods of time.
14. Refer all servicing to qualified service personnel.
Servicing is required when the apparatus has been
damaged in any way, such as power-supply cord or plug
is damaged, liquid has been spilled or objects have
fallen into the apparatus, the apparatus has been
exposed to rain or moisture, does not operate normally,
or has been dropped.
1
Page 4

Electrical Warnings
1. Avoid Abuse to the Power Supply
To reduce risk of electric shock, unplug the power supply
from outlet before attempting any maintenance or cleaning.
Turning off controls will not reduce this risk.
WARNING: To reduce the risk of fire or electric shock, do
not expose this apparatus to rain or moisture.
DO NOT disassemble the power supply. Return the appa-
ratus to FrontRow for qualified service and repair if required.
Incorrect reassembly may result in a risk of electric shock or fire.
DO NOT expose the power supply to rain, snow, water, gas,
oil, etc.
DO NOT operate the power supply if it has received a sharp
blow, been dropped, or otherwise damaged in any way; return
the apparatus to FrontRow for qualified service and repair.
DO NOT block or cover the apparatus and impede ventilation.
DO NOT expose batteries (battery pack or batteries
installed) to excessive heat such as sunshine, fire, or the like
or excessive cold.
2. Proper Use of the Power Supply and Wiring
An extension cord should not be used unless absolutely
necessary. Use of improper extension cord could result in a risk
of fire and electric shock. The cord MUST be plugged into
a grounded outlet. Make sure it is properly wired, in good
electrical condition, and wire size is large enough for AC
ampere rating of the power supply or charger. To reduce
risk of damage to plug and cord when disconnecting the
power supply or charger, ALWAYS pull on plug - NEVER
on cord.
Locate cord so that it will not be stepped on, tripped over, or
otherwise subject to damage or stress. DO NOT lay extension cord on charger. DO NOT operate the power supply
with damaged cord or plug - replace them immediately.
Electrical Safety Information:
PRECAUTIONS & SAFETY
!
RECOMMENDATIONS
Follow Manufacturers' Recommendations
Before using the system and power supply, read all instructions
for, and caution markings on the receiver and power supply and in
this user guide.
2
Page 5
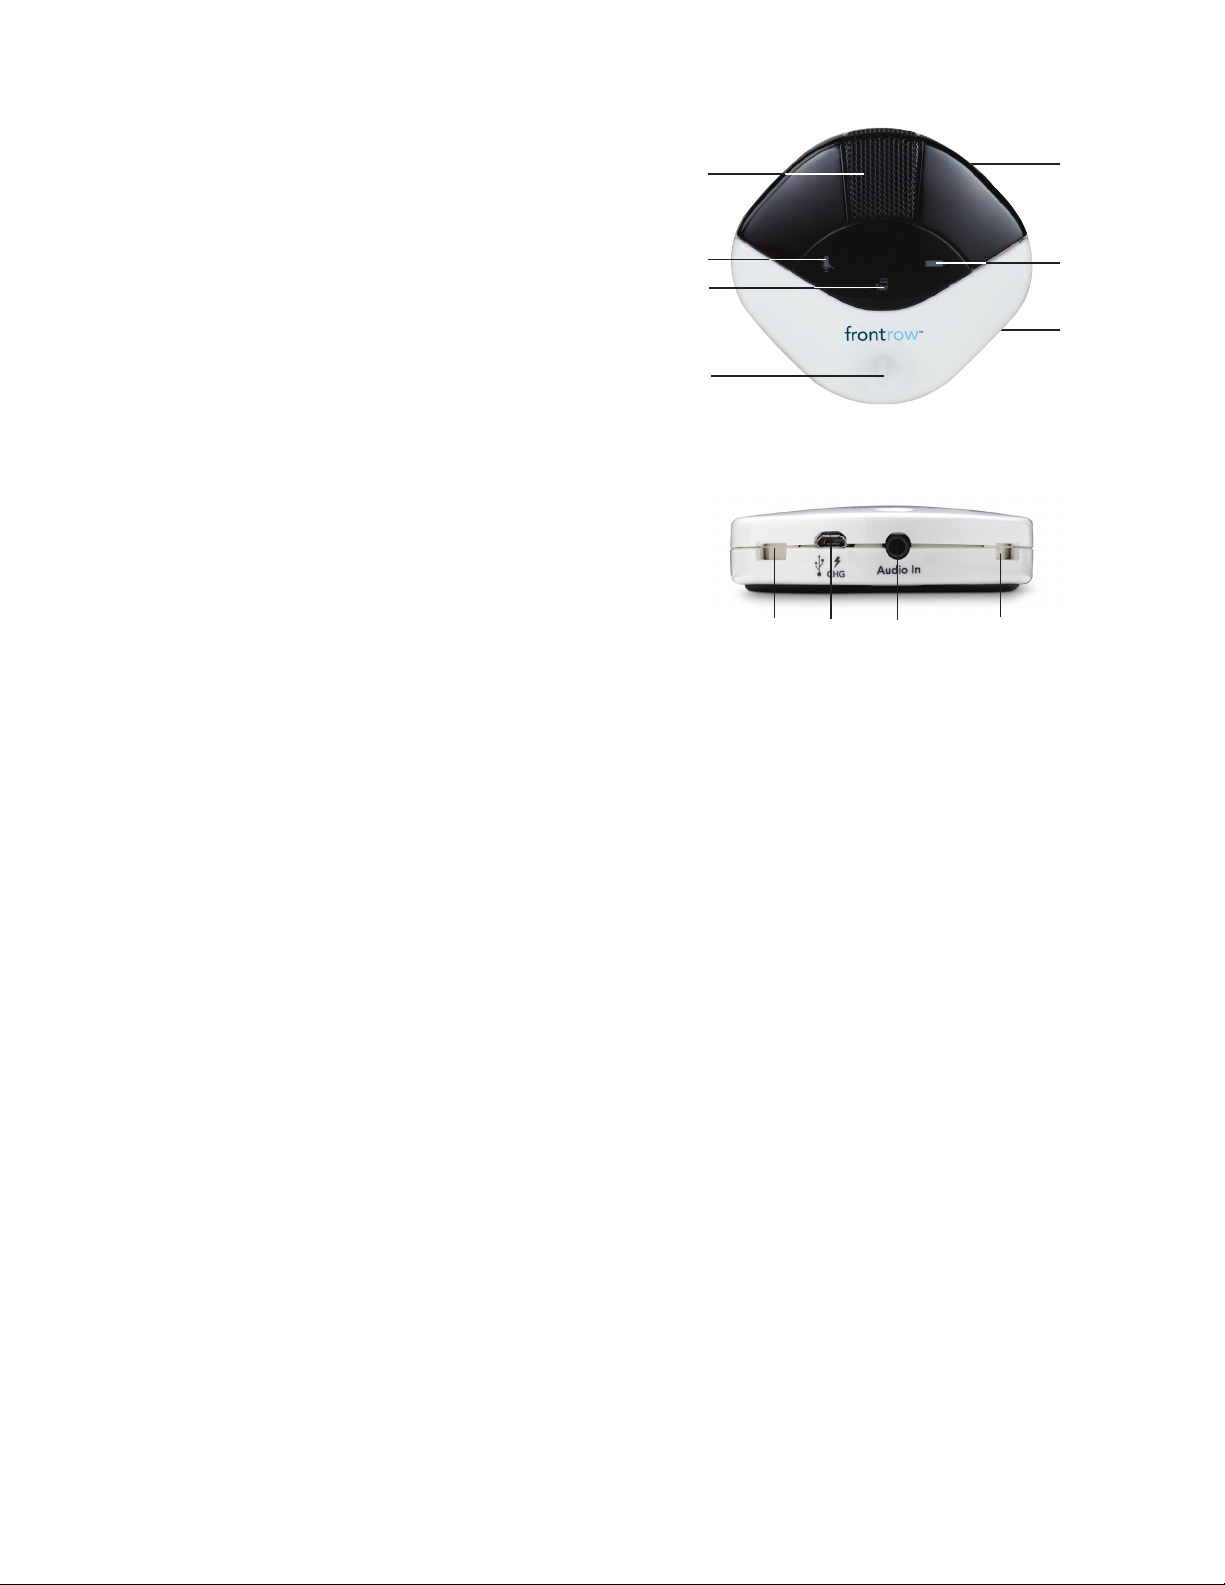
ITM-02 Pendant Microphone
1 Amazing Sound Quality
With FrontRow's digital synthesis technology, the ITM-02
uses a single cardioid microphone element to deliver
superb pickup and audio quality. And combined with a
high-isolation, low- noise, open air microphone suspension,
the ITM-02 minimizes noise from friction against clothing,
buttons or jewelry.
2 Mute Indicator
OFF/STANDBY ...........Un-muted
SOLID RED ..............Muted
3 Power Indicator
SOLID GREEN ...........Power On
OFF ....................Standby
4 Smart Button
Controls all of the features of the Pendant Microphone. Tap
the button to mute, or use with voice command to activate
the lesson capture software and control your audio system.
When the Pendant Microphone is in standby mode:
PRESS MOMENTARILY .....Awaken
When the Pendant Microphone is active:
PRESS MOMENTARILY .....Mute / Un-mute
PRESS AND HOLD...........Issue Voice Command or
trigger programmed event
5 Superior Comfort
Lightweight (just 73.7g/2.6oz) with soft backing that
provides comfort and reduces friction noise from contact
with clothing, buttons or jewelry.
6 Battery Indicator
In Use
OFF ..............Battery Charged
FLASHING RED ........Battery Low
When Charging
SOLID RED ..............Charging
SOLID GREEN .......Fully Charged
FLASHING RED/GREEN Charge fault
Front
1
2
5
6
3
7
4
Bottom
10
98
10
9 Portable Audio Interface
3.5mm audio input jack lets you use the Pendant
Microphone to transmit audio wirelessly from any
secondary audio source such as a computer or MP3 player.
10 Charge Contacts
For use with the optional IMC-01 microphone charger.
11 Adjustable power
Adjust the power to increase either battery life or range.
12 Programmable channels
Program the switch positions to 2 of 5 available channels.
7 Lithium Ion Battery
3-year life expectancy, lightweight, rechargeable lithium
ion battery.
8 Charging / Programming Jack
For charging via USB cable or for configuring settings using
the FrontRow Microphone Settings application.
3
Page 6
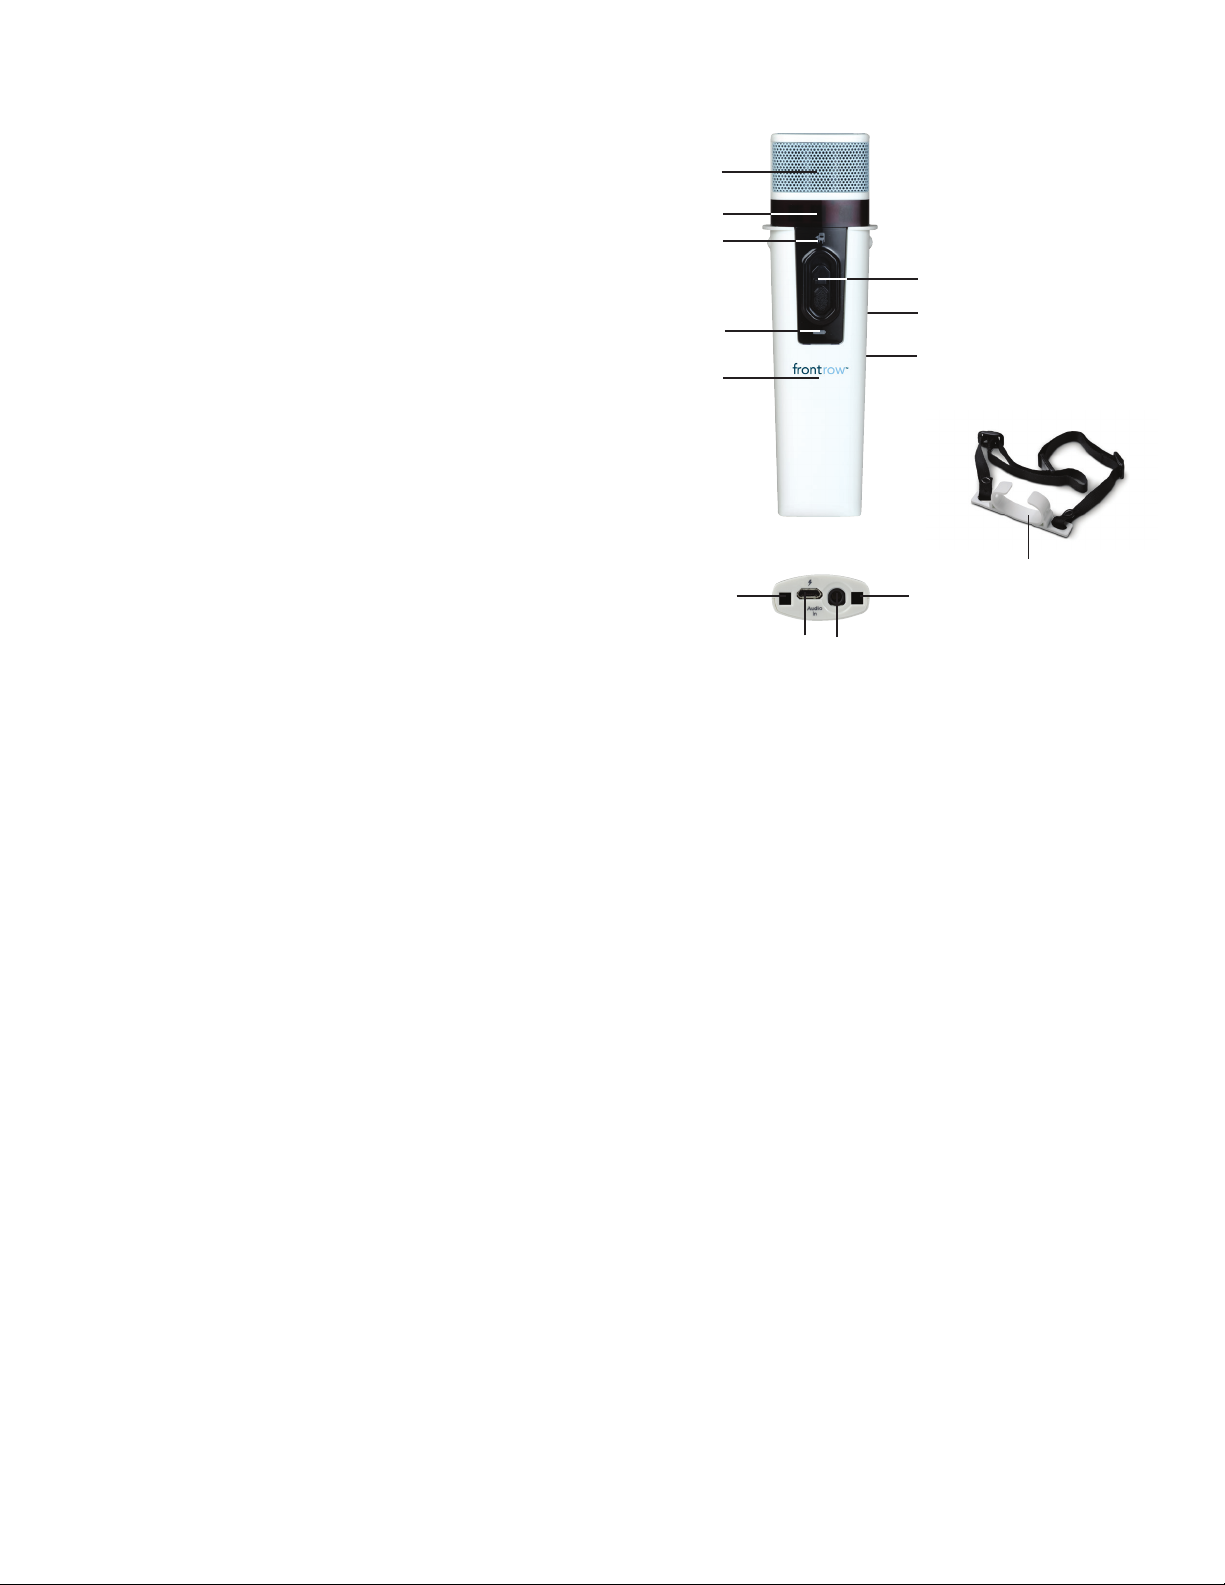
ISM-02 Pass-Around Microphone
1 Amazing Sound Quality
With FrontRow's ClearVoice™ digital synthesis technology,
the ISM-02 uses a single cardioid microphone element to
deliver superb pick up and audio quality. And combined with
a high isolation, low noise, open air microphone suspension
– the ISM-02 minimizes handling noise.
2 360˚ Emitter Diodes
360˚ emitter diodes let students hold the Pass-Around
Microphone the way it's most comfortable for them without
worry of dropout.
3 Power Indicator
SOLID GREEN ...........Power On
OFF ....................Power Off
Front
1
2
3
6
7
4
8
5
Lavaliere clip
4 Battery Indicator
In Use
OFF ..............Battery Charged
FLASHING RED ........Battery Low
When Charging
SOLID RED.............. Charging
SOLID GREEN .......Fully Charged
FLASHING RED/GREEN. Charge fault
5 Small and Lightweight
At less than 15cm/6in tall and just 73.7g/2.6oz the micro-
phone is much easier for even young students to use than a
standard-sized mic.
6 Power/Push-to-talk Switch
The push-to-talk option makes transitions when passing the
microphone between students easier (e.g. no need to take
time from the conversation to turn the mic on and off during transition).
PRESS AND HOLD .....Push-to-talk
PRESS AND SLIDE UP ....Power On
7 Name Plate
Perfect for adding a name or room number for easy identifi-
cation.
Bottom
12
11
9
10
11
11 Charge Contacts
For use with the optional IMC-01 microphone charger.
12 Comfortable Hands Free Option
Easy, comfortable lavaliere clip makes reading in front of
class simple and lets the Pass-Around Microphone double
as a lightweight teacher microphone.
13 Adjustable power
Adjust the power to increase either battery life or range.
14 Programmable channels
Program the switch positions to 2 of 5 available channels.
8 Lithium Ion Battery
3-year life expectancy, lightweight, rechargeable lithium ion
battery.
9 Charging/Programming Jack
For charging via USB cable or for configuring settings using
the FrontRow Microphone Settings application.
10 Portable Audio Interface
3.5mm audio input jack lets you use the Pass-Around
Microphone to transmit audio from any secondary
audio source such as a computer or MP3 player.
4
Page 7

Volume
Settings
Your ezRoom is equipped with a powerful Adapto™ feedback
suppression engine that helps avoid harsh squealing noise
that would normally occur when a microphone gets too close
to a speaker. Nevertheless, try to use volume settings for daily
use that give good audibility without constantly activating the
feedback suppression engine.
If more volume is required for a large or noisy room, you may
notice the Adapto engine activating and at a high volume or
short distance from a speaker and the engine may not be able
to maintain a pleasant audio quality. If feedback occurs, move
away from the speaker or lower either the master volume or the
volume for the microphone that is causing the feedback from the
Teacher Edition Software or FrontRow wall controller.
Control the volume of connected audio devices or individual
microphones via the Teacher Edition software or a FrontRow wall
controller.
Master Volume
Your ezRoom system has a master volume control that
increases or decreases the mixed volume of all devices and
microphones. Master volume can also be increased or reduced
using voice commands
Device Vo lume
Control the individual volume of each device connected to
your ezRoom.
*For best results, the volume on the device itself should be at
least 75% of its maximum volume.
Microphone Volume
You can separately control the volume of each microphone
used with your ezRoom.
NOTE: The ezRoom comes standard with the ability to use
two microphones simultaneously. With the optional Channel
Expansion Module your ezRoom can be used with up to five
microphones simultaneously.
NOTE: When playing music from a device connected to the
Microphone's Audio In jack, select the Music Audio In option
in the FrontRow Teacher Edition software for best audio
performance.
OptiVoice
A powerful tool for test taking, directions and ELL instruction.
Fragile consonant sounds carry 75% of the meaning in speech
but are easily destroyed by background noise. OptiVoice
strengthens these critical sounds, doing the work of a 12-band
equalizer with a single switch.
For low background noise environments and for a more
natural reproduction of your voice, use the low setting. For
environments with higher background noise, use the mid or
high setting. Experiment with the right mix of microphone
volume and OptiVoice setting to find the optimal solution for
your environment.
NOTE: OptiVoice affects microphone audio only; auxiliary
audio sources can be adjusted using the equalizer adjustment
in the optional Teacher Edition software application.
OptiVoice settings can be changed using a FrontRow
controller (if programmed) or using the FrontRow Teacher
Edition software.
PrioriTeach
Use PrioriTeach to have the ezRoom automatically reduce
the volume of all other audio sources including Pass-Around
Microphones when you speak into the Pendant Microphone.
Settings for PrioriTeach are available through the FrontRow
Teacher Edition software.
NOTE: The PrioriTeach feature is only activated by a Pendant
Microphone and only when on channel A or B.
™
™
Voice Command
Your ezRoom can be controlled using your ITM-02 Pendant
Microphone and your voice. See page 6 for details, a list of
available voice commands, and instructions for use.
Voice Command can be used on only one channel at a time.
Set the command channel to A or B depending on the channel
you are using with your Pendant Microphone.
Settings for Voice Command are available through the FrontRow
Teacher Edition software application.
Restore Defaults
Your ezRoom audio settings can be restored to factory defaults
if necessary using the Teacher Edition software.
NOTE: If using a FrontRow wall controller or software to control
your ezRoom, user guides for those products are available at
gofrontrow.com/guides-resources.
5
Page 8

PowerFlex
TeacherTalk
Voice Command
Your ezRoom System lets you remotely control parameters using
a few simple voice commands.
To issue a voice command:
1. Press and hold the Smart Button on the Pendant Microphone.
2. Wait for Voice Command tone and LED on the ceiling to turn to flashing green.
3. Keeping the button pressed, issue one of the commands below.
4. Wait for confirmation tone and LED on the ceiling to return to solid green.
5. Release the button.
For best performance:
• Follow the sequence above precisely when issuing voice command.
• Avoid brushing the microphone against clothing, jewelry, etc. while issuing voice command.
• Speak clearly with a normal conversational tone.
• When issuing the Finish command, wait until the LED returns to solid green before releasing the button.
• Avoid holding the microphone close to the mouth when speaking a command. The microphone is optimized to understand
commands when it is sitting flat on the chest.
NOTE: Voice command works only with the Pendant (teacher) Microphone, and only on either channel A or B.
NOTE: While recording, voice command tone and confirmation tones are not heard so they will not be recorded.
NOTE: In some cases, if the ezRoom does not recognize a command, the LED will remain flashing green for up to 10 seconds.
During this time, audio will not transmit from the microphones.
Say: When you want to:
Increase Increase the volume by 2 steps
Reduce Reduce the volume by 2 steps
Begin Start a recording
Suspend Pause a recording
Finish Stop a recording
Intercom Make an intercom call request
Power Up Turn display on
Shut Down Turn display off
Freeze Screen Freeze/Unfreeze projector image
Blank Screen Blank/Show projector image
Source One Switch AV input
So urce Two Switch AV input
Source Three Switch AV input
Source Four Switch AV input
Source Five Switch AV input
NOTE: Projector/display voice commands must be programmed and installed to work with your equipment.
6
Page 9
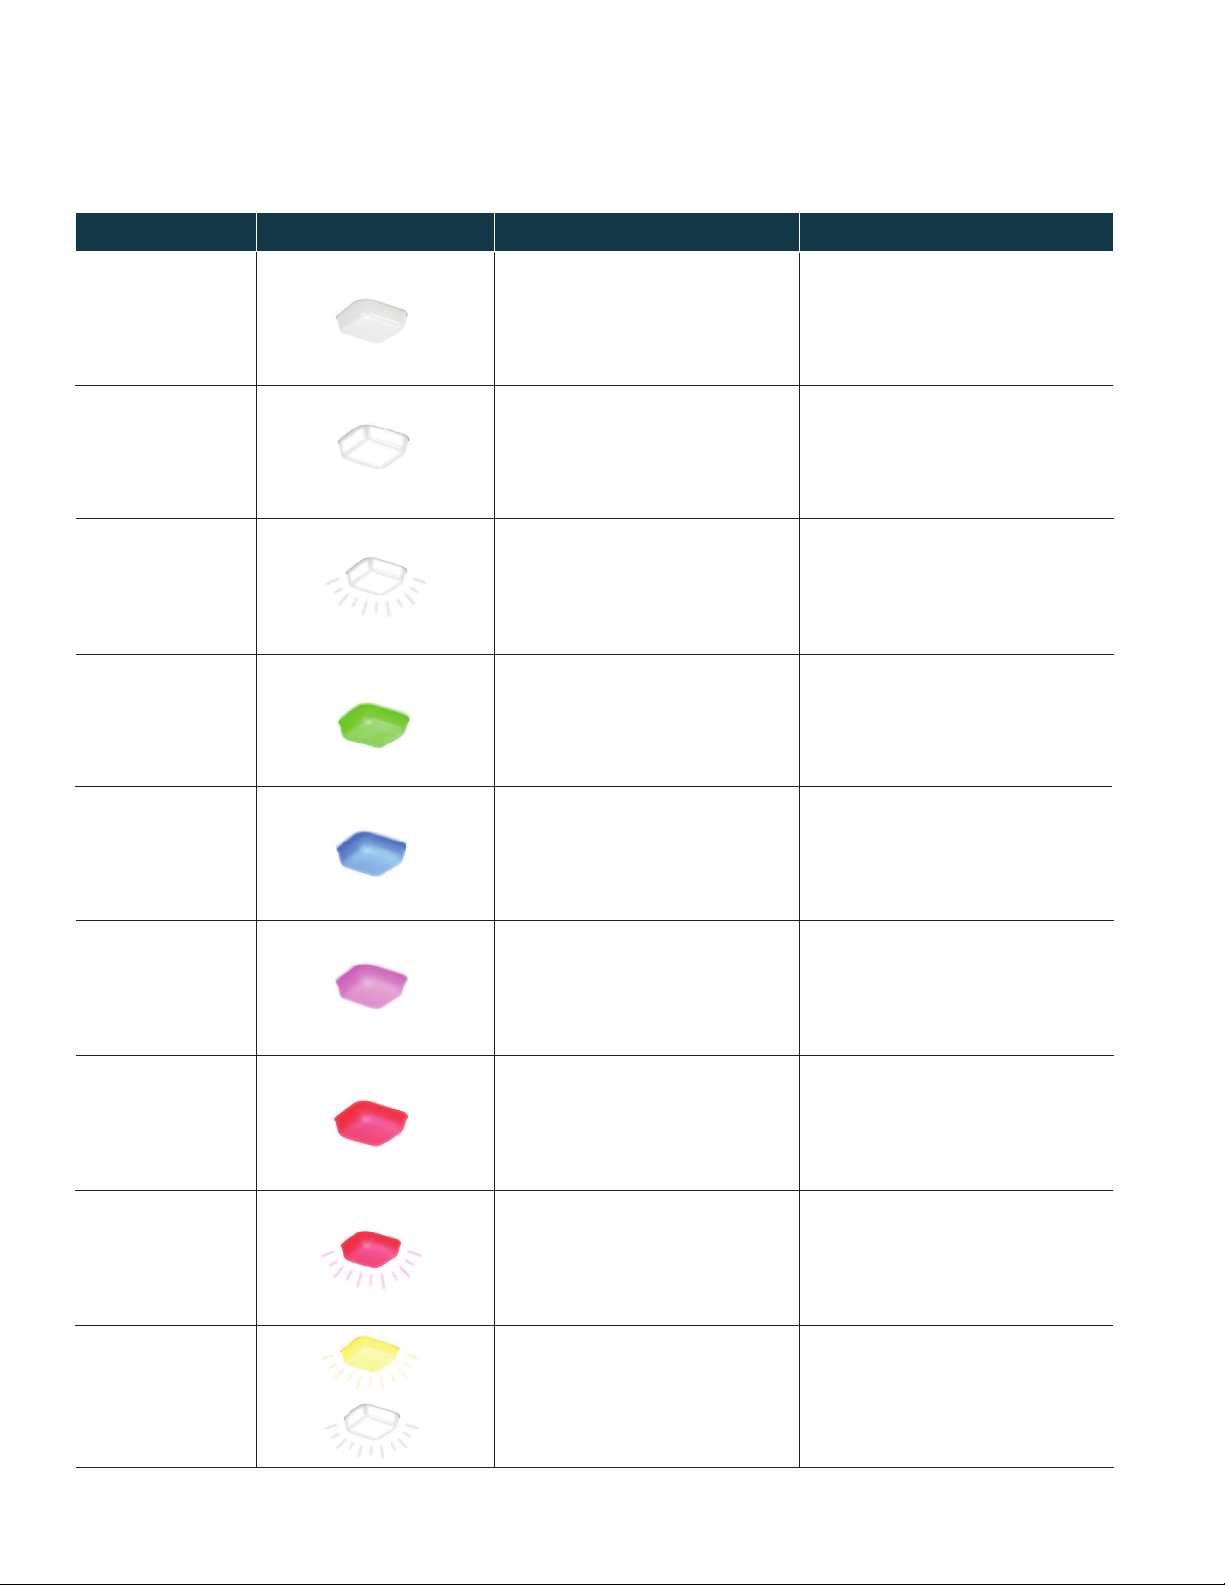
Beacon LED Status Indicator Signals
Your ezRoom is equipped with a status indicator Beacon or LCD which helps you know the status of your device. The color of the
Beacon or LCD will change based on what is happening with your system. It is also possible for your system to be configured to
turn the Beacon off.
Color Beacon Status Notes
No light
White
Flashing White
Green
Blue
Power off/asleep
Power on
System on backup power
Unit on backup PoE
Voice command ready
Intercom call active
Back-up power is an option and
must be installed separately
When used with
FrontRow Conductor
Purple
Red
Flashing Red
Alternating
Yellow/White
Page/Bell/Pre-recorded
message active
Recording active
Recording paused
System re-boot required
7
When used with
FrontRow Conductor
When used with
FrontRow Teacher Edition
Contact your system
administrator
Page 10
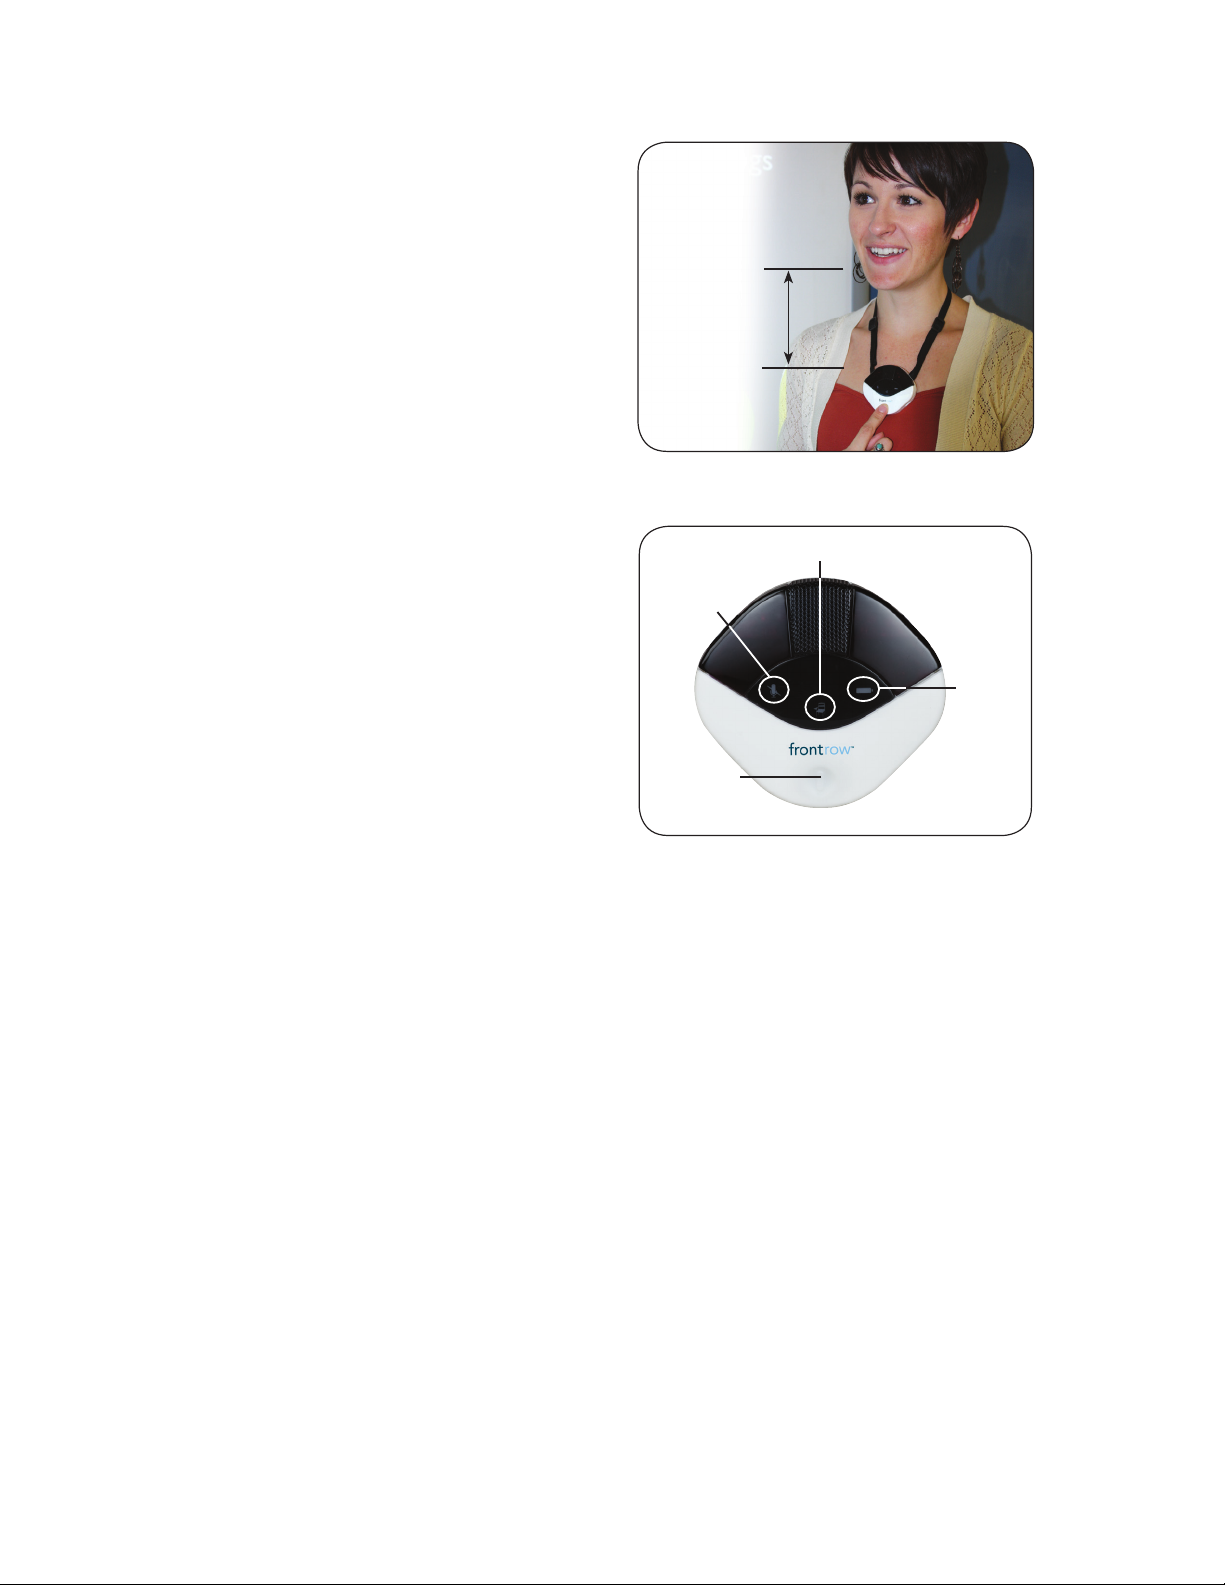
ITM-02 Pendant Microphone
Using
1. Place the microphone around your neck and
connect clasp.
2. Adjust the neck straps to position the microphone
approximately 5in (14cm) from your mouth.
3. Press the Smart Button to wake the microphone. The power
indicator should be green.
NOTE: Your microphone will go into standby mode (off)
automatically after 10 minutes in mute mode or 10 minutes
of silence. Press the Smart Button to wake it.
4. Momentarily press the Smart Button to mute as needed for
private conversations. Mute indicator light will turn red.
5. Press and hold the Smart Button to issue a voice
command or trigger a programmed event. For detailed
instructions on using Voice Commands see page 5.
6. When the battery in your microphone gets low, the battery
indicator will flash red.
7. At the end of the day, charge your microphone.
5in/14 cm
power indicator
mute
indicator
battery
indicator
Smart
Button
8
Page 11
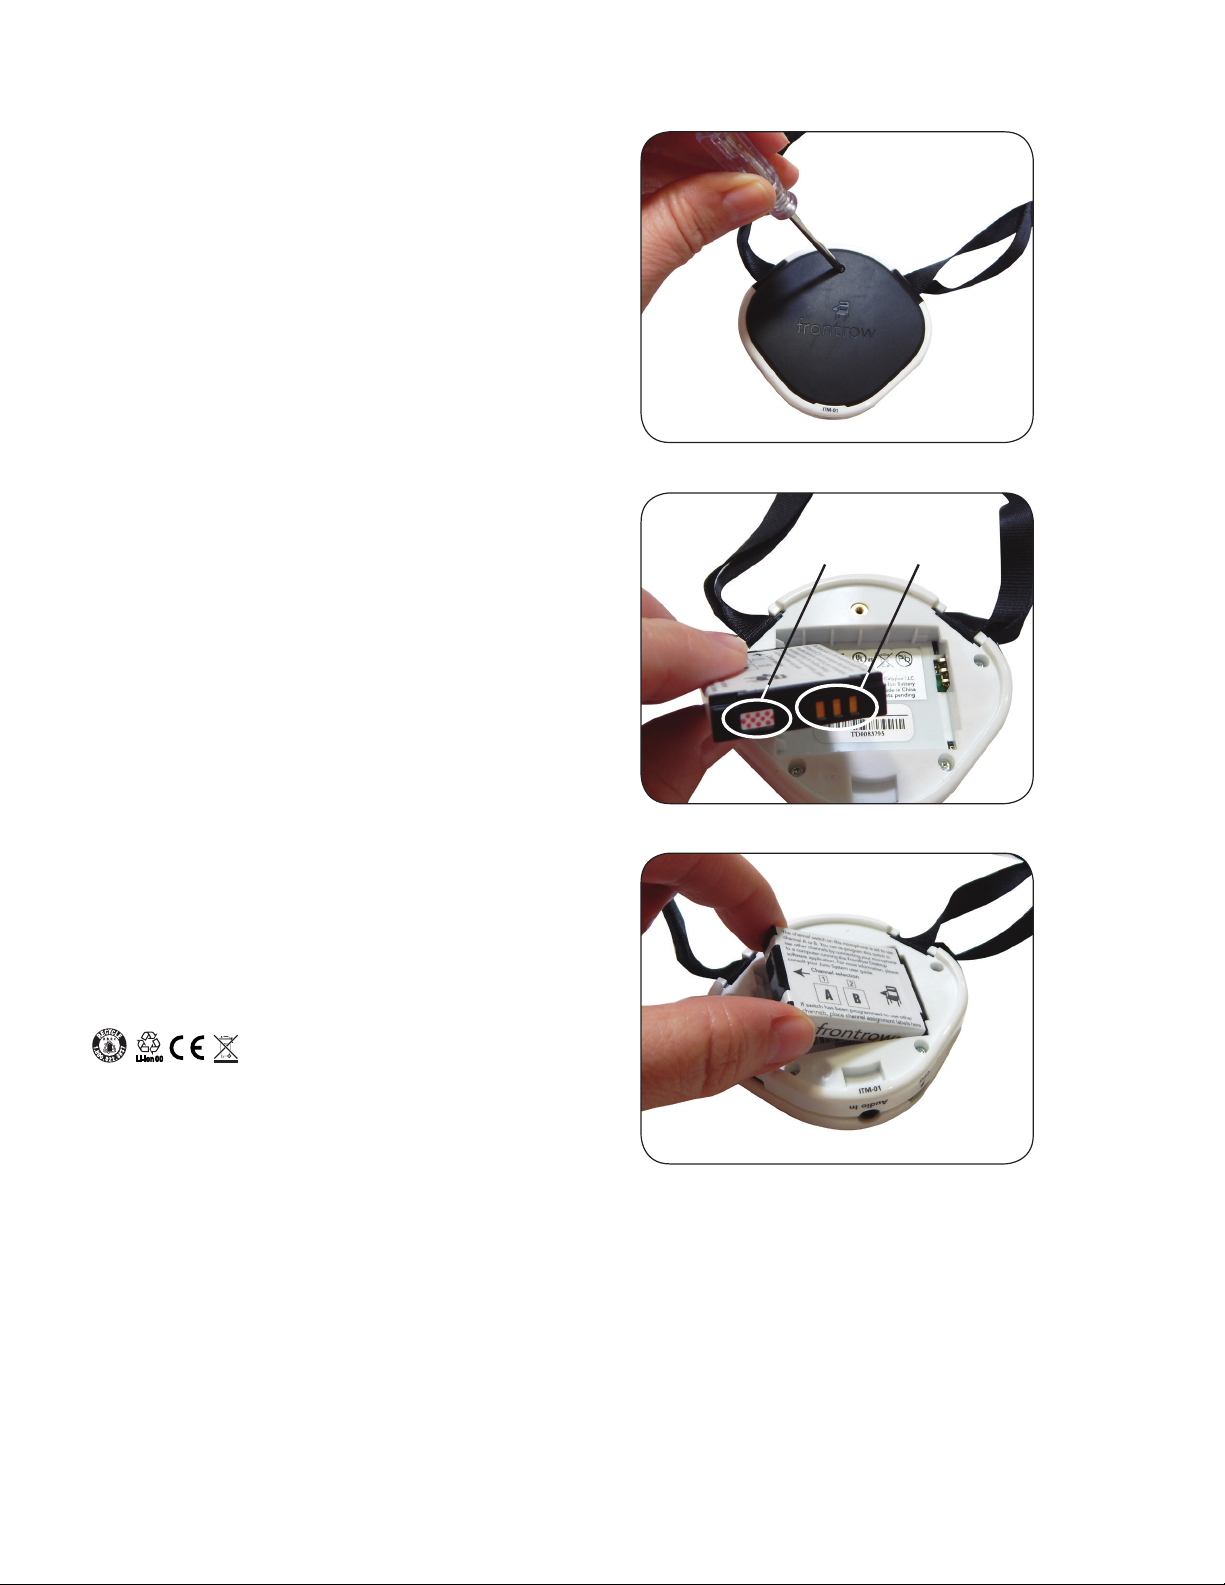
Battery
Installing the battery
1. Unscrew the battery door on the back of the microphone
using the supplied Phillips screwdriver.
2. Locate the charge contacts on the battery and on the
microphone.
3. Insert the battery into the compartment - battery contacts
first, then push the battery into place.
4. Replace the battery door.
5. For best performance, charge the battery in the microphone
overnight before initial use.
NOTE: When the battery is removed, it will take 2-3 charge/
discharge cycles for the battery to report accurate status to the
FrontRow Teacher Edition application.
Battery Safety
Warning: To reduce risk of fire or burns:
• Do not use batteries that have been dropped or otherwise
damaged.
Moisture
indicator
Charge
contacts
• Do not attempt to open, disassemble or service the battery pack.
• Do not crush, puncture or short external contacts or dispose
of in fire or water.
• Do not use the battery if exposed to moisture. When exposed
to moisture, the red checked pattern next to the charge contacts will disappear.
• Do not expose to temperatures above
40°C (104°F)
• Replace only with the battery pack designed for this product.
• Batteries shall not be exposed to excessive heat such as
sunshine, fire or the like, or excessive cold.
9
Page 12
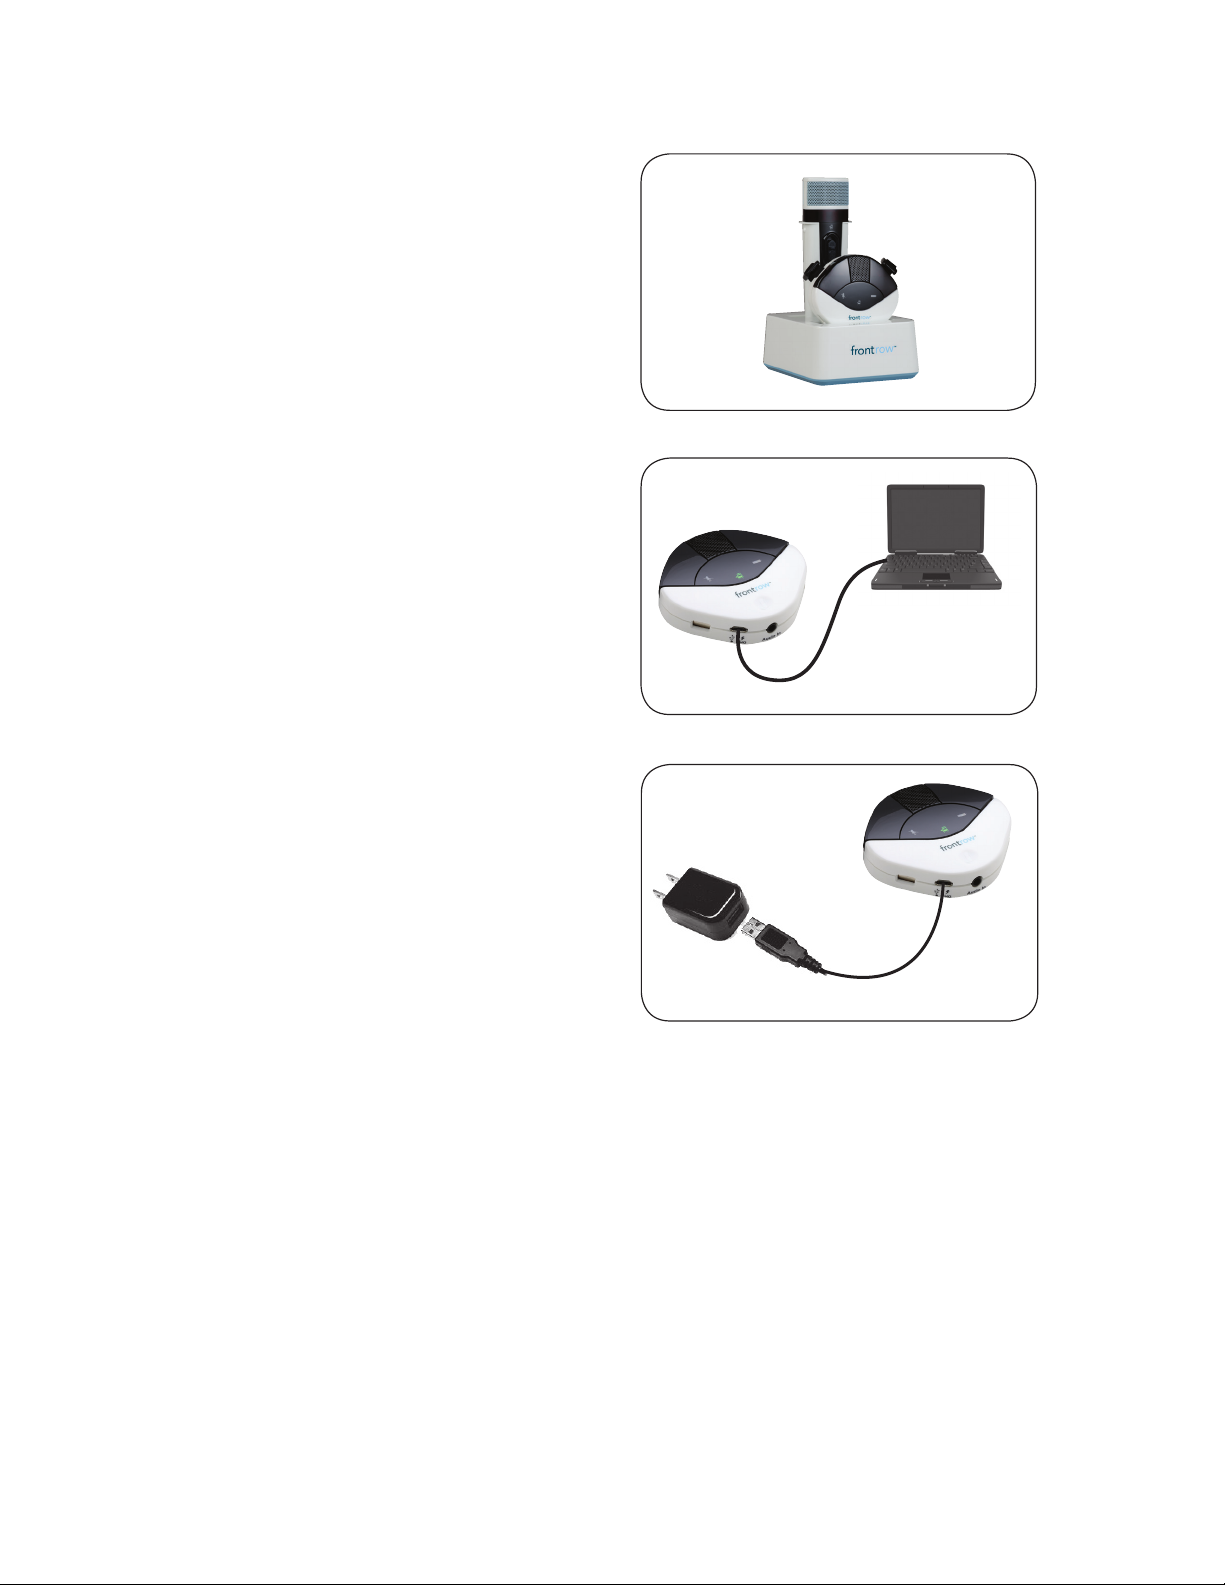
Charging
Charge your battery in one of three ways:
• IMC-01 universal microphone charger (optional).
• USB cable connected to your computer’s USB port*.
• USB cable connected to a USB to AC power adapter.
*NOTE - When charging from a computer USB port:
If using a laptop on battery power and the battery is low, the
ITM-02 microphone will not charge. We recommend that you
always have your laptop plugged in to a power source when
attempting to charge or program your microphone.
The ITM-02 microphone will not charge from a low-power USB
port. If you are having trouble charging from a USB port on
a computer that is plugged in to a power source, try using a
different USB port on your computer.
The ITM-02 microphone will not charge unless you have first
installed the software drivers as part of the FrontRow Desktop,
Teacher Edition or Microphone Settings software application.
To download the application, visit gofrontrow.com/
guides-resources.
IMPORTANT! To maintain proper charging when using the
IMC-01 universal microphone charger, occasionally clean the
charge contacts on the bottom of the microphone using a
cotton swab dipped in rubbing alcohol.
IMPORTANT! To ensure top performance and avoid equipment
damage, batteries should be charged at room temperature.
IMPORTANT! To ensure top performance, FrontRow
recommends replacing rechargeable batteries every
three years.
IMPORTANT! Store the battery properly if it will be unused for a
period of more than 2 weeks.
1. Charge the battery in the microphone for at least 2 hours.
2. Remove battery from microphone, place it
in its own bag or envelope and store in a cool dry place.
3. Recharge battery before next use.
10
Page 13
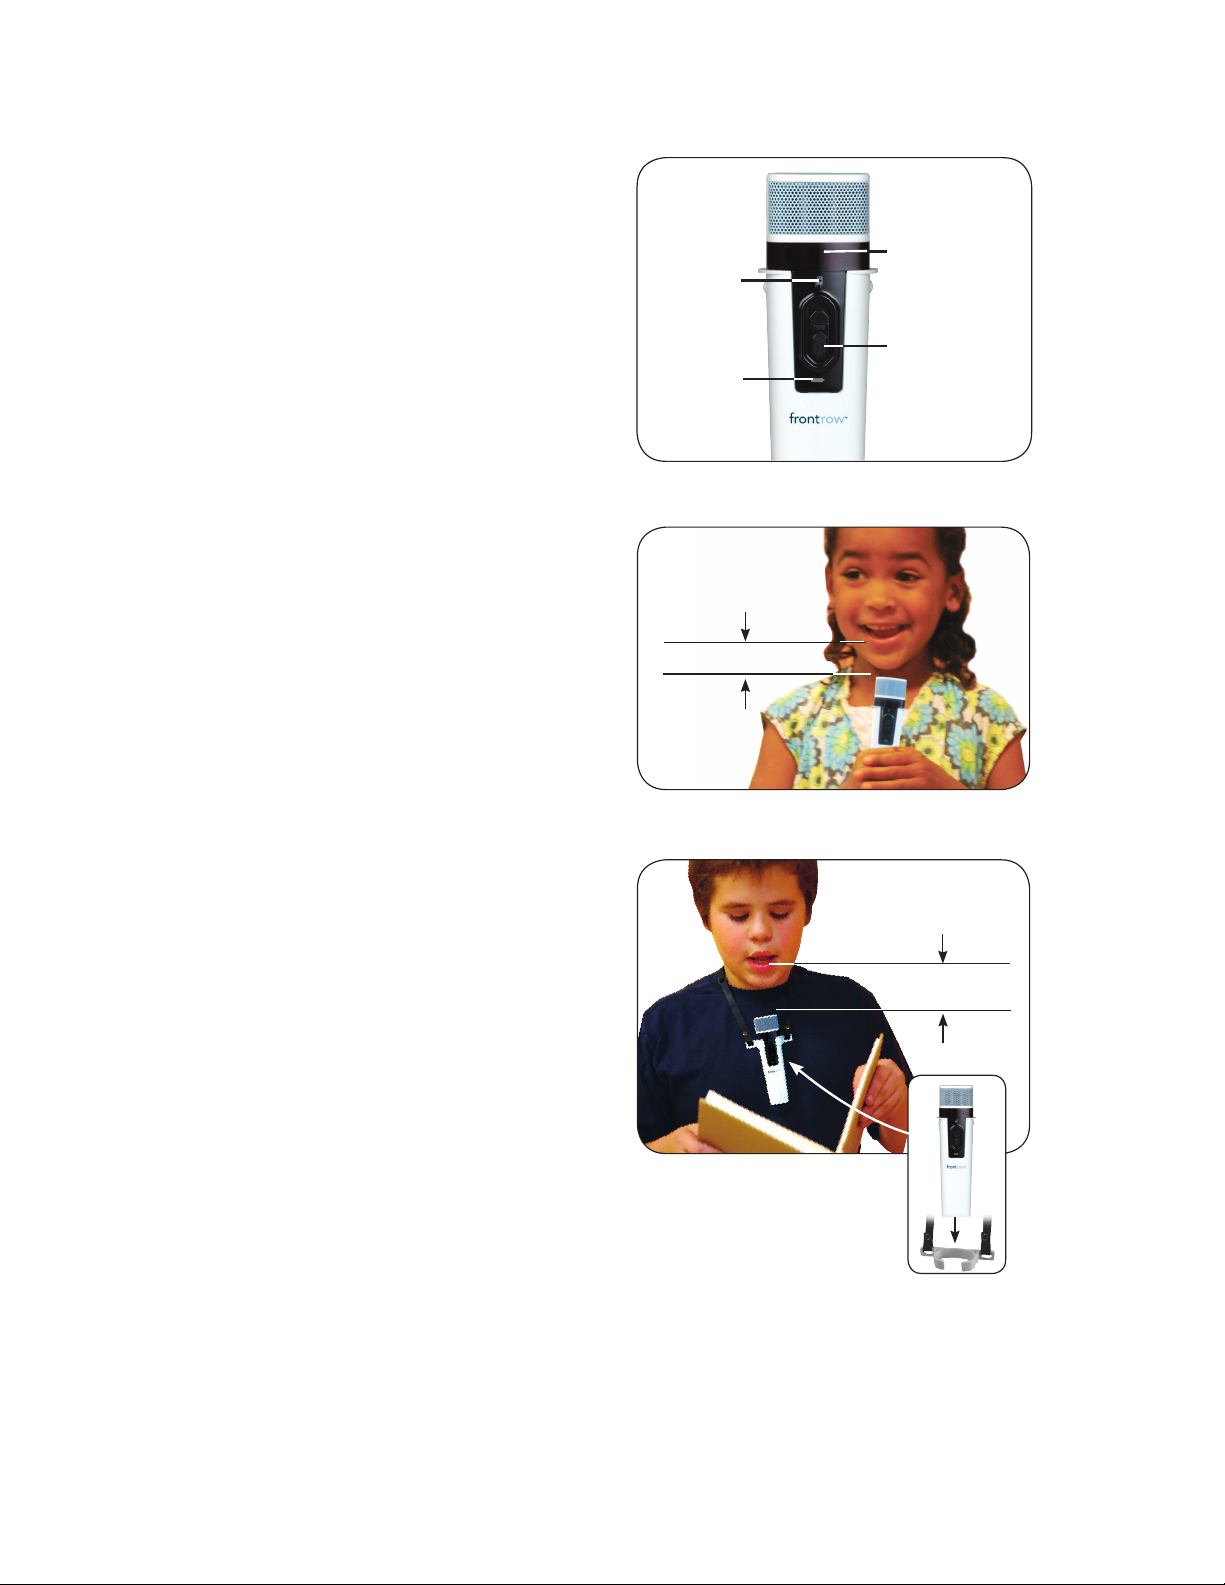
ISM-02 Pass-Around Microphone
Using
1. Turn the microphone on by sliding the Power Switch up.
2. Note Power Indicator (chair icon).
Green = On and transmitting
Off = Power is off
NOTE: In order to conserve battery life, if the power switch
is left on, your microphone will automatically go into Standby
Mode (off) after 10 minutes of silence. Move the switch to the off
position, then back on to reset.
3. Keep the top of the microphone approximately 3 - 4in.
(7.5 – 10cm) from the mouth when using it as a hand-held
microphone.
4. Do not block emitter diodes.
5. To allow hands-free use (for example, when reading aloud
and turning pages), attach the lavaliere clip and neck strap.
Adjust the neck strap to position the microphone approximately 4 - 5in (10 - 13cm) from the mouth.
6. When needed, you can simply push and hold the Power Switch
while talking rather than sliding it into the "on" position. This
makes transitions when passing the microphone between
students easier (e.g., no need to take time from the conversation to turn the mic on and off during transition). For best
results, when using the push-to-talk function, be sure to press
on the lower section of the switch.
Power
indicator
Battery
indicator
3-4in. (7.5-10cm)
Emitter diodes
Power/
Push-to-talk
switch
7. When the battery in your microphone gets low (approximately 1/2 hour of use time left) the battery indicator will
flash red.
8. Turn off the microphone and charge at the end of the day.
(See page 18)
NOTE: The ISM-02 is factory set on Channel B. Each microphone
must be on a separate channel. See Programming and Switching
the Microphone Channels on page 16.
4-5in. (10 -13 c m)
11
Page 14
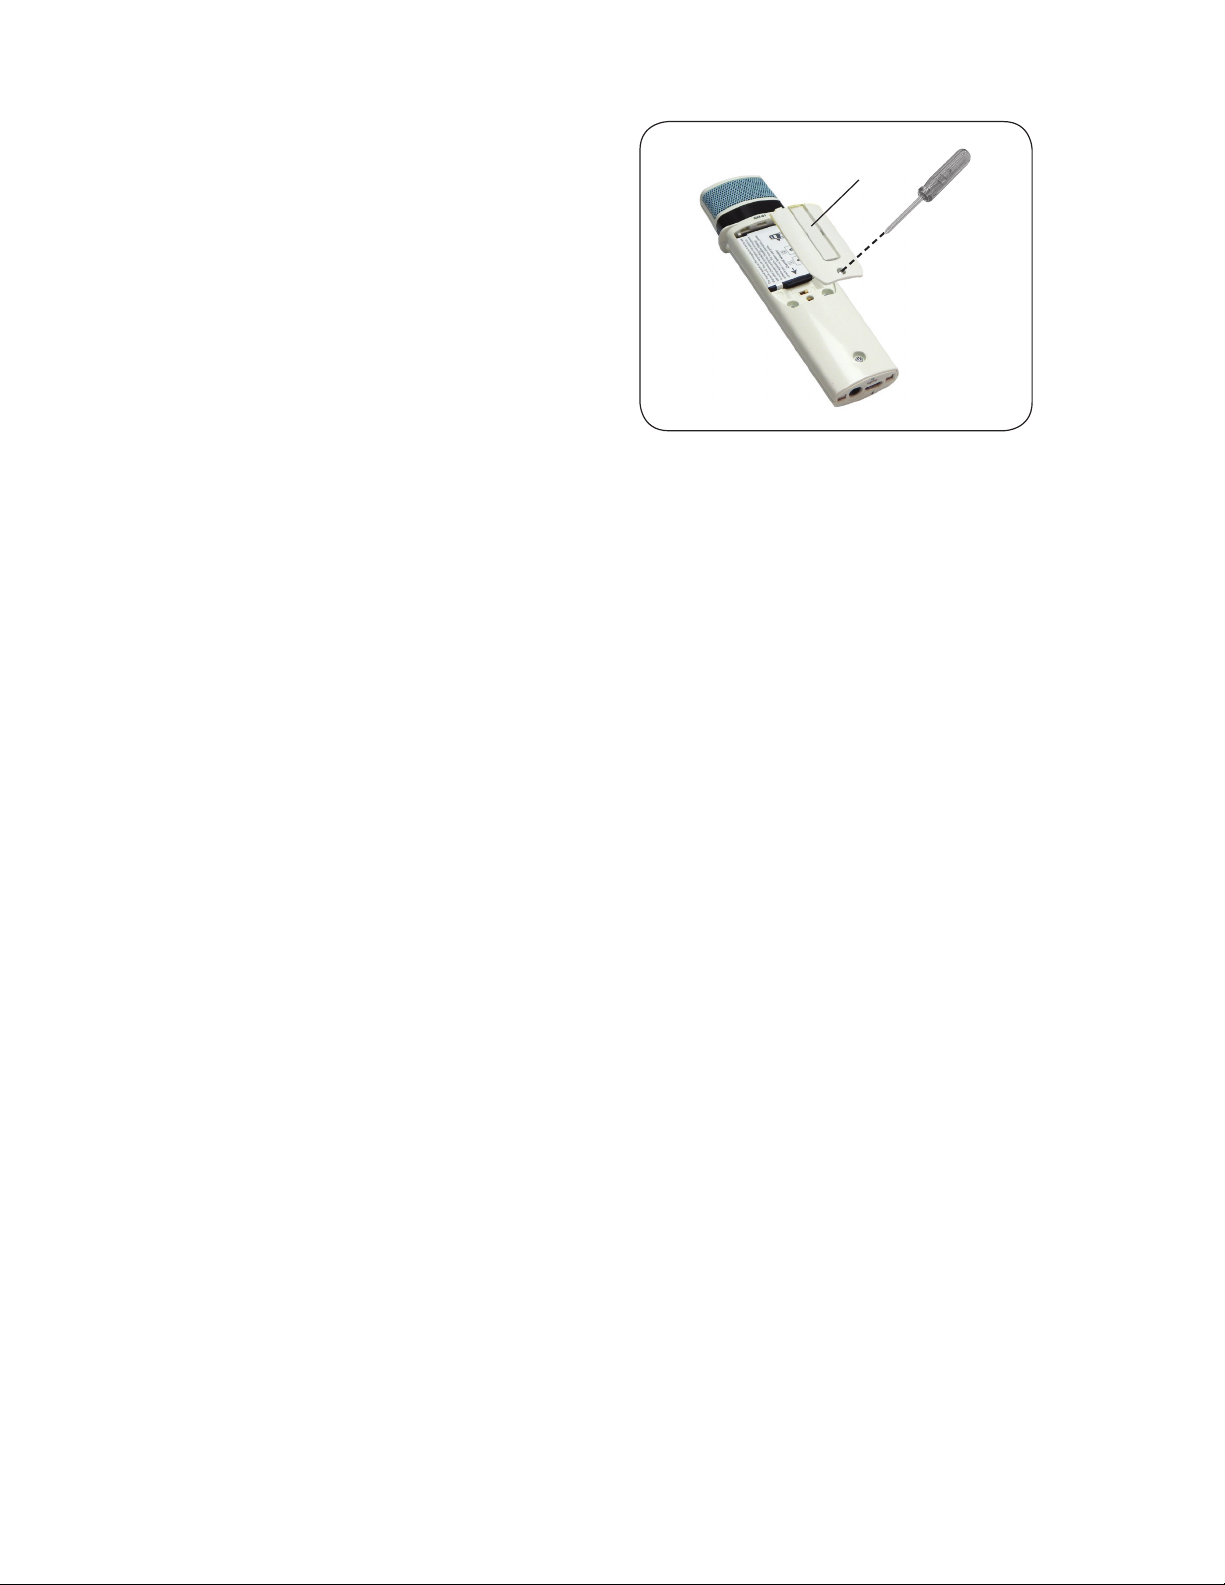
Labeling
Your Pass-Around Microphone includes a location for adding
a name or room number for easy identification.
1. Place the microphone on a stable surface with the battery
door facing up.
2. Remove the battery door using the supplied Phillips
screwdriver.
3. Slide the clear window out of the battery door.
4. Write the name of the microphone on a blank label that came
with your microphone.
5. Place the label in the battery door.
6. Slide the clear window back into the battery door.
7. Replace the battery door and tighten the screw.
clear window
12
Page 15
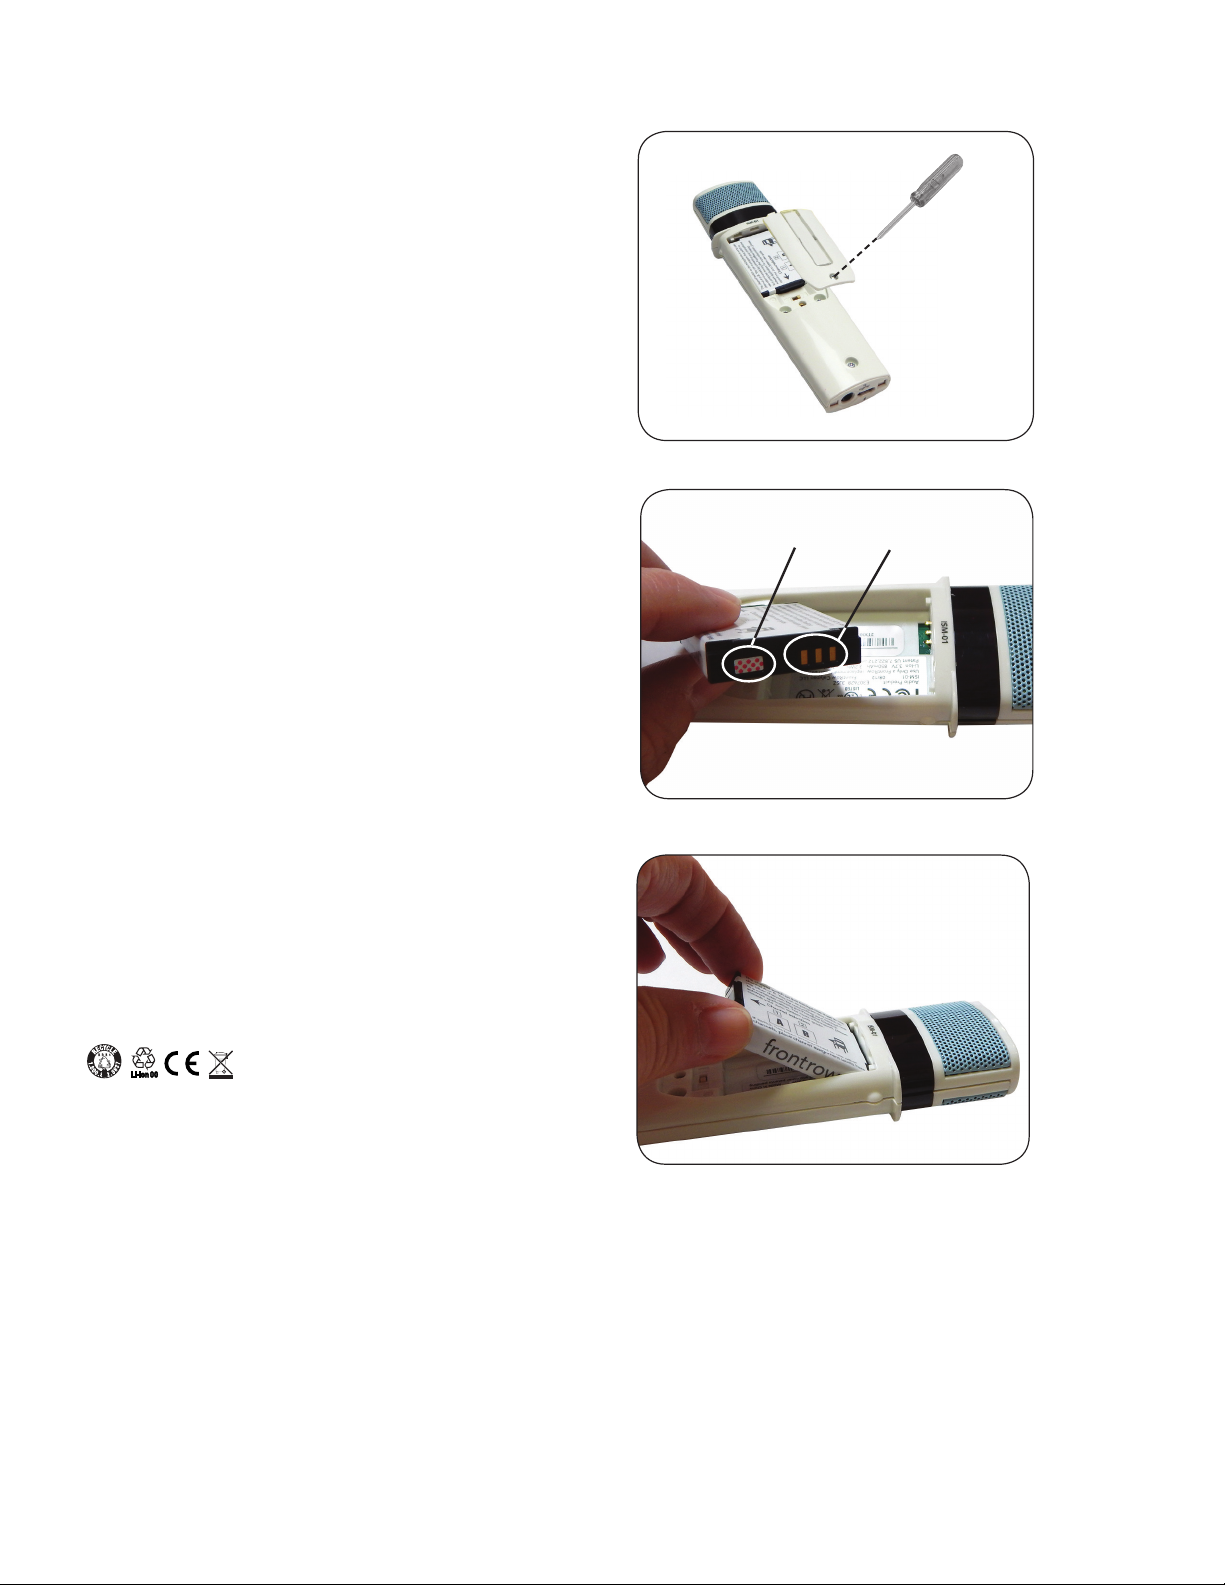
Battery
Installing the battery
1. Unscrew the battery door on the back of the microphone
using the supplied Phillips head screwdriver.
2. Locate the charge contacts on the battery and on the
microphone.
3. Insert the battery into the compartment - battery contacts first,
then push the battery into place.
4. Replace the battery door.
5. For best performance, charge battery in the microphone
overnight before initial use.
NOTE: When the battery is removed, it will take 2-3 charge/
discharge cycles for the battery to report accurate status to
the Teacher Edition application.
Battery Safety
WARNING: To reduce risk of fire or burns:
• Do not use batteries that have been dropped or otherwise
damaged.
Moisture
Indicator
Pass-Around
Microphone
Charge
contacts
• Do not attempt to open, disassemble or service the battery pack.
• Do not crush, puncture or short external contacts or dispose
of in fire or water.
• Do not use the battery if exposed to moisture. When exposed to moisture, the red checked pattern next to the
charge contacts will disappear.
• Do not expose to temperatures above 40°C (104°F).
• Replace only with the battery pack designed for this product.
• Batteries shall not be exposed to excessive heat such as
sunshine, fire or the like, or to excessive cold.
13
Page 16
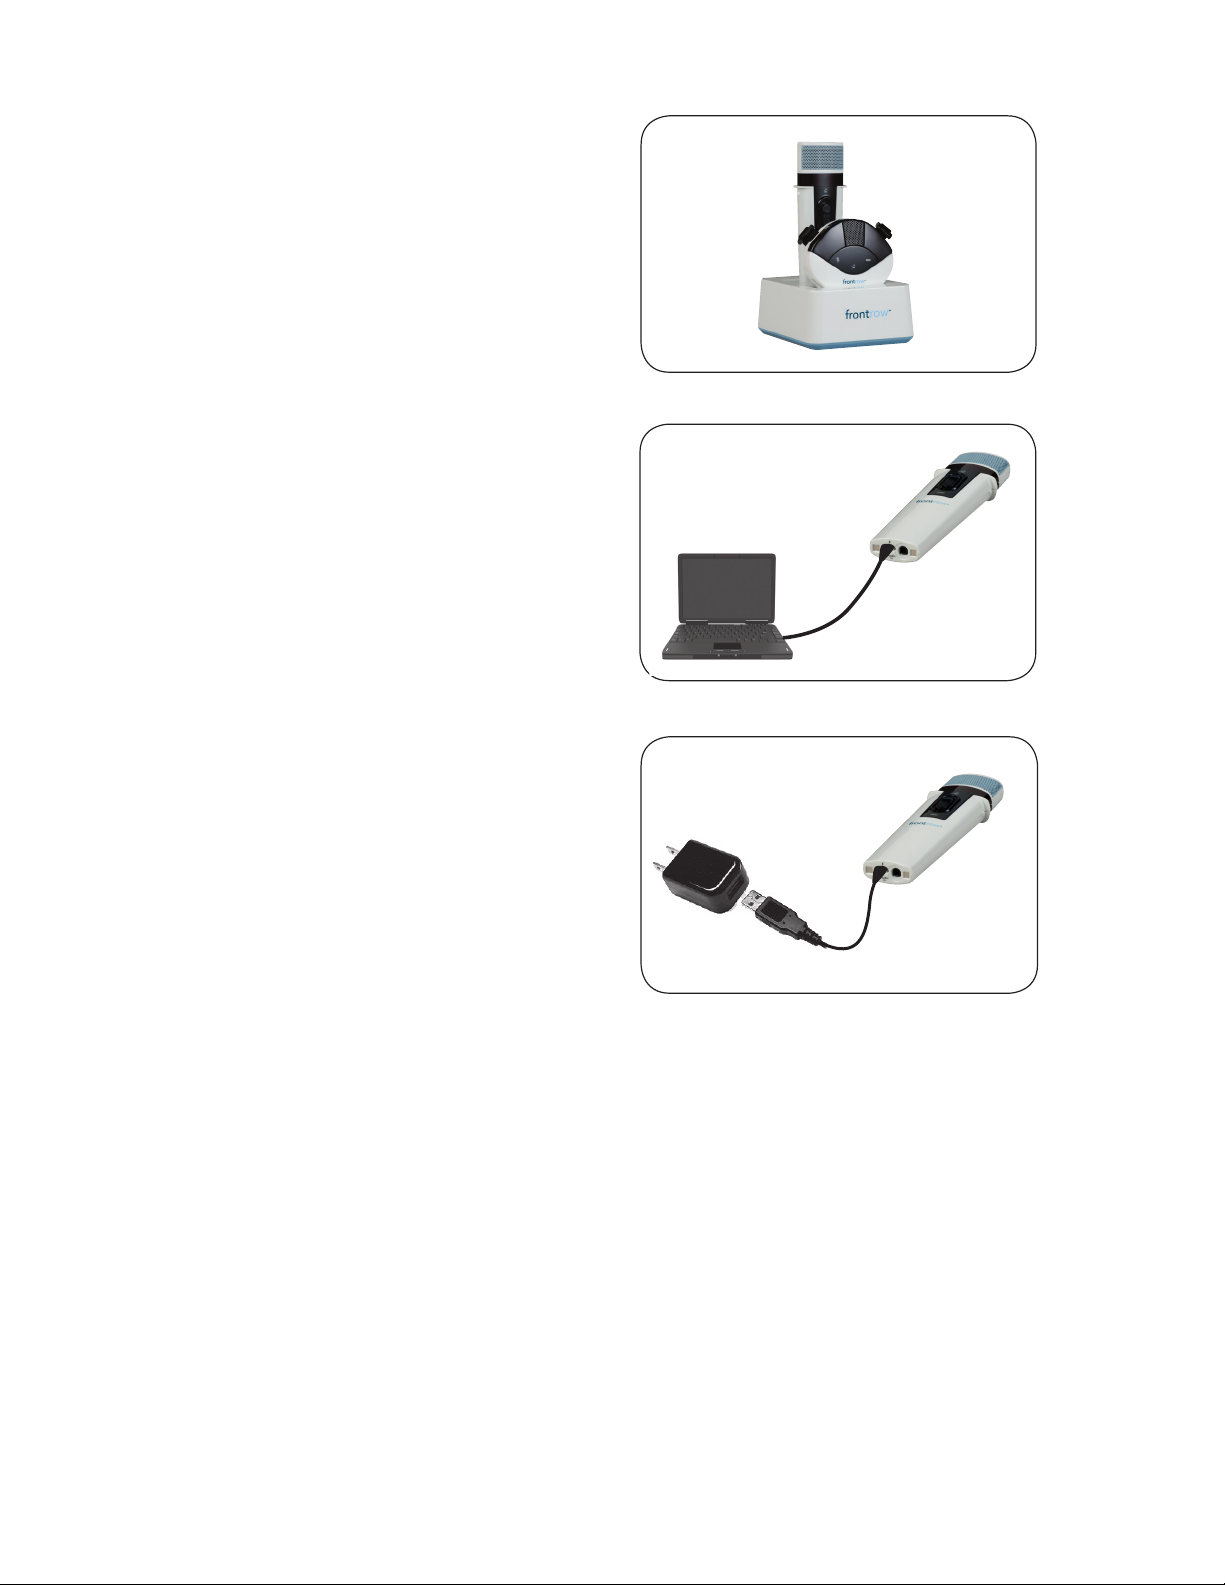
Charging
Charge your microphone in one of three ways:
• IMC-01 universal microphone charger (optional).
• USB cable connected to your computer’s USB port*.
• USB cable connected to a USB to AC power adapter.
*NOTE - When charging from a computer USB port:
If using a laptop on battery power and the battery is low, the
ISM-02 microphone will not charge. We recommend that you
always have your laptop plugged in to a power source when
attempting to charge or program your microphone.
The ISM-02 microphone will not charge from a low-power USB
port. If you are having trouble charging from a USB port on
a computer that is plugged in to a power source, try using a
different USB port on your computer.
The ISM-02 microphone will not charge unless you have first
installed the software drivers as part of the Teacher Edition or
Microphone Settings software application. To download the
application, visit gofrontrow.com/guides-resources.
IMPORTANT! To maintain proper charging when using the
IMC-01 universal microphone charger, occasionally clean the
charge contacts on the bottom of the microphone using a
cotton swab dipped in rubbing alcohol.
IMPORTANT! To ensure top performance and avoid equipment
damage, batteries should be charged at room temperature.
IMPORTANT! To ensure top performance, FrontRow
recommends replacing rechargeable batteries every three years.
IMPORTANT! Store the battery properly if it will be unused for a
period of more than 2 weeks.
1. Charge the battery in the microphone for at least 2 hours.
2. Remove battery from microphone, place it in its own bag or
envelope and store in a cool dry place.
3. Recharge battery before next use.
14
Page 17
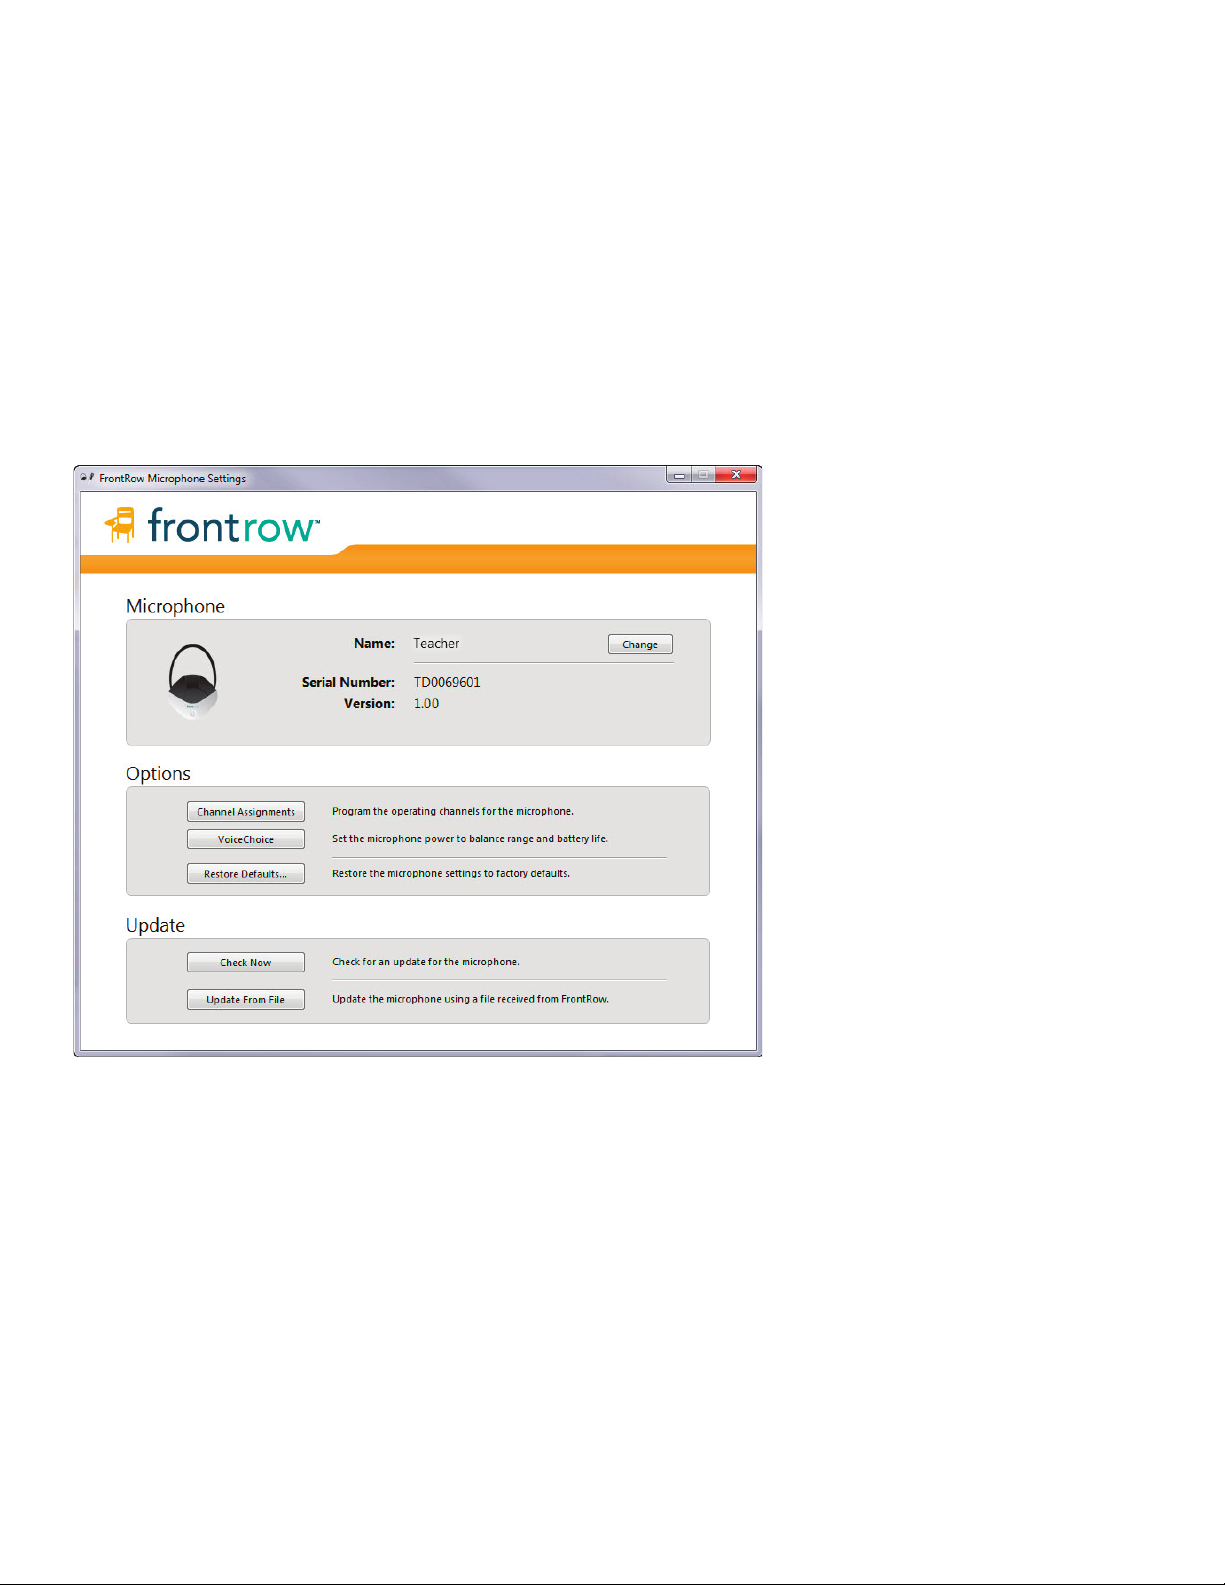
Microphone Configuration
Your microphones can be configured using the FrontRow Microphone Settings application*.
Microphone name – You can name your microphone for display in the Teacher Edition Software, making it easier to identify when
changing volume.
Channel assignment – Assign the operating channels for your microphone.
VoiceChoice – Set the balance of microphone range and battery life that's right for you. Increase range when you need it for use in
large or odd shaped rooms. Increase battery life when you need more talk time from your microphone.
Restore defaults – Restore the microphone settings to factory defaults.
Firmware updates – From time to time, FrontRow may make improvements or enhancements to your microphone's firmware. Use this
function to periodically check for updates.
* The Microphone Settings application is available at gofrontrow.com/guides-resources.
15
Page 18
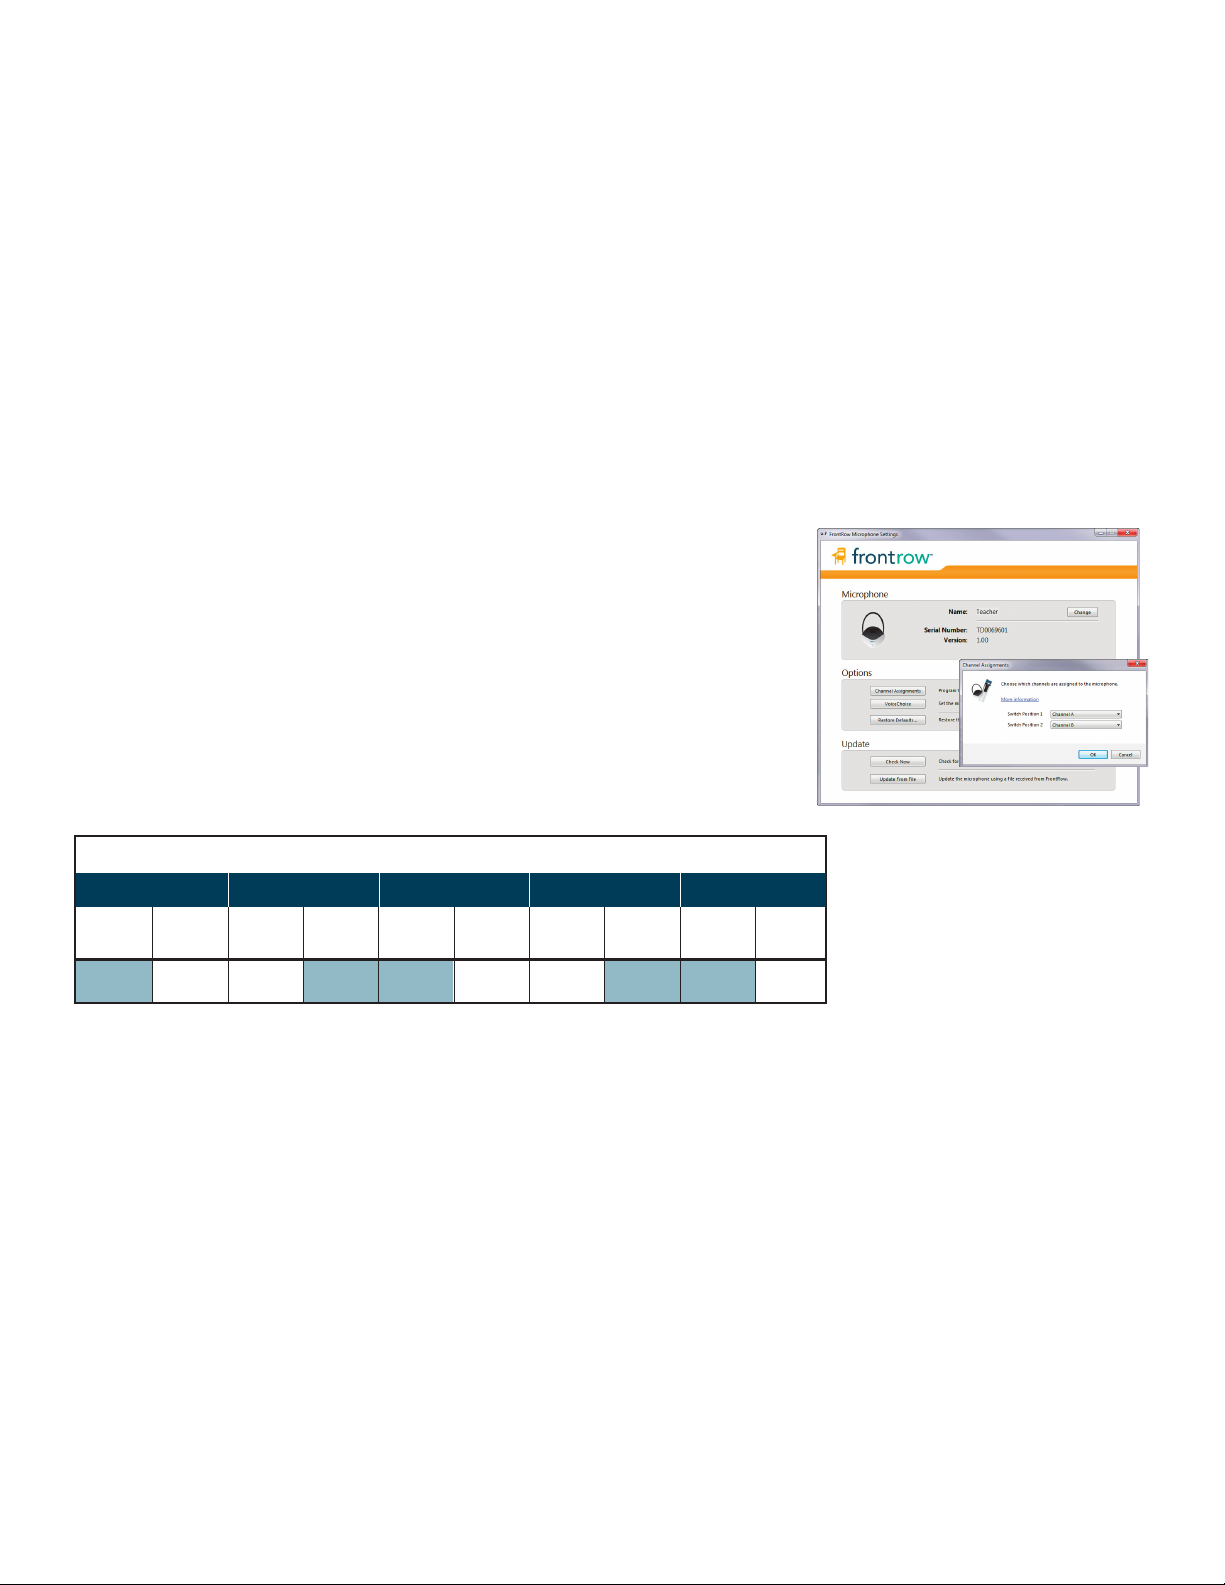
Using Multiple Microphones
Your ezRoom system is designed to receive up to 5 microphone signals at once*. Any combination of Pass-Around and Pendant
Microphones is possible. For example, use two Pendant Microphones (one for a teacher and one for a teacher’s aide) and three PassAround Microphones for students, or one Pendant Microphone for a teacher and four Pass-Around Microphones for students.
Microphones must be on different channels or interference will occur. You can quickly program them to properly operate
on different channels.
NOTE: If you are using the ITM-02 Pendant Microphone with just one ISM-02 Pass-Around Microphone, you probably don't need to
program or set anything. The ITM-02 Pendant Microphone is factory set to transmit on channel A and the ISM-02 Pass-Around
Microphone is factory set to transmit on channel B.
If you have the Channel Expansion Module installed system and are using multiple microphones, you must assign channels using
the Microphone Settings software and set mic switch positions so that each ITM-02 Pendant and ISM-02 Pass-Around Microphone
transmits on a unique channel. Use the Recommended Channel Setting guide below to program channels and choose switch positions
for your microphones.
Programming and switching the microphone channels
1. Use a USB cable to connect the microphone to a computer with the FrontRow
Microphone Settings software application** installed.
2. Open the Microphone Settings software application.
3. Click the Microphone Settings button.
4. Click the Channel Assignments button.
5. Using the drop down choices on the right, assign the desired channels
to the switch positions (see guide below) and click OK.
Recommended Channel Setting
Microphone 1
Switch Switch Switch Switch Switch Switch Switch Switch Switch Switch
Position Position Position Position Position Position Position Position Position Position
1 2 1 2 1 2 1 2 1 2
A B A B C D C D E C
*The ezRoom comes standard with 2 channels. Add 3 additional channels with the optional Channel Expansion Module.
** The Microphone Settings application is available at gofrontrow.com/guides-resources.
Microphone 2 Microphone 3 Microphone 4
Microphone 5
16
Page 19
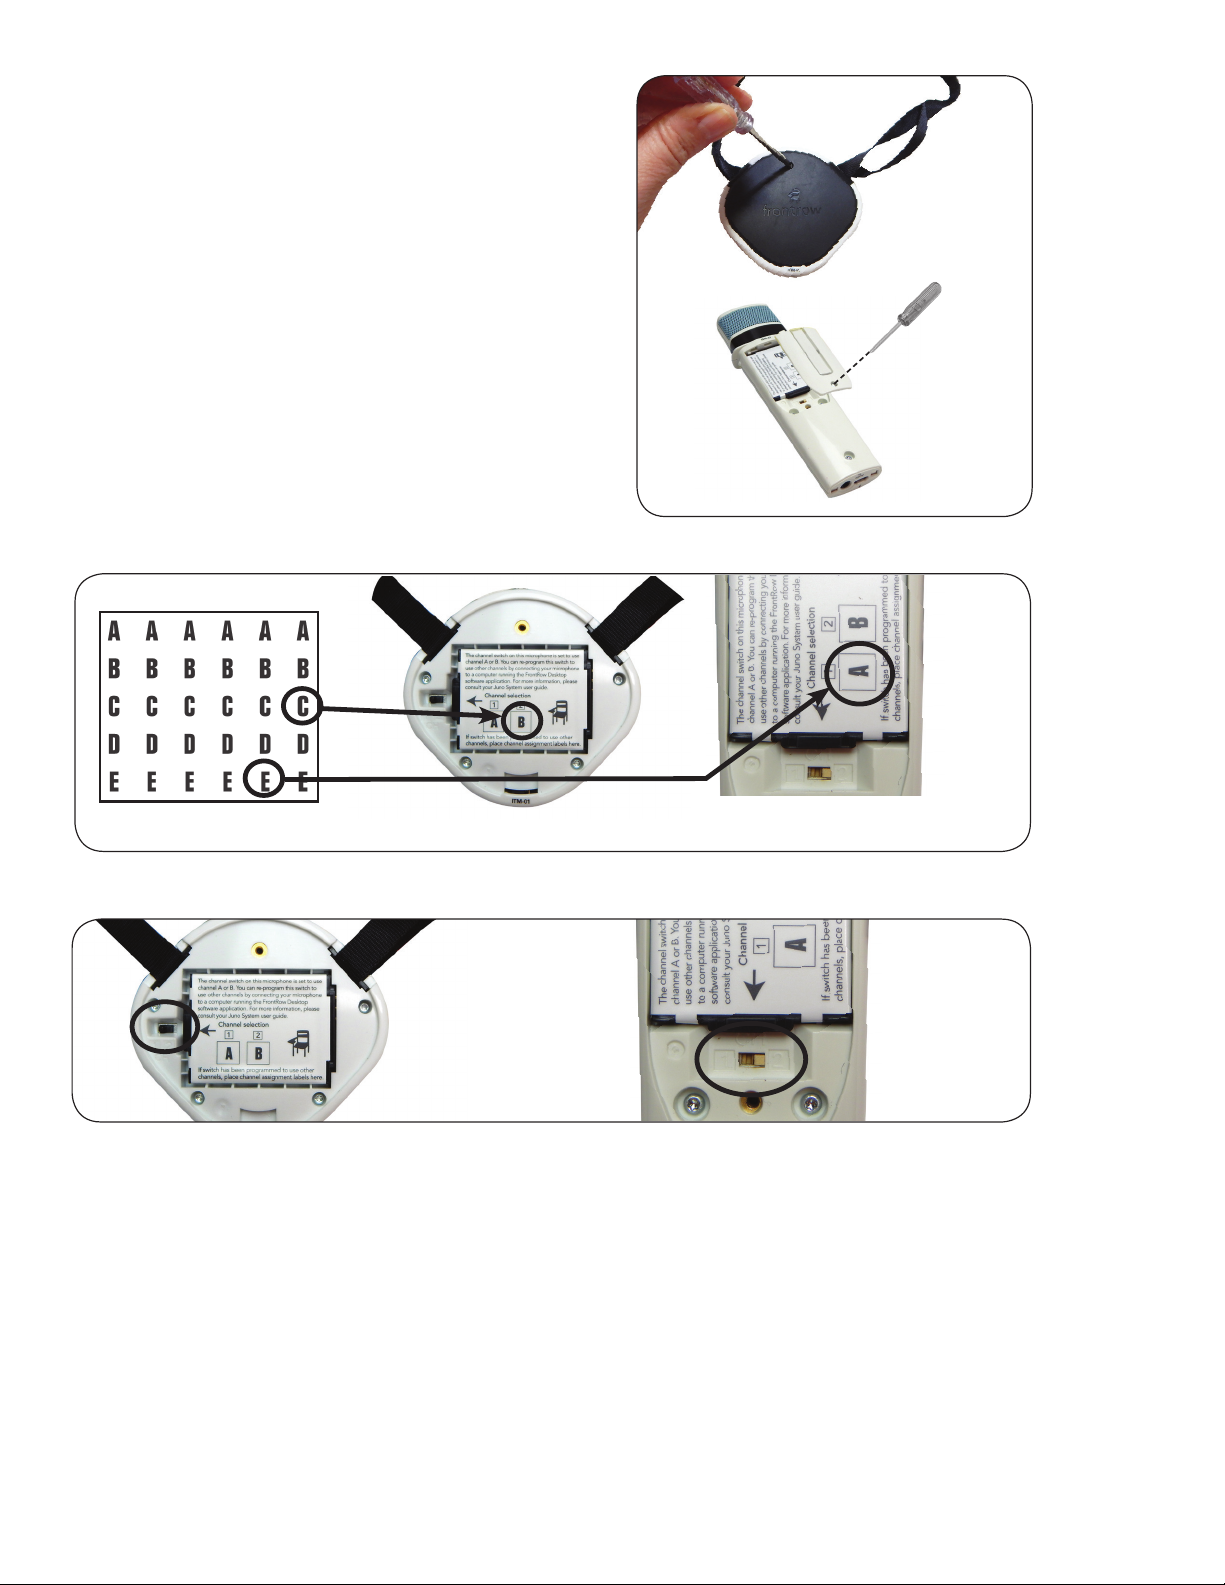
6. Unscrew battery door using the supplied Phillips screwdriver.
7. Using the channel indicator labels included with your
microphones, label the switch positions you've just
reprogrammed.
8. Move the selection switch to the channel you want to use –
ideally, the one indicated in the shaded column in the table
on page 16.
9. Close and screw down battery door.
Channel Label Sheet
Pendant
Microphone
Pass-Around
Microphone
Pendant Microphone
Pendant
Microphone
Pass-Around Microphone
Pass-Around
Microphone
17
Page 20
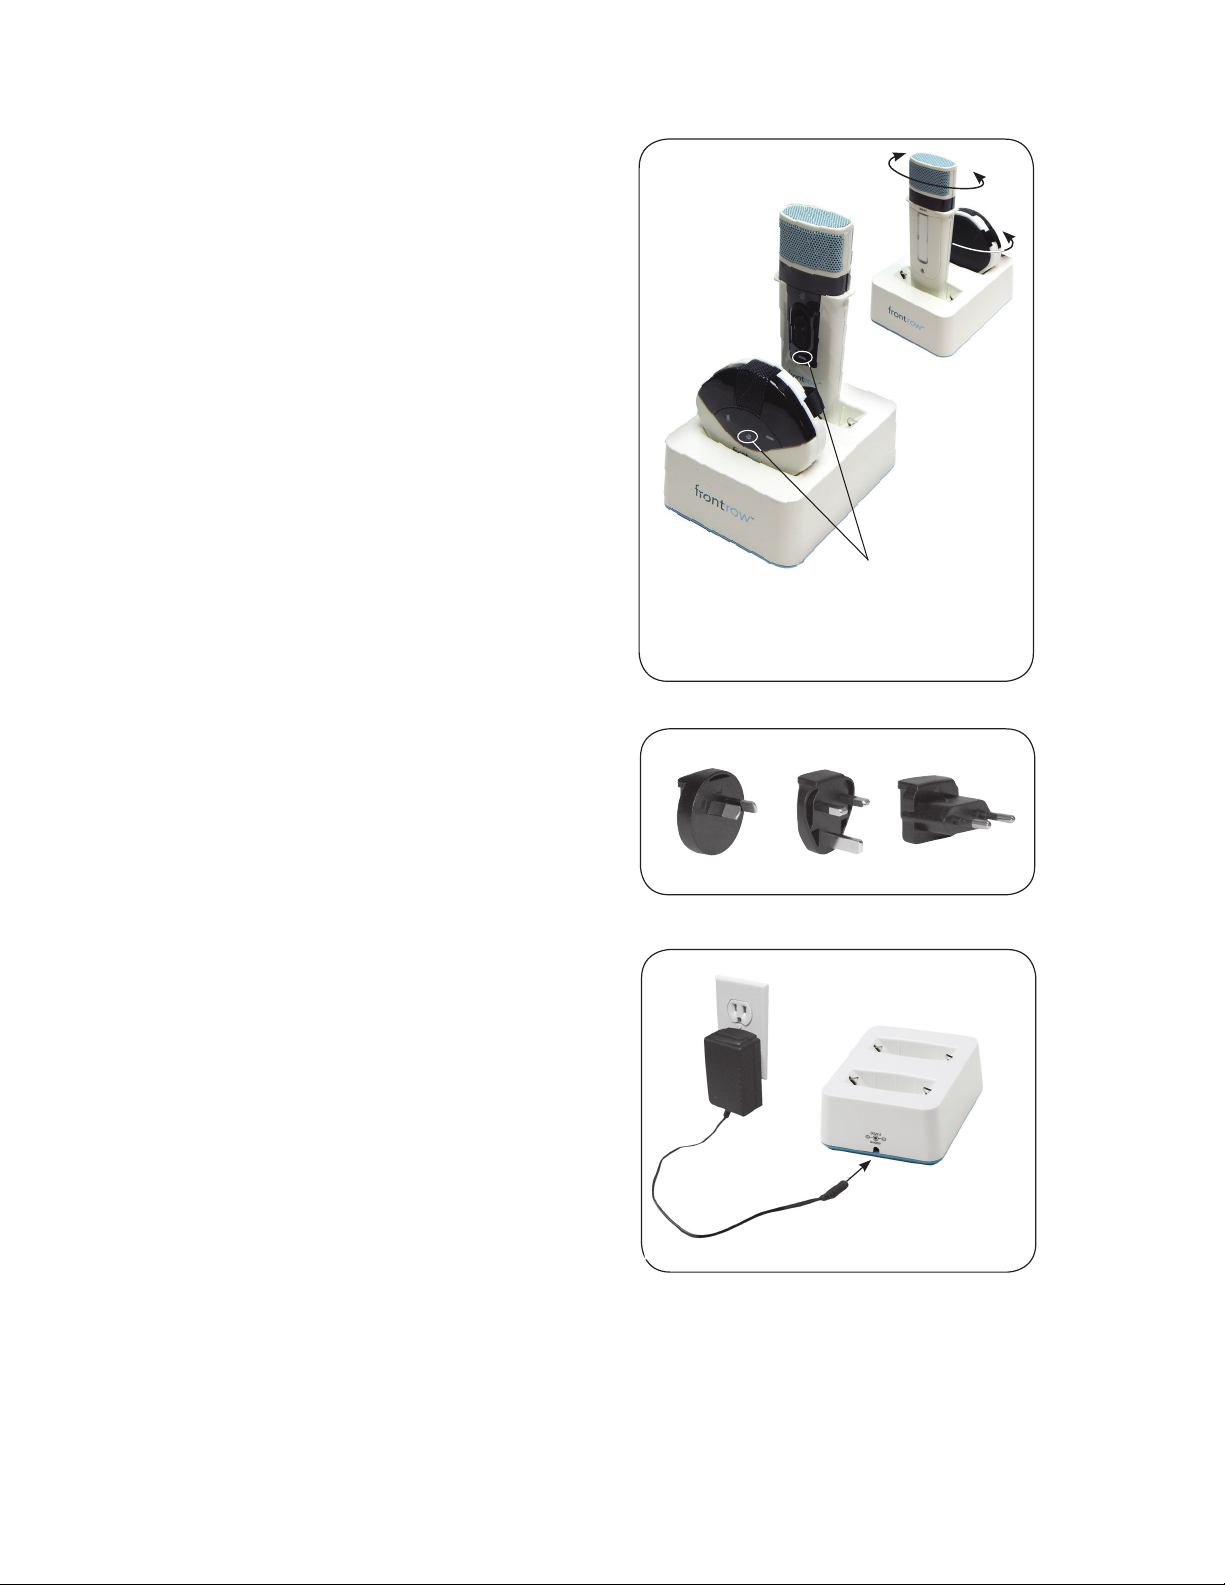
IMC-01 Microphone Charger
Charger setup
1. Insert microphones in either of the two charge pockets.
2. Find the power plug that is appropriate for the power outlet
style in your country.
3. Slide power plug onto the power supply.
4. Plug the power supply into the power outlet and into the
back of the charging base.
Battery Indicator
When Charging:
SOLID RED = Charging
SOLID GREEN = Fully Charged
Charger back
Power
Jack
18
Page 21

Troubleshooting
Microphone will not charge from the USB jack on my
computer
• Verify that you have the microphone drivers installed. To install
the drivers, you will need to install the FrontRow Microphone
Settings application or Teacher Edition application.* You may
need to reconnect your microphone after installation.
• If using a laptop computer, verify that it is plugged into a
power outlet.
• If using a computer (desktop or laptop) that is plugged into
a power outlet, you may be using a low power USB jack. Try
other USB jacks on the computer.
Microphone is not recognized by my computer
• Verify that you have the microphone drivers installed. To
install the drivers, you will need to install the FrontRow
Microphone Settings application or the FrontRow Teacher
Edition application*. You may need to reconnect your
microphone after installation.
All the lights are flashing on my Pendant or Pass-Around
Microphone
• If all lights are flashing after attempting a firmware update,
open the Microphone Settings application and connect the
microphone to the computer with the USB cable. After a
short time, a message will be displayed that the microphone
needs to be updated. If this message is not displayed,
disconnect the USB cable and remove the battery (see
pages 9 and 13). After about 15 seconds, replace the battery
and battery door and then reconnect the USB cable to the
computer and microphone. The following message should now
be displayed: Click Start Update to proceed. The microphone
will have the original version of the firmware installed. After this
completes, click Check Now to update the microphone to the
current version of the firmware.
No signal reception
• Check that the microphone is on
• Check that the microphone is not muted (see page
(ITM-02 only).
• Verify that you are not blocking either the emitters on the
microphone or the sensors on the wall or ceiling.
• If reception is interrupted when facing a certain direction,
install an additional sensor in that area of the room (see
Installer Guide) or adjust VoiceChoice settings (see page
• If using more than one microphone, verify that they are not
on the same channel
’Dead spots’ or
• Verify that you are not blocking either the emitters on the
microphone or the sensors installed on the ceiling or wall are
not being blocked.
• If reception is interrupted or noisy when facing a certain
direction, install an additional sensor in that area of the room
(see Installer Guide) or adjust VoiceChoice settings
(see page
• If using more than one microphone, verify that they are not
on the same channel
• There may be "noisy" electrical wiring. Install an AC line filter.
Feedback (squealing)
•
Lower the Microphone or Master volume.
• Position the microphone closer to mouth.
Weak or no output from speaker(s)
•
Increase t
• Position the microphone closer to mouth.
• Verify that the microphone is on and not muted.
15
).
he Master, Device or Microphone Volume control
(see page 16-17)
microphone crackling/noise
(see pages 16-17)
(see pages 8, 11)
.
.
.
8
)
15
).
The Battery Indicator on the Pendant or Pass-Around
Microphone is flashing green/red
•
Make sure the unit is not excessively hot or cold.
•
Remove microphone from charger for 5 minutes and then
try again.
•
The battery needs to be replaced
The Push-to-Talk function is not working on the Pass-Around
Microphone
•
Verify you are pressing on the lower section of the switch (see
page 11).
•
Verify the battery is charged.
*Available at www.gofrontrow.com/guides-resources
High- or low-pitched whine or hum coming through speakers
•
There may be a ground loop with the system. Install a ground
loop isolator.
• There may be "noisy" electrical wiring. Install an AC line filter..
Charging light won't come on
•
Check that the charger is connected to a working power outlet.
When playing audio from an audio device such as an
™
iPhone
noise through the speakers
•
19
or other MP3 player, I can hear background
Your device may be emitting a low level hum that is amplified
by the ezRoom. Use a filtering cable such as a ground loop
isolation transformer cable to eliminate or reduce the noise.
Page 22

My voice commands are not being recognized
•
Make sure there is not excessive background noise while
issuing command
•
Make sure the microphone is not being moved around,
brushing on clothing, buttons or jewelry.
•
Make sure you are following the correct sequence when issuing
command
(see page 6).
PrioriTeach not working
•
Adjust the drop down level from the FrontRow Teacher Edition
software application.
•
Verify that PrioriTeach is turned on using the FrontRow Teacher
Edition software application.
•
Increase the volume level for the Pendant Microphone.
The Beacon on the ceiling is flashing yellow/white
•
The system requires a reboot.
20
Page 23
Regulatory
receiver: part 15, subpart A
FrontRow ICR-01 Receiver ICR-01
FrontRow Transmitter ITM-02
FrontRow Transmitter ISM-02
Tested to comply with
FCC Standards
FOR HOME OR OFFICE USE
This equipment has been tested and found to comply with the
limits for a Class A digital device, pursuant to Part 15 of the FCC
Rules. These limits are designed to provide reasonable protection against harmful interference in a residential installation. This
equipment generates, uses and can radiate radio frequency
energy and, if not installed and used in accordance with the
instructions, may cause harmful interference to radio communications. However, there is no guarantee that interference
will not occur in a particular installation. This product conforms
to the essential requirements of European Union Directive /
EU Directive 2004/108/EC EMC Directive and 2002/95 ROHS
Directive. This product can be subject to interference at our
operational frequency bands of 2.1, 2.4, 2.8, 3.3, and 3.6 MHz.
Electrical and electronic equipment (EEE) contains
materials, components and substances that could
be dangerous or detrimental to human health and
the environment if waste electrical and electronic equipment
(WEEE) is not disposed of correctly. Products marked with the
crossed-out dustbin shown here are electrical and
electronic equipment. The crossed-out dustbin indicates that waste electrical and electronic equipment
may not be disposed of with unsorted household
waste and that it must be collected separately. In developing and manufacturing your FrontRow Calypso LLC product,
we used high-quality materials and components that can be
reused. Thus, when disposing of your waste electrical and
electronic equipment, you must use a collection system designated for this purpose, regardless of whether you dispose of
your waste at your local waste site or it is collected from your
home. Please contact your local authority for further information.
IC notes
This Class A digital apparatus complies with Canadian ICES-003.
Cet appareil numérique de la classe A est conforme à la
norme NMB-003 du Canada.
The term "IC:" before the radio certification number only signifies that Industry of Canada technical specifications were met.
FCC notes
The ICR-01 system is approved by the FCC (Federal
Communications commission). The use of the system may be
governed by specific FCC rules and FCC licensing or notifications may be required. Consult your local FCC office for
detailed information. FrontRow Calypso LLC receivers and
transmitters, when required, are approved by the Federal
Communications Commission (FCC) in the U.S. and Industry
Canada. Other government approvals are available upon
request. (Other international regulations may also apply.) Any
changes or modifications made to any government-approved
element of this instrument, without the express approval of
FrontRow Calypso LLC in writing, could void the user's authority to operate those elements of the system.
This product conforms with the essential requirements of
European Union Directive /EU Directive 2004/108/EC EMC
Directive and 2002/95 ROHS Directive. This product can be
subject to interference at our operational frequency bands of
2.1, 2.4, 2.8, 3.3, and 3.6 MHz.
21
Page 24

Batteries
Batteries contain substances that can be harmful to human
health and the environment if not handled correctly.
Batteries are marked with the WEEE symbol. This symbolises
that exhausted batteries must not be disposed of together
with unsorted rubbish, but are to be collected separately.
Some batteries are also marked with the chemical symbol
Hg (mercury), Cd (cadmium) or Pb (lead). These substances
are particularly harmful, so it is important that they are
collected and disposed of via an established recycling
scheme. This ensures that your batteries are reused in compliance with regulations and do not damage the environment.
Therefore, when disposing of exhausted batteries, make sure
that you use an established recycling scheme. This might
involve delivering them to a designated collection point or
recycling center.
22
Page 25
Installer Assistance: www.gofrontrow.com
USA/Global Canada Australia Scandinavia
1690 Corporate Circle 6950 Creditview Road, 629 Nudgee Road Kongebakken 9
Petaluma, CA 94954-6712 Unit 1 Nundah QLD 4012 2765 Smørum
United States Mississauga, ON L5N 0A6 Australia Denmark
toll-free: 800.227.0735 Canada tel: 1 800 746 642 tel: +45 3917 7101
tel: 707.769.1110 toll-free: 800.340.9894 fax: 1300 737 983 fax: +45 3927 790 0
fax: 707.769.9624 tel: 905.461.5300 www.gofrontrow.com www.gofrontrow.com
www.gofrontrow.com www.gofrontrow.com
© 2016 FrontRow Calypso LLC Phonic Ear, FrontRow, Calypso and t he name s of Phonic Ear, Caly pso, an d FrontRow product s are trademarks or re gistered tr ademarks of
FrontRow Caly pso LLC in the U.S. an d other c ountries.
1550-00004/Rev A 1116
 Loading...