

Page 1
conductor
USER GUIDE
Page 2

YOU’RE ABOUT TO IMPROVE
COMMUNICATION THROUGHOUT
YOUR SCHOOL AND DISTRICT.
Welcome to FrontRow Conductor version 2.0
FrontRow is the teacher- and tech-friendly way to improve
the learning environment in every classroom.
The FrontRow Conductor is a powerful, integrated schooland district-wide communication platform. Conductor
allows you to communicate with anyone, or any device, from
anywhere in your school.
To fully understand the power of Conductor, we recommend
that you first review this User Guide.
This User Guide will walk you step-by-step through the
Conductor interface, providing instruction and how-to for
the most common uses. Please remember that Conductor is
completely customizeable and often times will be configured
to your school’s specifications (system design and proper
implementation is the responsibility of user or user’s agents).
If you don’t find what you’re looking for within this Guide,
please refer to www.gofrontrow.com for more information or
contact your System Administrator.
Thank you for choosing FrontRow! You're just steps away
from a more productive campus.
Page 3

CONTENTS
Introduction ..................................................................................1
Before You Begin
Getting Started .............................................................................2-3
Logging into the system from the touch computer
Public Announcement (PA) ...................................................................4-6
Making a PA from the push-to-talk microphone
Zones........................................................................................7
Understanding and managing zones
Intercom ...................................................................................8-9
Initiate and receive an intercom
Bell Schedules ............................................................................10-11
Emergency Alerts .........................................................................12-14
Bells ........................................................................................15
Manually playing bells or music
Telephone Interface (CMP500) .................................................................16
Other Features .............................................................................17
Appendix
A. Adding, Deleting or Editing a Zone ....................................................18-19
B. Creating Schedules.....................................................................20
C. Creating Alert Buttons ...............................................................21-23
D. Creating Bell Buttons...................................................................24
E. Managing Audio Files ...............................................................25-27
F. Managing Users, Permissions and Security..................................................28
G. Streaming Music from a Mobile Device ....................................................29
Page 4
Introduction: Before you begin
Welcome to the FrontRow Conductor System!
Conductor is a remarkably versatile and easy-to-use school communication platform, used for paging, bells, intercom
and emergency communications. Depending upon its needs, your school may be using some or all of the system.
This User Guide is designed to provide you with the basic information needed to use the Conductor Admin Software,
running on a dedicated computer, on a day-to-day basis. Note that this is not a set-up guide or configuration manual.
Rather, it assumes that Conductor is ready to go and has been configured by your school or district IT staff, most likely
working with FrontRow and a local integrator.
IMPORTANT
Remember – Conductor is an essential part of your school’s emergency communication system. It is very important that
you read this guide and familiarize yourself with the system’s various features and functions. System design and proper
implementation are the responsibility of user or user’s agents. Conductor must be properly configured and programmed
in accordance with the user’s system design. Failure to do so could impair Conductor’s functionality, including emergency
communication and alerts. To help ensure system performance in a variety of adverse conditions, FrontRow recommends
supporting the integrity of the server with a secure location, an Uninterruptible Power Supply (UPS), a regular practice of
server backups, and a backup server. If you have questions, please contact your district IT staff or System Administrator.
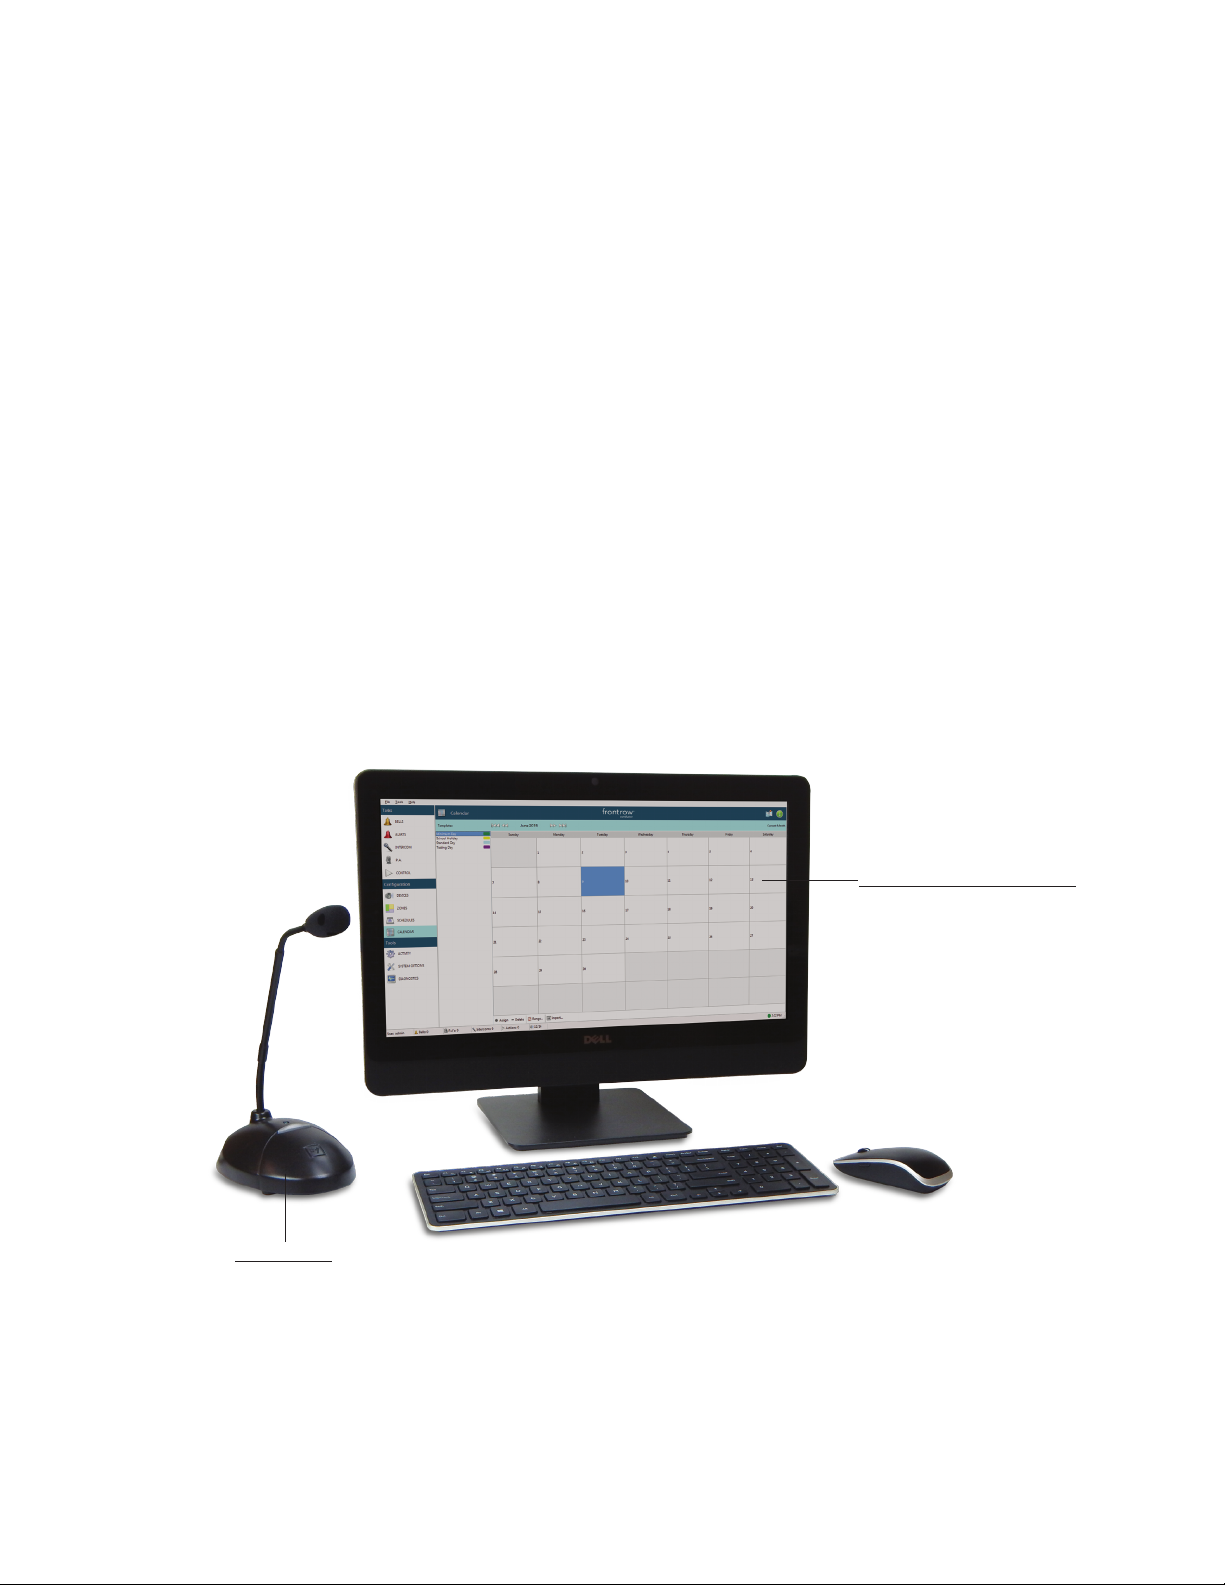
Conductor Admin Station
Microphone
Touch screen user interface
1
Page 5
Getting Started:
Logging into the system from the touch computer
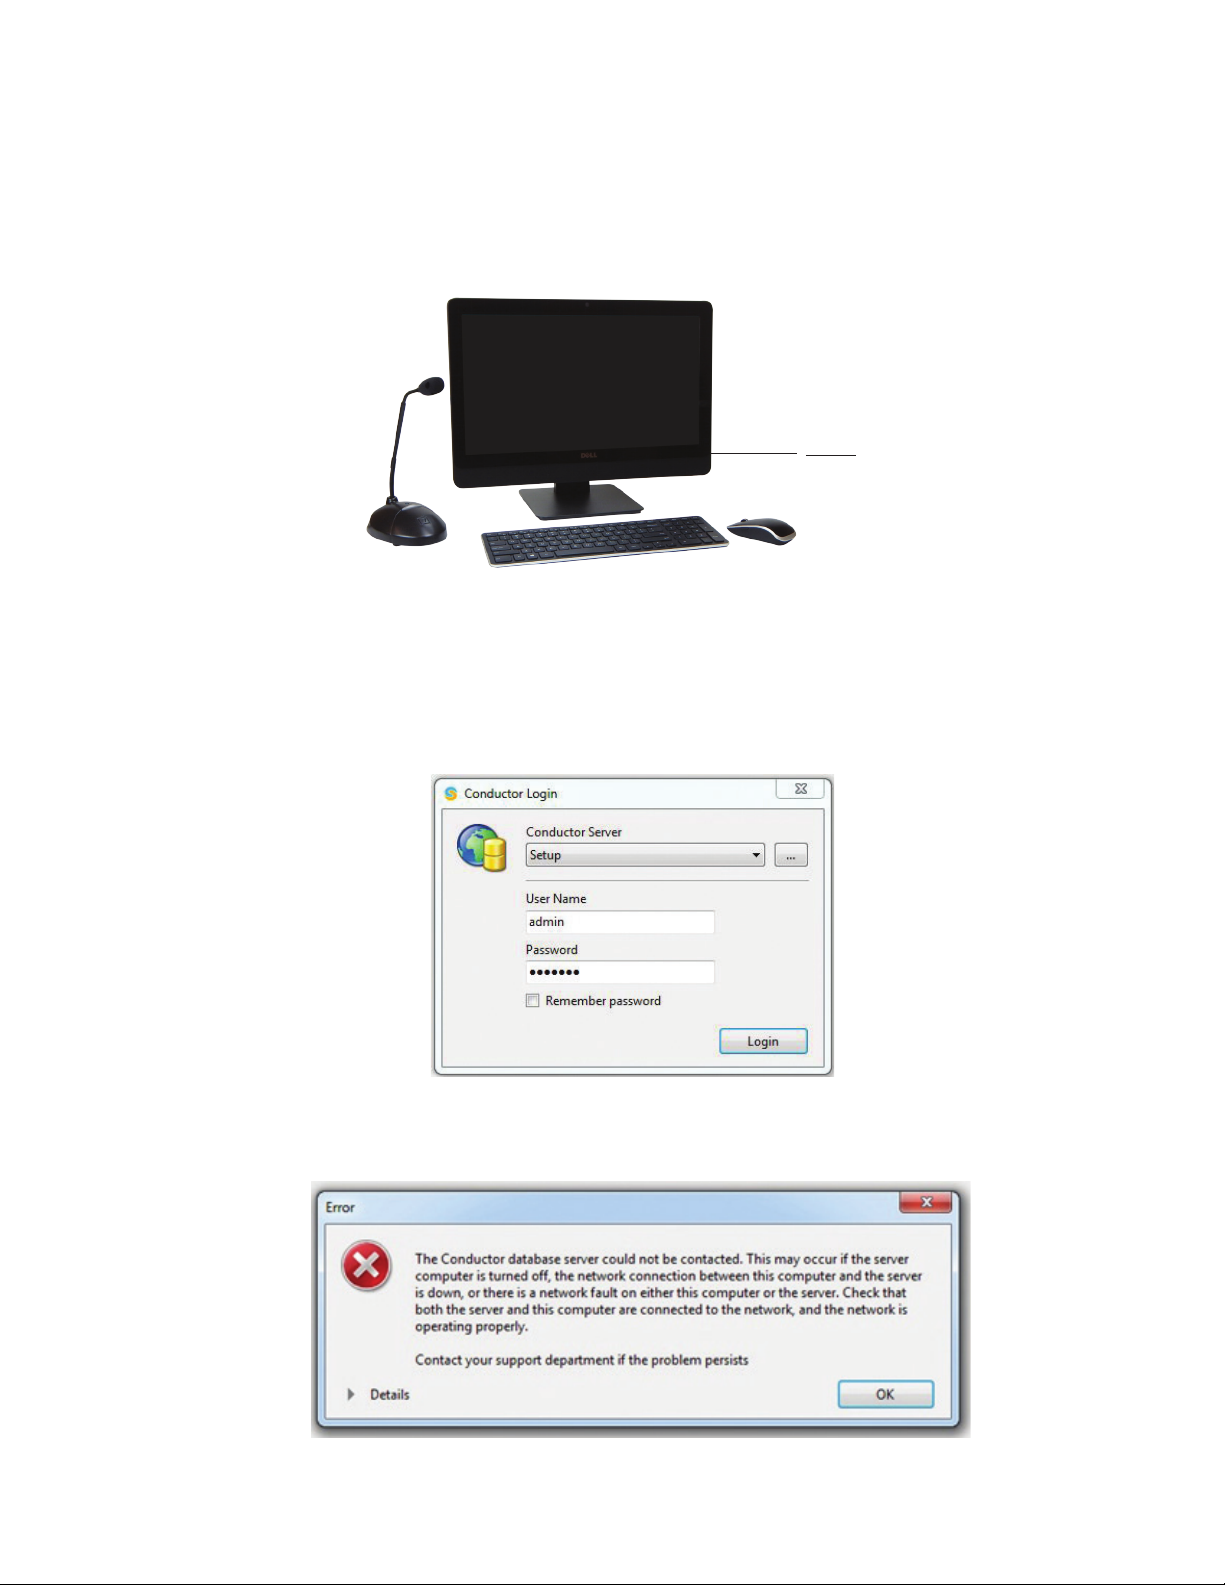
If the touch computer has been turned off, turn it on by pressing the button on the bottom right side of the display.
Power
Conductor will start up automatically when you turn on the computer. If prompted for a login and password, you must
get this information from your System Administrator. The default login is user “admin” and password “calypso”.
Conductor Login Screen
NOTE: If you see the error below click on “OK” and you will then see the screen above.
2
Page 6
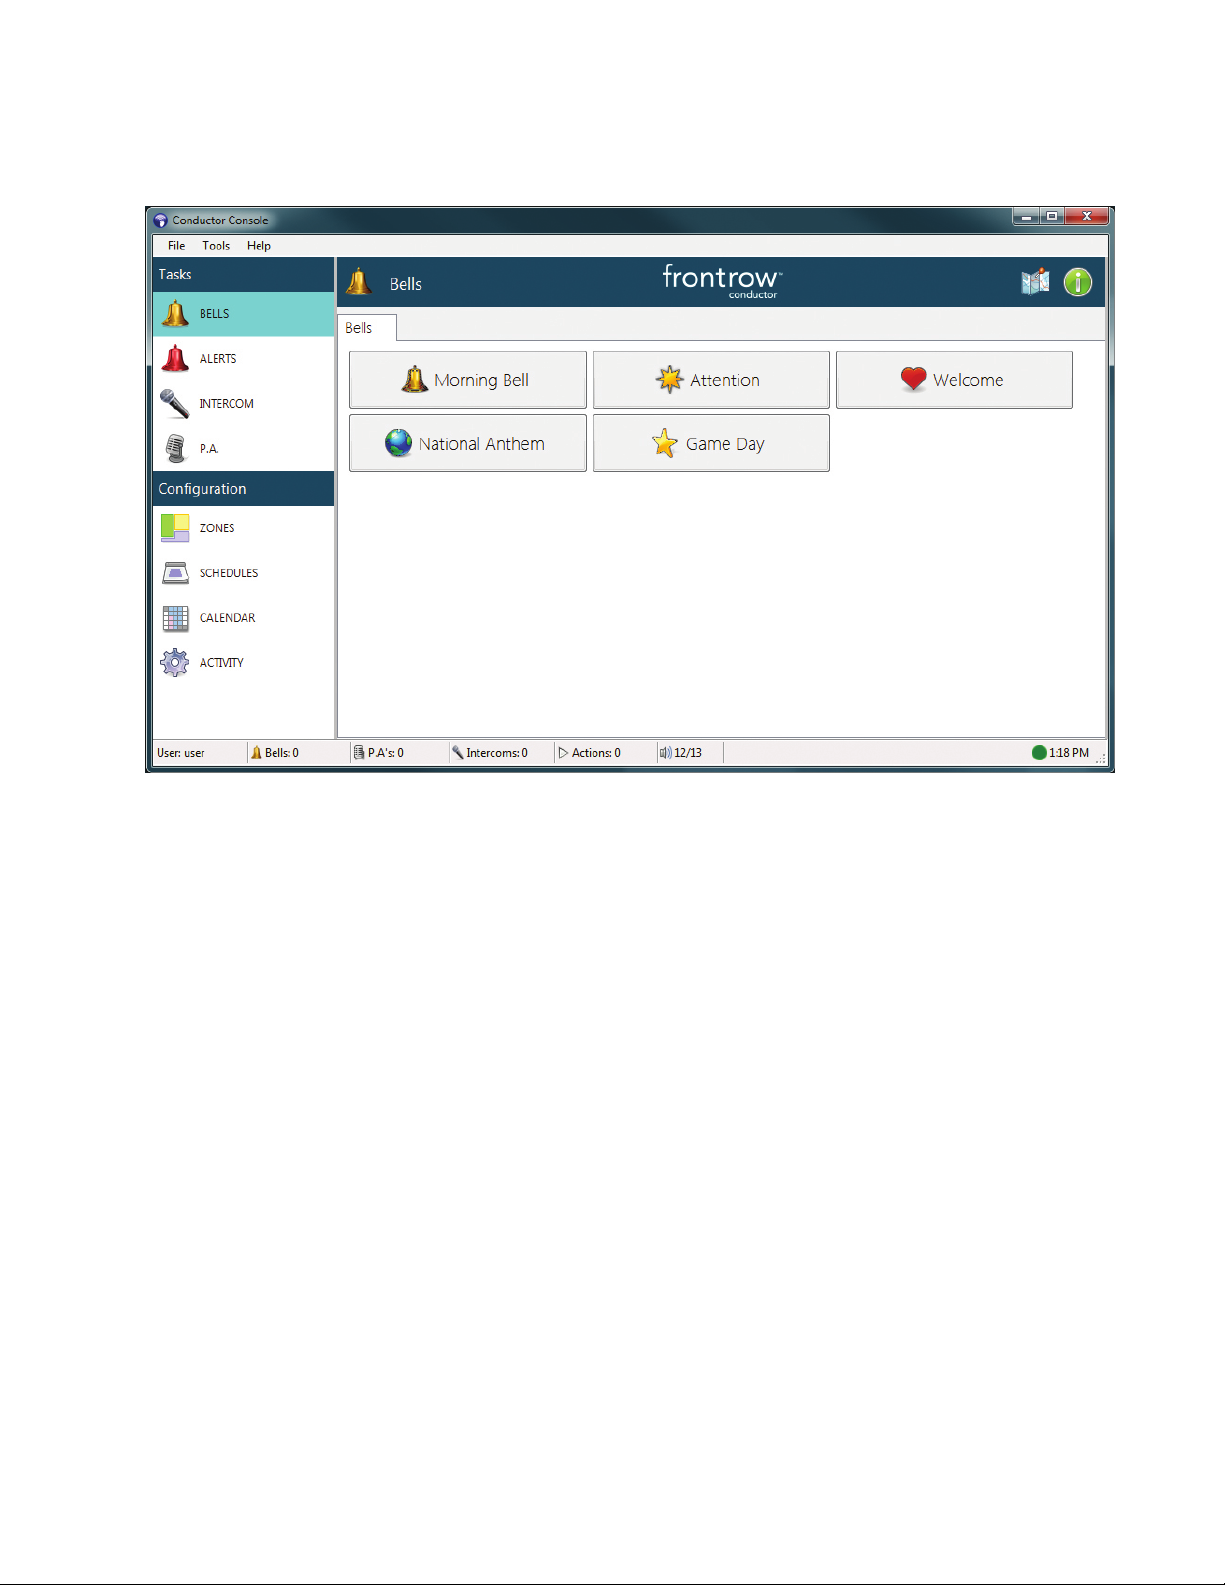
IMPORTANT: Your screen may look different, depending on your account access and how your system is configured.
Check with your system administrator if you have questions about which features you have access to.
3
Page 7
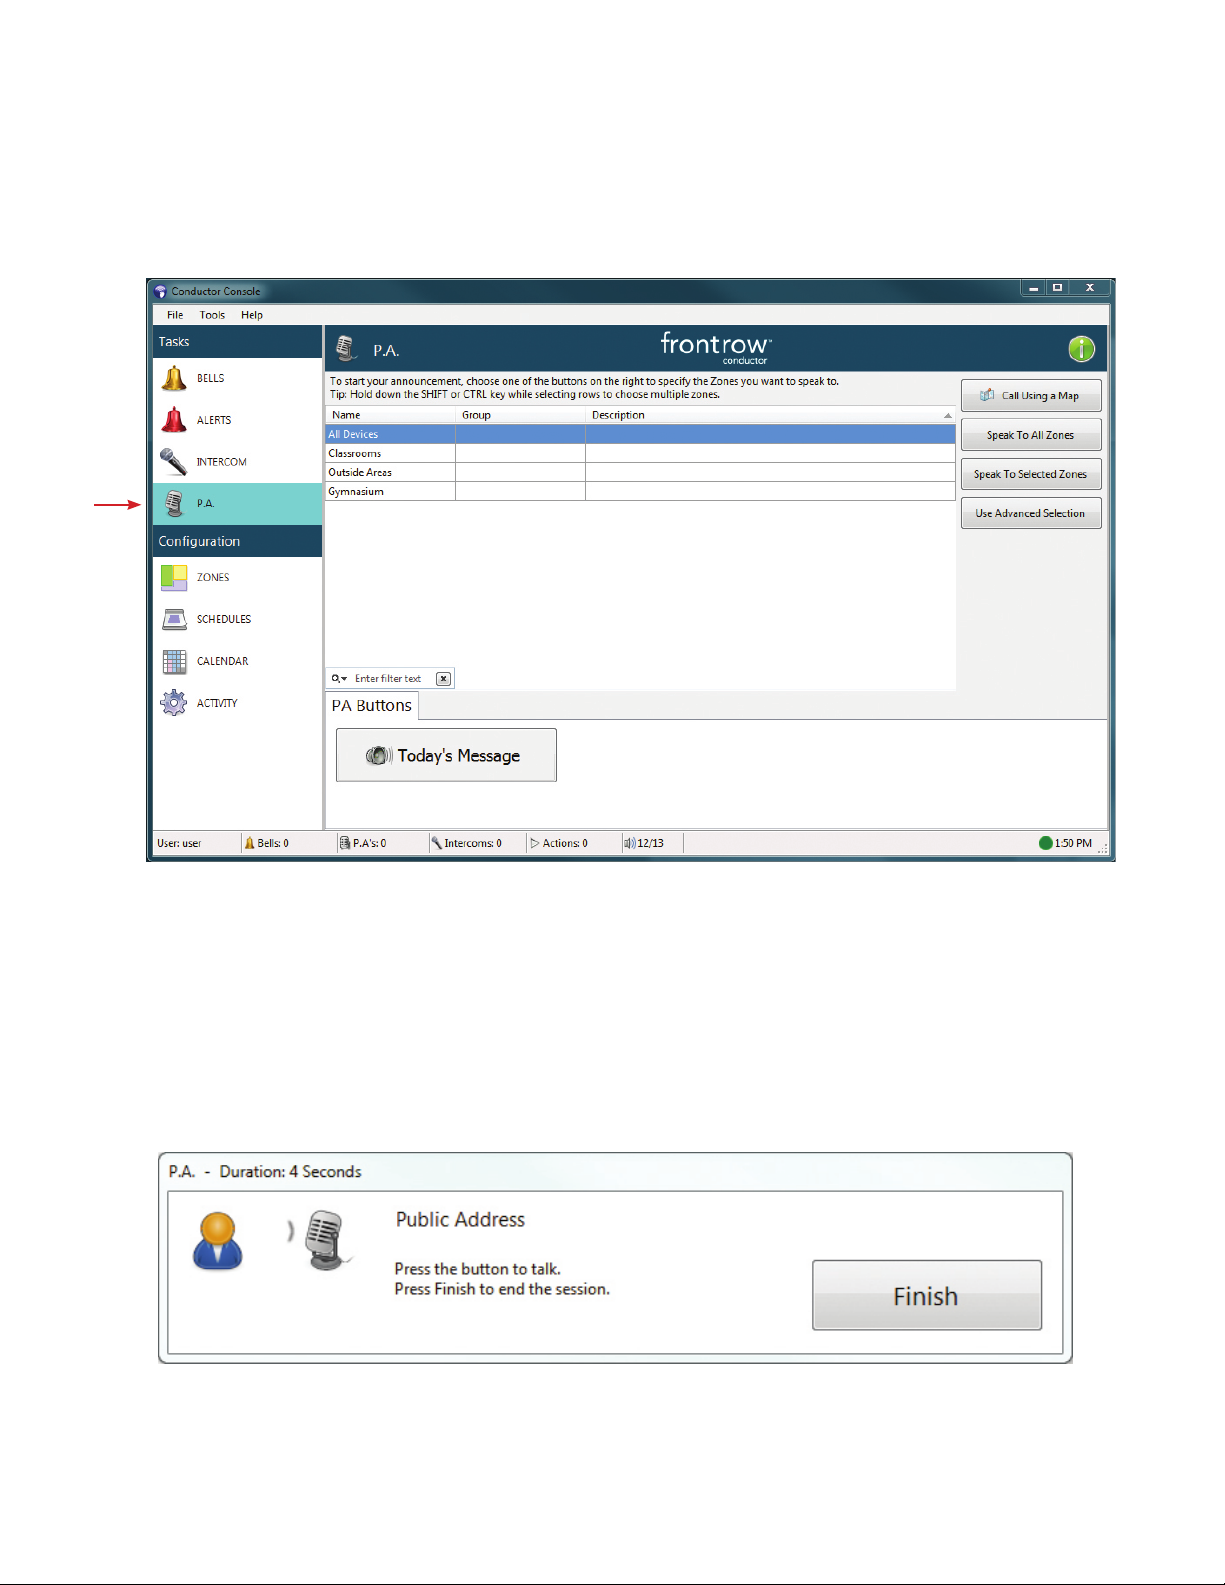
Public Announcement:
Making a PA from the push-to-talk microphone
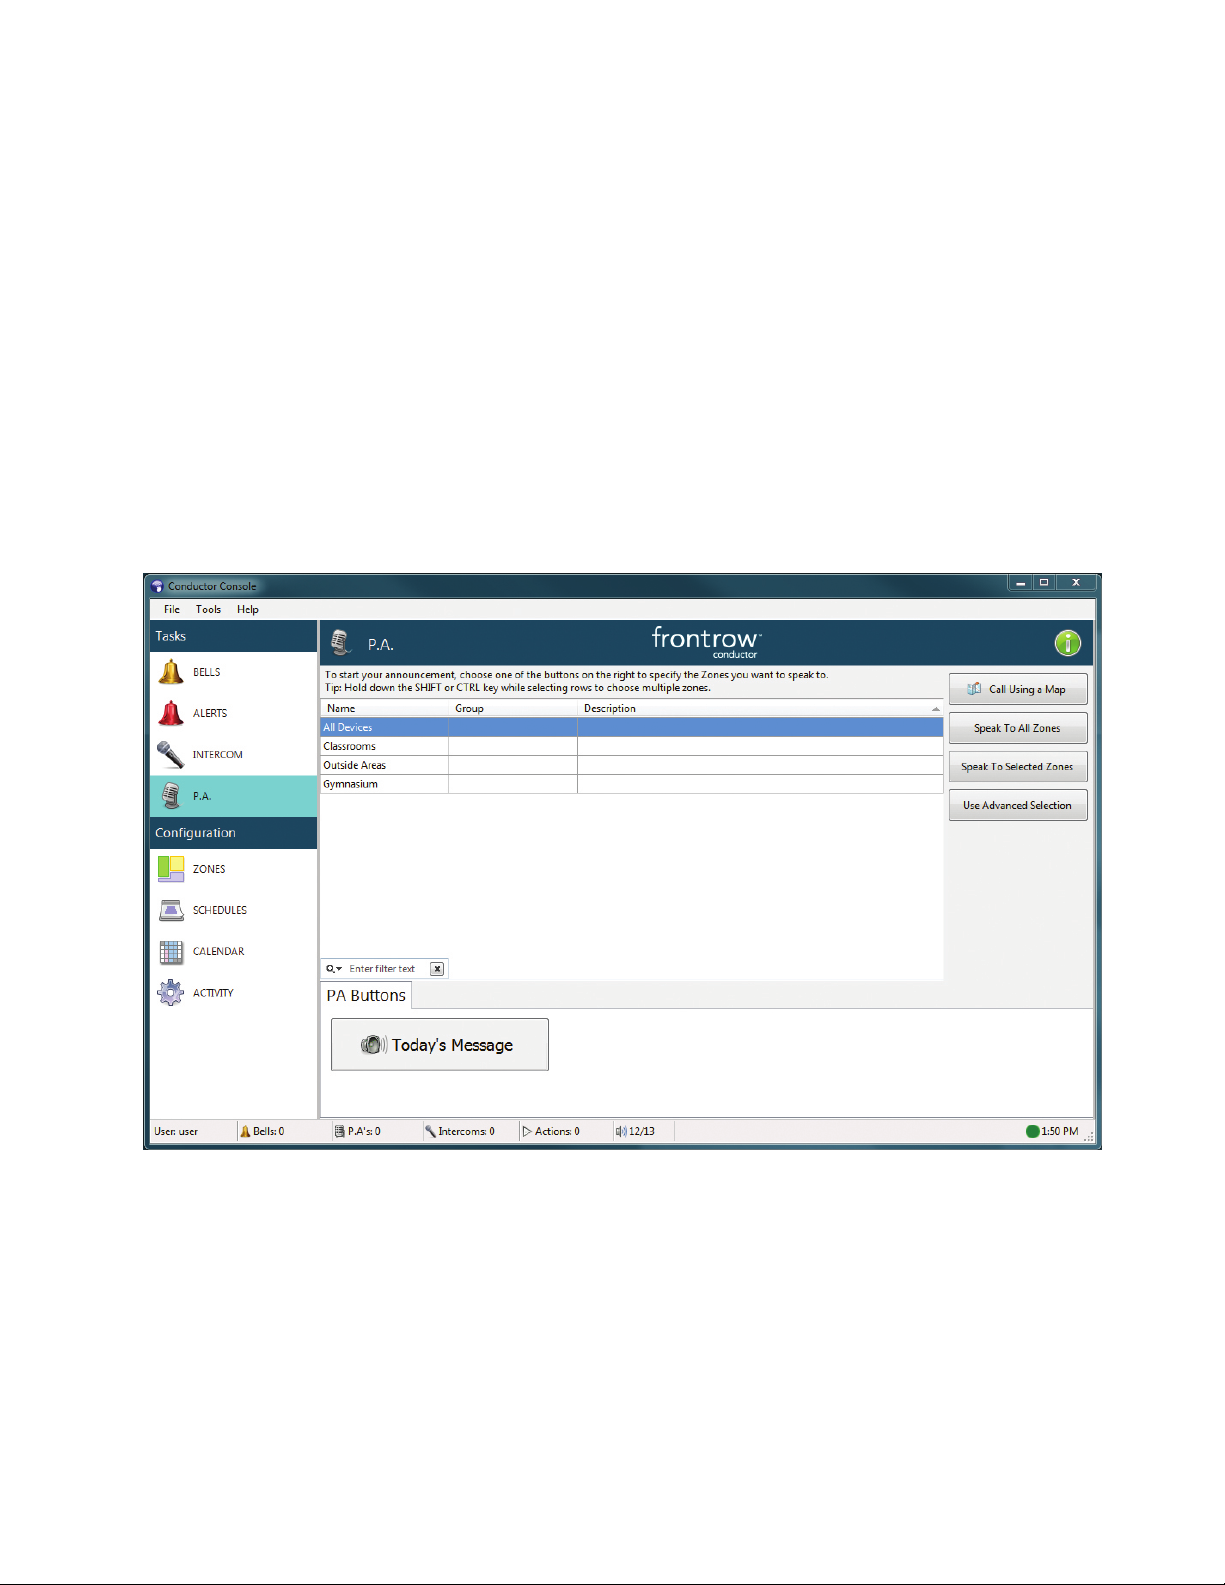
1. From the user interface select the P.A. tab
2. Select a paging method:
• “Call using a Map” will bring up a map or image of the school to allow paging to one or more locations.
• “Speak to All Zones” is an all call to all locations.
• “Speak to Selected Zones” allows you to page to a specific zone (or zones) from the list of zones. (Note that
you can make a page to a group of zones by clicking on a zone while holding down the “Ctrl” button on the
keyboard.)
• “Advanced Selection” allows you to page to a single room (device), by assigned attributes, etc.
4
Page 8
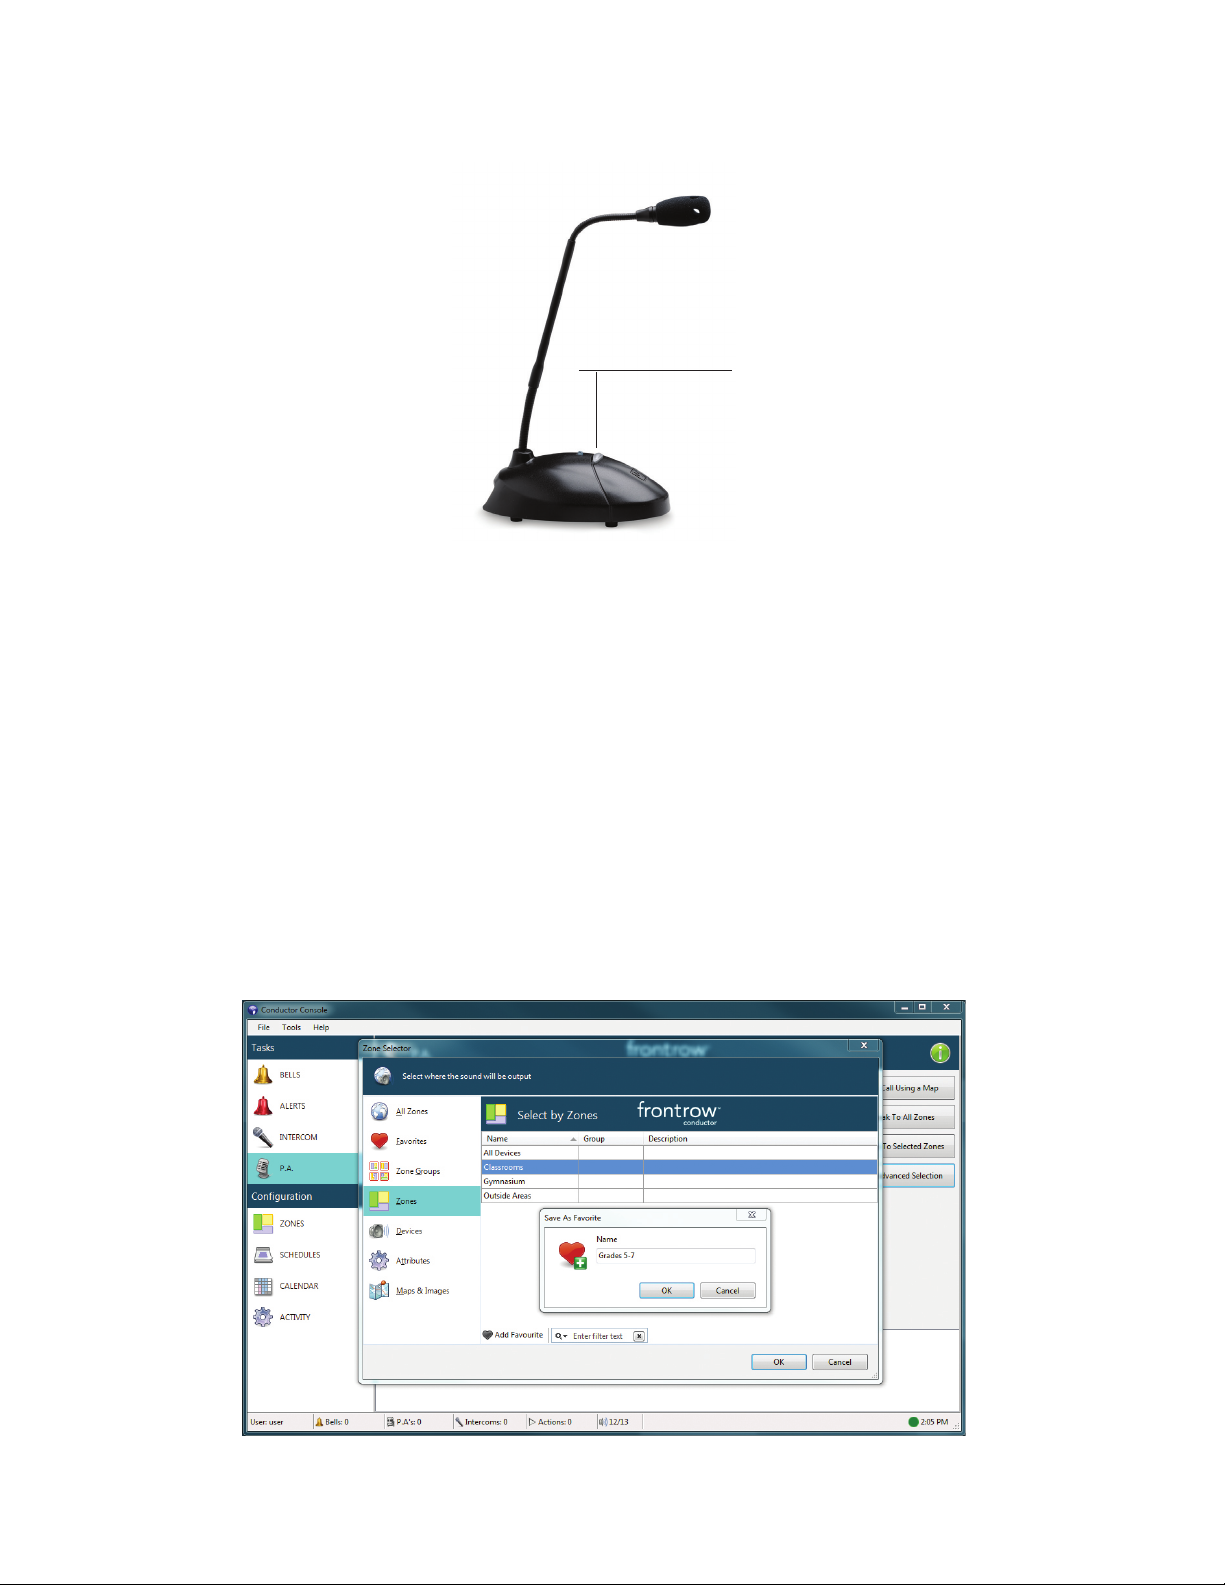
3. To make your page press down on the microphone button and speak into the microphone (no audio will be heard until
you press the mic button).
Push-to-talk button
4. When your page is finished release the button and click on the FINISH button. (Don’t forget to click FINISH!)
5. Paging to Favorites: Sometimes there are groups of zones that get paged to often. To make it easier for the user
Conductor allows you to add these zones to a Favorite category.
To create a Favorite:
• Select PA from the main interface.
• Select Advanced Selection.
• Select Zones.
• Highlight the zones that you want to be part of this Favorite (you can easily add zones by holding down the “Shift”
or “Ctrl” buttons on your keyboard).
• Click Add Favorite, then give it a name and the select OK.
• You will now see this Favorite zone group within the Favorites tab selection.
5
Page 9
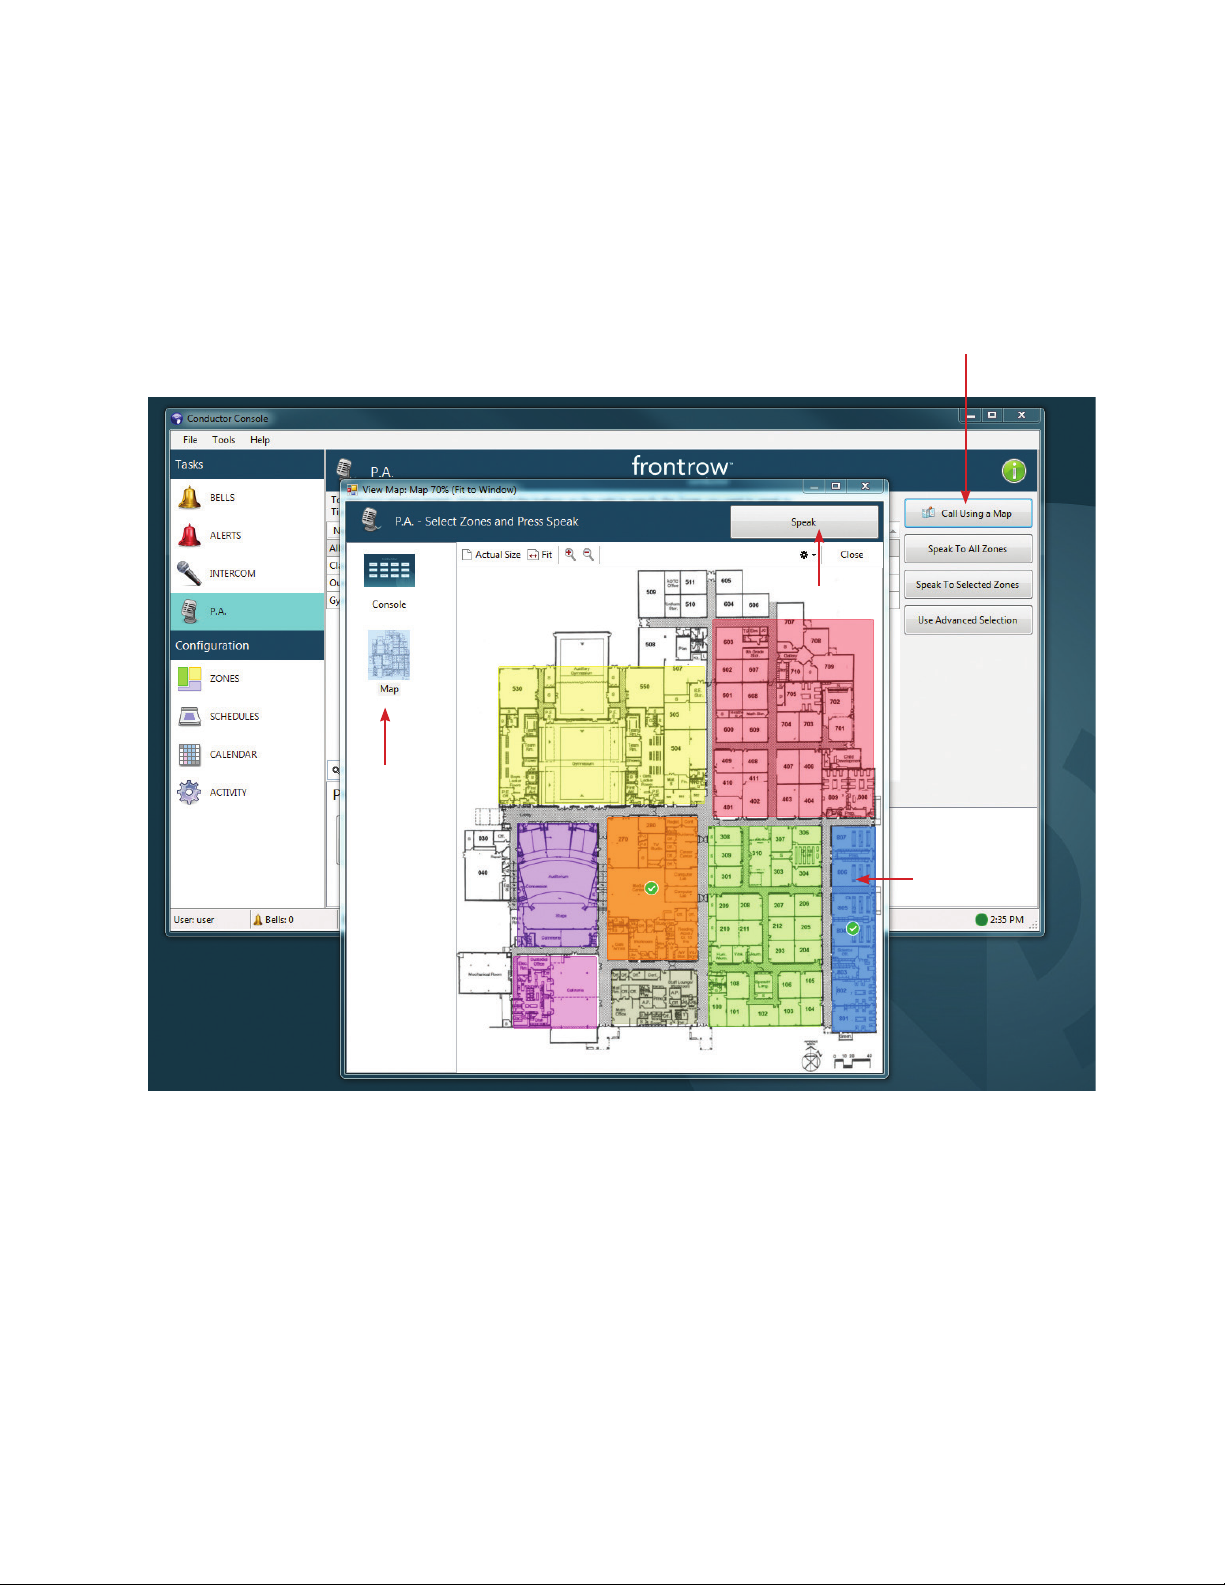
To page to a location using a map:
1. Select “Call Using a Map.”
2. Select the map you wish to use (there may be more than one).
3. Select one or more regions on the map.
4. Press the “Speak” button, then use the Push-to-talk microphone to speak to the selected locations.
1
4
2
3
6
Page 10
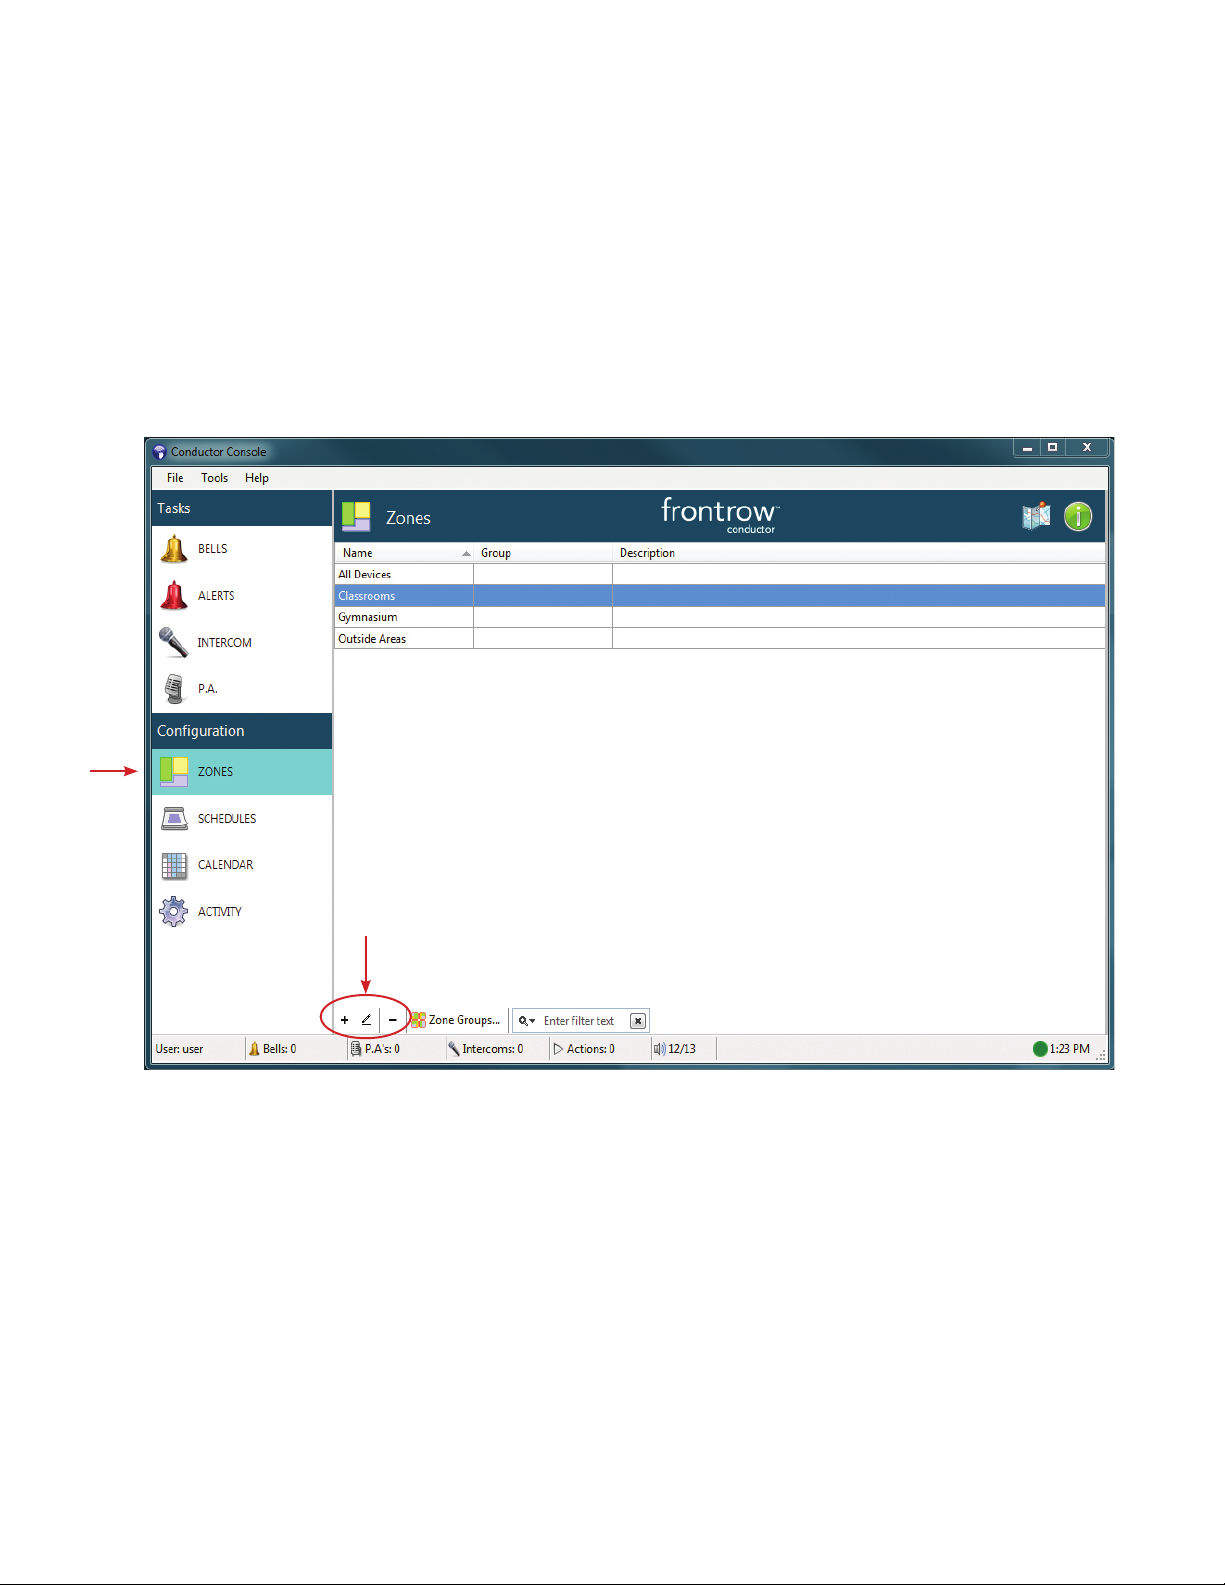
Zones: Understanding and managing zones
A zone is a logical group of classrooms, hallways, etc. The Conductor system allows the user to page everyone
at once (an “all call”), select a particular group (such as 8th grade), a single location or an ad hoc combination
of zones. The zone grouping is defined by your school and can be easily adjusted as the school’s requirements
change.
Click on the ZONES tab on the left hand side of the interface to see the zones that are available. This is a list of
the zones that have been created for your system. More zones can be easily added, renamed, reorganized or
removed. (See Appendix A)
Add, edit, or delete zones
7
Page 11
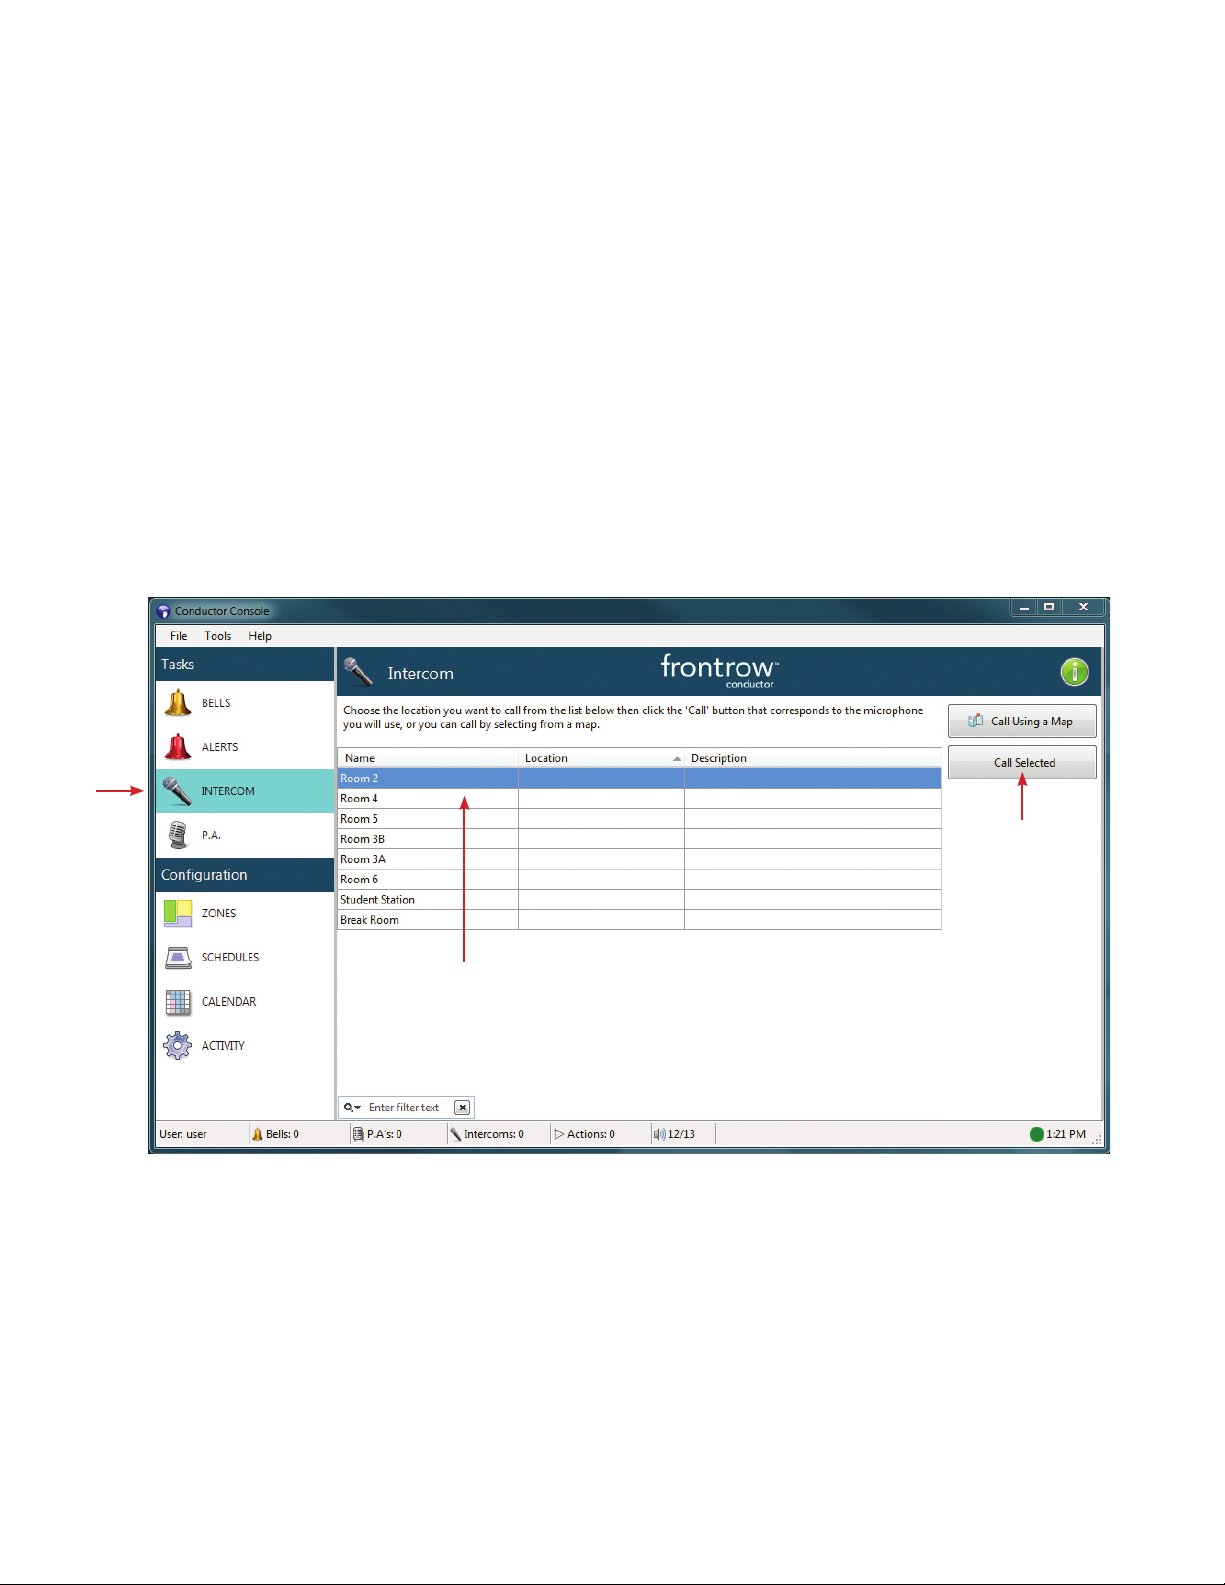
Intercom: Initiate and receive an intercom
The Conductor system allows for two-way intercom sessions from the admin station to a classroom. This is an
optional component to Conductor system so your system may or may not have this capability.
Calling a room:
1. Select “Intercom” and then choose the location you want to speak to.
2. Select “Call Selected”. You will now see a dialog box that lets you know that your intercom session is now active.
A tone will play in the room to let the teacher know the line is open.
3. Press down on the microphone button and speak into the microphone. Release the button to hear the speaker in
the room. When your call is finished click on the FINISH button.
4. Once an intercom session starts (regardless of who initiated the call) the admin station is responsible for ending
the call.
Select location.
Click here to
begin intercom.
8
Page 12
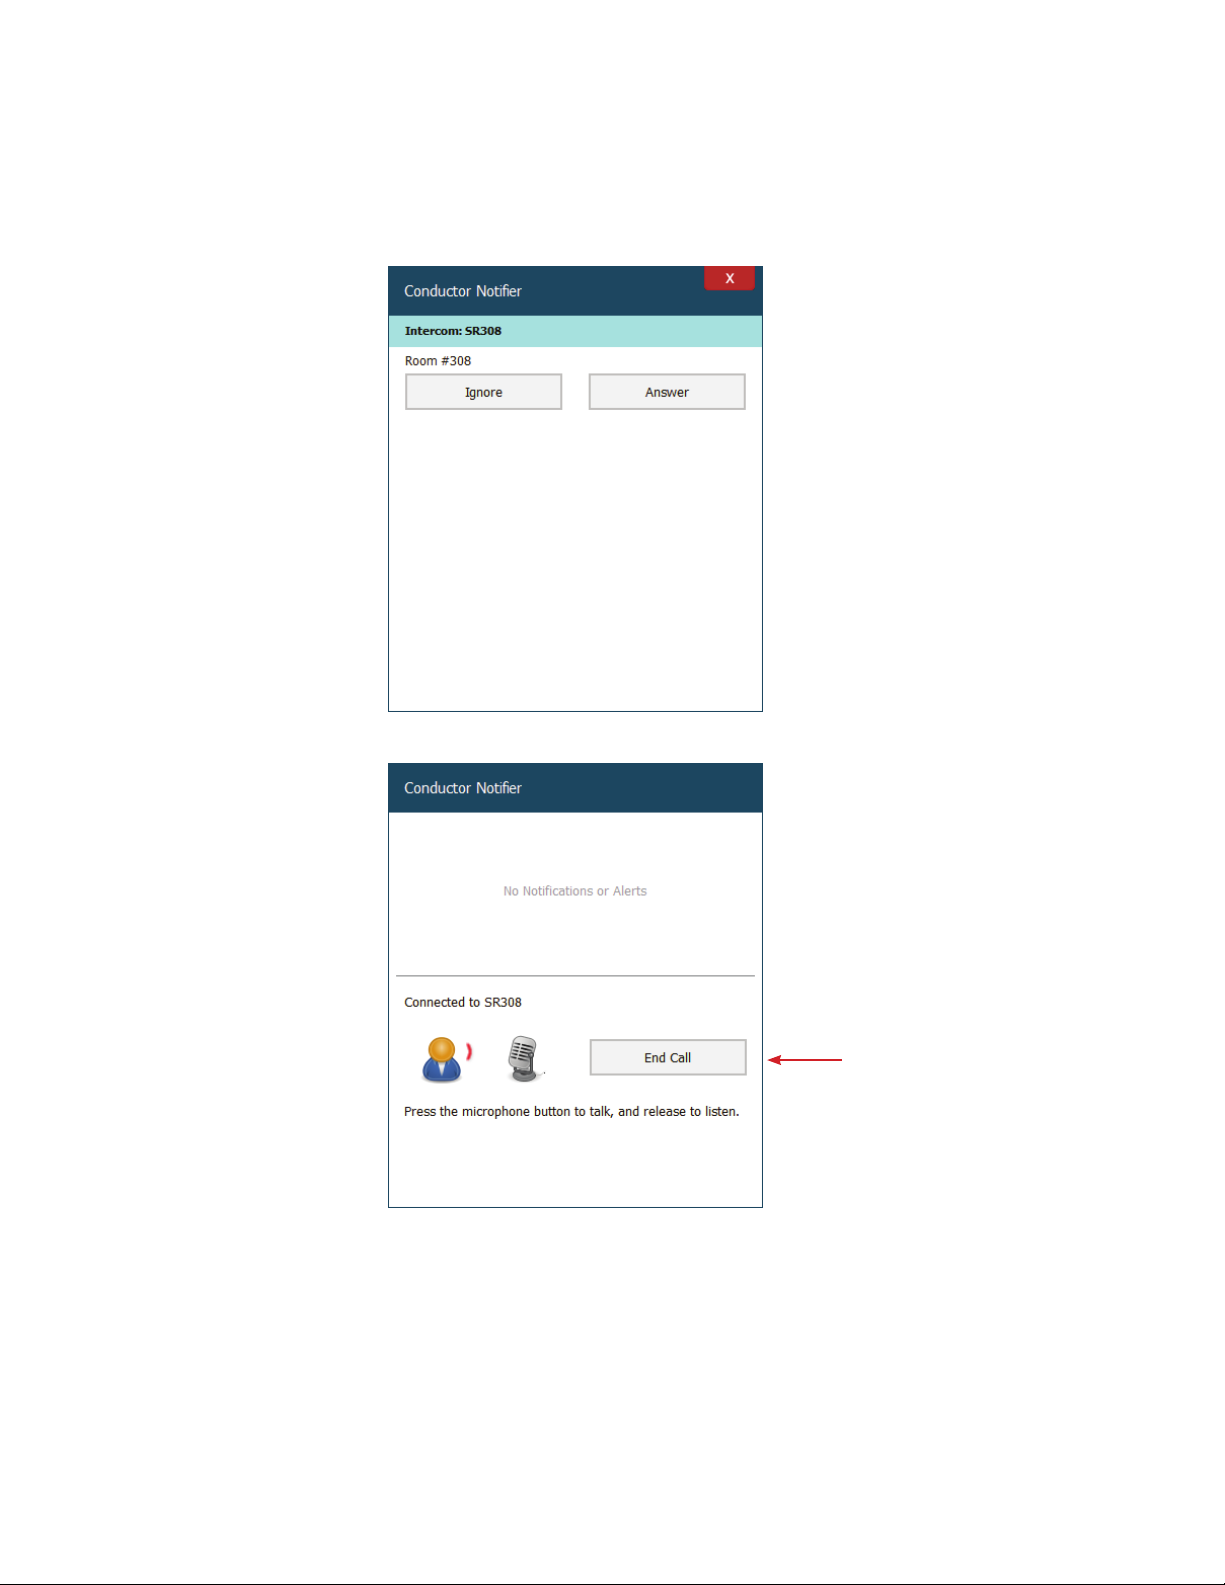
Receiving a call:
1. When a classroom sends a call request you will see the Notifier pop up and hear it ringing. From this window you
can press the Answer button to speak to the caller.
Room #308 initiates a call.
Click “Answer” to start
the intercom session or click
Ignore to ignore the call. This
may be useful if you have multiple
intercom stations on site.
Click here to
end call.
9
Page 13
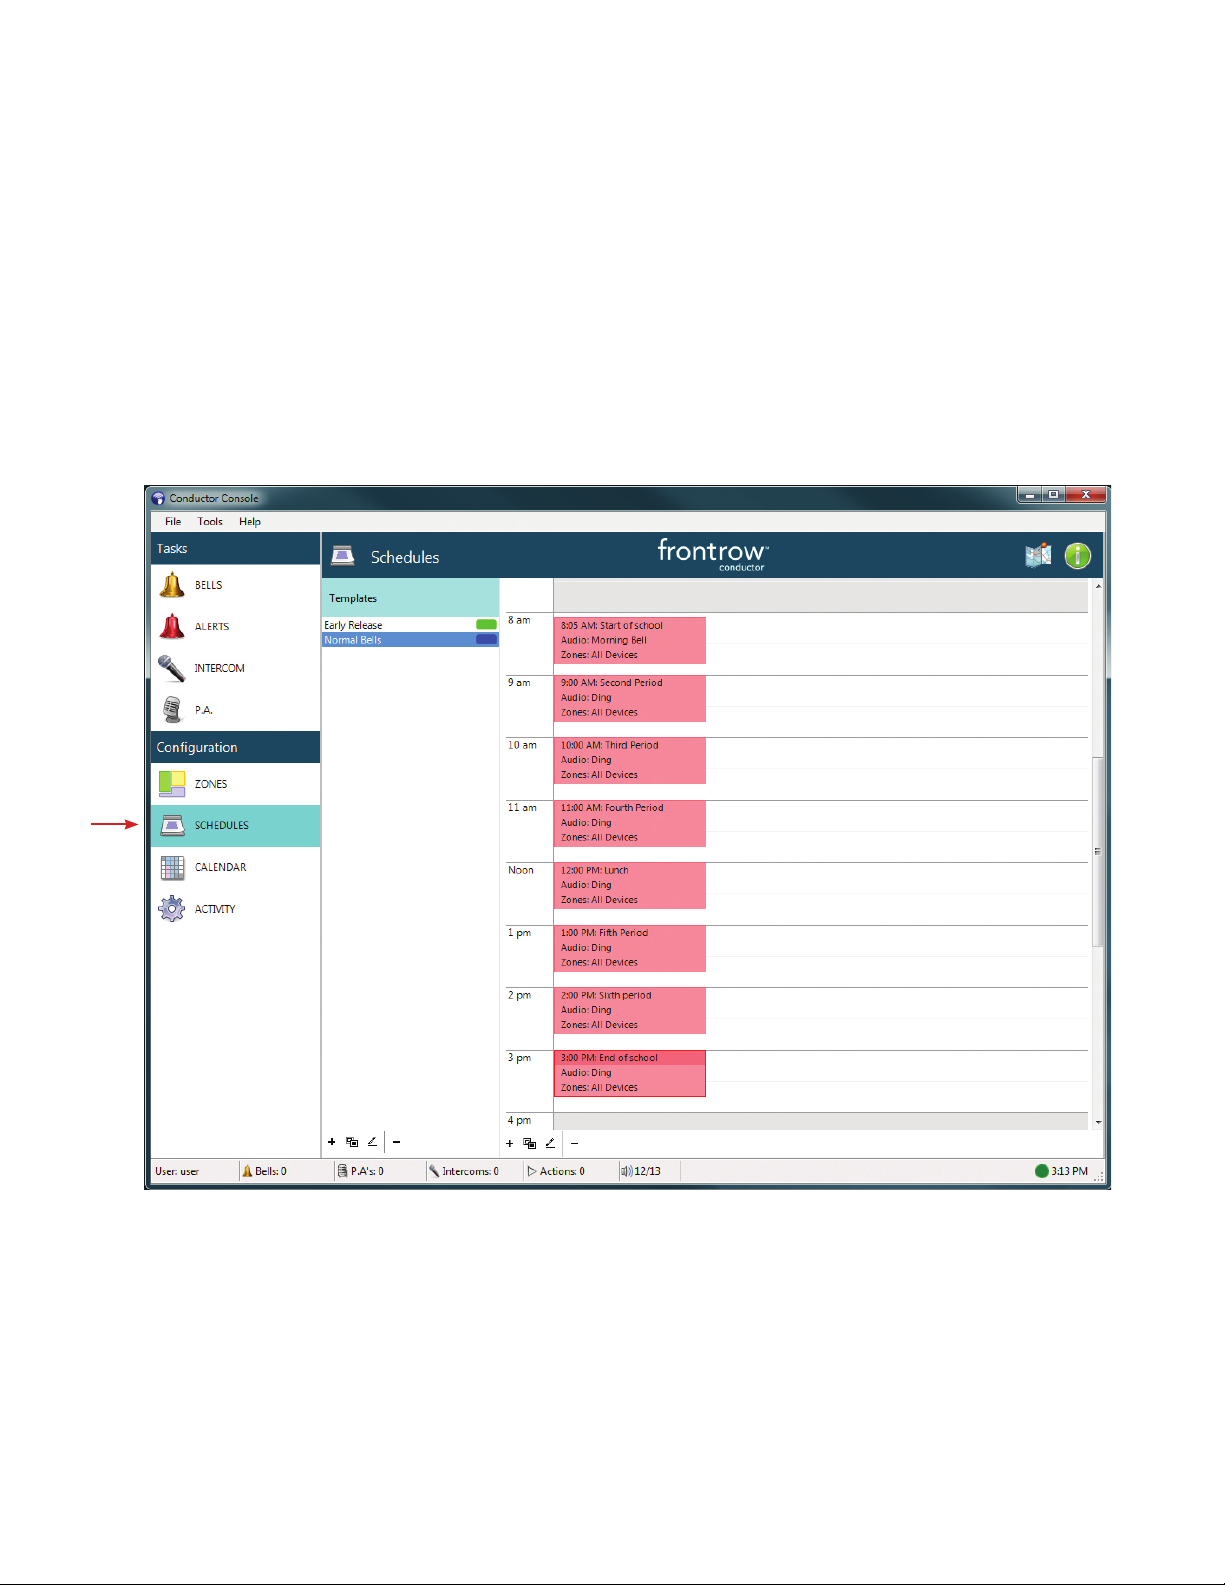
Bell Schedules
The Conductor system makes creating and managing bell schedules easy for schools. There are two parts to
creating bell schedules.
1. Schedules – A schedule is list of events (such as bells) that will happen at specified times.
2. Calendar – Each calendar day can run one schedule. This is where you assign which schedules will run on
which days.
Below, there are two schedules: Early Release and Normal Bells.
10
Page 14
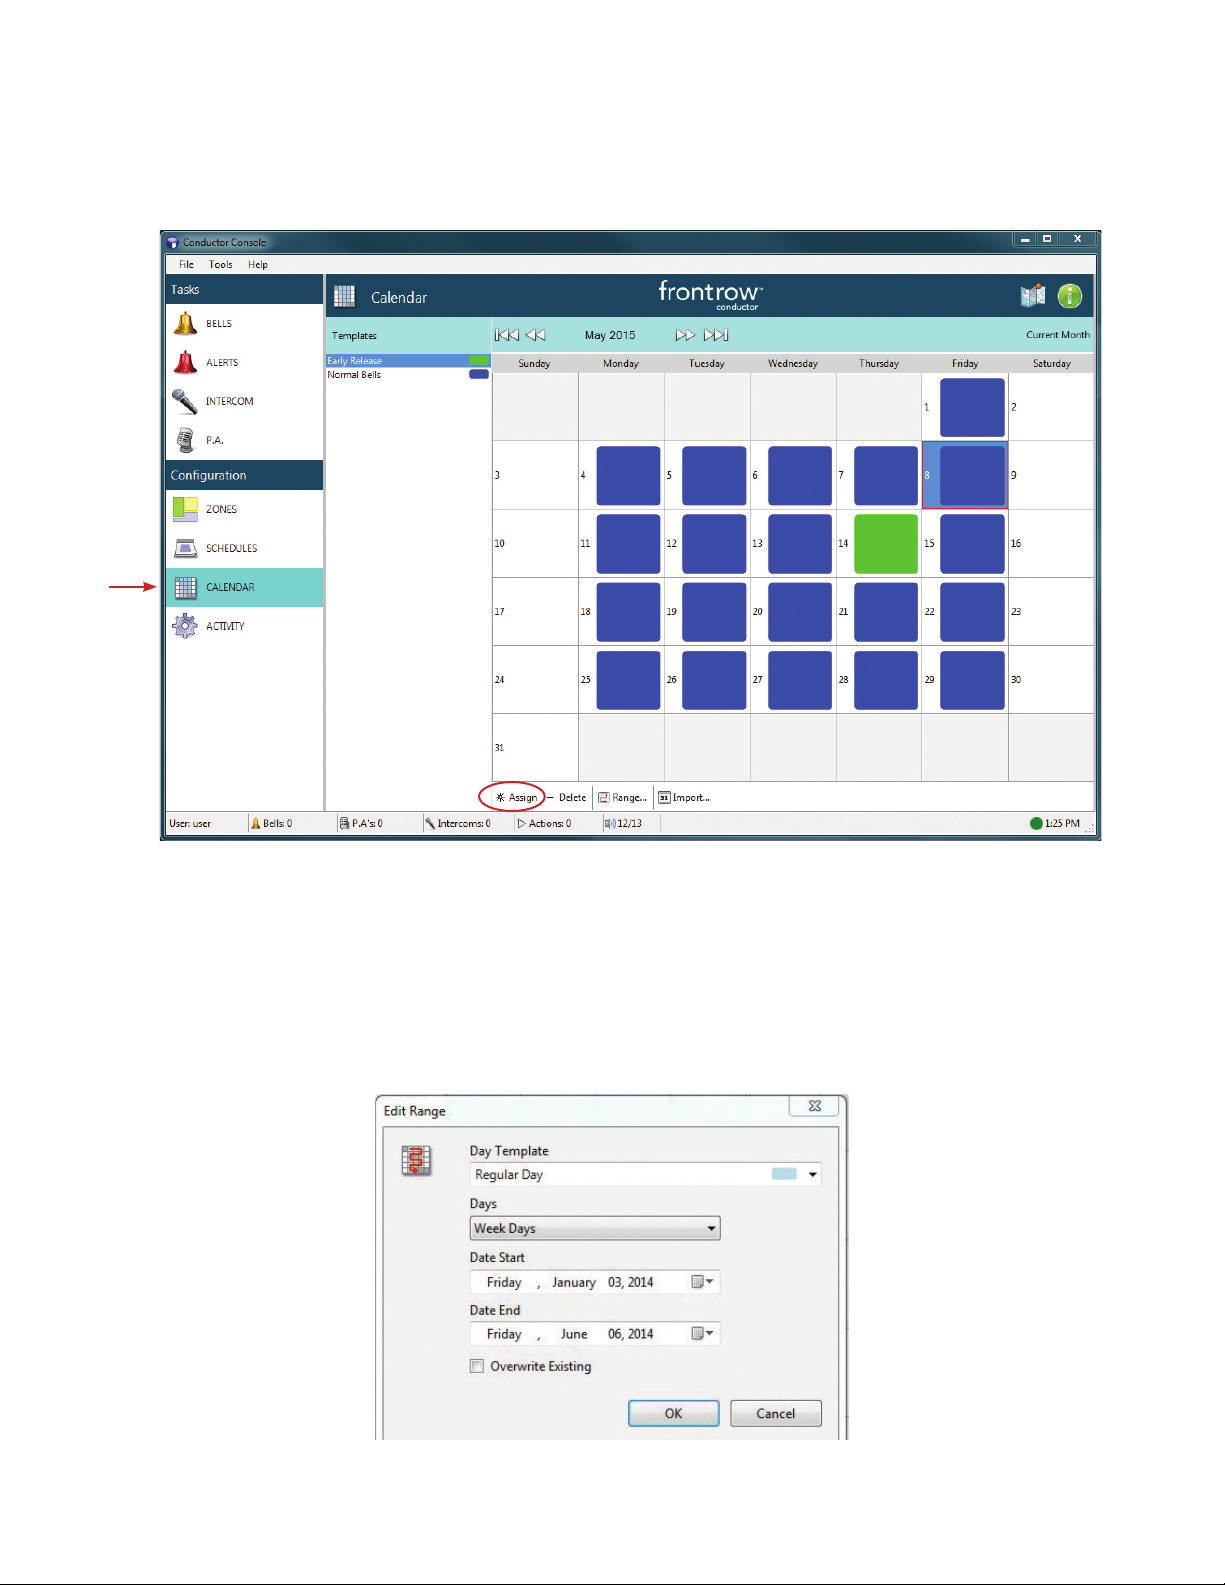
Calendar View
Click on “Calendar.” You will now see a view of what schedules (if any) are currently running for each day. The below
example shows the normal schedule running on all weekdays except for the 14th.
To assign or change a template to a specific day, highlight the template, highlight the day and then click on assign (near
the bottom left side). You can select a range of days by drag-selecting an area of days, or using shift/control-clicking for
multiple selection. You can also select the Range option to add a template to a block of days and months. This is very
useful at the start of the year!
Range example:
11
Page 15
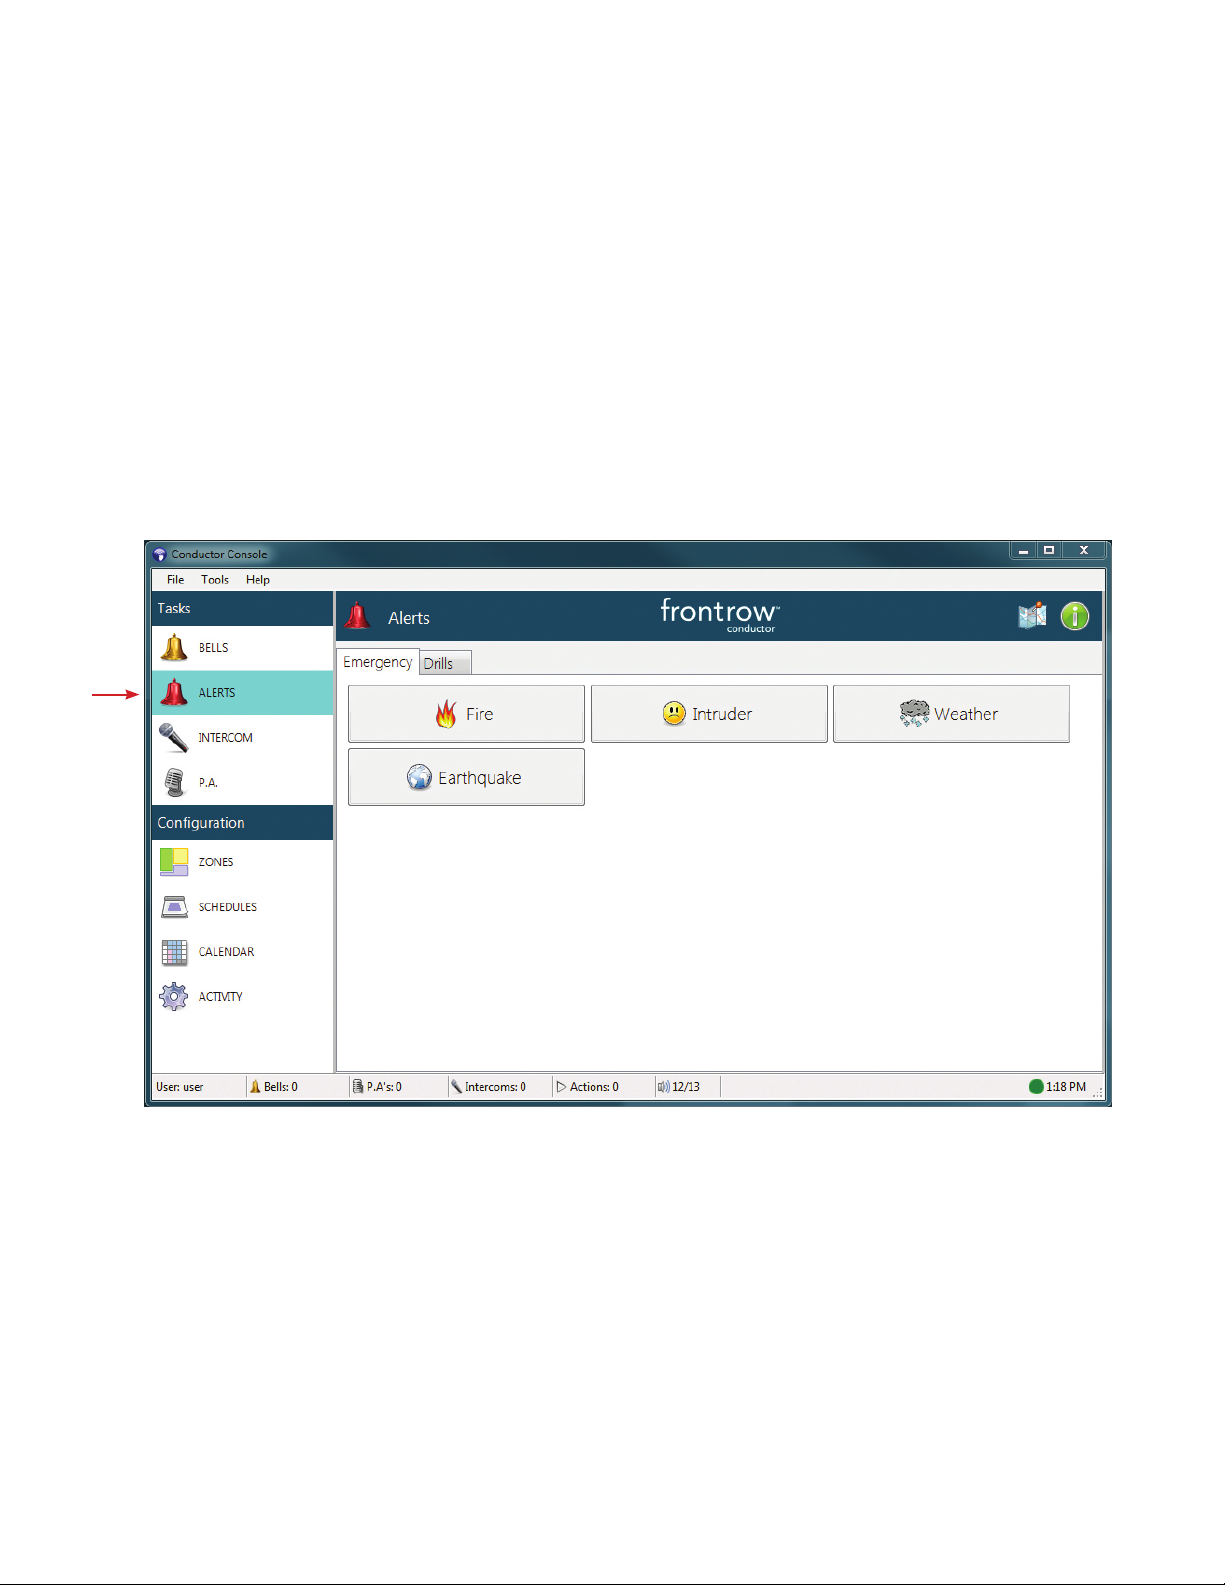
Emergency Alerts
One of the most important components of the Conductor system is how easily emergency alerts can be triggered. Select
“Alerts” to view the pre-programmed alerts, based on the needs of the school. Pressing an Alert button can initiate
a programmed sequence of actions, including playing audible emergency alerts, displaying visual alerts*, triggering
automatic locking systems, or forcing projectors to show evacuation routes.
IMPORTANT: System design and proper implementation are the responsibility of user or user’s agents.
Conductor must be properly configured and programmed in accordance with the user’s system design. Failure
to do so could impair Conductor’s functionality, including emergency communication and alerts. To help ensure
system performance in a variety of adverse conditions, FrontRow recommends supporting the integrity of the
server with a secure location, an Uninterruptible Power Supply (UPS), a regular practice of server backups, and
a backup server.
(See Appendix C for programming Alert buttons)
* In rooms that are equipped with a Smart Receiver or Juno Connect, the system can be configured to give visual
notification that an alert has been initiated. When an alert is initiated from Conductor, the color of the Smart
Receiver Beacon or Juno Connect LCD can be configured to change, giving visual notification along with any audible
instructions programmed in the alert button. For information about programming the Smart Receiver or Juno Connect,
see the ICR-01 Smart Receiver or Juno Connect Installer Guide.
12
Page 16
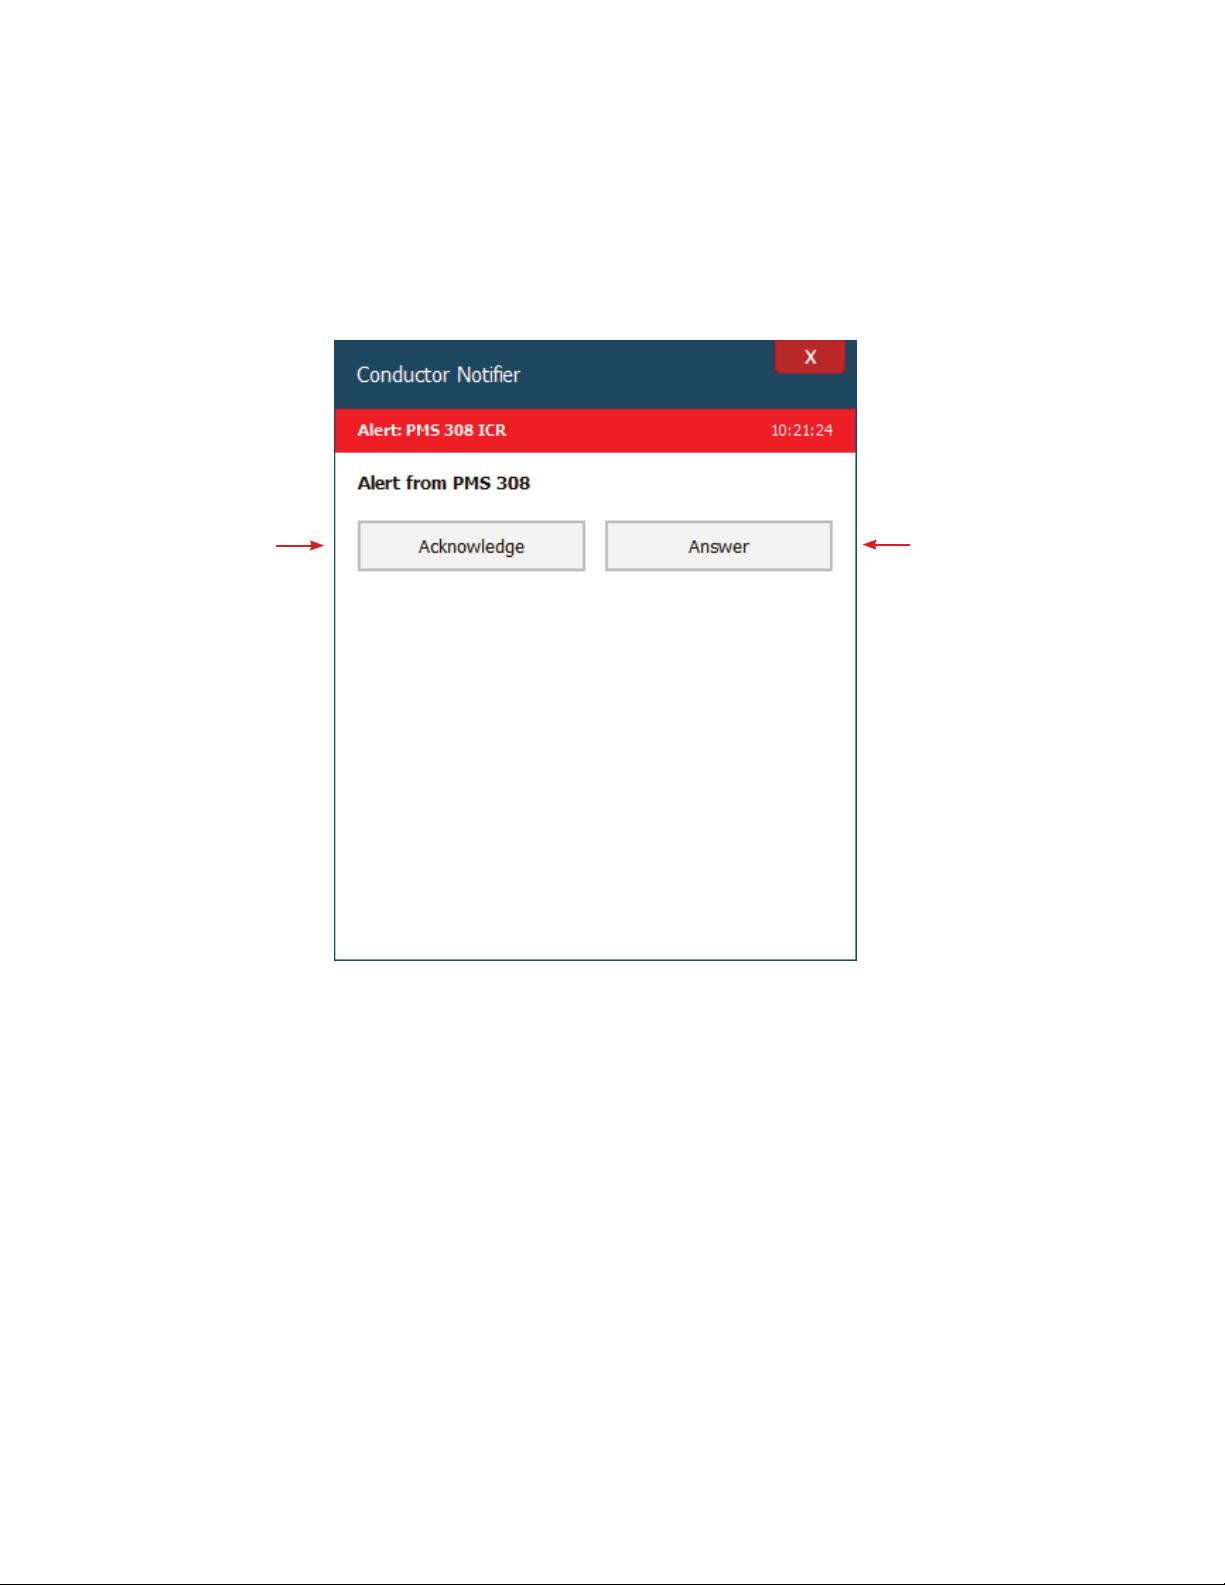
Conductor can also receive alerts from specific locations. Shown below is an alert from a specific classroom.
This alert is accompanied by a loud alarm set of tones to ensure that the alarm is not missed. When this alarm is
received you must follow the procedures developed by your school.
When the alert is received on an Admin station equipped with FrontRow intercom functionality, it can be
answered directly from the Notifier application or the alert can simply be acknowledged*, in both cases this
will stop the alarm tone.
Click here to
acknowledge
the alert*
*In rooms that are equipped with a Smart Receiver or Juno Connect, the system can be configured to give visual
and/or audible notification that an alert was received by Conductor. When an alert is acknowledged by a person
using the Notifier application, the color of the Smart Receiver Beacon or Juno Connect LCD can be configured to
change, letting people in the classroom know that a person has seen the alert. For more information about setting
up the visual notifications with the Smart Receiver, see the ICR-01 Smart Receiver or Juno Connect Installer Guide.
Click here to
start intercom
13
Page 17
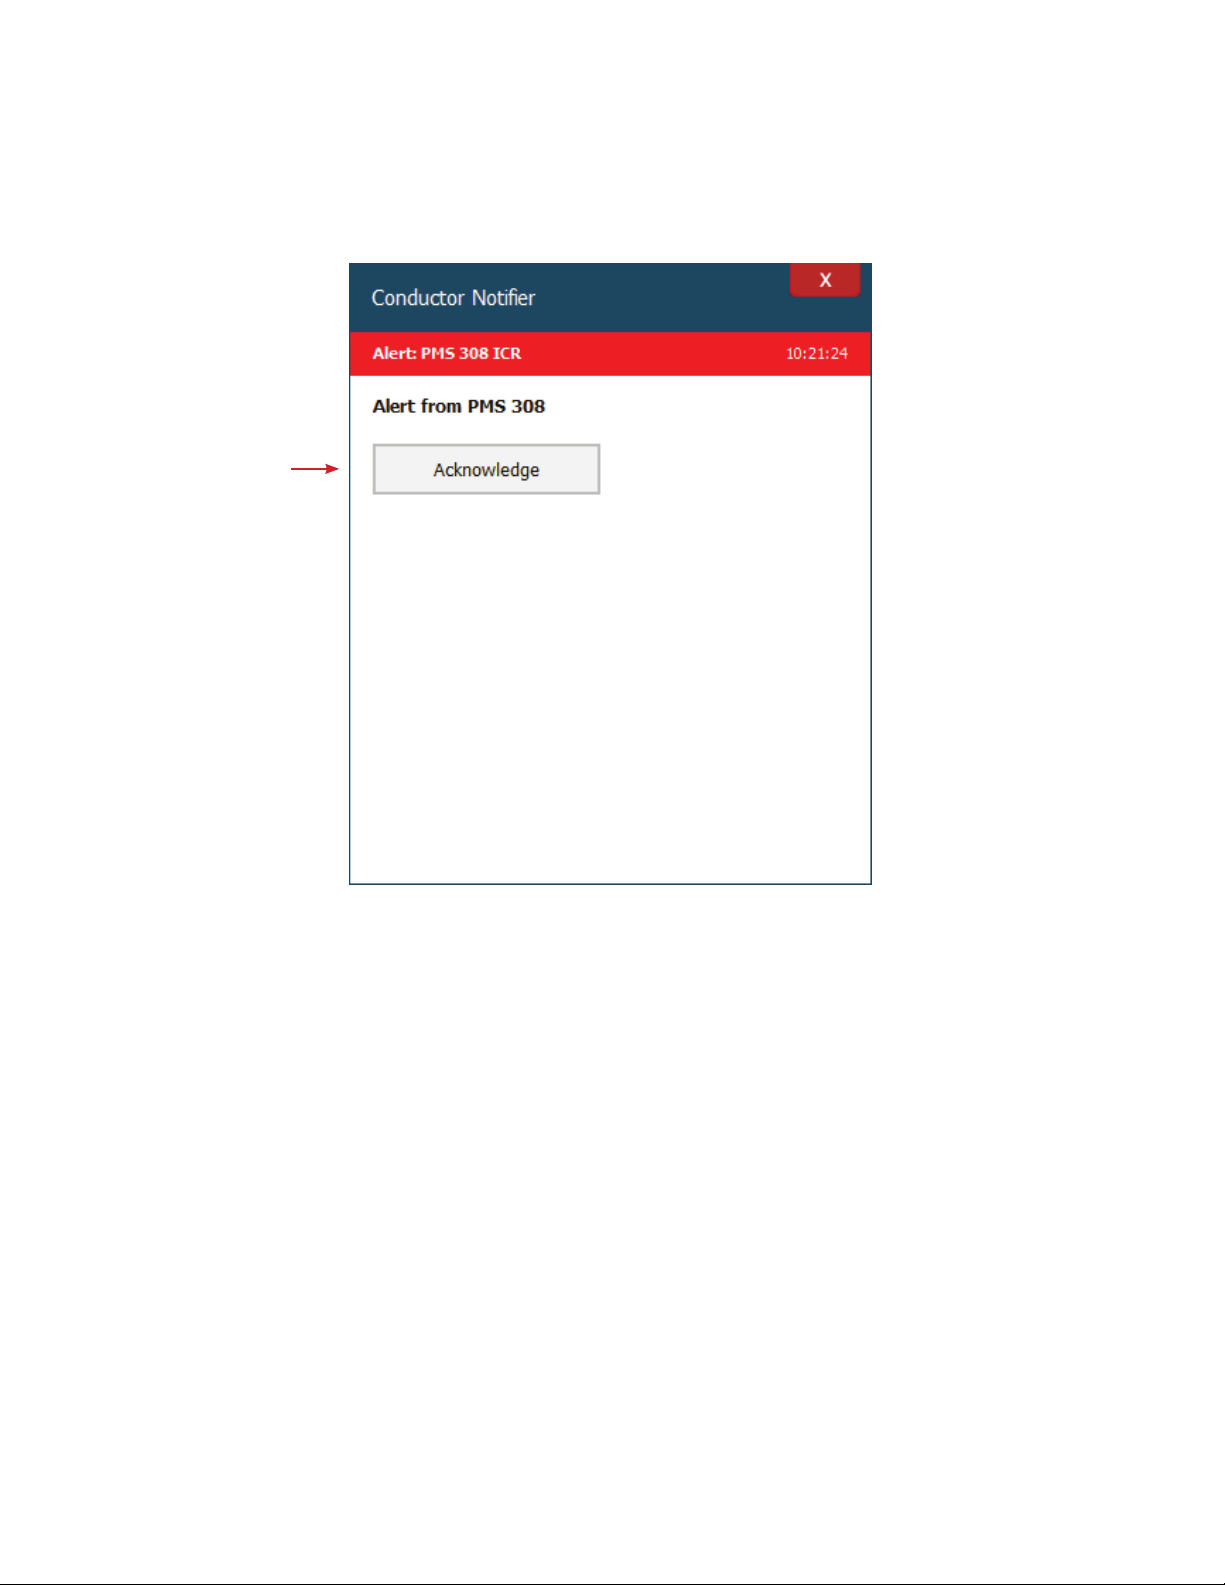
The Conductor Notifier is a separate application from the main Conductor Console and can be installed on
multiple computers so that additional administrators can receive alerts. When a computer receives a notification
and is not connected with intercom functionality (Admin Station, talk-back kit), the Answer button will not
appear. In this case, the alert can only be acknowledged*.
Click here to
acknowledge
the alert*
*In rooms that are equipped with a Smart Receiver or Juno Connect, the system can be configured to give visual
and/or audible notification that an alert was received by Conductor. When an alert is acknowledged by a person
using the Notifier application, the color of the Smart Receiver Beacon or Juno Connect LCD can be configured
to change, letting people in the classroom know that a person has seen the alert. For more information about
setting up the visual notifications with the Smart Receiver, see the ICR-01 Smart Receiver or Juno Connect
Installer Guide.
14
Page 18
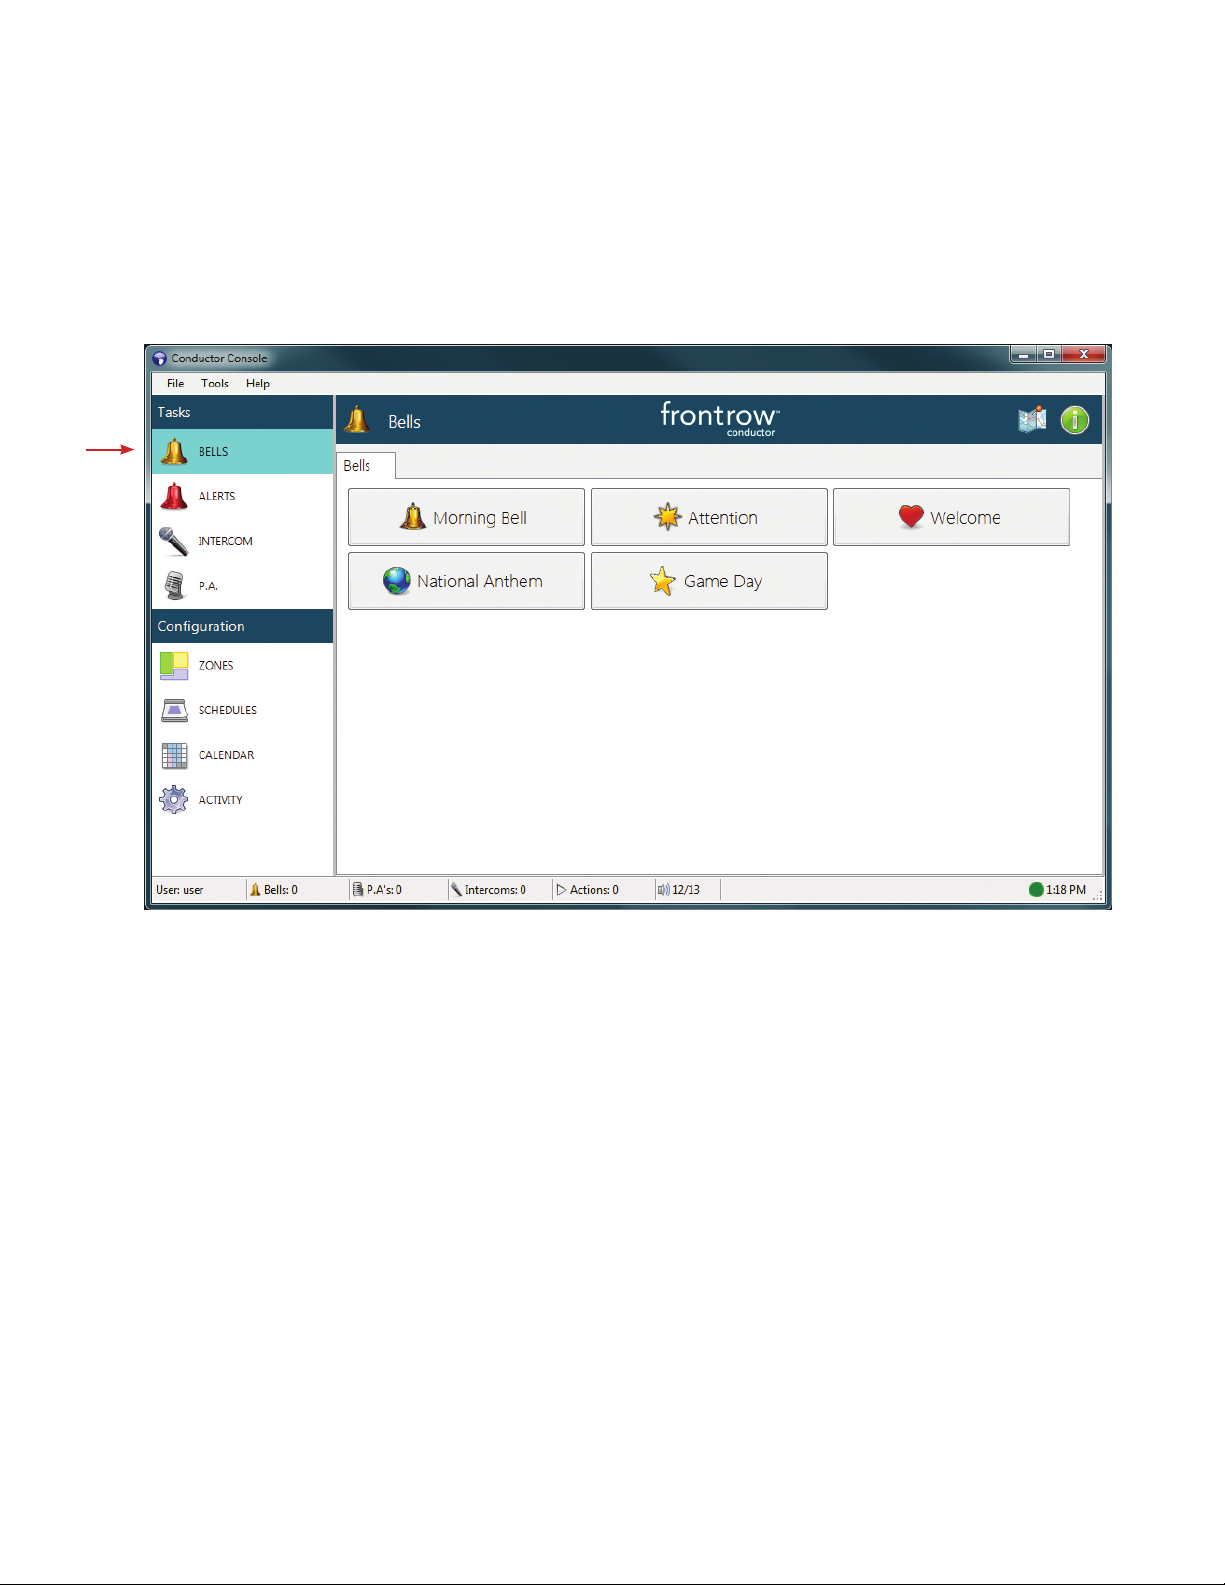
Bells: Manually playing bells and music
Conductor allows for the addition of buttons that play pre-recorded (non-emergency) audio files. This is useful for
testing zones, playing sounds that are not scheduled, pre-recorded announcements or music, etc.
These buttons may be preconfigured to play to specific zones, to all zones, or to ask you where it should be played.
15
Page 19

Telephone Interface (optional)
Conductor supports the addition of an option (CMP500) that allows paging from any telephone.
Using the telephone for paging:
1. Dial the extension of the CMP500 assigned by the school and wait for the CMP500 to answer.
2. The CMP500 will answer and play a prompt asking for the security code or it will play a single beep, depending
on how the interface has been setup. When prompted (or after the beep) enter the password given to you by your
System Administrator followed by the # key. The default password is 1 2 3 4 followed by the # key.
3. After the welcome message prompt or a beep enter # # on the telephone keypad to start an “All Call” page. Once
the # # has been entered speak your page and either hang up the telephone or enter * to terminate the call. Check
with your System Administrator to determine the proper method of ending a call.
Paging to specific zones may be set up on the system; please check with your System Administrator for the three
digit zone locations.
Example: 0 0 2 # could be a zone page to the bus loading area
It is possible that your CMP500 has special commands programmed beyond paging. Please refer to your System
Administrator for instructions.
To Change the voice message:
1. Dial the extension of the CMP500 assigned by the school and wait for the CMP500 to answer.
2. NOTE: in order for the CMP500 to allow for a change in voice messages the security code feature must be turned on.
3. After the CMP500 answers and plays the security code prompt enter the default password 4 3 2 1 # on the
telephone keypad (note, this password can be changed).
4. After the recording prompt enter a 1 on the telephone keypad to record a welcome message.
5. After the beep start recording the welcome message, the message must be less than 7.5 seconds. The message will
automatically be played back.
6. If you’re happy with the recorded message hang-up or enter a * on the telephone keypad. If the recorded message
is not correct simply enter a 1 on the telephone keypad to start over.
16
Page 20
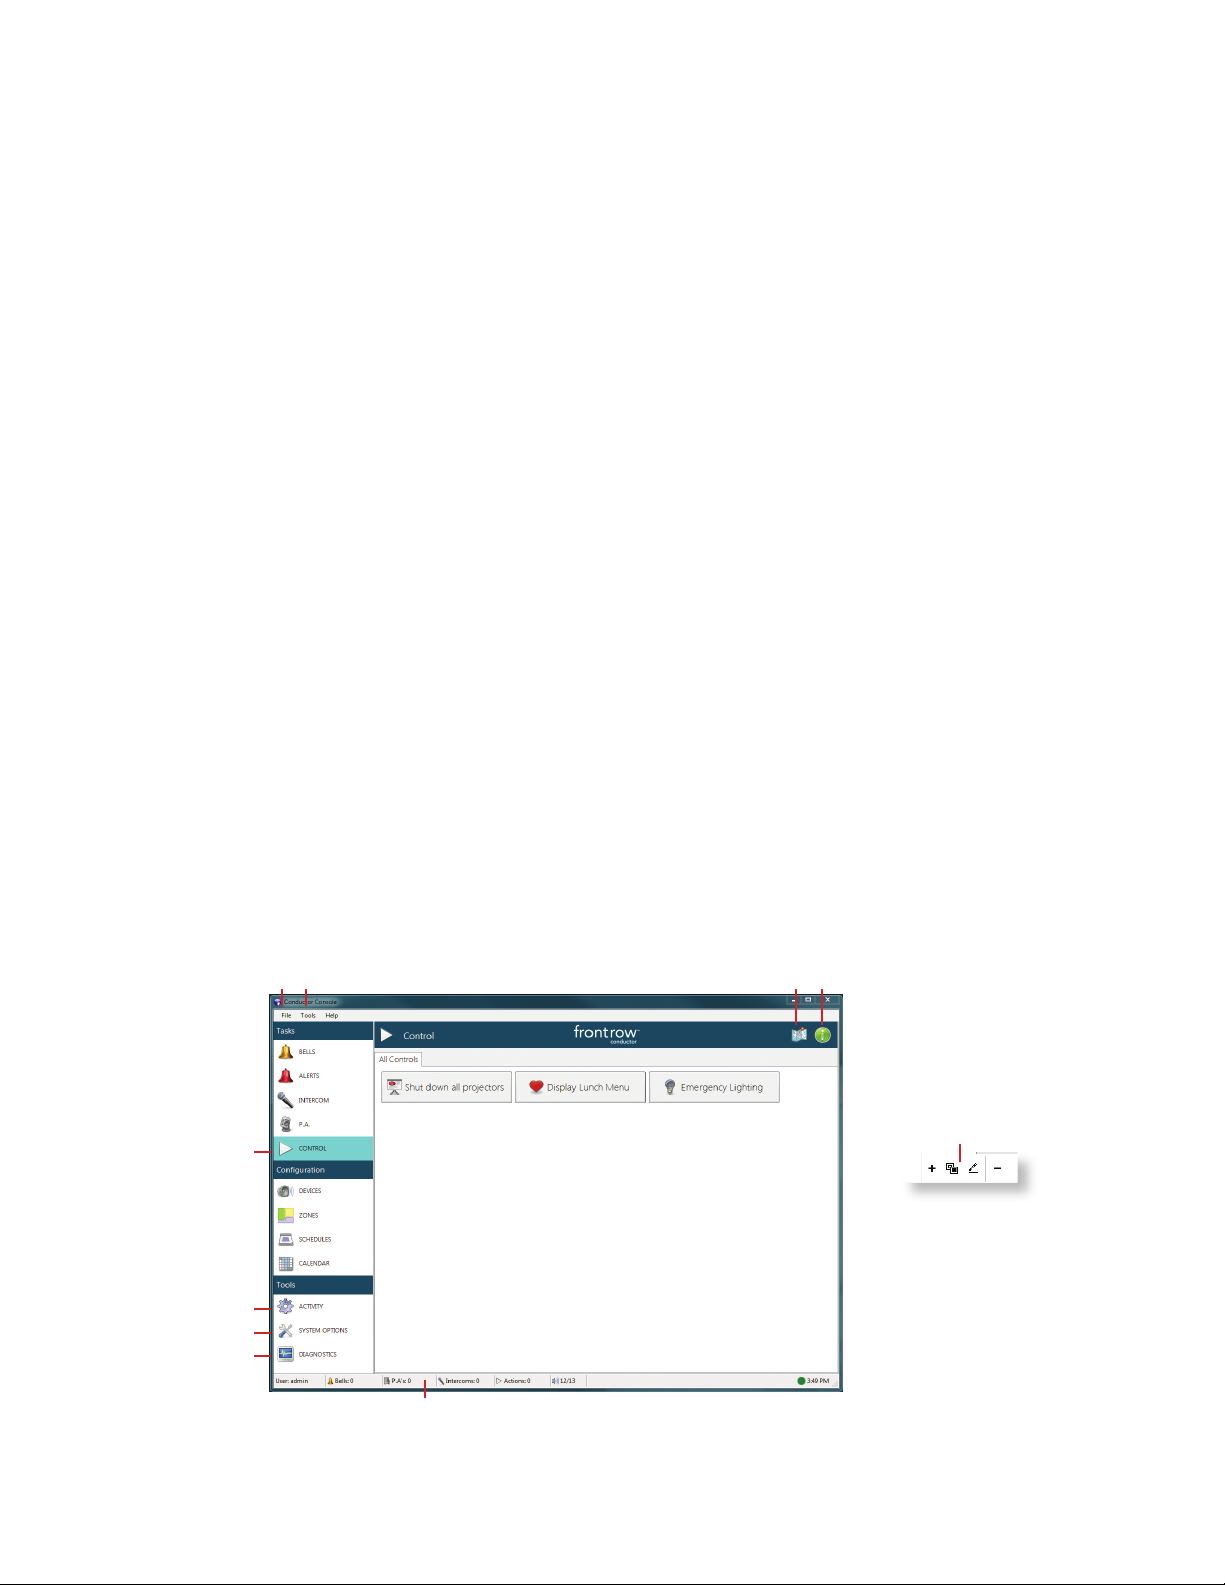
Other Features
1. Activity – Displays a list of current activities being performed by Conductor. To stop an activity click on the X under
on the column labeled Stop. This can be convenient if you need to force a song to stop before it has completed.
2. System Options (if enabled) – Add bells, alerts, triggers, email lists, maps, notes, audio sequences, user groups
and more in this area.
3. Diagnostics (if enabled) – Conductor keeps a log of activities which can be very useful in the event of a technical
problem. A log of activities can be sent to FrontRow for advanced troubleshooting.
4. Control – Customizable button are for control actions such as turning projectors off, etc.
5. File menu – Log out of the system, close Conductor and change passwords.
6. Options menu – (if enabled) Under Tools > Options is where you can change some of the screen attributes as well
as add/remove devices that can act as Master PA and Intercom stations.
7. Map – Conductor allows images to be imported that can be used as reference documents. For example, a JPG
image of the school’s layout can be quickly accessed from this section.
8. Notes – Add special notes such as instructions on what to do in an emergency.
9. Bottom Banner – (from left to right):
• User – the current user
• Bells – displays the number of current activities; in this case no activities (0) are active
• Intercom – displays current Intercom sessions
• Actions – display current Actions that are being executed
• Speaker Symbol – displays the number of devices (rooms) that are online and managed by Conductor, and the
total number of devices controlled by Conductor, even those that are offline or otherwise inaccessible
10. Editing symbols – Throughout Conductor interface editing symbols can be found in the lower bar. They are used to
ADD/DUPLICATE/EDIT/DELETE in the sections where editing is taking place.
5 6 7 8
10
4
1
2
3
9
17
Page 21
Appendix
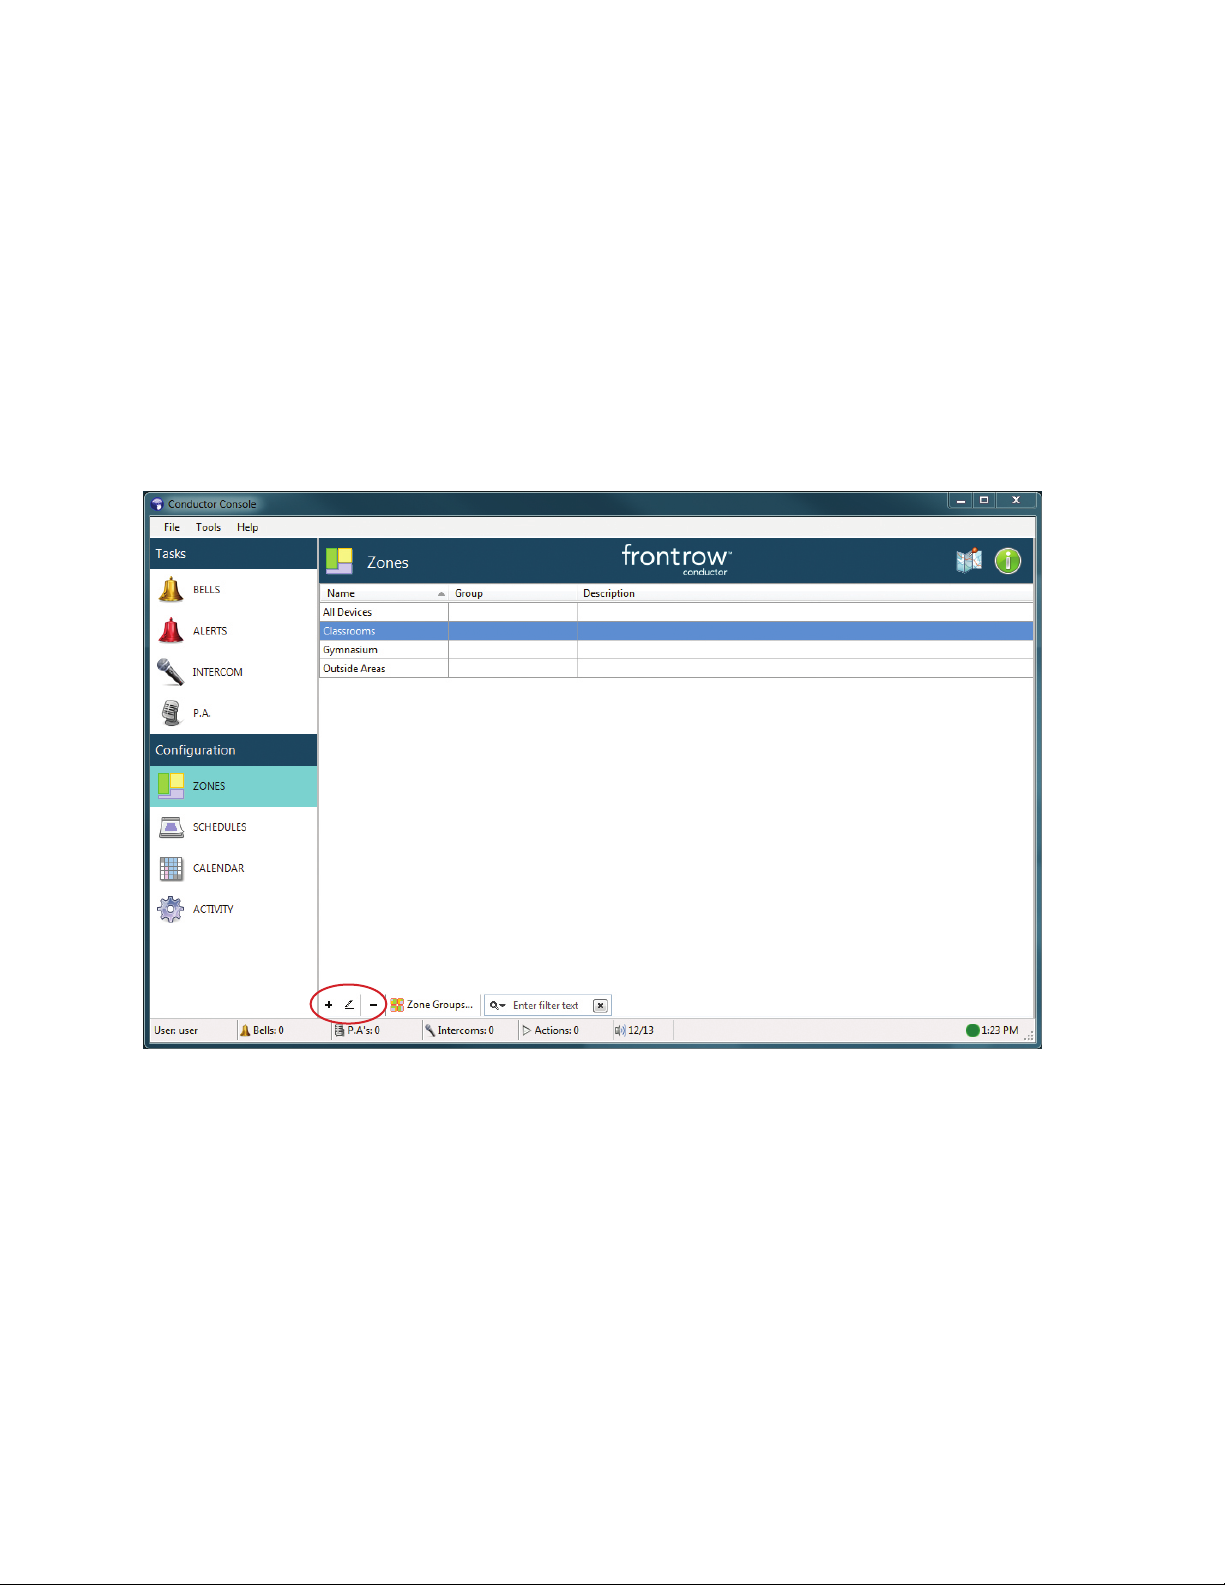
A. Adding, deleting or editing a Zone
Select “Zones”
• To Delete a zone, select it from the list of zones, then click the – button.
• To Edit the zone name, color, or device list, select the zone and click the edit (pencil icon) button.
• To Add a zone, click the + button.
18
Page 22
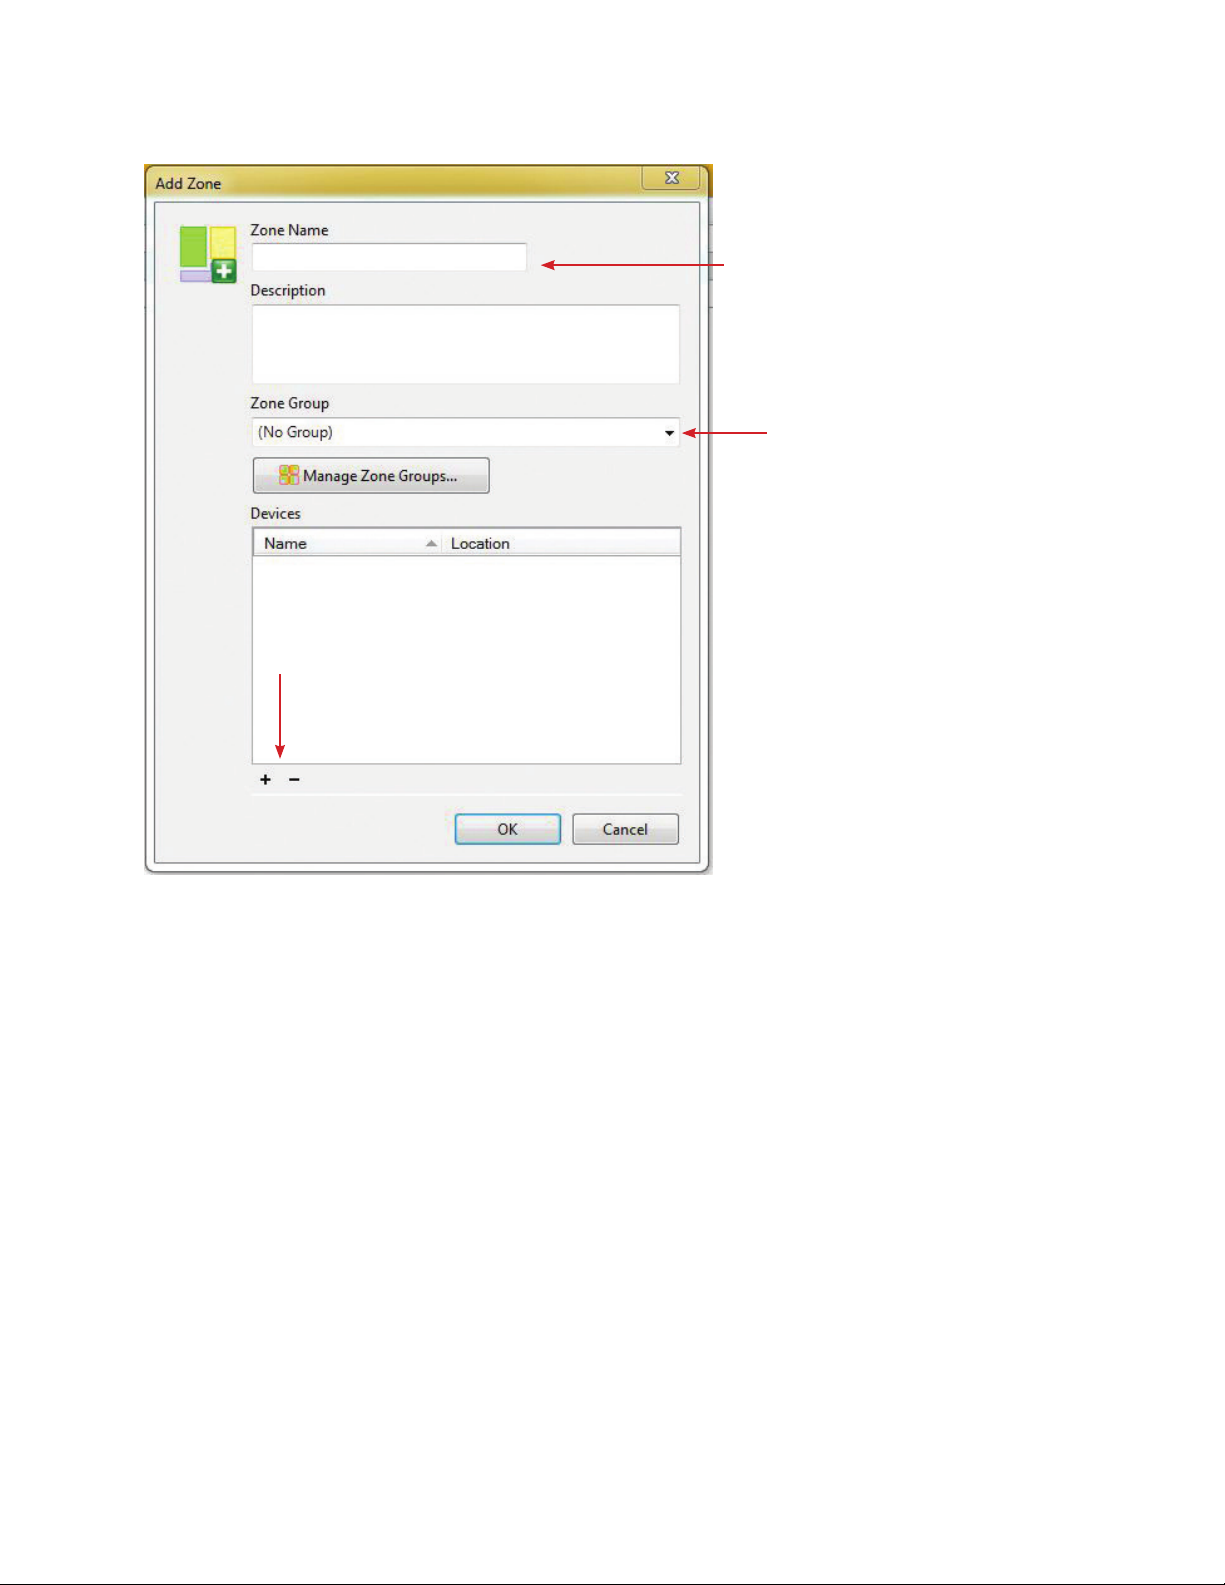
When the + button is clicked you will see this screen:
Add or delete locations (devices)
Provide a logical name for a
zone such as “hallway” or “K-3
classrooms”.
Option to place zones in
groups.
Clicking on the + symbol brings up the screen in which you can see all the available locations, also known as devices.
Click on the room (or rooms) that you want to add to the zone. You can select multiple rooms at once by holding down
the Shift button. Select OK and these rooms will now be added to your zone. You can easily remove rooms from the
zone by highlighting the room and selecting the – symbol.
19
Page 23
B. Creating Schedules
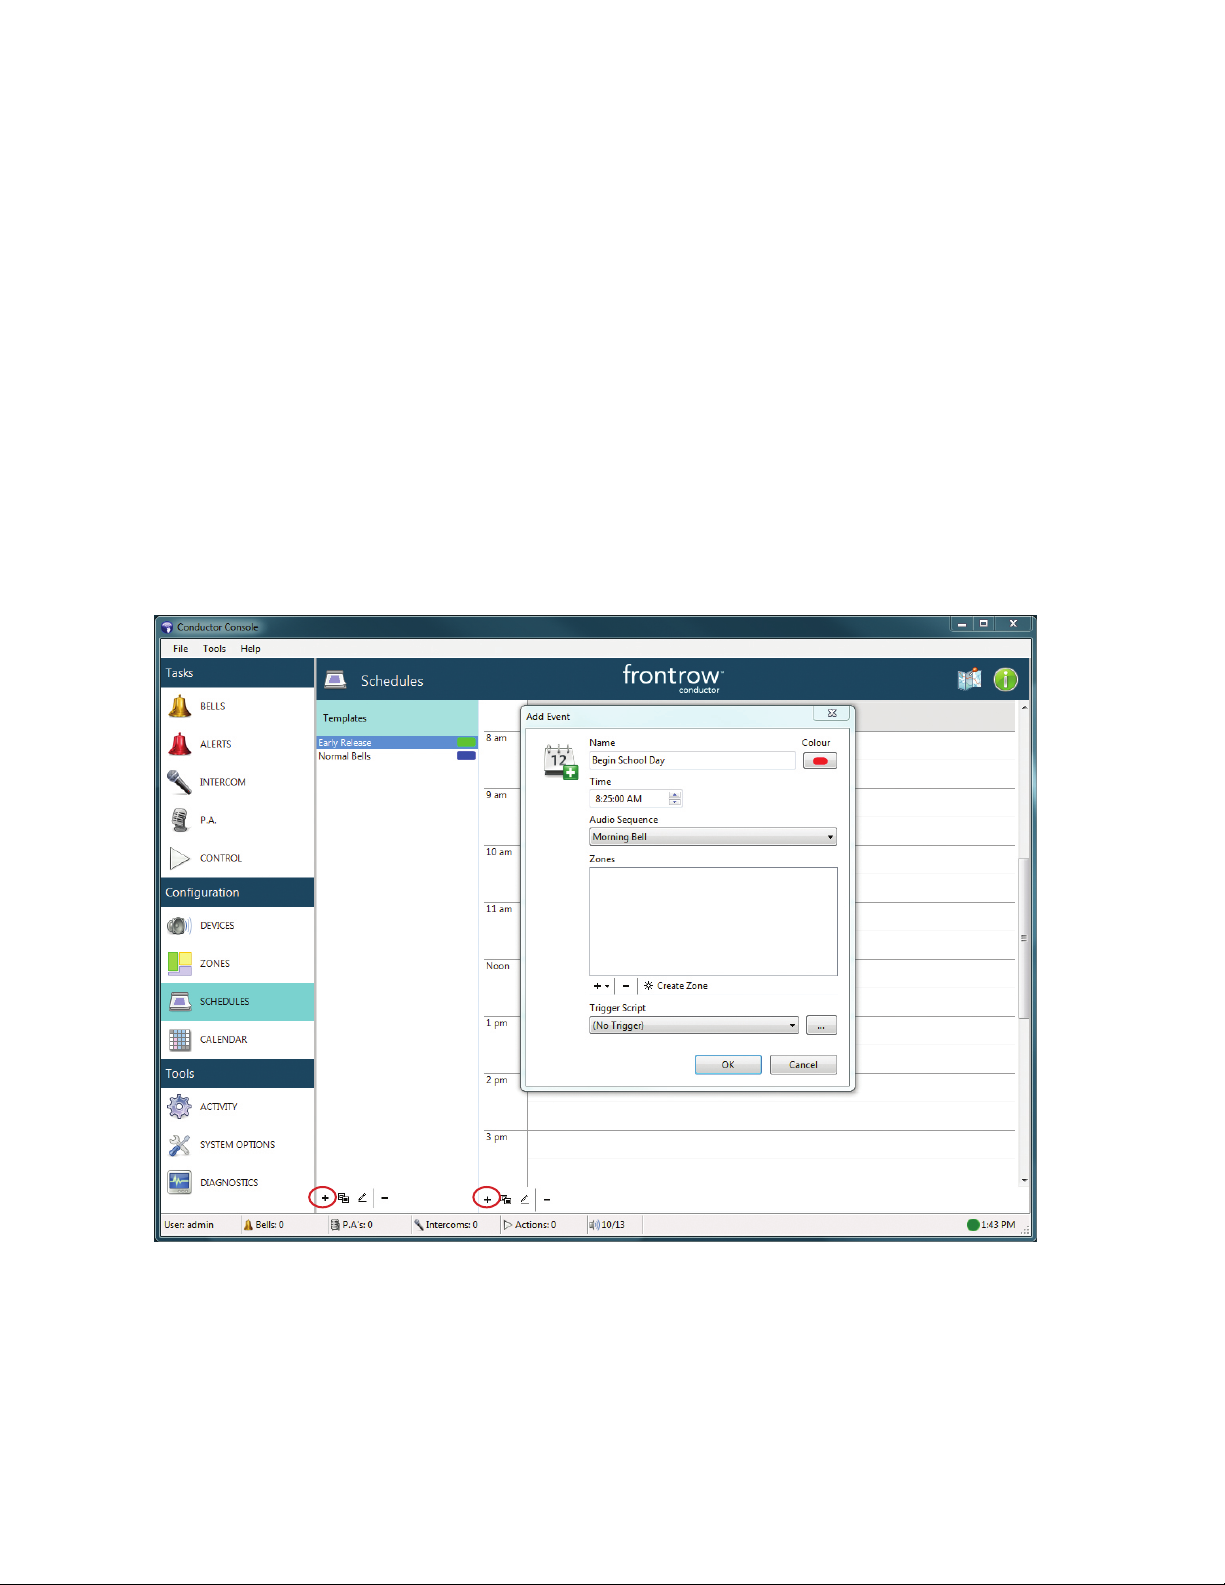
To create a new schedule follow these steps:
1. Click on the + button to add a new schedule.
2. Give it a name and assign it a color. (Assigning a color makes it easy to see which template is running for each day.)
3. Add an event:
• give it a name
• select a start time
• choose the appropriate audio sequence
• select the zones where the audio will play
• click OK to add the event to the schedule
4. Add more timed events as needed (tip: use the duplicate button to repeat an event multiple times in the day).
Note that Conductor can play different audio sequences for different zones at the same time, should that be necessary.
20
Page 24
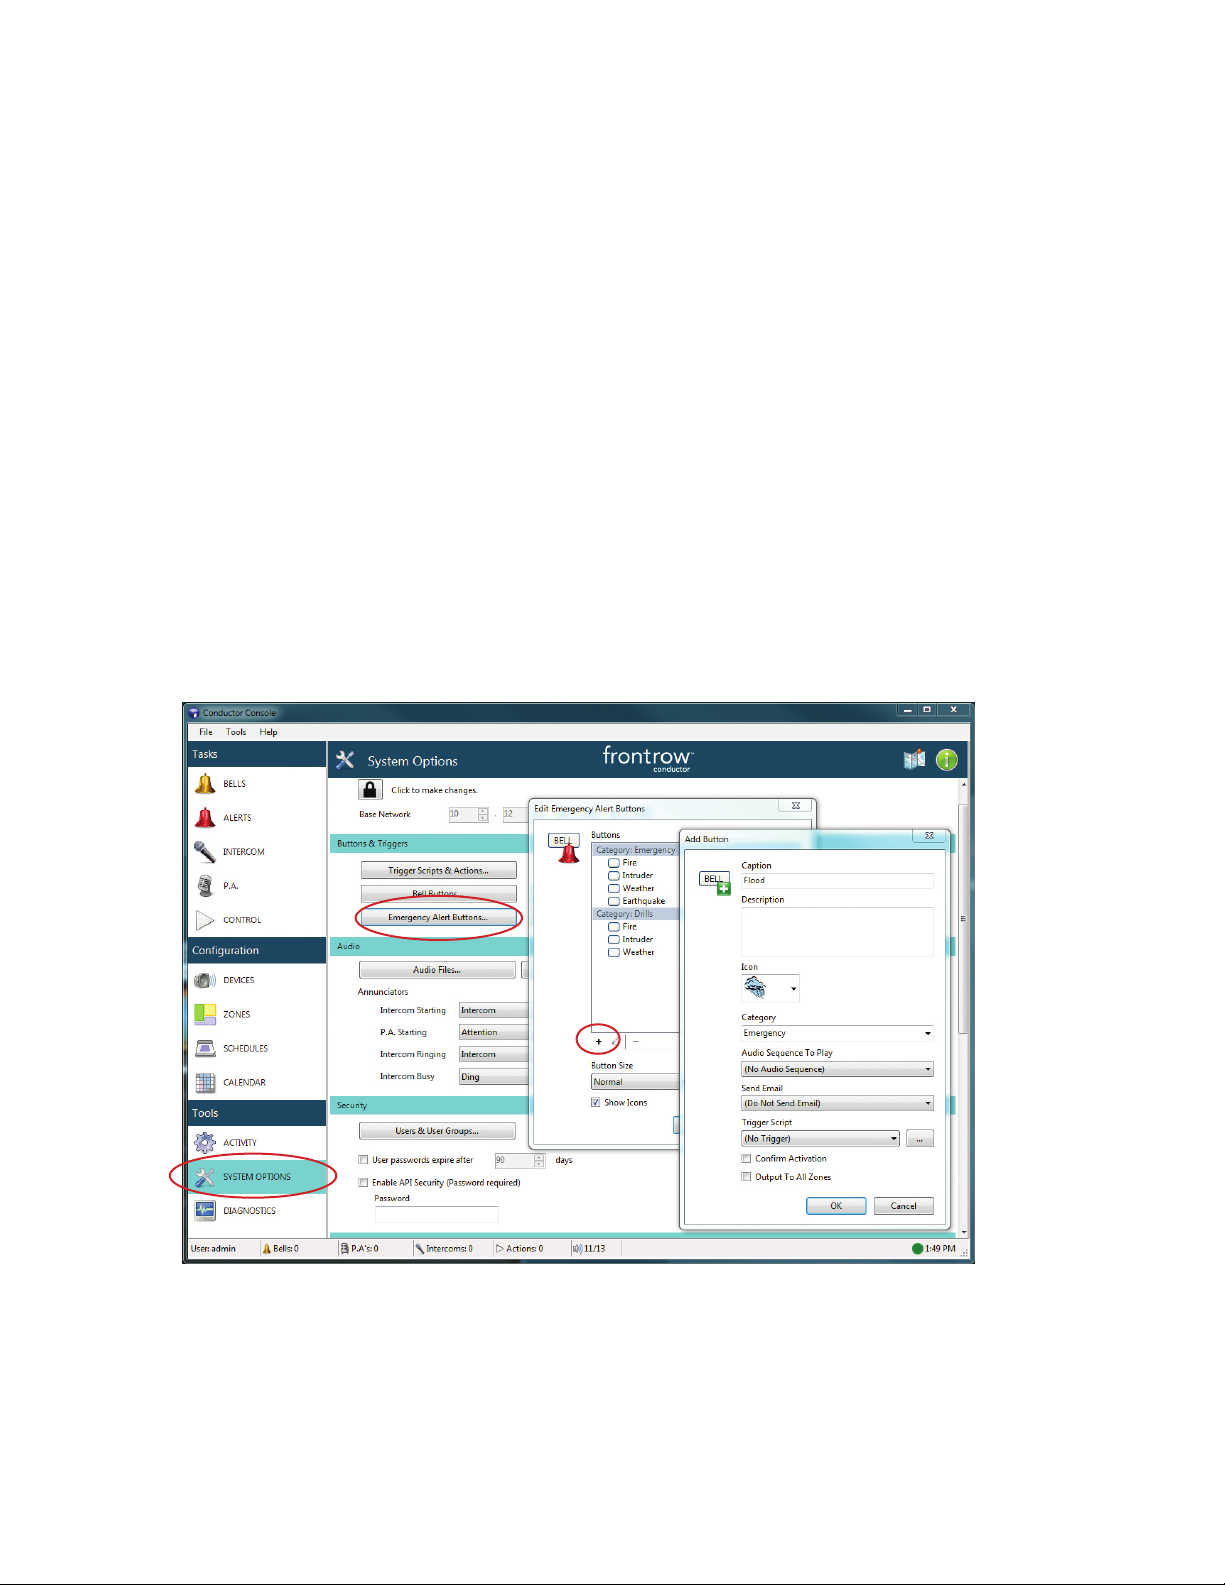
C. Creating Alert Buttons
Creating an alert button:
1. Click on Systems Options (accessing this section may require admin privileges).
2. Select Buttons and Triggers > Alert Buttons.
3. Click on + to add an alert button.
4. Fill in the caption that will be displayed on the button and choose an Icon for the button.
5. Select or enter a category for the button.
6. Add an audio sequence to be played when this alert is initiated.
7. Optionally, depending on your permissions, you can choose to have an email sent and a defined trigger event. A
trigger event can be something like “lock all outside doors”.
8. “Confirm Activation” will prompt “are you sure?” when the button is pressed.
9. If “Output to All Zones” is not checked, the user will be prompted to select where they want the audio to be played
when the button is pressed.
10. Choose the size of the button and if this button will display the associated Icon.
21
Page 25
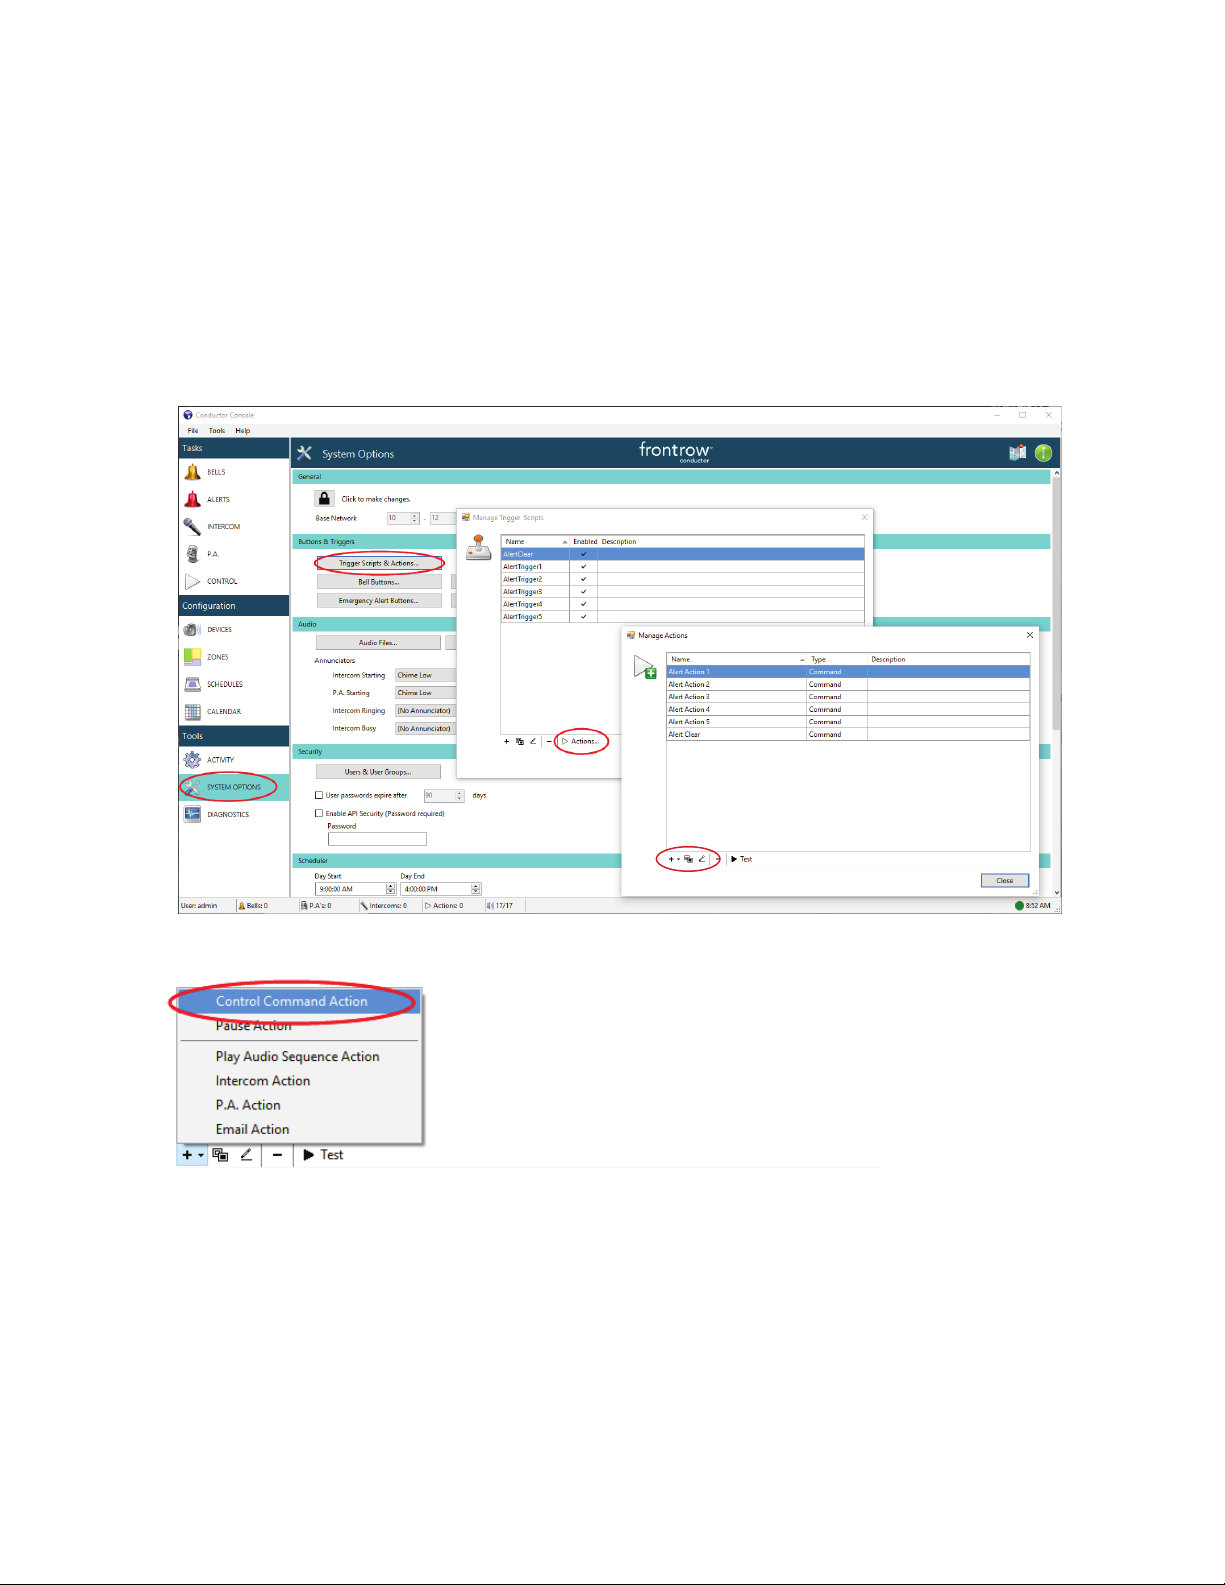
Using Alert Buttons with Smart Receiver or Juno Connect
If your site is using Conductor with rooms equipped with the FrontRow Smart receiver or Juno Connect, the alert
buttons can be configured to give visual notification by displaying colors and/or a strobe light (Smart Receiver only) in
classrooms when an alert button is pressed in Conductor.
To set up the Smart Receiver Beacon/Juno Connect LCD notification.
1. Click on Systems Options (accessing this section may require admin privileges).
2. Select Trigger Scripts and Actions.
3. Select Actions.
4. Click on the + to create an Action.
5. Create a Control Command Action
6. Name the action and add an optional description.
7. Create one of five options for different alert types to be displayed by the Smart Receiver’s Beacon or Juno LCD (for
more on programming the Smart Receiver or Juno Connect see the Smart Receiver or Juno Connect Installer Guide).
8. In the Command Text box, enter #PAS[“HPS”,M1]; for the Priority Alert 1 colors to be displayed.
9. For the different Priority Alert color versions, change the number following the M to 1, 2, 3, 4 or 5.
22
Page 26
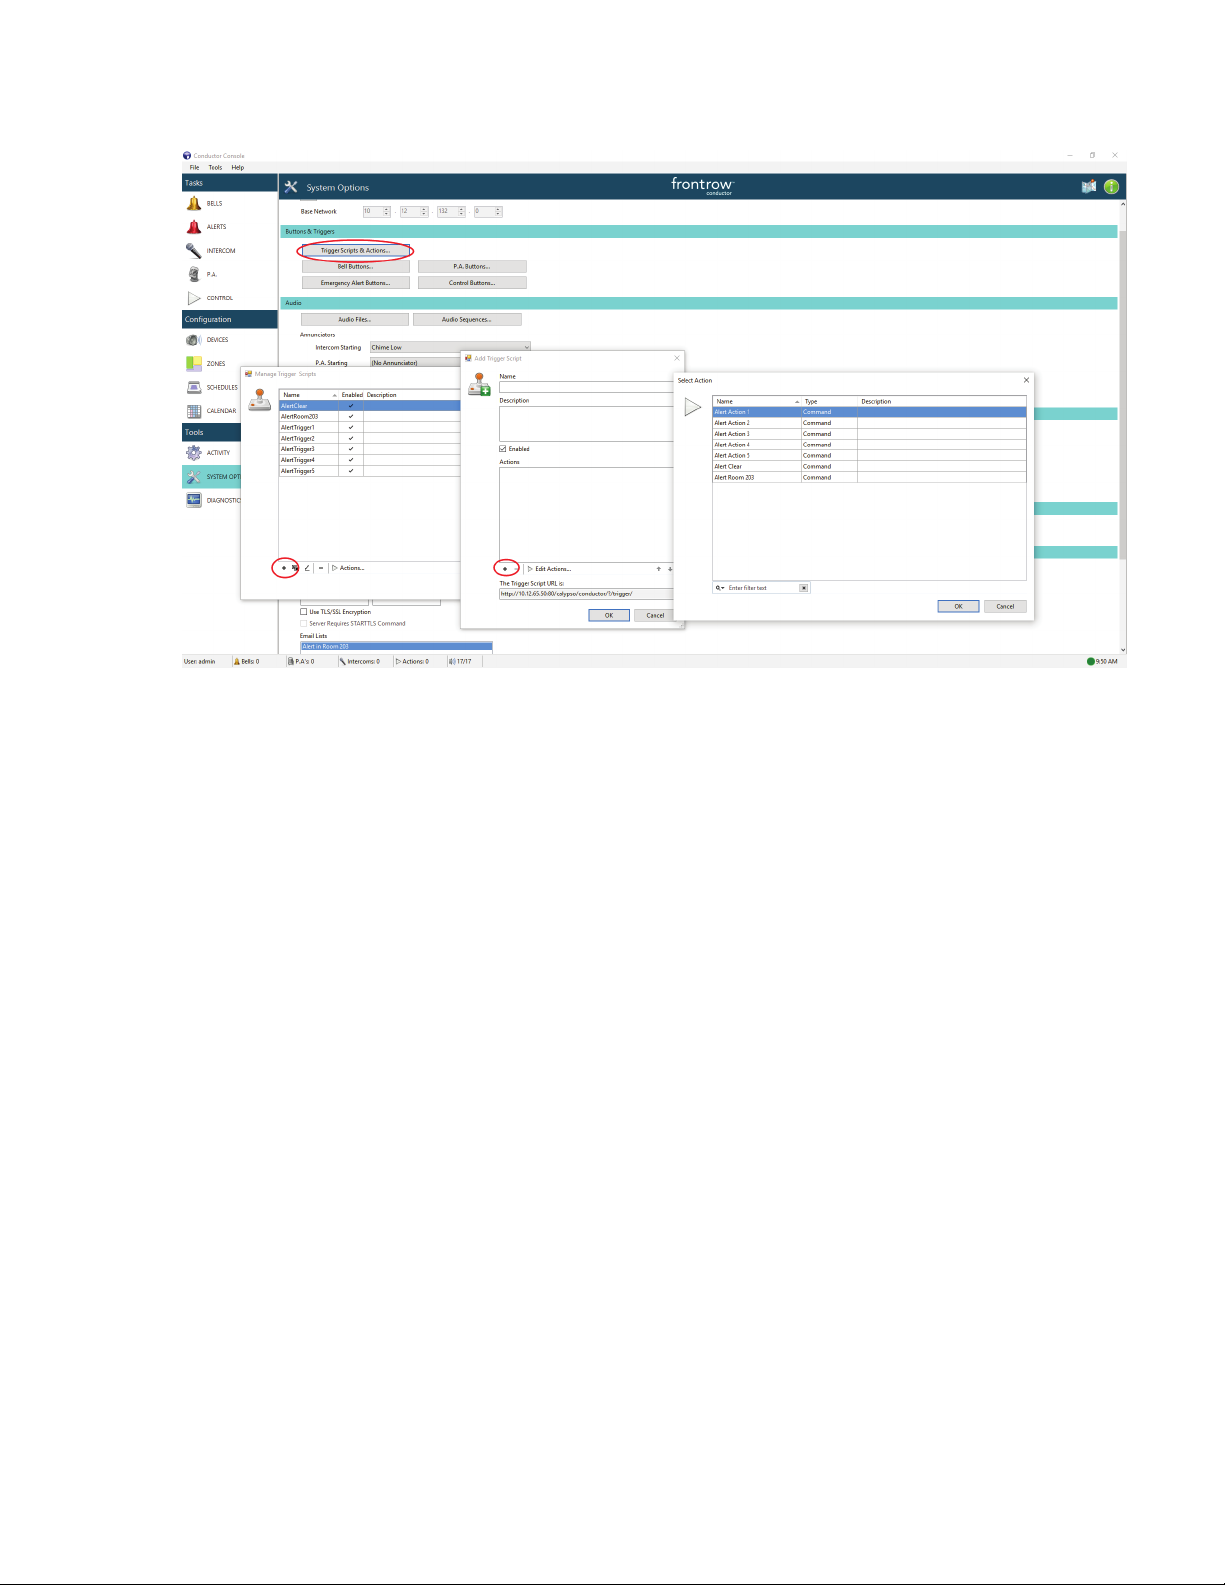
10. Create a Trigger Script
11. Click Trigger Scripts and Actions
12. Click + to create a new Trigger Script
13. Click + to add an Action (created in steps 5 - 9 above)
14. Click one of the Actions and click OK (this can be combined with other Actions that will be triggered at the same time)
15. Name the Trigger Script, add an optional description and click OK
16. Follow the directions for creating an Alert Button on page 21
23
Page 27
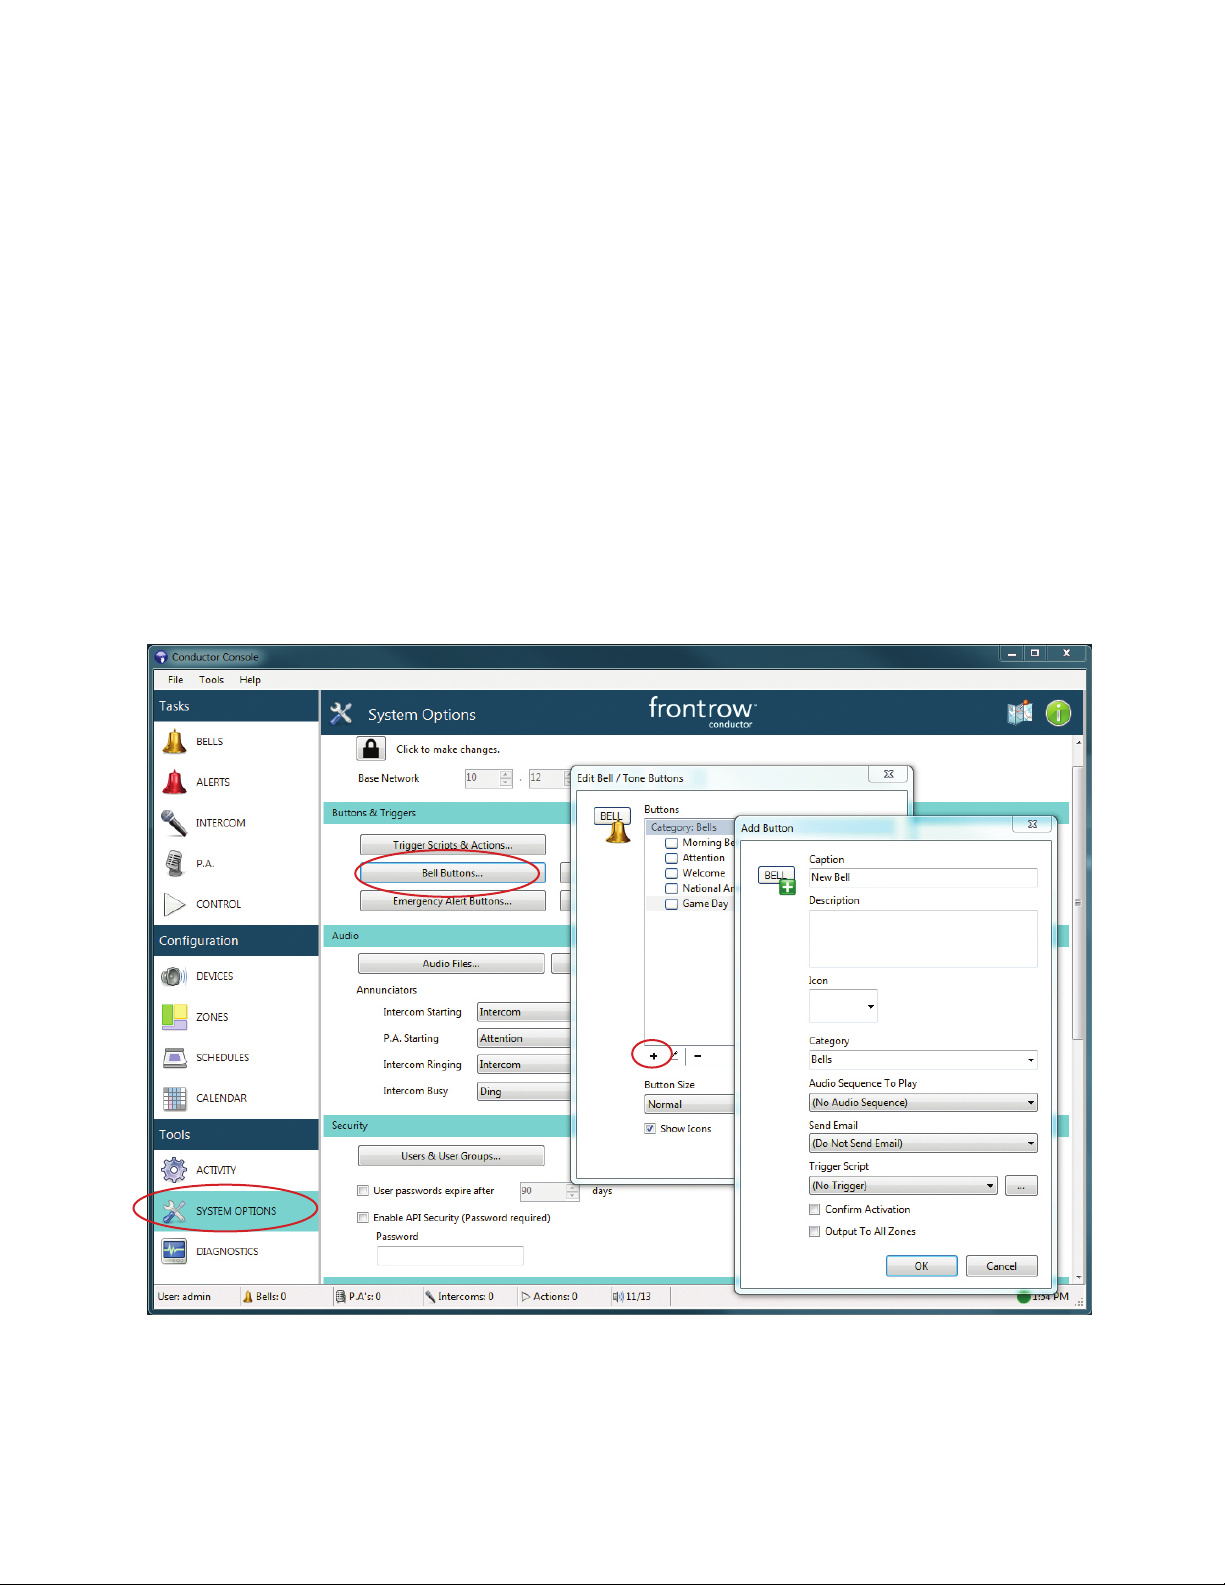
D. Creating Bell Buttons
Creating a bell button:
1. Click on Systems Options (accessing this section may require admin privileges).
2. Select Buttons and Triggers > Bell Buttons.
3. Click on the + button to add a button.
4. Fill in the caption that will be displayed on the button and choose an icon for the button.
5. Select or enter a category for the button.
6. Add an audio sequence to be played when the button is pressed.
7. “Confirm Activation” will prompt “are you sure?” when the button is pressed.
8. If “Output to All Zones” is not checked, the user will be prompted to select where they want the audio to be played
when the button is pressed.
9. Choose the size of the button and if this button will display the associated Icon.
24
Page 28
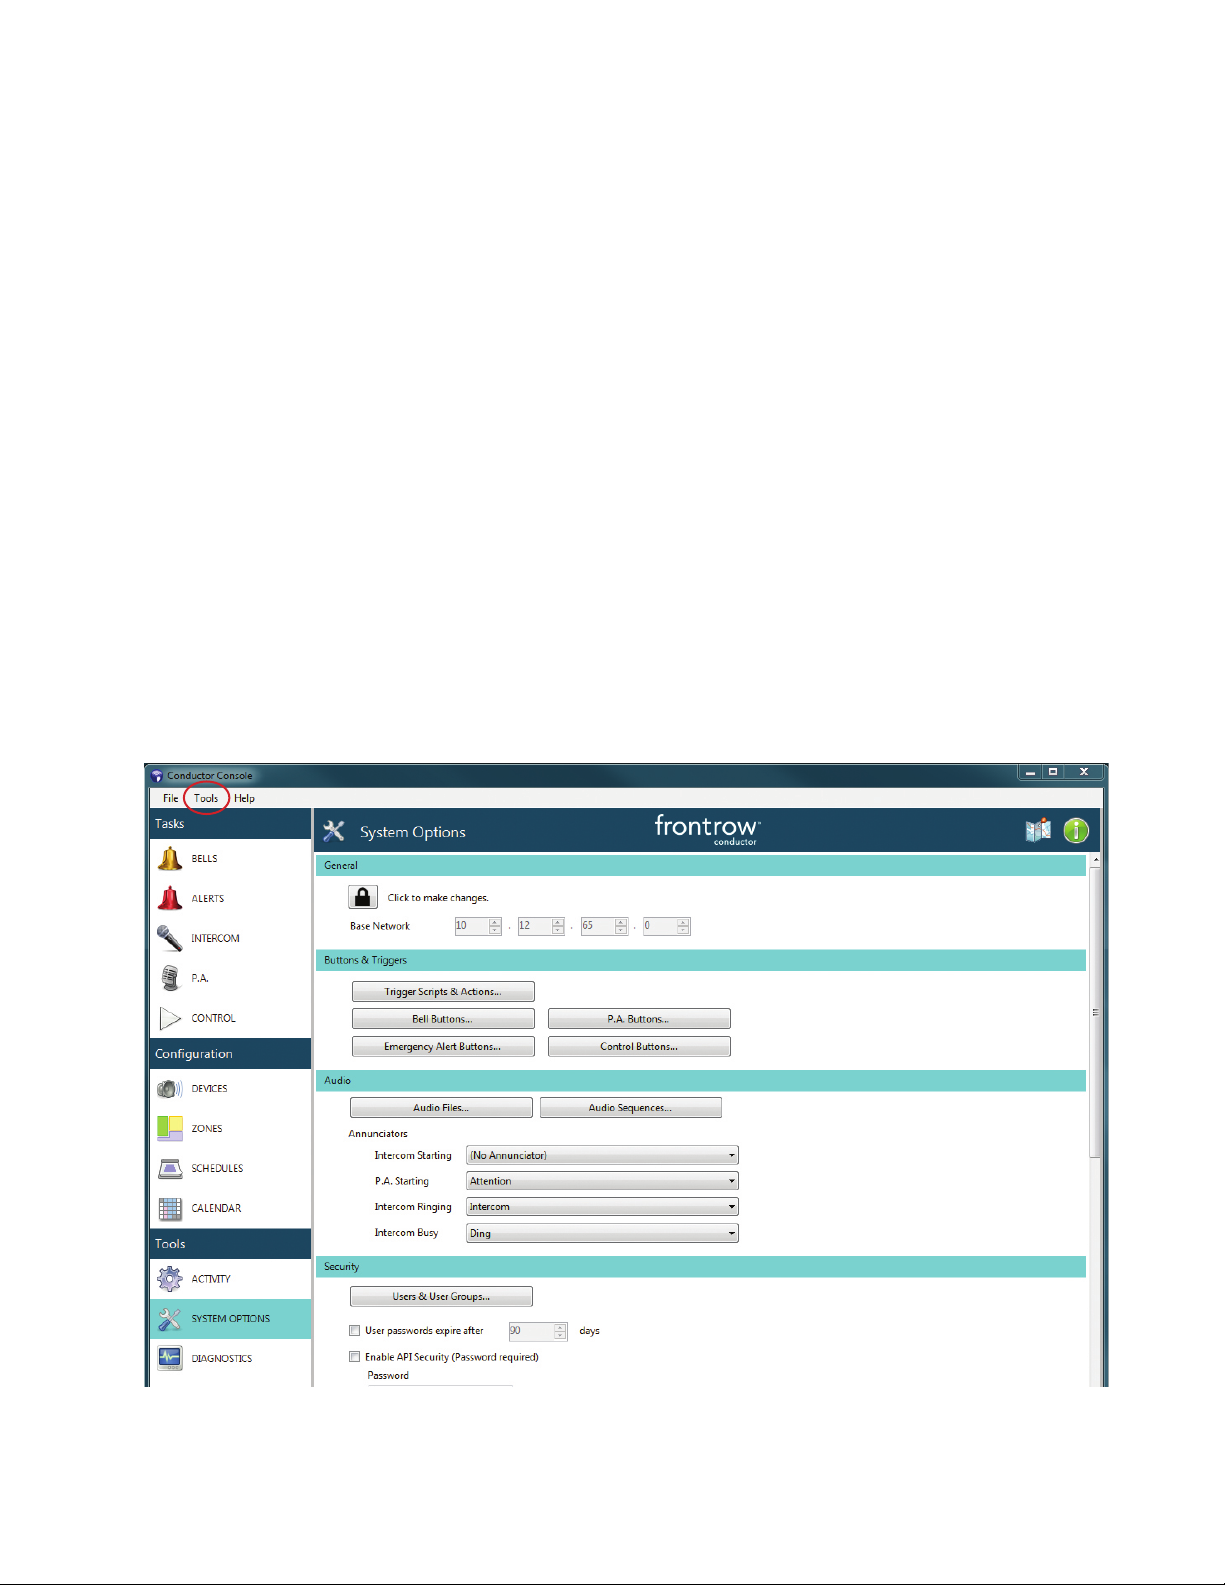
E. Managing Audio Files
Conductor includes a number of audio files for easy setup and configuration, but many schools like to add their
own sounds, music, and voice recordings to customize their campus experience. This section explains how to:
• Convert music files to be playable in Conductor
• Record your voice or other audio source
• Create audio sequences
To use any audio file, you must first create an audio sequence. Sequences are used because sometimes you may
want to play multiple audio files in succession, or repeat a sound multiple times.
Adding an audio file to Conductor system:
Audio is converted and recorded using a separate application called “Audio Tools.” This tool converts other audio files
such as MP3 and WMA files into the WAV format required for Conductor (sometimes even certain WAV files need to be
converted using this tool).
Importing an audio file:
To import an audio file:
1. Navigate to Conductor Audio Tools and select “Audio Conversion & Recording.”
25
Page 29
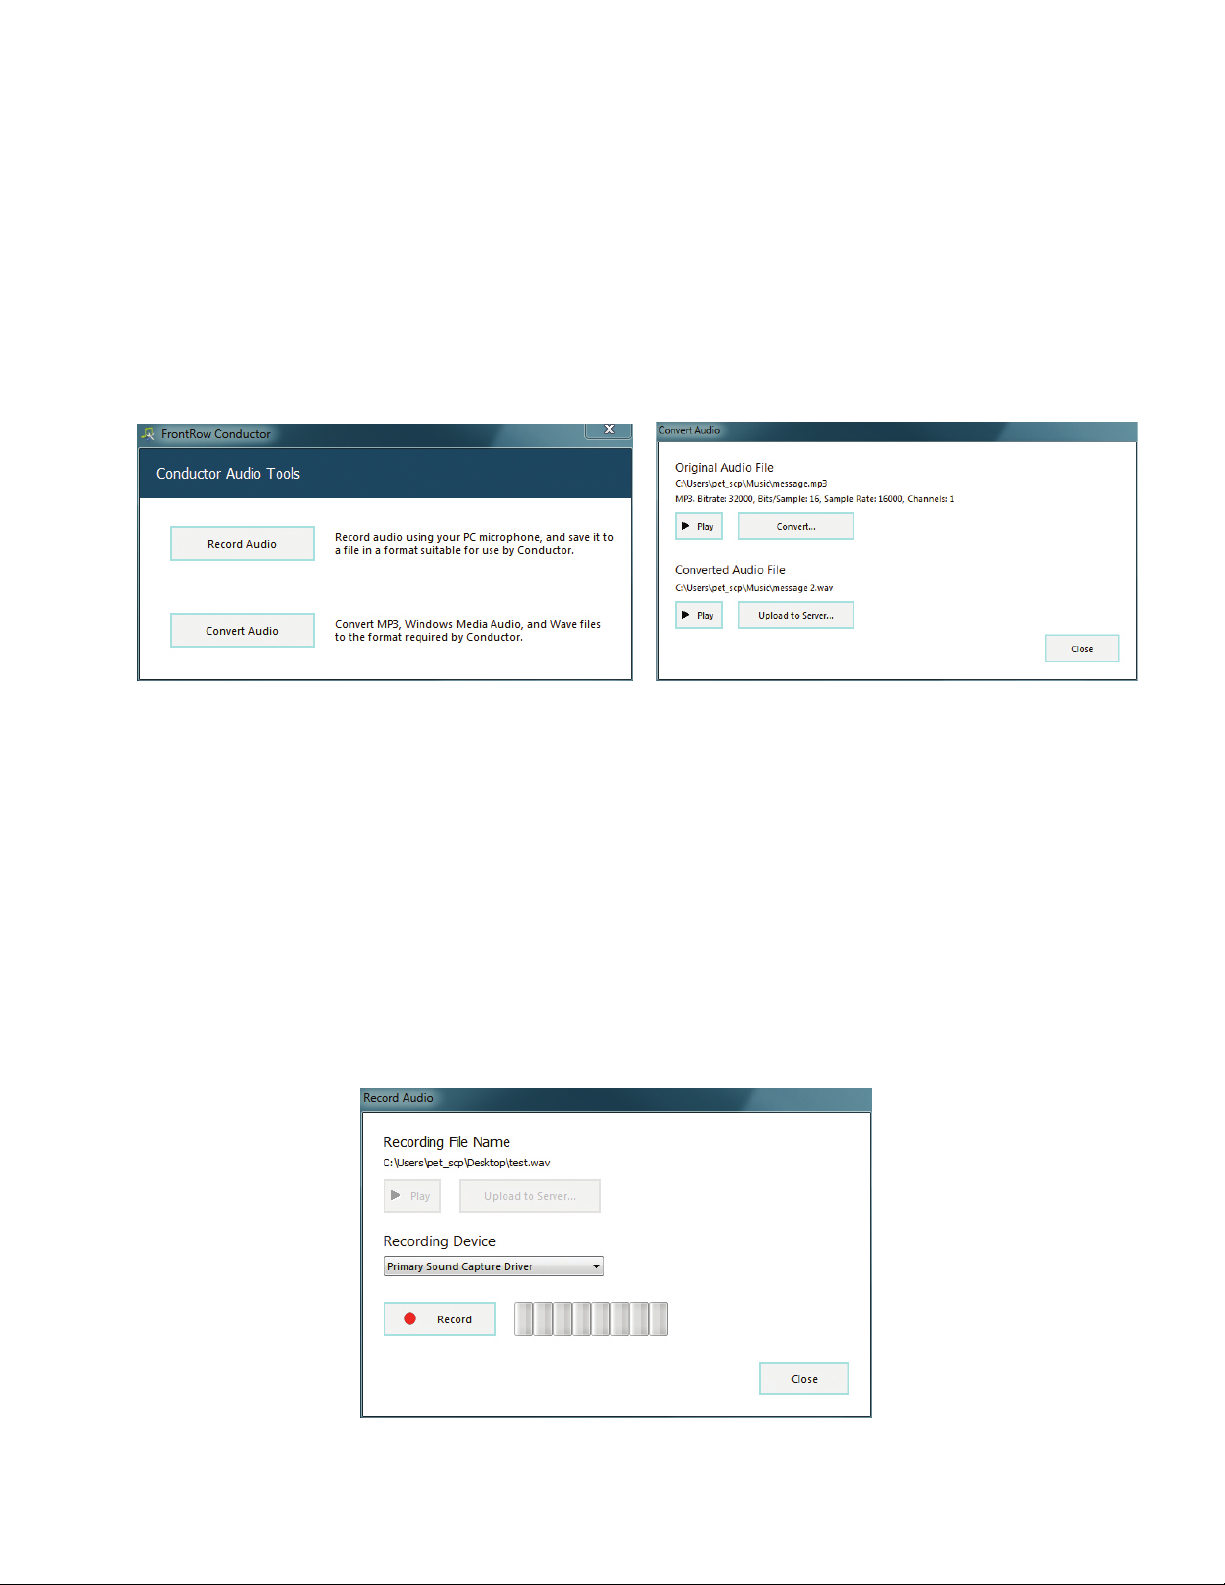
2. To import an audio file from your desktop (or other location) select Convert Audio.
3. Navigate to where your audio file is located.
4. Select your file and then click on Convert.
5. Give your file a name (avoid special characters such as $, %, etc.)
6. Select Save and your file will be converted and saved on your computer.
7. Click on Upload to Server and now this file will be available to be used in Conductor system. (If you have more
than one Conductor server, you may select which server to save the file. This is useful if managing audio files for
a district.)
Recording an audio file:
1. Open the Audio Tools and select “Record Audio”.
2. Select the output file location and give the file a name.
3. Select a recording device. This can be the computer’s internal microphone or an external type.
4. Select Record to start the recording. Select Stop to end the recording.
5. Select Upload to Server to add this new audio file to the server’s audio list.
NOTE: the quality of the recording depends very much on the equipment being used, the speaker’s expe-
rience and the environment. For the best results you may want to record the audio in a location equipped
with audio products dedicated to high-quality voice recordings.
26
Page 30
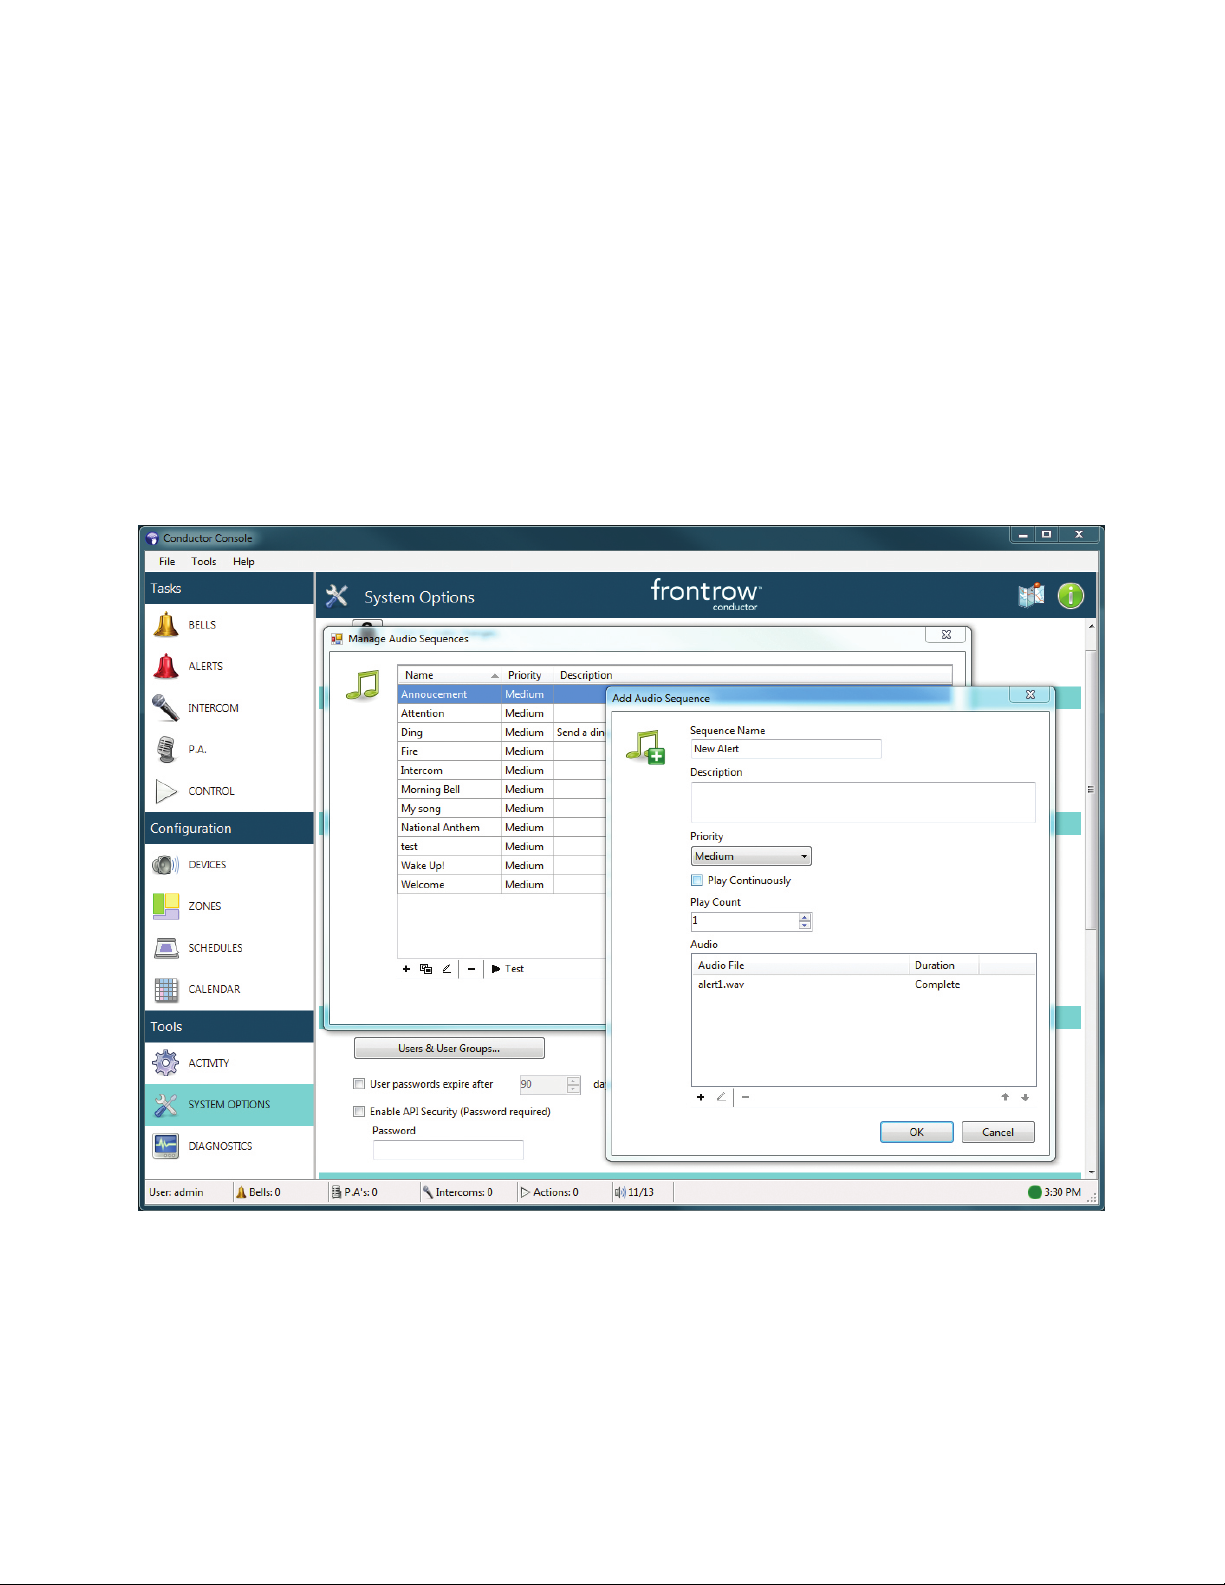
Creating an Audio Sequence:
1. Click on Audio Sequences (from the Tools menu or in System Options).
2. Select + to create a new sequence.
3. Name the sequence and set the priority: Important: Conductor can keep track of which audio sequences are
more important than the others. Audio sequences for Alert buttons should be set to a “High” priority so that they
override other audio in progress (such as bells and music). PA and intercom sessions will override everything, so that
spoken communication can always take place.
4. If “Play Continuously” is checked, the sequence will keep playing until stopped manually.
5. The “Play Count” determines how many times Conductor will play through the entire sequence.
6. Select + to add one or more files to the list. In the dialog that appears, you can select and play audio files (through
the computer speakers), set a specific duration, and add a delay after the file.
27
Page 31
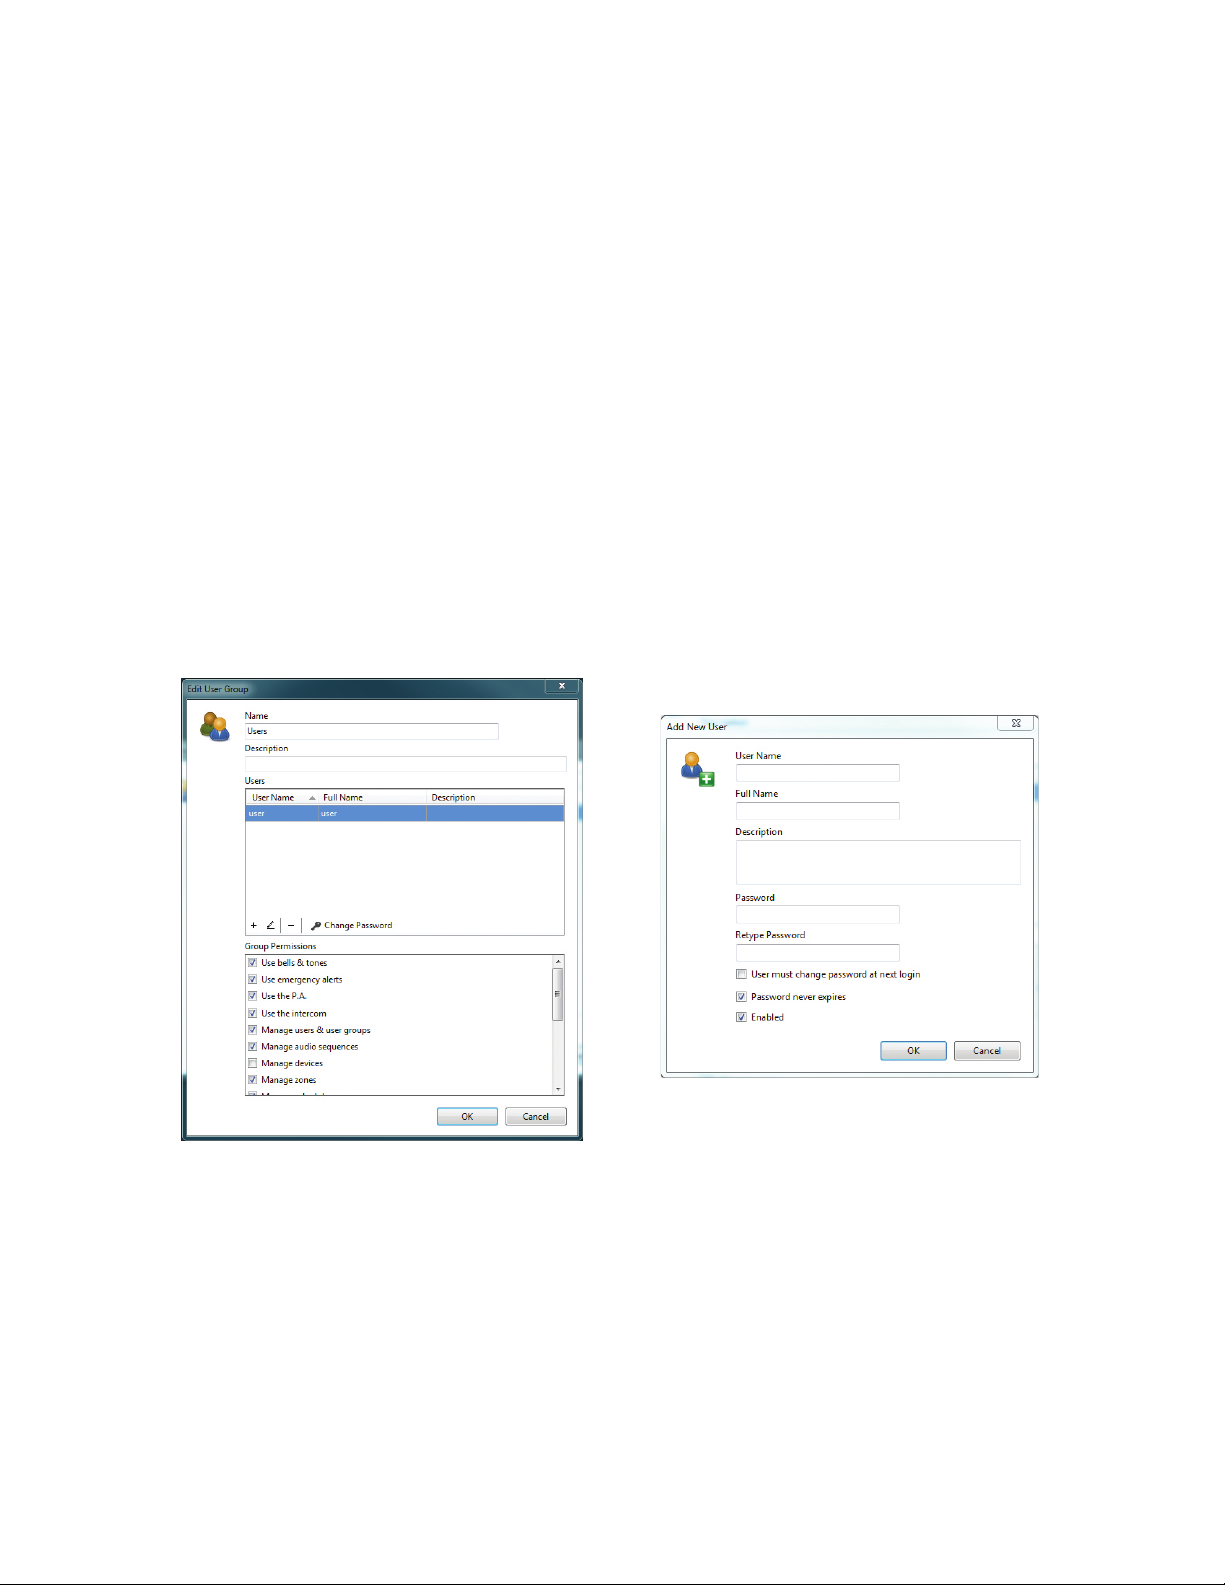
F. Managing Users, Permissions and Security
Your school may assign responsibility for communications to multiple people, each accessing Conductor for the same
or different purposes. Whether there are multiple computers running Conductor or just one, each user should have his/
her own login and password, and each should have a set of permissions to do only what s/he needs to do. This section
shows how to set up multiple users.
To Add a New User:
1. Click on Systems Options (accessing this section may require admin privileges).
2. Under “Security” click on “Users & User Groups”. A user group is a collection of users with similar privileges.
3. Double-click a group to open the list of users in that group (to create a new group click the + button).
4. In the Edit User Group window, select the + button, then give the new user a User Name, Full Name, Description
(optional), Password and set the options for the user’s login rules.
5. Click on OK to save the new user.
6. When this user logs into a Conductor system they will now be presented with only the items that they have
permission to access. (Note the group permissions for each group - these affect what is displayed in Conductor for
those users when logged in.)
28
Page 32
G. Streaming Music from a Mobile Device
With Conductor you can stream music from a mobile phone or other device directly through the paging system. Some
schools like to play music in the mornings or before school events. Instead of importing sound files then creating
buttons, which is great for music you play frequently, streaming music lets you play whatever you want from your mobile
device.
To stream music through the PA system:
1. Connect the headphone output from your mobile device to the “Audio Streaming In” on the master CM3000 using
a 3.5mm audio cable.
2. Start a PA session in Conductor to a zone, map location, or all zones.
3. Start playing music on your mobile device. (You can also use the microphone during the PA session, but only the mic
or the music will be heard at one time, not both).
4. Press “Finish” when you are done.
29
Page 33
Installer Assistance: www.gofrontrow.com
USA/Global Canada Australia Scandinavia
1690 Corporate Circle 6950 Creditview Road, 629 Nudgee Road Kongebakken 9
Petaluma, CA 94954-6712 Unit 1 Nundah QLD 4012 2765 Smørum
United States Mississauga, ON L5N 0A6 Australia Denmark
toll-free: 800.227.0735 Canada tel: 1 800 746 642 tel: +45 3917 7101
tel: 707.769.1110 toll-free: 800.340.9894 fax: 1300 737 983 fax: +45 3927 7900
fax: 707.769.9624 tel: 905.461.5300 www.gofrontrow.com www.gofrontrow.com
www.gofrontrow.com www.gofrontrow.com
The FrontRow alert notification feature is not intended to nor can it prevent emergencies. FrontRow Calypso LLC, its agents, employees, subsidiaries, affiliates and
parent companies are not responsible for individual applications of the alert notification feature or related equipment, and shall be exempt from liability for any loss,
damage, injury or other consequence arising directly or indirectly from said application. In the event of misuse or malfunction of the equipment or any of its
components or features, FrontRow Calypso LLC, its agents, employees, subsidiaries, affiliates or parent companies shall be exempt from liability for any loss,
damage, injury or other consequence arising directly or indirectly therefrom.
© 2017 FrontRow Calypso LLC Phonic Ear, FrontRow, Calypso and the names of Phonic Ear, Calypso, and FrontRow products are trademarks or registered trademarks of
FrontRow Calypso LLC in the U.S. and other countries.
821-2000-018/RevC 0317
 Loading...