

Page 1
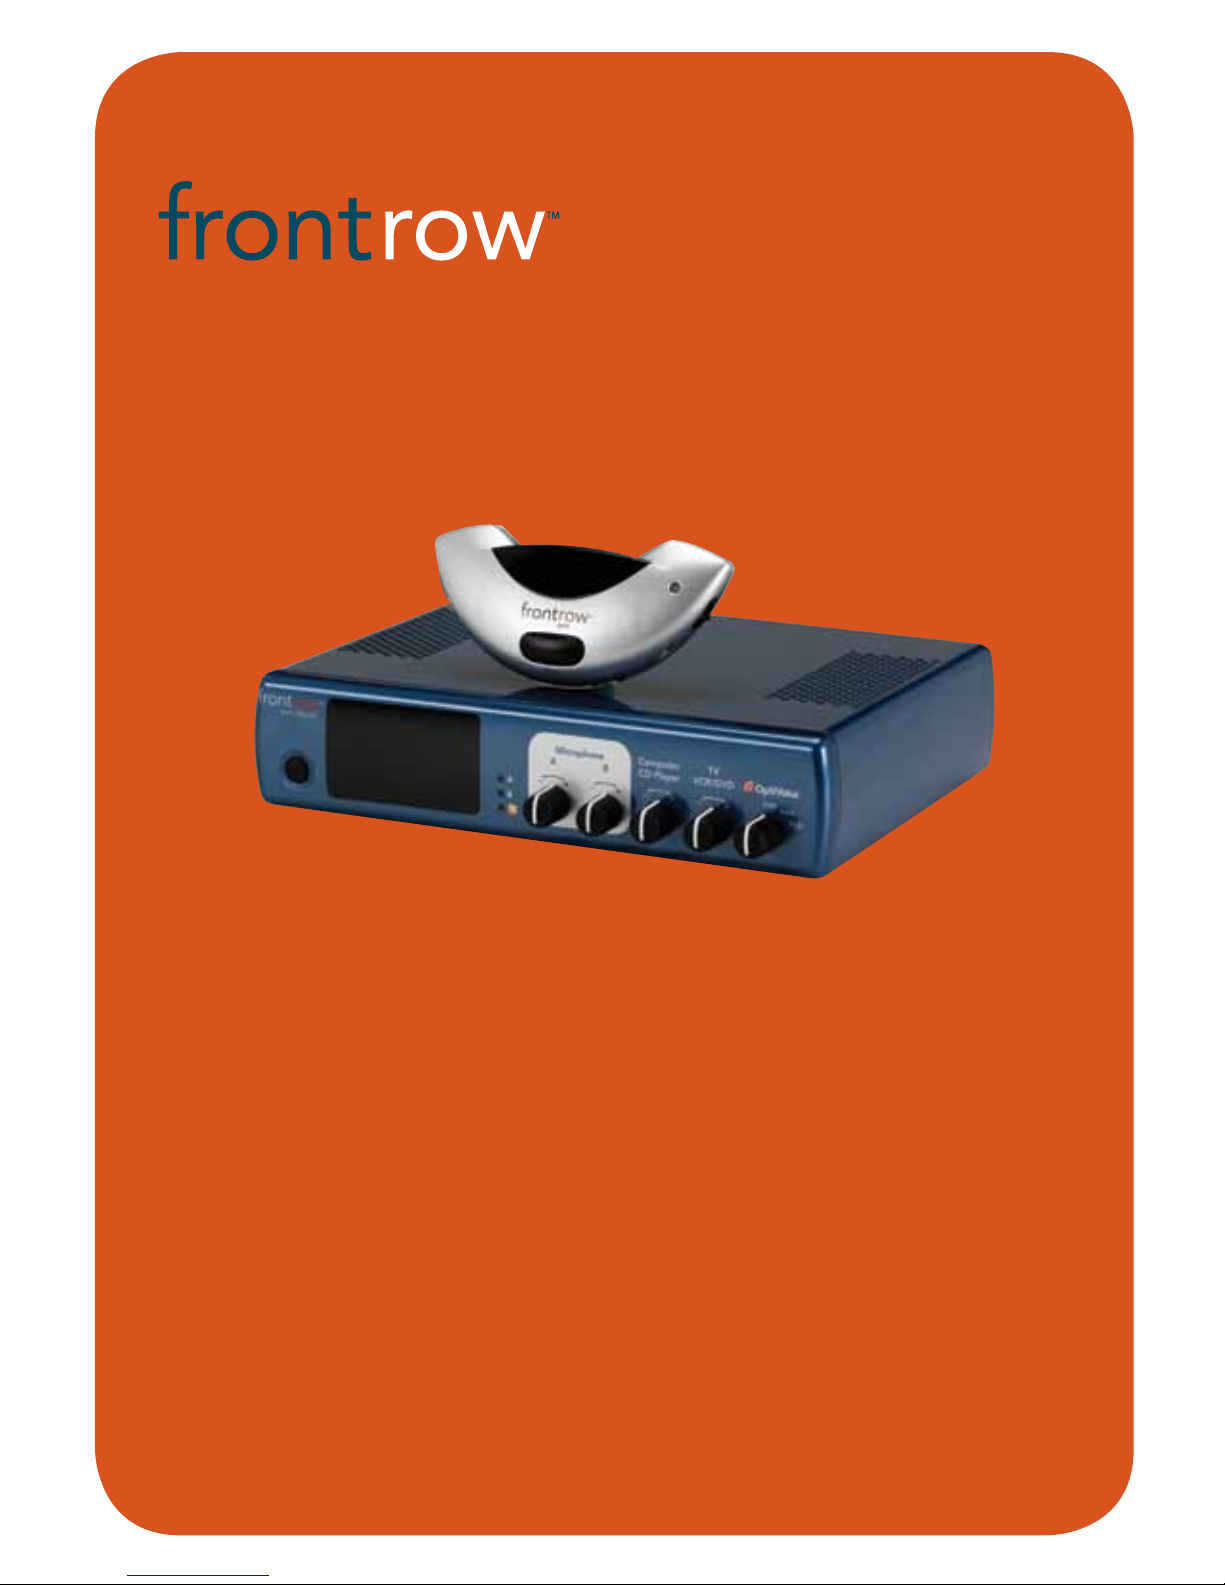
user guide
940R Receiver
940TM Pendant Microphone
950H Pass-Around Microphone
950C Microphone Charger
pro digital
Page 2

Contents
The FrontRow Pro Digital is listed with Educational Underwriters, a non-profit
organization committed to serving educators seeking to meet No Child Left Behind
(NCLB) requirements and to establishing best practices in education. EdU reviews the
research behind educational programs and products to verify that they meet NCLB
requirements and high educational standards. For additional information
regarding Educational Underwriters, go to www.educationalunderwriters.org.
The FrontRow Pro Digital is manufactured to conform to the most stringent
European guidelines for consumer products (RoHS) – it is produced using a
process free of lead and other materials harmful to the environment.
Important Safety Instructions ........................................................1
Electrical Warnings . . . . . . . . . . . . . . . . . . . . . . . . . . . . . . . . . . . . . . . . . . . . . . . . . . . . . . . . . . . . . . . . . 2
950C Charger
Chapter 1 Features ..............................................................3
Chapter 2 Charger Setup .........................................................4
940TM Pendant Microphone
Chapter 3 Features ..............................................................5
Chapter 4 Installing Battery and Charging ....................................... 6 - 7
Chapter 5 Using . . . . . . . . . . . . . . . . . . . . . . . . . . . . . . . . . . . . . . . . . . . . . . . . . . . . . . . . . . . . . . . . . 8
950H Pass-Around Microphone
Chapter 6 Features .................................................................. 9
Chapter 7 Setting channel, installing battery and charging ...........................10 - 11
Chapter 8 Using Pass-Around Microphone ..................................... 12 - 13
Chapter 9 Using a Second Transmitter .............................................14
940R Pro Digital Receiver
Chapter 10 Features .............................................................15
Chapter 11 Activate Receiver and Transmitter .......................................16
Chapter 12 Automatic Feedback Suppression and OptiVoice ..........................17
Chapter 13 Connecting to other Classroom Media ............................... 18 - 19
Chapter 14 Auxiliary Output - Rebroadcasting to Personal FM Receivers ................20
Chapter 15 Troubleshooting ......................................................21
Chapter 16 Regulatory ...........................................................22
The FrontRow Pro Digital System conforms to the stringent electrical safety
standards set by Underwriters Laboratory (UL).
Your 940TM Pendant Microphone, 950H Pass-Around Microphone, and 950C Charger use
SmartCharge technology. The microphone will only charge the "silver-sleeve", auto-sensing battery that comes with our microphone. If an incompatible battery is detected, the
microphone will not let you charge the battery. This prevents accidental damage.
You may use standard alkaline batteries in your microphones if you forget to charge them,
but do not attempt to charge alkaline batteries separately. To ensure proper charging,
always be sure that only "silver sleeve" auto-sensing batteries are installed.
Page 3

1
IMPORTANT SAFETY
INSTRUCTIONS
1. The apparatus shall not be exposed to
dripping or splashing and no objects
filled with liquids, such as vases, shall be
placed on the apparatus.
2. Read these instructions.
3. Keep these instructions.
4. Heed all warnings.
5. Follow all instructions.
6. Do not use this apparatus near water.
7. Clean only with dry cloth.
8. Do not block any ventilation openings.
Install in accordance with the manufacturer’s instructions.
9. Do not install near any heat sources
such as radiators, heat registers,
stoves, or other apparatus (including
amplifiers) that produce heat.
10. Do not defeat the safety purpose of
the polarized or grounding-type plug.
A polarized plug has two blades with
one wider than the other. A grounding
type plug has two blades and a third
grounding prong. The wide blade or
the third prong are provided for your
safety. If the provided plug does not fit
into your outlet, consult an electrician
for replacement of the obsolete outlet.
11. Protect the power cord from being
walked on or pinched particularly at
plugs, convenience receptacles, and the
point where they exit from the apparatus.
12. Only use attachments/accessories
specified by the manufacturer.
13. Use only with the cart, stand, tripod,
bracket, or table specified by the manufacturer, or sold with the
apparatus. When a cart is
used, use caution when
moving the cart/apparatus
combination to avoid
injury from tip-over.
14. Unplug this apparatus during lightning
storms or when unused for long periods
of time.
15. Refer all servicing to qualified service
personnel. Servicing is required when
the apparatus has been damaged in
any way, such as power-supply cord
or plug is damaged, liquid has been
spilled or objects have fallen into the
apparatus, the apparatus has been
exposed to rain or moisture, does
not operate normally, or has been
dropped.
16. Do not use batteries that have been
dropped or otherwise damaged.
Page 4

2
1. Avoid Abuse to the Power Supply
To reduce risk of electric shock, unplug
the power supply from outlet before
attempting any maintenance or cleaning.
Turn off controls will not reduce this risk.
To reduce the risk of fire or electric
shock, do not expose this apparatus to
rain or moisture.
DO NOT disassemble the power sup-
ply. Return the apparatus to Phonic
Ear FrontRow for qualified service and
repair if service or repair is required.
Incorrect reassembly may result in a risk
of electric shock or fire.
DO NOT expose the power supply to
rain, snow, water, gas, oil, etc.
DO NOT operate the power supply
if it has received a sharp blow, been
dropped, or otherwise damaged in any
way; return the apparatus to Phonic Ear
FrontRow for qualified service and repair.
DO NOT block or cover the apparatus
and impede ventilation.
DO NOT expose batteries (battery
pack or batteries installed) to excessive
heat such as sunshine, fire, or the like.
2. Proper Use of the Power Supply
and Wiring
An extension cord should not be used
unless absolutely necessary. Use of
improper extension cord could result
in a risk of fire and electric shock. The
cord MUST be plugged into a grounded
outlet. Make sure it is properly wired, in
good electrical condition, and wire size
is large enough for AC ampere rating of
the power supply or charger as specified
below. AWG = American Wire Gauge.
To reduce risk of damage to plug and
cord when disconnecting the power
supply or charger, ALWAYS pull on plug
- NEVER on cord.
Locate cord so that it will not be
stepped on, tripped over, or otherwise
subject to damage or stress. DO NOT
lay extension cord on charger.
DO NOT operate the power supply
with damaged cord or plug - replace
them immediately.
ELECTRICAL WARNINGS
!
ELECTRICAL SAFETY
INFORMATION:
PRECAUTIONS & SAFETY
RECOMMENDATIONS
Follow Manufacturers' Recommendations
Before using the receiver and power supply,
read all instructions for, and caution markings on the receiver and power supply and in
this user guide.
Page 5
3
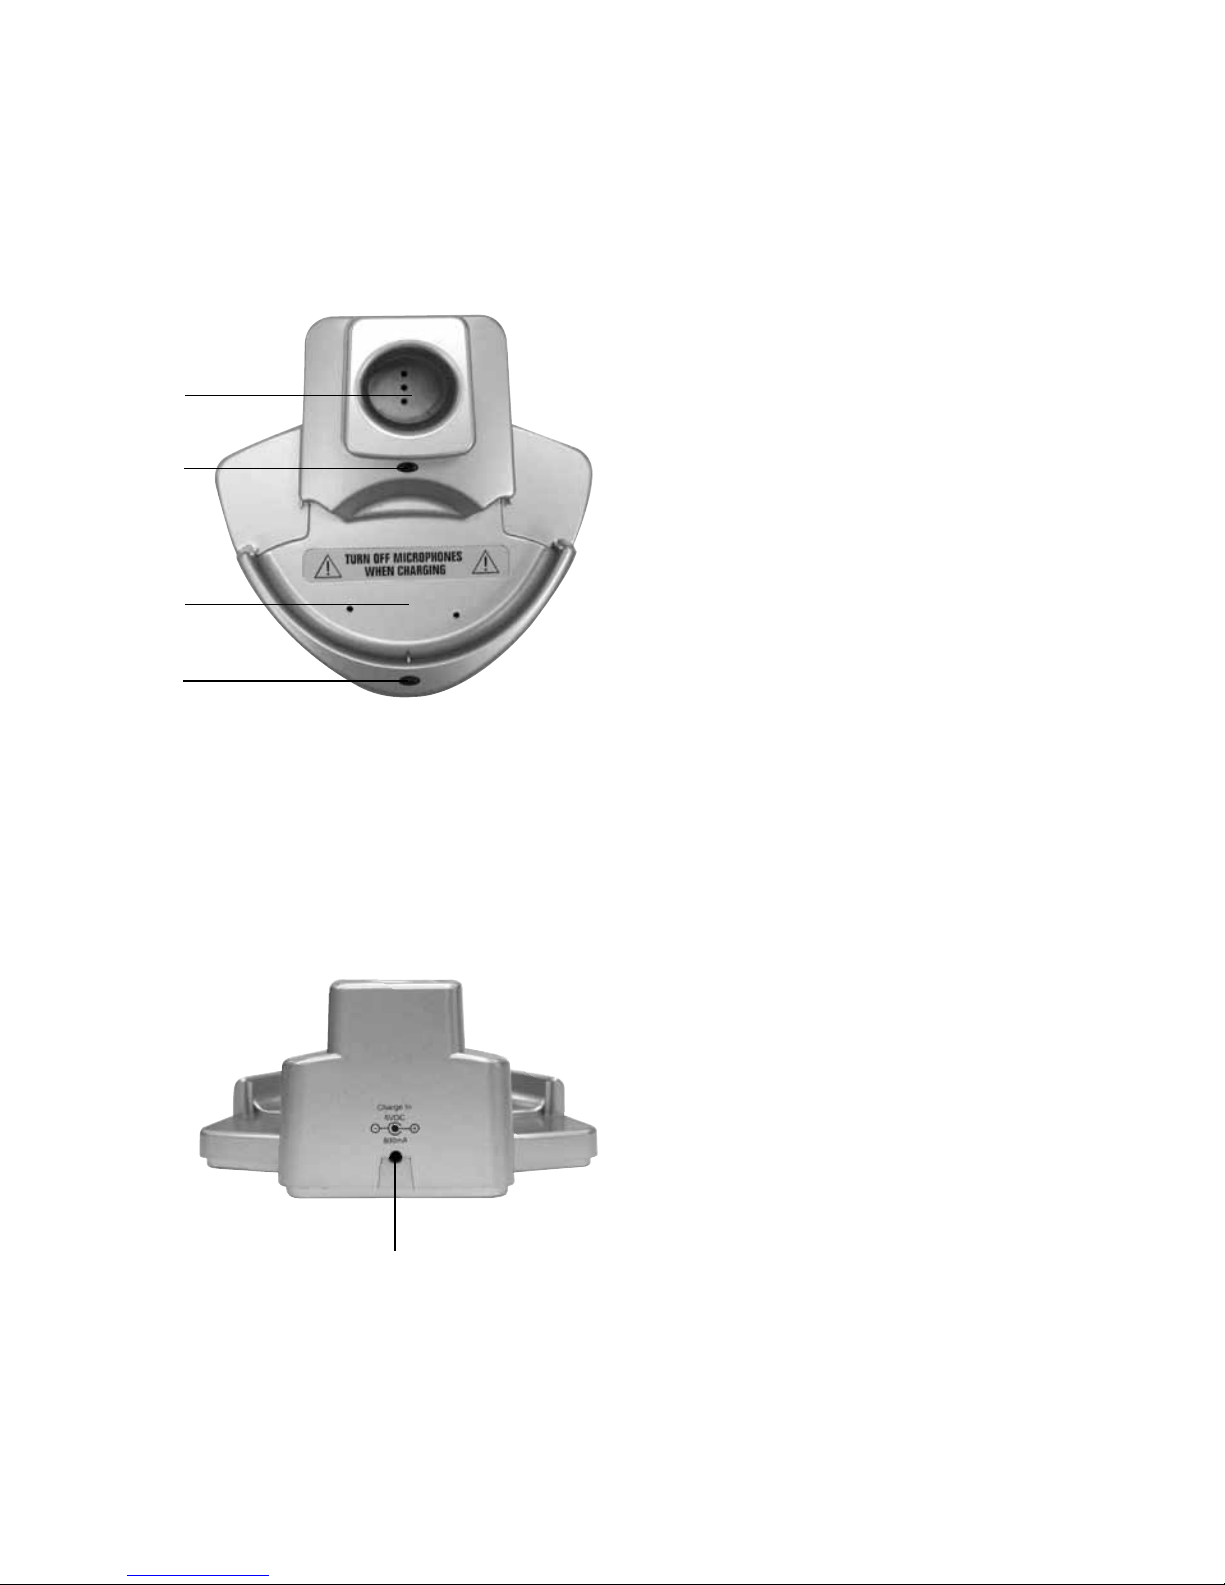
1. Charge pocket for 950H
Pass-Around microphone
2. 2-way indicator light for 950H
Pass-Around microphone
No light = Pocket empty or
improper battery
Red = Charging
Blinking red = Charge error
Green = Charging complete
3. Charge pocket for 940TM Pendant
microphone (will not charge 930TM
pendant microphone)
4. 2-way indicator light for 940TM
Pendant microphone
No light = Pocket empty
Red = Charging
Blinking red = Faulty or improper
battery
Green = Charging complete
5. Power supply input
1 950C Charger
Features
top
1
back
2
3
4
5
Page 6
4
2 950C Charger Setup
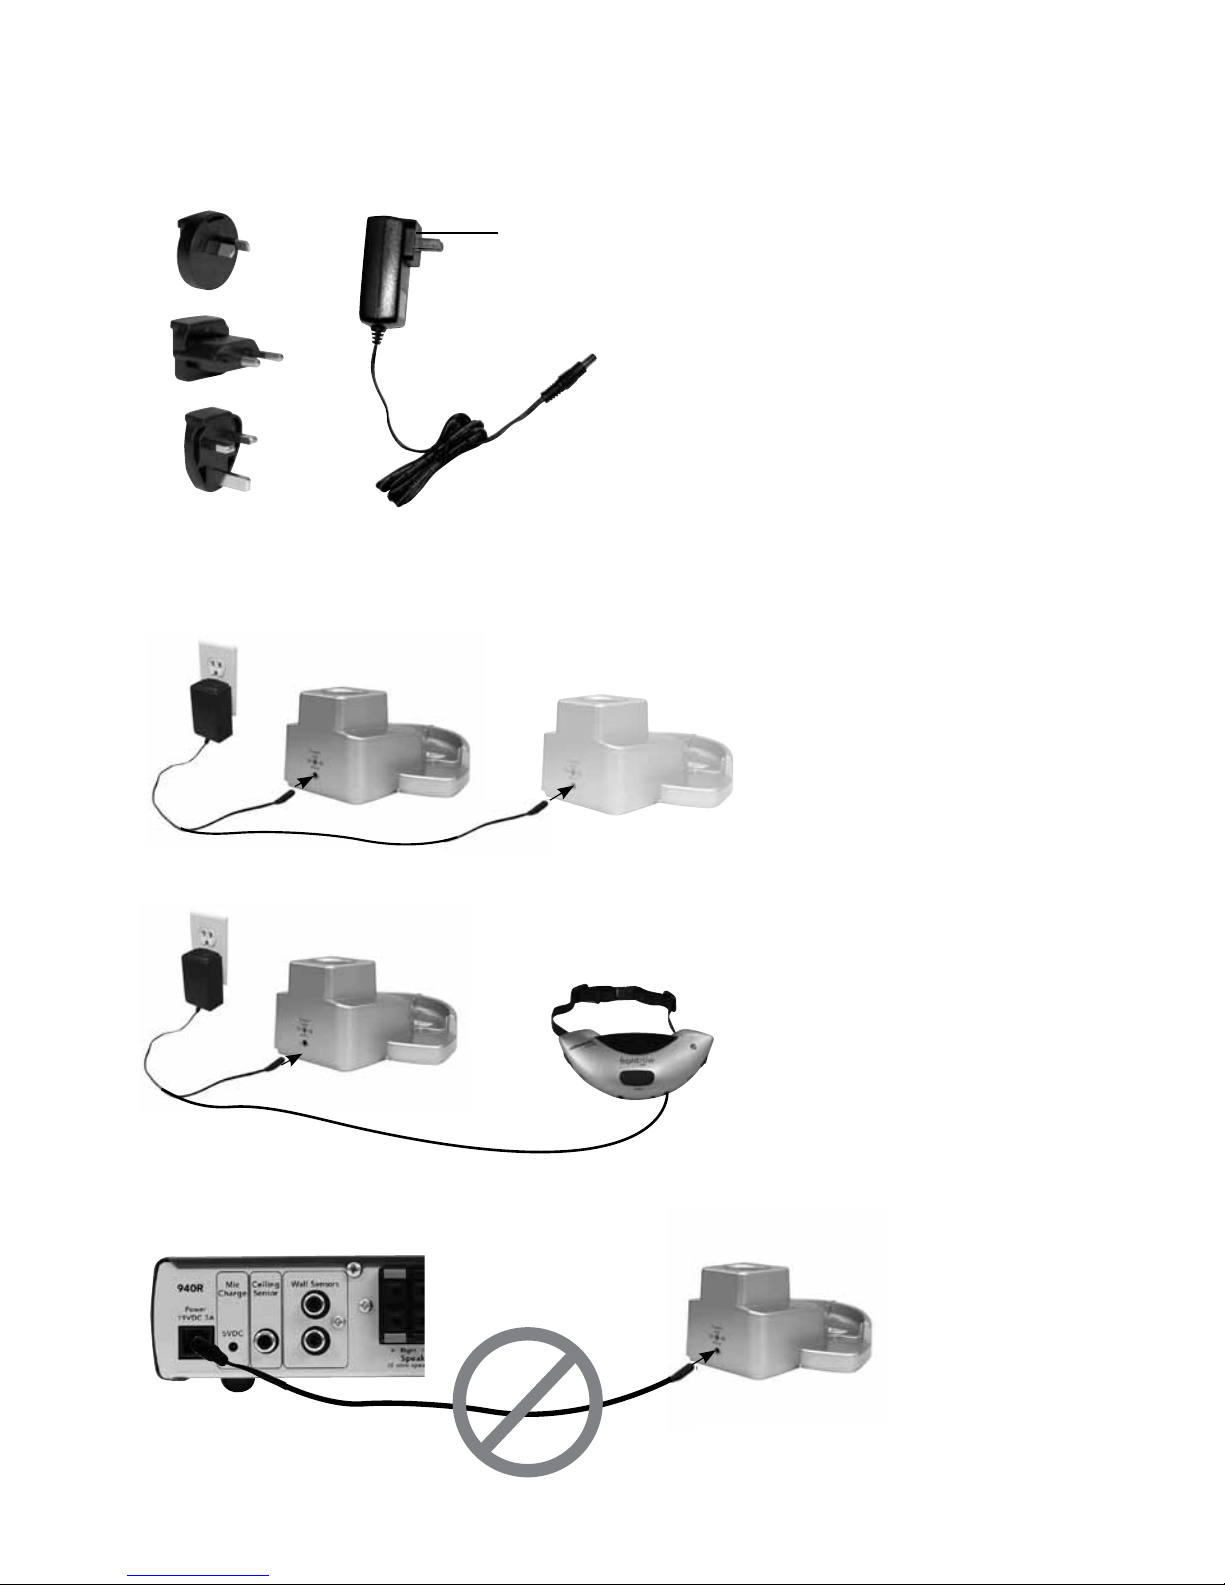
1. Find the power plug that is appropriate
for the power outlet style in your country
2. Slide power plug onto the power supply
3. Plug power supply into power outlet and
into the back of the charging base
4. Charging multiple microphones
You can charge up to 3 microphones
in any configuration by connecting two
chargers to the power supply. Charging
4 or more microphones will cause the
power supply to shut off.
NOTE: Always connect the 950C charger
to a wall outlet. Do not connect to the
940R receiver charge jack as the
microphones will not charge reliably.
1
2
3
4
OR
1
2
OR
Page 7
5
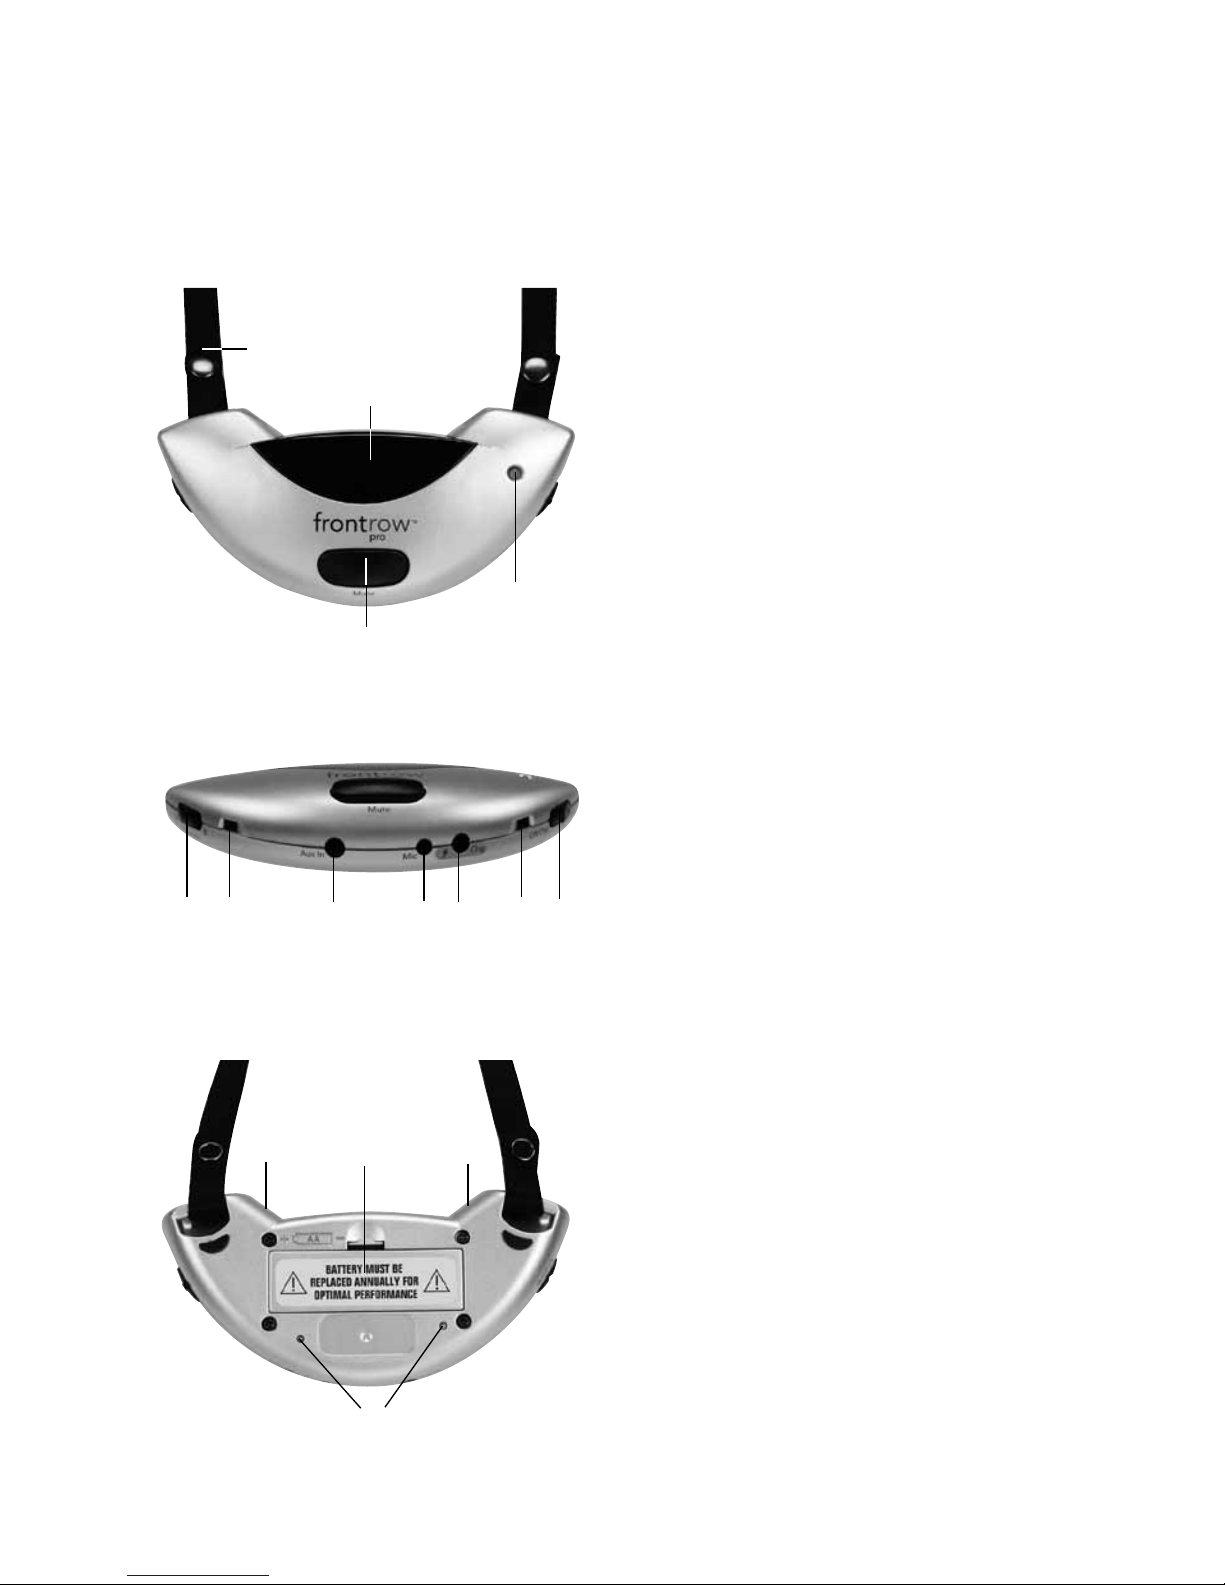
1. Neck strap
2. Infrared emitter diodes
(Do not block)
3. Indicator Light
4. Mute button
(Push to mute)
5. Channel selector
(Select Channel A or Channel B.
Cannot have two microphones on the
same channel in the same room)
6. Microphone ports (4)
(Do not block)
7. Aux-in audio jack
(Use aux-in audio adaptor cord to
send audio from a secondary audio
source such as an MP3 player, portable
radio/CD/tape player to the receiver)
8. External microphone jack (optional)
(Connect a boom microphone)
9. Charge jack
(When not using 950C charger)
10. On/off switch
11. Battery compartment
(1) AA (LR6) NiMH rechargeable battery
(FrontRow "silver sleeve", auto-sensing)
12. Charge contacts
940TM only. 930TM is not supported by
950C charger.
3 940TM Pendant Microphone
Features
front
1
2
3
4
back
6
6
11
bottom
65
7
68
9
10
12
Page 8
6
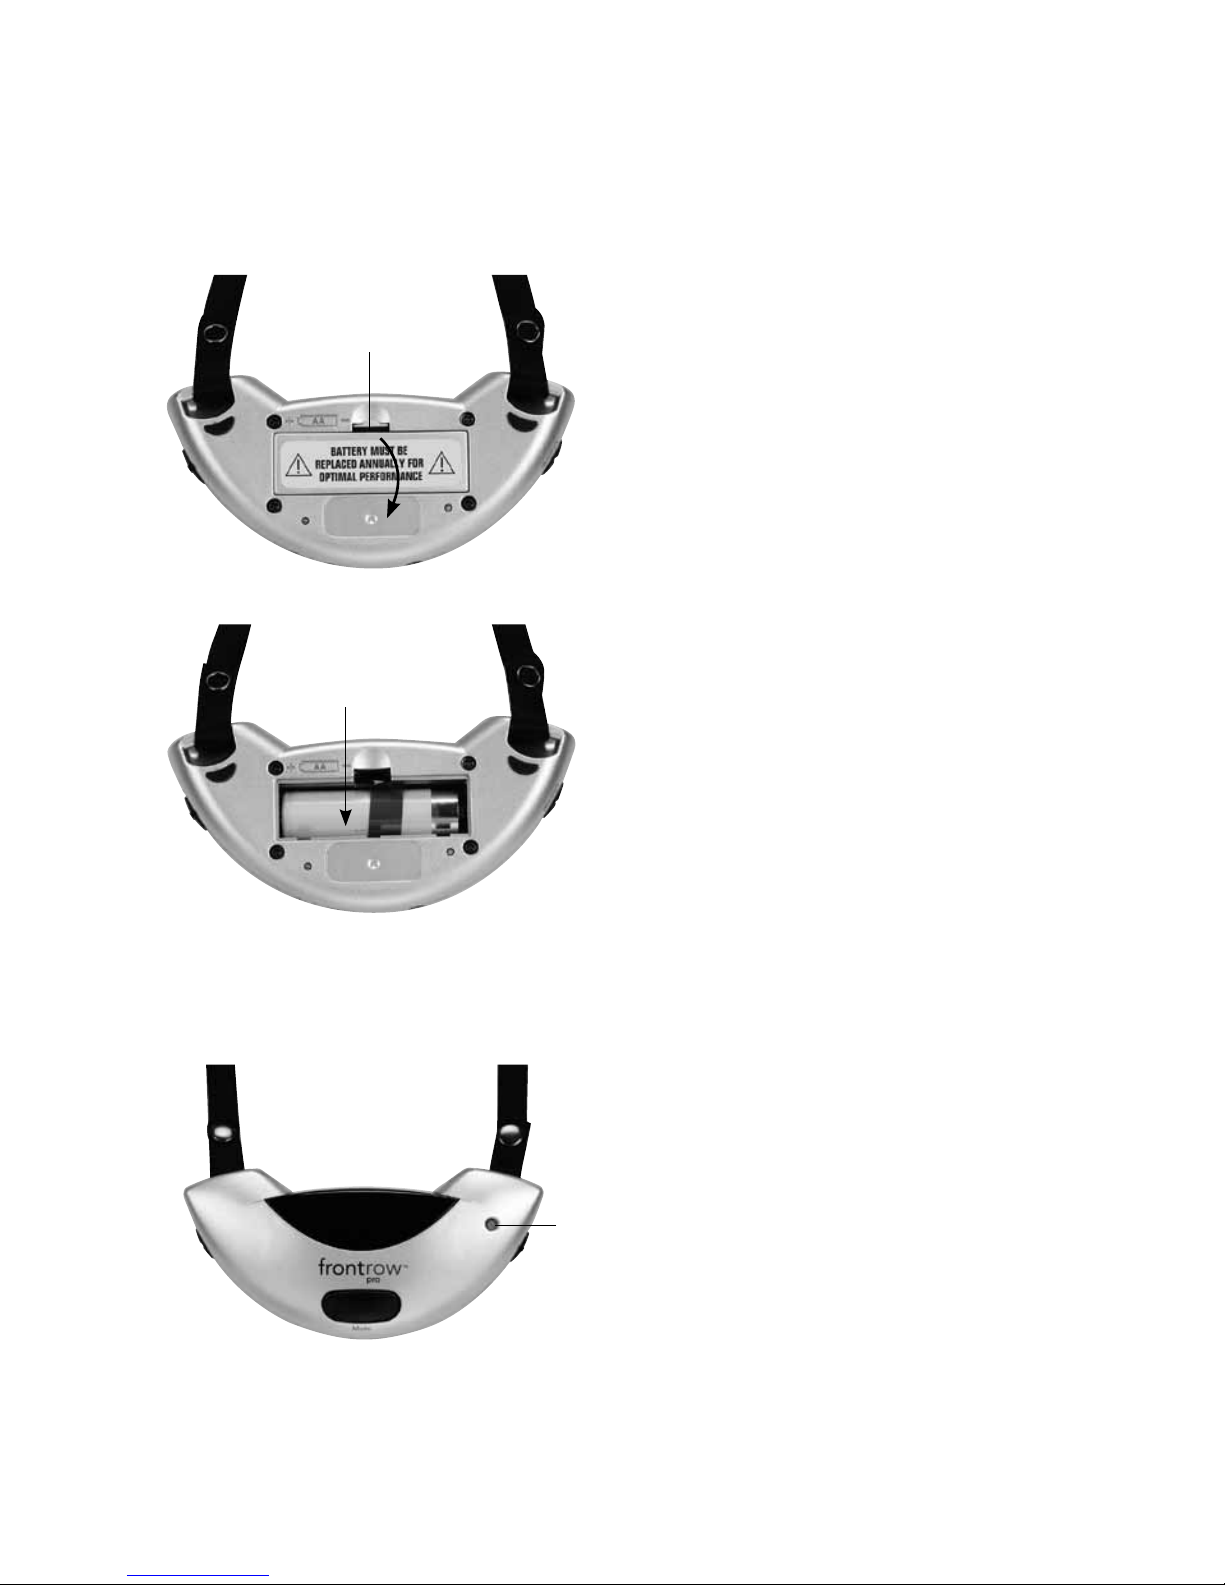
Install Battery
1. Push down on tab to open battery
compartment
2. Insert battery into compartment.
Note polarity indicators
3. Replace battery door
4. Charge battery overnight before initial use
IMPORTANT! To ensure top performance
and avoid equipment damage, FrontRow
recommends replacing rechargeable batteries
at the beginning of each school year.
Do not use batteries that have been
dropped or are otherwise damaged.
1
2
4 940TM Pendant Microphone
Installing Battery and Charging
1
NOTE: If you forget to charge your microphone
at night, you may use a standard AA (LR6) alkaline battery instead. Remember to remove the
alkaline battery and replace it with a FrontRow
"silver-sleeve", auto-sensing battery before
charging the unit.
IMPORTANT! In order to prevent damage
to your microphone, the SmartCharge feature
is intended to prevent charging of any battery
other than the "silver sleeve" auto-sensing
battery supplied by FrontRow. To e n s u re
proper charging, always be sure that only
FrontRow "silver sleeve" auto-sensing batteries
are installed.
Charge Battery Nightly
1. Indicator light will blink red when battery
is low
Page 9
7
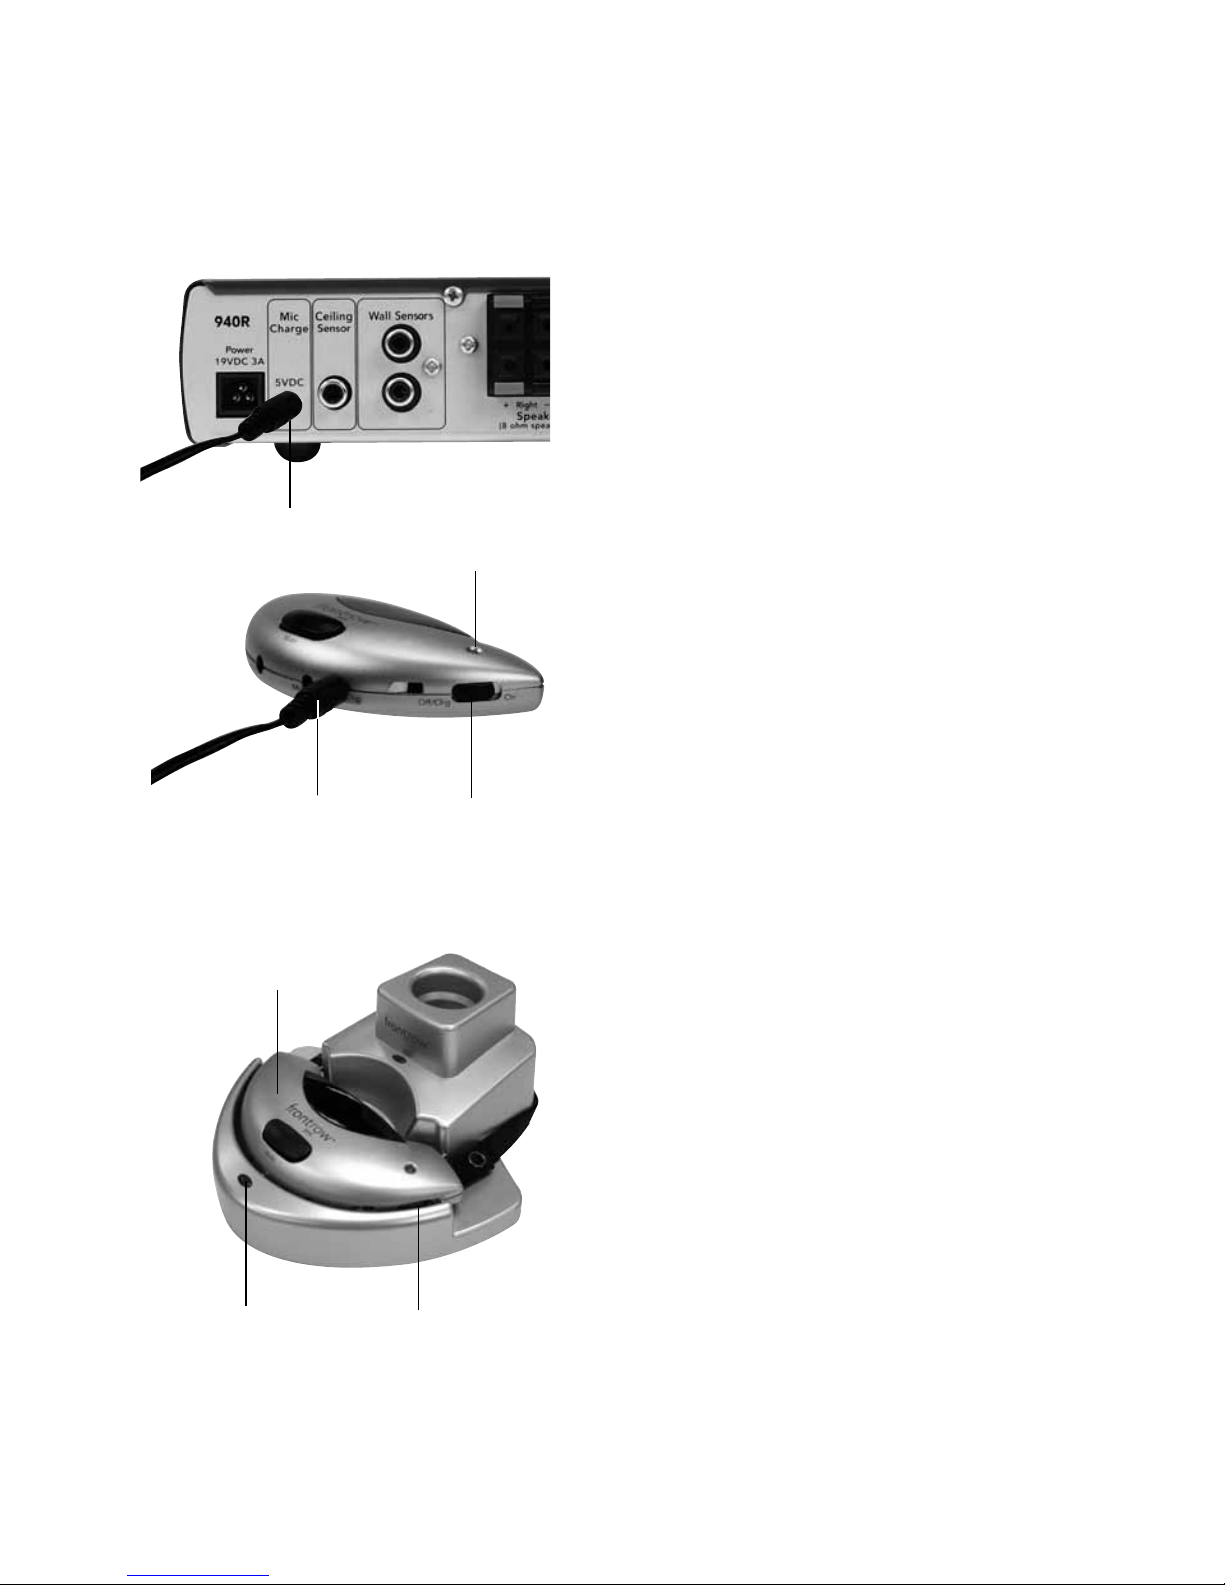
1. Plug the two-microphone charge cord
into the back of the 940R receiver
2. Turn microphone off
3. Insert one of the charge cord plugs into
the charge jack
4. The microphone indicator light should be
red when charging. If it is OFF, check
microphone battery and ensure charge
cord is properly connected to microphone
and receiver
5. To prolong the lifetime of the battery,
the unit will enter a low-power "maintenance
charge" mode after 14 hours of charging.
The indicator light on the 940TM will blink
red in the "maintenance charge" mode
940TM Pendant Microphone
Charging with the 2-unit charge cord
1
3
2
4/5
1. Turn microphone off
2. Place microphone face up into the
charge pocket. Ensure it is fully seated.
3. The charger indicator light should be
solid red when charging. If it is blinking
red, you are attempting to charge an
alkaline battery or the battery is damaged.
Replace this battery with a FrontRow
"silver sleeve" NiMH cell. If the light is off,
ensure charger is properly connected to
power supply and that you are charging a
940TM microphone (930TM microphones
cannot be charged in this charger). Re-check
the seating.
4. The charger indicator light will turn
green when charging is complete.
NOTE: Always connect the 950C charger
to a wall outlet. Do not connect to the
940R receiver charge jack as the
microphones will not charge reliably.
Charging with the 950C charger
1
2
3/4
Page 10
8
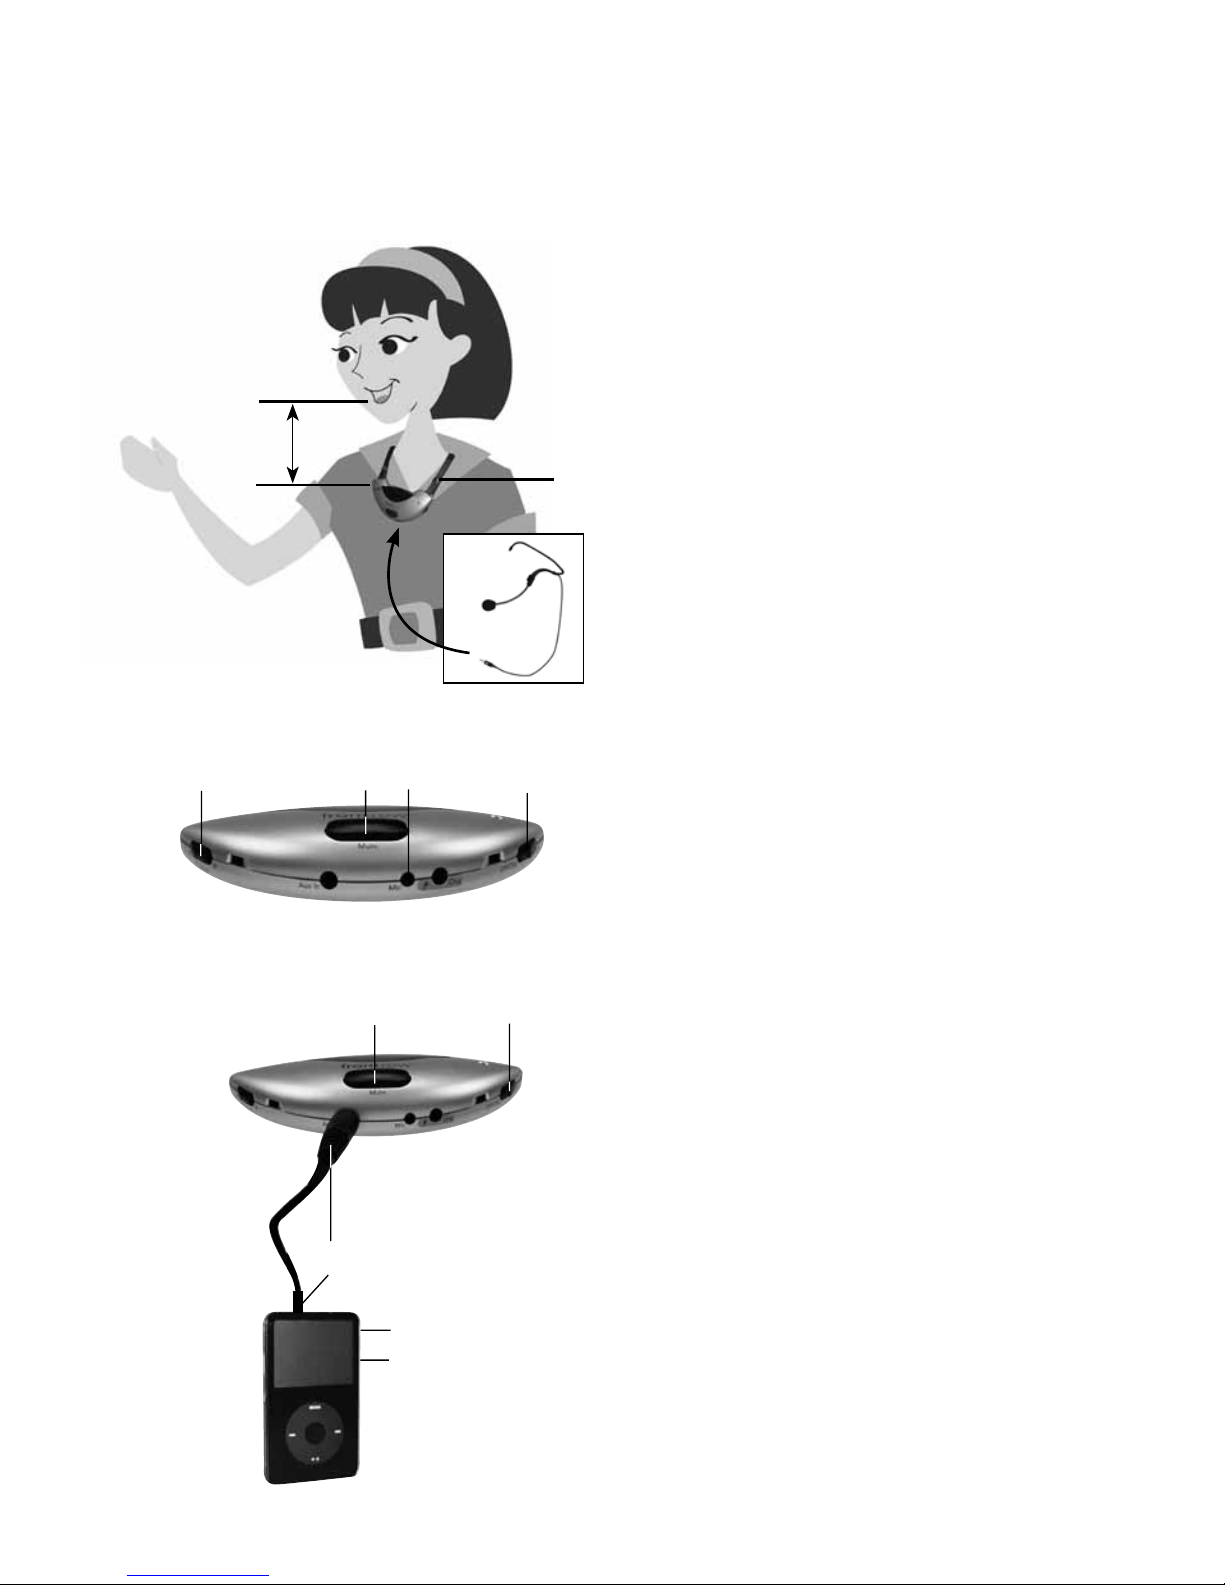
The 940TM Pendant Microphone can be
used to transmit audio from a secondary
audio source (MP3 player, computer, portable
radio/CD/tape player) to the receiver.
7. Plug one end of the audio adaptor cord
(included) in the Audio Out/headphone
jack of the secondary audio source. Plug
the other end of the adaptor cord to
the Aux-In jack on the 940TM Pendant
Microphone
8. Turn the secondary audio source on
9. Turn the 940TM Pendant Microphone on
10. Turn the volume on the secondary audio
source all the way up and adjust the microphone volume on the receiver to obtain
the optimal volume
11. You can "talk over" the secondary audio
by speaking into the microphone or mute
the microphone to ensure the best audio
sound quality
1. Place microphone around neck and connect clasp
2. Adjust neck straps to position microphone
approximately 5in (13cm) from mouth
3. Set channel to A or B (whichever is not
already in use)
4. Turn microphone on. Indicator light
should be green
5. Press mute switch as needed for private
conversations. Indicator light will blink green
6. Optional: if desired, plug in external
boom microphone
5in/13cm
2
6
1
940TM (bottom)
5
4
5 940TM Pendant Microphone
Using
63
Light Legend
Green ..........On
Blinking Green ....Muted
Blinking Red ......Low Battery
When Charging with 950C charger
No light ........... Charging
When Charging with 2-unit charge cord only
No light ...........Alkaline Battery is
detected, or microphone
power is still on
Red ............ Charging
Blinking Red ..... Maintenance Charge
7
9
8
10
11
Page 11
9
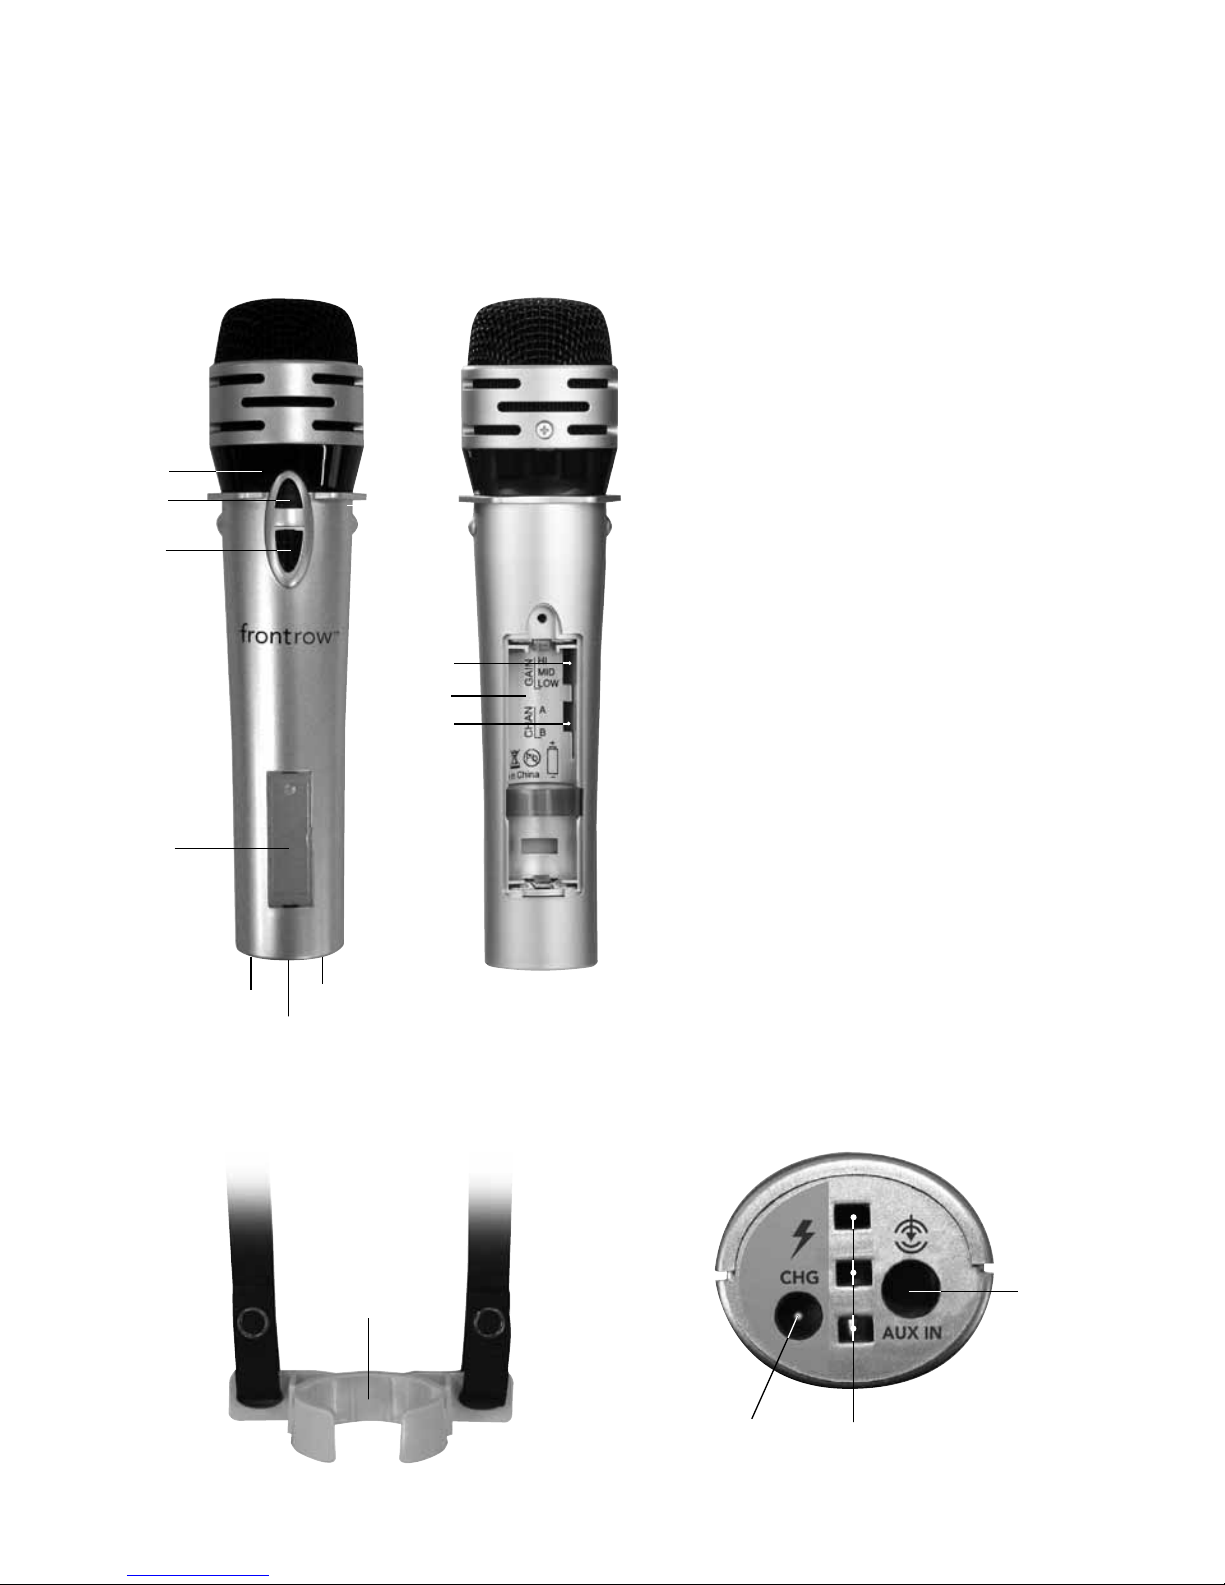
1. Emitter diodes
(Do not block)
2. 2-way indicator light
Green = On and transmitting
Blinking red = Low battery
Red = Charging via 3.5mm charge
input jack only
No light = Charging via 950C charger
3. On/off switch
4. Battery compartment
(On back)
5. Gain switch
(Inside battery compartment)
6. Channel switch
(Inside battery compartment)
7. Name plate
8. Charge input jack
(Use with 2-unit charge cord only)
9. Aux input jack
10. Lavaliere clip
11. 950C charger contacts
6 950H Pass-Around Microphone
Features
10
11
8
9
1
2
3
4
5
7
8
9
6
11
Back
Front
Bottom
Page 12
10
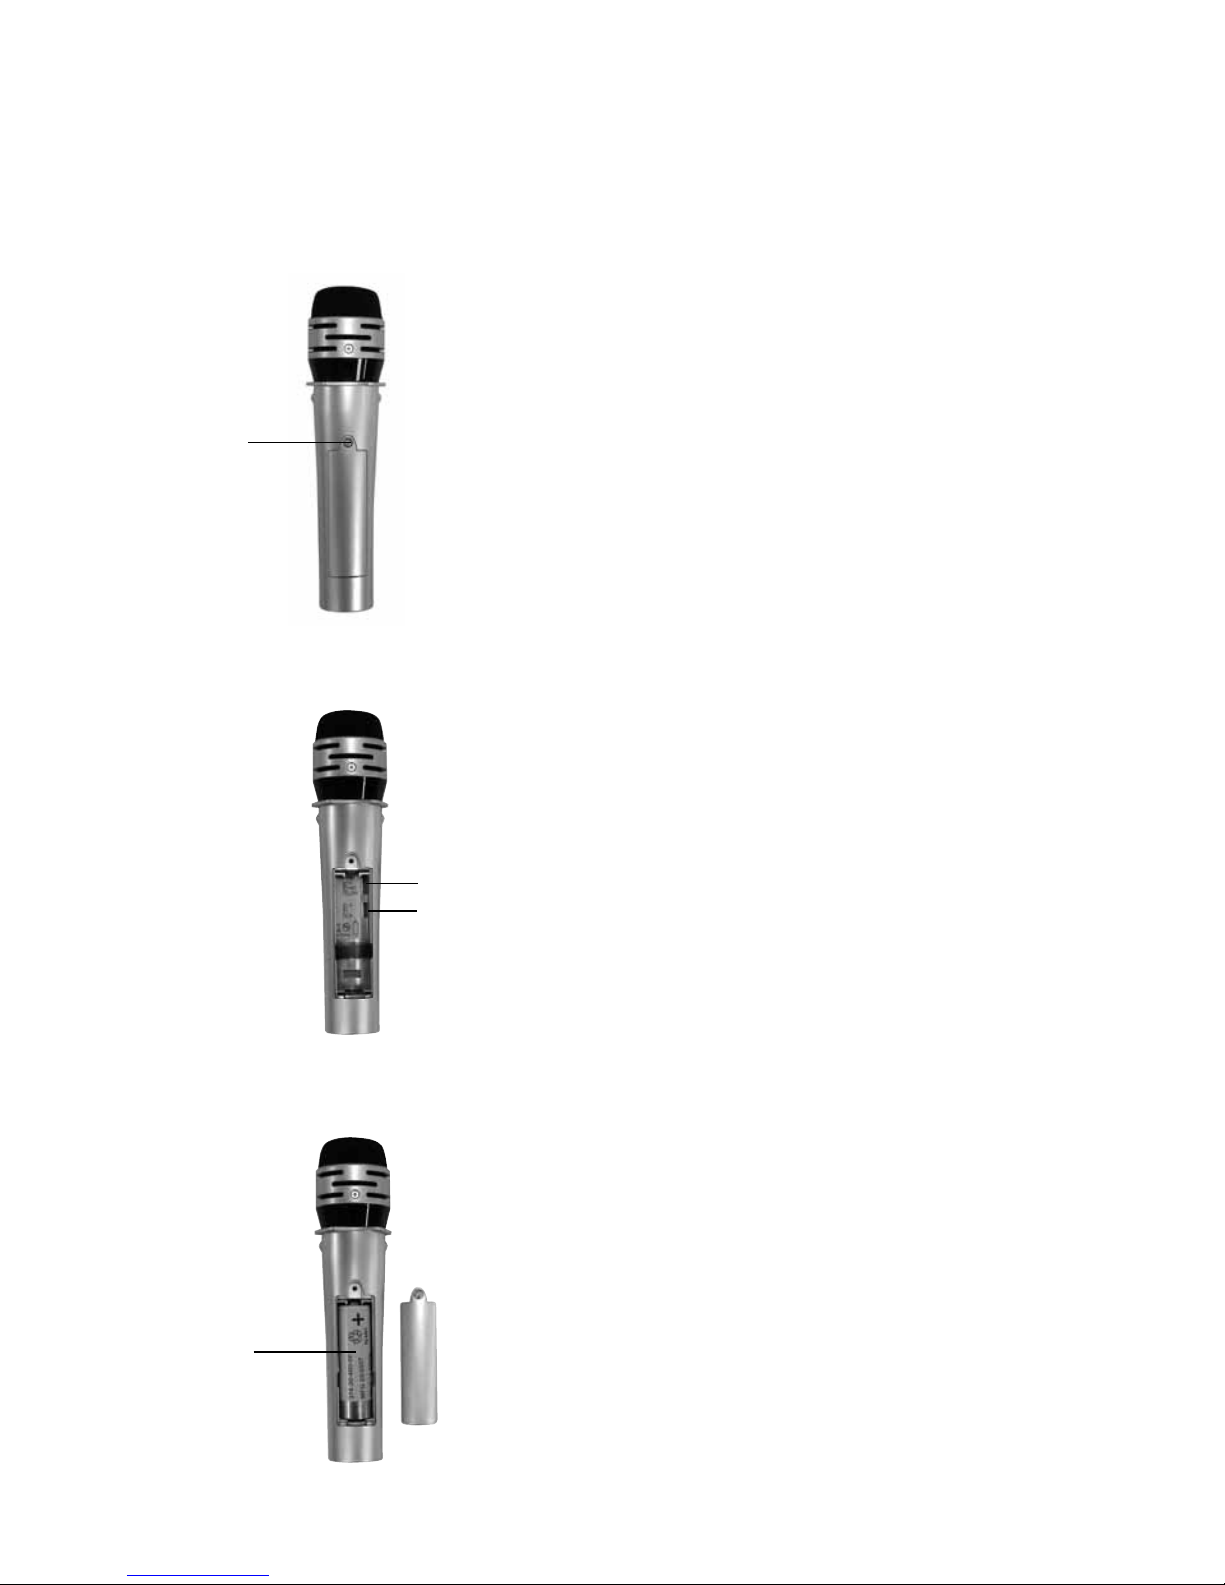
Set gain and channel, and install battery
1. Unscrew battery door to open
battery compartment
2. Set gain as follows:
High: If majority of users will hold the
microphone far from the mouth
Mid (recommended): For most uses
Low: If majority of users will hold the
microphone close to the mouth
3. Set channel to A or B
(Whichever is not in use)
4. Insert battery into compartment.
Note polarity indicators
5. Replace battery door
6. Charge battery overnight before
initial use
IMPORTANT! To ensure top performance
and avoid equipment damage, FrontRow
recommends replacing rechargeable batteries
at the beginning of each school year.
Do not use batteries that have been dropped
or are otherwise damaged.
Charge Battery Nightly
Indicator light will blink red when battery is low
NOTE: If you forget to charge your microphone at night, you may use a standard AA
(LR6) alkaline battery instead. Remember to
remove the alkaline battery and replace it with
a FrontRow "silver-sleeve", auto-sensing battery before charging the unit.
IMPORTANT! In order to prevent damage
to your microphone, the SmartCharge
feature is intended to prevent charging of
any battery other than the "silver sleeve"
auto-sensing battery supplied by FrontRow.
Do not attempt to charge alkaline batteries
separately. To ensure proper charging,
always be sure that only FrontRow "silver
sleeve" auto-sensing batteries are installed.
7 950H Pass-Around Microphone
Setting gain, channel, installing battery, and charging
1
4
2
3
Page 13
11
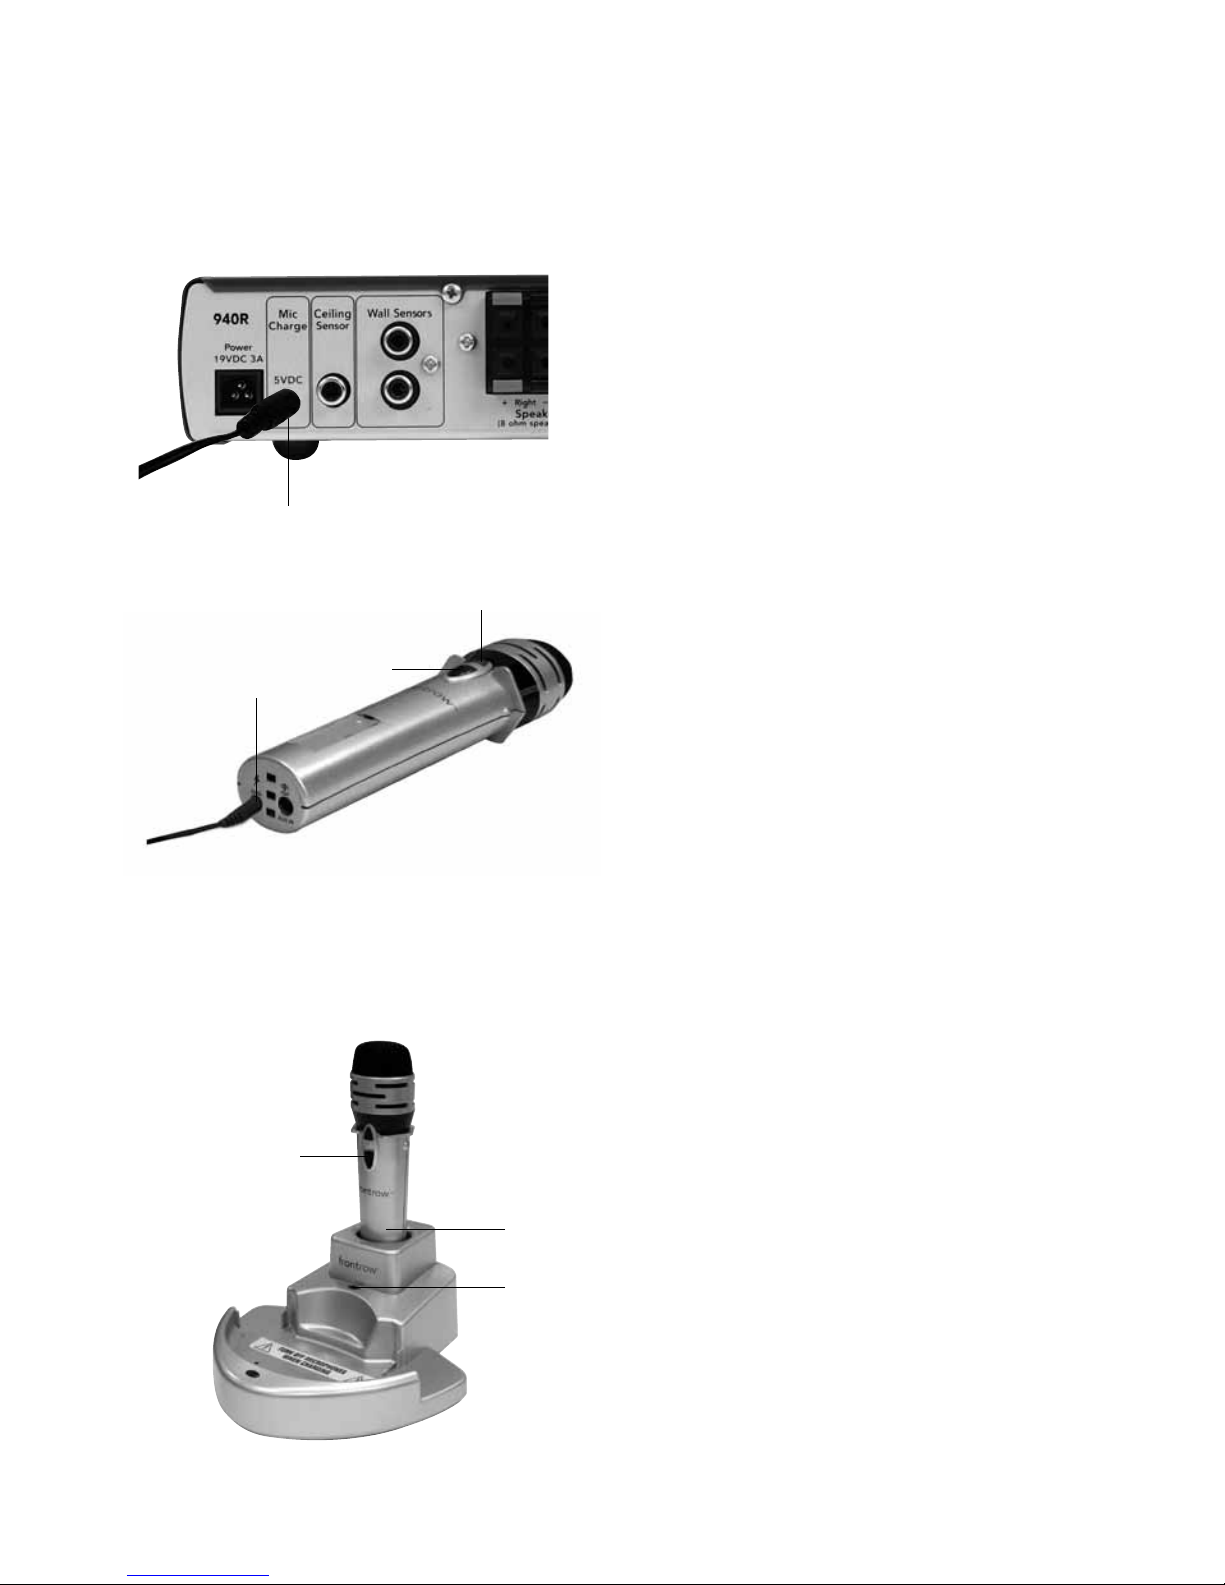
1. Plug the two-microphone charge cord into
the back of the 940R receiver
2. Turn microphone off
3. Insert one of the charge cord plugs into
the charge jack
4. The microphone indicator light should be
red when charging. If it is OFF, ensure that
you are not attempting to change an alkaline
battery, and that charge cord is properly
connected to microphone and receiver and
950H is OFF.
950H Pass-Around Microphone
Charging with the 2-unit charge cord
1
3
1. Turn microphone off
2. Place microphone into the charge pocket.
Ensure it is fully seated.
3. The charger indicator light should be
solid red when charging. If the light is off,
ensure charger is properly connected
to power supply and that you are not
attempting to charge an alkaline battery.
4. The charger indicator light will turn green
when charging is complete and unit will
enter maintenance mode.
NOTE: Always connect the 950C charger
to a wall outlet. Do not connect to the
940R receiver charge jack as the
microphones will not charge reliably.
Charging with the 950C charger
1
3/4
2
4
2
Page 14
12
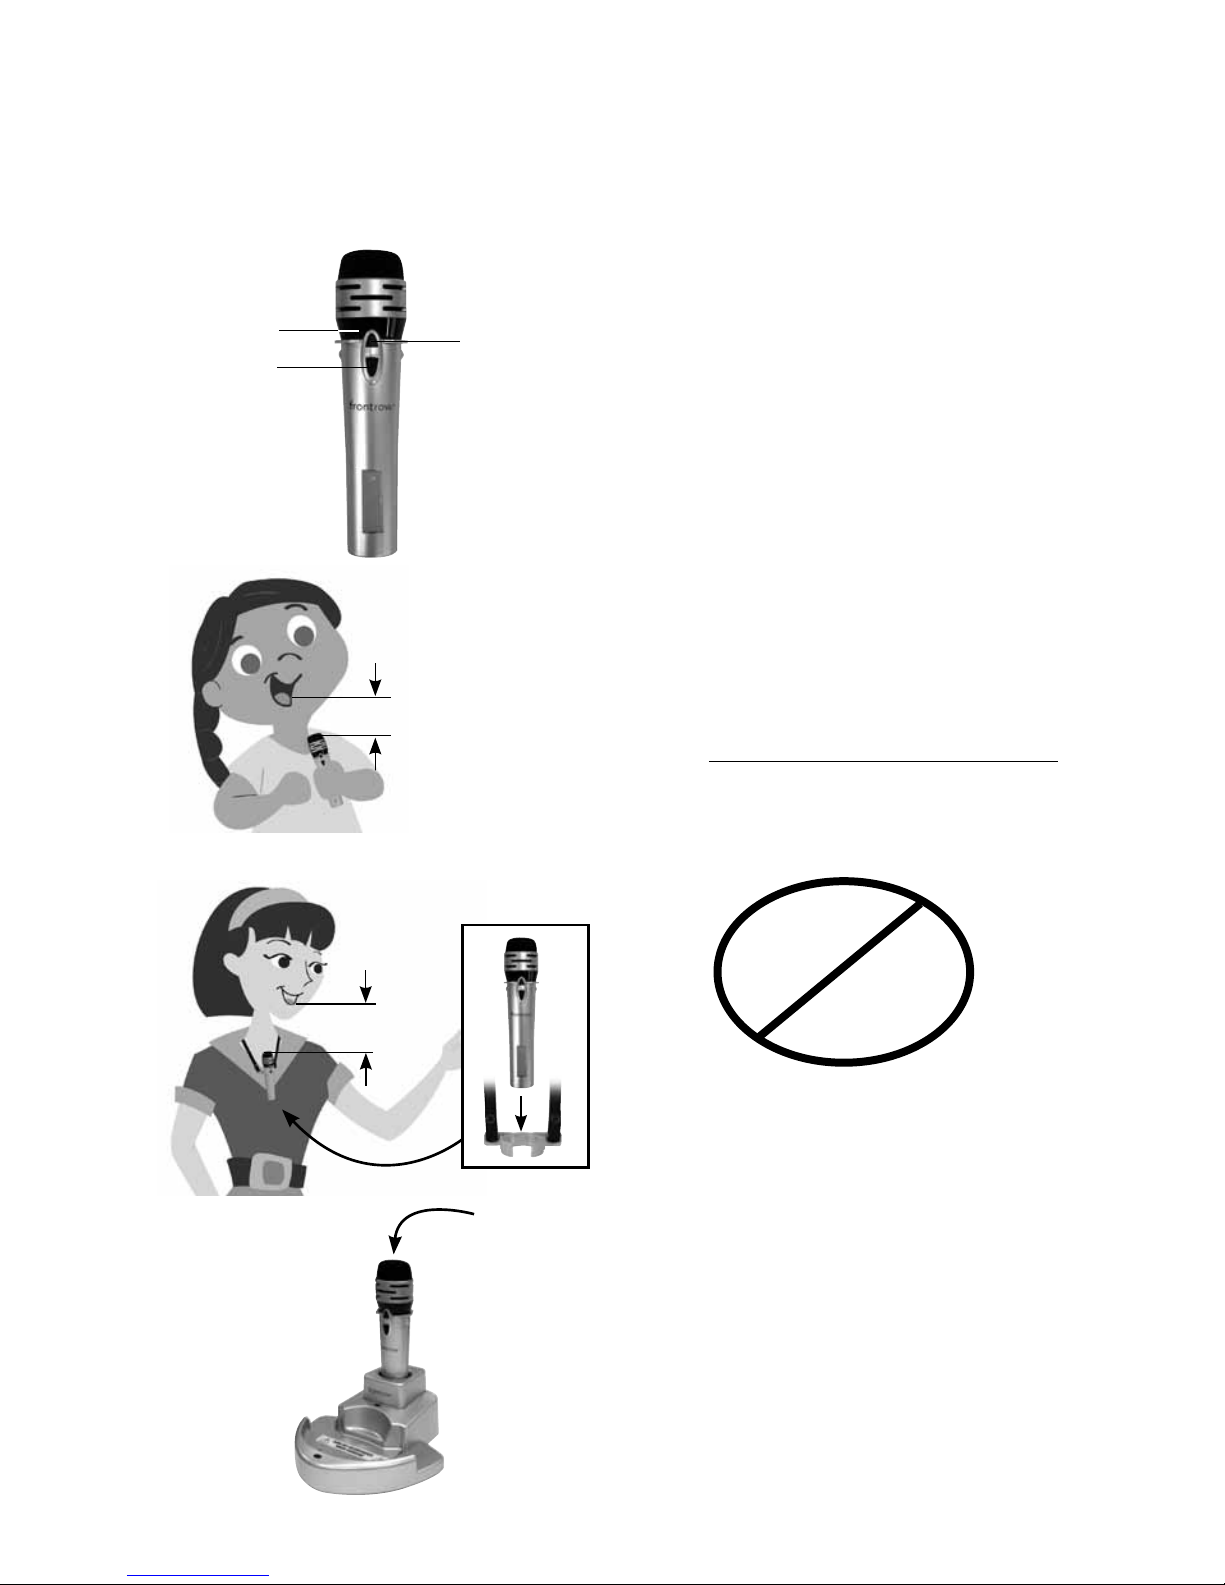
1. Turn microphone on
2. Note indicator light
Green = On and transmitting
Blinking red = Low battery
3. Keep top of microphone approximately
3 - 4in. (7.5 – 10cm) from mouth when
using as a hand-held microphone
4. To allow hands-free use (for example,
when reading aloud and turning pages),
attach the lavaliere clip. Adjust neck strap
to position microphone approximately
4 - 5in (10 - 13cm) from mouth.
5. Do not block emitter diodes
6. Turn off microphone and place microphone
in charger at the end of the day
NOTE: The 950H is factory set on Channel B.
If you are using two microphones, they must
be on different channels.
8 950H Pass-Around Microphone
Using
1
2
5
6
A + B
A + A
B + B
3
3in. (7c m)
5in. (13cm)
4
Page 15
13
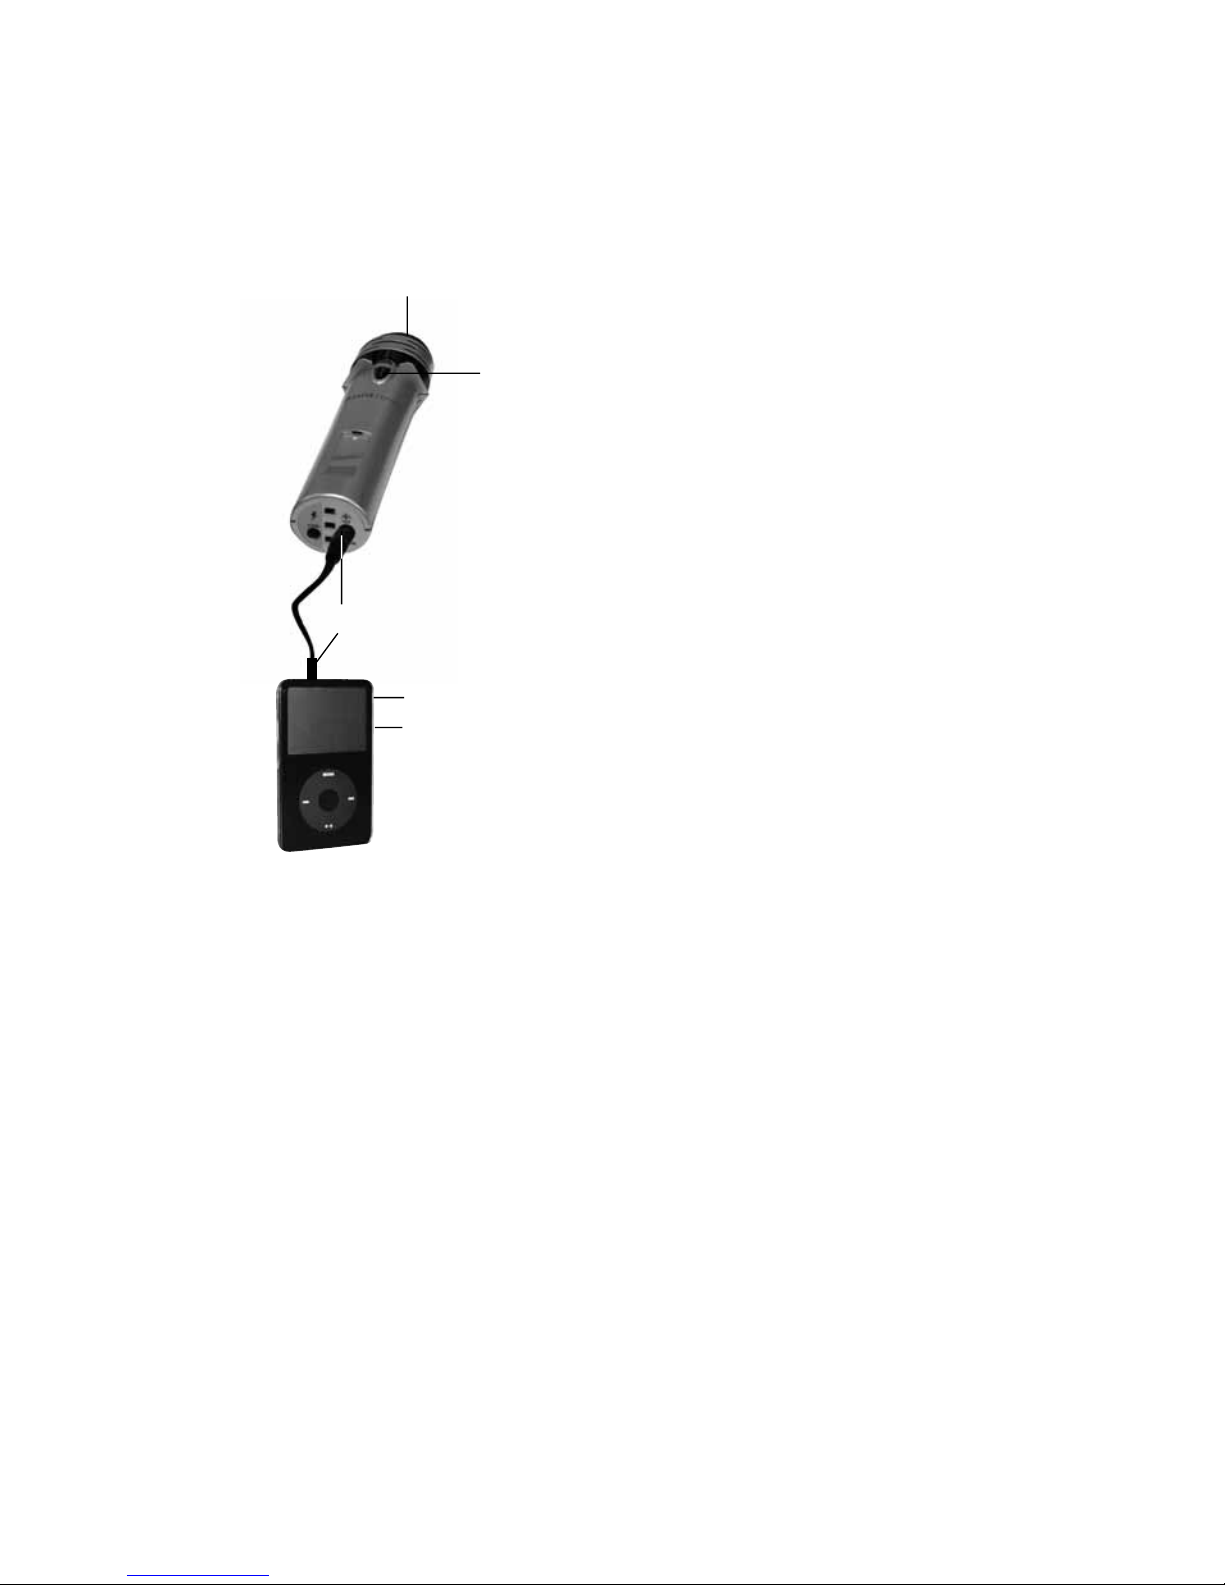
The 950H Pass-Around Microphone can be
used to transmit audio from a secondary
audio source (MP3 player, computer, portable
radio/CD/tape player) to the receiver.
7. Plug one end of the audio adaptor cord
(included) in the Audio Out/headphone
jack of the secondary audio source.
Plug the other end of the adaptor cord to
the Aux-In jack on the 950H Pass-Around
Microphone
8. Turn the secondary audio source on
9. Turn the 950H Pass-Around Microphone on
10. Turn the volume on the secondary audio
source all the way up and adjust the microphone volume on the receiver to obtain
the optimal volume
11. When using this feature the microphone
voice audio is disabled
7
9
8
10
11
950H Pass-Around Microphone
Using (cont.)
Page 16
14
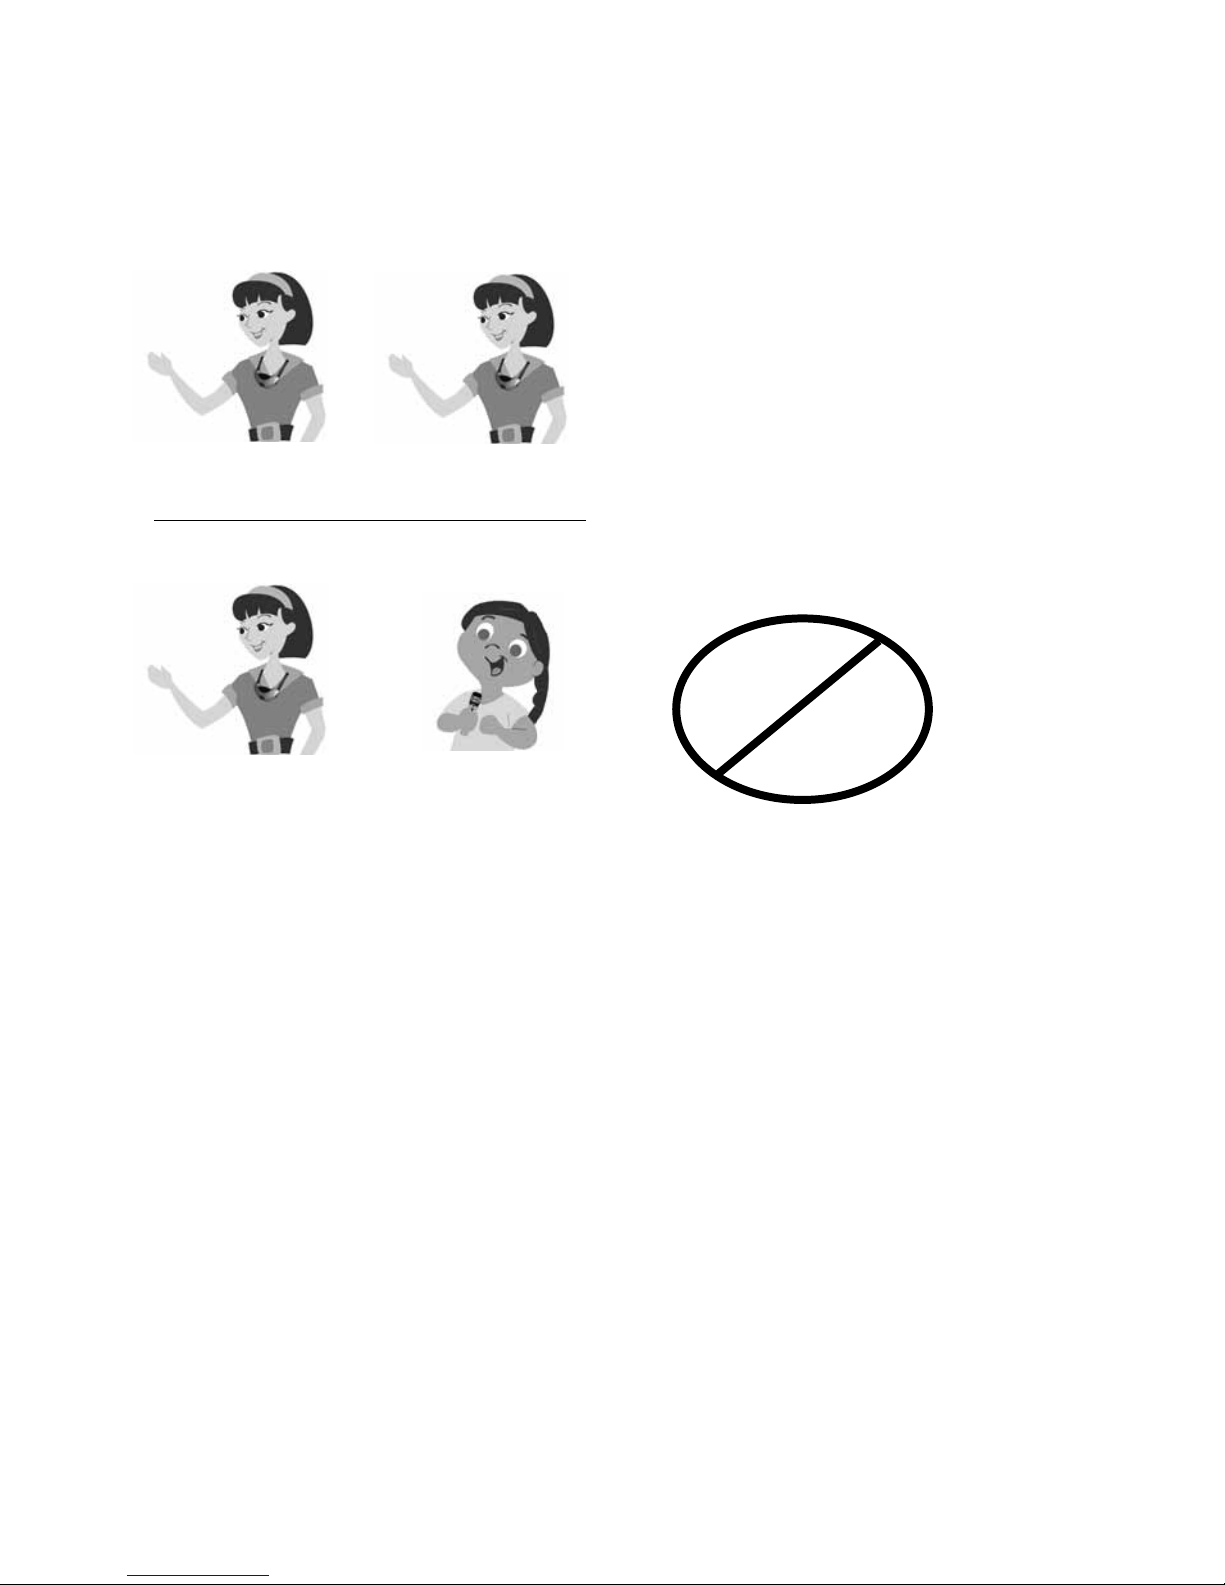
9 Using a Second Microphone
Your receiver is designed to receive two
microphone signals at once. For example,
two teachers (or a teacher and an aide)
may each use a microphone. Or, one
teacher can use a microphone and students can use a pass-around microphone.
Microphones must be on different channels
or interference will occur.
A + B
A + A
B + B
teacher
(channel A)
student
(channel B)
teacher 1
(channel A)
teacher 2
(channel B)
Classroom 1
Classroom 2
Page 17
15
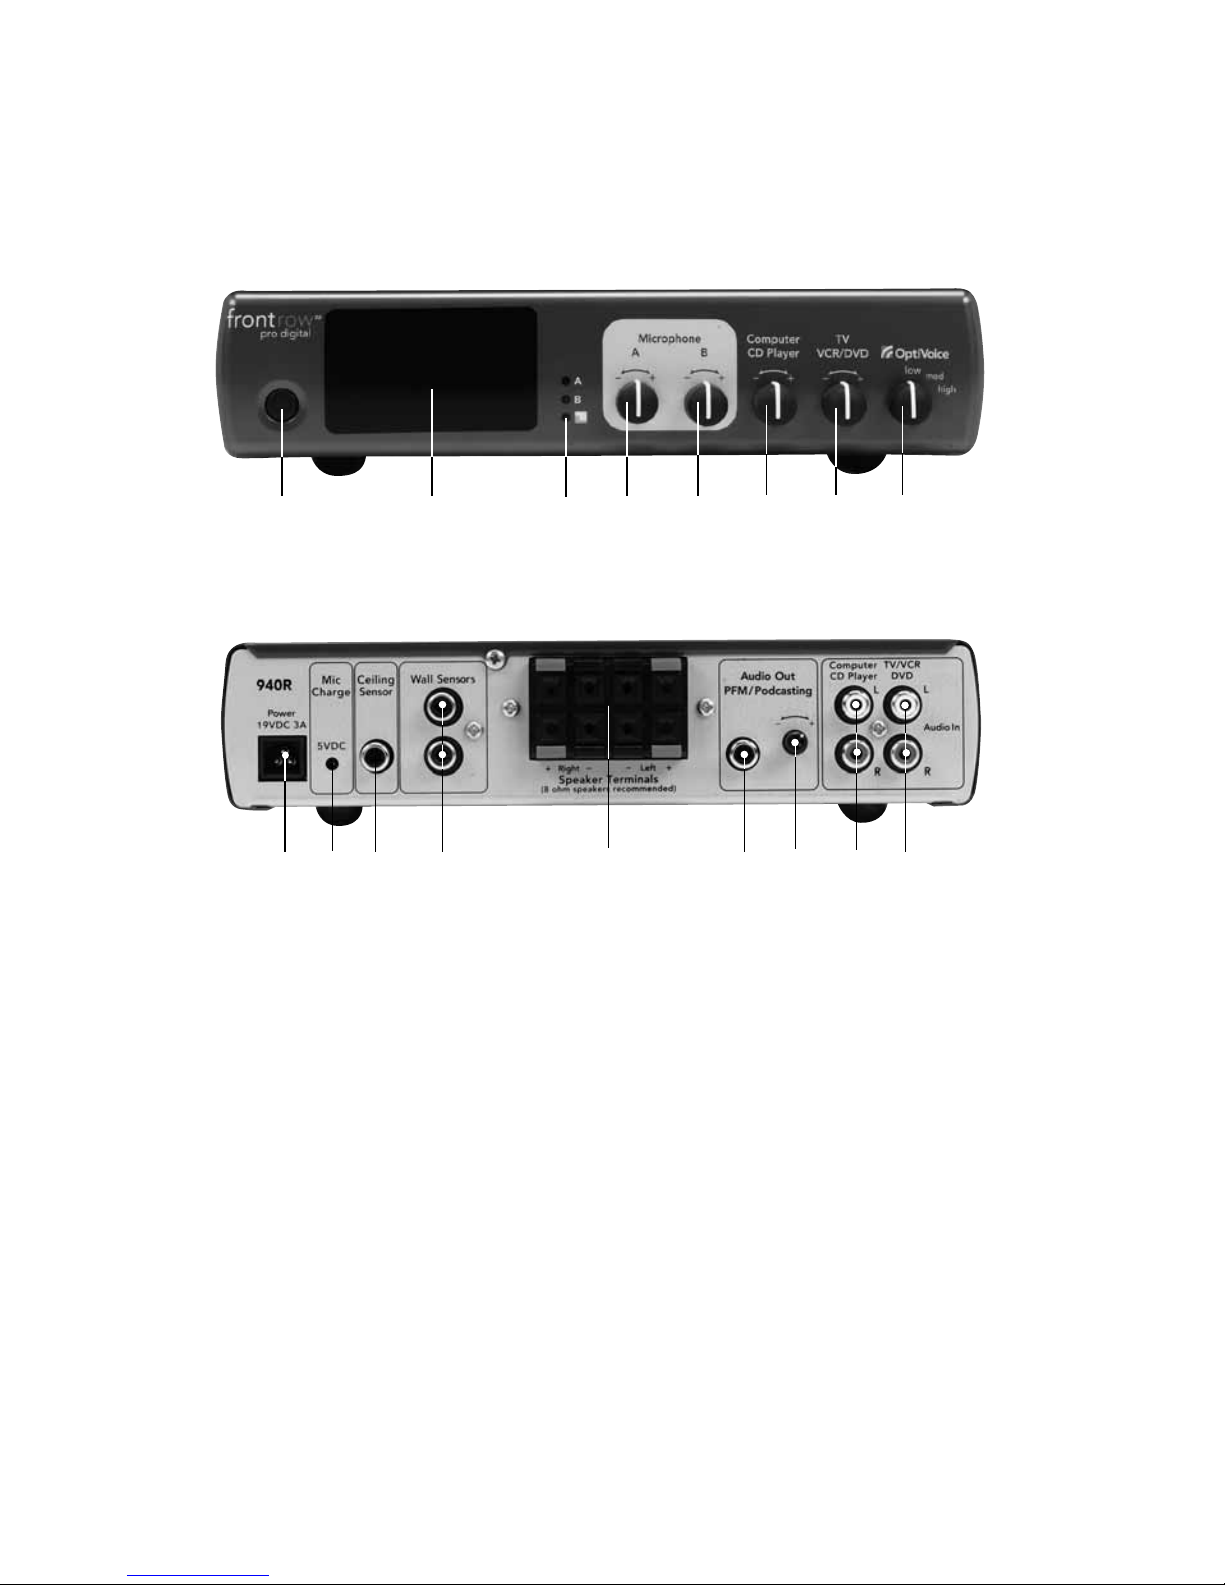
10 940R Pro Digital Receiver
Features
1. Power button
2. Internal infrared sensor
3. Microphone A/B and feedback
suppression status lights
4. Microphone A volume control
5. Microphone B volume control
6. Aux-In audio volume control
(Computer/CD player)
7. Aux-In Audio volume control
(TV/VCR/DVD)
8. OptiVoice™ selector
(Optimizes teacher's voice clarity for
various room noise levels)
9. Power jack
10. Transmitter charge output jack
(Charges up to two microphones)
11. Infrared ceiling sensor input
12. Infrared wall sensor input
13. 4 speaker terminals
14. Audio Out jack (RCA) for podcasting
15. Audio Out volume control
16. Aux-In audio jack (stereo RCA)
(Computer/CD player)
17. Aux-In audio jack (stereo RCA)
(TV/VCR/DVD)
1
front
back
2
4
5
6 7
8
9
11
12
13
14
15
17
10 16
3
Page 18
16
11 940R Pro Digital Receiver
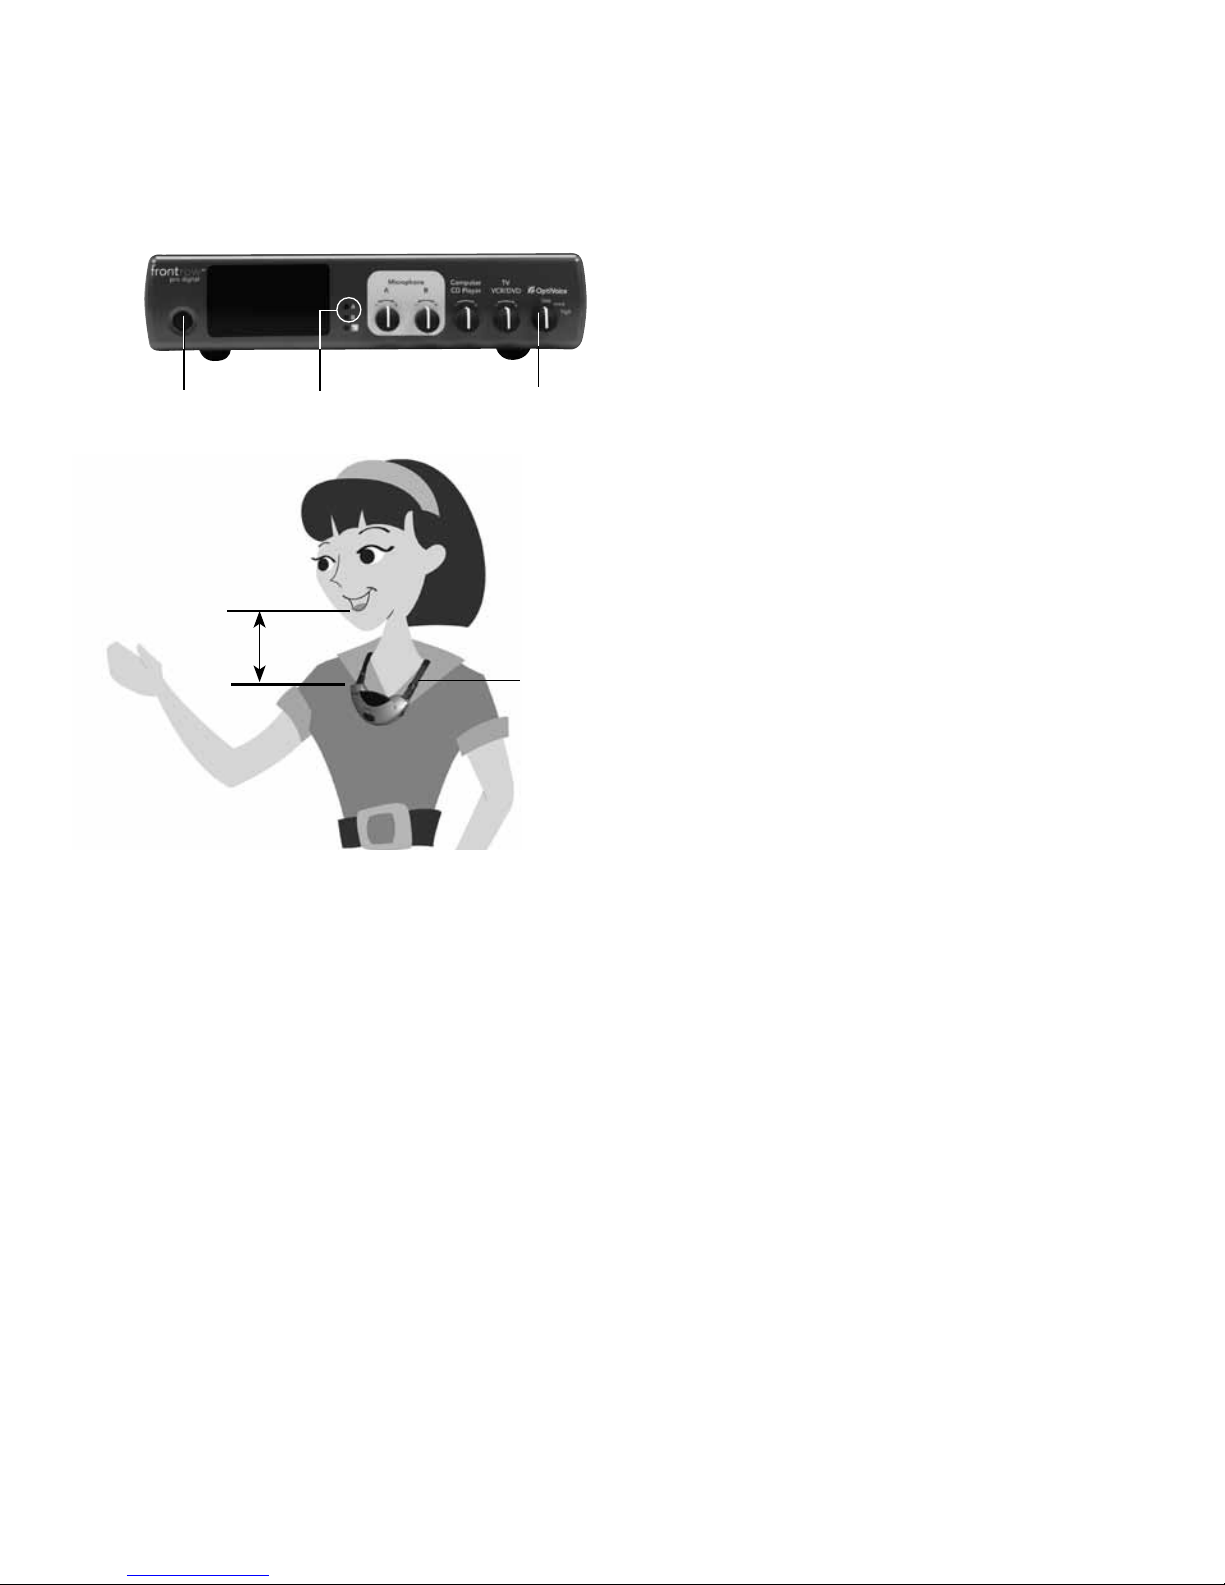
Activate Receiver and Microphone
1. Press power button
Green.....Power On
Yellow .... Standby mode
2. Put microphone around neck and adjust
strap so it is 5in. (13cm) from your mouth
3. Turn microphone on and check
microphone A or B indicator light
Green.....Power On
Red .......Microphone Off/Muted
4. Select proper OptiVoice level
Low .......Low background noise
environment
Med .......Medium background noise
environment
High .......High level background noise
environment
5. Speak in a normal conversational tone
while walking the entire room. Have a
second person adjust the volume to a
comfortable level.
5in/13cm
2
1
3
3
4
Daily Use
Your FrontRow Pro Digital has an energy-saving
standby mode. The receiver will automatically
go into standby mode in 10 minutes after you:
•Turnofformuteyourmicrophone
•Stopplayingasecondaryaudiosource
(computer, MP3 player, etc.)
The receiver will come out of standby mode
automatically when you:
•Turnonorun-muteyourmicrophone
•Play a secondary audio source (computer,
MP3 player, etc.) connected to the receiver
Daily operation is easier than ever; the system
will "wake up" and "go to sleep" automatically.
Once the microphone and auxiliary audio
volume is set to the optimal level, the only
thing you need to remember is to turn the
microphone on in the morning and turn it
off and charge it in the evening.
To play auxiliary audio through the system,
you simply need to press "play" on your
auxiliary audio source and "stop" when
you are finished.
NOTE: When the 940R is in standby mode
the external sensor LED's will blink every
two seconds.
Page 19
17
1
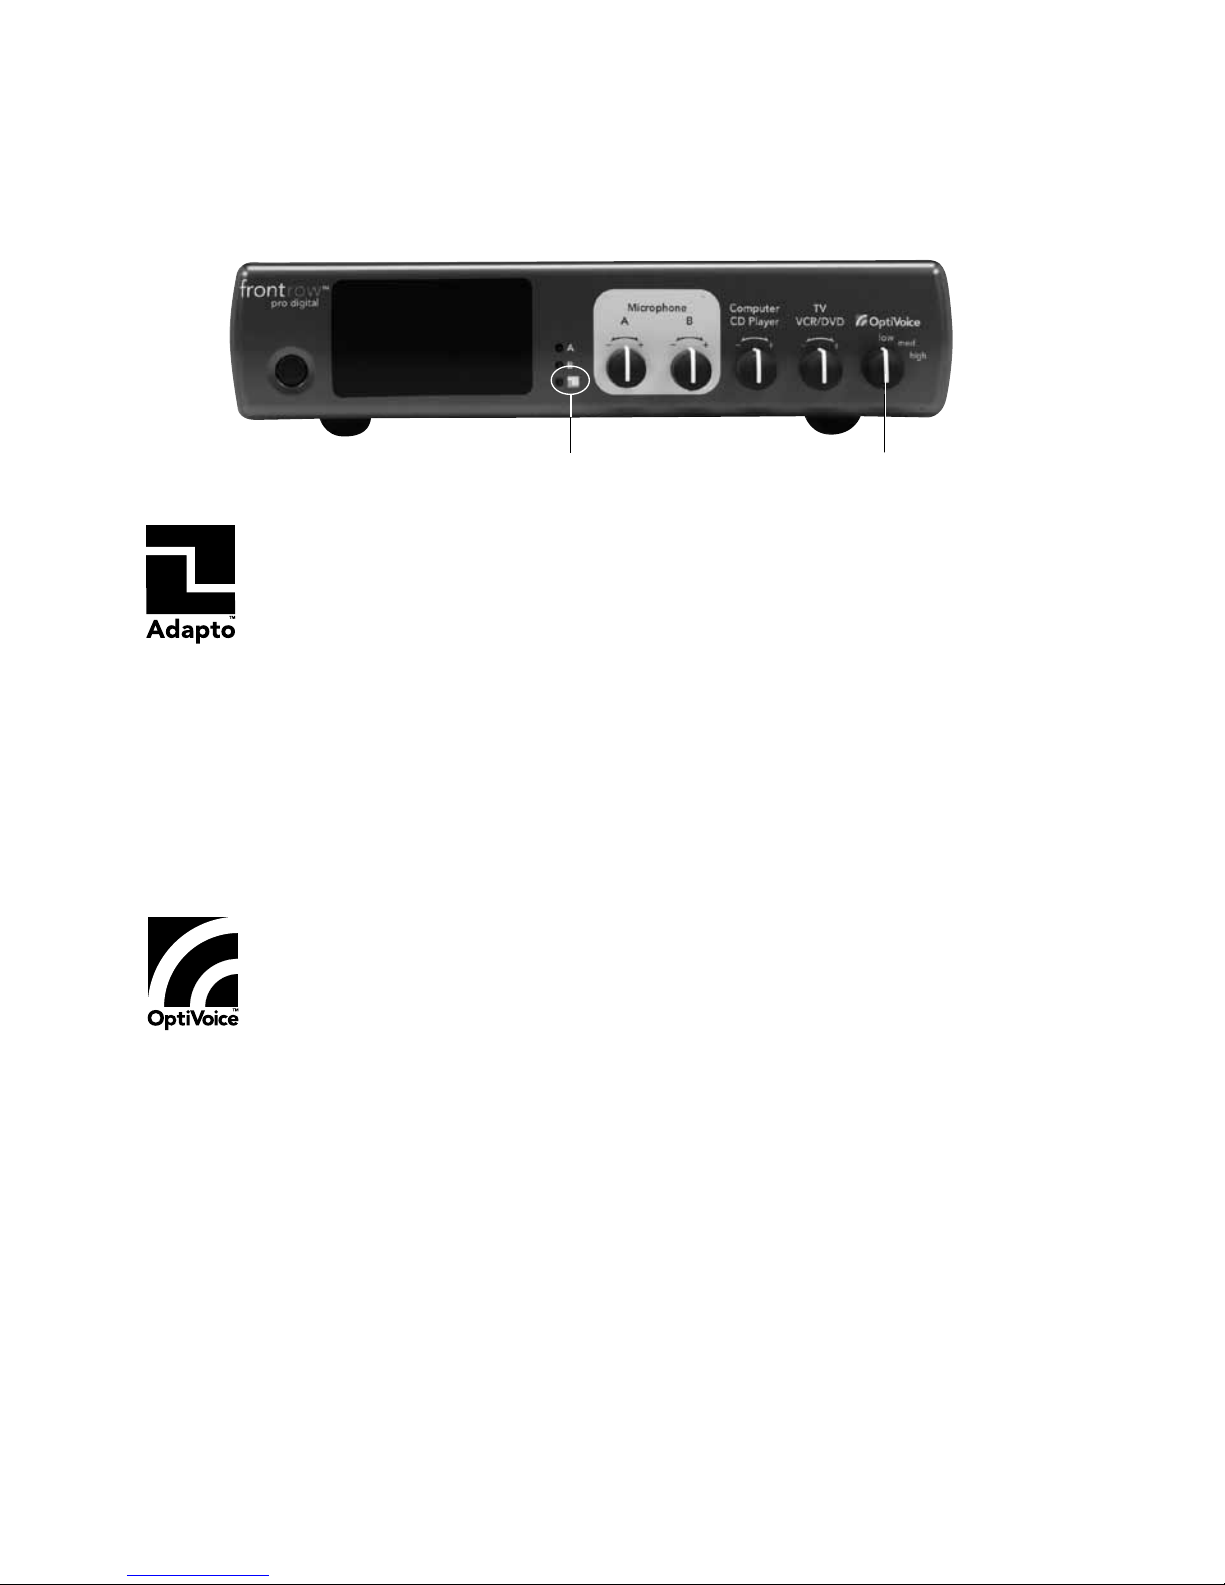
The FrontRow Pro Digital features automatic feedback suppression. The Adapto
™
platform analyzes the sound quality hundreds of times a second, looking for signs
of feedback. When feedback is detected, it filters it out, allowing the teacher to have
optimal volume settings AND complete freedom of movement around the classroom.
When the automatic feedback suppression is active, the Adapto light (1) on the front
panel will turn green. It may turn on and off throughout the day, but that is OK; it just means
that it is working to optimize sound quality.
When adjusting the volume the goal is speech clarity, not rock concert power and volume. As
a general rule, you should barely hear your own voice through the system when speaking.
NOTE: Feedback may still occur if the volume is turned up very high – too high for sensible classroom use. If this occurs, turn volume down in small increments until the feedback disappears.
12 940R Pro Digital Receiver
Automatic Feedback Suppression and OptiVoice
PMS Orange 21C
PMS 485 Red
A powerful tool for test-taking, directions, and ESL instruction. Fragile consonant
sounds carry about 75% of the meaning in speech but are easily destroyed by
background noise.
OptiVOice
strengthens these critical sounds, doing the work of
a 12-band equalizer with a single switch (2).
For low background noise environments and for a more natural reproduction of your voice,
use the low setting. For environments with higher background noises, use the medium or high
setting. Experiment with the right mix of microphone volume and
OptiVOice
setting to find the
optimal solution for your environment.
2
Page 20
18
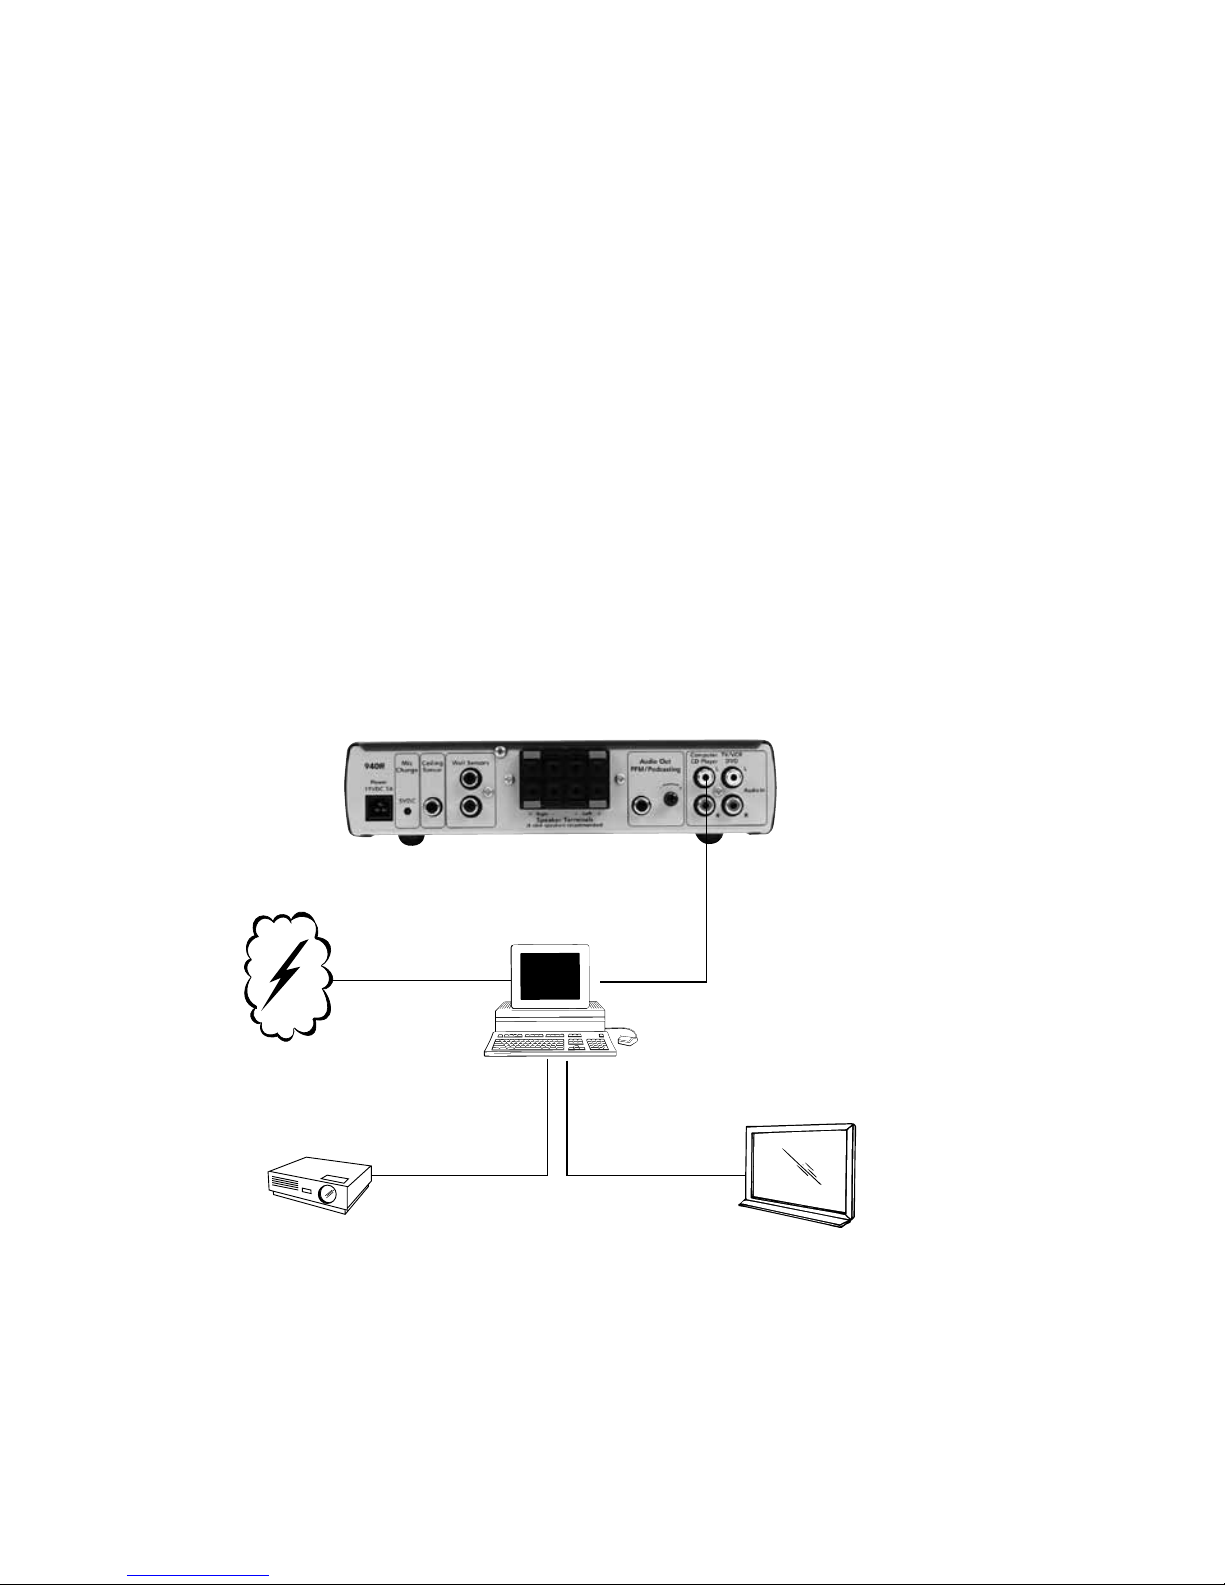
Your FrontRow Pro Digital can connect to other media to enhance the overall audio experience in your classroom. Ideally, these connections were made during installation; however,
they can easily be made after the unit is installed using the audio cords that came with the
system or standard audio cords from your local electronics store.
Option 1
Many classrooms use a computer as a multi-media "hub" (with an LCD projector), which is
connected to the internet or school network to download/stream all audio and video, and
audio files. For these classrooms, you may only require one auxiliary audio input connection
to the 940R.
Computer
940R (back)
13 940R Pro Digital Receiver
Connecting to other Classroom Media
LCD Projector
Audio
Out
Screen or
Interactive White Board
Internet
Audio
Video
Page 21
19
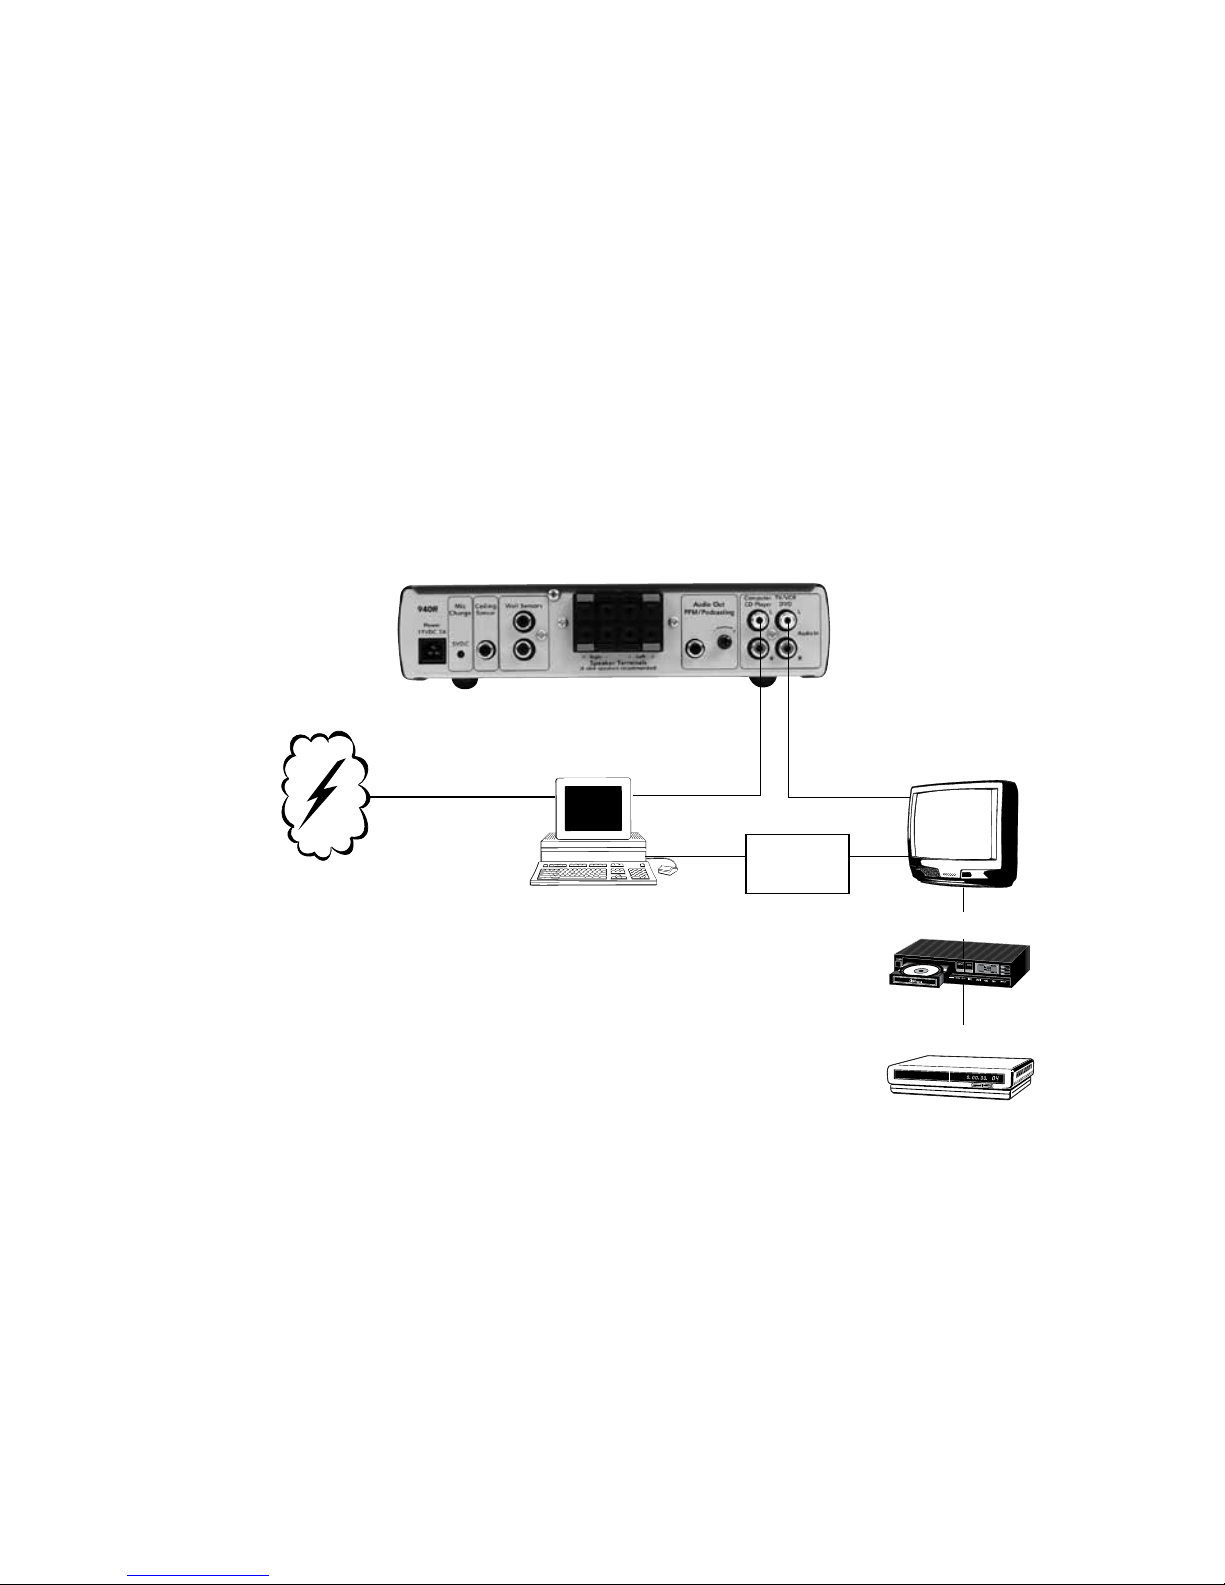
DVD Player
VCR
940R Pro Digital Receiver
Connecting to other classroom media (cont.)
TV
Option 2
Some classrooms use a computer as the multi-media "hub", but it is connected to a TV instead
of an LCD projector. They also occasionally use the TV/DVD/VCR as a stand alone media. For
these classrooms, you may need to use both auxiliary audio input connections to the 940R.
940R (back)
Audio
Out
Computer
Audio
Out
Internet
Audio
Video
Signal
Converter
Page 22
20
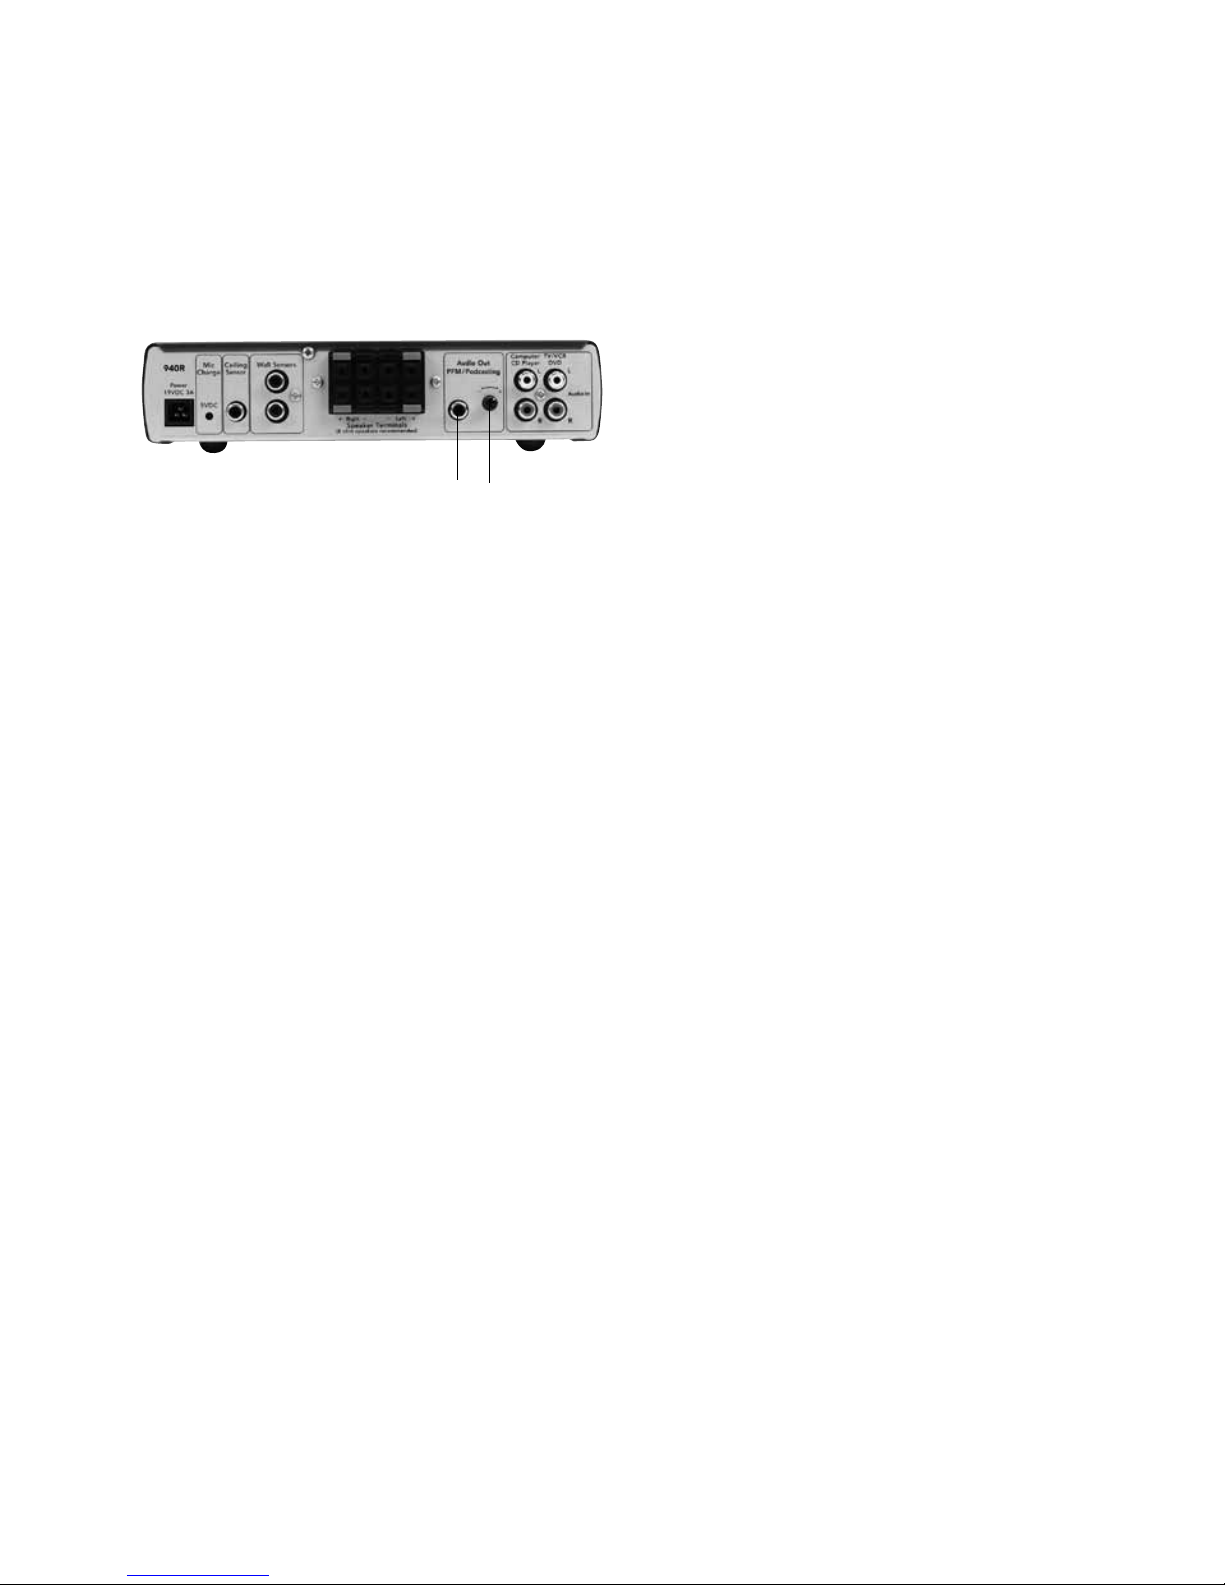
Allows rebroadcast of all voice and auxiliary
audio directly to a hearing-impaired student's
personal FM system.
14 940R Pro Digital Receiver
Auxiliary Output - Rebroadcasting to Personal
FM Receivers
1. Plug RCA cord into audio out port on
back of Pro Digital receiver. Depending
on the device you are connecting, match
the type of the other end of the cord to
the aux in on the transmitter (typically
3.5mm).
2. Adjust volume level setting for
transmitter
a. if device you are connecting is a line
level input, set volume control nearer
to maximum
b. if device you are connecting is a mic
level input, set volume control nearer
to minimum
Test and adjust as volume level as
needed.
1
2
Page 23

21
Receiver won’t turn on (power light doesn’t
turn on)
•Verifythatthepowersupplyispluggedinto
both the receiver and a working wall outlet
• Testwithanotherpowersupply
Receiver keeps going into standby mode
when playing auxiliary audio
• Volumelevelonauxiliaryaudiodeviceisset
too low
Receiver will not "wake up" from standby mode
• Volumelevelonauxiliaryaudiodeviceisset
too low
• Makesuremicrophoneisonandworkingcorrectly, and the receiver is receiving the signal
Adapto LED keeps flashing on and off
• Thisisnormal.Thelightwillturnonwhen
the Adapto platform is processing the speech
signal. There is nothing you need to do
’Dead spots’ or
microphone crackling/noise
• Verifythatyouarenotblockingeitherthe
emitters on the microphone or the sensors
on receiver or mounted around room
• Ifreceptionisinterruptedornoisywhenfacing
a certain direction, install an additional sensor
in that area of the room (see Installer Guide)
•Ifusingmorethanonemicrophone,verify
that they are not on the same channel
•Rechargeorreplacethemicrophonebatteries
No signal reception (channel indicator light
on receiver is red)
• Checkthatthemicrophoneison
• Checkthatthemicrophoneisnotmuted
(940TM only)
• Verifythatyouarenotblockingeitherthe
emitters on the microphone or the sensors
on receiver or mounted around the room
• Ifreceptionisinterruptedwhenfacinga
certain direction, install an additional sensor
in that area of the room (see Installer Guide)
•Ifusingmorethanonemicrophone,verify
that they are not on the same channel
•Rechargeorreplacethemicrophonebatteries
Feedback (squealing)
•
Lower the Microphone A or B Volume control(s)
on the receiver
•Makesurethatspeakersaremountedasclose
as possible to the ceiling and to the listening
area; avoid mounting speakers in the teacher’s
primary lecture area
• Positionthemicrophoneclosertomouth
•SelecttheLoworMediumOptiVoicesetting
•Setthegainswitchonthepass-around
microphone to "mid" or "low"
Weak or no output from speaker(s)
•
Increase t
he Microphone A or B Volume
or Aux-In Audio Volume control(s) on
the receiver, or audio device
• Positionthemicrophoneclosertomouth
• Setthegainswitchonthepass-around
microphone to "mid" or "high"
• Verifythatthespeakershavebeenproperly
installed
High or low pitched whine or hum coming
through speakers
•
There may be a ground loop with the
system. Install a ground loop isolator (see
Installer Guide)
• Theremaybe"noisy"electricalwiring.Install
an AC line filter (see Installer Guide)
Sensor lights are blinking
•
This is normal. When the 940R is in standby mode
the sensor LED's will blink every two seconds
Charger light won't come on or is blinking red
•
Check that the charger is connected to a
working power outlet
•
The charger can charge only 950H and
940TM microphones with charge contacts.
Refer to page 3, feature 12 to confirm that
your microphone has these contacts.
•
You may be attempting to charge an
alkaline battery or a rechargeable battery
that has reached the end of its useful
life. Check the battery and replace with a
FrontRow "silver sleeve" rechargeable battery.
15 Troubleshooting
Page 24
22
16 Regulatory
FrontRow Pro Digital Receiver 940R
FrontRow Pro Digital Transmitter 940TM
Tested to comply with
FCC Standards
FOR HOME OR OFFICE USE
receiver: part 15, subpart B
This equipment has been tested and found
to comply with the limits for a Class B digital
device, pursuant to Part 15 of the FCC Rules.
These limits are designed to provide reasonable protection against harmful interference
in a residential installation. This equipment
generates, uses and can radiate radio frequency energy and, if not installed and used
in accordance with the instructions, may
cause harmful interference to radio communications. However, there is no guarantee
that interference will not occur in a particular
installation.
This product conforms with the
essential requirements of European
Union Directive /EU Directive
2004/108/EC EMC Directive and 2002/95
ROHS Directive. This product can be subject
to interference at our operational frequency
bands of 2.3 and 2.8 MHz.
This product has been cleared by the U.S. Food
and Drug Administration for use by persons
with normal hearing and hearing impairment.
FCC notes
The FrontRow Pro Digital active learning
system is approved by the FCC (Federal
Communications Commission). The use of
the system may be governed by specific FCC
rules and FCC licensing or notifications may
be required. Consult your local FCC office
for detailed information.
Phonic Ear receivers and transmitters, when
required, are approved by the Federal
Communications Commission (FCC) in the
U.S. and Industry Canada. Other government
approvals are available upon request. (Other
international regulations may also apply.)
Any changes or modifications made to any
government-approved element of this instrument, without the express approval of
Phonic Ear, Inc. in writing, could void the
user's authority to operate those elements
of the system.
IC notes
This Class B digital apparatus complies with
Canadian ICES-003.
Cet appareil numérique de la classe B est
conforme à la norme NMB-003 du Canada.
The term "IC:" before the radio certification
number only signifies that Industry of Canada
technical specifications were met.
Electrical and electronic
equipment (EEE) contains
materials, components and
substances, that could be
dangerous or detrimental to human health
and the environment if waste electrical and
electronic equipment (WEEE) is not disposed
of correctly. Products marked with the
crossed-out dustbin shown here are electrical
and electronic equipment. The crossed-out
dustbin indicates that waste electrical and
electronic equipment may not be disposed
of with unsorted household waste and that it
must be collected separately.
In developing and manufacturing your Phonic
Ear product, we used high-quality materials
and components that can be reused. Thus,
when disposing of your waste electrical
and electronic equipment, you must use a
collection system designated for this purpose,
regardless of whether you dispose of your
waste at your local waste site or it is collected
from your home. Please contact your local
authority for further information.
Page 25

© 2012 Phonic Ear Inc. Phonic Ear, FrontRow and the names of Phonic Ear and FrontRow products are trademarks or registered
trademarks of Phonic Ear, Inc. in the U.S. and other countries. Product specifications and accessories subject to change without
notice.
USA/Global
FrontRow
Corporate Headquarters
1690 Corporate Circle
Petaluma, CA 94954-6712
toll-free: 800.227.0735
tel: 707.769.1110
fax: 707.769.9624
web: www.gofrontrow.com
Australia
Phonic Ear
629 Nudgee Road
Nundah Qld 4012
Australia
freecall: 1 800 PHONIC
fax: 1300 746 642
web: www.gofrontrow.com.au
Canada
FrontRow
6950 Creditview Road, Unit 1
Mississauga, ON L5N 0A6
toll-free: 800.340.9894
tel: 905.4 61.53 00
fax: 905.677.7760
web: www.gofrontrow.com
Scandinavia
Phonic Ear A/S
Kongebakken 9
2765 Smørum
Denmark
tel: +45 3917 7101
fax: +45 3927 7900
web: www.gofrontrow.com
www.phonicear.com
New Zealand
Oticon New Zealand Ltd.
142 Lambton Quay
P.O. Box 9128
Te Aro. Wellington
toll-free: 800 OTICON
toll-free fax: 00800 FAX
OTICON
web: www.oticon.co.nz
United Kingdom
PC Werth Limited
Audiology House
45 Nightingale Lane
London SW12 8SP
tel: 020 8772 2700
web: www.soundfield.info
921-31-010 -00/Rev. J 0 112
 Loading...