

Page 1
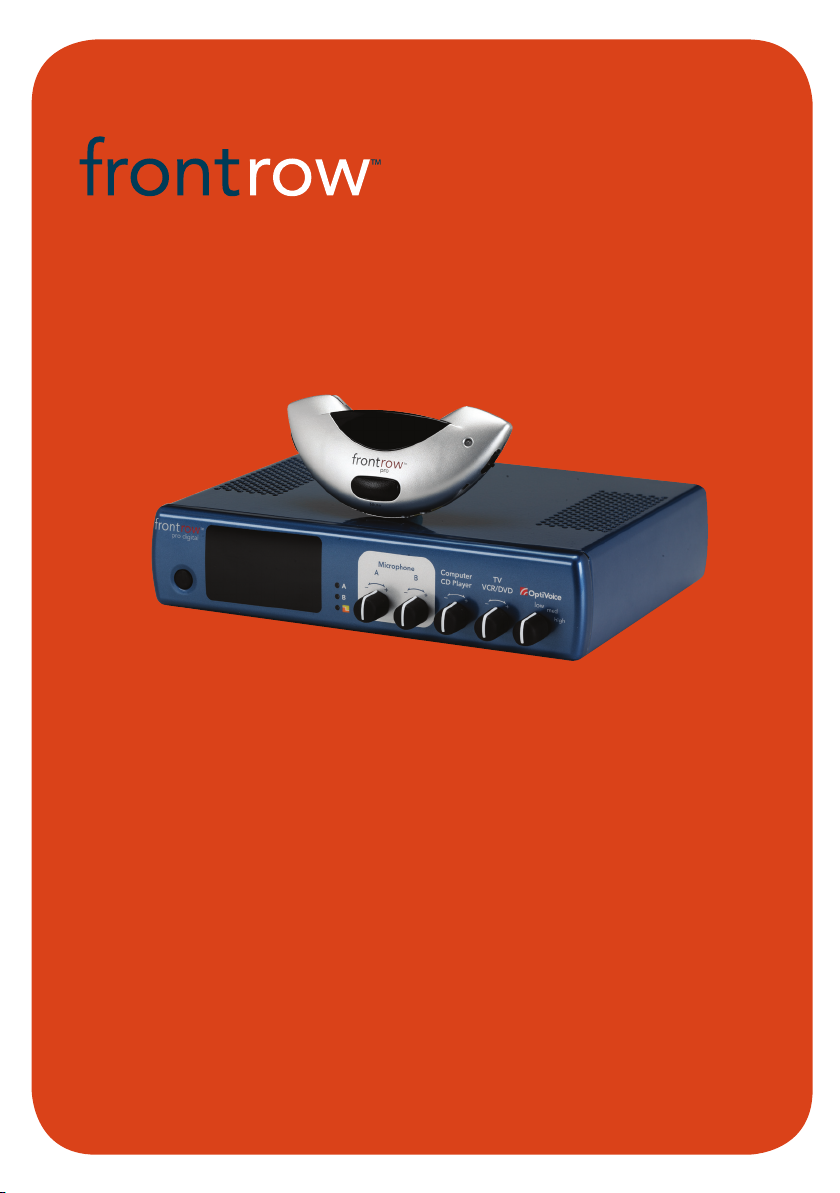
pro digital
user guide
940R Receiver
940TM Pendant Transmitter
Page 2
Introduction
Congratulations on the purchase of your new FrontRow Pro Digital active learning system!
Active learning systems engage students, improve attentiveness to the teacher, build
learning success, reduce the achievement gap, foster control and orderliness, improve
test scores, and reduce vocal strain and fatigue for teachers. Numerous studies show
that classrooms using active learning enjoy better student comprehension, increased
student participation, better grades and fewer behavioral referrals.
Read this manual carefully to become familiar with your system and to get the most
out of its many features and options.
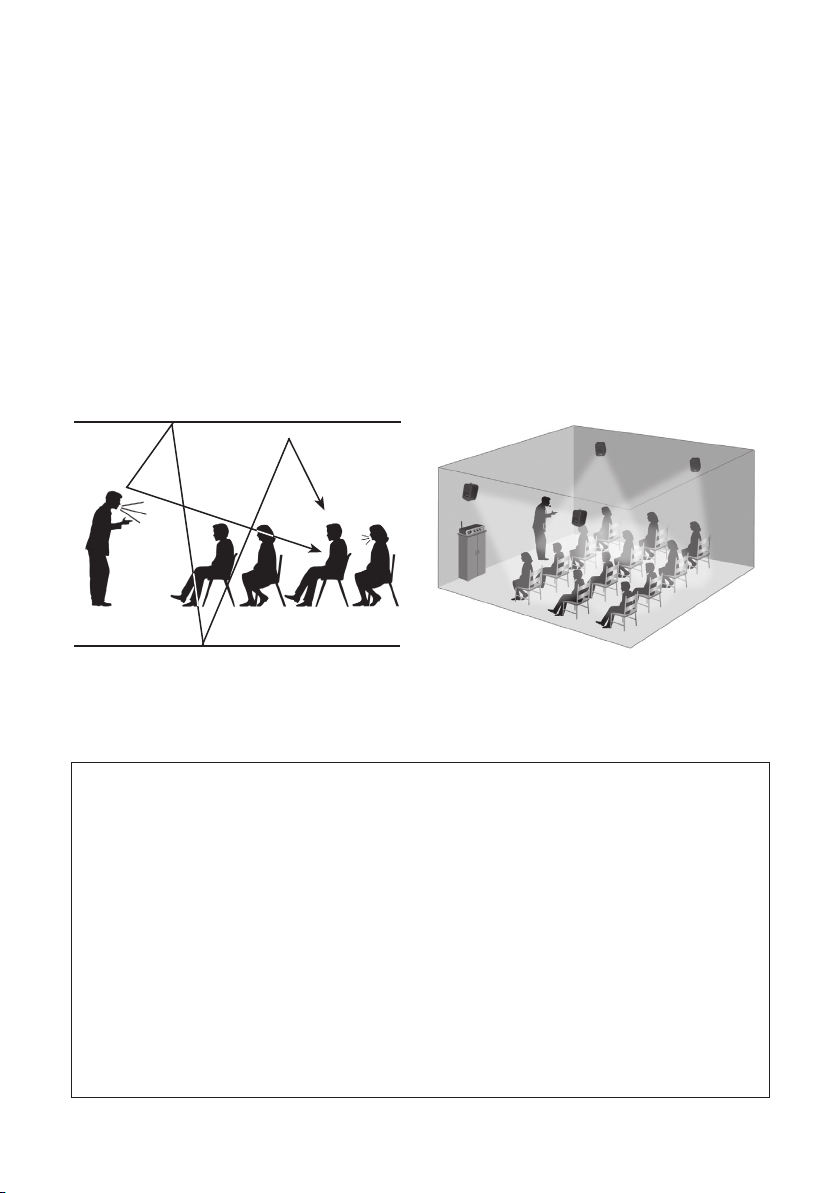
Understanding Active Learning and its Benefits
without active learning
?
• reduced comprehension
• reduced attention
• teacher fatigue
?
cough!
with active learning
• improved comprehension
• improved attention
• greater teacher energy
Installation Notice
Your FrontRow Pro Digital active learning system is a precision wireless audio instrument designed to improve students’ ability to perceive the teacher’s voice. In fact,
the US Food and Drug Administration (FDA) considers it to be a medical device.
As such, we strongly recommend having your system set up by a professional
installer who is familiar with FrontRow active learning systems (contact your representative for referrals to installers in your area).
If you choose to install your FrontRow Pro Digital system yourself, take great care
to follow the instructions in the separate FrontRow Pro Digital Installer Guide
before using. Achieving the best performance from your system is only possible by
properly selecting and positioning all speakers and sensors. Improper installation
can result in poor performance.
1
Page 3

Classroom Amplification Has Never Been This Smart
The FrontRow Pro Digital is built on the powerful Adapto platform. The Adapto
platform uses powerful digital processing to manage the sound reproduction
and command and control functions of the receiver. Just a few of the benefits
of the Adapto platform are:
Digital Signal Processing
Digital Signal Processing creates and extremely quiet system which allows for the purest and cleanest reproduction of voice and music.
•
OptiVoice:
OptiVoice technology takes speech clarity a step further, maximizing students’
ability to understand by emphasizing speech frequencies that are most critical to
comprehension; which is especially critical in noisier classrooms.
•
Automatic Feedback Suppression
The powerful Adapto platform uses digital processing to analyze the sound qual
ity hundreds of times a second, looking for signs of feedback. When feedback
is detected, it filters it out, allowing the teacher to have optimal volume settings
AND complete freedom of movement around the classroom
Intelligent Power Management
The FrontRow Pro Digital receiver uses less energy than a standard analog system and
also has a standby mode, which will automatically power-down the receiver when it
does not detect a microphone or audio input, thereby using much less energy over the
lifetime of the product.
•
“Set it and forget it” Standby Mode
Once the microphone volume is set to the optimal level, the only thing teachers
need to remember in the morning is to turn the microphone on. The receiver will
turn on automatically when you turn on and/or un-mute a microphone or you turn
on an audio source connected to the receiver.
•
ENERGY STAR compliant
The FrontRow Pro Digital has earned the ENERGY STAR®. By reduc-
ing energy consumption, the FrontRow Pro Digital is saving schools
money and helping to decrease the amount of pollutants and greenhouse gases released into our environment.
-
2
Page 4

Basic System Guidelines
To help ensure that you get the most from this system, follow these basic guidelines:
Microphones:
Proper pendant microphone placement will allow you to comfortably wear your
microphone all day and ensure the best sound quality.
Speak at a normal level when using your pendant microphone; the system is projecting your voice for you.
Use a student microphone (sold separately) to create a more dynamic learning
environment by amplifying a student’s voice when they are reading or presenting.
Do not use two microphones on the same channel. Your FrontRow Pro Digital
receiver is designed to accept audio from two microphones simultaneously, but they
must be on separate channels.
Receiver:
“Set it and forget it.” The system has a standby mode, so once the proper volume
is set for the classroom, the only thing you need to do in the morning is turn your microphone on. The system will “wake up” automatically and “go to sleep” automatically.
Feel free to move about the room. Proper installation and the Adapto platform will
ensure your voice will not “drop out” and you will not experience excessive feedback.
Enhance the audio of all your multimedia by connecting your computer, TV/DVD,
CD or MP3 player to the system.
Use OptiVoice to enhance speech intelligibility when the room is particularly noisy or
during critical tasks such test taking.
Use the Audio Out function to connect to a recording device such as a computer or
MP3 player to record your lessons. You can also connect a student’s personal FM system
to the receiver so you only have to wear the pendant microphone when speaking.
Batteries:
Install batteries in your equipment now, then charge overnight before initial use.
Charge microphone batteries every night. Our Nickel Metal Hydride (NiMH)
batteries last a minimum of 8 hours between charges, but should be charged every
night so they are ready to go in the morning.
Replace microphone rechargeable batteries after 12 months of use. Only use special “silver sleeve”, auto-sensing batteries supplied by your FrontRow representative.
Avoid battery corrosion. Remove batteries if your transmitter will not be used for
several weeks.
Alkaline batteries may be used if you forgot to charge your transmitter the night
before. NEVER attempt to recharge alkaline batteries. To ensure proper charging,
always be sure that only "silver sleeve", auto-sensing batteries are installed.
3
Page 5

Contents
Introduction . . . . . . . . . . . . . . . . . . . . . . . . . . . . . . . . . . . . . . . . . . . . . . . . . . . . . . . . . . . . . .1
Classroom Amplification Has Never Been This Smart . . . . . . . . . . . . . . . . . . . . . . . . . . .2
Basic System Guidelines. . . . . . . . . . . . . . . . . . . . . . . . . . . . . . . . . . . . . . . . . . . . . . . . . . . .3
Chapter 1 Typical Microphone Components
Chapter 2
Typical Receiver Components. . . . . . . . . . . . . . . . . . . . . . . . . . . . . . . . . . . . . 6
940TM Pendant Microphone
Chapter 3 Features
. . . . . . . . . . . . . . . . . . . . . . . . . . . . . . . . . . . . . . . . . . . . . . . . . . . . . . .7
Chapter 4 Installing Batteries and Charging
Chapter 5 Using
. . . . . . . . . . . . . . . . . . . . . . . . . . . . . . . . . . . . . . . . . . . . . . . . . . . . 10 - 11
940R Pro Digital Receiver
Chapter 6
Chapter 7 Features
Chapter 8
Chapter 9
Chapter 10
Chapter 11
Chapter 12 Troubleshooting
Chapter 13 Product Specifications
Chapter 14 Regulatory
Key Features . . . . . . . . . . . . . . . . . . . . . . . . . . . . . . . . . . . . . . . . . . . . . . . . . . . . . 12
. . . . . . . . . . . . . . . . . . . . . . . . . . . . . . . . . . . . . . . . . . . . . . . . . . . . . . . . . 13
Activate Receiver and Transmitter . . . . . . . . . . . . . . . . . . . . . . . . . . . . . . . . 14
Automatic Feedback Suppression . . . . . . . . . . . . . . . . . . . . . . . . . . . . . . . . 15
Using a Second Transmitter. . . . . . . . . . . . . . . . . . . . . . . . . . . . . . . . . . . . . .16
Connecting to other classroom media . . . . . . . . . . . . . . . . . . . . . . . . . . . . .17 - 19
. . . . . . . . . . . . . . . . . . . . . . . . . . . . . . . . . . . . . . . . . . . . . . .20
. . . . . . . . . . . . . . . . . . . . . . . . . . . . . . . . . . . . . . . . . .21
. . . . . . . . . . . . . . . . . . . . . . . . . . . . . . . . . . . . . . . . . . . . . . . . 22 - 23
. . . . . . . . . . . . . . . . . . . . . . . . . . . . . . . . .5
. . . . . . . . . . . . . . . . . . . . . . . . . . . . . . 8 - 9
FrontRow Pro Digital is manufactured to conform to the most stringent new
European guidelines for consumer products (RoHS) – it is produced using a
lead-free process and is free of other materials harmful to the environment.
The FrontRow Pro Digital is listed with Educational Underwriters, a non-profit organization committed to serving educators seeking to meet No Child Left Behind
(NCLB) requirements and to establishing best practices in education. EdU reviews
the research behind educational programs and products to verify that they meet
NCLB requirements and high educational standards. For additional information
regarding Educational Underwriters, go to www.educationalunderwriters.org
4
Page 6
1 Typical Microphone Components
1
2
1
2
3
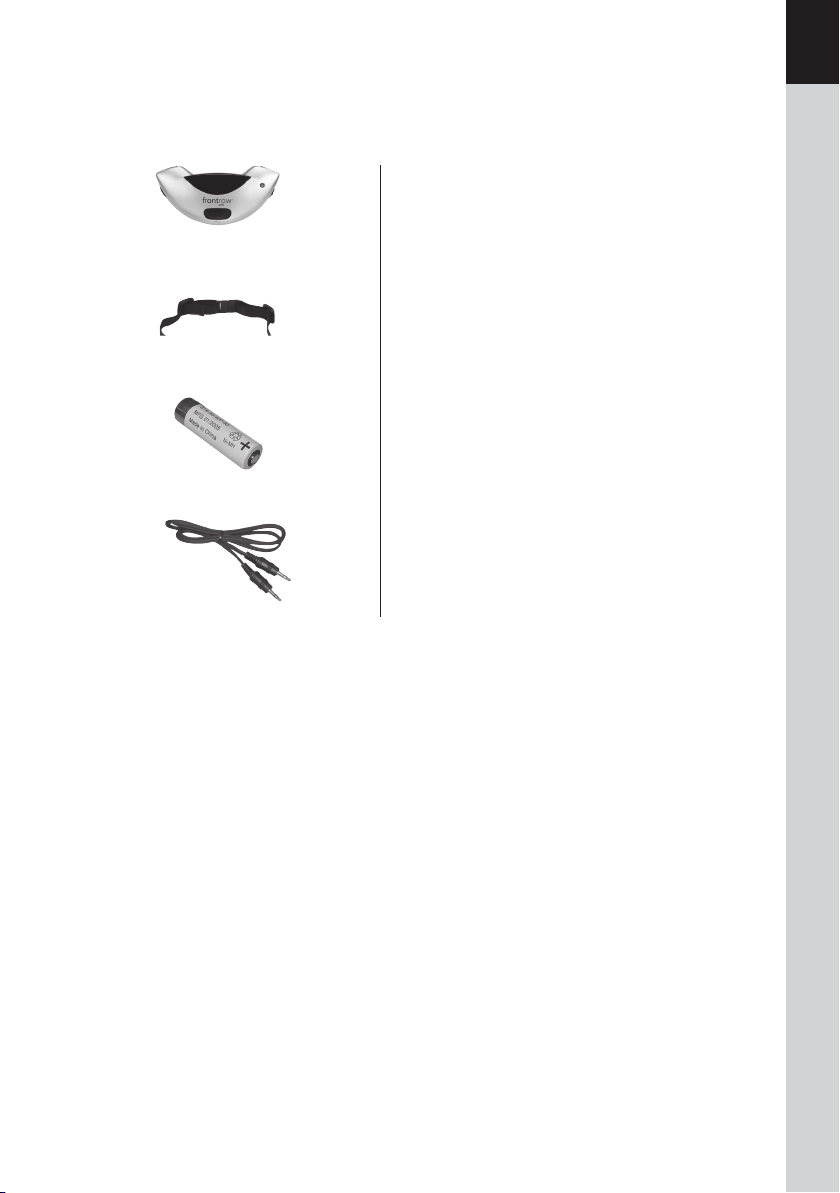
Transmitter
940TM Pendant Microphone
1.
2.
Adjustable Neck Strap
3. (1) AA (LR6) NiMH rechargeable battery
("silver sleeve", auto-sensing)
4.
Aux-in audio adaptor cord
(3.5mm to 3.5mm)
3
4
5
6
7
4
8
9
10
11
12
13
14
5
Page 7
2 Typical Receiver Components
1
2
or
3
4
or
5
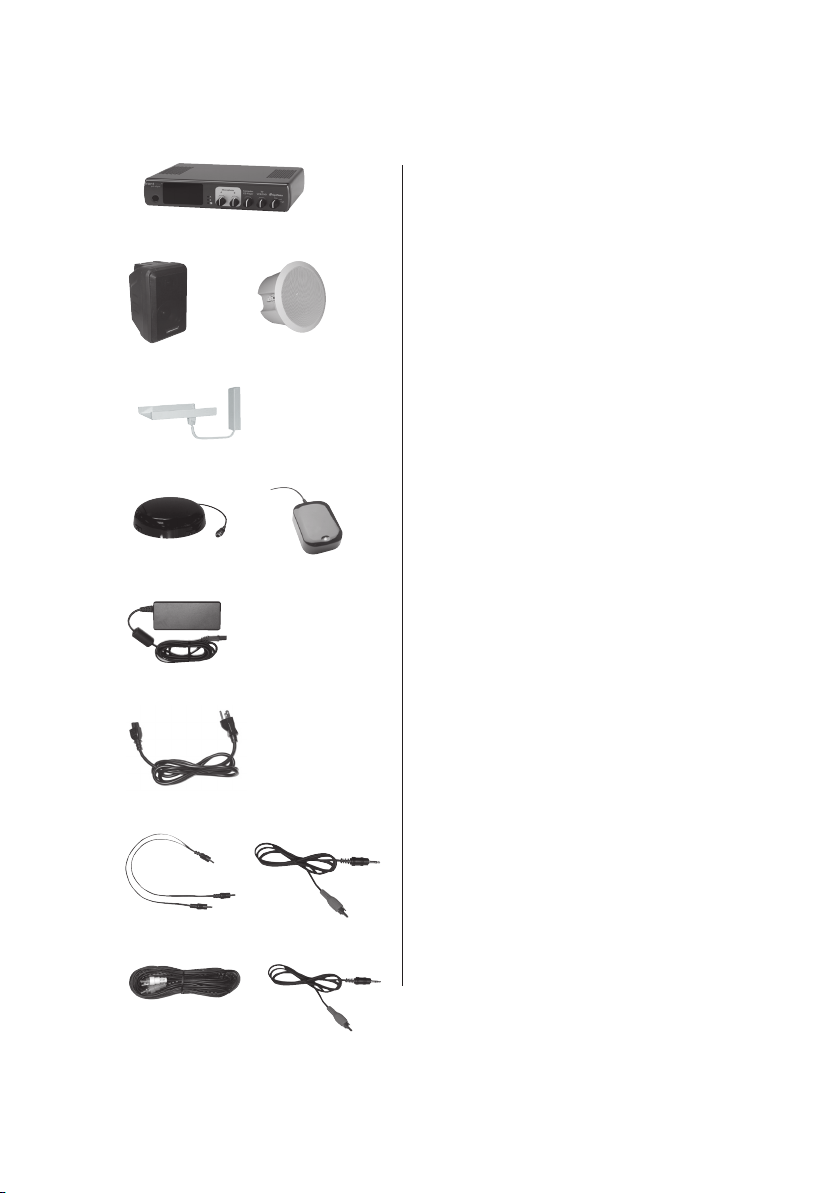
Receivers
1.
940R Pro Digital receiver
2.
Ceiling or Wall Speakers
3.
Receiver Mounting Tray
4. Ceiling or Wall Infrared Sensor
5.
Receiver power supply
6.
AC power cord (for power supply)
7. 940R cord kit
• Two-unit charge cord
• Aux-out cord (mono RCA/mono 3.5mm)
(12in/30cm)
8. Aux-in cord kit
• stereo RCA to stereo RCA
(18ft/6m)
• stereo RCA to stereo 3.5mm
(18ft/6m)
6
7
8
6
Page 8
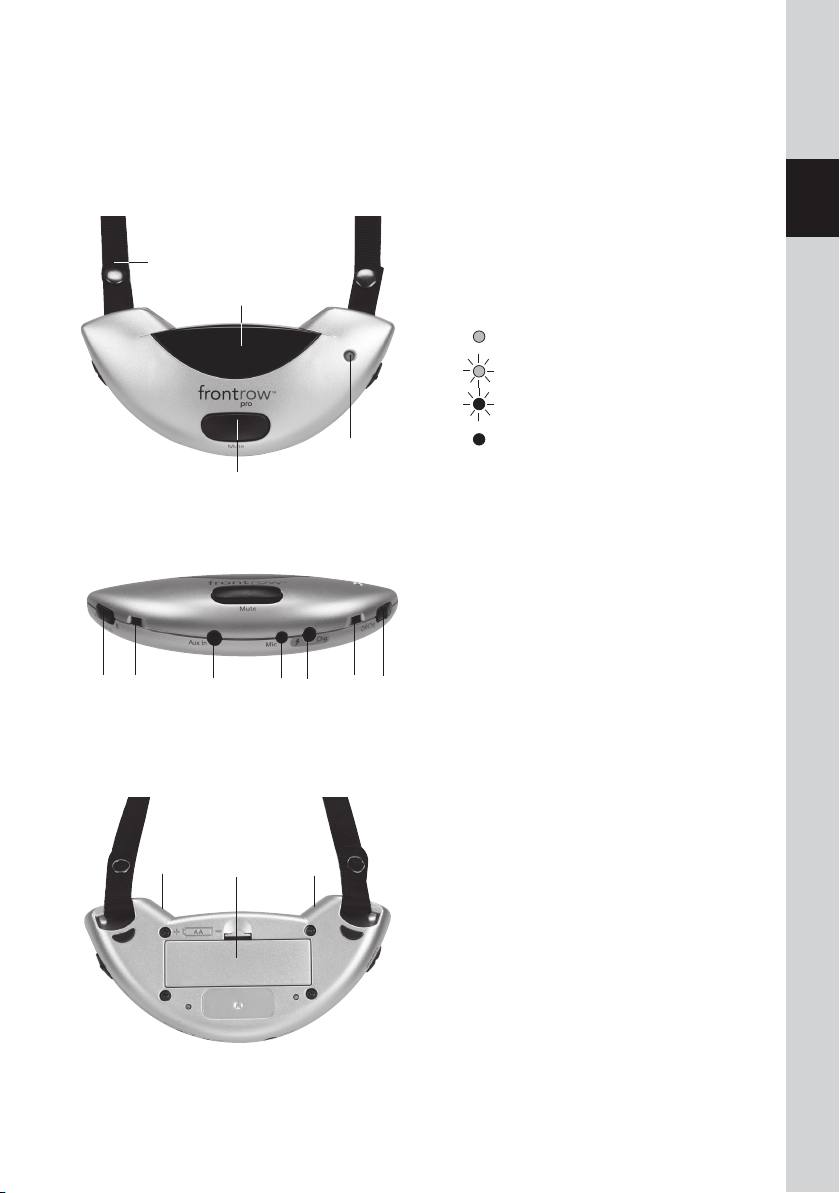
3 940TM Pendant Microphone
Features
front
1
2
3
4
bottom
65
7
back
6
11
9
10
68
6
1. Neck strap
2. Infrared emitter diodes
(
Do not block)
3. Indicator Light
Green light – On
Blinking green light – Mute
Blinking red light – Low Battery
Red light – Battery charging
(Indicator light will NOT turn green
4. Mute Button
(
Push to mute)
5. Channel Selector
(Select Channel A or Channel B. Do not
have two microphones on the same
channel in the same room)
6. Dual microphone ports
(
Do not block)
7. Aux-in audio jack
(Use aux-in audio adaptor cord to send
audio from a secondary audio source
such as an MP3 player, portable radio/
CD/tape player to the receiver)
8. External microphone jack (optional)
(
Connect a boom microphone)
9. Charge jack
10. On/off switch
11. Battery compartment
(1) AA (LR6) NiMH rechargeable battery
("silver sleeve", auto-sensing)
1
2
3
4
5
6
when fully charged)
7
8
9
10
11
12
13
14
7
Page 9
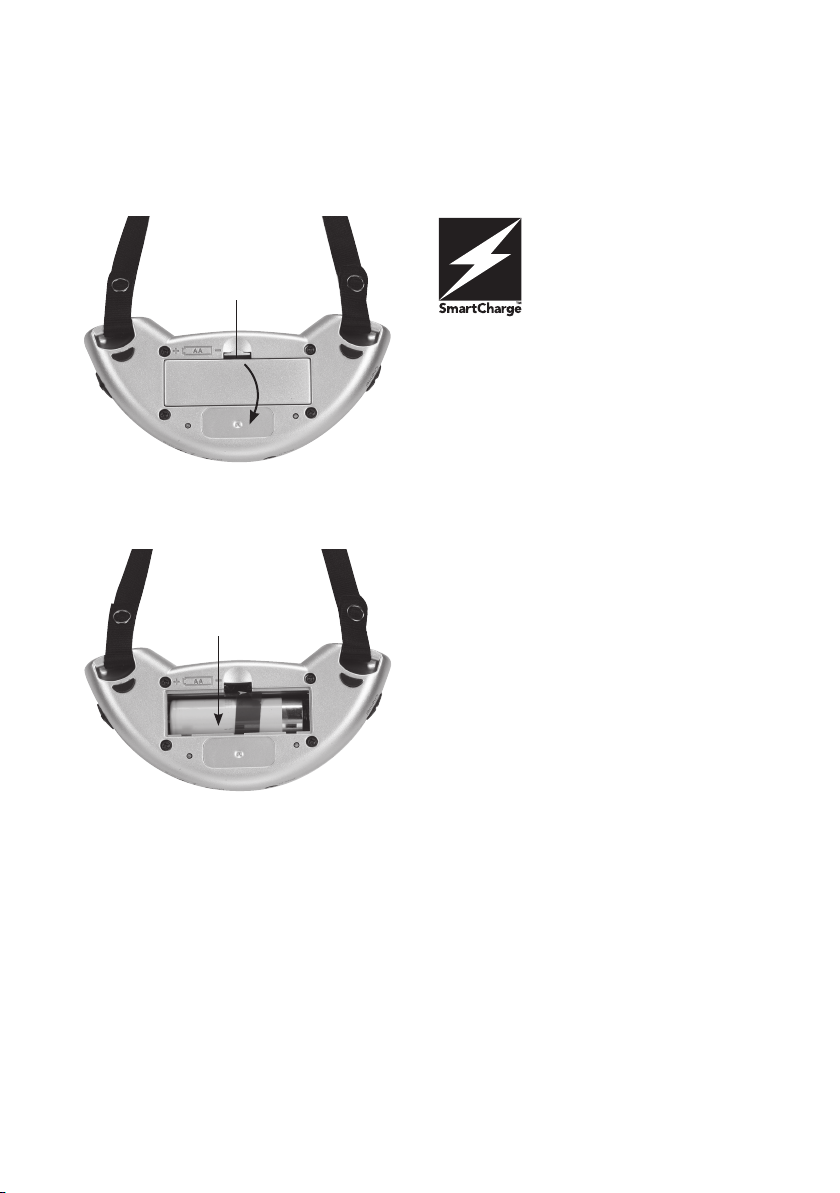
4 940TM Pendant Microphone
Installing Batteries and Charging
Your microphone is equipped
with SmartCharge technology
1
the "silver-sleeve", auto-sensing battery
that comes with your microphone. If an
incompatible battery is detected, the
microphone will not let you charge the
battery.
Install Battery
1. Push down on tab to open battery
compartment
2. Insert battery into compartment.
Note polarity indicators
3. Replace battery door
2
4. Charge battery overnight before
initial use
to protect against charging
incompatible batteries. The
microphone will only charge
8
Page 10
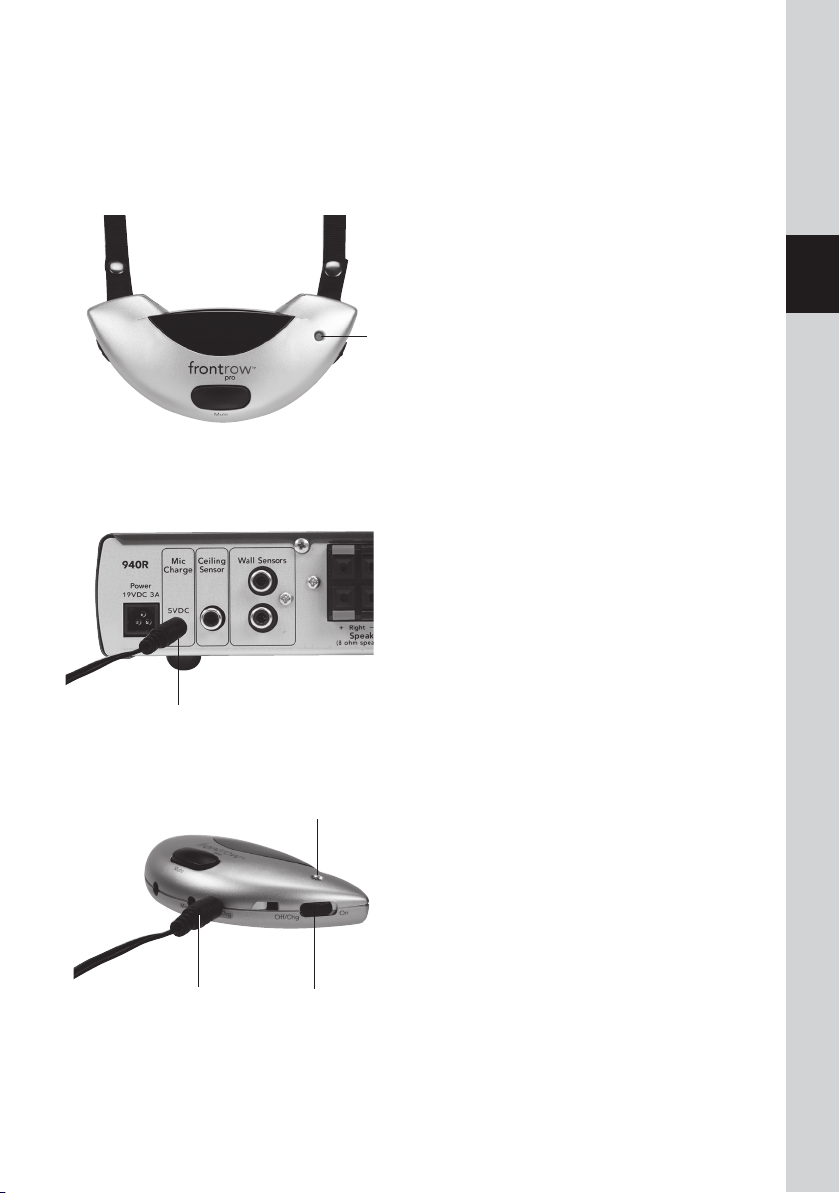
940TM Pendant Microphone
1
Installing Batteries and Charging (cont.)
Charge Battery Nightly
1. Indicator light will blink red when
battery is low
2.
Plug the two-microphone charge
1
2
5
cord into the back of the 940R
receiver
3. Turn microphone off
4. Insert one of the charge cord plugs
into the charge jack
5.
The microphone indicator light
should be red when charging. If it is
OFF, check microphone battery and
ensure charge cord is properly connected to microphone and receiver
NOTE: If you forget to charge your
microphone at night, you may use a
standard AA (LR6) alkaline battery
instead. Remember to remove the
alkaline battery and replace it with a
"silver-sleeve", auto-sensing battery
before charging the unit.
IMPORTANT!
damage to your microphone, the
SmartCharge feature is intended to
prevent charging of any battery other
than the "silver sleeve" auto-sensing
battery supplied by FrontRow. Do not
attempt to charge alkaline batteries.
To ensure proper charging, always
be sure that only "silver sleeve"
auto-sensing batteries are installed.
In order to prevent
2
3
4
5
6
7
8
9
10
11
12
13
4
3
14
9
Page 11
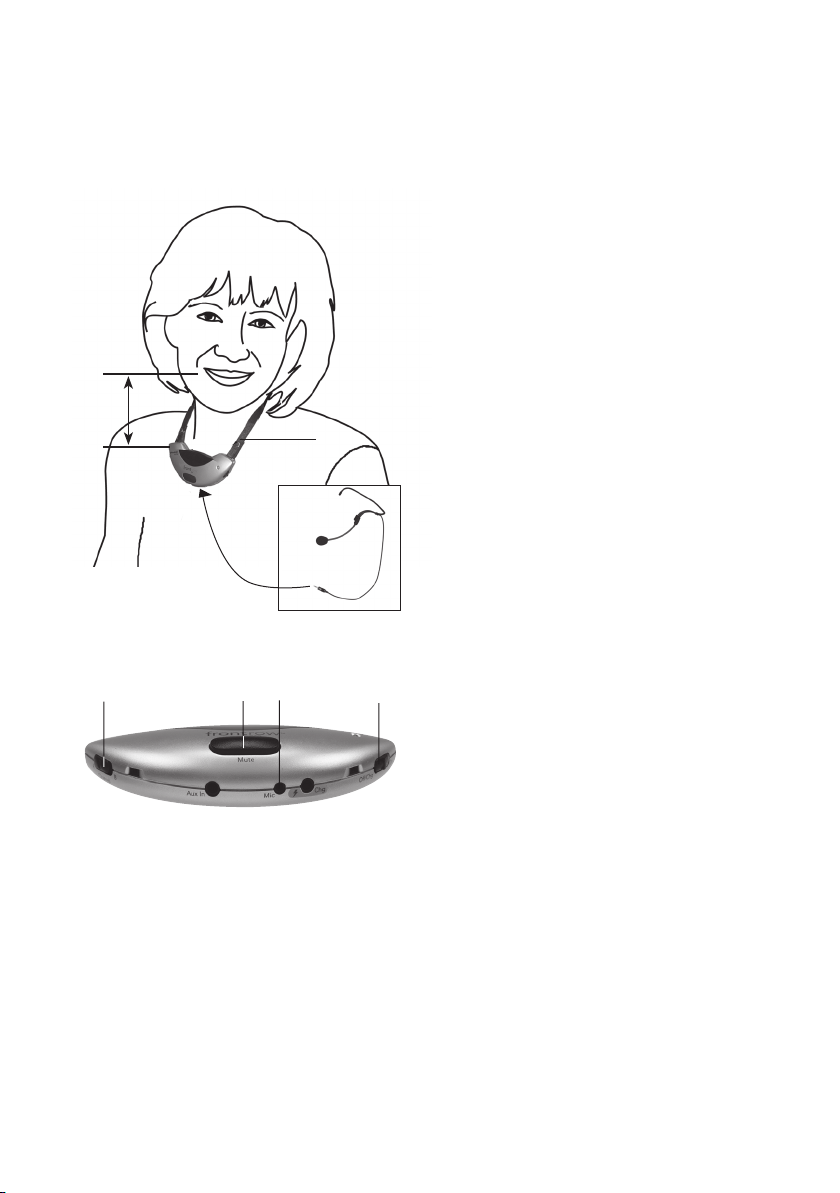
5 940TM Pendant Microphone
Using
1. Place microphone around neck and
2. Adjust neck straps to position micro
3. Set channel to A or B (whichever is not
4. Turn microphone on. Indicator light
2
5in/13cm
1
6
63
5
4
5. Press mute switch as needed for pri
6.
Light Legend
Green.................. On
Blinking Green ..... Muted
Blinking Red ........ Low Battery
Red ..................... Charging
No Light .............. OFF/Not charging
connect clasp
phone as close to mouth as possible
(approximately 5in/13cm)
already in use)
should be green
vate conversations. Indicator light will
blink green.
Optional: if desired, plug in external
boom microphone.
940TM (bottom)
10
Page 12
940TM Pendant Microphone
1
Using (cont.)
1
2
5
2
4
3
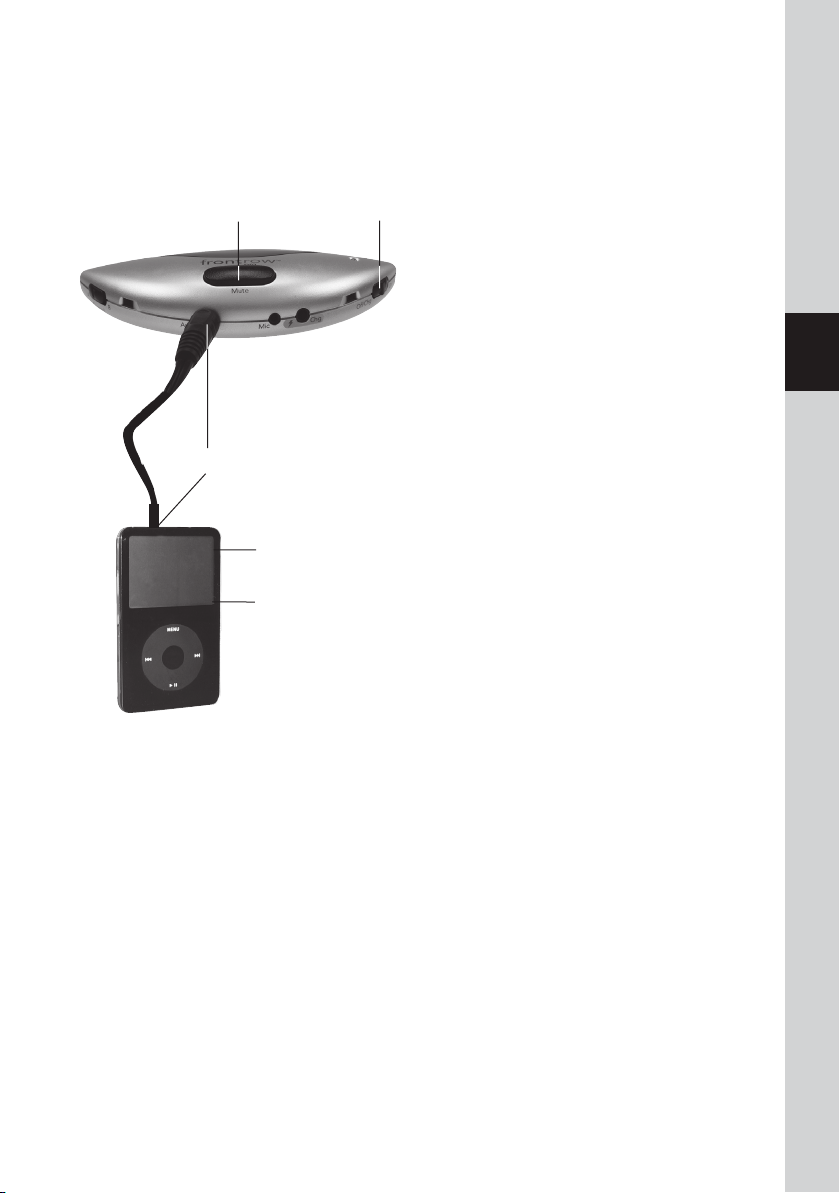
The 940TM Pendant Microphone
can be used to transmit audio from a
secondary audio source (MP3 player,
computer, portable radio/CD/tape
player) to the receiver.
1. Plug one end of the audio adaptor
cord (included) in the Audio Out/
headphone jack of the secondary audio source. Plug the other
end of the adaptor cord to the
Aux-In jack on the 940TM Pendant
Microphone.
2.
Turn the secondary audio source on
3. Turn the 940TM Pendant
Microphone on
4. Adjust the volume on the second
ary audio source and the microphone volume on the receiver to
obtain the optimal volume.
5. You can "talk over" the secondary
audio by speaking into the microphone or mute the microphone to
ensure the best audio sound quality.
-
3
4
5
6
7
8
9
10
11
12
13
14
11
Page 13

6 940R Pro Digital Receiver
Key Features
FrontRow Pro Digital's adaptive intelligence makes it the most time-saving, energysaving, hassle-free way to improve learning in every classroom.
“Set it and forget it” STANDBY mode
Your FrontRow Pro Digital receiver has an energy saving standby mode.
The receiver will automatically go into standby mode 1 minute after you turn
off or mute your microphone, or stop playing a secondary audio source
(computer, MP3 player, etc.)
The receiver will come out of standby mode automatically when you turn
on and/or un-mute a microphone or play an audio source connected to
the receiver.
OptiVoice:
OptiVoice™ technology takes speech clarity a step further, maximizing students’ ability to understand by emphasizing speech frequencies that are
most critical to comprehension; which is especially critical in noisier classrooms. Simply adjust the three-position switch on the front of the receiver.
Automatic Feedback Suppression
The powerful Adapto™ platform uses digital processing to analyze the sound
quality hundreds of times a second, looking for signs of feedback. When
feedback is detected, it filters it out, allowing the teacher to have optimal
volume settings AND complete freedom of movement around the classroom.
ENERGY STAR® compliant
The FrontRow Pro Digital is ENERGY STAR compliant, which means it uses
less energy than standard analog systems over the lifetime of the product.
By reducing energy consumption, the FrontRow Pro Digital is saving schools
money and helping to decrease the amount of pollutants and greenhouse
gases released into our atmosphere.
12
Page 14
7 940R Pro Digital Receiver
Features
1
2
1
9
10 16
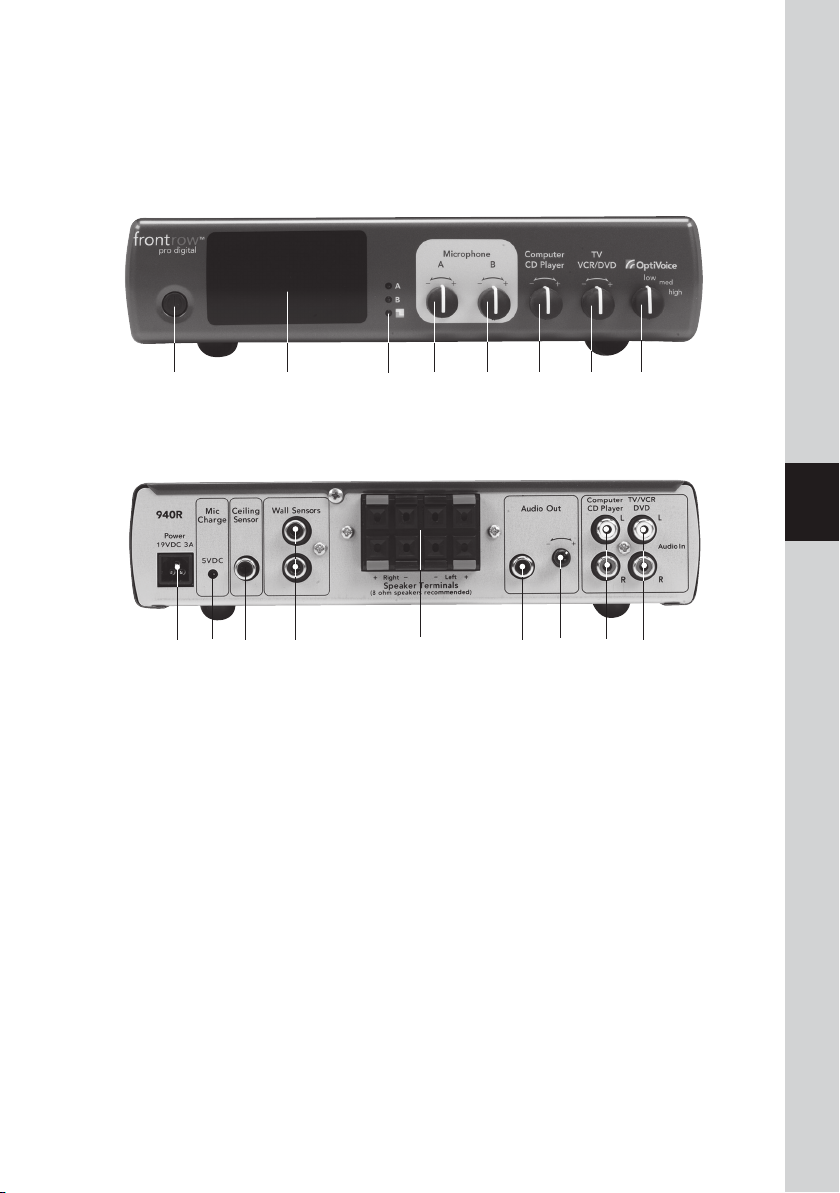
1. Power button
2. Internal Infrared Sensor
3. Microphone A/B and Feedback
Suppression Status Light
4. Microphone A Volume Control
5. Microphone B Volume Control
6. Aux-In Audio Volume Control
(
Computer/CD player)
7. Aux-In Audio Volume Control
(
TV/VCR/DVD)
8. OptiVoice™ Selector
(
Optimizes teacher's voice clarity for
various room noise levels)
9. Power Jack
11
2
12
front
3
4
5
4
3
6 7
5
8
6
back
7
8
13
10. Transmitter Charge Output Jack
(Charges up to two 940TM Pendant
Microphones)
11. Infrared Ceiling Sensor Input
12. Infrared Wall Sensor Input
13. 4 Speaker Terminals
14. Aux-Out Audio Jack (RCA)
15. Aux-Out Audio Volume Control
16. Aux-In Audio Jack (stereo RCA)
(
Computer/CD player)
17. Aux-In Audio Jack (stereo RCA)
(TV/VCR/DVD)
14
15
17
9
10
11
12
13
14
13
Page 15
8 940R Pro Digital Receiver
Activate Receiver and Transmitter
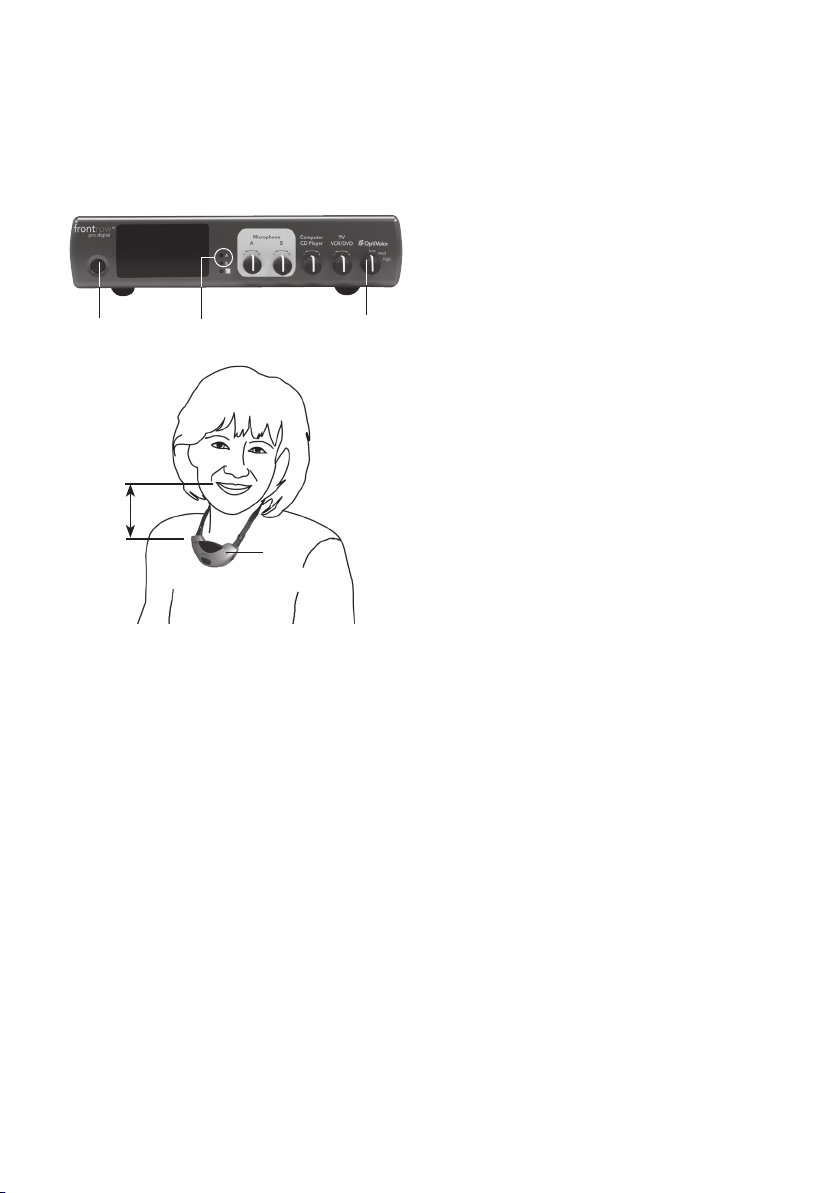
1. Press power button
Green .. . Power On
Yellow ... standby mode
2. Put microphone around neck and
1
3
4
2
5in/13cm
3
Daily Use
Your FrontRow Pro Digital has an energy-saving standby mode. The receiver will automatically go into standby mode after you:
• Turn off or mute your microphone
• Stop playing a secondary audio source (computer, MP3 player, etc.)
adjust strap so it is 5in. (13cm) from
your mouth
3. Turn microphone on and check
microphone A or B indicator light
Green .. . Power On
Red ...... Microphone Off/Muted
4. Select proper OptiVoice level
Low . . . . . . low background noise
environment
Med .. . . .
environment
High ..... high level background noise
environment
5. Speak in a normal conversational
tone while walking the entire room.
Have a second person adjust the
volume to a comfortable level.
medium background noise
The receiver will come out of standby mode automatically when you:
• Turn on or un-mute your microphone
•
Play a secondary audio source (computer, MP3 player, etc.) connected to the receiver
Daily operation is easier than ever; the system will "wake up" and "go to sleep" automatically.
Once the microphone and auxiliary audio volume is set to the optimal level, the
only thing you need to remember is to turn the microphone on in the morning
and turn it off and charge it in the evening.
To play auxiliary audio through the system, you simply need to press "play" on
your auxiliary audio source and "stop" when you are finished.
14
Page 16
1
9 940R Pro Digital Receiver
Automatic Feedback Suppression
The FrontRow Pro Digital features
automatic feedback suppression. The
Adapto™ platform analyzes the sound
quality hundreds of times a second,
looking for signs of feedback. When
feedback is detected, it filters it out,
4
allowing the teacher to have optimal volume settings AND complete freedom of
movement around the classroom.
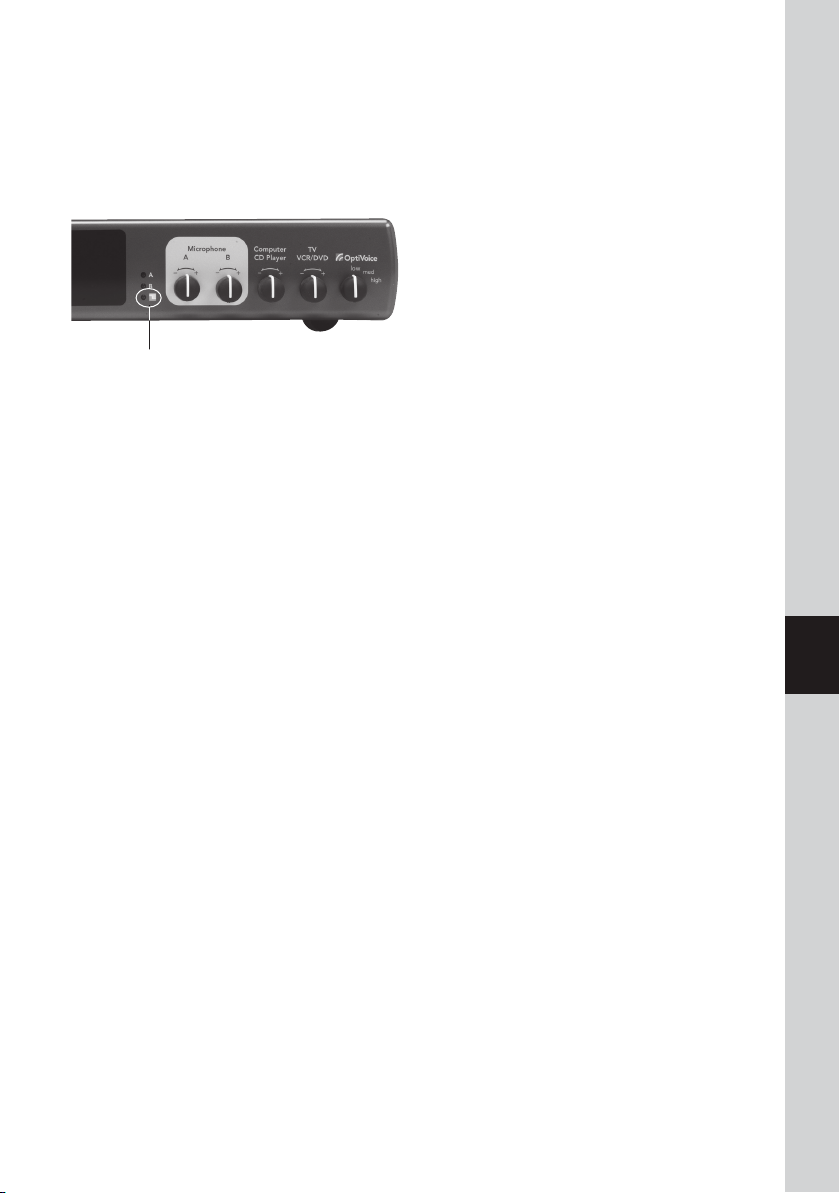
When the automatic feedback suppression is active, the Adapto light on
the front panel will turn green. It may
turn on and off throughout the day,
but that is OK; it just means that it is
working to optimize sound quality.
When adjusting the volume the goal
is speech clarity, not rock concert
power and volume. As a general rule,
you should barely hear your own voice
through the system when speaking.
2
3
4
5
6
7
8
9
NOTE:
Feedback may still occur if the
volume is turned up very high - too high
for sensible classroom use. If this occurs,
turn volume down in small increments
until the feedback disappears.
10
11
12
13
14
15
Page 17
10 940R Pro Digital Receiver
Using a Second Transmitter
teacher 1
(channel A)
teacher
(channel A)
Classroom 1
Classroom 2
teacher 2
(channel B)
student
(channel B)
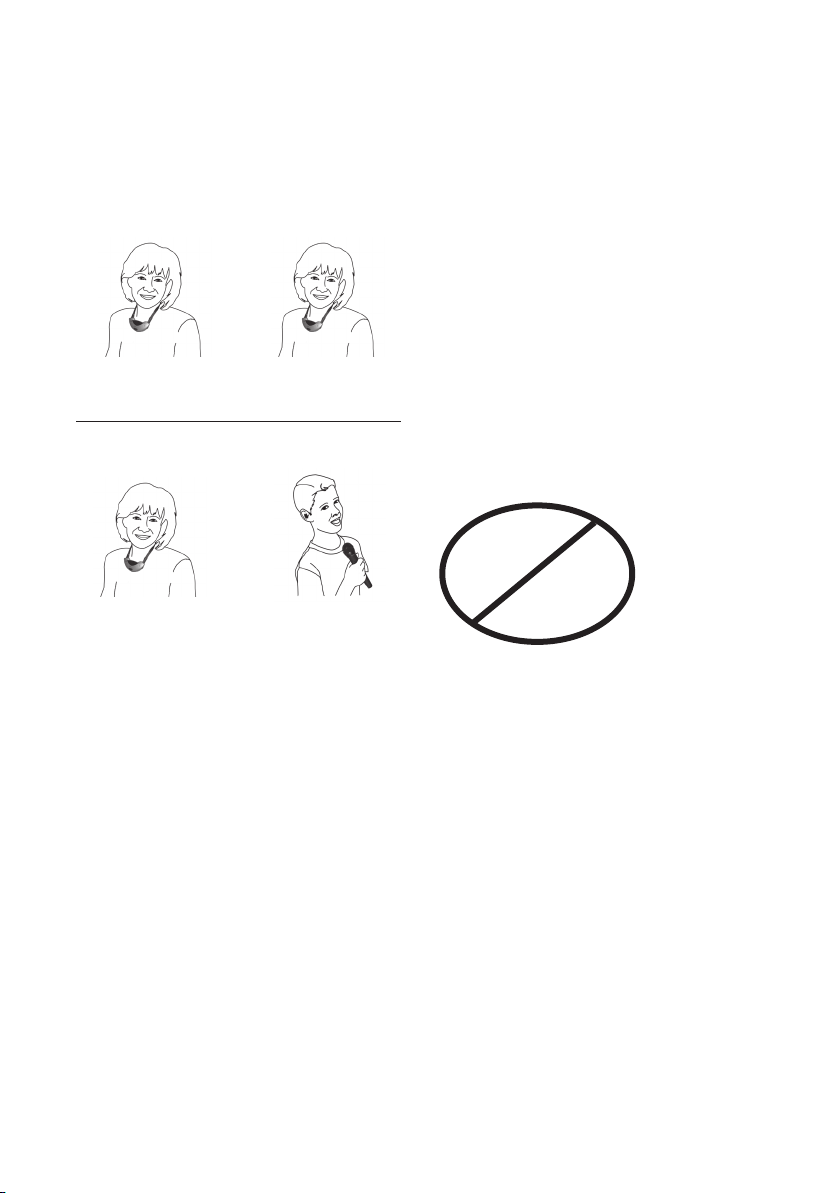
Your receiver is designed to receive two
microphone signals at once. For example,
two teachers (or a teacher and an aide)
may each use a 940TM pendant microphone. Or, one teacher can use a 940TM
microphone and students can use a student pass microphone (sold separately).
Microphones must be on different channels or interference will occur.
A + B
A + A
B + B
16
Page 18
11 940R Pro Digital Receiver
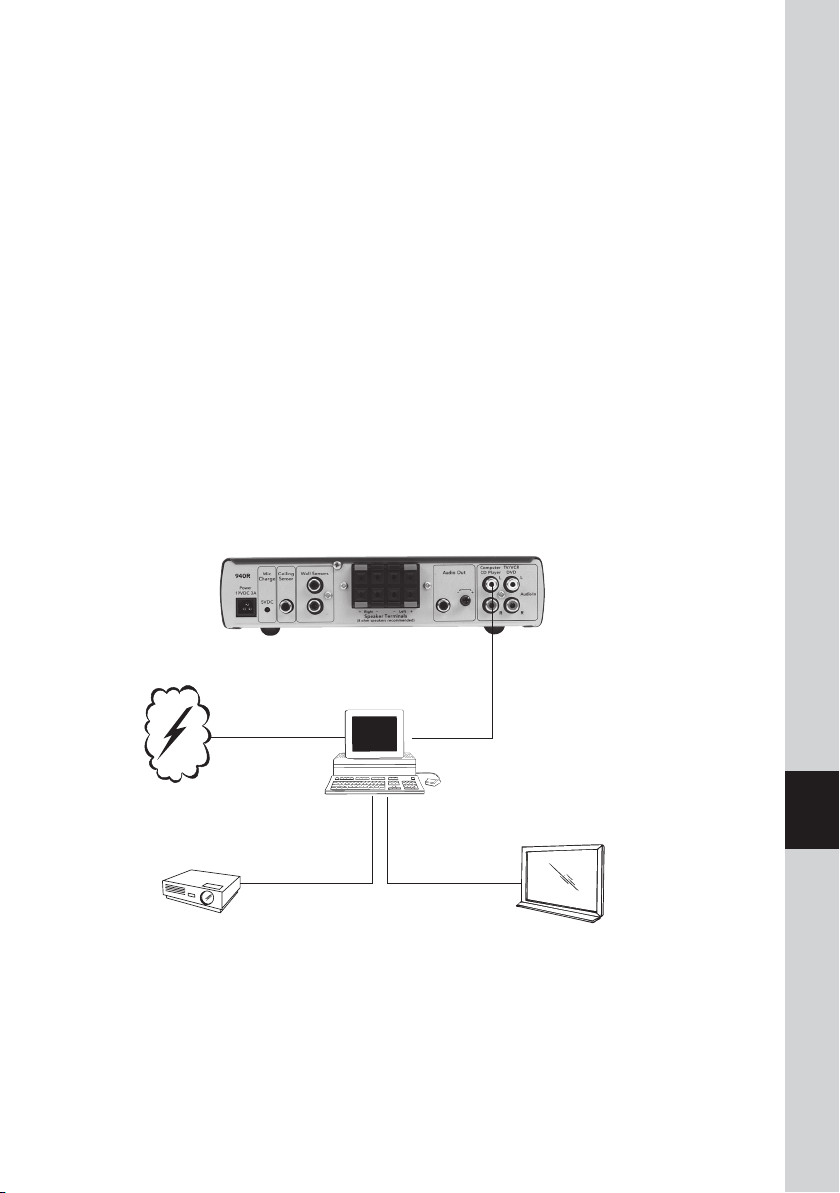
Connecting to other classroom media
Your FrontRow Pro Digital can connect to other media to enhance the overall
audio experience in your classroom. Ideally, these connections were made during
installation; however, they can easily be made after the unit is installed using the
audio cords that came with the system or standard audio cords from your local
electronics store.
1
2
3
4
Option 1
Many classrooms use a computer as a multi-media "hub" (with an LCD projector), which is connected to the internet or school network to download/stream all
audio and video, and audio files. For these classrooms, you may only require one
auxiliary audio input connection to the 940R.
940R (back)
Computer
Audio
Video
Internet
LCD Projec tor
Audio
Out
Screen or
Interactive White Board
5
6
7
8
9
10
11
12
13
14
17
Page 19
940R Pro Digital Receiver
Connecting to other classroom media (cont.)
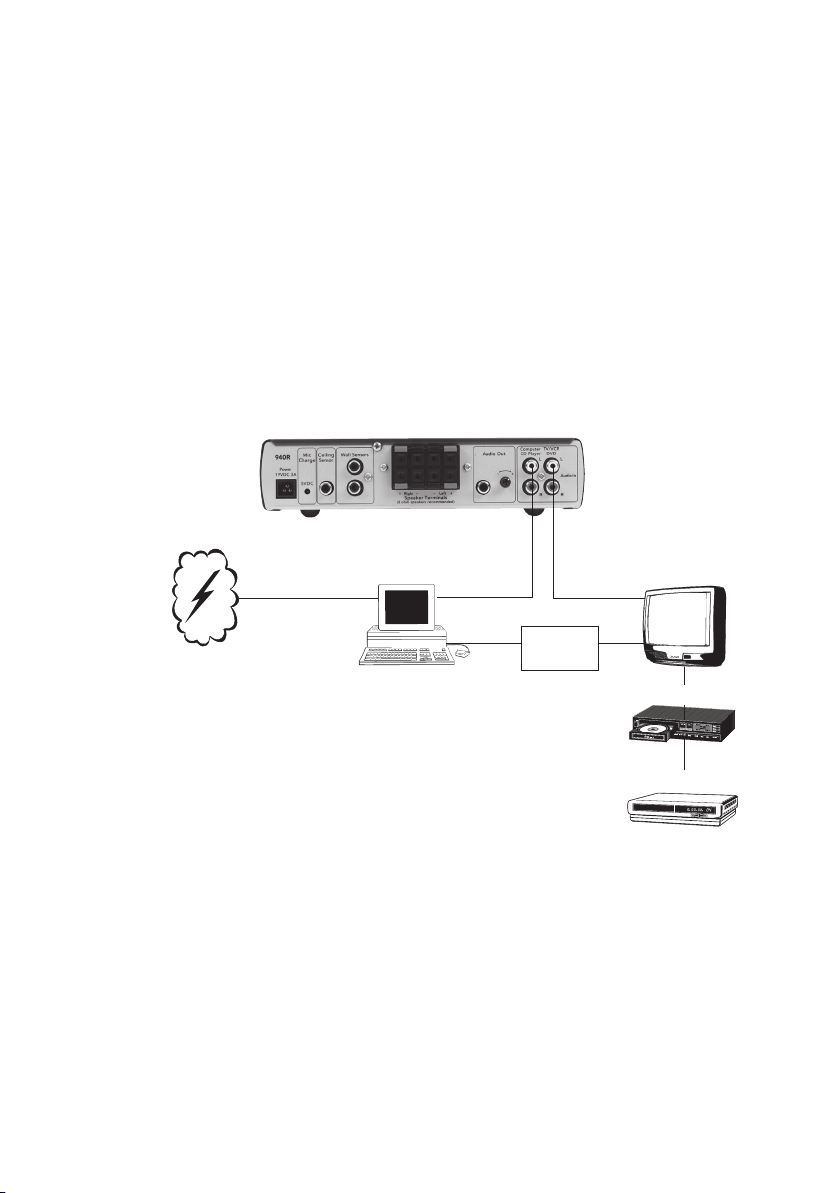
Option 2
Some classrooms use a computer as the multi-media "hub", but it is connected to
a TV instead of an LCD projector. They also occasionally use the TV/DVD/VCR as a
stand alone media. For these classrooms, you may need to use both auxiliary audio
input connections to the 940R.
940R (back)
Audio
Audio
Video
Internet
Computer
18
Out
Signal
Conver ter
Audio
Out
TV
DVD Player
VCR
Page 20
940R Pro Digital Receiver
1
Connecting to other classroom media (cont.)
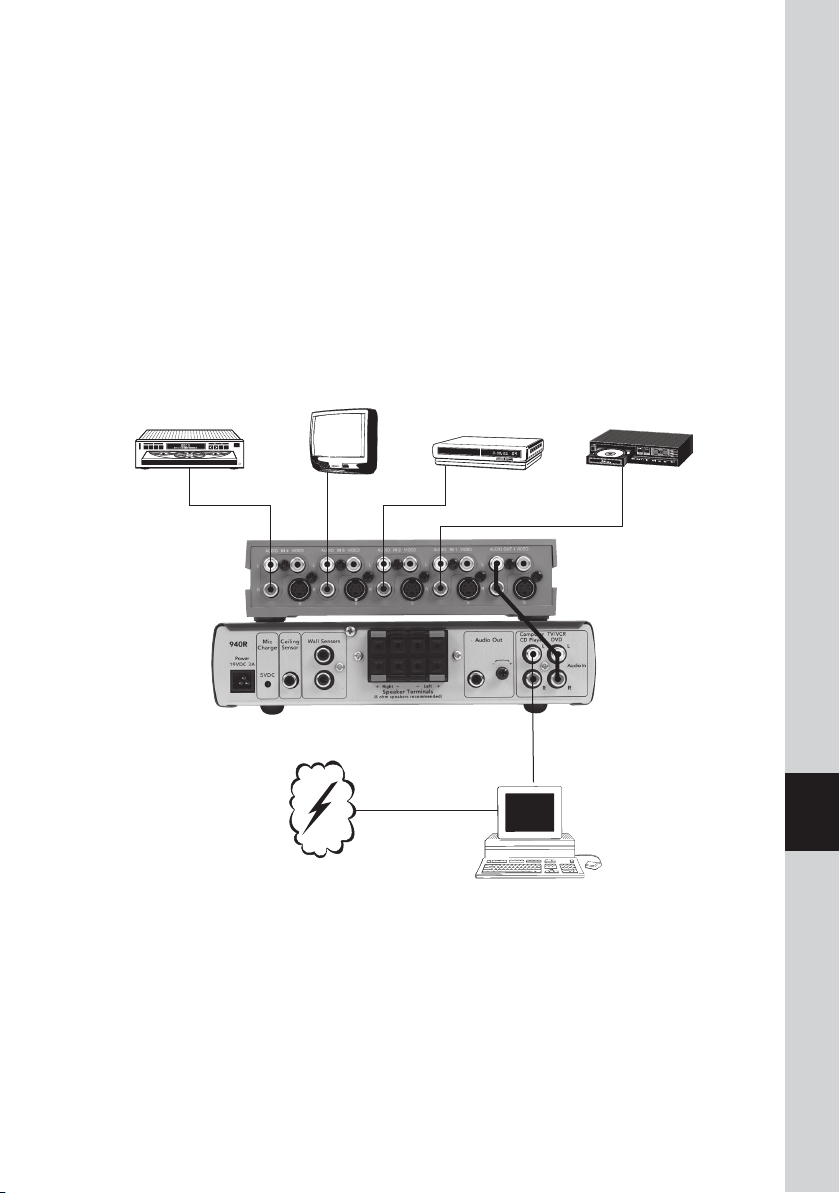
Option 3
Some classrooms may have many different types of media, but because of the
age of the equipment or incompatible input/outputs, they may not integrate with
each other. For these classrooms, you may choose to use an auxiliary audio box
to connect all the sources to one location, then connect it to one audio input
connection to the 940R.
TV
CD Player
VCR
DVD Player
2
3
4
5
6
7
8
9
Audio
Video
Internet
Computer
NOTE: Your FrontRow Pro Digital system can be connected to your schools PA
system so that the FrontRow Pro Digital will automatically mute all speakers when
an important page or announcement is made over the PA system. For more details,
go to www.gofrontrow.com.
10
11
12
13
14
19
Page 21

12 Troubleshooting
receiver won’t turn on (power light
doesn’t turn on)
• Verify that the power supply is plugged into
both the receiver and a working wall outlet
• Test with another power supply
Receiver keeps going into standby
mode (power light turns yellow, A/B/
Adapto lights turn off)
• This is normal. The receiver will go into
standby mode when:
• A microphone is turned off or muted for
more than 1 minute
• Auxiliary audio input is turned off for
more than 1 minute
Receiver will not "wake up" from
standby mode
• The receiver will power-up automatically when:
• You turn on and/or un-mute a microphone
• You turn on an audio source connected
to the receiver
Adapto LED keeps flashing on and off
• This is normal. The light will turn on when
the Adapto platform is processing the speech
signal. There is nothing you need to do.
’dead spots’ or
microphone crackling/
noise
• Verify that you are not blocking either the
emitters on the microphone or the sensors
on receiver or mounted around room
• If reception is interrupted or noisy when facing
a certain direction, install an additional sensor
in that area of the room (see Installer Guide)
• If using more than one microphone, verify
that they are not on the same channel
• Recharge or replace the microphone batteries
no signal reception (channel indicator
light on receiver is red)
• Check that the microphone is on
• Verify that you are not blocking either the
emitters on the microphone or the sensors
on receiver or mounted around room
• If reception is interrupted when facing a
certain direction, install an additional sensor
in that area of the room (see Installer Guide)
• If using more than one microphone, verify
that they are not on the same channel
• Recharge or replace the microphone batteries
feedback (squealing)
• Make sure that speakers are mounted as close
as possible to the ceiling and to the listening
area; avoid mounting speakers in the teacher’s
primary lecture area
• Position the microphone closer to mouth
•
Lower the Microphone A or B Volume control(s)
on the receiver
• Select the Low or Medium OptiVoice setting
weak or no output from speaker(s)
•
Increase t
or Aux-In Audio Volume control(s) on
the receiver
• Position the microphone closer to mouth
• Verify that the speakers have been properly
installed
he Microphone A or B Volume
20
Page 22

13 Product Specifications
1
2
Base Station Receiver: 940R
Receiving frequency: 2.3MHz & 2.8MHz
Transmission type: Infrared
Frequency response: 50Hz to 10kHz
Speakers: 8Ω
Maximum audio output power: 2 x 10w (8Ω),
2 x 20w (4Ω)
Auxiliary input level: 200 mVrms
Auxiliary input impedance: 22kΩ ± 10%
Signal-to-noise: >65dB (system)
thd: <1% @ 1kHz into 8Ω
Nominal deviation: ± 12 kHz
Maximum deviation: ± 25 kHz
Squelch: RF carrier/tone control
Squelch level: -24 dBu
Power supply: 19VAC at 3.16A
User controls: Power; Channel A volume; Channel
B volume; Two auxiliary audio volume; OptiVoice
Size (wxdxh): 21.5 x 23.5 x 2.25cm/8.5 x 8.3 x 1.75in
Weight: .94kg/2.11lbs
Operating range: 18.5m/60ft line-of-sight (typical)
Reception area: 163m2/1225ft2 (typical)
Reception angles (internal sensors): 130° horizontally;
60° vertically (1/2 power)
Inputs/outputs: 2 RCA stereo aux in jacks; RCA
aux out jack; 4 quick-connect speaker terminals;
3 RCA jacks for external sensor connection; 2.5mm
input power jack; 1.3mm output charge jack
Pendant Mic Transmitter: 940TM
Transmitting frequency: 2.3MHz & 2.8MHz (switchable)
Transmission type: Infrared
Operating range: 18.5m/60ft line-of-sight (typical)
Transmission angles: 160˚ horizontally; 40˚ vertically
(1/2 power)
Microphones: dual uni-directional cardioid
(directivity index 6.0@500Hz)
User controls: On/off/mute/channel
Inputs/outputs: 2.5mm mic input; 3.5mm aux
input; 1.3mm DC charge jack
Batter y life: minimum 8 hour (single A A,
2500mAHrechargeable NiMH)
Size (wxhxd): 11 x 6 x 2.5 cm/4.5 x 2.5 x 0.9 in
Weight: 85g/3.0oz (with battery)
3
4
5
6
7
8
9
10
11
12
13
14
21
Page 23
14 Regulatory
receiver: part 15, subpart B
FrontRow Pro Digital Receiver 940R
FrontRow Pro Digital Transmitter 940TM
Tested to comply with
FCC Standards
FOR HOME OR OFFICE USE
This equipment has been tested and found
to comply with the limits for a Class B digital
device, pursuant to Part 15 of the FCC Rules.
These limits are designed to provide reasonable protection against harmful interference
in a residential installation. This equipment
generates, uses and can radiate radio frequency energy and, if not installed and used
in accordance with the instructions, may
cause harmful interference to radio communications. However, there is no guarantee
that interference will not occur in a particular
installation.
FCC notes
The FrontRow Pro Digital active learning
system is approved by the FCC (Federal
Communications Commission). The use of
the system may be governed by specific FCC
rules and FCC licensing or notifications may
be required. Consult your local FCC office
for detailed information.
Phonic Ear receivers and transmitters, when
required, are approved by the Federal
Communications Commission (FCC) in the
U.S. and Industry Canada. Other government
approvals are available upon request. (Other
international regulations may also apply.)
Any changes or modifications made to any
government-approved element of this instrument, without the express approval of
Phonic Ear, Inc. in writing, could void the
user's authority to operate those elements
of the system.
This product conforms with the essential requirements of European Union
Directive 89/336/EEC EMC Direc tive
and 2002/95 ROHS Directive
This product has been cleared by the U.S. Food
and Drug Administration for use by persons
with normal hearing and hearing impairment.
Electrical and electronic
equipment (EEE) contains
materials, components and
substances, that could be
dangerous or detrimental to human health
and the environment if waste electrical and
electronic equipment (WEEE) is not disposed
of correctly. Products marked with the
crossed-out dustbin shown here are electrical
and electronic equipment. The crossed-out
dustbin indicates that waste electrical and
electronic equipment may not be disposed
of with unsorted household waste and that it
must be collected separately.
In developing and manufacturing your Phonic
Ear product, we used high-quality materials
and components that can be reused. Thus,
when disposing of your waste electrical
and electronic equipment, you must use a
collection system designated for this purpose,
regardless of whether you dispose of your
waste at your local waste site or it is collected
from your home. Please contact your local
authority for further information.
IC notes
This Class B digital apparatus complies with
Canadian ICES-003.
Cet appareil numérique de la classe B est
conforme à la norme NMB-003 du Canada.
The term "IC:" before the radio certification
number only signifies that Industry of Canada
technical specifications were met.
22
Page 24

1
ELECTRICAL WARNINGS
1. Avoid Abuse to the Power Supply
To reduce risk of electric shock, unplug
the power supply from outlet before
attempting any maintenance or cleaning.
Turn off controls will not reduce this risk.
DO NOT disassemble the power sup-
ply. Return the apparatus to Phonic
Ear Front Row for qualified service and
repair if service or repair is required.
Incorrect reassembly may result in a risk
of electric shock or fire.
DO NOT expose the power supply to
rain, snow, water, gas, oil, etc.
DO NOT operate the power supply
if it has received a sharp blow, been
dropped, or otherwise damaged in any
way; return the apparatus to Phonic Ear
Front Row for qualified service
and repair.
DO NOT block or cover the apparatus
and impede ventilation.
2. Proper Use of the Power Supply
and Wiring
An extension cord should not be used
unless absolutely necessary. Use of
improper extension cord could result
in a risk of fire and electric shock. The
cord MUST be plugged into a grounded
outlet. Make sure it is properly wired, in
good electrical condition, and wire size
is large enough for AC ampere rating of
the power supply or charger as specified
below. AWG = American Wire Gauge.
To reduce risk of damage to plug and
cord when disconnecting the power
supply or charger, ALWAYS pull on plug
- NEVER on cord.
Locate cord so that it will not be
stepped on, tripped over, or otherwise
subject to damage or stress. DO NOT
lay extension cord on charger.
DO NOT operate the power supply
with damaged cord or plug - replace
them immediately.
ELECTRICAL SAFETY
INFORMATION:
PRECAUTIONS & SAFETY
!
RECOMMENDATIONS
Follow Manufacturers' Recommendations
Before using the receiver and power supply,
read all instructions for, and caution markings on the receiver and power supply and in
this user guide.
2
3
4
5
6
7
8
9
10
11
12
13
14
23
Page 25
USA
FrontRow
Corporate Headquarters
2080 Lakeville Highway
Petaluma, CA 94954-6713
toll-free: 800.227.0735
tel: 707.769.1110
fax: 707.769.9624
web: ww w.gofrontrow.com
Canada
Phonic Ear
10-7475 Kimbel Street
Mississauga, ON L5S 1E7
toll-free: 800.340.9894
tel: 905.461.5300
fax: 905.677.7760
web: ww w.gofrontrow.com
New Zealand
Oticon New Zealand Ltd.
142 Lambton Quay
P.O. Box 9128
Te Aro. Wellington
toll-free: 800 OTICON
toll-free fax: 00800 FAX
OTICON
web: ww w.oticon.co.nz
Australia
Phonic Ear
512 Wickham Street
Fortitude Valley Qld 4051
toll-free: 1 800 PHONIC
tel: + 617 3250 0385
fax: + 617 3250 0386
web: ww w.gofrontrow.com
Europe/ASIA
Phonic Ear A/S
Kongebakken 9
2765 Smørum
Denmark
tel: +45 3917 7101
fax: +45 3927 7900
web: ww w.gofrontrow.com
United Kingdom
PC Werth Limited
Audiology House
45 Nightingale Lane
London SW12 8SP
tel: 020 8772 2700
web: ww w.soundfield.info
www.phonicear.com
© 2007 Phonic E ar Inc. Phonic Ear, FrontRow and the names of Phonic Ear and Fro ntRow pro duct s are t rademarks or registered trademarks of Phonic Ear, Inc. in the U.S. and other countries. Product specifications and accessories subject to change
without notice.
921-31-010 -00/Rev. A/4876 0307
 Loading...