

Page 1
user guide
230R receiver
4747 230R Multi-Freq User Guide 4/22/05 3:09 PM Page 2
Page 2

contents
caring for your system . . . . . . . . . . . . . . .42
transmitters compatible
with the 230R receiver . . . . . . . . . . . . . . .43
Frontrow Tempo channel numbers
and corresponding frequencies . . . . . .44-45
product specifications . . . . . . . . . . . . . . . .46
warranty . . . . . . . . . . . . . . . . . . . . . . .47-49
regulatory compliance . . . . . . . . . . . . . . .50
introduction . . . . . . . . . . . . . . . . . . . . . . . .1
understanding active learning . . . . . . . . . . .2
installation tips . . . . . . . . . . . . . . . . . . . . .3
system guidelines . . . . . . . . . . . . . . . . . . .4
system components . . . . . . . . . . . . . . .5-6
230R receiver features . . . . . . . . . . . . .7-8
setup and operation . . . . . . . . . . . . .9-13
auxiliary input (aux in) . . . . . . . . .14-20
auxiliary output (aux out) . . . . . . .21-22
speaker setup . . . . . . . . . . . . . . . . .23-30
advanced system setup . . . . . . . . .31-35
optional accessories . . . . . . . . . . . . . . . .36-37
230R part number
cross-reference list . . . . . . . . . . . . . . . .38-39
troubleshooting . . . . . . . . . . . . . . . . . .40-41
4747 230R Multi-Freq User Guide 4/22/05 3:09 PM Page 6
Page 3

introduction
Congratulations on the purchase of your new FrontRow Tempo™active learning system!
You may have heard the term ‘sound field’ used to describe technology that improves
classroom acoustics. Your FrontRow system fits under this category, but we call it an ‘active
learning system’ because it’s about so much more than just sound.
Active learning systems can help engage students, improve attentiveness to the teacher,
build learning success, reduce the achievement gap, foster control and orderliness, improve
test scores, and reduce vocal strain and fatigue for teachers. Numerous studies show that
classrooms using active learning enjoy better student comprehension, increased student
participation, better grades and fewer behavioral referrals.
Read this manual carefully to become familiar with your product and to get the most out of
its many features and options.
1
4747 230R Multi-Freq User Guide 4/22/05 3:09 PM Page 7
Page 4
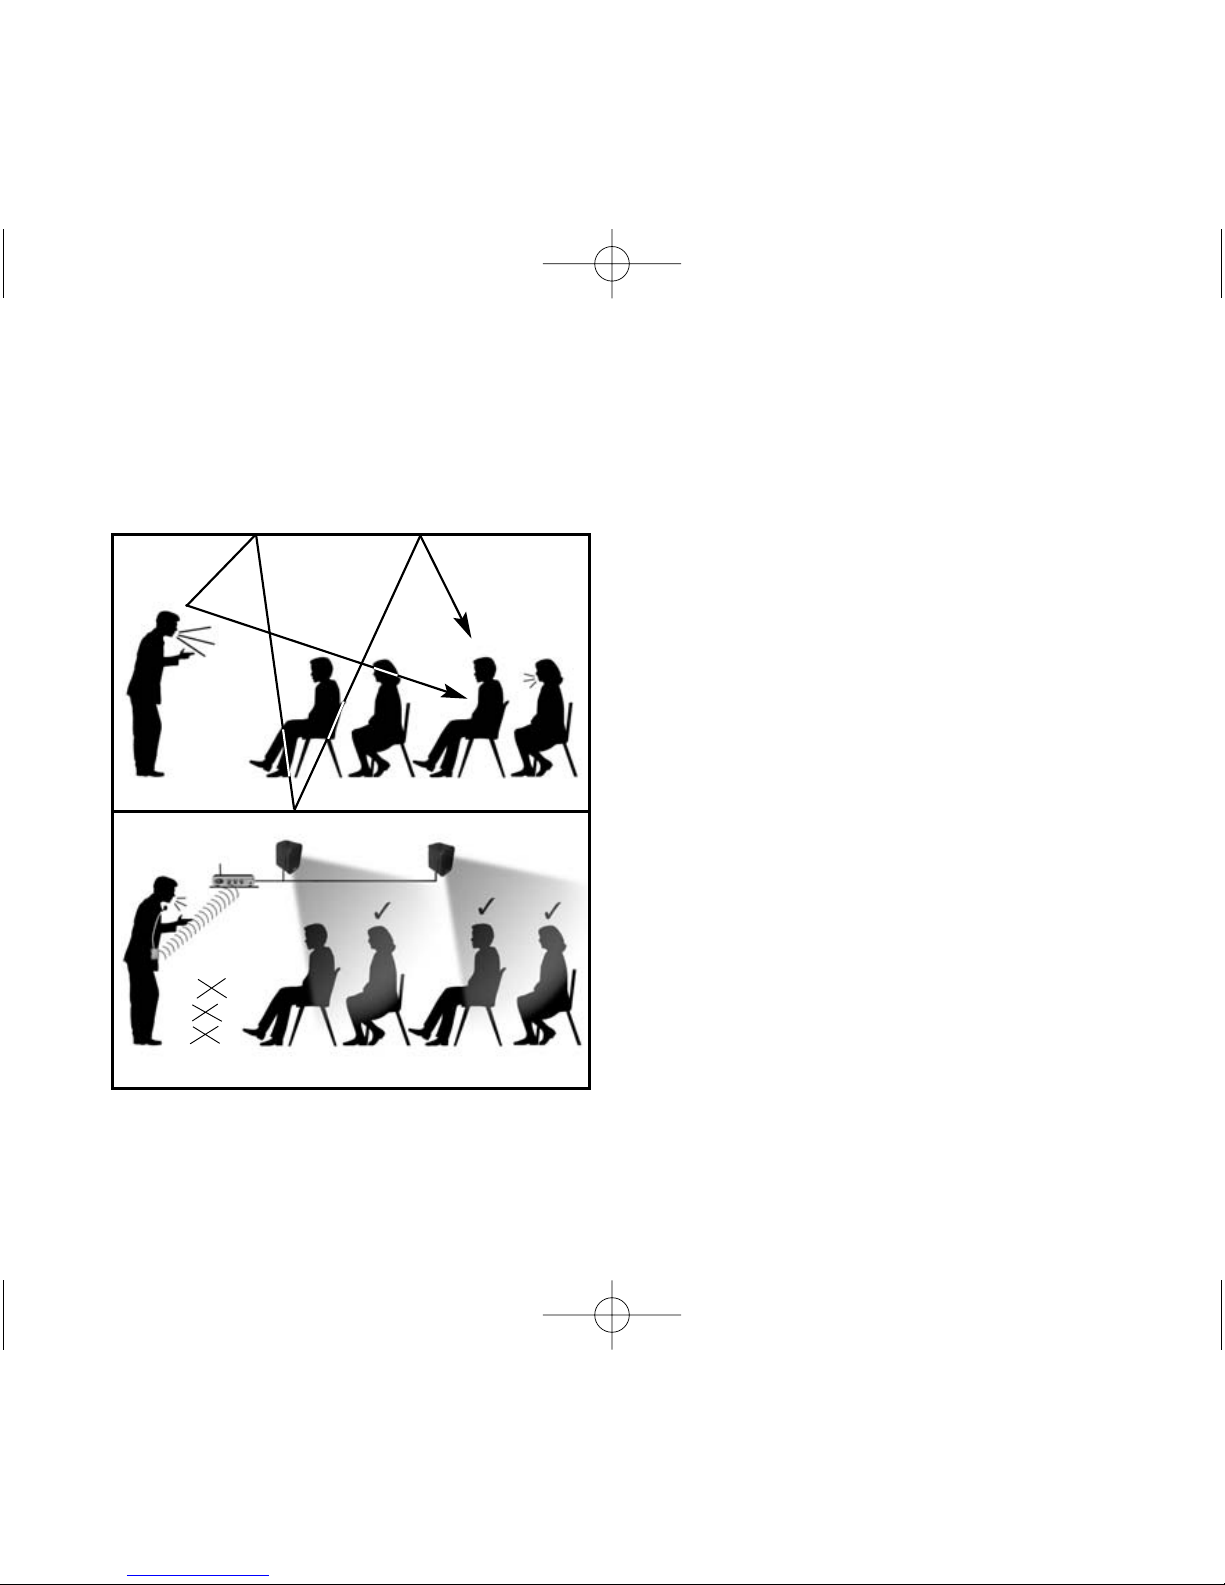
understanding active learning and its benefits
?
• distance
• noise
• echo
cough!
• distance
• noise
• echo
?
without active learning
with active learning
2
4747 230R Multi-Freq User Guide 4/22/05 3:09 PM Page 8
Page 5

Before you set up your system, take a good look around your room. Where are the outlets
located? Where are the computers and other electronic equipment? Where can you put your
receiver so it's easy for you to reach, but out of the way of students and main traffic areas?
Though each classroom is different, there are some general guidelines for both receiver and
speaker placement:
The receiver — should be in the front of the classroom at teacher's eye level when standing,
close to a wall outlet.
4 Compact wall speakers — should be mounted as high as possible and angled down
toward the listeners' ears. Place them around the room so there is even coverage in the listening
area (where the students are seated). Use as many as needed — four is recommended.*
4 Distributed ceiling speakers — space them evenly above the students’ seating area.
A minimum ceiling height of 10 feet is necessary, and 12 feet is even better. Use as many
as needed — a minimum of four is recommended.*
Single Cluster ceiling speaker — should be centered directly over the students’ seating
area. A minimum ceiling height of 12 feet is recommended, and 14 feet is even better.
* For optimal speaker placement, download Sound field Wizard software from our website at www.phonicear.com.
installation tips
3
4747 230R Multi-Freq User Guide 4/22/05 3:09 PM Page 9
Page 6

system guidelines
To help ensure that you get the most out of your new active learning system, we have put
together the following list of suggested guidelines:
Speak at a normal level — the system is projecting your voice for you.
Periodically check the volume and OptiVoice settings – these are often set and
then forgotten, but if accidentally changed, will affect how your system sounds.
Minimize the effects of feedback – avoid walking too closely to the speakers while
using the transmitter and microphone.
Place receiver in an open location – do not place the receiver in, or close to a metal
cabinet or enclosure. FM signals are effected by metallic objects and the receiver requires
proper cooling and ventilation.
Attach antenna – the receiver will not operate without the FM antenna.
Turn unit off while not in use – turning the unit off when not in use saves energy and
still allows the receiver to recharge the 330T/340T transmitter batteries when connected to
the rear of the receiver.
4
4747 230R Multi-Freq User Guide 4/22/05 3:09 PM Page 10
Page 7
5
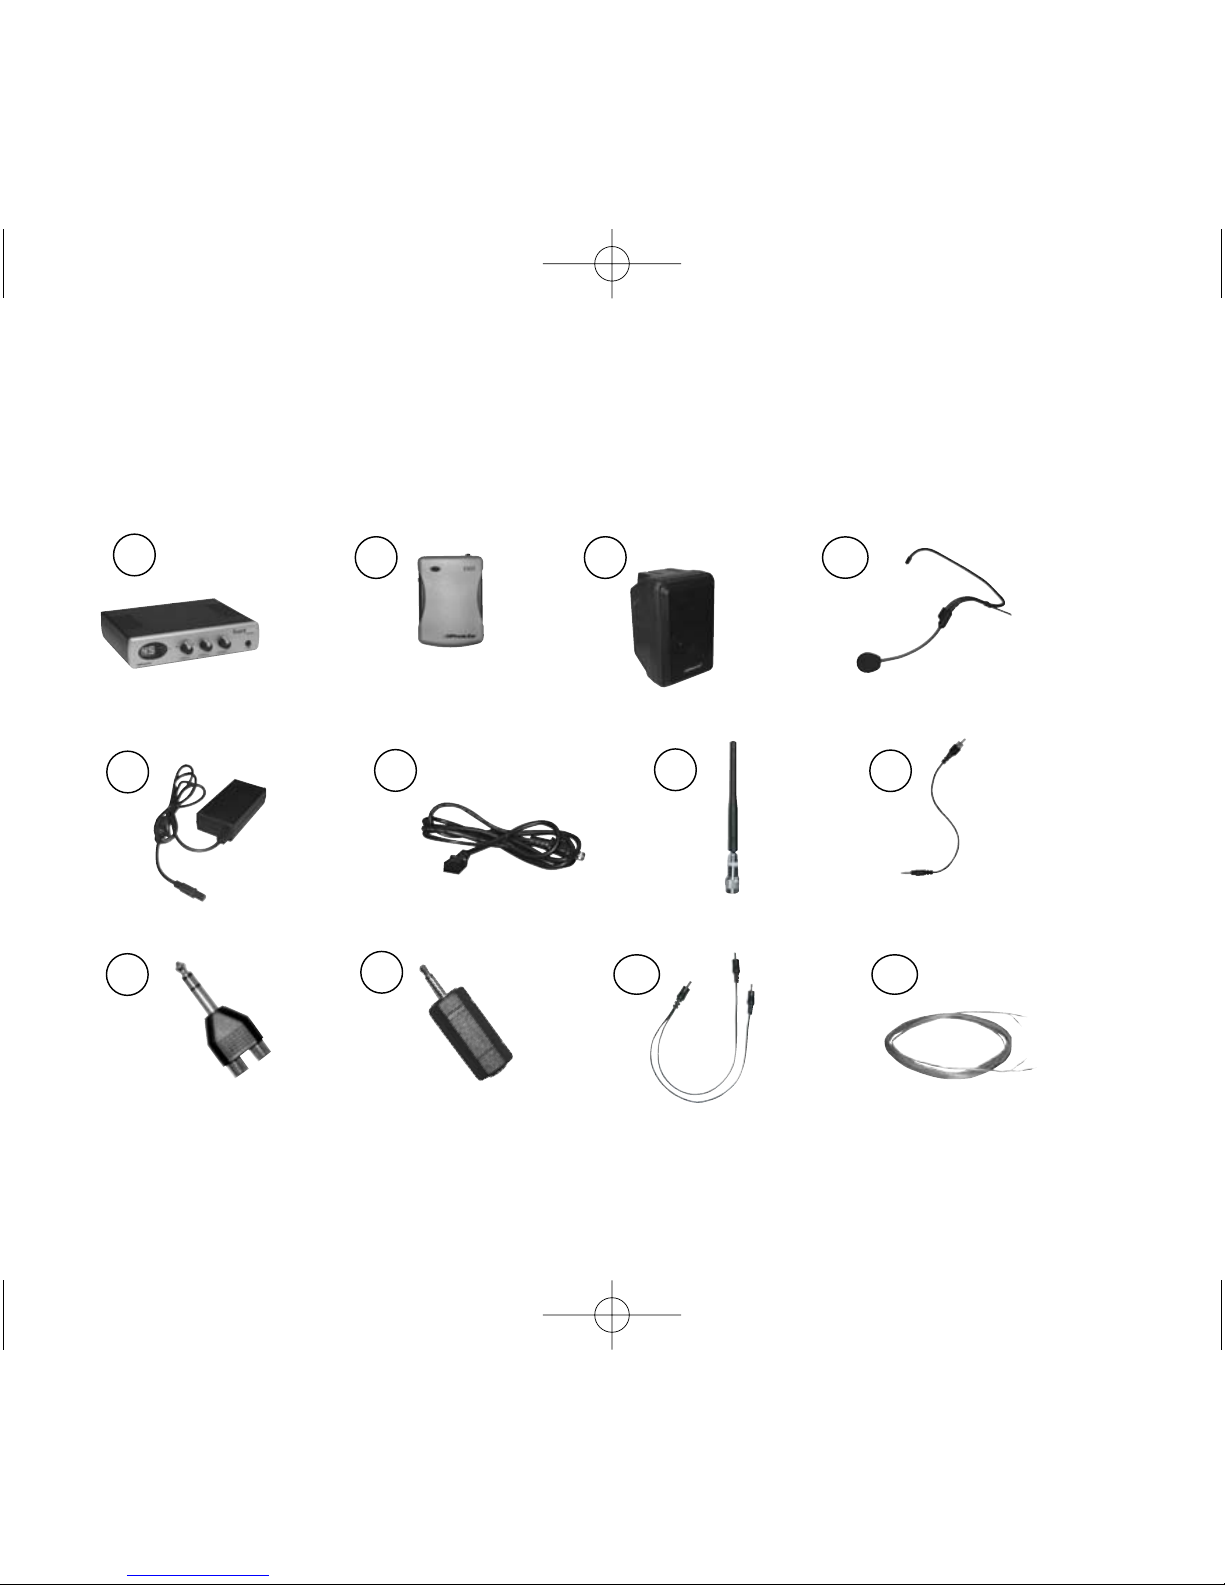
system components
8
9
10
5
7
11 12
4
6
1
2 3
4747 230R Multi-Freq User Guide 4/22/05 3:09 PM Page 11
Page 8

6
8 aux out cable/(RCA 3.5mm)
(AT0805)
9 aux-in adaptor plug /(
1
/4in– Dual RCA)
(310-2544-1342)
10 aux-out adaptor plug/(3.5mm – 2.5mm)
(310-2544-1341)
5 power supply
(040-7402-105)
7 antenna
(AT0831)
11 330T transmitter charging cord
(1.3mm – Dual 1.3mm)
(300-6497-105)
4 microphone/(AT0655 boom
microphone shown here)
12 speaker wire
(AT0581)
(Plenum rated, 24ft/7.3m, 48ft/14.6m,
60ft/18.3m lenths)
6 power cord
(AT0787 for USA/Canada)
(AT0787-EN for England)
(AT0787-EU for Europe)
(AT0787-AU for Australia and
New Zealand)
2 body-worn transmitter
(330T shown here)
1 230R base station receiver
3 speakers (470-2856-119)
(compact wall speaker shown here)
*speakers packaged separately
NOTE: Refer to part number cross-reference list
4747 230R Multi-Freq User Guide 4/22/05 3:09 PM Page 12
Page 9
7
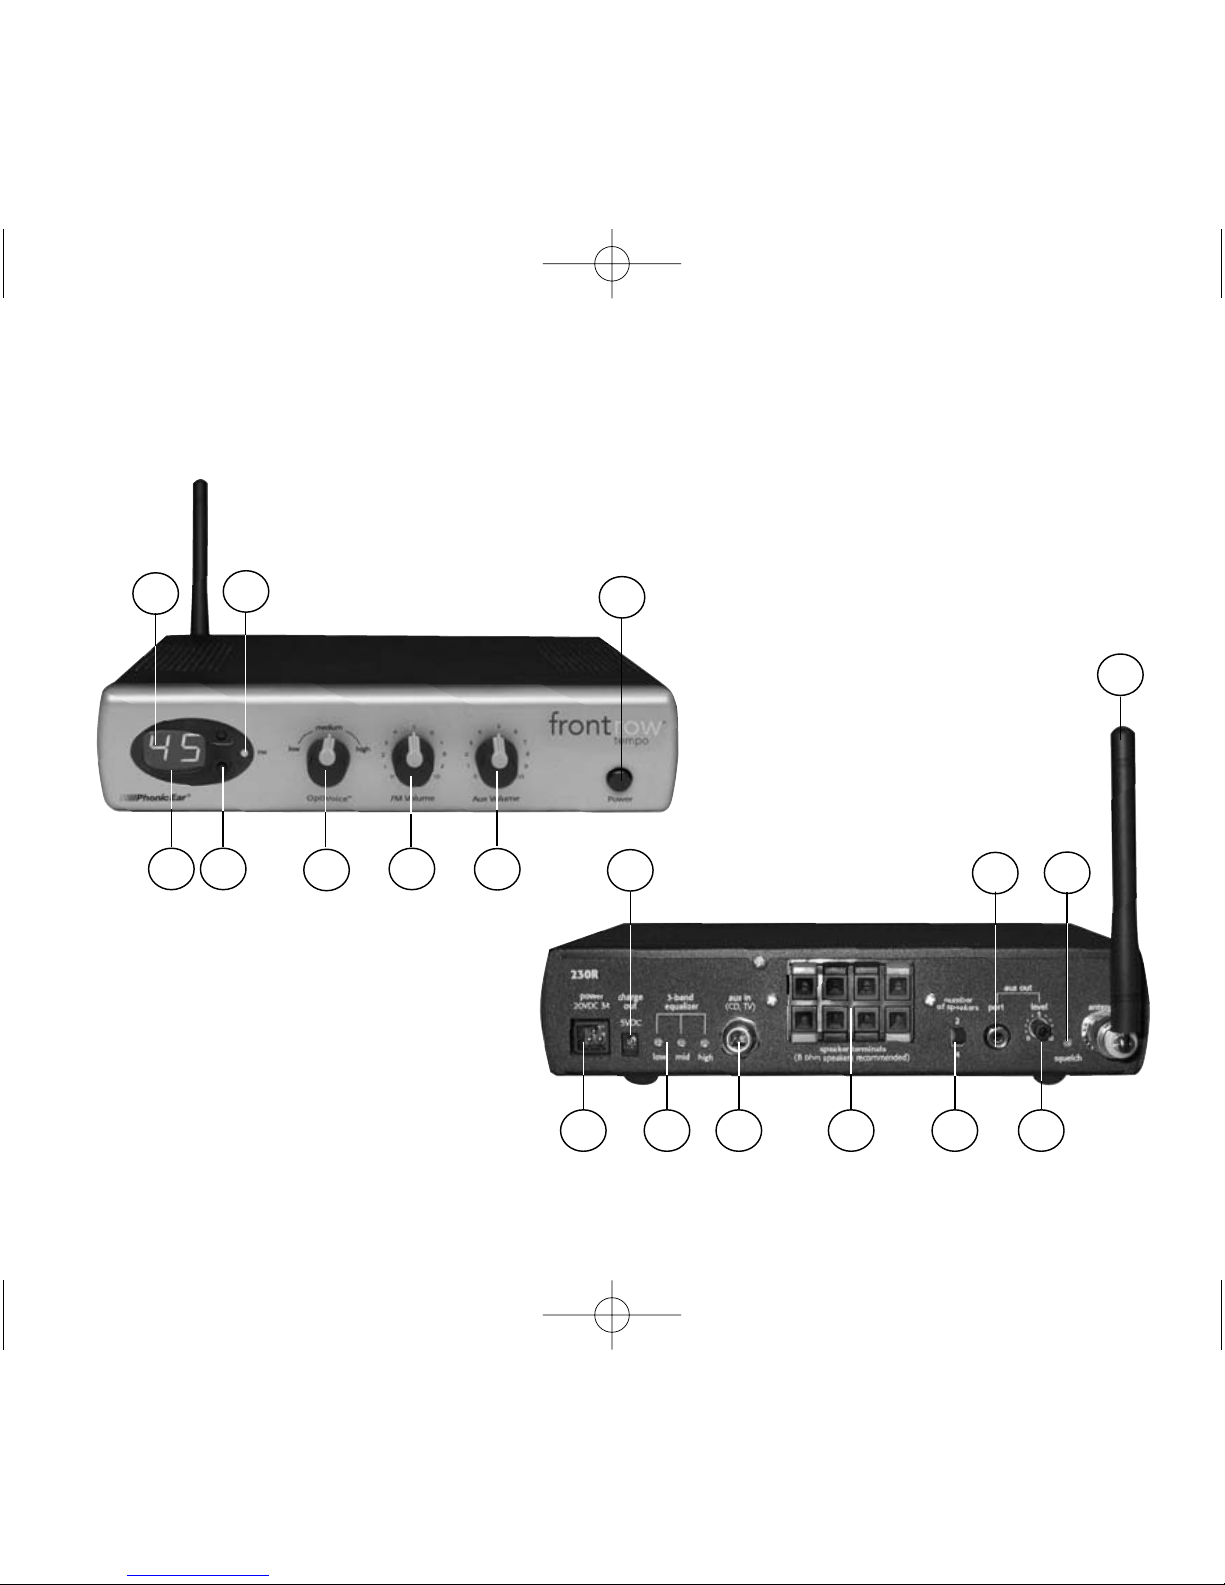
230R receiver features
front
back
7
2 3
4
5
6
8
9 11 12 13 14 16
17
10
15
18
1
4747 230R Multi-Freq User Guide 4/22/05 3:09 PM Page 13
Page 10

8
3 channel adjustment button
4 FM receiver signal light
1 channel display
6 FM Volume control
5 OptiVoice
™
control
7 aux Volume control
8 power button
9 power cord jack
10 transmitter charge jack (1.3mm)
11 3-band equalizer adjustment
12 aux in jack (1/4in)
13 speaker wire terminals
14 number of speakers switch
15 aux out port (RCA)
16 aux out level control
17 squelch adjustment
18 antenna
2 sleep/standby power indicator light
4747 230R Multi-Freq User Guide 4/22/05 3:09 PM Page 14
Page 11
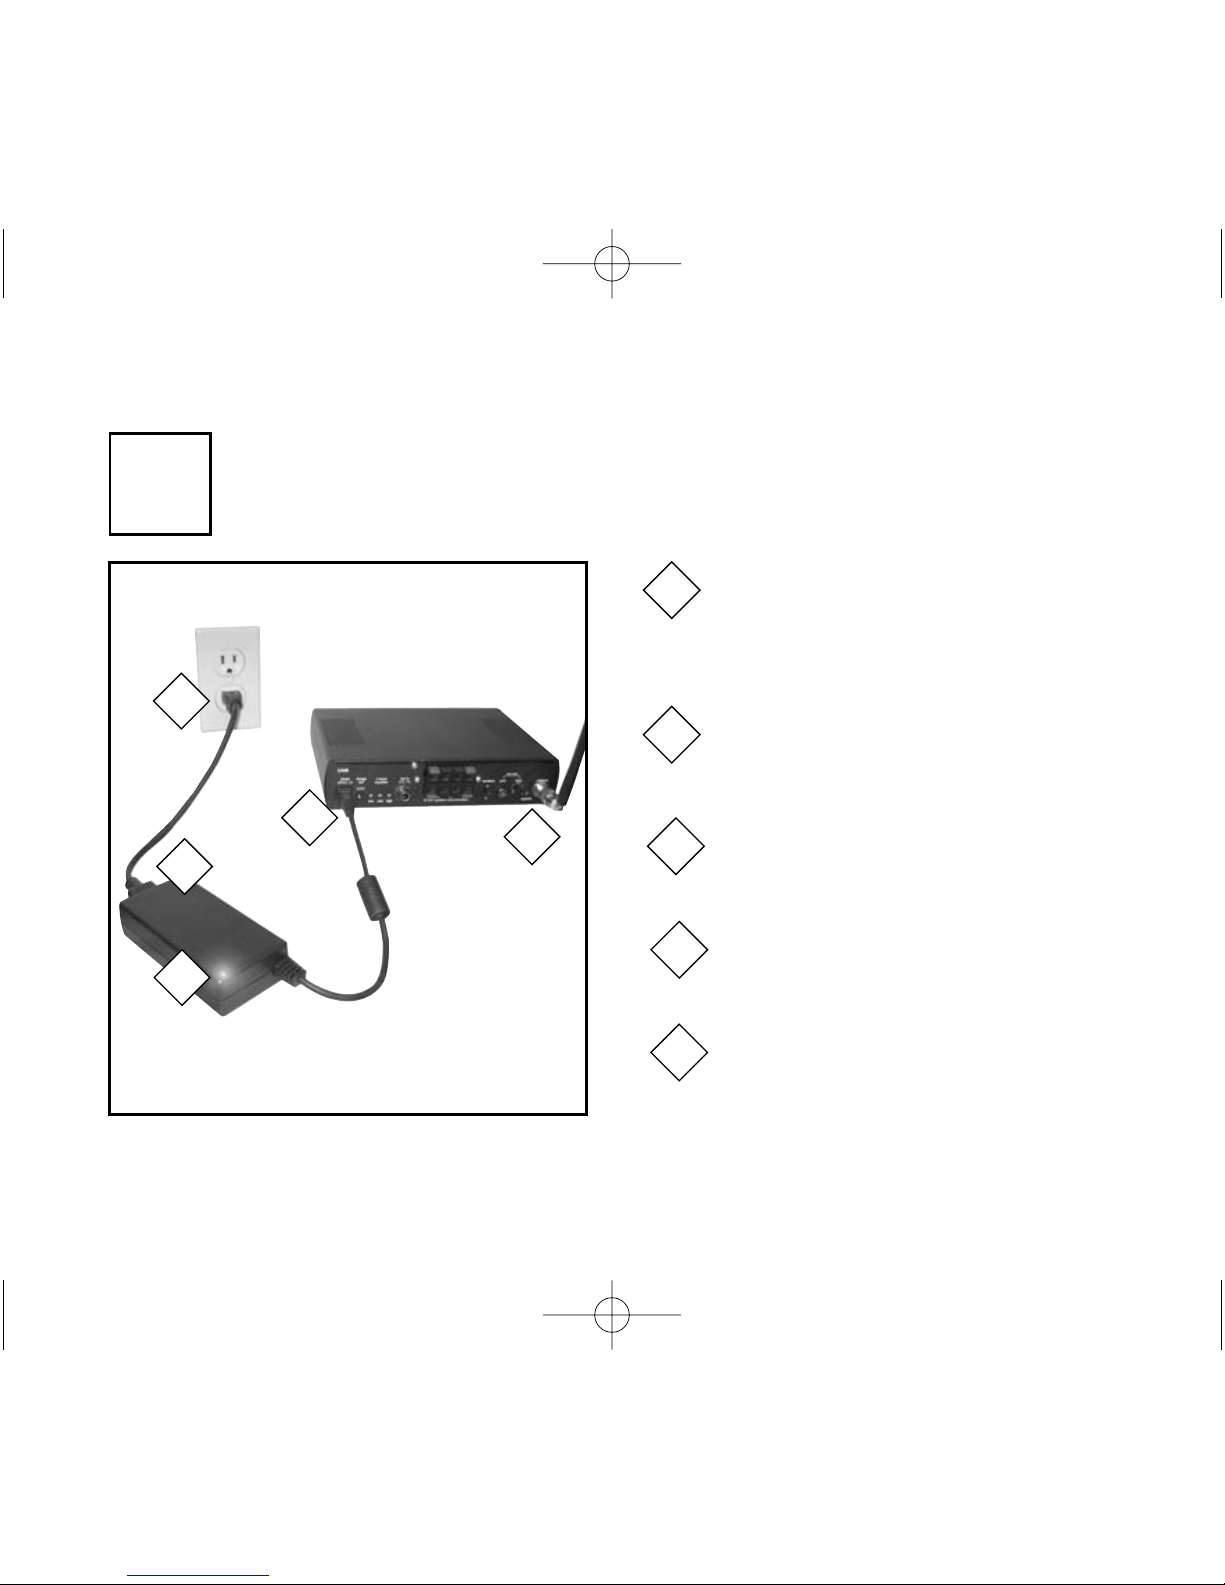
9
connecting power to 230R receiver
1
230R back
Plug power supply (040-7402-
105) into power port on back of
230R receiver
Plug power cord (AT0787) into
power supply unit (040-7402-105)
1
2
040-7402-105
1
3
2
AT0787
Plug power cord (AT0787) into
wall socket
3
4
Check to see that green light is on,
indicating that unit has power
4
setup and operation
5
Attach antenna to antenna port on
back of 230R receiver
5
4747 230R Multi-Freq User Guide 4/22/05 3:09 PM Page 15
Page 12
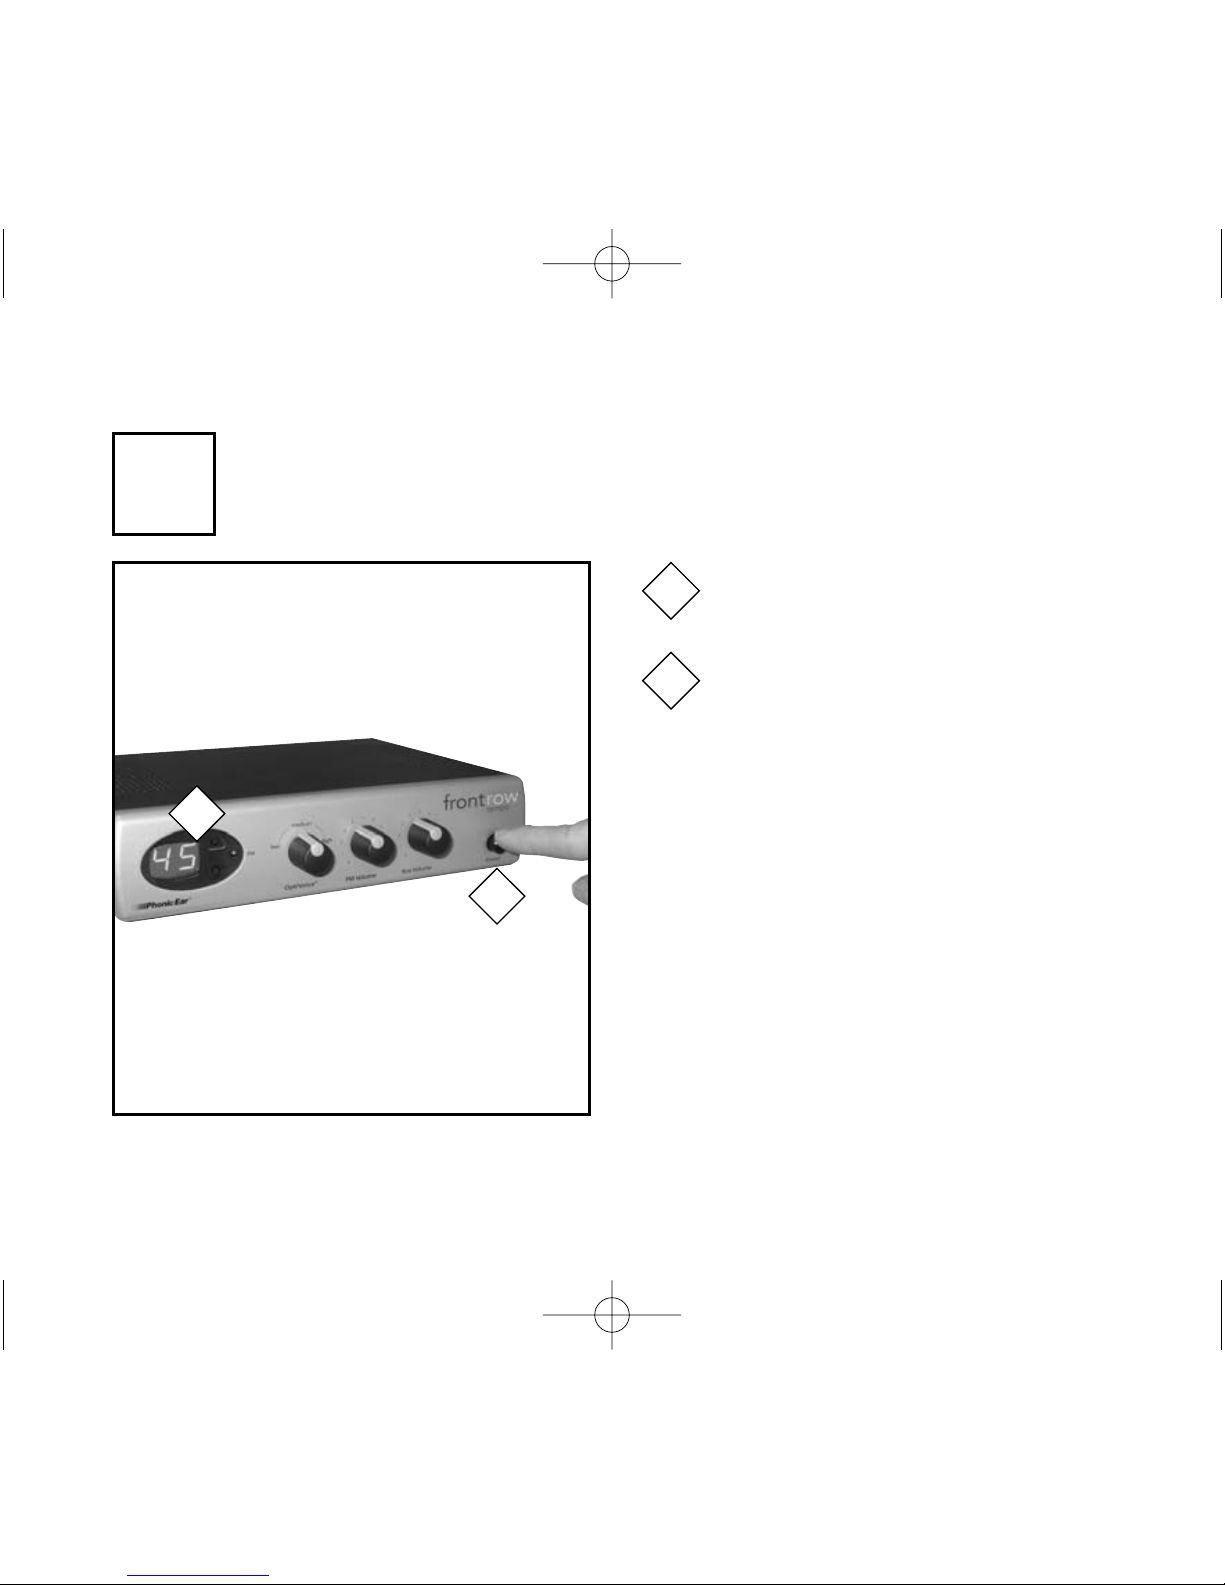
10
Push power button
Confirm that LED channel
display lights
turning on 230R receiver
2
1
2
1
2
4747 230R Multi-Freq User Guide 4/22/05 3:09 PM Page 16
Page 13
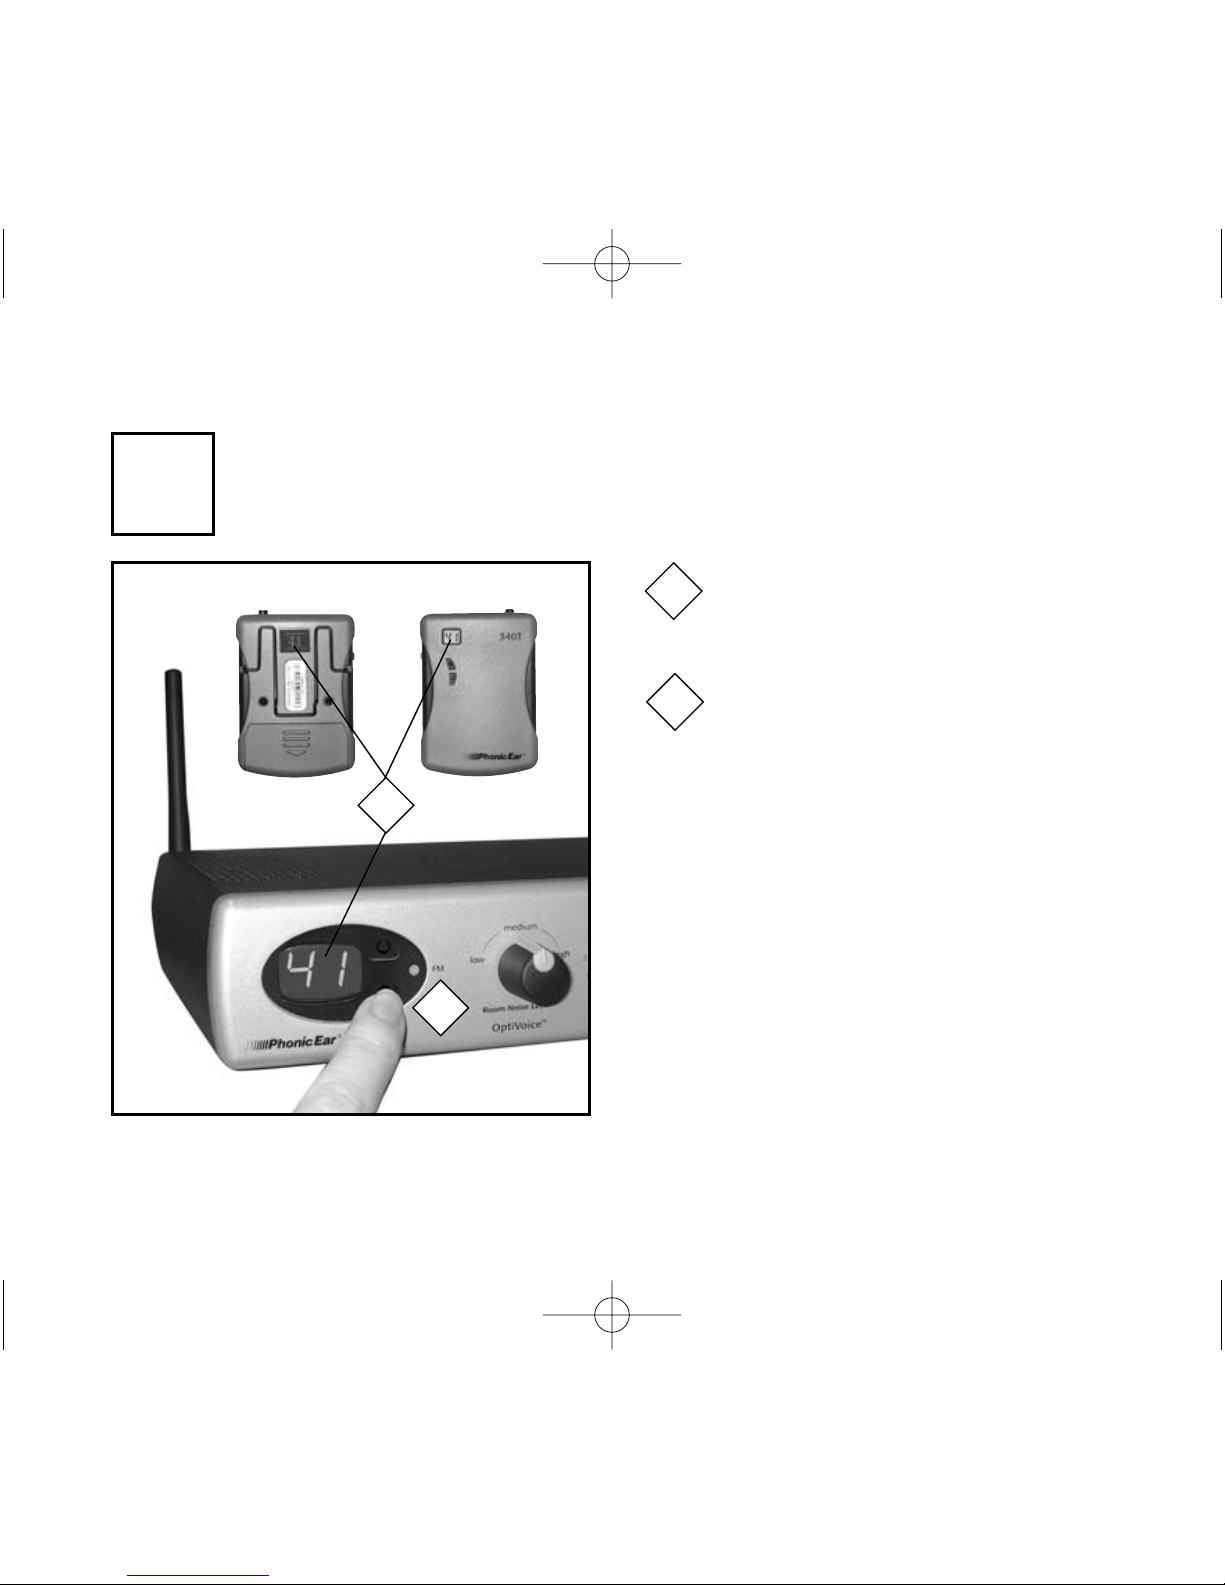
11
Push channel up/down buttons to
change channel setting
Confirm receiver channel matches
transmitter channel
adjusting channel setting
3
1
2
1
2
340T (Front)
NOTE: See “FrontRow Tempo channel
numbers and corresponding frequencies”
section for a complete list of Phonic Ear
channel numbers and corresponding
frequencies.
330T (Back)
or
US/Canada
Intl/EU
4747 230R Multi-Freq User Guide 4/22/05 3:09 PM Page 17
Page 14
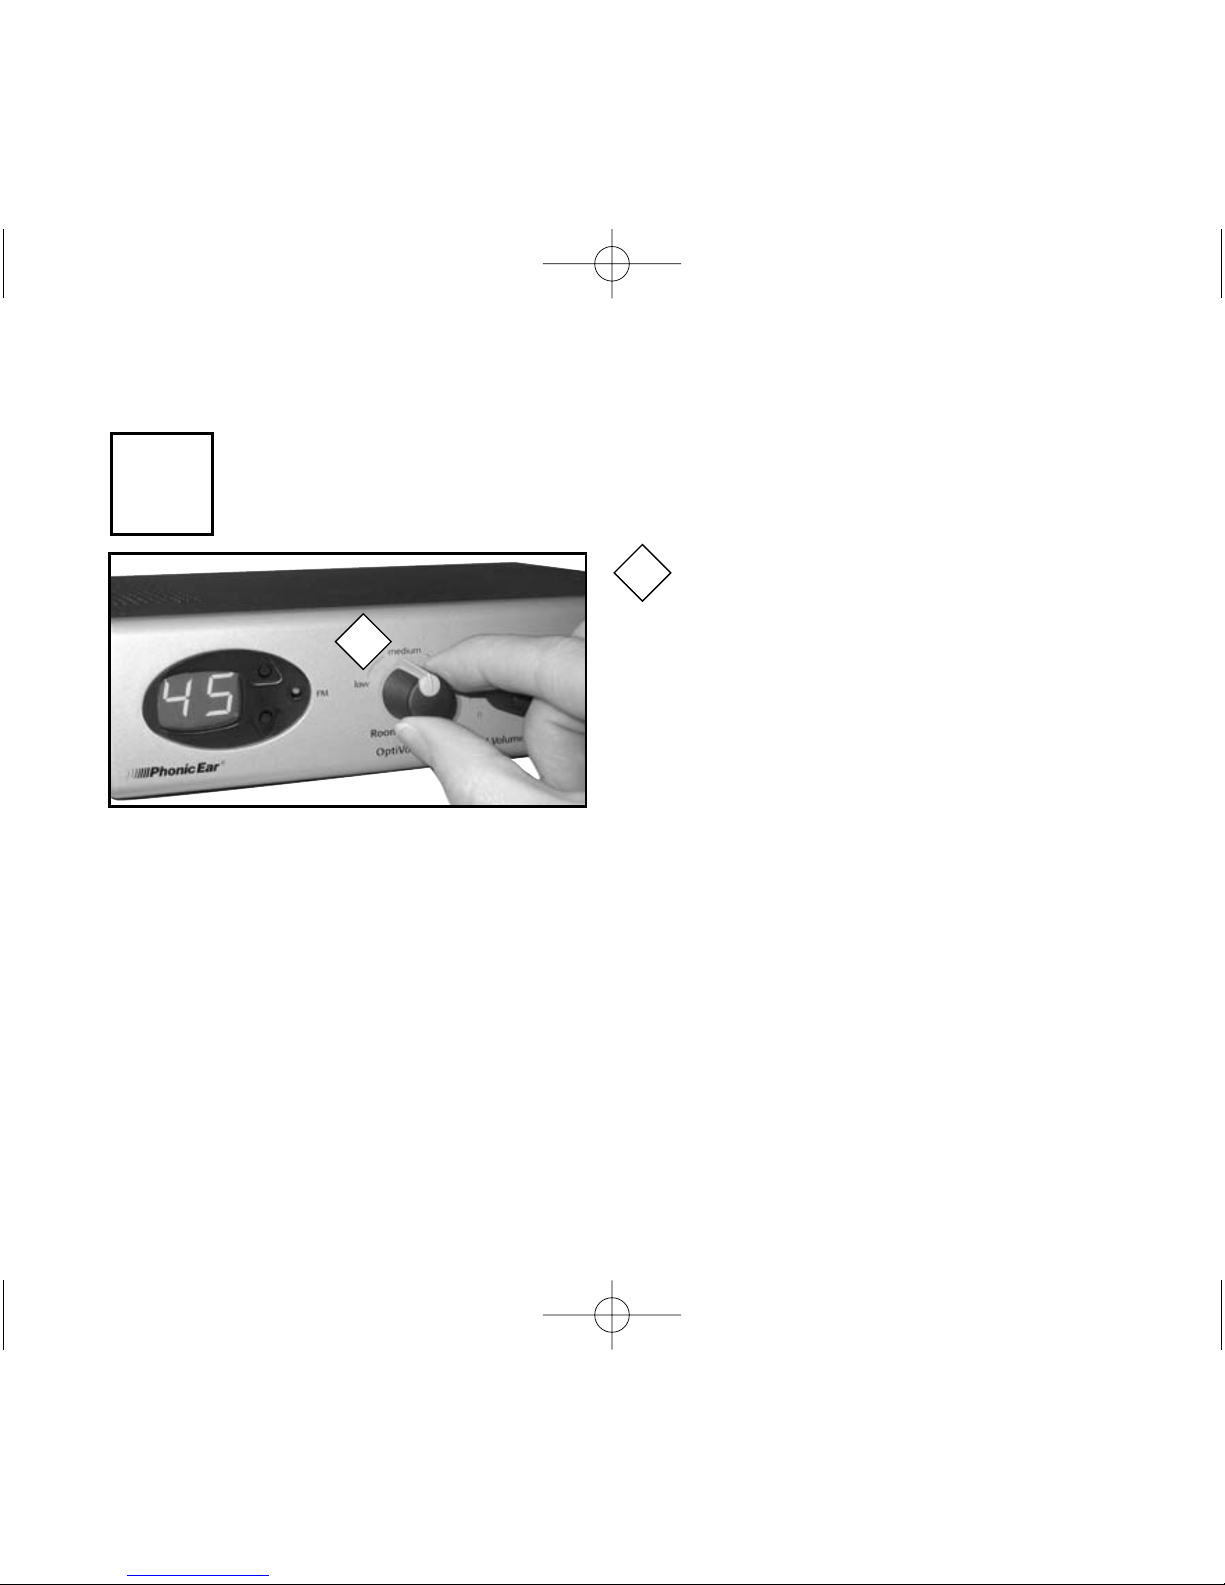
12
adjusting OptiVoice™ setting
1
Set OptiVoice switch according to room
noise level. Medium position is the recommended setting for average noise levels.
1
4
high: Use in high noise levels. Helps to ensure top comprehension during critical tasks
such as test-taking or hearing impaired instruction.
NOTE: With each increase in level, there is an increase of approximately 3dB in gain
(volume). This may require a decrease in the receiver volume setting to avoid potential
microphone/speaker feedback.
OptiVoice is a 3-position switch that automatically adjusts the sound quality of the primary
speaker’s voice. It allows teachers to shape the sound of their voice and helps to ensure maxium
speech clarity in low, medium and high noise levels.
low: Use in low-noise situations and for most
natural voice quality.
medium: Best setting for average classrooms
where low-medium noise levels are present.
4747 230R Multi-Freq User Guide 4/22/05 3:09 PM Page 18
Page 15
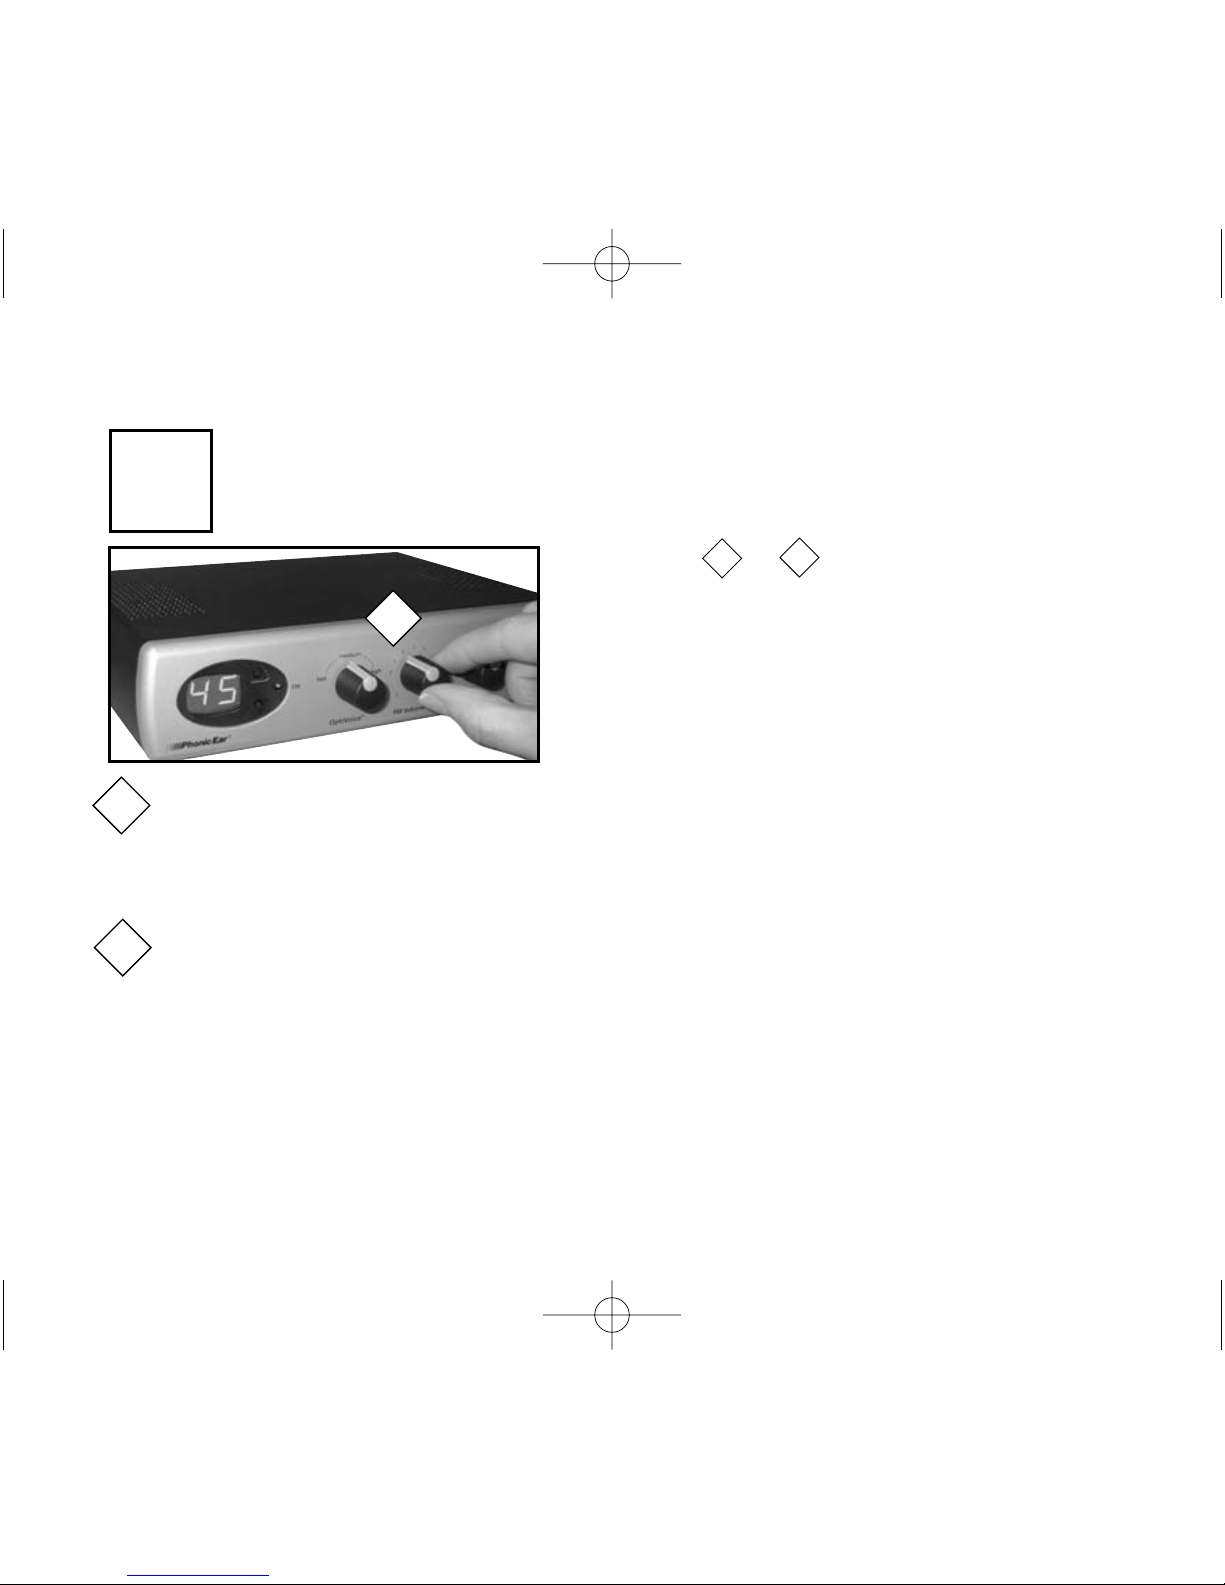
13
Follow steps or below to set FM volume to
proper level. Two people are needed to properly set the
volume level. It is difficult to hear your own voice and
make adjustments to it.
setting FM volume
5
1
1
With a sound level meter - Take a level reading in the “A” setting in the center of the room
during normal classroom activity, and another reading of the teacher's amplified voice (without the class activity). The level of the teacher's voice should be set between 10-15 decibels
above room noise level.
Without a sound level meter - First, ask someone to help you set the volume to a com-
fortable listening level. As your listener, they should also be the person making adjustments to
the volume setting. The speaker should begin talking into the microphone at their normal
speaking level while the listener determines the appropriate volume setting. The recommended
volume setting is achieved when the sound from the loudspeakers and the speaker’s voice are
the same level. If the speaker can hear their own voice through the loudspeakers, the volume
setting is too high.
NOTE: The average volume setting is between 4–5, but
may change depending on room acoustics and noise level.
2
1
2
4747 230R Multi-Freq User Guide 4/22/05 3:09 PM Page 19
Page 16
14
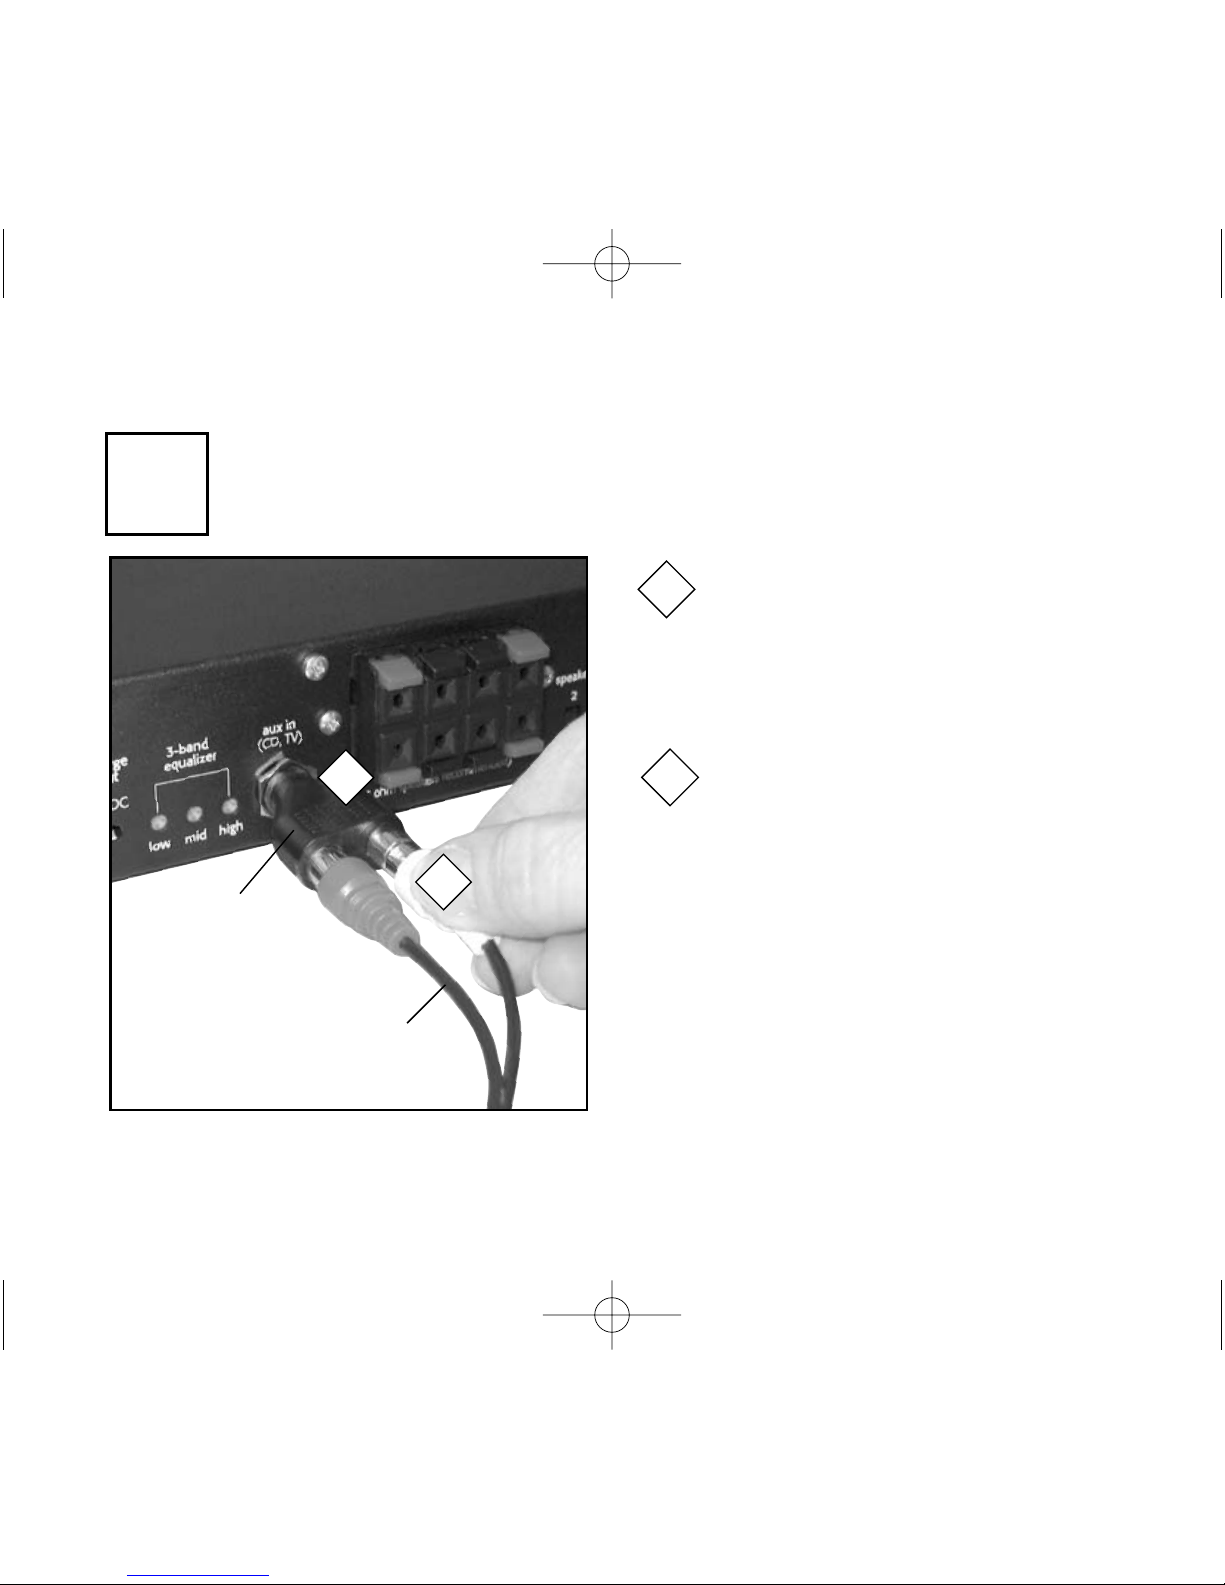
connecting CD, TV and other audio sources (optional)
For most connnections from CD
player, TV, stereo or other audio
sources, insert aux-in adaptor plug
(310-2544-1342) into aux in port
1
1
6
auxiliary input (aux-in)
310-2544-1342
AT0702-25
or
300-6332-107
Connect audio source to adaptor
plug using AT0702-25 or 3006332-107 (optional accessories –
not included with system. See
“Optional accessories” list)
2
2
4747 230R Multi-Freq User Guide 4/22/05 3:09 PM Page 20
Page 17
15
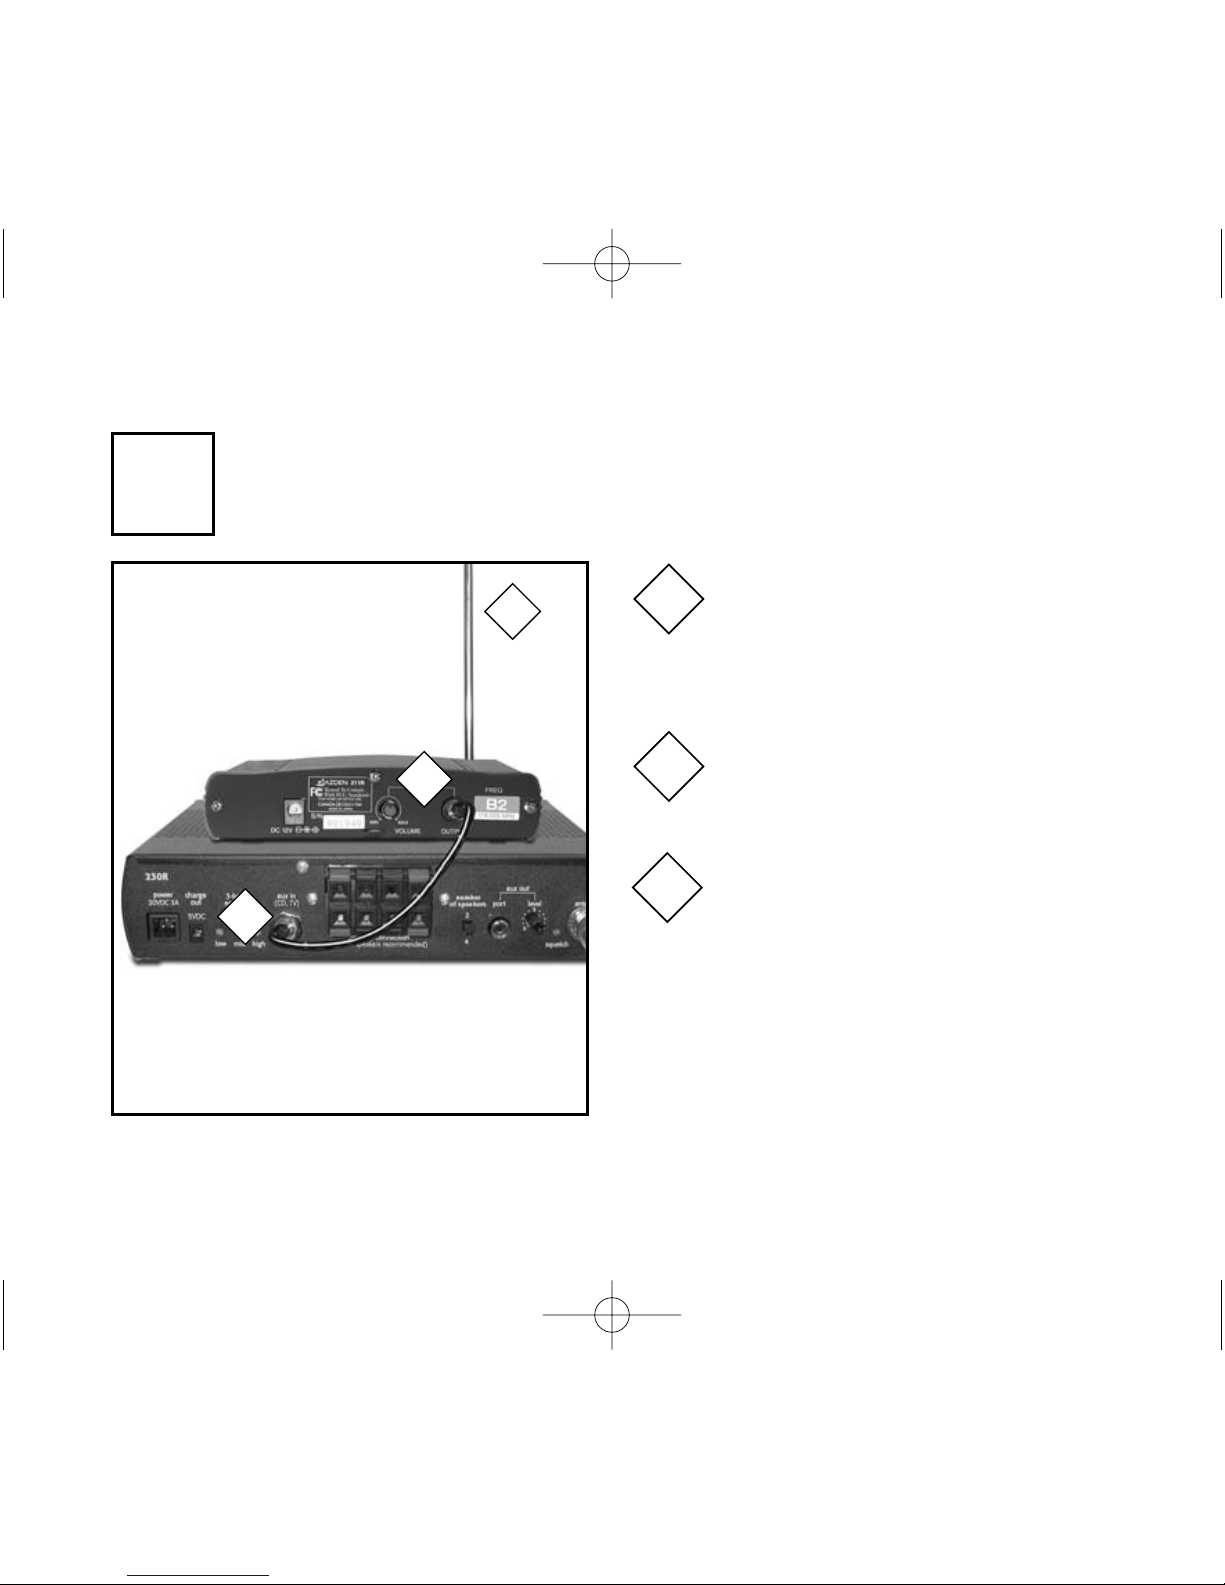
team-teaching with 211 receiver and handheld
microphone system*
211R (back)
230R (back)
Connect one end of the AT0573-1
cable to Output jack on back of
211R unit
1
2
2
1
Connect the other end to the
aux in jack on back of the 230R
receiver
3
3
Extend 211R receiver antenna
7
*Available in U.S. and Canada only.
4747 230R Multi-Freq User Guide 4/22/05 3:09 PM Page 21
Page 18
16
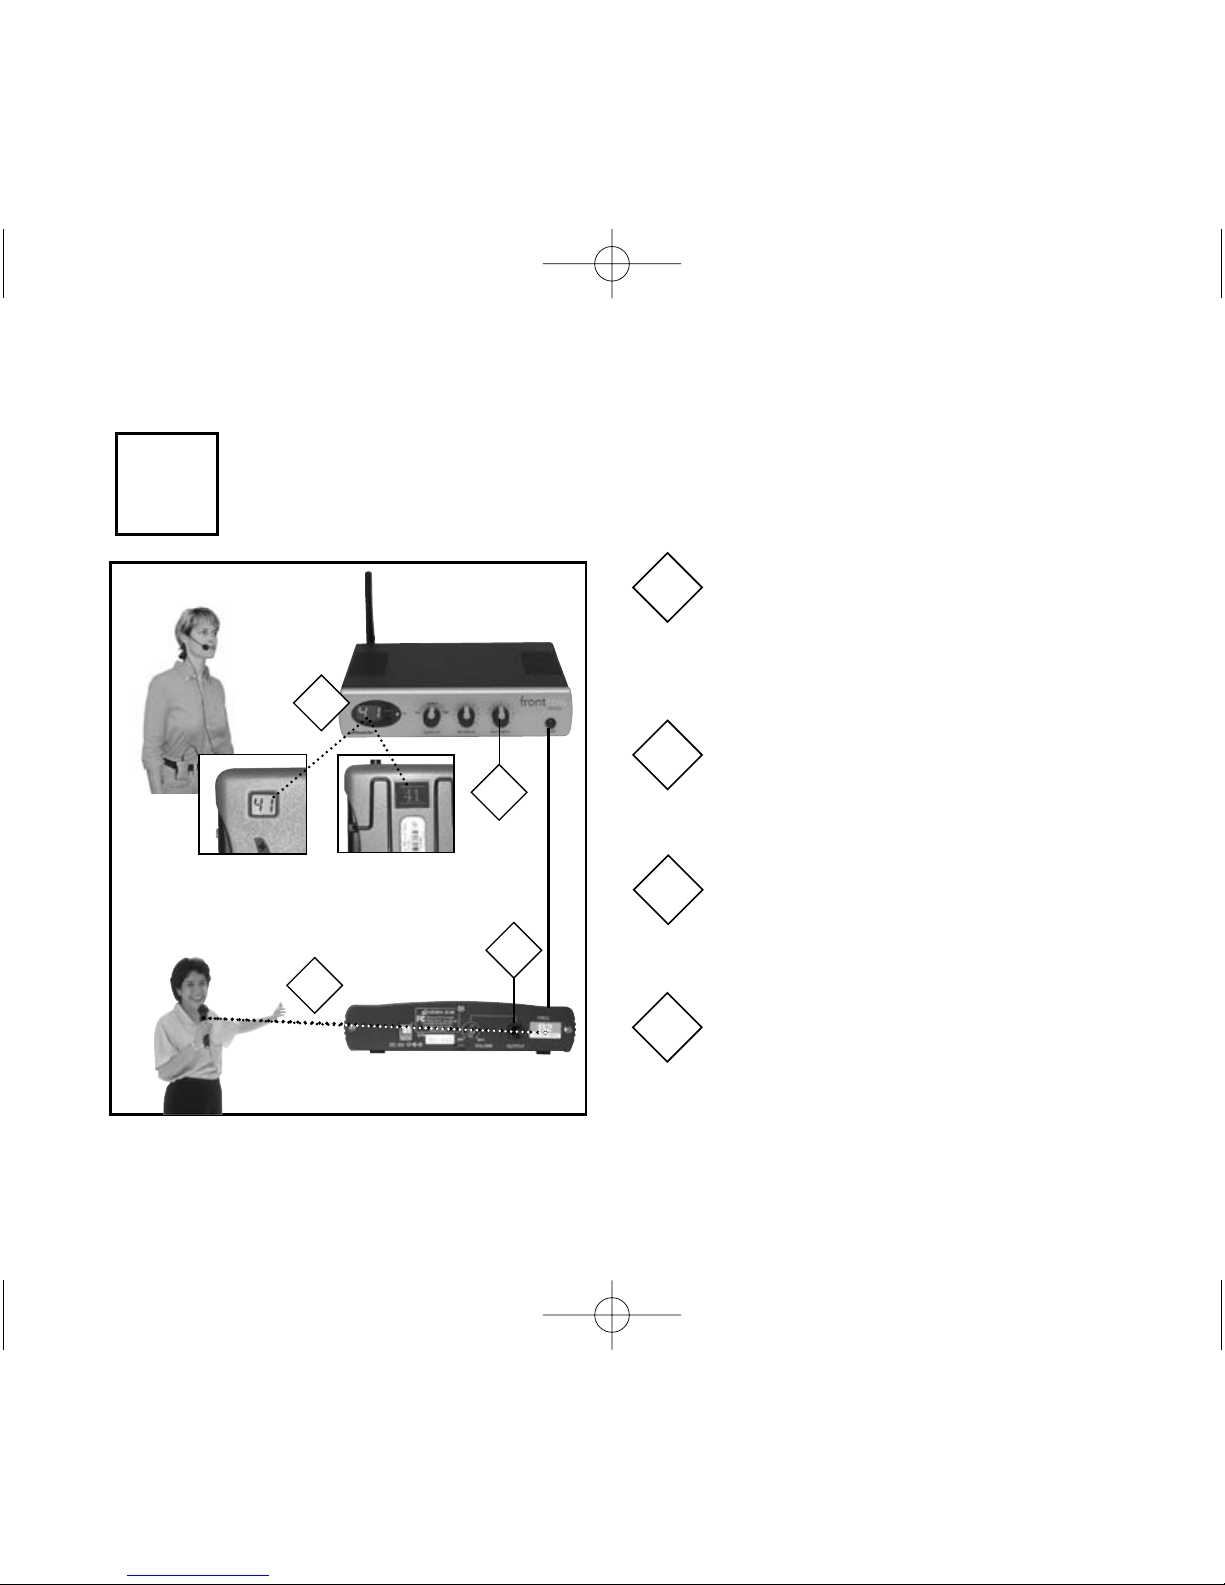
211R (back)
second teacher,
or student
230R (front)
No channel change is necessary on
the 211R and handheld mic – they
are factory set to match
Make sure that channel numbers
indicated on front of 230R receiver
matches channel number on the
transmitter
4
5
first teacher
340T (front)
5
Adjust the Aux Volume control
on front of 230R to proper level
7
7
AT0573-1
Set Volume control on back of
211R to approximately 1/3of the
way to it’s highest level setting
6
6
4
8
team-teaching with 211 receiver and handheld
microphone system (cont’d)
330T (back)
or
4747 230R Multi-Freq User Guide 4/22/05 3:09 PM Page 22
Page 19
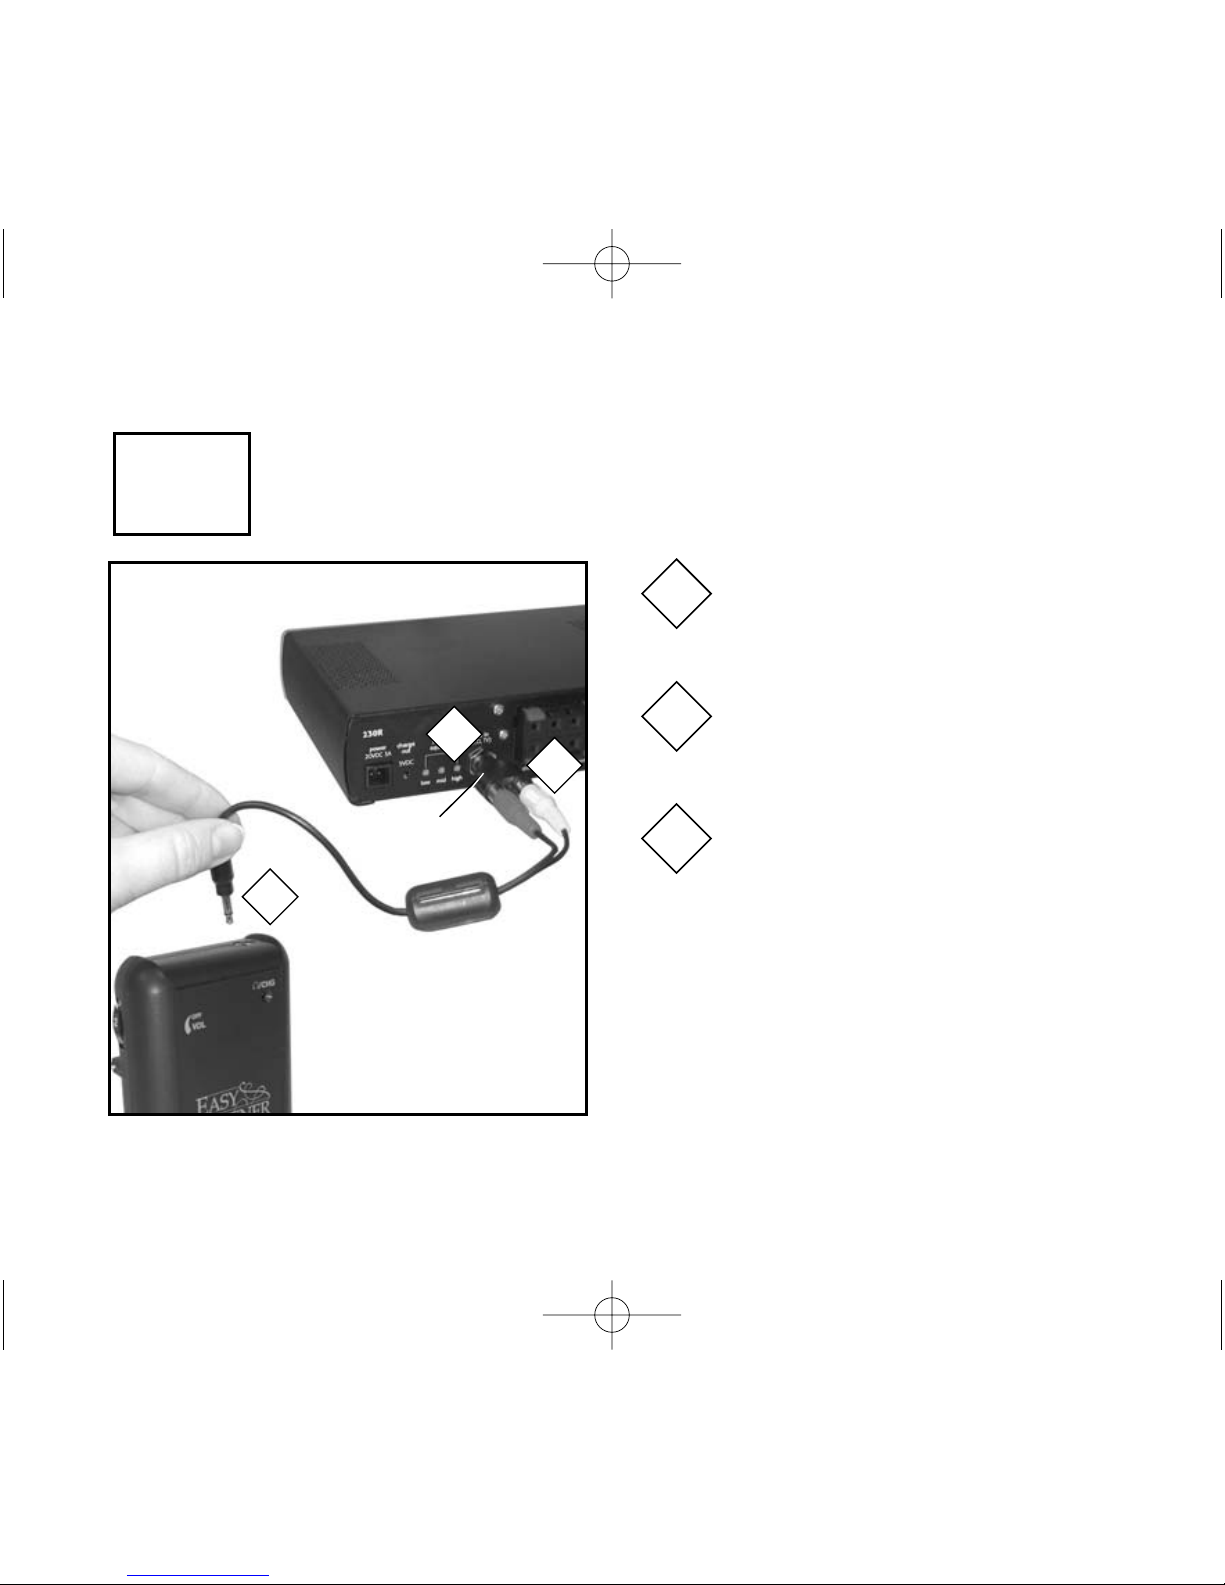
17
team-teaching with body-worn personal receiver &
transmitter units
Insert aux-in adaptor plug (3102544-1342) into aux in port on
back of 230R
1
Connect aux-in adaptor cord (3006332-107) to adaptor plug. (Match
red to red and white to white.)
2
300-6332-107
1
3
receiver
NOTE: Second teacher should be wearing a
transmitter on same channel as receiver (see
diagram on next page)
*
*If a different receiver is used, a different
adaptor cord may be required.
310-2544-1342
2
Plug other end of aux-in adaptor
plug into aux jack on body-worn
receiver
3
9a
4747 230R Multi-Freq User Guide 4/22/05 3:09 PM Page 23
Page 20
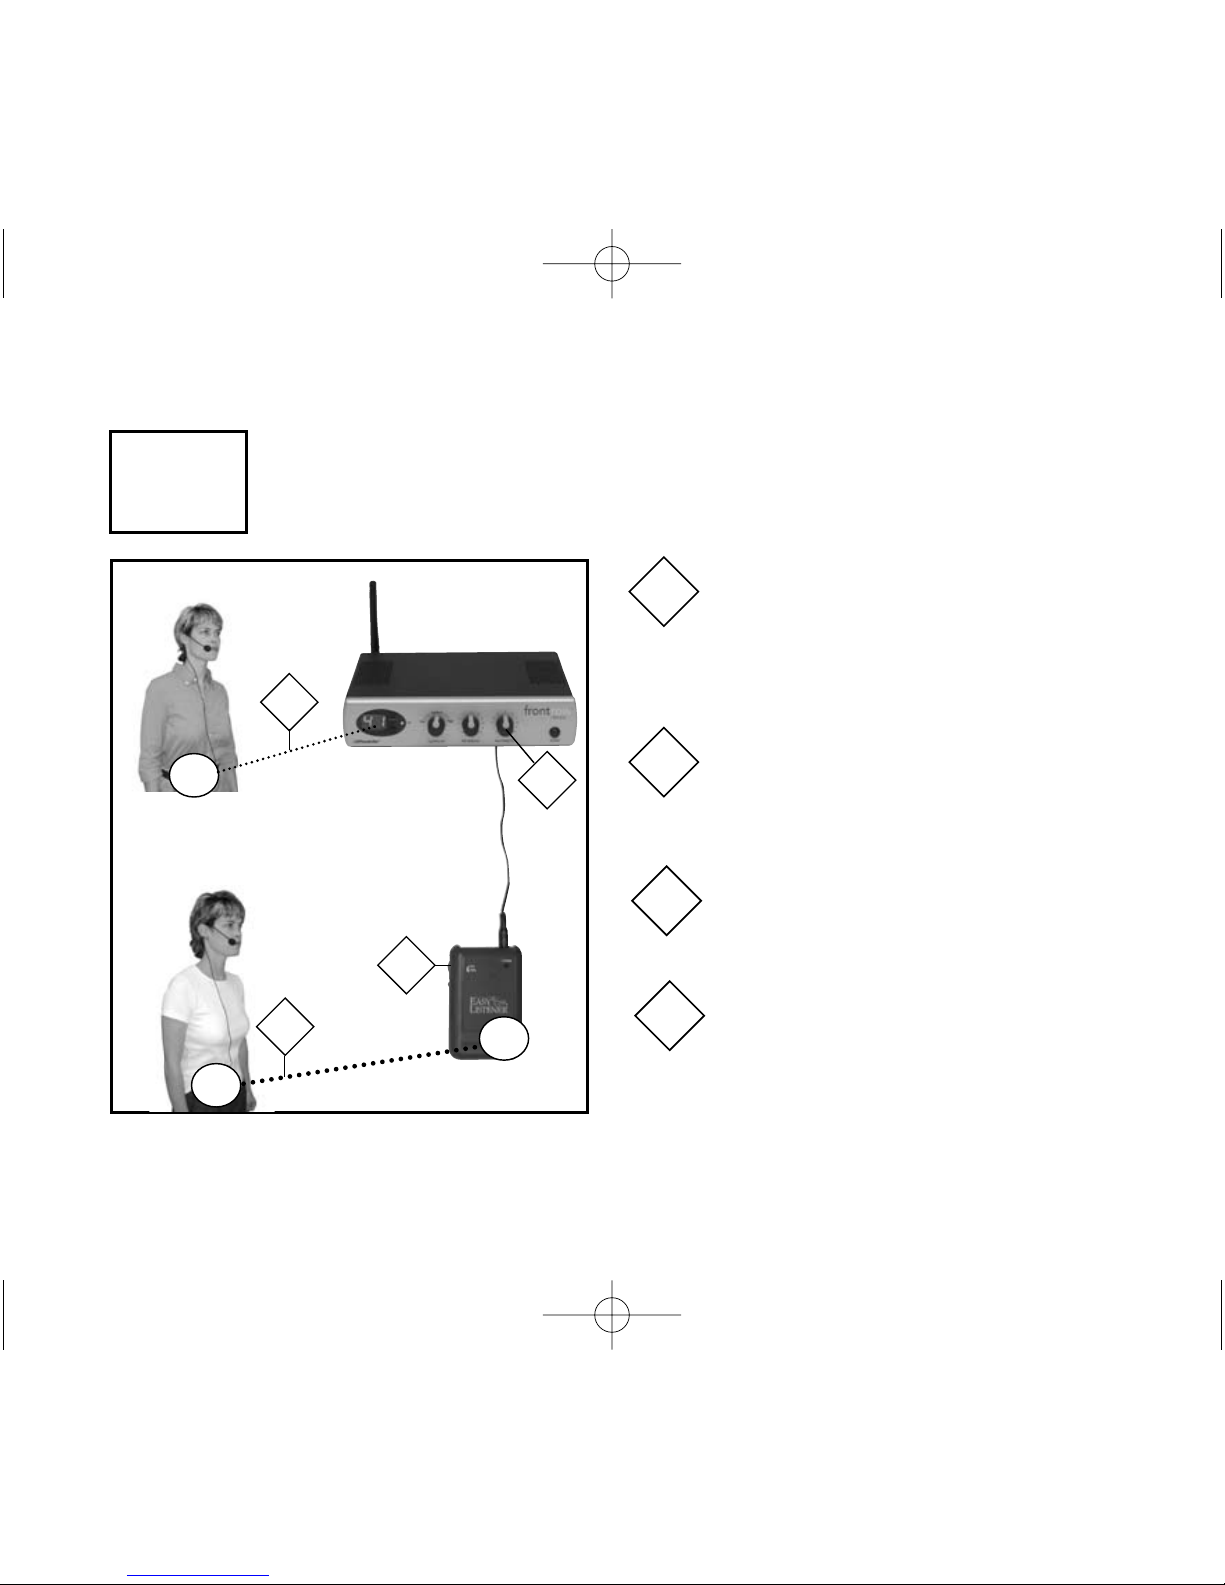
18
team-teaching with body-worn personal receiver &
transmitter units (cont’d)
First Teacher
Make sure the channel number of
230R receiver matches the channel
number of your 330T/340T (or
other transmitter)
3
Second Teacher*
Make sure the channel number on
personal receiver matches channel
number on personal transmitter
4
second teacher
4
230R (front)
first teacher
3
41
receiver
transmitter
330T/340T
9b
Set volume level on personal teamteaching receiver to 2/3max (6 -7 out
of 10).
5
Set aux volume level on 230R to
comfortable level (between 4 -5).
6
6
5
* Refer to the following page for channel pair combinations
not recommended with a 72MHz system.
32
32
sam
e channel
same channel
4747 230R Multi-Freq User Guide 4/22/05 3:09 PM Page 24
Page 21
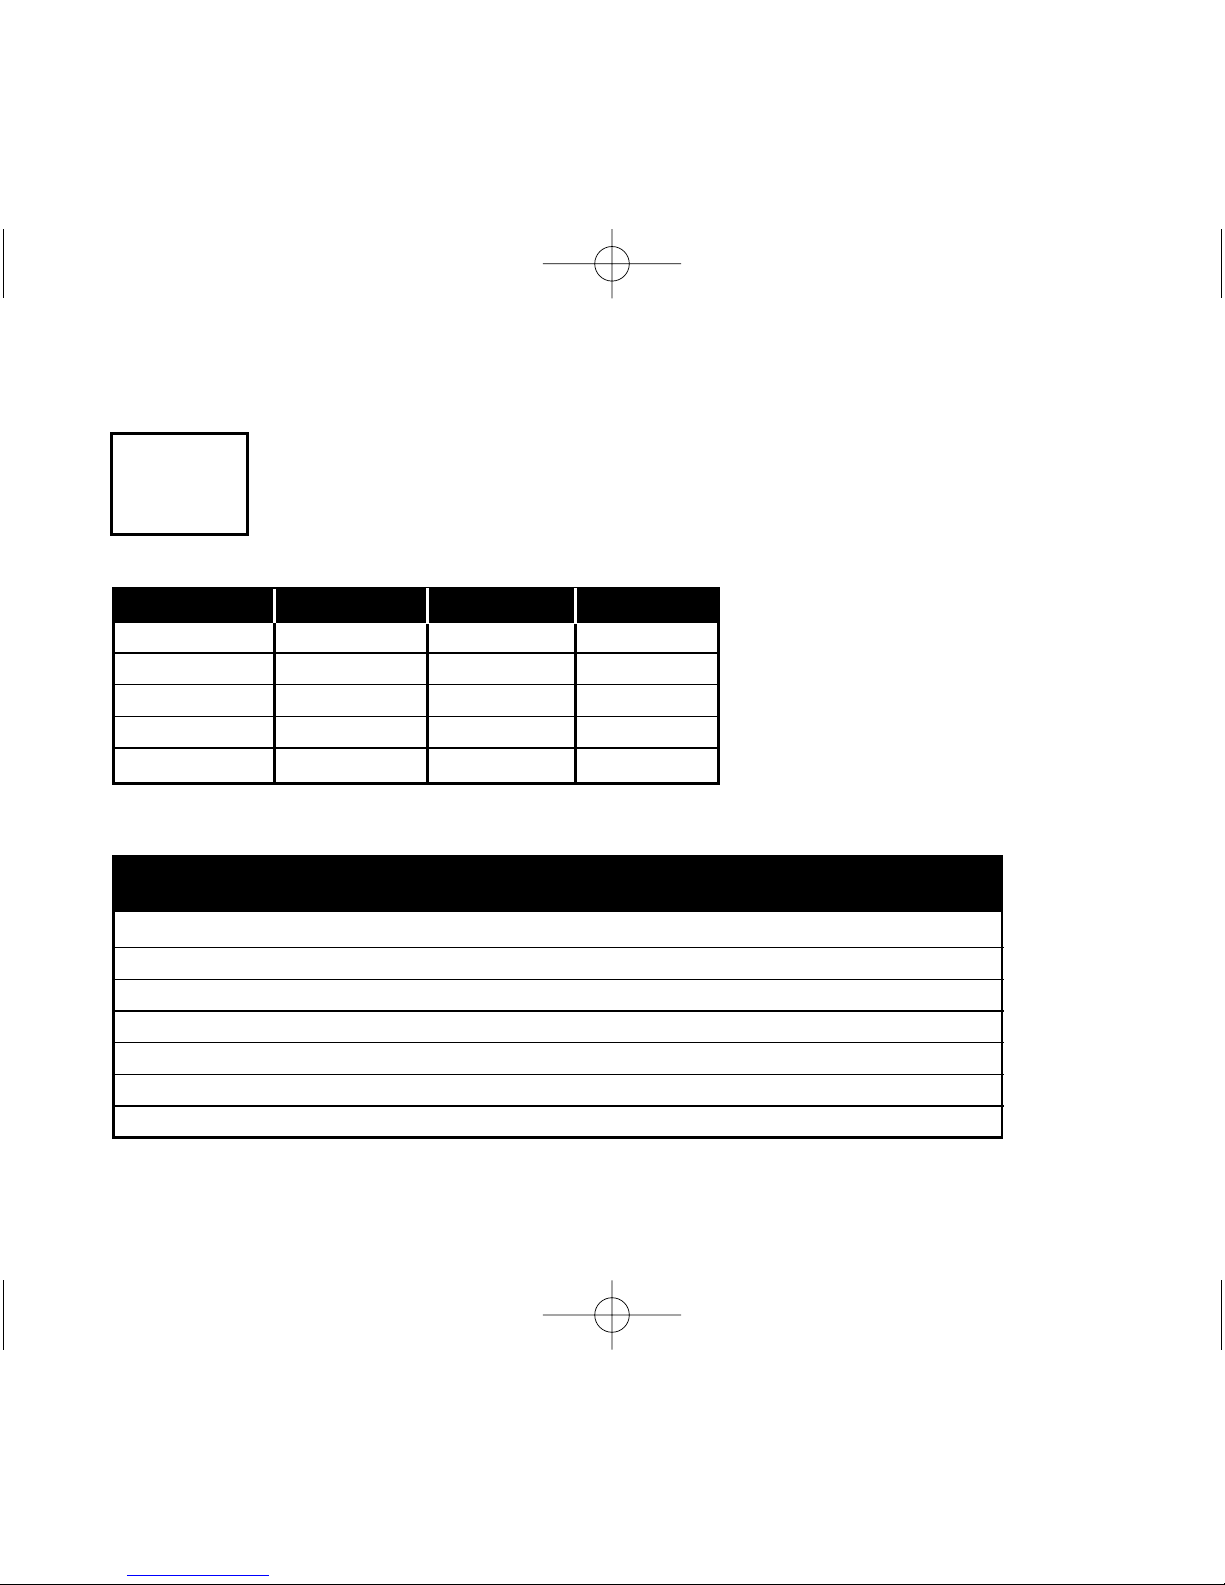
19
transmitters 300R 571R 575R
300T ✓✓✓
300TS ✓✓✓
300TS-216
330T/340T
571T
✓✓✓
possible Phonic Ear receivers and transmitter combinations for team-teaching
team-teaching channel pairs
9c
72MHz band frequency 216MHz band frequency effected
72.025MHz (Ch1) is not compatible with 216.075MHz (Ch42)
72.075MHz (Ch2) is not compatible with 216.225MHz (Ch45)
72.125MHz (Ch3) is not compatible with 216.375MHz (Ch48)
72.175MHz (Ch4) is not compatible with 216.525MHz (Ch51)
72.225MHz (Ch5) is not compatible with 216.675MHz (Ch54)
72.275MHz (Ch6) is not compatible with 216.825MHz (Ch57)
72.325MHz (Ch7) is not compatible with 216.975MHz (Ch60)
When team-teaching with a 72MHz personal transmitter/receiver pair, make sure to avoid
the following 72MHz/216MHz channel combinations:
4747 230R Multi-Freq User Guide 4/22/05 3:09 PM Page 25
Page 22
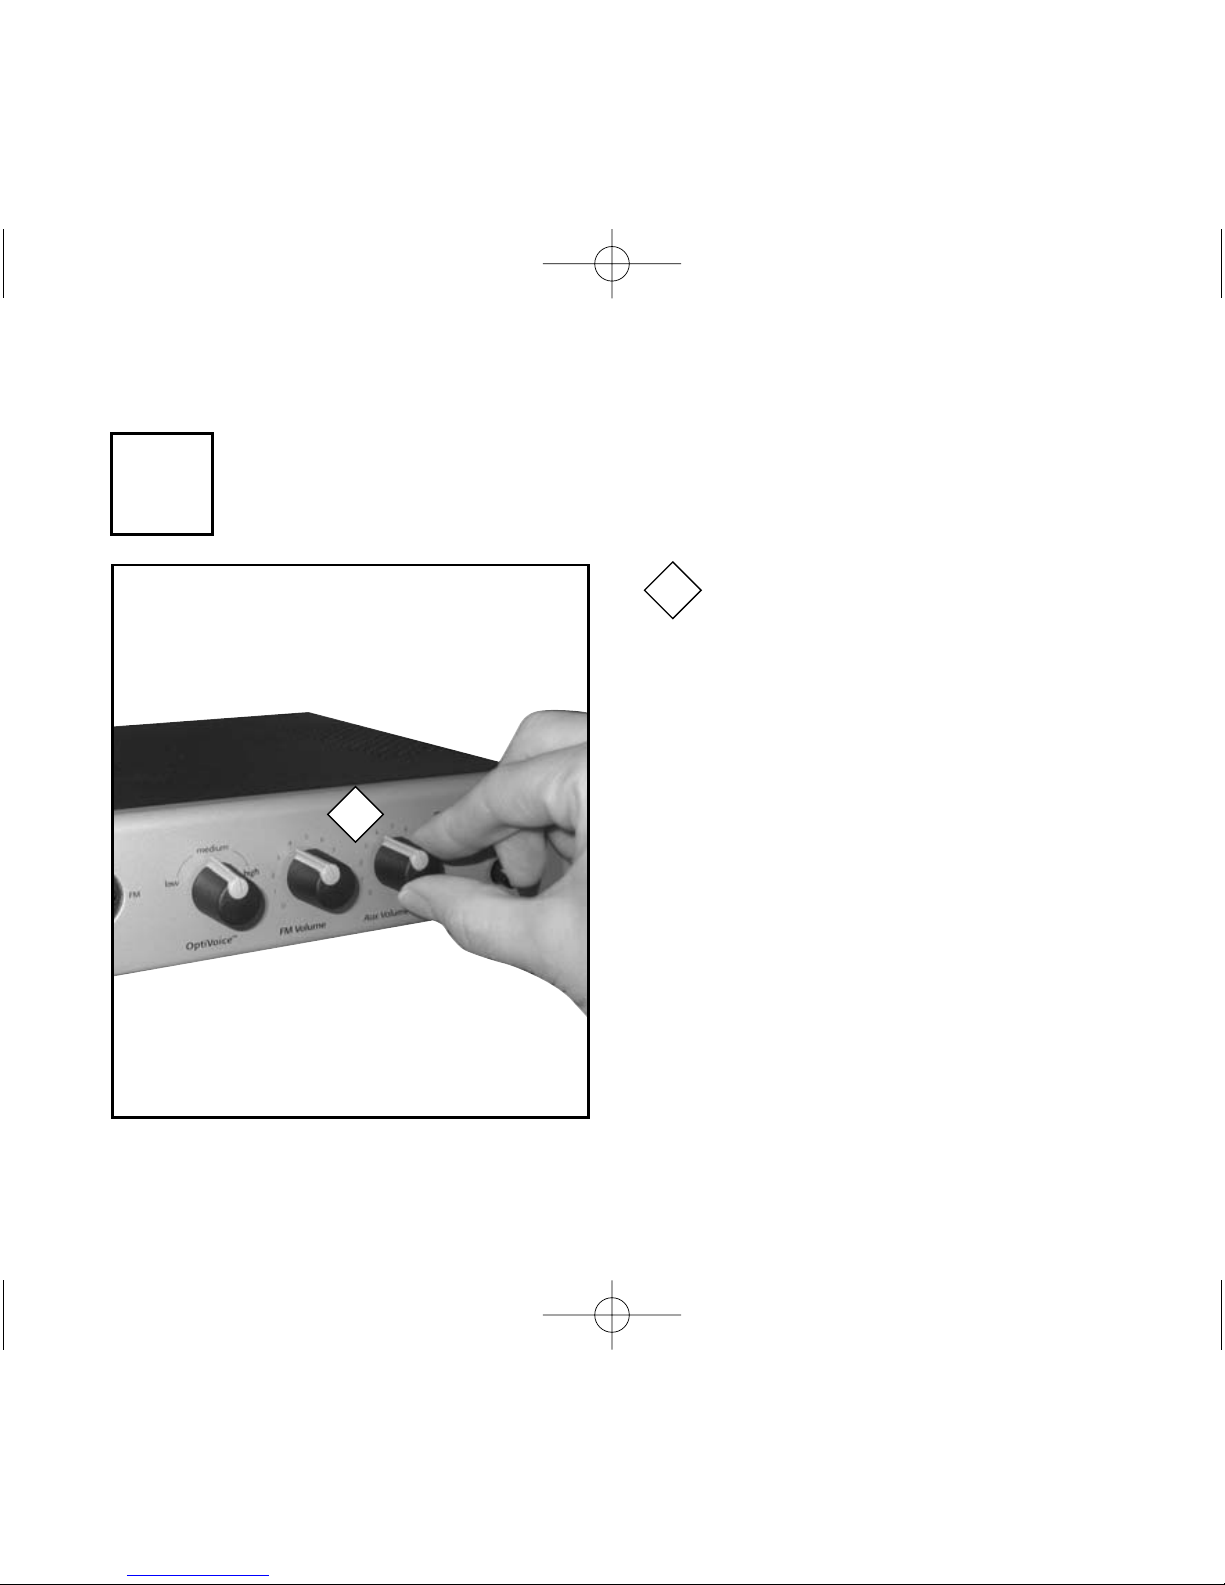
20
adjusting aux volume control
1
1
NOTE: OptiVoice does not affect aux
sound.
Turn aux volume control to adjust
CD, TV, stereo and other audio
sources plugged into aux in.
Depending on setup, you may have
to adjust volume of external audio
source.
10
4747 230R Multi-Freq User Guide 4/22/05 3:09 PM Page 26
Page 23
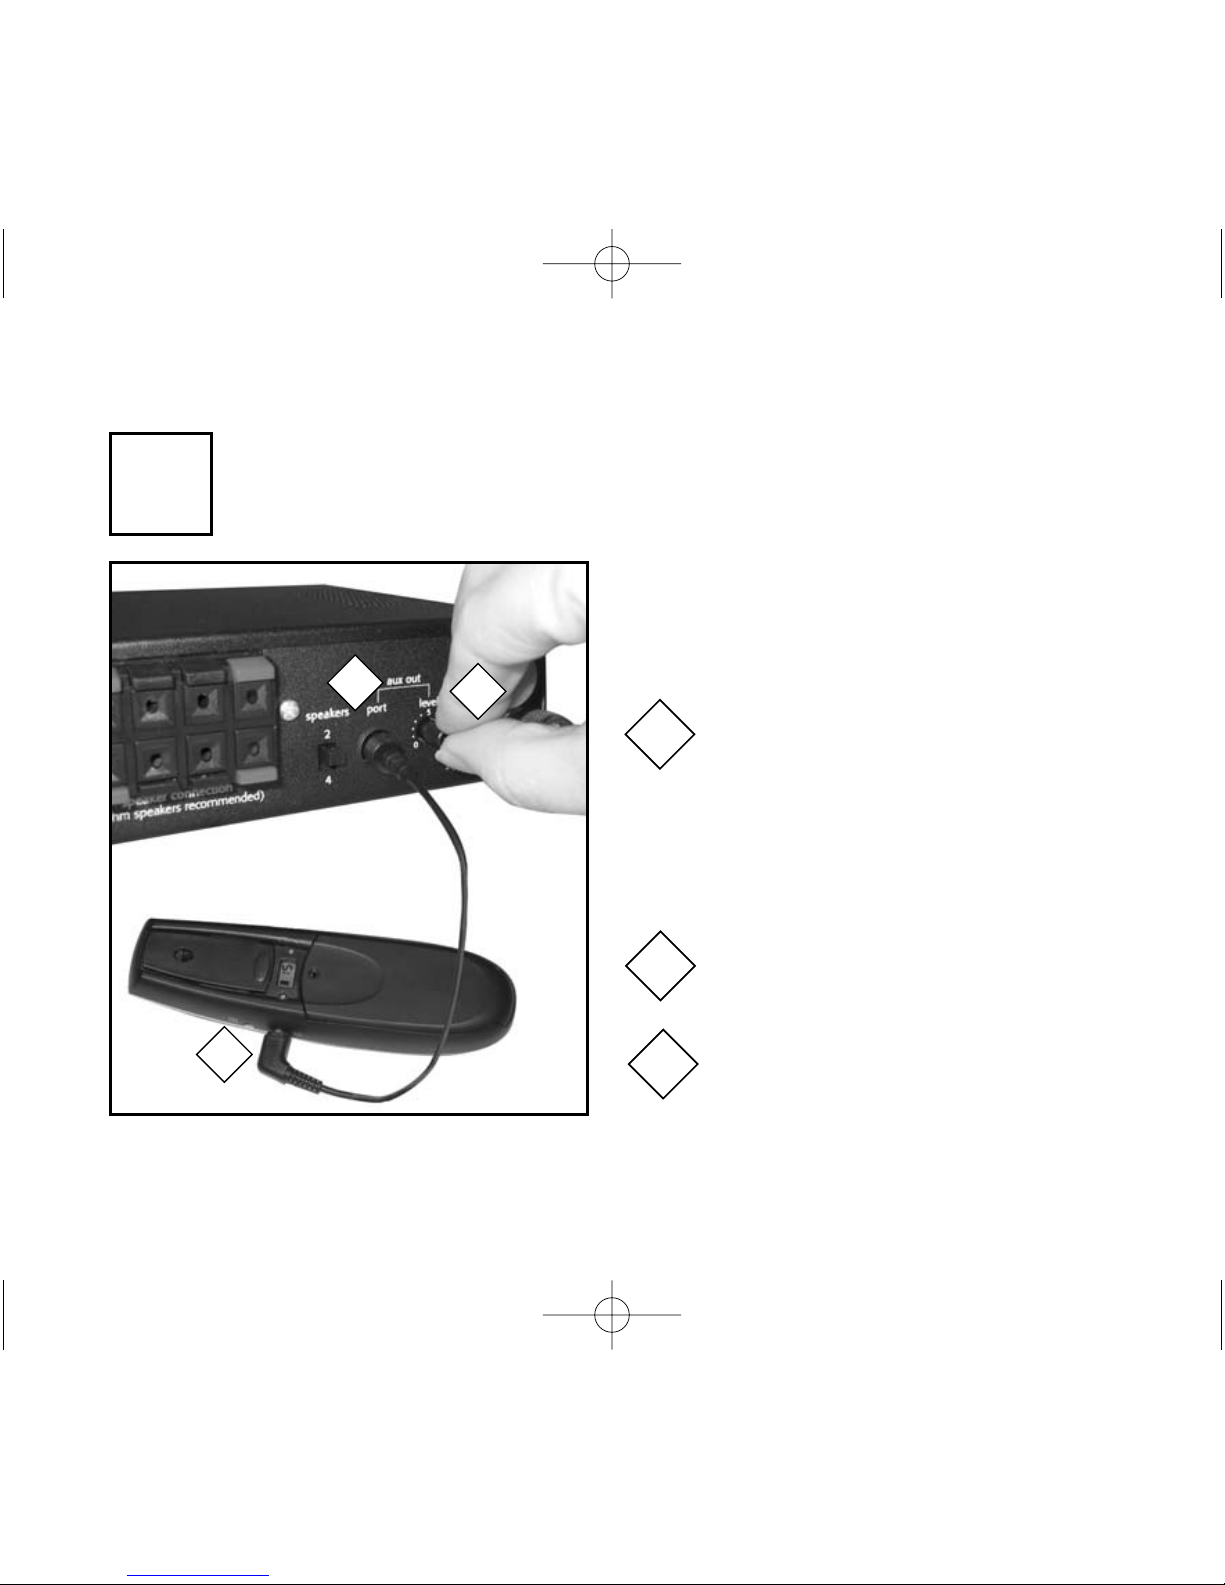
21
rebroadcasting to personal receivers
Adjust level setting according
to compatibility chart on
following page
3
1
Using AT0805 cord, attach
transmitter to aux out port
2
2
Using AT0805 cord, attach 3.5mm
end of cord into aux in port of transmitter. NOTE: (Lexis transmitter
shown here. See chart on next page
for list of compatible products and
input adaptor plug sizes. Adaptor plug
310-2544-1341 may be required).
1
3
auxiliary output (aux out)
The auxiliary output feature allows transmission, or rebroadcasting of the primary teacher’s
voice directly to a student’s personal FM receiver, regardless of their channel or frequency.
11
4747 230R Multi-Freq User Guide 4/22/05 3:09 PM Page 27
Page 24
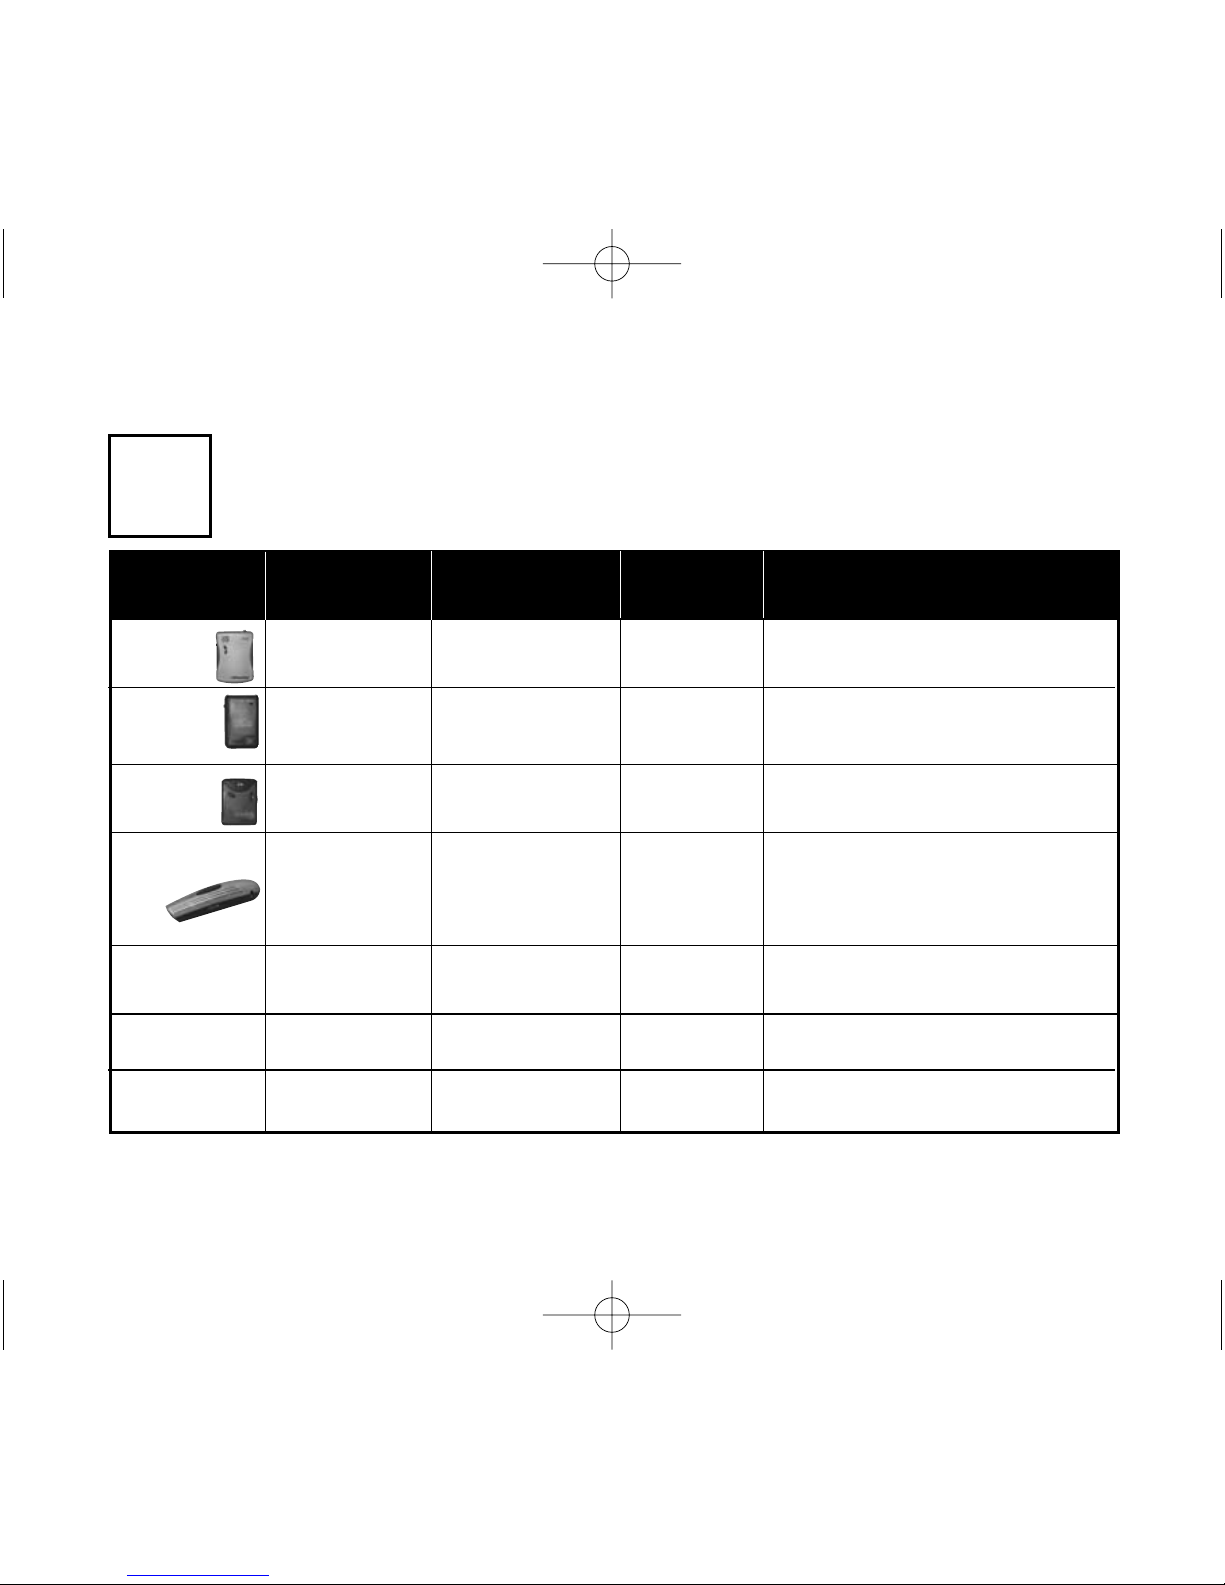
22
12
aux out rebroadcasting to other receivers from 230R receiver
transmitter
level of adaptor aux out
comments
compatibility cord(s) needed level setting
★★★★ AT0805 2
★★★★ AT0805 2
★★★★ AT0805 5
★★★★ AT0805 2
★★★ 2
★★★ AT0805 2
★★★ 2
★★★★ = most compatible
330T/
340T
300T
Easy
Listener
571T
Solaris
Lexis
Transmitter
Phonak
HandyMic TX3
Phonak
Campus S TX5
Phonak
MicroVox TX2
• used with 300R Easy Listener personal receiver
• requires use of external antenna for
range (AT0529A)
• used with 571R Solaris personal receiver
• requires use of external antenna for range
(AT0529A-26)
• used with Lexis BTE receiver
• set the aux input sensitivity setting to LO
(consult Lexis user guide)
• requires use of external antenna for
range (389-02-120-02)
• requires RCA (M) to 3.5mm (F) adaptor
to interface to handymic aux input cord
(Radio Shack P/N 274-387)
• must use external antenna
(Phonak P/N 052-0116)
handmic aux input cord
(europlug to 3.5mm (M)
(Phonak P/N 052-0117)
requires 2.5mm(male)
stereo to RCA (male)
adaptor cord
• used with Lexis receiver
4747 230R Multi-Freq User Guide 4/22/05 3:09 PM Page 28
Page 25
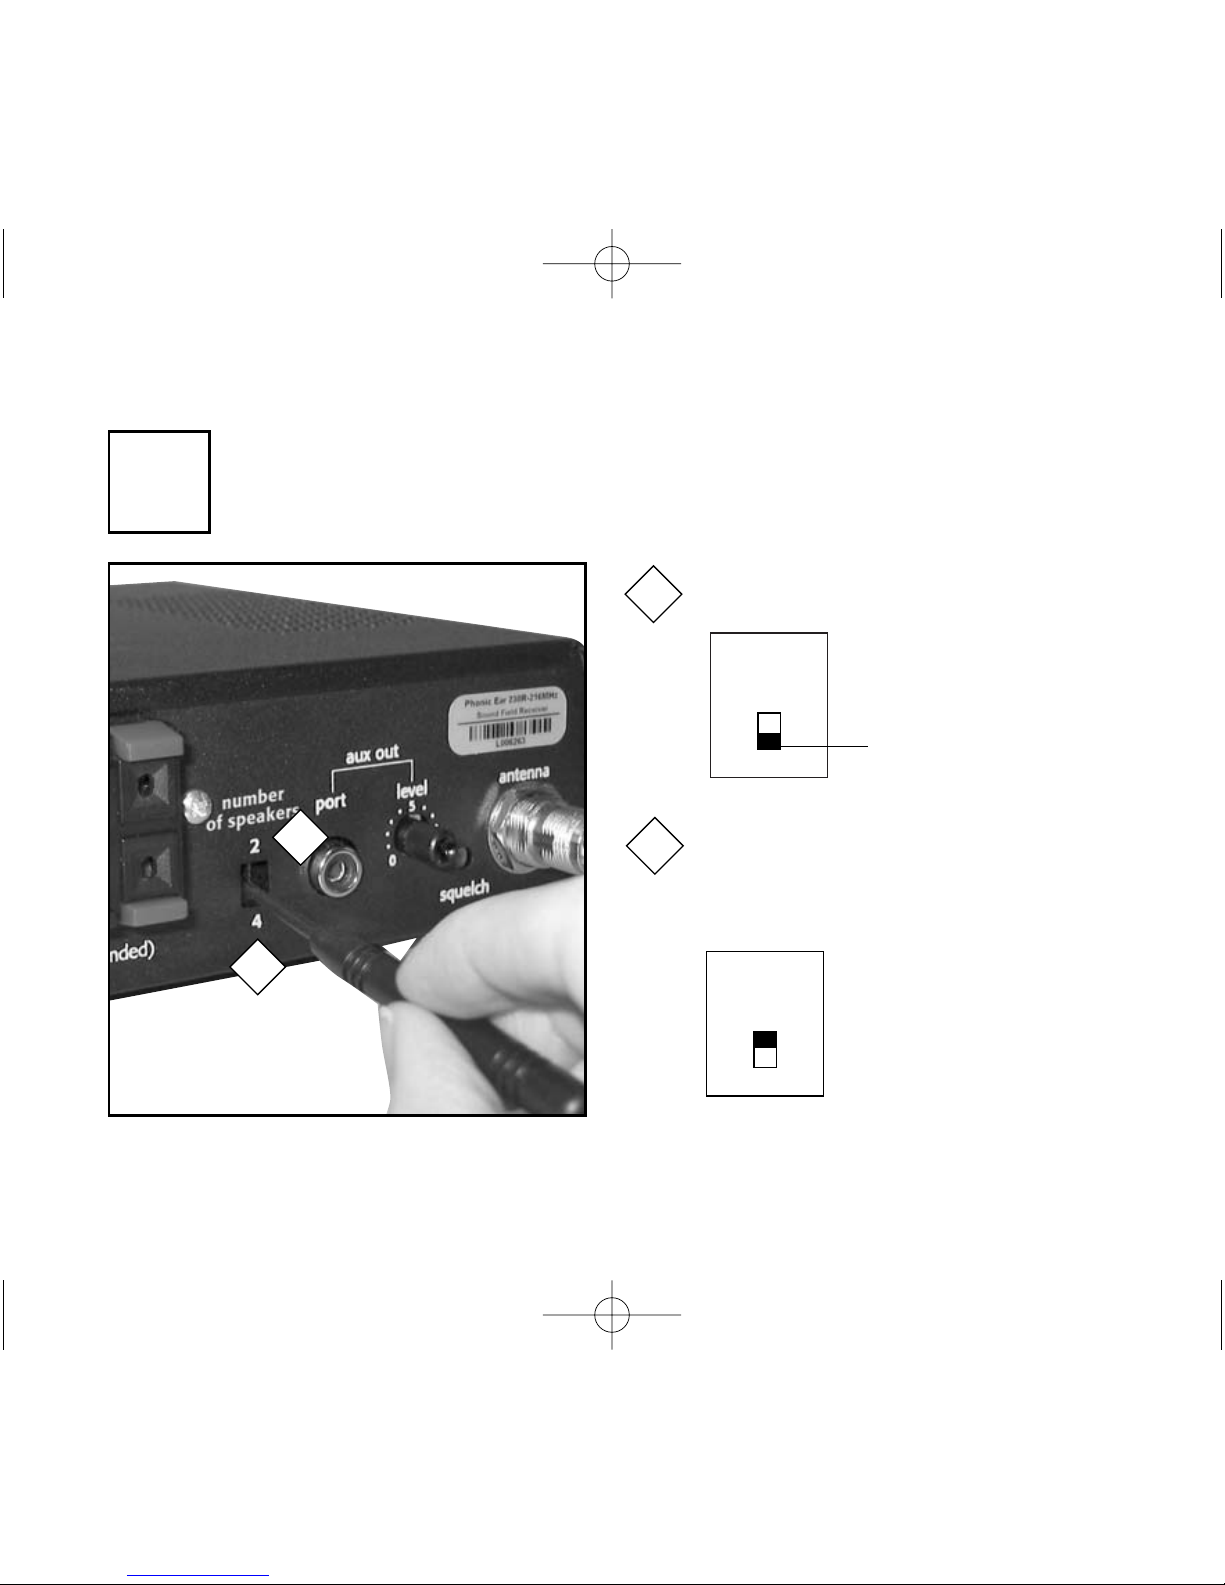
23
speaker setup
verify number of speakers setting
4 speakers are recommended for most
average-sized classrooms
1
1
13
2
2
number
of speakers
2
4
Verify the number of
speakers
switch is set
to 4 if using 4 or more
speakers
Set switch to 2 if using 1 single
cluster ceiling speaker or a 1-3
daisy-chaining speaker configuration
Selecting the proper setting
allows for:
• optimal speaker power
distribution and optimal
system performance
number
of speakers
2
4
4747 230R Multi-Freq User Guide 4/22/05 3:09 PM Page 29
Page 26
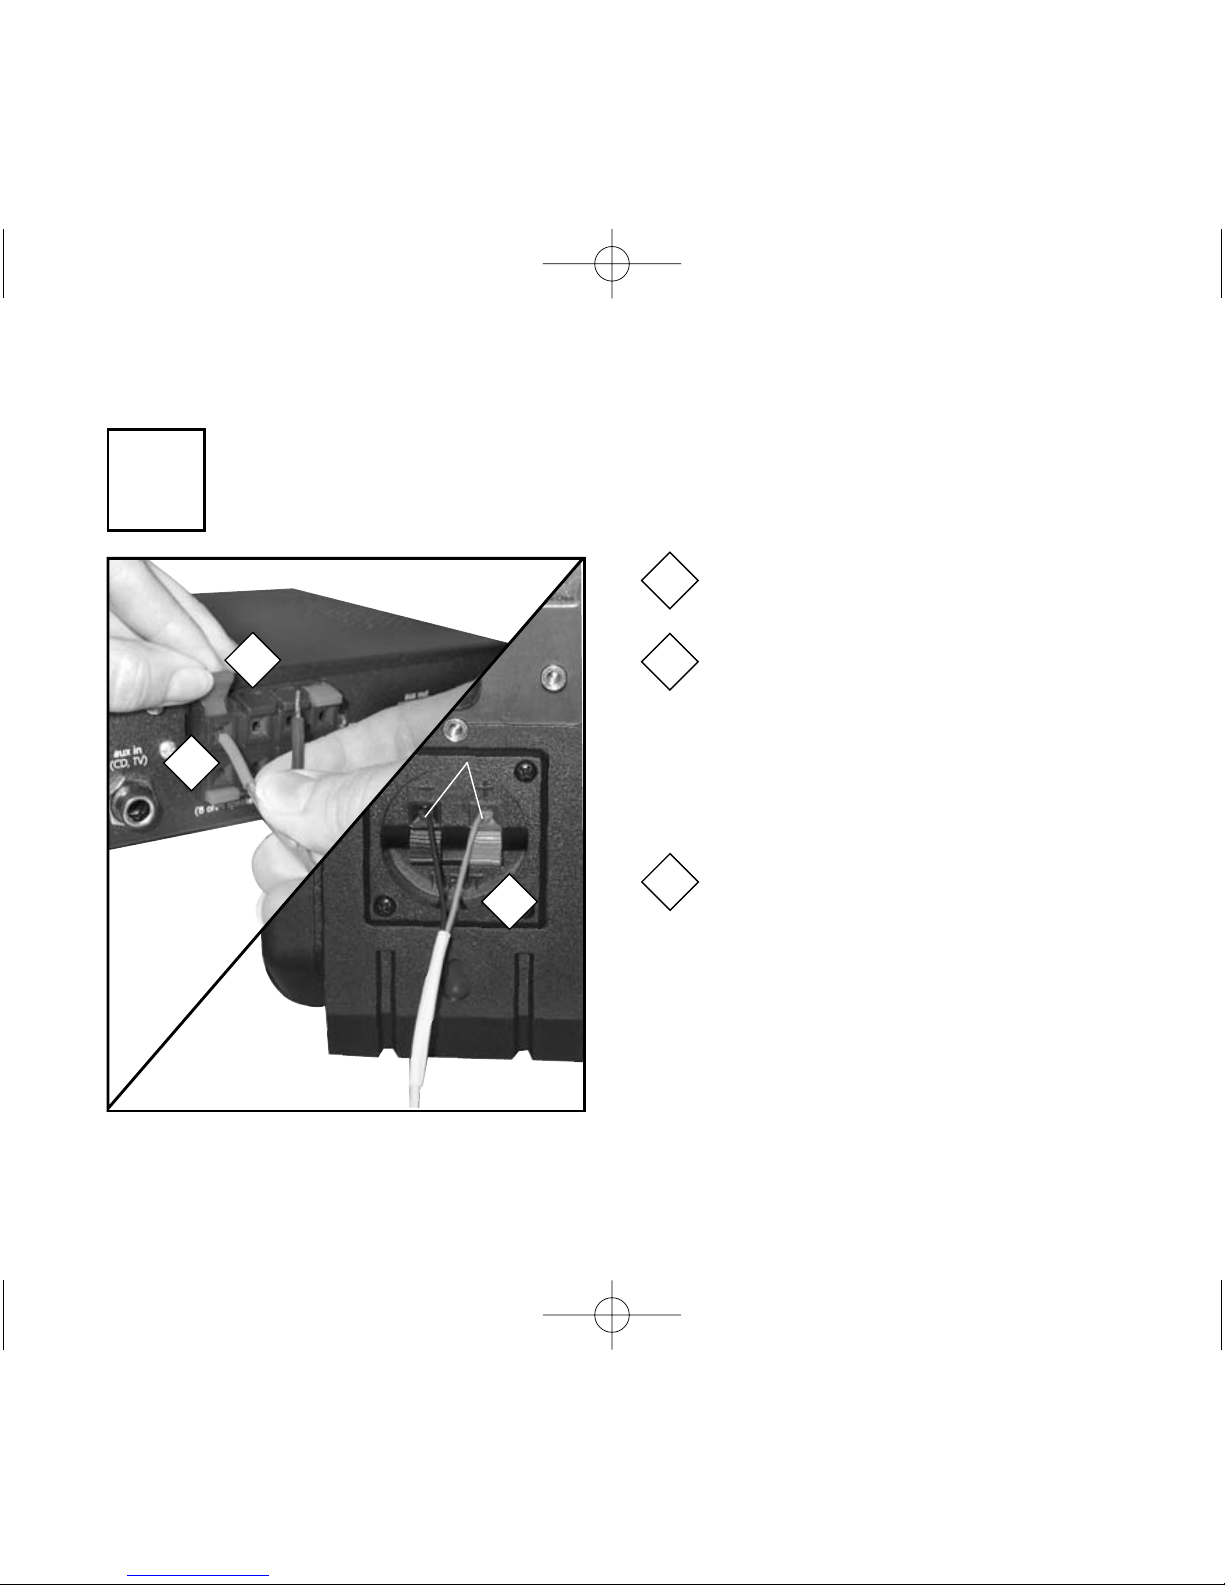
24
connecting speaker wires to 230R
14
NOTE: Use at least 18 GA Plenum
speaker wire (included with system)
230R back
Lift speaker cable connector tab
Insert exposed cable wire as far as
it will go into connector hole (red
to red; black to black), then push
tab down to secure cable. Pull on
cable slightly to make sure connection is secure.
1
2
1
2
3
Attach AT0581 speaker cable to
back of speaker. Insert red-tipped
cable into red speaker connector
and black-tipped cable into black
speaker terminal.
Red to Red and
Black to Black
AT0581
3
4747 230R Multi-Freq User Guide 4/22/05 3:09 PM Page 30
Page 27
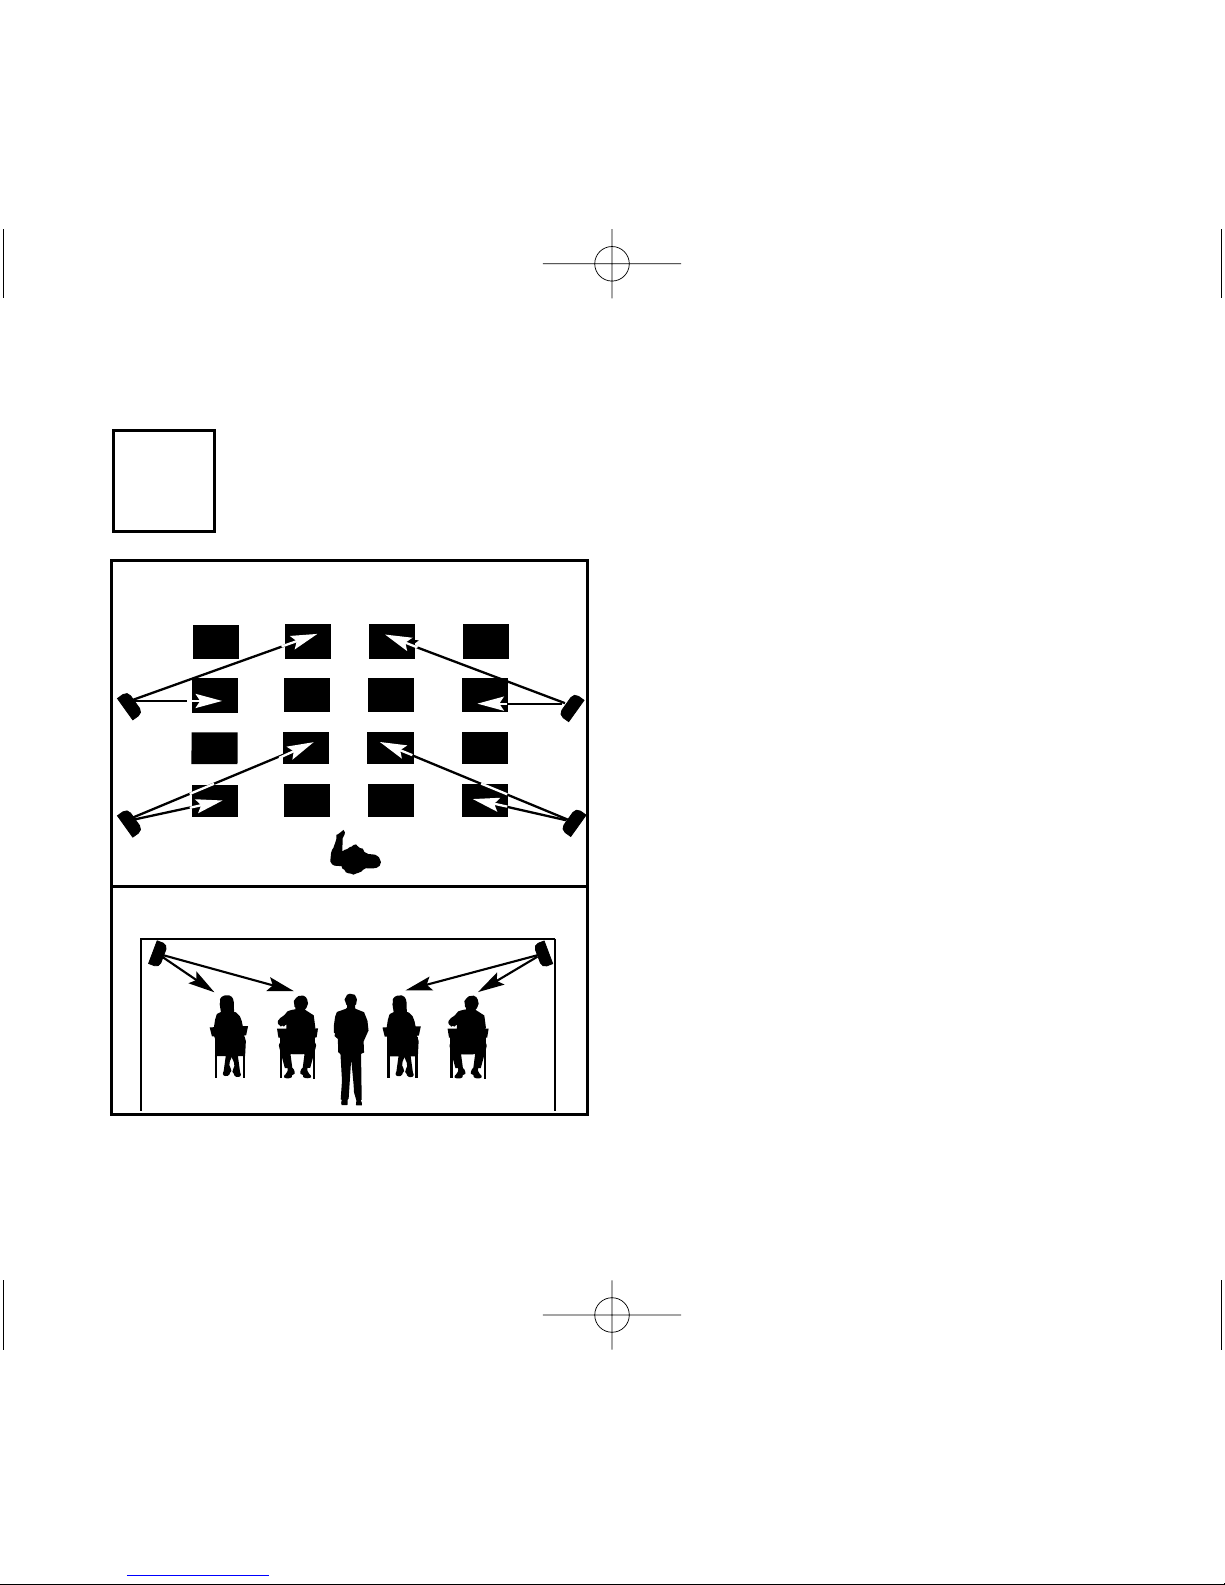
25
where to mount compact wall speakers
Based on your classroom acoustics and seating
arrangement, speaker placement will vary.
• For an average sized classroom, 4 speakers
are recommended
• Mount on walls, ceiling beams, or other
structure
• Place speakers as high up as possible
• Aim speakers down toward listeners’ faces.
• The farthest listener each speaker can
serve should be less than twice as far
away as the closest listener. (D2<2D
1
in diagram)
For optimal speaker placement, download our
sound field wizard software from our web
site at www.phonicear.com.
top view
D
2
D
1
D
2
front view
D
1
D
2
D
2
D
1
D
1
D
1
D
1
D
2
D
2
ceiling
wall
wall
ceiling
15
4747 230R Multi-Freq User Guide 4/22/05 3:09 PM Page 31
Page 28
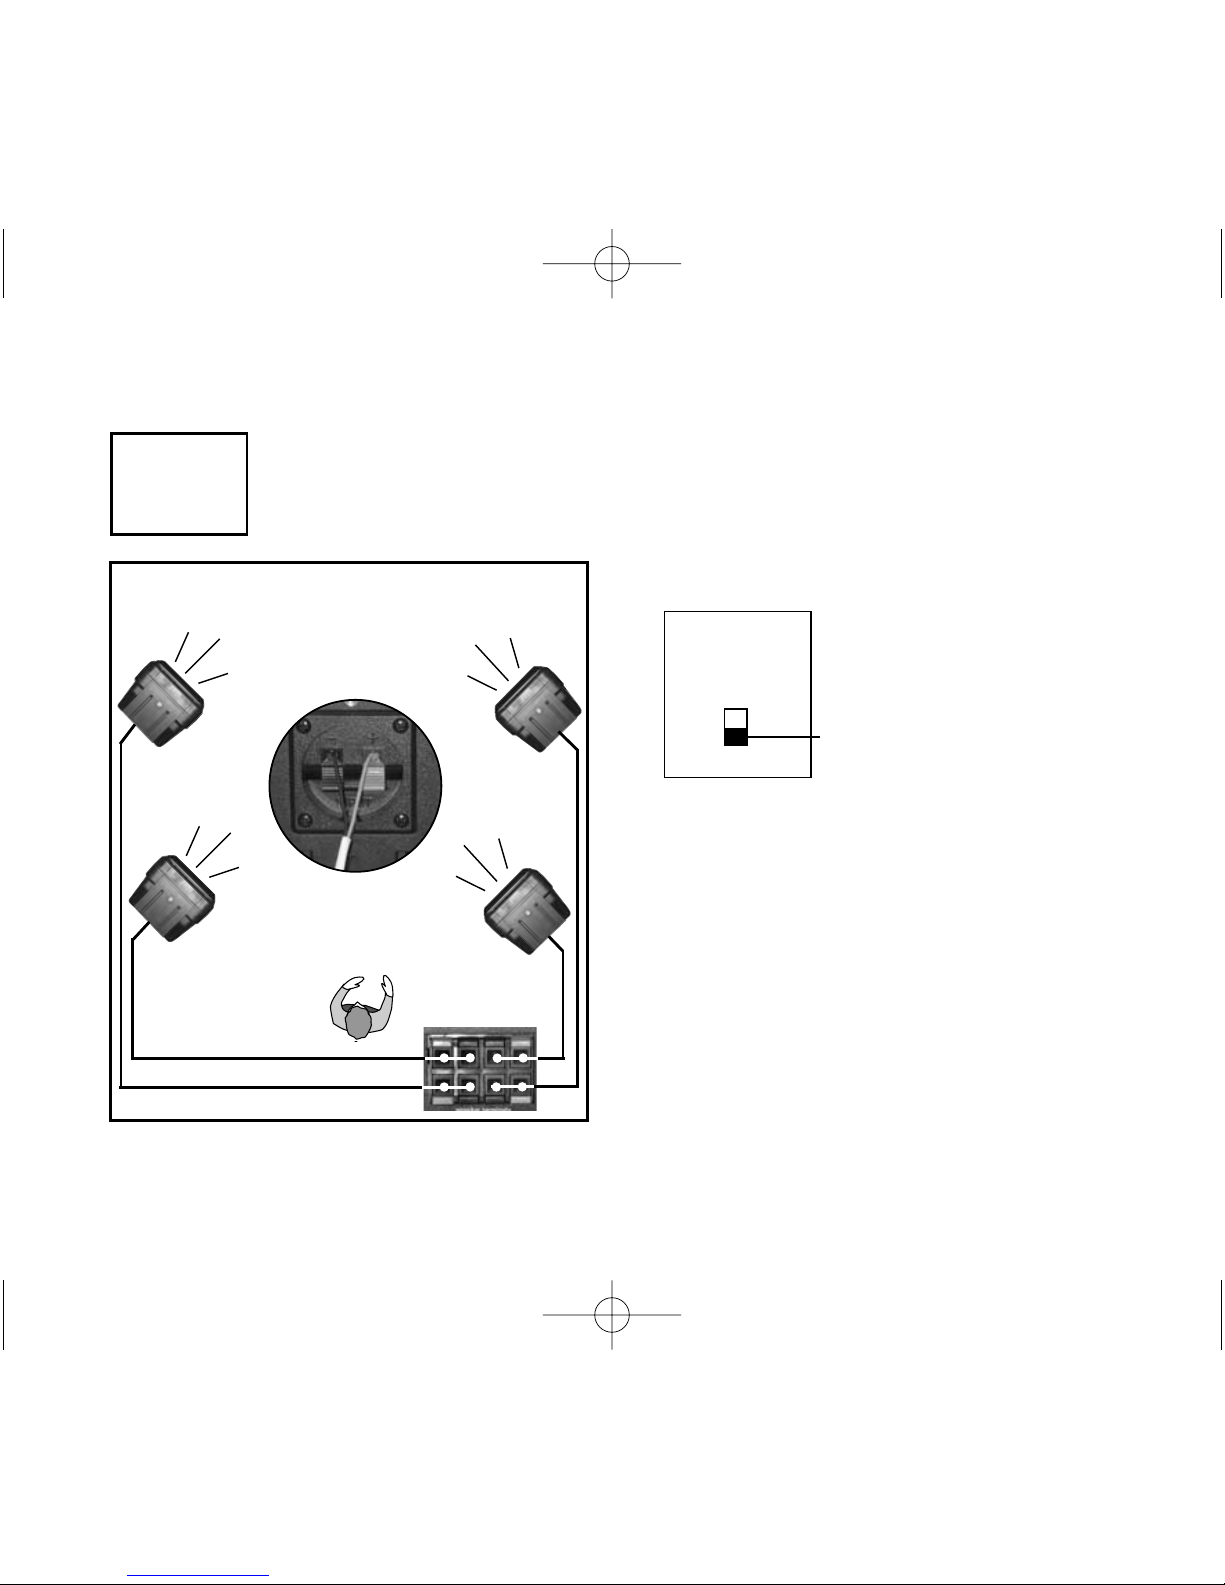
26
standard four-speaker setup
For other speaker connection options, see page 31
• For average-sized rooms (30 x 30 ft)
230R speaker
terminals
16a
number
of speakers
2
4
NOTE: When installing compact wall or
ceiling speakers, keep cord flush to wall
and away from foot traffic.
teacher
speaker cable hookup
(back of each speaker)
1
2
3
4
Verify the number of
speakers
switch is set
to 4 on back of 230R
• Sound will not come through until all
speakers have been hooked up.
4747 230R Multi-Freq User Guide 4/22/05 3:09 PM Page 32
Page 29
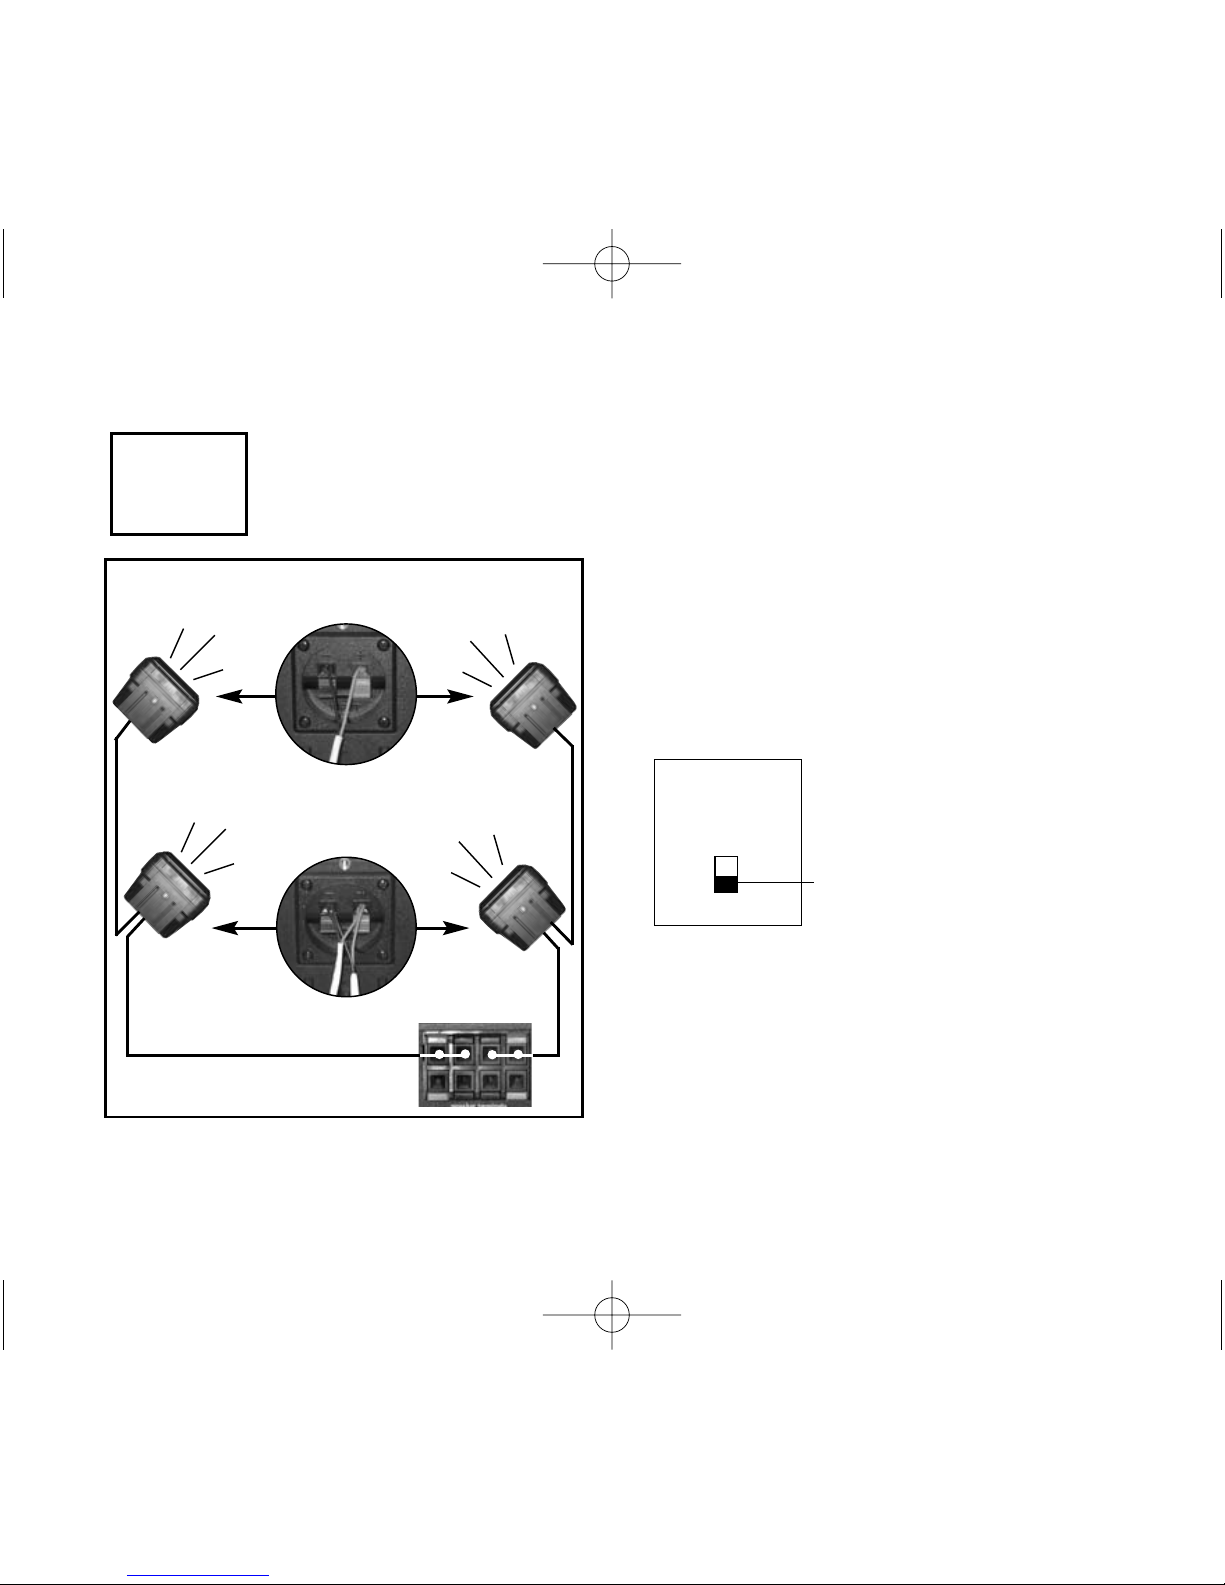
27
standard four-speaker daisy-chaining option
refer to advanced system setup section for advanced speaker
connection options
• Daisy-chaining allows setup with shorter
cable lengths
• For optimum performance, daisy chain
speakers in pairs: e.g. speakers 1-2, then
3- 4 rather than 1-2- 3 -4 separately
16b
number
of speakers
2
4
230R speaker
terminals
double speaker cable hookup
(back of speaker 1 & 3)
1
2
3
4
NOTE: Be sure to plug one speaker set
on right, and one speaker set on left side
of terminal.
Verify the number of
speakers
switch is set
to 4 on back of 230R
single speaker cable hookup
(back speaker 2 & 4)
4747 230R Multi-Freq User Guide 4/22/05 3:09 PM Page 33
Page 30
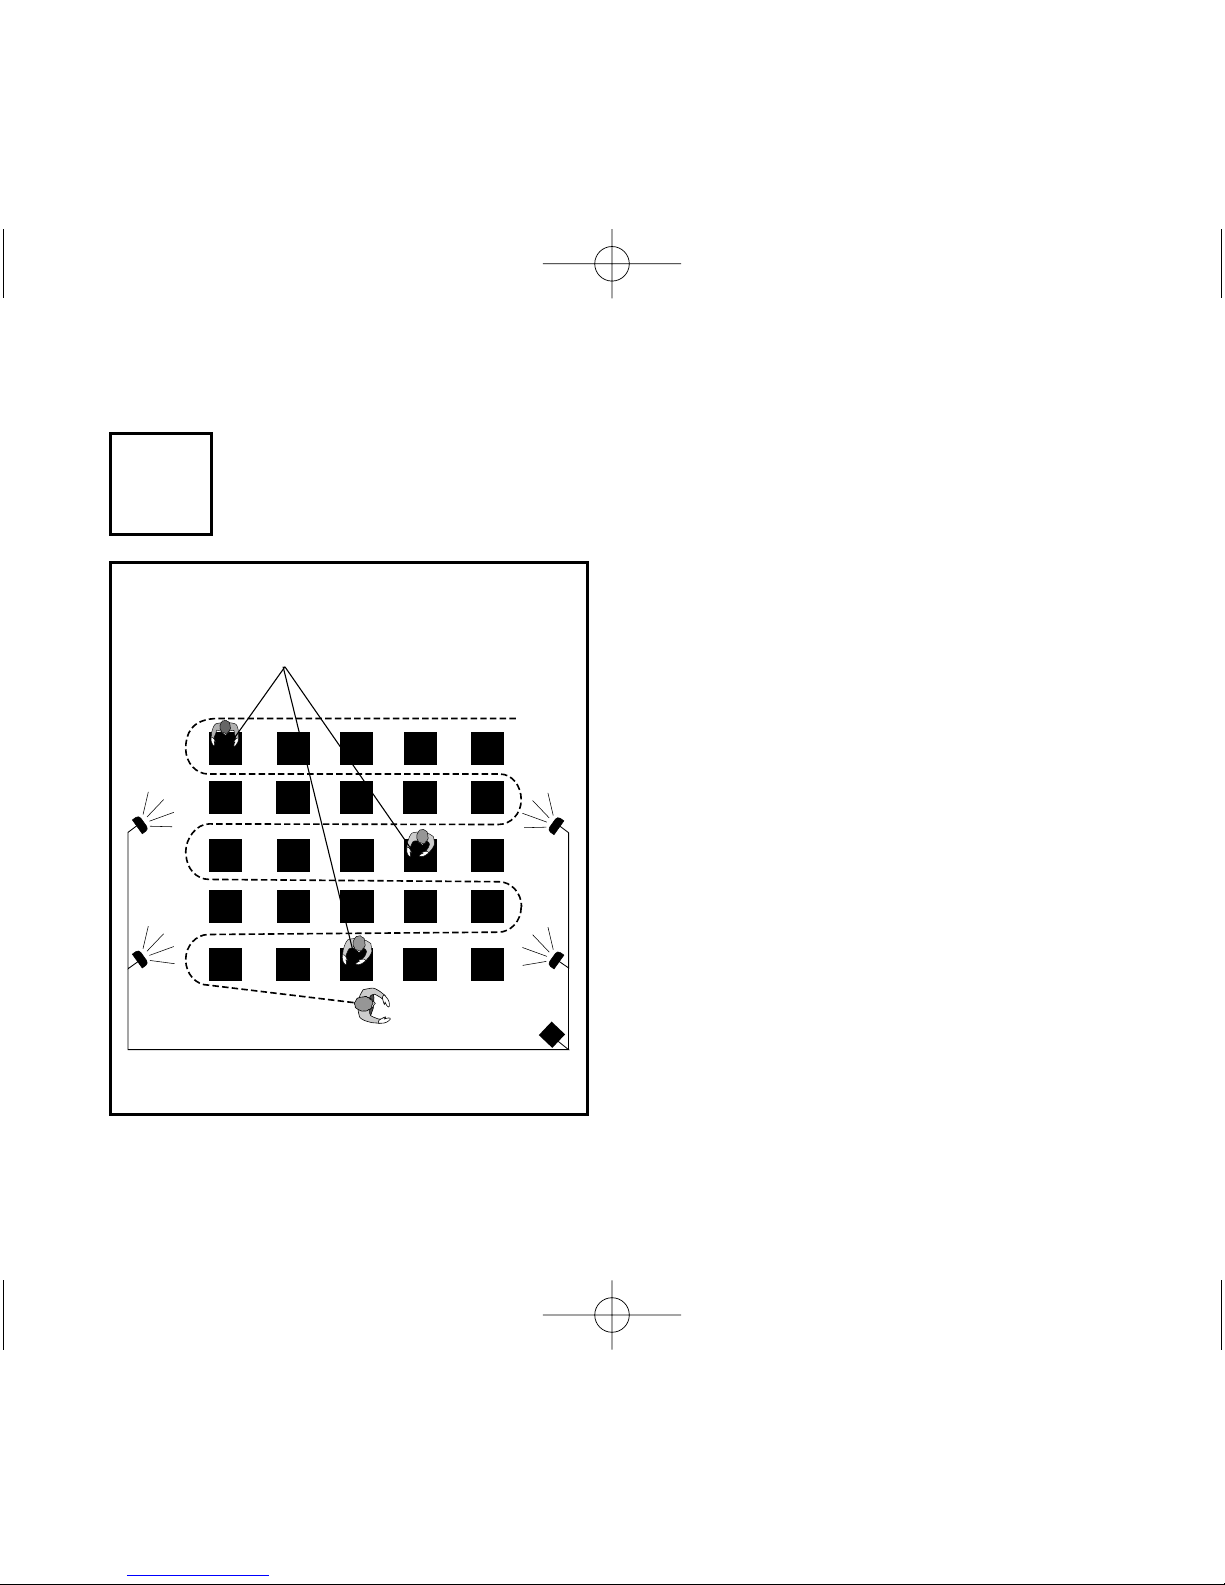
28
walk, talk, and listen to quality
(Initial setup only; reangle speakers towards listeners’ ears
if necessary.)
17
Ask another person to assess volume
levels from front and back of room
while you speak
top view
• Make certain that speakers are angled
down toward student seating area
• Adjust FM volume setting as necessary
• Refer to setting FM volume section of
user guide for instructions on how to
set volume
4747 230R Multi-Freq User Guide 4/22/05 3:09 PM Page 34
Page 31
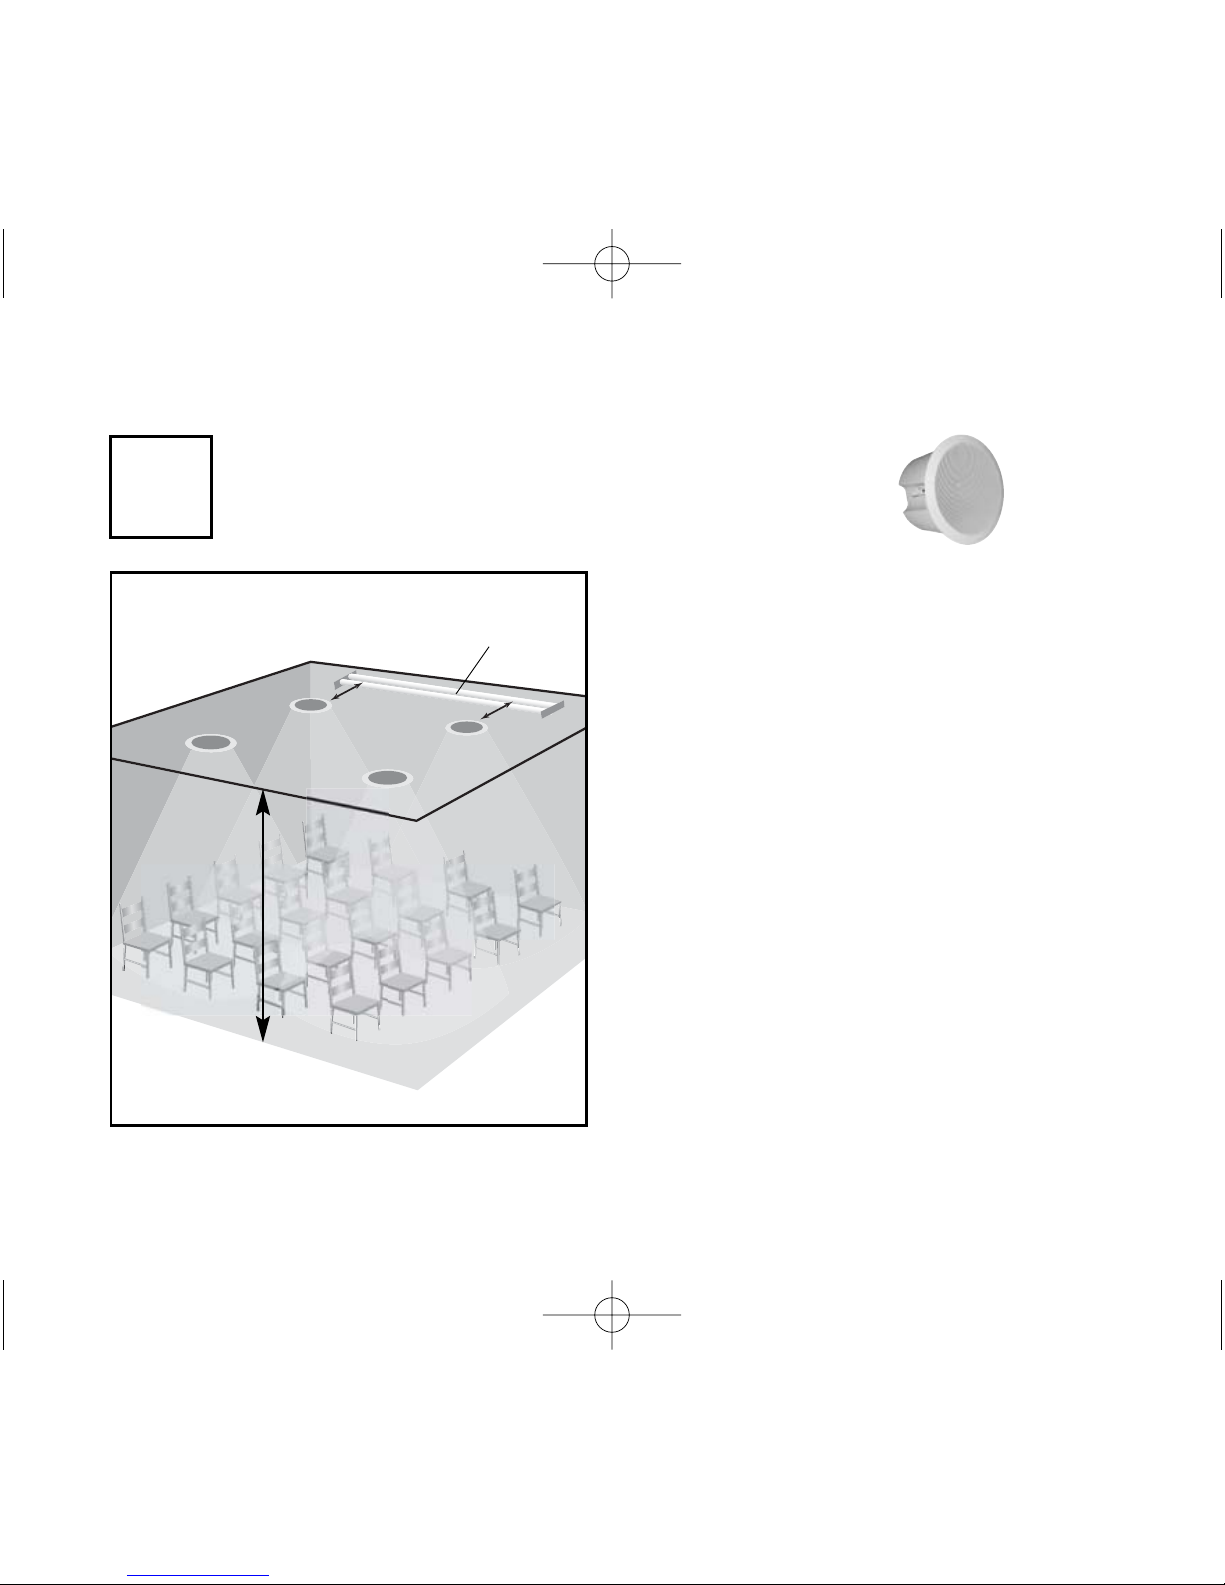
29
fluorescent
lighting transformer
>30cm /1ft
where to mount distributed ceiling speakers
• Space speakers evenly over listening area
• >3m/10ft minimum ceiling height
recommended
• >30cm/1ft distance from fluorescent
lighting transformer is recommended
18
>3m/10ft
4747 230R Multi-Freq User Guide 4/22/05 3:09 PM Page 35
Page 32
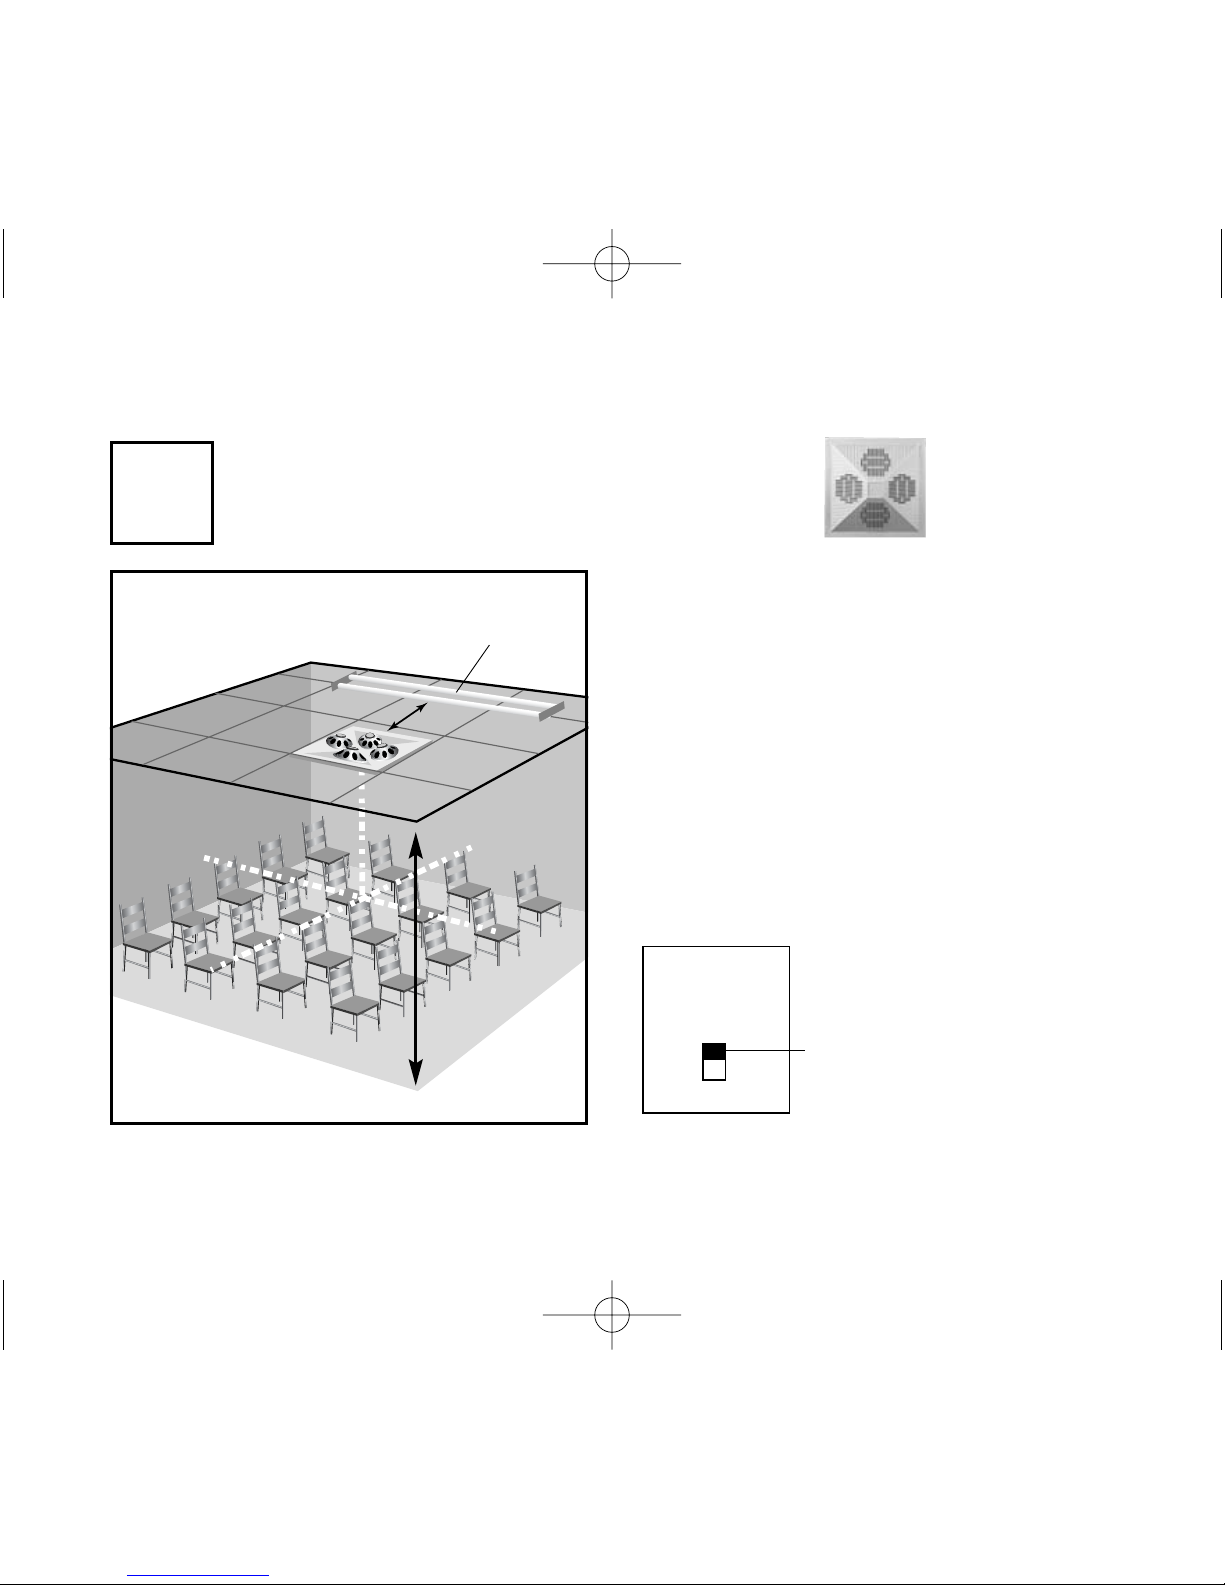
30
fluorescent
lighting transformer
>30cm /1ft
where to mount cluster ceiling speaker
• Center speaker over listening area
• >3.7m/12ft minimum ceiling height is
recommended
• >30cm/1ft distance from fluorescent
lighting transformer is recommended
19
>3.7m/12ft
number
of speakers
2
4
Set number of speakers
switch to 2 on back of 230R
4747 230R Multi-Freq User Guide 4/22/05 3:09 PM Page 36
Page 33
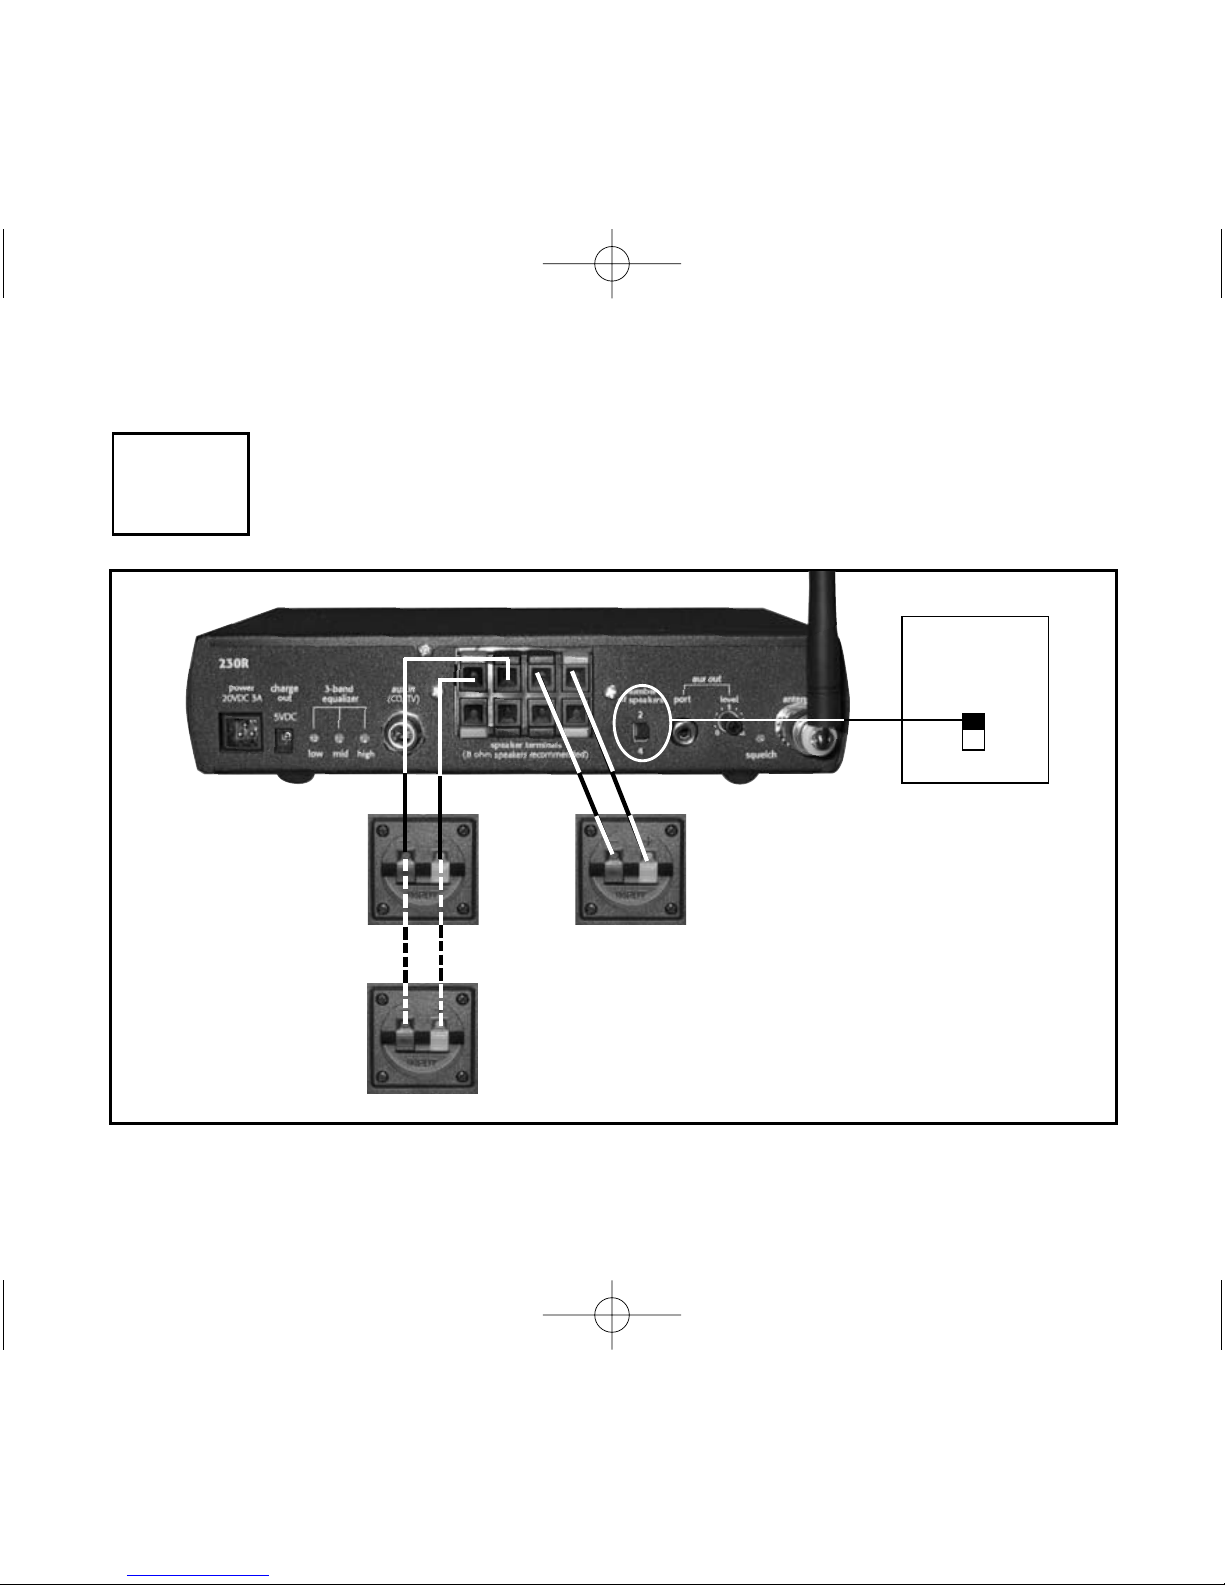
31
daisy-chaining with 3 speakers
230R back
compact speaker
input terminals
shown here
20a
1
Set number
of speakers
switch to 2
2
3
number
of speakers
2
4
advanced system setup
Be sure to connect
speaker wires to
the designated
terminals for best
performance and
sound distribution
4747 230R Multi-Freq User Guide 4/22/05 3:09 PM Page 37
Page 34
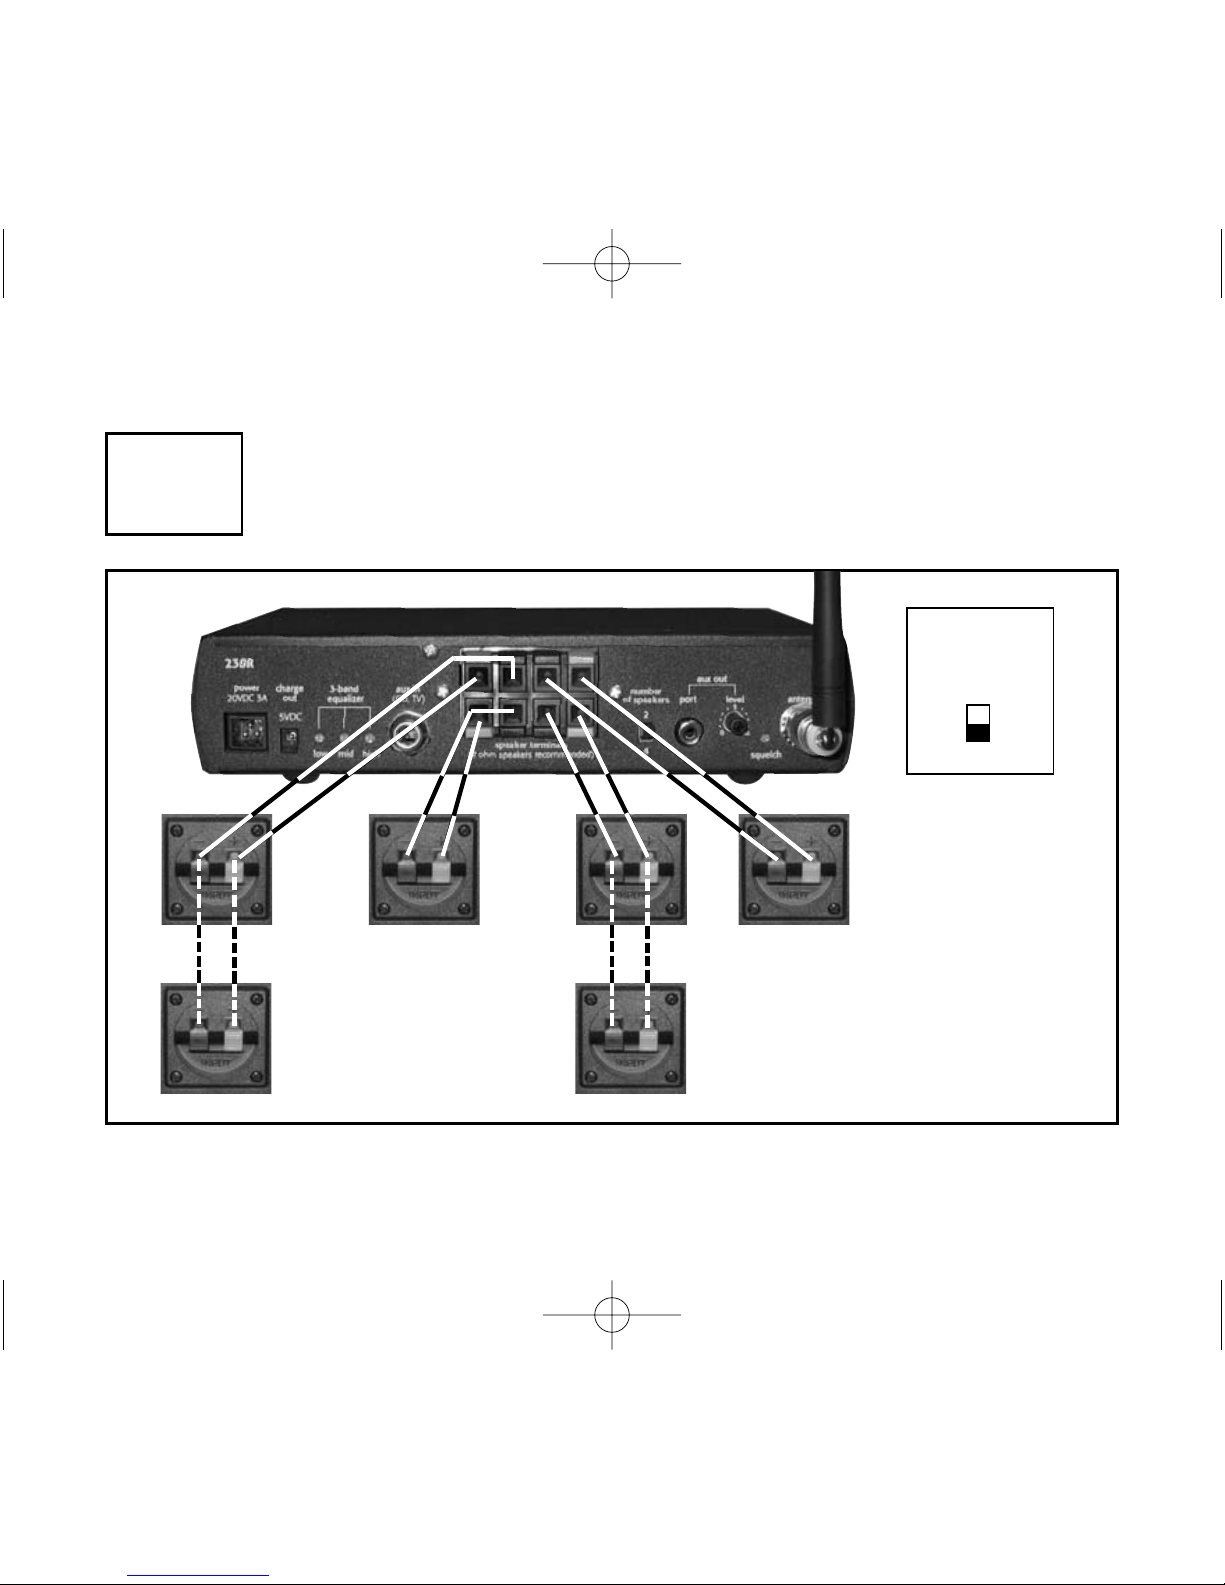
32
daisy-chaining with 6 speakers
230R back
compact speaker
input terminals
shown here
20b
number
of speakers
2
4
Set number
of speakers
switch to 4
Be sure to connect
speaker wires to
the designated
terminals for best
performance and
sound distribution
4747 230R Multi-Freq User Guide 4/22/05 3:09 PM Page 38
Page 35
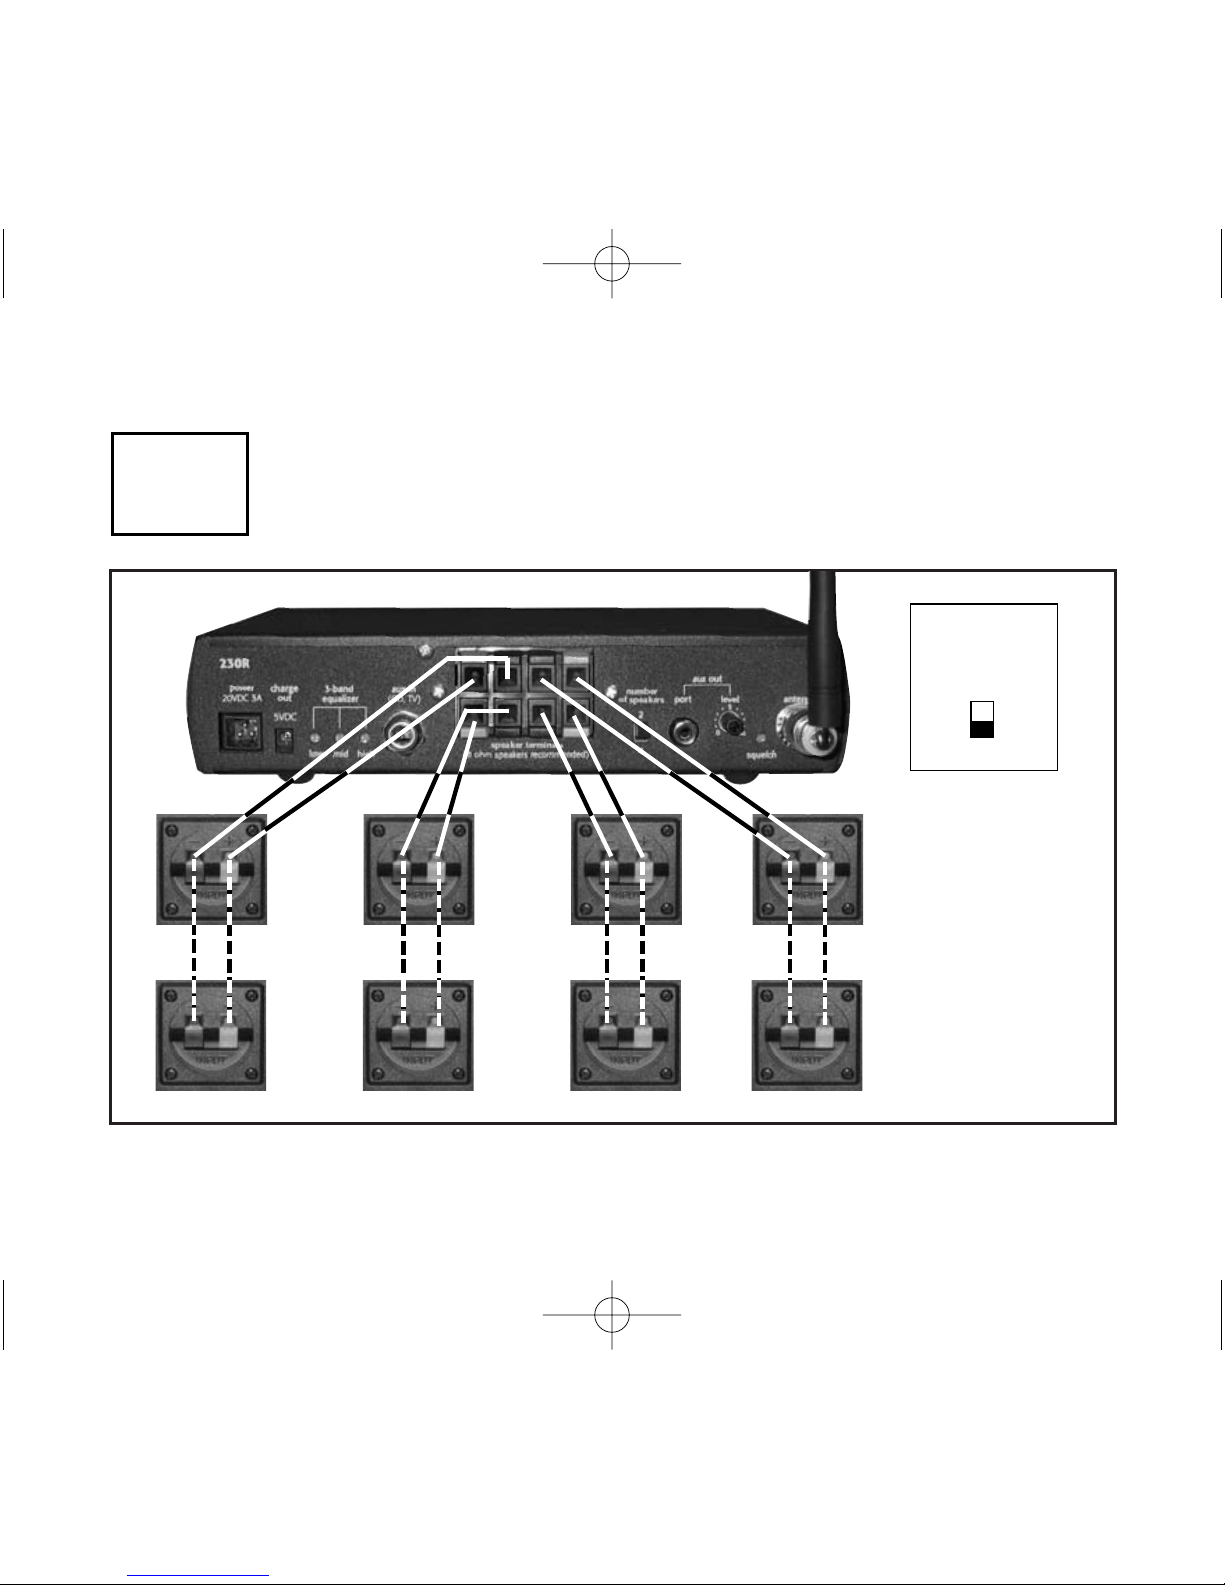
daisy-chaining with 8 speakers
230R back
compact speaker
input terminals
shown here
20c
Be sure to connect
speaker wires to
the designated
terminals for best
performance and
sound distribution
number
of speakers
2
4
Set number
of speakers
switch to 4
33
4747 230R Multi-Freq User Guide 4/22/05 3:09 PM Page 39
Page 36
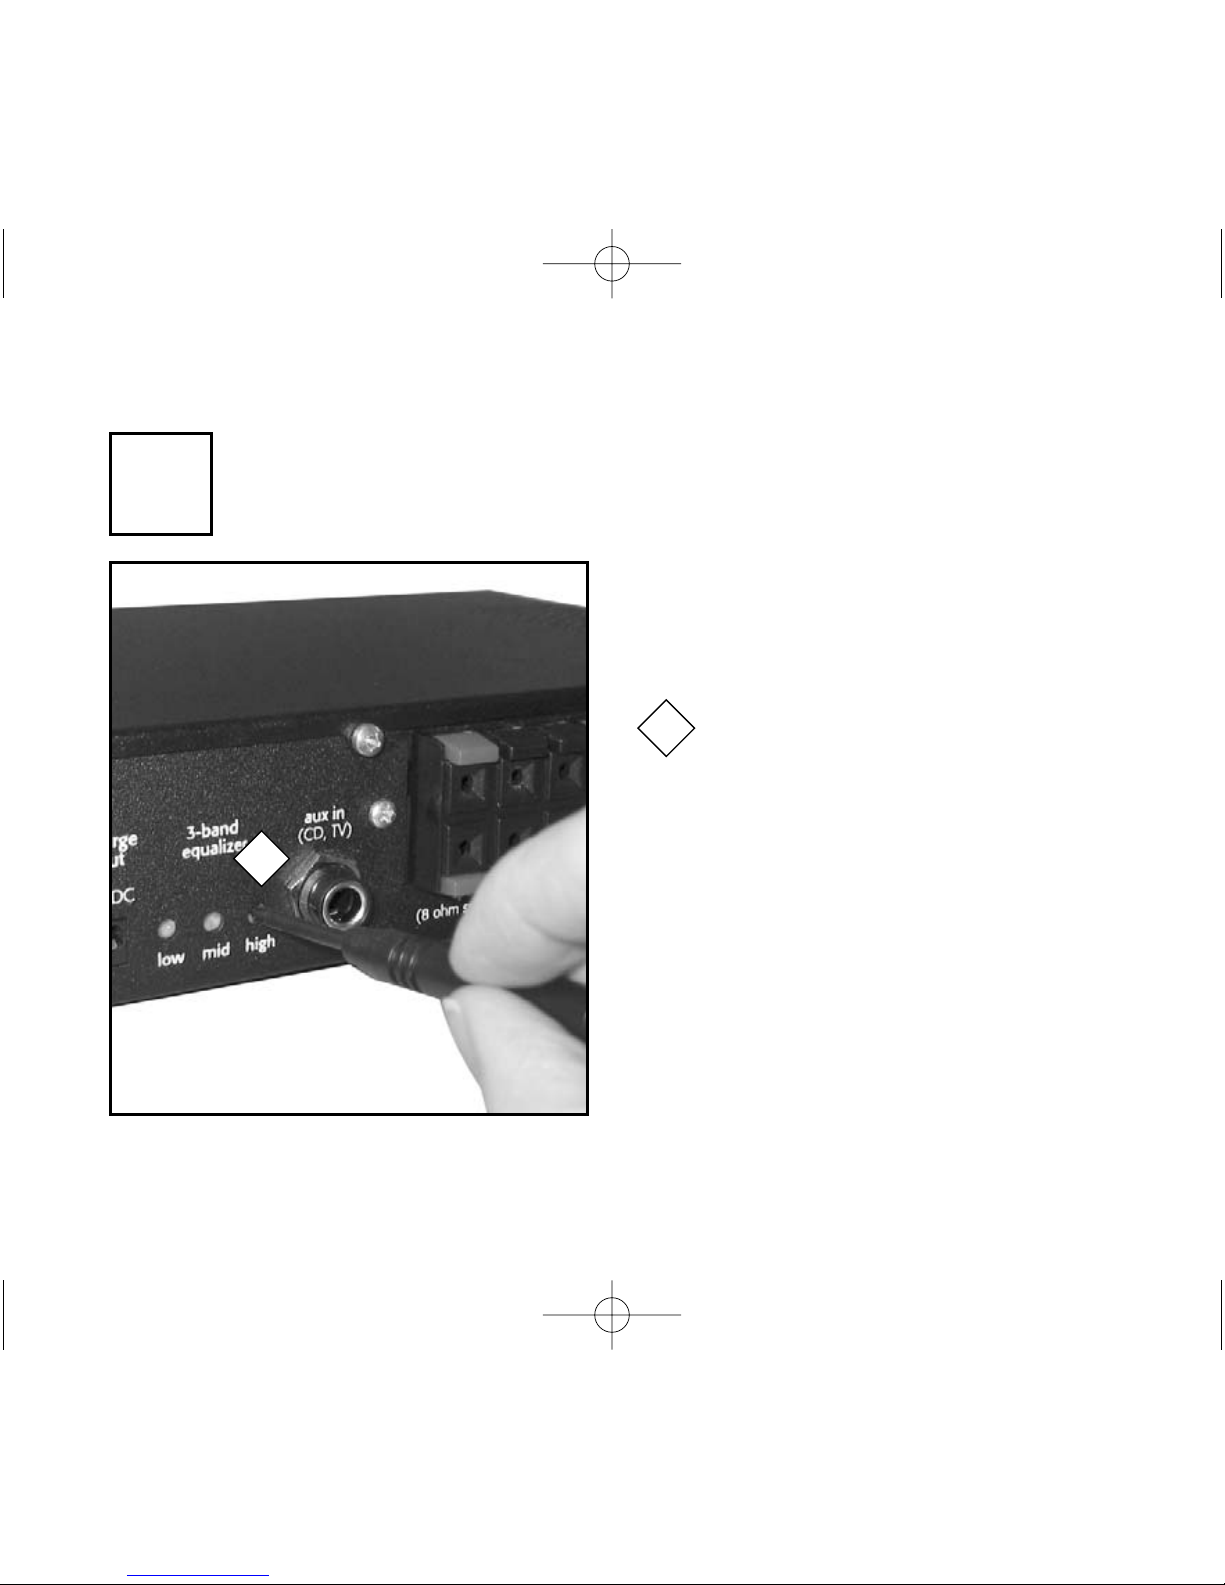
34
adjusting 3-band equalizer
(This setting should be adjusted by sound professionals ONLY)
21
Use screwdriver to adjust the low,
mid and high settings. Turn to the
right to add base, mid and high
tones. Turn left to decrease.
A properly adjusted equalizer optimizes the system’s sound quality and
reduces feedback.
Making improper adjustments could
result in a degradation in sound quality and performance.
1
1
ATTENTION: If you are not a sound professional, we do not recommend that you alter
the 3-band equalizer settings.
4747 230R Multi-Freq User Guide 4/22/05 3:09 PM Page 40
Page 37
35
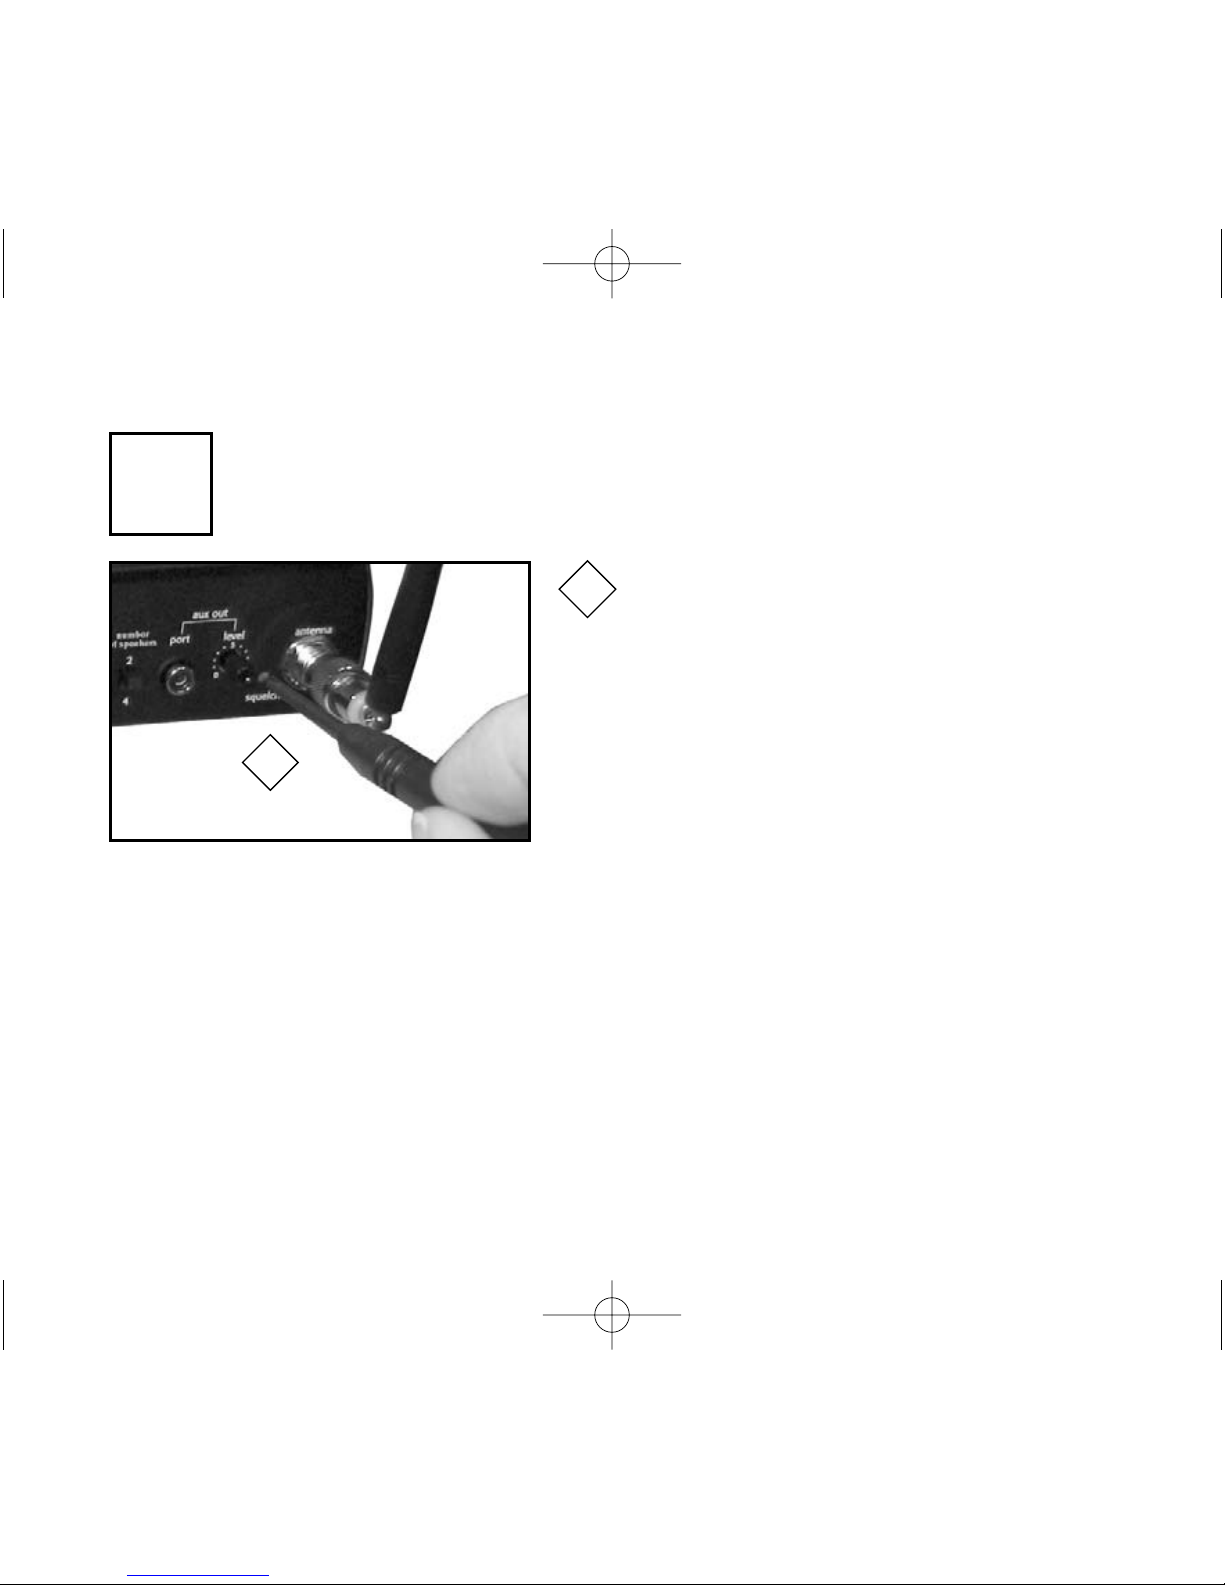
adjusting squelch
(This setting should be adjusted by sound professionals ONLY)
22
Using a screwdriver turn the control slightly to
the left (counter clockwise) to increase the system's range and to the right (clockwise) to
decrease the system's range.
1
The squelch setting increases or decreases the system’s range by disabling the receiver audio when
the transmitter signal is below the threshold point.
It also allows the ability to re-use a channel, pro-
vided that systems are installed more than 200ft
apart (indoors). For best results, ask someone to help you by wearing the transmitter and
walking away from the base station receiver towards the perimeters of the room. When you
begin to hear noisy static, you know you've reached the system's internal range limits.
Increase or decrease the range slightly, and re-test by repeating this step. (In most cases the
system's range will go well beyond the typical classroom.)
If noise or signal interference persists, make sure systems in adjacent classrooms are turned
off. Re-test range and set squelch for the minimum system range to reduce external interference. Contact Phonic Ear Service if extra assistance is required.
1
4747 230R Multi-Freq User Guide 4/22/05 3:09 PM Page 41
Page 38
36
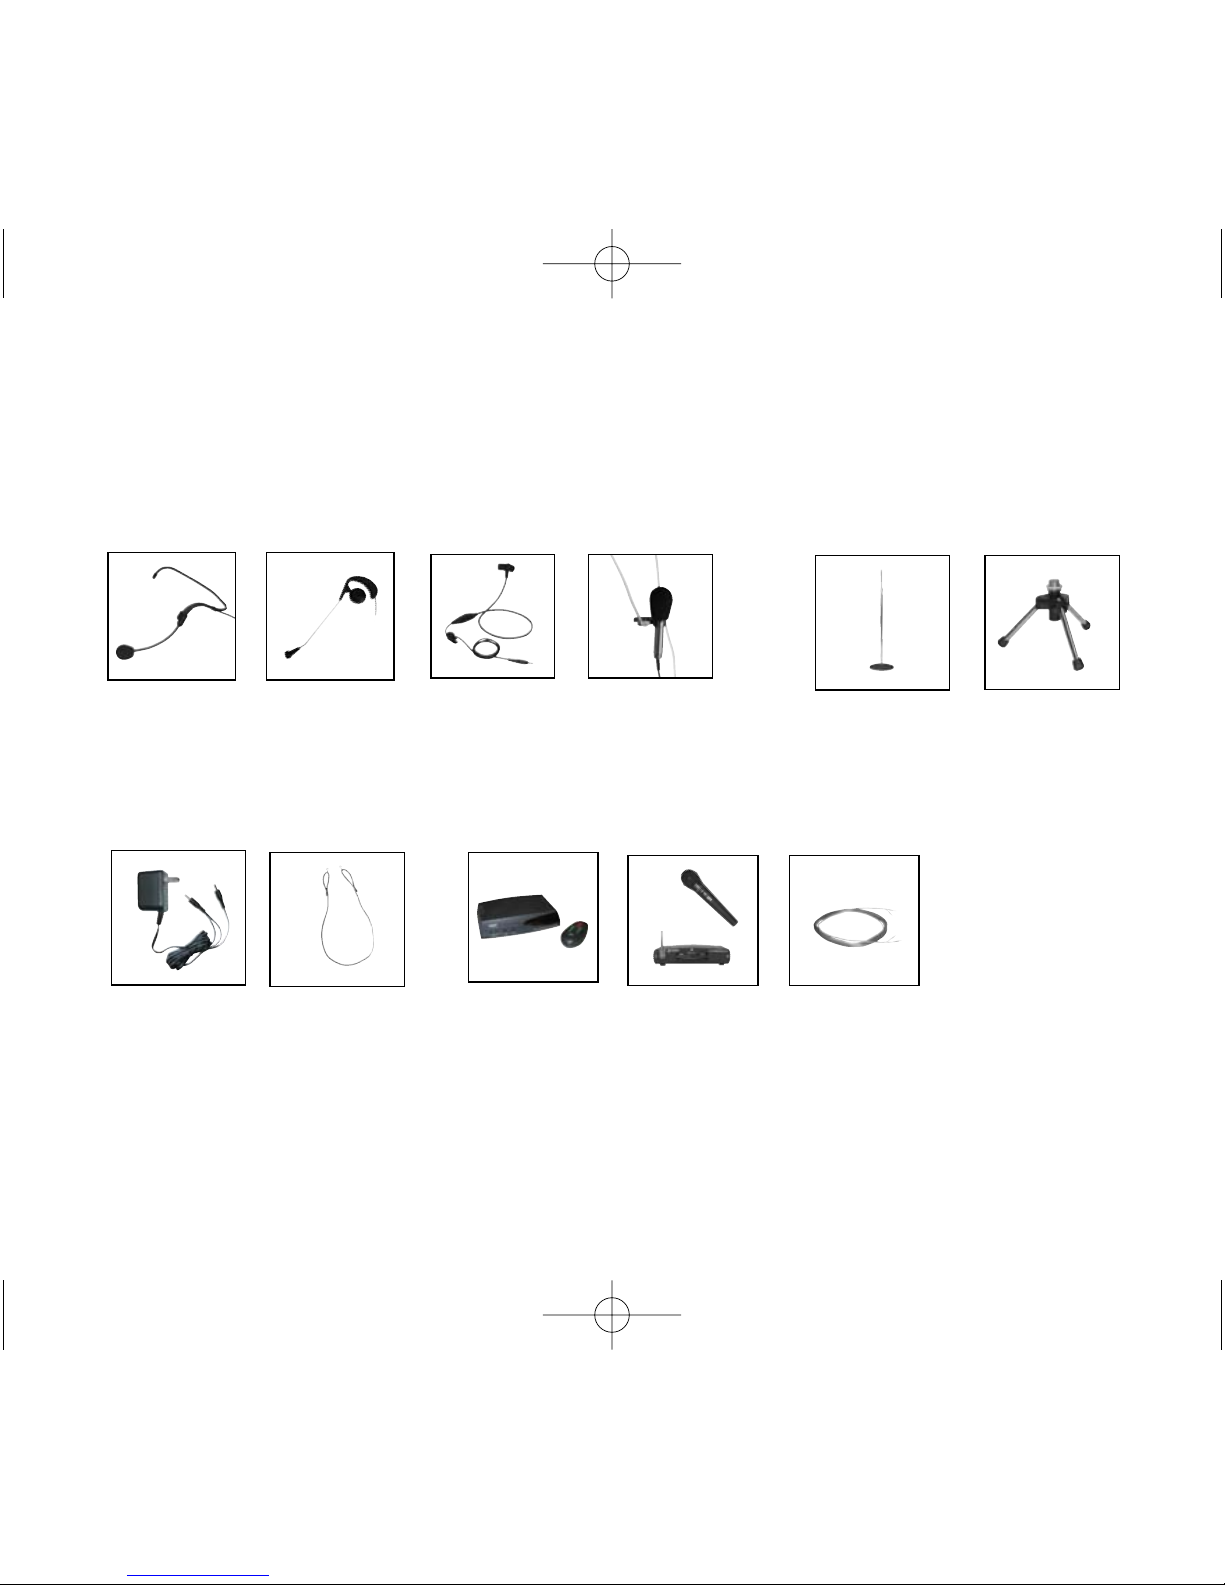
microphone styles
optional accessories
211
wireless microphone
system for teamteaching and student
pass-around use
AT0581
speaker wire
(Plenum rated,
24ft/7.3m, 48ft/14.6m,
60ft/18.3m lenths available)
AT0749
wall transformer/
charger for 330T
AT0512-BK
lavalier cord
AT0814
earhook microphone
AT0655
behind-the-neck
boom microphone
AT0291-L
directional microphone
with lavalier cord
transmitter accessories
AT0801
aux-box (adds four
additional audio
inputs)
AT0579
speaker floor stand
(requires AT0582
stand adaptor)
AT0816
FM collar microphone
with mute switch
receiver accessories
speaker accessories
AT0579-T
table-top stand
(requires AT0582
stand adaptor)
NOTE: Refer to part number cross-reference list
4747 230R Multi-Freq User Guide 4/22/05 3:09 PM Page 42
Page 39
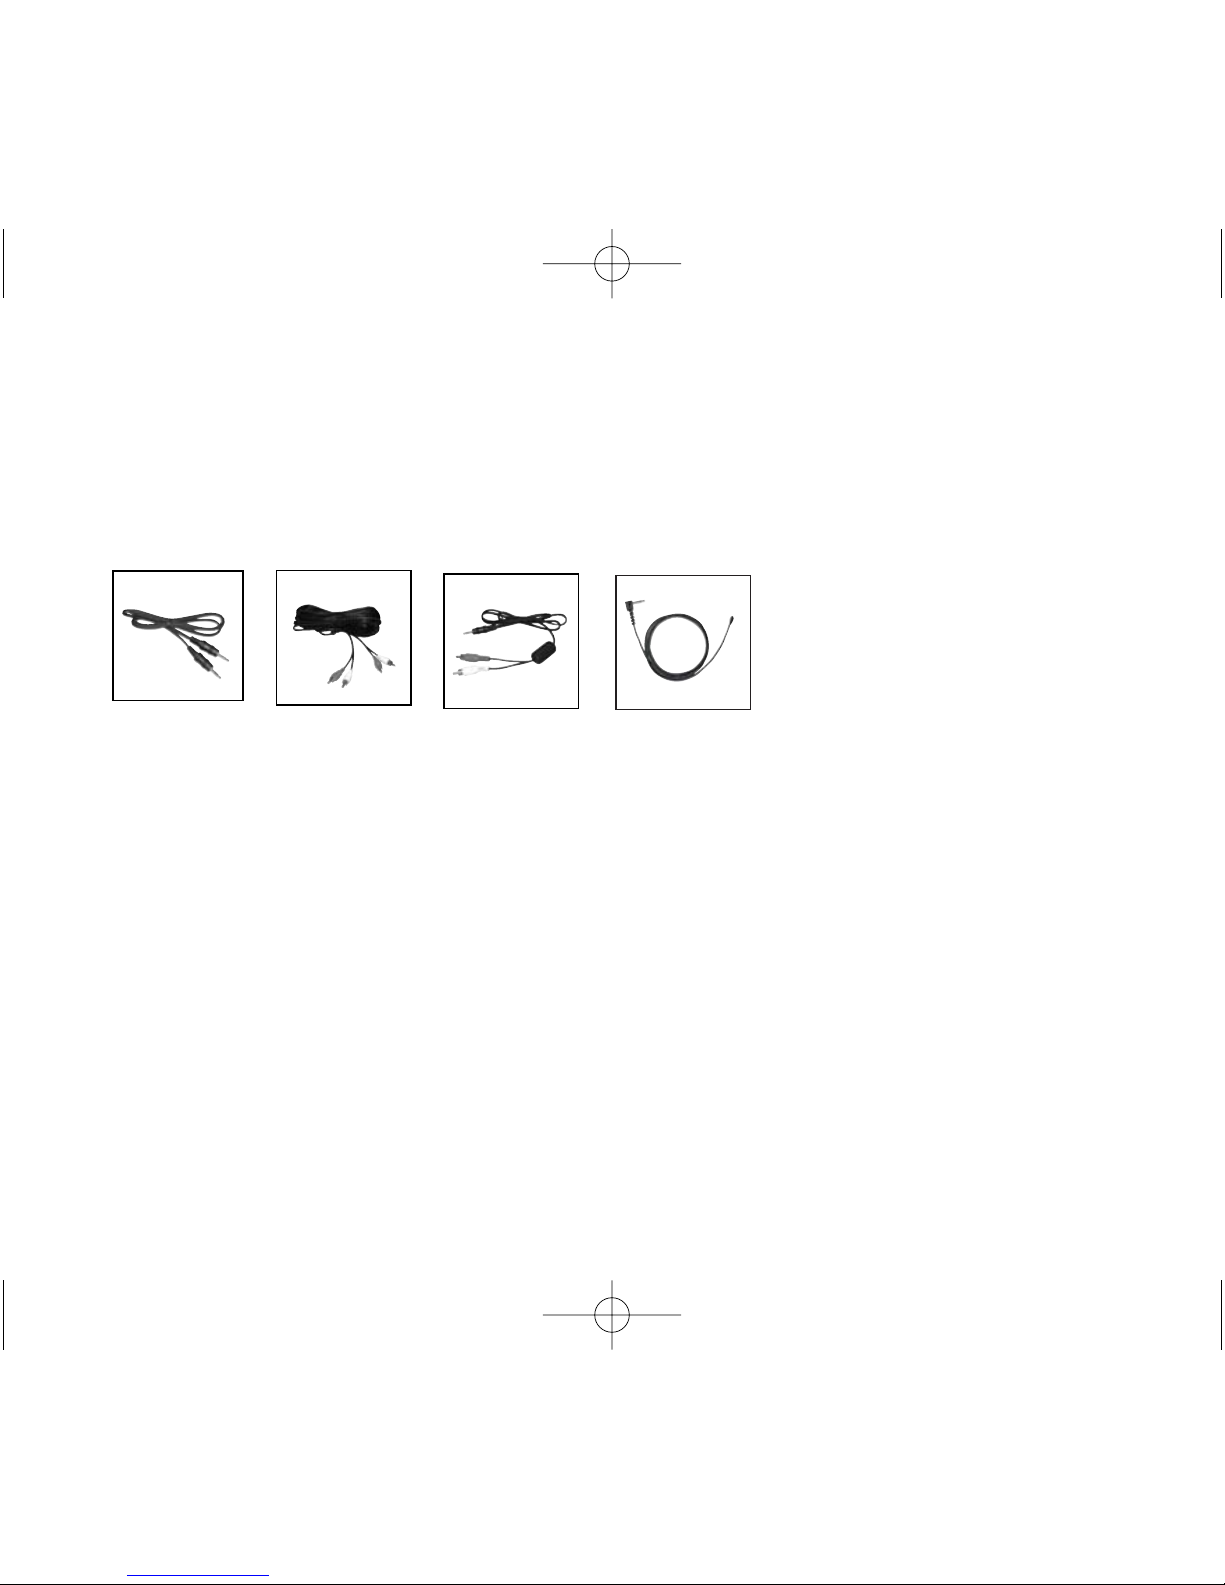
AT0529A
antenna (for use with
auxiliary input only)
384-01-210-08
aux-in adaptor cord
(3.5mm– 3.5mm)
330T to external
audio, TV, VCR,
DVD, computer, etc.
AT0702-25
aux-in adaptor cord
(dual RCA– dual RCA)
230R to external audio,
TV, VCR, DVD, etc.
auxiliary input adaptor cords
300-6332-107
aux-in adaptor cord
(3.5mm – dual RCA)
330T to external audio,
or team-teaching
37
optional accessories (cont’d)
NOTE: Refer to part number cross-reference list
4747 230R Multi-Freq User Guide 4/22/05 3:09 PM Page 43
Page 40
38
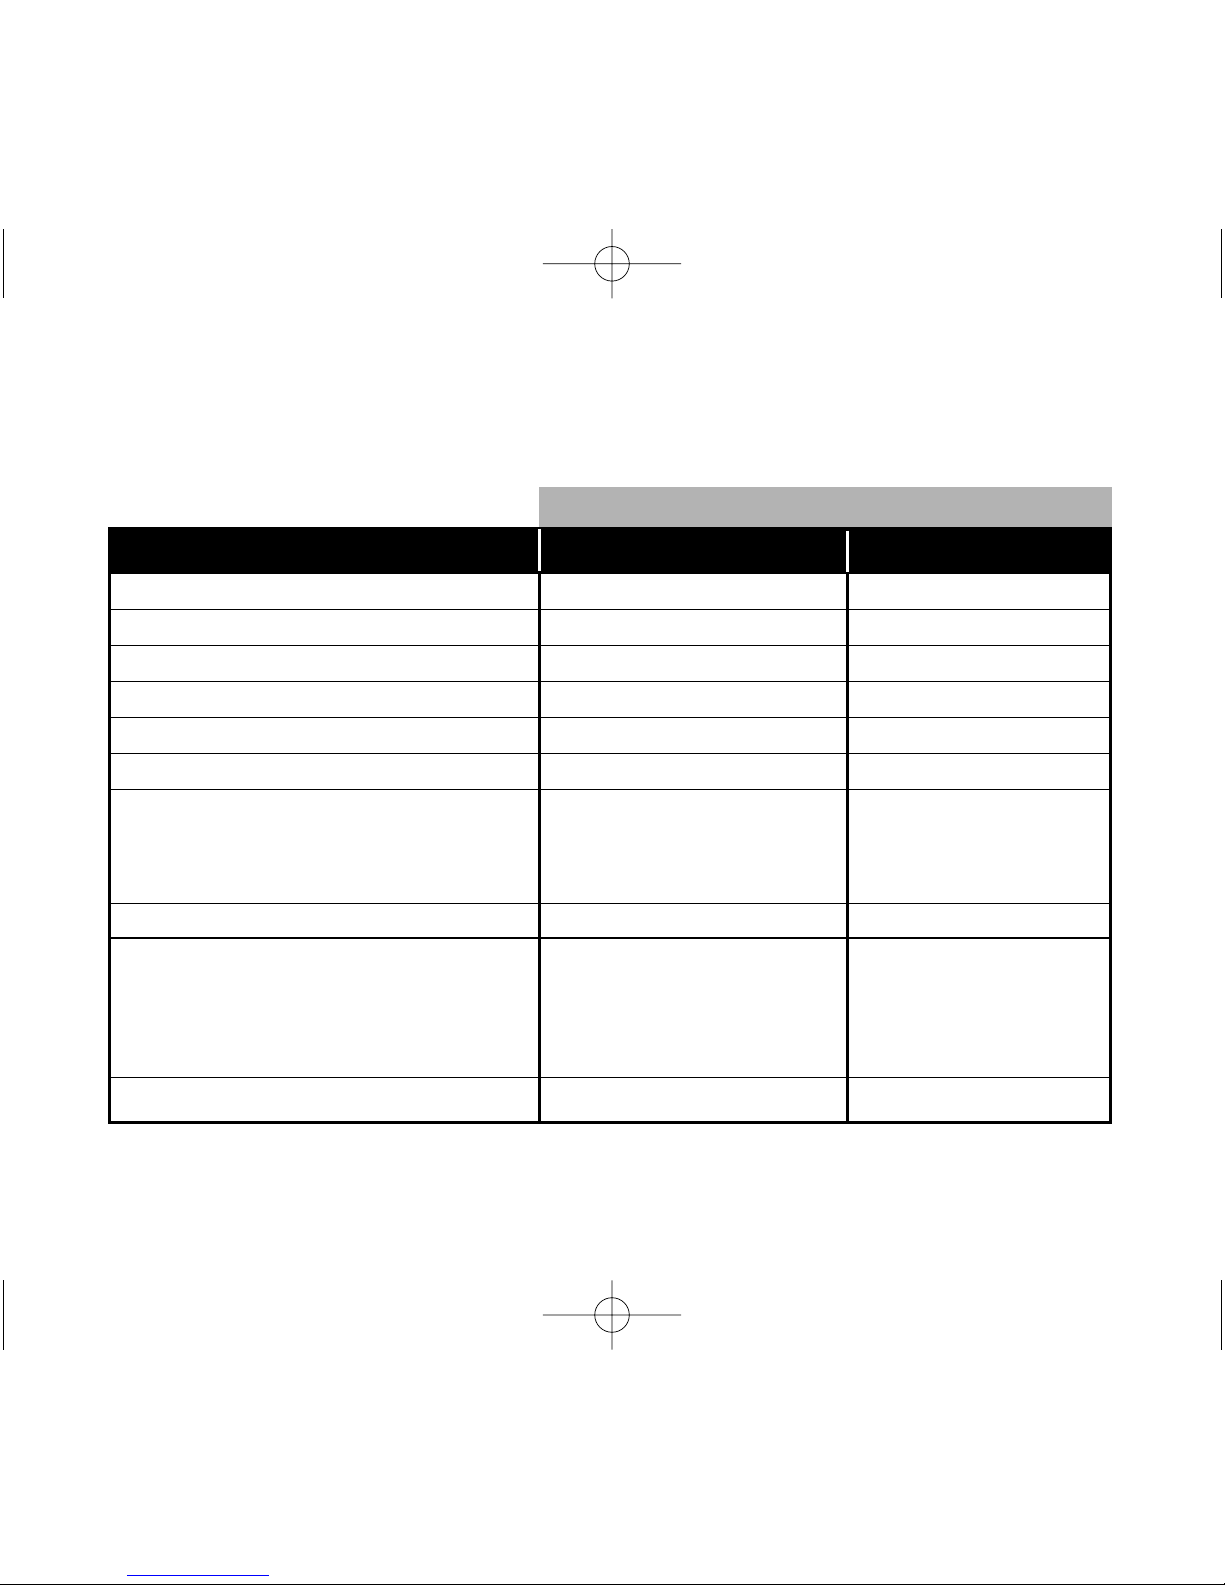
230R part number cross-reference list
Description Phonic Ear, Inc. (USA/Canada) Phonic Ear A/S (Intl.)
230R receiver 230R-216USA 202-00-001-00
330T body-worn transmitter 330T-216USAX
340T body-worn transmitter 340T-173 202-01-001-00
speaker (compact wall speaker) 470-2856-119 -470-2856-119
speaker (distributed ceiling speaker) AT0806 -AT0806
power supply 040-7402-105 890-88-004-00
AC power cord (US) AT0787
• England AT0787-EN -AT0787-EN
• Europe AT0787-EU -AT0787-EU
• Australia/New Zealand AT0787-AU -AT0787-AU
antenna AT0831 -AT0831
kit, plugs and cords (includes) 595-6440-101 890-88-005-00
• aux-out cable (RCA-3.5mm) included in above kit included in above kit
• aux-in adaptor plug (1/4in - dual RCA) included in above kit included in above kit
• aux-out adaptor plug (3.5mm - 2.5mm) included in above kit included in above kit
• charging cord (1.3mm - dual 1.3mm) included in above kit included in above kit
behind-the-neck boom microphone AT0655 -AT0655
part numbers
4747 230R Multi-Freq User Guide 4/22/05 3:09 PM Page 44
Page 41
39
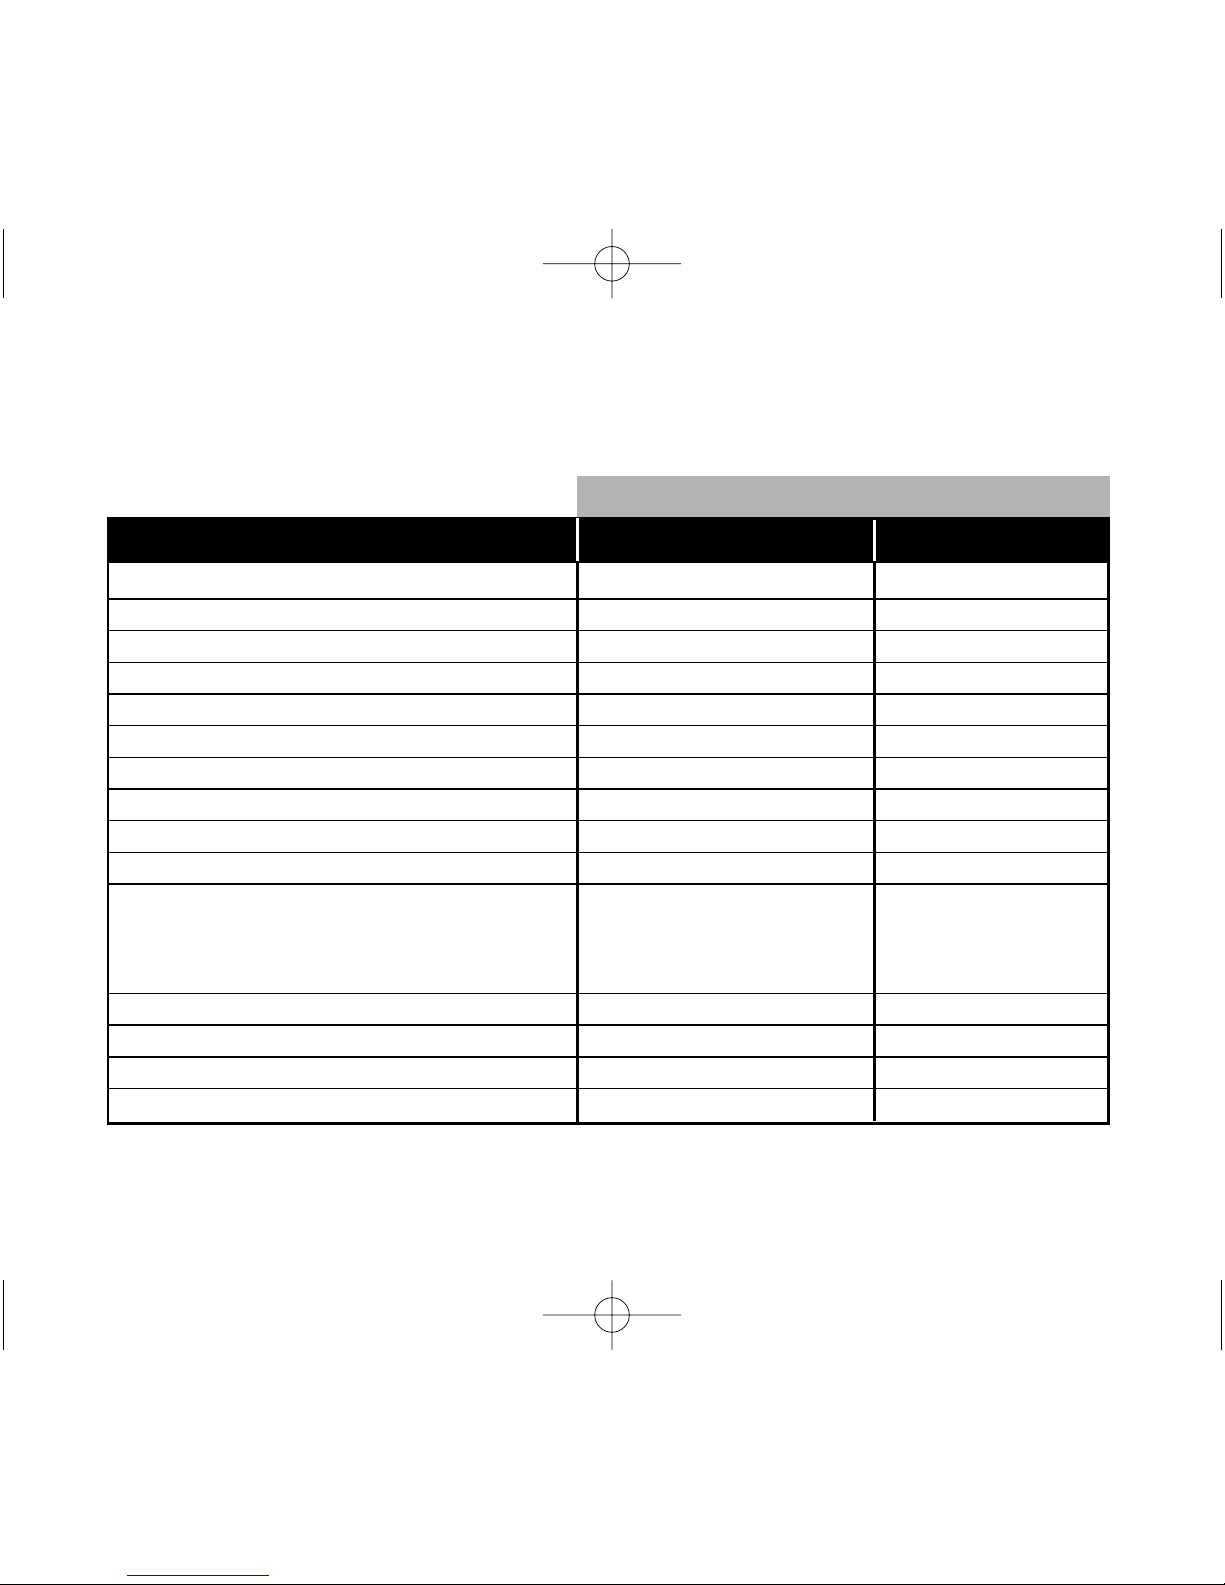
230R part number cross-reference list (cont’d)
Description Phonic Ear, Inc. (USA/Canada) Phonic Ear A/S (Intl.)
earhook microphone AT0814 -5-300-400-110
FM collar microphone AT0816 -AT0816
directional microphone with lavalier cord AT0291-L -AT0291-L
wall transformer (for 330T/340T charging) 040-7150-105 890-88-051-00
lavalier cord AT0512-BK -AT0512-BK
aux-box (4 audio input device) AT0801 -AT0801
wireless mic system (team teach/pass around mic) 211 NA
aux-in adaptor cord (3.5mm-3.5mm) 384-01-210-08 384-01-210-08
aux-in adaptor cord (dual RCA - dual RCA, 25ft) AT0702-25 -AT0702-25
aux-in adaptor cord (3.5mm - dual RCA) 300-6332-107 384-88-005-00
speaker wire (plenum rated)
• 24ft/7.3m length AT0581-24 -AT0581-24
• 48ft/14.6m length AT0581-48 -AT0581-48
• 60ft/18.3m length AT0581-60 -AT0581-60
antenna, auxiliary AT0529A -AT0529A
speaker floor stand AT0579 -AT0579
table-top speaker stand AT0579-T -AT0579-T
230R user guide/instructions for use 821-6440-107 921-00-310-00
part numbers
4747 230R Multi-Freq User Guide 4/22/05 3:09 PM Page 45
Page 42

40
no FM reception (green FM indicator
light on front of receiver is not on)
• Verify the receiver is turned on
• Verify the frequency number on the receiver
matches the frequency number on transmitter
• Verify that receiver antenna is connected
weak sound from speaker(s)
• Make sure AT0655 boom microphone (or
other microphone) is being worn correctly
•
Increase FM and/or Aux Vol control
• Reposition the microphone closer to the
speaker’s mouth
• Check that none of the speakers are blocked
or covered
• Verify that the speaker wires are properly con-
nected to 230R speaker terminals (reinsert each
one deep into terminal socket)
• Reposition speakers closer to the listeners
troubleshooting
4747 230R Multi-Freq User Guide 4/22/05 3:09 PM Page 46
Page 43

41
troubleshooting (cont’d)
receiver is receiving a signal but no
sound is coming from speaker
• Verify microphone is connected properly to
transmitter and is working correctly
• Confirm that transmitter mute switch is in
off position (un-depressed)
feedback from speaker(s)
• Turn down the volume on the 230R receiver
• Reposition mic closer to mouth
• Make sure the person wearing the transmitter is
not too close to the speaker(s)
• Make sure AT0655 boom microphone (or
other mic) is being worn correctly
speaker(s) is picking up FM interference or hum
• Check to make sure no other wireless systems
are operating on similar frequencies
• Check to make sure the system is placed more
than 6ft from a computer
• Check to make sure metal objects are not
placed too close to transmitter or speaker(s)
(i.e. jewelry, metal shelves)
4747 230R Multi-Freq User Guide 4/22/05 3:09 PM Page 47
Page 44

42
caring for your system
cleaning
Clean as needed, using a soft, damp cloth.
other important notes
• Protect your sound field system from excessive
moisture, heat, and mechanical shocks.
• Clean with a soft damp cloth.
• The case bottom and top of the 230R and the
040-7402-105 receiver power supply can get
warm under normal operation.
4747 230R Multi-Freq User Guide 4/22/05 3:09 PM Page 48
Page 45
43
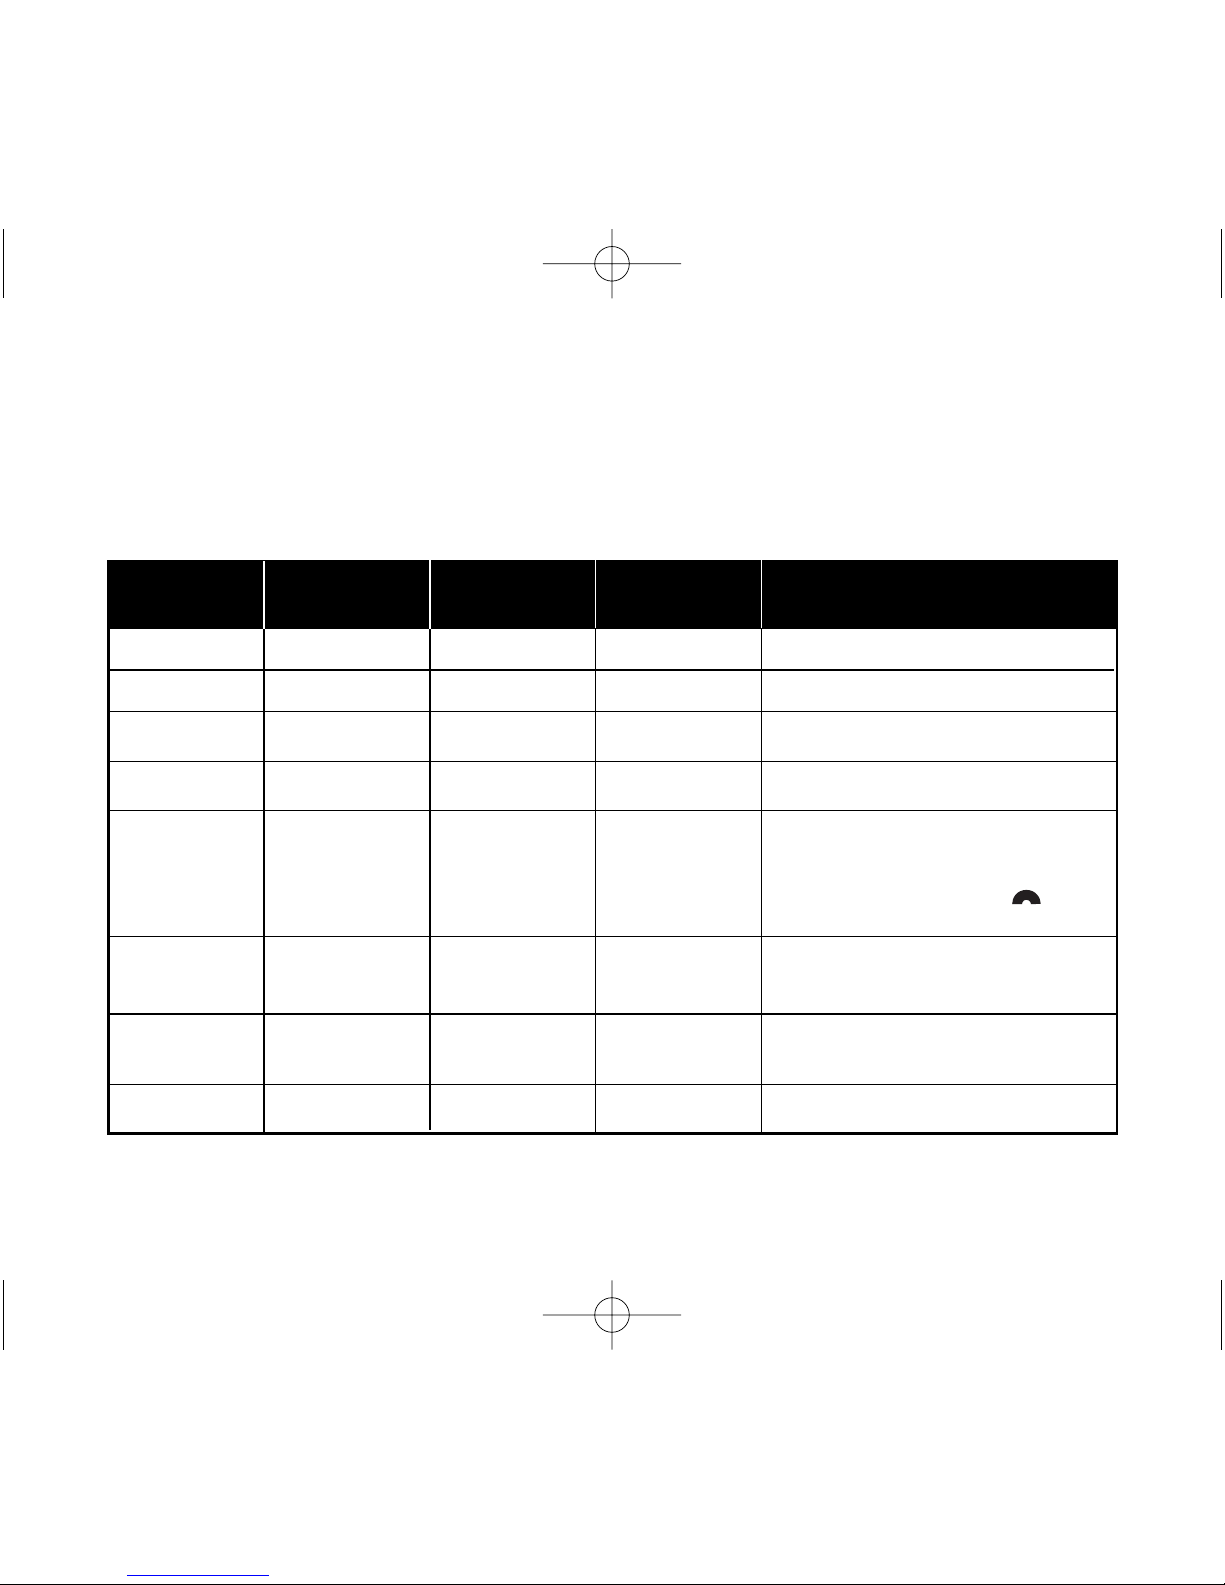
transmitters that are compatible with the 230R receiver
transmitter
compatible performance accessory
comments
rating needed
a) Lexis requires the use of AT0655R boom mic
b) may require use of external antenna for better
range (389-02-120-02)
c) set microphone to omni mode
d) set sensitivity level to high
330T- 216
✔ ★★★★
none
340T-173 ✔ ★★★★ none
300TS-216
✔ ★★★★
none
Sprite
300TE-173
✔ ★★★★
none
Easy Listener
Lexis transmitter
✔ ★★★
✔
(as mic)
216 & 173
Phonak
Handymic TX3 N/A N/A N/A
(as mic)
Phonak
✔ ★★★ ✔
Campus S TX5
Phonak
✔ ★★★ ✔
MicroVox TX2
a) omni mic has extreme feedback issues
b) recommend use of external boom mic
from Phonak
recommend boom mic
a) built-in mic has high level of feedback
b) requires use of external mic, which the
Handymic will not accommodate
★★★★ = most compatible
(no adaptor
cord required)
4747 230R Multi-Freq User Guide 4/22/05 3:09 PM Page 49
Page 46

44
Frontrow Tempo channel numbers and corresponding frequencies
216MHz (U.S. & Canada)
169-176MHz (EU)
U.S. & Canada
CH FREQUENCY
41 216.025
42 216.075
43 216.125
44 216.175
45 216.225
46 216.275
47 216.325
48 216.375
49 216.425
50 not available
51 216.525
52 216.575
53 216.625
54 216.675
55 216.725
56 216.775
57 216.825
58 216.875
59 216.925
60 216.975
total: 19
United Kingdom
CH FREQUENCY
13 173.3500
15 173.4000
17 173.4500
21 173.5000
24 173.5500
25 173.6000
27 173.6500
29 173.7000
30 173.7500
32 173.8000
34 173.8500
35 173.9000
36 173.9500
37 174.0000
38 174.0500
40 174.1000
42 174.1500
44 174.2000
45 174.2500
47 174.3000
48 174.3500
CH FREQUENCY
50 174.4000
52 174.4500
53 174.5000
54 174.5500
55 174.6000
57 174.6500
59 174.7000
60 174.7500
62 174.8000
63 174.8500
65 174.9000
66 174.9500
67 175.0000
71 175.0500
total: 35
4747 230R Multi-Freq User Guide 4/22/05 3:09 PM Page 50
Page 47

45
Frontrow Tempo channel numbers and corresponding frequencies (con-
New Zealand
CH FREQUENCY
A1 173.0000
A2 173.0500
A3 173.1000
A4 173.1500
A5 173.2000
A6 173.2500
A7 173.3000
13 173.3500
15 173.4000
19 173.4650
23 173.5450
26 173.6400
28 173.6950
31 173.7550
91 173.8125
33 173.8250
35 173.9000
36 173.9500
93 173.9625
69 173.9900
37 174.0000
total: 21
Australia
CH FREQUENCY
13 173.3500
15 173.4000
19 173.4650
23 173.5450
26 173.6400
28 173.6950
31 173.7550
91 173.8125
35 173.9000
36 173.9500
37 174.0000
38 174.0500
41 174.1200
77 174.1750
86 174.2250
87 174.2750
78 174.3250
88 174.3750
89 174.4250
79 174.4750
90 174.5250
CH FREQUENCY
55 174.6000
57 174.6500
59 174.7000
61 174.7700
63 174.8500
65 174.9000
66 174.9500
67 175.0000
94 175.5000
95 175.6000
2 175.7000
9 175.8000
97 175.8500
10 175.9500
11 176.0000
total: 36
For a complete list of available
channels in other countries, please
contact Phonic Ear International.
169-176MHz (EU)
4747 230R Multi-Freq User Guide 4/22/05 3:09 PM Page 51
Page 48
46
product specifications
receiving frequency 169-176MHz, synthesized (International)
216MHz, synthesized (U.S./Canada)
frequency stability ±500Hz 0Oto 50O C
modulation FM narrow-band
AF frequency response 20Hz -20kHz, -3dB (Aux in)
70Hz -10kHz, -3dB (FM in)
power output 14W into 8Ω/28W into 4Ω
auxiliary input level 300mV
rms
(-10dBV) 0.25in stereo
auxiliary output 0-1V
rms
adjustable via rear panel, RCA
aux input impedance 47kΩ
FM signal-to-noise > 63dB, A weighted
THD
< 3% @ 1kHz maximum output
nominal deviation ±5kHz
maximum deviation ±10kHz
squelch RSSI-type
squelch level adjustable via rear panel
power supply 20VDC @ 3A
charge port 5VDC, 200mA
base station receiver: 230R
user controls (front) on/off, FM volume, Aux volume,
OptiVoice, channel up/down
installer controls 3-band equalizer, squelch, speaker
configuration selector
displays 2 digit channel LED display and
LED for “FM signal”
dimensions (
WxHxD
) 21.9 x 5.4 x 16.2 cm/
8.6 x 2.1 x 6.4 in
weight 1.11kg/2.45lb
case steel, powder coat finish
NOTE:
This product may only be used in countries in which
the preset frequency range has been approved. The
approved country’s frequency range will be pre-set by
the factory for the original destination country of
each product. Please contact Phonic Ear to verify the
frequency approvals before traveling with the product
to a foreign country other than its original destination.
4747 230R Multi-Freq User Guide 4/22/05 3:09 PM Page 52
Page 49

47
warranty
time period of warranty
This warranty will go into effect upon the date
of purchase and will stay in effect as long
as the instrument remains the property of the
original owner. F
RONTROW TEMPO
™
has a 3-year
warranty.
what is covered by this warranty
Any electronic component, which because of workmanship, manufacturing or design defects, fails to
function properly under normal use during the life
of this warranty will be replaced or repaired at no
charge for parts or labor, when returned to the factory service center. Transportation in is paid by the
customer. Transportation out is paid by Phonic Ear.
If it is determined that repair is not feasible, the
entire unit may be replaced with an equivalent unit
upon mutual agreement of the manufacturer and
customer.
what is not covered by this warranty
This limited warranty does not apply to:
1. Malfunctions resulting from abuse, neglect
or accident
2.
I
nstruments connected, installed, used or adjusted
in any manner contrary to instructions provided
by the manufacturer
3. Consequential damages and damages resulting
from delay or loss of this instrument. The exclusive remedy under this warranty is strictly limited
to repair or replacement as herein provided
4. Products damaged in transit unless investigated
by the shipper and returned to the warrantor
with the investigation report
5. Peripheral accessories as itemized within the
product specification sheet as applicable, when
such items are returned within 1 year from
original purchase
6. Batteries if applicable
4747 230R Multi-Freq User Guide 4/22/05 3:09 PM Page 53
Page 50

48
warranty (cont’d)
Phonic Ear Inc. reserves the right to make changes in
the design or construction of any of its instruments at
any time without incurring any obligation to make any
changes whatsoever on units previously purchased.
This warranty is in lieu of all other expressed warranties.
All expressed and implied warranties will terminate upon
the expiration of this written warranty. No representative
or person is authorized to represent or assume for us any
liability in connection with the sale or use of our products other than as set forth above.
what to do if you need service
If you require service under the warranty terms, obtain a
service order form either online at
www.phonicear.
com/support.asp
or through our U.S. customer
service department at
800.227.0735, then press 7
(or +1.707.769.1110 outside the U.S.). Fill the form
out completely remembering to include:
1. Description of the problem
2. Your billing address
3. Your shipping address (if different from
billing address)
4. Contact name and phone number
5. A P.O. number if the equipment is not under a
warranty or service contract
4747 230R Multi-Freq User Guide 4/22/05 3:09 PM Page 54
Page 51

49
Then, carefully package the equipment using its
original packaging and in its original shipping
container
to prevent damage and send it postpaid to
the service center near you:
USA:
Phonic Ear Inc.
3880 Cypress Drive
Petaluma, CA 94954-7600
U.S.A.
In Canada:
Phonic Ear Ltd.
10-7475 Kimbel Street
Mississauga, Ontario
L5S 1E7 Canada
International:
Phonic Ear A/S
Distribution Centre
Tilstedvej 73
7700 Thisted
Denmark
what to do if you have questions
If you have any questions about service, call the U.S.A.
service department at
800.227.0735, then press 7
or +1.707.769.1110 outside the U.S.A.
about your batteries
To ensure that your batteries are as fresh as possible
upon arrival, we have intentionally not installed
them in your equipment.
battery replacement
It is recommended to re-order new rechargeable
AAA NiMH batteries from Phonic Ear annually.
warranty (cont’d)
4747 230R Multi-Freq User Guide 4/22/05 3:09 PM Page 55
Page 52
50
regulatory compliance
Frontrow Tempo Receiver 230R
Tested to comply with
FCC Standards
FOR HOME OR OFFICE USE
receiver: part 15, subpart B
The term "IC:" before the radio certification number only signifies that Industry of Canada technical
specifications were met.
This product conforms with the essential
requirements of European Union Directive
1999/5/CE R&TTE Directive
Waste from electronic equiment
must be handled according to
local regulations.
4747 230R Multi-Freq User Guide 4/22/05 3:09 PM Page 56
Page 53

© 2005 Phonic Ear Inc. Phonic Ear and the names of Phonic Ear products are trademarks or registered trademarks of Phonic Ear Inc. in the U.S. and
other countries.
Product specifications and accessories subject to change without notice. 821-6440-107/Rev. C/4747 0405
u.s.a. 800.227.0735, then press 5•canada 800.263.8700 • international +45 3917 7101
4747 230R Multi-Freq User Guide 4/22/05 3:09 PM Page 1
 Loading...