

Page 1

CONFIDENTIAL AND PROPRIETARY
ProGear
U
B
ETA RELEASE
This information is subject to change.
Note: The software release you have may be
newer than the features reflected in this document.
frontpath
2841 Mission College Blvd.
Santa Clara, CA. 95054
408-588-8800
www.frontpath.com
- 12/18/2000
SERS GUIDE
V
ERSION
1.0
Copyright 2000 frontpath, Inc. All Rights Reserved.
A SONICblue Company.
Page 2

Copyright
This manual is copyrighted. All rights reserved. This
document may not, in whole or part, be copied, reproduced,
reduced, or translated by any means, either mechanical or
electronic, without prior consent in writing from frontpath.
The information in this manual has been carefully checked
and is believed to be accurate. However, frontpath assumes
no responsibility for any inaccuracies that may be contained
in this manual. In no event will frontpath be liable for direct,
indirect, special, incidental, or consequential damages
resulting from any defect or omission in this manual, even if
advised of the possibility of such damages.
In the interest of continued product development, frontpath
reserves the right to make improvements in this manual and
the products it describes at any time, without notice or
obligation.
Copyright © 2000. All rights reserved.
frontpath Incorporated. A SONICblue Company.
All trademarks are property of their respective owners.
P/N 52400000-001
Confidential and Proprietary
Page 3

A
I
NTRODUCTION
What Is ProGear? ........................................................................1
Wireless Internet Browsing......................................................2
Handwriting Recognition ...........................................................2
Product Features .........................................................................2
Flexibility for VARs......................................................................3
Table of Contents
............................................................... 1
2G
ETTING STARTED
ProGear Overview ......................................................................5
Starting ProGear for the First Time .......................................8
Turning ProGear On ..................................................................8
Turning ProGear Off ..................................................................9
Power Management ....................................................................9
The Scroll Button and LED Light.............................................10
The Screen Cover .......................................................................11
The Touch Screen and Stylus ...................................................11
The Browser Window ...............................................................12
The Taskbar ..................................................................................13
3U
SING THE ONSCREEN KEYBOARD
Overview .......................................................................................15
Accessing the Onscreen Keyboard .........................................15
Entering Text ................................................................................16
Editing Text ...................................................................................16
Switching to Handwriting Recognition...................................17
........................................................... 5
................................ 15
4U
SING HANDWRITING RECOGNITION
Overview .......................................................................................19
Character vs. Word Recognition ............................................19
Accessing Handwriting Recognition........................................21
Confidential and Proprietary
.......................... 19
Page 4

Using the Word Entry Pane......................................................22
Using the Character Entry Pane ..............................................23
Switching to the Onscreen Keyboard....................................25
Tips for Using Handwriting Recognition................................25
5U
SING THE SETTINGS-TOOLBOX WINDOW
Overview .......................................................................................27
Adjusting LCD brightness..........................................................29
Aligning the Touch Screen ........................................................29
Changing the Orientation of ProGear ...................................29
Turning Off the Tone .................................................................30
Adjusting Speaker and Headphones Volume ........................30
Muting the Audio .........................................................................31
Changing ProGear to Left-Handed .........................................31
Setting the Sleep Time................................................................32
Setting the Off Time ...................................................................32
6T
HE CRADLE AND THE BATTERY
Using the Cradle ..........................................................................33
Recharging the Battery with the Cradle ................................34
Recharging the Battery without the Cradle..........................35
Replacing the Battery Pack ........................................................35
Installing or Replacing the Backup Battery ............................36
Installing the Extra Battery........................................................37
Extending Battery Life ................................................................38
................. 27
.................................... 33
AT
ROUBLESHOOTING
BT
ECHNICAL SPECIFICATIONS
ProGear Specifications ...............................................................41
CS
UPPORT AND INFORMATION SERVICES
Table of Contents Confidential and Proprietary
........................................................ 39
........................................... 41
......................... 43
Page 5

Contact Information ...................................................................43
DG
LOSSARY OF TERMS
ET
RADEMARK
I
NFORMATION
Trademarks ...................................................................................49
Warranty .......................................................................................49
Certification ..................................................................................49
....................................................... 45
, W
ARRANTY AND CERTIFICATION
.................................................................. 49
Confidential and Proprietary
Page 6

Page 7

I
NTRODUCTION
1
Welcome to the world of wireless personalized information! With
ProGear you can now surf the Internet without worrying about
being wired to a network or tied to your computer.
This chapter introduces you to the key features of ProGear and
explains some of the technology behind this unique product.
Topics include:
W
HAT IS PROGEAR
♦
W
IRELESS INTERNET BROWSING
♦
H
ANDWRITING RECOGNITION
♦
P
ROGEAR FEATURES
♦
F
LEXIBILITY FOR
♦
?
VAR
S
WHAT IS PROGEAR?
ProGear is frontpaths premier Information Appliance targeted to
the vertical market segments. ProGear couples hardware and
software to deliver one of the first ever wireless, truly portable,
untethered, broadband-based products capable of enabling
vertical partners to fully customize content.
frontpaths ProGear supports all rich media formats and offers a
high quality 10.4" TFT display, X 86 compatibility and a touch
screen that will enable quick access to applications or the Internet.
A soft keyboard or handwriting recognition gives users the choice
of input modes. ProGear comes with SoundBlaster® compatible
audio and microphone/headphone support. In addition, ProGear
comes standard with a three-hour battery. As upgrades, ProGear
has an extended life, six-hour battery and also offers a cradle
with integrated charging station. Both batteries are Lithium-ion
with smart battery technology.
Confidential and Proprietary
1
Page 8

WIRELESS INTERNET BROWSING
ProGear connects to the Internet through a device that supports
802.11b, the IEEE standard for wireless networks. This device,
often called a network access point, transfers data between
ProGear and a local area network at up to 11 Mbps using radio
frequency (RF) waves. Access to the Internet is anywhere up to
about 150 feet of a network access point. This wireless technology
gives you the freedom to surf the Internet while you are away
from your networked PC.
HANDWRITING RECOGNITION
In addition to an onscreen keyboard, ProGear features
sophisticated handwriting recognition software from Motorola.
To compose an e-mail or enter a URL, simply write with the penshaped stylus directly on the touch-sensitive screen in the
Handwriting Recognition window. The recognition software
translates your natural handwritingprinting or cursiveinto
language ProGear can understand.
PRODUCT FEATURES
ProGear contains the best technology available, including:
♦ Instant-On technology that allows you to immediately return
to the last application used
♦ High-performance, low-power processor, able to playback or
display the Internet formats you enjoy, like WAV and MP3
♦ Linux operating system with built-in power management
♦ Touch screen with onscreen keyboard and handwriting
recognition for versatile text input
♦ High-resolution, high-contrast TFT (thin-film transistor)
display for excellent text and video quality in full color
♦ Netscape Navigator with complete access to the Internet
♦ Netscape plug-ins that let you hear audio or view video from
within the browser
Introduction
2
Confidential and Proprietary
Page 9

♦ Wireless connectivity that ensures reliable data transfer rates
up to 11 megabits per second (Mbps)
♦ Toolbox for customizing ProGear to your individual
preferences, such as right- or left- hand orientation and
portrait or landscape mode
♦ Light-weight durable design with a built-in screen cover
♦ Replaceable, rechargeable Lithium-ion batteries for long life
FLEXIBILITY FOR VARS
Because ProGear is based on the Linux open operating system and
x86-compatible processor, value-added resellers (VARs) and
developers can customize the device to meet the needs of
individual vertical markets. For example:
♦ Doctors and nurses can use ProGear to access patient
information instantly.
♦ Hotel and resort customers can use ProGear to access hotel
billing information and verify flight information as well as
browse their favorite Internet sites.
♦ Educators and training professionals can create interactive
portable curriculum.
Confidential and Proprietary
3
Page 10

Introduction
4
Confidential and Proprietary
Page 11

G
ETTING STARTED
2
This chapter helps you get acquainted with ProGear and covers
the following topics:
P
ROGEAR OVERVIEW
♦
S
TARTING PROGEAR FOR THE FIRST TIME
♦
T
URNING PROGEAR ON
♦
T
URNING PROGEAR OFF
♦
P
OWER MANAGEMENT
♦
T
HE SCREEN COVER
♦
T
HE TOUCH SCREEN AND STYLUS
♦
T
HE SCROLL BUTTON AND
♦
T
HE BROWSER WINDOW
♦
T
HE TASKBAR
♦
NoteThe descriptions in this guide are based on a landscape
screen orientation. ProGear can be used in a portrait or landscape
screen orientation. (To change the screen orientation, see Chapter
5.)
LED L
IGHT
PROGEAR OVERVIEW
Take a moment to examine the ProGear contents and components
described on the following page.
Confidential and Proprietary
5
Page 12

ProGear & Stylus
Screen cover
Power cable
Cradle (optional)
Component Description
Touch screen The low-gloss screen that responds to the touch
of the stylus
Screen cover A protective plastic cover which, when closed,
puts ProGear into Off mode, thereby conserving
power (not available in beta units)
Stylus The pen-shaped instrument used for entering
text and selecting links in Internet applications
Stylus storage
slot
A slot in the upper left side of ProGear used for
storing the stylus when it is not in use
Power button The button on the bottom left corner of
ProGear that turns the device on and off
Microphone An internal microphone, located to the left of
the Scroll button, used for enabling certain
applications, such as voice over the Internet
LED light The oval light-emitting diode behind the Scroll
button that indicates battery and power status
when connected to A/C power
Scroll button The black rubber button that protrudes from the
bottom front of ProGear and is used for moving
scrollbars and opening the Taskbar
Speaker A built-in speaker, located to the right of the
Scroll button, through which audio is heard
Getting Started
Confidential and Proprietary
6
Page 13

Speaker line out The jack on the bottom right side of ProGear
used for plugging in headphones
USB port The Universal Serial Bus port used to connect
ProGear to an external keyboard, printer, or
mouse
Microphone
A jack used for an external microphone
jack
DC power-in
jack
The jack used to connect the AC/DC power
adapter to ProGear
RF card slot (Sealed and unavailable to end users)
Infrared port The port used to connect ProGear wirelessly to
an infrared-equipped device (requires additional
software)
Reset button Accessible through a small hole in the back of
ProGear, this button begins a system-wide reset
of the unit (not for normal use)
AC/DC power
adapter
Battery pack
(installed)
Backup battery
(installed)
Extra battery
(optional)
Cradle
(optional)
The component that supplies electrical power to
ProGear and charges its battery pack
A rechargeable S.M.A.R.T battery that powers
ProGear in mobile environments
AAA battery used as a source of power when
swapping out the battery pack
Additional standard battery or an upgrade to an
extended life battery
A storage unit or holder for ProGear when used
in landscape mode or for recharging the battery
Confidential and Proprietary
7
Page 14

STARTING PROGEAR FOR THE FIRST TIME
To power on ProGear for the first time:
1. Insert the electrical plug
of the AC/DC power
adapter into a properly
grounded electrical
outlet.
2. Plug the round end of
the AC/DC power
adapter into the DC
power-in jack of
ProGear.
3. Let the battery charge for three hours before using ProGear in
a mobile environment. You can use ProGear while the battery
is charging, as long as the unit remains connected via the
AC/DC power adapter.
4. Align the touch screen. For instructions, see Chapter 5.
Figure - Connecting Power
TURNING PROGEAR ON
To power on ProGear, press the power button located on the
bottom left corner of the unit (when viewed in landscape mode).
The system displays the Netscape browser window in full screen.
NoteThe first time that ProGear is turned on you will see a boot
sequence. This boot sequence will also occur every time all the
batteries are removed from the unit.
If you have any problems turning ProGear on, see
Troubleshooting
Getting Started
.
Confidential and Proprietary
8
Appendix A,
Page 15

TURNING PROGEAR OFF
When you need to power down, ProGear offers the following
modes:
♦ Off. Press the power button once to turn ProGear off.
♦ Shutdown. Use this mode of powering down only when you
expect the unit to remain off for a long period of time.
Pressing the power button twice performs a complete system
shutdown. To turn ProGear on from this state, press the
power button once. It will take approximately 60 seconds for
ProGear to power on.
Note Putting ProGear into Shutdown mode will force a full
system boot up sequence. Use this mode when you want to turn
off the system for several days.
POWER MANAGEMENT
ProGear includes two distinct features for conserving power.
Sleep
Sleep helps manage resources by turning off power to the display
after a defined period of inactivity (Never, 1, 2, 5, or 10 minutes).
♦ To resume working when the system is in Sleep, press the
Scroll button or tap the touch screen. If you press the power
button on the side of ProGear, the unit will be turned on.
♦ To change the period of inactivity, see
Sleep Time
.
Chapter 5, Setting the
Off
Because ProGear is designed with Instant On technology, pressing
the power button once is the preferred method of turning ProGear
off. This mode provides advanced power savings by suspending
power to the LCD panel, the backlight, the hard disk, and the
network connection.
Confidential and Proprietary
9
Page 16

Use Off mode when you stop working temporarily but want the
system to come back on quickly. (It takes a moment to establish a
new network connection.) The system can remain in an off state
up to five days, depending on the condition of the main and
backup batteries.
♦ To turn ProGear Off, press the power button once, or tap the
Sleep button on the TaskBar.
♦ To turn ProGear instantly on, press the power button once.
♦ To change the period of inactivity, while in Sleep and before
the system turns off, see
Chapter 5, Setting the Off Time
.
THE SCROLL BUTTON AND LED LIGHT
Scroll button
The Scroll button is the round black knob located below the
center of the touch screen (when viewed in landscape mode). You
can press it up, down, left, right, or straight on.
The Scroll button has several functions:
♦ Moving scroll bars in Internet applications. To navigate
vertically, press the Scroll button up or down; to navigate
horizontally, press it to the left or right.
♦ Opening/closing the Taskbar. To open/close the Taskbar, press
the Scroll button until the Taskbar pops up.
♦ Resuming from Sleep Mode. To resume working when the
system is in Sleep mode, press the Scroll button.
NoteFor more information about Sleep mode, see the Power
Management section earlier in this chapter.
LED light
The LED light surrounding the Scroll button indicates power and
battery status, based on the color displayed:
Getting Started
10
Confidential and Proprietary
Page 17
Display
Green
Red
Off
Indicates
The system is plugged into AC power, and the
battery is fully charged
The system is plugged into AC power, and the
battery is charging
The system is powered by the battery,
power
not
AC
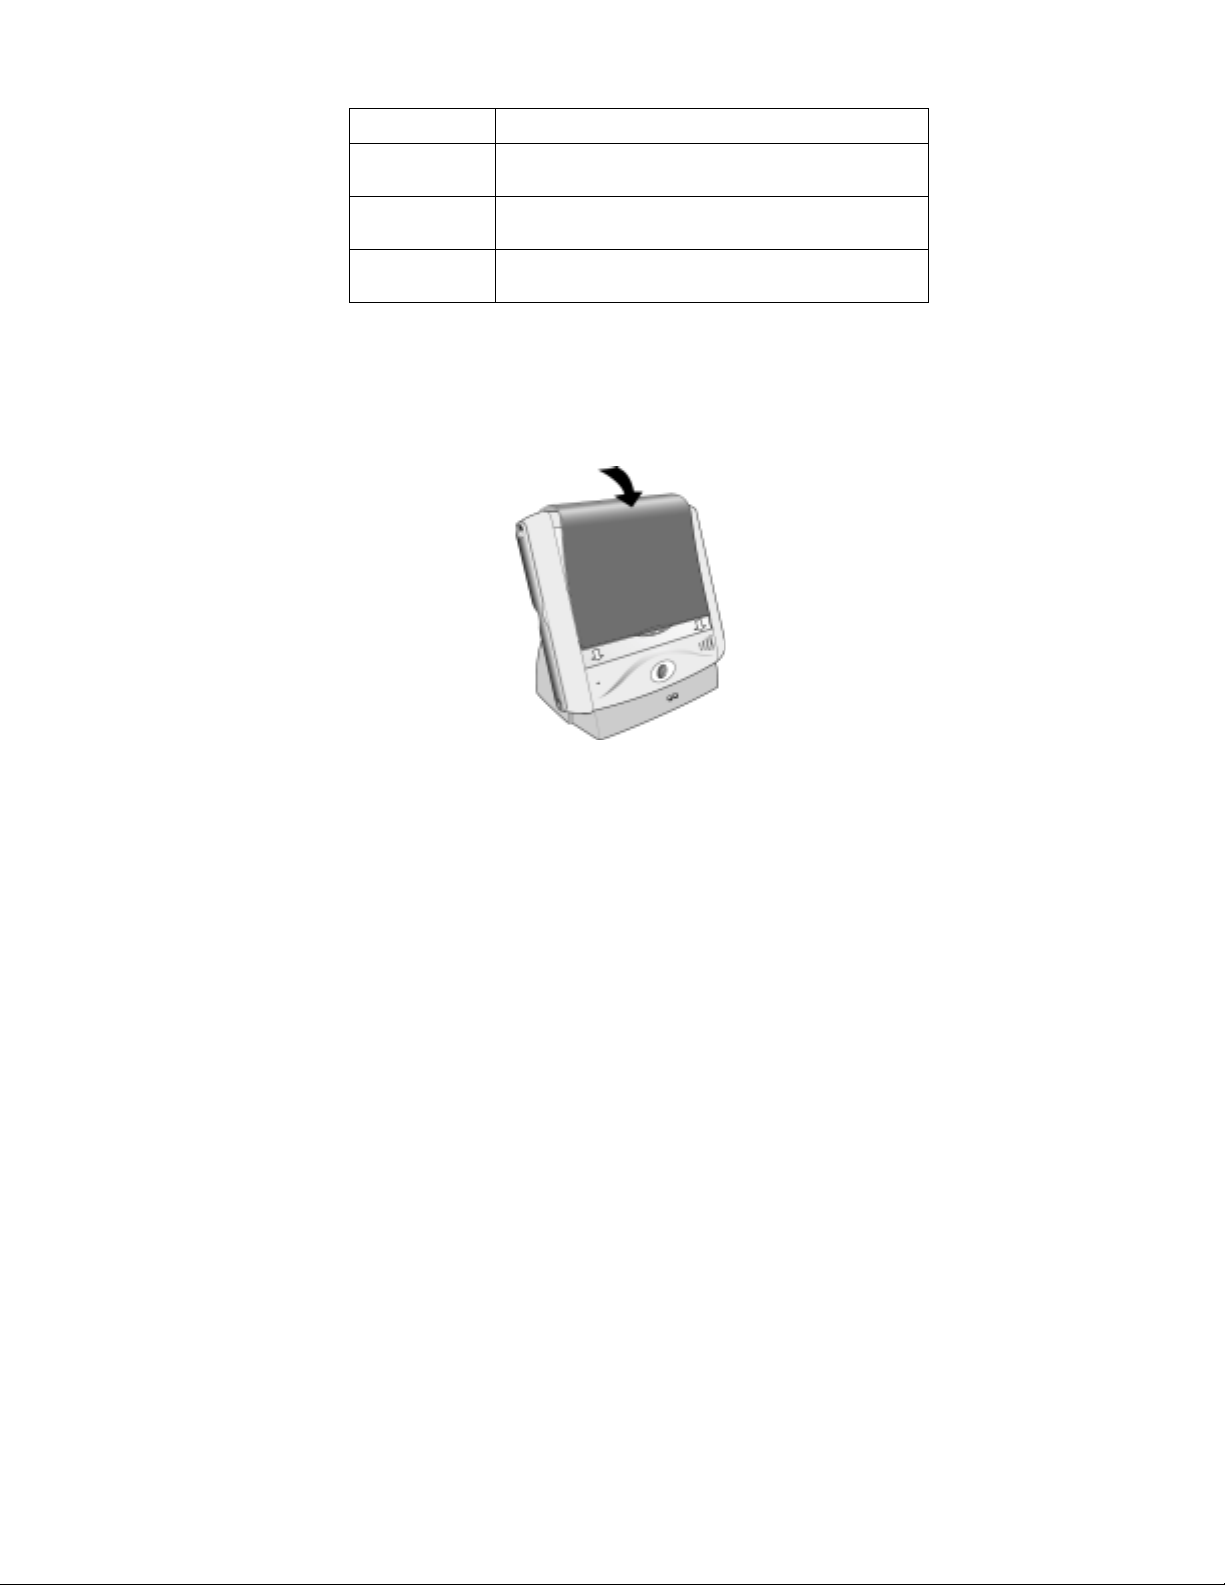
THE SCREEN COVER
ProGear comes with a soft screen cover that protects the touch
screen and LCD panel.
Figure - ProGear w/ screen cover
The cover, when locked into place, turns off ProGear. To wake
ProGear, unlock the cover and press the Scroll button.
THE TOUCH SCREEN AND STYLUS
The touch screen responds to the touch of your finger or the tap
of the stylus in much the same way that your computer responds
to the click of a mouse.
Because the stylus has been specially designed to activate the
touch screen, frontpath recommends using only the ProGear
Confidential and Proprietary
11
Page 18

stylus to ensure precision in navigating the Internet and entering
text. Using the stylus will also help keep the screen clean.
To use the touch screen properly:
♦ Tap the stylus lightly to select links or indicate text entry
points.
♦ Tap and drag the stylus to highlight text or slide scrollbars.
Maintaining the quality of the touch screen
The ProGear screen has a thin Mylar covering, which is sensitive
to touch. To maintain the high quality of this covering, do NOT:
♦ Drop ProGear
♦ Spill liquids on or near the touch screen
♦ Use sharp instruments as input devices
♦ Press down on the stylus with force
♦ Subject the screen to temperatures above 35°C (94°F) or below
0°C (32°F)
♦ Place objects on top of the touch screen
♦ Spray the screen directly to clean it; instead use a soft cloth
sprayed with glass cleaner
THE BROWSER WINDOW
ProGear includes Netscape Navigator. When you first power on,
ProGear will automatically display a predefined home page.
Selecting the Home button on the top taskbar will also take you
to this home page from any Internet site.
You can use the Scroll button or vertical bar to the right of the
browser to scroll up and down. The Netscape Navigator browser
can be viewed in either portrait or landscape orientation.
Getting Started
12
Confidential and Proprietary
Page 19

THE TASKBAR
If the Taskbar is not visible, press the Scroll button until the
Taskbar pops up on the bottom of your screen.
The Taskbar contains buttons to help you navigate, and icons that
provide information about the system. From left to right on the
Taskbar, you see the following:
Button, Icon, or Box Function
frontpath button Links to the frontpath Internet
site
Settings-Toolbox button Launches the Settings-Toolbox
window
Text button Opens the onscreen keyboard
(or the Handwriting Recognition
window, if you have previously
selected this mode of text entry)
Netscape button Launches another instance of
Netscape
Wireless Connection icon Displays the ! symbol when
there is no connection to the
wireless network
Mute icon Displays the ! symbol when the
stereo speakers/headphones are
muted
Battery Status icon Displays the ! symbol when the
battery is being charged
Clock Displays the current time
Open windows box Pops up a list of windows
currently open in Netscape
Close button Closes the active Netscape
window (currently displayed on
the screen)
Confidential and Proprietary
13
Page 20

Off button Turns ProGear off
X button Closes the Taskbar
Getting Started
14
Confidential and Proprietary
Page 21

U
SING THE ONSCREEN
K
EYBOARD
3
This chapter explains how to use the onscreen keyboard. Topics
include:
O
VERVIEW
♦
A
CCESSING THE ONSCREEN KEYBOARD
♦
E
NTERING TEXT
♦
E
DITING TEXT
♦
S
WITCHING TO HANDWRITING RECOGNITION
♦
OVERVIEW
The ProGear onscreen keyboard resembles the external keyboard
you are accustomed to using with a computer. It includes all the
letters, numbers, punctuation, and other symbols you need for
Internet applications. An extra key, Tab ←, has been added to let
you tab backwards in forms more easily.
You activate the keyboard by tapping on the keys using the
stylus. To close the keyboard and view Netscape in full screen,
simply tap the X button.
NoteBy default, ProGear is set up for right-hand users, and the
keyboard automatically appears to the right of the window. To
change this setting, see
Handed
.
Chapter 5, Changing ProGear to Left-
ACCESSING THE ONSCREEN KEYBOARD
To access the onscreen keyboard:
1. Turn ProGear on.
2. Press the Scroll button until the Taskbar pops up on the
bottom of the screen.
Confidential and Proprietary
15
Page 22

3. Using the stylus, tap the Text button
Netscape window resizes, and the onscreen keyboard now
appears below it.
on the Taskbar. The
ENTERING TEXT
To enter text in an Internet application:
1. Access the onscreen keyboard.
2. Tap the stylus in the browser field where you want to enter
text. A blinking line appears in that field.
3. Using the keyboard, tap the characters you want.
♦ To capitalize one letter, tap Shift and then the letter.
♦ To capitalize several letters in a row, tap Caps and then
the letters. When finished, tap Caps again.
♦ To enter any of the secondary characters associated with
number keys (the @ sign, for example), tap Shift and the
appropriate number key.
♦ To enter a secondary character when the Caps key is on,
tap the Shift key.
♦ As you tap, each character appears in the Preview pane
above the keyboard and in the browser field.
4. When you are done entering text, tap Tab or Enter. Or tap the
stylus in the next browser field.
EDITING TEXT
Editing text in the onscreen keyboard is easy.
♦ To erase characters you just entered in the current browser
field, tap Backspace.
♦ To edit text in a previous browser field, tap in that field to
the right of the text, and tap Backspace. Then tap the correct
characters, and tap Tab or Enter.
♦ To delete a string of characters, tap in the browser field and
drag the stylus to highlight the text you want to delete. Then
tap Backspace.
Using the Onscreen Keyboard
16
Confidential and Proprietary
Page 23

SWITCHING TO HANDWRITING
RECOGNITION
To enter text using handwriting recognition instead of the
keyboard, tap the Handwriting Recognition button
bottom left of the keyboard.
Whenever you switch to another mode of text entry, ProGear
retains any text in the Preview pane.
at the
Confidential and Proprietary
17
Page 24

Using the Onscreen Keyboard
18
Confidential and Proprietary
Page 25

U
SING HANDWRITING
R
ECOGNITION
4
This chapter explains how to use handwriting recognition to enter
and edit text. It includes the following topics:
O
VERVIEW
♦
C
HARACTER VS
♦
A
CCESSING HANDWRITING RECOGNITION
♦
U
SING THE WORD ENTRY PANE
♦
U
SING THE CHARACTER ENTRY PANE
♦
H
ANDWRITING PASSWORDS
♦
H
ANDWRITING
♦
E
DITING TEXT
♦
S
WITCHING TO THE ONSCREEN KEYBOARD
♦
OVERVIEW
The handwriting recognition software in ProGear enables you to
hand write text in Internet-based e-mail applications, the
Netscape browser window, and Internet forms using your natural
stylewhether cursive or printing.
. W
ORD RECOGNITION
URL
S
As you write with the stylus in the Handwriting Recognition
window, the smart software displays the text in a Preview pane
and sends it to the Internet application.
NoteBy default, handwriting recognition is set up for right-
hand users, with the window automatically displaying to the
right. If you want to change this setting, see
ProGear to Left-Handed
.
Chapter 5, Changing
CHARACTER VS. WORD RECOGNITION
With ProGear, you can write whole words or single characters. As
a general rule:
Confidential and Proprietary
19
Page 26

♦ Use the Word Entry pane to write whole words that can be
found in a standard English dictionary. Word entry is useful
for search engines, e-mail messages, and some forms.
♦ Use the Character Entry pane to write Internet addresses,
unique passwords, proper names, phone numbers, and
addressestext not found in a standard English dictionary.
Take a look at the Handwriting Recognition window:
Button, Pane, or Tab Description or function
Tab →
Tabs forward to the next browser
field
Tab ←
Tabs back to the previous browser
field
Preview pane Displays characters as you write
them in the Character or Word Entry
pane
Best guesses list A list the system displays when it is
unsure of the text you just entered
Word Entry pane The section of the Handwriting
Recognition window where you
enter one word at a time
Enter Clears the Preview pane and, in
some cases, moves the text entry
point to the next browser field
Spacebar Inserts a space
Using Handwriting Recognition
20
Confidential and Proprietary
Page 27

Setting (For developers to set system
parameters; not yet implemented)
Undo/Redo One click clears the last word from
the Preview pane and browser field;
two clicks restores the word
Character Entry pane The section of the Handwriting
Recognition window where you
enter one character at a time
Keyboard button Switches to the onscreen keyboard,
retaining any text already in the
Preview pane
Lowercase (abc) tab The tab you select before entering
lowercase characters in the Character
Entry pane
Uppercase (ABC) tab The tab you select before entering
uppercase characters in the
Character Entry pane
Numbers (123) tab The tab you select before entering
numbers in the Character Entry pane
Symbols (@#$) tab The tab you select before entering
symbols in the Character Entry pane
ACCESSING HANDWRITING RECOGNITION
To access handwriting recognition:
1. Open the Taskbar, and tap the Text Entry button
default, the onscreen keyboard appears.
2. Tap the Handwriting Recognition button on the bottom left
corner of the keyboard.
Although the default setting is the onscreen keyboard, ProGear
will automatically open the Handwriting Recognition window the
Confidential and Proprietary
21
. By
Page 28

next time you tap the Text Entry button, if handwriting
recognition was the most recent input option you used.
USING THE WORD ENTRY PANE
Use the Word Entry pane to enter text in search engines, compose
e-mail messages, or write standard English words in Internet
forms.
To use the Word Entry pane:
1. Access the Handwriting Recognition window (see above).
2. IMPORTANT! Tap the stylus in the field where you want text
to appear. A blinking line displays in that field, identifying
the text entry point. If necessary, also tap the Preview pane to
clear it.
3. In the Word Entry pane, write one word at a time, in printing
or cursive. The system responds depending on its ability to
recognize the word.
♦ If the system recognizes the word, it displays the word
automatically in the Internet application and Preview pane.
If this word is correct, go to step 4. If this word is incorrect,
tap Backspace to delete it, and start again.
♦ If the system is unsure of the word, it displays a list of
Best Guesses under the Preview pane. If the correct word
appears in the Best Guesses list, tap it, and then go to step
4. If the correct word does not appear in the Best Guesses
list, write it in the Word Entry pane again. (The system
automatically clears the Preview pane and browser field.)
Using Handwriting Recognition
22
Confidential and Proprietary
Page 29

4. Tap the appropriate button in the Internet application (Search,
Go, etc.) or Tab forward to move the text entry point to the
next browser field.
NoteFor help, see
this chapter.
Tips for Using Handwriting Recognition
later in
USING THE CHARACTER ENTRY PANE
Use the Character Entry pane to input Internet addresses, proper
names, phone numbers, and addresses in an Internet form.
Character Entry Pane
To use the Character Entry pane:
1. Tap in the Preview pane to delete any characters.
2. Tap in the field where you want text to appear. This identifies
the text entry point for the Internet application. Before
entering a character, tap the appropriate tab:
♦ Lowercase tab for lowercase (small) letters
♦ Uppercase tab for uppercase (capital) letters
♦ Numbers tab for numbers
♦ Symbols tab for punctuation or other symbols like the @
sign
3. Write the letter, number, or symbol in the Character Entry
pane. That character appears in the Preview pane at the top
of the Handwriting Recognition window. If the character is
incorrect, tap Backspace, and try again.
Confidential and Proprietary
23
Page 30

Handwriting Passwords
1. Tap in to the correct browser field, and make sure the cursor
is blinking.
2. Tap in the Preview pane to delete any characters.
3. Tap the appropriate tab, depending on the character you want
to enter. (Lowercase, Uppercase, Number, or Symbol).
4. As you write characters, each appears in the Preview pane
(Stars appear in the browser field). Verify each character
before proceeding; if you make a mistake, tap Backspace and
try again.
5. When each character of your password appears correctly in
the Preview pane, tap the appropriate button in the Internet
application (Enter, Go, etc) to proceed.
NoteThe security of your password remains protected even
though your password appears briefly in the Preview pane. After
you tap Enter, or otherwise send the password to the application,
the Preview pane automatically clears, and other users cannot
retrieve that information.
Handwriting URLs
1. Tap into the location box of the browser, and drag the stylus
to select the URL you want to replace.
2. Tap Backspace to delete this URL. Then tap the Preview pane
to delete any characters there.
3. In the Character Entry pane, tap the Lowercase tab, and then
write the new URL, one character at a time:
♦ For a period, tap the Symbols tab, and then tap lightly
into the Character Entry pane once.
♦ For the @ sign, tap the Symbols tab, and then write the
@ symbol.
♦ Remember to tap the Lowercase tab again to write letters.
♦ As you write each character, check the Preview pane for
accuracy; tap Backspace to delete any incorrect
characters.
Using Handwriting Recognition
24
Confidential and Proprietary
Page 31

4. When done, tap Enter in the keyboard. Netscape displays the
new Internet site.
Note The onscreen keyboard or a USB keyboard is
recommended for entering URL's.
Editing Text
♦ To edit text you wrote in the Character Entry or Word Entry
pane, position the blinking line to the right of the incorrect
character, tap Backspace, and then write the character again.
♦ To delete the last word you wrote in the Word Entry pane, tap
Undo/Redo
♦ To restore the word you just deleted, tap the Undo/Redo
button again.
.
SWITCHING TO THE ONSCREEN KEYBOARD
To enter text using the onscreen keyboard instead of handwriting
recognition, tap the keyboard button
the handwriting recognition window.
NoteWhenever you switch to another mode of text entry,
ProGear retains any text in the Preview pane. So you can toggle
between the keyboard and both modes of handwriting
recognition, using whichever method you find easier and faster.
to the bottom left of
TIPS FOR USING HANDWRITING
RECOGNITION
When using handwriting recognition, keep these tips in mind:
♦ Make sure that your cursive, mixed, and printed handwriting
is legible.
♦ Remember to cross your t's and dot your i's to make
recognition easier.
♦ Do not write on a slant. Writing should be approximately
straight across the screen.
Confidential and Proprietary
25
Page 32

♦ Press firmly when writing to prevent the stylus from lifting
during character entry (but not too firmly, you want to
protect the touch screen)
Using Handwriting Recognition
26
Confidential and Proprietary
Page 33

U
SING THE SETTINGS
-
T
OOLBOX
W
INDOW
5
This chapter describes how to use each of the tools in the SettingsToolbox window to customize ProGear. Topics include:
O
VERVIEW
♦
A
DJUSTING
♦
A
LIGNING THE TOUCH SCREEN
♦
C
HANGING THE ORIENTATION OF PROGEAR
♦
T
URNING OFF THE TONE
♦
A
DJUSTING SPEAKER AND HEADPHONES VOLUME
♦
M
UTING THE AUDIO
♦
C
HANGING PROGEAR TO LEFT-HANDED
♦
S
ETTING THE SLEEP TIME
♦
S
ETTING THE OFF TIME
♦
OVERVIEW
The Settings-Toolbox window enables you to change a variety of
settings on ProGearfrom the volume of the speaker to the
alignment of the touch screen.
LCD
BRIGHTNESS
To access the Settings-Toolbox window, open the Taskbar, and tap
the Settings-Toolbox button
Confidential and Proprietary
.
27
Page 34

Each button, slider, or box in the window controls a particular
setting:
This button,
Lets you
slider, or box
Brightness slider Adjust the brightness of the touch screen
Alignment button Access the tool for fine-tuning the touch screen
Orientation
buttons
Change the orientation of ProGear to portrait-
left, portrait-right, or landscape
Tone Off Turn off/on the system feedback sounds
Sleep Timing box Select the length of inactivity time after which
the display shuts off and the system goes into
Sleep mode
Off Timing box Select the length of inactivity time after which
the system goes into Off mode
Left-hand button Position the text entry window to the left side of
the display
Right-hand
button
Position the text entry window to the right side
of the display
Mute button Turn the stereo speaker and headphones on/off
Speaker Volume
Adjust the volume of the speaker.
slider
Headphones
Adjust the volume of the headphones.
Volume slider
X button Close the Settings-Toolbox window
Using the Settings-Toolbox
28
Confidential and Proprietary
Page 35

ADJUSTING LCD BRIGHTNESS
1. Open the Taskbar, and tap the Settings-Toolbox button. The
Settings-Toolbox window appears.
2. Tap the Brightness slider
desired level of brightness.
3. Tap the X button to close the Settings-Toolbox window.
and drag it up or down to the
ALIGNING THE TOUCH SCREEN
You may notice that the touch screen does not respond accurately
when you tap the stylus. To correctly align the touch screen with
the stylus:
1. Open the Taskbar, and tap the Settings-Toolbox button. The
Settings-Toolbox window appears.
2. Tap the Alignment button
3. Follow the on-screen instructions, taking care to tap the stylus
precisely in the center of each crosshair.
4. When done, tap the X button to close the Settings-Toolbox
window.
. The Alignment utility opens.
CHANGING THE ORIENTATION OF PROGEAR
ProGear can be used in portrait or landscape mode by changing the
settings and rotating the unit. Portrait mode provides convenience
for right- and left- hand use and landscape mode provides
Confidential and Proprietary
Figure - Landscape handwritingFigure - Portrait-right handwriting
29
Page 36

convenience for use in a desktop setting.
1. Open the Taskbar, and tap the Settings-Toolbox button. The
Settings-Toolbox window appears.
2. Tap the button for the orientation you prefer:
♦ The Left button
with the Scroll button to the left.
♦ The Center button
mode with the Scroll button on the bottom (the default
mode).
♦ The Right button
with the Scroll button to the right.
3. Tap the X button to close the Settings-Toolbox window.
4. Rotate the unit.
positions the screen in portrait mode
positions the screen in landscape
positions the screen in portrait mode
TURNING OFF THE TONE
1. Open the Taskbar, and tap the Settings-Toolbox button. The
Settings-Toolbox window appears.
2. Tap the Tone Off button
sounds off (or back on).
3. Tap the X button to close the Settings-Toolbox window.
to turn the system feedback
ADJUSTING SPEAKER AND HEADPHONES
VOLUME
1. Open the Taskbar, and tap the Settings-Toolbox button. The
Settings-Toolbox window appears.
2. Tap the slider for the speaker
drag it up or down to the desired level of volume.
3. Tap the X button to close the Settings-Toolbox window.
Using the Settings-Toolbox
or headphones , and
30
Confidential and Proprietary
Page 37

MUTING THE AUDIO
1. Open the Taskbar, and tap the Settings-Toolbox button. The
Settings-Toolbox window appears.
2. Tap the Mute button to turn off the sound from the
speaker and headphones (or turn it back on).
3. Tap the X button to close the Settings-Toolbox window.
CHANGING PROGEAR TO LEFT-HANDED
By default, ProGear is set up for right-hand users, and it displays
the text entry pane to the right of the screen. To change ProGear to
left-handed:
1. Open the Taskbar, and tap the Settings-Toolbox button
The Settings-Toolbox window appears.
2. Tap the Left-hand button
3. Tap the X button to close the Settings-Toolbox window.
4. Rotate the unit.
Figure - Portrait-left handwriting
.
.
Confidential and Proprietary
31
Page 38

SETTING THE SLEEP TIME
You can set a timer in ProGear to automatically put the system
into Sleep mode after a defined period of inactivity (1,2, 5, or 10
minutes). The Sleep feature turns off power to the display, thereby
conserving system resources.
To set the Sleep time:
1. Open the Taskbar, and tap the Settings-Toolbox button
The Settings-Toolbox window appears.
2. Tap the Sleep Timing box, and select the inactivity time that
should elapse before the system goes into Sleep.
3. Tap the X button to close the Settings-Toolbox window.
NoteFor more information on Sleep, see
Management
.
Chapter 2, Power
.
SETTING THE OFF TIME
You can set a timer in ProGear that automatically turns the system
off, suspending power to the LCD panel, the backlight, the hard
disk, and the network connection. This feature provides advanced
power management.
To set the Off time:
1. Open the Taskbar, and tap the Settings-Toolbox button. The
Settings-Toolbox window appears.
2. Tap the Off Timing box, and select the inactivity time that
should elapse while the system is sleep and before it turns off.
3. Tap the X button to close the Settings-Toolbox window.
NoteFor more information on Off, see
Management.
Chapter 2, Power
Using the Settings-Toolbox
32
Confidential and Proprietary
Page 39

T
HE CRADLE AND
B
THE
ATTERY
6
ProGear contains a Lithium-ion battery with S.M.A.R.T battery
technology and a backup battery. As upgrades, you can purchase
an extra battery and a cradle with integrated charging station.
U
SING THE CRADLE
♦
R
ECHARGING THE BATTERY WITH THE CRADLE
♦
R
ECHARGING THE BATTERY WITHOUT THE CRADLE
♦
R
EPLACING THE BATTERY PACK
♦
R
EPLACING THE BACKUP BATTERY
♦
I
NSTALLING OR REPLACING THE EXTRA BATTERY
♦
E
XTENDING BATTERY LIFE
♦
USING THE CRADLE
The cradle is used for storing the unit and charging the battery.
ProGear connects to the cradle through docking connectors when
placed in the cradle. The docking connectors are located on both
sides of the ProGear battery (located in the back of the unit) and
connect when tilted in place.
The cradle can charge the battery contained in ProGear and the
extra battery simultaneously. The extra battery can be stored in the
cradle until ready for use.
ProGear sits in the cradle slot in landscape mode only; to allow for
a comfortable viewing angle when used in a desktop setting. In
addition, the cradle provides for connection of four external USB
devices, such as a keyboard and mouse.
Confidential and Proprietary
33
Page 40

RECHARGING THE BATTERY WITH THE
CRADLE
The ProGear battery can be recharged while ProGear is sitting in
the cradle. The cradle can also charge the battery contained in
ProGear and the extra battery simultaneously. There is status
indicator located on the front of the cradle to display the battery
charge status for the extra battery. One LED displays green when
connected to AC power and the other LED displays red when
recharging the battery.
1. Insert the electrical plug of
the AC/DC power adapter
into a properly grounded
electrical outlet.
2. Plug the round end of the
AC/DC power adapter into
the DC power-in jack in the
back of the cradle.
3. Place your ProGear in the cradle,
making sure it connects to the docking
connectors located on both sides of the
battery in the back of the unit.
4. Let the battery charge for three hours.
You can use ProGear while the battery
is charging, as long as the unit remains
connected via the AC/DC power adapter.
Figure - Power Connection
Figure - ProGear in
Troubleshooting
34
Confidential and Proprietary
Page 41

RECHARGING THE BATTERY WITHOUT THE
CRADLE
You can charge the ProGear battery using only the AC/DC power
adapter:
1. Insert the electrical plug of the
AC/DC power adapter into a
properly grounded electrical
outlet.
2. Plug the round end of the
AC/DC power adapter into the
DC power-in jack of ProGear.
3. Let the battery charge for
three hours before using
ProGear
in a mobile environment. You can
use ProGear while the battery is charging, as long as the unit
remains connected via the AC/DC power adapter.
Note Charging ProGear should be done only with the supplied
AC/DC power adapter.
Figure - Power Connection
REPLACING THE BATTERY PACK
The ProGear main battery can be replaced with a standard or
extended life battery. The battery is located on the back of ProGear
and extends the length of the unit. Before replacing the battery:
♦ Make sure that the unit is powered off using the Off power
management mode.
♦ Prior to removing the battery pack, make sure that the AAA
backup battery is in place and charged.
Confidential and Proprietary
35
Page 42

To replace the main battery pack:
1. Use your thumb to push open the battery door tab (located
under the battery pack) and pull the door outward.
Figure - Replacing Main Battery
2. Lift the battery pack out of the casing.
3. Place the new battery pack in the casing, making sure that it
connects with the contacts on both sides of the casing.
4. Close the battery door.
Note There is no need to replace the standard battery pack unless
you want to upgrade to the extended life battery.
INSTALLING OR REPLACING THE BACKUP
BATTERY
Before using ProGear for the first time, you must insert an AAA
backup battery, which keeps the unit charged while swapping out
the main battery pack. Insert the battery in the battery casing on
the back of ProGear directly above the main battery.
Backup battery considerations:
Troubleshooting
36
Confidential and Proprietary
Page 43

♦ Power to the AAA backup battery is used only when swapping
out the main battery pack.
♦ Backup battery must be fully charged before swapping out the
main battery pack.
♦ It is recommended that you replace the AAA battery every six
months.
To install or replace the backup battery:
1. Push in on the battery door tab
and pull the door outward.
2. Pull the AAA battery out of the
casing.
3. Place the new battery in the
casing, making sure that it
connects with the contacts on
both sides of the casing.
4. Close the battery door.
Figure - Installing or replacing
backup battery
INSTALLING THE EXTRA BATTERY
The cradle allows for storage and charging of an extra battery.
Install the battery as indicated below. Make sure that the battery
connects with the contacts when installed in the cradle.
Figure - Installing Extra Battery
Confidential and Proprietary
37
Page 44

EXTENDING BATTERY LIFE
TBD
Troubleshooting
38
Confidential and Proprietary
Page 45

T
ROUBLESHOOTING
A
If you experience a problem using ProGear, refer to the solutions
offered below.
I am having trouble turning ProGear on.
Make sure that:
1. The electrical outlet is working (try plugging another device
into it).
2. The surge protectorif you are using oneis turned on.
3. The power cord is securely connected to the AC/DC power
adapter.
4. The AC/DC power adapter is securely seated in the ProGear DC
power-in jack.
ProGear seems frozen.
If the system is not responding to the Scroll button or the stylus:
1. Give the system time to display (which may take a few
moments).
2. Check the Netscape icon to see whether it is animated.
3. Try powering down by pressing the power button twice.
4. If that fails, press the power button for four seconds. This will
force the system to shutdown. Then turn ProGear on again.
5. If the power button does not respond, press the Reset button.
The reset button is located on the back of ProGear by the Reset
label. Use the tip of an unfolded paper clip (or similar object)
to gently press the reset button inside the hole.
Confidential and Proprietary
39
Page 46

I cannot access the Internet.
1. Try accessing another Internet site.
2. Make sure you are located within 150 feet of the access point.
3. Contact your system administrator to be sure the access point
is configured correctly.
4. Power down and power back up again.
The touch screen does not respond correctly to
the stylus
If you tap the touch screen and the cursor or blinking line does not
appear in the right place, you must align the screen. For
instructions, see
Chapter 5, Using the Settings-Toolbox Window
.
I cannot hear the audio
1. Open the Taskbar and check the status of the Mute indicator. If
you see the ! symbol, tap the Mute indicator to turn the audio
back on.
2. If necessary, open the Settings-Toolbox window, and adjust
the Speaker Volume.
ProGear does not run on the battery
The battery may be too low to power ProGear. Attach the AC/DC
power adapter (for details, see
First Time
check the status of the battery. If necessary, recharge it.
), and press the power button. Open the Taskbar and
Chapter 2, Starting ProGear for the
Netscape is unable to locate the server.
Try accessing another Internet site. If you are still having trouble,
ask your system administrator to check the network connection.
Troubleshooting
40
Confidential and Proprietary
Page 47

T
ECHNICAL SPECIFICATIONS
B
PROGEAR SPECIFICATIONS
Size
: 9" x 11" x 1"
Form Factor
Weight
CPU
: Transmeta TM3200 400 MHz
x86-compatible processor with
integrated Northbridge
Display
Poly Silicon XGA TFT LCD
Memory
Application Software
Navigator 4.7x
: Tablet
: 3.2 lbs.
: 10.4" Toshiba Low Temp
: 64 megabyte SDRAM
: Netscape
Environmentals
Operating temperature: 0°C
(32°F) to 35°C (94°F)
Humidity: Up to 95% at 30°C
(85°F)
Altitude: Up to 10,000 feet
Operating System
2.4x with built-in power
management
Storage
gigabyte hard disk drive;
ProGear 1050TC - 64MB
compact flash
Battery
S.M.A.R.T Lithium-ion, 1600
mAh 3-cell battery pack
Plug-ins
RealNetworks RealPlayer, and
Adobe Acrobat Reader (PDF)
: ProGear 1050 - 6
: Rechargeable
: Macromedia Flash,
:
: Linux
PC Card Type 2 Slot
with one 802.11b wireless card
installed
Confidential and Proprietary
: PCMCIA
Ports
: One USB port, one
IrDA v1.1 infrared port
41
Page 48

Also included
: AC/DC power adapter, speaker, microphone,
microphone jack, headphone jack, Scroll button, and stylus
Technical Specifications
42
Confidential and Proprietary
Page 49

S
UPPORT AND
I
NFORMATION SERVICES
C
CONTACT INFORMATION
If after consulting the documentation you need help with
ProGear, see the support section of frontpath's web site at
www.frontpath.com/support. If you have technical support
questions, call 1-800-438-6463.
Confidential and Proprietary
43
Page 50

Support & Information Services
Confidential and Proprietary
44
Page 51

G
LOSSARY OF TERMS
D
802.11b
A standard developed by the Institute of Electrical and Electronics
Engineers (IEEE) for wireless local area networks. 802.11b-based
LANs transmit and receive data over radio waves in the 2.4 GHz
band at the rate of up to 11 megabits per second (Mbps).
AC97
Audio Codec 97. A component specification for a two-chip audio
architecture. The standard created by Intel, Analog Devices,
Creative Labs, National Semiconductor, and Yamaha, calls for the
separation of the audio subsystem into two chips. The codec
(analog portion) goes into one chip and any other circuitry
(digital portion) goes in the audio controller. Separating digital
from analog makes it easier to improve the audio quality of the
codecs.
ATA-4
Advanced Technology Attachment. A standard for an interface
that integrates the controller on the disk drive of a computer.
Bridge
A device that connects two local area networks (LANs) or two
sections of the same LAN.
Compact flash
A solid-state storage device incorporating flash memory in an
industry-standard form factor.
Confidential and Proprietary
45
Page 52

CPU
Central Processing Unit. The CPU is the brain of the computer.
Sometimes referred to simply as the processor, the CPU is where
most calculations take place. In terms of computing power, the
CPU is the most important element of a computer system.
DHCP
Dynamic Host Configuration Protocol. A network server protocol
that assigns an IP (Internet Protocol) address to each device on a
network.
EIDE
Enhanced Integrated Drive Electronics. A standard for a hardware
interface that is faster than IDE and allows more capacity.
GB
Gigabyte (thousand megabytes). Used to measure computer
memory.
IrDA
Infrared Data Association. A standard for transmitting data via
infrared light waves.
LCD
Liquid Crystal Display. A type of display often used in calculators,
portable computers, and other handheld devices. LCDs are lighter
and consume much less power than other computer displays.
MB
Megabyte (one million bytes). Used to measure system capacities.
Glossary of Terms
Confidential and Proprietary
46
Page 53

Mbps
Megabits per second (million bits per second). Used to measure
the rate of information transfer.
Network access point
An external device that acts as a bridge between a wired local
area network (LAN) and a wireless device, like ProGear. Also
called an access point.
PCMCIA
Personal Computer Memory Card International Association. A
standard for adding different types of peripherals to portable
computers. The PCMCIA 802.11b wireless card is used in ProGear.
SDRAM
Synchronous dynamic random access memory. A type of memory
that can run at much higher clock speeds than conventional
computer memory.
S.M.A.R.T.
Self-monitoring analysis and reporting technology. Used for
transferring information between the system and the battery.
TFT
Thin-film transistor. A type of LCD flat-panel display in which
each pixel is controlled by up to four transistors. TFT technology
provides the best resolution of all the flat-panel techniques,
creating color images that are as sharp as those on traditional
computer monitors.
USB
Universal Serial Bus. A standard that supports data transfer rates
of 12 Mbps (12 million bits per second). A USB port can be used
Confidential and Proprietary
47
Page 54

to connect peripheral devices such as a mouse, external keyboard,
or printer.
Glossary of Terms
Confidential and Proprietary
48
Page 55

T
RADEMARK
AND
, W
C
ERTIFICATION
ARRANTY
E
I
TRADEMARKS
Copyright 2000. ProGear is a trademark of frontpath
Incorporated. A SONICblue Company. All Rights Reserved. All
trademarks are property of their respective owners.
WARRANTY
frontpath offers a limited warranty on all Beta ProGear units
during the period of the Beta program for this model. If your Beta
ProGear requires service, contact frontpath at 1-800-438-6463.
CERTIFICATION
TBD
Confidential and Proprietary
49
Page 56

Warranty and Certification
Information
F
Limited Warranty
This limited warranty (“Warranty”) applies only to the frontpath ProGear™ device (the
“Product”) and covers parts and labor against defects in material or workmanship for a
period of one (1) year from the original date of purchase (“Warranty Period”). An
extended warranty may be available for an additional charge. frontpath does not
warrant that the operation of the Product will be without interruption or error free.
frontpath will repair or replace a defective Product while it’s covered by this Warranty,
at frontpath’s option, and will return the repaired or replaced Product to you. frontpath
will pay the cost of shipping the Product back to you. The replacement Product or part
may be new or like new and will have the same functionality at least equal to that of
the Product being replaced or repaired. Any replacement parts will be warranted for the
remainder of the original Warranty Period or 90 days, whichever is longer. All defective
parts replaced under this Warranty will become the property of frontpath. After the
Warranty Period has expired, you are responsible for all parts and labor charges for
repairs. The repair and replacement process for Products in locations outside of the
United States will vary dependant on Customer’s location.
This Warranty does not cover any Product that has been damaged or rendered defective
(a) as a result of accident, misuse, neglect, abuse or other physical damage to the surface
of the Product; (b) as a result of acts of God or nature; (c) by operation outside the
usage parameters stated in the Product materials, information or other documentation;
(d) by the use of parts not supplied by frontpath; (e) improper or inadequate testing,
modification or maintenance; (f) as a result of software, interfacing, media, parts, or
supplies not provided or supported by frontpath; (g) as a result of service by anyone
other than frontpath or its authorized reseller or a frontpath authorized Warranty service
provider; or (h) as a result of the use of the Product with accessories, other products, or
ancillary or peripheral equipment and frontpath determines that there is no fault with
the Product itself.
This Warranty only applies to the frontpath ProGear™ that this Warranty accompanies
and is non-transferable to any other frontpath device or customer. For Product
information, service assistance, resolution of a service problem, or technical assistance,
please call 1(800) 929-8673. If you purchased the Product outside the United States,
please call customer service at 1(408) 588-8800, or visit us on the web at
http://www.frontpath.com/support.
1
Page 57

Proof of purchase in the form of the original bill of sale from frontpath or an authorized
reseller (which is evidence that the Product is within the warranty period) must be
presented with the Product in order for you to obtain warranty service. You are
responsible for presenting proof of date of purchase. Warranty service is only available
through frontpath’s authorized warranty service centers.
If within the warranty period you discover that the Product is defective in material or
workmanship, you may return the Product to frontpath or its authorized reseller for
warranty service after obtaining a return materials authorization (“RMA”) number from
a frontpath customer service representative at the above number.
All returns require a RMA number and must be presented for Warranty service prior to
the expiration of the Warranty period. All returns are subject to inspection. Returned
units where no failure is found or those where the failure is the result of accident,
misuse, neglect, abuse or some other cause not covered under this warranty may be
subject to a handling/inspection charges.
You are responsible for the cost of shipping the Product to frontpath (or a frontpath
authorized reseller) for service. Merchandise sent to us without a RMA number will be
returned. Pack the Product into a shipping box with plenty of packing material, and
tape securely. Write the RMA number issued by Customer Service clearly on the outside
of the shipping carton. We suggest that you send the Product to us "Insured." We cannot
accept COD or freight-collect shipments. No goods will be accepted for exchange or
return without prior authorization.
An express exchange service which permits the customer to receive from our stock a
new or like-new unit immediately upon receipt of their failed device rather than having
the customer wait for the repair of their unit may be available for an additional charge.
Please ask the frontpath customer service representative for more details about this
optional service when you request the RMA number.
frontpath shall have no obligation to repair, replace, or refund the Product until such
Product is returned to frontpath or its authorized reseller.
It is your responsibility to backup the contents of the hard drive or flash memory,
including any data you have stored or software you have installed. It is likely that the
contents of the hard drive or flash memory will be removed in the course of Warranty
service and frontpath will not be responsible for any damage or loss of any programs,
data or other information stored on any media or any part or any Product serviced
hereunder. Your Product may be returned to you configured as originally purchased.
Be sure to remove all third party hardware, parts, options and attachments not
warranted by frontpath prior to sending the Product to frontpath for Warranty service.
frontpath is not liable for any removal or damage to these items.
IF THE PRODUCT DOES NOT OPERATE AS WARRANTED, YOUR SOLE REMEDY FOR
BREACH OF THAT WARRANTY IS THE REPLACEMENT OR REPAIR OF THE PRODUCT
OR PART OR FULL REFUND OF THE PURCHASE PRICE PAID, AT FRONTPATH’S SOLE
OPTION. TO THE FULL EXTENT ALLOWED BY LAW, THE FOREGOING WARRANTIES
ARE EXCLUSIVE AND ARE IN LIEU OF ALL OTHER WARRANTIES, TERMS OR
CONDITIONS, EXPRESS OR IMPLIED, EITHER IN FACT OR BY OPERATION OF LAW,
STATUTORY OR OTHERWISE, INCLUDING CONDITIONS OF MERCHANTABILITY,
2
Page 58

FITNESS FOR A PARTICULAR PURPOSE OR ANY OTHER LEGAL THEORY RELATED TO
THIS PRODUCT.
TO THE FULL EXTENT ALLOWED BY LAW, FRONTPATH ALSO EXCLUDES FOR ITSELF
AND ITS AUTHORIZED RESELLERS ANY LIABILITY, WHETHER BASED IN CONTRACT
OR TORT FOR ANY INDIRECT, SPECIAL, PUNITIVE, INCIDENTAL OR CONSEQUENTIAL
DAMAGES OF ANY KIND, OR FOR LOSS OF PROFITS, LOSS OF REVENUE, LOSS OF
INFORMATION OR DATA, LOSS OF USE OF ANY ASSOCIATED EQUIPMENT, DOWN
TIME, CUSTOMER’S TIME OR ANY OTHER FINANCIAL LOSS ARISING OUT OF OR IN
CONNECTION WITH THE SALE, INSTALLATION, MAINTENANCE, USE, PERFORMANCE,
FAILURE OR INTERRUPTION OF THIS PRODUCT, EVEN IF FRONTPATH HAS BEEN
ADVISED OF THE LIKELIHOOD OF THE POSSIBILITY OF SUCH LOSS, AND LIMITS ITS
LIABILITY TO REPLACEMENT OR REPAIR OF THE PRODUCT OR PART, OR REFUND OF
THE PURCHASE PRICE PAID, AT THE SOLE OPTION OF FRONTPATH. EXCEPT TO THE
EXTENT PROHIBITED BY APPLICABLE LAW, ANY IMPLIED WARRANTY OR
MERCHANTABILITY OR FITNESS FOR A PARTICULAR PURPOSE ON THIS PRODUCT IS
LIMITED TO THE DURATION OF THIS WARRANTY.
Some states do not allow the exclusion or limitation of incidental or consequential
damages, or allow limitations on how long an implied warranty lasts, so the above
limitations or exclusions may not apply to you. This Limited Warranty gives you
specific legal rights, and you may have other rights that vary from state to state.
Certification
This Equipment has been tested and found to comply with the limits for a Class B digital
device, pursuant to Part 15 of the FCC rules.
These limits are designed to provide reasonable protection against harmful interference
in a residential installation. This equipment generates, uses and can radiate radio
frequency energy and, if not installed and used in accordance with the instructions, may
cause harmful interference to radio communications. However, there is no guarantee
that interference will not occur in a particular installation. If this equipment does cause
harmful interference to radio or television reception, which can be determined by
turning the equipment off and on, the user is encouraged to try to correct the
interference by one or more of the following measures:
♦
Reorient or relocate the receiving antenna.
♦
Increase the separation between the equipment and receiver.
♦
Connect the equipment into an outlet on a circuit different from that to which the
receiver is connected.
♦
Consult the dealer or an experienced radio/TV technician for help.
Page 59

FCC RF Radiation Exposure Statement
This equipment complies with FCC RF radiation exposure limits set forth for an
uncontrolled environment. This equipment should be installed and operated with a
minimum distance of 2.5 centimeters between the radiator and your body.
 Loading...