

Page 1

APACHE
User’s Guide
Apache, Dakota, Montana, and Tango24 are trademarks of
Frontier Design Group, LLC.
All other trademarks and registered trademarks are
the property of their respective holders.
Copyright © 2002 Frontier Design Group, LLC
199 Heater Road • Lebanon, NH 03766 • 603-448-6283
All Rights Reserved
Page 2

Contents
Introduction ....................................................1
About the Company .................................... 2
Technical Support ........................................ 2
Safety Precautions........................................3
Maintenance and Protection ........................ 7
Installation...................................................... 8
Setting Up....................................................8
Apache Basics..............................................10
Status Modes................................................. 11
Scanning Status ........................................... 11
Activity Status .............................................12
Patch Modes .................................................13
Input Patch .................................................13
Output Patch ..............................................14
Store/Recall Modes.......................................15
Store Mode.................................................15
Recall Mode ...............................................18
MIDI Features ...............................................18
MIDI Mode ................................................18
Remote Control.........................................20
Cascading Apaches..................................... 24
Reference...................................................... 32
Frequently Asked Questions (FAQ) ............ 32
Optical Signals ...........................................33
Troubleshooting ........................................34
Apache Specifications................................. 36
Page 3
Apache User’s Guide 1
Introduction
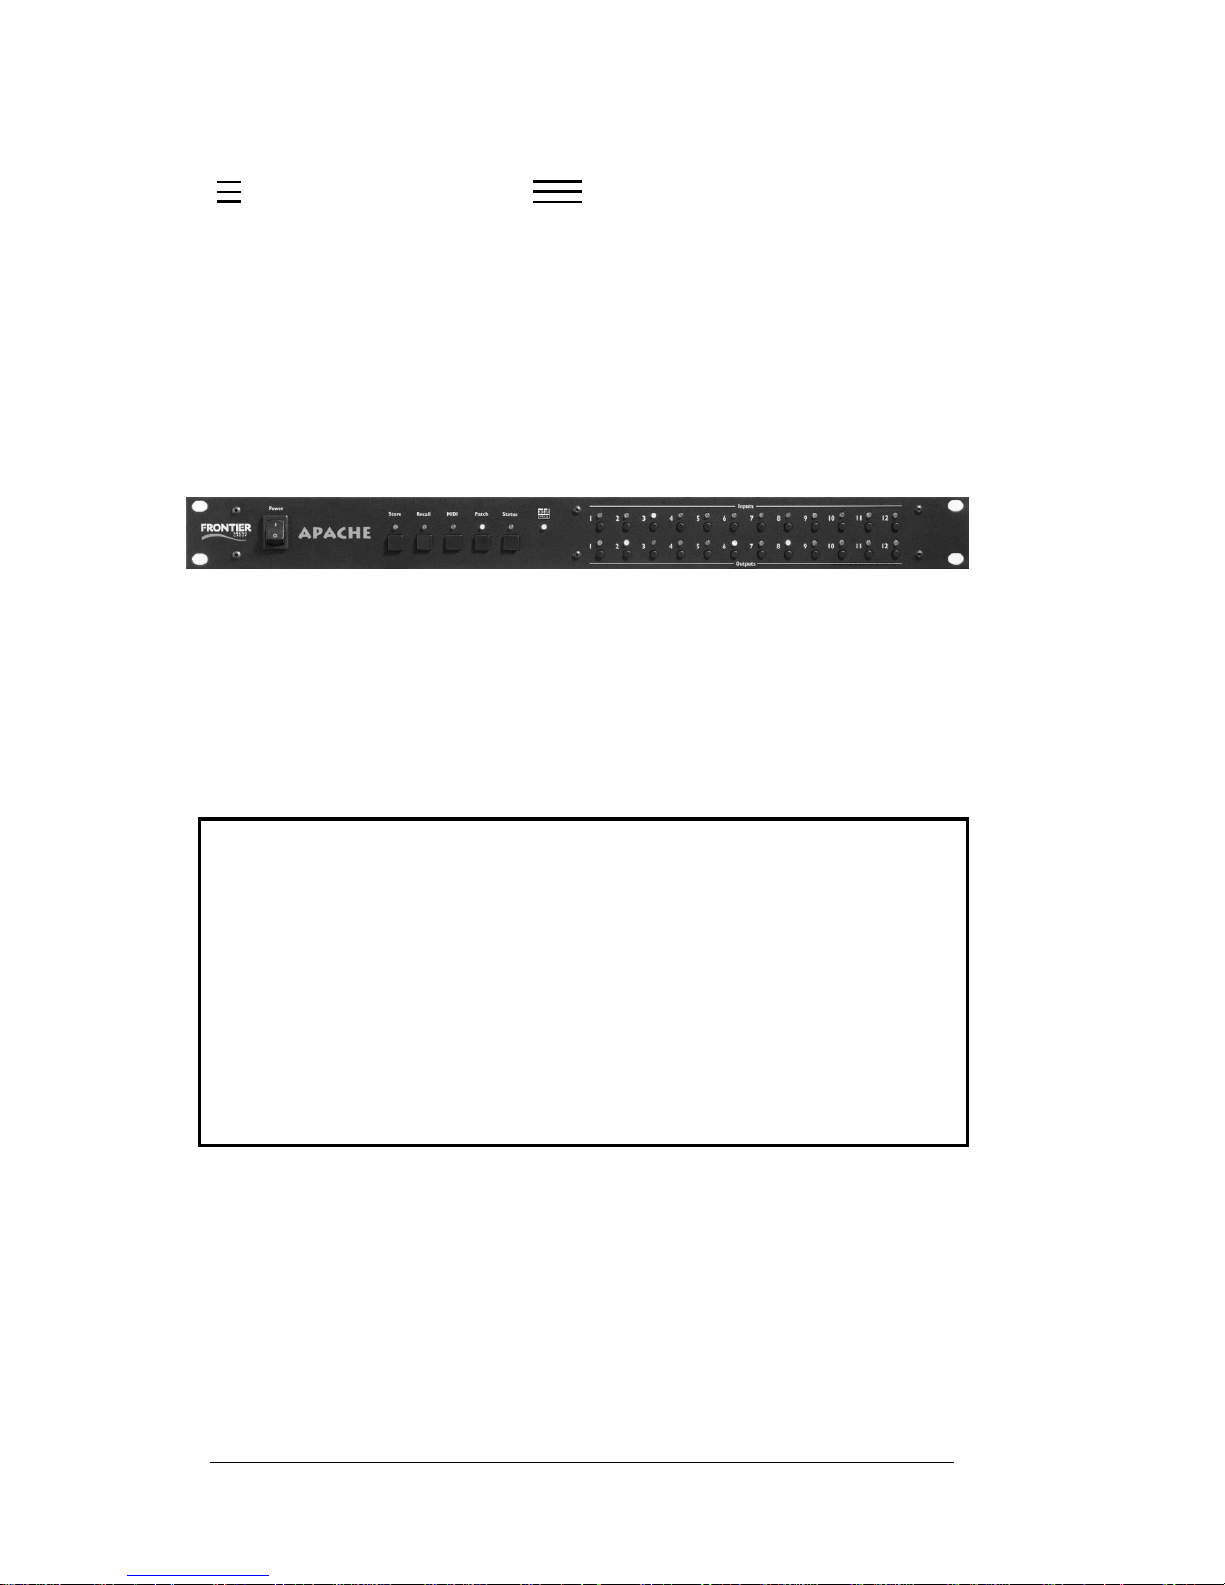
Apache™ is a 12-port optical patchbay that can send and receive
signals in either ADAT™ (8-channel) or TOSLINK™ (2-channel)
format. Each of Apache’s 12 optical inputs can be patched
independently to one or more of its 12 optical outputs, so you can
patch a signal from one device to another, or distribute a signal to
multiple devices.
The patching options can be controlled from Apache’s front panel or
from a computer that’s connected to the Apache MIDI IN port. Sets of
patches can be stored as presets which can then be recalled, allowing
you to quickly reconfigure your entire studio. Using presets, you can
completely repatch your optical signals with only two button presses.
— TERMINOLOGY —
Patch: A logical connection from an optical input to an optical
output. An Apache input can be patched to zero, one, several,
or all Apache outputs.
Preset: A set of patches that is stored in Apache's memory, and
can be recalled at any time.
Page 4

2 Apache User’s Guide
About the Company
Frontier Design Group develops, manufactures and sells digital audio
hardware and software. Our goal is to provide high-quality, high-value
tools to help our customers be more creative and productive.
We’re always interested in receiving your feedback on our products, as
well as your ideas for improvements and new products. You
can send email to [email protected] or write to us
at the address shown on the inside cover of this User’s Guide.
Technical Support
If you have any problems or questions that aren’t addressed in
this guide, there are three ways to get more help:
• Refer to our web site (www.frontierdesign.com) for information
on current revisions, answers to frequently asked questions,
troubleshooting procedures, and additional documentation.
The web site is available every day, 24 hours a day.
• Send specific questions via email to [email protected].
We’ll respond promptly (usually within one business day).
• You can call Frontier Design Group with your questions, at
1-800-928-3236 (outside the USA, call 603-448-6283).
Phone support is normally provided weekdays from 9:30 a.m.
to 5:30 p.m. EST.
Page 5
Apache User’s Guide 3
Safety Precautions
WARNINGS
• Do NOT plug in, turn on or attempt to operate a unit that
is damaged.
• There are NO user-serviceable parts inside the unit.
NEVER remove the top cover or front panel. All servicing is
to be done ONLY by qualified service personnel at Frontier
Design Group.
• To prevent electrical shock, this unit MUST be connected
to a properly-grounded AC power outlet. Do not remove or
alter the grounding prong of the power cable. If you’re not
sure that your power outlet is properly grounded, have it
checked by a qualified electrician.
• Before connecting the power cable, make sure the voltage
selection switch (on the side panel) is set properly for
your power source.
• Do not permit fingers to touch the terminals of plugs when
installing or removing the power cable from the
AC outlet.
• To reduce the risk of fire or electrical shock, do not expose
this unit to rain or other moisture.
• Do not handle the power cable with wet hands.
• Do not pull on the power cable when disconnecting it from
an AC outlet. Grasp the plug casing rather than the cable.
Page 6
4 Apache User’s Guide
ADVERTENCIAS
• NO lo enchufe, encienda o intente operar una unidad que
esté dañada o averiada.
• NO hay piezas que puedan ser reparadas por el usuario dentro
de la unidad. NUNCA quite la tapa superior o panel frontal. Todo
servicio debe ser hecho SOLAMENTE por personal de servicio
capacitado de Frontier Design Group.
• Para evitar electrochoque o descarga eléctrica, esta
unidad DEBE estar conectada a un receptáculo de potencia
CA con buena conexión a tierra. No quite o altere la púa de
conexión a tierra en el cable de potencia. Si no está seguro
de que su receptáculo esté adecuadamente conectado a tierra,
haga que verifique esto un electricista capacitado.
• Antes de conectar al cable de potencia, asegúrese que
el interruptor de selección de voltaje (en el panel lateral)
esté fijado al voltaje apropiado para su fuente de poder.
• No permita que dedos toquen las púas de los enchufes cuando
esté instalando o quitando el cable de potencia
de la salida de energía CA.
• Para reducir el riesgo de incendio o electrochoque, no exponga
esta unidad a la lluvia u otro tipo de humedad.
• No manipule el cable de potencia con manos mojadas.
• No tire el cable de potencia para desconectarlo del
receptáculo CA. Agarre el enchufe en vez del cable.
Page 7
Apache User’s Guide 5
AVERTISSEMENTS
• Ne PAS brancher, mettre en marche ni essayer de faire
fonctionner un dispositif endommagé.
• AUCUNE pièce à l’intérieur de ce dispositif ne peut être réparée
ou entretenue par l’utilisateur. Ne JAMAIS déposer le capot ou
le panneau avant. L’entretien ou les réparations NE doivent
être effectués QUE par le personnel d’entretien qualifié du
groupe Frontier Design.
• Afin d’éviter les chocs électriques, ce dispositif DOIT être
connecté à une prise de courant c.a. bien mise à la terre.
Ne pas enlever ou modifier la broche de terre du câble
d’alimentation. Si l’on n’est pas sûr que la prise d’alimentation
est bien mise à la terre, la faire vérifier par un électricien
qualifié.
• Avant de connecter le câble d’alimentation, s’assurer que
le sélecteur de tensio (sur le panneau latéral) est bien réglé
pour la source de courant.
• Ne pas toucher avec les doigts les broches des fiches,
quand on connecte ou déconnecte le câble d’alimentation
de la prise c.a.
• Pour réduire le risque d’incendie ou d’électrocution,
ne pas exposer le dispositif à la pluie ou à l’humidité.
• Ne pas manipuler le câble d’alimentation les mains mouillées.
• Ne pas tirer sur le câble d’alimentation quand on le déconnecte
de la prise c.a. Saisir la fiche plutôt que le câble.
Page 8
6 Apache User’s Guide
WARNUNG
• Beschädigte Geräte NICHT anschließen, NICHT einschalten
und NICHT den Versuch unternehmen, sie zu betreiben.
• Im Gerät befinden sich KEINE Teile, die vom Benutzer gewartet
werden können. Abdeckung und Frontplatte dürfen NIEMALS
entfernt werden. Jegliche Wartungen dürfen NUR von
qualifiziertem Servicepersonal der Frontier Design Group
durchgeführt werden.
• Zur Verhinderung von elektrischen Schlägen MUSS dieses Gerät
an einer ordnungsgemäß geerdeten Wechselstrom-Steckdose
angeschlossen werden. Die Erdungsklemme des Netzkabels darf
nicht entfernt oder verändert werden. Sollte Ungewissheit
darüber bestehen, ob die Steckdose ordnungsgemäß geerdet
ist, muss diese von einem qualifizierten Elektriker überprüft
werden.
• Vor Anschluss des Netzkabels ist sicherzustellen, dass der
Spannungswahlschalter (an der Seitenwand) korrekt auf Ihre
Stromversorgung eingestellt ist.
• Die Finger dürfen bei Verbinden bzw. Trennen des Netzkabels
von der Wechselstrom-Steckdose die Anschlusspole des
Steckers nicht berühren.
• Zur Verringerung des Risikos von Feuer oder elektrischem
Schlag darf diese Einheit weder Regen noch sonstiger
Feuchtigkeit ausgesetzt werden.
• Netzkabel nicht mit nassen Händen berühren.
• Beim Trennen des Netzkabels von der Wechselstrom-Steckdose
nicht am Netzkabel selbst, sondern am Stecker ziehen.
Page 9

Apache User’s Guide 7
Maintenance and Protection
Read instructions — Before using your Apache, please make sure
you’ve read all safety and operating instructions.
Retain instructions — Keep the User’s Guide and safety instructions
for future reference. If you ever have questions about Apache, send
them by email to [email protected].
Heed warnings and instructions — Follow all safety and operating
instructions carefully.
Protective plugs — To prevent dust from accumulating in the
connectors, keep the protective plastic plug inserted in each optical
port that is not currently in use.
Cleaning — Turn off and disconnect Apache before cleaning it. For
cleaning, use a damp cloth. Do not use liquid or aerosol cleaners.
Power cord protection — Arrange all power cords so that they’re not
likely to be walked on or pinched by items placed on or against them.
Lightning — For added protection during lightning storms or
power surges, unplug Apache from the power outlet.
Damage requiring service by qualified technician:
• if the power supply cord or plug has been damaged
• if liquid has been spilled or objects have fallen into the unit
• if the unit has been exposed to rain or other liquid
• if the unit has been dropped or its metal enclosure has been damaged
• if the unit does not operate as described in the User’s Guide
• if the unit exhibits a change in performance
Page 10
8 Apache User’s Guide
Installation
Setting Up
Apache is designed for mounting in a standard 19" rack. You can start
by mounting Apache in your rack and then connecting cables to it, but
it may be easier to pull your cables through an empty rack space and
connect them to Apache before you mount it in the rack.
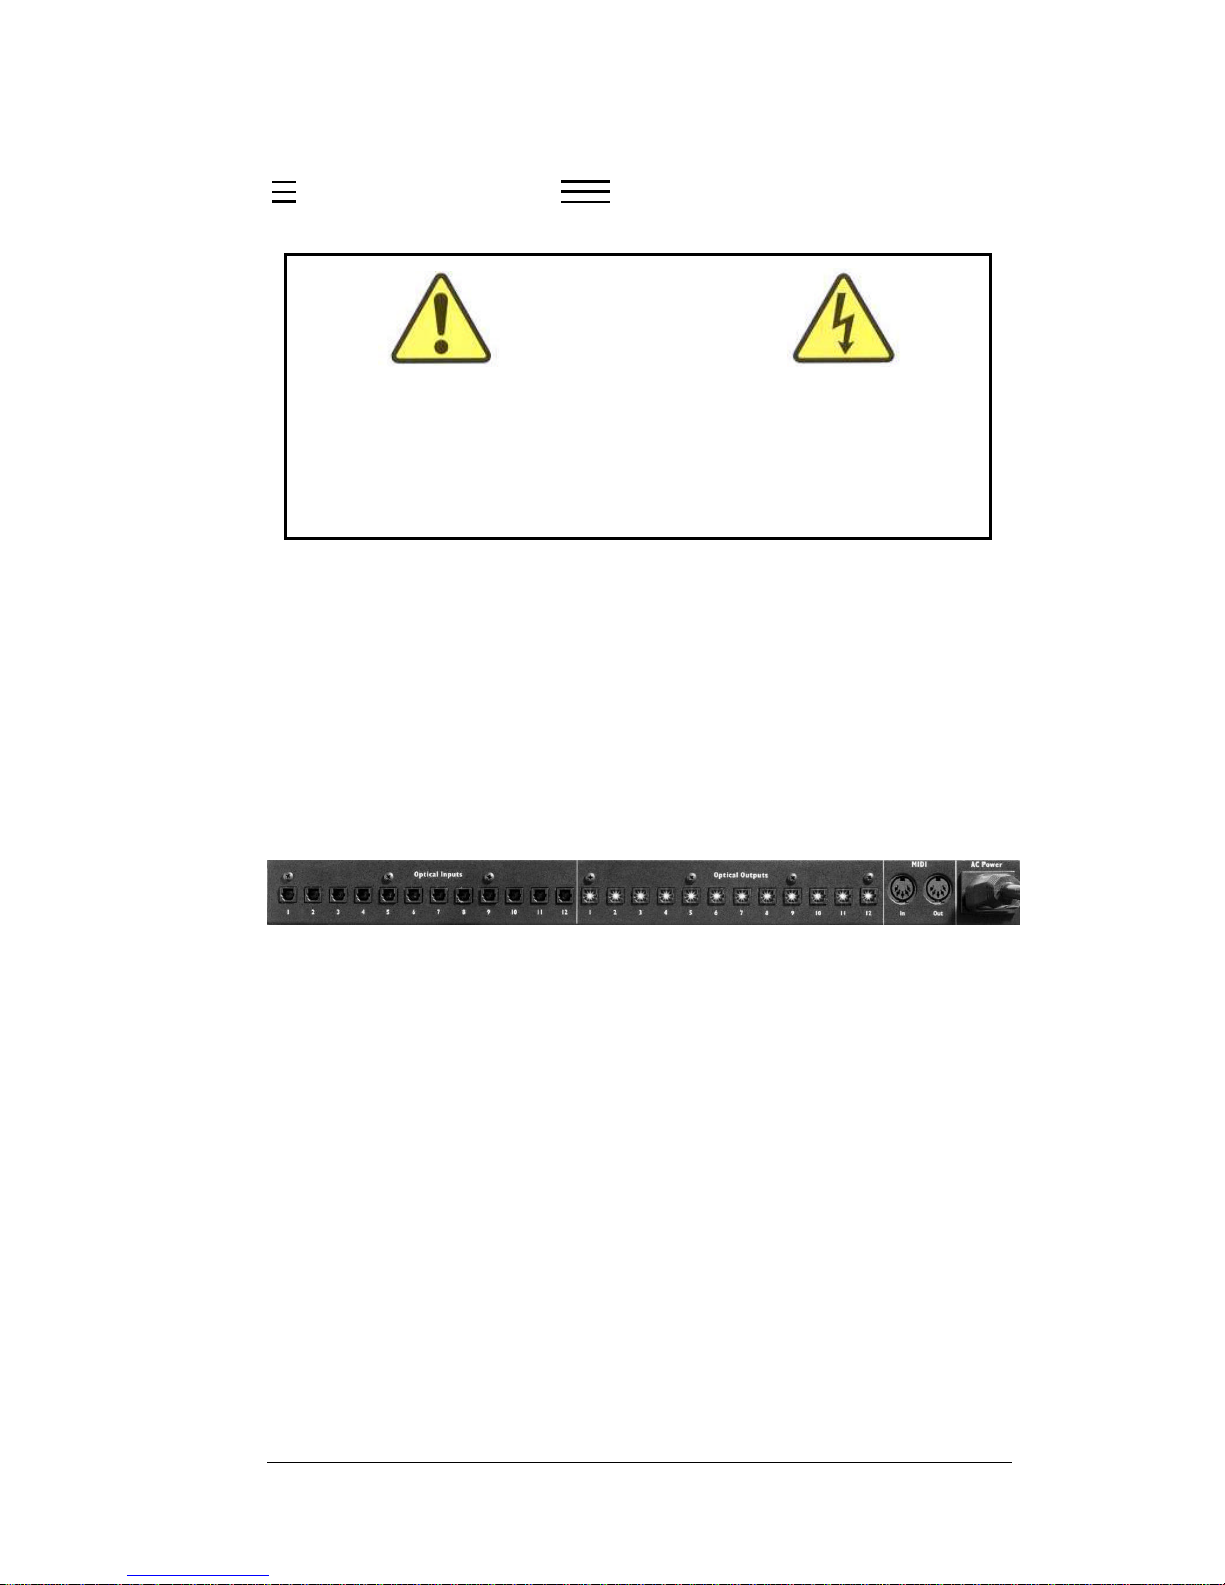
All Apache cables connect to the back panel, shown here:
Most, but not all, lightpipe devices have an equal number of optical
inputs and outputs. It’s often convenient to use the same Apache input
and output numbers for each device, although it’s certainly not
required.
For example, if you have a 4-port computer interface (such as
the Dakota/Montana cards from Frontier Design Group), you
could connect the optical outputs from the cards to Apache
inputs 1, 2, 3, 4, and connect Apache outputs 1, 2, 3, 4 to the
optical inputs on the cards.
WARNING!
Never remove Apache’s top cover or front panel. It has
dangerous voltages inside. If your Apache doesn’t function
properly, refer to the troubleshooting section later in this
User’s Guide or contact Frontier Design Group for help.
Page 11
Apache User’s Guide 9
1. Look at the voltage selection switch (on the Apache side panel), and
verify that it is set correctly for your power source.
2. On the Apache front panel, make sure the power switch is off
(press “O”) and then connect an IEC power cord to the Power input
on the Apache back panel. Connect the other end of the power cord
to the appropriate power source.
3. On the Apache back panel, remove the protective plug from
each optical port you intend to use. Keep the plugs for later use
(to prevent dust from accumulating in any unused optical connectors).
4. Connect the desired optical cables to Apache’s optical inputs and
optical outputs. Be sure that you connect the outputs from other
devices to the Apache inputs, and that you connect the Apache
outputs to the inputs of other devices.
Note: The direction of an optical signal is easy to verify because
optical outputs emit red light. If an optical cable is emitting red light,
the cable is coming from an active output. The outputs use lightemitting diodes (LEDs), not laser light, so their light is not dangerous.
5. If you intend to control Apache from a computer via MIDI, you must
also connect a MIDI cable from the computer’s MIDI OUT port to
Apache’s MIDI IN port. With this connection, you can control Apache
from the computer via MIDI System Exclusive messages. See “Remote
Control” later in this guide for more details.
6. If you want to use two or more Apaches at once, you need to decide
which Apache will be the master, and then connect the appropriate
MIDI ports to create a chain of Apaches. See “Cascading Apaches”
later in this guide for more details.
WARNING!
Before connecting a power cable to Apache, make sure the
voltage selection switch is set properly for your power source.
Page 12

10 Apache User’s Guide
Apache Basics
An Apache input can be patched to any combination of Apache outputs
(all, some, one, or none of the outputs). An Apache output can be
patched from one input or from none of the inputs (in which case, the
output is inactive). You cannot patch multiple inputs to a single output.
Whenever Apache is powered up, a light on the front panel indicates its
current mode — Store, Recall, MIDI, Patch, or Status. Only one mode
is active at a time. Pressing a mode button activates the mode. You
can leave the current mode at any time by pressing a different mode
button.
The buttons on Apache’s front panel provide quick access to all the
Apache functions. These examples demonstrate Apache’s four basic
functions.
To create a patch from input 5 to output 2:
• Press the Patch button.
• Press Input button 5.
• Press Output button 2.
To see what input is patched to output 7:
• Press the Status button.
• Press Output button 7.
To save the current set of patches as preset 10:
• Press the Store button.
• Press Input button 10.
To recall the set of patches previously stored as preset 3:
• Press the Recall button.
• Press Input button 3.
Page 13

Apache User’s Guide 11
Status Modes
There are two status modes — Scanning Status and Activity Status.
You can toggle between the two modes by pressing the Status button
while the Status light is on.
— Scanning Status —
In Scanning Status mode, Apache repeatedly scans through the
inputs from left to right (1, 2, 3, … , 11, 12, 1, 2, 3, … ), lighting
one input at a time while also lighting all the outputs that are currently
patched from that input.
While scanning through the inputs, Apache also provides information
about the input signal. If there’s no signal present at the input
connector, then the input light is dim in Scanning Status mode. If the
input signal is active, then the input light is bright. If the input signal is
in ADAT format, then the ADAT Optical light is also on.
You can temporarily pause Scanning Status mode by pressing an input
or output button to display its current patching (if any).
• Pressing an input button lights the input, and lights all outputs that
are patched from that input. If an input is not currently patched,
pressing the input button lights only that input (no outputs light).
• If the output is currently patched, pressing an output button lights the
output and its input, and lights all other outputs that are also patched
from that input. If the output is not currently patched, pressing an
output button lights only that output (no inputs or other outputs light).
After displaying the selected patch for a few seconds, Apache
automatically begins scanning again.
Page 14

12 Apache User’s Guide
— Activity Status —
In this mode, the Apache input and output lights provide information
about signals on the corresponding optical input and output
connectors.
Activity Status mode indicates which connectors are in use, and which
ADAT connectors are being used for active audio. The input lights are
in one of three states:
Each output light simply shows the same information as the input from
which it is patched. If an output is not patched from any input, the
output light is off.
In Activity Status mode, you can press an input or output button to
display its current patching (if any).
• Pressing an input button lights the input, and lights all outputs that
are patched from that input. If an input is not currently patched,
pressing the input button lights only that input (no outputs light).
• If the output is currently patched, pressing an output button lights the
output and its input, and lights all other outputs that are also patched
from that input. If the output is not currently patched, pressing an
output button lights only that output (no inputs or other outputs light).
After displaying the selected patch for a few seconds, Apache
automatically returns to indicating the activity for all inputs and outputs
again.
off Indicates that there’s no signal present. Either nothing is
connected to the input, or the input is connected to an
inactive optical source.
on (dim) Indicates that a signal is present. It can be an 8-channel
ADAT-format signal whose audio channels are all quiet, or
a 2-channel TOSLINK-format signal.
on (bright) Indicates that an 8-channel ADAT-format signal is present,
with active audio (above -48dBFS) on some channel(s).
Page 15

Apache User’s Guide 13
Patch Modes
Pressing the Patch button initiates Patch mode. You can leave Patch
mode at any time by pressing a different mode button (Status, for
example). When you press the Patch button, all the input and output
lights blink slowly, and you can then press an input or output button to
display its current patching (if any).
Pressing Patch and then an input button activates Input Patch mode.
Pressing Patch and then an output button activates Output Patch
mode. These two modes are useful for different purposes. You can
change Patch modes by pressing the Patch button again to restart
Patch mode selection.
— Input Patch —
In this mode, you press an input button to select the corresponding
input source, and then press output buttons to change which outputs
are patched from that input.
1. Press Patch and then the input you want to select. If you change your
mind, you can just press another input button to select a different
input.
The selected input blinks slowly, and Apache lights all outputs that are
currently patched from that input.
2. Press any output button to toggle its patch from the selected input
on/off. While the same input is selected, you can toggle any or all of
the outputs.
continued è
Page 16

14 Apache User’s Guide
If you patch an input to an output that was originally patched from
another input, the new patch overwrites the original patch. Here are
two examples:
• Suppose input 1 is patched to output 4. If you then patch input 2 to
output 4, the patch from input 1 to output 4 is automatically
disconnected.
• Suppose input 1 is patched to outputs 4, 5, 6, 9. If you then patch
input 3 to output 5, the patch from input 1 to output 5 is automatically
disconnected, and the patches from input 1 to outputs 4, 6, 9 remain
intact.
If you don’t want to overwrite an existing patch, or any part of an
existing group of patches, you can save those patches as a preset
before you define any new patches. See “Store Mode” later in this
guide for more details about saving a preset.
— Output Patch —
In this mode, you press an output button to select it, and then press
an input button to change which input is patched to that output, or
to disconnect its patch.
1. Press Patch and then the output you want to select. If you change
your mind, you can just press another output button to select a
different output.
The selected output blinks slowly, and Apache lights the input (if any)
that is currently patched to that output. Apache also lights all other
outputs that are patched from that input.
2. To change which input is patched to the selected output, press an
unlit input button. Or, if you want to disconnect the patch, press the
lit input button to toggle it off.
Page 17

Apache User’s Guide 15
Store Mode
Apache has 12 presets, which are saved sets of patches that you
can recall and change at any time. Apache comes preloaded with
12 default presets, but it’s easy to make your own presets to fit
your studio setup. To create a new preset:
1. Use Patch mode to create the set of patches that you want to
save as a preset.
2. Press the Store button.
The 12 input lights blink slowly, representing the 12 presets.
3. Press an input button to save all the current patches in that preset,
overwriting the set of patches previously stored in that preset.
The input button blinks briefly to indicate that the new preset is
stored. Then Apache automatically returns to the mode it was in
before you selected Store mode.
Note: If you mistakenly enter Store mode and don’t want to overwrite
any presets, you can leave the mode by pressing a different mode
button (Status or Patch, for example).
In addition to the 12 presets on Apache, you can save an unlimited
number of presets on your computer. See “Remote Control” later in
this guide for more details.
The 12 default presets are listed on the following pages. Here are
three examples to illustrate how the default presets could be used —
Example 1: Suppose you have four 24-channel devices:
• 02R mixer connected to Apache ports 1–3
• computer interface connected to Apache ports 4–6
• hard disk recorder connected to Apache ports 7–9
• three ADAT decks connected to Apache ports 10–12
Default preset 3 sends output from the hard disk recorder to all three
of the other devices, so you could mix it on the 02R, and/or record it on
the computer, and/or back it up on a set of ADAT tapes. Similarly, default
preset 2 sends output from the computer to the 02R, and the hard disk
recorder, and the ADAT decks.
Page 18

16 Apache User’s Guide
Example 2: Suppose you have the same setup as in Example 1.
Default preset 9 lets you transfer audio between the computer and the
ADAT decks (Apache ports 4–6 and 10–12) while also mixing hard disk
material on the 02R (Apache ports 7–9 and 1–3). It’s like setting up your
studio to be two separate mini-studios for a while. Similarly, using the
same setup, default presets 8 and 10 create other pairs of mini-studios:
• default preset 8: 02R n computer, and hard disk n ADAT decks
• default preset 9: 02R n hard disk, and computer n ADAT decks
• default preset 10: 02R n ADAT decks, and computer n hard disk
Example 3: Now suppose you have three 32-channel devices:
• Dakota/Montana PCI cards connected to Apache ports 1–4
• four Tango24 converters connected to Apache ports 5–8
• four ADAT decks connected to Apache ports 9–12
Default preset 12 sends output from the ADAT decks to Dakota/Montana,
and from Dakota/Montana to the Tango24 converters, and from the
Tango24 converters to the ADAT decks. Default preset 6 sends output
from the Tango24 converters to Dakota/Montana and to the ADAT decks.
— Default presets —
preset 1
1122331425361728391102113
12
default preset 1 distributes first set of 24 channels (inputs 1–3 across all outputs)
preset 2
4152634455664758694105116
12
default preset 2 distributes second set of 24 channels (inputs 4–6 across all outputs)
preset 3
7182937485967788997108119
12
default preset 3 distributes third set of 24 channels (inputs 7–9 across all outputs)
preset 4
1011121231041151261071181291010111112
12
default preset 4 distributes fourth set of 24 channels (inputs 10–12 across all outputs)
Page 19

Apache User’s Guide 17
preset 8
41526
3142536107118129710811912
default preset 8 swaps sets of 24 channels (1–3 with 4–6, and 7–9 with 10–12)
preset 9
7182931041151261728394105116
12
default preset 9 swaps sets of 24 channels (1–3 with 7–9, and 4–6 with 10–12)
preset 10
1011121237485964758691102113
12
default preset 10 swaps sets of 24 channels (1–3 with 10–12, and 4–6 with 7–9)
preset 11
5162738495106117128192103114
12
default preset 11 routes sets of 32 channels
preset 12
9110211312415263748596107118
12
default preset 12 routes sets of 32 channels
preset 5
1122334415263748192103114
12
default preset 5 distributes first set of 32 channels (inputs 1–4 across all outputs)
preset 6
5162738455667788596107118
12
default preset 6 distributes second set of 32 channels (inputs 5–8 across all outputs)
preset 7
9110211312495106117128991010111112
12
default preset 7 distributes third set of 32 channels (inputs 9–12 across all outputs)
Page 20

18 Apache User’s Guide
Recall Mode
Any stored preset can be recalled at any time. When you recall
a preset, its set of patches becomes the current set of patches,
replacing any patches that were in effect.
To recall a preset:
1. Press the Recall button.
The 12 input lights blink slowly, representing the 12 presets.
2. Press an input button to recall the desired preset.
The input button blinks briefly to indicate that the preset is
recalled. Then Apache automatically returns to the mode you
were in before Store mode.
Note: If you mistakenly enter Recall mode and don’t want to recall a
preset, you can leave the mode by pressing a different mode button
(Status or Patch, for example).
MIDI Mode
The MIDI IN and MIDI OUT ports on Apache can be used for either or
both of these two purposes —
• remote control of Apache via MIDI System Exclusive (SysEx) messages
from a computer
• connecting multiple Apaches in a cascade configuration (to expand
your patchbay beyond 12 pairs of optical ports)
Regardless of whether you’re using remote control or a cascade
configuration (or both), pressing the MIDI mode button on any Apache
lets you see the current MIDI device ID for that Apache and whether
the Apache is receiving MIDI messages.
Page 21
Apache User’s Guide 19
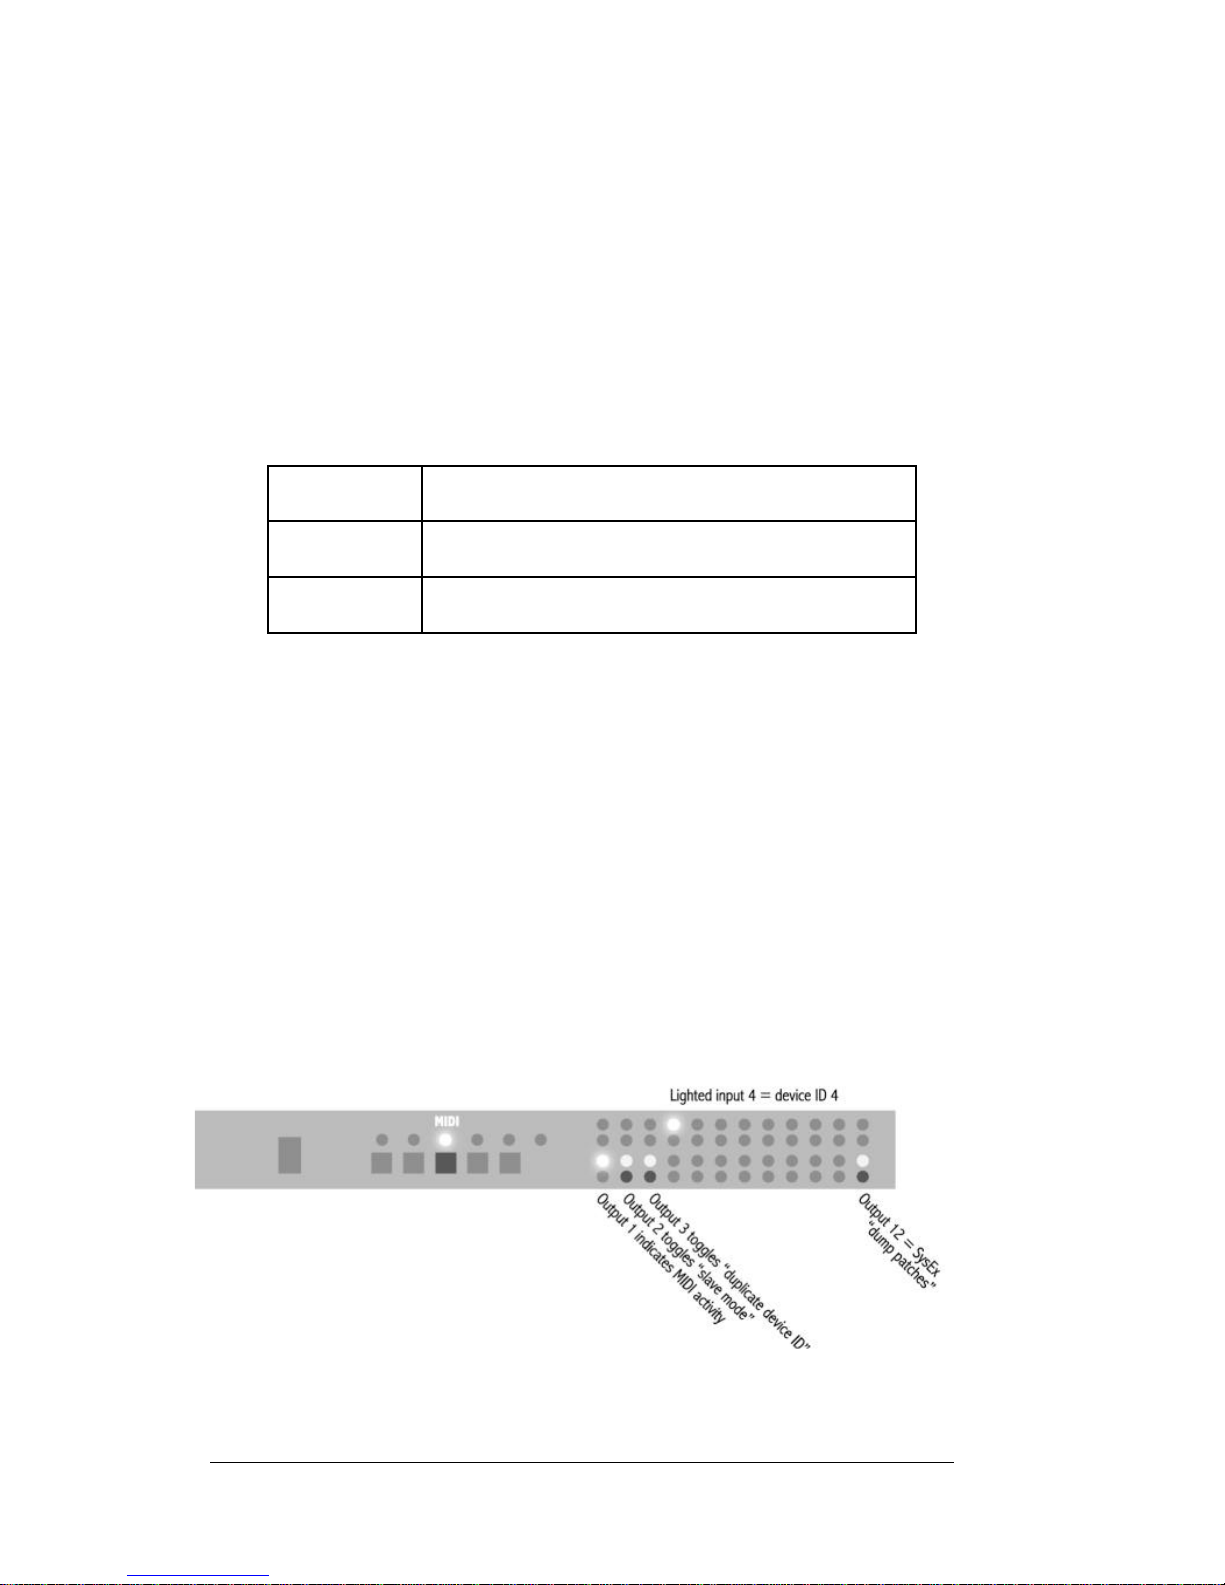
When MIDI mode is selected on any Apache, its MIDI device ID is
indicated by its lit input. For example, the illustration below shows an
Apache with input 4 lit (in MIDI mode), indicating that the Apache is
currently set to device ID 4.
In MIDI mode, the output 1 light on each Apache indicates whether
that Apache is receiving any MIDI messages. The output 1 light can be
off, dim, or bright —
For example, if you’re using remote control and you send a SysEx
message from the computer to an Apache, output 1 lights to indicate
that the Apache is receiving MIDI from the computer.
In MIDI mode, output buttons 2 and 3 let you specify settings
for Apaches in a cascaded configuration. For more details about those
settings (“slave mode” and “duplicate device ID”), refer to “Cascading
Apaches” later in this guide. If you’re using remote control, output
button 12 lets you manually send the current patches from Apache to
the computer (see “Remote Control” for details).
off Apache currently is not receiving MIDI messages
on (dim) Apache detects MIDI active sensing
on (bright) Apache currently is receiving MIDI messages
Page 22

20 Apache User’s Guide
Remote Control
You can remotely control Apache by sending MIDI System Exclusive
(SysEx) messages to it from a computer.
Apache can also send its current patch settings (equivalent to a
preset) to the computer as a SysEx message, where it can be saved as
a file and later sent back to Apache to restore those patches.
— Setting up —
If you want to remotely control Apache from a computer:
1. Connect a standard MIDI cable from the computer’s MIDI OUT port to
the Apache’s MIDI IN port.
2. If you also want the ability to store patch settings on the computer,
then connect another MIDI cable from the Apache’s MIDI OUT port to
the computer’s MIDI IN port (or if you’re using multiple Apaches in a
cascade configuration, then connect the MIDI OUT port of the last
slave Apache to the computer’s MIDI IN port).
Apache does not have a MIDI THRU port, but it does automatically
pass MIDI data from its MIDI IN port to its MIDI OUT port, with only
minimal delay (0.6–1.0 msec).
Page 23
Apache User’s Guide 21
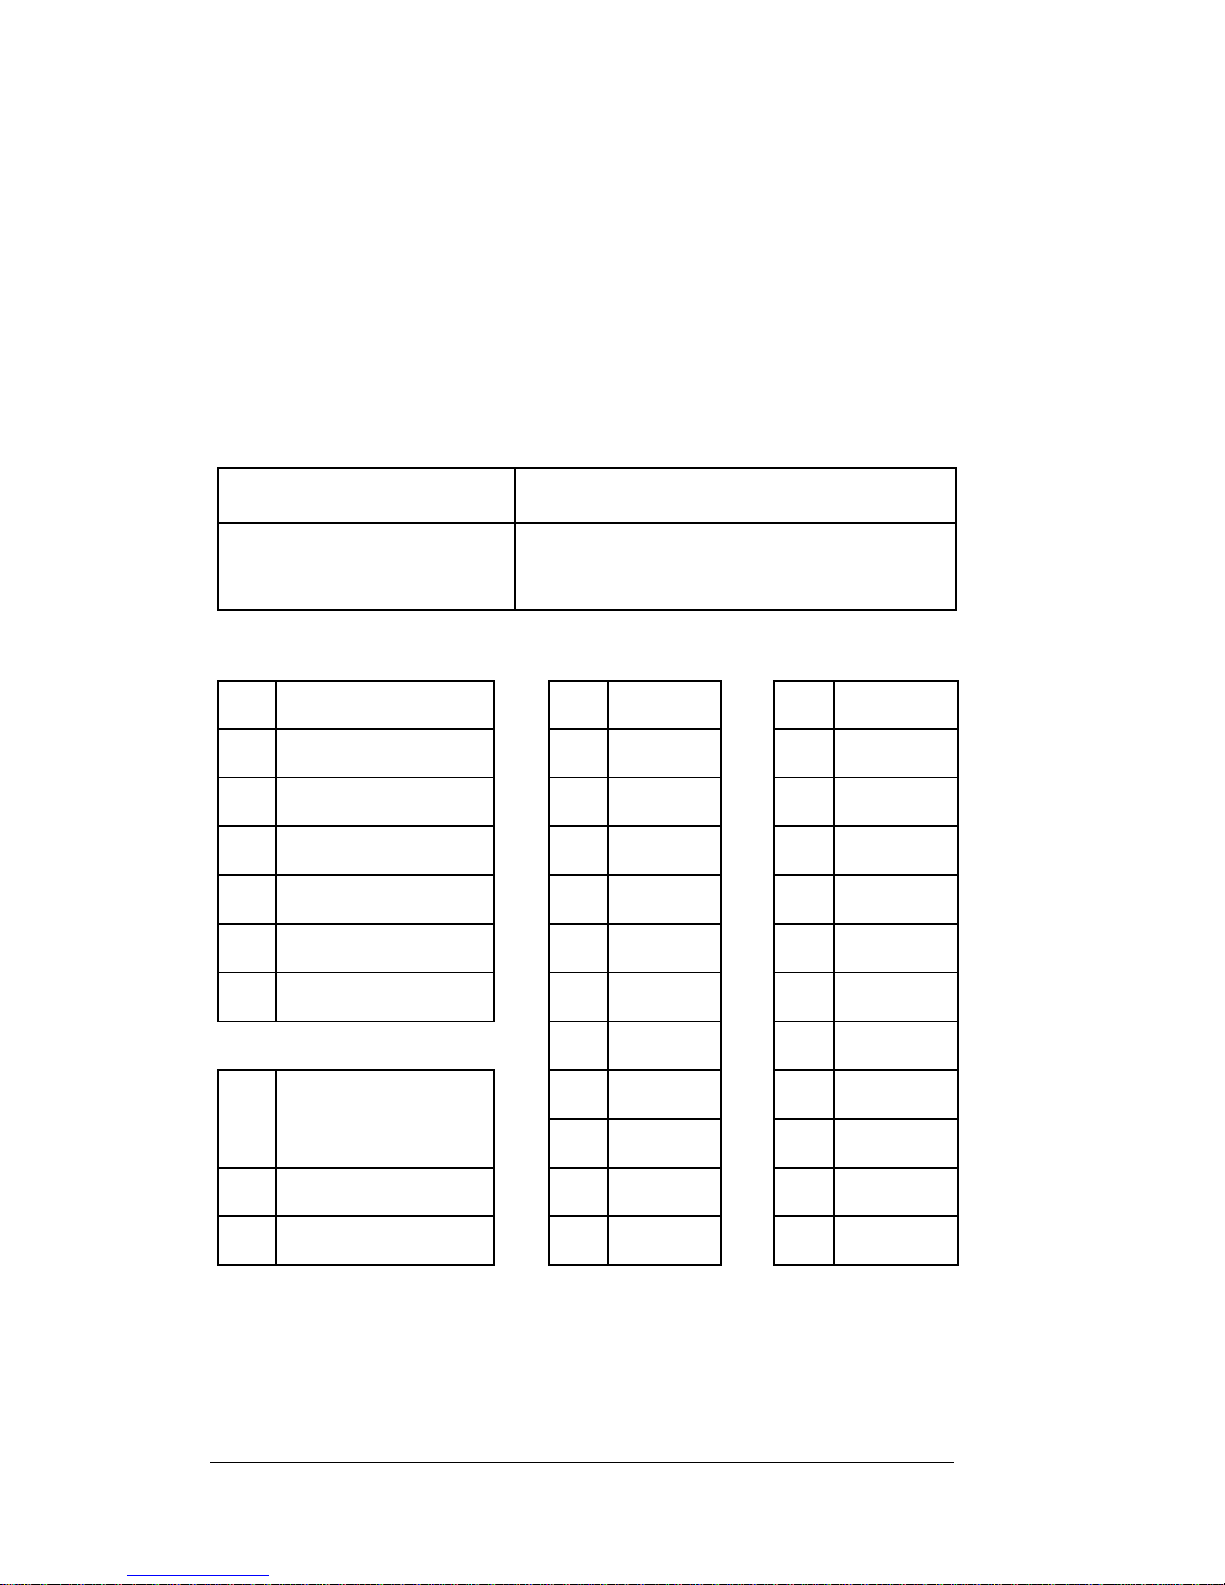
— Remote front panel —
Any of the Apache front panel buttons can be remotely activated
by sending a SysEx message from the computer to the Apache. The
message must contain 7 bytes if it is intended for all the Apaches that
are connected to the computer, or 8 bytes if it is intended only for
Apaches with a particular device ID.
These messages, listed as hexadecimal bytes, are:
The possible “bb” values are:
For example, sending “F0 00 01 40 00 44 F7” is equivalent to pressing
the Status button on all Apaches connected to the computer; sending
“F0 00 01 40 00 08 45 F7” is equivalent to setting only the Apaches
with device ID 9 to Activity Status mode.
40 Store 20 Input 1 10 Output 1
41 Recall 21 Input 2 11 Output 2
42 MIDI 22 Input 3 12 Output 3
43 Patch 23 Input 4 13 Output 4
44 Status 24 Input 5 14 Output 5
45 Activity Status 25 Input 6 15 Output 6
46 Scanning Status 26 Input 7 16 Output 7
27 Input 8 17 Output 8
30 28 Input 9 18 Output 9
29 Input 10 19 Output 10
31 receive these patches 2A Input 11 1A Output 11
32 restart scanning 2B Input 12 1B Output 12
dump the current
patches from Apache
to the computer
F0 00 01 40 00 bb F7
remotely press button “bb” on all Apaches
F0 00 01 40 00 id bb F7
remotely press button “bb” on Apaches with
device ID set to “id” (00=ID1, 01=ID2, …)
Page 24

22 Apache User’s Guide
— Dumping patches —
You can remotely or manually command an Apache to dump its current
patch settings, sending them in a SysEx message to the computer. The
SysEx message can be saved in a file on the computer, and then can
be sent back to Apache when you want to use those patches again.
Using this process, you can save an unlimited number of Apache
presets on the computer.
To remotely command Apache to dump its current patches to the
computer, send one of these two SysEx messages:
To manually command Apache to dump its current patches to the
computer, select MIDI mode on that Apache and then press its output
button 12. The output 12 light will blink for a few seconds to indicate
that the SysEx message is being sent to the computer.
Regardless of whether you’ve remotely or manually commanded
Apache to dump its current patches to the computer, Apache will send
a SysEx message (20 bytes) that includes its device ID and a list of its
current patches. For example, the message could look like this:
F0 00 01 40 00 05 31 01 06 00 02 02 0F 0B 0A 01 04 0F 02 F7
Similarly, if you want to remotely define patches on one or more
Apaches, you can send a SysEx message with the 20-byte format from
the computer to the Apache(s). In this case, the “device ID”
byte is optional — if you omit the device ID byte, all Apaches will
respond to the command (updating their patches); if you include
the device ID byte, only Apaches with matching device IDs will respond.
For example, the message could look like this:
F0 00 01 40 00 02 31 05 03 00 01 04 09 0A 0A 0A 0B 0F 0F F7
F0 00 01 40 00 30 F7 if you’re using a single (non-cascaded) Apache
F0 00 01 40 00 id 30 F7 to restrict the command to an Apache whose
device ID is set to “id”
Page 25

Apache User’s Guide 23
Here’s a description of each byte in the message:
F0 00 01 40 00 02 31 05 03 00 01 04 09 0A 0A 0A 0B 0F 0F F7
F0
Begin MIDI SysEx message
00
1st byte of Frontier Design Group manufacturer’s ID
01
2nd byte of Frontier Design Group manufacturer’s ID
40
3rd byte of Frontier Design Group manufacturer’s ID
00
Apache product ID
02
Device ID (02 = Apache ID 3)
31
Command to receive these patches
05
Output 1 comes from Input 6 (05 = input 6)
03
Output 2 comes from Input 4 (03 = input 4)
00
Output 3 comes from Input 1 (00 = input 1)
01
Output 4 comes from Input 2 (01 = input 2)
04
Output 5 comes from Input 5 (04 = input 5)
09
Output 6 comes from Input 10 (09 = input 10)
0A
Output 7 comes from Input 11 (0A = input 11)
0A
Output 8 comes from Input 11 (0A = input 11)
0A
Output 9 comes from Input 11 (0A = input 11)
0B
Output 10 comes from Input 12 (0B = input 12)
0F
Output 11 is not patched from any input (0F = no
patch)
0F
Output 12 is not patched from any input (0F = no
patch)
F7
End MIDI SysEx message
manufacturer’s ID list of patches (1 byte for each of the 12 outputs)
Page 26
24 Apache User’s Guide
Cascading Apaches
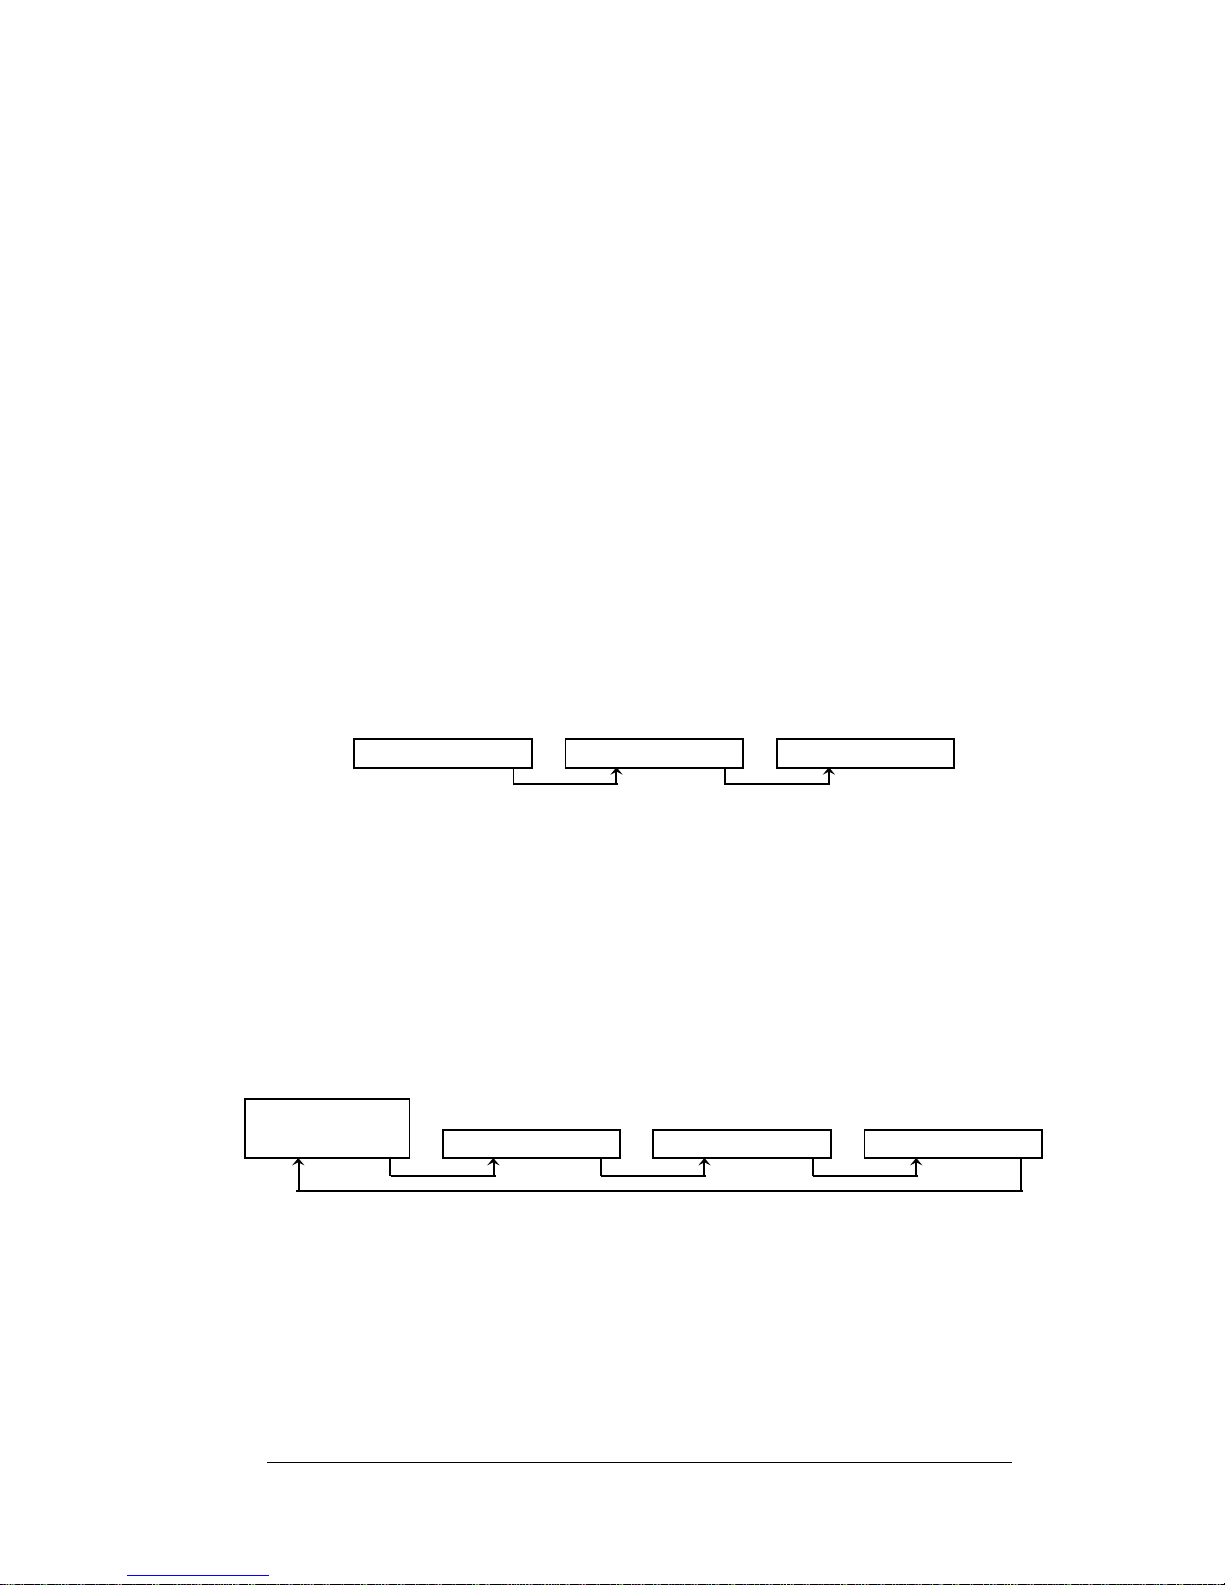
If you need more than 12 pairs of optical ports to connect all of your
gear, you can expand your digital patchbay by using the MIDI ports to
connect a “chain” of Apaches.
When you connect the MIDI OUT port of one Apache to the MIDI IN port
of another Apache, you are cascading the Apaches. There are two
useful cascade styles (both are described more completely later in this
guide) —
• each Apache in the chain has a unique device ID
• all Apaches in the chain have the same device ID
The first Apache in the chain is called the master Apache. You can
cascade any number of Apaches to that master.
Also, if you have properly connected all the MIDI cables, you can
remotely control any or all of the Apaches in a cascaded system,
by using SysEx messages from a computer. For more details about
sending and receiving SysEx messages, refer to “Remote Control”
earlier in this guide.
1st Apache (master) 2nd Apache 3rd Apache
MIDI OUT MIDI IN MIDI OUT MIDI INMIDI OUTMIDI IN MIDI IN
computer
MIDI OUT
1st Apache (master) 2nd Apache 3rd Apache
MIDI OUT MIDI IN MIDI OUT MIDI IN
Page 27

Apache User’s Guide 25
— Setting up —
1. Decide which Apache you want to designate as the master, and
connect its MIDI OUT port to the MIDI IN port of another Apache.
2. If you want to cascade additional Apaches, then connect the MIDI OUT
port of that second Apache to the MIDI IN port of a third Apache.
Continue connecting the MIDI OUT port of each Apache to the MIDI IN
port of the next Apache, for all the Apaches you want to cascade.
Once you’ve cascaded the Apaches via MIDI, pressing any mode
button on the master Apache automatically selects the same mode on
all the cascaded Apaches.
3. (Optional) If you also want to remotely control the Apaches, connect
the computer’s MIDI OUT port to the master Apache’s MIDI IN port.
If you also want the ability to send MIDI messages from any of the
Apaches to the computer, connect the MIDI OUT port of the last
Apache in the chain to the MIDI IN port of the computer.
4. Press the master Apache’s MIDI mode button to display the device ID
for all Apaches in the chain.
The device ID for each Apache is indicated by its lighted input button.
By default, the device ID for each Apache is set to 1. To change the
device ID for any Apache in MIDI mode, simply press the desired input
button (1 through 12) on that Apache.
The cascade examples included later in this chapter provide more
details about setting the appropriate device IDs. Regardless of the
cascade style, you can always press the MIDI mode button on any
Apache to display (and change) its current MIDI device ID.
Note: If any of the Apaches are in Scanning Status mode, their
scanning positions may be temporarily unsynchronized (for example,
the master Apache may be scanning through inputs 7, 8, 9 while a
cascaded Apache is scanning through inputs 2, 3, 4). But as soon as
the master Apache restarts scanning at input 1, it will automatically
synchronize the scanning positions of all the cascaded Apaches.
Page 28
26 Apache User’s Guide
— Cascading with unique MIDI device IDs —
Use this cascade style when you want to have multiple Apaches with
independent patch configurations, but with presets that are unified
across the set of Apaches.
When the Apaches have unique device IDs, the optical signals can be
patched within each Apache or between Apaches (if there are optical
cables connected between the Apaches). For example, with the proper
cabling and settings, you can patch input 5 of one Apache
to output 8 of another Apache.
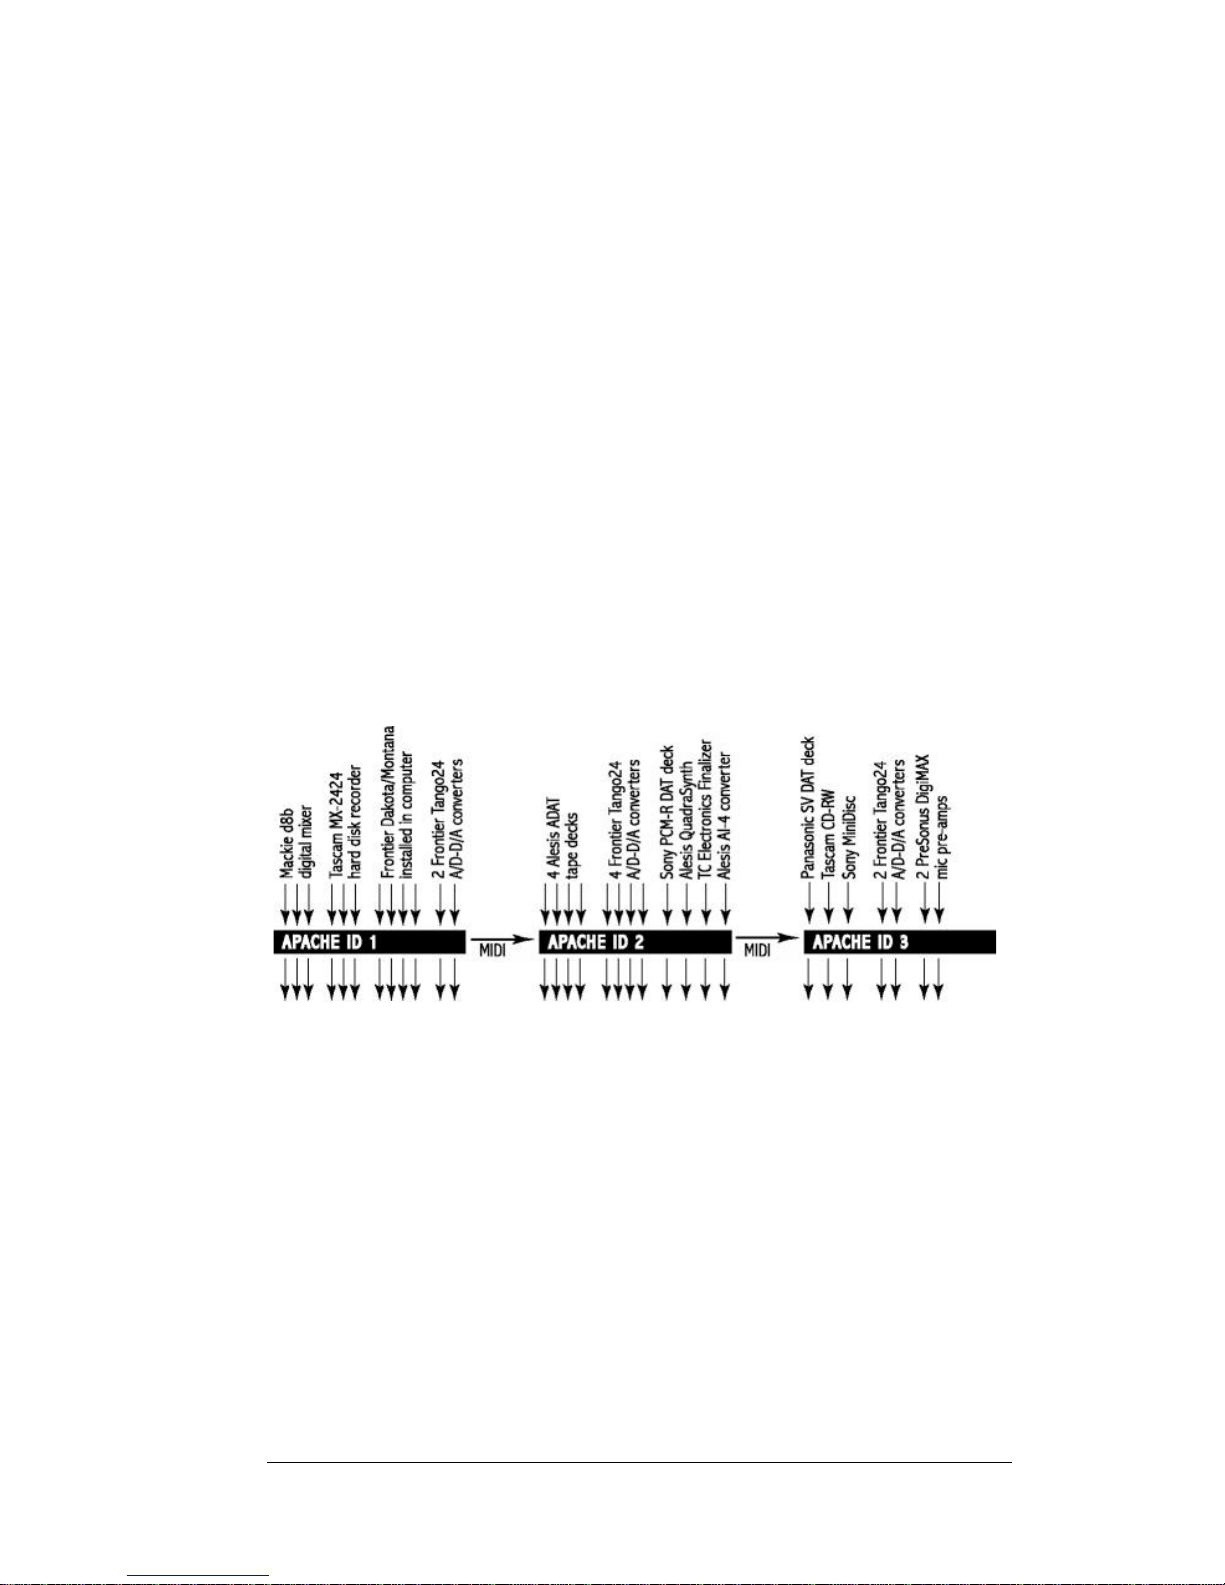
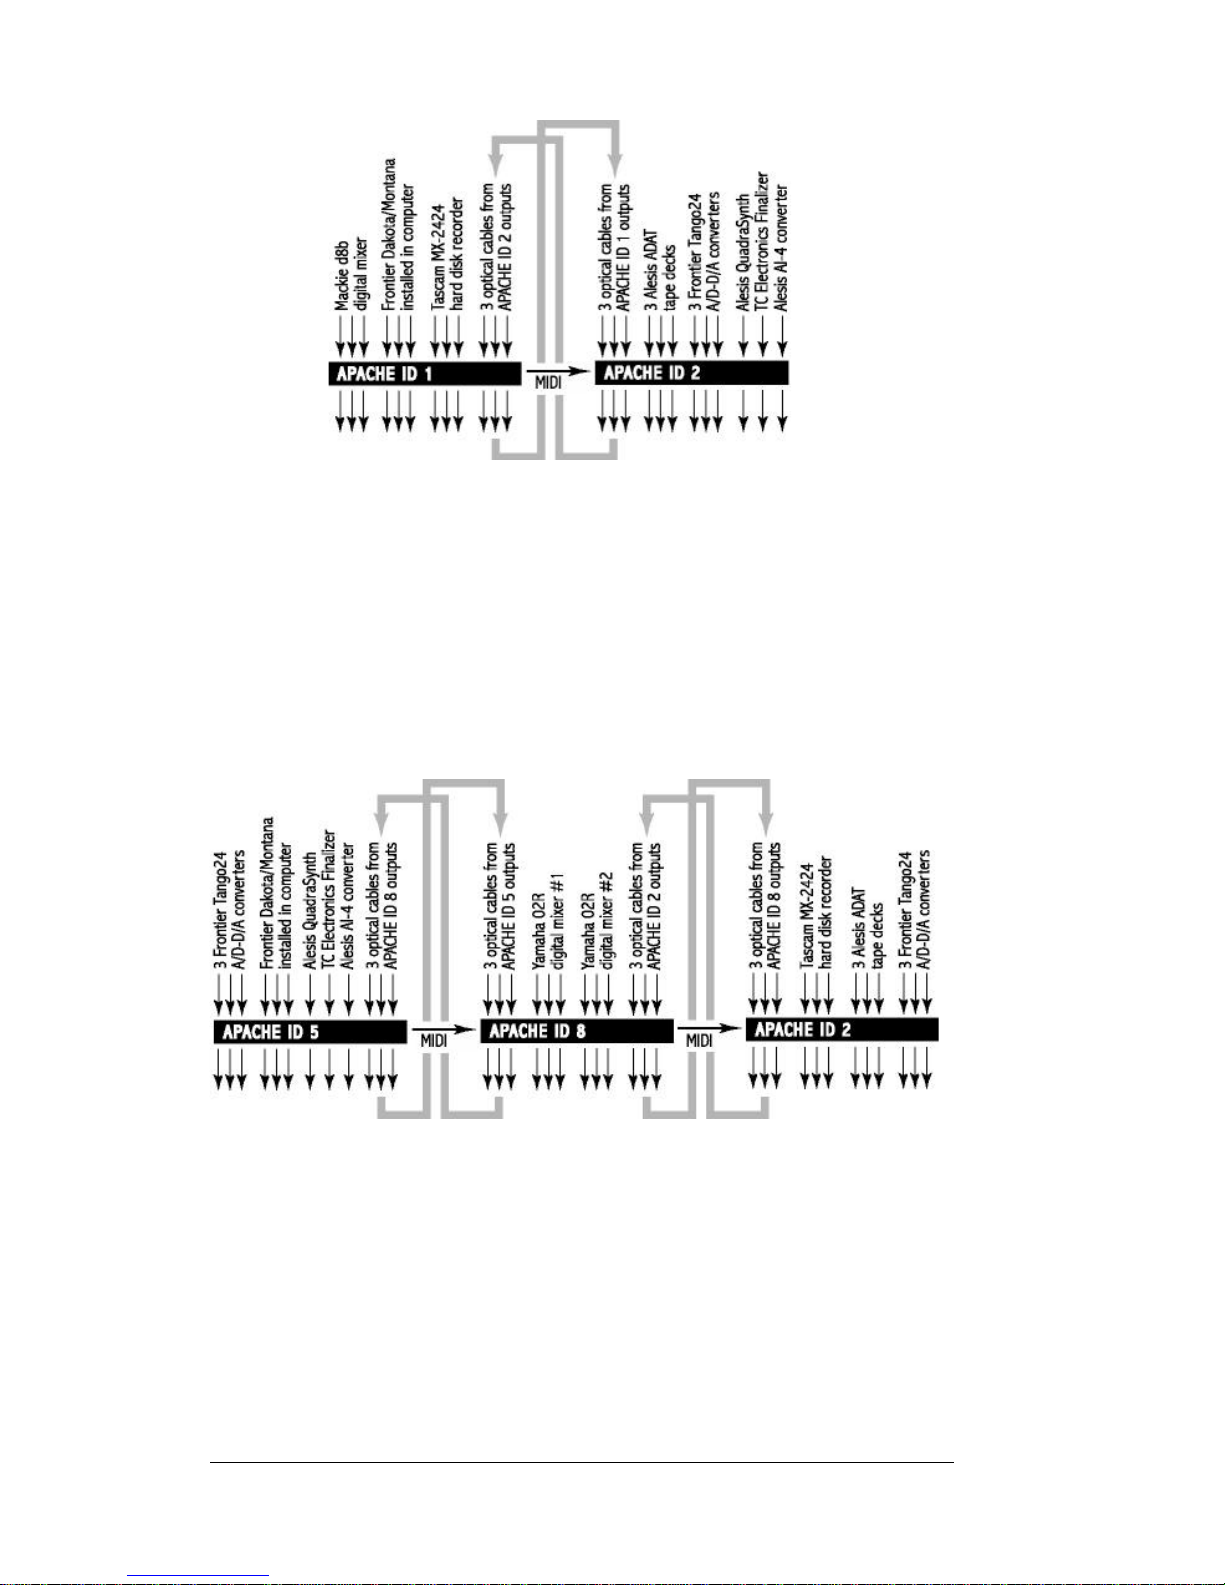
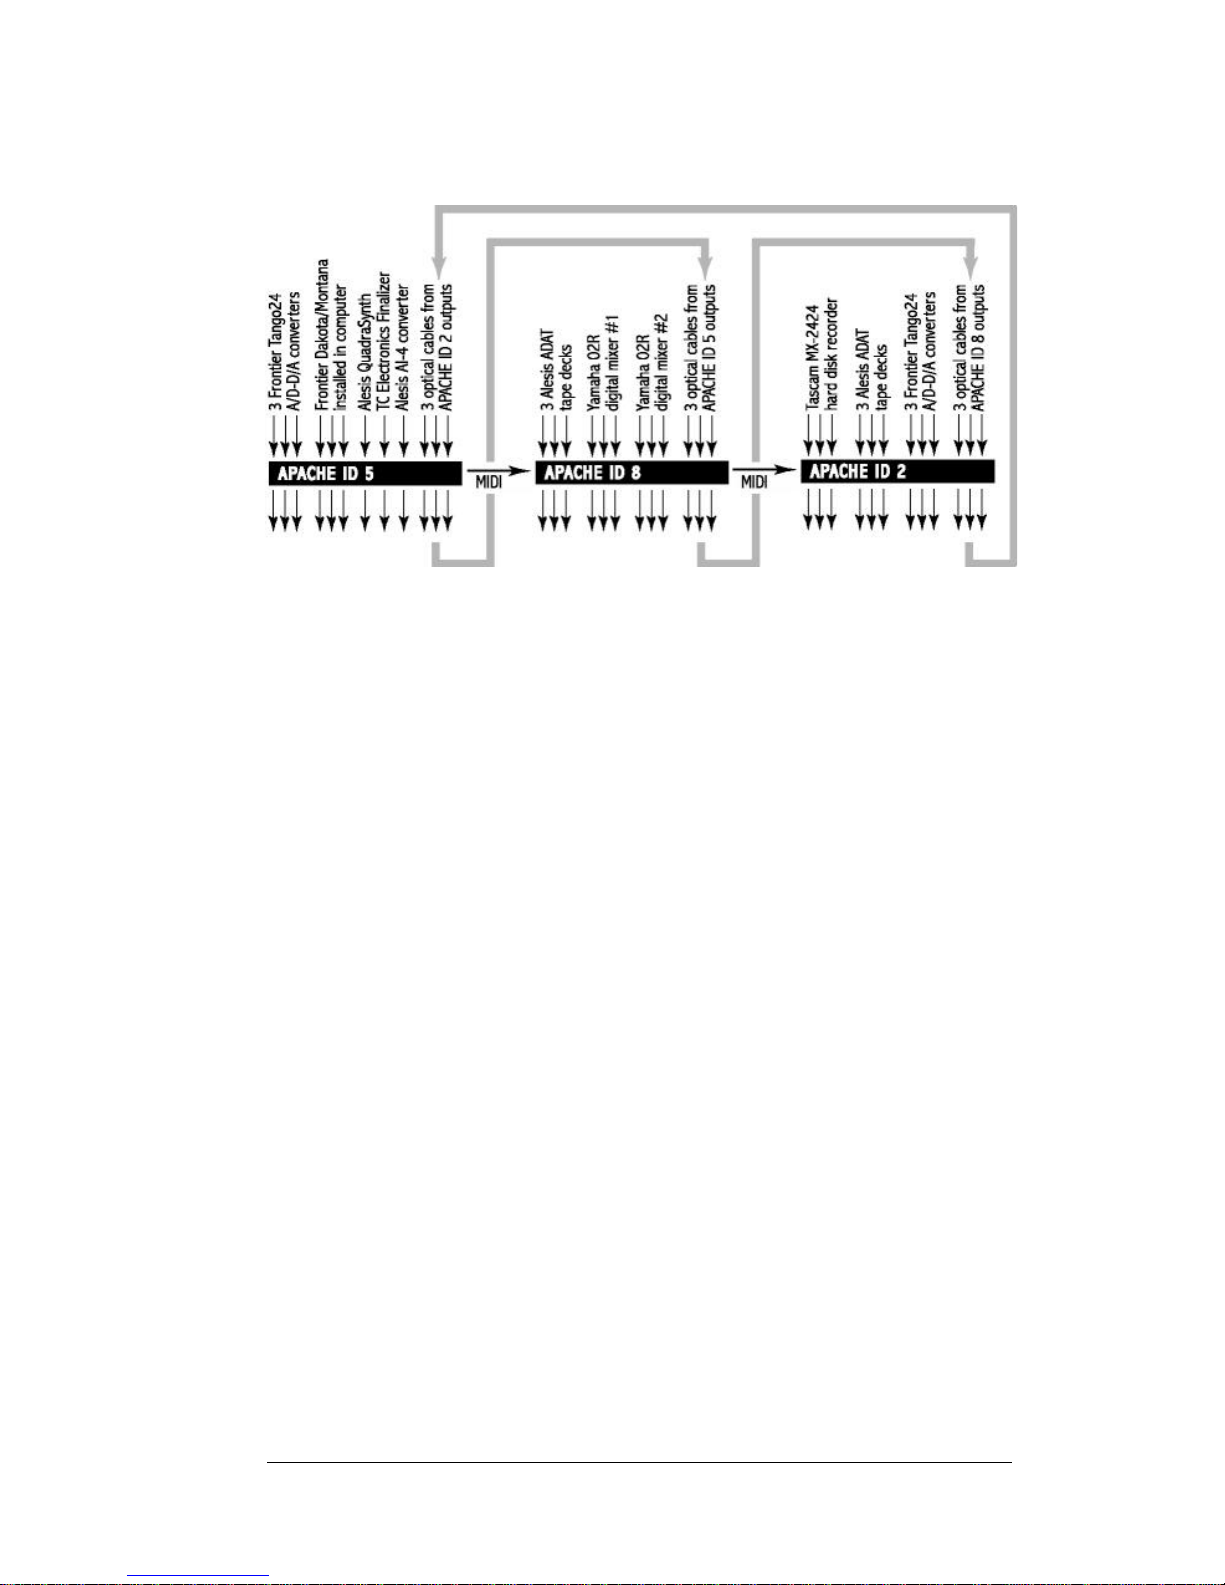
Figure 1 illustrates a scenario in which patches remain local within
each Apache. Figures 2, 3, and 4 illustrate three scenarios in which
patches can be made between Apaches.
Figure 1. Each Apache has a unique device ID, and all patches remain local within each
Apache. For example, any device connected to Apache ID 1 can be patched to any other
device connected to Apache ID 1, but cannot be patched to any device connected to
Apache ID 2 or 3 (because there are no optical connections between the Apaches).
Although the patches remain local within each Apache, storing (or recalling) any preset on
the master Apache will automatically store (or recall) the patches for all of the cascaded
Apaches too. For example, you can define some patches on Apache ID 1, some patches on
Apache ID 2, and some patches on Apache ID 3, and then store all of those patches by
storing a preset on the master Apache (ID 1 in this illustration). If you later recall that
preset on the master Apache, the patches on all three Apaches will be recalled.
Page 29
Apache User’s Guide 27
Figure 3. Each Apache has a unique device ID, and patches can extend across different
Apaches (for example, a device connected to Apache ID 2 can be patched to a device
connected to Apache ID 5 because there are optical outputs from Apache ID 2 connected
to optical inputs of Apache ID 8, and there are optical outputs from Apache ID 8 connected
to optical inputs of Apache ID 5).
In the scenario illustrated in Figure 3, if you wanted to patch 24 channels of output from
the three ADAT tape decks to Dakota/Montana in the computer, you’d patch inputs 7, 8, 9
on Apache ID 2 to outputs 1, 2, 3 on Apache ID 2, and also patch inputs 10, 11, 12 on
Apache ID 8 to outputs 1, 2, 3 on Apache ID 8, and also patch inputs 10, 11, 12 on
Apache ID 5 to outputs 4, 5, 6 on Apache ID 5. These patches can be stored as a unified
preset, as described in Figure 1.
Figure 2. Each Apache has a unique device ID, and patches can extend across different
Apaches (for example, a device connected to Apache ID 1 can be patched to a device
connected to Apache ID 2 because there are optical outputs from Apache ID 1 connected
to optical inputs of Apache ID 2).
In the scenario illustrated in Figure 2, if you wanted to patch 24 channels of output from
the Mackie d8b mixer to the three ADAT tape decks, you’d patch inputs 1, 2, 3 on Apache
ID 1 to outputs 10, 11, 12 on Apache ID 1, and also patch inputs 1, 2, 3 on Apache ID 2
to outputs 4, 5, 6 on Apache ID 2. These patches can be stored as a unified preset, as
described in Figure 1.
Page 30
28 Apache User’s Guide
Figure 4. Each Apache has a unique device ID, and patches can extend across different
Apaches (for example, a device connected to Apache ID 2 can be patched to a device
connected to Apache ID 8 because there are optical outputs from Apache ID 2 connected
to optical inputs of Apache ID 5, and there are optical outputs from Apache ID 5 connected
to optical inputs of Apache ID 8).
In the scenario illustrated in Figure 4, if you wanted to patch 24 channels of output from
the MX-2424 hard disk recorder to the 02R mixer #1, you’d patch inputs 1, 2, 3 on
Apache ID 2 to outputs 10, 11, 12 on Apache ID 2, and also patch inputs 10, 11, 12 on
Apache ID 5 to outputs 10, 11, 12 on Apache ID 5, and also patch inputs 10, 11, 12 on
Apache ID 8 to outputs 4, 5, 6 on Apache ID 8. These patches can be stored as a unified
preset, as described in Figure 1.
Page 31

Apache User’s Guide 29
To set up multiple Apaches with unique device IDs:
1. Press the MIDI mode button on the master Apache. The current
MIDI device ID for each Apache is indicated by its lighted input.
2. Press the appropriate Input button on each Apache to make sure
that different input numbers are lighted on the master and on each
cascaded Apache. For example, you could press Input 1 on the master
Apache to assign it device ID 1, Input 2 on the next Apache to assign
it device ID 2, Input 3 on the next Apache to assign it device ID 3, and
so on for all the cascaded Apaches.
3. Make sure MIDI mode is selected, and then on each cascaded
Apache (but not on the master), press Output button 2 to enable
“slave mode” (so that only the master Apache’s mode buttons will
control the mode selection for the cascaded Apaches).
When Output 2 is lit on all the slave Apaches, only the master
Apache’s mode buttons (Patch, Status, Store, Recall) are functional.
The MIDI mode button remains functional on all Apaches at all times.
In Patch mode, you can still press the Input and Output buttons on
any Apache to independently define patches for that Apache. In Status
mode, you can still press the Input and Output buttons on any Apache
to check individual patches. If you store (or recall) a preset on the
master Apache, then the corresponding preset is automatically stored
(or recalled) on all the slave Apaches too.
Unless you’re controlling the Apaches from a computer,
do not enable Output 2 (“slave mode”) on the master
Apache. Although it is possible to press the button and
turn on the light, all the Apaches would then be defined
as slaves — a configuration that’s not useful.
Page 32
30 Apache User’s Guide
— Cascading with the same MIDI device IDs —
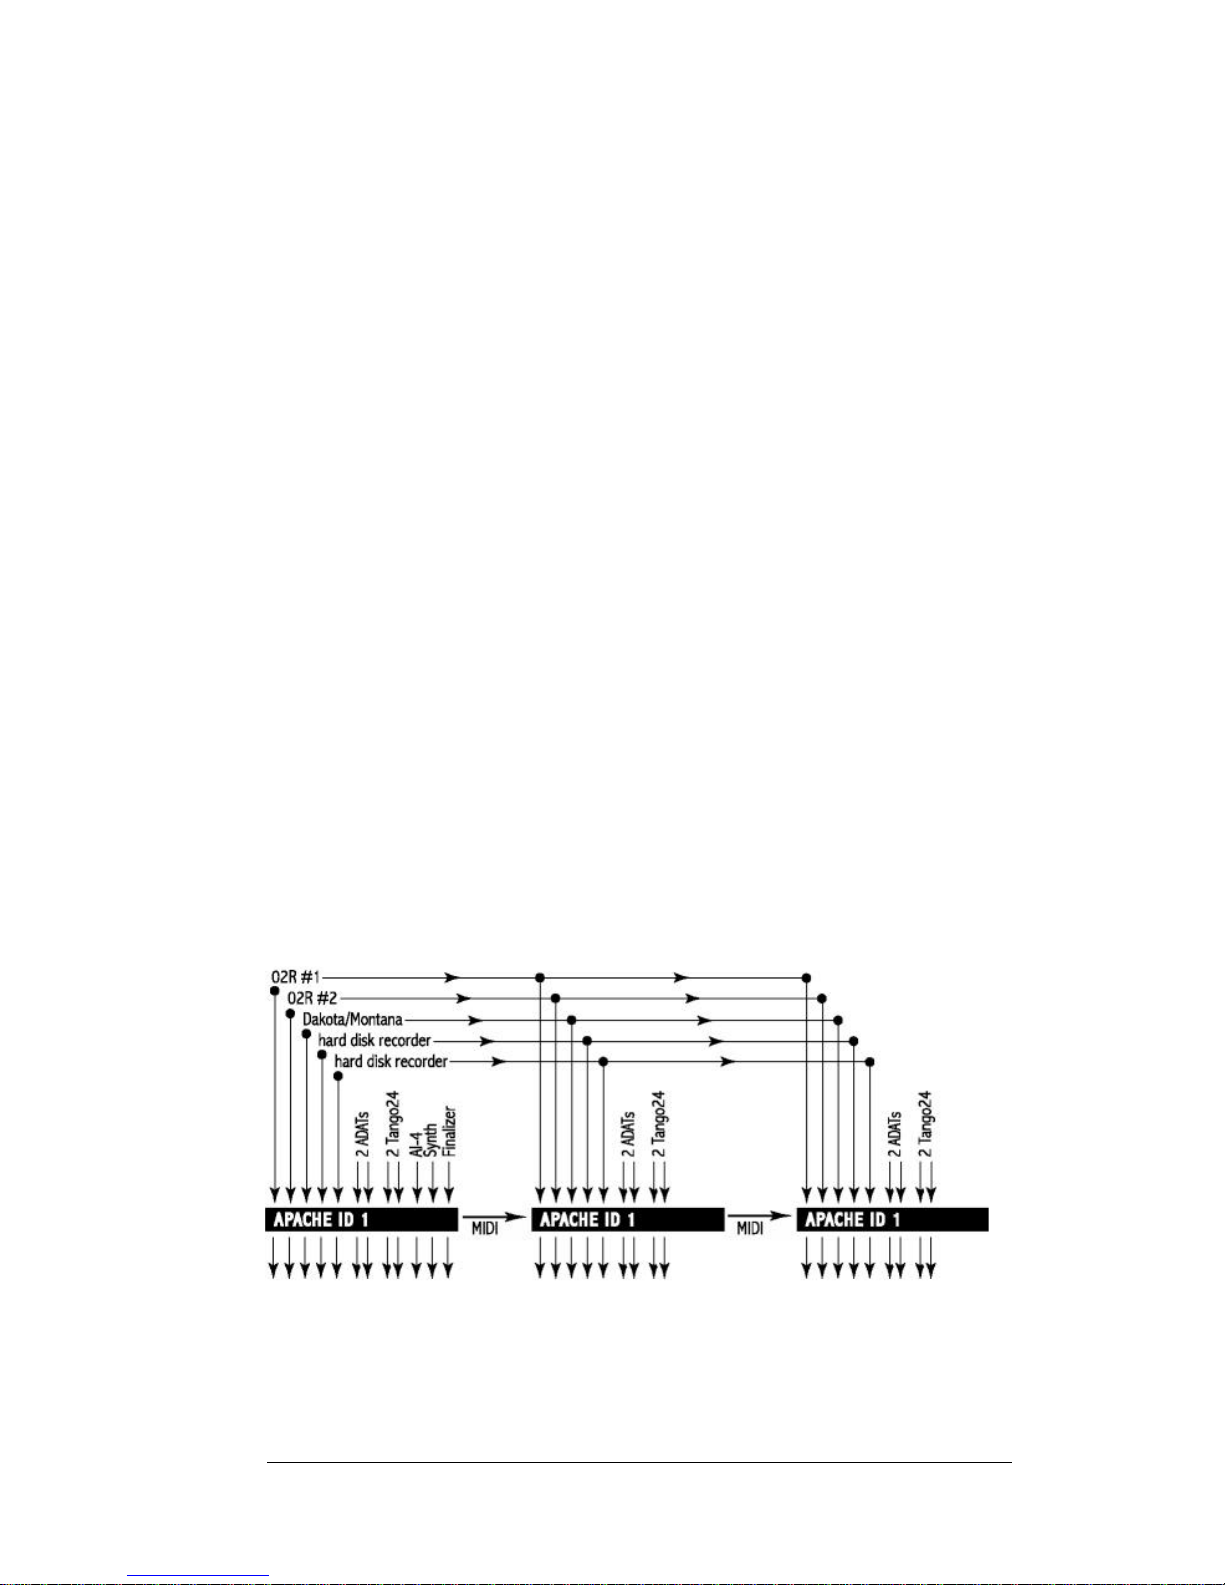
Use this cascade style when you want to have multiple Apaches that
function as if they were one “wider” Apache in which each input and
output accommodates 16 or 24 channels rather than 8 channels.
For example, you could distribute several 24-channel devices across
three Apaches, by connecting 8 channels from each device to the
same optical input on all three Apaches.
Figure 5 illustrates one possible scenario, with:
All three Apaches set to the same device ID,
02R #1 channels 1–8 connected to input 1 on the master Apache,
02R #1 channels 9–16 connected to input 1 on the second Apache,
02R #1 channels 17–24 connected to input 1 on the third Apache;
02R #2 channels 1–8 connected to input 2 on the master Apache,
02R #2 channels 9–16 connected to input 2 on the second Apache,
02R #2 channels 17–24 connected to input 2 on the third Apache;
Dakota/Montana channels 1–8 connected to input 3 on the master Apache,
Dakota/Montana channels 9–16 connected to input 3 on the second Apache,
Dakota/Montana channels 17–24 connected to input 3 on the third Apache;
and so on for other 24-channel devices. Other 8-channel devices
(such as a Tango24) can also be connected, as shown in Figure 5.
Figure 5. Each Apache has the same device ID (in this example, ID 1).
Page 33

Apache User’s Guide 31
To set up multiple Apaches with the same device ID:
1. Press the MIDI mode button on the master Apache. The current
MIDI device ID for each Apache is indicated by its lighted Input.
2. If necessary, press the appropriate Input button on each Apache
to make sure that the same Input number is lighted on the master
and all cascaded Apaches. For example, you could press Input 5
on the master Apache and on each cascaded Apache to assign
MIDI device ID 5 to all of them.
3. Make sure MIDI mode is selected, and then on each cascaded
Apache (but not on the master), press Output button 2 to enable
“slave mode” (so that only the master Apache’s mode buttons will
control the mode selection for the cascaded Apaches).
4. On each slave Apache, also press Output button 3 to enable
“duplicate device ID.” When Output 3 is lit, you can only define
patches and presets by pressing buttons on the master Apache,
and any settings on the master Apache are automatically duplicated
on each slave Apache.
Now that you’ve enabled slave mode and duplicate device ID on each
cascaded Apache, you can use the buttons on the master Apache to
simultaneously control the settings of the master and all the slave
Apaches.
For example, if you patch input 6 to outputs 8 and 9 on the master
Apache, then input 6 will automatically be patched to outputs 8 and 9
on all the slave Apaches too. And if you store (or recall) preset 3 on
the master Apache, then preset 3 is automatically stored (or recalled)
on all the slave Apaches too.
Unless you’re controlling the Apaches from a computer,
do not enable Outputs 2 and 3 (“slave mode” and
“duplicate device ID”) on the master Apache. Although it
is possible to press those buttons and turn on those lights,
all the Apaches would then be defined as slaves —
a configuration that’s not useful.
Page 34

32 Apache User’s Guide
Frequently Asked Questions (FAQ)
Questions Answers
If I patch an input to several
outputs, does the signal become
degraded or distorted?
No. Whether the input is patched to one
output or to all 12, the same clean signal is
delivered through each output.
Can Apache route several inputs
to a single output?
No. Combining multiple inputs is a mixing
function. Apache doesn’t mix or alter the
optical signals.
How do I select an Apache input
to serve as the clock master for
the Apache outputs?
You don’t! Each Apache input is separately
re-clocked and transmitted to its patched
outputs. In effect, whatever is the clock
source of the Apache input becomes the
clock source of its patched outputs. In terms
of clocking, Apache acts just like a set of
optical cables.
Can Apache convert between
ADAT and TOSLINK signals?
No. Apache is only for routing signals, not for
converting signal formats.
Can I use multiple Apaches
together?
Yes. You can cascade any number of
Apaches and use them together. See
“Cascading Apaches” earlier in this guide for
details.
What’s the longest optical cable
that can be used with Apache?
Apache has been tested successfully with
many devices, using optical cables up to
10 meters (33 feet) long.
Can Apache send and receive
S/MUX, MR-X, PAQRAT, or other
variations of ADAT optical
signals?
Yes. Apache recognizes, re-clocks, and
faithfully passes any information that is
encoded in an ADAT optical signal, including
these alternative formats.
Can I save more than
12 presets?
Yes. Apache’s remote control feature lets you
save an unlimited number of presets on the
computer. See “Remote Control” earlier in
this guide for details.
Page 35

Apache User’s Guide 33
Optical Signals
Optical devices commonly transmit audio signals with either of these
two different formats: ADAT or TOSLINK.
The ADAT optical format was pioneered by Alesis for the original
ADAT digital audio tape machine. This format supports 8 channels
of 24-bit data at 44.1 or 48 kHz. Other manufacturers have used
ADAT-formatted signals to transmit other audio formats, such as
4 channels of 24-bit audio data at 96 kHz.
The TOSLINK format is the optical equivalent of SPDIF. It transmits
2 channels of 24-bit audio data, usually at 44.1 or 48 kHz.
ADAT and TOSLINK signals use exactly the same LED transmitters,
optical receivers, and plastic fiber optical cables. There is no way to
know which kind of signal is being transmitted by an optical cable just
by looking at it.
The plastic optical cables (also called lightpipes) are remarkably
durable. However, here are some recommendations for optimum
performance:
• Optical cables are flexible, so you can bend them gently, but
do not bend them sharply.
• Use the shortest optical cable that will work for each connection,
to minimize the optical pulse distortion that occurs in all plastic
fiber optical cables.
• Be careful not to scratch the polished tips of the optical cables,
especially when inserting them into an optical port.
• Dust can accumulate in any open, unused optical port, causing
it to malfunction. To prevent dust from accumulating in the
connectors, keep the protective plastic plug inserted in each
optical port that is not currently in use.
Page 36
34 Apache User’s Guide
Troubleshooting
Problem Solutions
No lights are lit when I turn on
the Apache power switch.
• Make sure the Apache power cable is
securely connected to an appropriate power
source and to the Apache power input.
• Verify that the Apache power switch is on
(press “|”).
I’m not getting any audio from
Apache.
• Verify that the source device is sending
audio, and that the source and destination
devices are using the same optical signal
format (either ADAT or TOSLINK).
• Use Apache’s Status button to select
Activity Status mode. Then press the input
button that corresponds to the source
device, and verify that it is patched to the
intended output.
• In Activity Status mode, verify that Apache’s
input and output lights correspond to the
signal you’re trying to transmit. The Apache
lights should be on (dim) if transmitting a
TOSLINK-format signal, or on (bright) if
transmitting an ADAT-format signal.
• Temporarily connect an optical cable from
the source device directly to the destination
device, bypassing the Apache. If the problem
still exists, it is caused by something other
than Apache.
WARNING!
Never remove Apache’s top cover or front panel.
If your Apache does not power up correctly, contact
Frontier Design Group for assistance.
Page 37

Apache User’s Guide 35
continued è
Problem Solutions
I’m getting clicks and pops on
signals going through Apache.
• Check the source device and the
destination device for each optical signal, and
make sure that there’s exactly one audio
clock master (set to Internal) in the system.
• Temporarily connect an optical cable from
the source device directly to the destination
device, bypassing the Apache. If the problem
still exists, it is caused by something other
than Apache.
A destination device is indicating
errors when receiving a signal
from Apache.
• Verify that the source device is sending
audio, and that the source and destination
devices are using the same optical signal
format (either ADAT or TOSLINK).
• Use Apache’s Status button to select
Activity Status mode. Then press the input
button that corresponds to the source
device, and verify that it is patched to the
intended output.
• In Activity Status mode, verify that Apache’s
input and output lights correspond to the
signal you’re trying to transmit. The Apache
lights should be on (dim) if transmitting a
TOSLINK-format signal, or on (bright) if
transmitting an ADAT-format signal.
• Temporarily connect an optical cable from
the source device directly to the destination
device, bypassing the Apache. If the problem
still exists, it is caused by something other
than Apache.
I have two Apaches, but I can’t
get one of them to control the
other.
• Verify that a known-good MIDI cable is
connected from the master Apache’s MIDI
OUT port to the slave Apache’s MIDI IN port.
• Refer to “Cascading Apaches” earlier in this
guide to verify that all of the settings on both
Apaches are correct.
Page 38

36 Apache User’s Guide
Problem Solutions
Apache is not responding
properly to MIDI messages
from my computer.
• Verify that a known-good MIDI cable is
connected from the correct MIDI OUT port of
the computer to the MIDI IN port on Apache.
• Send a MIDI message from the computer,
and verify that Apache’s MIDI indicator lights
(press the MIDI mode button and look at the
output 1 light when sending a SysEx message
from the computer).
• Compare the bytes in the SysEx message to
the information provided in “Remote Control”
(earlier in this guide) to make sure that
you’re sending a valid SysEx message.
• If the MIDI message includes the device ID
byte, make sure that byte corresponds to the
actual device ID of the Apache you’re trying
to use (and remember that SysEx messages
use hexadecimal numbers: 00 = ID1, 01 =
ID2, … , 09 = ID10, 0A = ID11, 0B =
ID12)
Optical inputs
and outputs
12 inputs and 12 outputs supporting both ADAT and TOSLINK
(optical SPDIF) digital audio signals on standard optical
connectors
MIDI
1 MIDI input and 1 MIDI output
Patch presets
12 presets within Apache unit; unlimited number of presets when
using computer-based MIDI control
Power
120V~0.2A 60Hz
230V~0.1A 50Hz
Dimensions
19" x 4.8" x 1.75" (1U rackmount enclosure)
48.7 cm x 12.1 cm x 4.5 cm
Weight
4.5 lbs (2.1 kg)
— Apache Specifications —
These specifications are subject to revision without notice.
Page 39

Limited Warranty
Frontier Design Group, LLC (“FRONTIER”) warrants this product to be free of defects in
material and workmanship for a period of one (1) year from the date of original retail
purchase. This warranty is enforceable only by the original retail purchaser. Any written or
oral information or advice given by FRONTIER dealers, distributors, agents, or employees will
in no way increase the scope of this warranty. FRONTIER’s entire liability and your sole and
exclusive remedy for any breach of the foregoing limited warranty will be, at FRONTIER’s sole
and absolute option, either refund of the purchase price or repair or replacement of any
product that proves to be defective on inspection by FRONTIER or its authorized service
representative.
This warranty does not cover claims for damage due to abuse, neglect, alteration or
attempted repair by unauthorized personnel, and is limited to failures arising during normal
use that are due to defects in material or workmanship in the product.
THIS LIMITED WARRANTY IS THE ONLY WARRANTY PROVIDED BY FRONTIER. YOU EXPRESSLY
DISCLAIM ALL OTHER WARRANTIES, EITHER EXPRESSED OR IMPLIED, INCLUDING BUT NOT
LIMITED TO IMPLIED WARRANTIES OF MERCHANTABILITY AND FITNESS FOR A PARTICULAR
PURPOSE WITH REGARD TO THE PRODUCT AND ACCOMPANYING WRITTEN MATERIALS.
Because some jurisdictions do not allow the exclusion or limitation of implied warranties, the
above limitation may not apply to you.
In no event will FRONTIER or any of the members, directors, officers, employees, or affiliates
be liable to you for any consequential, incidental, indirect, or special damages whatsoever
(including, without limitation, damages for loss of business profits, business interruption, loss
of business information and the like), whether foreseeable or unforeseeable, arising out of
the use of or inability to use the Product or accompanying written materials, regardless of the
basis of the claim and even if FRONTIER or a FRONTIER representative has been advised of
the possibility of such damage. FRONTIER’s liability to you for direct damages for any cause
whatsoever, and regardless of the form of the action, will be limited to the greater of $500 or
the money paid for the Product that causes the damages. THIS LIMITATION WILL NOT APPLY
IN CASE OF PERSONAL INJURY ONLY WHERE AND TO THE EXTENT THAT APPLICABLE LAW
REQUIRES SUCH LIABILITY. Because some jurisdictions do not allow the exclusion or limitation
of liability for consequential or incidental damages, the above limitation may not apply to you.
This warranty only applies to products sold in the United States of America or Canada. The
terms of this warranty and any obligations of FRONTIER under this warranty shall apply only
within the country of sale. This warranty will be construed under the laws of the State of New
Hampshire, except for that body of law dealing with conflicts of law. If any provision of this
warranty shall be held by a court of competent jurisdiction to be contrary to law, that provision
will be enforced to the maximum extent permissible, and the remaining provisions of this
warranty will remain in full force and effect.
Page 40
This equipment has been tested and found to comply with the limits for a Class B digital
device, pursuant to Part 15 of the FCC Rules. These limits are designed to provide
reasonable protection against harmful interference in a residential installation. This
equipment generates, uses, and can radiate radio frequency energy and, if not installed and
used in accordance with the User’s Guide, may cause harmful interference to radio
communications. However, there is no guarantee that interference will not occur in a
particular installation. If this equipment does cause harmful interference to radio or television
reception, which can be determined by turning the equipment off and on, the user is
encouraged to try to correct the interference by one or more of the following measures:
• Reorient or relocate the receiving antenna.
• Increase the separation between the equipment and receiver.
• Connect the equipment to an outlet on a circuit different from that to which the receiver
is connected.
• Consult the dealer or an experienced radio/TV technician for help.
The user is cautioned that changes and modifications made to the equipment without the
approval of manufacturer could void the user’s authority to operate this equipment.
Frontier Design Group, LLC declares that the multiport optical patchbay called Apache
conforms to the following Directives and Standards:
Council Directives: 89/336/EEC, 73/23/EEC
Conformance Standards: EN55022 Class B, EN50082-1
Manufacturer: Frontier Design Group, LLC
199 Heater Road
Lebanon, NH 03766 (USA)
603-448-6283 voice
603-448-6398 FAX
European Contact: Et Cetera Distribution
Valley House
2 Bradwood Court, St. Crispin Way
Haslingden
LANCS, BB4 4PW, UK
+44 1706 228039 voice
+44 1706 222989 FAX
Declaration of Conformity
Compliance Statement
 Loading...