

FRONTEAR 7198-34 Instruction Manual
True Wireless Earbuds with Metal
Charging Case
Instruction Manual
7198-34
Hello! This is your instruction manual, to
help create the best possible experience
with this cool product.
Safety Precautions:
Please follow the rules described in
1.
this manual closely to ensure your
safety.
Before using the earbuds, we would
2.
strongly encourage you read this
manual.
Do not modify, repair or dismantle the
3.
earbuds or power bank.
Do not use any liquids to clean the
4.
products.
Do not use the earbuds near water, or
5.
intense temperatures.
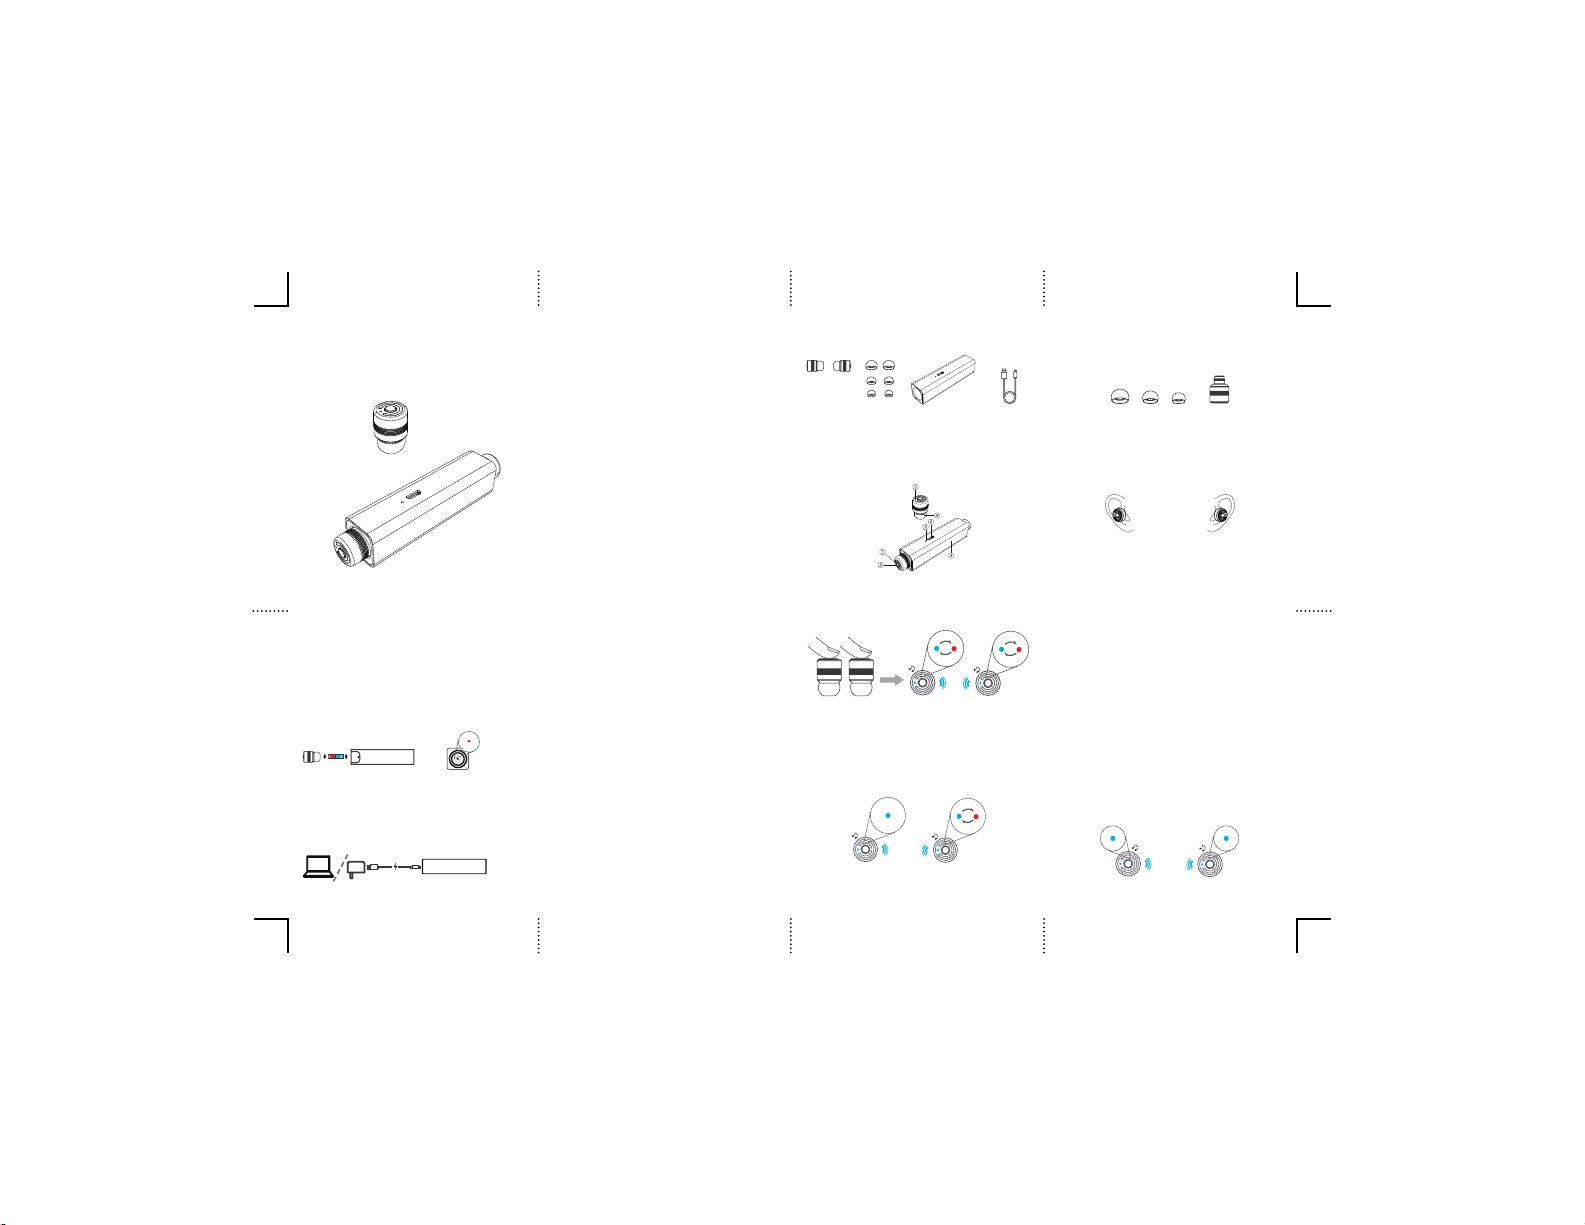
Included Contents:
Earbuds Ear tips Power Bank Charging
Multi-function
1.
button
Microphone
2.
LED Indicator
3.
Ear tips
4.
Power Case
5.
Micro USB input port
6.
Power Case LED
7.
indicator
Cable
Fit:
In order to get the best audio experience,
try all the ear tips (S, M, L) for the best t.
+
For the most comfortable t, wear the
earbuds as shown below.
(Hint: the mircophone should be placed
towards your mouth)
right ear left ear
| 01
Charging: Stereo Earbud Usage
Charge the devices completely before
initial use.
1. Charging the earbuds
Magnetic contact recharging, the LED
indicator will turn solid RED when
charging & will turn off once the earbuds
are fully charged.
2. Charging the power case
Use the USB cable to connect to an
adapter or computer to charge the power
bank. Once fully charged the LED light on
the case will turn BLUE.
1. Power ON
Long press the button for about 3 seconds,
the LED indicator will light red and a warning
tone will sound.
2. Power OFF: One earbud
Press and hold the button for 5 seconds,
the LED will light red and a sound will alert
accordingly. Once one earbud is turned off
the other will automatically turn off if they
were connected.
3. Pairing: rst time
When OFF, press and hold the button on both
earbuds, at the same time, for 5 seconds.
The LED’s will light red and blue alternately.
Keep the earbuds close to each other. double
press the button of the earbud you want to
become the Primary.
| 05
| 02
| 06
The earbuds will pair together
automatically, after they pair one earbud
will ash blue slowly, and the other
earbud will ash red and blue alternately.
If done successfully only one “Metal
TWS” will appear to pair.
front side
| 03
| 07
| 04
4. Search and Connection
While the earbuds are ashing red and
blue wait several seconds and only
one “TWS Metal” shows on the pairing
list then select it to connect. It will pair
automatically.
5. Pairing successful
When the earbuds are ashing blue
slowly after being initially paired
successfully, only one “TWS Metal”
shows on your smartphone, this means it
is already connected.
Previously paired earbuds will connect
automatically after power ON.
| 08

6. Calling (Earbud A / Primary)
Answer/End Call:
Press the button once to answer and incoming
call, and again to end the call.
Reject a call:
Press and hold the multifunction button to reject
an incoming call.
Redial:
Double press the multifunction button to redial the
last number you dialed.
7. Playing Audio
Earbud A / Primary
Play/Pause: Press the multifunction button once
to play, and press again to pause.
Earbud B / Secondary
Next Track: Press the multifunction button once to
play the next track.
| 09
Single Earbud Usage
1. Power ON/OFF
Power ON: Long press the multifunction
button for about 3 seconds, the indicator
lights red & a warning tone will sound.
Power OFF: Long press the multifunction
button for about 5 seconds, the red LED
will light once, then Off, and a warning
tone will sound.
2. Pairing for the rst time
Long press the multi-functional button for
5 seconds, the indicator lights will ash
red and blue. Connect through Bluetooth,
search “TWS Metal” & click connecting, It
will pair automatically.
| 10
3. Once the earbud is successfully
connected with your device, you can
listen to audio.
4. Answer/End calls: Press the multibutton once to answer an incoming call,
and again to end.
5. Reject a call: Press and hold the
multifunction button to reject an incoming
call.
6. Redial: Double press the multifunction
button to redial the last number you
dialed.
7. Music: short press the button to pause
the music or play the music.
| 11
Earbud Tech Specications
Items Specications
Charging time
Play time
Bluetooth Range
Mic Sensitivity
Mobile devices cannot connect with the earbuds if
the earbuds are not in pairing mode.
If the earbuds are unable to connect to a mobile
device via Bluetooth for 5+ minutes, the earbuds
will power off automatically.
2 hrs (from 0-100)
1.5 hrs
10m
-42+3db
| 12
Troubleshooting Safety Precautions
Issue Reason Solution
Start-up failure
No sound when
paired
No indication
during charging
Shut down
automatically
Noise during
calls
Low volume
Signal
interrupted
low battery
wrong pairing
Earbuds aren’t
securely inserted
low battery
mobile device is
too far away
earbuds are
turned down low
environment
disturbance,
distance to far
from mobile
device
charge earbuds
and power case
re-pairing
check earbuds,
and try again
charge earbuds
and power case
bring mobile
device closer
adjust earbuds to
comfort & sound
bring the mobile
device closer to
the earbuds
Read all the instructions before using the product.
1.
The unit’s full performance is achieved only after 2
2.
or 3 completed charge and discharge cycles.
To reduce the risk of injury, close supervision is
3.
necessary when the product is used near children.
Do not expose the device to moisture.
4.
Do not use the device in excess of its output
5.
rating. Overload outputs above rating may result in
a risk of re or injury.
Do not use the device if damaged or modied.
6.
Damaged or modied batteries may exhibit
unpredictable behavior resulting in re, explosion
or risk of injury.
Do not disassemble the device. Take it to a
7.
qualied service person when service or repair is
required. Incorrect reassembly may result in a risk
of re or injury.
Do not expose the device to re or excessive
8.
temperature. Exposure to re or temperatures
| 13
| 14
above 212ºF may cause explosion.
Have servicing performed by a qualied repair
9.
person using only identical replacement parts.
This will ensure that the safety of the product is
maintained.
FCC Statement
Changes or modications not expressly
•
approved by the party responsible for compliance
could void the user’s authority to operate the
equipment.
This equipment has been tested and found
•
to comply with the limits for a Class B digital
device, pursuant to Part 15 of the FCC Rules.
These limits are designed to provide reasonable
protection against harmful interference in a
residential installation. This equipment generates
uses and can radiate radio frequency energy
and, if not installed and used in accordance with
the instructions, may cause harmful interference
to radio communications. However, there is no
guarantee that interference will not occur in a
back side
| 15
particular installation. If this equipment does
cause harmful interference to radio or television
reception, which can be determined by turning
the equipment off and on, the user is encouraged
to try to correct the interference by one or more of
-
the following measures:
-
Reorient or relocate the receiving antenna.
Increase the separation between the equipment
-
and receiver.
Connect the equipment into an outlet on a
-
circuit different from that to which the receiver
is connected.
•
Consult the dealer or an experienced radio/TV
technician for help.
This device complies with part 15 of the FCC
rules. Operation is subject to the following two
conditions (1) this device may not cause harmful
interference, and (2) this device must accept any
interference received, including interference that
may cause undesired operation.
MADE IN CHINA
| 16
 Loading...