

Page 1
/ Perfect Charging / Perfect Welding / Solar Energy
WF MOUNTING Drum
Installationsanleitung
DEENFR
Drahtvorschub
Installations instructions
Wire-feed unit
Instructions d'installation
Dévidoir
42,0410,1849 004-31012017
Page 2

2
Page 3
Allgemeines
x
DE
Sicherheit
Bestimmungsgemäße Verwendung
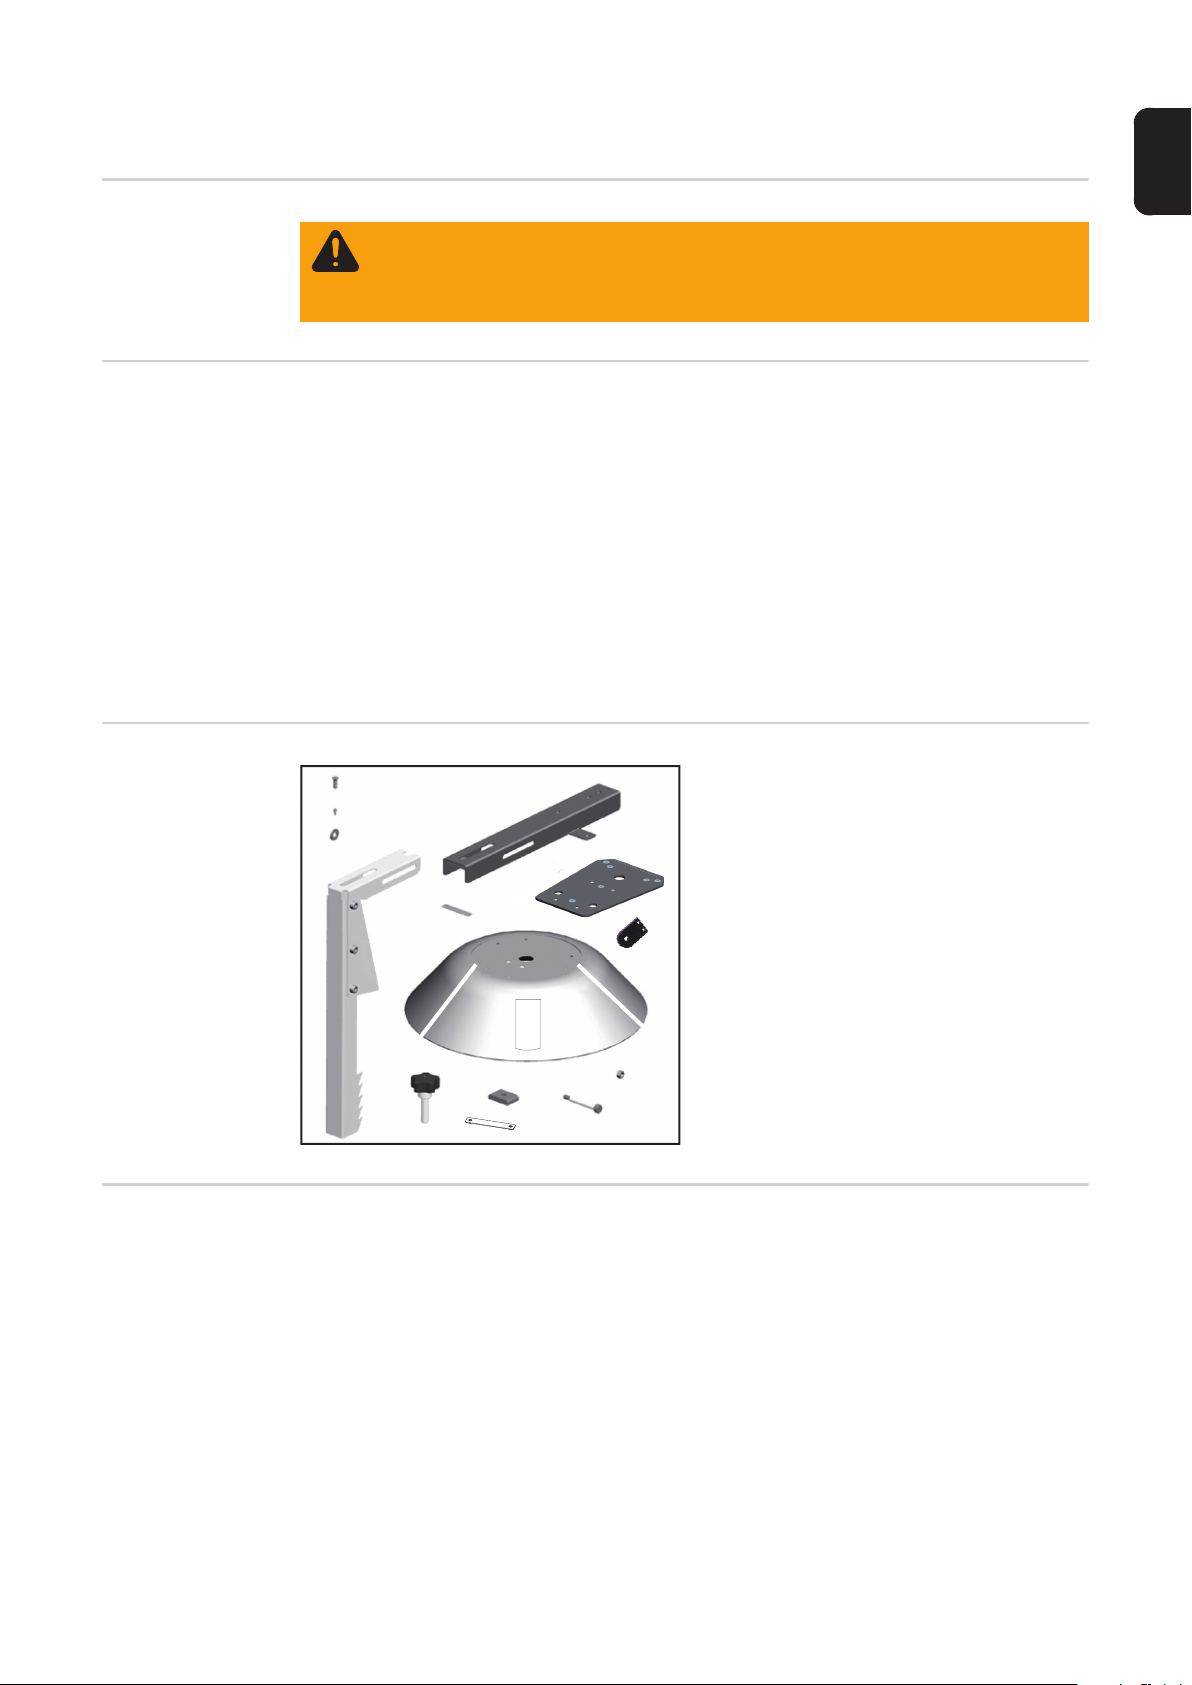
Lieferumfang
WARNUNG! Fehlerhaft durchgeführte Arbeiten können schwerwiegende Perso-
nen- und Sachschäden verursachen. Nachfolgend beschriebene Tätigkeiten dürfen nur von geschultem Fachpersonal durchgeführt werden! Beachten Sie die
Sicherheitsvorschriften in der Bedienungsanleitung der Stromquelle.
Die Fassaufnahme WF MOUNTING Drum ist ausschließlich für die Verwendung auf einem
Schweißdraht-Fass in Verbindung mit Fronius Drahtförder-Komponenten bestimmt.
Eine andere oder darüber hinausgehende Benutzung gilt als nicht bestimmungsgemäß.
Für hieraus entstehende Schäden haftet der Hersteller nicht.
Zur bestimmungsgemäßen Verwendung gehört auch
- das vollständige Lesen dieser Montageanleitung sowie der Bedienungsanleitungen
der Systemkomponenten
- das Befolgen aller Anweisungen und Sicherheitsvorschriften dieser Montageanleitung
- die Einhaltung der in dieser Montageanleitung angegebenen Montagelage des Abspul-Drahtvorschubes
- die Einhaltung der Inspektions- und Wartungsarbeiten
6x
10x
3x
M6x20 mm
M5x12 mm
A6
3x
Ohne Abbildung:
- 1 Einbauanleitung
Erforderliches
Werkzeug
1x
3x
1x
3x
3x
3x
3x
3x
1x
M5
3x
- Gabelschlüssel (SW 8 mm)
- Torx-Schraubendreher TX25
- Innensechskant-Schlüssel (SW 3 mm)
- Innensechskant-Schlüssel (SW 4 mm)
3
Page 4
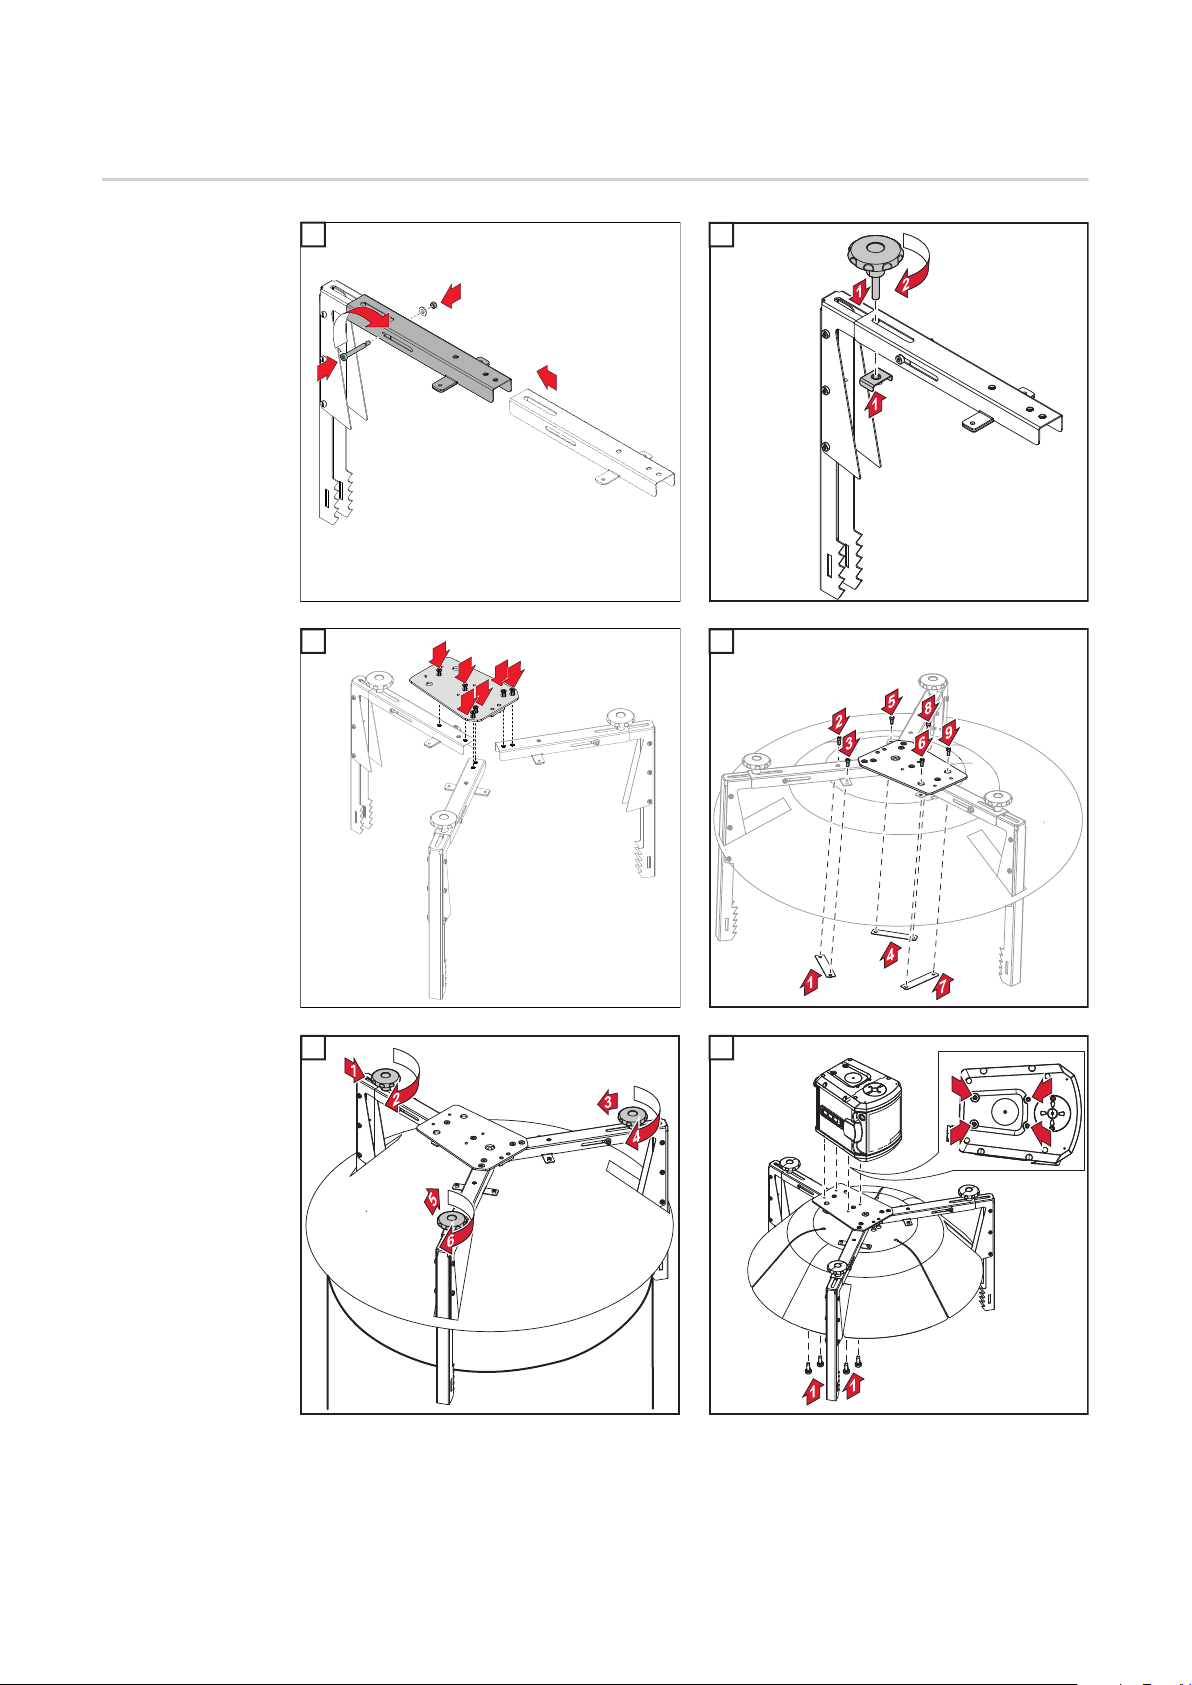
WF MOUNTING Drum montieren
WF MOUNTING
Drum montieren
1 2
1
2
3
2
1
3x
3 4
3 4
1
2
5
6
6x
33
4
M6 x 20 mm
2
5
5
WF MOUNTING Drum aufsetzen / wechseln
6
6
4x TX25
M5 x 12 mm
3 Nm
WICHTIG! Zum Wechseln des Schweißdraht-Fasses muss der Abspul-Drahtvorschub
nicht von der Fassaufnahme WF MOUNTING Drum entfernt werden.
4
Page 5

Hinweis für den
Betrieb mit einem
Abspul-Drahtvorschub
WICHTIG! Beim Betrieb eines Abspul-Drahtvorschubes auf der Fassaufnahme darauf
achten, dass die Drahtelektrode keinesfalls die Fassaufnahme berührt.
Draht-Förderschlauch verwenden!
DE
Hinweis für den
Betrieb mit einem
Drahtende-Sensor
Für den Betrieb mit einem Drahtende-Sensor ist die Option
OPT/i WF R Drahtende-Ringsensor - 4,100,878,CK
erforderlich.
Die Montage des Drahtende-Sensors an der Fassaufnahme WF MOUNTING Drum ist in
der Installationsanleitung des Drahtende-Sensor beschrieben.
5
Page 6

6
Page 7

General
x
Safety
WARNING! Work that is carried out incorrectly can cause serious injury and dam-
age. The following activities must only be carried out by trained and qualified personnel. Observe the safety rules in the power source operating instructions.
Proper use The WF MOUNTING Drum holder is intended exclusively for use on a welding wire drum
in conjunction with Fronius wirefeeding components.
Utilisation for any other purpose, or in any other manner, shall be deemed to be not in accordance with the intended purpose.
The manufacturer shall not be held liable for any damages arising from such usage.
Proper use includes:
- reading these fitting instructions and the operating instructions of the system components in full
- following all the instructions and safety rules in these fitting instructions
- observing the installation position specified in these fitting instructions for the unreeling wire-feed unit
- performing all stipulated inspection and maintenance work
Scope of supply
6x
10x
3x
M6x20 mm
M5x12 mm
A6
3x
Not illustrated:
- 1 Installation Instructions
EN
3x
1x
3x
3x
3x
Tools required - Flat spanner, 8 mm
- Torx screwdriver, TX25
- Allen key, 3 mm
- Allen key, 4 mm
3x
1x
3x
1x
M5
3x
7
Page 8

Fitting the WF MOUNTING Drum
Fitting the WF
MOUNTING Drum
1 2
1
2
3
2
1
3x
3 4
3 4
1
2
5
6
6x
33
4
M6 x 20 mm
2
5
5
Positioning/changing the WF MOUNTING Drum
6
6
4x TX25
M5 x 12 mm
3 Nm
IMPORTANT! The unreeling wirefeeder does not have to be removed from the WF
MOUNTING Drum holder when changing the welding wire drum.
8
Page 9

Notes for using
with an unreeling
wire-feed unit
IMPORTANT! When using an unreeling wire-feed unit on the drum holder, ensure that the
wire electrode never makes contact with the drum holder.
Use a wirefeeding hose!
Notes for using
with a wire end
sensor
Optional equipment
OPT/i WF R wire end ring sensor - 4,100,878,CK
must be fitted in order to use a wire end sensor.
See the wire end sensor's Installation Instructions to fit the wire sensor to the WF MOUNTING Drum holder.
EN
9
Page 10

10
Page 11

Généralités
x
Sécurité
Utilisation
conforme à la
destination
AVERTISSEMENT ! Les erreurs en cours d'opération peuvent entraîner des
dommages corporels et matériels graves. Les opérations décrites ci-après
doivent être effectuées exclusivement par du personnel qualifié et formé ! Respectez les consignes de sécurité figurant dans les instructions de service de la
source de courant.
FR
Le dispositif de préhension de fûts WF MOUNTING drum est exclusivement destiné à une
utilisation avec un fût de fil d'apport associé à d'autres composants d'amenée de fil Fronius.
Toute autre utilisation est considérée comme non conforme.
Le fabricant ne saurait être tenu responsable des dommages consécutifs.
Font également partie de l'emploi conforme
- la lecture complète des présentes Instructions de montage ainsi que des Instructions
de service des composants périphériques,
- le respect des prescriptions et consignes de sécurité des présentes Instructions de
montage,
- le respect des positions de montage du dévidoir indiquées dans les présentes Instructions de montage,
- le respect des travaux d'inspection et de maintenance.
Contenu de la livraison
6x
10x
3x
M6x20 mm
M5x12 mm
A6
3x
3x
1x
3x
3x
3x
1x
3x
3x
Outillage requis - Clé à fourche (ouverture 8 mm)
- Tournevis Torx TX25
- Clé pour vis à tête six pans creux (ouverture 3 mm)
- Clé pour vis à tête six pans creux (ouverture 4 mm)
Non illustrés :
- Instructions d'installation
1x
M5
3x
11
Page 12

Installation du WF MOUNTING Drum
Installation du WF
MOUNTING Drum
1 2
1
2
3
2
1
3x
3 4
3 4
1
2
5
6
6x
33
4
M6 x 20 mm
2
5
5
Positionner/Remplacer le WF MOUNTING Drum
6
6
4x TX25
M5 x 12 mm
3 Nm
IMPORTANT ! Pour remplacer le fût de fil d'apport, le dévidoir ne doit pas être retiré du
dispositif de préhension de fûts WF MOUNTING Drum.
12
Page 13

Consignes pour
l'utilisation d'un
dévidoir
IMPORTANT ! Lors du fonctionnement d'un dévidoir sur le dispositif de préhension des
fûts, veiller à ce que le fil-électrode ne touche en aucun cas le dispositif.
Utiliser une gaine de dévidoir !
Consignes pour
le fonctionnement avec un
capteur de fin de
fil
L'option
OPT/i WF R Capteur annulaire de fin de fil - 4,100,878,CK
est disponible pour le fonctionnement avec un capteur de fin de fil.
Le montage du capteur de fin de fil sur le dispositif de préhension de fûts WF MOUNTING
Drum est décrit dans les Instructions d‘installation du capteur de fin de fil.
FR
13
Page 14

14
Page 15

FR
15
Page 16

FRONIUS INTERNATIONAL GMBH
Froniusplatz 1, A-4600 Wels, Austria
Tel: +43 (0)7242 241-0, Fax: +43 (0)7242 241-3940
E-Mail: sales@fronius.com
www.fronius.com
www.fronius.com/addresses
Under http://www.fronius.com/addresses you will find all addresses
of our Sales & service partners and Locations
 Loading...