

Page 1

Fronius prints on elemental chlorine free paper (ECF) sourced from certified sustainable forests (FSC).
/ Perfect Charging / Perfect Welding / Solar Energy
TTW 4500 / 5500 PAP
Bedienungsanleitung
DE
WIG Roboter-Schweißbrenner
Operating instructions
EN
TIG robot welding torch
Manual de instrucciones
ES
Antorcha de robot TIG
Instructions de service
FR
Torche de soudage TIG robot
Istruzioni per l'uso
IT
Torcia per saldatura con robot TIG
Manual de instruções
Tocha de solda com robô para sold-
PT-BR
agem TIG
42,0410,1756 014-26082021
Page 2

Page 3

Inhaltsverzeichnis
Allgemeines 4
Gerätekonzept 4
Einsatzgebiete 4
Lieferumfang 4
Optionen TTW 4500 PAP 5
Optionen TTW 5500 PAP 5
Schweißbrenner montieren 6
Sicherheit 6
TTW 4500 montieren 6
TTW 5500 montieren 7
Option Engspalt-Gasdüse montieren 7
Fehlerdiagnose, Fehlerbehebung 9
Sicherheit 9
Fehlerdiagnose, Fehlerbehebung 9
Pflege, Wartung und Entsorgung 10
Sicherheit 10
Allgemeines 10
Bei jeder Inbetriebnahme 10
Monatlich 10
Entsorgung 10
Technische Daten 11
TTW 4500, TTW 5500 11
DE
3
Page 4

Allgemeines
(1) (2) (3) (4) (5) (6) (7)
(8)
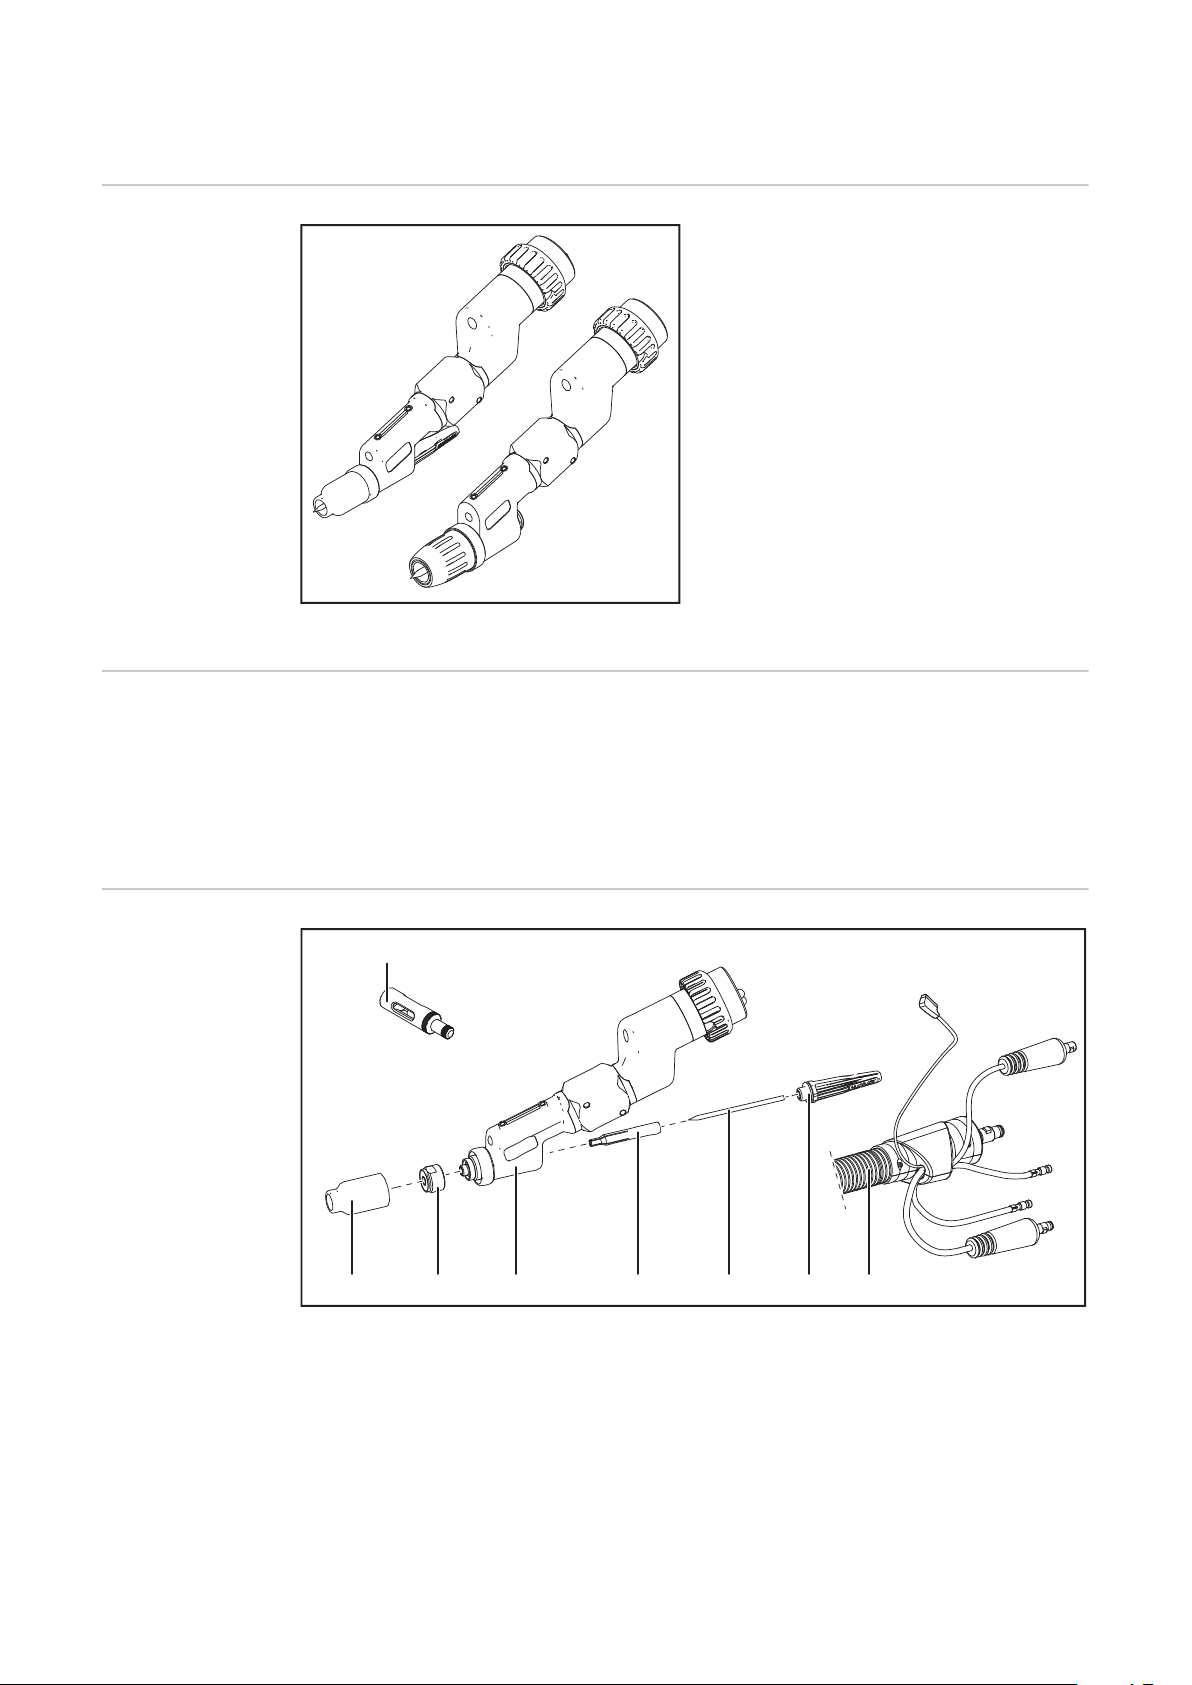
Gerätekonzept
Gerätekonzept TTW 4500 / 5500 PAP
Einsatzgebiete Die Roboter-Schweißbrenner kommen bei folgenden Anwendungen zum Einsatz, z.B.:
- im Rohrleitungs- und Apparatebau
- im Behälterbau
- bei höchsten Qualitätsanforderungen
- bei Sonderwerkstoffen (z.B.: Titan, Nickelbasis-Legierungen)
- Automobil- und Automobilzulieferindustrie
Die wassergekühlten WIG RoboterSchweißbrenner TTW 4500 und TTW
5500 dienen zum WIG-Schweißen.
Die Schweißbrenner haben serienmäßig
einen Fronius F++ Anschluss. Für den
Betrieb an einem handelsüblichen WIGSchweißgerät stehen verschiedene Adapter zur Verfügung. Jeder Schweißbrenner
kann mit einer geschobenen KD und einer
Schleppgasdüse ausgestattet werden.
Das Schlauchpaket kann auch für
bestimmte Plasmabrenner verwendet werden.
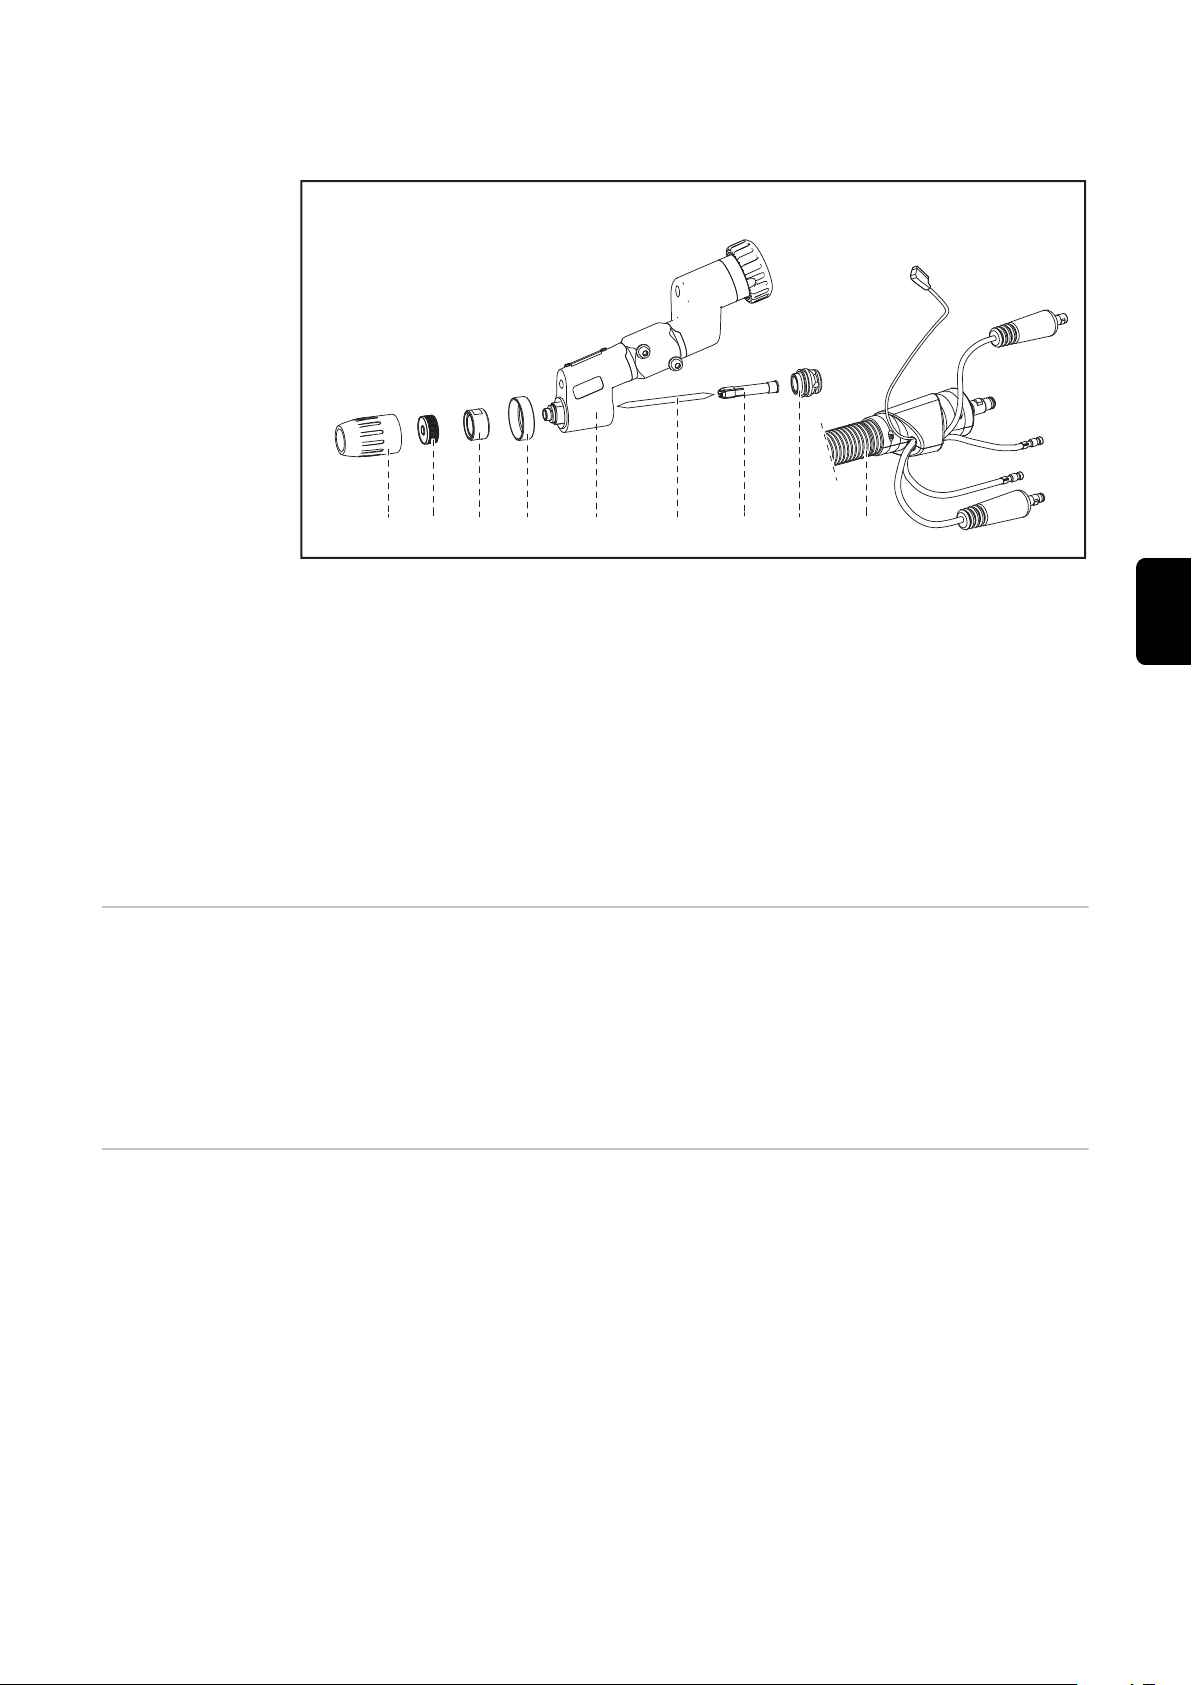
Lieferumfang
Lieferumfang TTW 4500 PAP
(1) Keramische Schutz-Gasdüse
(2) Gaslinse
(3) Brennerkörper TTW
(4) Spannhülse 3,2 mm
(5) Wolframelektrode 3,2 mm
(6) Brennerkappe mittel
4
Page 5

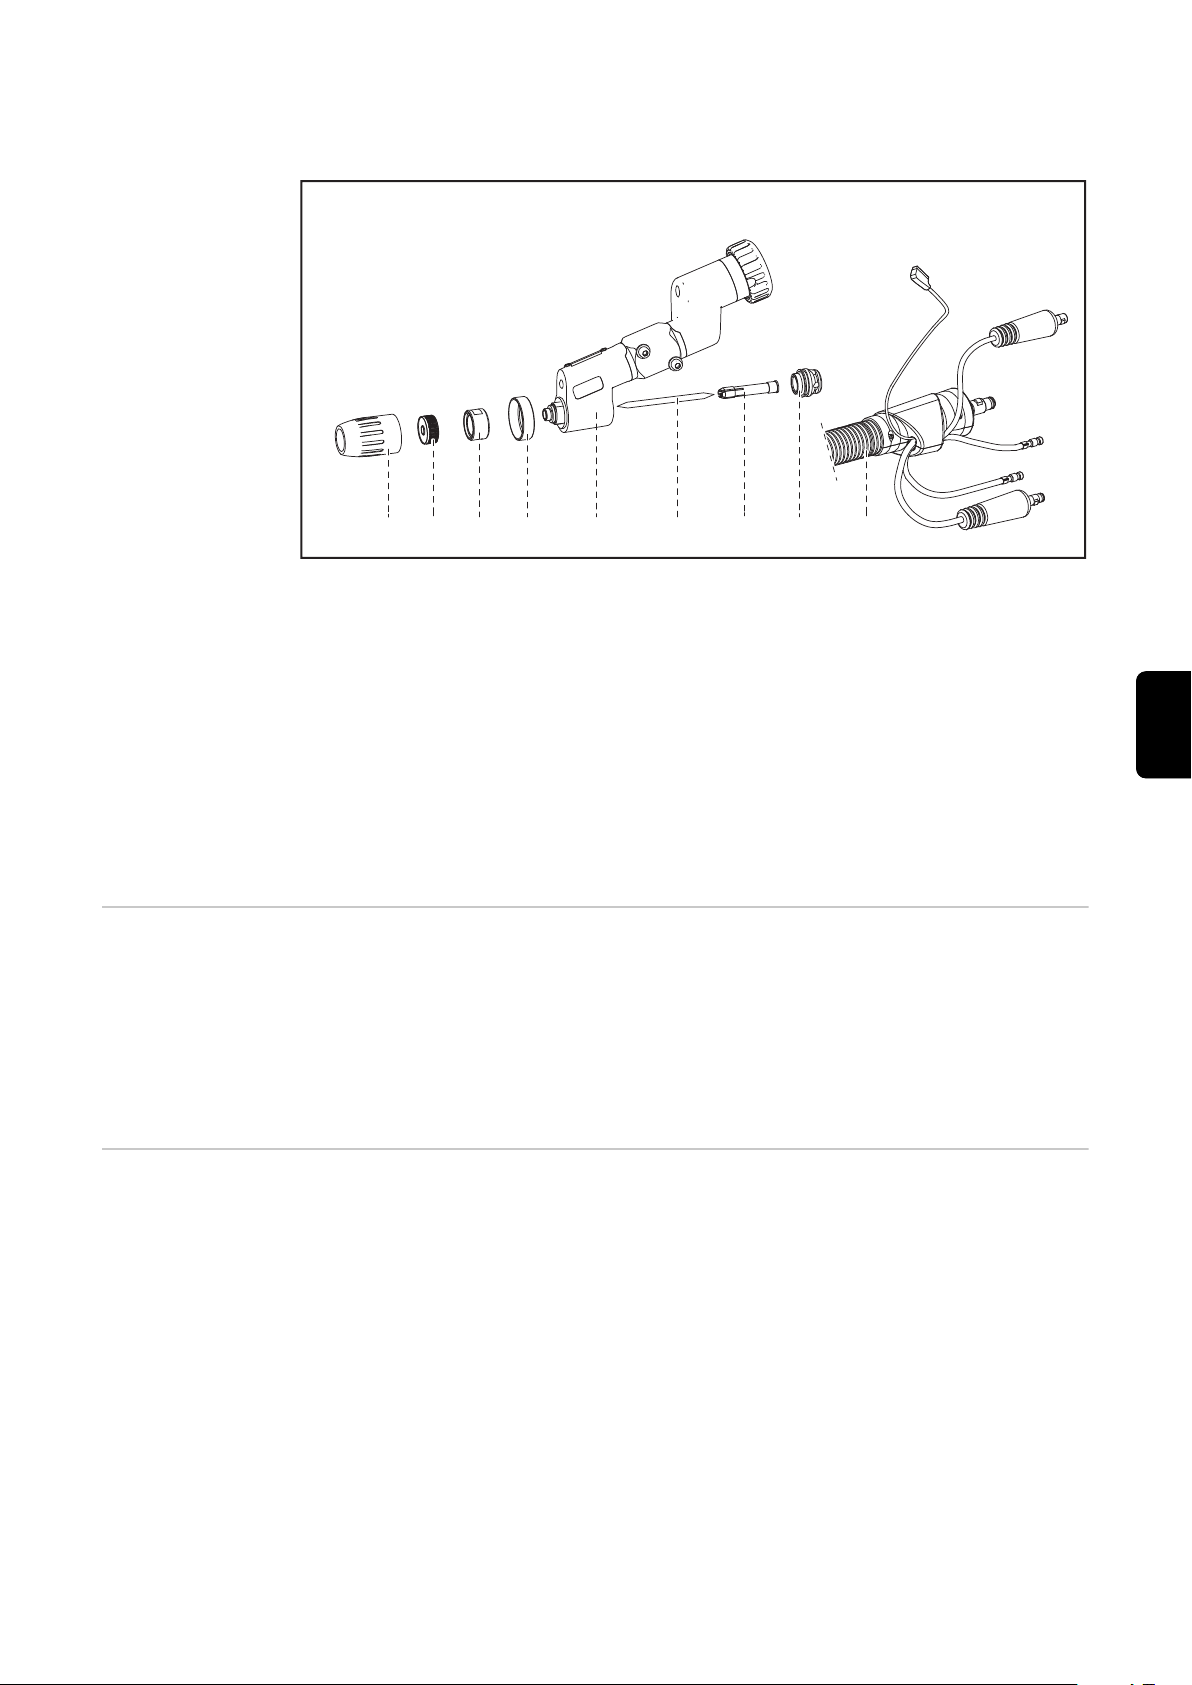
(7) Schlauchpaket mit integriertem Drahtförderschlauch
(1) (3) (5) (6) (7) (8) (9)
(2)
(4)
(8) Einstell-Lehre
Lieferumfang TTW 5500 PAP
(1) Keramische Schutz-Gasdüse
(2) Gaslinse
(3) Gasmantel-Ring
(4) Isoliering
(5) Brennerkörper TTW
(6) Wolframelektrode 4,8 mm
(7) Spannhülse 4,8 mm
(8) Brennerkappe kurz (TTW 5500)
(9) Schlauchpaket mit integriertem Drahtförderschlauch
DE
Optionen TTW
4500 PAP
Optionen TTW
5500 PAP
- Kaltdrahtzuführung (Push-System): Robacta Plasma / WIG KD
- Spannhülse (siehe Ersatzteilliste)
- Gasdüse M 18 x 1,5
- Adapter für Fronius Z Zentralanschluss
- Schleppgasdüse 50 / 100 mm
- Aufnahme Halteschelle
- Brennerkappen
- Kaltdrahtzuführung (Push-System): Robacta KD Plasma / WIG PAP
- Spannhülse 3,2 / 4 / 6,4 mm
- Schleppgasdüse 50 / 100 mm
- Gasdüse 3/4
- Aufnahme Halteschelle
- Brennerkappen
- Adapter für Fronius Z Zentralanschluss
5
Page 6

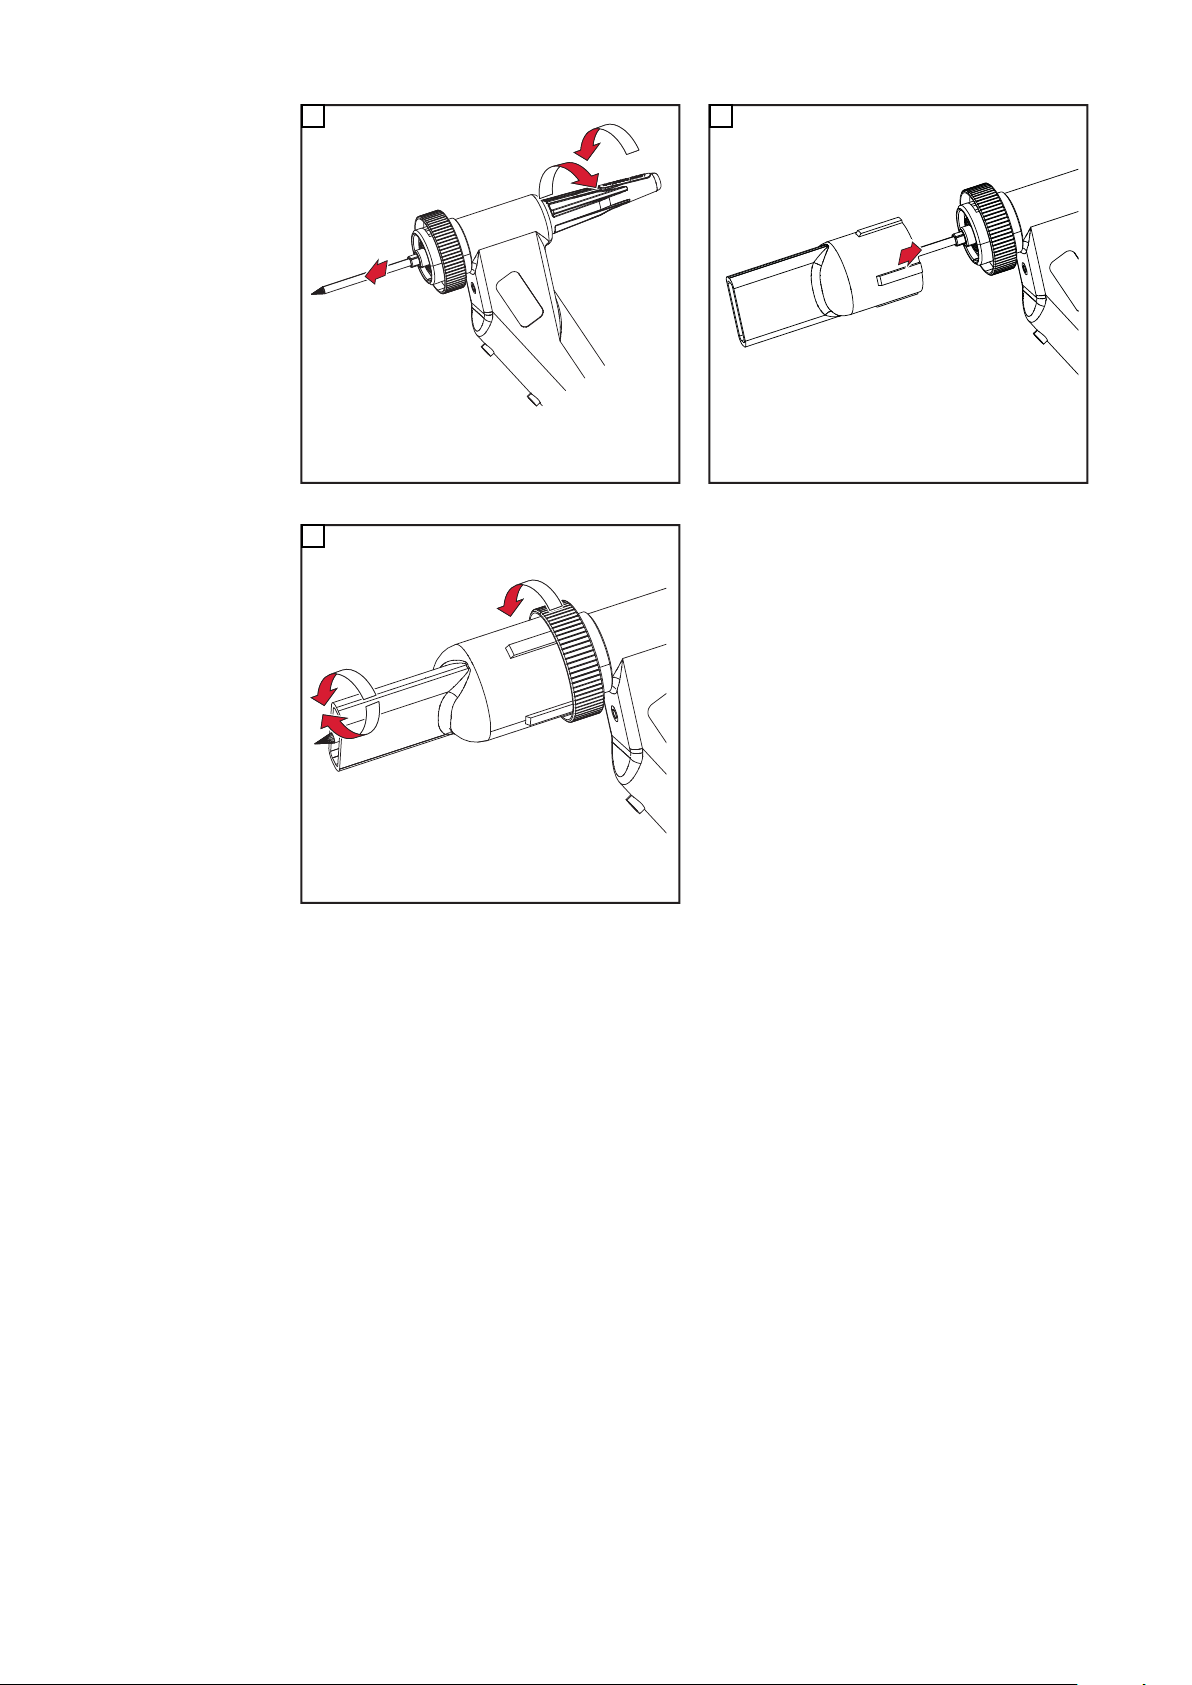
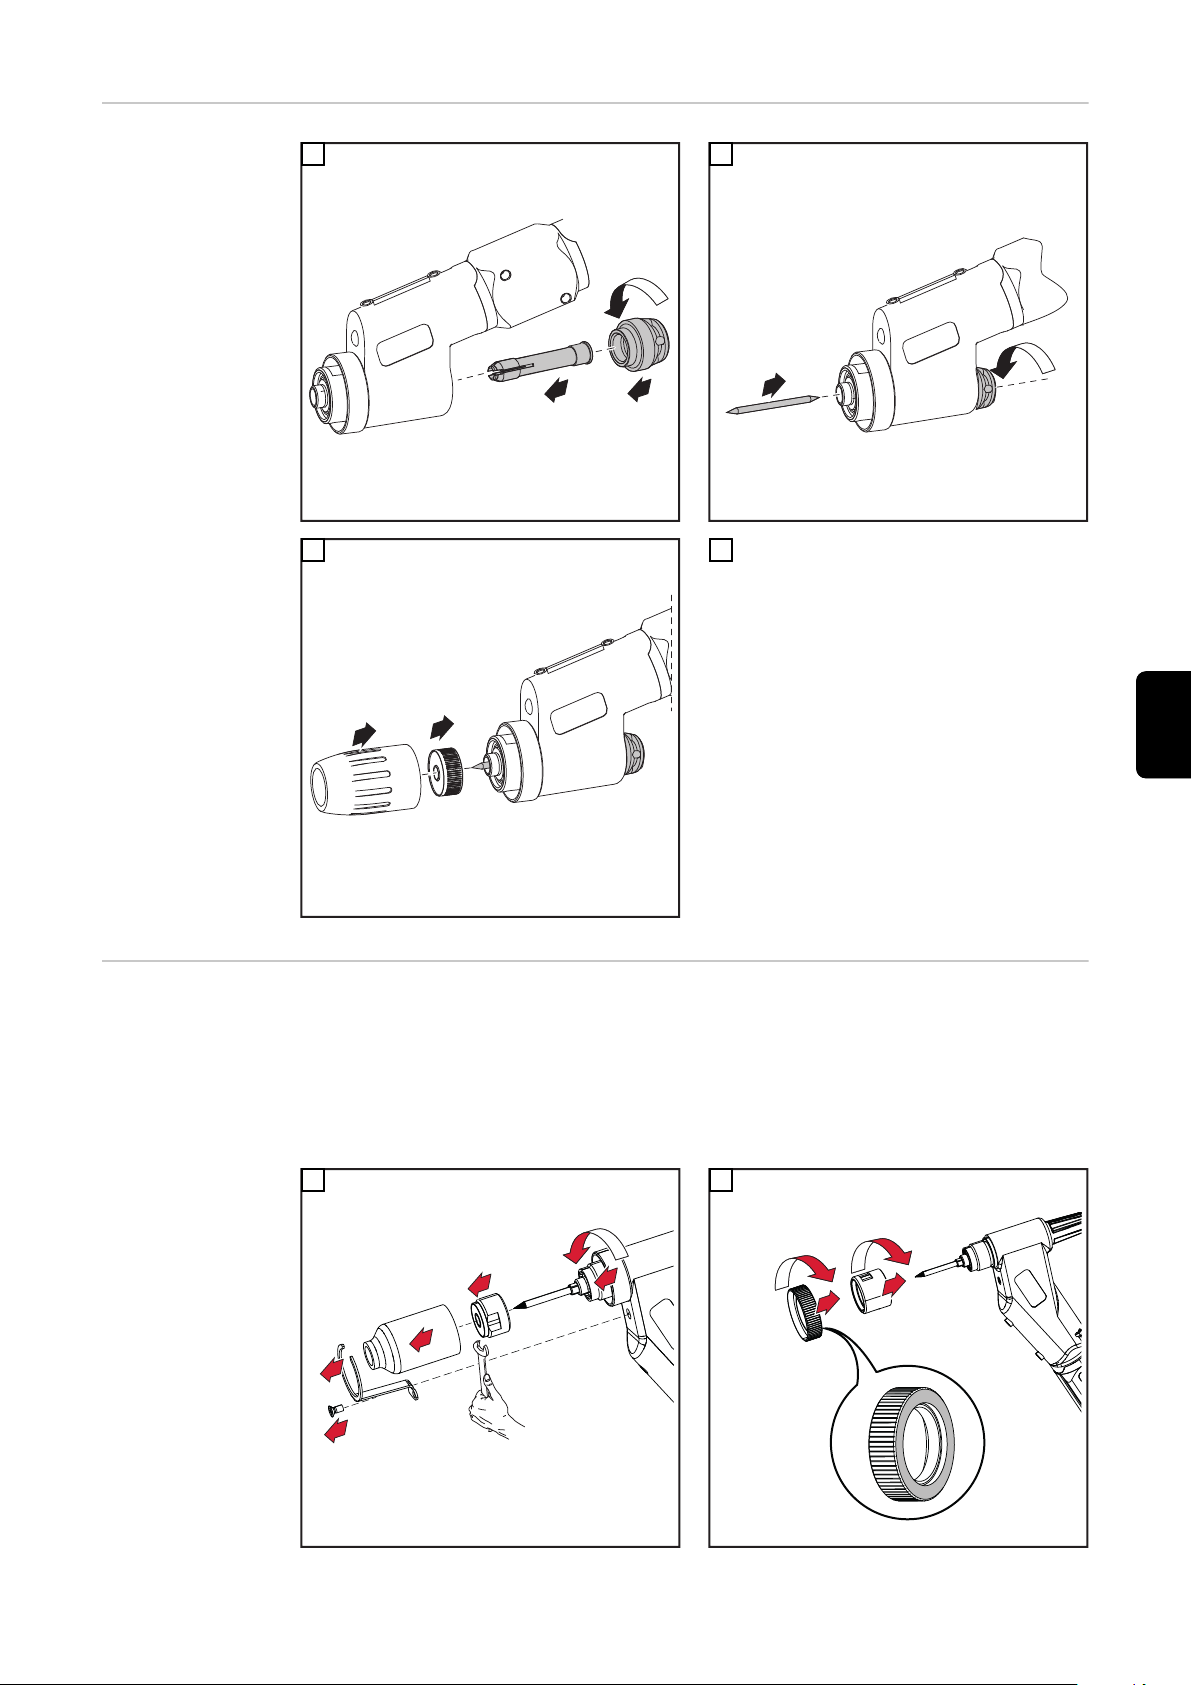
Schweißbrenner montieren
1
2
1
2
1
3
2
4
Sicherheit
TTW 4500 montieren
WARNUNG!
Gefahr durch fehlerhaft durchgeführte Arbeiten.
Schwerwiegende Personen- und Sachschäden können die Folge sein.
Die Anschlussarbeiten dürfen nur von geschultem Fachpersonal unter Berücksichti-
▶
gung der gültigen Sicherheitsbestimmungen durchgeführt werden!
Sicherheitsvorschriften in der Bedienungsanleitung beachten!
▶
WARNUNG!
Gefahr durch elektrischen Strom.
Ein elektrischer Schlag kann tödlich sein.
Vor Arbeiten am Schweißbrenner:
▶
Netzschalter von Stromquelle in Stellung - O - schalten
▶
Stromquelle vom Netz trennen
▶
Ein verständliches Warnschild gegen Wiedereinschalten anbringen
▶
1
2
3 4
6
Page 7

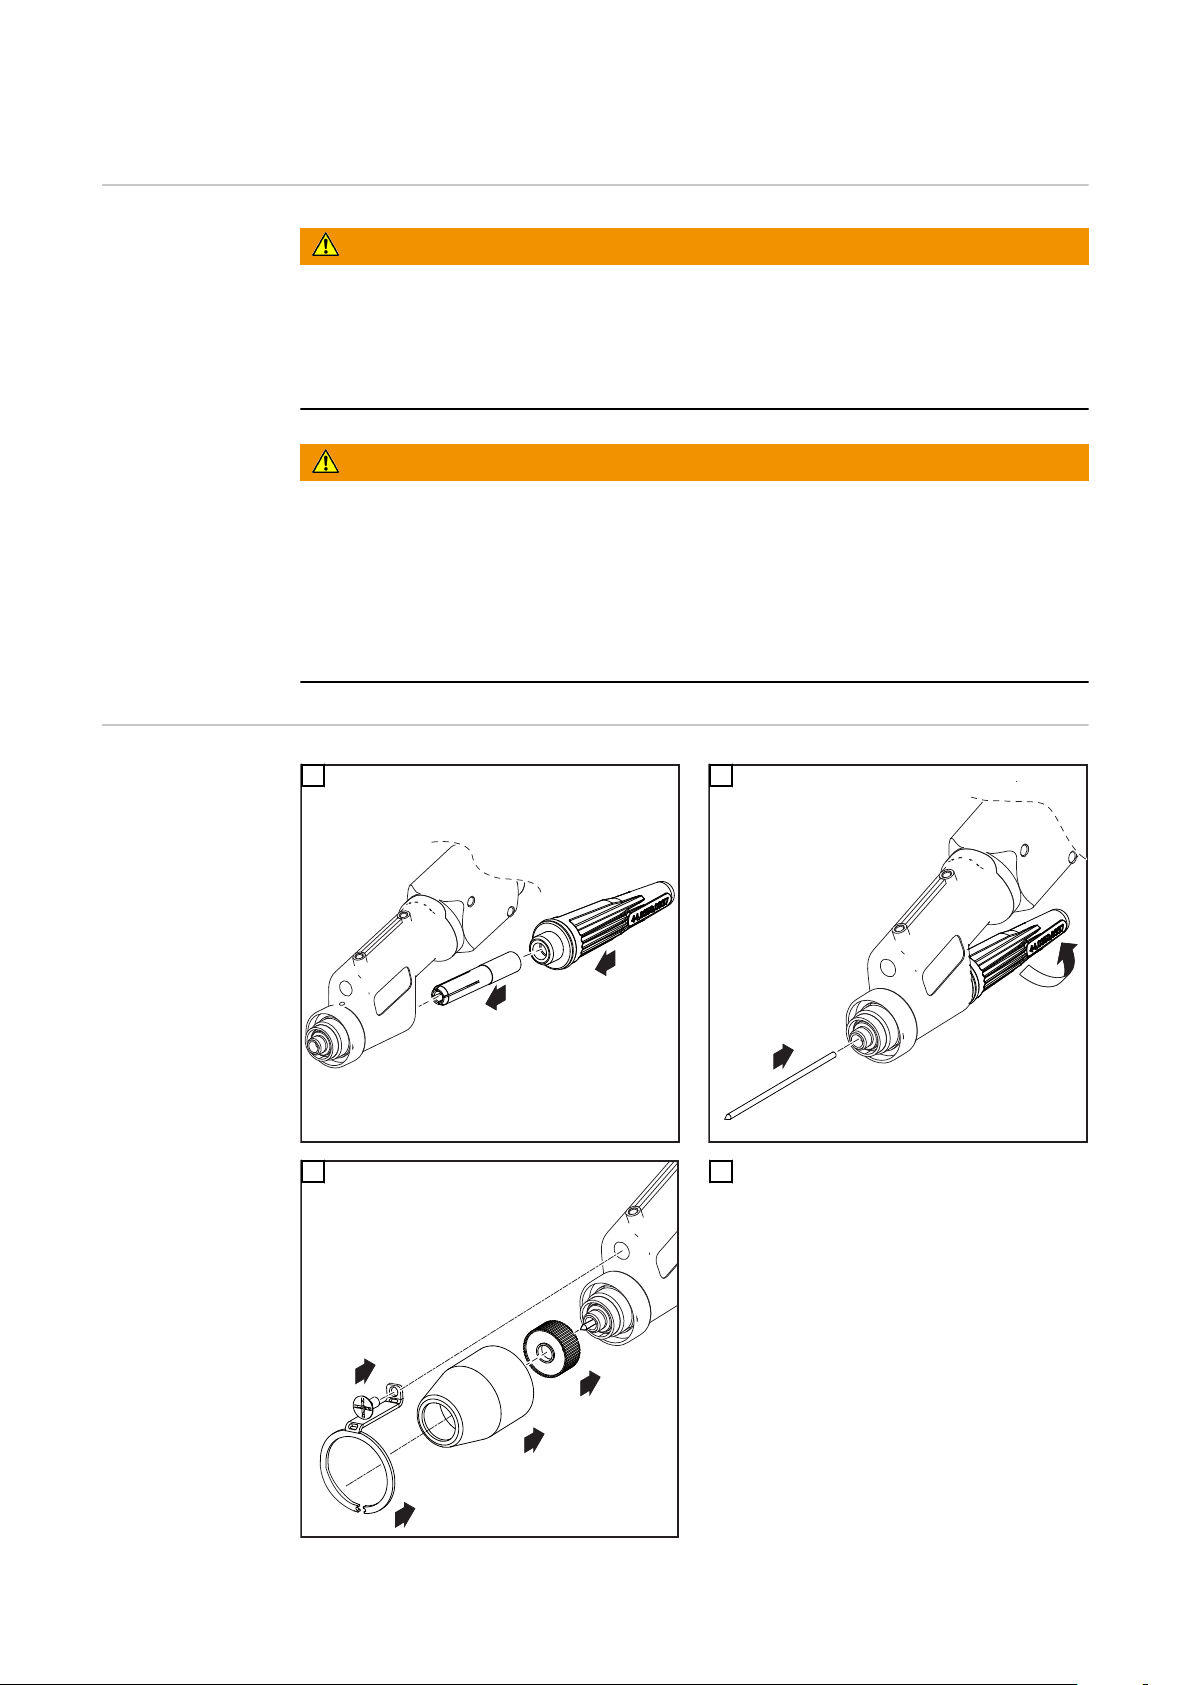
TTW 5500 mon-
2
3
1
㪉
2
1
1
2
1
2
3
4
5
5
1
*
2
*
tieren
1
3 4
2
DE
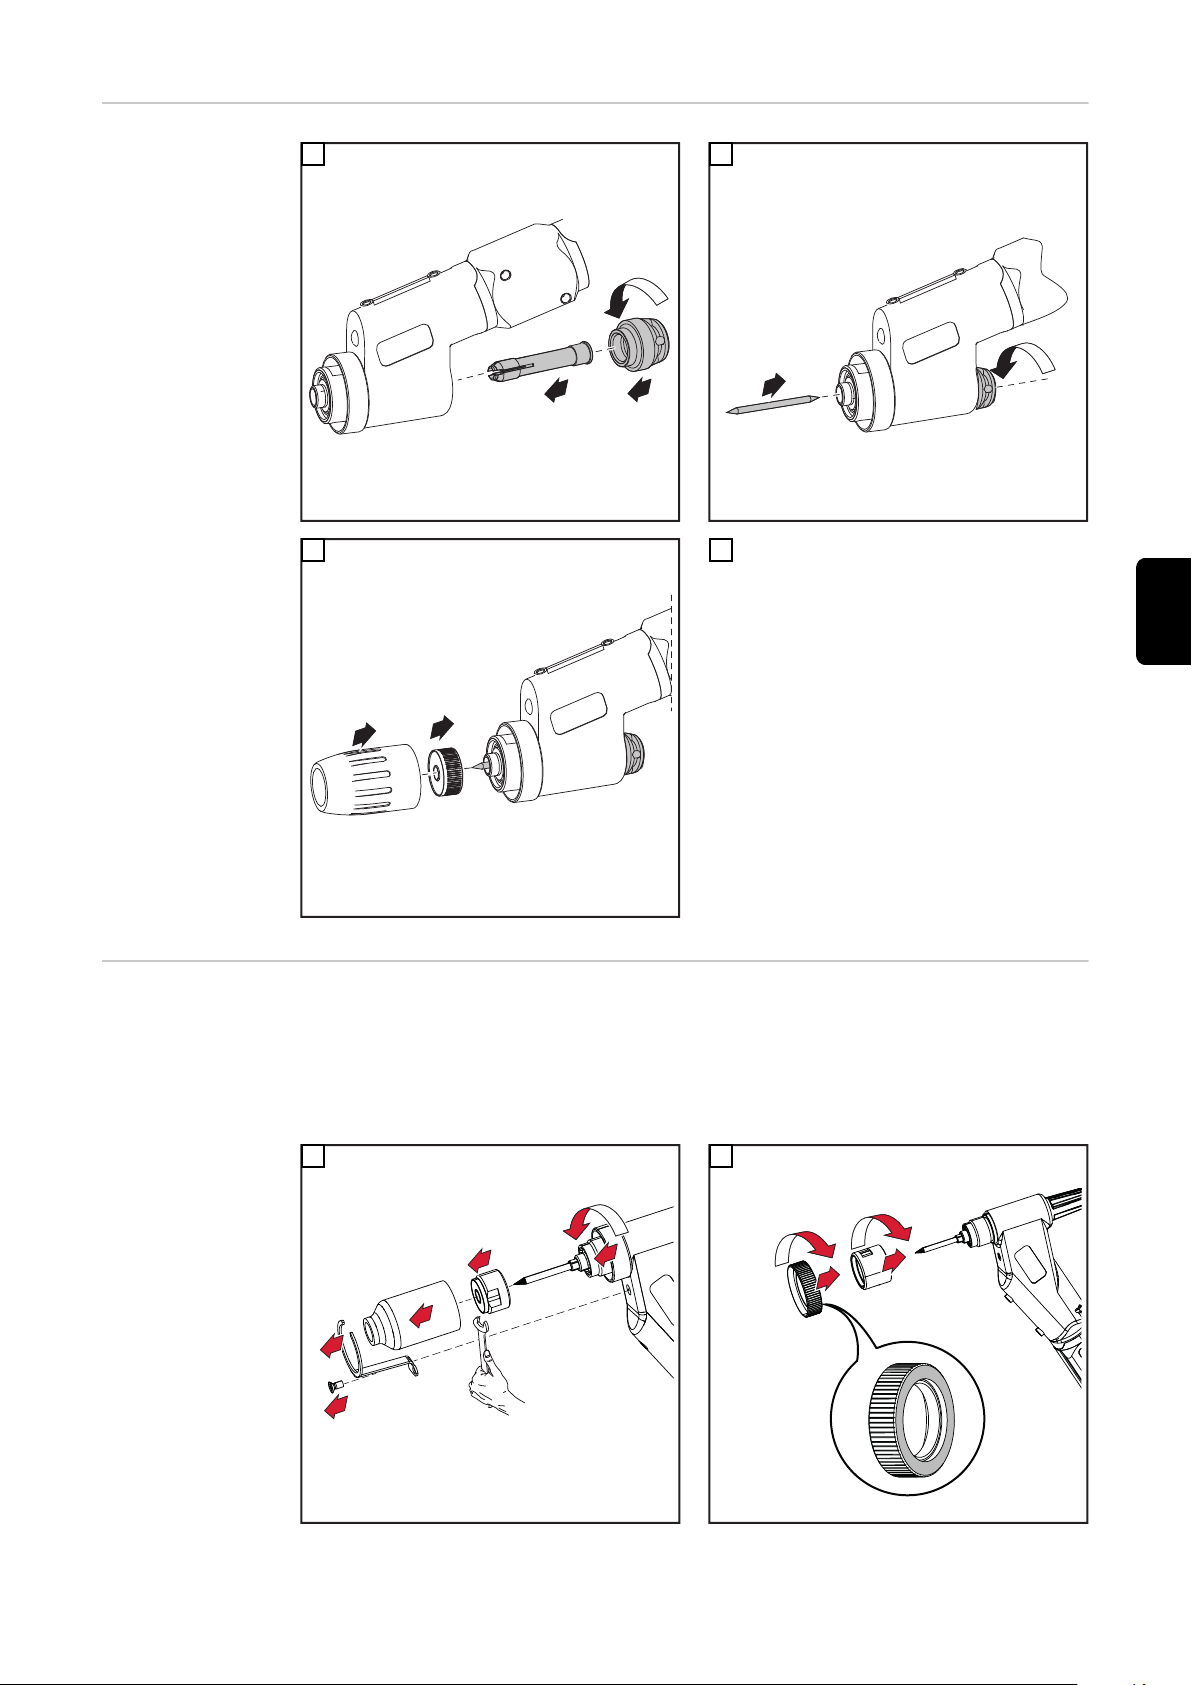
Option EngspaltGasdüse montieren
Für die Montage der Engspalt-Gasdüse sind folgende Artikel zusätzlich erforderlich:
- Isolierring D 35,5 mm - 42,0100,0010
- Gasmantelring M18 x 1,5 mm - 42,0001,6781
- Engspalt-Gasdüse - 42,0300,3210
1
2
* Bis auf Anschlag aufschrauben
7
Page 8

2
1
3
~ 15 mm
3
1
**
1
2
5
4
** Bis auf Anschlag montieren
8
Page 9

Fehlerdiagnose, Fehlerbehebung
DE
Sicherheit
Fehlerdiagnose,
Fehlerbehebung
WARNUNG!
Gefahr durch elektrischen Strom.
Ein elektrischer Schlag kann tödlich sein.
Vor Arbeiten am Schweißbrenner:
▶
Netzschalter von Stromquelle in Stellung - O - schalten
▶
Stromquelle vom Netz trennen
▶
Ein verständliches Warnschild gegen Wiedereinschalten anbringen
▶
Lichtbogen zündet nicht
Ursache:
Behebung:
Ursache:
Behebung:
Schutzgas-Abdeckung nicht ausreichend
Ursache:
Behebung:
Wolframelektrode verschmutzt
Wolframelektrode reinigen
Wolframelektrode falsch positioniert
Wolframelektrode richtig positionieren
Gaslinse im Schweißbrenner fehlt
Gaslinse montieren
HF wird auf Roboter abgeleitet
Ursache:
Behebung:
HF zündet nicht auf Werkstück
Ursache:
Behebung:
Elektrisch leitender Roboterflansch montiert
Kunststoff-Roboterflansch montieren
Zündhilfe fehlt
Zündhilfe montieren und Zündhilfe-Adapter anschließen
9
Page 10

Pflege, Wartung und Entsorgung
Sicherheit
Gefahr durch elektrischen Strom.
Ein elektrischer Schlag kann tödlich sein.
▶
▶
▶
▶
Allgemeines Regelmäßige und vorbeugende Wartung des Schweißbrenners sind wesentliche Fakto-
ren für einen störungsfreien Betrieb. Der Schweißbrenner ist hohen Temperaturen ausgesetzt. Daher benötigt der Schweißbrenner eine häufigere Wartung als andere Komponenten einer Schweißanlage.
Bei jeder Inbetriebnahme
- Schweißbrenner, Schlauchpaket und Stromanschlüsse auf Beschädigung prüfen
- Gas- und Wasseranschlüsse auf Dichtheit prüfen
- Kühlgerät auf einwandfreie Funktion überprüfen, Wasser Rückflussmenge im
- Verschleißteile auf einwandfreien Zustand prüfen, Verschleißteile vor dem Einbau
WARNUNG!
Vor Arbeiten am Schweißbrenner:
Netzschalter von Stromquelle in Stellung - O - schalten
Stromquelle vom Netz trennen
Ein verständliches Warnschild gegen Wiedereinschalten anbringen
Kühlmittelbehälter überwachen und gegebenenfalls Kühlgerät entlüften
reinigen
Monatlich - Falls vorhanden, Filter im Kühlkreislauf auf Verunreinigung prüfen
- Kühlmittel auf Reinheit prüfen; bei grober Verunreinigung Kühlmittel austauschen
und Schweißbrenner über Kühlmittel-Vorlauf und Kühlmittel-Rücklauf mehrmals
durchspülen
- Schweißbrenner zerlegen und auf Ablagerungen / Verunreinigungen prüfen
Entsorgung Die Entsorgung nur gemäß den geltenden nationalen und regionalen Bestimmungen
durchführen.
10
Page 11

Technische Daten
DE
TTW 4500, TTW
5500
TTW 4500 TTW 5500
Spannungsbemessung (V-Peak) 141 V 141 V
Schutzgas Argon EN 439
Kühlsystem Flüssigkeitskühlung
Kühlmittel Original Fronius Kühlmittel
Kühlleistung 800 W *) 1000 W *)
Kühlmitteldruck max. 5,5 bar
79,74 psi.
Kühlmitteldruck min. 3,0 bar
43,5 psi.
Kühlmittel-Mindestdurchfluss 1,0 l /min 1,0 l / min
Schweißstrom DC bei 10
min / 40° C (104° F)
Schweißstrom AC bei 10
min / 40° C (104° F)
*) Geringste Kühlleistung laut Norm IEC 60974-2
100% Einschaltdauer
(ED)
60% ED
100% ED
60% ED
350 A
450 A
250 A
320 A
5,5 bar
79,74 psi.
3,0 bar
43,5 psi.
430 A
550 A
300 A
400 A
Das Produkt entspricht den Anforderungen laut Norm IEC 60974-7
11
Page 12

12
Page 13

Contents
General 14
Device concept 14
Application areas 14
Scope of supply 14
TTW 4500 PAP options 15
TTW 5500 PAP options 15
Fitting the welding torch 16
Safety 16
Fitting the TTW 4500 16
Fitting the TTW 5500 17
Fitting the narrow-gap gas nozzle (option) 17
Troubleshooting 19
Safety 19
Troubleshooting 19
Care, maintenance and disposal 20
Safety 20
General 20
At every start-up 20
Monthly 20
Disposal 20
Technical data 21
TTW 4500, TTW 5500 21
EN
13
Page 14

General
(1) (2) (3) (4) (5) (6) (7)
(8)
Device concept
TTW 4500 / 5500 PAP device concept
Application areas The robot welding torches are used in, e.g.:
- Pipeline and equipment construction
- Container construction
- Applications requiring the highest quality standards
- Applications using special materials (e.g. titanium, nickel-based alloys)
- The automobile and the automotive component supply industries
The TTW 4500 and TTW 5500 water-cooled TIG robot welding torches are used for
TIG welding.
The welding torches have a Fronius F++
connection as standard. Various adapters
are available to enable the torches to be
operated with any standard TIG welding
machine. Each torch can be equipped with
a pushed wire-feed unit and a drag gas
nozzle. The hosepack can also be used
for certain plasma torches.
Scope of supply
TTW 4500 PAP scope of supply
(1) Ceramic protective gas nozzle
(2) Gas lens
(3) TTW torch body
(4) Clamping sleeve 3.2 mm
(5) Tungsten electrode 3.2 mm
(6) Torch cap, medium
14
Page 15

(7) Hosepack with integrated wire-feed hose
(1) (3) (5) (6) (7) (8) (9)
(2)
(4)
(8) Adjusting gauge
TTW 5500 PAP scope of supply
(1) Ceramic protective gas nozzle
(2) Gas lens
(3) Gas shroud
(4) Insulating ring
(5) TTW torch body
(6) Tungsten electrode 4.8 mm
(7) Clamping sleeve 4.8 mm
(8) Torch cap, short (TTW 5500)
(9) Hosepack with integrated wire-feed hose
EN
TTW 4500 PAP
options
TTW 5500 PAP
options
- Cold wire feeder (push system): Robacta Plasma / TIG KD
- Clamping sleeve (see spare parts list)
- Gas nozzle M 18 x 1.5
- Adapter for Fronius Z central connector
- Drag gas nozzle 50 / 100 mm
- Clamp holder
- Torch caps
- Cold wire feeder (push system): Robacta KD Plasma / TIG PAP
- Clamping sleeve 3.2 / 4 / 6.4 mm
- Drag gas nozzle 50 / 100 mm
- Gas nozzle 3/4
- Clamp holder
- Torch caps
- Adapter for Fronius Z central connector
15
Page 16

Fitting the welding torch
1
2
1
2
1
3
2
4
Safety
Fitting the TTW
4500
WARNING!
Danger due to work that has been carried out incorrectly.
This can result in severe personal injury and damage to property.
All connections must be made by trained and qualified personnel in compliance with
▶
the relevant safety regulations.
Note the safety rules in the operating instructions.
▶
WARNING!
Danger from electric current.
An electric shock can be fatal.
Before carrying out any work on the welding torch:
▶
Turn the power source mains switch to the "O" position
▶
Unplug the power source from the mains
▶
Put up an easy-to-understand warning sign to stop anybody inadvertently switching
▶
it back on again
1
2
3 4
16
Page 17

Fitting the TTW
2
3
1
㪉
2
1
1
2
1
2
3
4
5
5
1
*
2
*
5500
1
3 4
2
EN
Fitting the narrow-gap gas
nozzle (option)
You will also need the following items to fit the narrow-gap gas nozzle:
- Insulation ring D 35.5 mm - 42,0100,0010
- Gas shield M18 x 1.5 mm - 42,0001,6781
- Narrow-gap gas nozzle - 42,0300,3210
1
2
* Screw on as far as it will go
17
Page 18

2
1
3
~ 15 mm
3
1
**
1
2
5
4
** Push on as far as it will go
18
Page 19

Troubleshooting
Safety
Troubleshooting
WARNING!
Danger from electric current.
An electric shock can be fatal.
Before carrying out any work on the welding torch:
▶
Turn the power source mains switch to the "O" position
▶
Unplug the power source from the mains
▶
Put up an easy-to-understand warning sign to stop anybody inadvertently switching
▶
it back on again
Arc not igniting
Cause:
Remedy:
Cause:
Remedy:
Insufficient shielding gas cover
Cause:
Remedy:
Tungsten electrode dirty
Clean tungsten electrode
Tungsten electrode positioned incorrectly
Position tungsten electrode correctly
No gas lens in welding torch
Fit gas lens
EN
HF is conducted to robot
Cause:
Remedy:
HF does not ignite on workpiece
Cause:
Remedy:
Electrically-conductive robot flange fitted
Fit plastic robot flange
No pilot arc
Fit pilot arc and connect pilot arc adapter
19
Page 20

Care, maintenance and disposal
Safety
Danger from electric current.
An electric shock can be fatal.
▶
▶
▶
▶
General Regular preventive maintenance of the welding torch is essential for problem-free opera-
tion. The welding torch is subjected to high temperatures. It therefore requires more frequent maintenance than other components in the welding system.
At every start-up - Check welding torch, hosepack and power connections for signs of damage
- Check gas and water connections for leaks
- Check that the cooling unit is working properly, monitor the water return level in the
- Check that the wearing parts are in perfect condition, clean wearing parts before fit-
WARNING!
Before carrying out any work on the welding torch:
Turn the power source mains switch to the "O" position
Unplug the power source from the mains
Put up an easy-to-understand warning sign to stop anybody inadvertently switching
it back on again
coolant container, vent the cooling unit if necessary
ting them
Monthly - If applicable, check the filter in the cooling circuit for contamination
- Check that coolant is pure; if there are any impurities, replace the coolant and rinse
the welding torch thoroughly several times by letting coolant flow into it and back out
again
- Dismantle the welding torch and check for deposits/contamination
Disposal Dispose of in accordance with the applicable national and local regulations.
20
Page 21

Technical data
TTW 4500, TTW
5500
TTW 4500 TTW 5500
Voltage measurement (V-Peak) 141 V 141 V
Shielding gas Argon EN 439
Cooling system Liquid cooling
Coolant Original Fronius coolant
Cooling power 800 W *) 1000 W *)
Max. coolant pressure 5.5 bar
79.74 psi.
Min. coolant pressure 3.0 bar
43.5 psi.
Minimum coolant flow rate 1.0 l/min 1.0 l/min
DC welding current at 10
min / 40° C (104° F)
AC welding current at 10
min / 40° C (104° F)
*) Lowest cooling power according to standard IEC 60974-2
The product conforms to the requirements of standard IEC 60974-7
100% duty cycle (D.C.)
60% D.C.
100% D.C.
60% D.C.
350 A
450 A
250 A
320 A
5.5 bar
79.74 psi.
3.0 bar
43.5 psi.
430 A
550 A
300 A
400 A
EN
21
Page 22

22
Page 23

Tabla de contenido
Generalidades 24
Diseño de los equipos 24
Campos de aplicación 24
Volumen de suministro 24
Opciones TTW 4500 PAP 25
Opciones TTW 5500 PAP 25
Montar la antorcha 26
Seguridad 26
Montar la TTW 4500 26
Montar la TTW 5500 27
Opcional: montaje de la tobera de gas de intersticio estrecho 27
Diagnóstico de errores, solución de errores 29
Seguridad 29
Diagnóstico de errores, solución de errores 29
Cuidado, mantenimiento y eliminación 30
Seguridad 30
Generalidades 30
Con cada puesta en servicio 30
Mensualmente 30
Eliminación 30
Datos técnicos 31
TTW 4500, TTW 5500 31
ES
23
Page 24

Generalidades
(1) (2) (3) (4) (5) (6) (7)
(8)
Diseño de los
equipos
Campos de aplicación
Las antorchas de robot TIG refrigeradas
por agua TTW 4500 y TTW 5500 sirven
para la soldadura TIG.
Estas antorchas tienen de serie una conexión F++ de Fronius. Hay disponibles
diferentes adaptadores para el servicio en
un equipo de soldadura TIG comercial.
Cada antorcha puede equiparse con un
KD de empuje y una tobera de arrastre
para gas. También es posible utilizar el
paquete de mangueras para determinadas
antorchas de plasma.
Diseño de los equipos TTW 4500 / 5500 PAP
Las antorchas de robot se utilizan para las siguientes aplicaciones, por ejemplo:
- Construcción de tuberías y aparatos
- Construcción de depósitos
- Cuando se requiere una calidad máxima
- Materiales especiales (por ejemplo: titanio, aleaciones en base a níquel)
- Industria automovilística y proveedores de automoción
Volumen de
suministro
Volumen de suministro TTW 4500 PAP
(1) Tobera de gas protector de cerámica
(2) Lente de gas
(3) Cuerpo de antorcha TTW
(4) Virola tensora 3,2 mm
(5) Electrodo de tungsteno 3,2 mm
(6) Caperuza de antorcha media
24
Page 25

(7) Paquete de mangueras con manguera de transporte de hilo integrada
(1) (3) (5) (6) (7) (8) (9)
(2)
(4)
(8) Calibre de ajuste
Volumen de suministro TTW 5500 PAP
(1) Tobera de gas protector de cerámica
(2) Lente de gas
(3) Anillo de camisa de gas
(4) Anillo aislante
(5) Cuerpo de antorcha TTW
(6) Electrodo de tungsteno 4,8 mm
(7) Virola tensora 4,8 mm
(8) Caperuza de antorcha corta (TTW 5500)
(9) Paquete de mangueras con manguera de transporte de hilo integrada
ES
Opciones TTW
4500 PAP
Opciones TTW
5500 PAP
- Alimentación de hilo frío (sistema Push): Robacta para soldadura con chorro de
plasma / TIG KD
- Virola tensora (ver la lista de repuestos)
- Tobera de gas M 18 x 1,5
- Adaptador para conexión central Z de Fronius
- Tobera de arrastre para gas 50 / 100 mm
- Alojamiento para la abrazadera de sujeción
- Caperuzas de antorcha
- Alimentación de hilo frío (sistema Push): Robacta KD para soldadura con chorro de
plasma / TIG PAP
- Virola tensora 3,2 / 4 / 6,4 mm
- Tobera de arrastre para gas 50 / 100 mm
- Tobera de gas 3/4
- Alojamiento para la abrazadera de sujeción
- Caperuzas de antorcha
- Adaptador para conexión central Z de Fronius
25
Page 26

Montar la antorcha
1
2
1
2
1
3
2
4
Seguridad
Montar la TTW
4500
¡PELIGRO!
Peligro originado por trabajos realizados incorrectamente.
La consecuencia pueden ser graves daños personales y materiales.
¡Los trabajos de conexión sólo deben ser realizados por personal técnico debida-
▶
mente formado teniendo en cuenta las disposiciones de seguridad vigentes!
Se deben tener en cuenta las indicaciones de seguridad del manual de instruccio-
▶
nes.
¡PELIGRO!
Peligro originado por corriente eléctrica.
Las descargas eléctricas pueden ser mortales.
Antes de realizar trabajos en la antorcha:
▶
Poner el interruptor de red de la fuente de corriente en la posición - O -
▶
Separar la fuente de corriente de la red
▶
Colocar un rótulo de aviso claro y legible para impedir cualquier reconexión
▶
1
2
3 4
26
Page 27

Montar la TTW
2
3
1
㪉
2
1
1
2
1
2
3
4
5
5
1
*
2
*
5500
1
3 4
2
ES
Opcional: montaje de la tobera
de gas de intersticio estrecho
Para el montaje de la tobera de gas de intersticio estrecho se necesitan adicionalmente
los siguientes artículos:
- Anillo aislante D 35,5 mm - 42,0100,0010
- Anillo de camisa de gas M18 x 1,5 mm - 42,0001,6781
- Tobera de gas de intersticio estrecho - 42,0300,3210
1
2
* Enroscar hasta el tope
27
Page 28
2
1
3
~ 15 mm
3
1
**
1
2
5
4
** Montar hasta el tope
28
Page 29

Diagnóstico de errores, solución de errores
Seguridad
Diagnóstico de
errores, solución
de errores
¡PELIGRO!
Peligro originado por corriente eléctrica.
Las descargas eléctricas pueden ser mortales.
Antes de realizar trabajos en la antorcha:
▶
Poner el interruptor de red de la fuente de corriente en la posición - O -
▶
Separar la fuente de corriente de la red
▶
Colocar un rótulo de aviso claro y legible para impedir cualquier reconexión
▶
El arco voltaico no se enciende
Causa:
Solución:
Causa:
Solución:
La cubierta de gas protector no es suficiente
Causa:
Solución:
El electrodo de tungsteno está sucio
Limpiar el electrodo de tungsteno
El electrodo de tungsteno está posicionado incorrectamente
Posicionar el electrodo de tungsteno correctamente
Falta la lente de gas en la antorcha
Montar la lente de gas
ES
La AF se deriva al robot
Causa:
Solución:
La AF no se ceba sobre la pieza de trabajo
Causa:
Solución:
Se ha montado una brida de robot con conductividad eléctrica
Montar una brida de robot de plástico
Falta el arco voltaico piloto
Montar el arco voltaico piloto y conectar el adaptador del mismo
29
Page 30

Cuidado, mantenimiento y eliminación
Seguridad
Peligro originado por corriente eléctrica.
Las descargas eléctricas pueden ser mortales.
▶
▶
▶
▶
Generalidades El mantenimiento periódico y preventivo de la antorcha es un factor relevante para un
servicio sin perturbaciones. La antorcha está expuesta a altas temperaturas. Por este
motivo, la antorcha requiere un mantenimiento más frecuente que los demás componentes del sistema de soldadura.
Con cada puesta
en servicio
- Comprobar los posibles daños en la antorcha, el paquete de mangueras y las cone-
- Comprobar la estanqueidad de las conexiones de gas y agua
- Comprobar el funcionamiento intachable de la unidad de refrigeración, monitorizar
- Comprobar el estado intachable de las piezas de desgaste y limpiarlas antes del
¡PELIGRO!
Antes de realizar trabajos en la antorcha:
Poner el interruptor de red de la fuente de corriente en la posición - O Separar la fuente de corriente de la red
Colocar un rótulo de aviso claro y legible para impedir cualquier reconexión
xiones de corriente
el caudal de retorno de agua en el depósito de refrigerante y purgar el aparato refrigerador si fuera necesario
montaje
Mensualmente - Si estuviera disponible, comprobar si hay impurezas en el filtro del circuito de refri-
geración
- Comprobar la pureza del refrigerante. En caso de impurezas gruesas, sustituir el
refrigerante y lavar la antorcha varias veces haciendo que el refrigerante avance y
retroceda
- Desarmar y comprobar la antorcha con respecto a acumulaciones e impurezas
Eliminación Efectuar la eliminación observando las normas nacionales y regionales aplicables.
30
Page 31

Datos técnicos
TTW 4500, TTW
5500
TTW 4500 TTW 5500
Dimensionamiento de tensión (V-Peak) 141 V 141 V
Gas protector Argón EN 439
Sistema de refrigeración Refrigeración por líquido
Refrigerante Refrigerante original de Fro-
nius
Potencia de refrigeración 800 W *) 1000 W *)
Presión máxima de refri-
gerante
Presión mínima de refri-
gerante
Caudal mínimo de refrigerante 1,0 l/min 1,0 l/min
Corriente de soldadura
DC con 10 min / 40° C
(104° F)
Corriente de soldadura
AC con 10 min / 40° C
(104° F)
5,5 bar
79,74 psi.
3,0 bar
43,5 psi.
100% duración de ciclo
de trabajo (DC)
60% DC
100% DC
60% DC
350 A
450 A
250 A
320 A
5,5 bar
79,74 psi.
3,0 bar
43,5 psi.
430 A
550 A
300 A
400 A
ES
*) Menor potencia de refrigeración según la norma IEC 60974-2
El producto cumple los requisitos de la norma IEC 60974-7
31
Page 32

32
Page 33

Sommaire
Généralités 34
Concept de l’appareil 34
Domaines d'application 34
Livraison 34
Options TTW 4500 PAP 35
Options TTW 5500 PAP 35
Monter la torche de soudage 36
Sécurité 36
Monter le TTW 4500 36
Montage TTW 5500 37
Monter l'option buse de gaz pour chanfrein étroit 37
Diagnostic d’erreur, élimination de l'erreur 39
Sécurité 39
Diagnostic d’erreur, élimination de l'erreur 39
Maintenance, entretien et élimination 40
Sécurité 40
Généralités 40
À chaque mise en service 40
Mensuel 40
Élimination des déchets 40
Caractéristiques techniques 41
TTW 4500, TTW 5500 41
FR
33
Page 34

Généralités
(1) (2) (3) (4) (5) (6) (7)
(8)
Concept de
l’appareil
Domaines d'application
Les torches de soudage pour robot TIG
TTW 4500 et TTW 5500, refroidies par
eau, sont utilisées pour le pour le soudage
TIG.
De série, les torches sont équipées d'un
raccord Fronius F++. Divers adaptateurs
sont disponibles pour utilisation sur un
appareil de soudage TIG usuel du commerce. Chaque torche de soudage peut
être équipée d'une avance KD et d'une
buse à gaz de traînage. Le faisceau de
liaison peut également être utilisé pour
certaines torches plasma.
Concept de l’appareil TTW 4500 / 5500 PAP
Les torches de soudage pour robot plasma sont utilisées dans les applications suivantes, par exemple :
- dans la construction de conduites et d'appareils
- dans la construction de conteneurs
- si des exigences de qualité élevées sont imposées
- avec des matériaux spéciaux (p. ex. : titane, alliages à base de nickel)
- dans l'industrie automobile et de la sous-traitance du secteur automobile
Livraison
Livraison TTW 4500 PAP
(1) Buse gaz de protection en céramique
(2) Lentille gaz
(3) Corps de torche TTW
(4) Douille de serrage 3,2 mm
(5) Électrode tungstène 3,2 mm
(6) Cache de torche, moyen
34
Page 35

(7) Faisceau de liaison avec gaine de dévidoir intégrée
(1) (3) (5) (6) (7) (8) (9)
(2)
(4)
(8) Gabarit de réglage
Livraison TTW 5500 PAP
(1) Buse gaz de protection en céramique
(2) Lentille gaz
(3) Bague gaz
(4) Bague d'isolation
(5) Corps de torche TTW
(6) Électrode tungstène 4,8 mm
(7) Douille de serrage 4,8 mm
(8) Cache de torche, court (TTW 5500)
(9) Faisceau de liaison avec gaine de dévidoir intégrée
FR
Options TTW
4500 PAP
Options TTW
5500 PAP
- Alimentation de fil froid (système Push) : Robacta Plasma / TIG KD
- Douille de serrage (voir Liste de pièces de rechange)
- Buse gaz M 18 x 1,5
- Adaptateur pour Fronius Z raccord central
- Buse à gaz de traînage 50 / 100 mm
- Support collier de fixation
- Caches de torche
- Alimentation de fil froid (système Push) : Robacta KD Plasma / TIG PAP
- Douille de serrage 3,2 / 4 / 6,4 mm
- Buse à gaz de traînage 50 / 100 mm
- Buse gaz 3/4
- Support collier de fixation
- Caches de torche
- Adaptateur pour Fronius Z raccord central
35
Page 36

Monter la torche de soudage
1
2
1
2
1
3
2
4
Sécurité
Monter le TTW
4500
AVERTISSEMENT!
Danger en cas d'erreurs en cours d'opération.
Cela peut entraîner des dommages corporels et matériels graves.
Les travaux de raccordement ne doivent être réalisés que par un personnel spécia-
▶
lisé formé à cet effet et dans le respect des prescriptions de sécurité en vigueur !
Respectez les consignes de sécurité figurant dans les Instructions de service.
▶
AVERTISSEMENT!
Risque d'électrocution.
Une décharge électrique peut être mortelle.
Avant tous travaux sur la torche de soudage :
▶
Commuter l’interrupteur du secteur de la source de courant sur - O -
▶
Débrancher la prise secteur de la source de courant
▶
Apposer un panneau d'avertissement compréhensible afin de prévenir toute remise
▶
en marche
1
2
3 4
36
Page 37

Montage TTW
2
3
1
㪉
2
1
1
2
1
2
3
4
5
5
1
*
2
*
5500
1
3 4
2
FR
Monter l'option
buse de gaz pour
chanfrein étroit
Pour monter la buse de gaz pour chanfrein étroit, les articles suivants sont également
nécessaires :
- Bague d'isolation D 35,5 mm – 42,0100,0010
- Bague d'enveloppe à gaz M18 x 1,5 mm – 42,0001,6781
- Buse de gaz pour chanfrein étroit – 42,0300,3210
1
2
* Dévisser jusqu'à la butée
37
Page 38

2
1
3
~ 15 mm
3
1
**
1
2
5
4
** Monter jusqu'à la butée
38
Page 39

Diagnostic d’erreur, élimination de l'erreur
Sécurité
Diagnostic d’erreur, élimination
de l'erreur
AVERTISSEMENT!
Risque d'électrocution.
Une décharge électrique peut être mortelle.
Avant tous travaux sur la torche de soudage :
▶
Commuter l’interrupteur du secteur de la source de courant sur - O -
▶
Débrancher la prise secteur de la source de courant
▶
Apposer un panneau d'avertissement compréhensible afin de prévenir toute remise
▶
en marche
L’arc ne s'amorce pas
Cause :
Remède :
Cause :
Remède :
Cache de gaz de protection insuffisant
Cause :
Remède :
Électrode tungstène encrassée
Nettoyer l'électrode tungstène
Électrode tungstène mal positionnée
Positionner correctement l'électrode tungstène
Absence de lentille de gaz dans la torche de soudage
Monter la lentille de gaz
FR
HF dérivée sur le robot
Cause :
Remède :
HF ne s'amorce pas sur la pièce à souder
Cause :
Remède :
Bride de robot montée conductrice d'électricité
Monter une bride de robot en plastique
Pas d'arc pilote
Monter l'arc pilote et raccorder l'adaptateur d'arc pilote
39
Page 40

Maintenance, entretien et élimination
Sécurité
Risque d'électrocution.
Une décharge électrique peut être mortelle.
▶
▶
▶
▶
Généralités Un entretien régulier et préventif de la torche de soudage constitue un facteur important
permettant d'en garantir le bon fonctionnement. La torche de soudage est soumise à des
températures élevées. Elle nécessite donc une maintenance plus fréquente que les
autres composants d'une installation de soudage.
À chaque mise en
service
- Vérifier les éventuels dommages sur la torche de soudage, le faisceau de liaison et
- Vérifier l'étanchéité des raccords de gaz et d'eau
- Vérifier le fonctionnement correct du refroidisseur, surveiller le débit de retour d'eau
- Vérifier l'état des pièces d'usure, nettoyer les pièces d'usure avant de les mettre en
AVERTISSEMENT!
Avant tous travaux sur la torche de soudage :
Commuter l’interrupteur du secteur de la source de courant sur - O Débrancher la prise secteur de la source de courant
Apposer un panneau d'avertissement compréhensible afin de prévenir toute remise
en marche
les connexions au réseau électrique
dans le réservoir de réfrigérant et le cas échéant purger le refroidisseur
place
Mensuel - Le cas échéant, vérifier l'encrassement du filtre dans le circuit de refroidissement
- Vérifier la pureté du réfrigérant ; en présence d'impuretés, remplacer le réfrigérant et
rincer plusieurs fois la torche via l'arrivée et le retour de réfrigérant
- Démonter la torche de soudage et vérifier l'absence de dépôts / impuretés
Élimination des
déchets
L'élimination doit être réalisée conformément aux prescriptions nationales et régionales
en vigueur.
40
Page 41

Caractéristiques techniques
TTW 4500, TTW
5500
TTW 4500 TTW 5500
Mesure de la tension (V-Peak) 141 V 141 V
Gaz de protection Argon EN 439
Système de refroidisse-
ment
Réfrigérant Réfrigérant d'origine Fronius
Puissance de refroidisse-
ment
Pression du réfrigérant
max.
Pression du réfrigérant
min.
Débit minimal de réfrigérant 1,0 l/min 1,0 l/min
Intensité de soudage DC
à 10 min / 40° C (104° F)
Intensité de soudage CA
à 10 min / 40° C (104° F)
800 W *) 1000 W *)
5,5 bars
3,0 bars
100% facteur de marche
(d.f.)
60% d.f.
100% d.f.
60% d.f.
Refroidissement par liquide
5,5 bars
79,74 psi.
43,5 psi.
350 A
450 A
250 A
320 A
79,74 psi.
3,0 bars
43,5 psi.
430 A
550 A
300 A
400 A
FR
*) Puissance de refroidissement minimale conformément à la norme IEC 60974-2
Ce produit satisfait aux exigences de la norme IEC 60974-7
41
Page 42

42
Page 43

Indice
In generale 44
Concezione dell'apparecchio 44
Settori d'impiego 44
Fornitura 44
Opzioni TTW 4500 PAP 45
Opzioni TTW 5500 PAP 45
Montaggio della torcia per saldatura 46
Sicurezza 46
Montaggio TTW 4500 46
Montaggio TTW 5500 47
Montaggio dell'ugello narrow gap opzionale 47
Diagnosi e risoluzione degli errori 49
Sicurezza 49
Diagnosi e risoluzione degli errori 49
Cura, manutenzione e smaltimento 50
Sicurezza 50
In generale 50
Ad ogni messa in funzione 50
Ogni mese 50
Smaltimento 50
Dati tecnici 51
TTW 4500, TTW 5500 51
IT
43
Page 44

In generale
(1) (2) (3) (4) (5) (6) (7)
(8)
Concezione
dell'apparecchio
Concezione dell'apparecchio TTW 4500 / 5500 PAP
Settori d'impiego Le torce per saldatura a robot vengono utilizzate nelle seguenti applicazioni, ad es.:
- costruzione di tubazioni e apparecchiature
- costruzione di serbatoi
- settori con requisiti qualitativi elevatissimi
- materiali speciali (ad es.: titanio, leghe a base di nichel)
- settore automobilistico e relativo indotto.
Le torce per saldatura robot TIG raffreddate ad acqua TTW 4500 e TTW 5500
servono per la saldatura TIG.
Le torce per saldatura sono dotate di serie
di un attacco Fronius F++. Sono disponibili
vari adattatori per l'utilizzo su apparecchi
per saldatura TIG comunemente disponibili in commercio. Ogni torcia per saldatura
può essere equipaggiata con un KD spinto
e un ugello per trailer gas. Il pacchetto tubi
flessibili può essere utilizzato anche per
determinate torce per saldatura a plasma.
Fornitura
Fornitura TTW 4500 PAP
(1) Ugello del gas inerte in ceramica
(2) Limitatore del gas
(3) Corpo della torcia TTW
(4) Bussola di serraggio 3,2 mm
(5) Elettrodo al tungsteno 3,2 mm
(6) Cappuccio della torcia centrale
44
Page 45
(7) Pacchetto tubi flessibili con tubo di alimentazione filo integrato
(1) (3) (5) (6) (7) (8) (9)
(2)
(4)
(8) Calibro di registrazione
Fornitura TTW 5500 PAP
Opzioni TTW
4500 PAP
(1) Ugello del gas inerte in ceramica
(2) Limitatore del gas
(3) Anello corona gas
(4) Isolamento
(5) Corpo della torcia TTW
(6) Elettrodo al tungsteno 4,8 mm
(7) Bussola di serraggio 4,8 mm
(8) Cappuccio della torcia corto (TTW 5500)
(9) Pacchetto tubi flessibili con tubo di alimentazione filo integrato
- Alimentazione filo a freddo (sistema Push): KD Robacta Plasma / TIG
- Bussola di serraggio (vedere l'elenco dei pezzi di ricambio)
- Ugello del gas M 18 x 1,5
- Adattatore per attacco centrale Fronius Z
- Ugello per trailer gas 50 / 100 mm
- Alloggiamento fascetta di supporto
- Cappucci della torcia
IT
Opzioni TTW
5500 PAP
- Alimentazione filo a freddo (sistema Push): KD Robacta Plasma / TIG PAP
- Bussola di serraggio 3,2 / 4 / 6,4 mm
- Ugello per trailer gas 50 / 100 mm
- Ugello del gas 3/4
- Alloggiamento fascetta di supporto
- Cappucci della torcia
- Adattatore per attacco centrale Fronius Z
45
Page 46
Montaggio della torcia per saldatura
1
2
1
2
1
3
2
4
Sicurezza
Montaggio TTW
4500
PERICOLO!
Pericolo dovuto a lavori eseguiti in modo errato.
può causare gravi lesioni personali e danni materiali.
I collegamenti devono essere eseguiti unicamente da personale qualificato e
▶
addestrato nel rispetto delle disposizioni di sicurezza vigenti.
Osservare le norme di sicurezza riportate nelle istruzioni per l'uso.
▶
PERICOLO!
Pericolo dovuto alla corrente elettrica.
Una scossa elettrica può risultare mortale.
Prima di eseguire qualsiasi lavoro sulla torcia per saldatura:
▶
Posizionare l'interruttore di rete del generatore su "O".
▶
Scollegare il generatore dalla rete.
▶
Apporvi un cartello di segnalazione comprensibile recante il divieto di riaccendere
▶
l'apparecchio.
1
2
3 4
46
Page 47
Montaggio TTW
2
3
1
㪉
2
1
1
2
1
2
3
4
5
5
1
*
2
*
5500
1
3 4
2
IT
Montaggio
dell'ugello narrow gap opzionale
Per montare l'ugello narrow gap occorrono i seguenti articoli:
- Anello isolante D 35,5 mm - 42,0100,0010
- Anello corona gas M18 x 1,5 mm - 42,0001,6781
- Ugello narrow gap - 42,0300,3210
1
2
* Avvitare fino in fondo.
47
Page 48

2
1
3
~ 15 mm
3
1
**
1
2
5
4
* Montare fino in fondo.
48
Page 49

Diagnosi e risoluzione degli errori
Sicurezza
Diagnosi e risoluzione degli errori
PERICOLO!
Pericolo dovuto alla corrente elettrica.
Una scossa elettrica può risultare mortale.
Prima di eseguire qualsiasi lavoro sulla torcia per saldatura:
▶
Posizionare l'interruttore di rete del generatore su "O".
▶
Scollegare il generatore dalla rete.
▶
Apporvi un cartello di segnalazione comprensibile recante il divieto di riaccendere
▶
l'apparecchio.
L'arco voltaico non si accende
Causa:
Risoluzione:
Causa:
Risoluzione:
Copertura del gas inerte insufficiente.
Causa:
Risoluzione:
Elettrodo al tungsteno sporco.
Pulire l'elettrodo al tungsteno.
Elettrodo al tungsteno posizionato in modo errato.
Posizionare correttamente l'elettrodo al tungsteno.
Limitatore del gas assente nella torcia per saldatura.
Montare il limitatore del gas.
IT
Deviazione dell'alta frequenza sul robot
Causa:
Risoluzione:
Mancata accensione alta frequenza sul pezzo da lavorare
Causa:
Risoluzione:
Montata flangia robot conduttrice di elettricità.
Montare flangia robot in plastica.
Arco voltaico pilota assente
Montare l'arco voltaico pilota e collegare il relativo adattatore.
49
Page 50

Cura, manutenzione e smaltimento
Sicurezza
Pericolo dovuto alla corrente elettrica.
Una scossa elettrica può risultare mortale.
▶
▶
▶
▶
In generale Una manutenzione regolare e preventiva della torcia per saldatura è fondamentale per
garantirne il corretto funzionamento. La torcia per saldatura è esposta a temperature elevate. Per questo motivo richiede una manutenzione più frequente rispetto agli altri componenti di un impianto di saldatura.
Ad ogni messa in
funzione
- Verificare che torcia per saldatura, pacchetto tubi flessibili e attacchi elettrici non
- Verificare la tenuta degli attacchi dell'acqua e del gas.
- Controllare che il gruppo di raffreddamento funzioni correttamente, monitorare la
- Verificare che i pezzi soggetto a usura siano in condizioni ottimali e pulirli prima di
PERICOLO!
Prima di eseguire qualsiasi lavoro sulla torcia per saldatura:
Posizionare l'interruttore di rete del generatore su "O".
Scollegare il generatore dalla rete.
Apporvi un cartello di segnalazione comprensibile recante il divieto di riaccendere
l'apparecchio.
siano danneggiati.
portata del flusso di ritorno dell'acqua nel serbatoio del refrigerante e, se necessario,
far sfiatare il gruppo di raffreddamento.
installarli.
Ogni mese - Se presente, verificare che non vi siano impurità nel filtro del circuito di raffredda-
mento.
- Verificare che non vi siano impurità nel refrigerante; in presenza di notevoli impurità,
sostituire il refrigerante e pulire la torcia per saldatura utilizzando più volte la mandata e il ritorno del refrigerante.
- Smontare la torcia per saldatura e verificare che non vi siano depositi / impurità.
Smaltimento Lo smaltimento va eseguito unicamente nel rispetto delle disposizioni nazionali e regio-
nali vigenti.
50
Page 51

Dati tecnici
TTW 4500, TTW
5500
TTW 4500 TTW 5500
Misurazione tensione (V Peak) 141 V 141 V
Gas inerte Argon EN 439
Sistema di raffreddamento A liquido
Refrigerante Refrigerante originale Fronius
Potenza di raffredda-
mento
Pressione max. refriger-
ante
Pressione min. refriger-
ante
Portata min. refrigerante 1,0 l /min 1,0 l /min
Corrente di saldatura DC
a 10 min / 40° C (104° F)
Corrente di saldatura AC
a 10 min / 40° C (104° F)
*) Potenza di raffreddamento min. secondo la norma IEC 60974-2.
800 W *) 1000 W *)
5,5 bar
79.74 psi.
3,0 bar
43.5 psi.
100% tempo di accensione (TA)
60% TA
100% TA
60% TA
350 A
450 A
250 A
320 A
5,5 bar
79.74 psi.
3,0 bar
43.5 psi.
430 A
550 A
300 A
400 A
IT
Questo prodotto è conforme ai requisiti della norma IEC 60974-7.
51
Page 52

52
Page 53

Índice
Informações gerais 54
Conceito de dispositivo 54
Áreas de aplicação 54
Escopo de fornecimento 54
Opções TTW 4500 PAP 55
Opções TTW 5500 PAP 55
Montar a tocha de soldagem 56
Segurança 56
Montar TTW 4500 56
Montar TTW 5500 57
Montar a opção de bico de gás de fenda estreita 57
Diagnóstico de erro, eliminação de erro 59
Segurança 59
Diagnóstico de erro, eliminação de erro 59
Conservação, Manutenção e Descarte 60
Segurança 60
Informações gerais 60
Sempre que for colocada em funcionamento 60
Mensalmente 60
Descarte 60
Dados técnicos 61
TTW 4500, TTW 5500 61
PT-BR
53
Page 54
Informações gerais
(1) (2) (3) (4) (5) (6) (7)
(8)
Conceito de dispositivo
Áreas de
aplicação
As tochas TIG robô resfriadas a água
TTW 4500 e TTW 5500 servem para a
soldagem TIG.
As tochas de solda têm por série uma
conexão F++ da Fronius. Diferentes adaptadores estão disponíveis para a operação
e uma fonte de solda TIG convencional.
Cada tocha de solda pode ser equipada
com um KD empurrado e um bocal de gás
de transporte. O jogo de mangueiras
também pode ser usado para determinadas tochas de plasma.
Conceito de dispositivo TTW 4500 /5500 PAP
As tochas-robô são usadas nas seguintes aplicações, por exemplo:
- na indústria de tubulações e de aparelhos
- na construção de contêineres
- com as mais altas exigências de qualidade
- em materiais especiais (por exemplo: ligas à base de titânio e de níquel)
- Indústria automobilística e seus fornecedores
Escopo de fornecimento
Escopo de fornecimento TTW 4500 PAP
(1) Bico de gás de proteção cerâmico
(2) Lente de gás
(3) Corpo da tocha de solda TTW
(4) Luva de fixação 3,2 mm
(5) Eletrodo de tungstênio 3,2 mm
(6) Capa de tocha central
54
Page 55
(7) Jogo de mangueira com mangueira de avanço de arame integrada
(1) (3) (5) (6) (7) (8) (9)
(2)
(4)
(8) Calibrador de ajuste
Escopo de fornecimento TTW 5500 PAP
(1) Bico de gás de proteção cerâmico
(2) Lente de gás
(3) Anel do manto de gás
(4) Isolante
(5) Corpo da tocha de solda TTW
(6) Eletrodo de tungstênio 4,8 mm
(7) Luva de fixação 4,8 mm
(8) Capa da tocha curta (TTW 5500)
(9) Jogo de mangueira com mangueira de avanço de arame integrada
PT-BR
Opções TTW
4500 PAP
Opções TTW
5500 PAP
- Alimentador de arame frio (Sistema Push): Robacta Plasma / TIG KD
- Luva de fixação (consultar lista de peças de reposição)
- Bico de gás M 18 x 1,5
- Adaptador para conexão central Z da Fronius
- Bocal de gás de transporte 50 / 100 mm
- Alojamento do clipe de retenção
- Capas de tocha
- Alimentador de arame frio (Sistema Push): Robacta KD Plasma / TIG PAP
- Luva de fixação 3,2 / 4 / 6,4 mm
- Bocal de gás de transporte 50 / 100 mm
- Bico de gás 3/4
- Alojamento do clipe de retenção
- Capas de tocha
- Adaptador para conexão central Z da Fronius
55
Page 56

Montar a tocha de soldagem
1
2
1
2
1
3
2
4
Segurança
Montar TTW 4500
PERIGO!
Perigo devido a trabalhos realizados de forma incorreta.
Danos pessoais e materiais graves podem ser provocados.
Os trabalhos de conexão só podem ser executados por profissionais treinados de
▶
acordo com as normas de segurança em vigor!
Considere as normas de segurança na instrução de manuseio.
▶
PERIGO!
Perigo devido à corrente elétrica.
Um choque elétrico pode ser fatal.
Antes de trabalhar com a tocha de solda:
▶
colocar o interruptor de rede elétrica da fonte de solda para a posição - O
▶
desconectar a fonte de solda da rede elétrica
▶
colocar um sinal de alerta claro para evitar o religamento
▶
1
2
3 4
56
Page 57
Montar TTW 5500
2
3
1
㪉
2
1
1
2
1
2
3
4
5
5
1
*
2
*
1
3 4
2
Montar a opção
de bico de gás de
fenda estreita
Para a montagem do bico de gás de fenda estreita, os seguintes artigos também são
necessários:
- Isolante D 35,5 mm - 42,0100,0010
- Anel de revestimento de gás M18 x 1,5 mm - 42,0001,6781
- Bico de gás de fenda estreita - 42,0300,3210
1
2
PT-BR
* Parafusar até o encosto
57
Page 58

2
1
3
~ 15 mm
3
1
**
1
2
5
4
** Montar até o encosto
58
Page 59

Diagnóstico de erro, eliminação de erro
Segurança
Diagnóstico de
erro, eliminação
de erro
PERIGO!
Perigo devido à corrente elétrica.
Um choque elétrico pode ser fatal.
Antes de trabalhar com a tocha de solda:
▶
colocar o interruptor de rede elétrica da fonte de solda para a posição - O
▶
desconectar a fonte de solda da rede elétrica
▶
colocar um sinal de alerta claro para evitar o religamento
▶
Arco voltaico não entra em ignição
Causa:
Solução:
Causa:
Solução:
Cobertura do gás de proteção insuficiente
Causa:
Solução:
Eletrodo de tungstênio está sujo
Limpar o eletrodo de tungstênio
Eletrodo de tungstênio posicionado incorretamente
Posicionar corretamente o eletrodo de tungstênio
Lente de gás está ausente na tocha de solda
Montar a lente de gás
PT-BR
HF é derivado para o robô
Causa:
Solução:
HF não faz ignição sobre a peça de produção
Causa:
Solução:
Flange condutor de eletricidade do robô está montado
Montar o flange de plástico do robô
Falta arco piloto
Montar o arco piloto e conectar o adaptador do arco piloto
59
Page 60

Conservação, Manutenção e Descarte
Segurança
Informações
gerais
Sempre que for
colocada em funcionamento
PERIGO!
Perigo devido à corrente elétrica.
Um choque elétrico pode ser fatal.
Antes de trabalhar com a tocha de solda:
▶
colocar o interruptor de rede elétrica da fonte de solda para a posição - O
▶
desconectar a fonte de solda da rede elétrica
▶
colocar um sinal de alerta claro para evitar o religamento
▶
A manutenção regular e preventiva da tocha é um fator importante para uma operação
sem falhas. A tocha de solda é submetida a altas temperaturas. Por isso, ela precisa de
manutenção com mais frequência que outros componentes do sistema de soldagem.
- Testar a tocha de solda, o jogo de mangueira e as conexões de corrente quanto a
danos
- Verificar a estanqueidade das conexões de gás e água
- Verificar o dispositivo de refrigeração quanto ao funcionamento correto, monitorar a
água e o volume de refluxo no recipiente de refrigeração e, se necessário, purgar o
dispositivo de refrigeração
- Verificar as peças de desgaste quanto ao perfeito estado, limpar as peças de desgaste antes da instalação
Mensalmente - Caso esteja disponível, verificar o filtro do circuito de refrigeração quanto a sujeiras
- Verificar o agente refrigerante quanto à sua pureza. Em caso de muita sujeira, substituí-lo e enxaguar várias vezes a tocha de solda através do fluxo do agente refrigerante e do refluxo do agente refrigerante
- Desmontar a tocha de solda e verificar a existência de sedimentos e sujeiras
Descarte O descarte pode ser executado somente de acordo com as determinações nacionais e
regionais em vigor.
60
Page 61

Dados técnicos
TTW 4500, TTW
5500
TTW 4500 TTW 5500
Dimensionamento de tensão (V-Peak) 141 V 141 V
Gás de proteção Argônio EN 439
Sistema de refrigeração Refrigeração por líquido
Agente refrigerante Agente refrigerante original
da Fronius
Potência de refrigeração 800 W *) 1000 W *)
Pressão máx. do agente
refrigerante
Pressão mín. do agente
refrigerante
Taxa de fluxo mínima do agente de refrigeração 1,0 l/min. 1,0 l/min.
Corrente de soldagem CC
em 10 min / 40 °C (104
°F)
Corrente de soldagem CA
em 10 min./ 40 °C (104
°F)
5,5 bars
79,74 psi.
3,0 bars
43,5 psi.
100% Ciclo de trabalho
(CT)
60% CT
100% CT
60% CT
350 A
450 A
250 A
320 A
5,5 bars
79,74 psi.
3,0 bars
43,5 psi.
430 A
550 A
300 A
400 A
PT-BR
*) Menor potência de refrigeração conforme norma IEC 60974-2
O produto está em conformidade com as exigências da norma IEC 60974-7.
61
Page 62

62
Page 63

PT-BR
63
Page 64

FRONIUS INTERNATIONAL GMBH
Froniusstraße 1
A-4643 Pettenbach
AUSTRIA
contact@fronius.com
www.fronius.com
Under www.fronius.com/contact you will find the addresses
of all Fronius Sales & Service Partners and locations
 Loading...