

Page 1

/ Battery Charging Systems / Welding Technology / Solar Electronics
TR1000
TR1100
Bedienungsanleitung
DEENFR
Fernbedienung
Operating Instructions
Remote control
Mode d’emploi
Commande à distance
Instrukcja obsługi
PL
Zdalne sterowanie
42,0410,2575
006-24022020
Page 2
BEDIENUNGSELEMENTE
Je nach Ausführung Ihres Schweißbrenners stehen
unterschiedliche Funktionen zur Verfügung. Mit dem
Standard-Schweißbrenner (Abb.4) sind die Betriebsarten 2-Takt und 4-Takt Betrieb möglich. Der Up/DownSchweißbrenner (Abb.5) bietet zusätzlich eine Up/DownFunktion an. Mit dem JobMaster (Abb.6) können weiters
einzelne Parameter am Griff angezeigt und eingestellt
werden.
2-TAKT-BETRIEB
- Brennertaste drücken und halten: Schweißstart
- Brennertaste loslassen: Schweißende
4-TAKT-BETRIEB
- Brennertaste drücken und loslassen: Schweißstart
- erneut Brennertaste drücken und loslassen: Schweißende
UP/DOWN FUNKTION
Mit der Up- bzw. Down-Taste kann der Schweißstrom
jederzeit erhöht bzw. abgesenkt werden. Durch Loslassen der Taste wird der Schweißstrom fixiert.
- Taste Up: Schweißstrom erhöhen
- Taste Down: Schweißstrom absenken
JOBMASTER
Mit der Taste Parameteranzeige (1) kann der Parameter (Schweißstrom, Drahtgeschwindigkeit, JOB-N°)
angewählt, und mit der Taste Parametereinstellung (2)
geändert werden.
(3) Parameter Schweißstrom
(4) Parameter Drahtgeschwindigkeit
(5) Parameter JOB-N° (Jobnummer)
(6) kundenspezifisch ausgeführt
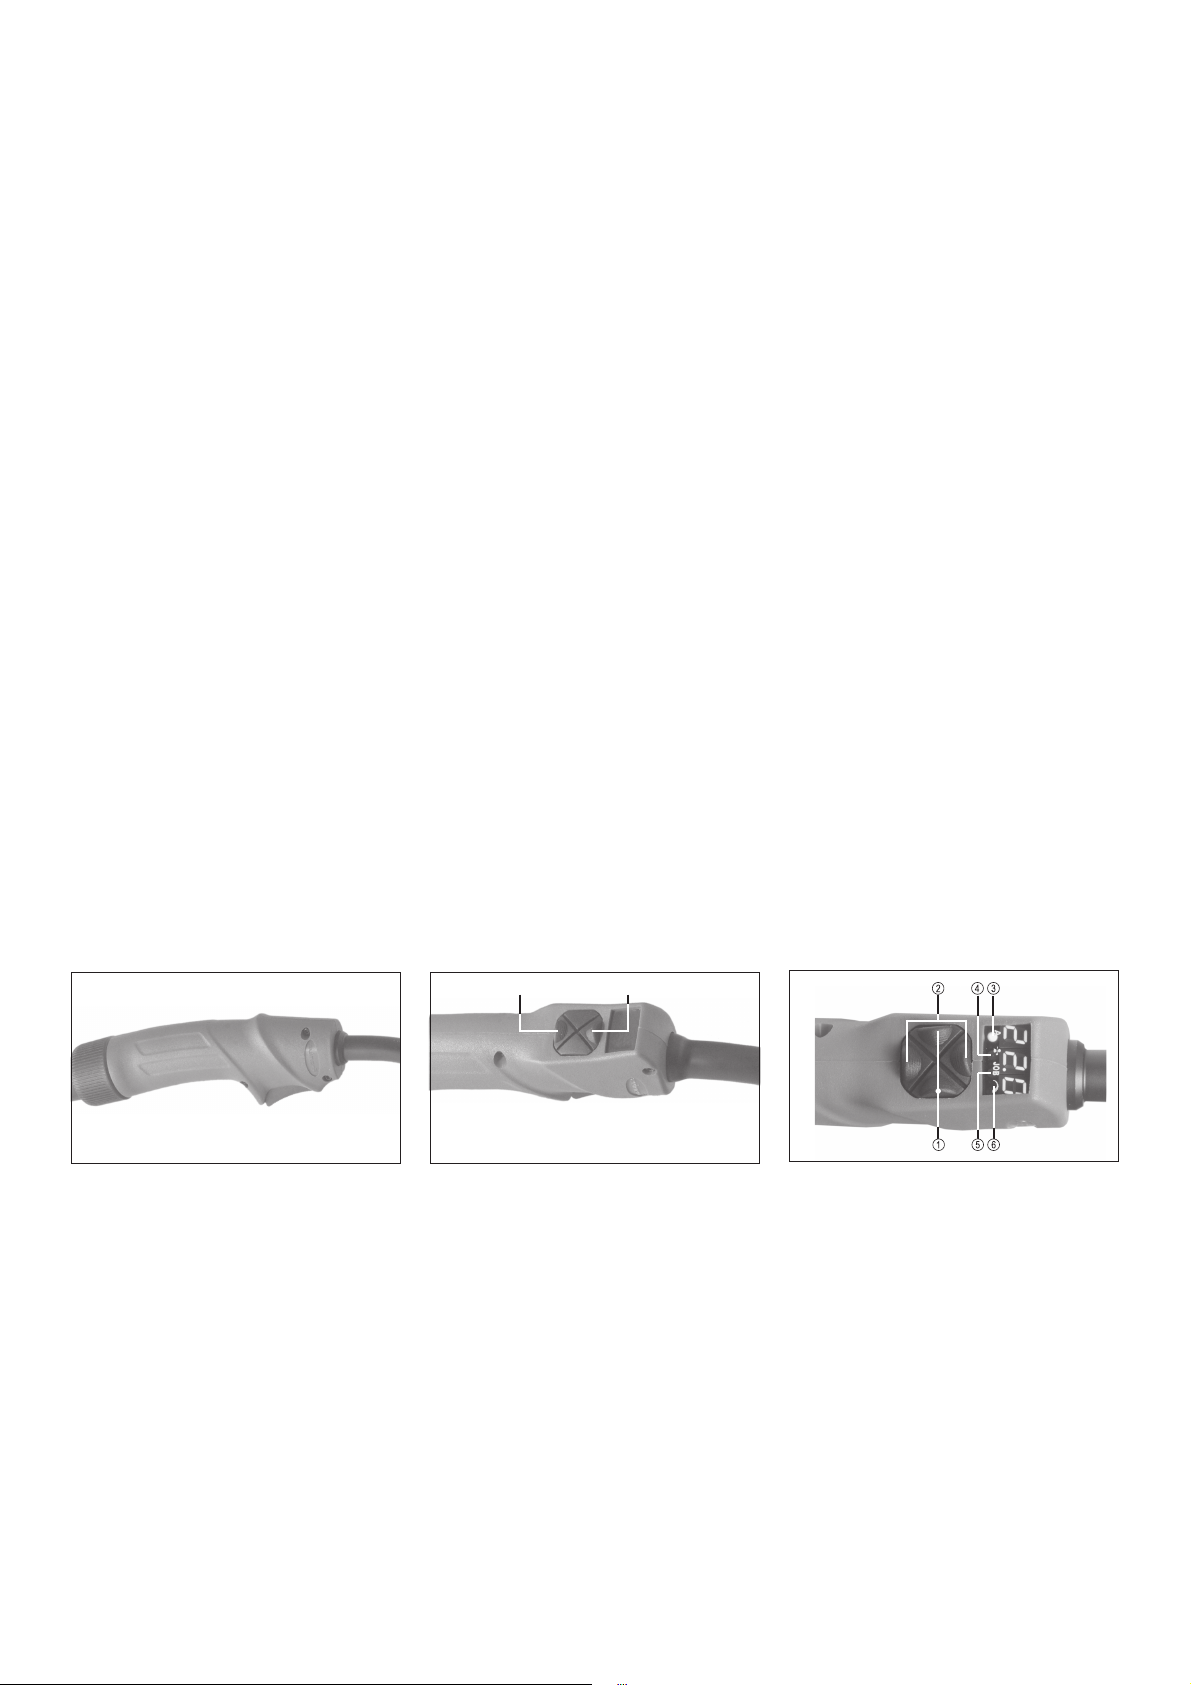
CONTROLS
Depending on the type of your welding torch, different
functions are available. The standard welding torch (fig.
4) allows for the 2-step and the 4-step operating modes.
In addition, the Up/Down welding torch (fig. 5) offers the
up/down function. The JobMaster (fig. 6) enables to
visualize and adjust individual parameters at the torch
handle.
2-STEP MODE
- press and hold torch trigger: start of welding
- release torch trigger: end of welding
4-STEP MODE
- press and release torch trigger: start of welding
- again press and release torch trigger: end of welding
UP/DOWN FUNCTION
The up/down buttons allow to increase or reduce the
welding current whenever required. Release the button
to set the welding current selected.
- Up button: increase welding current
- Down button: reduce welding current
JOBMASTER
The Parameter Display button (1) allows to select the
parameter (welding current, wire speed, job number)
that may then be changed using the Parameter Setting
button (2).
(3) parameter Welding Current
(4) parameter Wire Speed
(5) parameter Job Number
(6) according to customer specification
ÉLÉMENTS DE COMMANDE
Selon le type de torche que vous utilisez, des fonctions
différentes sont disponibles. La torche standard (fig. 4)
dispose des fonctions „Fonctionnement à 2 pas“ et
„Fonctionnement à 4 pas“. La torche Haut/Bas (fig. 5)
offre également la fonction Haut/Bas. De plus, le
JobMaster (fig. 6) permet de visualiser et régler des
paramètres individuels sur la poignée.
FONCTIONNEMENT À 2 PAS
- appuyer sur la touche de la torche et maintenir:
départ de soudage
- relâcher touche de la torche: fin de soudage
FONCTIONNEMENT À 4 PAS
- appuyer sur la touche de la torche et relâcher: départ
de soudage
- de nouveau appuyer sur la touche de la torche et
relâcher: fin de soudage
FONCTION HAUT/BAS
En actionnant la touche Haut ou Bas, il est possible
d‘augmenter ou réduire le courant de soudage à tout
moment. Le courant de soudage est réglé en relâchant
la touche.
- Touche Haut: augmenter le courant de soudage
- Touche Bas: réduire le courant de soudage
JOBMASTER
La touche „Affichage de paramètres“ (1) permet de
sélectionner les paramètres (courant de soudage, vitesse
de fil d‘acier, numéro du job) qui seront changés en
appuyant sur la touche „Réglage de paramètres“ (2).
(3) paramètre „Courant de soudage“
(4) paramètre „Vitesse de fil d‘acier“
(5) paramètre „Numéro de job“
(6) selon les spécifications du client
Abb.4 , Fig.4
Down Up
Abb.6 , Fig.6Abb.5 , Fig.5
ud_fr_st_mb_00081 012013
Page 3

ELEMENTY OBSŁUGOWE
W zależności od wersji palnika spawalniczego
użytkownik ma dostęp do różnych funkcji. Standardowa
wersja palnika spawalniczego (il. 4) umożliwia dwa
tryby pracy: 2-taktowy i 4-taktowy. Palnik spawalniczy w
wersji Up/Down (il. 5) oferuje dodatkowo funkcję Up/
Down. Za pomocą palnika spawalniczego JobMaster
(il. 6) można ustawiać poszczególne parametry za pomocą panelu na rękojeści.
TRYB 2-TAKTOWY
– Nacisnąć i przytrzymać przycisk palnika: początek
spawania.
– Zwolnić przycisk palnika: koniec spawania.
TRYB 4-TAKTOWY
– Nacisnąć i zwolnić przycisk palnika: początek spa-
wania.
– Ponownie nacisnąć i zwolnić przycisk palnika: ko-
niec spawania.
FUNKCJA UP/DOWN
Za pomocą przycisku Up/Down można w każdej chwili
zwiększyć lub zmniejszyć wartość prądu spawania.
Zwolnienie przycisku powoduje ustalenie wartości prądu
spawalniczego.
– Przycisk Up: zwiększanie prądu spawalniczego.
– Przycisk Down: zmniejszanie wartości prądu spa-
walniczego.
JOBMASTER
Za pomocą przycisku Wyświetlanie parametrów (1)
można wybrać parametr (prąd spawalniczy, prędkość
podawania drutu, JOB-N°), a za pomocą przycisku
Ustawianie parametrów (2) dokonać ich zmiany.
(3) Parametr Prąd spawalniczy
(4) Parametr Prędkość podawania drutu
(5) Parametr JOB-N° (numer zadania)
(6) Dostosowany do konkretnego klienta
Il. 4
Down Up
Il. 6Il. 5
ud_fr_st_mb_00081 012013
Page 4

FRONIUS INTERNATIONAL GMBH
Froniusplatz 1, A-4600 Wels, Austria
Tel: +43 (0)7242 241-0, Fax: +43 (0)7242 241-3940
E-Mail: sales@fronius.com
www.fronius.com
Under http://www.fronius.com/addresses you will find all addresses
www.fronius.com/addresses
of our Sales & service partners and Locations.
ud_fr_st_so_00082 012011
 Loading...