

Page 1
/ Perfect Charging / Perfect Welding / Solar Energy
Testbox Cleaning Systems
Bedienungsanleitung
DEEN-US
Systemerweiterung
Operating Instructions
System extension
42,0410,1509 001-15012019
Page 2

2
Page 3

Sehr geehrter Leser
Einleitung Wir danken Ihnen für Ihr entgegengebrachtes Vertrauen und gratulieren Ihnen zu Ihrem
technisch hochwertigen Fronius Produkt. Die vorliegende Anleitung hilft Ihnen, sich mit
diesem vertraut zu machen. Indem Sie die Anleitung sorgfältig lesen, lernen Sie die vielfältigen Möglichkeiten Ihres Fronius Produktes kennen. Nur so können Sie seine Vorteile
bestmöglich nutzen.
Bitte beachten Sie auch die Sicherheitsvorschriften und sorgen Sie so für mehr Sicherheit
am Einsatzort des Produktes. Sorgfältiger Umgang mit Ihrem Produkt unterstützt dessen
langlebige Qualität und Zuverlässigkeit. Das sind wesentliche Voraussetzungen für hervorragende Ergebnisse.
DE
3
Page 4

4
Page 5

Inhaltsverzeichnis
Allgemeines ............................................................................................................................................... 7
Gerätekonzept ...................................................................................................................................... 7
Lieferumfang......................................................................................................................................... 7
Erforderliche Messmittel ....................................................................................................................... 7
Bestimmungsgemäße Verwendung...................................................................................................... 8
Netzanschluss....................................................................................................................................... 8
Sicherheit.............................................................................................................................................. 8
Bedienelemente und Anschlüsse............................................................................................................... 10
Bedienelemente und Anschlüsse ......................................................................................................... 10
Testbox am Reinigunggerät anschließen .................................................................................................. 12
Testbox an Robacta TC Geräten anschließen......................................................................................12
Testbox an Robacta Reamer Geräten anschließen.............................................................................. 12
Robacta TC mit Option Drahtabschneider prüfen...................................................................................... 13
Robacta TC 1000 mit Option Drahtabschneider prüfen........................................................................ 13
Robacta TC 2000 mit Option Drahtabschneider prüfen........................................................................ 14
Robacta Reamer prüfen............................................................................................................................. 15
Robacta Reamer Braze+ prüfen ........................................................................................................... 15
Robacta Reamer prüfen........................................................................................................................ 16
DE
5
Page 6

6
Page 7

Allgemeines
DE
Gerätekonzept
Die Testbox "Cleaning Systems" dient zum
Testen folgender Reinigungsgeräte:
- Robacta Reamer Braze+
4,044,047
- Robacta TC 1000 (alle Varianten)
4,075,122
- Robacta TC 2000 (alle Varianten)
4,075,123
- Robacta Reamer V Easy Han6P
44,0450,1478
- Robacta Reamer V Easy Han6PJ
44,0450,1951
ab Baujahr 2018:
- Robacta Reamer V Easy - 44,0450,1444
- Robacta Reamer Alu 900U/min - 44,0450,1227
- Robacta Reamer Alu 3000 - 44,0450,1284
- Robacta Reamer Bürstenkopf Alu - 44,0450,1449
- Robacta Reamer Twin ohne Einsprüh-Vorrichtung - 44,0450,1229
- Robacta Reamer Twin ohne Drahtabschneider - 44,0450,1282
- Roabcta Reamer Twin mit Drahtabschneider - 44,0450,1145
Lieferumfang
WICHTIG! Der ordnungsgemäße Prüfablauf des zu prüfenden Reinigungsgerätes wird in
den jeweiligen Serviceanleitung beschrieben.
Die Serviceanleitungen stehen im Downloadcenter unter „downloadcenter.fronius.com“
zur Verfügung.
(1) Adapterkabel für Robacta Reamer /
(1)
(2)
Robacta Reamer Braze+
43,0004,0172
(2) Testbox
4,045,991
Erforderliche
Messmittel
- Digitalmultimeter
- Strommesszange
- Oszilloskop
7
Page 8

Bestimmungsgemäße Verwendung
Netzanschluss Das Gerät ist für die am Leistungsschild angegebene Netzspannung ausgelegt. Die erfor-
Die Testbox ist ausschließlich zum Testen von Fronius Schweißbrenner-Reinigungsgeräten bestimmt.
Eine andere oder darüber hinausgehende Benutzung gilt als nicht bestimmungsgemäß.
Für hieraus entstehende Schäden haftet der Hersteller nicht.
Zur bestimmungsgemäßen Verwendung gehört auch
- das vollständige Lesen dieser Bedienungsanleitung
- das Befolgen aller Anweisungen und Sicherheitsvorschriften dieser Bedienungsanleitung
- die Einhaltung der Inspektions- und Wartungsarbeiten
derliche Absicherung der Netzzuleitung finden Sie im Abschnitt „Technische Daten“. Sind
Netzkabel oder Netzstecker bei Ihrer Geräteausführung nicht angebracht, Netzkabel oder
Netzstecker entsprechend den nationalen Normen montieren.
HINWEIS!
Nicht ausreichend dimensionierte Elektroinstallation kann zu schwerwiegenden
Sachschäden führen.
Die Netzzuleitung sowie deren Absicherung sind entsprechend der vorhandenen Stromversorgung auszulegen. Es gelten die Technischen Daten auf dem Leistungsschild.
Sicherheit
WARNUNG!
Fehlbedienung und fehlerhaft durchgeführte Arbeiten können schwerwiegende Personen- und Sachschäden verursachen.
► Alle in der Bedienungsanleitung beschriebenen Funktionen dürfen nur von geschultem
Fachpersonal angewendet werden.
► Alle in der Bedienungsanleitung beschriebenen Arbeiten dürfen nur von geschultem
Fachpersonal durchgeführt werden.
► Das Fachpersonal muss von der Fa. Fronius eine Schulung zur ordnungsgemäßen
Bedienung des Gerätes erhalten haben.
► Die beschriebenen Funktionen erst anwenden und die beschriebenen Arbeiten erst
durchführen, wenn folgende Dokumente vollständig gelesen und verstanden wurden:
diese Bedienungsanleitung,
sämtliche Bedienungsanleitungen der Systemkomponenten, insbesondere Sicherheitsvorschriften.
WARNUNG!
Fehlerhaft durchgeführte Arbeiten können schwerwiegende Personen- und Sachschäden verursachen.
Vor allen Arbeiten und Tests:
► Netzschalter der Stromquelle in Stellung - O - schalten
► Stromquelle vom Netz trennen
► sicherstellen, dass die Stromquelle bis zum Abschluss aller Arbeiten vom Netz ge-
trennt bleibt
► Drahtelektrode aus dem Schweißbrenner entfernen
► den Schweißbrenner von allen Systemkomponenten trennen
8
Page 9

VORSICHT!
Verbrennungsgefahr durch heiße Schweißbrenner-Komponenten und heißes Kühlmittel.
► Vor Beginn aller in dieser Bedienungsanleitung beschriebenen Arbeiten sämtliche
Schweißbrenner-Komponenten und das Kühlmittel auf Zimmertemperatur (+25 °C, +
77 °F) abkühlen lassen.
VORSICHT!
Bei wassergekühlten Schweißbrennern: Gefahr von Sachschäden durch auslaufendes Kühlmittel.
► Vor Beginn aller in dieser Bedienungsanleitung beschriebenen Arbeiten, das Kühlmit-
tel aus dem Schweißbrenner entfernen.
DE
9
Page 10

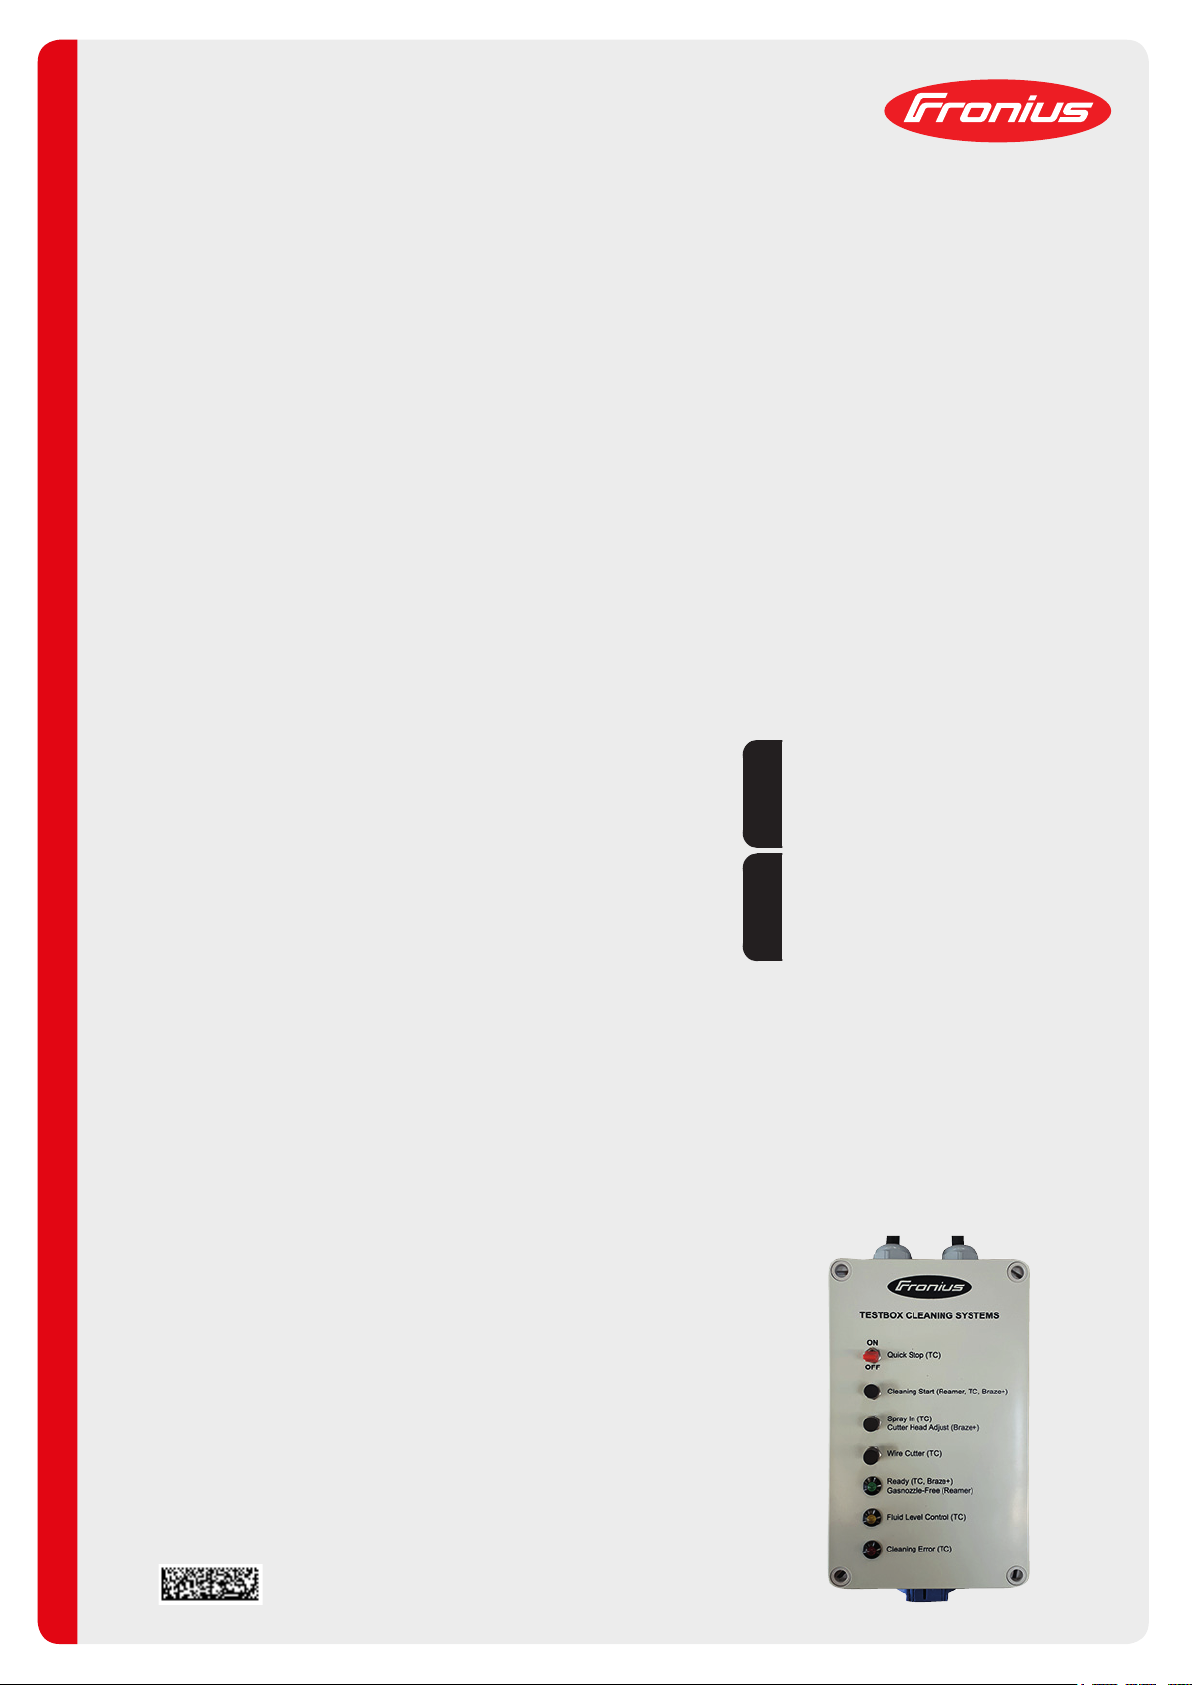
Bedienelemente und Anschlüsse
Bedienelemente
und Anschlüsse
(1)
(2)
(3)
(4)
(5)
(6)
(9)
(7)
(8)
(1) Netzkabel
(2) Schalter Quick Stop ON/OFF *
(3) Taste Cleaning Start
zum Starten des Prüfvorganges
(4) Taste Spray In *
zum Einsprühen von Trennmittel
Taste Cutter Head Adjust
zum kurzfristigen Erhöhen des Arbeitsdruckes von 2 bar auf 6 bar bei Robacta Reamer Braze+
(5) Taste Wire Cutter *
zum Überprüfen der Option Drahtabschneider
(10)
10
(6) Kontroll-Leuchte Ready
leuchtet, wenn eine Reinigung oder Reinigungssimulation gestartet werden kann
Kontroll-Leuchte Gasnozzle-Free
leuchtet nach abgeschlossener Prüfung von Robacta Reamer, wenn die Gasdüse
wieder freigegeben wurde
Page 11

(7) Kontroll-Leuchte Fluid Level Control *
leuchtet, wenn im Trennmittelbehälter kein oder zu wenig Trennmittel vorhanden
ist
(8) Kontroll-Leuchte Cleaning Error *
leuchtet, wenn bei der Reinigungssimulation ein Fehler auftritt
(9) Steuerkabel
(10) Steckdose
* bei Robacta TC Reinigungsgeräten
DE
11
Page 12

Testbox am Reinigunggerät anschließen
Testbox an Robacta TC Geräten
anschließen
Testbox an Robacta Reamer Geräten anschließen
TC Reinigungsgerät vom Netz trennen
1
Testbox an der Anschlussbuchse „Standard I/O“ des Reinigungsgerätes anschließen
2
Schalter Quick Stop auf OFF stellen
3
Reinigungsgerät am Netz anschließen (230 V AC, 50 Hz)
4
Testbox am Netz anschließen (230 V AC, 50 Hz)
5
Adapterkabel am Robacta Reamer Reinigungsgerät anschließen
1
Testbox am Adapterkabel anschließen
2
Testbox am Netz anschließen (230 V AC, 50 Hz)
3
12
Page 13

Robacta TC mit Option Drahtabschneider prüfen
DE
Robacta TC 1000
mit Option Drahtabschneider prüfen
Schalter Quick Stop an der Testbox auf ON stellen
1
Der Ladevorgang beginnt.
Nach 20 Sekunden ist der Ladevorgang auf ~ 270 V abgeschlossen, die KontrollLeuchte Ready leuchtet auf.
Das Gerät ist zur Entladung bereit.
Taste Cleaning Start drücken
2
Die Kontroll-Leuchte Ready erlischt.
Der Reinigungsvorgang wird simuliert, ein Magnetimpuls in der Reinigungsspule wird
ausgelöst.
Nach der Entladung beginnt ein neuer Ladevorgang, nach 20 Sekunden leuchtet die
Kontroll-Leuchte Ready wieder auf.
Das Gerät ist zur nächsten Entladung bereit.
Leuchtet die Kontroll-Leuchte Cleaning Error, ist ein Fehler im System vorhanden. Der
Entladevorgang ist nicht möglich.
- Fehleranalyse starten
- Anschlüsse beachten
Taste Spray In drücken
3
Die Funktion des Trennmittel-Zerstäubers wird überprüft. Das Magnetventil im Reinigungsgerät Robacta TC 1000 muss hörbar schalten.
Taste Wire Cutter drücken
4
Die Option Drahtabschneider wird überprüft. Das Magnetventil im externen Drahtabschneider muss hörbar schalten.
13
Page 14

Robacta TC 2000
mit Option Drahtabschneider prüfen
Schalter Quick Stop an der Testbox auf ON stellen
1
Der Ladevorgang beginnt.
Nach 50 Sekunden ist der Ladevorgang auf ~ 470 V abgeschlossen. Ab 290 V leuchtet die Kontroll-Leuchte Ready auf, das Gerät ist zur Entladung bereit.
Die Entladung sollte jedoch nur im vollständig geladenen Zustand erfolgen.
Taste Cleaning Start drücken
2
Die Kontroll-Leuchte Ready erlischt.
Der Reinigungsvorgang wird simuliert, ein Magnetimpuls in der Reinigungsspule wird
ausgelöst.
Nach der Entladung beginnt ein neuer Ladevorgang, nach 50 Sekunden ist das Gerät
vollständig geladen. Die Kontroll-Leuchte Ready leuchtet ab 290 V / ca. 20 Sekunden
wieder auf.
Das Gerät ist zur nächsten Entladung bereit.
Leuchtet die Kontroll-Leuchte Cleaning Error, ist ein Fehler im System vorhanden. Der
Entladevorgang ist nicht möglich.
- Fehleranalyse starten
- Anschlüsse beachten
Taste Spray In drücken
3
Die Funktion des Trennmittel-Zerstäubers wird überprüft. Das Magnetventil im Reinigungsgerät Robacta TC 2000 muss hörbar schalten.
Taste Wire Cutter drücken
4
Die Option Drahtabschneider wird überprüft. Das Magnetventil im externen Drahtabschneider muss hörbar schalten.
14
Page 15

Robacta Reamer prüfen
DE
Robacta Reamer
Braze+ prüfen
Voraussetzung:
- Druckluft-Versorgung 6 bar ist am Reinigungsgerät angeschlossen
- Alle Sensoren sind richtig eingestellt
- Messerkopf ist vollständig montiert
- Messerpaar befindet sich in 0-Position
- Die Motorabdeckung ist geschlossen
- Testbox ist angeschlossen, Kontroll-Leuchte Ready leuchtet
Gasdüse oder Brenner mit Gasdüse am Messerkopf einsetzen
1
Gasdüse beispielsweise mit dem Griff eines Schraubendrehers oder Gasdüse am
2
Brennerkörper manuell nach unten drücken, bis der Sensor am Reinigungsgerät
leuchtet - Gasdüse im Messerkopf unten halten
Taste Cleaning Start an der Testbox drücken und halten
3
Der Messerkopf beginnt zu rotieren.
Taste Cleaning Start loslassen
4
Gasdüse im Messerkopf vorsichtig loslassen
5
Der Messerkopf geht in die Ausgangsposition zurück.
Taste Cutter Head Adjust drücken
6
Das Reinigungsgerät erhöht den Arbeitsdruck kurzfristig von 2 bar auf 6 bar (am Ventil
ist ein kurzes Zischen hörbar).
Kontrolle:
- Auf der Taste Cutter Head Adjust bleiben
- Messerkopf nach unten drücken - für das Nachuntendrücken des Messerkopfes
muss ein deutlich höherer Kraftaufwand aufgebracht werden, als vorher.
15
Page 16

Robacta Reamer
prüfen
Voraussetzung:
- Druckluft-Versorgung ist am Reinigungsgerät angeschlossen
- Testbox ist angeschlossen, Kontroll-Leuchte Ready leuchtet
Taste Cleaning Start an der Testbox drücken und halten
1
Die Gasdüse wird gespannt, der Motor beginnt zu drehen und fährt nach oben.
Taste Cleaning Start loslassen
2
Der Motor fährt nach unten, hört auf zu drehen und sprüht ein (ausgenommen Robacta Reamer Alu).
Die Kontroll-Leuchte Gasnozzle-Free leuchtet auf (bei Robacta Reamer Alu ist der
Motor in der unteren Position).
16
Page 17

Dear reader,
Introduction Thank you for the trust you have placed in our company and congratulations on buying this
high-quality Fronius product. These instructions will help you familiarize yourself with the
product. Reading the instructions carefully will enable you to learn about the many different
features your Fronius product has to offer. This will allow you to make full use of its advantages.
Please also note the safety rules to ensure greater safety when using the product. Careful
handling of the product will repay you with years of safe and reliable operation. These are
essential prerequisites for excellent results.
EN-US
17
Page 18

18
Page 19

Contents
General ...................................................................................................................................................... 21
Device Concept..................................................................................................................................... 21
Scope of Supply.................................................................................................................................... 21
Required Measuring Instruments.......................................................................................................... 21
Intended Use......................................................................................................................................... 22
Grid Connection.................................................................................................................................... 22
Safety.................................................................................................................................................... 22
Operating controls and connections .......................................................................................................... 24
Operating Controls and Connections ................................................................................................... 24
Connecting the test box to the cleaning device ......................................................................................... 26
Connecting the Test Box to Robacta TC Devices................................................................................. 26
Connecting the Test Box to Robacta Reamer Devices......................................................................... 26
Testing the Robacta TC with optional wire cutter ...................................................................................... 27
Testing the Robacta TC 1000 with Optional Wire Cutter...................................................................... 27
Testing the Robacta TC 2000 with Optional Wire Cutter...................................................................... 28
Testing the Robacta Reamer ..................................................................................................................... 29
Testing the Robacta Reamer Braze+ ................................................................................................... 29
Testing the Robacta Reamer................................................................................................................ 30
EN-US
19
Page 20

20
Page 21

General
Device Concept
The "Cleaning Systems" test box is used to
test the following cleaning devices:
- Robacta Reamer Braze+
4,044,047
- Robacta TC 1000 (all variants)
4,075,122
- Robacta TC 2000 (all variants)
4,075,123
- Robacta Reamer V Easy Han6P
44,0450,1478
- Robacta Reamer V Easy Han6PJ
44,0450,1951
From year of manufacture 2018 onwards:
- Robacta Reamer V Easy - 44,0450,1444
- Robacta Reamer Alu 900rpm - 44,0450,1227
- Robacta Reamer Alu 3000 - 44,0450,1284
- Robacta Reamer aluminum brush head - 44,0450,1449
- Robacta Reamer Twin without injection device - 44,0450,1229
- Robacta Reamer Twin without wire cutter - 44,0450,1282
- Robacta Reamer Twin with wire cutter - 44,0450,1145
EN-US
Scope of Supply
IMPORTANT! The correct test procedure for the cleaning device is described in the rele-
vant Service Instructions.
The Service Instructions are available to download from the DownloadCenter at "downloadcenter.fronius.com".
(1) Adapter cable for Robacta Reamer/
(1)
(2)
Robacta Reamer Braze+
43,0004,0172
(2) Test box
4,045,991
Required Measuring Instruments
- Digital multimeter
- Current clamp
- Oscilloscope
21
Page 22

Intended Use The test box is intended exclusively for testing Fronius welding torch cleaning devices.
Any other use does not constitute proper use. The manufacturer shall not be liable for any
damage resulting from such improper use.
Proper use also means:
- Reading these Operating Instructions in their entirety
- Following all instructions and safety rules in these Operating Instructions
- Carrying out all the specified inspection and servicing work
Grid Connection The device is designed for the grid voltage listed on the rating plate. The fuse protection
required for the grid lead can be found in the "Technical Data" section. If mains cables or
mains plugs are not included with your version of the appliance, attach the appropriate
mains cable or mains plug in accordance with your country's standards.
NOTE!
An under-dimensioned electrical installation can lead to serious damage.
The grid lead and its fuse protection should be designed to suit the existing power supply.
The technical data on the rating plate should be followed.
Safety
WARNING!
Incorrect operation and incorrectly performed work can cause serious injury and
damage to property.
► All functions described in the Operating Instructions may only be used by trained spe-
cialist personnel.
► All work listed in the Operating Instructions may only be performed by trained specialist
personnel.
► The specialist personnel must have received training on the proper use of the device
from Fronius.
► The functions described must only be used and the work described must only be car-
ried out once the following documents have been read and understood in full:
These Operating Instructions,
All Operating Instructions for system components, especially the safety rules.
WARNING!
Tasks performed incorrectly can cause serious injury and damage to property.
Before carrying out all work and tests:
► Switch the power switch on the power source to - O ► Disconnect the power source from the grid
► Ensure that the power source remains disconnected from the grid until all work is com-
plete
► Remove the wire electrode from the welding torch
► Disconnect the welding torch from all system components
22
Page 23

CAUTION!
Burning hazard due to hot welding torch components and coolant.
► Allow all welding torch components and the coolant to cool down to room temperature
(+25 °C, +77 °F) before starting any of the work described in these Operating Instruc-
tions.
CAUTION!
For water-cooled welding torches: Escaping coolant can result in damage to property.
► Before beginning any of the work described in these Operating Instructions, remove
the coolant from the welding torch.
EN-US
23
Page 24

Operating controls and connections
Operating Controls and Connections
(1)
(2)
(3)
(4)
(5)
(6)
(9)
(7)
(8)
(1) Mains cable
(2) Quick Stop ON/OFF switch *
(3) Cleaning Start button
Used to start the test procedure
(4) Spray In button *
Used to spray in parting agent
Cutter Head Adjust button
Used to increase the working pressure from 2 bar to 6 bar for a short period of time
on the Robacta Reamer Braze+
(5) Wire Cutter button *
Used to test the optional wire cutter
(10)
24
(6) Ready indicator light
Lights up when the cleaning process or cleaning simulation can be started
Gasnozzle-Free indicator light
Lights up when the Robacta Reamer test has been completed and the gas nozzle
has been released
Page 25

(7) Fluid Level Control indicator light *
Lights up where there is too little or no parting agent in the parting agent container
(8) Cleaning Error indicator light *
Lights up if an error occurs during the cleaning simulation
(9) Control cable
(10) Socket
* On Robacta TC cleaning devices
EN-US
25
Page 26

Connecting the test box to the cleaning device
Connecting the
Test Box to Robacta TC Devices
Connecting the
Test Box to Robacta Reamer Devices
Unplug the TC cleaning device from the grid
1
Connect the test box to the "Standard I/O" connection socket on the cleaning device
2
Switch the Quick Stop ON/OFF switch to OFF
3
Connect the cleaning device to the grid (230 V AC, 50 Hz)
4
Connect the test box to the grid (230 V AC, 50 Hz)
5
Connect the adapter cable to the Robacta Reamer cleaning device
1
Connect the test box to the adapter cable
2
Connect the test box to the grid (230 V AC, 50 Hz)
3
26
Page 27

Testing the Robacta TC with optional wire cutter
Testing the Robacta TC 1000
with Optional
Wire Cutter
Switch the Quick Stop switch on the test box to ON
1
The charging process begins.
After 20 seconds the charging process is completed at ~ 270 V, the Ready indicator
light lights up.
The device is ready for discharging.
Press the Cleaning Start button
2
The Ready indicator light goes out.
The cleaning procedure is simulated, a magnetic pulse is triggered in the cleaning coil.
After discharging is complete, a new charging process begins, after 20 seconds the
Ready indicator light lights up once again.
The device is ready for the next discharge.
If the Cleaning Error indicator light lights up, there is an error in the system. It is not
possible to carry out the discharge process.
- Start the failure analysis
- Monitor the connections
Press the Spray In button
3
The function of the parting agent atomizer is tested. You must be able to hear the solenoid valve in the Robacta TC 1000 cleaning device switching.
EN-US
Press the Wire Cutter button
4
The optional wire cutter is tested. You must be able to hear the solenoid valve in the
external wire cutter switching.
27
Page 28

Testing the Robacta TC 2000
with Optional
Wire Cutter
Switch the Quick Stop switch on the test box to ON
1
The charging process begins.
After 50 seconds the charging process is completed at ~ 470 V. At 290 V and above,
the Ready indicator light lights up, the device is ready for discharging.
However, the discharge should only be carried out when the device is fully charged.
Press the Cleaning Start button
2
The Ready indicator light goes out.
The cleaning process is simulated, a magnetic pulse is triggered in the cleaning coil.
After discharging is complete, a new charging process begins, after 50 seconds the
device is fully charged. The Ready indicator light lights up again from 290 V / after approx. 20 seconds.
The device is ready for the next discharge.
If the Cleaning Error indicator light lights up, there is an error in the system. It is not
possible to carry out the discharge process.
- Start the failure analysis
- Monitor the connections
Press the Spray In button
3
The function of the parting agent atomizer is tested. You must be able to hear the solenoid valve in the Robacta TC 2000 cleaning device switching.
Press the Wire Cutter button
4
The optional wire cutter is tested. You must be able to hear the solenoid valve in the
external wire cutter switching.
28
Page 29

Testing the Robacta Reamer
Testing the Robacta Reamer
Braze+
Requirement:
- A 6 bar compressed air supply is connected to the cleaning device
- All sensors are set up correctly
- The cutter head is fully attached
- Cutter pair is in the 0 position
- The motor cover is closed
- Test box is connected, the Ready indicator light is lit up
Insert the gas nozzle or welding torch with gas nozzle into the cutter head
1
Manually press the gas nozzle downwards using, for example, the handle of a screw-
2
driver or the gas nozzle on the torch body until the sensor on the cleaning device lights
up - hold down the gas nozzle in the cutter head
Press and hold the Cleaning Start button on the test box
3
The cutter head begins to rotate.
Release the Cleaning Start button
4
Carefully release the gas nozzle in the cutter head
5
The cutter head returns to its original position.
Press the Cutter Head Adjust button
6
EN-US
The cleaning device increases the working pressure from 2 bar to 6 bar for a short period of time (a short hiss can be heard coming from the valve).
Check the following:
- Continue to hold down the Cutter Head Adjust button
- Press the cutter head downwards - a considerably higher level of force is required
to press the cutter head down than was previously necessary.
29
Page 30

Testing the Robacta Reamer
Requirement:
- A compressed air supply is connected to the cleaning device
- Test box is connected, the Ready indicator light is lit up
Press and hold the Cleaning Start button on the test box
1
The gas nozzle is clamped; the motor begins to turn and moves upwards.
Release the Cleaning Start button
2
The motor travels downwards, stops turning and sprays in (except on the Robacta
Reamer Alu).
The Gasnozzle-Free indicator light lights up (on the Robacta Reamer Alu the motor is
in the lower position).
30
Page 31

EN-US
31
Page 32

FRONIUS INTERNATIONAL GMBH
Froniusplatz 1, A-4600 Wels, Austria
Tel: +43 (0)7242 241-0, Fax: +43 (0)7242 241-3940
E-Mail: sales@fronius.com
www.fronius.com
www.fronius.com/addresses
Under http://www.fronius.com/addresses you will find all addresses
of our Sales & service partners and Locations
 Loading...