


Operating
Instructions
RC Pedal TIG /TMC
RC Pedal TIG /BT
DE
EN
ES-MX
FR
NO
PT-BR
Bedienungsanleitung
Operating Instructions
Manual de instrucciones
Instructions de service
Bruksanvisning
Manual de instruções
42,0410,2345 006-20032023


Inhaltsverzeichnis
Allgemeines 4
Gerätekonzept 4
Voraussetzungen 4
Optionen 4
Bluetooth trademarks 4
Hinweise zur Funkkennzeichnung 5
Funktionsweise 6
Technische Daten 7
Bedienelemente und Anschlüsse 8
RC Pedal TIG /TMC: Bedienelemente und Anschlüsse 8
RC Pedal TIG /BT: Bedienelemente und Anschlüsse 8
Inbetriebnahme 10
RC Pedal TIG /TMC: Fernbedienung anschließen 10
RC Pedal TIG /BT: Fernbedienung via Bluetooth mit der Stromquelle verbinden 10
Schweißstrom einstellen und Schweißen 11
RC Pedal TIG /BT: Batterie wechseln 12
Anzeichen für leere Batterien 12
RC Pedal TIG /BT: Batterie wechseln 12
DE
3

Allgemeines
Gerätekonzept Die Fernbedienungen RC Pedal
TIG /TMC und RC Pedal TIG /BT
ermöglichen ein einfaches Einstellen
des Schweißstromes mittels Fußpedal.
Die Hände bleiben frei, somit ist auch
bei ständiger Schweißstrom-Korrektur
eine ungestörte Brennerführung sichergestellt.
Bei angeschlossener Fernbedienung
oder aufrechter Bluetooth-Verbindung
gilt der an der Stromquelle eingestellte Schweißstrom als Maximalstrom.
Der gesamte Pedalweg entspricht dem
Bereich vom minimalen Schweißstrom
bis zum Maximalstrom.
Bei geringem Schweißstrom
ermöglicht die Fernbedienung ein besonders sensibles Dosieren.
Voraussetzungen
Optionen
Bluetooth trademarks
Der Betrieb der Fernbedienungen ist mit folgenden Stromquellen möglich:
RC Panel TIG /TMC:
iWave 190i, iWave 230i
-
TransTig 170, TransTig 210
-
RC Panel TIG /BT:
iWave 230i
-
TransTig 170, TransTig 210
-
nur in zertifizierten Ländern
-
TMC Verlängerung 5 m 43,0004,5979
Die Wortmarke Bluetooth® und die Bluetooth®-Logos sind eingetragene Marken
und Eigentum der Bluetooth SIG, Inc. und werden vom Hersteller in Lizenz verwendet. Andere Marken und Handelsbezeichnungen sind Eigentum der jeweiligen
Rechteinhaber.
4

Hinweise zur
Funkkennzeichnung
Die Fernbedienung RC Pedal TIG /BT ist mit einem Funkmodul ausgestattet.
Funkmodule unterliegen in den USA der Kennzeichnungspflicht nach FCC:
FCC
Dieses Gerät entspricht Abschnitt 15 der FCC-Bestimmungen. Der Betrieb unterliegt folgenden Bedingungen:
(1) Dieses Gerät darf keine Störungen verursachen und
(2) Das Gerät muss jede erhaltene Störbeeinflussung verkraften, einschließlich
Störbeeinflussungen, die zu einer Beeinträchtigung des Betriebes führen können.
FCC ID: QOQBLE121LR
Industry Canada RSS
Dieses Gerät entspricht den lizenzfreien Industry Canada RSS Normen. Der Betrieb unterliegt folgenden Bedingungen:
(1) Dieses Gerät darf keine Störungen verursachen und
(2) Das Gerät muss jede erhaltene Störbeeinflussung verkraften, einschließlich
Störbeeinflussungen, die zu einer Beeinträchtigung des Betriebes führen können.
IC: 5123A-BGTBLE121LR
Sofern vom Hersteller nicht ausdrücklich genehmigt sind Änderungen oder Modifikationen des Funkmoduls nicht erlaubt und führen zum Verlust der Betriebsberechtigung des Gerätes durch den Benutzer.
DE
HINWEIS!
Dieses Gerät wurde getestet und entspricht den Grenzwerten für ein digitales
Gerät der Klasse A gemäß Teil 15 der FCC-Bestimmungen.
Diese Grenzwerte sind so ausgelegt, dass sie einen angemessenen Schutz gegen
schädliche Störungen bieten, wenn das Gerät in einer gewerblichen Umgebung
betrieben wird. Dieses Gerät erzeugt und verwendet Hochfrequenzenergie und
kann diese ausstrahlen, und wenn es nicht gemäß der Bedienungsanleitung installiert und verwendet wird, kann es zu schädlichen Störungen der Funkkommunikation kommen. Der Betrieb dieses Gerätes in einem Wohngebiet kann zu
schädlichen Störungen führen, die der Benutzer auf eigene Kosten zu beheben
hat.
5

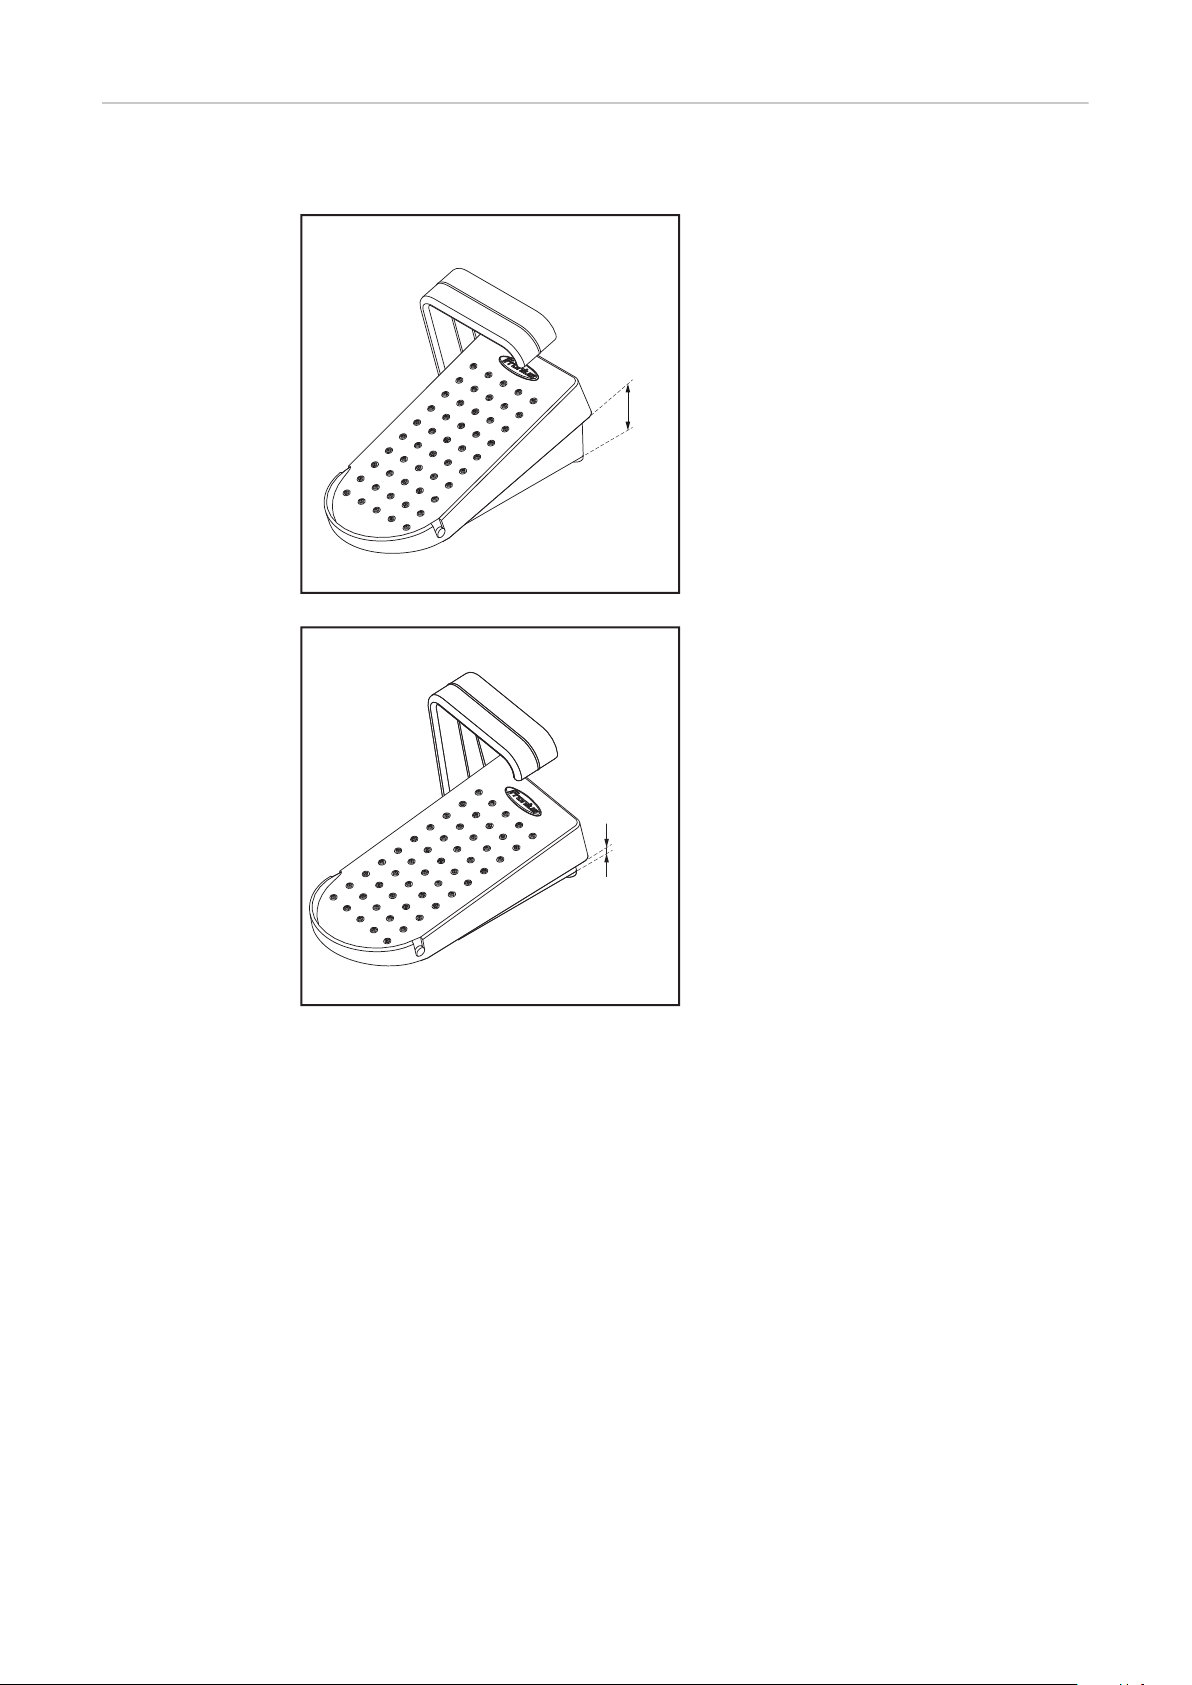
Funktionsweise Der Pedalweg entspricht einem kontinuierlichen Erhöhen des Schweißstromes.
0 %
100 %
Pedal nicht betätigt (0 %)
... entspricht dem Minimalstrom der
Stromquelle
Pedal voll durchgetreten (100 %)
... entspricht dem an der Stromquelle
eingestellten Schweißstrom
Je nach Einstellung des Setup-Parameters Startstromzeit ergeben sich folgende
Bedienmöglichkeiten für die Fernbedienung:
Startstromzeit = off
Startstrom, Hauptstrom, Absenkstrom und Endstrom sowie die Dauer der
Ströme werden ausschließlich vom Schweißer durch Betätigen des Pedals vorgegeben.
Je mehr das Pedal betätigt wird, desto mehr Strom steht zur Verfügung.
Startstromzeit = 0,01 - 30,0 s
Startstrom, Up-Slope und Startstromzeit werden an der Stromquelle einge-
-
stellt.
Nach Betätigen des Pedals startet der Schweißprozess mit dem eingestellten
-
Startstrom und Up-Slope.
Am Ende des eingestellten Up-Slope wird der Hauptstrom erreicht. Der
-
Hauptstrom kann mittels Pedal verändert werden.
Die Fernbedienung gibt über die Pedalstellung einen Prozentwert des eingestellten Schweißstromes vor.
6

Stabelektroden-Schweißen
Der Schweißstrom wird ausschließlich vom Schweißer durch Betätigen des Pedals vorgegeben.
Je mehr das Pedal betätigt wird, desto mehr Strom steht zur Verfügung.
DE
Technische Daten
RC Pedal TIG /TMC RC Pedal TIG /BT
Versorgungsspannung + 24 V DC 3,0 V DC
(2 x 1,5 V AA-Batterie)
Verbindung zur Stromquelle
Bluetooth-Reichweite - bis zu 10 m
Bluetooth-Version - BLE 4.0
Frequenzbereich - 2402 - 2480 MHz
Sendeleistung - 8,32 dBm EIRP
Kanäle - 40 (0 - 39)
Modulation - GFSK
Batterie-Lebensdauer - 3100 h
Listung - BT SIG Nr. D041023
Schutzklasse IP 23 IP 23
TMC-Kabel Bluetooth
(in gerader Linie, ohne
Hindernisse und Störungen)
(Bluetooth Low Energy)
bei 50 % Einschaltdauer
Temperaturbereich -10 - +40 °C
+14 - +104 °F
Prüfzeichen CE, CSA CE, FCC, IC
Maße (l x b x h) 276 x 138 x 190 mm
10.87 x 5.43 x 7.48 in.
Gewicht 1,81 kg
3.99 lbs.
-10 - +40 °C
+14 - +104 °F
260 x 140 x 175 mm
10.24 x 5.51 x 6.89 in.
1,55 kg
3.42 lbs.
7

Bedienelemente und Anschlüsse
TMC
(1) (2)
(3)
(1) (2)
(3) (4) (5)
(6)
(3)(3)
(3)
RC Pedal TIG /
TMC: Bedienelemente und
Anschlüsse
(1) Pedal
(2) TMC-Kabel
RC Pedal
TIG /BT: Bedienelemente und
Anschlüsse
(3) schraubbare Gummi-Standfüße
Die Gummi-Standfüße können bei Bedarf entfernt oder gewechselt werden.
8
(1) Pedal
(2) Status-LED
Leuchtet nach dem Einschalten für 3 Sekunden.
Blinkt 4 x, wenn sich die Fernbedienung mit einem Empfänger verbindet.
Wird der Verbindungsaufbau unterbrochen, stoppt auch das Blinken.
Leuchtet nicht, wenn die Batterie schwach oder leer ist.

(3) schraubbare Gummi-Standfüße
Die Gummi-Standfüße können bei Bedarf entfernt oder gewechselt werden.
(4) Ein-/Ausschalter
(5) Batteriefach
Batterien sind im Lieferumfang der Fernbedienung enthalten.
(6) Aufkleber mit QR-Code und MAC-Adresse
DE
9

Inbetriebnahme
1
2
TMC
RC Pedal TIG /
TMC: Fernbedienung anschließen
Nur bei WIG-Anwendungen:
1
Steuerstecker des WIG-Schweißbrenners vom TMC-Anschluss der Stromquelle abstecken
2
Bei angeschlossener Fernbedienung wird das Fernbedienungssymbol in der Statuszeile der Stromquelle angezeigt.
Die Betriebsarten 2-Takt, 4-Takt und Punktieren können nicht mehr ausgewählt
werden.
RC Pedal
TIG /BT: Fernbedienung via
Bluetooth mit
der Stromquelle
verbinden
Fernbedienung an der Unterseite einschalten
1
Stromquelle einschalten und die Bluetooth-Funktion aktivieren
2
Die Fernbedienung ist betriebsbereit, wenn diese von der Stromquelle erkannt und angezeigt wird.
Falls erforderlich, Bluetooth-Einstellungen an der Stromquelle bestätigen
3
VORSICHT!
Gefahr von Personen- und Sachschäden durch unerwarteten Zündvorgang!
Durch eine andere oder zweite mit der Stromquelle verbundene Fuß-Fernbedienung kann ein unerwarteter Zündvorgang ausgelöst werden.
Sicherstellen, dass die richtige Fuß-Fernbedienung mit der Stromquelle ver-
▶
bunden ist!
MAC Adresse prüfen!
▶
Beim Aus-/Einschalten der Fernbedienung beachten:
Die Fernbedienung nach dem Ausschalten für mindestens 3 Sekunden ausgeschaltet lassen, da ansonsten das Ausschalten nicht erkannt wird.
Wird nach dem Ausschalten zu schnell wieder eingeschaltet, leuchtet die StatusLED keine 3 Sekunden lang.
10

Schweißstrom
einstellen und
Schweißen
WARNUNG!
Gefahr durch Fehlbedienung und fehlerhaft durchgeführte Arbeiten.
Schwerwiegende Personen- und Sachschäden können die Folge sein.
Die beschriebenen Funktionen erst anwenden, wenn die Bedienungsanlei-
▶
tung der Fernbedienung sowie die Bedienungsanleitungen der Stromquelle
und aller anderen Systemkomponenten vollständig gelesen und verstanden
wurden.
WICHTIG! Bei angeschlossener Fernbedienung oder aufrechter Bluetooth-Verbindung steht der an der Stromquelle eingestellte Schweißstrom nur bei voll
durchgetretenem Pedal zur Verfügung.
HINWEIS!
Parameter, die an der Fernbedienung einstellbar sind, können nicht an der
Stromquelle geändert werden.
Schweißstrom an der Stromquelle einstellen
1
Pedal betätigen
2
Der Zündvorgang wird eingeleitet (Wertänderung 5 %).
DE
Wird das Pedal der Fernbedienung losgelassen, wird der Schweißprozess kontrolliert beendet (Gasnachströmung, Schweißende).
11

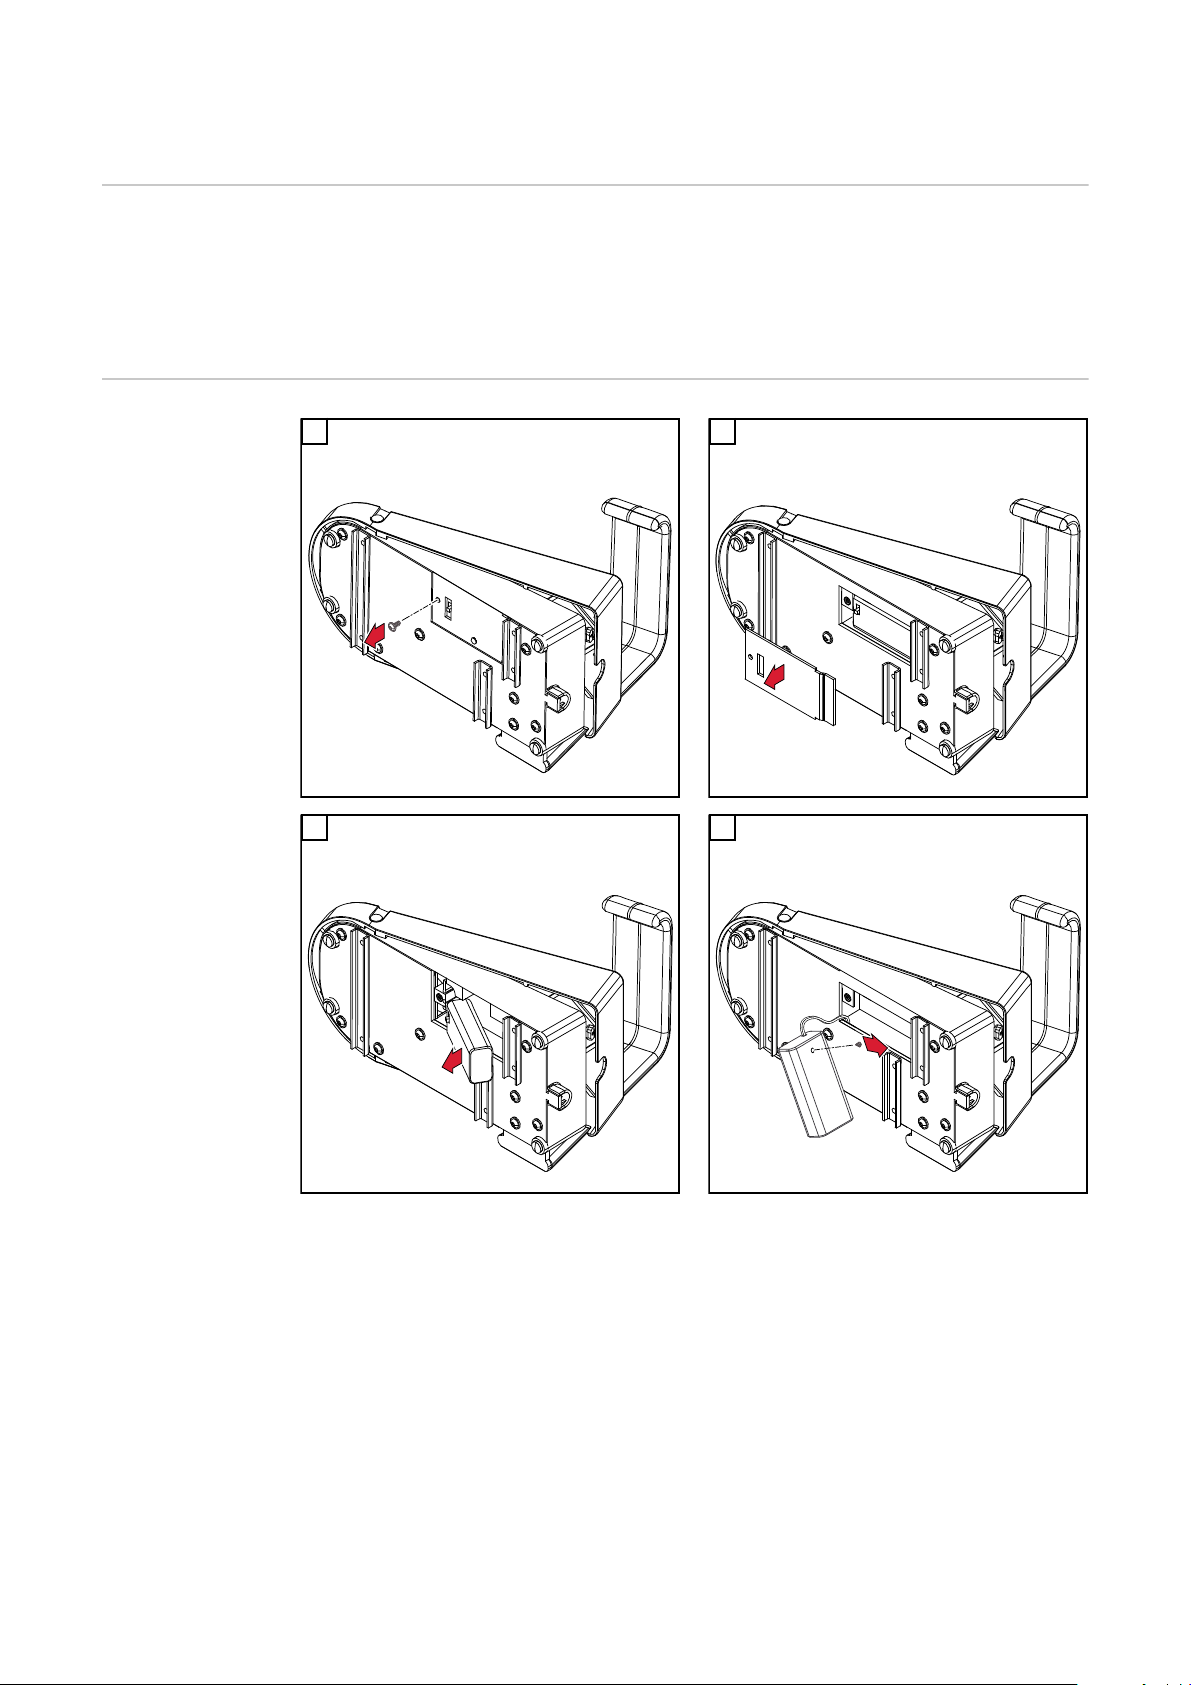
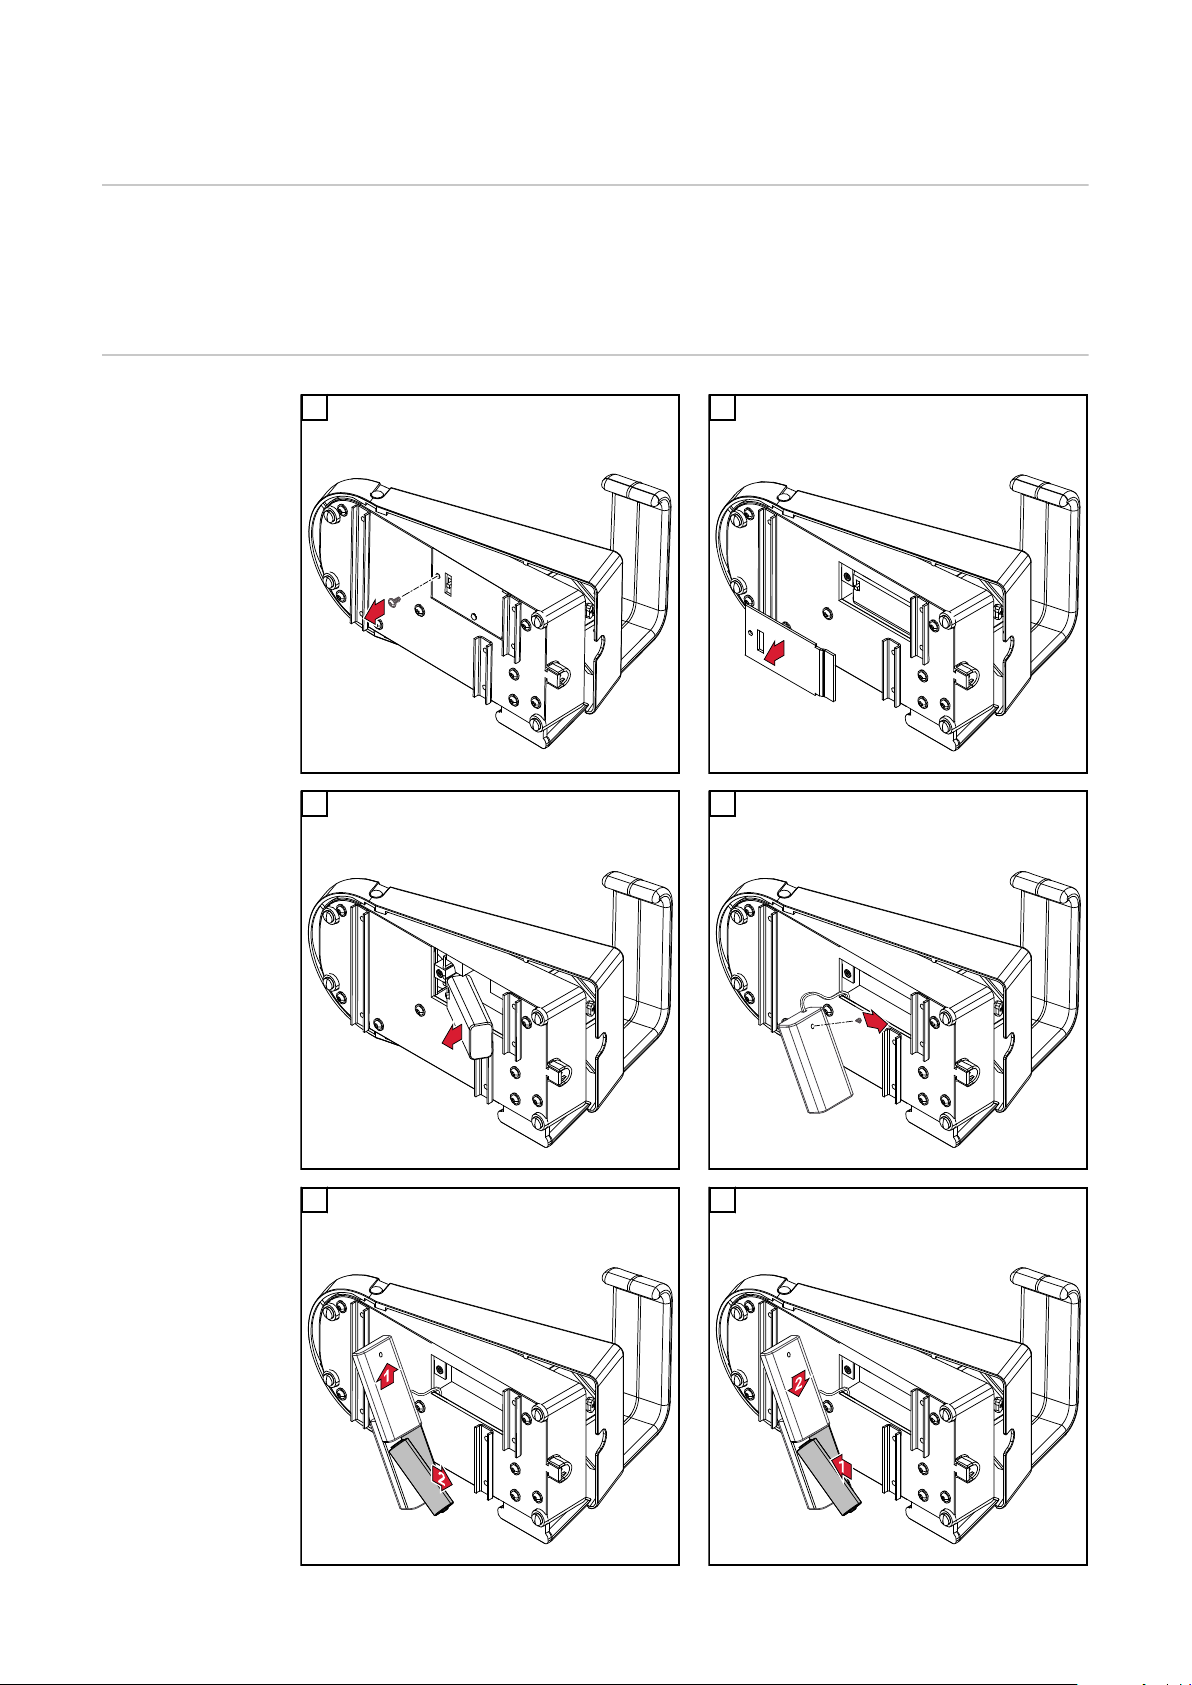
RC Pedal TIG /BT: Batterie wechseln
Anzeichen für
leere Batterien
RC Pedal
TIG /BT: Batterie
wechseln
Die Status-LED leuchtet nach dem Einschalten nicht oder weniger als 3 Sekunden.
An der Stromquelle wird neben dem Bluetooth-Teilnehmer ein Batteriesymbol
mit dem aktuellen Entladezustand der Batterien angezeigt.
1 2
3 4
12

5 6
7 8
DE
9 10
13

14

Contents
General 16
Device concept 16
Requirements 16
Options 16
Bluetooth trademarks 16
Information on radio certification 17
How it works 18
Technical data 19
Control elements and connections 20
RC Pedal TIG/TMC: Control elements and connections 20
RC Pedal TIG/BT: Control elements and connections 20
Start-up 22
RC Pedal TIG /TMC: connecting the remote control 22
RC Pedal TIG /BT: connecting the remote control to the power source via Bluetooth 22
Setting the welding current and welding 23
RC Pedal TIG /BT: changing the battery 24
Indication of empty batteries 24
RC Pedal TIG /BT: changing the battery 24
EN
15

General
Device concept The RC Pedal TIG /TMC and RC Pedal
TIG /BT remote controls allow the welding current to be easily adjusted with
the aid of a foot pedal.
The welder's hands remain free, meaning that in addition to constant welding current correction, uninterrupted
torch guidance is guaranteed.
When a remote control is connected or
a Bluetooth connection established,
the welding current set on the power
source is deemed the maximum current. The total pedal travel corresponds to the range from the minimum
welding current to the maximum welding current.
At low welding currents, the remote
control allows for especially sensitive
adjustment.
Requirements The remote controls can be operated with the following power sources:
RC Panel TIG /TMC:
iWave 190i, iWave 230i
-
TransTig 170, TransTig 210
-
RC Panel TIG /BT:
iWave 230i
-
TransTig 170, TransTig 210
-
Only in certified countries
-
Options
Bluetooth trademarks
TMC extension 5 m 43,0004,5979
The Bluetooth® word mark and logos are registered trademarks owned by Bluetooth SIG, Inc. and any use of such marks by Fronius International GmbH is under license. Other trademarks and trade names are those of their respective owners.
16

Information on
radio certification
The RC Pedal TIG /BT remote control is fitted with a wireless module.
In the USA, wireless modules are subject to FCC certification:
FCC
EN
This wireless module is subject to Part 15 of the FCC Code of Federal Regulations. Its use is subject to the following conditions:
(1) This device must not cause any interferences and
(2) The device must be able to cope with any interference, including that which
could adversely affect the operation of the module.
FCC ID: QOQBLE121LR
Industry Canada RSS
This device complies with the Industry Canada licence-exempt RSS standards.
Its use is subject to the following conditions:
(1) This device must not cause any interferences and
(2) The device must be able to cope with any interference, including that which
could adversely affect the operation of the module.
IC: 5123A-BGTBLE121LR
Unless expressly stated by the manufacturer, changes or modifications to the
wireless module are not permitted and will invalidate the user's operating license
for the device.
NOTE!
This equipment has been tested and found to comply with the limits for a Class
A digital device, pursuant to Part 15 of the FCC Rules.
These limit values are intended to provide an adequate level of protection against
harmful emissions when the device is used in an industrial environment. This device generates and uses high-frequency energy and may also radiate this energy.
If the device is not installed and used according to the Operating Instructions,
this could potentially lead to dangerous interference of the wireless communication system. Operation of this equipment in a residential area is likely to cause
harmful interference, in which case users will be required to correct the interference at their own expense.
17

How it works Depressing the pedal equates to continually increasing the welding current.
0 %
100 %
Pedal not actuated (0%)
... corresponds to the minimum current
of the power source
Pedal fully depressed (100%)
... corresponds to the welding current
set on the power source
Depending on the starting current time setup parameter, the remote control may
be operated in the following ways:
Starting current time = off
Starting current, main current, reduced current and final current as well as the
duration of the currents are controlled solely by the welder actuating the pedal.
The further the pedal is depressed, the more current is available.
Starting current time = 0.01 - 30.0 s
Starting current, UpSlope and starting current time are set on the power
-
source.
When the pedal is actuated, the welding process begins with the set starting
-
current and UpSlope.
The main current is reached at the end of the set UpSlope. The main current
-
can be changed using the pedal.
The remote control specifies a percentage value of the set welding current according to the pedal position.
18

Manual metal arc welding
The welding current is controlled solely by the welder actuating the pedal.
The further the pedal is depressed, the more current is available.
Technical data
RC Pedal TIG /TMC RC Pedal TIG /BT
Supply voltage + 24 V DC 3.0 V DC
(2 x 1.5 V AA battery)
Connection to power
source
Bluetooth range - Up to 10 m
Bluetooth version - BLE 4.0
Frequency range - 2402 - 2480 MHz
Transmission power - 8.32 dBm EIRP
Channels - 40 (0 - 39)
Modulation - GFSK
Battery life - 3100 h
Listing - BT SIG No. D041023
Protection class IP 23 IP 23
TMC cable Bluetooth
(in a straight line, without obstruction and
interference)
(Bluetooth Low Energy)
at 50% duty cycle
EN
Temperature range -10 - +40 °C
+14 - +104 °F
Mark of conformity CE, CSA CE, FCC, IC
Dimensions (l x w x h) 276 x 138 x 190 mm
10.87 x 5.43 x 7.48 in.
Weight 1.81 kg
3.99 lbs.
-10 - +40 °C
+14 - +104 °F
260 x 140 x 175 mm
10.24 x 5.51 x 6.89 in.
1.55 kg
3.42 lbs.
19

Control elements and connections
TMC
(1) (2)
(3)
(1) (2)
(3) (4) (5)
(6)
(3)(3)
(3)
RC Pedal TIG/
TMC: Control
elements and
connections
(1) Pedal
(2) TMC cable
RC Pedal
TIG/BT: Control
elements and
connections
(3) Screw-on rubber feet
The rubber feet can be removed or replaced if necessary.
(1) Pedal
(2) Status LED
Lights up after switching on for 3 seconds.
(3) Screw-on rubber feet
20
Flashes four times, if the remote control is connected to a receiver.
The flashing stops if the connection is interrupted.
Does not light up if the battery is weak or flat.

The rubber feet can be removed or replaced if necessary.
(4) On/Off switch
(5) Battery compartment
Batteries are included in the scope of supply for the remote control.
(6) Sticker with QR code and MAC address
EN
21

Start-up
1
2
TMC
RC Pedal TIG /
TMC: connecting
the remote control
For TIG applications only:
1
Disconnect the TIG welding torch plug from the TMC connection on the
power source
2
When the remote control is connected, the remote control symbol is displayed in
the status bar on the power source.
The 2-step, 4-step and spot welding modes can no longer be selected.
RC Pedal
TIG /BT: connecting the remote
control to the
power source via
Bluetooth
Switch on remote control at the bottom
1
Switch on power source and activate Bluetooth function
2
The remote control is ready to use when this is detected and displayed by the
power source.
Confirm Bluetooth settings on the power source if necessary
3
CAUTION!
Risk of injury and damage from unexpected arc ignition!
Unexpected ignition can be triggered by another pedal remote control connected
to the power source.
Make sure that the correct pedal remote control is connected to the power
▶
source!
Check MAC address!
▶
Beware when switching the remote control on/off:
Leave the remote control for at least 3 seconds after switching off, otherwise the
switch off will not be detected.
If the device is switched on again too quickly after it has been switched off, the
status LED illuminates for less than 3 seconds.
22

Setting the welding current and
welding
WARNING!
Danger due to incorrect operation and incorrectly performed work.
This can result in serious injury and damage to property.
Do not use the functions described until you have thoroughly read and un-
▶
derstood the Operating Instructions of the remote control, the power source
and all other system components.
IMPORTANT! When the remote control is connected or the Bluetooth connection is established, the welding current set on the power source is only available
when the pedal is fully depressed.
NOTE!
Parameters which can be adjusted on the remote control cannot be altered on
the power source.
Set the welding current on the power source
1
Actuate the pedal
2
The ignition process is initiated (value change 5%).
If the remote control's pedal is released, the welding process comes to an end in
a controlled manner (gas post-flow, end of welding).
EN
23

RC Pedal TIG /BT: changing the battery
Indication of
empty batteries
RC Pedal
TIG /BT: changing the battery
The status LED does not light up after the device is switched on or does so for
less than 3 seconds.
Alongside the Bluetooth user, a battery symbol showing the current state of
discharge for the batteries is displayed on the power source.
1 2
3 4
24

5 6
7 8
EN
9 10
25

26

Contenido
General 28
Concepto del sistema 28
Requisitos 28
Opciones 28
Bluetooth trademarks 28
Información acerca de la certificación de radio 29
Cómo funciona 30
Datos técnicos 31
Elementos de control y conexiones 32
TMC/TIG de pedal de RC: Elementos de control y conexiones 32
Componente/TIG de pedal de RC: Elementos de control y conexiones 32
Puesta en servicio 34
TMC/TIG de pedal de RC: conexión del mando a distancia 34
BT/TIG de pedal de RC: conexión del mando a distancia a la fuente de corriente mediante
el Bluetooth
Configurar la corriente de soldadura y la soldadura 35
RC Pedal TIG /BT: Cambio de batería 36
Indicación de baterías descargadas 36
BT/TIG de pedal de RC: cambio de batería 36
ES-MX
34
27

General
Concepto del
sistema
Los mandos a distancia TMC/TIG de
pedal de RC y BT/TIG de pedal de RC
permiten que la corriente de soldadura
sea ajustada con facilidad con la ayuda
de un pedal de pie.
Las manos del soldador se mantienen
libres, lo que significa que además de
una corrección constante de la corriente de soldadura, la guía de la antorcha ininterrumpida está garantizada.
Cuando un mando a distancia es
conectado o se establece una conexión
de Bluetooth, la corriente de soldadura
establecida en la fuente de corriente
es considerada la corriente máxima. El
recorrido total del pedal corresponde
al rango desde la corriente de soldadura mínima hasta la corriente de soldadura máxima.
Con corrientes de soldadura bajas, el
mando a distancia permite un ajuste
especialmente sensible.
Requisitos Los mandos a distancia pueden ser operados con las siguientes fuentes de corri-
ente:
TMC/TIG de panel RC:
iWave 190i, iWave 230i
-
TransTig 170, TransTig 210
-
BT/TIG de panel RC:
iWave 230i
-
TransTig 170, TransTig 210
-
Solo en países certificados
-
Opciones
Bluetooth trademarks
Extensión de 5 m del TMC 43,0004,5979
La marca de la palabra Bluetooth® y los logotipos de Bluetooth® son marcas comerciales registradas y propiedad de Bluetooth SIG, Inc. y son utilizados por el
fabricante bajo licencia. Otras marcas y nombres comerciales son propiedad de
sus respectivos dueños.
28

Información
acerca de la certificación de radio
El mando a distancia BT/TIG de pedal de RC cuenta con un módulo de conexión
inalámbrica.
En Estados Unidos, los módulos de conexión inalámbrica están sujetos a la certificación FCC:
FCC
Este módulo de conexión inalámbrica está sujeto a la Parte 15 del Código de Regulaciones Federales FCC. Su uso está sujeto a las siguientes condiciones:
(1) Este dispositivo no debe causar interferencias y
(2) El dispositivo debe poder sobrellevar cualquier interferencia, incluida aquella
que pueda afectar de manera negativa el funcionamiento del módulo.
ID de FCC: QOQBLE121LR
RSS de Industry Canada
Este dispositivo cumple con las normas RSS exentas de licencia de Industry Canada. Su uso está sujeto a las siguientes condiciones:
(1) Este dispositivo no debe causar interferencias y
(2) El dispositivo debe poder sobrellevar cualquier interferencia, incluida aquella
que pueda afectar de manera negativa el funcionamiento del módulo.
IC: 5123A-BGTBLE121LR
ES-MX
A menos que el fabricante lo manifieste expresamente, no se permiten cambios o
modificaciones al módulo de conexión inalámbrica y estos anularían la licencia de
funcionamiento del dispositivo perteneciente al usuario.
¡OBSERVACIÓN!
Este equipo ha sido probado y se considera que respeta los límites del dispositivo digital Clase A según la Parte 15 de las normas FCC.
Estos valores límites están diseñados para proveer un grado de protección
adecuado contra las emisiones dañinas cuando el dispositivo se usa en un ámbito
industrial. Este dispositivo genera y utiliza energía de alta frecuencia y también
podría irradiarla. Si el dispositivo no se instala y utiliza conforme el Manual de instrucciones, esto podría generar interferencia peligrosa del sistema de comunicación inalámbrico. El uso de este equipo en una zona residencial podría causar
interferencia dañina, en ese caso, los usuarios deberán corregir la interferencia
por su cuenta.
29
Cómo funciona Dejar de presionar el pedal equivale a incrementar continuamente la corriente de
0 %
100 %
soldadura.
Pedal no accionado (0 %)
... corresponde a la corriente mínima
de la fuente de poder
Pedal completamente presionado (100
%)
... corresponde a la corriente de soldadura establecida en la fuente de poder
Dependiendo del parámetro de soldadura de configuración de tiempo de la corriente inicial, el mando a distancia puede ser operado de las siguientes maneras:
Tiempo de corriente inicial = desactivado
La corriente inicial, la corriente principal, la corriente reducida y la corriente final, así como la duración de las corrientes, son controladas únicamente por el
soldador que está operando el pedal.
Mientras más se presione el pedal, habrá más corriente disponible.
Tiempo de corriente inicial = 0.01 - 30.0 s
La corriente inicial, UpSlope y el tiempo de la corriente inicial se establecen
-
en la fuente de poder.
Cuando el pedal es accionado, el proceso de soldadura comienza con la cor-
-
riente inicial y UpSlope.
La corriente principal es alcanzada al final del UpSlope establecido. La corri-
-
ente principal puede ser cambiada usando el pedal.
El mando a distancia especifica el valor de porcentaje de la corriente de soldadura establecida de acuerdo con la posición del pedal.
30

Soldadura manual por arco voltaico metálico
La corriente de soldadura es controlada únicamente por el soldador que está
operando el pedal.
Mientras más se presione el pedal, habrá más corriente disponible.
Datos técnicos
TMC/TIG de pedal de
RC
Tensión de alimentación + 24 V CC 3.0 V CC
Conexión a fuente de
corriente
Rango del Bluetooth - Hasta 10 m
Versión de Bluetooth - BLE 4.0
Rango de frecuencia - 2402 - 2480 MHz
Potencia de transmisión - 8.32 dBm EIRP
Canales - 40 (0 - 39)
Modulación - GFSK
Vida útil de la batería - 3100 h
Cable TMC Bluetooth
BT/TIG de pedal de RC
(batería AA de 2 x 1.5 V)
(en línea recta, sin obstrucciones ni interferencia)
(Bluetooth Low Energy)
en un ciclo de trabajo de
50%
ES-MX
Registro - BT SIG N.º D041023
Grado de protección IP23 IP23
Rango de temperatura -10 - +40 °C
+14 - +104 °F
Certificado de conformidad
Dimensiones (l x a x alt.) 276 x 138 x 190 mm
Peso 1.81 kg
CE, CSA CE, FCC, IC
10.87 x 5.43 x 7.48 in.
3.99 lb
-10 - +40 °C
+14 - +104 °F
260 x 140 x 175 mm
10.24 x 5.51 x 6.89 in.
1.55 kg
3.42 lb
31

Elementos de control y conexiones
TMC
(1) (2)
(3)
(1) (2)
(3) (4) (5)
(6)
(3)(3)
(3)
TMC/TIG de pedal de RC: Elementos de control y conexiones
(1) Pedal
(2) Cable TMC
Componente/TI
G de pedal de
RC: Elementos
de control y conexiones
(3) Patas de goma atornillables
Las patas de goma pueden retirarse o sustituirse si es necesario.
(1) Pedal
(2) LED de estado
Se ilumina después de la puesta en servicio durante 3 segundos.
32
Destella cuatro veces si el mando a distancia está conectado a un receptor.
El destello se detiene si se interrumpe la conexión.
No se ilumina si la batería está débil o descargada.

(3) Patas de goma atornillables
Las patas de goma pueden retirarse o sustituirse si es necesario.
(4) Interruptor de encendido/apagado
(5) Compartimiento de la batería
Las baterías son suministradas con el mando a distancia.
(6) Etiqueta con código QR y dirección MAC
ES-MX
33

Puesta en servicio
1
2
TMC
TMC/TIG de pedal de RC: conexión del mando
a distancia
Para aplicaciones de TIG únicamente:
1
Desconecte el conector de la antorcha TIG de la conexión de TMC en la fuente de corriente.
2
Cuando el mando a distancia es conectado, el símbolo de mando a distancia se
muestra en la barra de estado en la fuente de corriente.
Los modos de 2 pasos, 4 pasos y soldadura por puntos ya no pueden ser seleccionados.
BT/TIG de pedal
de RC: conexión
del mando a distancia a la fuente de corriente
mediante el
Bluetooth
Encienda el mando a distancia en la parte inferior.
1
Encienda la fuente de corriente y active la función de Bluetooth.
2
El mando a distancia estará listo para usarse cuando sea detectado y mostrado por la fuente de corriente.
Confirme las configuraciones de Bluetooth en la fuente de corriente, si es ne-
3
cesario.
¡PRECAUCIÓN!
¡Riesgo de lesiones y daños por ignición de arco voltaico inesperada!
La ignición inesperada puede ser iniciada por otro mando a distancia de pedal
conectado a la fuente de corriente.
¡Asegúrese de que el mando a distancia de pedal correcto esté conectado a
▶
la fuente de corriente!
¡Compruebe la dirección MAC!
▶
Cuidado al encender/apagar el mando a distancia:
Espere al menos 3 segundos después de apagar el mando a distancia, de lo contrario, no se detectará la desactivación.
Si el dispositivo se enciende nuevamente justo después de haber sido apagado, el
LED de estado iluminará por menos de 3 segundos.
34

Configurar la
corriente de
soldadura y la
soldadura
¡PELIGRO!
Peligro por fallos del sistema y el trabajo que no es realizado de forma adecuada.
Esto puede resultar en lesiones personales graves y daños a la propiedad.
No use las funciones descritas hasta que haya leído cuidadosamente y en-
▶
tendido el manual de instrucciones del mando a distancia, la fuente de corriente y del resto de componentes del sistema.
¡IMPORTANTE! Cuando el mando a distancia es conectado o se establece una
conexión de Bluetooth, la corriente de soldadura establecida en la fuente de corriente está disponible únicamente cuando el pedal deja de ser presionado por
completo.
¡OBSERVACIÓN!
Los parámetros que pueden ser ajustados en el mando a distancia no pueden ser
modificados en la fuente de corriente.
Establecer la corriente de soldadura en la fuente de corriente
1
Accionar el pedal
2
El proceso de ignición es iniciado (cambio de valor de 5 %).
ES-MX
Si el pedal del mando a distancia es liberado, el procedimiento de soldadura finaliza de manera controlada (postflujo de gas, final de la soldadura).
35
RC Pedal TIG /BT: Cambio de batería
Indicación de
baterías descargadas
BT/TIG de pedal
de RC: cambio
de batería
El LED de estado no ilumina cuando se enciende el dispositivo o lo hace por menos de 3 segundos.
Junto al usuario de Bluetooth, un símbolo de batería muestra el estado actual de
descarga de las baterías en la fuente de corriente.
1 2
3 4
36

5 6
7 8
ES-MX
9 10
37

38

Sommaire
Généralités 40
Concept d'appareil 40
Conditions requises 40
Options 40
Bluetooth trademarks 40
Remarques concernant le marquage radioélectrique 41
Mode de fonctionnement 42
Caractéristiques techniques 43
Éléments de commande et connexions 44
RC Pedal TIG /TMC : éléments de commande et connecteurs 44
RC Pedal TIG /BT : éléments de commande et connecteurs 44
Mise en service 46
RC Pedal TIG /TMC : Raccordement de la commande à distance 46
RC Pedal TIG /BT : connecter la commande à distance à la source de courant par Bluetooth
Réglage de l'intensité de soudage et soudage 47
RC Pedal TIG /BT : remplacer les piles 48
Indication en cas de piles vides 48
RC Pedal TIG /BT : remplacer les piles 48
46
FR
39

Généralités
Concept d'appareil
Les commandes à distance RC Pedal
TIG /TMC et RC Pedal TIG /BT permettent un réglage facile de l'intensité
de soudage à l'aide d'une pédale.
Les mains libres, il est possible d'assurer un guidage de la torche sans accroc
tout en corrigeant constamment l'intensité de soudage.
Lorsque la commande à distance est
raccordée ou que la connexion Bluetooth est établie, l'intensité de soudage
réglée au niveau de la source de courant constitue l'intensité de soudage
maximum. La course de la pédale correspond à la plage d'intensité de soudage, de la valeur minimale à la valeur
maximale.
Lorsque l'intensité de soudage est faible, la commande à distance permet
un dosage particulièrement sensible.
Conditions requises
Options
Bluetooth trademarks
L'utilisation des commandes à distance est possible avec les sources de courant
suivantes :
RC Panel TIG /TMC :
iWave 190i, iWave 230i
-
TransTig 170, TransTig 210
-
RC Panel TIG /BT :
iWave 230i
-
TransTig 170, TransTig 210
-
uniquement dans les pays certifiés
-
Rallonge TMC 5 m 43,0004,5979
La marque verbale Bluetooth® et les logos Bluetooth® sont des marques
déposées et la propriété de Bluetooth SIG, Inc. et sont utilisés sous licence par
le fabricant. D'autres marques et dénominations commerciales sont la propriété
de leurs ayant-droits respectifs.
40

Remarques concernant le marquage radioélectrique
La commande à distance RC Pedal TIG /BT est équipée d'un module radio.
Aux États-Unis, les modules radio sont soumis à un marquage obligatoire selon
FCC :
FCC
Cet appareil est conforme au paragraphe 15 des dispositions FCC. Son utilisation
est soumise aux conditions suivantes :
(1) L'appareil ne doit causer aucune perturbation.
(2) L'appareil doit pouvoir surmonter toutes les influences parasites constatées, y
compris les influences parasites susceptibles de perturber le fonctionnement.
ID FCC : QOQBLE121LR
Industry Canada RSS
Cet appareil est conforme aux normes Industry Canada RSS exemptes de licence. Son utilisation est soumise aux conditions suivantes :
(1) L'appareil ne doit causer aucune perturbation.
(2) L'appareil doit pouvoir surmonter toutes les influences parasites constatées, y
compris les influences parasites susceptibles de perturber le fonctionnement.
IC : 5123A-BGTBLE121LR
Dans la mesure où elles ne sont pas expressément autorisées par le fabricant, les
adaptations ou modifications du module radio ne sont pas admises et entraînent
la perte de l'autorisation d'utilisation par l'exploitant.
REMARQUE!
Cet appareil a été testé et correspond aux valeurs limites imposées par la partie 15 des dispositions du FCC pour un appareil numérique de classe A.
Ces valeurs limites ont pour but d'assurer une protection appropriée contre les
perturbations nocives lorsque l'appareil est utilisé dans un environnement commercial. Cet appareil produit, utilise et émet de l'énergie à haute fréquence. Si ce
dernier n'est pas installé et utilisé conformément aux Instructions de service, il
peut provoquer des perturbations nocives des communications radio. L'utilisation
de cet appareil dans des zones résidentielles peut entraîner des perturbations
nocives, auxquelles l'utilisateur devra remédier à ses frais.
FR
41

Mode de fonc-
0 %
100 %
tionnement
La course de la pédale correspond à une augmentation constante de l'intensité
de soudage.
Pédale non enfoncée (0 %)
... correspond à l'intensité minimale de
la source de courant
Pédale entièrement enfoncée (100 %)
... correspond à l'intensité de soudage
réglée au niveau de la source de courant
En fonction du réglage des paramètres setup du temps de courant de démarrage,
les options de commande suivantes sont disponibles pour la commande à distance :
Temps du courant de démarrage = off
Le courant de démarrage, le courant principal, le courant de descente, le courant
final ainsi que la durée des courants sont exclusivement définis par le soudeur à
l'aide de la pédale.
Plus la pédale est enfoncée, plus il y a de courant disponible.
Temps du courant de démarrage = 0,01 - 30,0 s
Le courant de démarrage, l'UpSlope et le temps du courant de démarrage
-
sont réglés au niveau de la source de courant.
Après l'actionnement de la pédale, le process de soudage démarre avec le
-
courant de démarrage et l'UpSlope réglés.
À la fin de l'UpSlope réglé, le courant principal est atteint. Le courant princi-
-
pal peut être modifié à l'aide de la pédale.
Par la position de la pédale, la commande à distance définit un pourcentage de
l'intensité de soudage réglée.
42

Soudage manuel à l'électrode enrobée
L'intensité de soudage est exclusivement définie par le soudeur à l'aide de la
pédale.
Plus la pédale est enfoncée, plus il y a de courant disponible.
Caractéristiques
techniques
RC Pedal TIG /TMC RC Pedal TIG /BT
Tension d'alimentation + 24 V DC 3,0 V DC
(2 x pile AA 1,5 V)
Connexion à la source de
courant
Portée Bluetooth - Jusqu'à 10 m
Version Bluetooth - BLE 4.0
Plage de fréquence - 2 402 à 2 480 MHz
Puissance d'émission - 8,32 dBm EIRP
Canaux - 40 (0 - 39)
Modulation - GFSK
Durée de vie de la pile - 3 100 h
Référencement - BT SIG N° D041023
Classe de protection IP 23 IP 23
Câble multi connecteur
TIG
Bluetooth
(en ligne droite, sans obstacles ni perturbations)
(Bluetooth Low Energy)
à 50 % de facteur de
marche
FR
Plage de température -10 à +40 °C
+14 à +104 °F
Marques de conformité CE, CSA CE, FCC, IC
Dimensions (L x l x H) 276 x 138 x 190 mm
10.87 x 5.43 x 7.48 in.
Poids 1,81 kg
3.99 lbs.
-10 à +40 °C
+14 à +104 °F
260 x 140 x 175 mm
10.24 x 5.51 x 6.89 in.
1,55 kg
3.42 lbs.
43

Éléments de commande et connexions
TMC
(1) (2)
(3)
(1) (2)
(3) (4) (5)
(6)
(3)(3)
(3)
RC Pedal TIG /
TMC : éléments
de commande et
connecteurs
(1) Pédale
(2) Câble multi connecteur TIG
RC Pedal TIG /
BT : éléments de
commande et
connecteurs
(3) Pieds en caoutchouc vissables
Les pieds en caoutchouc peuvent être retirés ou remplacés si nécessaire.
(1) Pédale
(2) LED d'état
S'allume pendant 3 secondes après le démarrage.
44
Clignote 4 x lors de la connexion de la commande à distance avec un
récepteur.
Le clignotement s'arrête si l'établissement de la connexion est interrompu.
S'éteint lorsque la pile est faible ou vide.

(3) Pieds en caoutchouc vissables
Les pieds en caoutchouc peuvent être retirés ou remplacés si nécessaire.
(4) Interrupteur marche/arrêt
(5) Compartiment à batterie
Les batteries sont comprises dans la livraison de la commande à distance.
(6) Autocollant avec code QR et adresse MAC
FR
45

Mise en service
1
2
TMC
RC Pedal TIG /
TMC : Raccordement de la commande à distance
Uniquement pour les applications TIG :
1
débrancher la fiche de commande de la torche de soudage TIG du multi connecteur TIG de la source de courant
2
Lorsque la commande à distance est raccordée, le symbole correspondant s'affiche dans la ligne d'état de la source de courant.
Les modes de service 2 temps, 4 temps et soudage par points ne peuvent plus
être sélectionnés.
RC Pedal TIG /
BT : connecter la
commande à distance à la
source de courant par Bluetooth
Allumer la commande à distance sur la face inférieure
1
Allumer la source de courant et activer la fonction Bluetooth
2
La commande à distance est prête à fonctionner si elle est reconnue et affichée par la source de courant.
Si nécessaire, confirmer les réglages Bluetooth sur la source de courant
3
ATTENTION!
Risque de dommages corporels et matériels en raison d'amorçages inattendus !
Un amorçage peut être déclenché de façon inattendue via une autre ou une deuxième pédale de commande à distance raccordée à la source de courant.
S'assurer que la pédale de commande à distance raccordée à la source de
▶
courant est bien la bonne !
Vérifier l'adresse MAC !
▶
Lors du démarrage/de l'arrêt de la commande à distance :
La commande à distance doit être arrêtée pendant au moins 3 secondes pour
que l'arrêt soit reconnu.
Si elle est rallumée trop rapidement après l'arrêt, la DEL d'état ne s'allume pas
pendant les 3 secondes.
46

Réglage de l'intensité de soudage et soudage
AVERTISSEMENT!
Danger en cas d'erreur de manipulation et d'erreur en cours d'opération.
Cela peut entraîner des dommages corporels et matériels graves.
N'utiliser les fonctions décrites qu'après avoir lu et compris l'intégralité des
▶
Instructions de service de la commande à distance, de la source de courant
et de tous les autres composants périphériques.
IMPORTANT ! Lorsque la commande à distance est raccordée ou que la connexion Bluetooth est établie, l'intensité de soudage réglée au niveau de la source de
courant n'est disponible que lorsque la pédale est entièrement enfoncée.
REMARQUE!
Les paramètres qui peuvent être réglés sur la commande à distance ne peuvent
pas être modifiés à partir de la source de courant.
Régler l'intensité de soudage au niveau de la source de courant
1
Actionner la pédale
2
Le processus d'amorçage est enclenché (modification de la valeur de 5 %).
Lorsque la pédale de commande à distance est relâchée, le process de soudage
se termine de façon contrôlée (post-débit de gaz, fin du soudage).
FR
47

RC Pedal TIG /BT : remplacer les piles
Indication en cas
de piles vides
RC Pedal TIG /
BT : remplacer
les piles
La DEL d'état s'allume pendant moins de 3 secondes ou pas du tout après le
démarrage.
Sur la source de courant, à côté du périphérique Bluetooth, un symbole affiche
l'état de charge des piles.
1 2
3 4
48

5 6
7 8
9 10
FR
49

50

Innholdsfortegnelse
Generelt 52
Apparatkonsept 52
Forutsetninger 52
Alternativer 52
Bluetooth trademarks 52
Informasjon om radiokallesignal 53
Virkemåte 54
Tekniske data 55
Betjeningselementer og tilkoblinger 56
RC Pedal TIG /TMC: Betjeningselementer og tilkoblinger 56
RC Pedal TIG /BT: Betjeningselementer og tilkoblinger 56
Idriftsetting 58
RC Pedal TIG /TMC: Koble til fjernkontrollen 58
RC Pedal TIG /BT: Koble fjernkontrollen til strømkilden via Bluetooth 58
Stille inn sveisestrøm og sveise 59
RC Pedal TIG /BT: Bytt batteri 60
Indikator på tomme batterier 60
RC Pedal TIG /BT: Bytt batteri 60
NO
51

Generelt
Apparatkonsept Fjernkontrollene RC Pedal TIG /TMC
og RC Pedal TIG /BT gjør det mulig å
stille sveisestrømmen på enkelt vis ved
hjelp av en pedal.
Hendene er fri, og dermed sikres også
uhindret kontroll av sveisepistolen,
selv ved stadige sveisestrømkorreksjoner.
Når fjernkontrollen er tilkoblet eller
det er opprettet Bluetooth-forbindelse, gjelder den innstilte sveisestrømmen på strømkilden som maksimalstrøm. Den totale pedalstrekningen tilsvarer området fra minimal sveisestrøm til maksimalstrøm.
Ved lav sveisestrøm gjør fjernkontrollen det mulig å dosere på en svært
følsom måte.
Forutsetninger Fjernkontrollene kan brukes med følgende strømkilder:
RC Panel TIG /TMC:
iWave 190i, iWave 230i
-
TransTig 170, TransTig 210
-
RC Panel TIG /BT:
iWave 230i
-
TransTig 170, TransTig 210
-
Kun i sertifiserte land
-
Alternativer
Bluetooth trademarks
TMC-forlengelse 5 m 43,0004,5979
Varemerket Bluetooth® og Bluetooth®-logoene er registrerte varemerker som
tilhører Bluetooth SIG, Inc. og brukes på lisens fra produsenten. Andre varemerker og handelsbetegnelser tilhører de respektive rettighetshaverne.
52

Informasjon om
radiokallesignal
Fjernkontrollen RC Pedal TIG /BT er utstyrt med en radiomodul.
Radiomoduler er underlagt merkekrav iht. til FCC i USA.
FCC
Dette apparatet samsvarer med avsnitt 15 i FCC-bestemmelsene. Bruken underligger følgende vilkår:
(1) Dette apparatet må ikke forårsake interferens
(2) Apparatet må kunne motstå alle interferensinnvirkninger, inkludert interferens som kan føre til redusert funksjonalitet.
FCC ID: QOQBLE121LR
Industry Canada RSS
Dette apparatet samsvarer med de lisensfrie Industry Canada RSS-standardene.
Bruken underligger følgende vilkår:
(1) Dette apparatet må ikke forårsake interferens
(2) Apparatet må kunne motstå alle interferensinnvirkninger, inkludert interferens som kan føre til redusert funksjonalitet.
IC: 5123A-BGTBLE121LR
Såfremt det ikke uttrykkelig har blitt tillatt av produsenten, er det forbudt å foreta endringer eller modifikasjoner av radiomodulen; manglende overholdelse
fører til tap av bruksrettigheten av apparatet.
NO
MERKNAD!
Dette apparatet har blitt testet iht. og samsvarer med grenseverdiene for digitale apparater i klasse A, del 15 i FCC-bestemmelsene.
Disse grenseverdiene er satt slik at de gir egnet beskyttelse mot skadelige
forstyrrelser når apparatet brukes i kommersielle omgivelser. Apparatet produserer og bruker høyfrekvensenergi, og kan utstråle denne. Hvis apparatet ikke installeres og brukes slik det er beskrevet i bruksanvisningen, kan dette føre til skadelige forstyrrelser i radiokommunikasjonen. Bruken av apparatet i boligområder
kan føre til skadelige forstyrrelser, som brukeren selv må dekke kostnadene for.
53

Virkemåte Pedalstrekningen tilsvarer en kontinuerlig økning av sveisestrømmen.
0 %
100 %
Pedal ikke trådt inn (0 %)
... tilsvarer minstestrømmen til
strømkilden
Pedal trykket helt inn (100 %)
... tilsvarer den sveisestrømmen som er
innstilt på strømkilden
Avhengig av innstilling i setup-parameteren "Startstrømtid" har du følgende
bruksmuligheter for fjernkontrollen:
Startstrømtid = off
Startstrøm, hovedstrøm, reduksjonsstrøm, sluttstrøm og varigheten til strømtypene styres utelukkende av sveiseren ved bruk av pedalen.
Jo mer du trykker inn pedalen, desto mer strøm er tilgjengelig.
Startstrømtid = 0,01–30,0 s
Startstrøm, Up-Slope-fase og startstrømtid stilles inn på strømkilden.
-
Etter at du har trykket inn pedalen, starter sveiseprosessen med den innstil-
-
te startstrømmen og Up-Slope-fasen.
Mot slutten av den innstilte Up-Slope-fasen nås hovedstrømmen. Hoveds-
-
trømmen kan endres ved hjelp av pedalen.
Fjernkontrollen angir en prosentverdi for den innstilte sveisestrømmen basert på
pedalens stilling.
54

Stavelektrodesveising
Sveisestrømmen styres utelukkende av sveiseren ved bruk av pedalen.
Jo mer du trykker inn pedalen, desto mer strøm er tilgjengelig.
Tekniske data
RC Pedal TIG /TMC RC Pedal TIG /BT
Tilførselsspenning +24 V DC 3,0 V DC
(2 x 1,5 V AA-batteri)
Tilkobling til strømkilde TMC-kabel Bluetooth
Bluetooth-rekkevidde - Inntil 10 m
(i rett linje, uten hindringer og forstyrrelser)
Bluetooth-versjon - BLE 4.0
(Bluetooth Low Energy)
Frekvensområde - 2402–2480 MHz
Sendereffekt - 8,32 dBm EIRP
Kanaler - 40 (0–39)
Modulasjon - GFSK
Batteriets levetid - 3100 h
ved 50 % innkoblingsvarighet
Listeoppføring - BT SIG Nr. D041023
Beskyttelsesklasse IP 23 IP 23
Temperaturområde -10 - +40 °C
+14 - +104 °F
-10 - +40 °C
+14 - +104 °F
NO
Kontrolltegn CE, CSA CE, FCC, IC
Mål (l x b x h) 276 x 138 x 190 mm
10.87 x 5.43 x 7.48 in.
Vekt 1,81 kg
3.99 lbs.
260 x 140 x 175 mm
10.24 x 5.51 x 6.89 in.
1,55 kg
3.42 lbs.
55

Betjeningselementer og tilkoblinger
TMC
(1) (2)
(3)
(1) (2)
(3) (4) (5)
(6)
(3)(3)
(3)
RC Pedal TIG /
TMC: Betjeningselementer
og tilkoblinger
(1) Pedal
(2) TMC-kabel
RC Pedal
TIG /BT: Betjeningselementer
og tilkoblinger
(3) Skrubare gummiføtter
Gummiføttene kan fjernes eller skiftes ut om nødvendig.
(1) Pedal
(2) Status-LED
Lyser i 3 sekunder etter innkobling.
(3) Skrubare gummiføtter
56
Blinker 4 ganger når fjernkontrollen kobler seg opp til en mottaker.
Dersom tilkoblingsprosessen avbrytes, stopper også blinkingen.
Lyser ikke dersom batteriet er svakt eller tomt.

Gummiføttene kan fjernes eller skiftes ut om nødvendig.
(4) På/av-bryter
(5) Batterirom
Batteriene følger med fjernkontrollen.
(6) Klistremerke med QR-kode og MAC-adresse
NO
57

Idriftsetting
1
2
TMC
RC Pedal TIG /
TMC: Koble til
fjernkontrollen
Kun ved TIG-sveising:
1
Koble styrepluggen til TIG-sveisepistolen fra TMC-tilkoblingen på strømkilden.
2
Ved tilkoblet fjernkontroll vises fjernkontrollsymbolet i statuslinjen til strømkilden.
Driftstypene 2-takts, 4-takts og punktsveising kan ikke velges lenger.
RC Pedal
TIG /BT: Koble
fjernkontrollen
til strømkilden
via Bluetooth
Slå på fjernkontrollen på undersiden
1
Slå på strømkilden og aktiver Bluetooth-funksjonen
2
Fjernkontrollen er klar til bruk når den gjenkjennes og vises av strømkilden.
Hvis nødvendig må du bekrefte Bluetooth-innstillingene på strømkilden
3
FORSIKTIG!
Uventet tenning medfører fare for personskader og materielle skader!
Dersom en annen eller en ekstra pedalfjernkontroll er koblet til strømkilden, kan
det utløses en uventet tenningsprosess.
Påse at riktig pedalfjernkontroll er koblet til strømkilden!
▶
Kontroller MAC-adressen!
▶
Vær obs på følgende når fjernkontrollen slås av/på:
La fjernkontrollen være av i minst 3 sekunder etter at du har slått den av, ellers
registreres det ikke at den er av.
Dersom du slår den på igjen for fort, vil ikke status-LED-lampen lyse i 3 sekunder.
58

Stille inn sveisestrøm og sveise
FARE!
Fare på grunn av feilbetjening og mangelfullt utført arbeid.
Følgene kan bli alvorlige personskader og materielle skader.
De funksjonene som er beskrevet, må ikke brukes før bruksanvisningen til
▶
fjernkontrollen og bruksanvisningene til strømkilden samt alle andre systemkomponenter har blitt lest og forstått.
VIKTIG! Når fjernkontrollen er tilkoblet eller Bluetooth-forbindelsen opprettet,
er den innstilte sveisestrømmen på strømkilden kun tilgjengelig når pedalen er
trykket helt inn.
MERKNAD!
Parametre som kan stilles inn på fjernkontrollen, kan ikke endres på strømkilden.
Still inn sveisestrøm på strømkilden
1
Trykk inn pedalen
2
Tennprosessen startes (verdiendring 5 %).
Hvis pedalen til fjernkontrollen slippes opp, avsluttes sveiseprosessen på en kontrollert måte (gassetterstrømming, sveiseslutt).
NO
59

RC Pedal TIG /BT: Bytt batteri
Indikator på
tomme batterier
RC Pedal
TIG /BT: Bytt
batteri
Status-LED-lampen lyser ikke etter innkobling eller lyser mindre enn 3 sekunder.
Ved siden av Bluetooth-deltakeren på strømkilden vises det et batterisymbol
med batterienes ladenivå.
1 2
3 4
60
5 6

7 8
9 10
NO
61

62

Índice
Informações gerais 64
Conceito de dispositivo 64
Pré-requisitos 64
Opções 64
Bluetooth trademarks 64
Avisos para a marcação de transmissão de rádio 65
Modo de operação 66
Dados técnicos 67
Elementos de comando e conexões 68
RC Pedal TIG/TMC: Controles operacionais e conexões 68
RC Pedal TIG/BT: Controles operacionais e conexões 68
Comissionamento 70
RC Pedal TIG/TMC: Conectar o controle remoto 70
RC Pedal TIG/BT: Controle remoto por Bluetooth com a conexão da fonte de solda 70
Configurar a corrente de soldagem e a soldagem 71
RC Pedal TIG/BT: Substituir bateria 72
Evidência para baterias vazias 72
RC Pedal TIG/BT: Substituir bateria 72
PT-BR
63

Informações gerais
Conceito de dispositivo
Pré-requisitos A operação dos controles remotos é possível com as seguintes fontes de solda:
Os controles remotos RC Pedal
TIG/TMC e RC Pedal TIG /BT RC Pedal TMC possibilitam um ajuste simples da corrente de soldagem com o pedal.
As mãos permanecem livres, com isso,
é garantida uma condução tranquila da
tocha até na correção constante da
corrente de soldagem.
No controle remoto conectado ou na
conexão Bluetooth estabelecida, a corrente de soldagem ajustada vale como
corrente máxima na fonte de solda. Todo o percurso do pedal corresponde à
área da corrente de soldagem mínima
até a corrente máxima.
Em caso de pouca corrente de soldagem, o controle remoto possibilita
uma dosagem sensível.
Opções
Bluetooth trademarks
RC Panel TIG/TMC:
iWave 190i, iWave 230i
-
TransTig 170, TransTig 210
-
RC Panel TIG/BT:
iWave 230i
-
TransTig 170, TransTig 210
-
apenas em países certificados
-
Extensão TIG 5 m 43,0004,5979
A marca Bluetooth® e os logotipos Bluetooth®são marcas registradas de propriedade da Bluetooth SIG, Inc. e são usados pelo fabricante sob licença. Outras
marcas e nomes comerciais são propriedade de seus respectivos detentores de
direitos.
64

Avisos para a
marcação de
transmissão de
rádio
O controle remoto RC Pedal TIG /BT possui um módulo de rádio.
Nos EUA, os módulos de rádio são submetidos à rotulagem obrigatória nos termos da FCC (Comissão Federal de Comunicações):
FCC
Este dispositivo está de acordo com a Seção 15 dos termos da FCC. A operação
está sujeita às seguintes condições:
(1) Este dispositivo não pode provocar nenhuma interferência e
(2) O dispositivo deve suportar qualquer interferência recebida, inclusive as que
podem prejudicar a operação.
ID FCC: QOQBLE121LR
Industry Canada RSS
Este dispositivo está de acordo com as normas da Industry Canada RSS sem licença. A operação está sujeita às seguintes condições:
(1) Este dispositivo não pode provocar nenhuma interferência e
(2) O dispositivo deve suportar qualquer interferência recebida, inclusive as que
podem prejudicar a operação.
IC: 5123A-BGTBLE121LR
A menos que sejam explicitamente autorizadas pelo fabricante, adaptações e
modificações do módulo de rádio não são permitidas e levam à perda do direito
de operação do dispositivo pelo usuário.
AVISO!
Este dispositivo foi testado e obedece aos limites estabelecidos para um dispositivo digital Classe A, de acordo com a Seção 15 dos termos da FCC.
Esses limites são projetados para fornecer uma proteção adequada contra interferências nocivas quando o dispositivo estiver sendo operado em um ambiente
industrial. Este dispositivo gera, utiliza e pode emitir energia de alta frequência, e
se não for instalado e utilizado de acordo com o manual de instruções, pode provocar interferências prejudiciais à comunicação por rádio. A operação deste dispositivo em uma área residencial pode provocar interferências prejudiciais, as
quais deverão ser solucionadas pelo usuário às suas próprias custas.
PT-BR
65

Modo de ope-
0 %
100 %
ração
O caminho do pedal corresponde a um aumento contínuo da corrente de soldagem.
Pedal não acionado (0%)
... corresponde à corrente mínima da
fonte de solda
Pedal pressionado até o fim (100%)
... corresponde à corrente de soldagem
configurada na fonte de solda
Dependendo da configuração de corrente inicial do parâmetro setup, existem as
seguintes possibilidades de operação para o controle remoto:
Tempo de corrente inicial = off
Corrente inicial, corrente principal, controle de redução e corrente final, assim
como a duração das correntes, são especificadas somente pelo soldador através
do acionamento dos pedais.
Quanto mais acionado o pedal, mais corrente estará à disposição.
Tempo de corrente inicial = 0,01 - 30,0 s
Corrente inicial, upslope e tempo de corrente inicial são configurados na fon-
-
te de solda.
O processo de soldagem se inicia com a corrente inicial e o upslope configu-
-
rados depois de acionar o pedal.
A corrente principal é atingida ao final do upslope configurado. A corrente
-
principal pode ser alterada com o pedal.
O controle remoto especifica, através da configuração do pedal, um valor de porcentagem da corrente de soldagem configurada.
66

Soldagem de eletrodos revestidos
A corrente de soldagem é especificada somente pelo soldador com o acionamento do pedal.
Quanto mais acionado o pedal, mais corrente estará à disposição.
Dados técnicos
RC Pedal TIG /TMC RC Pedal TIG /BT
Tensão de alimentação + 24 V CC 3,0 V CC
(2 baterias AA de 1,5 V)
Conexão para a fonte de
solda
Alcance Bluetooth - até 10 m
Versão Bluetooth - BLE 4.0
Área de frequência - 2402 - 2480 MHz
Desempenho de envio - 8,32 dBm EIRP
Canais - 40 (0 - 39)
Modulação - GFSK
Vida útil da bateria - 3100 h
Listagem - BT SIG Nº D041023
Classe de proteção IP 23 IP 23
Cabo TMC Bluetooth
(em linha reta, sem barreiras e interferências)
(Bluetooth Low Energy)
em 50% do ciclo de trabalho
PT-BR
Faixa de temperatura -10 - +40 °C
+14 - +104 °F
Símbolo de conformidade
Dimensões (c x l x a) 276 x 138 x 190 mm
PESO 1,81 kg
CE, CSA CE, FCC, IC
10.87 x 5.43 x 7.48 in.
3.99 lb.
-10 - +40 °C
+14 - +104 °F
260 x 140 x 175 mm
10.24 x 5.51 x 6.89 in.
1,55 kg
3.42 lb.
67

Elementos de comando e conexões
TMC
(1) (2)
(3)
(1) (2)
(3) (4) (5)
(6)
(3)(3)
(3)
RC Pedal TIG/
TMC: Controles
operacionais e
conexões
(1) Pedal
(2) Cabo TMC
RC Pedal
TIG/BT: Controles operacionais
e conexões
(3) pés de borracha parafusados
Os pés de borracha podem ser removidos ou substituídos, se necessário.
(1) Pedal
(2) Status de LED
Acende após a ativação por 3 segundos.
(3) pés de borracha parafusados
68
Pisca 4 x, ao conectar o controle remoto com um receptor.
O estabelecimento da conexão é interrompido e para de piscar.
Não se acende quando a bateria está fraca ou vazia.

Os pés de borracha podem ser removidos ou substituídos, se necessário.
(4) Ligado/Desligado
(5) Célula de bateria
As baterias estão inclusas no fornecimento do controle remoto.
(6) Adesivo com QR code e endereço MAC
PT-BR
69

Comissionamento
1
2
TMC
RC Pedal TIG/
TMC: Conectar o
controle remoto
Somente em aplicações TIG:
1
separar a tomada da tocha TIG da conexão TMC da fonte de solda
2
No controle remoto conectado, o símbolo de controle remoto é exibido na linha
de status da fonte de solda.
Os modos de operação de 2 ciclos, 4 ciclos e pontilhação não podem mais ser
selecionados.
RC Pedal
TIG/BT: Controle remoto por
Bluetooth com a
conexão da fonte
de solda
Controle remoto ativado na parte inferior
1
A fonte de solda é ligada e a função Bluetooth é ativada
2
O controle remoto está pronto para operação quando é reconhecido e notificado pela fonte de solda.
Caso necessário, confirme a configuração Bluetooth na fonte de solda
3
CUIDADO!
Perigo de danos para pessoas e materiais devido a processo de ignição inesperado!
Um segundo controle remoto de pedal ou um alternativo for conectado à fonte
de solda pode acionar um processo de ignição inesperado.
Certifique-se que o controle remoto do pedal esteja conectado corretamen-
▶
te com a fonte de solda!
Verificar endereço MAC!
▶
Ao ativar/desativar o controle remoto certifique-se de:
manter o controle remoto desligado por pelo menos 3 segundos, caso contrário,
a desativação não é reconhecida.
Após a desativação ser ligada muito rapidamente após o desligamento, o LED de
status não acenderá por 3 segundos.
70

Configurar a corrente de soldagem e a soldagem
PERIGO!
Perigo devido a manuseio e trabalhos realizados incorretamente.
Podem ocorrer danos pessoais e materiais graves.
As funções descritas devem ser usadas somente quando o manual de in-
▶
struções do controle remoto e os manuais de instruções das fontes de solda
e de todos os outros controles remotos forem lidos e compreendidos totalmente.
IMPORTANTE! Se o controle remoto estiver conectado ou a conexão Bluetooth
estiver estabelecida, a corrente de soldagem configurada estará disponível na
fonte de solda somente com o pedal completamente acionado.
AVISO!
Os parâmetros que são configuráveis no controle remoto não podem ser alterados na fonte de solda.
Ajustar a corrente de soldagem na fonte de solda
1
Acionar o pedal
2
O procedimento de ignição é iniciado (alteração do valor de 5%).
Se o pedal do controle remoto for solto, o processo de soldagem será encerrado
de forma controlada (pós-fluxo de gás, fim de soldagem).
PT-BR
71
RC Pedal TIG/BT: Substituir bateria
Evidência para
baterias vazias
RC Pedal
TIG/BT: Substituir bateria
O LED de status se acende após a ativação por no máximo 3 segundos.
Na fonte de solda, existe um símbolo de bateria, próximo ao participante Bluetooth, que exibe o estado de carregamento atual da bateria.
1 2
3 4
72
5 6

7 8
9 10
PT-BR
73

74

PT-BR
75

 Loading...