

Page 1

Einbauanleitung
D
Widerstands-Schweißzange
Installation instructions
GB
Resistance welding gun
Instructions d’installation
F
Pince de pointage par
résistance
Profibus DeltaSpot
Istruzioni di montaggio
I
Pinza di saldatura a
resistenza
Instrucciones de montaje
E
Pinzas de soldadura de
resistencia
Instruções de instalação
P
Pinça de soldagem com
resistência
Návod pro vestavbu
CS
Odporové svařovací kleště
42,0410,1551 012008
Page 2

Page 3
Allgemeines
Sicherheit
Allgemein
Lieferumfang
WARNUNG! Fehlerhaft durchgeführte Arbeiten können schwerwiegende Sach-
und Personenschäden verursachen. Diese Montage darf nur von geschultem
Fachpersonal durchgeführt werden! Beachten Sie die Sicherheitsvorschriften in
der Bedienungsanleitung DeltaSpot und des Begleitschreibens der Firma Beckhoff.
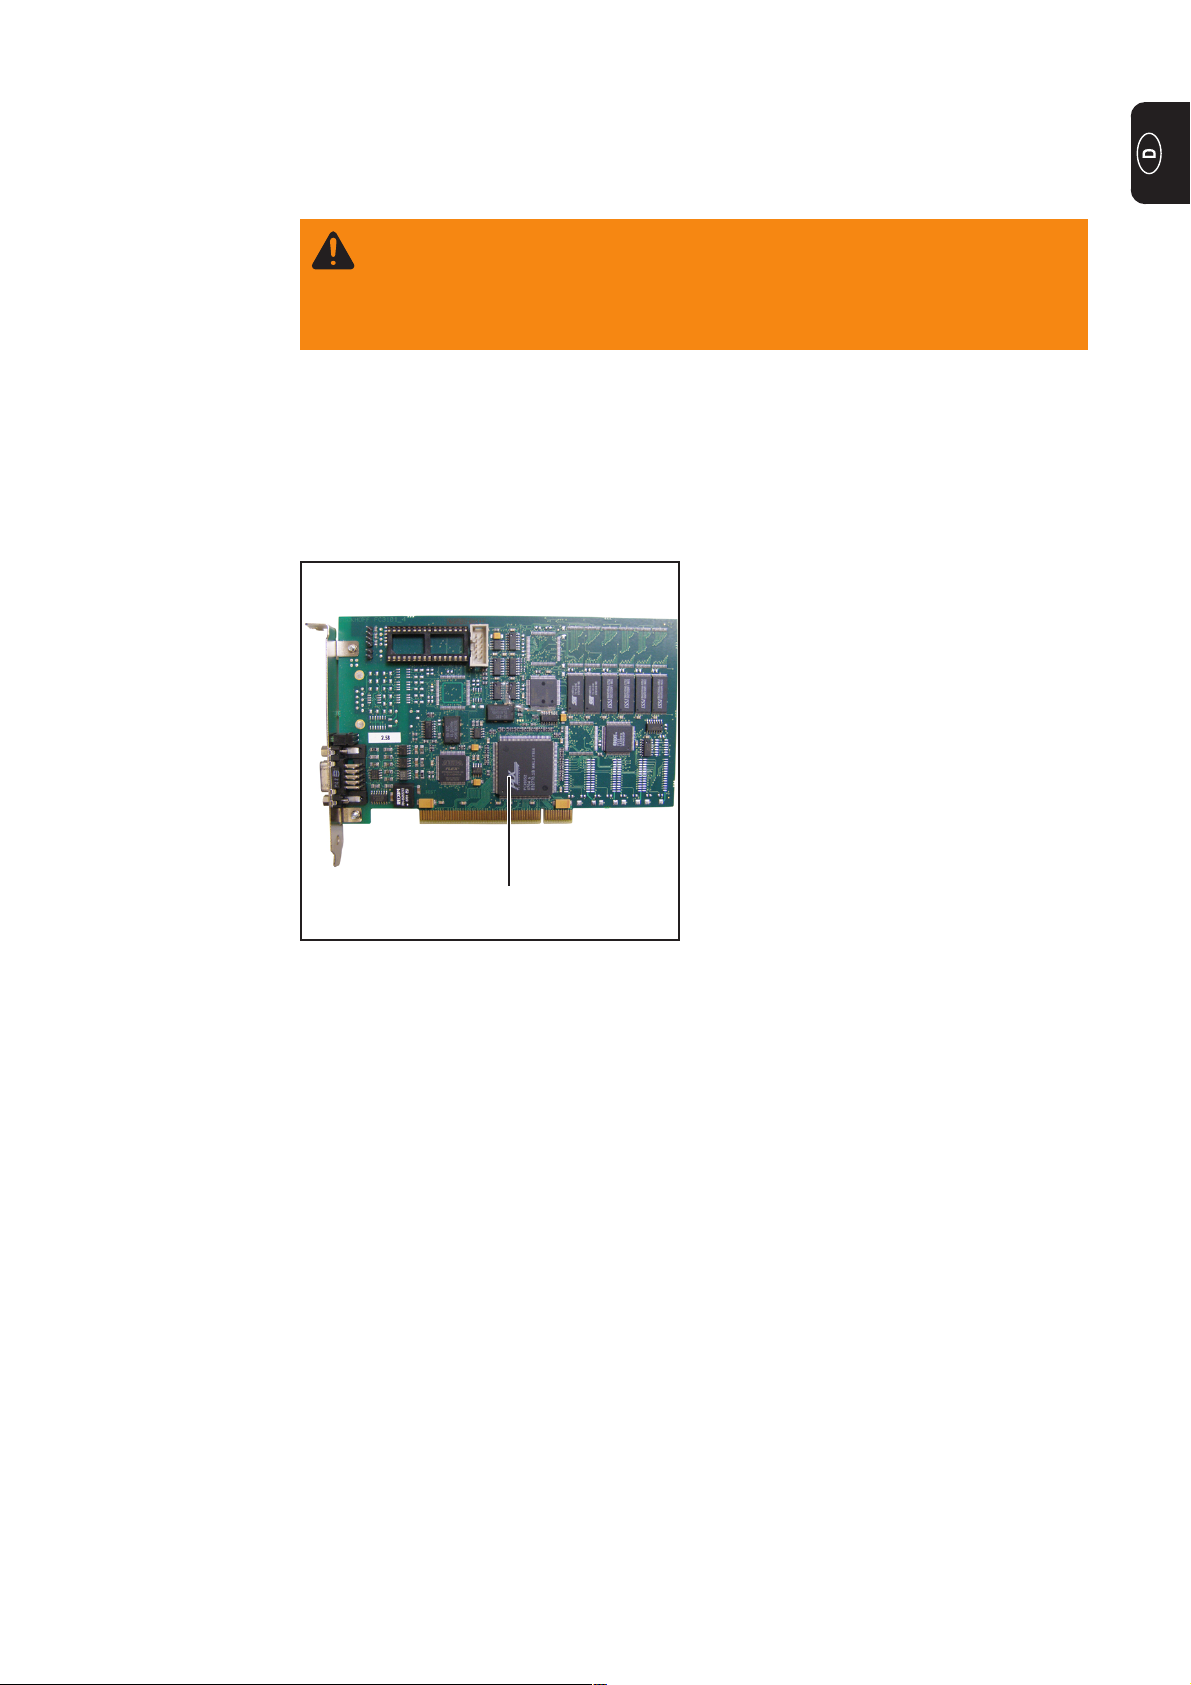
Der Einbau der Profibus Interface-Karte ist für eine Datenübertragung vom Roboter zur
Zangensteuerung notwendig.
(1) Profibus Interface-Karte
Erforderliche
Werkzeuge
(1)
Profibus Interface-Karte
- Kreuz-Schraubendreher mittel (Größe PH2)
1
Page 4
Profibus Interface-Karte einbauen und installieren
Profibus
Interface-Karte
einbauen
(1)
Abdeckung entfernen
(3)
(4)
1. Netzstecker des Industrie-PCs ausstecken
2. Deckel des Industrie-PCs entfernen
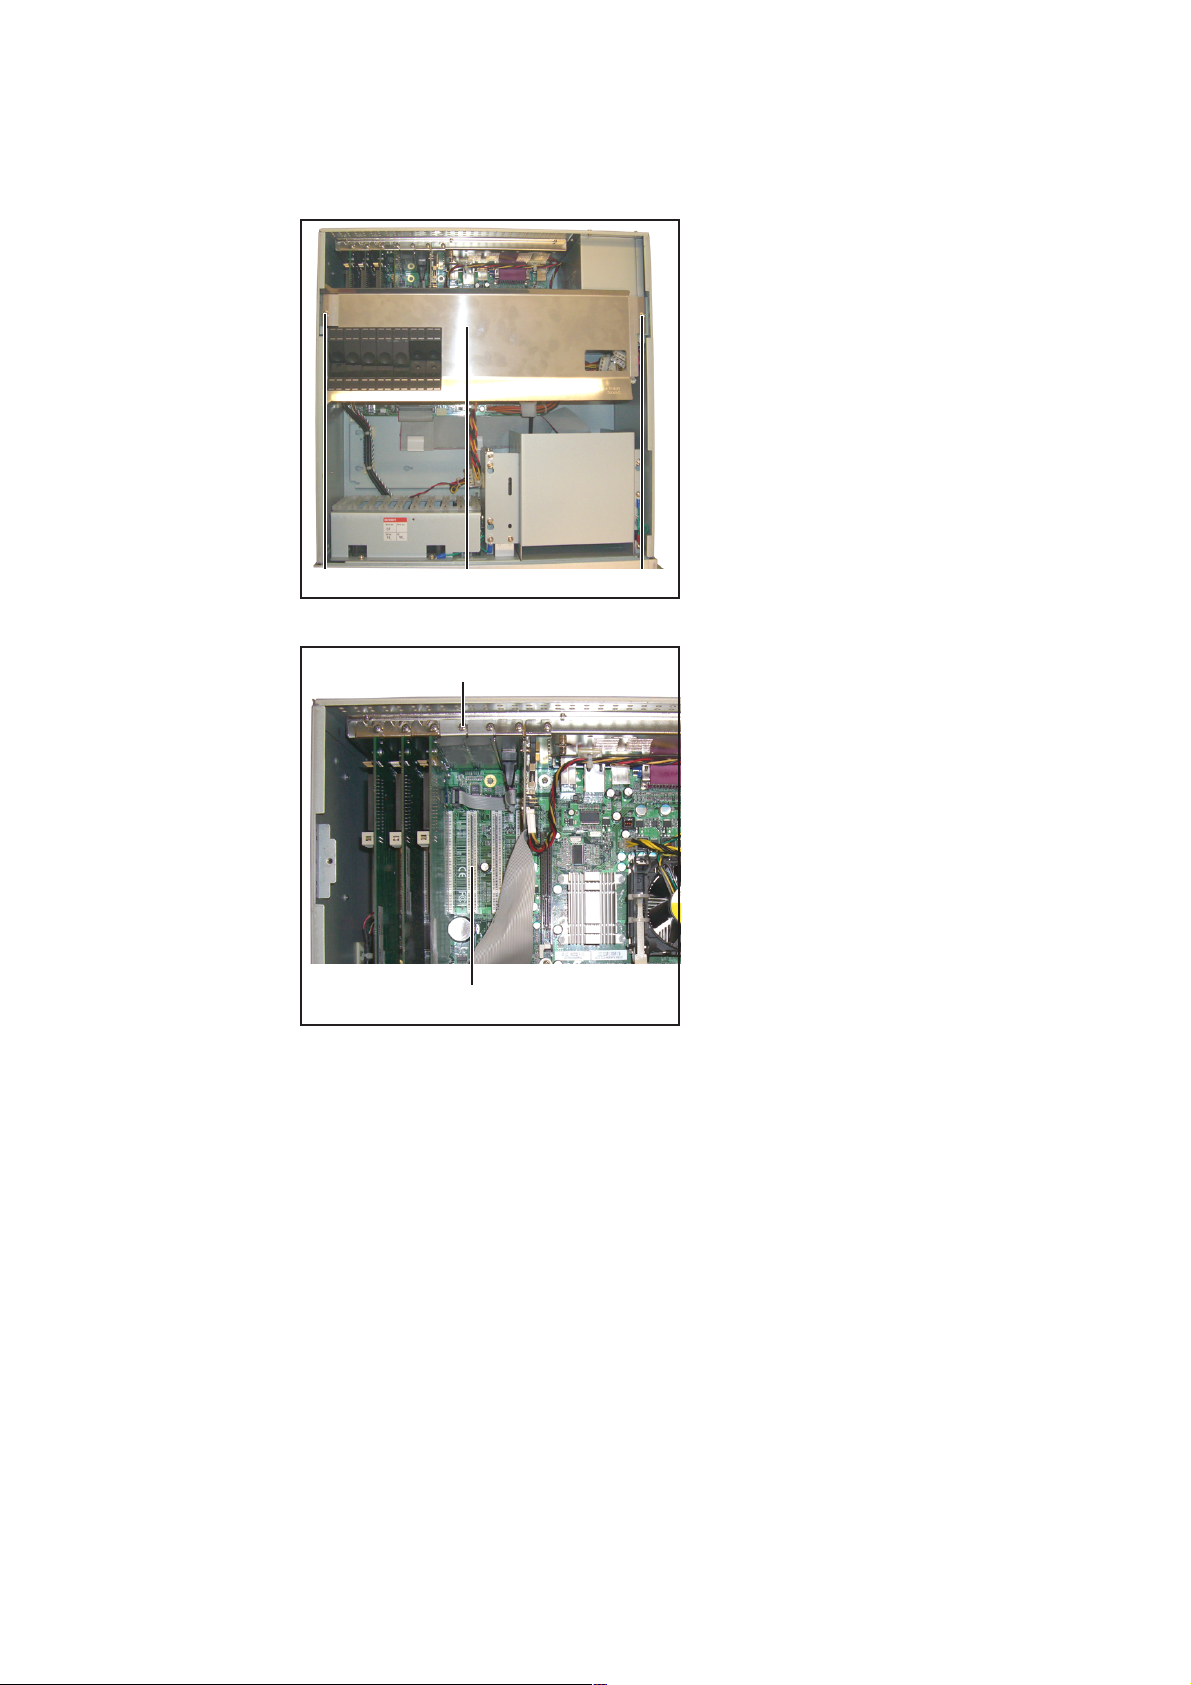
3. 2 Schrauben (1) lösen
4. Abdeckung (2) entfernen
(1)(2)
5. Schraube (3) der Blindabdeckung
lösen und Blindabdeckung entfernen
6. Profibus Interface-Karte in einen
beliebigen freien PCI-Steckplatz (4)
einstecken
7. Profibus Interface-Karte mittels
Schraube (3) befestigen
8. Abdeckung (2) mittels Schrauben (1)
befestigen
9. Deckel des Industrie-PCs montieren
10. Netzstecker einstecken
11. Industrie-PC hochfahren und als
Administrator anmelden (Benutzername: administrator, Standard-Kennwort:
blizzard)
Profibus
Interface-Karte
installieren
Profibus Interface-Karte einbauen
1. Windows Explorer öffnen (Rechte Maustaste auf „Start“ klicken - „Explorer“ öffnen)
2. „C:\\Blizzard.tsm“ doppelklicken
Es öffnet sich der System Manager der Software TwinCat
2
Page 5
Profibus
Interface-Karte
installieren
(Fortsetzung)
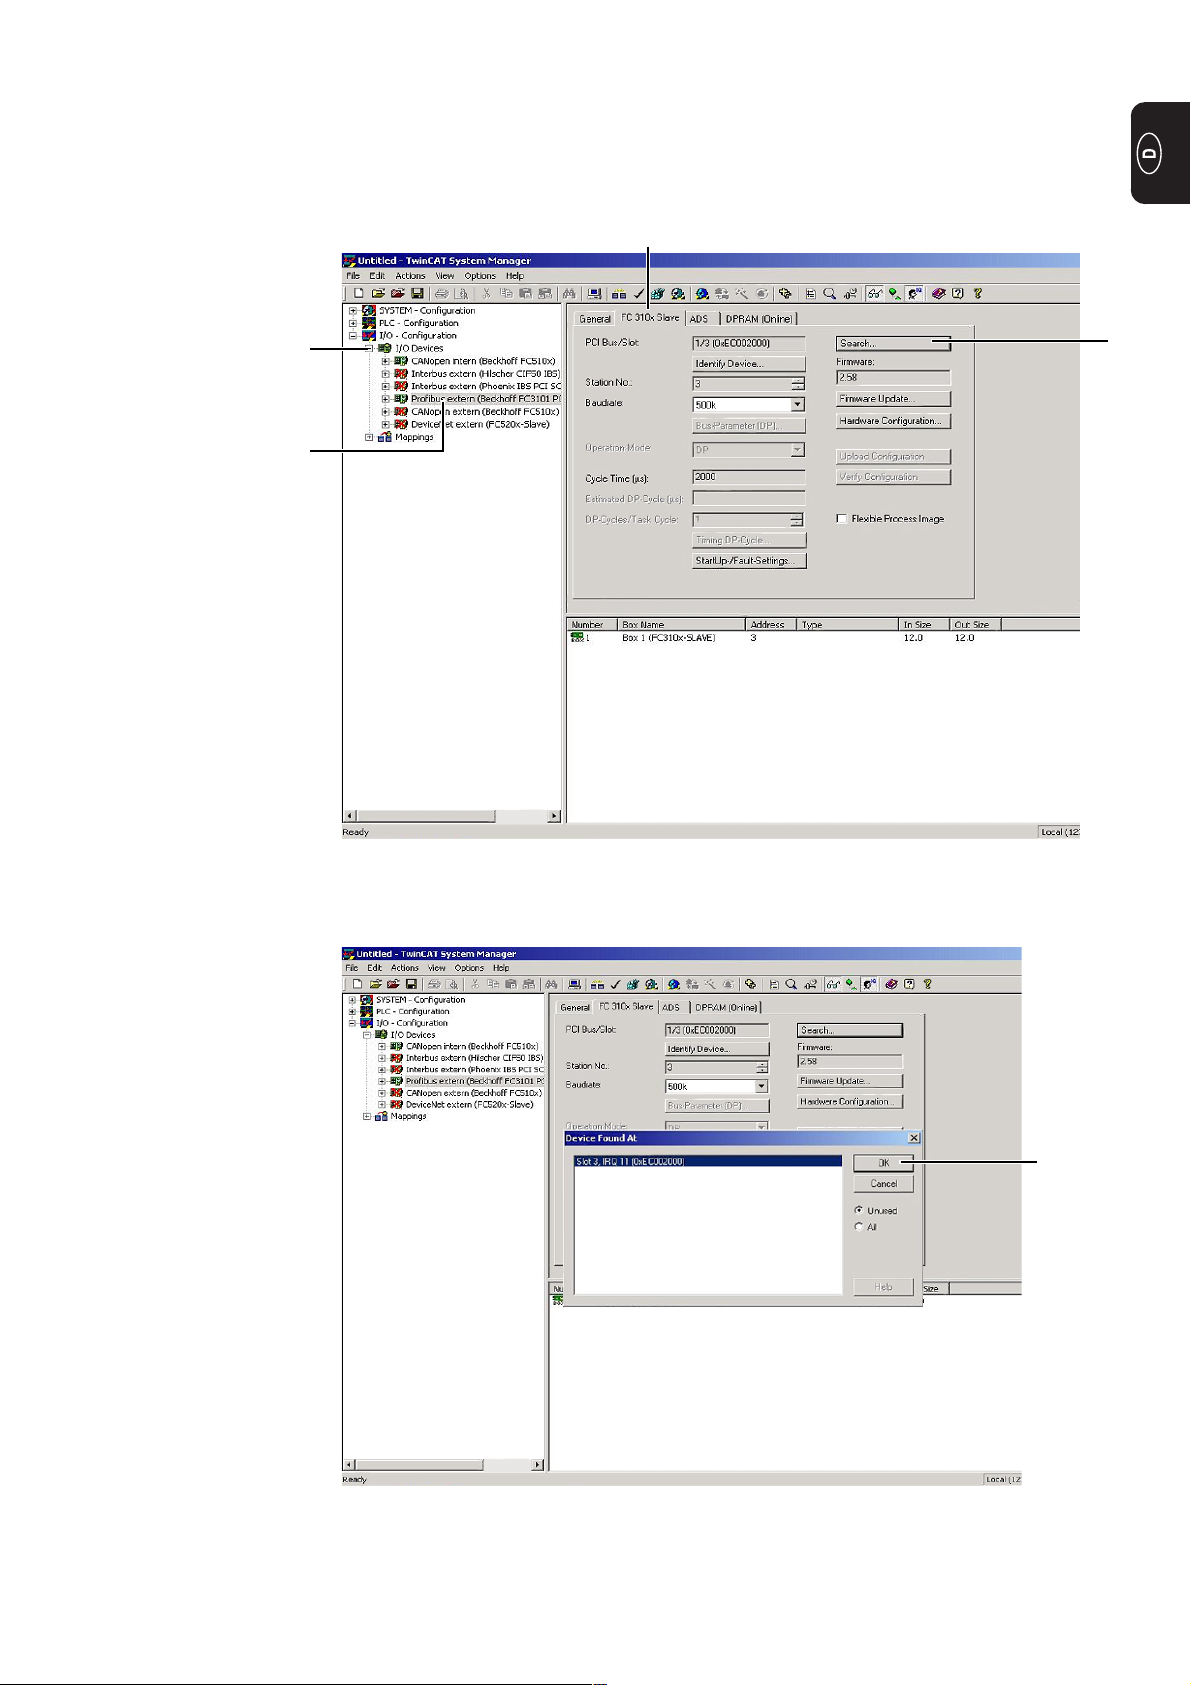
3. I/O Devices“ durch einen Klick auf das „+“-Symbol (1) öffnen
4. Profibus Interface-Karte (2) durch Klicken auswählen
5. Profibus Interface-Karte aktivieren (rechte Maustaste auf und „Disable“ abwählen)
6. Reiter „FC 310x Slave“ (3) öffnen
7. „Search“ (4) klicken
(3)
(1)
(2)
Die „Schnittstellen-Karte“ wird am entsprechenden Steckplatz gefunden (Bsp Slot 3) .
(4)
8. Die gefunde Interface-Karte durch einen Klick auf „OK“ (5) bestätigen
(5)
(5)
Wichtig! Es kann vorkommen, dass der Steckplatz der CAN-Karte ebenfalls erneut
gesucht werden muss.
3
Page 6

Profibus
Interface-Karte
installieren
(Fortsetzung)
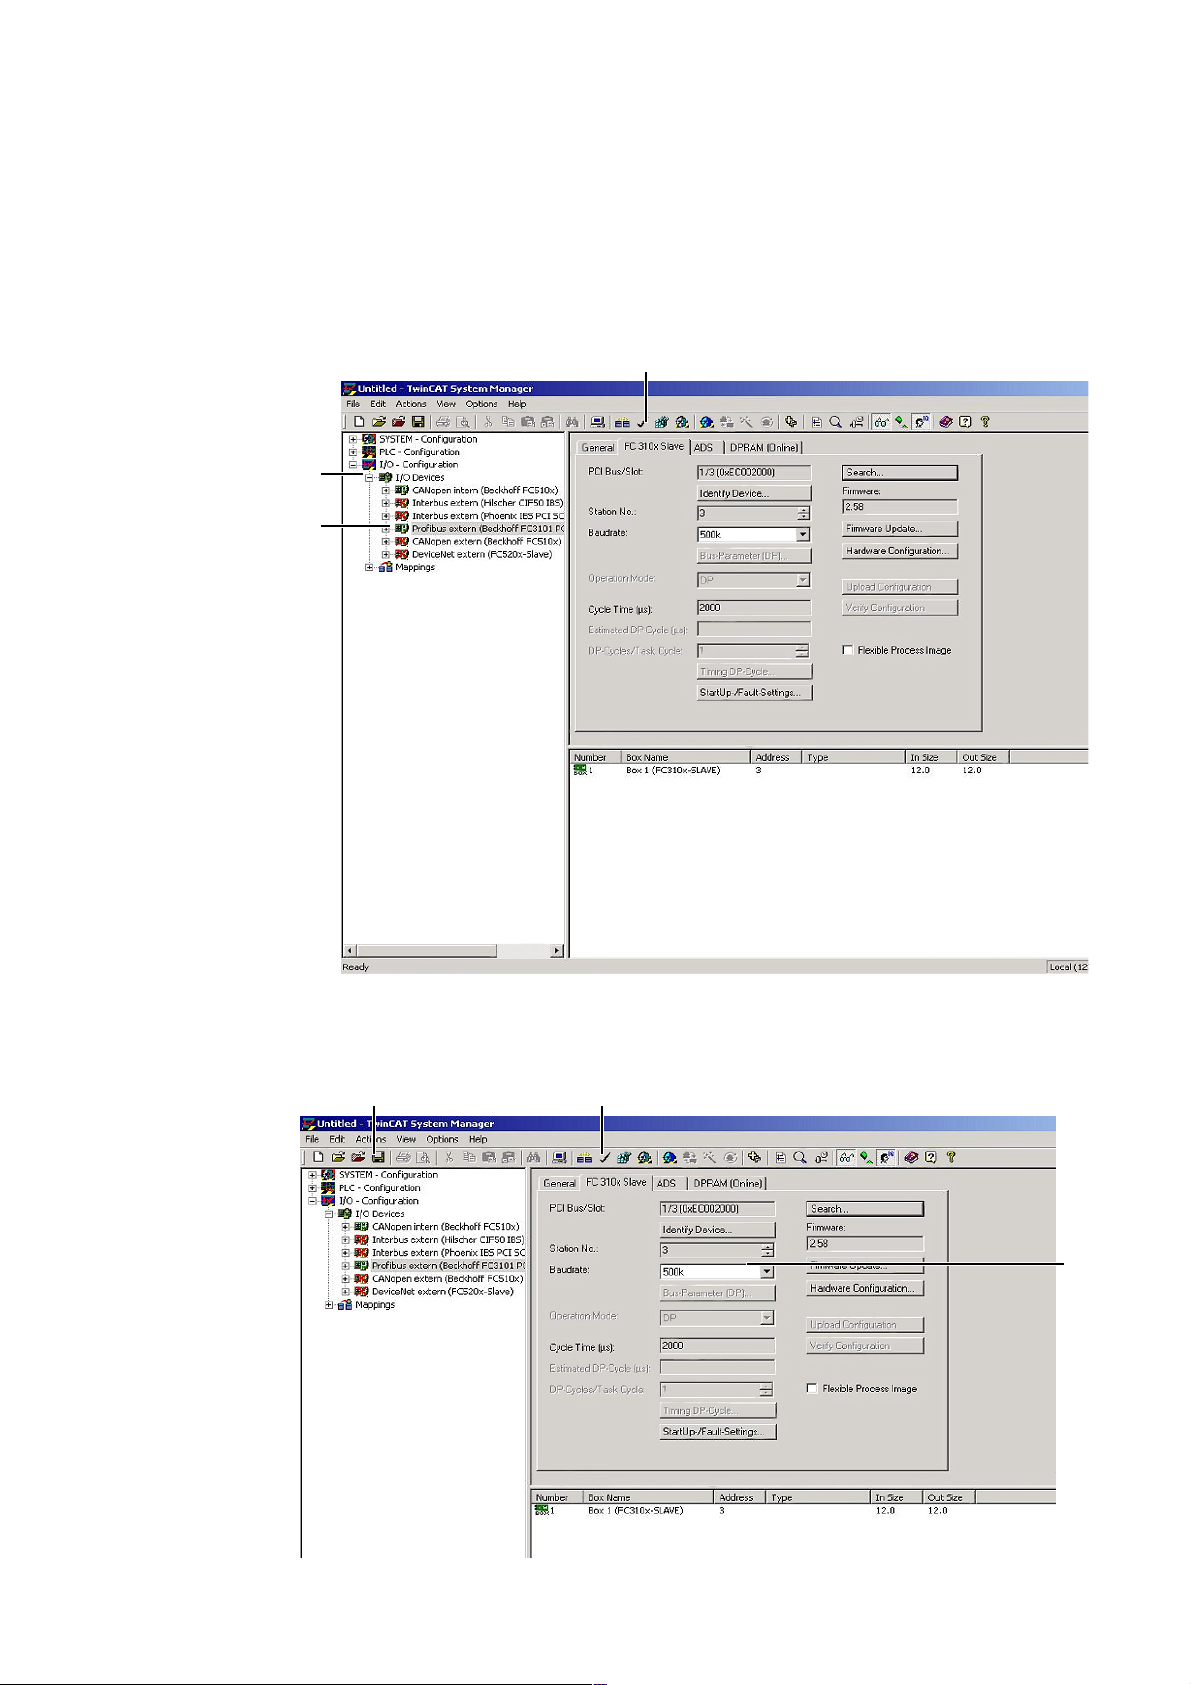
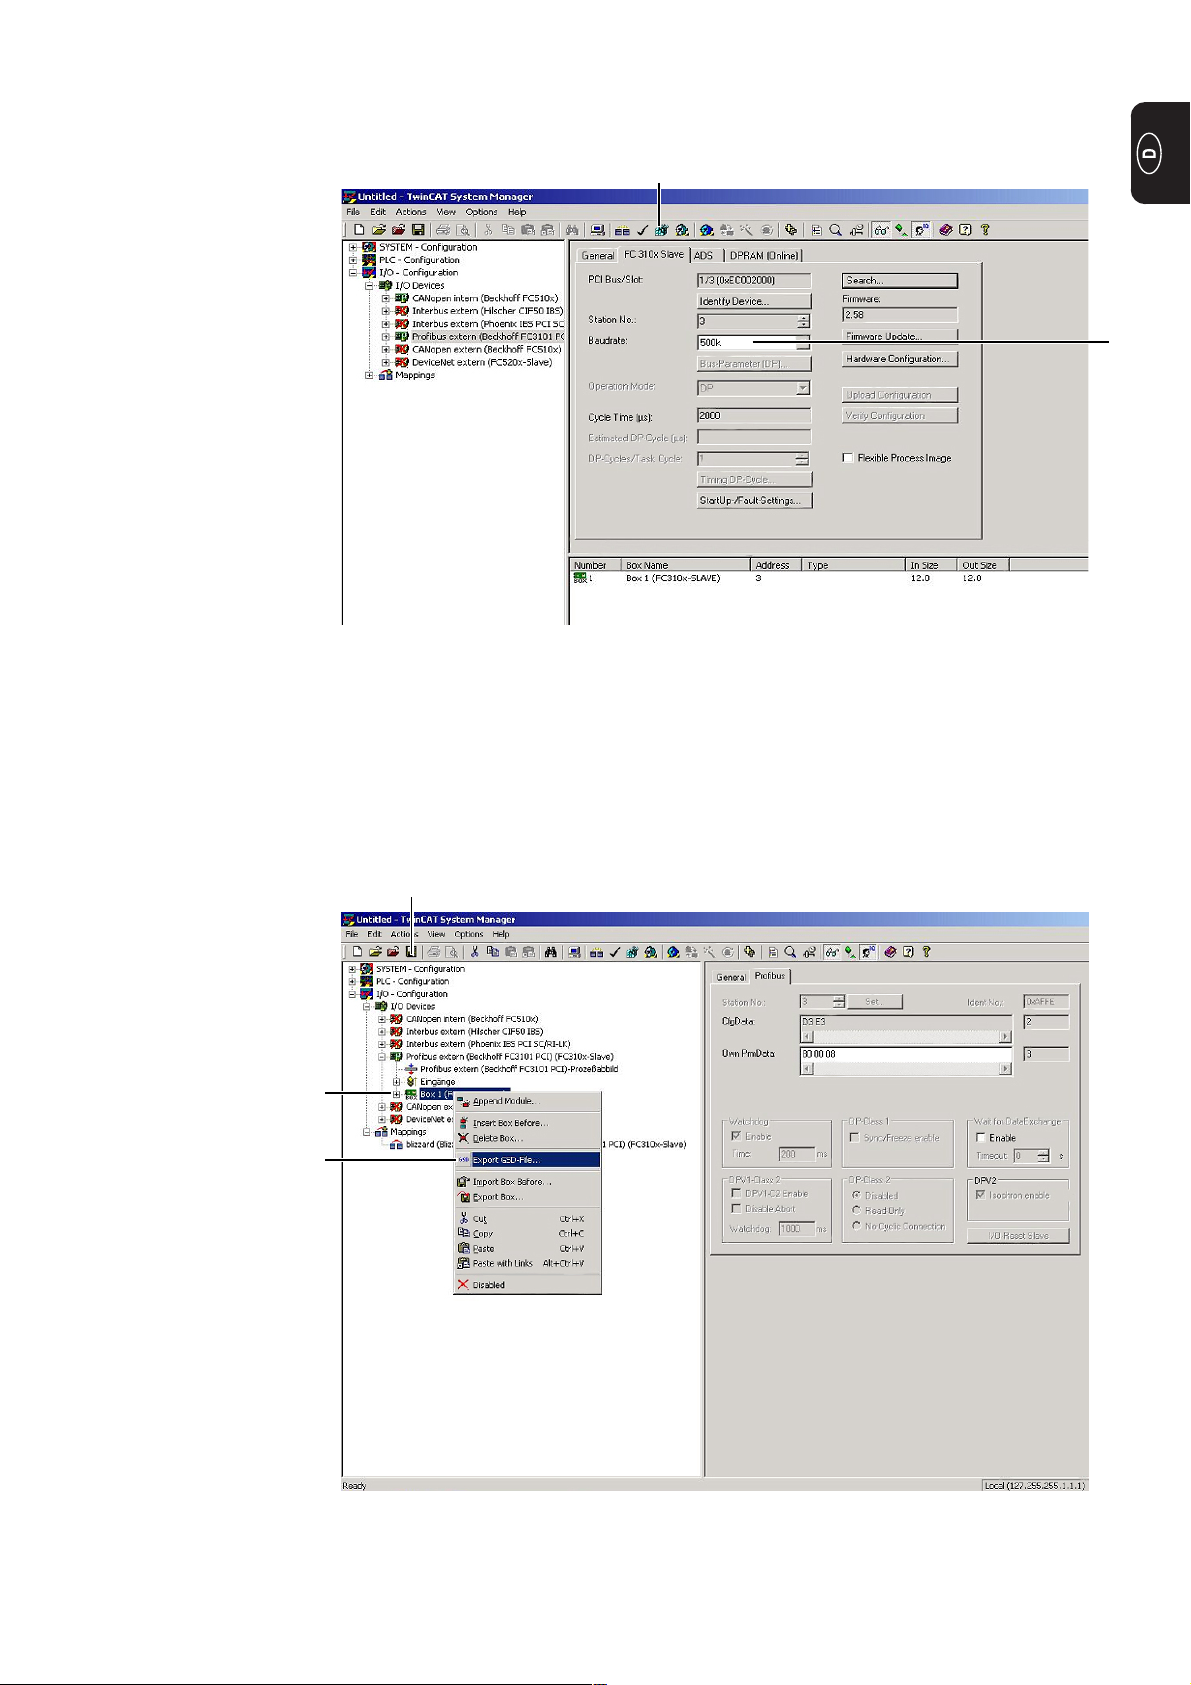
9. Benötigte Baudrate (6) einstellen
Der Wert für die Baudrate wird vom Roboter- oder Steuercomputer vorgegeben. Bei
Unklarheiten wenden Sie sich an der Steuerungs- oder Roboterprogrammierer.
10. Konfiguration übernehmen und TwinCat (7) in „Run“-Modus setzen (auf das Symbol
klicken)
(8)
(7)
(6)
Es öffnet sich ein Dialog mit einer Abfrage
11. Abfrage mit „Yes“ bestätigen
Es öffnen sich zwei weitere Dialoge
12. Beide Dialoge mit „OK“ beantworten
13. Auf „Box1“ mit der rechten Maustaste klicken und „Export GSD-File“ anwählen
14. Einstellungen durch einen Klick auf den Speicherbutton (8) speichern
Der Installations-Vorgang ist abgeschlossen, der System Manager der Software
TwinCat kann geschlossen werden.
15. Den Industrie PC ausschalten und beim nächsten Starten mit dem Standard-Login
anmelden
4
Page 7

Profibus-Verbindung testen
Benötigte Komponenten
„HMS PROFIBUS
DB Mastersimulator“ und RS 232
Kabel anschließen
- Laptop mit RS 232 Schnittstelle
- „HMS PROFIBUS DP Mastersimulator“ (Fronius-Empfehlung)
- RS 232 Kabel
- Installierte Profibus Interface-Karte im Industrie PC
- Installierte Software „HMS PROFIBUS DP Mastersimulator“ am Laptop
1. „HMS PROFIBUS DP Mastersimulator“ (1) am RS 232 Anschluss des Laptops
anschließen
2. RS 232 Kabel (2) am „HMS PROFIBUS DP Mastersimulator“ anschließen
(1)
(2)
„HMS PROFIBUS DP Mastersimulator“ anschließen
3. Zweites Ende des RS 232 Kabels am RS 232 Anschluss des Industrie-PCs anschließen
„HMS PROFIBUS DP Mastersimulator“ anschließen
5
Page 8
Vorbereitung
(Fortsetzung)
1. Industrie-PC hochfahren und als Administrator anmelden (Benutzername: admininistrator, Standard-Kennwort: blizzard)
2. Windows Explorer öffnen (STRG + E)
3. „C:\\Blizzard.tsm“ doppelklicken
Es öffnet sich der System Manager der Software TwinCat
7. „I/O Devices“ durch einen Klick auf das „+“-Symbol (1) öffnen
8. Profibus Interface-Karte (2) durch Klicken auswählen
9. Reiter „FC 310x Slave“ (3) öffnen
(3)
(1)
(2)
10. Baudrate auf 19,2k einstellen (4)
11. Konfiguration übernehmen und TwinCat (5) in „Run“-Modus setzen (auf das Symbol
klicken)
(6)
(5)
(4)
6
Page 9
Vorbereitung
(Fortsetzung)
Es öffnet sich ein Dialog mit einer Abfrage
12. Abfrage mit „Yes“ bestätigen
Es öffnen sich zwei weitere Dialoge
13. Beide Dialoge mit „OK“ beantworten
14. Einstellungen durch einen Klick auf den Speicherbutton (6) speichern
Profibus-Verbindung testen
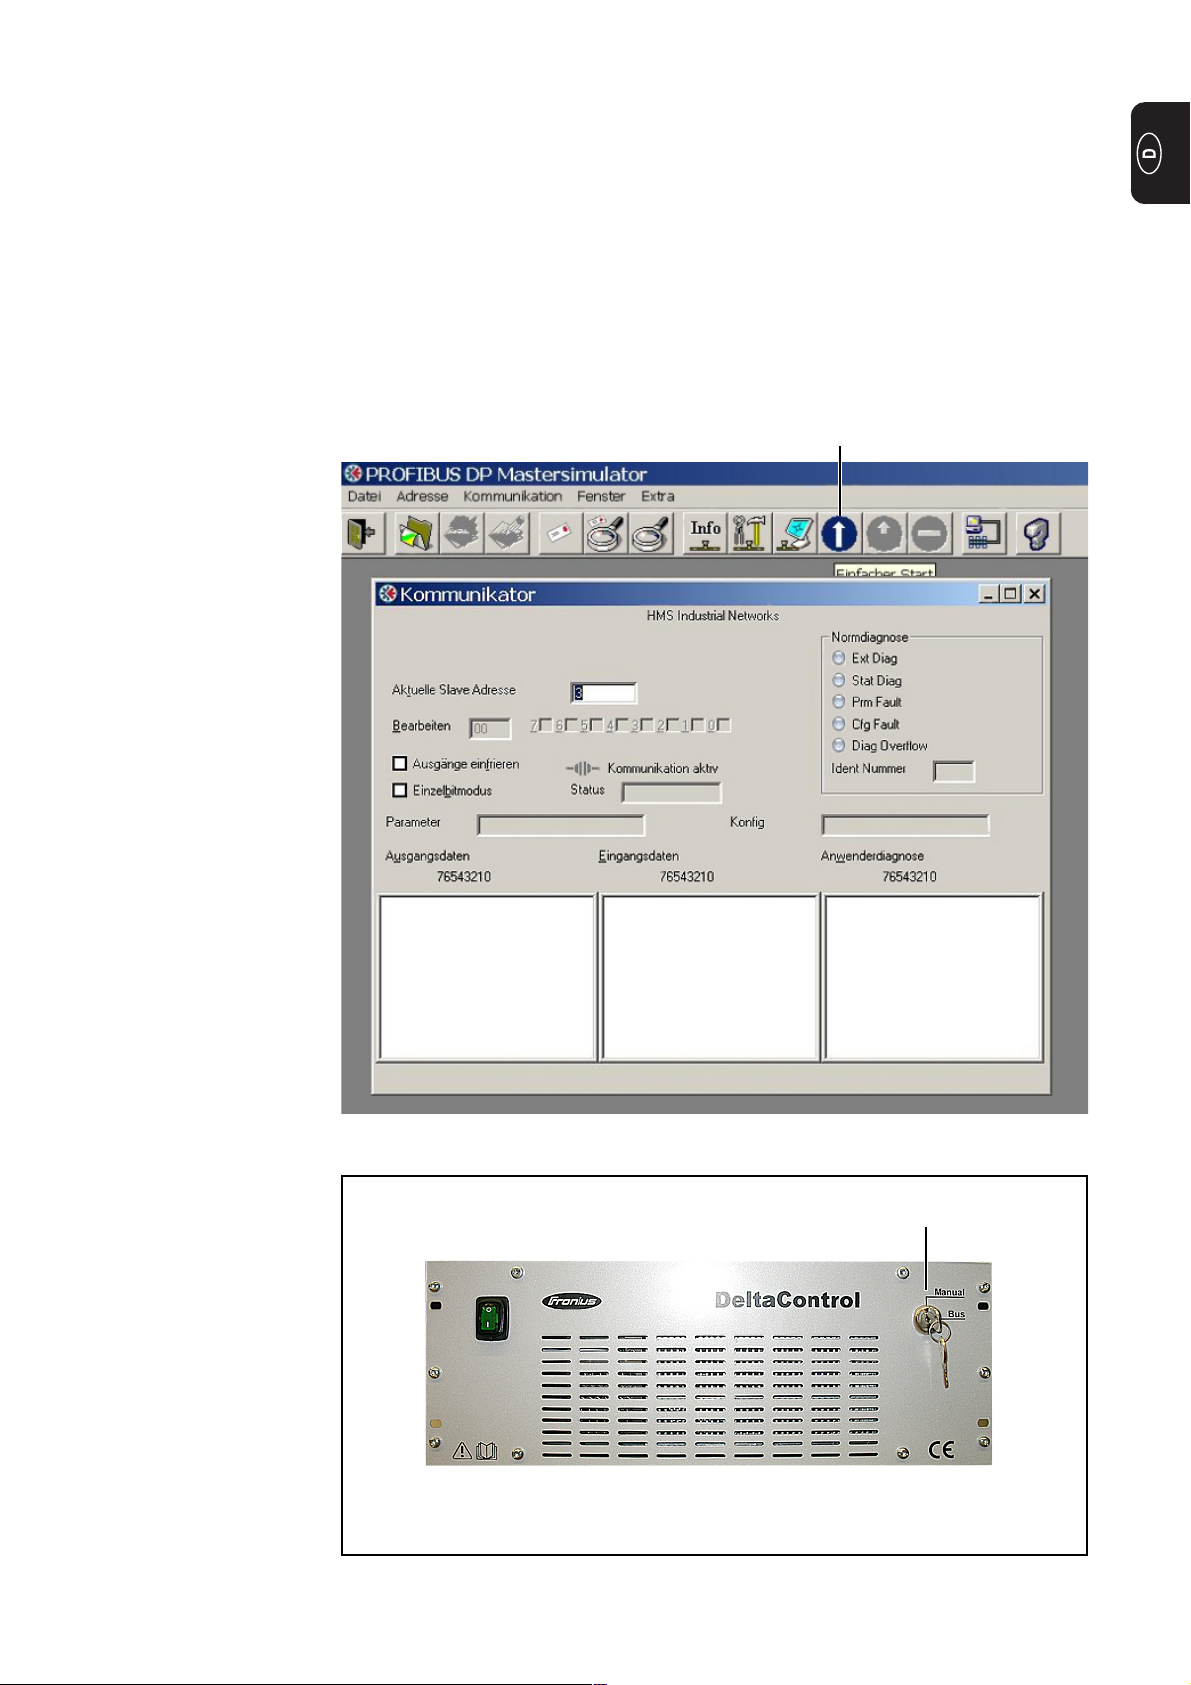
1. Software „HMS PROFIBUS DP Mastersimulator“ am Laptop starten
2. Auf das Symbol „Einfacher Start“ (1) klicken
(1)
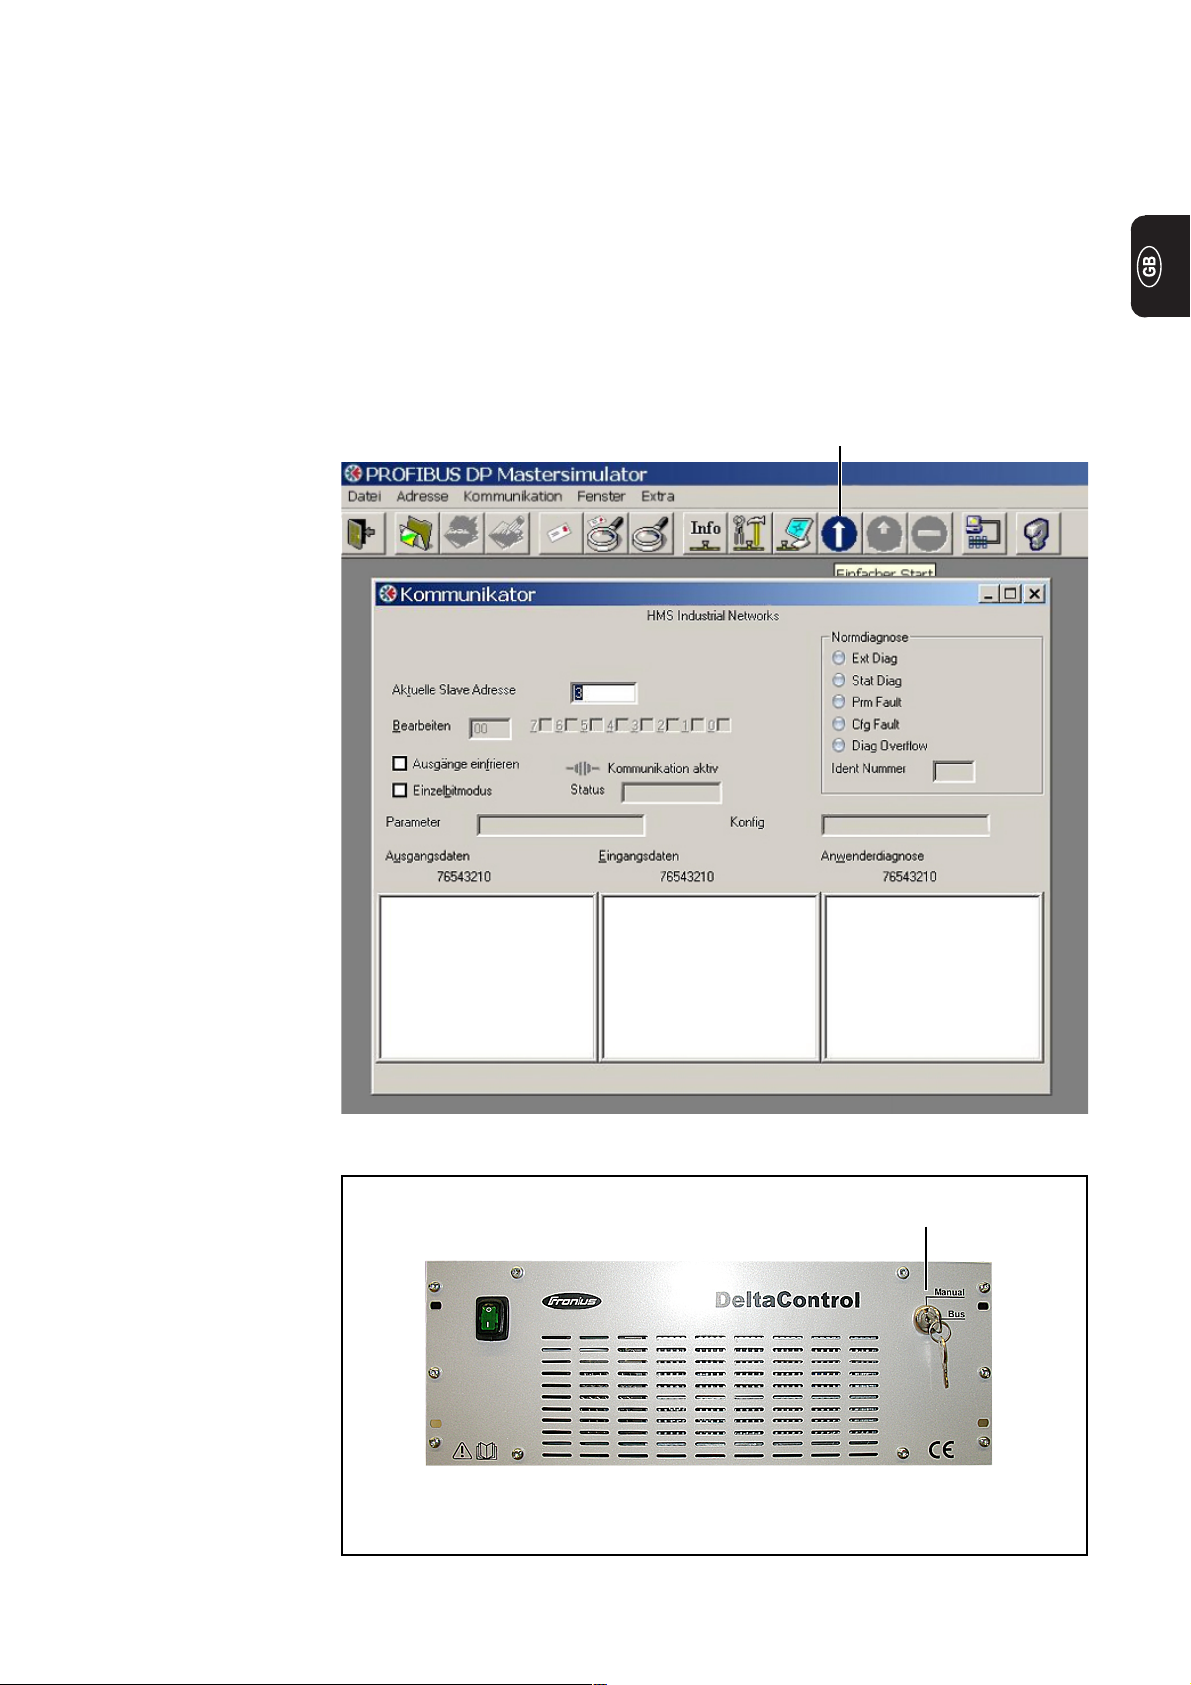
3. Schlüsselschalter am DeltaControl auf „Manual“ (2) stellen
Schlüsselschalter auf „Manual“ stellen
7
(2)
Page 10

dung testen
(Fortsetzung)
4. Im „HMS PROFIBUS DP Mastersimulator“ ein Bit von „0“ auf „1“ setzen (3)Profibus-Verbin-
(3)
Ist die Verbindung in Ordnung, wird im Xplorer - Diagnose Arbeitsblatt „start homing
automatic“ auf „1“ gesetzt (4)
(4)
8
Page 11
Abschließende
Tätigkeiten
1. Baudrate beim Anlagenbetreiber erfragen und einstellen (1 - Beispiel „500k“)
2. Konfiguration übernehmen und TwinCat (2) in „Run“-Modus setzen (auf das Symbol
klicken)
(2)
Es öffnet sich ein Dialog mit einer Abfrage
(1)
3. Abfrage mit „Yes“ bestätigen
Es öffnen sich zwei weitere Dialoge
4. Beide Dialoge mit „OK“ beantworten
5. Auf „Box1“ (4) mit der rechten Maustaste klicken und „Export GSD-File“ (5) anwählen
6. Einstellungen durch einen Klick auf den Speicherbutton (3) speichern
(3)
(4)
(5)
Die Profibusverbindung ist einsatzbereit.
9
Page 12

10
Page 13

General remarks
Safety
General
Scope of supply
WARNING! Work performed incorrectly can cause serious injury to people and
damage to property. This installation must only be carried out by trained and
qualified personnel. Observe the safety rules in the DeltaSpot operating instructions and the accompanying literature from Beckhoff.
The installation of the Profibus interface card is required for data transfer from the robot
to the gun controller.
(1) Profibus interface card
(1)
Profibus interface card
Tools required - Medium Phillips screwdriver (PH2)
1
Page 14

Inserting and installing the Profibus interface card
Profibus
Inserting the
interface card
(1)
Removing the cover
(3)
1. Remove the industrial PC mains plug
2. Remove the cover of the industrial PC
3. Undo two screws (1)
4. Remove cover (2)
(1)(2)
5. Undo the blanking cover screws (3)
and remove blanking cover
6. Insert the Profibus interface card into
any free PCI slot (4)
7. Fasten the Profibus interface card
using screw (3)
8. Fasten the cover (2) using screws (1)
9. Put the cover of the industrial PC
back on
10. Plug in the mains plug
11. Boot up the industrial PC and log on
as administrator (username: administrator, standard password: blizzard)
Profibus
Installing the
interface card
(4)
Installing the Profibus interface card
1. Open Windows Explorer (right click on „Start“, „Explorer“)
2. Double click on „C:\\Blizzard.tsm“
The TwinCat System Manager will open
2
Page 15
Profibus
Installing the
interface card
(continued)
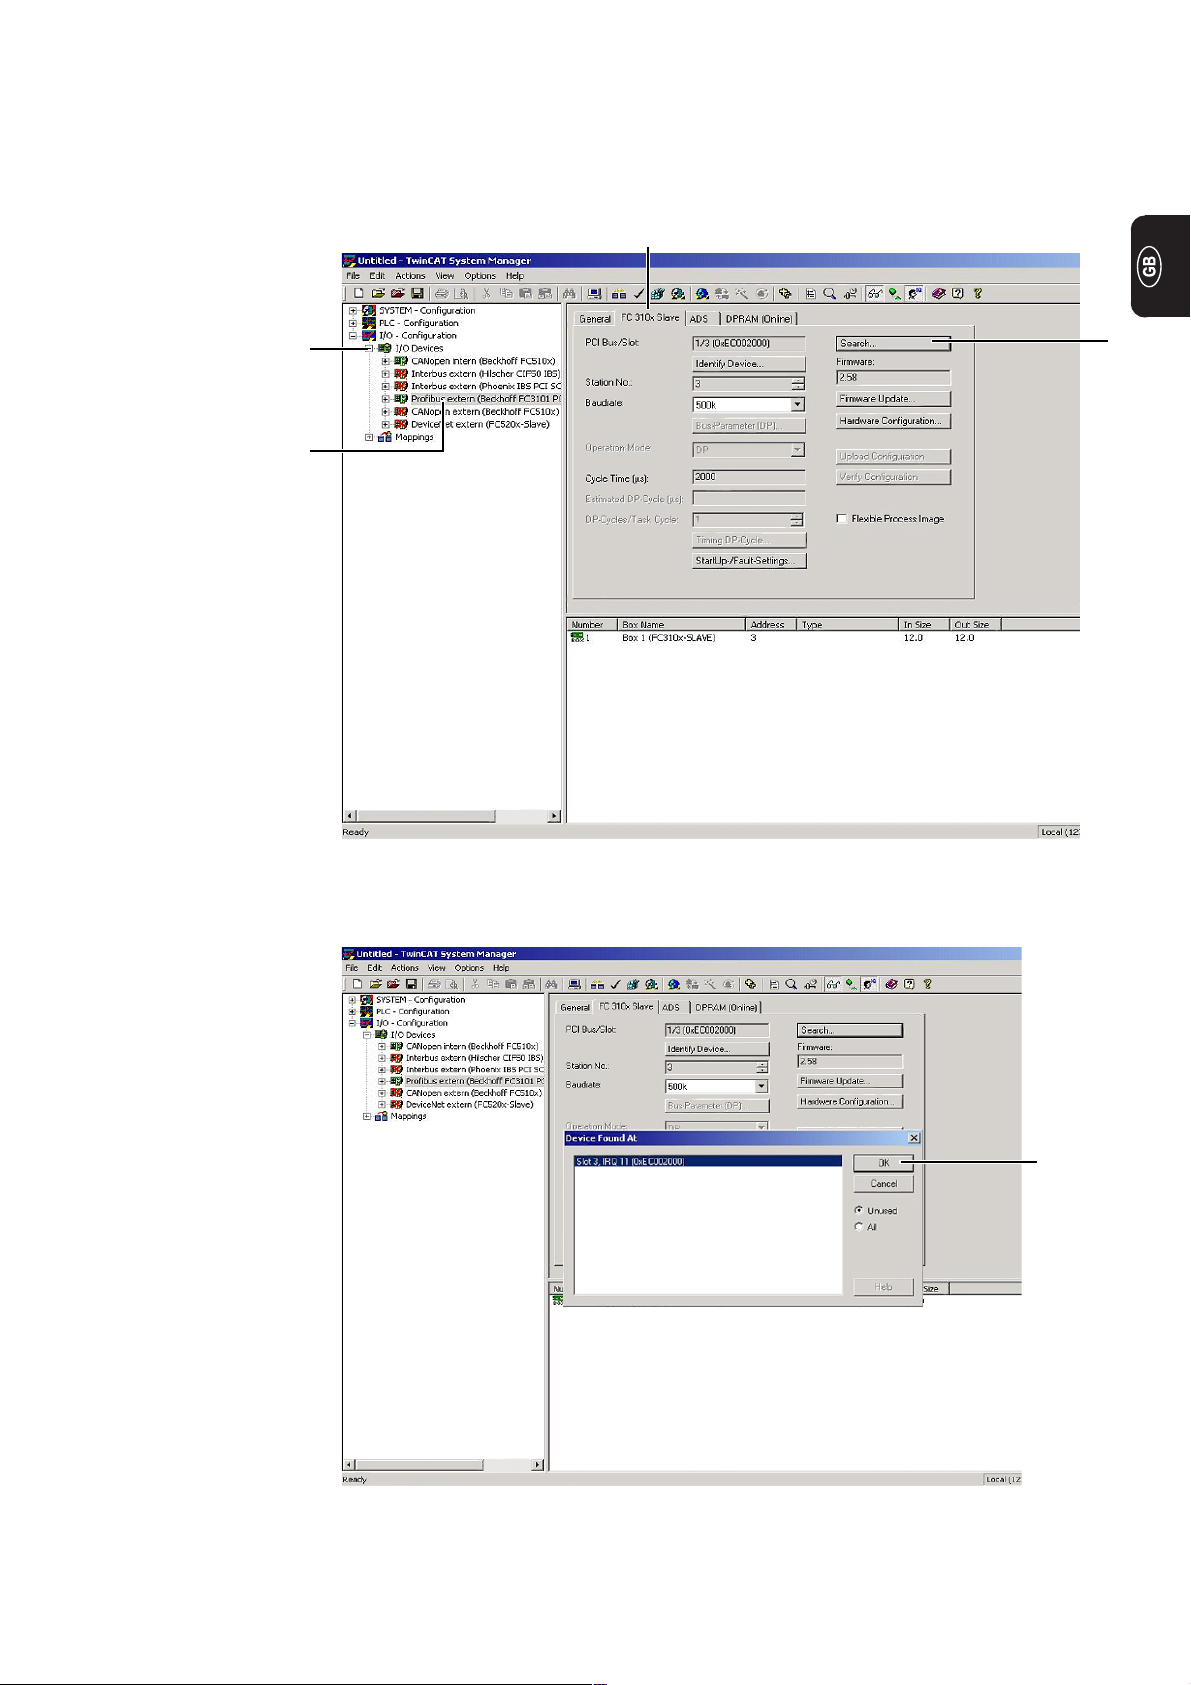
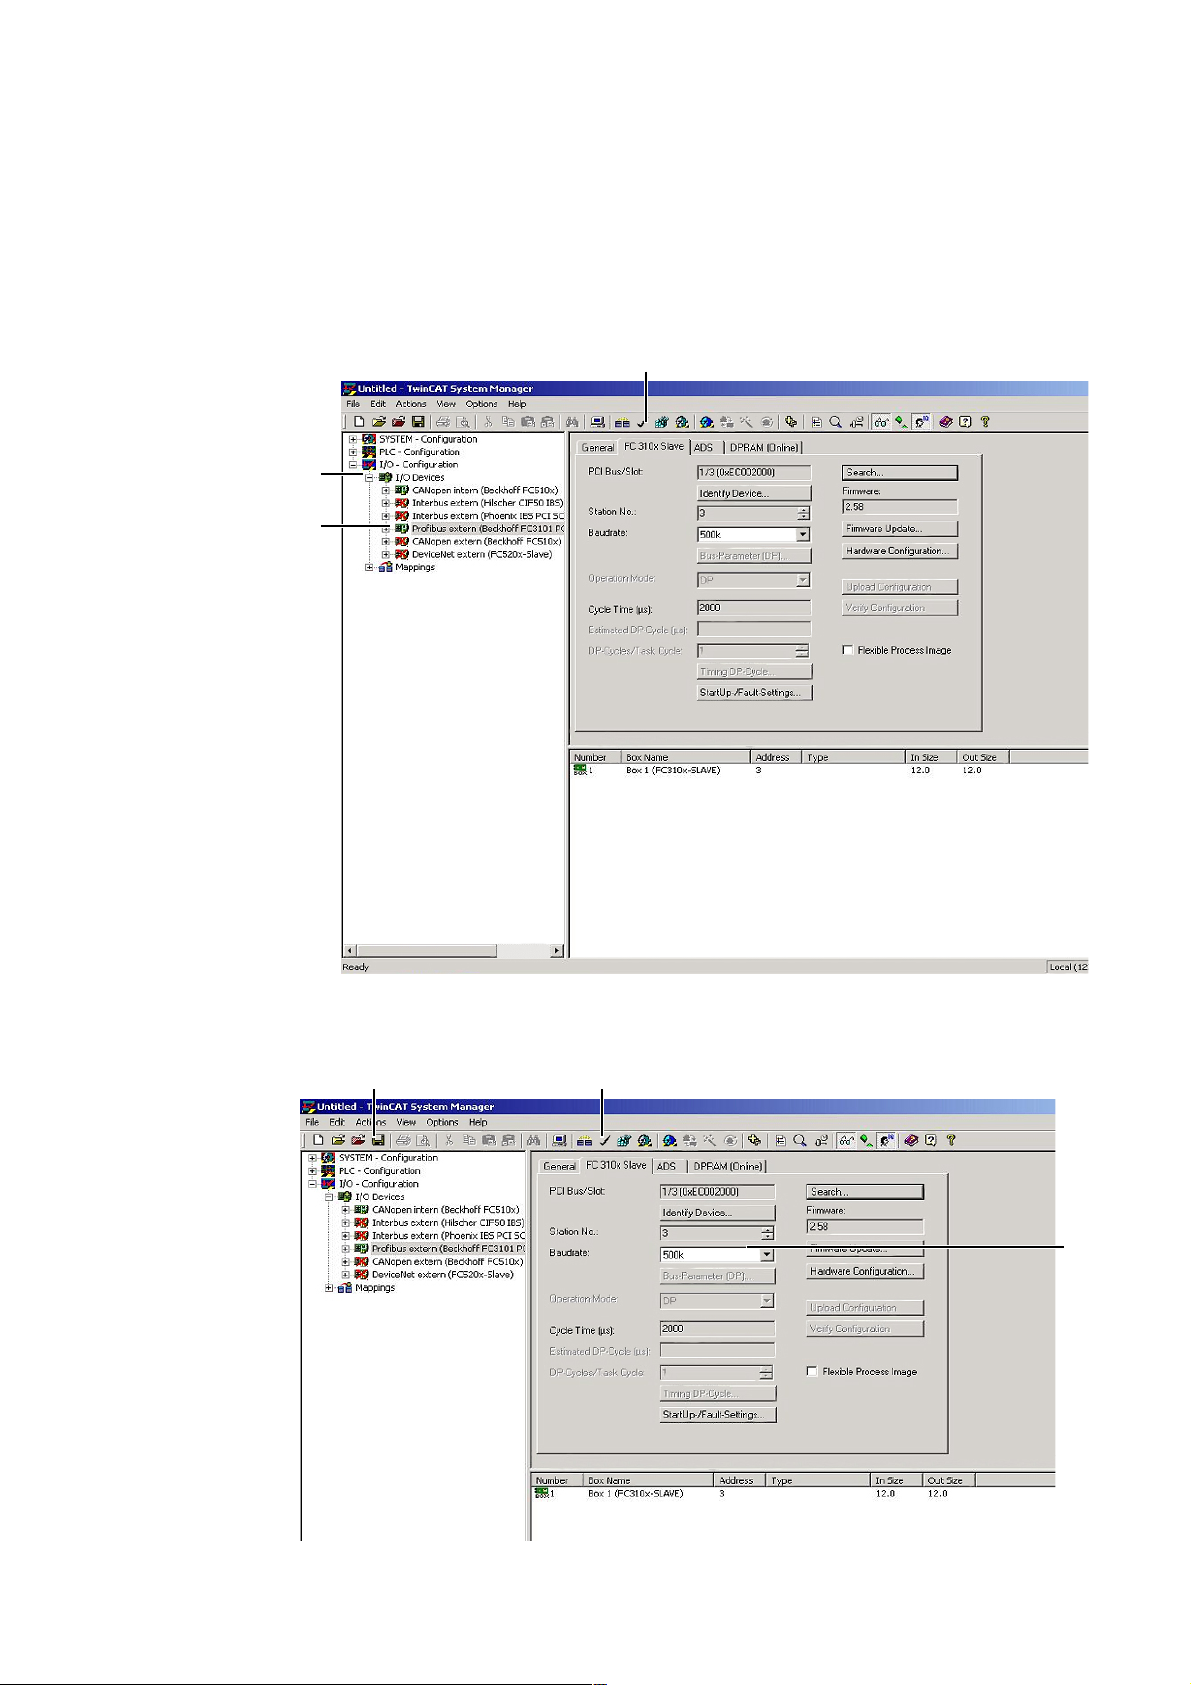
3. Open „I/O devices“ by clicking on the „+“ symbol (1)
4. Select Profibus interface card (2) by clicking
5. Activate Profibus interface card (right click and uncheck „Disable“)
6. Click on the „FC 310x Slave“ tab (3)
7. Click on „Search“ (4)
(3)
(1)
(2)
The interface card is found in the relevant slot (e.g. slot 3).
(4)
8. Confirm the found interface card by clicking on „OK“ (5)
(5)
(5)
Important! It sometimes happens that you will need to search for the CAN card’s
slot again.
3
Page 16

Profibus
Installing the
interface card
(continued)
9. Set the required baud rate (6)
The value for the baud rate is determined by the robot or control computer. If
anything is unclear consult the robot or control computer programmer(s).
10. Accept configuration and set TwinCat (7) to „Run“ mode (click on the symbol)
(8)
(7)
(6)
A dialog box will open with a prompt
11. Click on „Yes“
Two more dialog boxes will open
12. Confirm both with „OK“
13. Right click on „Box1“ and select „Export GSD file“
14. Save settings by clicking on the Save button (8)
The installation process is complete, the TwinCat System Manager can be closed.
15. Switch off the industrial PC and login using your standard login on the next startup
4
Page 17
Testing the Profibus connection
Components
required
Connecting HMS
PROFIBUS DP
Mastersimulator
and RS 232 cable
- Laptop with RS 232 interface
- „HMS PROFIBUS DP Mastersimulator“ (Fronius recommendation)
- RS 232 cable
- Industrial PC with Profibus interface card installed
- „HMS PROFIBUS DP Mastersimulator“ software installed on laptop
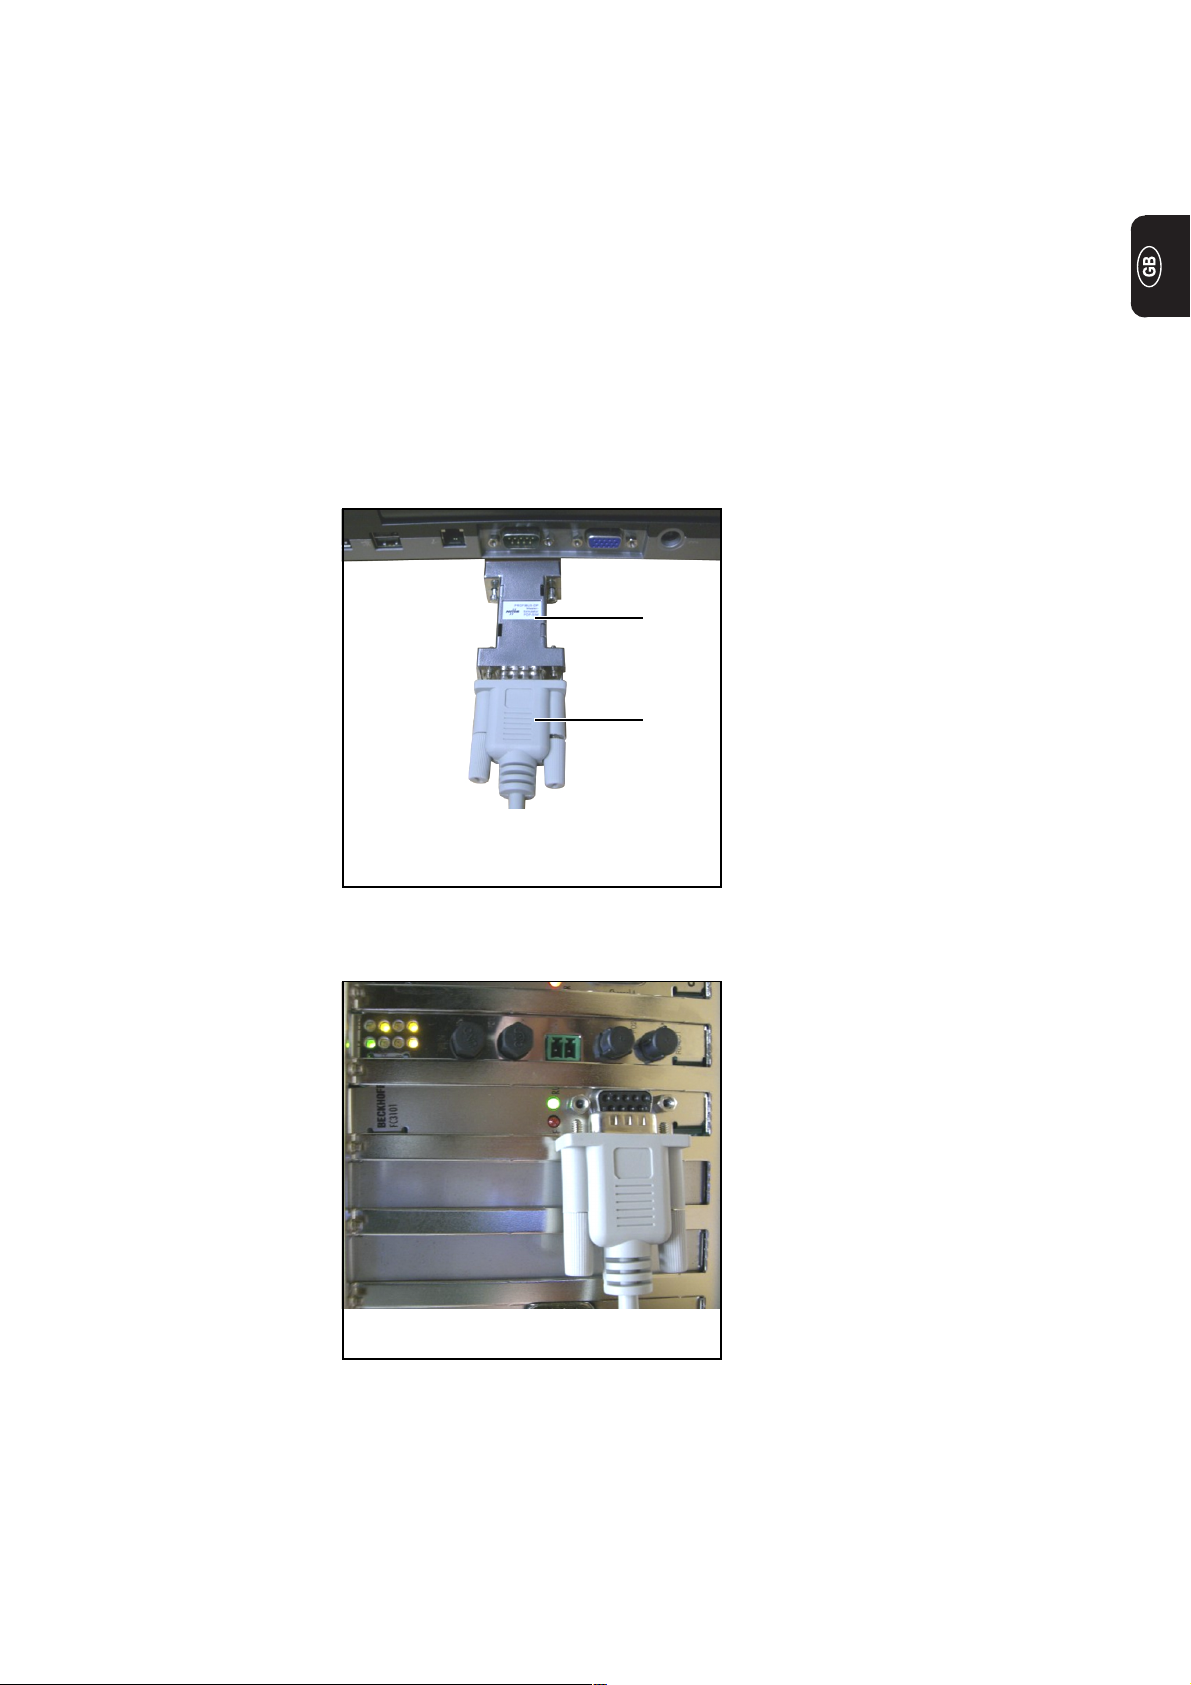
1. Connect the HMS PROFIBUS DP Mastersimulator (1) to the RS 232 port on the
laptop
2. Connect the RS 232 cable (2) to the HMS PROFIBUS DP Mastersimulator
(1)
(2)
Connecting the HMS PROFIBUS DP Mastersimulator
3. Connect the second end of the RS 232 cable to the RS 232 port of the industrial PC
Connecting the HMS PROFIBUS DP Mastersimulator
5
Page 18
Preparations
(continued)
1. Boot up the industrial PC and log on as administrator (username: administrator,
standard password: blizzard)
2. Open Windows Explorer (Windows key+E)
3. Double click on „C:\\Blizzard.tsm“
The TwinCat System Manager will open
7. Open „I/O devices“ by clicking on the „+“ symbol (1)
8. Select Profibus interface card (2) by clicking
9. Click on the „FC 310x Slave“ tab (3)
(3)
(1)
(2)
10. Set baud rate to 19.2k (4)
11. Apply configuration and set TwinCat (5) to „Run“ mode (click on the symbol)
(6)
(5)
(4)
6
Page 19
Preparations
(continued)
A dialog box will open with a prompt
12. Click on „Yes“
Two more dialog boxes will open
13. Confirm both with „OK“
14. Save settings by clicking on the Save button (6)
Testing the
Profibus connection
1. Start the „HMS PROFIBUS DP Mastersimulator“ software on the laptop
2. Click on the „Einfacher Start“ (Quick start) symbol (1)
(1)
3. Set keylock switch on DeltaControl to „Manual“ (2)
Setting keylock switch to „Manual“
7
(2)
Page 20

Profibus connection
(continued)
4. Set a bit from 0 to 1 in the „HMS PROFIBUS DP Mastersimulator“ (3)Testing the
(3)
If the connection is working, the „start homing automatic“ diagnostic worksheet in
Xplorer is set to 1 (4)
(4)
8
Page 21
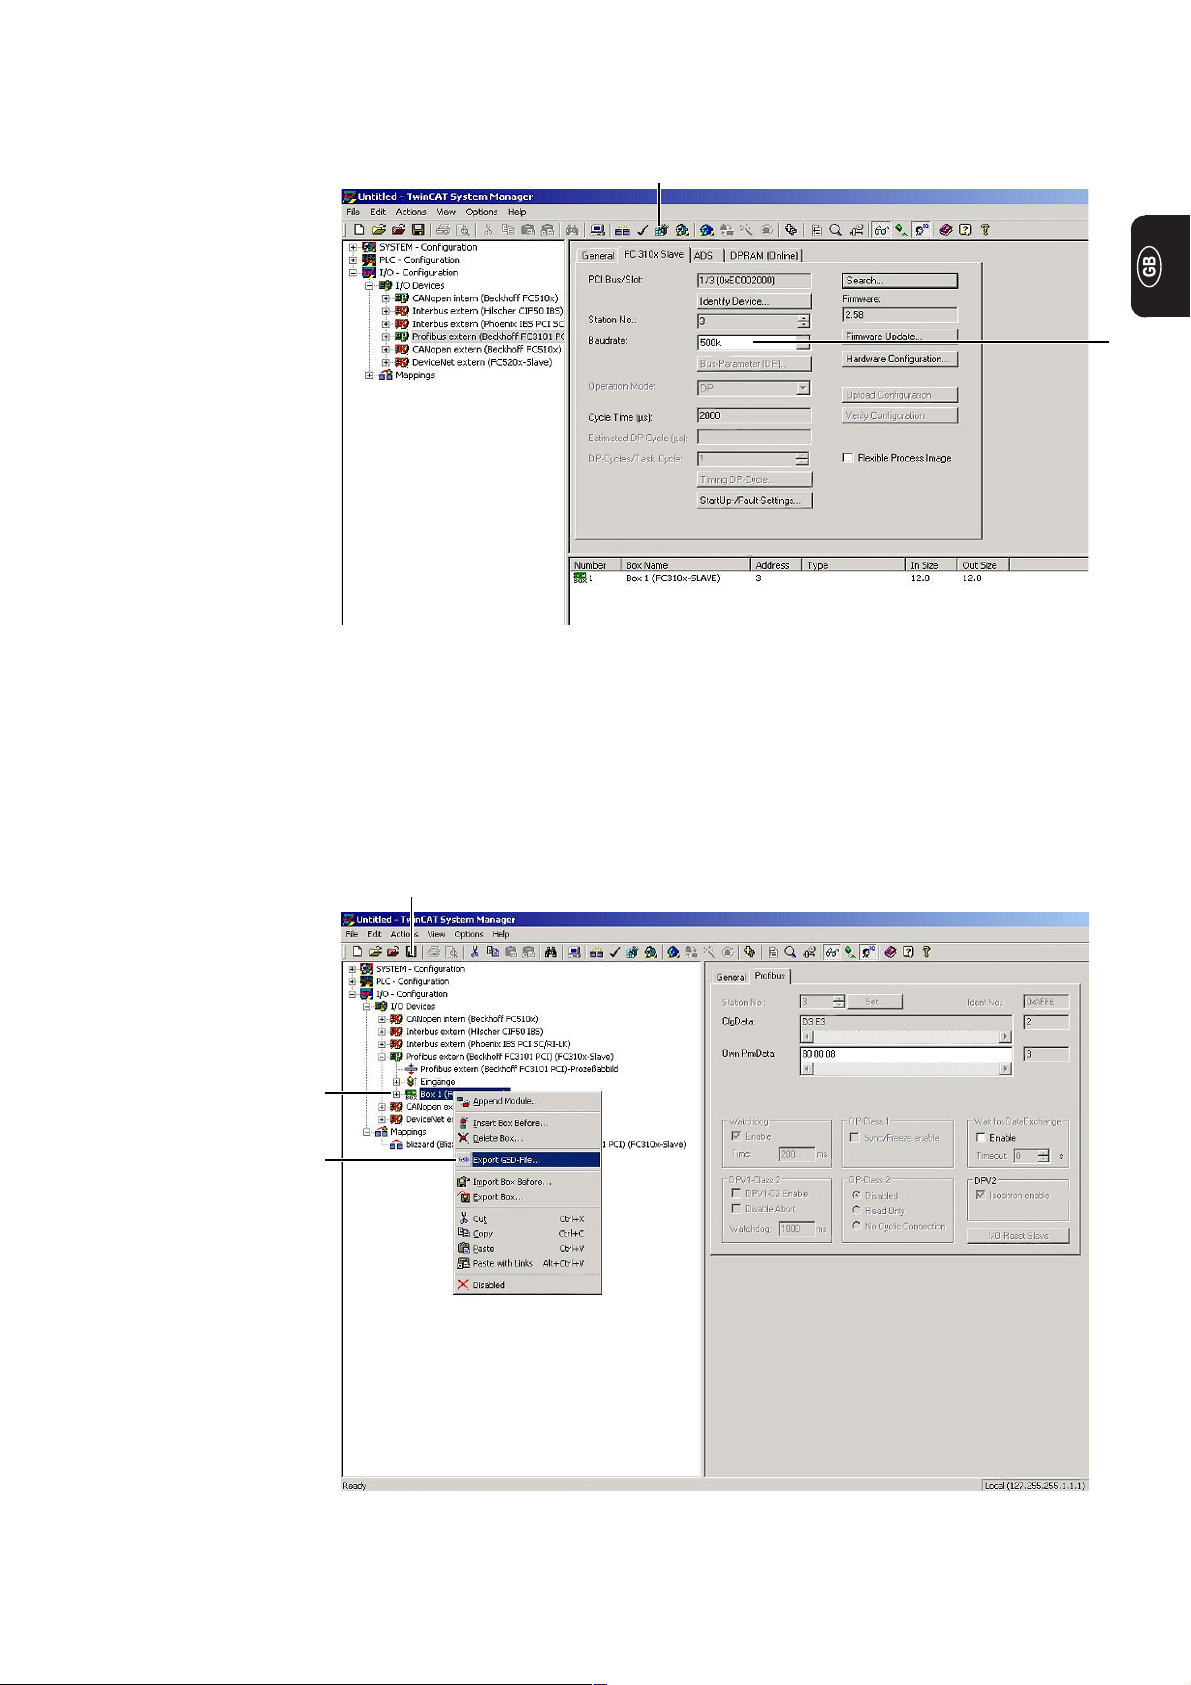
Finally... 1. Ask your system administrator for your baud rate and set it (1 - example 500k)
2. Apply configuration and set TwinCat (2) to „Run“ mode (click on the symbol)
(2)
A dialog box will open with a prompt
(1)
3. Click on „Yes“
Two more dialog boxes will open
4. Confirm both with „OK“
5. Right click on „Box1“ (4) and select „Export GSD file“ (5)
6. Save settings by clicking on the Save button (3)
(3)
(4)
(5)
The Profibus connection is ready.
9
Page 22

10
Page 23

Généralités
Sécurité
Généralités
Livraison
AVERTISSEMENT ! Les erreurs en cours d’opération peuvent entraîner des
dommages corporels et matériels graves. Ce montage doit être effectué exclusivement par du personnel qualifié et formé ! Respectez les consignes de sécurité
des Instructions de service DeltaSpot et de la lettre d’accompagnement de la
société Beckhoff.
L’installation de la carte interface Profibus est indispensable pour la transmission des
données du robot à la commande de la pince.
(1) Carte interface Profibus
(1)
Carte interface Profibus
Outils requis - Tournevis cruciforme moyen (taille PH2)
1
Page 24

Monter et installer la carte interface Profibus
Profibus
Monter la carte
interface
(1)
Retirer le cache
(3)
1. Débrancher la fiche secteur du PC
industriel
2. Retirer le capot du PC industriel
3. Desserrer les 2 vis (1)
4. Retirer le cache (2)
(1)(2)
5. Dévisser la vis (3) de l’obturateur et
retirer ce dernier
6. Brancher la carte interface Profibus
sur un quelconque emplacement PCI
libre (4)
7. Fixer la carte interface Profibus à
l’aide la vis (3)
8. Fixer le cache (2) avec les vis (1)
9. Remonter le capot du PC industriel
10. Brancher la fiche secteur
11. Démarrer le PC industriel et
s’enregistrer en tant qu’administrateur
(Nom utilisateur : administrator, Mot
de passe standard : blizzard)
(4)
Profibus
Installer la carte
interface
Monter la carte interface Profibus
1. Ouvrir Windows Explorer (touche droite de la souris, cliquer sur « Démarrer » - ouvrir
« Explorer »)
2. Double-cliquer sur « C:\\Blizzard.tsm »
Le System Manager du logiciel TwinCat s’ouvre alors
2
Page 25

Profibus
Installer la carte
interface
(suite)
3. Ouvrir « I/O Devices » en cliquant sur le symbole « + » (1)
4. Sélectionner la carte interface Profibus (2) en cliquant
5. Activer la carte interface Profibus (touche droite de la souris et désélectionner «
Disable » (Désélectionner))
6. Ouvrir le cavalier « FC 310x Slave » (3)
7. Cliquer sur « Rechercher » (4)
(3)
(1)
(2)
La « carte interface » est trouvée sur l’emplacement correspondant (Ex. Slot 3).
(4)
8. Confirmer la carte interface trouvée en cliquant sur « OK » (5)
(5)
(5)
Important ! Il se peut que l’emplacement de la carte CAN doive également être
recherché une nouvelle fois.
3
Page 26

Profibus
Installer la carte
interface
(suite)
9. Paramétrer le taux de bauds (6) nécessaire
La valeur pour le taux de bauds est prescrit par l’ordinateur du robot ou l’ordinateur de
commande. En cas d’incertitudes, contacter le programmeur de commande ou de
robot.
10. Appliquer la configuration et mettre TwinCat (7) en mode « Activer » (cliquer sur le
symbole)
(8)
(7)
(6)
Une fenêtre de dialogue s’ouvre
11. Répondre à la question par « Oui »
Deux autres fenêtres de requête s’ouvrent alors
12. Répondre aux deux requêtes par « OK »
13. Cliquer avec la touche droite de la souris sur « Box1 » et sélectionner « Export GSDFile » (Fichier export GSD)
14. Enregistrer les paramétrages effectués en cliquant sur le bouton d’enregistrement (8)
La procédure d’installation est terminée, vous pouvez fermer le System Manager du
logiciel TwinCat.
15. Déconnecter le PC industriel et s’enregistrer avec le code d’identification standard
lors du démarrage suivant
4
Page 27

Tester la connexion Profibus
Composants
nécessaires
Raccorder le
HMS PROFIBUS
DP Mastersimulator et le câble RS
232
- Ordinateur portable avec interface RS 232
- HMS PROFIBUS DP Mastersimulator (recommandation Fronius)
- Câble RS 232
- Carte interface Profibus installée sur le PC industriel
- Logiciel « HMS PROFIBUS DP Mastersimulator » installé sur l’ordinateur portable
1. Brancher le HMS PROFIBUS DP Mastersimulator (1) au raccord RS 232 de
l’ordinateur portable
2. Raccorder le câble RS 232 (2) au HMS PROFIBUS DP Mastersimulator
(1)
(2)
Raccorder le HMS PROFIBUS DP Mastersimulator
3. Brancher la seconde extrémité du câble RS 232 au raccord RS 232 du PC industriel
Raccorder le HMS PROFIBUS DP Mastersimulator
5
Page 28

Préparation
(suite)
1. Démarrer le PC industriel et s’enregistrer en tant qu’administrateur (Nom utilisateur :
administrator, Mot de passe standard : blizzard)
2. Ouvrir Windows Explorer (STRG + E) (Ctrl + E)
3. Double-cliquer sur « C:\\Blizzard.tsm »
Le System Manager du logiciel TwinCat s’ouvre alors
7. Ouvrir « I/O Devices » en cliquant sur le symbole « + » (1)
8. Sélectionner la carte interface Profibus (2) en cliquant
9. Ouvrir le cavalier « FC 310x Slave » (3)
(3)
(1)
(2)
10. Paramétrer le taux de bauds sur 19,2 k (4)
11. Appliquer la configuration et mettre TwinCat (5) en mode « Activer » (cliquer sur le
symbole)
(6)
(5)
(4)
6
Page 29

Préparation
(suite)
Une fenêtre de dialogue s’ouvre
12. Répondre à la question par « Oui »
Deux autres fenêtres de requête s’ouvrent alors
13. Répondre aux deux requêtes par « OK »
14. Enregistrer les paramétrages effectués en cliquant sur le bouton d’enregistrement (6)
Tester la connexion Profibus
1. Lancer le logiciel « HMS PROFIBUS DP Mastersimulator » de l’ordinateur portable
2. Cliquer sur le symbole « Einfacher Start » (1) (Démarrage simplifié)
(1)
3. Placer le commutateur à clé du DeltaControl sur « Manual » (2) (Manuel)
(2)
Placer le commutateur à clé sur « Manual » (Manuel)
7
Page 30

Tester la connexion Profibus
(suite)
4. Dans « HMS PROFIBUS DP Mastersimulator » déplacer la coche de « 0 » sur « 1 »
(3)
(3)
Si la connexion est en ordre, « start homing automatic » est placé sur « 1 » (4) dans
la fiche de travail Xplorer - Diagnostic
(4)
8
Page 31

Étapes finales 1. Demander le taux de bauds à l’exploitant de l’installation et procéder au réglage (1 -
Exemple « 500 k »)
2. Appliquer la configuration et mettre TwinCat (2) en mode « Activer » (cliquer sur le
symbole)
(2)
Une fenêtre de dialogue s’ouvre
(1)
3. Répondre à la question par « Oui »
Deux autres fenêtres de requête s’ouvrent alors
4. Répondre aux deux requêtes par « OK »
5. Cliquer avec la touche droite de la souris sur « Box1 » (4) et sélectionner « Export
GSD-File » (5) (Fichier export GSD)
6. Enregistrer les paramétrages effectués en cliquant sur le bouton d’enregistrement (3)
(3)
(4)
(5)
La connexion Profibus est prête à fonctionner.
9
Page 32

10
Page 33

Generalità
Sicurezza
In generale
Fornitura
AVVISO! Un’esecuzione errata degli interventi può comportare gravi lesioni
personali e danni materiali. Il montaggio deve essere eseguito esclusivamente da
personale specializzato e appositamente addestrato. Attenersi alle norme di
sicurezza riportate nelle istruzioni per l’uso di DeltaSpot e nella lettera di accompagnamento della ditta Beckhoff.
L’installazione della scheda di interfaccia Profibus è necessaria per la trasmissione dei
dati dal robot al comando della pinza.
(1) Scheda di interfaccia Profibus
(1)
Scheda di interfaccia Profibus
Utensili necessari - Cacciavite a croce medio (PH2)
1
Page 34

Montaggio e installazione della scheda di interfaccia Profibus
Montaggio
della scheda di
interfaccia Profibus
(1)
Rimozione della copertura
(3)
1. Staccare la spina di rete del PC.
2. Rimuovere il coperchio del PC.
3. Allentare le due viti (1).
4. Rimuovere la copertura (2).
(1)(2)
5. Allentare la vite (3) della copertura
cieca e rimuovere la copertura.
6. Inserire la scheda di interfaccia Profibus in un qualsiasi slot PCI (4) libero.
7. Fissare la scheda di interfaccia
Profibus con la vite (3).
8. Fissare la copertura (2) con le viti (1).
9. Rimontare il coperchio del PC.
10. Inserire la spina di rete.
11. Avviare il PC e accedere come Amministratore (nome utente: administrator,
password predefinita: blizzard).
Installazione
della scheda di
interfaccia Profibus
(4)
Montaggio della scheda di interfaccia Profibus
1. Aprire Esplora risorse (fare clic con il pulsante destro del mouse su „Start“ e aprire
„Esplora risorse“).
2. Fare doppio clic su „C:\\Blizzard.tsm“.
Si apre il Gestore di sistema del software TwinCat.
2
Page 35

Installazione
della scheda di
interfaccia Profibus
(continuazione)
3. Aprire „I/O Devices“ (Periferiche I/O) facendo clic sul simbolo „+“ (1).
4. Selezionare la scheda di interfaccia Profibus (2) facendovi clic sopra.
5. Attivare la scheda di interfaccia Profibus (facendo clic con il pulsante destro del
mouse e deselezionando l’opzione „Disable“ (Disabilita)).
6. Aprire la scheda „FC 310x Slave“ (Slave FC 310x) (3).
7. Fare clic sul pulsante „Search“ (Cerca) (4).
(3)
(1)
(2)
La scheda di interfaccia viene trovata sullo slot corrispondente (esempio: slot 3).
(4)
8. Confermare la scheda di interfaccia trovata facendo clic su „OK“ (5).
(5)
(5)
Importante! È possibile che si debba nuovamente cercare anche lo slot della scheda
CAN.
3
Page 36

Installazione
della scheda di
interfaccia Profibus
(continuazione)
9. Impostare la velocità in baud (6) necessaria.
Il valore della velocità in baud è specificato dal computer del robot o di comando.
Contattare il programmatore del comando o del robot in caso di dubbi.
10. Applicare la configurazione e impostare TwinCat (7) in modalità di esecuzione (fare
clic sul simbolo).
(8)
(7)
(6)
Si apre una finestra di dialogo con un messaggio di richiesta.
11. Confermare il messaggio di richiesta con „Yes“ (Sì).
Si aprono altre due finestre di dialogo.
12. Rispondere a entrambe con „OK“.
13. Fare clic con il pulsante destro del mouse su „Box1“ e selezionare „Export GSD-File“
(Esporta file GSD).
14. Salvare le impostazioni facendo clic sull’apposito pulsante (8).
La procedura di installazione è completata. È possibile chiudere il Gestore di sistema
del software TwinCat.
15. Spegnere il PC e al successivo avvio accedere con l’account di accesso predefinito.
4
Page 37

Prova della connessione Profibus
Componenti
necessari
Collegamento
del HMS PROFIBUS DP Mastersimulator e del
cavo RS 232
- Computer portatile dotato di interfaccia RS 232
- Profibus HMS PROFIBUS DP Mastersimulator (consigliato da Fronius)
- Cavo RS 232
- Scheda di interfaccia Profibus installata nel PC
- Software „HMS PROFIBUS DP Mastersimulator“ installato nel computer portatile
1. Collegare il HMS PROFIBUS DP Mastersimulator (1) all’attacco RS 232 del computer portatile.
2. Collegare il cavo RS 232 (2) al HMS PROFIBUS DP Mastersimulator.
(1)
(2)
Collegamento del HMS PROFIBUS DP Mastersimulator
3. Collegare la seconda estremità del cavo RS 232 all’attacco RS 232 del PC.
Collegamento del HMS PROFIBUS DP Mastersimulator
5
Page 38

Preparazione
(continuazione)
1. Avviare il PC e accedere come Amministratore (nome utente: administrator, password
predefinita: blizzard).
2. Aprire Esplora risorse (CTRL + E).
3. Fare doppio clic su „C:\\Blizzard.tsm“.
Si apre il Gestore di sistema del software TwinCat.
7. Aprire „I/O Devices“ (Periferiche I/O) facendo clic sul simbolo „+“ (1).
8. Selezionare la scheda di interfaccia Profibus (2) facendovi clic sopra.
9. Aprire la scheda „FC 310x Slave“ (Slave FC 310x) (3).
(3)
(1)
(2)
10. Impostare la velocità in baud su 19,2k (4).
11. Applicare la configurazione e impostare TwinCat (5) in modalità di esecuzione (fare
clic sul simbolo).
(6)
(5)
(4)
6
Page 39

Preparazione
(continuazione)
Si apre una finestra di dialogo con un messaggio di richiesta.
12. Confermare il messaggio di richiesta con „Yes“ (Sì).
Si aprono altre due finestre di dialogo.
13. Rispondere a entrambe con „OK“.
14. Salvare le impostazioni facendo clic sull’apposito pulsante (6).
Prova della
connessione
Profibus
1. Avviare il software „HMS PROFIBUS DP Mastersimulator“ sul computer portatile.
2. Fare clic sul simbolo „Einfacher Start“ (Avvio semplice) (1).
(1)
3. Ruotare l’interruttore a chiave nella posizione „Manual“ (Manuale) (2).
(2)
Impostazione dell’interruttore a chiave su „Manual“ (Manuale)
7
Page 40

connessione
Profibus
(continuazione)
4. In „HMS PROFIBUS DP Mastersimulator“ impostare su bit da „0“ a „1“ (3).Prova della
(3)
Se la connessione funziona, nella scheda Diagnosi di Xplorer „start homing automatic“ (Avvia homing automatico) viene impostato su „1“ (4).
(4)
8
Page 41

Operazioni
conclusive
1. Richiedere la velocità in baud al gestore dell’impianto e impostarla (1 - esempio:
„500k“).
2. Applicare la configurazione e impostare TwinCat (2) in modalità di esecuzione (fare
clic sul simbolo).
(2)
(1)
Si apre una finestra di dialogo con un messaggio di richiesta.
3. Confermare il messaggio di richiesta con „Yes“ (Sì).
Si aprono altre due finestre di dialogo.
4. Rispondere a entrambe con „OK“.
5. Fare clic con il pulsante destro del mouse su „Box1“ (4) e selezionare „Export GSDFile“ (Esporta file GSD) (5).
6. Salvare le impostazioni facendo clic sull’apposito pulsante (3).
(4)
(5)
(3)
La connessione Profibus è pronta per l’uso.
9
Page 42

10
Page 43

Generalidades
Seguridad
Generalidades
Volumen de
suministro
¡ADVERTENCIA! Los trabajos realizados de forma incorrecta pueden causar
graves daños materiales y personales. ¡Este montaje sólo debe ser efectuado
por personal técnico formado! Deben tenerse en cuenta las indicaciones de
seguridad del manual de instrucciones DeltaSpot y de la carta acompañante de
Beckhoff.
El montaje de la tarjeta de interfaz Profibus es necesario para una transmisión de datos
del robot al control de pinzas.
(1) Tarjeta de interfaz Profibus
Herramientas
necesarias
(1)
Tarjeta de interfaz Profibus
- Destornillador para tornillos de cabeza en cruz mediano (tamaño PH2)
1
Page 44

Montar e instalar la tarjeta de interfaz Profibus
Profibus
Montar la tarjeta
de interfaz
(1)
Retirar la cubierta
(3)
(4)
1. Desenchufar la clavija para la red del
PC industrial
2. Retirar la tapa del PC industrial
3. Soltar los 2 tornillos (1)
4. Retirar la cubierta (2)
(1)(2)
5. Soltar el tornillo (3) de la cubierta
ciega y retirar la cubierta ciega
6. Enchufar la tarjeta de interfaz Profibus
en cualquier puesto enchufable del
PCI libre (4)
7. Fijar la tarjeta de interfaz Profibus
mediante el tornillo (3)
8. Fijar la cubierta (2) mediante los
tornillos (1)
9. Montar la tapa del PC industrial
10. Enchufar la clavija para la red
11. Iniciar el PC industrial y conectarse
como administrador (nombre de
usuario: administrator, contraseña
estándar: blizzard)
Profibus
Instalar la tarjeta
de interfaz
Montar la tarjeta de interfaz Profibus
1. Abrir el Explorador de Windows (hacer clic con el botón derecho del ratón en „Inicio“
„Explorador“)
2. Hacer doble clic sobre „C:\\Blizzard.tsm“
Se abre el System Manager del software TwinCat.
2
Page 45

Profibus
Instalar la tarjeta
de interfaz
(continuación)
3. Abrir „I/O Devices“ con un clic sobre el símbolo „+“ (1)
4. Seleccionar la tarjeta de interfaz Profibus (2) con un clic
5. Activar la tarjeta de interfaz Profibus (botón derecho del ratón y deseleccionar „Disable“ (Desactivar)
6. Abrir la pestaña „FC 310x Slave“ (FC 310x Esclavo) (3)
7. Hacer clic en „Search“ (Búsqueda) (4)
(3)
(1)
(2)
Se ha encontrado la „Tarjeta de interfaz“ en el correspondiente puesto enchufable
(ejemplo: Slot 3).
(4)
8. Confirmar la tarjeta de interfaz encontrada con un clic en „OK“ (Aceptar) (5)
(5)
(5)
¡Importante! Puede ocurrir que también sea necesario buscar el puesto enchufable
de la tarjeta CAN.
3
Page 46

Profibus
Instalar la tarjeta
de interfaz
(continuación)
9. Ajustar la tasa de baudios necesaria (6)
El valor para la tasa de baudios es predeterminado por el ordenador del robot o del
control. En caso de cualquier duda debe ponerse en contacto con el programador de
control o robot.
10. Aceptar la configuración y poner TwinCat (7) en el modo „Run“ (Ejecutar) (hacer clic
en el símbolo)
(8)
(7)
(6)
Se abre un diálogo con una consulta.
11. Confirmar la consulta con „Yes“ (Sí)
Se abren otros dos diálogos.
12. Responder ambos diálogos con „OK“ (Aceptar)
13. Hacer clic en „Box1“ (Caja1) con el botón derecho del ratón y seleccionar „Export
GSD-File“ (Exportar archivo GSD)
14. Guardar los ajustes con un clic sobre el botón de guardar (8)
El proceso de instalación ha finalizado y se puede cerrar el System Manager del
software TwinCat.
15. Apagar el PC industrial y conectarse con el código de acceso estándar con motivo
del próximo inicio
4
Page 47

Comprobar la conexión Profibus
Componentes
requeridos
Conectar el HMS
PROFIBUS DP
Mastersimulator y
el cable RS 232
- Ordenador portátil con interfaz RS-232
- HMS PROFIBUS DP Mastersimulator (recomendación de Fronius)
- Cable RS 232
- Tarjeta de interfaz Profibus instalada en el PC industrial
- Software „HMS PROFIBUS DP Mastersimulator“ instalado en el ordenador portátil
1. Conectar el HMS PROFIBUS DP Mastersimulator (1) a la conexión RS 232 del
ordenador portátil
2. Conectar el cable RS 232 (2) al HMS PROFIBUS DP Mastersimulator
(1)
(2)
Conectar el HMS PROFIBUS DP Mastersimulator
3. Conectar el segundo extremo del cable RS 232 a la conexión RS 232 del PC industrial
Conectar el HMS PROFIBUS DP Mastersimulator
5
Page 48

Preparación
(continuación)
1. Iniciar el PC industrial y conectarse como administrador (nombre de usuario: administrator, contraseña estándar: blizzard)
2. Abrir el Explorador de Windows (CTRL + E)
3. Hacer doble clic sobre „C:\\Blizzard.tsm“
Se abre el System Manager del software TwinCat.
7. Abrir „I/O Devices“ (Dispositivos E/S) con un clic sobre el símbolo „+“ (1)
8. Seleccionar la tarjeta de interfaz Profibus (2) con un clic
9. Abrir la pestaña „FC 310x Slave“ (FC 310x Esclavo) (3)
(3)
(1)
(2)
10. Ajustar la tasa de baudios a 19,2k (4)
11. Aceptar la configuración y poner TwinCat (5) en el modo „Run“ (Ejecutar) (hacer clic
en el símbolo)
(6)
(5)
(4)
6
Page 49

Preparación
(continuación)
Se abre un diálogo con una consulta.
12. Confirmar la consulta con „Yes“ (Sí)
Se abren otros dos diálogos.
13. Responder ambos diálogos con „OK“ (Aceptar)
14. Guardar los ajustes con un clic sobre el botón de guardar (6)
Comprobar la
conexión Profibus
1. Iniciar el software „HMS PROFIBUS DP Mastersimulator“ en el ordenador portátil
2. Hacer clic en el símbolo „Inicio sencillo“ (1)
(1)
3. Poner el interruptor con llave de DeltaControl en la posición „Manual“ (Manual) (2)
(2)
Poner el interruptor con llave en la posición „Manual“ (Manual)
7
Page 50

conexión Profibus
(continuación)
4. Poner un bit en el „HMS PROFIBUS DP Mastersimulator“ de „0“ a „1“ (3)Comprobar la
(3)
Si la conexión está en orden, en el Xplorer - Hoja de trabajo de diagnóstico se pone
„start homing automatic“ (inicio de retorno a la posición inicial automático) a „1“ (4)
(4)
8
Page 51

Actividades
finales
1. Consultar al propietario del equipo para conocer la tasa de baudios y ajustarla (1 ejemplo „500k“)
2. Aceptar la configuración y poner TwinCat (2) en el modo „Run“ (Ejecutar) (hacer clic
en el símbolo)
(2)
(1)
Se abre un diálogo con una consulta.
3. Confirmar la consulta con „Yes“ (Sí)
Se abren otros dos diálogos.
4. Responder ambos diálogos con „OK“ (Aceptar)
5. Hacer clic en „Box1 (Caja1)“ (4) con el botón derecho del ratón y seleccionar „Export
GSD-File“ (Exportar archivo GSD) (5)
6. Guardar los ajustes con un clic sobre el botón de guardar (3)
(4)
(5)
(3)
La conexión de Profibus está lista para el uso.
9
Page 52

10
Page 53

Geral
Segurança
Geral
Âmbito de
fornecimento
ALERTA! Trabalhos executados com falhas podem causar graves danos pes-
soais e materiais. Esta montagem pode ser executada apenas por especialistas
treinados! Observe as prescrições de segurança no manual de instruções MI
DeltaSpot e o aviso da empresa Beckhoff.
A instalação do cartão de interface Profibus é necessária para uma transmissão de dados
por robô para o comando das pinças.
(1) Cartão de interface Profibus
Ferramentas
necessárias
(1)
Cartão de interface Profibus
- Por meio da chave de fenda Phillips (tamanho PH2)
1
Page 54

Instalar e montar cartão de interface Profibus
Profibus
Instalar cartão de
interface
(1)
Remover cobertura
(3)
1. Retirar plugues de rede do PC industrial
2. Remover a tampa do PC industrial
3. Soltar 2 parafusos (1)
4. Retirar cobertura (2)
(1)(2)
5. Soltar parafuso (3) da cobertura cega
e retirá-la
6. Inserir o cartão de interface Profibus
em um local qualquer de encaixe livre
do PCI (4)
7. Fixar o cartão de interface Profibus
por meio de parafusos (3)
8. Fixar a cobertura (2) por meio de
parafusos (1)
9. Montar a tampa do PC industrial
10. Encaixar o plugue da rede elétrica
11. Acrescentar o PC industrial e registrar
como administrador (nome de usuário:
administrador, senha padrão: blizzard)
(4)
Profibus
Instalar o cartão
de interface
Instalar o cartão de interface Profibus
1. Abrir o Windows Explorer (clicar na tecla direita do mouse em „Start“ (iniciar) - abrir
„Explorer“)
2. Clicar duas vezes em „C:\\Blizzard.tsm“
É aberto o gerenciador do sistema do software TwinCat
2
Page 55

Profibus
Instalar o cartão
de interface
(continuação)
3. Abrir „I/O Devices“ (dispositivos E/S) ao clicar no símbolo „+“ (1)
4. Selecionar o cartão de interface Profibus (2) ao clicar
5. Ativar o cartão de interface Profibus (com a tecla direita do mouse e anular com
„Disable“ (desabilitar))
6. Abrir o roteador „FC 310x Slave“ (3)
7. Clicar em „Search“ (procurar) (4)
(3)
(1)
(2)
O „Schnittstellen-Kart“ (cartão de interface) é encontrado no local de encaixe correspondente (Por exemplo, encaixe 3).
(4)
8. Confirmar o cartão de interface encontrado clicando em „OK“ (5)
(5)
(5)
Importante! É possível que o local de encaixe do cartão CAN também tenha que ser
procurado novamente.
3
Page 56

Profibus
Instalar o cartão
de interface
(continuação)
9. Configurar a freqüência de transmissão (6) necessária
O valor para a freqüência de transmissão é simulado pelo computador de comando
ou pelo robô. Na falta de clareza, recorra ao programador de comando ou do robô.
10. Assumir a configuração e posicionar TwinCat (7) no modo „Run“ (executar) (clicar no
símbolo)
(8)
(7)
(6)
É aberta uma caixa de diálogo com uma pergunta
11. Confirmar a pergunta com „Yes“ (sim)
São abertas duas outras caixas de diálogo
12. Responder ambas as caixas de diálogo com „OK“
13. Clicar em „Box1“ com a tecla direita do mouse e selecionar „Export GSD-File“
(exportar arquivo GSD)
14. Salvar as configurações clicando no botão Salvar (8)
O processo de instalação é concluído, e o gerenciador do sistema do software
TwinCat pode ser fechado.
15. Desligar o PC industrial e registrá-lo ao iniciar novamente com o login padrão
4
Page 57

Testar conexão Profibus
Componentes
necessários
Conectar o HMS
PROFIBUS DP
Mastersimulator
e o cabo RS 232
- Laptop com interface RS 232
- HMS PROFIBUS DP Mastersimulator (recomendação Fronius)
- Cabo RS 232
- Cartão de interface Profibus instalado no PC industrial
- Software „HMS PROFIBUS DP Mastersimulator“ instalado no laptop
1. Conectar o HMS PROFIBUS DP Mastersimulator (1) na conexão RS 232 do laptop
2. Conectar o cabo RS 232 (2) no Profibus Master Simulator
(1)
(2)
Conectar o HMS PROFIBUS DP Mastersimulator
3. Conectar a segunda extremidade do cabo RS 232 na conexão RS 232 do PC industrial
Conectar o HMS PROFIBUS DP Mastersimulator
5
Page 58

Preparação
(continuação)
1. Acrescentar o PC industrial e registrar como administrador (nome de usuário: administrador, senha padrão: blizzard)
2. Abrir Windows Explorer (Ctrl + E)
3. Clicar duas vezes em „C:\\Blizzard.tsm“
É aberto o gerenciador do sistema do software TwinCat
7. Abrir „I/O Devices“ (dispositivos E/S) ao clicar no símbolo „+“ (1)
8. Selecionar o cartão de interface Profibus (2) ao clicar
9. Abrir o roteador „FC 310x Slave“ (3)
(3)
(1)
(2)
10. Configurar a freqüência de transmissão em 19,2 k (4)
11. Assumir a configuração e posicionar TwinCat (5) no modo „Run“ (executar) (clicar no
símbolo)
(6)
(5)
(4)
6
Page 59

Preparação
(continuação)
É aberta uma caixa de diálogo com uma pergunta
12. Confirmar a pergunta com „Yes“ (sim)
São abertas duas outras caixas de diálogo
13. Responder ambas as caixas de diálogo com „OK“
14. Salvar as configurações clicando no botão Salvar (6)
Testar conexão
Profibus
1. Iniciar o software „HMS PROFIBUS DP Mastersimulator“ no laptop
2. Clicar no símbolo „Einfacher Start“ (Início Simples) (1)
(1)
3. Colocar o atuador chave no DeltaControl em „Manual“ (2)
Colocar o atuador chave em „Manual“
7
(2)
Page 60

Profibus
(continuação)
4. Colocar no „HMS PROFIBUS DP Mastersimulator“ um bit de „0“ em „1“ (3)Testar conexão
(3)
Estando a conexão em ordem, é colocado em „1“, na folha de trabalho de diagnóstico Xplorer, „start homing automatic“ (iniciar homing automático)(4)
(4)
8
Page 61

Atividades concluídas
1. Obter e configurar a freqüência de transmissão na operação da instalação (1 exemplo „500k“)
2. Assumir a configuração e posicionar TwinCat (2) no modo „Run“ (executar) (clicar no
símbolo)
(2)
(1)
É aberta uma caixa de diálogo com uma pergunta
3. Confirmar a pergunta com „Yes“ (sim)
São abertas duas outras caixas de diálogo
4. Responder ambas as caixas de diálogo com „OK“
5. Clicar em „Box1“ (4) com a tecla direita do mouse e selecionar „Export GSD-File“ (5)
(exportar arquivo GSD)
6. Salvar as configurações clicando no botão Salvar (3)
(3)
(4)
(5)
A conexão Profibus está pronta para aplicação.
9
Page 62

10
Page 63

Všeobecné informace
Bezpečnost
Všeobecné
informace
Obsah balení
VAROVÁNÍ! Chybně provedená práce může zapříčinit závažné zranění a
materiální škody. Tuto montáž mohou provádět pouze osoby odborně vyškolené
společností Fronius! Dodržujte bezpečnostní pokyny návodu k obsluze zařízení
DeltaSpot a průvodního dopisu společnosti Beckhoff.
Použití karty rozhraní Profibus je nutné pro datový přenos mezi robotem a řízením kleští.
(1) Karta rozhraní Profibus
Požadované
nástroje
(1)
Karta rozhraní Profibus
- Křížový šroubovák střední (velikost PH2)
1
Page 64

Vložení a instalace karty rozhraní Profibus
Profibus
Vložení karty
rozhraní
(1)
Sejmutí krytu
(3)
1. Vytáhněte síťovou zástrčku průmyslového PC.
2. Sejměte kryt průmyslového PC.
3. Uvolněte dva šrouby (1).
4. Sejměte kryt (2).
(1)(2)
5. Uvolněte šroub (3) záslepky a sejměte záslepku.
6. Kartu rozhraní Profibus zasuňte do
libovolné volné zásuvky PCI (4).
7. Kartu rozhraní Profibus upevněte
pomocí šroubu (3).
8. Kryt (2) upevněte pomocí šroubů (1).
9. Namontujte kryt průmyslového PC.
10. Zasuňte zástrčku přístroje do
napájecí sítě.
11. Spusťte průmyslové PC a přihlašte se
jako administrátor (uživatelské jméno:
administrator, standardní heslo:
blizzard).
(4)
Profibus
Instalace karty
rozhraní
Vložení karty rozhraní Profibus
1. Otevřete Průzkumník Windows (pravým tlačítkem myši klepněte na „Start“ - poté
vyberte položku „Prozkoumat“).
2. Dvakrát klepněte na „C:\\Blizzard.tsm“.
Otevře se systémový řídící program softwaru TwinCat.
2
Page 65

Profibus
Instalace karty
rozhraní
(pokračování)
3. Klepnutím na symbol „+“ (1) otevřete „I/O Devices“ (Zařízení I/O).
4. Klepnutím vyberte kartu rozhraní Profibus (2).
5. Aktivujte kartu rozhraní Profibus (pravým tlačítkem myši zrušte zaškrtnutí políčka
„Disable“ (Deaktivovat).
6. Otevřete kartu „FC 310x Slave“ (3).
7. Klepněte na „Search“ (Hledat) (4).
(3)
(1)
(2)
„Karta rozhraní“ bude nalezena na odpovídající zásuvce (např. Slot 3).
(4)
8. Nalezenou kartu rozhraní potvrďte jedním klepnutím na „OK“ (5).
(5)
(5)
Důležité! Může se stát, že zásuvku karty CAN bude nutné prohledat znovu.
3
Page 66

Profibus
Instalace karty
rozhraní
(pokračování)
9. Nastavte požadovanou přenosovou rychlost (6).
Hodnota pro přenosovou rychlost se řídí podle robota nebo řídícího počítače. V
případě nejasností se obraťte na programátory řízení nebo robota.
10. Převezměte konfiguraci a přepněte TwinCat (7) do režimu spuštění (klepněte na
symbol).
(8)
(7)
(6)
Otevře se dialogové okno s dotazem.
11. Dotaz potvrďte pomocí tlačítka „Yes“ (Ano).
Otevřou se dvě další dialogová okna.
12. Obě potvrďte pomocí „OK“.
13. Pravým tlačítkem myši klepněte na „Box1“ (Modul1) a zvolte „Export GSD-File“
(Export souboru GSD).
14. Nastavení uložte klepnutím na tlačítko pro uložení (8).
Instalace je dokončena, systémový řídící program softwaru TwinCat může být
uzavřen.
15. Vypněte průmyslové PC a při příštím spuštění se přihlašte standardním přihlašovacím jménem.
4
Page 67

Test připojení Profibus
Požadované
součásti
Připojení HMS
PROFIBUS DP
Mastersimulator
a kabelu RS 232
- Laptop s rozhraním RS 232
- HMS PROFIBUS DP Mastersimulator (doporučení společnosti Fronius)
- kabel RS 232
- Nainstalovaná karta rozhraní Profibus na průmyslovém PC
- Nainstalovaný software „HMS PROFIBUS DP Master Simulator“ na laptopu
1. HMS PROFIBUS DP Mastersimulator (1) připojte k přípojce RS 232 na laptopu.
2. Kabel RS 232 (2) připojte k HMS PROFIBUS DP Mastersimulator.
(1)
(2)
Připojení HMS PROFIBUS DP Mastersimulator
3. Druhý konec kabelu RS 232 připojte k přípojce RS 232 průmyslového PC.
Připojení simulátoru HMS PROFIBUS DP Mastersimulator
5
Page 68

Příprava
(pokračování)
1. Spusťte průmyslové PC a přihlašte se jako administrátor (uživatelské jméno: administrator, standardní heslo: blizzard).
2. Otevřete Průzkumník Windows (CTRL + E).
3. Dvakrát klepněte na „C:\\Blizzard.tsm“.
Otevře se systémový řídící program softwaru TwinCat.
7. Klepnutím na symbol „+“ (1) otevřete „I/O Devices“ (Zařízení I/O).
8. Klepnutím vyberte kartu rozhraní Profibus (2).
9. Otevřete kartu „FC 310x Slave“ (3).
(3)
(1)
(2)
10. Přenosovou rychlost nastavte na 19,2 k (4).
11. Převezměte konfiguraci a přepněte TwinCat (5) do režimu spuštění (klepněte na
symbol).
(6)
(5)
(4)
6
Page 69

Příprava
(pokračování)
Otevře se dialogové okno s dotazem.
12. Dotaz potvrďte pomocí tlačítka „Yes“ (Ano).
Otevřou se dvě další dialogová okna.
13. Obě potvrďte pomocí „OK“.
14. Nastavení uložte klepnutím na tlačítko pro uložení (6).
Test připojení
Profibus
1. Na laptopu spusťte software „HMS PROFIBUS DP Master Simulator“.
2. Klepněte na symbol snadného startu (1).
(1)
3. Klíčový vypínač DeltaControl přepněte na hodnotu „Manual“ (Ručně) (2).
(2)
Přepnutí klíčového vypínače na hodnotu „Manual“ (Ručně)
7
Page 70

Profibus
(pokračování)
4. V nabídce „HMS PROFIBUS DP Mastersimulator“ přepište jeden bit z „0“ na „1“ (3).Test připojení
(3)
V případě, že je připojení v pořádku, dojde na diagnostickém pracovním listu Průzkumníku „start homing automatic“ ke změně hodnoty na „1“ (4).
(4)
8
Page 71

Další činnosti 1. Otevřete a nastavte přenosovou rychlost u provozovatele zařízení (1 - příklad
„500k“).
2. Převezměte konfiguraci a přepněte TwinCat (2) do režimu spuštění (klepněte na
symbol).
(2)
Otevře se dialogové okno s dotazem.
(1)
3. Dotaz potvrďte pomocí tlačítka „Yes“ (Ano).
Otevřou se dvě další dialogová okna.
4. Obě potvrďte pomocí „OK“.
5. Pravým tlačítkem myši klepněte na „Box1“ (Modul1) (4) a zvolte „Export GSD-File“
(Export souboru GSD) (5).
6. Nastavení uložte klepnutím na tlačítko pro uložení (3).
(3)
(4)
(5)
Připojení Profibus je připraveno k použití.
9
Page 72

FRONIUS INTERNATIONAL GMBH
Buxbaumstraße 2, A-4600 Wels, Austria
Tel: +43 (0)7242 241-0, Fax: +43 (0)7242 241-3940
E-Mail: sales@fronius.com
www.fronius.com
Under http://www.fronius.com/addresses you will find all addresses
www.fronius.com/addresses
of our Sales & service partners and Locations.
ud_fr_st_so_00082 012008
 Loading...