

Page 1

Fronius prints on elemental chlorine free paper (ECF) sourced from certified sustainable forests (FSC).
/ Perfect Charging / Perfect Welding / Solar Energy
LocalNet RS 232 Interface
Bedienungsanleitung
DE
Operating instructions
EN
Instructions de service
FR
42,0410,0691 004-19012022
Page 2

Page 3

Inhaltsverzeichnis
LocalNet RS 232 Interface 4
Sicherheit 4
Allgemeines 4
Lieferumfang 4
Beschreibung der Anzeigen am LocalNet RS 232 Interface 4
Systemkomponenten miteinander verbinden 5
Update via LocalNet RS 232 interface 6
Allgemeines 6
Voraussetzungen für die Verwendung des Local-Net RS 232 Interface 6
Software Local-Net & Tools installieren 6
Software Local-Net Server Professional konfigurieren 6
Software BASICLoad installieren 7
Software BASICLoad konfigurieren 7
Update durchführen 7
Fehlerdiagnose, Fehlerbehebung 8
DE
3
Page 4

LocalNet RS 232 Interface
(1)
(3)
(4)
(2)
Sicherheit
Gefahr durch unsachgemäße Verbindung mit der Stromquelle.
Sachschäden am PC können die Folge sein.
▶
Allgemeines Das LocalNet RS 232 Interface kann nur in Verbindung mit einer LocalNet-Applikations-
software und Systemkomponenten (Stromquelle, Drahtvorschub, etc.) mit Anschlußbuchse LocalNet verwendet werden. Zum korrekten Betrieb muß die LocalNet-Applikationssoftware am Computer gestartet sein.
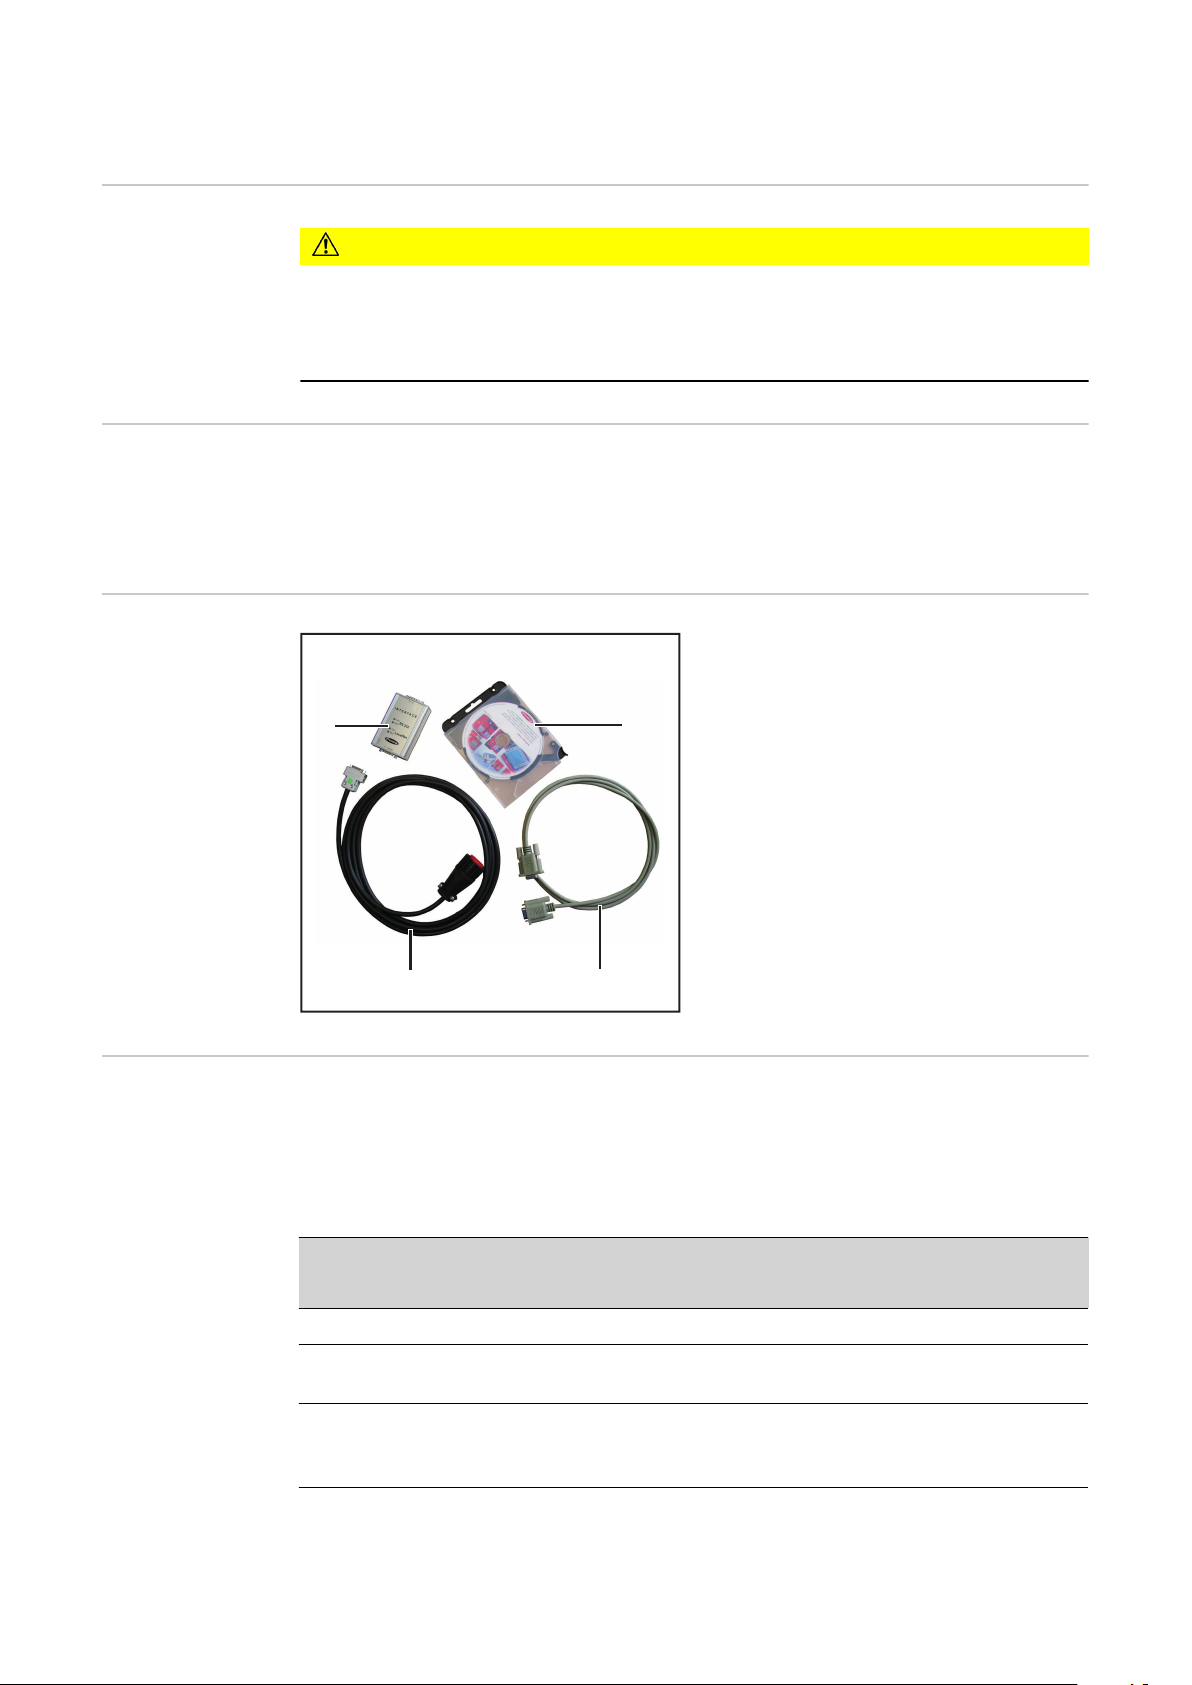
Lieferumfang
VORSICHT!
Verbindung zwischen PC und Stromquelle nur mit dem LocalNet RS 232 Interface
und mitgelieferten Kabeln herstellen.
(1) LocalNet RS 232 Interface
(2) LocalNet Schnittstellen-Kabel
(3) RS 232 Schnittstellen-Kabel
(4) CD Software-Tools
Beschreibung der
Anzeigen am LocalNet RS 232 Interface
4
Jede Anzeige steht für eine Sendeleitung (TxD) bzw. Empfangsleitung (RxD). Blinkt eine
Anzeige so findet auf den entsprechenden Leitungen Datentransfer statt.
x ... Anzeige blinkt
RS 232 LocalNet Status
TxD RxD TxD RxD
x x x x Kommunikation ist o.k.
x - x x PC meldet sich nicht; LocalNet Applikationssoftware am
PC starten
- - - x Fehlerfunktion am Interface; Anschluß an PC und Systemkomponente überprüfen; ev. Interface tauschen
- x x - PC sendet Daten - Systemkomponente meldet sich
nicht; Systemkomponente eventuell defekt
- - - - keine Anzeige blinkt; Anschluß an PC und Systemkomponente überprüfen; ev. Interface tauschen
Page 5

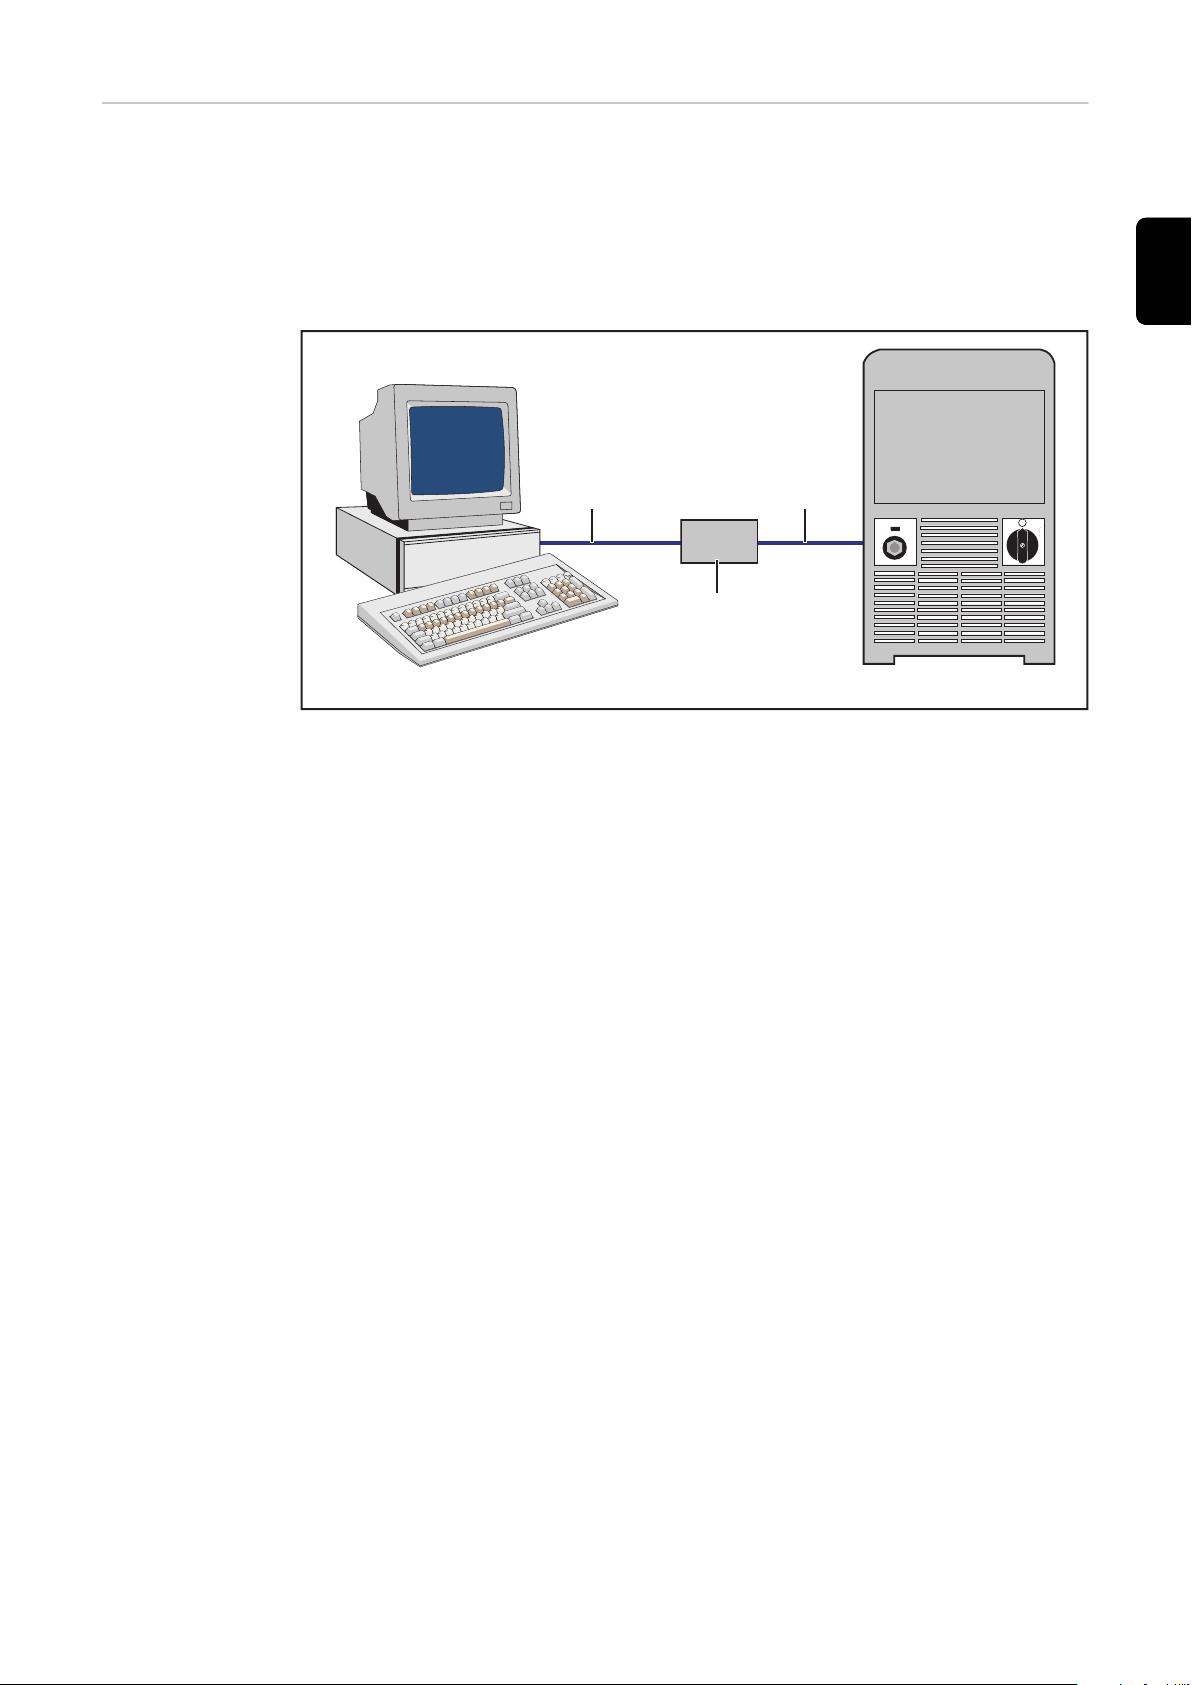
Systemkompo-
StromquellePC
RS 232
Schnittstellen-
Kabel
LocalNet
Schnittstellen-
Kabel
LocalNet RS 232 Interface
nenten miteinander verbinden
(1) RS 232 Schnittstellen-Kabel und LocalNet Schnittstellen-Kabel laut Beschriftung
an LocalNet RS 232 Interface anschließen
(2) RS 232 Schnittstellen-Kabel an freier, bereits definierter Schnittstelle (z.B.
COM1) des PCs anschließen
(3) LocalNet Schnittstellen-Kabel an Anschlußbuchse LocalNet der Systemkompo-
nente (z.B. Stromquelle) anschließen
DE
5
Page 6

Update via LocalNet RS 232 interface
Allgemeines Bei folgenden Fronius Systemkomponenten kann in Verbindung mit dem LocalNet RS
232 Interface ein Software-Update durchgerführt werden:
- Stromquellen der TS/TPS Geräteserie (Print UST)
- Stromquellen der MW/TT Geräteserie (Print UST)
- Stromquellen der TSt Geräteserie
- Klartextanzeige der TransTig 2500 / 3500 Comfort
- Klartextanzeige der MagicWave 2500 / 3500 Comfort
Voraussetzungen
für die Verwendung des LocalNet RS 232 Interface
Software LocalNet & Tools installieren
Um Software-Updates mit dem LocalNet RS 232 Interface durchzuführen, folgende Voraussetzungen erfüllen:
- Firmware Stromquelle TS/TPS, MW/TT OFFICIAL UST V3.29.33 oder höher
- Firmware Stromquelle TS/TPS, MW/TT OFFICIAL UST V4.01.06 oder höher
- Firmware Stromquelle OFFICIAL TransSteel V1.1.15 oder höher
- Software LocalNet & Tools V2.6.c oder höher auf dem PC installiert
- Bei TS/TPS, MW/TT Geräteserie Software BASICLoad V3.50.2 oder höher auf dem
PC installiert
- Bei TSt Geräteserie Software BASICLoad V3.60.6 oder höher auf dem PC installiert
WICHTIG! Ist die Software mit einer kompatiblen Versionsnummer bereits installiert sind
nur die Konfigurationen zu überpüfen.
CD Software-Tools in das CD-Laufwerk einlegen oder die Datei LNTools_X.Xx vom
1
DownloadCenter (https://www.fronius.com/de/schweisstechnik/downloads) herunterladen
Die Datei LNTools_XX.exe ausführen
2
Den Anweisungen des Installations Assistenten folgen
3
- LocalNet & Tools wird installiert
Software LocalNet Server Professional konfigurieren
6
Die Datei LocalNet Server Professional ausführen - im Start-Menü unter „Fronius
1
Product Group / LocalNet SDK“
Im Dropdown-Menü Netz „COM1“ auswählen
2
Page 7

LocalNet Server Professional beenden
3
DE
Software BASICLoad installieren
Software BASICLoad konfigurieren
CD Software-Tools in das CD-Laufwerk einlegen oder die Datei BASI-
1
CLoad_VX.XX.X vom DownloadCenter (https://www.fronius.com/de/schweisstechnik/downloads) herunterladen
Die Datei BASICLoad_VX.XX.X.exe ausführen
2
Den Anweisungen des Installations Assistenten folgen
3
- BASICLoad wird installiert
Die Datei BASICLoad-Setup ausführen - im Start-Menü unter „Fronius Product
1
Group„
Im Dropdown-Menü C167 (UST) „LocalNet“ auswählen
2
Update
durchführen
BASICLoad-Setup beenden
3
WARNUNG!
Gefahr durch Fehlbedienung und fehlerhaft durchgeführte Arbeiten.
Schwerwiegende Personen- und Sachschäden können die Folge sein.
Nach dem Einschalten der Systemkomponenten darauf achten, dass die jeweilige
▶
Systemkomponente nicht aktiviert wird.
WICHTIG! Aktuelle Firmware steht im DownloadCenter (https://www.fronius.com/de/
schweisstechnik/downloads) zur Verfügung.
Systemkomponenten miteinander verbinden
1
Systemkomponenten einschalten
2
Doppelklick auf die Firmware die installiert werden soll
3
- BasicLoad startet
- Anzeigen am Interface blinken
7
Page 8

Fehlerdiagnose, Fehlerbehebung
Updaten der Firmware nicht möglich
Ursache:
Behebung:
Update startet nicht
Status-LED im „BasicLoad“-Fenster blinkt gelb
Alte Version „BasicLoad“ auf PC installiert
Neuere Version „BasicLoad“ auf PC installieren, Update Vorgang wiederholen
Ursache:
Behebung:
Meldung „Fehler beim Öffnen der Schnittstelle!“
Ursache:
Behebung:
Mangelhafte Verbindung der Komponenten
Sicherstellen das alle Komponenten ordnungsgemäß miteinander verbunden sind
BasicLoad-Einstellungen nicht auf LocalNet gesetzt
BasicLoad-Einstellungen auf LocalNet setzen
8
Page 9

Contents
LocalNet RS 232 Interface 10
Safety 10
General 10
Scope of supply 10
Description of the displays on the LocalNet RS 232 interface 10
Connecting system components 11
Update via LocalNet RS 232 interface 12
General information 12
Requirements for using the Local-Net RS 232 interface 12
Install LocalNet & Tools software 12
Configure Local-Net Server Professional software 12
Install BASICLoad software 13
Configure BASIC-Load software 13
Performing an update 13
Troubleshooting 14
EN
9
Page 10

LocalNet RS 232 Interface
(1)
(3)
(4)
(2)
Safety
Danger from incorrect connection to the power source.
This can result in damage to the PC.
▶
General The LocalNet RS 232 interface can only be used in conjunction with LocalNet application
software and system components (power source, wire-feed unit, etc.) with LocalNet connection sockets. To ensure correct operation, the LocalNet application software must already be running on the computer.
Scope of supply
CAUTION!
Connect the power source to the PC using the LocalNet RS 232 interface and the
cables provided only.
(1) LocalNet RS 232 interface
(2) LocalNet interface cable
(3) RS 232 interface cable
(4) Software tools CD
Description of the
displays on the
LocalNet RS 232
interface
10
Each display represents a transmit line (TxD) and a receive line (RxD). A flashing display
indicates that data is being transferred along the respective lines.
x ... Display flashes
RS 232 LocalNet Status
TxD RxD TxD RxD
x x x x Communication is ok
x - x x PC does not respond; start the LocalNet application
software on the PC
- - - x Interface error; connect to PC and check system components. Replace interface if necessary.
- x x - PC is sending data - system component does not respond; system component possibly faulty
- - - - No display flashing; check connection to PC and system
component. Replace interface if necessary
Page 11
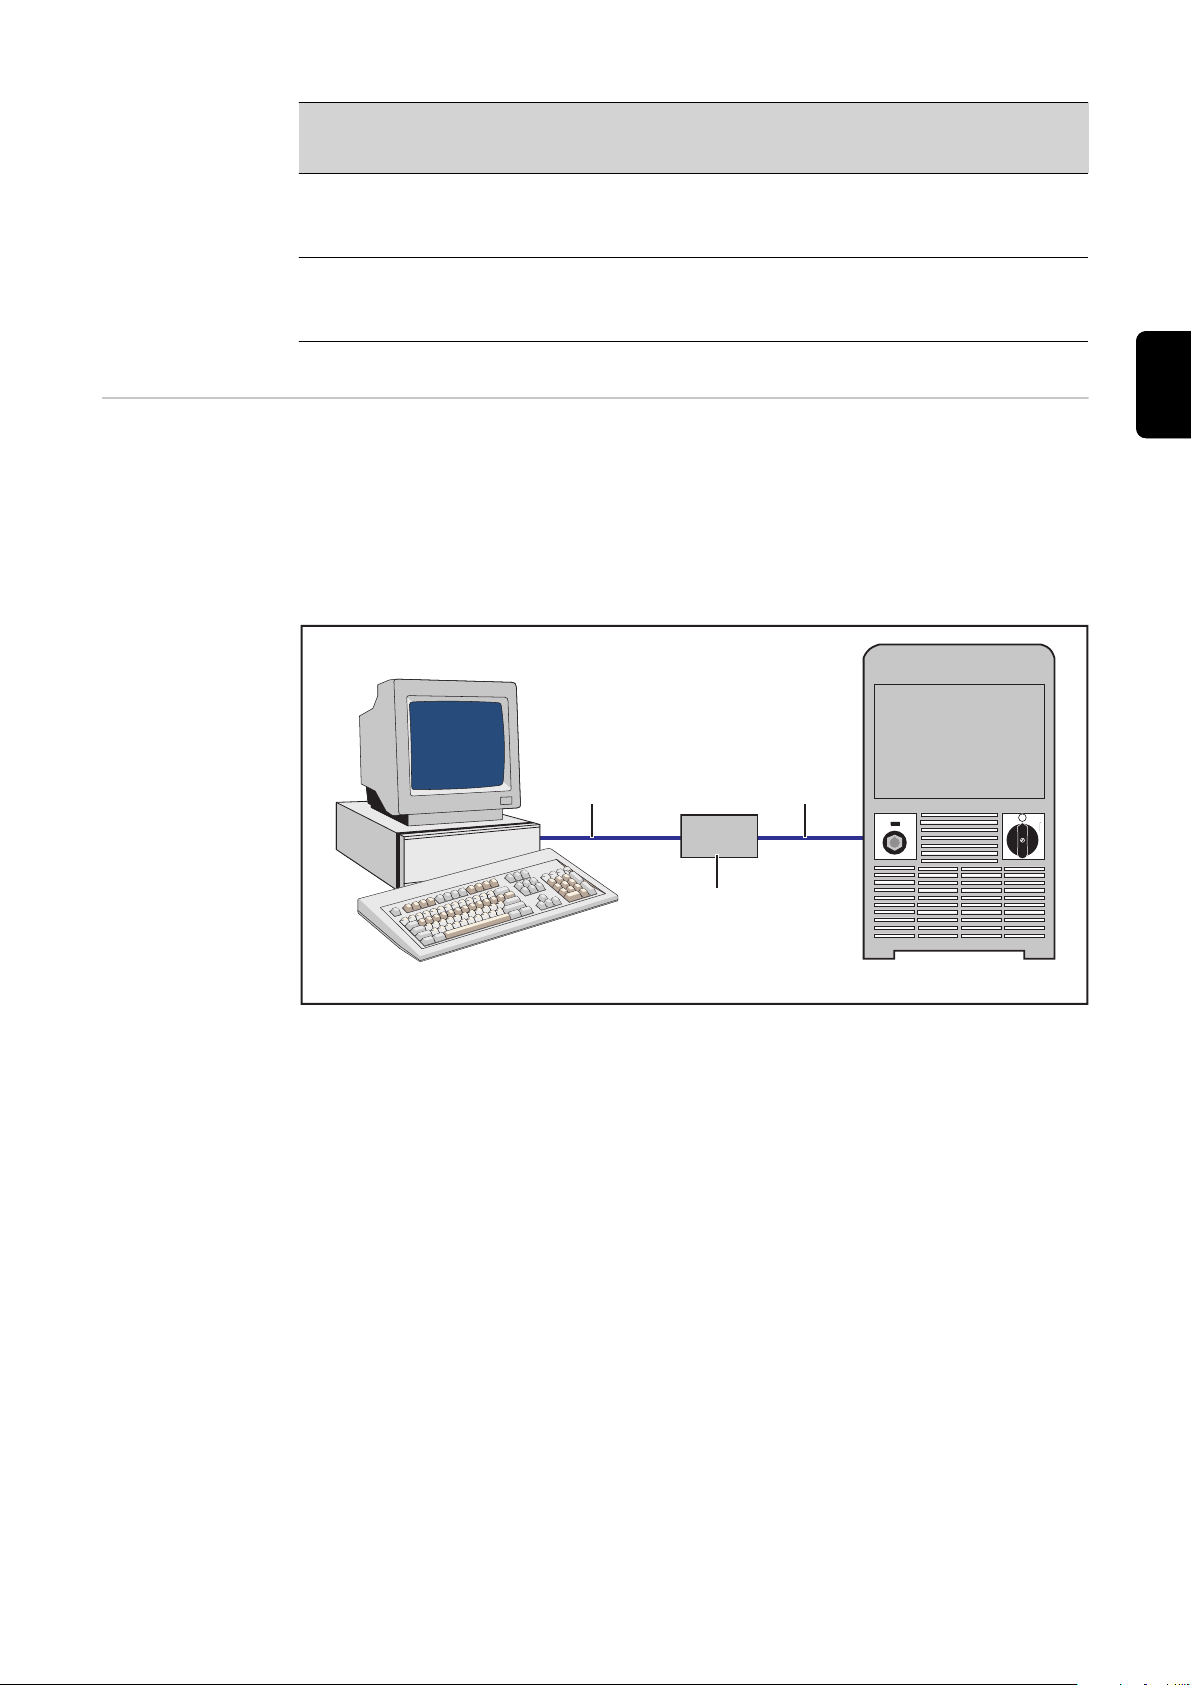
Connecting sys-
Power sourcePC
RS 232
Interface
cable
LocalNet
Interface
cable
LocalNet RS 232 Interface
tem components
(1) Connect the RS 232 interface cable and LocalNet interface cable to the LocalNet
RS 232 interface according to the labelling.
(2) Connect the RS 232 interface cable to the free interface (e.g. COM1) that has al-
ready been defined on the PC
(3) Connect the LocalNet interface cable to the LocalNet connection socket on the
system component (e.g. power source)
EN
11
Page 12

Update via LocalNet RS 232 interface
General information
Requirements for
using the LocalNet RS 232 interface
A software update for the following Fronius system components can be performed using
the LocalNet RS 232 interface:
- Power sources for the TS/TPS range (UST PC board)
- Power sources for the MW/TT range (UST PC board)
- Power sources for the TSt range
- Clear text display on the TransTig 2500/3500 Comfort
- Clear text display on the MagicWave 2500/3500 Comfort
The following requirements must be satisfied in order to perform software updates using
the LocalNet RS 232 interface:
- Power source firmware TS/TPS, MW/TT OFFICIAL UST V3.29.33 or higher
- Power source firmware TS/TPS, MW/TT OFFICIAL UST V4.01.06 or higher
- Power source firmware OFFICIAL TransSteel V1.1.15 or higher
- LocalNet & Tools software V2.6.c or higher installed on the PC
- For the TS/TPS, MW/TT range, BASICLoad software V3.50.2 or higher installed on
the PC
- For the TSt range, BASICLoad software V3.60.6 or higher installed on the PC
IMPORTANT! If software with a compatible version number has already been installed,
then only the configurations need to to checked.
Install LocalNet &
Tools software
Configure LocalNet Server Professional software
Insert the software tools CD into the CD drive or download the LNTools_X.Xx file
1
from the DownloadCenter (https://www.fronius.com/en/welding-technology/downloads).
Execute the LNTools_XX.exe file
2
Follow the instructions in the installation wizard
3
- LocalNet & Tools is installed
Execute the LocalNet Server Professional file - in the start menu under „FroniusPro-
1
duct Group / LocalNet SDK“
Select „COM1“ from the Network drop down menu
2
12
Page 13

Close LocalNet Server Professional
3
Install BASICLoad software
Configure BASICLoad software
Insert the software tools CD into the CD drive or download the BASICLoad_VX.XX.X
1
file from the DownloadCenter (https://www.fronius.com/en/welding-technology/downloads).
Execute the BASICLoad_VX.XX.X.exe file
2
Follow the instructions in the installation wizard
3
- BASICLoad is installed
Execute the BASICLoad setup file - in the start menu under „Fronius Product Group“
1
Select „LocalNet“ from the C167 (UST) dropdown menu
2
EN
Performing an
update
Close BASICLoad setup
3
WARNING!
Danger from incorrect operation and work that is not carried out properly.
This can result in serious personal injury and damage to property.
After switching on the system components, ensure that the relevant system compo-
▶
nent is not activated.
IMPORTANT! The latest firmware is available from the DownloadCenter (https://
www.fronius.com/de/schweisstechnik/downloads)
Connect the system components
1
Switch on the system components
2
Double click on the firmware to be installed
3
- BasicLoad starts
- The displays on the interface flash
13
Page 14

Troubleshooting
Not possible to update the firmware
Cause:
Remedy:
Update does not start
The status LED in the „BasicLoad“ window flashes yellow
An old version of „BasicLoad“ is installed on the PC
Install a newer version of „BasicLoad“ on the PC, repeat the update
Cause:
Remedy:
„Error occurred when opening the interface!“ message
Cause:
Remedy:
The components are not connected correctly
Ensure that all components are properly connected to each other
BasicLoad settings are not set to LocalNet
Set the BasicLoad settings to LocalNet
14
Page 15

Sommaire
Interface Localnet RS 232 16
Sécurité 16
Généralités 16
Livraison 16
Description des affichages surl’interface Local-Net RS 232 16
Raccorder ensemble les composants du système 17
Mise à jour via l’interface LocalNet RS 232 18
Généralités 18
Conditions requises pourl’utilisation del’interface Local-Net RS 232 18
Installer le logiciel LocalNet & Tools 18
Configurer le logiciel LocalNet Server Professional 18
Installer le logiciel BASICLoad 19
Configurer le logiciel BASICLoad 19
Effectuer la mise à jour 20
Diagnostic d’erreur, élimination de l'erreur 21
FR
15
Page 16
Interface Localnet RS 232
(1)
(3)
(4)
(2)
Sécurité
Risques dus à une connexion incorrecte avec la source de courant.
Cela peut entraîner des dommages sur le PC
▶
Généralités L’interface LocalNet RS232 ne peut être utilisée qu’en liaison avec un logiciel d’applicati-
on LocalNet des composants de système (source de courant, dévidoir, etc.) avec connecteur LocalNet. Pour un fonctionnement correct, le logiciel d’application LocalNet doit
avoir été lancé.
Livraison
ATTENTION!
Ne réaliser la connexion entre le PC et la source de courant qu’avec l’interface LocalNet RS 232 et les câbles fournis.
(1) Interface LocalNet RS 232
(2) Câble interfaces LocalNet
(3) Câble interfaces RS 232
(4) CD Software Tools
Description des
affichages
surl’interface Local-Net RS 232
16
Chaque affichage représente une ligne de transmission (TxD) ou une ligne de réception
(RxD). Un affichage clignotant signale un transfert de données sur les lignes correspondantes.
x ... L’affichage clignote
RS 232 LocalNet État
TxD RxD TxD RxD
x x x x La communication est en ordre
x - x x Aucun signal du PC ; démarrer le logiciel d’application
- - - x Fonction d’erreur sur l’interface ; vérifier la connexion
sur le PC
au PC et les composants du système ; éventuellement,
échanger l’interface
Page 17
RS 232 LocalNet État
Source de courantPC
Câble
interfaces
RS232
Câble
interfaces
LocalNet
LocalNet RS 232 Interface
TxD RxD TxD RxD
- x x - Le PC envoie des données - Aucun signal des composants du système ; composants du système éventuellement défectueux
- - - - Aucun affichage ne clignote ; vérifier la connexion au
PC et aux composants du système ; éventuellement,
échanger l’interface
FR
Raccorder ensemble les composants du
système
(1) Raccorder le câble interfaces RS 232 et le câble interfaces LocalNet selon les in-
scriptions figurant sur l’interface LocalNet RS 232
(2) Raccorder le câble interfaces RS 232 à une interface libre, déjà définie (p. ex.
COM1) du PC
(3) Raccorder le câble interfaces LocalNet au connecteur LocalNet des composants
du système (p. ex. source de courant)
17
Page 18

Mise à jour via l’interface LocalNet RS 232
Généralités En liaison avec l’interface LocalNet RS 232, une mise à jour de logiciel peut être effec-
tuée sur les composants de système Fronius suivants :
- Sources de courant de la série d’appareils TS/TPS (circuit imprimé UST)
- Sources de courant de la série d’appareils MW/TT (circuit imprimé UST)
- Sources de courant de la série d’appareils TSt
- Affichage en texte clair des TransTig 2500 / 3500 Comfort
- Affichage en texte clair des MagicWave 2500 / 3500 Comfort
Conditions requises pourl’utilisation del’interface
Local-Net RS 232
Installer le logiciel LocalNet &
Tools
Pour les mises à jour de logiciel avec l’interface LocalNet RS 232, les conditions requises du système sont les suivantes :
- Version de logiciel source de courant TS/TPS, MW/TT OFFICIAL UST V3.29.33 ou
supérieure
- Version de logiciel source de courant TS/TPS, MW/TT OFFICIAL UST V4.01.06 ou
supérieure
- Version de logiciel source de courant OFFICIAL TransSteel V1.1.15 ou supérieure
- Version du logiciel LocalNet & Tools V2.6.c ou supérieure installée sur le PC
- Pour la série d’appareils TS/TPS, MW/TT, version du logiciel BASICLoad V3.50.2 ou
supérieure installée sur le PC
- Pour la série d’appareils TSt, version du logiciel BASICLoad V3.60.6 ou supérieure
installée sur le PC
IMPORTANT! Si le logiciel est déjà installé avec une version compatible, seules les configurations doivent être vérifiées.
Placer le CD Software Tools dans le lecteur CD ou télécharger le fichier LN-
1
Tools_X.Xx du DownloadCenter (https://www.fronius.com/fr-fr/france/techniques-desoudage/telechargements)
Exécuter le fichier LNTools_XX.exe
2
Suivre les indications de l’assistant d’installation
3
- Le logiciel LocalNet & Tools est installé
Configurer le logiciel LocalNet
Server Professional
18
Exécuter le fichier LocalNet Server Professional - dans le menu de démarrage
1
sous « Fronius Product Group / LocalNet SDK »
Sélectionner « COM1 » dans le menu déroulant Réseau
2
Page 19

Fermer le logiciel LocalNet Server Professional
3
FR
Installer le logiciel BASICLoad
Configurer le logiciel BASICLoad
Placer le CD Software Tools dans le lecteur CD ou télécharger le fichier BASI-
1
CLoad_VX.XX.X du DownloadCenter (https://www.fronius.com/fr-fr/france/techniques-de-soudage/telechargements)
Exécuter le fichier BASICLoad_VX.XX.X.exe
2
Suivre les indications de l’assistant d’installation
3
- Le logiciel BASICLoad est installé
Exécuter le fichier BASICLoad-Setup - dans le menu de démarrage sous « Fronius
1
Product Group »
Sélectionner « LocalNet » dans le menu déroulant C167 (UST)
2
Fermer le Setup BASICLoad
3
19
Page 20

Effectuer la mise
à jour
AVERTISSEMENT!
Danger dû à une erreur de manipulation et d'erreur en cours d'opération.
Cela peut entraîner des dommages corporels et matériels graves.
Après la connexion des composants du système, veiller à ce que les composants du
▶
système concernés ne soient pas activés.
IMPORTANT! Le logiciel actuel est disponible dans le DownloadCenter (https://
www.fronius.com/fr-fr/france/techniques-de-soudage/telechargements).
Raccorder ensemble les composants du système
1
Connecter les composants du système
2
Double-cliquer sur le logiciel devant être installé
3
- Le logiciel BasicLoad démarre
- Les affichages de l’interface clignotent
20
Page 21

Diagnostic d’erreur, élimination de l'erreur
Mise à jour du logiciel impossible
Cause:
Remède:
La mise à jour ne démarre pas
La DEL d’état de la fenêtre « BasicLoad » clignote en jaune
Cause:
Remède:
Message « Erreur à l’ouverture de l’interface !»
Cause:
Remède:
Version ancienne de « BasicLoad » installée sur le PC
Installer un version récente de « BasicLoad » sur le PC, répéter ensuite la procédure de mise à
jour
Connexion défectueuse des composants
Vérifier que tous les composants sont correctement reliés entre eux
Les réglages BasicLoad ne sont pas effectués sur LocalNet
Effectuer les réglages BasicLoad sur LocalNet
FR
21
Page 22

22
Page 23

FR
23
Page 24

Fronius International GmbH
Froniusstraße 1
4643 Pettenbach
Austria
contact@fronius.com
www.fronius.com
Under www.fronius.com/contact you will find the adresses
of all Fronius Sales & Service Partners and locations.
spareparts.fronius.com
SPAREPARTS
ONLINE
 Loading...