

Page 1
D GB E
USA
Fronius Datalogger Web
Kurz-Installation
Fronius IG Plus
Fronius IG
Fronius IG US
+
Fronius Com Card
Fronius Datalogger Web
Quick installation
blau / blue / azul
max. 42V AC/6A
US: Class 2 only
Fronius
Com Card
IN
OUT
rot / red / rojo
Fronius Datalogger Web
Instalación rápida
12VDC 1A
Class 2
12VDC
Output
Class 2
Input only
blau /
blue /
azul
rot / red / rojo
OUTIN
PC / Laptop
1 Min. 1 Min.
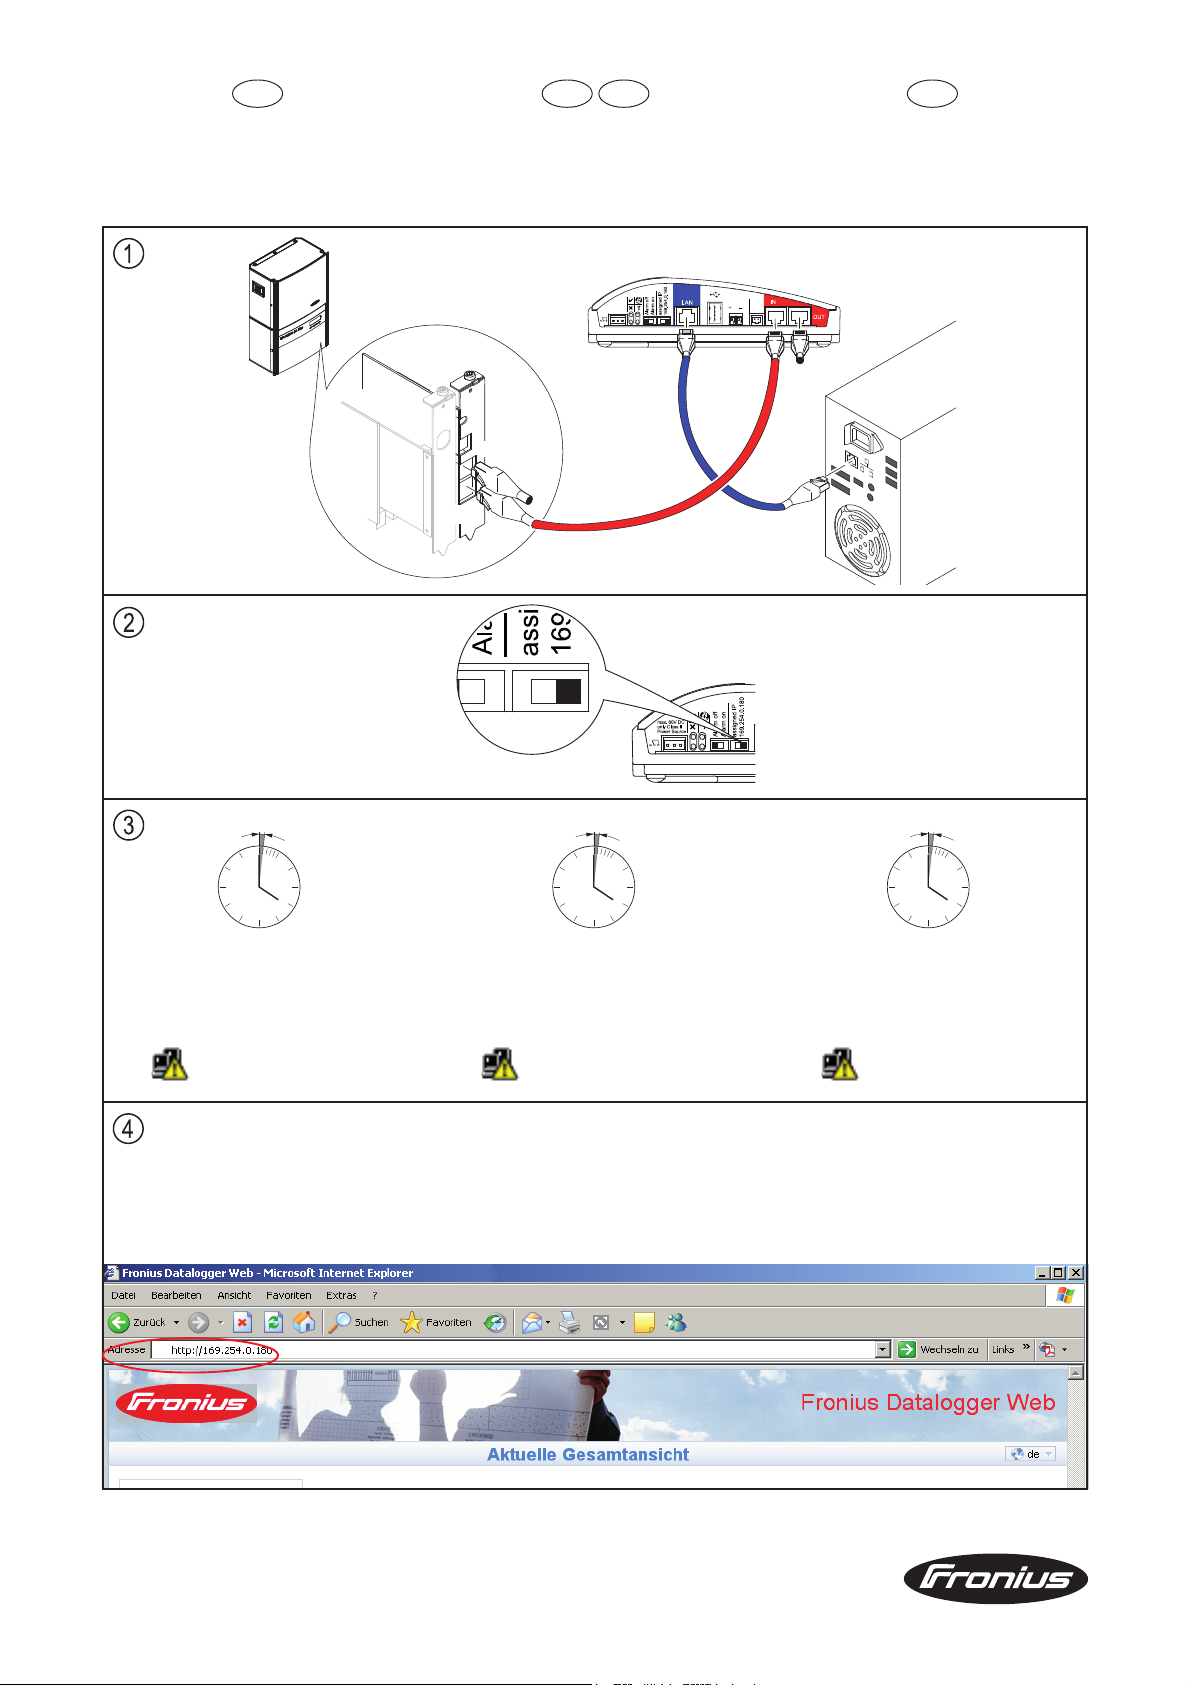
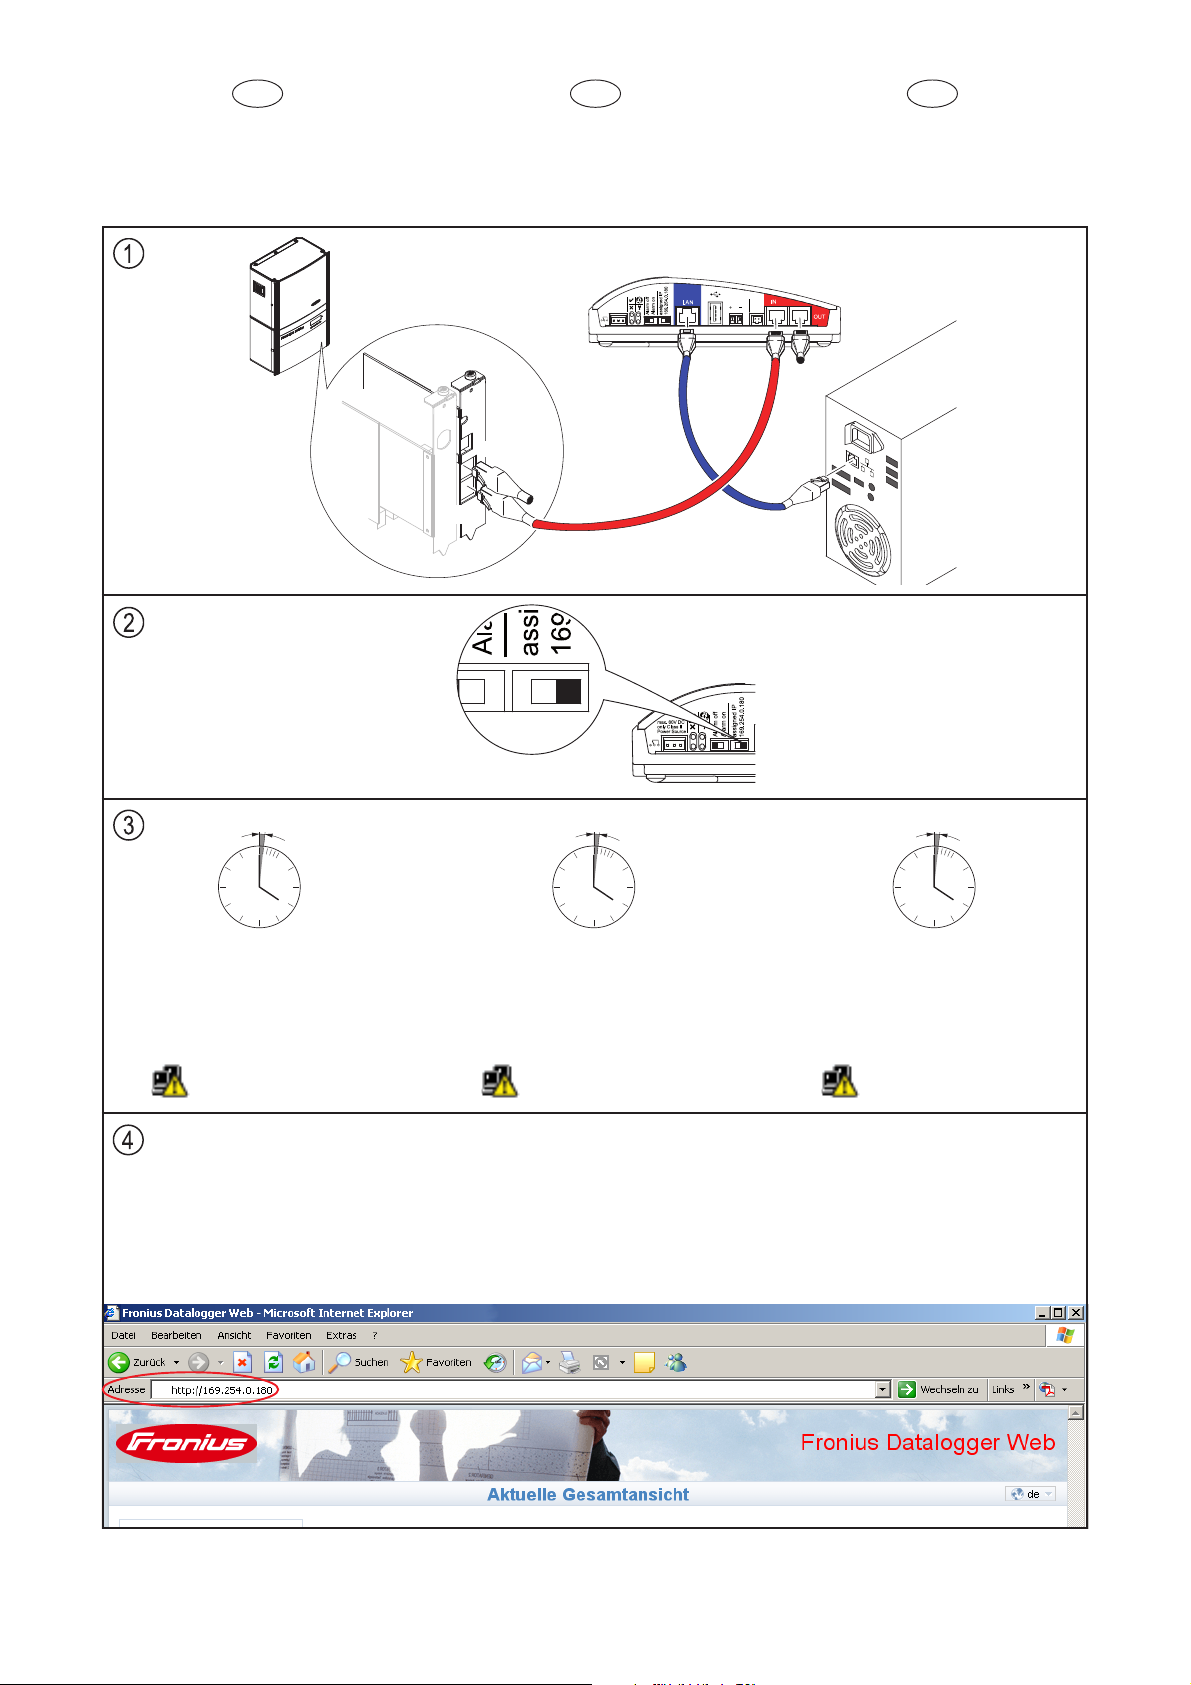
- ca. 1 Minute warten, bis in
der Task-Leiste des PC /
Laptop das ‘Connectivity’Symbol angezeigt wird:
- Internet-Browser öffnen (z.B.
Microsoft Internet Explorer)
- Im Adressfeld eingeben:
http://169.254.0.180
169.254.0.180
1 Min.
- Wait about 1 minute until the
‘Connectivity’ icon appears in
the task bar of the PC/laptop:
- Open web browser (e.g.
Microsoft Internet Explorer)
- In address bar type in:
http://169.254.0.180
- Esperar aproximadamente 1
minuto hasta que se muestre
el símbolo de ‘Connectivity’
en la barra de herramientas
del PC / ordenador
portátil:
- Abrir el browser de Internet
(por ejemplo, Microsoft
Internet Explorer)
- Introducir lo siguiente en el
campo de dirección:
http://169.254.0.180
Text und Abbildungen entsprechen dem technischen Stand bei Drucklegung. Änderungen vorbehalten.
Text and illustrations technically correct at the time of going to print. Right to effect modifications is reserved.
El texto y las ilustraciones corresponden al estado de la técnica en el momento de la impresión. Reservado el derecho a modific aciones.
42,0410,1438 022012 Fronius International GmbH, http://www.fronius.com
1
Page 2
D E
GB USA
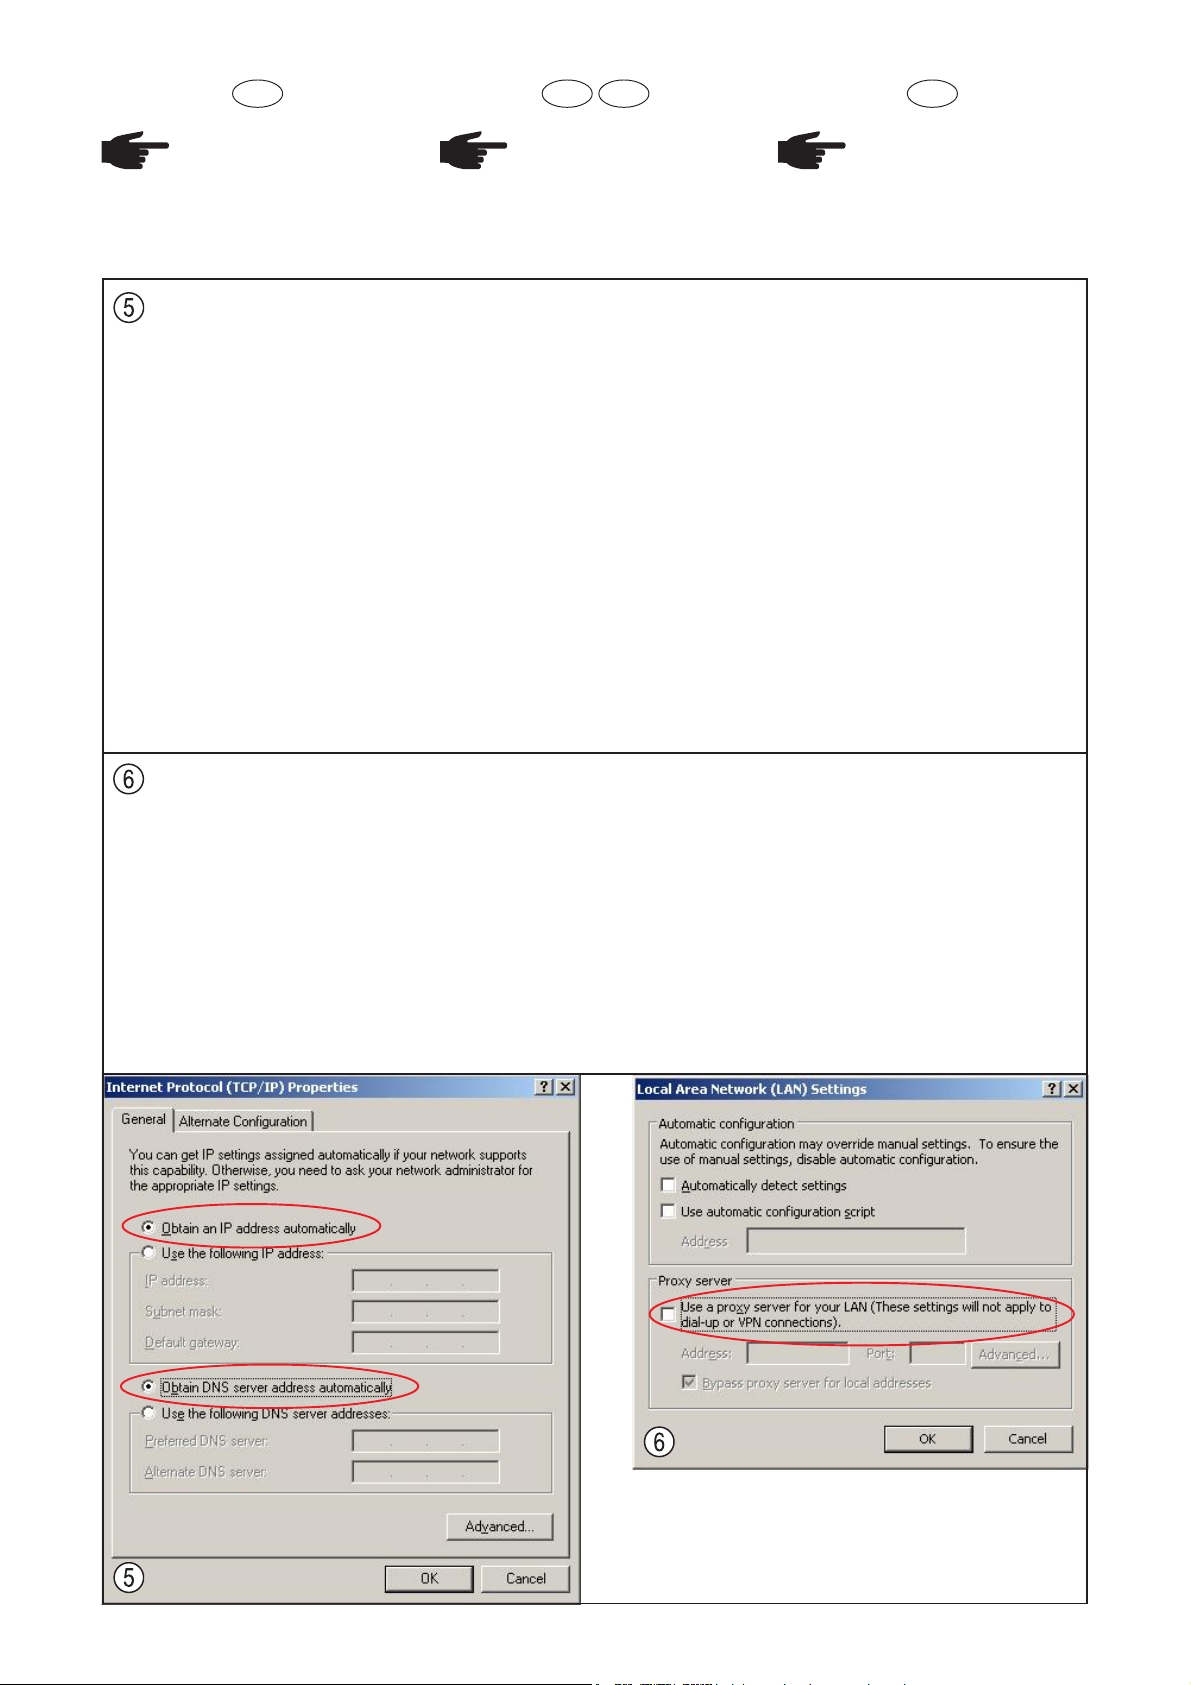
HINWEIS! Wenn keine
Verbindung zum Fronius
Datalogger Web aufgebaut wird, die NetzwerkEinstellungen überprüfen:
- Start / Einstellungen / Systemsteuerung
- Doppelklick auf ‘Netzwerkverbindungen’
- Doppelklick auf ‘LANVerbindung’
- Im Register ‘Allgemein’
Schaltfläche ‘Eigenschaften’
klicken
- ‘Internetprotokoll (TCP/IP)’
anklicken
- Schaltfläche ‘Eigenschaften’
klicken
- ‘IP-Adresse automatisch
beziehen’ und ‘DNS-Serveradresse automatisch beziehen’ aktivieren
NOTE! If no connection
can be established to the
Fronius Datalogger Web,
check the network settings:
- Start / Settings / Control Panel
- Double click on „Network
Connections“
- Double click on „Local Area
Connection“
- Click on „Properties“ on the
„General“ tab
- Click on „Internet Protocol
(TCP/IP)“
- Click the „Properties“ button
- Select ‘Obtain an IP address
automatically’ and ‘Obtain
DNS server address automatically’
¡OBSERVACIÓN! Si no
se establece la conexión
con el Fronius Datalogger
Web, comprobar los
ajustes de la red:
- Start / Settings / Control
Panel
- Doble clic en ‘Network
Connections’
- Doble clic en ‘Local Area
Connection’
- Hacer clic en el botón
‘Properties’ del registro
‘General’
- Hacer clic en ‘Internet
Protocol (TCP/IP)’
- Hacer clic en el botón
‘Properties’
- Activar ‘Obtain an IP adress
automatically’ y ‘Obtain DNS
server adress automatically’
- Internet-Browser öffnen (z.B.
Microsoft Internet Explorer)
- Menüpunkt ‘Extras’ klicken
- ‘Internetoptionen’ klicken
- Register ‘Verbindungen’
klicken
- Im Feld ‘LAN-Einstellungen’
die Schaltfläche ‘Einstellungen’ klicken
- ‘Proxyserver für LAN verwenden’ deaktivieren
- Open web browser (e.g.
Microsoft Internet Explorer)
- Click on „Tools“ menu.
- Click on „Internet Options“
- Select the „Connections“ tab
- In the „Local Area Network
(LAN) settings“ field, click the
„LAN settings“ button
- Uncheck the ‘Use a proxy
server for your LAN’ box
- Abrir el browser de Internet
(por ejemplo, Microsoft
Internet Explorer)
- Hacer clic en la opción de
menú ‘Tools’
- Hacer clic en ‘Internet Options’
- Hacer clic en el registro
‘Connections’
- Hacer clic en el botón ‘Properties’ en el campo ‘LAN Settings’
- Desactivar ‘Use a proxy
server for your LAN’
2
Page 3
F I NL
Fronius Datalogger Web
Installation rapide
Fronius IG Plus
Fronius IG
Fronius IG US
+
Fronius Com Card
Fronius Datalogger Web
Installazione rapida
bleu / azzurro / blauw
max. 42V AC/6A
US: Class 2 only
Fronius
Com Card
IN
OUT
rouge / rosso /
rood
Fronius Datalogger Web
Snelle installatie
12VDC 1A
Class 2
12VDC
Output
Class 2
Input only
bleu /
azzurro /
blauw
rouge / rosso / rood
OUTIN
PC / Laptop
- Attendre env. 1 minute
jusqu’à ce que la barre des
tâches du PC / Ordinateur
portable affiche l’icône
„Connexion réseau“ :
- Ouvrir le navigateur Internet
(par ex. Microsoft Internet
Explorer)
- Dans la barre d’adresse,
saisir : http://169.254.0.180
169.254.0.180
1 Min.
- Attendere ca. 1 minuto fino a
che nella barra delle applicazioni del PC/laptop non viene
visualizzato il simbolo „Connectivity“:
- Aprire il browser Internet (ad
es. Microsoft Internet Explorer)
- Nel campo dell’indirizzo,
immettere:
http://169.254.0.180
1 Min.1 Min.
- Wacht ca. 1 minuut totdat in
de taakbalk van de pc /
laptop het ‘Connectivity’symbool wordt weergegeven:
- Open uw internetbrowser
(bijvoorbeeld Microsoft
Internet Explorer)
- Typ in de adresregel:
http://169.254.0.180
Les textes et les illustrations correspondent à l’état de la technique au moment de l’impression. Sous réserve de modifications.
Il testo e le illustrazioni corrispondono alla dotazione tecnica dell’apparecchio al momento della stampa. Con riserva di modifiche.
Teksten en afbeeldingen komen overeen met de stand der techniek bij het ter perse gaan. Wijzigingen voorbehouden.
3
Page 4

F NL
I
REMARQUE ! Si aucune
connexion n’est établie
vers Datalogger Ethernet,
vérifier les paramètres
réseau :
- Démarrer / Paramètres /
Panneau de configuration
- Double-cliquer sur „Connexions réseau“
- Double-cliquer sur „Connexion au réseau local“
- Dans l’onglet „Général“, cliquer
sur le bouton „Propriétés“
- Cliquer sur „Protocole
Internet (TCP/IP)“
- Cliquer sur le bouton „Propriétés“
- Activer „Obtenir une adresse
IP automatiquement“ et
„Obtenir les adresses des
serveurs DNS automatiquement“
AVVERTENZA! Se non
viene stabilita alcuna
connessione al Datalogger Ethernet, controllare
le impostazioni di rete:
- Start / Impostazioni / Pannello
di controllo
- Fare doppio clic su „Connessioni di rete“
- Fare doppio clic su „Connessione alla rete locale (LAN)“
- Nella scheda „Generale“, fare
clic su „Proprietà“
- Fare clic su „Protocollo
Internet (TCP/IP)“
- Fare clic su „Proprietà“
- Attivare „Ottieni automaticamente un indirizzo IP“ e
„Ottieni indirizzo server DNS
automaticamente“
¡OPMERKING! Als er
geen verbinding met
Datalogger Ethernet tot
stand komt, controleer dan
de netwerk-instellingen:
- Start / Instellingen / Configuratiescherm
- Dubbelklik op ‘Netwerkverbindingen’
- Dubbelklik op ‘LAN-verbinding’
- Klik op het tabblad ‘Algemeen’ op de knop ‘Eigenschappen’
- Schakel het selectievakje
‘Internet-protocol (TCP/IP)’ in
- Klik op de knop ‘Eigenschappen’
- Selecteer de opties ‘Automatisch een IP-adres laten
toewijzen’ en ‘Automatisch
een DNS-serveradres laten
toewijzen’
- Ouvrir le navigateur Internet
(par ex. Microsoft Internet
Explorer)
- Sélectionner le menu „Outils“
- Cliquer sur „Options Internet“
- Cliquer sur l’onglet „Connexions“
- Dans le champ „Paramètres du
réseau local“, cliquer sur le
bouton „Paramètres réseau“
- Désactiver „Utiliser un serveur
proxy pour votre réseau local“
-
Aprire il browser Internet (ad
es. Microsoft Internet Explorer)
- Fare clic sulla voce di menu
„Strumenti“
- Fare clic su „Opzioni Internet“
- Fare clic sulla scheda
„Connessioni“
- Nel campo „Impostazioni rete
locale (LAN)“, fare clic su
„Impostazioni LAN“
- Disattivare „Utilizza un server
proxy per le connessioni LAN“
- Open uw internetbrowser
(bijvoorbeeld Microsoft
Internet Explorer)
- Open het menu ‘Extra’
- Kies ‘Internetopties’
- Klik op het tabblad ‘Verbindingen’
- Klik in het gedeelte ‘LANinstellingen’ op de knop
‘Instellingen’
- Schakel het selectievakje
‘Een proxyserver voor het
LAN-netwerk gebruiken’ uit
4
Page 5

CZ
ZH
TR
Fronius Datalogger Web
Struèný návod k instalaci
Fronius IG Plus
Fronius IG
Fronius IG US
+
Fronius Com Card
Fronius
Com Card
OUT
IN
červená / kirmizi /
modrá / mavi /
max. 42V AC/6A
US: Class 2 only
Fronius Datalogger WFronius Datalogger W
Fronius Datalogger W
Fronius Datalogger WFronius Datalogger W
Kurulum ÖzetiKurulum Özeti
Kurulum Özeti
Kurulum ÖzetiKurulum Özeti
12VDC 1A
Class 2
12VDC
Output
Class 2
Input only
modrá /
mavi /
červená / kirmizi /
OUTIN
PC / Laptop /
Dizüstü bilgisayar
ebeb
eb
ebeb
1 Min. 1 Min.
-Vyčkejte cca 1 minutu, než
se v liště PC/laptopu zobrazí
symbol ’Connectivity’:
- Otevřete internetový
prohlížeč (např. Microsoft
Internet Explorer).
- Do adresního pole zadejte
adresu: http://169.254.0.180
169.254.0.180
- PC / dizüstü bilgisayarýn görev
çubuðunda ‘Connectivity’
(Baðlantý) sembolü görüntüle-
ne kadar, yaklaþýk 1
dakika bekleyin:
- Internet Tarayýcýsýný açýn
(örn. Microsoft Internet
Explorer)
- Adres alanýna þu adresi
http://169.254.0.180http://169.254.0.180
girin:
http://169.254.0.180
http://169.254.0.180http://169.254.0.180
Text a vyobrazení odpovídají technickému stavu v době zadání do tisku. Změny vyhrazeny.
Metin ve resimler, baskýnýn hazýrlandýðý tarihte geçerli olan teknik düzeyi yansýtmaktadýr. Deðiþiklik yapma hakký saklýdýr.
5
Page 6

CZ
ZH
TR
UPOZORNĚNÍ! V přípa-
dě, že nebude navázáno
spojení se zařízením
Datalogger Ethernet, je
třeba přezkoušet nastavení sítě:
- Start/Nastavení/Ovládací panely
- Poklepejte na položku ‘Síťová
propojení’.
- Poklepejte na položku ‘Propojení LAN’.
- V nabídce ‘Všeobecné’ klepněte
na tlačítko ‘Vlastnosti’.
- Klepněte na položku ‘Internetový protokol (TCP/IP)’.
- Klepněte na tlačítko ‘Vlastnosti’.
- Vyberte volbu ‘Automaticky
obsadit adresu IP’ a ‘Automaticky
obsadit adresu serveru DNS’.
- Otevřete internetový prohlížeč
(např. Microsoft Internet
Explorer).
- Klepněte na nabídku ‘Nástroje’.
- Klepněte na ‘Možnosti internetu’.
- Klepněte na kartu ‘Připojení’.
- V poli ‘Nastavení místní sítě
LAN’ klepněte na tlačítko
‘Nastavení’.
- Zrušte zaškrtnutí pole ‘Použít
pro síť LAN server Proxy’.
NOT!NOT!
NOT! Herhangi bir
NOT!NOT!
Datalogger Ethernet
baðlantýsý yapýlmamasý
durumunda, að ayarlarýný
kontrol edin:
- Baþlat / Ayarlar / Denetim
Masasý
- ‘Að Baðlantýlarý’na çift týklatýn
- ‘LAN-Baðlantýsý’ný çift týklatýn
- ‘Genel’ sekmesinde ‘Özellikler’ düðmesini týklatýn
- ‘(TCP/IP) Internet
Protokolü’nü týklatýn
- ‘Özellikler’ düðmesini týklatýn
- ‘Otomatik olarak bir IP adresi
al’ ve ‘DNS sunucu adresini
otomatik olarak al’ düðmelerini etkinleþtirin
- Internet Tarayýcýsýný açýn
(örn. Microsoft Internet
Explorer)
- ‘Ek Özellikler’ menü öðesini
týklatýn
- ‘Internet Seçenekleri’ni
týklatýn
- ‘Baðlantýlar’ sekmesini
týklatýn
- ‘Yerel að (LAN) ayarlarý’
alanýnda, ‘Ayarlar’ düðmesini
týklatýn
- ‘Yerel aðýnýz için bir proxy
sunucusu kullanýn’ onay
kutusunu devre dýþý býrakýn
6
Page 7

HU
RUS
DK
Fronius Datalogger Web
(Fronius web adatgyűjtő)
Rövid telepítés
Fronius IG Plus
Fronius IG
Fronius IG US
+
Fronius Com Card
Fronius Datalogger Web
Быстрая установка
kék/синий/blå
max. 42V AC/6A
US: Class 2 only
Fronius
Com Card
IN (BE)
OUT
(KI)
piros/красный/rød
Fronius Datalogger Web
Kort installation
12VDC 1A
Class 2
12VDC
Output
Class 2
Input only
IN
(BE)
kék
синий
blå
piros/красный/rød
OUT
(KI)
PC / laptop
ПК/портативный ПК
1 Min.
- Várjon kb. 1 percet, amíg a
PC / laptop tálcáján megjelenik a ‘Connectivity’ (kapcsolat) szimbólum:
Nyissa meg az Internet
böngészőt (pl. Microsoft
Internet Explorer)
- Vigye be a címmezõbe a
következõt:
http://169.254.0.180
169.254.0.180
1 ìèí.
- Подождите прибл. 1 мин,
пока на панели управления
ПК/портативного ПК не
появится символ «Connectivity»:
- Откройте интернет-обозреватель (например, Microsoft Internet Explorer)
- В поле ввода адреса
укажите:
http://169.254.0.180
1 Min.
- vent ca. 1 minut, til ‘Connectivity’-symbolet vises i pc’ens
/ laptoppens taskliste:
- Åbn internet-browseren
(f.eks. Microsoft Internet
Explorer)
- Indtast følgende i adressefeltet: http://169.254.0.180
A szöveg és az ábrák a kézirat leadásának időpontjában fennálló műszaki állapotnak felelnek meg. A változtatás jogát fenntartjuk.
Текст и иллюстрации отражают технический уровень на момент публикации. Компания оставляет за собой право на внесение изменений.
Tekst og billeder svarer til de tekniske forhold på trykketidspunktet. Ret til ændringer forbeholdes.
7
Page 8

HU
RUS
DK
TUDNIVALÓ! Ha nem jön
létre a kapcsolat a
Fronius Datalogger Webbel, ellenőrizze a hálózati
beállításokat:
- Start / beállítások / rendszervezérlés
- Kettős kattintás a ‘hálózati
kapcsolatokra’
- Kettős kattintás a ‘LANkapcsolatra’
- Kattintson az ‘Általános’
regiszterben a ‘Tulajdonságok’ kapcsolófelületre
- Kattintson a ‘(TCP/IP internetprotokollra)’
- Kattintson a ‘Tulajdonságok’
kapcsolófelületre
- Aktiválja az ‘IP-cím automatikus konfigurálását’ és a
‘DNS-szervercím automatikus konfigurálását’
УКАЗАНИЕ! В случае
отсутствия соединения
с Fronius Datalogger
Web проверьте
настройки сети:
- Старт/настройки/
управление системой
- Дважды щелкните по
кнопке «Соединения сети»
- Дважды щелкните по
кнопке «Соединение LAN»
- Во вкладке «Общие
сведения» нажмите на
кнопку «Свойства»
- Нажмите на кнопку
«Интернет-протокол (TCP/
IP)»
- Нажмите на кнопку
«Свойства»
- Активируйте опции
«Получать IP-адрес
автоматически» и
«Получать адрес DNSсервера автоматически»
BEMÆRK! Hvis der ikke
opbygges nogen forbindelse til Fronius
Datalogger Web, kontrolleres netværks-indstillingerne:
- Start / indstillinger / systemstyring
- Dobbeltklik på ‘Netværksforbindelser’
- Dobbeltklik på ‘LAN-forbindelse’
- Klik på kontaktknappen
‘Egenskaber’ i registeret
‘Generel kontaktknap’
- Klik på ‘Internetprotokol
(TCP/IP)’
- Klik på kontaktknappen
‘Egenskaber’
- Aktivér ‘Tildel automatisk IPadresse’ og ‘Tildel automatisk DNS-serveradresse’
- Nyissa meg az Internet
böngészőt (pl. Microsoft
Internet Explorer)
- Kattintson az ‘Extrák’ menüpontra
- Kattintson az ‘Internet opciókra’
- Kattintson a ‘Kapcsolatok’
regiszterre
- Kattintson a ‘LAN-beállítások’
mezőben a ‘Beállítások’ kapcsolófelületre
- Deaktiválja a LAN ‘Proxy-szerver
használatát’
- Откройте интернет-обозреватель (например,
Microsoft Internet Explorer)
- Выберите пункт меню
«Дополнительные опции»
- Нажмите на кнопку «Опции
Интернета»
- Выберите вкладку «Соединения»
- В поле «Настройки LAN»
нажмите на кнопку «Настройки»
- Дезактивируйте опцию
«Использовать прокси-сервер
для LAN»
- Åbn internet-browseren
(f.eks. Microsoft Internet
Explorer)
- Klik på menupunktet ‘Ekstra’
- Klik på ‘Internetoptioner’
- Klik på registeret ‘Forbindelser’
- Klik på kontaktknappen
‘Indstillinger’ i feltet ‘LANindstillinger
- Deaktivér ‘Anvend proxyserver til LAN’
8
 Loading...