

Page 1

/ Battery Charging Systems / Welding Technology / Solar Electronics
Demo Licence / Licence Key
Bedienungsanleitung
Software
DEENFR
Operating Instructions
Software
Instructions de service
Logiciel
42,0410,0873 002-28032012
Page 2

Page 3

Allgemein
Produktkonzept Zusätzlich zu der umfangreichen Funktionalität der digitalen Stromquellen bietet Fronius
ein reichhaltiges Angebot an Optionen. Vielfach besteht Interesse seitens des Kunden
das Einsatzgebiet seiner digitalen Stromquelle zu erweitern, oder seine Anlage weiter zu
individualisieren.
Demo Licence / Licence Key ermöglicht die kurzzeitige Freischaltung von Optionen
direkt an der Anlage des Kunden.
DE
Demo Licence
Licence Key Licence Key funktioniert nach demselben Prinzip wie Demo Licence. Licence Key wird
Eine Vorführung direkt an der Anlage des Kunden bietet ideale Voraussetzungen, die
Vorteile der in Frage kommenden Optionen zu präsentieren. Dies vor allem, weil der
Nutzen der gewünschten Optionen direkt in Zusammenhang mit der Anwendung des
Kunden demonstriert wird.
Auch die Einschulung des Kunden vor Ort ist in vielen Fällen wünschenswert.
All das ermöglicht Demo Licence.
Wichtig! Demo Licence ermöglicht serienmäßig auch die Präsentation von Optionen,
welche als Vollversion ohne PC genutzt werden können. Da Demo Licence ausschließlich in Verbindung mit einem PC (Notebook) lauffähig ist, eignet sich DemoLicence
jedoch nur für Demonstrationszwecke.
Demo Licence wird an einen PC (Notebook) angesteckt. Der PC (Notebook) ist über
das Interface „RS 232 / LocalNet“ (4,100,262) mit dem LocalNet der Stromquelle verbunden.
Solange oben genannte Verbindung aufrecht bleibt, sind die für Demo Licence freigeschalteten Optionen voll funktionsfähig und stehen für Demonstrations- und Einschulungszwecke zur Verfügung.
ebenfalls an einen PC (Notebook) angesteckt. Die für den Licence Key freigeschalteten
Optionen stehen an jeder beliebigen Stromquelle zur Verfügung, solange der PC (Notebook) mit dieser Stromquelle verbunden bleibt.
Software Servicemodul
Für Licence Key sind auschließlich Optionen im Angebot, welche auch in der Vollversion
einen PC (Notebook) erfordern.
In Verbindung mit der Software Servicemodul, können zusätzliche Optionen am Licence
Tool / Licence Key freigeschaltet werden. Dies erfolgt nach demselben Prinzip wie bei
einer Stromquelle.
Wichtig! Die Software Servicemodul ist im Umfang des Software-Paketes „LocalNet &
Tools“ enthalten, welches Demo Licence / Licence Key beiliegt.
Für die Bestellung der mittels Demo Licence / Licence Key freizuschaltenden Optionen
steht dieselbe Auswahl zur Verfügung, wie für die digitalen Stromquellen selbst. Die
Identifizierung des einzelnen Demo Licence / Licence Keys erfolgt über die im Demo
Licence / Licence Key gespeicherte und die darauf aufgedruckte Seriennummer.
3
Page 4

Software Servicemodul
(Fortsetzung)
Ausführungen Um den unterschiedlichen Schnittstellen an den PCs (Notebooks) Rechnung zu tragen,
Wurde die gewünschte Option angefordert, erhalten Sie einen Code zur Freischaltung
der gewünschten Option, z.B. per E-Mail.
werden folgende Ausführungen angeboten:
- Demo Licence für parallele Schnittstelle .................... 4,045,896
- Demo Licence für USB-Schnittstelle .......................... 4,045,898
- Licence Key für parallele Schnittstelle ........................ 4,045,932
- Licence Key für USB-Schnittstelle.............................. 4,045,934
Systemvoraussetzungen
PC (Notebook)
Stromquelle
HINWEIS! Da Fronius keinen Einfluss auf die Anzahl der installierten Applikatio-
nen und des verwendeten Betriebssystemes hat, ist eine Angabe der Mindestvoraussetzungen für die Hardware des verwendeten PC (Notebooks) nicht
möglich.
In Abhängigkeit der Schnittstellen-Ausführung Ihres Demo Licence / Licence Key, sind
folgende Betriebssysteme zulässig:
- Parallele Schnittstelle: Windows 95 / 98 / 98 SE / ME / NT 4.0 / 2000 / XP
- USB-Schnittstelle: Windows 98 / 98 SE / ME / 2000 / XP
Installierte Software (im Lieferumfang von Demo Licence):
- Software-Paket „LocalNet & Tools“, ab Version 2.5 c
- Software „WIBU-Key“ (WKDU-INT.exe)
Demo Licence / Licence Key wird von folgenden Stromquellen unterstützt:
- Trans Synergic 4000 / 5000
- TransPuls Synergic 2700 / 3200 / 4000 / 5000
- TransTig 2200 / 2500 / 3000 / 4000 / 5000
- MagicWave 1700 / 2200 / 2500 / 3000 / 4000 / 5000
Demo Licence / Licence Key wird ab folgender Software-Version unterstützt:
- Software-Version OFFICIAL UST V2.85.1 (Stromquelle)
4
Page 5
Bestellnummern
Demo Licence - Demo Licence für parallele Schnittstelle .................... 4,045,896
- Demo Licence für USB-Schnittstelle .......................... 4,045,898
Mit Demo Licence wird folgende Software mitgeliefert:
- LocalNet & Tools, ab Version 2.5 c
- Software „WIBU-Key“ (WKDU-INT.exe)
Licence Key - Licence Key für parallele Schnittstelle ........................ 4,045,932
- Licence Key für USB-Schnittstelle.............................. 4,045,934
Mit Licence Key wird folgende Software mitgeliefert:
- LocalNet & Tools, ab Version 2.5 c
- Software „WIBU-Key“ (WKDU-INT.exe)
DE
Verfügbare
Optionen
Für Demo Licence / Licence Key stehen sämtliche Optionen zur Verfügung, die auch zur
endgültigen Freischaltung an der Stromquelle angeboten werden.
Derzeit sind folgende Optionen verfügbar:
HINWEIS! Die Option Mode CC / CV (Konstantstrom / Konstantspannung) steht
nur zur Verfügung, wenn am LocalNet ein Roboterinterface ROB 5000 oder ein
Feldbuskoppler für Roboteransteuerung, angeschlossen ist.
Artikel Stromquelle Demo Licence Licence Key
(Parallel / USB) (Parallel / USB)
(4,045,896 / 898) (4,045,932 / 934)
4,061,101 SynchroPuls Option Integriert* Nicht Verfügbar
4,061,102 SFI Option Integriert* Nicht Verfügbar
4,061,103 JobExplorer Option Nicht Verfügbar Nicht Verfügbar
4,061,107 JobExplorer Enterprise Nicht verfügbar Option Option
4,061,104 GunTrigger Option Integriert* Nicht Verfügbar
4,061,105 WeldProcessData Option Nicht Verfügbar Nicht Verfügbar
4,061,108 WeldProcessData Enterprise Nicht verfügbar Option Option
4,061,109 WeldOffice Option Nicht Verfügbar Nicht Verfügbar
4,061,111 WeldOffice Enterprise Nicht Verfügbar Option Option
4,061,106 Mode CC / CV Option Integriert* Nicht Verfügbar
4,061,112 TCS Option Integriert* Nicht Verfügbar
4,061,113 Drive Option Integriert* Nicht Verfügbar
4,061,110 TimeTwin Digital Option Nicht Verfügbar Nicht Verfügbar
4,061,120 Dokumentation Option Nicht Verfügbar Nicht Verfügbar
4,061,121 Dokumentation Enterprise Nicht Verfügbar Option Option
Option ................... Mitbestellen mit dem Produkt oder Nachbestellen als Option möglich
Integriert ................ Es erfolgt ein automatisches Ausliefern des Produktes mit der Freischaltung. Bei fehlender Freischaltung
Nicht verfügbar ..... Bestellen oder Freischalten ist nicht möglich
* ............................. Nicht für den Dauerbetrieb geeignet, da der PC immer mit der Stromquelle verbunden sein muss.
(ältere Version), ist das Bestellen eines Freischaltcodes erforderlich.
Deshalb eignet sich diese Option nur für Demonstrationszwecke.
5
Page 6

Zubehör HINWEIS! Demo Licence / Licence Key kann nur in Verbindung mit dem Inter-
face RS 232 / LocalNet verwendet werden.
- Interface RS 232 / LocalNet ....................................... 4,100,262
Sind sämtliche Anschlussbuchsen LocalNet des Schweißsystems (z.B. an der Stromquelle oder am Drahtvorschub) belegt, werden folgende Optionen empfohlen:
- Verteiler „LocalNet passiv“ ......................................... 4,100,261
HINWEIS! Der Verteiler „LocalNet passiv“ funktioniert nur ordnungsgemäß,
wenn beide Verteilenden angeschlossen sind.
- Verteiler „LocalNet aktiv“ ............................................ 4,100,298
HINWEIS! Gegenüber dem Verteiler LocalNet passiv können beim Verteiler
LocalNet aktiv einzelne Anschlussbuchsen unbelegt bleiben, wenn die zusätzlichen Teilnehmer nicht mehr benötigt werden.
6
Page 7

Demo Licence / Licence Key anschließen
DE
Sicherheit
Hardware verknüpfen
WARNUNG! Fehlbedienung und fehlerhaft durchgeführte Arbeiten können
schwerwiegende Sach- und Personenschäden verursachen. Die folgenden
Arbeitsschritte dürfen nur von geschultem Fachpersonal durchgeführt werden!
Beachten Sie die Sicherheitsvorschriften in der Bedienungsanleitung Ihrer
Digitalen Stromquelle.
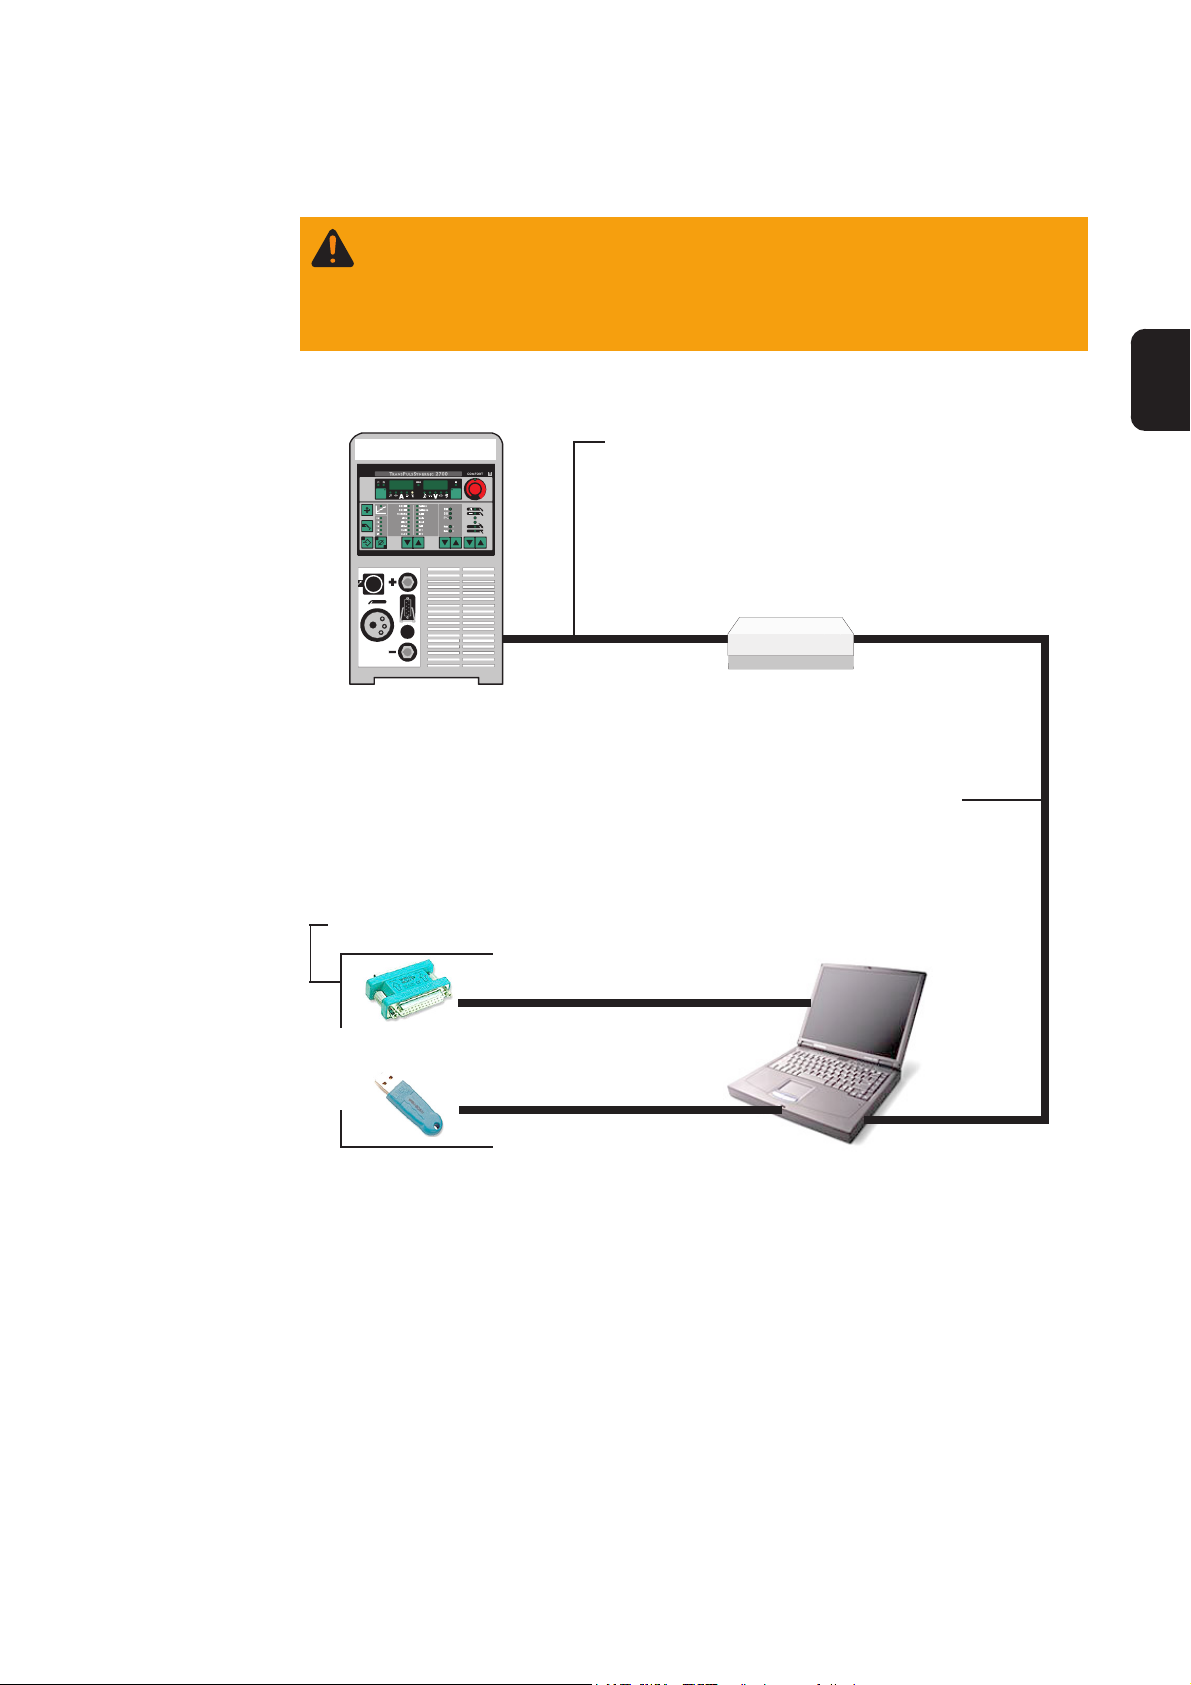
Stromquelle
3. Je nach Schnittstellen-Ausführung,
DemoLicence / Licence Key an einer
freien
- parallelen Schnittstelle
- USB-Schnittstelle
des PCs (Notebooks) anstecken
1. Verbindungskabel LocalNet an einer
freien Anschlussbuchse LocalNet
anstecken (z.B. an der Stromquelle)
Interface RS 232 /
LocalNet (4,100,262)
RS 232LocalNet
2. RS 232-Kabel an einer
freien seriellen Schnittstelle
des PCs (Notebooks)
anstecken
wahlweise
DemoLicence Parallel (4,045,896)
LicenceKey Parallel (4,045,932)
DemoLicence USB (4,045,898)
LicenceKey USB (4,045,934)
PC
(Notebook)
serielle Schnittstelle
7
Page 8
Software installieren
Software-Paket
„LocalNet &
Tools“
Das Software-Paket „LocalNet & Tools“ sowie der Software „WIBU-Key“ ist im Lieferumfang des Interface „RS 232 / LocalNet“ (4,100,262) enthalten.
- Software „LocalNet & Tools“ installieren
HINWEIS! Nach der Installation der Software „LocalNet & Tools“, folgende Datei
im Explorer aufrufen:
- Zum Beispiel: C: \ Fronius \ Setup \ LNTOOLS \ 25c_en \ WKDU-Int.exe
Die Datei „WKDU-Int.exe“ dient zur Installation der Software „WIBU-Key“. Wird die
Software „WIBU-Key“ nicht installiert, kann es zu Problemen beim Anwenden des Demo
Licence Tools kommen.
Demo Licence / Licence Key anwenden
Datenverbindung
- Demo Licence / Licence Key an der entsprechenden Schnittstelle des PCs (Notebooks) und am Interface RS 232 / LocalNet anschließen,
- gemäß Kapitel „Demo Licence / Licence Key anschließen“
- Software „Servicemodul“ starten
Verfügbarkeit der
Optionen
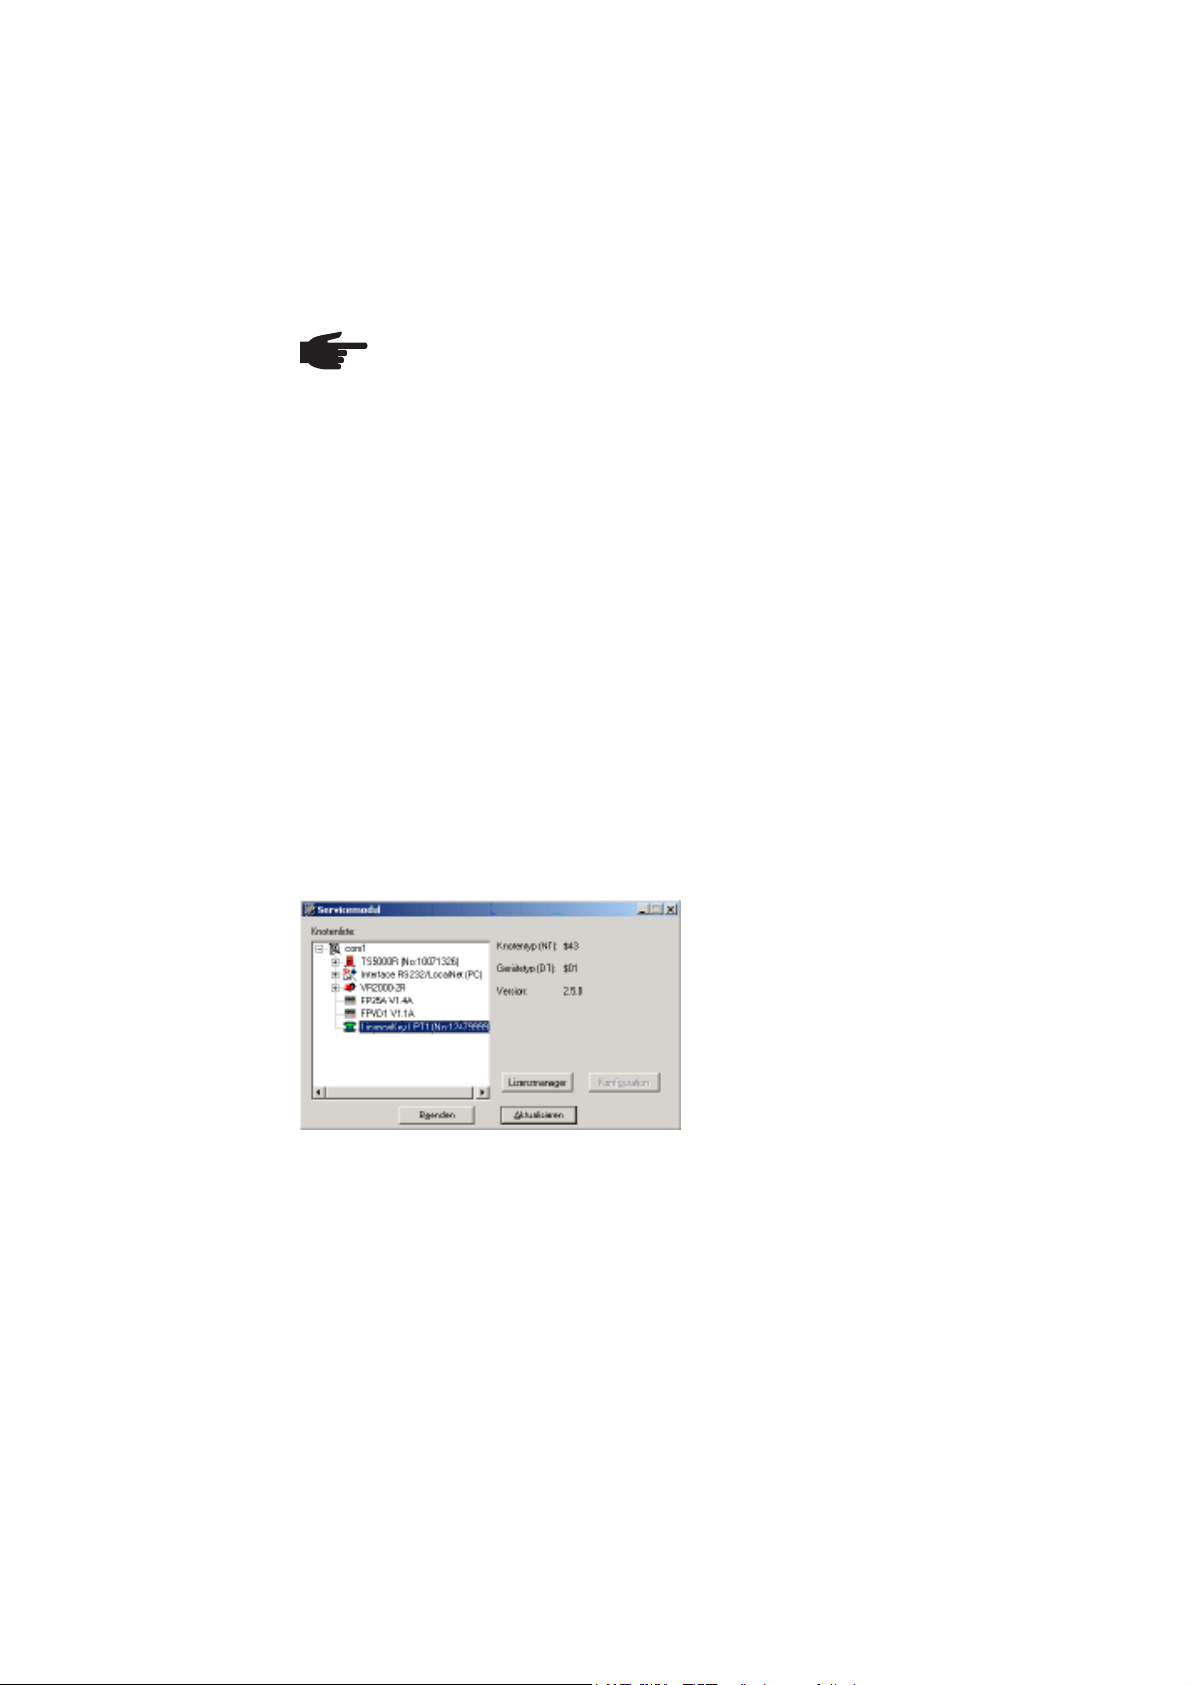
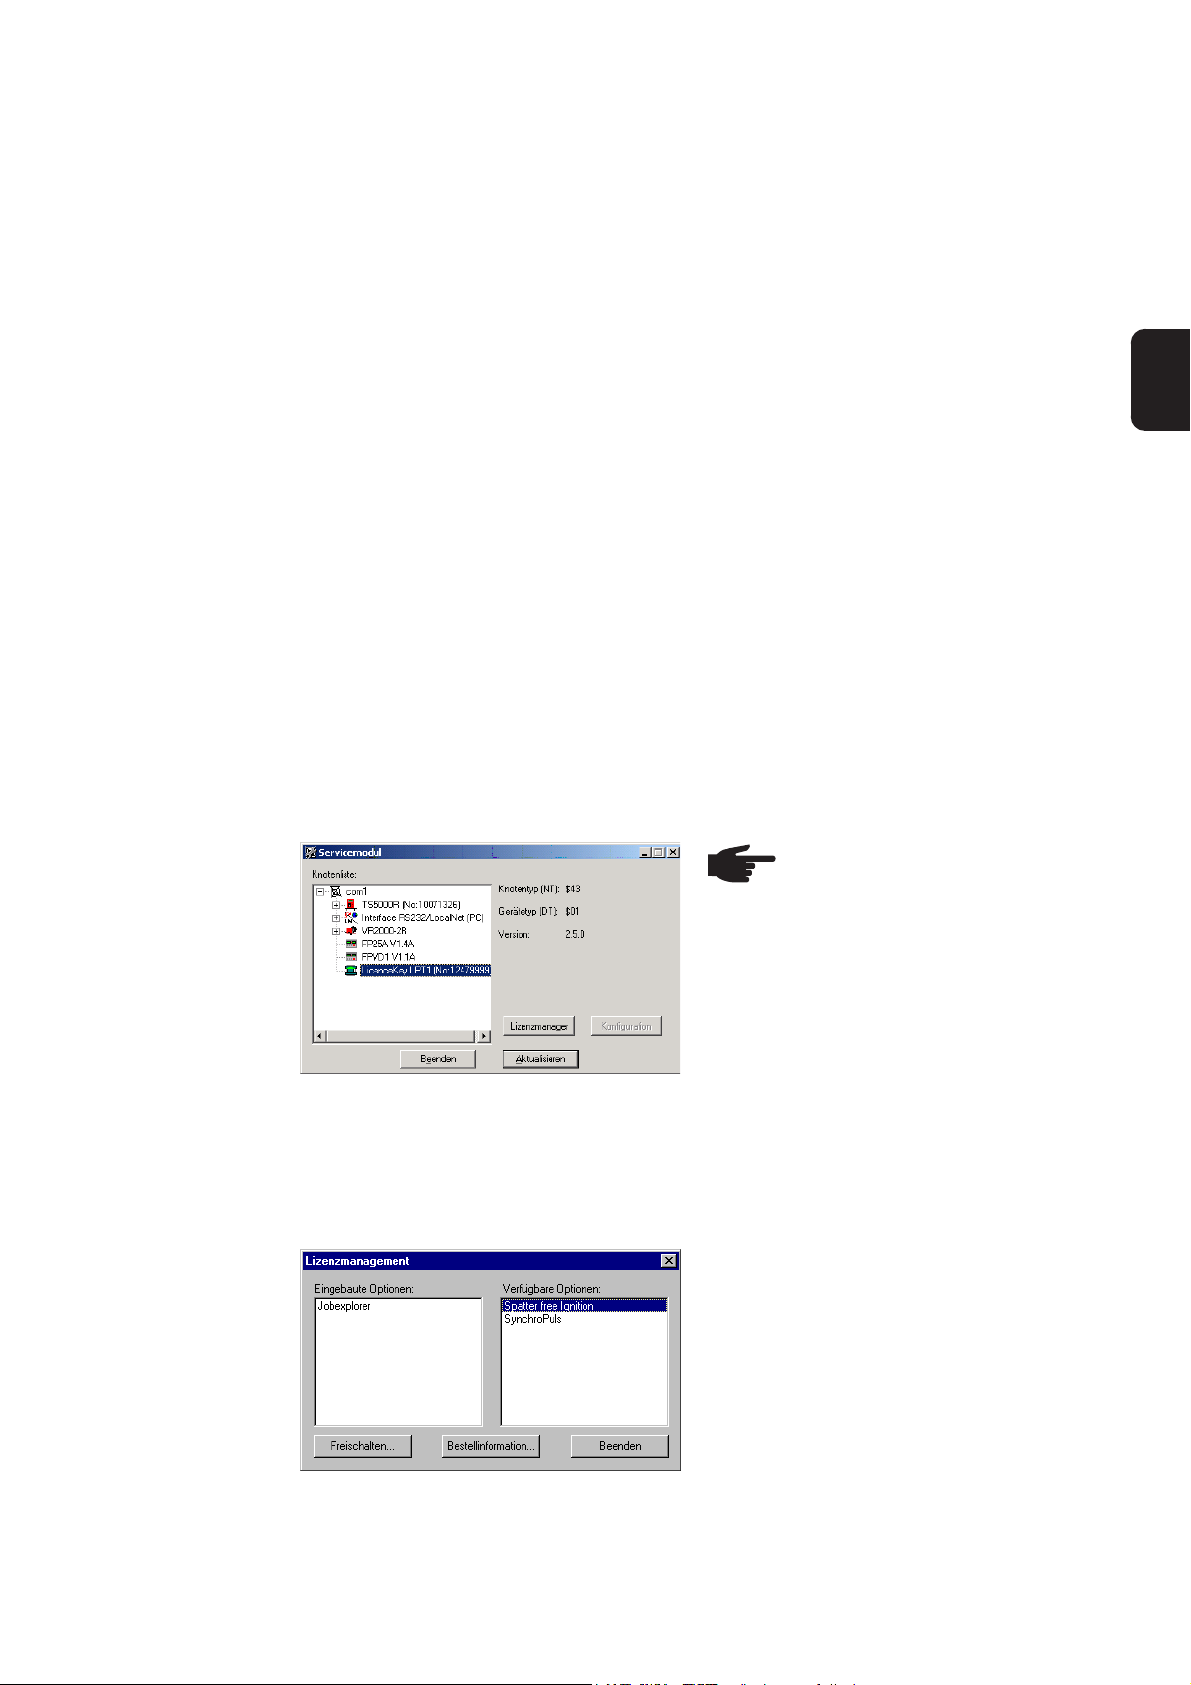
Nach dem Start der Software Servicemodul erscheint das Anzeigefenster „Servicemodul“ mit der Knotenliste.
Wichtig! In Abb.9 ist nur ein Netzwerk
abgebildet („com1“).
- Gegebenenfalls werden in der Knotenliste mehrere Netzwerke angezeigt
(z.B. „com1“ und „com2“).
- Die gewünschten Optionen sind nur
an der Stromquelle verfügbar, die mit
dem ersten aufgelisteten Netz (z.B.
„com1“) verbunden ist.
Abb.2 Anzeigefenster „Servicemodul“
- Die gewünschten Optionen sind an der Stromquelle verfügbar,
- solange das Anzeigefenster „Servicemodul“ geöffnet ist
- solange der PC (Notebook) gemäß Kapitel „Demo Licence / Licence Key anschließen“ mit der Stromquelle verbunden ist
- wenn die gewünschten Optionen am Demo Licence / Licence Key freigeschaltet
sind
8
Page 9

Optionen für Demo Licence / Licence Key freischalten
DE
Allgemeines
Software Servicemodul starten
Licence Tool /
Licence Key
anwählen
Wichtig! Das Software-Paket „LocalNet & Tools“ sowie der Software „WIBU-Key“ ist im
Lieferumfang des Interface „RS 232 / LocalNet“ (4,100,262) enthalten.
Die mitgelieferte Software Servicemodul ermöglicht die Freischaltung auch zukünftiger
Optionen am Demo Licence / Licence Key. Dies erfolgt nach demselben Prinzip wie bei
einer Stromquelle.
Vor dem Laden des Bausteines, mit der gewünschten Option, folgendes sicherstellen:
- Installation des Software-Paketes „LocalNet & Tools“ sowie der Software „WIBUKey“
- gemäß Kapitel „Software installieren“
- Den Baustein an der entsprechenden Schnittstelle des PCs (Notebooks) und am
Interface „RS 232 / LocalNet“ anschließen,
- gemäß Kapitel „Demo Licence Tool anschließen“
Die Software Servicemodul steht im Start-Menü unter „Fronius Product Group“ zur
Verfügung.
Nach dem Start der Software Servicemodul erscheint ein Anzeigefenster mit sämtlichen
im LocalNet vernetzten Elementen.
HINWEIS! Erscheint das aktuelle
Netzwerk nicht, auf Button
„Aktualisieren“ klicken.
Bestellung der
gewünschten
Optionen
- Mittels Doppelklick auf das aktive
Netzwerk (z.B. „com1“), werden
sämtliche LocalNet-Teilnehmer aufgelistet
- Auf das Element „Licence Key“ klicken
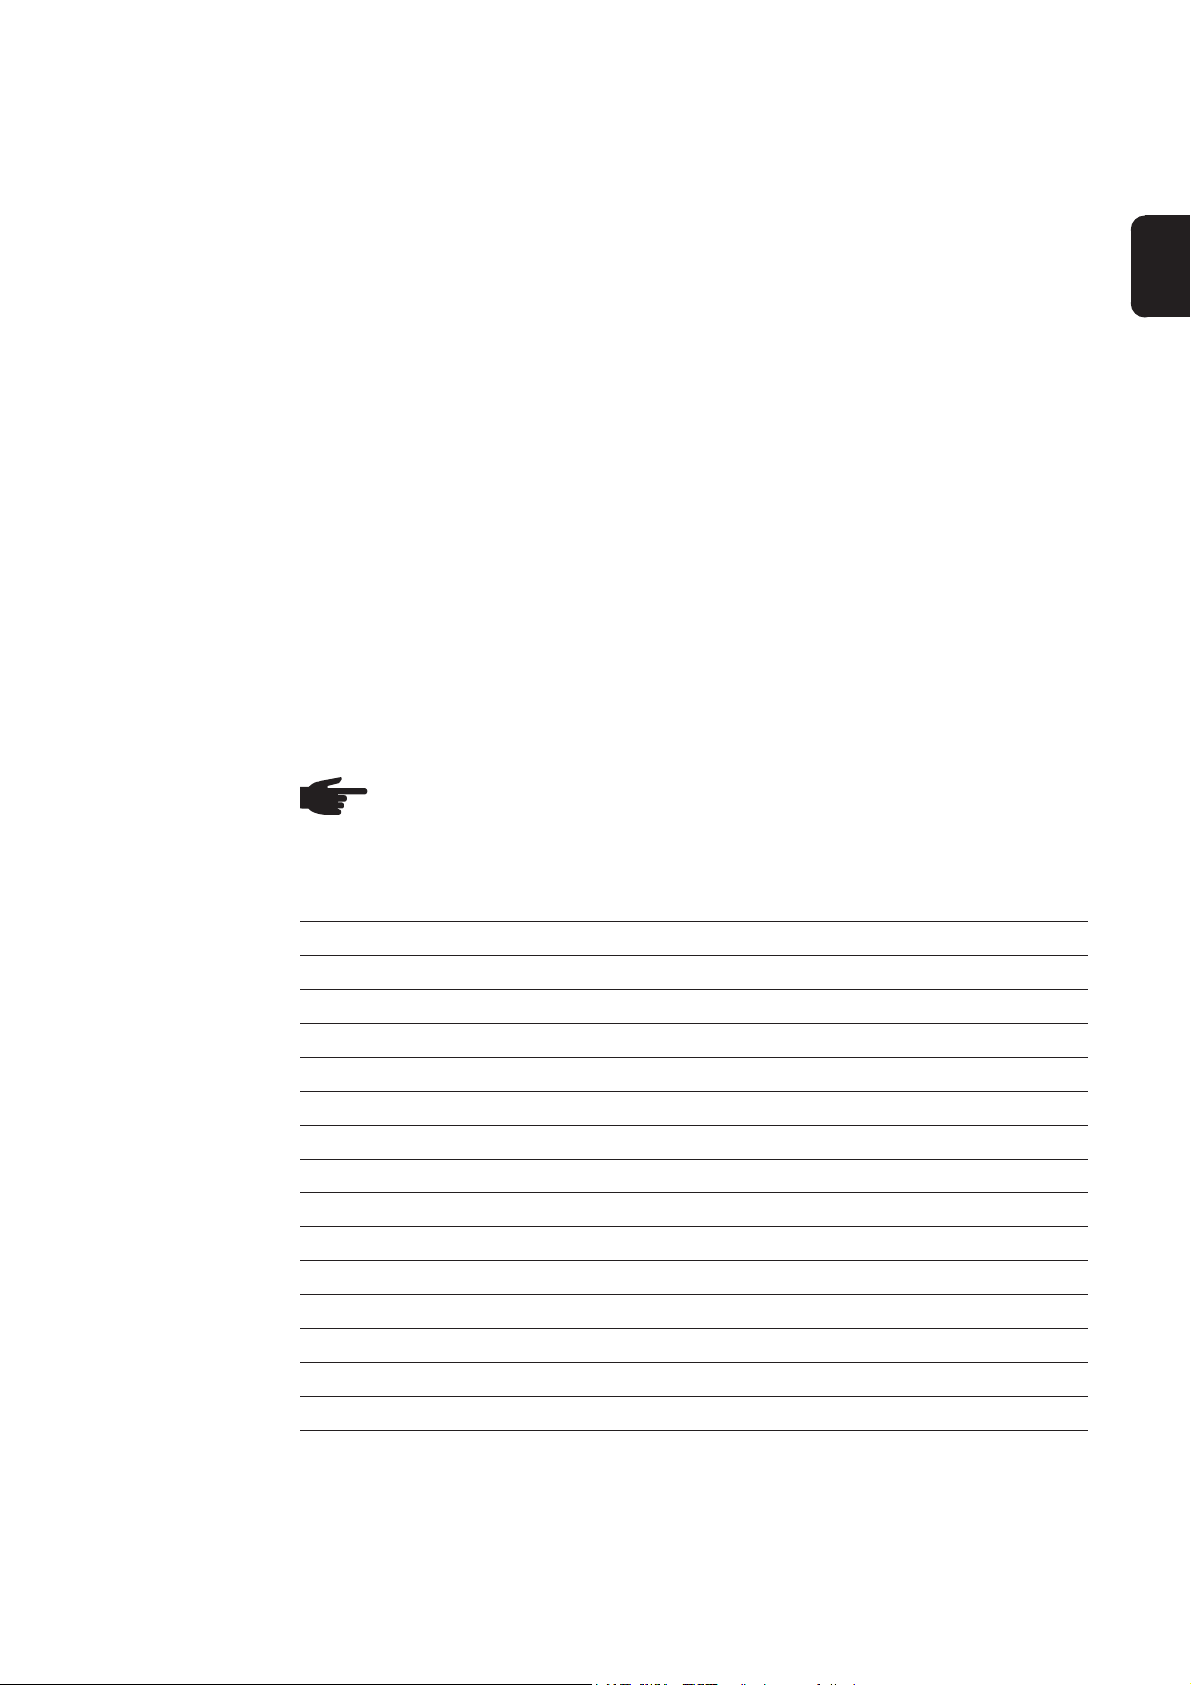
Abb.3 Anzeige der LocalNet-Teilnehmer
Es erscheint das Auswahlfenster „Lizenzmanagement“. Sowohl die eingebauten als
auch die verfügbaren Optionen werden aufgelistet.
Abb.4 Eingebaute Optionen und verfügbare
(bestellbare) Optionen
- Auf Button „Lizenzmanager“ klicken
Werden Bestellinformationen gewünscht
- Die entsprechenden Optionen, im Feld
„Verfügbare Optionen“, markieren
- Auf Button „Bestellinformation“ klicken
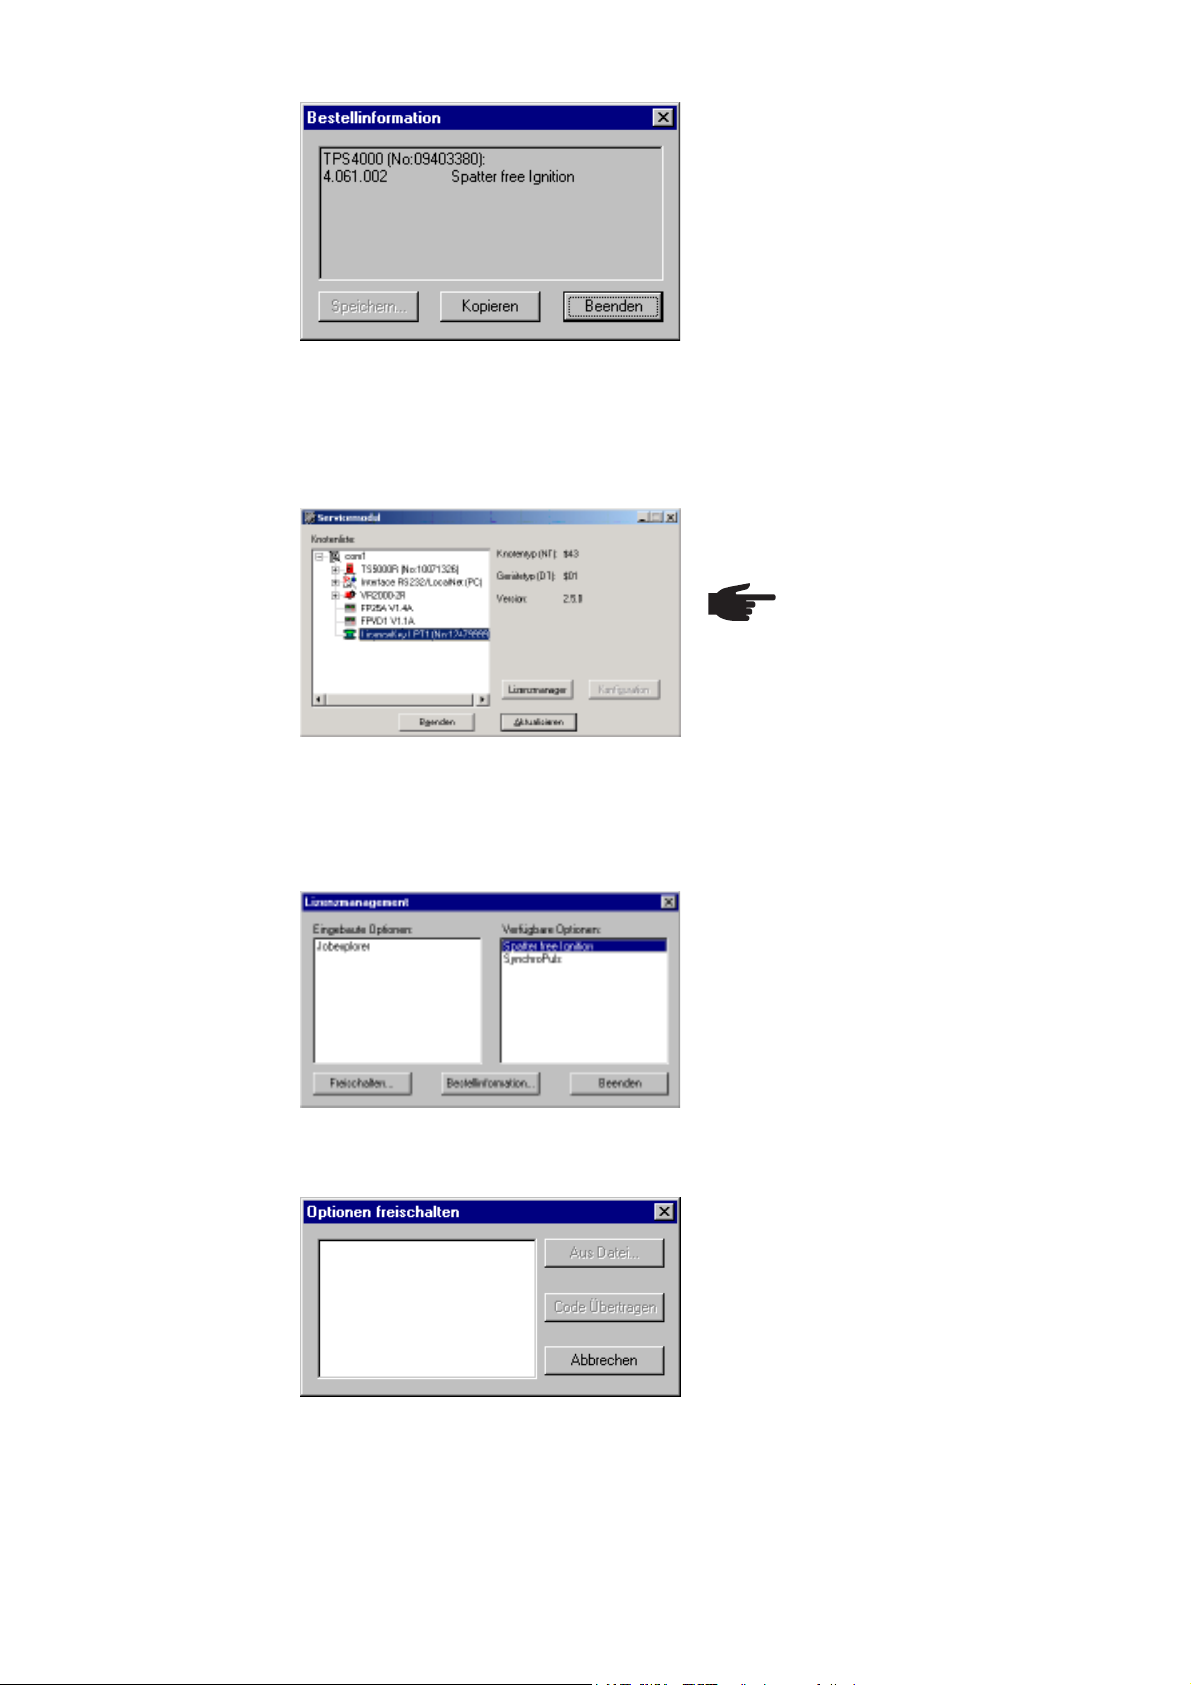
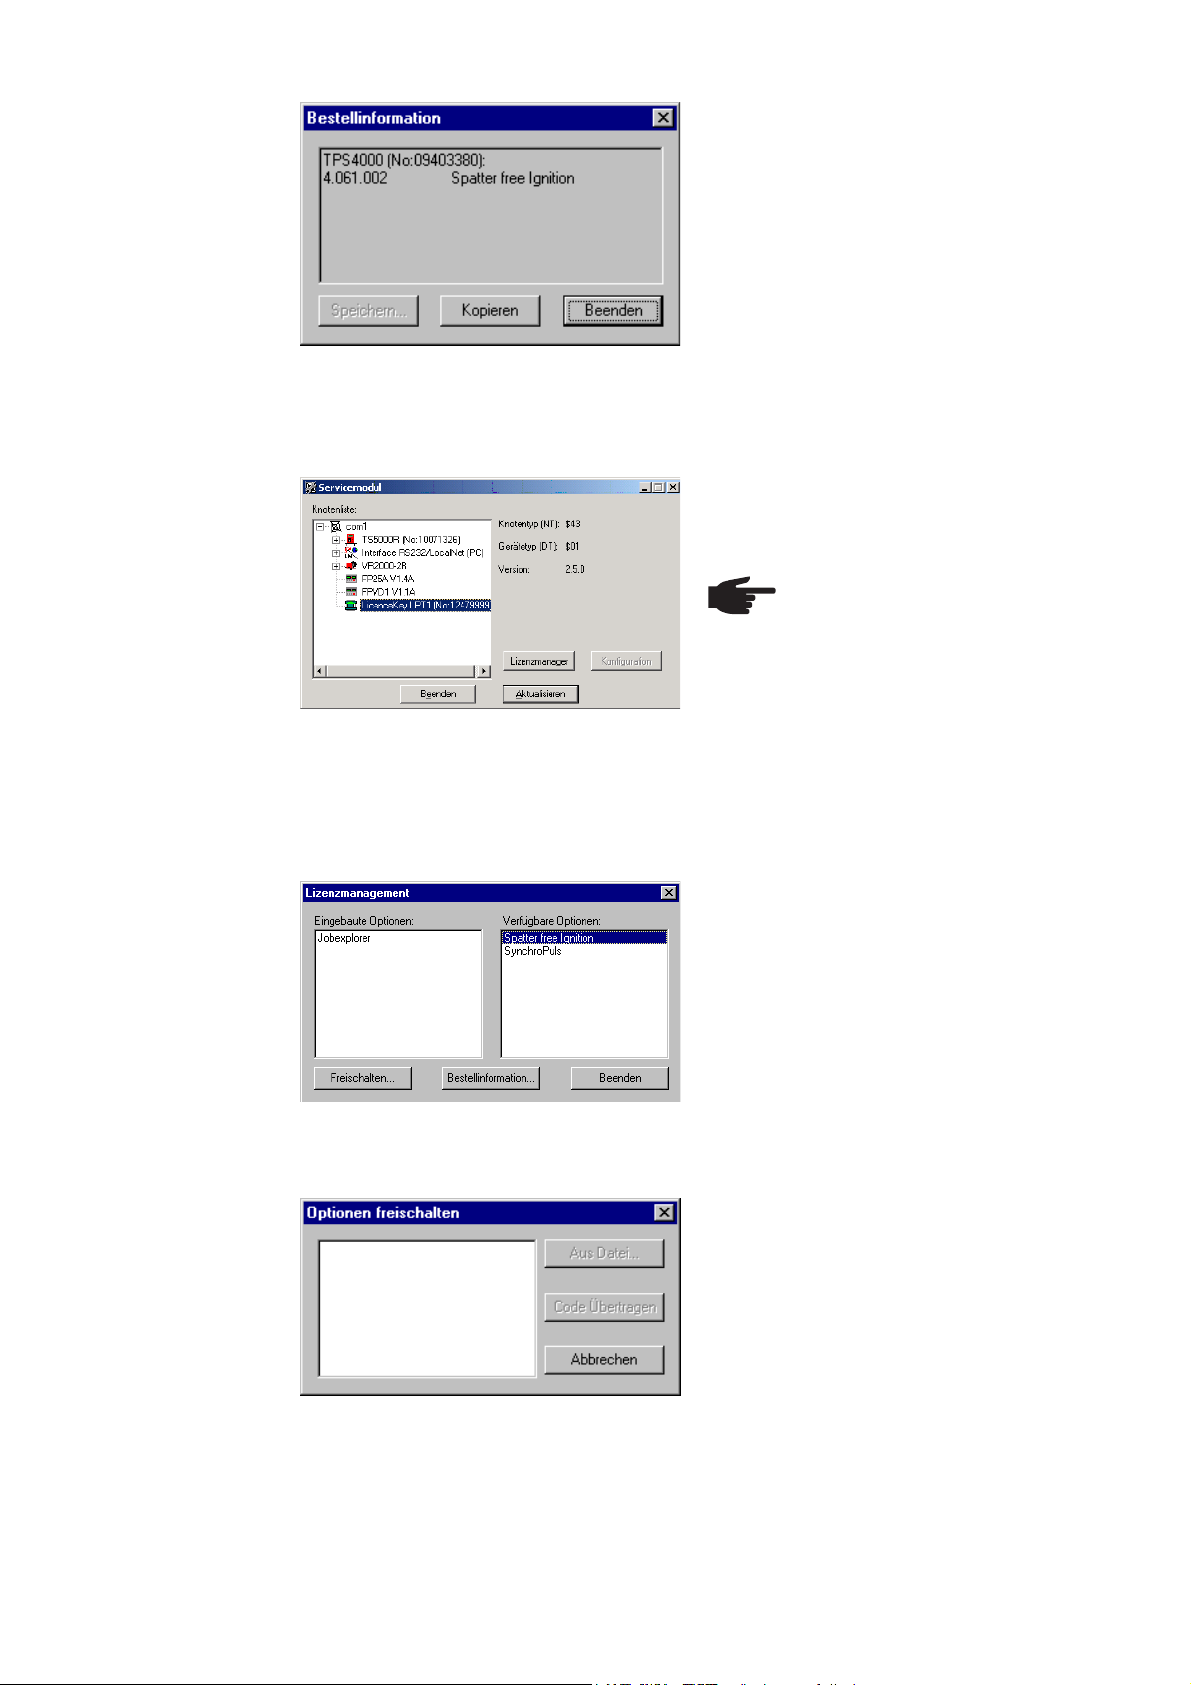
Es erscheint das Anzeigefenster „Bestellinformation“.
9
Page 10
Bestellung der
gewünschten
Optionen
(Fortsetzung)
Für die Bestellung, z.B. per E-Mail, können die Bestellinformationen in die Zwischenablage des PCs (Notebooks) kopiert
werden
- Auf Button „Kopieren“ klicken
Abb.5 Bestellinformation (Text für Bestellung)
Nach erfolgter Bestellung wird, z.B. per e-mail, ein Code zur Freischaltung der bestellten
Optionen übermittelt.
Bestellte Optionen freischalten
Bestellte Optionen freischalten
- Im Anzeigefenster „Servicemodul“ auf
das Element „Licence Key“ klicken
Abb.6 Anzeige der LocalNet-Teilnehmer
- Auf Button „Lizenzmanager“ klicken
Es erscheint das Auswahlfenster „Lizenzmanagement“.
- Die freizuschaltenden Optionen, im
Feld „Verfügbare Optionen“, markieren
- Im Anzeigefenster „Lizenzmanagement“ auf Button „Freischalten“
klicken
HINWEIS! Die Seriennummer
des angewählten Elementes
muss mit der Seriennummer des
Licence Tools / Licence Keys
übereinstimmen, für welches die
Option bestellt wurde.
Abb.7 Anzeigefenster „Lizenzmangement“
Es erscheint das Dialogfenster „Optionen freischalten“
Im Dialogfenster „Optionen freischalten“
entweder
- Code per Tastatur in das leere Feld
eintragen
- Auf Button „Code übertragen“ klicken
- Die bestellten Optionen werden
freigeschaltet
Abb.8 Eingabe des Codes für die Freischaltung
der bestellten Optionen
10
Page 11

Bestellte Optionen freischalten
(Fortsetzung)
Oder, falls Datei für den Code übermittelt wurde, auf Button „Aus Datei“ klicken
- Im nachfolgend erscheinenden Dialogfenster (nicht abgebildet) Datei auswählen
(Pfad angeben)
- Code wird automatisch in das leere Feld im Dialogfenster „Optionen freischalten“
eingetragen (Abb.7)
- Auf Button „Code übertragen“ klicken
- Die bestellten Optionen werden freigeschaltet
DE
Software Servicemodul beenden
- Durch Klicken auf Button „Beenden“,
im Anzeigefenster „Servicemodul“, die
Software Servicemodul beenden
Abb.9 Anzeigefenster „Servicemodul“
11
Page 12

Page 13

General Information
Product concept In addition to the complex functionality of the digital power sources Fronius offers a wide
range of options. Many of our customers are interested in expanding the range of
application of the digital power sources used, or in further individualising their installation.
The Demo Licence / Licence Key allows to release the use of options directly at the
customer‘s installation within short time.
Demo Licence A presentation given on the customer‘s installation directly creates the perfect conditions
for demonstrating the advantages of the various options. This is useful as the benefit of
the requested option can be demonstrated directly in relation to the application of the
customer.
Also the training of the customer on site is desirable in many cases.
All this can be achieved by means of the Demo Licence.
Important! The Demo Licence also allows as standard the presentation of options,
which may be used as a full version without a PC. As the Demo Licence will only function
when linked to a PC (notebook), the Demo Licence is suitable for demonstration purposes only.
EN
The Demo Licence is connected to a PC (notebook). The PC (notebook) is linked with
the LocalNet of the power source via the interface “RS 232 / LocalNet“ (4,100,262).
As long as the above mentioned connection is maintained, the options released for the
Demo Licence remain fully operational and are available for demonstration and training
purposes.
Licence Key The Licence Key functions on the same principle as the Demo Licence. The Licence Key
is plugged into a PC (Notebook). The options released for the Licence Key are available
on any power source, as long as the PC remains connected to this power source.
With the Licence Key, only those options are offered, which in the full version also
require a PC.
Software service
module
In connection with the software service module it is possible to release additional options
on the Demo Licence Tool / Licence Key. This is carried out following the same principles
as in the case of a power source.
Important! The software service module is included in the scope of the software package “LocalNet & Tools“ enclosed with the Demo Licence / Licence Key.
For orders of the free options released by means of the Demo Licence / Licence Key,
the same selection is available as for digital power sources. The identification of single
Demo Licence / Licence Keys is via the serial numbers stored in the Demo Licence /
Licence Key and printed on them.
13
Page 14

Software service
module
(continued)
Versions For the different interfaces on the PCs (notebooks) we offer the following versions:
After having ordered the requested option, you will receive a code for releasing the
requested option, e.g. via e-mail.
- Demo Licence for parallel interface........................ 4,045,896
- Demo Licence for USB interface ............................ 4,045,898
- Licence Key for parallel interface ........................... 4,045,932
- Licence Key for USB interface ............................... 4,045,934
System requirements
PC (Notebook)
Power source
NOTE! As Fronius does not have any influence on the number of applications
installed nor on the operating system used, it is not possible to specify the
minimum requirements of hardware of the used PC (notebook).
Depending on the interface version of your Demo Licence / Licence Key the following
operating systems are acceptable:
- parallel interface: Windows 95 / 98 / 98 SE / ME / NT 4.0 / 2000 / XP
- USB interface: Windows 98 / 98 SE / ME / 2000 / XP
Installed software (included in the scope of supply of the Demo Licence):
- software package “LocalNet & Tools“, as of version 2.5 c
- software “WIBU-Key“ (WKDU-INT.exe)
The Demo Licence / Licence Key is supported by the following power sources:
- Trans Synergic 4000 / 5000
- TransPuls Synergic 2700 / 3200 / 4000 / 5000
- TransTig 2200 / 2500 / 3000 / 4000 / 5000
- MagicWave 1700 / 2200 /2500 / 3000 / 4000 / 5000
The Demo Licence / Licence Key is supported as of the following software version:
- software version OFFICIAL UST V2.85.1 (power source)
14
Page 15
Order numbers
Demo Licence - Demo Licence for parallel interface ............................ 4,045,896
- Demo Licence for USB interface ................................ 4,045,898
The following software is supplied with the Demo Licence:
- LocalNet & Tools, as of version 2.5 c
- software “WIBU-Key“ (WKDU-INT.exe)
Licence Key - Licence Key for parallel interface ............................... 4,045,932
- Licence Key for USB interface ................................... 4,045,934
The following software is supplied with the Demo Licence:
- LocalNet & Tools, as of version 2.5 c
- software “WIBU-Key“ (WKDU-INT.exe)
EN
Available options
Any option offered for the final release of the power source is also available for the
Demo Licence / Licence Key.
Currently available options:
NOTE! The option mode CC / CV (constant current / constant voltage) can only
be made available if a robot interface ROB 5000 or a field bus coupler for robot
control is connected with the LocalNet.
Item Power source Demo Licence Licence Key
(Parallel / USB) (Parallel / USB)
(4,045,896 / 898) (4,045,932 / 934)
4,061,101 SynchroPuls Option Integrated* Not available
4,061,102 SFI Option Integrated* Not available
4,061,103 JobExplorer Option Not available Not available
4,061,107 JobExplorer Enterprise Not available Option Option
4,061,104 GunTrigger Option Integrated* Not available
4,061,105 WeldProcessData Option Not available Not available
4,061,108 WeldProcessData Enterprise Not available Option Option
4,061,109 WeldOffice Option Not available Not available
4,061,111 WeldOffice Enterprise Not available Option Option
4,061,106 Mode CC / CV Option Integrated* Not available
4,061,112 TCS Option Integrated* Not available
4,061,113 Drive Option Integrated* Not available
4,061,110 TimeTwin Digital Option Not available Not available
4,061,120 Documentation Option Not available Not available
4,061,121 Documentation Enterprise Not available Option Option
Option ................ Order with the product or order later as option possible
Integrated ........... Automatic delivery of the product takes place with release
Not available ...... Order and/or release is not possible
* .......................... Not suitable for permanent operation, as the PC must always be linked to the power source. This option is
When release does not take place (older version), a release code must be ordered.
therefore only suitable for deminstration purposes.
15
Page 16

Accessories NOTE! The Demo Licence / Licence Key can only be used in connection with
the interface RS 232 / LocalNet.
- Interface RS 232 / LocalNet ....................................... 4,100,262
If all LocalNet sockets of the welding machine (e.g. at the power source or the wire
feeder) are occupied, the following options are recommended:
- Distributor “LocalNet passive“ .................................... 4,100,261
NOTE! Proper function of the distributor “LocalNet passive“ is only ensured if
both LocalNet distributors are connected.
- Distributor “LocalNet active“ ....................................... 4,100,298
NOTE! Compared to the distributor “LocalNet passive“ it is possible in the case
of the distributor “LocalNet active“ that individual sockets remain free, if the
additional users connected are no longer required.
16
Page 17

How to connect the Demo Licence / Licence Key
Safety
Connecting the
hardware
WARNING! Incorrect operation and faulty work can cause serious material and
physical damage. The following process steps shall only be carried out by
trained skilled personnel! Please stick to the safety instructions detailed in the
User Manual of your digital power source.
power source
3. Depending on the interface version
connect the Demo Licence / Licence
Key either to a free
- parallel interface or a
- USB interface
of the PC (notebook)
1. Connect connecting cable LocalNet to
LocalNet
EN
a free LocalNet socket (e.g. on the
power source)
Interface RS 232 /
LocalNet (4,100,262)
RS 232
2. Connect RS 232 cable
to a free serial interface
of the PC (notebook)
optional
DemoLicence parallel (4,045,896)
LicenceKey parallel (4,045,932)
DemoLicence USB (4,045,898)
LicenceKey USB (4,045,934)
PC
(Notebook)
serial interface
17
Page 18

Software Installation
Software package
“LocalNet &
Tools“
The software package “LocalNet & Tools“ as well as the software “WIBU-Key“ is included in the scope of supply of the interface “RS 232 / LocalNet“ (4,100,262).
- install software “LocalNet & Tools“
NOTE! After having installed the software “LocalNet & Tools“ call up the following files in the explorer:
- e.g.: C: \ Fronius \ Setup \ LNTOOLS \ 25c_en \ WKDU-Int.exe
The file “WKDU-Int.exe“ is used for installing the software “WIBU-Key“. If the software
“WIBU-Key“ is not installed, there may arise problems when using the Demo Licence
Tool.
How to use the Demo Licence / Licence Key
Data link
- Connect the Demo Licence / Licence Key with the corresponding interface of the PC
(notebook) and with the interface RS 232 / LocalNet,
- in accordance with Chapter “How to connect the Demo Licence / Licence Key“
- start software “Service module“
Availability of
options
After the start of the software service module the “Service module“ window including the
node list is displayed.
Important! Fig.9 shows one network
(“com1“) only.
- If necessary, the node list includes
several networks (e.g. “com1“ and
“com2“).
- The requested options are only
available on the power source which is
linked with the first net listed (e.g.
“com1“).
fig.2 “Service module“ window
- The requested options are available on the power source,
- as long as the “Service Module“ window is opened
- as long as the PC (notebook) is connected with the power source in accordance
with the Chapter “How to connect the Demo Licence / Licence Key“
- if the requested options are released on the Demo Licence / Licence Key
18
Page 19

Releasing the options for Demo Licence / Licence
Key
General
Start software
service module
Select Demo
Licence Tool /
Licence Key
Important! The software package “LocalNet & Tools“ as well as the software “WIBU-
Key“ are included in the scope of supply of the interface “RS 232 / LocalNet“
(4,100,262).
The supplied software service module also allows to release future options on the Demo
Licence / Licence Key. This is carried out following the same principle as in the case of a
power source.
Before the module is loaded by using the requested option, make sure that:
- the software package “LocalNet & Tools“ as well as the software “WIBU-Key“ are
installed
- according to chapter “Software Installation“
- the module of the corresponding interface of the PC (notebook) and on the interface
“RS 232 / LocalNet“ is connected,
- in accordance with the Chapter “How to connect the Demo Licence Tool“
The software service module is made available in the start menu under “Fronius Product
Group“.
After having started the software service module a window with all elements linked in the
LocalNet is shown.
NOTE! If the current network is
not displayed, click the button
“Update“.
EN
Ordering the
requested options
- Double-click the active network (e.g.
“com1“) to list all LocalNet parties
- Click element “Licence Key“
- Click button “Licence Manager“
fig.3 display of the LocalNet parties
The selection window “Licence Management“ is displayed. Both the installed as well as
the available options are listed.
If information regarding the order is
requested:
- select the respective options in the
box “Available Options“
- click button “Order Information“
fig.4 installed options and available (to be
ordered) options
The window “Order Information“ is displayed.
19
Page 20

Ordering the
requested options
(continued)
For the order, e.g. via e-mail, it is possible
to copy the order information in the
clipboard of the PC (notebooks)
- click button “Copy“
fig.5 order information (text for order)
After ordering, e.g. via e-mail, a code is transmitted to release the ordered options.
Release of the
options ordered
Release of the
options ordered
- Click the element “Licence Key“ in the
window “Service Module“
NOTE! The serial number for the
selected component must correspond with the serial number of
the Licence Tool / Licence Key,
for which the option was ordered.
fig.6 display of the LocalNet parties
- Click button “Licence Manager“
The selection window “Licence Management“ is displayed.
- Select the options to be released in
the box “Available Options“
- Click the button “Release“ in the
window “Licence Management“
fig.7 window “Licence Management“
The dialogue box “Release Options“ is displayed
The following is carried out in the dialogue
box “Release Options“
- enter code in empty box via keyboard
- click the button “Transfer Code“
- The ordered options are released.
fig.8 code entry for the release of the options
ordered
20
Page 21

Release of the
options ordered
(continued)
If the file for the code was transmitted, click the button “From File“
- select file in the dialogue box shown subsequently (not detailed) (specify path)
- The code is automatically entered in the empty field in the dialogue box “Release
Options“ (fig.7)
- Click button “Transfer Code“
- The ordered options are released.
EN
Close software
servicemodule
- Click the button “Close“ in the window
“Service Module“ to close the software
service module.
fig.9 window “Service Module“
21
Page 22

Page 23

Généralités
Concept produit En plus de la grande fonctionnalité des sources de courant numériques, Fronius propo-
se une large gamme d’options. Les clients expriment souvent le désir d’élargir les
possibilités d’application de leur source de courant numérique ou de personnaliser
encore plus leur installation.
Le Demo Licence / Licence Key permet de libérer des options sur l’installation du client
pour une courte durée.
FR
Demo Licence
Licence Key La Licence Key fonctionne d’après le même principe que la licence de démonstration.
L’idéal pour présenter les avantages des options entrant en ligne de compte est de faire
une démonstration directement sur l’installation du client. En particulier parce que vous
pouvez ainsi montrer comment s’utilisent les options désirées dans le cadre concret des
applications du client.
Il est d’autre part souvent souhaitable de former le client sur place.
Demo Licence vous offre toutes ces possibilités.
Important! La licence de démonstration (Demo Licence) permet également la présentation d’options en série pouvant être utilisées en tant que version intégrale sans PC.
Comme la licence de démontrastion fonctionne exclusivement en association avec un
PC (ordinateur portable), elle ne se prête toutefois qu’à des fins de démonstration.
Le Demo Licence se connecte à un PC (portable). Le PC (portable) est relié au LocalNet
de la source de courant par l’interface « RS 232 / LocalNet » (4,100,262).
Tant que la connexion sus-mentionnée est maintenue, toutes les options libérées pour le
Demo Licence sont totalement opérationnelles et sont à votre disposition pour vos
démonstrations et cours de formation.
Elle se branche également sur un PC (ordinateur portable). Les options autorisées pour
la Licence Key sont disponibles sur la source de courant de votre choix tant que le PC
(ordinateur portable) reste connecté à cette dernière.
Le logiciel Servicemodul
Pour Licence Key, nous proposons exclusivement des options nécessitant également un
PC (ordinateur portable) dans la version intégrale.
En lien avec le logiciel Servicemodul, il est possible de libérer des options supplémentaires sur le Demo Licence / Licence Key. Ceci se fait sur le même principe que pour une
source de courant.
Important! Le logiciel Servicemodul est compris dans le progiciel « LocalNet & Tools »
qui accompagne le Demo Licence / Licence Key.
Pour commander les options à autoriser au moyen de Demo Licence / Licence Key, on
dispose du même choix que pour les sources de courant numériques mêmes.
L’identification de la Demo Licence/Licence Key individuelle s’effectue par le biais du
numéro de série enregistré dans la Demo Licence/Licence Key et figurant dessus.
23
Page 24

Le logiciel Servicemodul
(suite)
Modèles Pour que cet outil puisse fonctionner avec les différents ports de PC (portable), nous
Une fois que vous avez demandé l’option désirée, vous recevez un code (par e-mail par
exemple) qui vous permet de libérer cette option.
proposons les modèles suivants :
- Demo Licence pour port parallèle .......................... 4,045,896
- Demo Licence pour port USB ................................ 4,045,898
- Licence Key pour port parallèle .............................. 4,045,932
- Licence Key pour port USB .................................... 4,045,934
L’utilisation d’ordinateur portable est très fréquente, car elle permet une plus grande
mobilité. Le modèle pour port PCMCIA est particulièrement avantageux pour les démons-trations qui ont directement lieu sur l’installation du client.
Conditions système
PC (portable)
Source de courant
REMARQUE! Étant donné que Fronius n’a aucune influence sur le nombre
d’applications installées et sur le système d’exploitation utilisé, il ne nous est
pas possible de vous indiquer les conditions minimum que doit remplir le PC
(portable) utilisé.
En fonction du modèle de port que vous avez sur votre Demo Licence / Licence Key,
vous pouvez vous connecter aux systèmes d’exploitation suivants :
- Port parallèle : Windows 95 / 98 / 98 SE / ME / NT 4.0 / 2000 / XP
- Port USB: Windwos 98 / 98 SE / ME / 2000 / XP
Logiciels installés (compris dans la livraison du Demo Licence) :
- Progiciel « LocalNet & Tools », version 2.5 c et ultérieures
- Logiciel « WIBU-Key » (WKDU-INT.exe)
Le Demo Licence / Licence Key est assisté par les sources de courant suivantes :
- Trans Synergic 4000 / 5000
- TransPuls Synergic 2700 / 3200 / 4000 / 5000
- TransTig 2200 / 2500 / 3000 / 4000 / 5000
- MagicWave 1700 / 2200 / 2500 / 3000 / 4000 / 5000
Le Demo Licence / Licence Key est assisté à partir de la version de logiciel suivante :
- Version de logiciel OFFICIAL UST V2.85.1 (source de courant)
24
Page 25

Numéros de commande
Demo Licence - Demo Licence pour port parallèle .............................. 4,045,896
- Demo Licence pour port USB .................................... 4,045,898
Les logiciels suivants sont livrés avec le Demo Licence:
- LocalNet & Tools, version 2.5 c et ultérieures
- Logiciel « WIBU-Key » (WKDU-INT.exe)
FR
Licence Key
Options disponibles
- Licence Key pour port parallèle .................................. 4,045,932
- Licence Key pour port USB ........................................ 4,045,934
Les logiciels suivants sont livrés avec le Licence Key:
- LocalNet & Tools, version 2.5 c et ultérieures
- Logiciel « WIBU-Key » (WKDU-INT.exe)
Vous avez à votre disposition pour le Demo Licence / Licence Key toutes les options qui
sont proposées comme pouvant être définitivement libérées sur la source de courant.
Les options actuellement disponibles sont les suivantes :
REMARQUE! L’option Mode CC / CV (courant constant / tension constante)
n’est disponible que si une interface robot ROB 5000 est installée sur le LocalNet ou si un coupleur de bus de terrain est raccordé pour la commande du
robot.
Article Source de courant Demo Licence Licence Key
(Parallèle / USB) (Parallèle / USB)
(4,045,896 / 898) (4,045,932 / 934)
4,061,101 SynchroPuls Option Intégrée* Non disponible
4,061,102 SFI Option Integriert* Non disponible
4,061,103 JobExplorer Option Non disponible Non disponible
4,061,107 JobExplorer Enterprise Non disponible Option Option
4,061,104 GunTrigger Option Intégrée* Non disponible
4,061,105 WeldProcessData Option Non disponible Non disponible
4,061,108 WeldProcessData Enterprise Non disponible Option Option
4,061,109 WeldOffice Option Non disponible Non disponible
4,061,111 WeldOffice Enterprise Non disponible Option Option
4,061,106 Mode CC / CV Option Intégrée* Non disponible
4,061,112 TCS Option Intégrée* Non disponible
4,061,113 Drive Option Intégrée* Non disponible
4,061,110 TimeTwin Digital Option Non disponible Non disponible
4,061,120 Documentation Option Non disponible Non disponible
4,061,121 Documentation Enterprise Non disponible Option Option
Option ................... Commande en même temps que le produit ou commande ultérieure possibles en option
Intégrée ................. Le produit est automatiquement livré avec le code d’accès
Non disponible ...... La commande ou le déblocage ne sont pas possibles.
* ............................. Ne convient pas au fonctionnement permanent, car le PC doit être connecté à la source de courant en
En cas d’absence du code d’accès (version plus ancienne), il est nécessaire de le commander
permanence. Pour cette raison, cette option ne se prête qu’à des fins de démonstration.
25
Page 26

Accessoires REMARQUE! Le Demo Licence / Licence Key ne peut être utilisé qu’en lien
avec l’interface RS 232 / LocalNet.
- Interface RS 232 / LocalNet ....................................... 4,100,262
Si tous les connecteurs LocalNet du système de soudage (par exemple sur la source de
courant ou sur l’avance du fil) sont affectés, nous vous recommandons les options
suivantes :
- Distributeur « LocalNet passif » ................................. 4,100,261
REMARQUE! Le distributeur « LocalNet passif » ne fonctionne correctement
que lorsque les deux postes sont raccordés.
- Distributeur « LocalNet actif » .................................... 4,100,298
REMARQUE! Contrairement au distributeur LocalNet passif, certains connecteurs du distributeur LocalNet actif peuvent rester non affectés si vous n’avez
plus besoin des postes supplémentaires.
26
Page 27
Raccorder Demo Licence / Licence Key
Sécurité
Relier le matériel
informatique
AVERTISSEMENT! Les erreurs de manipulation et les travaux mal faits peu-
vent causer de graves dommages coroporels et matériels. Seul le personnel
spécialisé et formé est autorisé à entreprendre les opérations suivantes !
Conformez-vous aux consignes de sécurité indiquées dans le mode d’emploi
de votre source de courant numérique.
1. Raccordez le câble de connexion
LocalNet
Source de courant
3. Selon le modèle de port que vous
avez, raccordez le Demo Licence /
Licence Key à un
- port parallèle
- USB port
du PC (portable)
FR
LocalNet à un connecteur LocalNet
non affecté (par exemple à la source
de courant)
Interface RS 232 /
LocalNet (4,100,262)
RS 232
2. Raccordez le câble
RS 232 à un port série
libre du PC (portable)
au choix
DemoLicence Parallèle (4,045,896)
LicenceKey Parallèle (4,045,932)
DemoLicence USB (4,045,898)
LicenceKey USB (4,045,934)
PC
(portable)
Port série
27
Page 28

Installation du logiciel
Logiciels «LocalNet & Tools»
Le progiciel «LocalNet & Tools» ainsi que le logiciel «WIBU-Key» sont compris dans la
livraison de l’interface «RS 232/LocalNet (4,100,262)»
- Installer le logiciel «LocalNet & Tools»
REMARQUE! Suite à l’installation du prgiciel «LocalNet & Tools» , appeler le
fichier suivant dans l’explorateur:
- Exemple: C: \ Fronius \ Setup \ LNTOOLS \ 25c_en \ WKDU-Int.exe
Le fichier «WKDU-Int.exe» sert à l’installation du logiciel «WIBU-Key». A défaut de
l’installation du logiciel «WIBU-Key», des problèmes peuvent survenir à l’application du
Demo Licence Tool.
Utiliser Demo Licence / Licence Key
Circuit de transmission des
données
- Raccordez le Demo Licence / Licence Key au port correspondant de votre PC
(portable) et à l’interface RS 232 / LocalNet
- conformément au chapitre « Raccorder Demo Licence / Licence Key »
- Lancez le logiciel « Servicemodul »
Disponibilité des
options
Une fois que vous avez lancé le logiciel Servicemodul, la fenêtre « Servicemodul »
contenant la liste des noeuds s’affiche.
Important! Sur la figure 9, vous ne trouvez qu’un seul réseau représenté
(« com1 »).
- Il se peut que plusieurs réseaux soient
affichés dans la liste des noeuds (par
exemple « com1 » et « com2 »).
- Les options désirées ne sont disponibles que sur la source de courant qui
est reliée au premier réseau de la liste
(par exemple « com1 »).
Fig. 2 Fenêtre d’affichage « Servicemodul »
- Les options désirées sont disponibles sur la source de courant
- tant que la fenêtre d’affichage « Servicemodul » est ouverte,
- tant que le PC (portable) est connecté à la source de courant conformément au
chapitre « Raccorder Demo Licence / Licence Key »,
- lorsque les options désirées sont libérées sur le Demo Licence / Licence Key.
28
Page 29
Libérer les options sur le Demo Licence / Licence
Key
Généralités
Lancez le logiciel
« Servicemodul »
Sélectionner
Demo Licence /
Licence Key
Important ! Le progiciel « LocalNet & Tools » et le logiciel « WIBU-Key » sont compris
dans la livraison de l’interface « RS 232 / LocalNet » (4,100,262).
Le logiciel Servicemodul livré avec permettra de libérer également les options futures
sur le Demo Licence / Licence Key. Ceci se fait sur le même principe que pour la source
de courant.
Avant de charger le module, avec l’option désirée, faites les vérifications suivantes :
- Installation du progiciel « LocalNet & Tools » et du logiciel « WIBU-Key »,
- suivant le chapitre «installation du logiciel»
- Raccordez le module au port correspondant du PC (portable) et à l’interface « RS
232 / LocalNet »
- conformément au chapitre « Raccorder Demo Licence Tool ».
Le logiciel Servicemodul est disponible dans le menu Démarrer sous « Fronius Product
Group ».
Une fois que vous avez lancé le logiciel Servicemodul, une fenêtre comportant tous les
éléments en réseau sur le LocalNet s’affiche.
REMARQUE! Si le réseau actuel
ne s’affiche pas, cliquez sur le
bouton « Refresh ».
FR
Commande des
options désirées
- Pour faire apparaître la liste de tous
les postes LocalNet, double-cliquez
sur le réseau actif (par exemple
« com1 »)
- Cliquez sur l’élément « Licence Key »
Fig. 3 Affichage des postes LocalNet
La fenêtre « Licence Management » s’affiche. Vous voyez apparaître la liste des options
intégrées et des options disponibles.
Fig. 4 Options intégrées et options disponibles
(sur commande)
- Cliquez sur le bouton « Licence
Manager »
Si vous désirez des informations concernant la commande
- sélectionnez l’option correspondante
dans le champ « Available options »
- Cliquez sur le bouton « Ordering
information... »
La fenêtre « Ordering information » s’affiche.
29
Page 30
Commande des
options désirées
(suite)
Pour les commandes, par e-mail par
exemple, vous pouvez copier les informations concernant la commande dans le
presse-papier du PC (portable)
- Cliquez sur le bouton « Copy »
Fig. 5 Information concernant la commande (texte
de la commande)
Une fois la commande passée, nous vous ferons parvenir un code, par e-mail par
exemple, qui vous permettra de libérer l’option commandée.
- Cliquez dans la fenêtre d’affichage
« Servicemodul » sur l’élément « Licence Key »
REMARQUE! Le numéro de
série de l’élément sélectionné
doit coïncider avec celui du
Licence Tool/Licence Key pour
lequel l’option a été commandée.
Libérer les options commandées
Fig. 6 Affichage des postes LocalNet
- Cliquez sur le bouton « Licence
La fenêtre « Licence Management » s’affiche.
- Sélectionnez les options que vous
- Cliquez dans la fenêtre d’affichage
Fig. 7 Fenêtre d’affichage « Licence Manager »
La boîte de dialogue « Enable options » s’affiche
Dans la boîte de dialogue « Enable options », vous pouvez soit
- entrer le code dans le champ vide en
- cliquez sur le bouton « Transmit
- et les options commandées sont
Fig. 8 Entrer le code pour libérer les options
commandées
Manager »
voulez libérer dans le champ « Available Options »
« Licence Management » sur le
bouton « Enable... »
utilisant le clavier,
code »
libérées.
30
Page 31

Libérer les options commandées
(suite)
soit cliquer sur le bouton « From file... » si un fichier vous a été transmis pour le code.
- Sélectionnez le fichier (indiquez-en le chemin) dans la boîte de dialogue qui
s’affiche ensuite (pas d’illustration).
- Le code est automatiquement saisi dans le champ vide de la boîte de dialogue
« Enable options » (fig. 7).
- Cliquez sur le bouton « Transmit code ».
- Les options commandées sont libérées.
Quittez le logiciel
Servicemodul
Fig. 9 Fenêtre d’affichage « Servicemodul »
- Quittez le logiciel Servicemodul en
cliquant sur le bouton « Quit » dans la
fenêtre d’affichage « Servicemodul ».
FR
31
Page 32

Page 33

FRONIUS INTERNATIONAL GMBH
Froniusplatz 1, A-4600 Wels, Austria
Tel: +43 (0)7242 241-0, Fax: +43 (0)7242 241-3940
E-Mail: sales@fronius.com
www.fronius.com
Under http://www.fronius.com/addresses you will find all addresses
www.fronius.com/addresses
of our Sales & service partners and Locations.
ud_fr_st_so_00082 012011
 Loading...