

Fronius CrashBox Robacta PAP L, CrashBox Robacta PAP XL Installation Instruction [DE, EN, FR]
Page 1

Fronius prints on elemental chlorine free paper (ECF) sourced from certified sustainable forests (FSC).
/ Perfect Charging / Perfect Welding / Solar Energy
CrashBox Robacta PAP L
CrashBox Robacta PAP XL
Installationsanleitung
DE
Installation instructions
EN
Instructions d'installation
FR
42,0410,1177 003-11032022
Page 2

Page 3
Allgemeines
(1) (2) (3) (4) (5)
Allgemeines
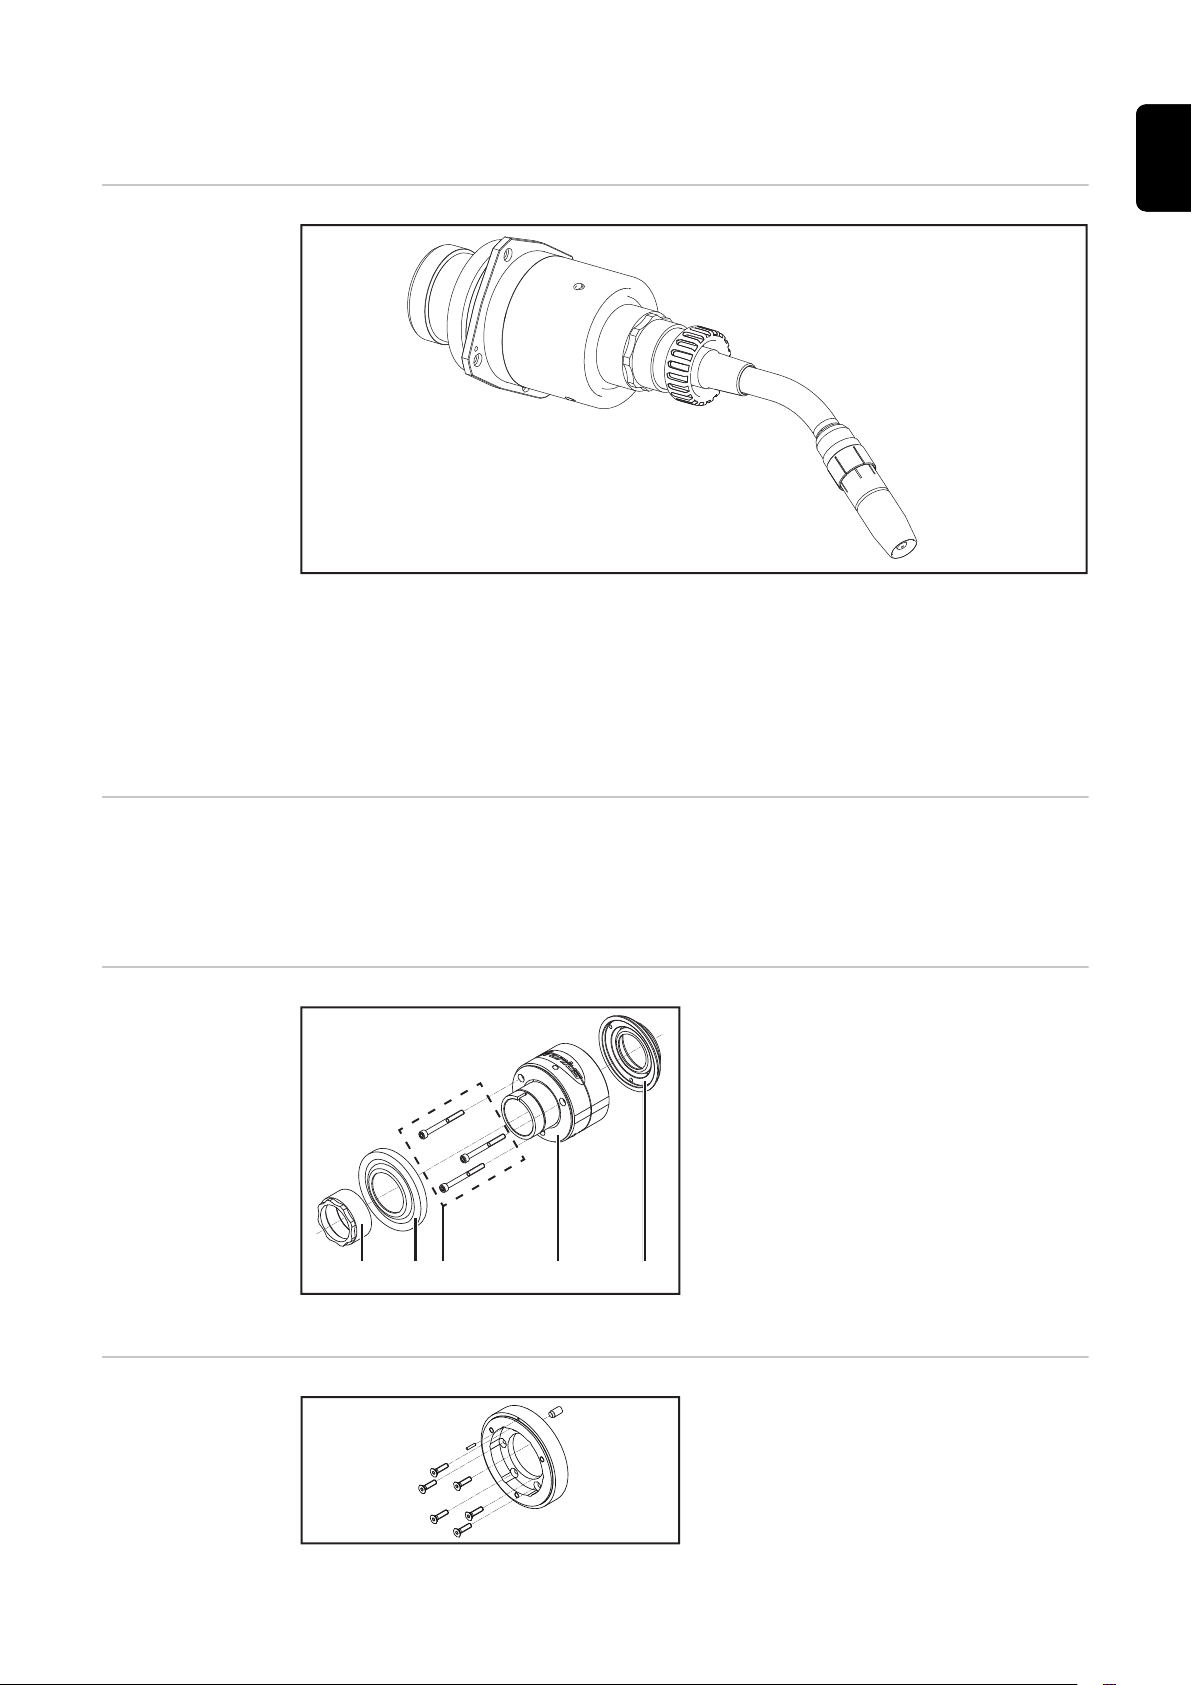
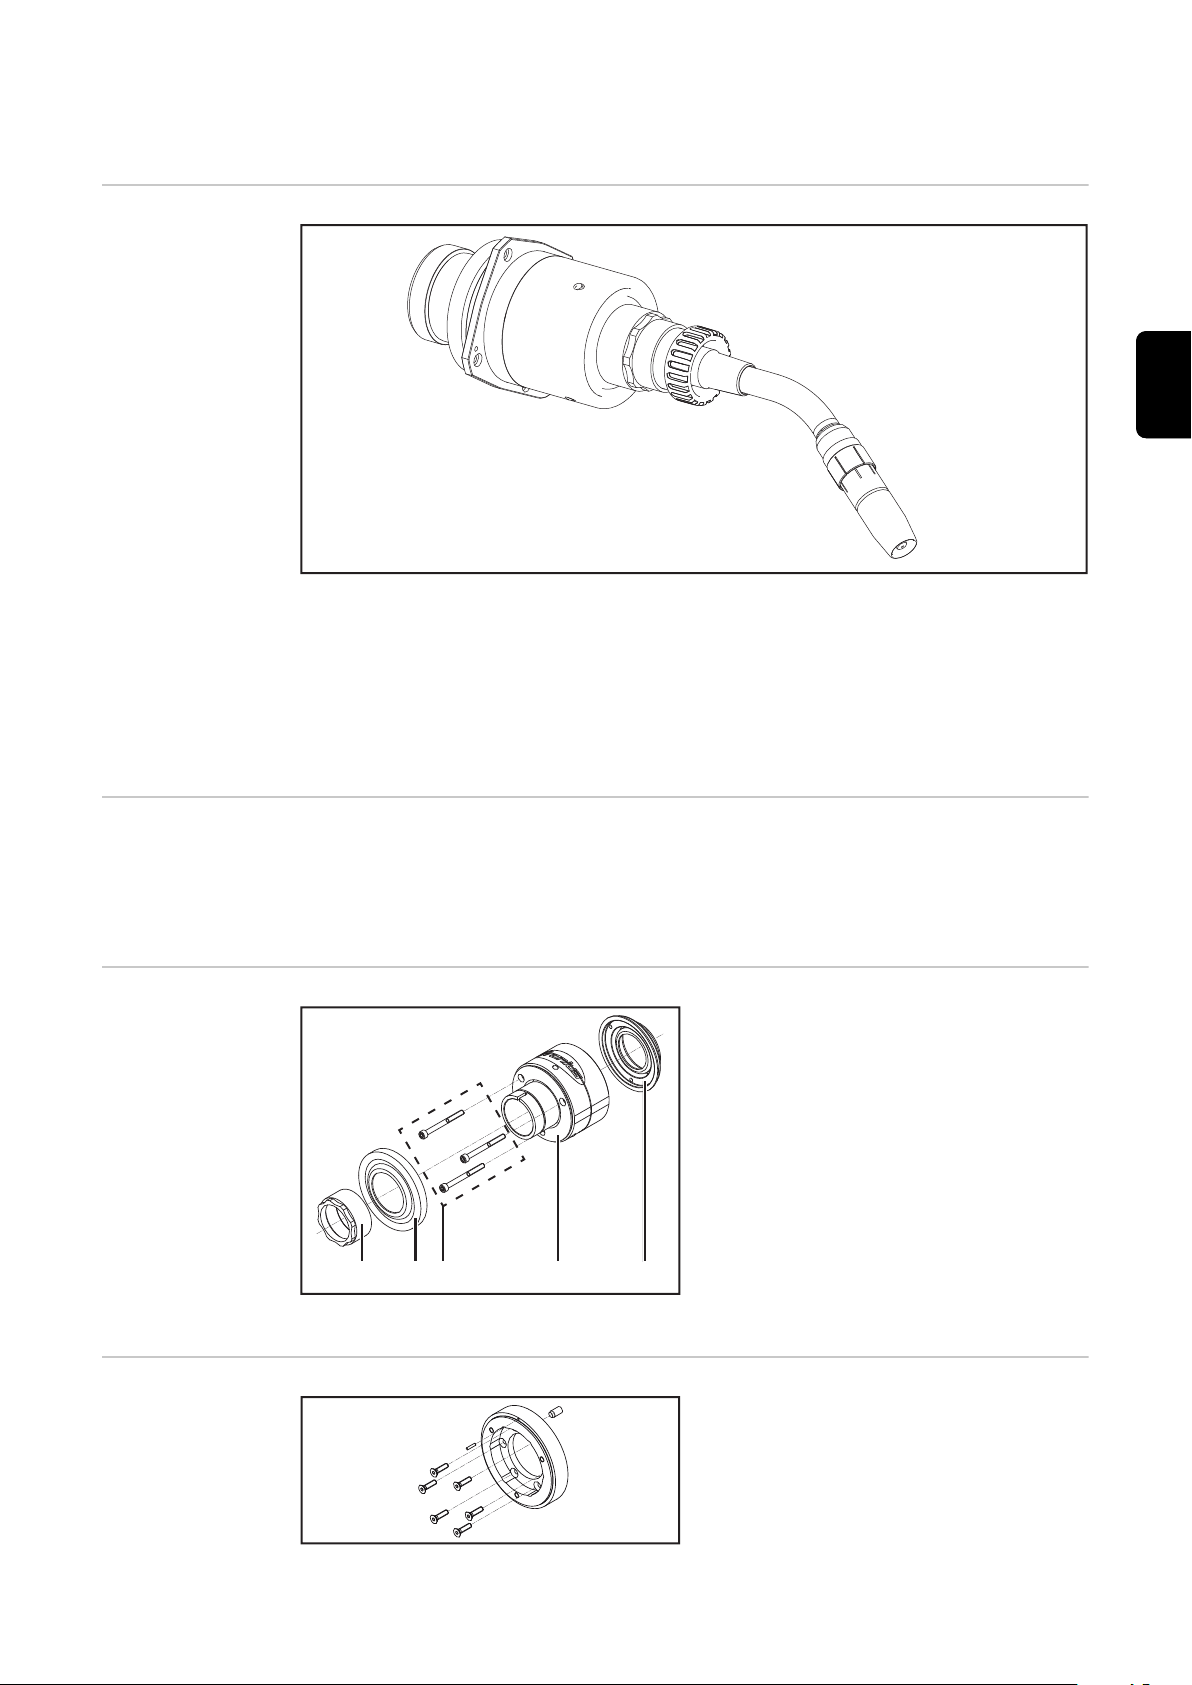
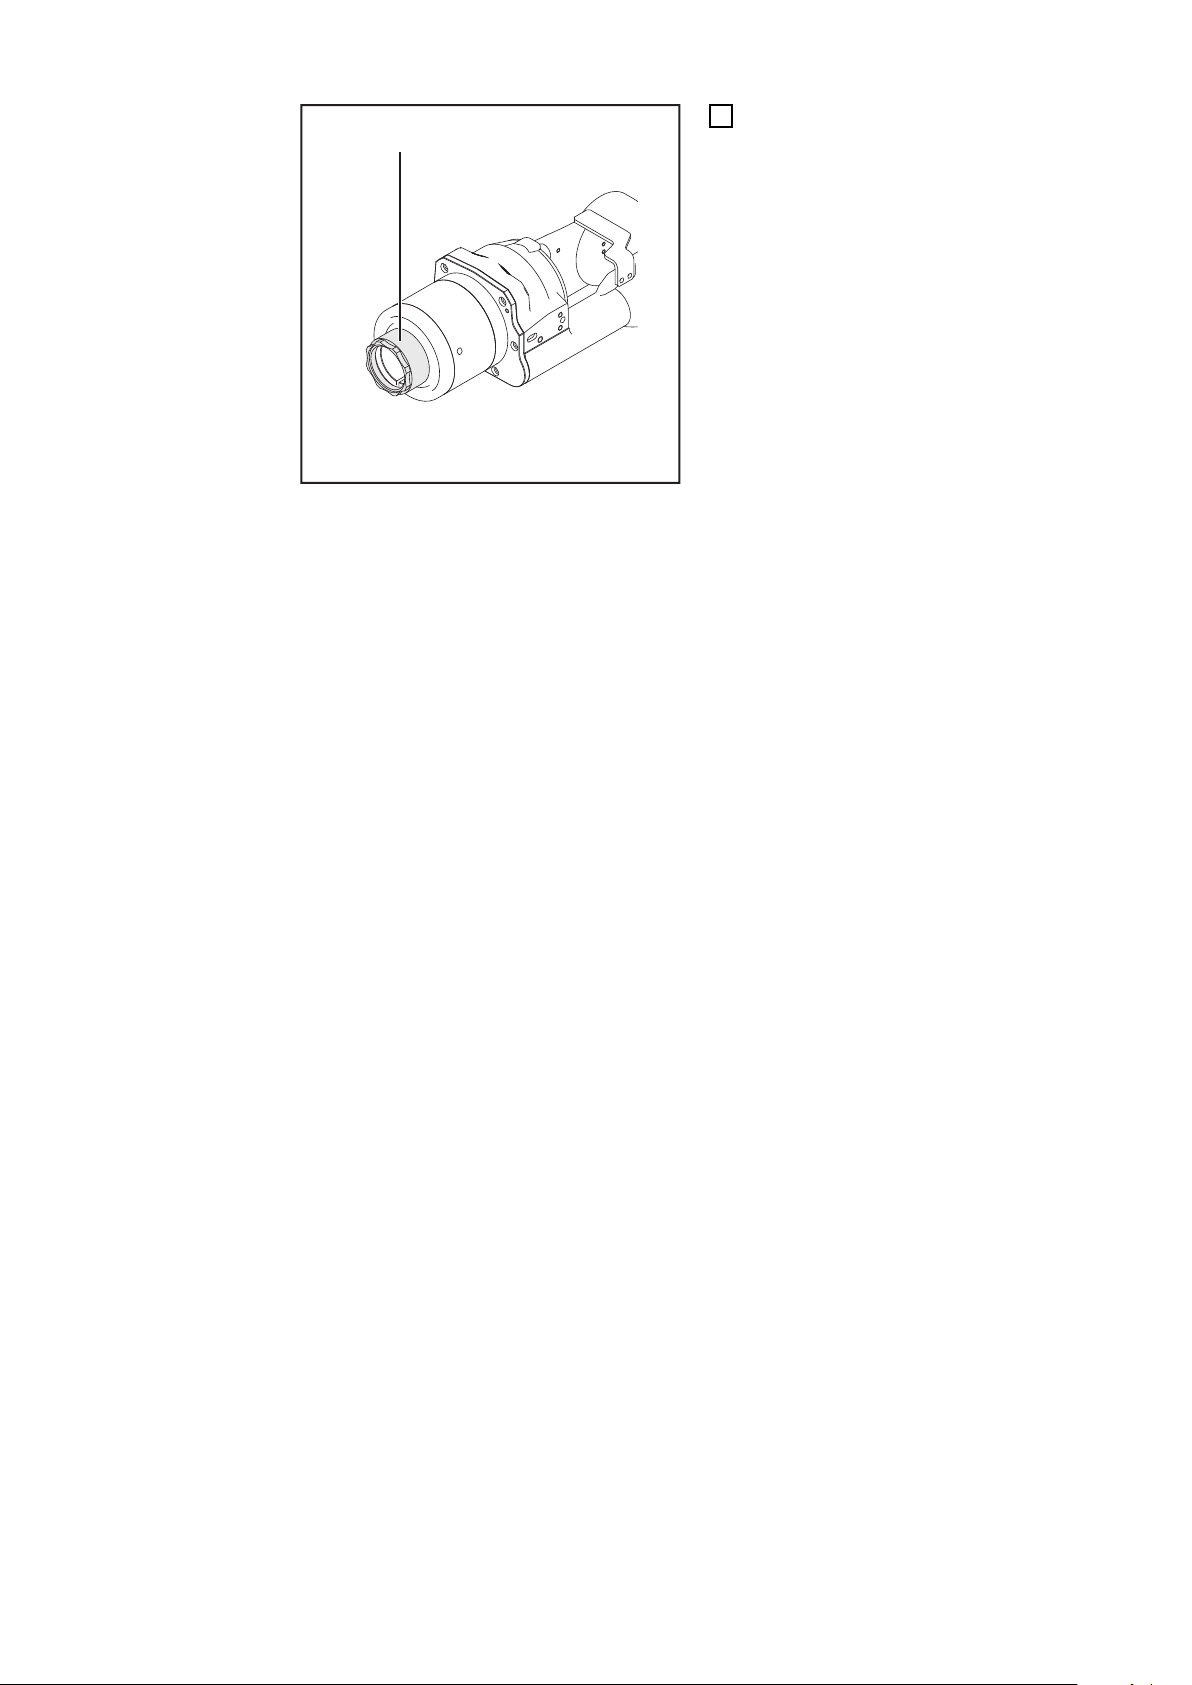
Am Roboterarm aufgebaute CrashBox Robacta PAP L / XL, hier z.B. mit gasgekühltem Roboter-Schweißbrenner Robacta MTG 2500
Die CrashBoxen Robacta PAP L und Robacta PAP XL sind Sicherheitseinrichtungen für
den Roboterbetrieb. Im Falle einer Kollision gibt die CrashBox ein Signal an die RoboterSteuerung aus, worauf die Roboter-Steuerung den Roboter sofort stoppt. Auf Grund der
gefederten Schweißbrenner-Aufnahme der CrashBox wird der Roboter-Schweißbrenner
im Falle einer Kollision vor Schäden geschützt.
DE
Gerätekonzept Die CrashBoxen Robacta PAP L und Robacta PAP XL sind speziell für die Montage am
Roboterarm konzipiert und für die Aufnahme von gas- und wassergekühlten Robacta
Roboter-Schweißbrennern ausgelegt. Das Schweißbrenner-Schlauchpaket verläuft
durch die CrashBox und in Folge durch den Roboterarm.
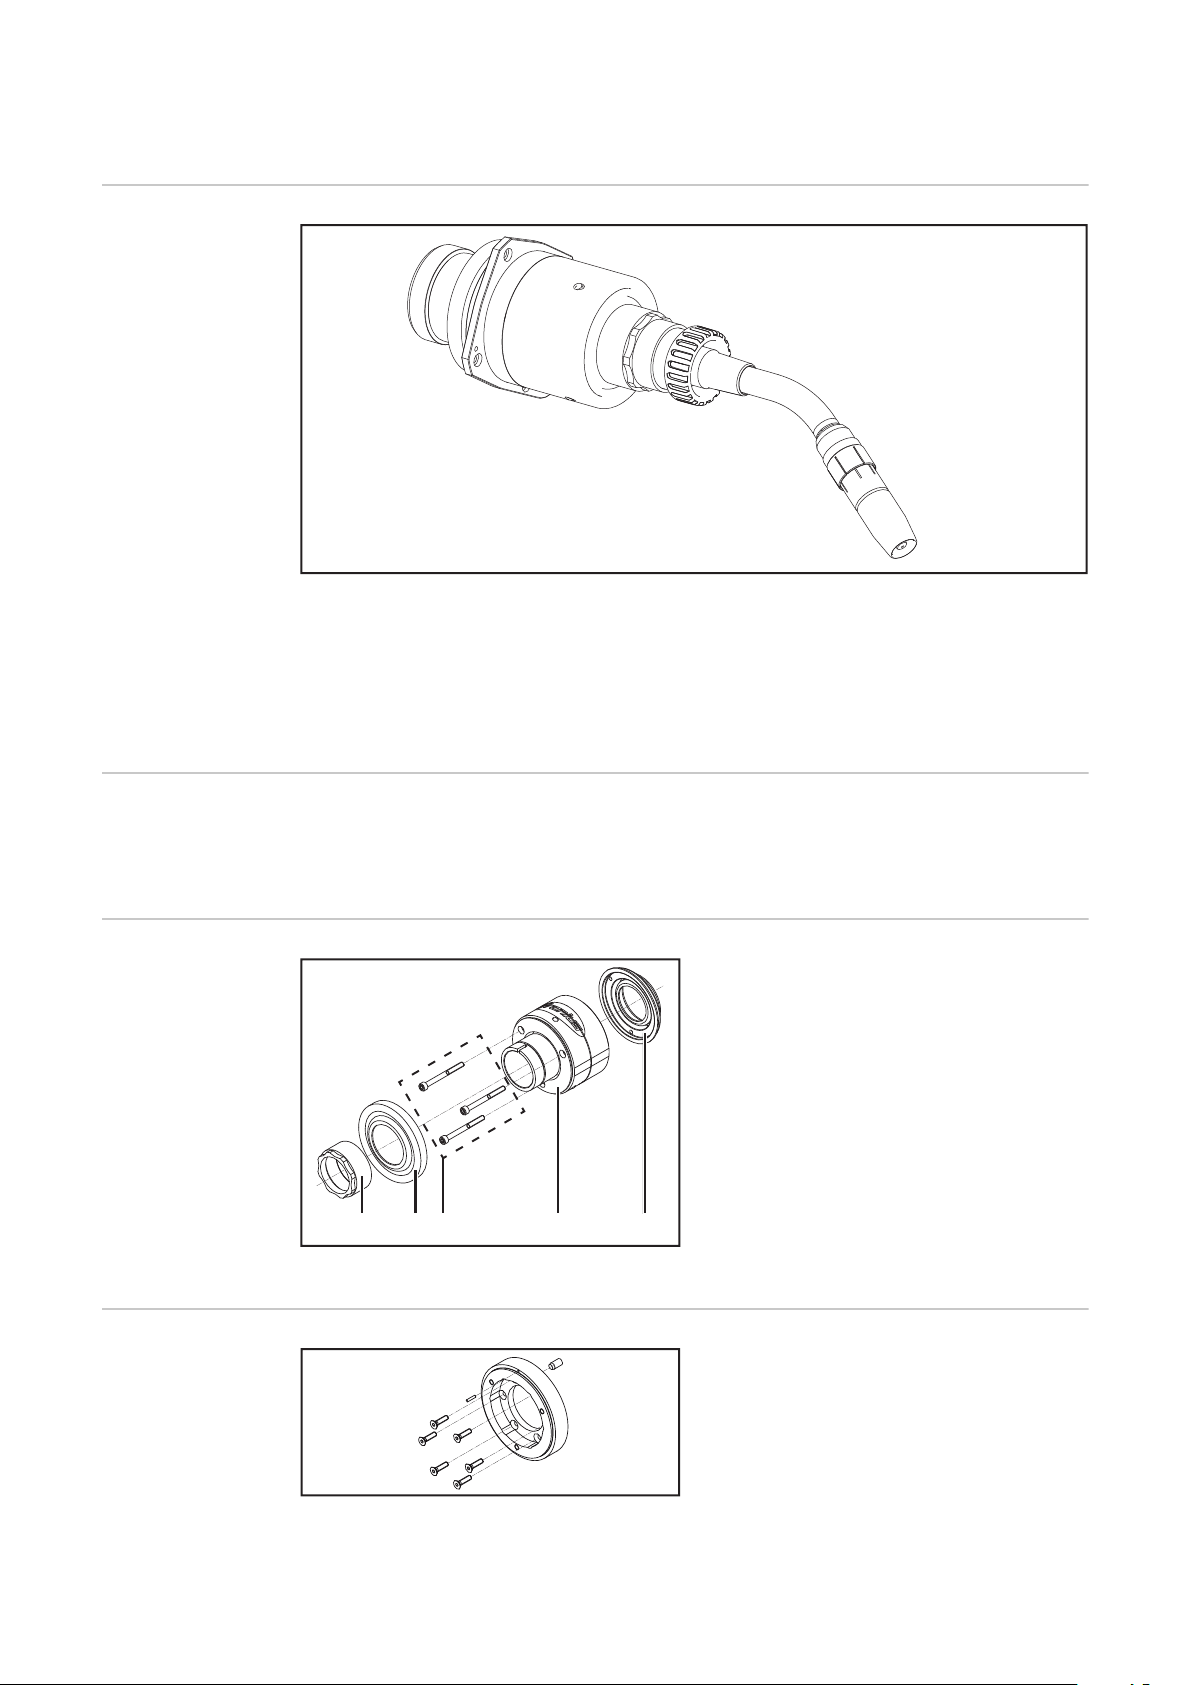
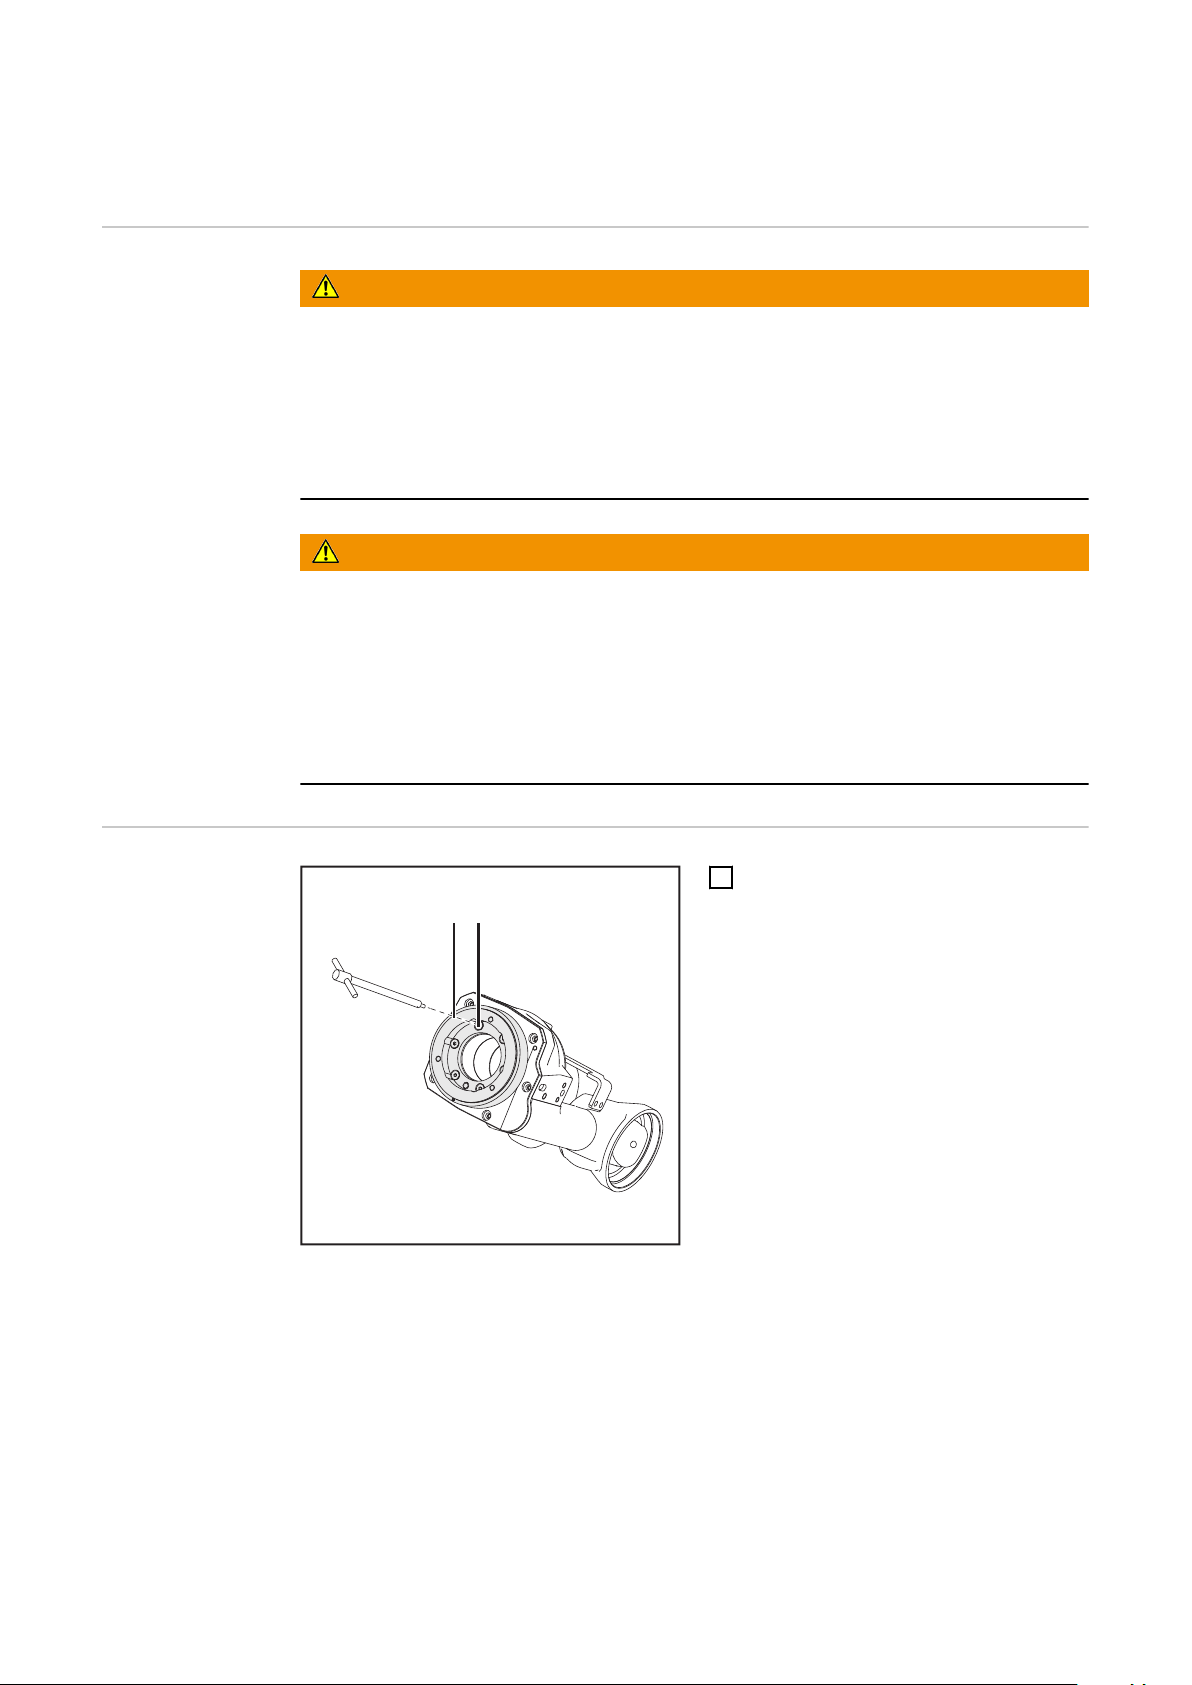
Lieferumfang
Lieferumfang CrashBox Robacta-PAP
Zusätzlich für die
Montage erforderlich
(1) 1 x Überwurfmutter
(2) 1 x Schutzkappe vorne
(3) 3 x Innensechskant-Schraube M5
x 55 mm mit Einstich
(4) 1 x CrashBox Robacta-PAP
(5) 1 x Schutzkappe hinten
Abhängig vom jeweiligen Roboter:
- 1 x Roboterflansch
- Schrauben zur Flanschbefestigung
Roboterflansch und Schrauben
Roboterflansch und Schrauben gemäß Ersatzteilliste
3
Page 4

CrashBox Robacta PAP L / XL am Roboter aufbau-
(1) (2)
en
Sicherheit
WARNUNG!
Gefahr durch Fehlbedienung und fehlerhaft durchgeführte Arbeiten.
Schwere Personen- und Sachschäden können die Folge sein.
Alle in diesem Dokument beschriebenen Arbeiten und Funktionen dürfen nur von
▶
technisch geschultem Fachpersonal ausgeführt werden.
Dieses Dokument vollständig lesen und verstehen.
▶
Sämtliche Sicherheitsvorschriften und Benutzerdokumentationen dieses Gerätes
▶
und aller Systemkomponenten lesen und verstehen.
WARNUNG!
Gefahr durch elektrischen Strom.
Schwere Personen- und Sachschäden können die Folge sein.
Vor Beginn der Arbeiten alle beteiligten Geräte und Komponenten ausschalten und
▶
von Stromnetz trennen.
Alle beteiligten Geräte und Komponenten gegen Wiedereinschalten sichern.
▶
Nach dem Öffnen des Gerätes mit Hilfe eines geeigneten Messgerätes sicherstel-
▶
len, dass elektrisch geladene Bauteile (beispielsweise Kondensatoren) entladen
sind.
CrashBox Robacta PAP L / XL am
Roboter aufbauen
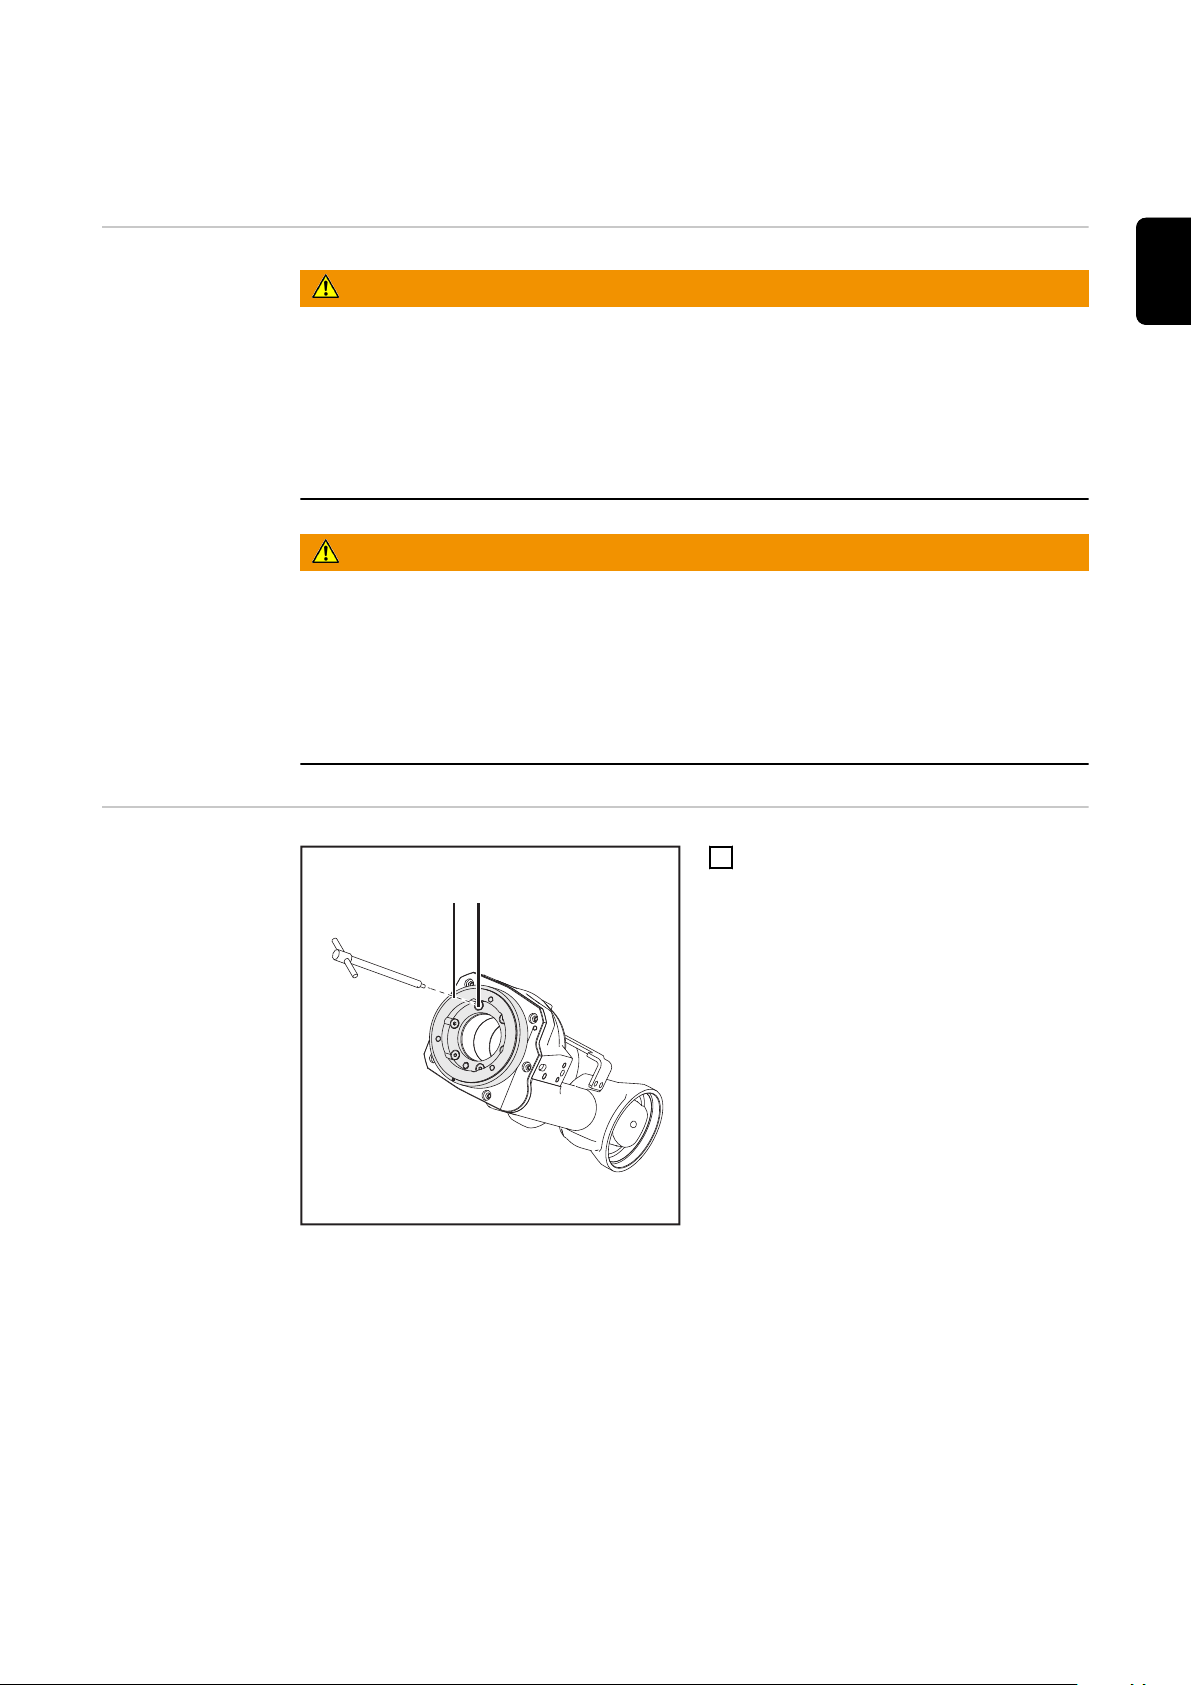
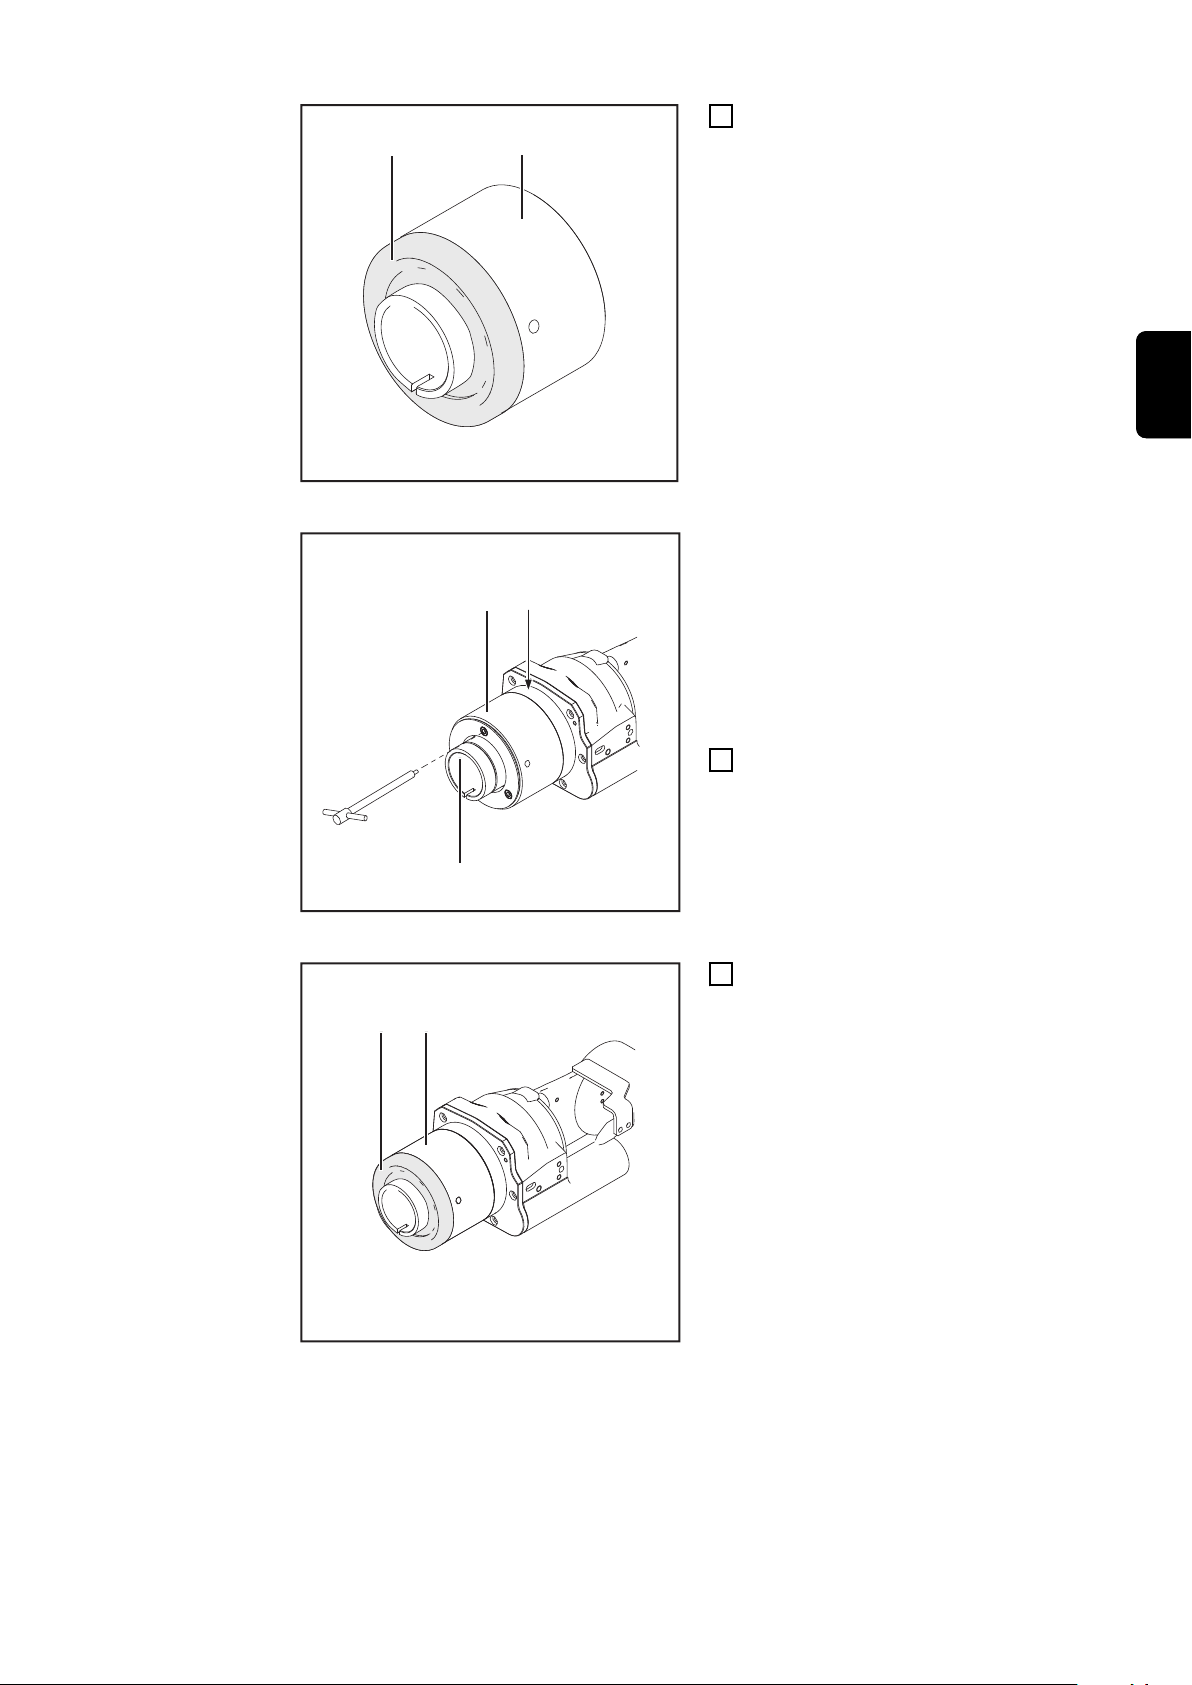
Roboterflansch montieren
Roboterflansch (1) mit den mitgeliefer-
1
ten Schrauben (2) am Roboter montieren
4
Page 5

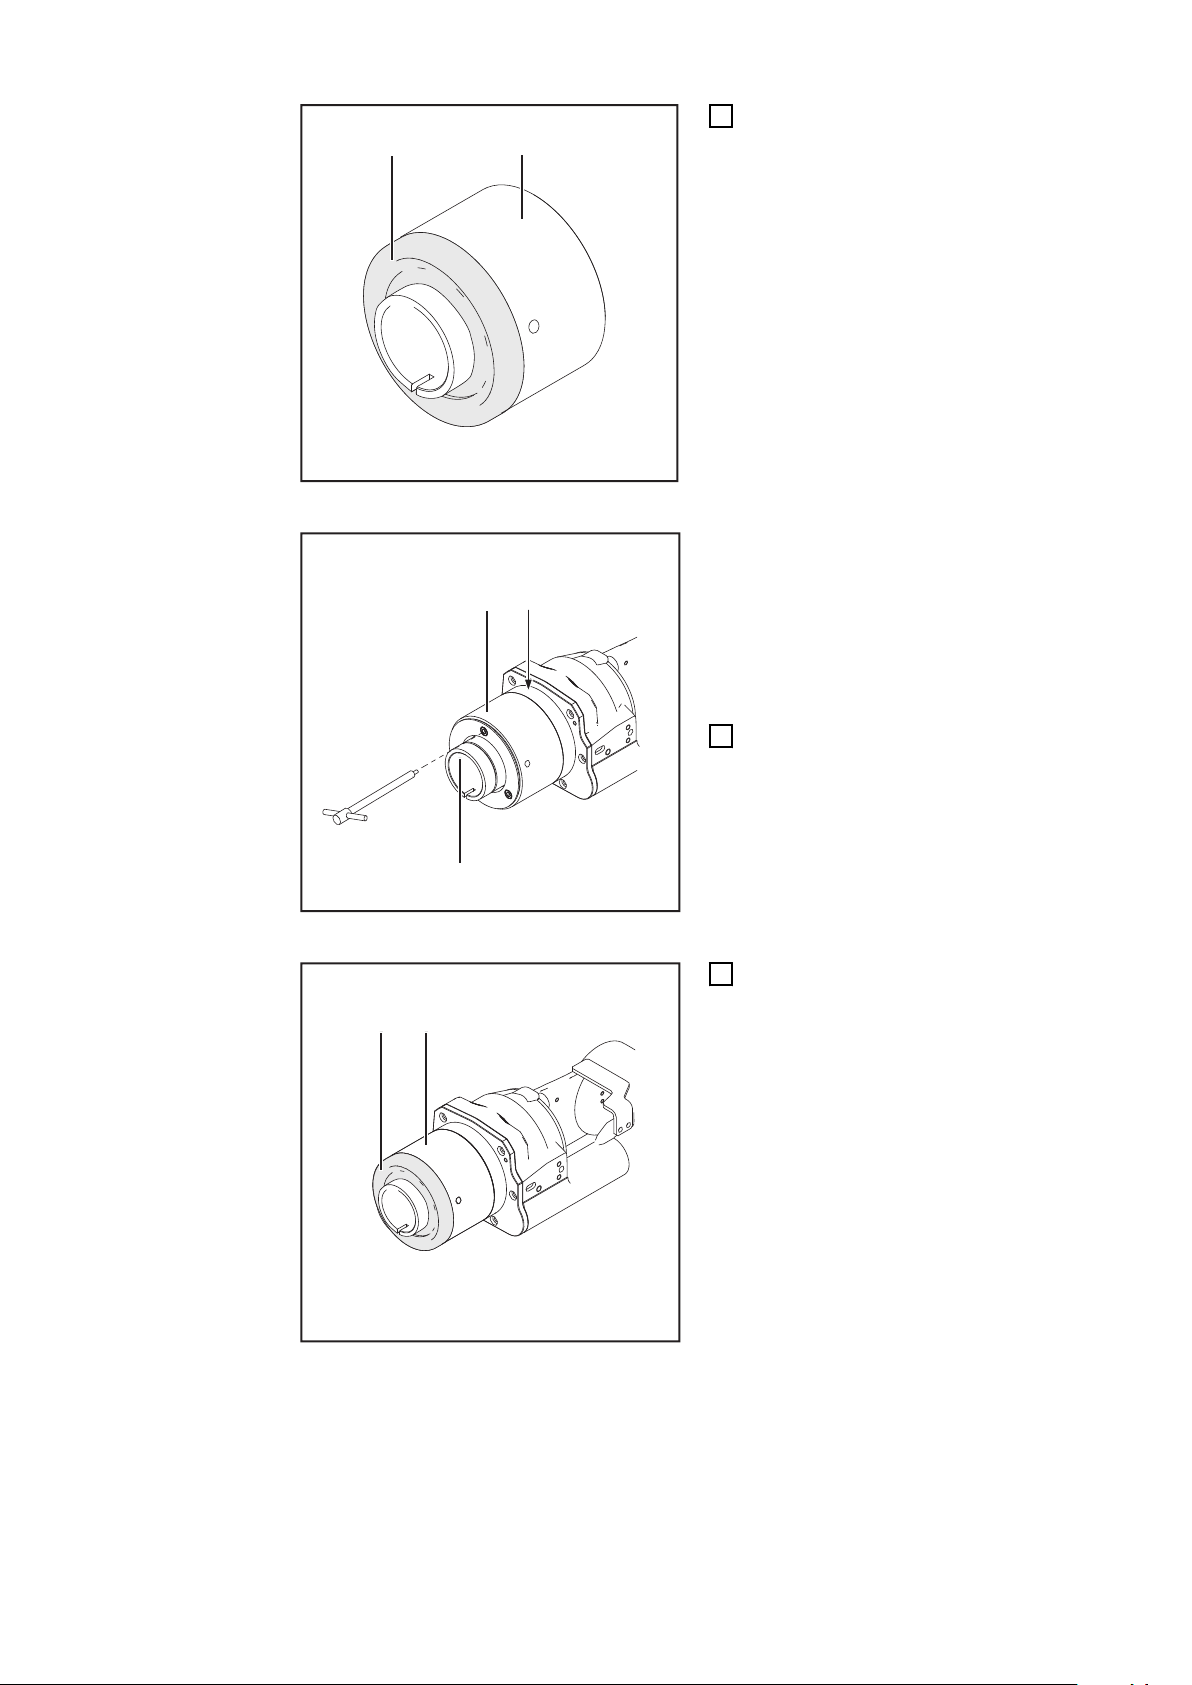
(4) (3)
Schutzkappe vorne abnehmen
(5)
(3)
(6)
(4) (3)
Schutzkappe vorne (4) von der Crash-
2
Box (3) abnehmen
WICHTIG! Maximales Anzugsmoment für
die Befestigung der CrashBox = 4 Nm.
WICHTIG! CrashBox (3) so am Roboter
montieren, dass die Schutzkappe hinten
(5) zum Roboter zeigt.
DE
CrashBox am Roboter montieren
CrashBox (3) mittels 3 Innensechs-
3
kant-Schrauben M5 x 55 mm (6) am
Roboter montieren
Schutzkappe vorne (4) auf CrashBox
4
(3) aufsetzen
Schutzkappe vorne aufsetzen
5
Page 6

(7)
Überwurfmutter aufschrauben
Überwurfmutter (7) leicht aufschrau-
5
ben
6
Page 7

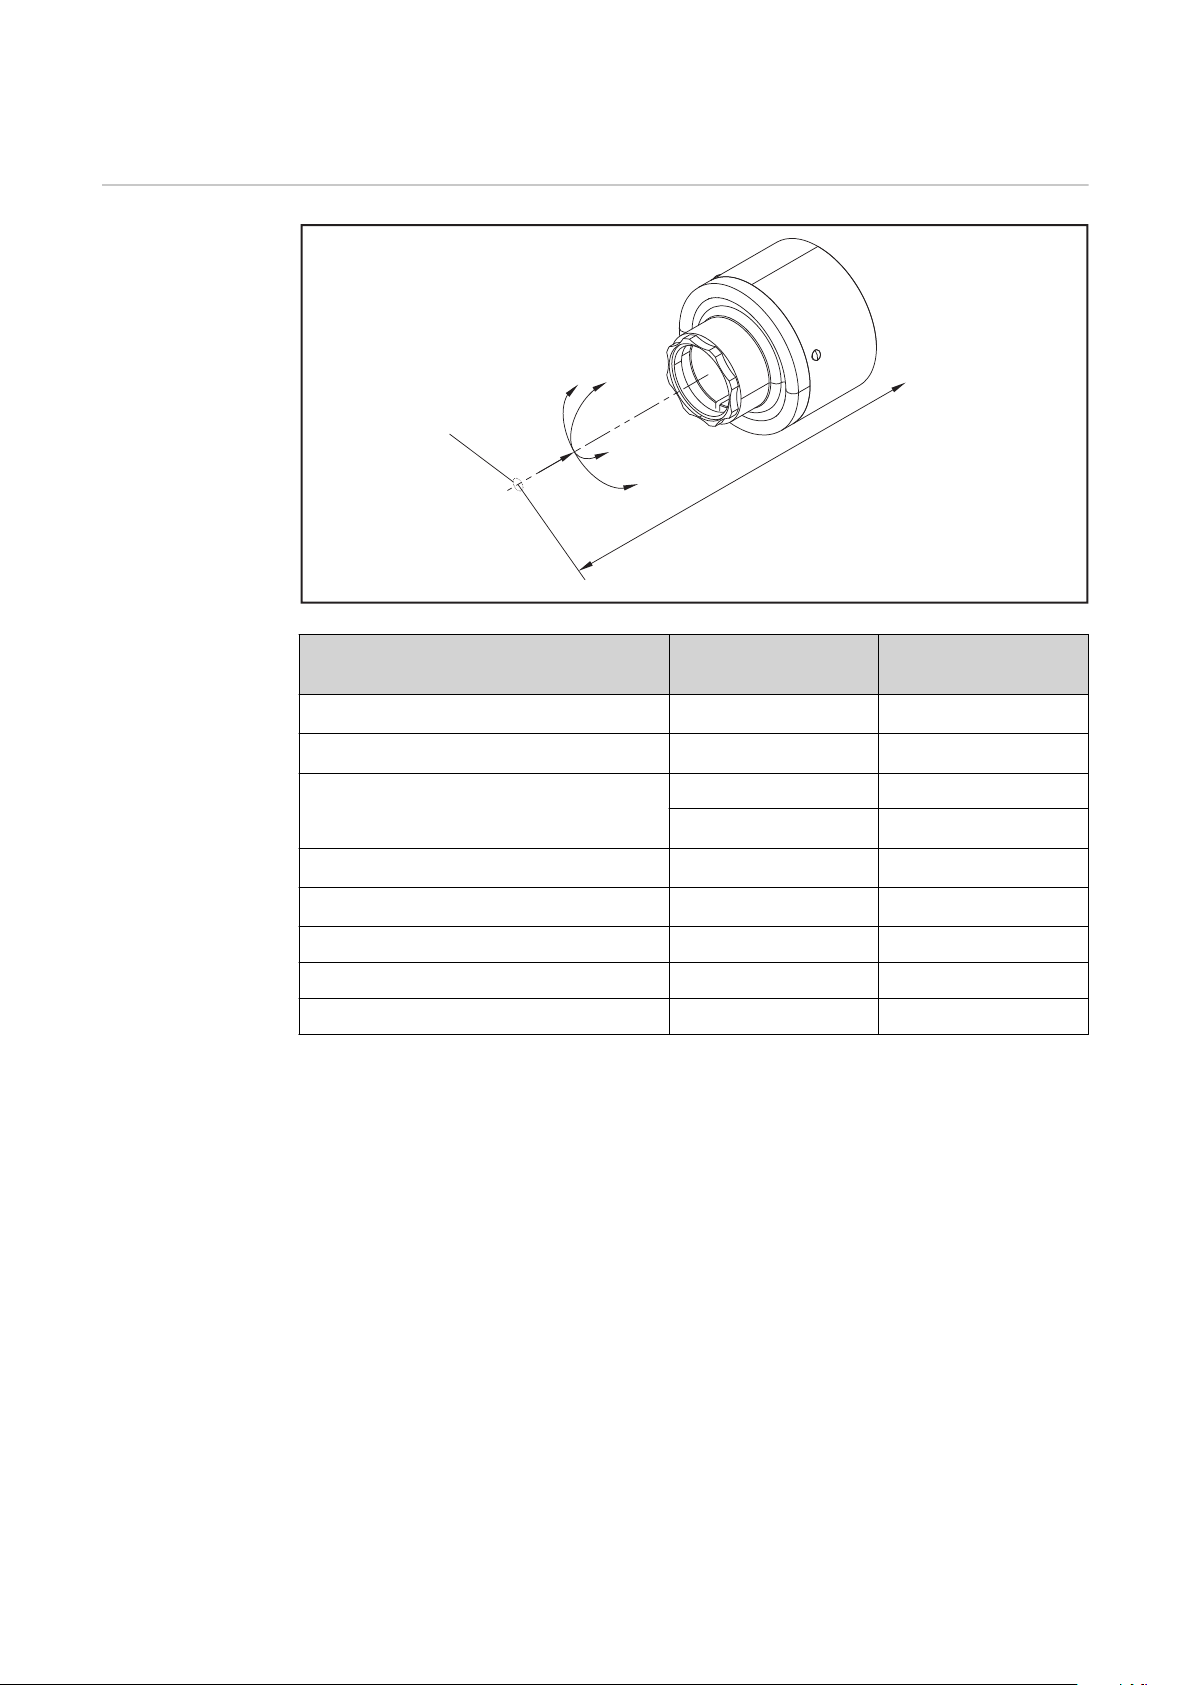
Technische Daten
y
y
x
x
z
300 mm
(1)
CrashBox Robacta PAP L / XL
DE
CrashBox Robacta
PAP L
Rückstellgenauigkeit (1)
± 0,05 mm
Auslösemoment 2) in x/y-Richtung 10 ± 1 Nm
Crashbox Robacta
1)
1)
PAP XL
± 0,05 mm
12 ± 1 Nm
max. 7° max. 7°
zulässige Auslenkung in x/y-Richtung
zulässige Kraft bei maximaler Auslen-
max. 35 mm
max. 60 Nm
1)
1)
max. 35 mm
max. 70 Nm
kung in x/y-Richtung
Auslösemoment 3) in z-Richtung 400 ± 50 Nm
1)
500 ± 50 Nm
zulässige Auslenkung in z-Richtung max. 4,0 mm max. 4,0 mm
Gewicht ca. 520 g ca. 520 g
Abmessungen Ø 89,5 x 77 mm Ø 89,5 x 77 mm
1)
In einer Entfernung von 300 mm vom Roboterflansch
2)
Drehmoment, bei dem das Auslösesignal erfolgt
3)
Kraft, bei der das Auslösesignal erfolgt
1)
1)
1)
1)
1)
7
Page 8
General
(1) (2) (3) (4) (5)
General remarks
Robacta PAP L / XL CrashBox fitted to the robot arm, in this example with Robacta MTG 2500 gascooled robot
welding torch
The Robacta PAP L and Robacta PAP XL CrashBoxes are safety devices used in robot
welding. In the event of a collision the CrashBox sends a signal to the robot control,
which stops the robot immediately. The spring-mounted torch holder on the CrashBox
protects the robot torch from damage should a collision occur.
Device concept The Robacta PAP L and the Robacta PAP XL CrashBoxes have been specially designed
for fitting to the robot arm and for holding gas and water-cooled Robacta robot torches.
The torch hosepack runs through the CrashBox and then through the robot arm.
Scope of supply
Robacta PAP L / XL CrashBox scope of supply
Additionally used
for installation
(1) 1 x union nut
(2) 1 x protective cap, front
(3) 3 x Allen screw M5 x 55 mm with
slot
(4) 1 x Robacta-PAP CrashBox
(5) 1 x protective cap, rear
Depending on the robot:
- 1 x robot flange
- Screws for fixing the flange
Robot flange and screws
8
Robot flange and screws in accordance
with the spare parts list
Page 9
Fitting the Robacta PAP L / XL CrashBox to the ro-
(1) (2)
bot
Safety
Fitting the Robacta PAP L / XL
CrashBox to the
robot
WARNING!
Danger from incorrect operation and work that is not carried out properly.
This can result in serious personal injury and damage to property.
All the work and functions described in this document must only be carried out by
▶
technically trained and qualified personnel.
Read and understand this document in full.
▶
Read and understand all safety rules and user documentation for this device and all
▶
system components.
WARNING!
Danger from electrical current.
This can result in serious personal injury and damage to property.
Before starting work, switch off all devices and components involved and disconnect
▶
them from the grid.
Secure all devices and components involved so they cannot be switched back on.
▶
After opening the device, use a suitable measuring instrument to check that electri-
▶
cally charged components (such as capacitors) have been discharged.
Attach robot flange (1) to the robot (2)
1
using the screws provided
EN
Fitting the robot flange
9
Page 10
(4) (3)
Removing the front protective cap
(5)
(3)
(6)
(4) (3)
Remove the front protective cap (4)
2
from the CrashBox (3)
IMPORTANT! Maximum tightening torque
for securing the CrashBox = 4 Nm.
IMPORTANT! Fit CrashBox (3) onto the
robot in such a way that the rear protective
cap (5) is facing the robot.
Fitting the CrashBox to the robo
Attach CrashBox (3) to the robot using
3
3 M5 x 55 mm Allen screws (6)
Place the front protective cap (4) on
4
the CrashBox (3)
10
Putting the front protective cap in place
Page 11

(7)
Screwing on the union nut
Lightly screw on union nut (7)
5
EN
11
Page 12
Technical data
y
y
x
x
z
300 mm
(1)
CrashBox Robacta PAP L / XL
CrashBox Robacta
PAP L
Reset accuracy (1)
± 0,05 mm
Release torque 2) in x/y direction 10 ± 1 Nm
Crashbox Robacta
1)
1)
PAP XL
± 0,05 mm
12 ± 1 Nm
max. 7° max. 7°
Permitted deflection in x/y direction
max. 35 mm
Permitted force at maximum deflection
max. 60 Nm
Release force 3) in z direction 400 ± 50 Nm
1)
1)
1)
max. 35 mm
max. 70 Nm
500 ± 50 Nm
Permitted deflection in z direction max. 4,0 mm max. 4,0 mm
Weight approx. 520 g approx. 520 g
Dimensions Ø 89,5 x 77 mm Ø 89,5 x 77 mm
1)
at a distance of 300 mm from the robot flange
2)
torque, at which the release signal occurs
3)
force, at which the release signal occurs
1)
1)
1)
1)
1)
12
Page 13
Généralités
(1) (2) (3) (4) (5)
Généralités
CrashBox Robacta PAP L / XL montée sur le bras du robot, ici par exemple avec la torche de soudage pour
robot refroidie au gaz Robacta MTG 2500
Les CrashBox Robacta PAP L et Robacta PAP XL sont des dispositifs de sécurité pour le
mode robot. En cas de collision, la CrashBox émet un signal à destination de la commande du robot, et la commande du robot stoppe immédiatement le robot. Grâce au
support sur ressorts de la torche de soudage contenu par la CrashBox, la torche de soudage pour robot est protégée contre les dommages en cas de collision.
FR
Conception de
l’appareil
Livraison
En plus pour le
montage nécessaire
Les CrashBox Robacta PAP L et Robacta PAP XL sont spécialement conçues pour être
montée sur les bras de robot et configurée pour loger les torches de soudage pour robot
Robacta refroidies par eau et refroidies au gaz. Le faisceau de liaison de la torche passe
à travers la CrashBox puis par le bras du robot.
(1) 1 pce Écrou-raccord
(2) 1 pce Bouchon de protection avant
(3) 3 pce Vis à tête à six pans creux
M5 x 55 mm avec encoche
(4) 1 pce CrashBox Robacta-PAP
(5) 1 pce Bouchon de protection ar-
rière
Livraison CrashBox Robacta-PAP
En fonction du robot :
- 1 pce. bride robot
- Vis pour fixer la bride
Bride robot et vis
Bride robot et vis selon la liste des pièces
de rechange
13
Page 14
Monter la CrashBox Robacta PAP L / XL sur le ro-
(1) (2)
bot
Sécurité
AVERTISSEMENT!
Danger dû à une erreur de manipulation et d'erreur en cours d'opération.
Cela peut entraîner des dommages corporels et matériels graves.
Toutes les fonctions et tous les travaux décrits dans le présent document doivent
▶
uniquement être exécutés par du personnel techniquement qualifié.
Ce document doit être lu et compris dans son intégralité.
▶
Lire et comprendre toutes les consignes de sécurité et la documentation utilisateur
▶
de cet appareil et de tous les composants périphériques.
AVERTISSEMENT!
Risque d'électrocution.
Cela peut entraîner des dommages corporels et matériels graves.
Avant d'entamer les travaux, déconnecter tous les appareils et composants con-
▶
cernés et les débrancher du réseau électrique.
S'assurer que tous les appareils et composants concernés ne peuvent pas être re-
▶
mis en marche.
Après ouverture de l'appareil, s'assurer, à l'aide d'un appareil de mesure approprié,
▶
que les composants à charge électrique (condensateurs, par ex.) sont déchargés.
Monter la CrashBox Robacta PAP
L / XL sur le robot
Installer la bride robot
Installer la bride robot (1) sur le robot
1
au moyen des vis (2) incluses dans la
livraison
14
Page 15
(4) (3)
Retirer le bouchon de protection avant
(5)
(3)
(6)
(4) (3)
Retirer le bouchon de protection avant
2
(4) de la CrashBox (3)
IMPORTANT! Couple de serrage maximal
pour la fixation de la CrashBox = 4 Nm.
IMPORTANT! Installer la CrashBox (3) sur
le robot de manière à ce que le bouchon
de protection arrière (5) soit dirigé vers le
robot.
FR
Monter la CrashBox sur le robot
Monter la CrashBox (3) sur le robot au
3
moyen des 3 vis à tête à six pans
creux M5 x 55 mm (6)
Remettre le bouchon de protection
4
avant (4) sur la CrashBox (3)
Remettre le bouchon de protection avant
15
Page 16
(7)
Visser l’écrou-raccord
Visser légèrement l’écrou-raccord (7)
5
16
Page 17

Caractéristiques techniques
y
y
x
x
z
300 mm
(1)
CrashBox Robacta PAP L / XL
FR
CrashBox Robacta
PAP L
Précision de positionnement (1)
± 0,05 mm
Couple de serrage 2) en direction x/y 10 ± 1 Nm
Crashbox Robacta
1)
1)
± 0,05 mm
12 ± 1 Nm
PAP XL
max. 7° max. 7°
Déport admissible en direction x/y
Force admissible pour déport maximal
max. 35 mm
max. 60 Nm
1)
1)
max. 35 mm
max. 70 Nm
en direction x/y
Force de déclenchement 3) en direction z 400 ± 50 Nm
1)
500 ± 50 Nm
Déport admissible en direction z max. 4,0 mm max. 4,0 mm
Poids ca. 520 g ca. 520 g
Dimensions Ø 89,5 x 77 mm Ø 89,5 x 77 mm
1)
à une distance de 300 mm de la bride de robot
2)
Couple de serrage à laquelle est émis le signal de déclenchement
3)
Force à laquelle est émis le signal de déclenchement
1)
1)
1)
1)
1)
17
Page 18

18
Page 19

FR
19
Page 20

Fronius International GmbH
Froniusstraße 1
4643 Pettenbach
Austria
contact@fronius.com
www.fronius.com
Under www.fronius.com/contact you will find the adresses
of all Fronius Sales & Service Partners and locations.
spareparts.fronius.com
SPAREPARTS
ONLINE
 Loading...