


/ Perfect Charging / Perfect Welding / Solar Energy
CMT Twin
Process description and
commissioning
User information
EN
System extension
42,0426,0138,EN 003-28082017

2

Dear reader,
Introduction Thank you for the trust you have placed in our company and congratulations on buying this
high-quality Fronius product. These instructions will help you familiarise yourself with the
product. Reading the instructions carefully will enable you to learn about the many different
features it has to offer. This will allow you to make full use of its advantages.
Please also note the safety rules to ensure greater safety when using the product. Careful
handling of the product will repay you with years of safe and reliable operation. These are
essential prerequisites for excellent results.
EN
3

4

Contents
General 7
General ...................................................................................................................................................... 9
System concept .................................................................................................................................... 9
Functional principle ............................................................................................................................... 9
Configurations....................................................................................................................................... 9
Dimensioning of the robot ..................................................................................................................... 10
Measures to increase system availability.............................................................................................. 10
Note for TimeTwin welding using a CMT Twin system ......................................................................... 10
System components required .................................................................................................................... 11
System components required ............................................................................................................... 11
Application example................................................................................................................................... 14
Application example.............................................................................................................................. 14
Installation and commissioning 15
Safety......................................................................................................................................................... 17
Safety.................................................................................................................................................... 17
Notes regarding the installation of Fronius system components ............................................................... 18
Installation and commissioning of Fronius system components ........................................................... 18
Setup regulations for the power sources .............................................................................................. 18
Fitting wearing parts to the torch neck ....................................................................................................... 19
Fitting wearing parts to the torch neck .................................................................................................. 19
Fitting the mounting bracket and torch neck .............................................................................................. 20
Fitting the mounting bracket to the robot .............................................................................................. 20
Screw the torch neck and drive units to the mounting bracket ............................................................. 20
Earth connection ........................................................................................................................................ 22
Earth connection ................................................................................................................................... 22
Recommendation to minimise arc blow ................................................................................................ 23
Connecting the LHSB-HUB with the power sources and wire-feed units .................................................. 24
Connecting the LHSB-HUB with the power sources and wire-feed units ............................................. 24
Connecting to the robot control.................................................................................................................. 25
Connecting to the robot control............................................................................................................. 25
Robot interfaces for CMT Twin ............................................................................................................. 25
Standard robot interfaces...................................................................................................................... 25
Twin fieldbus systems .......................................................................................................................... 26
Standard fieldbus systems.................................................................................................................... 27
Description of signal statuses .............................................................................................................. 28
Check compatibility of power sources and remote controls....................................................................... 29
Safety.................................................................................................................................................... 29
Checking power source compatibility.................................................................................................... 29
Checking the RCU 5000i database version .......................................................................................... 29
Checking the characteristics version ......................................................................................................... 31
Safety.................................................................................................................................................... 31
Checking the characteristics version .................................................................................................... 31
L/R alignment - aligning welding circuit inductivity and welding circuit resistance..................................... 33
Safety.................................................................................................................................................... 33
L/R alignment using RCU 5000i............................................................................................................ 33
Welding start-up......................................................................................................................................... 36
Welding start-up sequence ................................................................................................................... 36
Safety.................................................................................................................................................... 36
Welding start-up settings ...................................................................................................................... 36
Start delay parameter correction........................................................................................................... 37
Pulse/CMT welding .................................................................................................................................... 38
Process description pulse/CMT welding ............................................................................................... 38
CMT/CMT welding ..................................................................................................................................... 39
Process description CMT/CMT welding................................................................................................ 39
Single-wire welding ............................................................................................................
Special features and advantages.......................................................................................................... 40
........................ 40
EN
5

Material transfer .................................................................................................................................... 40
Applying the 'HD' ('Heavy Duty') configuration........................................................................................... 42
Available characteristics ....................................................................................................................... 42
Description of characteristics ................................................................................................................ 42
Configuring the system ......................................................................................................................... 42
Stick out ................................................................................................................................................ 44
Use 'Speed' configuration .......................................................................................................................... 45
Available characteristics ....................................................................................................................... 45
Description of characteristics ................................................................................................................ 45
Configuring the system ......................................................................................................................... 46
Stick out ................................................................................................................................................ 48
Use 'Root' configuration ............................................................................................................................. 49
Available characteristics ....................................................................................................................... 49
Description of characteristics ................................................................................................................ 49
Configuring the system ......................................................................................................................... 49
Standard welding parameter values for fillet welds.................................................................................... 51
Standard welding parameter values for fillet welds............................................................................... 51
Alignment of welding torch relative to the workpiece ............................................................................52
Standard welding parameter values for lap joints ...................................................................................... 53
Standard welding parameter values for lap joints ................................................................................. 53
Alignment of welding torch relative to the workpiece ............................................................................53
Prerequisities for welding........................................................................................................................... 55
Safety.................................................................................................................................................... 55
Prerequisities for welding...................................................................................................................... 55
6

General


General
System concept CMT Twin is a high performance welding process that combines the advantages of CMT
welding and Twin welding. In addition to numerous other benefits, it offers a very high welding speed and simple control of the process.
EN
Functional principle
- The wire is fed by two separate wire-feed units and Robacta Drive CMT drive units
- The wire-feed units and drive units are supplied by two independent power sources
- The wire electrodes are brought together in the torch neck in such a way that two independent welding potentials are created
(4)
(5)
(1)
(2)
(3)
(2)
(1)
(4)
(5)
No. Explanation
(1) Wire-feed unit 1 and 2
(2) Wire electrode 1 and 2
(3) LHSB-HUB
(4) Power source 1 and 2
(5) Separate welding potential
Configurations CMT Twin can be used in a variety of configurations depending on requirements. The
available configurations comprise:
- wearing parts optimised for CMT Twin
- dedicated characteristics on the RCU 5000i
Refer to the "Installation and commissioning" section for more information about the individual configurations.
9

Dimensioning of
the robot
Dimension the robot so that it is able to accommodate the Robacta Twin Compact Pro
torch neck and associated mounting bracket plus 2 Robacta Drive CMT drive units and 1
metre of the relevant hosepacks.
NOTE! The total weight of these components is 7.5 kg (16.53 Ib.).
Measures to increase system
availability
Note for
TimeTwin welding using a CMT
Twin system
To increase system availability, we recommend the following welding torch cleaning devices:
Robacta Reamer Twin
Mechanical welding torch cleaner, suitable for all base materials, such as steel, aluminium, CrNi steels, copper, etc.
Robacta Reamer V Twin
Mechanical welding torch cleaner, suitable for all base materials, such as steel, aluminium, CrNi steels, copper, etc.
Robacta TC 1000 Twin
Electromagnetic welding torch cleaner for ferromagnetic base materials
NOTE! When welding the TimeTwin process using a CMT Twin system, the
"TimeTwin Digital" software needs to be enabled on both power sources.
NOTE! Pulse synchronous welding can only be performed using TimeTwin characteristics.
It is not possible with CMT Twin characteristics.
10

System components required
EN
System components required
FK 4000 R
- 2 TPS 5000 CMT
- with DSP software version
5.01.063 or higher
- 2 RCU 5000i
- with database version 908 or higher
Use 2 FK 4000 R or 1 FK 9000 for:
- hosepack lengths of up to 4.25 m
(14.76ft.)
- 100 % duty cycle (10min/40°C) at 360
A
FK 9000 R
Use 2 FK 9000 for:
- hosepack lengths from 4.25 m - 8.25 m
(14.76 ft. - 27.07 ft.)
- 100 % duty cycle (10min/40°C) at 360
A
11

VR 7000 CMT
VR 1550
- 2 VR 7000 CMT or 2 VR 1550
- 2 Robacta Drive CMT drive units with
wire buffer and hosepacks
- 1 LHSB-HUB
12

(1)
(2)
(3)
(4)
(5)
- 1 Robacta Twin Compact Pro torch
neck and mounting bracket
EN
(1) 2 inner liners
(2) 1 wrench for nozzle fitting and con-
tact tip
(3) 2 nozzle fittings
(4) 2 spatter guards
(5) 2 contact tips
(6) 1 gas nozzle
(7) 2 TCP tips
(8) 1 wrench for union nut on drive
units
(6)
(7)
(8)
- Robot interface for connecting power source to the robot control
13

Application example
Application example
(8)
(1)
(22)
(1) Connection to robot control (12) Robot
(2) Robot interface (13) Drum coil
(3) Connection to robot interface (14) Drum coil
(4) Interconnecting hosepack (15) FK 9000 R or FK 4000 R cooling
(5) VR 7000 CMT or VR 1550 (16) TPS 5000 CMT power source
(6) VR 7000 CMT or VR 1550 (17) LHSB-HUB
(7) Wire buffer (18) FK 9000 R or FK 4000 R cooling
(8) Wire buffer (19) TPS 5000 CMT power source
(9) Robacta Drive CMT drive unit (20) RCU 5000i
(10) Robacta Drive CMT drive unit (21) RCU 5000i
(11) Robacta Twin Compact Pro torch
neck
(21)
(20)
(2)
(3) (4)
(19)
(18)
(17)
(5)
(16) (14) (13)
(15)
(6)
(22) Robot control
(7)
(9)
(10)
(12)
(11)
unit
unit
14

Installation and commissioning


Safety
Safety Observe the following safety instructions for all work described in these operating instruc-
tions.
WARNING! Work that is carried out incorrectly can cause serious injury or damage. All the work described below must only be carried out by trained and qualified personnel. Do not carry out any of the work described below until you have
fully read and understood the following documents:
- these operating instructions
- all the operating instructions for the system components, especially the safety rules
WARNING! Machines that start up automatically can cause serious injury and
damage. In addition to these operating instructions, the safety rules issued by the
manufacturers of the robot and welding systems must also be observed. For your
personal safety, ensure that all protective measures have been taken and will remain in place while you are in the working area of the robot.
WARNING! Work that is carried out incorrectly can cause serious injury or damage. Before starting the work listed below:
- turn the mains switch of both power sources to the "O" position
- disconnect both power sources from the mains
- put up an easy-to-understand warning sign to stop anybody inadvertently
switching it back on again
EN
WARNING! Risk of serious injury and damage from articles being dropped. All
the screw connections described below:
- must be checked after fitting to ensure they are tight
- must be checked after unusual events (e.g. a crash) to ensure they are tight
- must be checked regularly to ensure they are tight
17

Notes regarding the installation of Fronius system
components
Installation and
commissioning of
Fronius system
components
Setup regulations
for the power
sources
NOTE! Install and commission Fronius system components (power source, wire-
feed unit, cooling unit, hosepack, RCU 5000i, LHSB-HUB, etc.) according to the
operating instructions of the relevant device.
NOTE! If the power sources are used with two FK 4000 R, ensure a minimum gap
of 1000 mm (39.07 in.) between the power sources in order to guarantee a sufficient supply of fresh air to the cooling units.
NOTE! If the power sources are used with two FK 9000 R, ensure a minimum gap
of 1000 mm (39.07 in.) between the power sources in order to guarantee a sufficient supply of fresh air to the cooling units.
1000 mm
(39.37 in.)
18

Fitting wearing parts to the torch neck
EN
Fitting wearing
parts to the torch
neck
1 2
1
3
3
2
19

Fitting the mounting bracket and torch neck
Fitting the mounting bracket to the
robot
Screw the torch
neck and drive
units to the
mounting bracket
1
1
1 2
1
2
3x M6x12
2
1
2x
M6x12
8Nm
3
3
3
20

4
4
5 6
5 6
* Only screw in loosely to begin with -
do not tighten. Only tighten the
screws once all components have
been properly aligned with each
other - step 6.
This will avoid placing the drive
units under excessive strain.
EN
21

Earth connection
Earth connection
NOTE! Each power source must have its own dedicated earthing cable routed as
shown.
Separate earthing cable Shared earthing cable, earthing socket
22
Separate earthing cable laid in a loop Earthing cable coiled

Recommendation to minimise
arc blow
NOTE! To minimise arc blow,
weld away from the earthing connections.
EN
23

Connecting the LHSB-HUB with the power sources
and wire-feed units
Connecting the
LHSB-HUB with
the power sources and wire-feed
units
Connect the lead power source to connection (1) on the LHSB-HUB
1
Connect the wire-feed unit of the lead power source to connection (2) on the LHSB-
2
HUB
Connect the trail power source to connection (3) on the LHSB-HUB
3
Connect the wire-feed unit of the trail power source to connection (4) on the LHSB-
4
HUB
Connect the LHSB-HUB to the LocalNet port on the lead power source
5
(1) (2)
(3) (4)
24

Connecting to the robot control
EN
Connecting to the
robot control
Robot interfaces
for CMT Twin
Use one of the following configurations to connect the welding system to the robot con-
1
trol.
Refer to the operating instructions for the respective interface for instructions on connecting the welding system to the robot control.
There are two special robot interfaces for CMT Twin available for connecting to the robot
control:
- Twin Standard I/O Job (0-24 V digital)
- Twin Standard I/O Synergic / Job (0-24 V digital, 0-10 V analogue)
Each of these "Twin interfaces" features an integral programmable logic controller (PLC).
The signals are connected logically by the PLC. Both power sources are therefore triggered simultaneously by a signal from the robot control. Only one "Twin interface" is required for two power sources. The "Twin interface" in installed in the switch cabinet.
Example setup:
No. Part/device No. Part/device
(1) LocalNet connection (5) Twin interface
(2) LocalNet connection (6) Connection to robot control
(3) Power source (7) Robot control
(4) Power source
Standard robot
interfaces
(1)
(2)
(3)
(4)
(5)
(6)
(7)
The following standard robot interfaces can be used to connect to the robot control for Twin
processes:
- ROB 3000 (0-24 V digital)
- ROB 4000 (0-24 V digital, 0-10 V analogue)
- ROB 5000 (0-24 V digital, 0-10 V analogue)
Signals must be connected logically by the robot control when standard robot interfaces
are used. Two identical robot interfaces are required for two power sources. The two standard robot interfaces are installed in the switch cabinet. Robot interfaces "1" and "2" are connected to power sources "1" and "2" via LocalNet.
25

Application example:
No. Part/device No. Part/device
(1) Standard interface (5) Power source
(2) Standard interface (6) Power source
(3) LocalNet connection (7) Connection to robot control
(4) LocalNet connection (8) Robot control
Twin fieldbus
systems
(1) (3)
(2) (4)
(6)
(8)
The following Twin fieldbus systems can be used to connect to the robot control for Twin
processes:
- Twin DeviceNet fieldbus robot interface
- Twin CANopen fieldbus robot interface
- Twin Interbus CU fieldbus robot interface
- Twin Profibus fieldbus robot interface
An integral PLC is also a feature of the "Twin fieldbus systems" as well as the "Twin interfaces". The signals are connected logically by this PLC. Both power sources are therefore
triggered simultaneously by a signal from the robot control. Only one "Twin fieldbus system" is required for two power sources. The "Twin fieldbus system" is fitted to one of the
power sources. The connection to the second power source is established via LocalNet
and the connection to the robot control via the fieldbus.
(5)
(7)
26
Application example:
No. Part/device No. Part/device
(1) Robot control (5) Power source
(2) Fieldbus connection (6) LHSB-HUB
(3) Twin fieldbus system (7) Power source
(4) LocalNet connection

(1)
(2) (3) (4)
EN
(5)(7) (6)
Standard fieldbus
systems
The following standard fieldbus systems can be used to connect to the robot control for
Twin processes:
- DeviceNet fieldbus robot interface
- CanOpen fieldbus robot interface
- Interbus CU fieldbus robot interface
- Interbus LWL fieldbus robot interface
- Profibus 1.5 MB fieldbus robot interface
Signals must be connected logically by the robot control when standard fieldbus systems
are used. Two identical standard fieldbus systems are required for two power sources. The
two standard fieldbus systems are fitted to the power sources. The robot control is connected to the power sources via the fieldbus.
Application example:
No. Part/device No. Part/device
(1) Fieldbus connection (5) Power source
(2) Standard fieldbus system (6) LHSB-HUB
(3) Fieldbus connection (7) Power source
(4) Standard fieldbus system (8) Robot control
(1) (2) (3) (4)
(5)(7) (6)(8)
27

Description of
signal statuses
NOTE! During twin-wire welding (CMT Twin), the signal statuses have no influ-
ence on which power source operates as the lead or trail power source.
This is decided by the characteristic selection on the RCU 5000i.
Description of "Twin master selection" signal statuses
Power source 1 Power source 2 Effect
0 0 Power source 1 welds,
power source 2 is inactive
1 0 Both power sources weld
0 1 Both power sources weld
1 1 Power source 2 welds,
power source 1 is inactive
28

Check compatibility of power sources and remote
controls
Safety
EN
WARNING! If the equipment is used or tasks are carried out incorrectly, serious
injury or damage may result. All the work described below must only be carried
out by trained and qualified personnel. Do not carry out any of the work described
below until you have fully read and understood the following documents:
- these operating instructions
- all the operating instructions for the system components, especially the safety rules
CAUTION! The power sources must be switched on for the following work. This
poses a risk of injury and material damage due to:
- welding current
- unintentional ignition of an arc
- emerging wire electrodes
Until all work is completed, ensure that:
- welding is not initiated by any power source
- the wire electrodes are not fed out
Checking power
source compatibility
Checking the
RCU 5000i database version
NOTE! Check the compatibility of both power sources.
Open "Machine pre-sets" on the RCU
1
5000i menu
Select the "Version" screen
2
Check that the power source DSP soft-
3
ware version is 5.01.063 or higher
- If not, the power source cannot be
used for CMT Twin applications
NOTE! Check the database version of both RCU 5000i devices.
29

Open "Machine pre-sets" on the RCU
1
5000i menu
Select the "Version" screen
2
Check that the RCU 5000i database
3
version is DB 0908 or higher
If not, update the RCU 5000i firmware
4
30

Checking the characteristics version
EN
Safety
Checking the
characteristics
version
WARNING! If the equipment is used or tasks are carried out incorrectly, serious
injury or damage may result. All the work described below must only be carried
out by trained and qualified personnel. Do not carry out any of the work described
below until you have fully read and understood the following documents:
- these operating instructions
- all the operating instructions for the system components, especially the safety rules
CAUTION! The power sources must be switched on for the following work. This
poses a risk of injury and material damage due to:
- welding current
- unintentional ignition of an arc
- emerging wire electrodes
Until all work is completed, ensure that:
- welding is not initiated by any power source
- the wire electrodes are not fed out
NOTE! The welding start-up configured for CMT Twin is only available with characteristics version V2.9.4. Check the characteristics version to ensure that the
welding start-up configured for CMT Twin is available for the respective welding
system.
Use the adjusting dial to select "MIG/
1
MAG synergic welding" from the RCU
5000i menu
Press the OK button
2
31

- The last "Data" screen called up appears
In the relevant "Data" screen, press F4
3
"Filler metal"
- The 1st screen in the wizard appe-
ars ("Select a filler metal")
Apply the desired CMT Twin settings
4
depending on the application
- The "Welding program" screen is displayed again once the relevant settings
have been made
Check that characteristics version
5
V2.9.4 or higher is displayed
If not, update the RCU 5000i firmware
6
32

L/R alignment - aligning welding circuit inductivity
and welding circuit resistance
Safety
WARNING! If the equipment is used or tasks are carried out incorrectly, serious
injury or damage may result. All the work described below must only be carried
out by trained and qualified personnel. Do not carry out any of the work described
below until you have fully read and understood the following documents:
- these operating instructions
- all the operating instructions for the system components, especially the safety rules
CAUTION! The power sources must be switched on for the following work. This
poses a risk of injury and material damage due to:
- welding current
- unintentional ignition of an arc
- emerging wire electrodes
Until all work is completed, ensure that:
- welding is not initiated by any power source
- the wire electrodes are not fed out
EN
L/R alignment using RCU 5000i
NOTE! Optimum welding results are only achieved up to a welding circuit induc-
tivity of 30 μH (at a mains voltage of 400 V). Welding circuit inductivity in excess
of 30 μH must be reduced.
The following measures may be taken to reduce welding circuit inductivity:
- Keep the torch hosepack, interconnecting hosepack and earthing cable as
short as possible
- Lay the torch hosepack, interconnecting hosepack and earthing cable parallel to each other
Open "Machine pre-sets" on the RCU
1
5000i menu
Select the "MIG/MAG" screen
2
Press F4 "L/R alignment"
3
Machine pre-sets: e.g. "MIG/MAG" screen
33

"Actual values" screen
- The 1st screen in the wizard appears
("Actual values")
Press F2 "Forward"
4
- The 2nd screen in the wizard appears
("Preparations")
Follow the instructions given in the
5
"Preparations" screen
NOTE! The contact between the
earthing clamp and workpiece
must take place on a cleaned
workpiece surface.
"Preparations" screen
"L/R alignment" screen
Press F2 "Forward":
6
- LR alignment is started, the 3rd screen
in the wizard appears ("L/R alignment")
34

"Confirmation" screen
- Once the L/R alignment is complete,
the values obtained for welding circuit
resistance (R) and inductivity (L) appear in the 4th screen of the wizard
("Confirmation").
Press F2 "Done"
7
- The last "Data" screen called up appears.
EN
Machine pre-sets: e.g. "MIG/MAG" screen
35
Welding start-up
Welding start-up
sequence
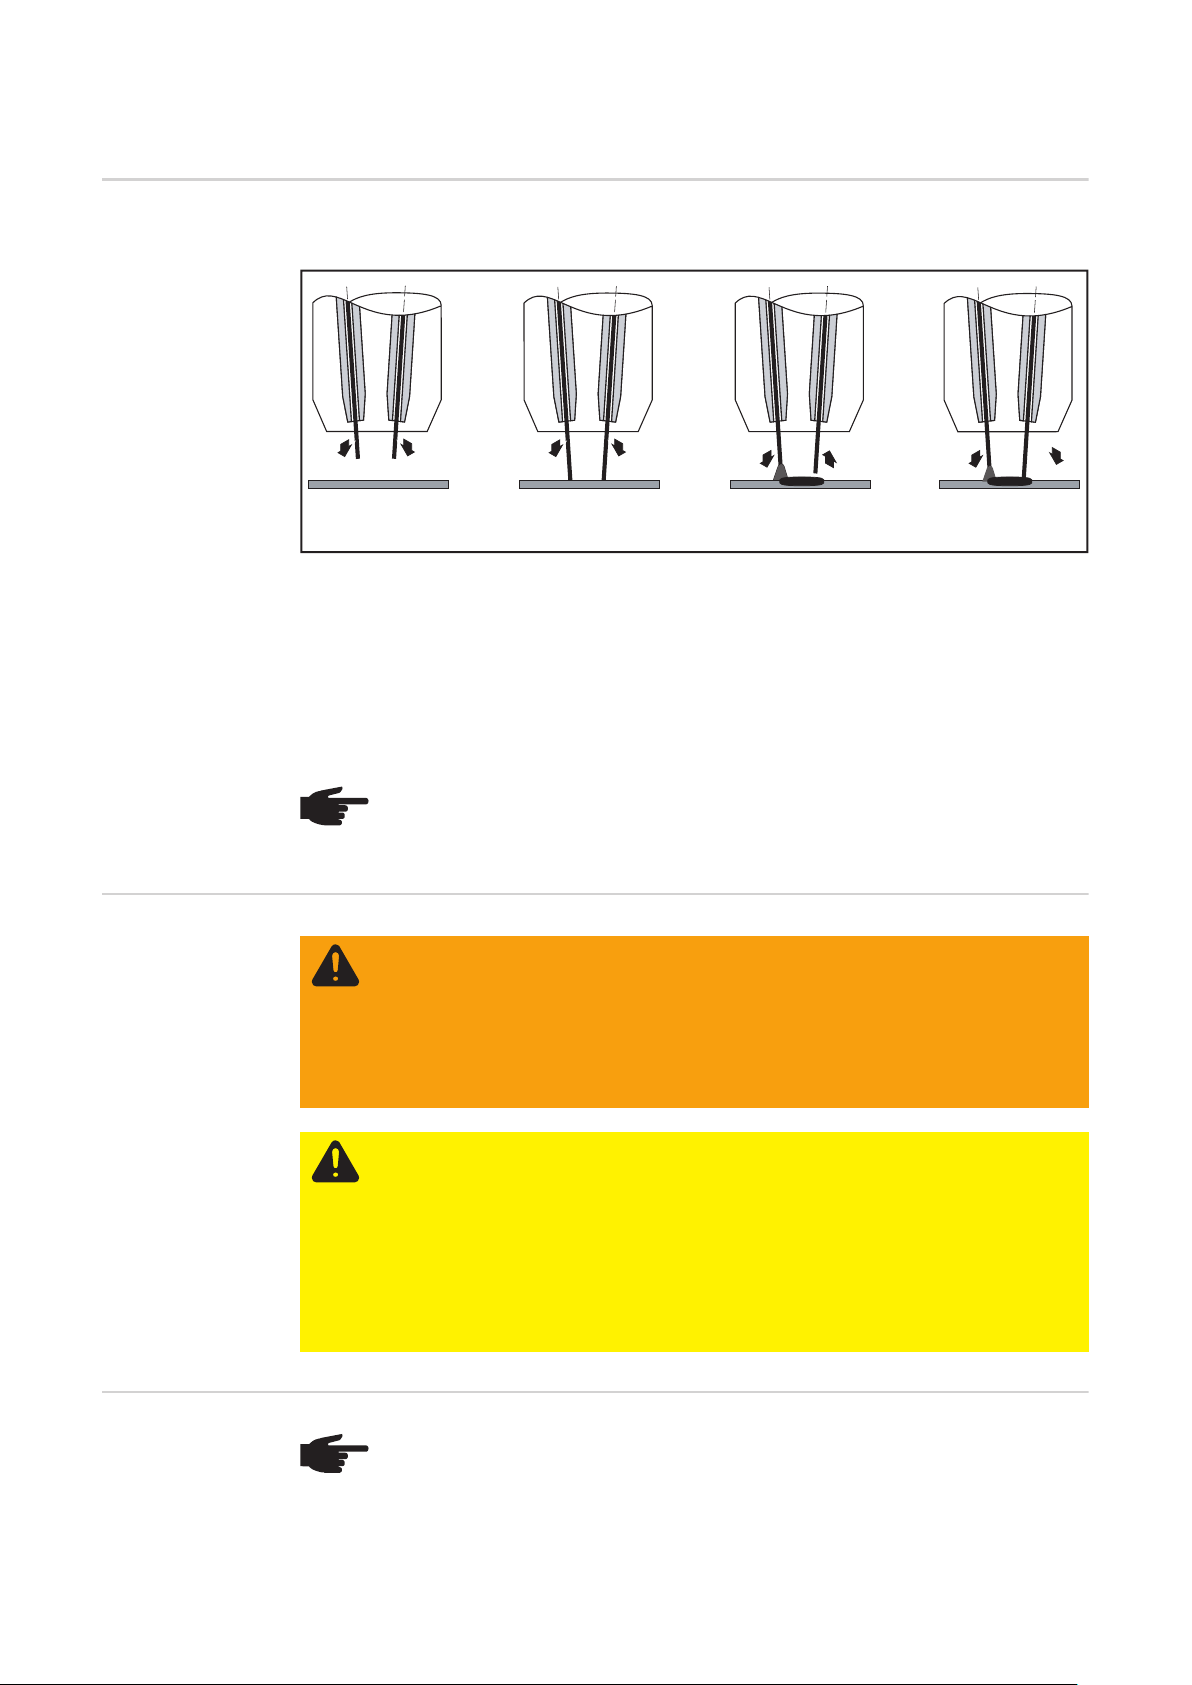
The welding start-up sequence for CMT Twin is as follows:
1. 2. 3. 4.
Welding start-up sequence
1. Both wire electrodes move towards the workpiece
2. Both wire electrodes touch the workpiece
3. The lead wire electrode commences the welding process, while the trail wire electrode
moves away from the workpiece and waits for the start signal from the lead wire electrode = welding start delay
4. Once the trail wire electrode receives the start signal, it then also starts the welding
process
NOTE! The welding start-up configured for CMT Twin is only available with characteristics version V2.9.4. Refer to the "Checking the characteristics version" section for instructions on how to check the characteristics version.
Safety
Welding start-up
settings
WARNING! If the equipment is used or tasks are carried out incorrectly, serious
injury or damage may result. All the work described below must only be carried
out by trained and qualified personnel. Do not carry out any of the work described
below until you have fully read and understood the following documents:
- these operating instructions
- all the operating instructions for the system components, especially the safety rules
CAUTION! The power sources must be switched on for the following work. This
poses a risk of injury and material damage due to:
- welding current
- unintentional ignition of an arc
- emerging wire electrodes
Until all work is completed, ensure that:
- welding is not initiated by any power source
- the wire electrodes are not fed out
NOTE! When welding using two processes (one pulse wire electrode, one CMT
wire electrode), the welding process begins with the wire electrode performing the
pulse process.
36

NOTE! If both wire electrodes are to weld with the CMT process, then the following must be selected for each wire electrode in the "Filler metal/Select a shielding
gas" menu on the RCU 5000i:
- which wire electrode is the lead electrode (wire electrode 1)
- which wire electrode is the trail electrode (wire electrode 2)
EN
Start delay parameter correction
The "Start delay" parameter is corrected to
delay welding from the trail electrode until
the lead electrode has melted the material.
The trail electrode therefore welds in the
weld pool and not on the solid material, delivering an optimum start to the weld seam.
Setting range: 0 - 5 (0 - 2.5 seconds)
37

Pulse/CMT welding
Process description pulse/CMT
welding
Properties of lead wire electrode (pulse):
- deep fusion penetration
- high deposition rate
Properties of trail wire electrode (CMT):
- extremely good filling of the weld seam
- improved process stability
Symbol Explanation
Trail wire electrode (CMT)
Lead wire electrode (pulse)
Weld pool
Pulsed arc with droplet transfer
Start of arc burn phase
Droplet melting phase
Droplet detachment
Welding direction
38
NOTE! The pulse/CMT combination may be used in both welding directions.

CMT/CMT welding
EN
Process description CMT/CMT
welding
NOTE! Different characteristics are used for each wire electrode in this process
variant.
Properties of lead wire electrode (CMT):
- shorter arc than the trail wire electrode
- higher arc power than the trail wire electrode
- starts the welding process
Properties of trail wire electrode (CMT):
- arc tuned to the weld pool
Symbol Explanation
Trail wire electrode (CMT)
Lead wire electrode (CMT)
Weld pool
Droplet melting phase
Start of arc burn phase
Droplet detachment
Welding direction
NOTE! The CMT/CMT combination may be used in both welding directions.
39

Single-wire welding
Special features
and advantages
Material transfer
A signal is emitted from the robot control that triggers welding from one power source only
(single-wire welding). Depending on the position of the torch neck or the out-of-position
weld seam, single-wire welding can be performed from either the lead or trail power
source. The second power source is paused.
NOTE! If using FK 4000 R cooling units, both units must be switched to continuous operation in order to perform single-wire welding:
Parameter C-C (Cooling unit Control) = "On" on power source "1" and power
source "2".
NOTE! To ensure a full gas shield during single-wire welding, the solenoid valve
on the paused power source must be open.
In systems using Twin interfaces, the solenoid valve is actuated from the robot
control. For standard interfaces and fieldbus systems, the solenoid valve must be
actuated directly.
Pulse/standard
Symbol
Trail wire electrode
Lead wire electrode
Pulsed arc with droplet transfer
Standard arc
I
L
I
T
Welding current of lead power source
Welding current of trail power source
Welding direction
I (A)
I
L
t (s)
IT = 0
Pulse (single-wire, lead power source): Welding current/time curve and schematic representation of the
material transfer
I (A)
I
L
t (s)
IT = 0
Standard (single-wire, lead power source): Welding
current/time curve and schematic representation of
the material transfer
40

I (A)
I (A)
I
T
t (s)
IL = 0
Pulse (single-wire, trail power source): Welding current/time curve and schematic representation of the
material transfer
Symbol
Trail wire electrode
Lead wire electrode
Weld pool
Droplet melting phase
Start of arc burn phase
I
T
IL = 0
Standard (single-wire, trail power source): Welding
current/time curve and schematic representation of
the material transfer
CMT
EN
t (s)
Droplet detachment
I
L
I
T
Welding current of lead power source
Welding current of trail power source
Welding direction
I (A)
I
L
t (s)
IT = 0
CMT (single wire, lead power source): Welding current/time curve and schematic representation of the
material transfer
I (A)
I
T
t (s)
IL = 0
CMT (single-wire, trail power source): Welding current/time curve and schematic representation of the
material transfer
41

Applying the 'HD' ('Heavy Duty') configuration
Available characteristics
Description of
characteristics
Characteristic
number
1474 Pulse G3Si1 1.2 M21 Ar+18% CO
1476 CMT G3Si1 1.2 M21 Ar+18% CO
1477 CMT G3Si1 1.2 C1 100% CO2 Lead
1478 CMT G3Si1 1.2 C1 100% CO2 Trail
Characteristic number
Welding process
1474 PulseFillet weld
1476 CMT Fillet weld
1477 CMT Fillet weld
1478 CMT Fillet weld
Welding process
thick-gauge sheet
thick-gauge sheet
light-gauge sheet/thick-gauge
sheet
light-gauge sheet/thick-gauge
sheet
Material Wire di-
Weld seam profile
Shielding gas
ameter
Characteristic
High frequency pulsed arc; short
arc length; optimised for fillet
welds
CMT arc length with greater arc
proportion; optimised for better
weld seam formation on thickgauge sheets
Lead CMT characteristic; starts
welding first; higher arc power; for
welding with 100% CO2, optimised for fillet welds
Trail CMT characteristic; arc burn
time modified for improved weld
seam formation when welding
with 100% CO
2
2
2
Combination
of characteristics
1474
Lead
with
1476
Trail
1477
Lead
with
1478
Trail
Configuring the
system
42
WARNING! If the equipment is used or tasks are carried out incorrectly, serious
injury or damage may result. All the work described below must only be carried
out by trained and qualified personnel. Do not carry out any of the work described
below until you have fully read and understood the following documents:
- these operating instructions
- all the operating instructions for the system components, especially the safety rules
Ensure that the wearing parts from the "HD" original equipment kit have been fitted
1

CAUTION! The power sources must be switched on for the following work. This
poses a risk of injury and material damage due to:
- welding current
- unintentional ignition of an arc
- emerging wire electrodes
Until all work is completed, ensure that:
- welding is not initiated by any power source
- the wire electrodes are not fed out
NOTE! The work described below is performed on both power sources using the
RCU 5000i.
Use the adjusting dial to select "MIG/
2
MAG synergic welding" from the RCU
5000i menu
Press the OK button
3
EN
- The last "Data" screen called up appears
43

In the relevant "Data" screen, press F4
4
"Filler metal"
- The 1st screen in the wizard appe-
ars ("Select a filler metal")
Depending on the application, apply
5
the settings for both power sources on
both RCU 5000i devices
NOTE! If both wire electrodes are to weld using the CMT process, then the following must be selected for each wire electrode (each power source) on the RCU
5000i:
- which wire electrode is the lead electrode
- which wire electrode is the trail electrode
Refer to the "Welding start-up" section for further details.
Stick out
Lead
Trail
9,5 mm
(0.37 in.)
Stick out and distance of the wire electrodes
=
1
17 mm (0.67 in.)
Stickout s
44

Use 'Speed' configuration
EN
Available characteristics
Description of
characteristics
Characteristic
number
1470 Pulse G3Si1 1.0 M21 Ar+18% CO
1471 CMT G3Si1 1.0 M21 Ar+18% CO
1472 Pulse G3Si1 1.2 M21 Ar+18% CO
1473 CMT G3Si1 1.2 M21 Ar+18% CO
1479 CMT G3Si1 1.2 M21 Ar+18% CO
Welding process
Material Wire di-
ameter
Shielding gas
2
2
2
2
2
1500 CMT G3Si1 1.2 C1 100% CO2 Lead
1501 CMT G3Si1 1.2 C1 100% CO2 Trail
1510 Pulse AlMg5 1.2 I1 100% Argon
1511 CMT AlMg5 1.2 I1 100% Argon
1522 Pulse AlMg5 1.6 I1 100% Argon
1523 CMT AlMg5 1.6 I1 100% Argon
Characteristic number
Welding process
1470 PulseLap joint, fillet weld
light-gauge sheet
1471 CMT Lap joint, fillet weld
light-gauge sheet
1472 PulseLap joint, fillet weld
light-gauge sheet
1473 CMT Lap joint
light-gauge sheet
1479 CMT Fillet weld
light-gauge sheet
1500 CMT Lap joint
light-gauge sheet
1501 CMT Lap joint
light-gauge sheet
Weld seam profile
Characteristic
High frequency pulsed arc; arc
length kept short; optimised for
high welding speeds
CMT arc length extremely short;
arc burn phase adjusted to prevent notches
High frequency pulsed arc; arc
length kept short
CMT arc length extremely short;
arc burn phase adjusted to prevent notches
Longer CMT arc to achieve a wider seam formation for fillet welds
Lead CMT characteristic; starts
welding first; higher arc power; for
welding with 100% CO
2
Trail CMT characteristic; extremely short CMT arc length; arc burn
phase adjusted to prevent notches; welding with 100% CO
2
Combination
of characteristics
1470
Lead
with
1471
Trail
1472
Lead
with
1473
Trail
or
1479
Trail
1500
Lead
with
1501
Trail
45

Characteristic number
Welding process
1510 PulseLap joint, fillet weld
light-gauge sheet
1511 CMT Lap joint, fillet weld
light-gauge sheet
1522 PulseFillet weld High frequency pulsed arc; arc
1523 CMT Fillet weld CMT arc; higher current in the
Weld seam profile
Characteristic
High frequency pulsed arc; arc
length kept short; optimised for
high welding speeds and aluminium
CMT arc; higher current in the
arc-on phase; optimised for aluminium
length kept short; optimised for
high welding speeds and aluminium, wire diameter 1.6 mm
arc-on phase; optimised for aluminium, wire diameter 1.6 mm
Combination
of characteristics
1510
Lead
with
1511
Trail
1522
Lead
with
1523
Trail
Configuring the
system
WARNING! If the equipment is used or tasks are carried out incorrectly, serious
injury or damage may result. All the work described below must only be carried
out by trained and qualified personnel. Do not carry out any of the work described
below until you have fully read and understood the following documents:
- these operating instructions
- all the operating instructions for the system components, especially the safety rules
Ensure that the wearing parts from the "Speed" original equipment kit have been fitted
1
CAUTION! The power sources must be switched on for the following work. This
poses a risk of injury and material damage due to:
- welding current
- unintentional ignition of an arc
- emerging wire electrodes
Until all work is completed, ensure that:
- welding is not initiated by any power source
- the wire electrodes are not fed out
NOTE! The work described below is performed on both power sources using the
RCU 5000i.
46

Use the adjusting dial to select "MIG/
2
MAG synergic welding" from the RCU
5000i menu
Press the OK button
3
- The last "Data" screen called up appears
EN
In the relevant "Data" screen, press F4
4
"Filler metal"
- The 1st screen in the wizard appe-
ars ("Select a filler metal")
Depending on the application, apply
5
the settings for both power sources on
both RCU 5000i devices
NOTE! If both wire electrodes are to weld using the CMT process, then the following must be selected for each wire electrode (each power source) on the RCU
5000i:
- which wire electrode is the lead electrode
- which wire electrode is the trail electrode
Refer to the "Welding start-up" section for further details.
47

Stick out
Lead
Trail
10 mm
(0.39 in.)
Stick out and distance of the wire electrodes
=
1
15 mm (0.59 in.)
Stickout s
48

Use 'Root' configuration
EN
Available characteristics
Description of
characteristics
Characteristic number
1524 Pulse G3Si1 1.2 M21 Ar+18% CO
1525 CMT G3Si1 1.2 M21 Ar+18% CO2 Lead
1526 CMT G3Si1 1.2 M21 Ar+18% CO2 Trail
Characteristic number
1524 PulseRoot pass Pulsed arc; optimised for root
1525 CMT Root pass Lead CMT characteristic; CMT
1526 CMT Root pass Trail CMT characteristic; CMT arc
Welding process
Welding process
Material Wire di-
ameter
Weld seam profile
pass
arc with greater arc proportion
with less arc pressure on the weld
pool
Shielding gas
2
Characteristic
Combination
of characteristics
1524
Lead
with
1525
Trail or
1526
Trail
1525
Lead
with
1526
Trail
Configuring the
system
WARNING! If the equipment is used or tasks are carried out incorrectly, serious
injury or damage may result. All the work described below must only be carried
out by trained and qualified personnel. Do not carry out any of the work described
below until you have fully read and understood the following documents:
- these operating instructions
- all the operating instructions for the system components, especially the safety rules
Ensure that the wearing parts from the "HD" original equipment kit have been fitted
1
CAUTION! The power sources must be switched on for the following work. This
poses a risk of injury and material damage due to:
- welding current
- unintentional ignition of an arc
- emerging wire electrodes
Until all work is completed, ensure that:
- welding is not initiated by any power source
- the wire electrodes are not fed out
49

NOTE! The work described below is performed on both power sources using the
RCU 5000i.
Use the adjusting dial to select "MIG/
2
MAG synergic welding" from the RCU
5000i menu
Press the OK button
3
- The last "Data" screen called up appears
In the relevant "Data" screen, press F4
4
"Filler metal"
- The 1st screen in the wizard appe-
ars ("Select a filler metal")
Depending on the application, apply
5
the settings for both power sources on
both RCU 5000i devices
NOTE! If both wire electrodes are to weld using the CMT process, then the following must be selected for each wire electrode (each power source) on the RCU
5000i:
- which wire electrode is the lead electrode
- which wire electrode is the trail electrode
Refer to the "Welding start-up" section for further details.
50

Standard welding parameter values for fillet welds
EN
Standard welding
parameter values
for fillet welds
NOTE! The following specifications are standard values determined under labo-
ratory conditions.
Filler metal and welding position:
Shielding gas: M21 Ar+18% CO2, 2 x 12 l/min
Wire electrode: G3Si1, 1.2 mm
Welding position: PB
Sheet thickness (mm)
a dimension (mm)
Wire electrode /
welding process
Lead /
Pulse
3 2.8
Trail /
CMT
Wire feed speed
(m/min)
Current
(A)
Voltage
(V)
Characteristics
used
16 420 28.0 1472*
10 275 19.0 1479*
Welding speed
3 2.7 13.3
(m/min)
Energy input
(kJ/cm)
Deposition rate
(kg/h)
Micrograph
43
6 3.5
84
10 5
12 6
Lead /
Pulse
Trail /
CMT
Lead /
Pulse
Trail /
CMT
Lead /
Pulse
Trail /
CMT
Lead /
Pulse
Trail /
CMT
Lead /
Pulse
Trail /
CMT
16 420 28.0 1472*
2.5 3.2 13.3
10 275 19.0 1479*
15.5 410 28.0 1474**
1.8 4.3 13
10 280 19.0 1476**
15.5 415 27.5 1474**
1.5 5 12.5
9 225 19.0 1476**
15 380 27.0 1474**
1 6.9 12.3
9 220 18.5 1476**
15 390 28.0 1472***
0.6 6.9 11.7
8 215 17.0 1479***
* 'Speed' configuration used
51

** 'HD' configuration used
*** 'HD' configuration wearing parts, characteristics from 'Speed' configuration used -
the characteristics from the Speed configuration were used to prevent an undesired "run-off" of the weld pool
Alignment of
welding torch relative to the workpiece
(1)
45°
(2)
Side view of welding torch/workpiece
- Welding torch (1) at a 45° angle to the
workpiece (2)
- Welding torch (1) at a 5° angle to the
welding direction
- both wire electrodes parallel to the welding direction
52

Standard welding parameter values for lap joints
EN
Standard welding
parameter values
for lap joints
NOTE! The following specifications are standard values determined under labo-
ratory conditions.
Filler metal and welding position:
Shielding gas: M21 Ar+18% CO2, 2 x 12 l/min
Wire electrode: G3Si1, 1.2 mm
Welding position: PB
Sheet thickness (mm)
Wire electrode
Lead 15 370 28.0 1472*
2
Trail 6 210 14.0 1473*
Wire feed speed
(m/min)
Current
(A)
Voltage
(V)
Characteristics
used
Welding speed
(m/min)
3.6 3.7 11.2
Energy input
(kJ/cm)
Deposition rate
(kg/h)
Micrograph
Alignment of
welding torch relative to the workpiece
Lead 15.5 390 28.5 1472*
3
Trail 6.5 225 15.0 1473*
* 'Speed' configuration used
(1)
35°
(2)
3 4 11.7
- Welding torch (1) at a 35° angle to the
workpiece (2)
- Welding torch (1) at a 5° angle to the
welding direction
- both wire electrodes parallel to the welding direction
Side view of welding torch/workpiece
53
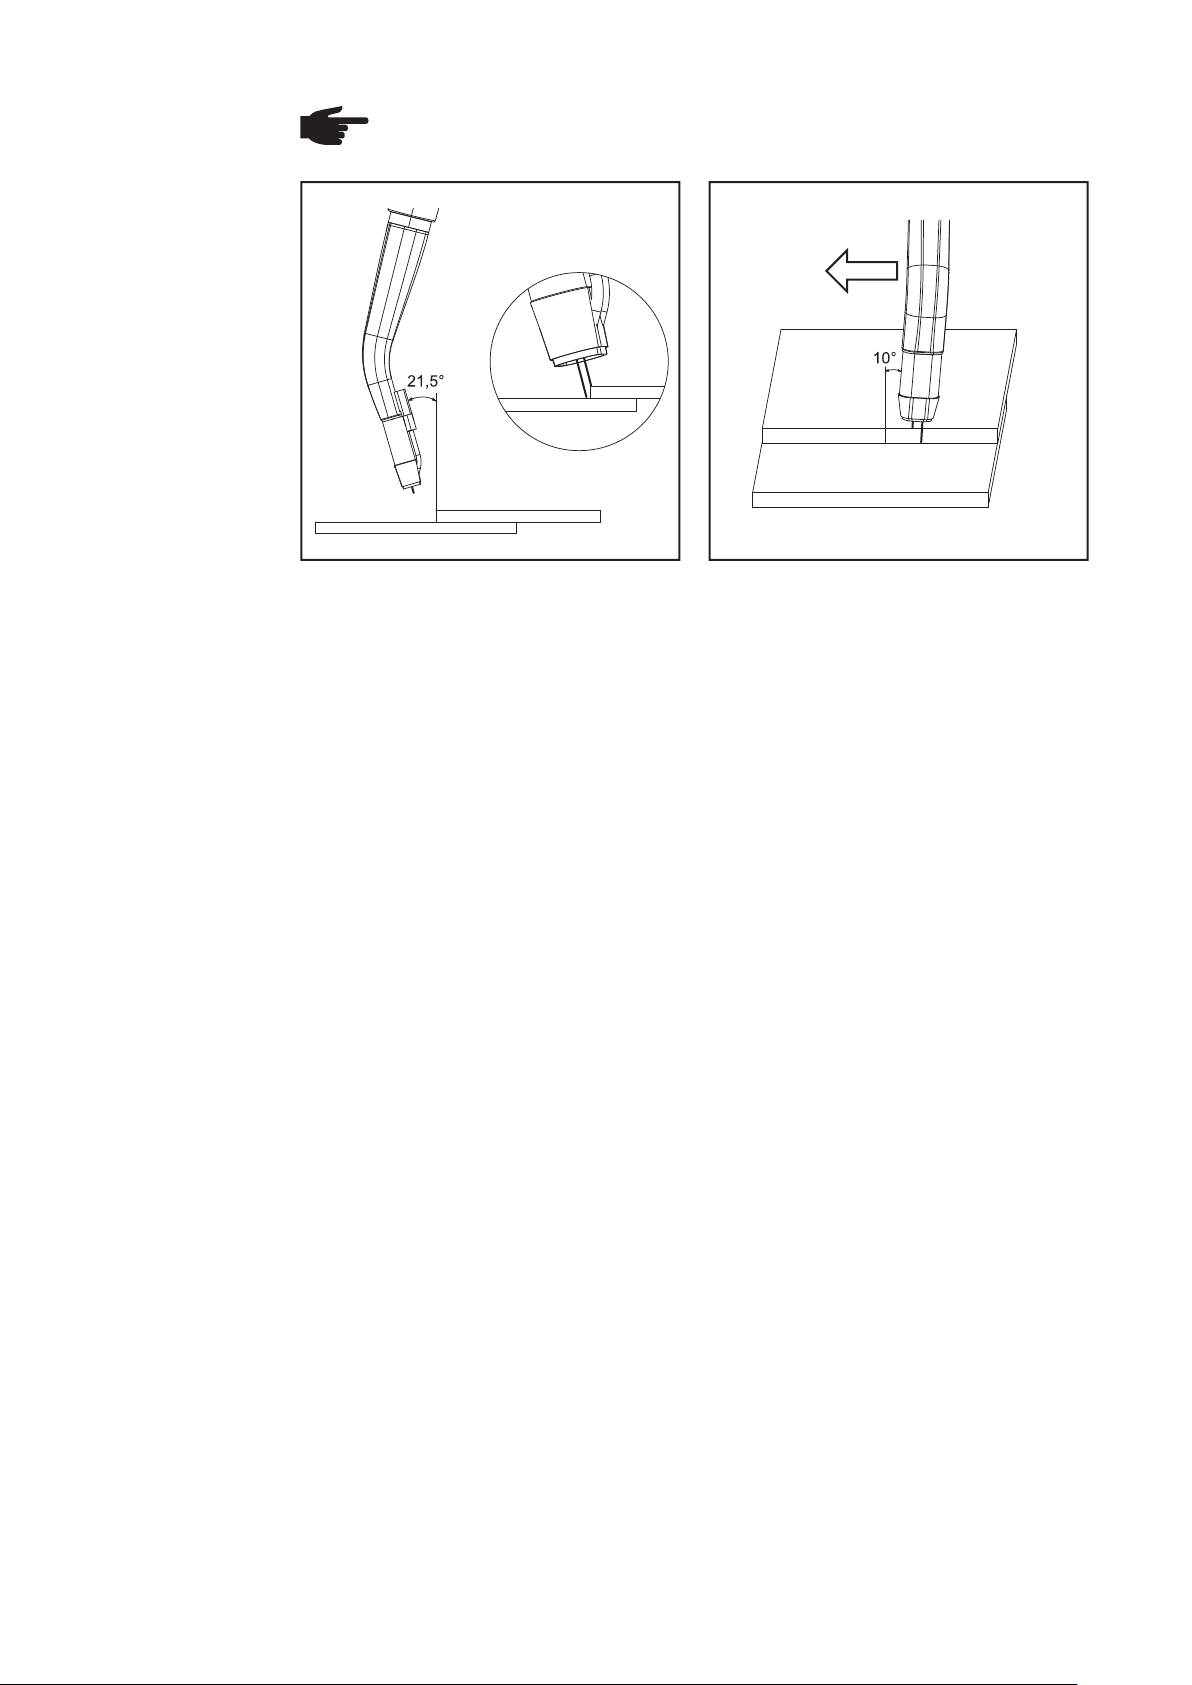
NOTE! If notches appear in the weld seam on the top sheet, adopting the welding
torch alignment shown below can prevent these notches from occurring.
54

Prerequisities for welding
EN
Safety
Prerequisities for
welding
WARNING! Incorrect operation or shoddy workmanship can cause serious injury
or damage. All the work described below must only be carried out by trained and
qualified personnel. Do not carry out any of the work described below until you
have fully read and understood the following documents:
- these operating instructions
- all the operating instructions for the system components, especially the safety rules
Prerequisities for CMT Twin welding:
- wearing parts fitted to the torch neck
- all system components fitted and installed properly
- compatibility of power sources and remote control systems confirmed
- characteristics version checked
- L/R alignment - welding circuit inductivity and welding circuit resistance aligned
- welding system connected to robot control
- welding system configured in line with the application
55

FRONIUS INTERNATIONAL GMBH
Froniusplatz 1, A-4600 Wels, Austria
Tel: +43 (0)7242 241-0, Fax: +43 (0)7242 241-3940
E-Mail: sales@fronius.com
www.fronius.com
www.fronius.com/addresses
Under http://www.fronius.com/addresses you will find all addresses
of our Sales & service partners and Locations
 Loading...