

Page 1

/ Battery Charging Systems / Welding Technology / Solar Electronics
DE
EN
FR
IT
ES
PT-BR
FSC / Koaxkabel tauschen
Changing the FSC/coaxial cable
Remplacer le FSC / le câble coaxial
Sostituzione dell FSC / del cavo
coassiale
FSC / Cambiar el cable coaxial
FSC / Trocar cabo coaxial
Umbauanleitung
MIG/MAG Hand-Schweißbrenner
Conversion instructions
MIG/MAG manual welding torch
Instructions de conversion
Torches de soudage MIG/MAG manuelles
Istruzioni di conversione
Torcia per saldatura manuale MIG/
MAG
Instrucciones de conversión
Antorcha manual MIG/MAG
Instruções de conversão
Tocha manual MIG/MAG
42,0410,1719 003-11042012
Page 2

0
Page 3

Allgemeines
DE
Sicherheit
Erforderliche
Werkzeuge und
Hilfsmittel
WARNUNG! Ein elektrischer Schlag kann tödlich sein. Vor Öffnen des Gerätes
- Netzschalter der Stromquelle in Stellung - O - schalten
- Stromquelle vom Netz trennen
- ein verständliches Warnschild gegen Wiedereinschalten anbringen
WARNUNG! Fehlerhaft durchgeführte Arbeiten können schwerwiegende Personen- und Sachschäden verursachen. Nachfolgend beschriebene Tätigkeiten
dürfen nur von geschultem Fachpersonal durchgeführt werden! Beachten Sie das
Kapitel „Sicherheitsvorschriften“ in der Bedienungsanleitung der Stromquelle und
der Systemkomponenten.
- Schraubendreher TX20
Falls die Steuerleitungen eingeklebt sind:
- Seitenschneider
- Abisolierzange
- Heißluft-Gebläse
- Schrumpfschlauch
-Lötkolben
Falls die Steuerleitungen nicht eingeklebt sind:
- CPC Auszieh-Werkzeug (44,0450,1436)
1
Page 4
FSC / Koaxkabel tauschen
FSC (Fronius
System Connector) demontieren
(2)
(1)
(3)
Befestigungsschraube (1) entfernen
1
Knickschutz (2) zurückschieben
2
Steuerleitungs-Kontakte in FSC (3) eingeklebt:
4 Steuerleitungen in der Mitte durch-
3
trennen
FSC (3) demontieren
4
Steuerleitungs-Kontakte nicht in FSC (3)
eingeklebt:
Steuerleitungs-Kontakte mit CPC Aus-
3
zieh-Werkzeug (44,0450,1436) aus
dem FSC herausdrücken
FSC (3) demontieren
4
2
Page 5

Neuen FSC / neu-
2
4
es Koaxkabel
montieren
Steuerleitungs-Kontakte in FSC eingeklebt:
FSC auf Koaxkabel montieren
1
HINWEIS! Wenn ein neuer FSC
montiert wird, Steuerleitungen in
FSC Gehäuse einbauen (weiß ->
a, braun -> b, grün -> c, gelb -> d).
HINWEIS! Wird ein neues Koaxkabel montiert, Kontakte der Steuerleitungen am Koaxkabel
entfernen.
Steuerleitungen 5 mm abisolieren
20 mm Schrumpfschlauch über Steu-
3
erleitung schieben (1 x grün, 1 x gelb,
1 x weiß, 1 x braun)
Steuerleitungen farbgleich verlöten
Schrumpfschlauch über Lötstelle
5
schieben und mit Heißluft-Fön
schrumpfen
Steuerleitungs-Kontakte nicht in FSC
eingeklebt:
FSC montieren
1
Steuerleitungs-Kontakte in FSC Ge-
2
häuse einbauen (weiß -> a, braun -> b,
grün -> c, gelb -> d)
DE
Knickschutz
montieren
Knickschutz auf FSC aufschieben
1
Befestigungsschraube montieren
2
3
Page 6

4
Page 7

General
Safety
Required tools
and material
WARNING! An electric shock can be fatal. Before opening the device:
- Turn the power source mains switch to the "O" position
- Unplug the power source from the mains
- Put up an easy-to-understand warning sign to stop anybody inadvertently
switching it back on again
WARNING! Work that is carried out incorrectly can cause serious injury and damage. The following activities must only be carried out by trained and qualified personnel. Read the "Safety rules" chapter in the power source and system
components operating instructions.
- TX20 screwdriver
If the control lines are glued in:
- Diagonal cutting pliers
- Wire strippers
-Hot air fan
- Shrink sleeve
- Soldering iron
If the control lines are not glued in:
- CPC extractor tool (44,0450,1436)
EN
5
Page 8

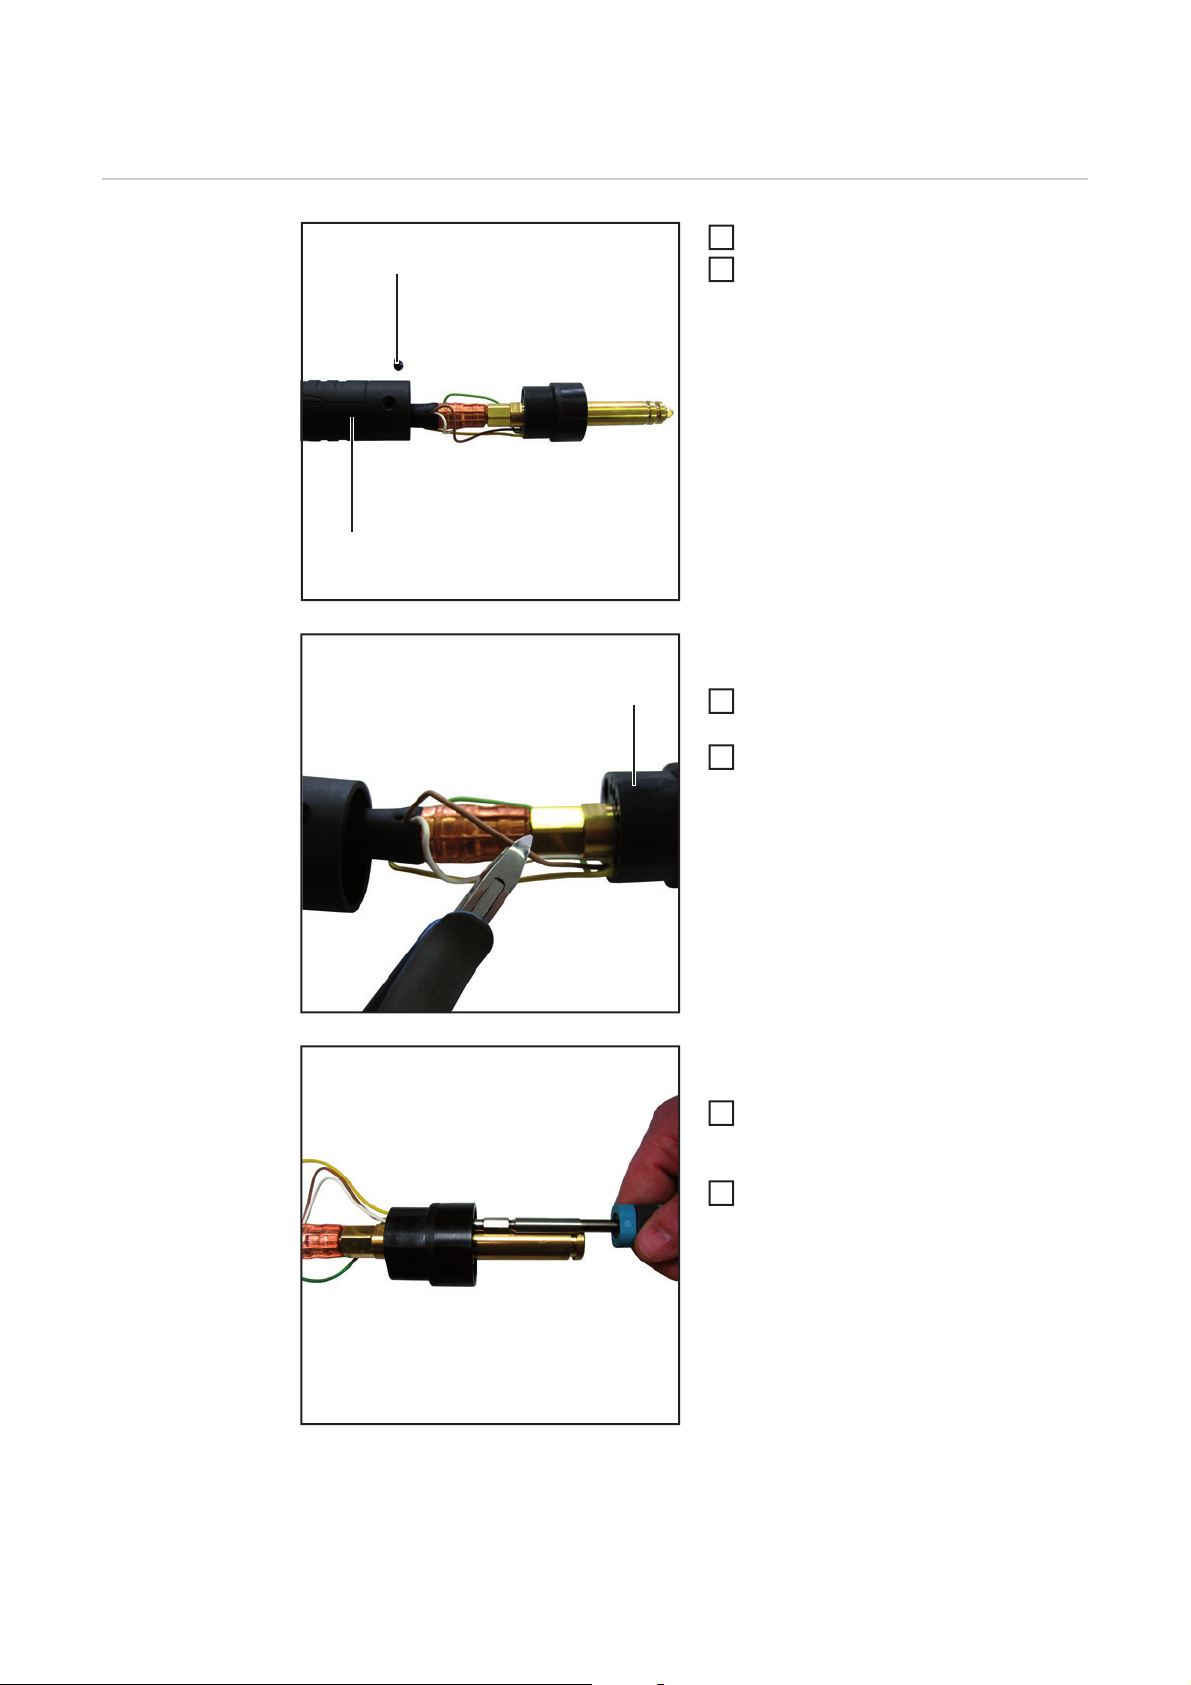
Changing the FSC/coaxial cable
Removing the
FSC (Fronius
System Connector)
(2)
(1)
(3)
Remove fastening screw (1)
1
Push back the anti-kink protection (2)
2
Control line contacts glued into FSC (3):
Cut through the four control lines in the
3
middle
Remove FSC (3)
4
Control line contacts not glued into FSC
(3):
Push control line contacts out of the
3
FSC using the CPC extractor tool
(44,0450,1436)
Remove FSC (3)
4
6
Page 9

Connecting a new
2
4
FSC/coaxial cable
Control line contacts glued into FSC:
Connect FSC to coaxial cable
1
NOTE! If connecting a new FSC,
wire up the control lines in the FSC
housing (white -> a, brown -> b,
green -> c, yellow -> d).
NOTE! If connecting a new coaxial cable, remove the control line
contacts from the coaxial cable.
Insulate 5 mm of control lines
Push 20 mm shrink sleeve over the
3
control line (1 x green, 1 x yellow, 1 x
white, 1 x brown)
Solder together control lines with matching colours
Push shrink sleeve over solder point
5
and shrink using a hot air dryer
Control line contacts not glued into
FSC:
Connect FSC
1
Wire up the control line contacts in the
2
FSC housing (white -> a, brown -> b,
green -> c, yellow -> d)
EN
Fitting the antikink protection
Push anti-kink protection onto FSC
1
Fit the fastening screw
2
7
Page 10

8
Page 11

Généralités
Sécurité
Outils et accessoires requis
AVERTISSEMENT ! Un choc électrique peut être mortel. Avant d'ouvrir l'appareil
- Placer l'interrupteur principal de la source de courant en position - O -
- Débrancher la prise secteur de la source de courant
- Apposer un panneau d'avertissement compréhensible afin de prévenir toute
remise en marche
AVERTISSEMENT ! Les erreurs en cours d'opération peuvent entraîner des
dommages corporels et matériels graves. Les opérations décrites ci-après doivent être effectuées exclusivement par du personnel qualifié et formé ! Respecter
les prescriptions du chapitre « Consignes de sécurité » figurant dans les Instructions de service de la source de courant et des composants du système.
- Tournevis TX20
Si les câbles de commande sont collés :
- Pince coupante de côté
- Pince à dénuder
- Pistolet à air chaud
- Gaine thermorétractable
- Fer à souder
Si les câbles de commande ne sont pas collés :
- Outil d'extraction CPC (44,0450,1436)
FR
9
Page 12

Remplacer le FSC / le câble coaxial
Démonter le FSC
(Fronius System
Connector)
(2)
(1)
(3)
Retirer les vis de fixation (1)
1
Repousser la protection anti-coude (2)
2
Contacts de câble de commande collés
dans le FSC (3) :
Sectionner les 4 câbles de commande
3
au milieu
Démonter le FSC (3)
4
Contacts de câble de commande non
collés dans le FSC (3) :
À l'aide de l'outil d'extraction CPC
3
(44,0450,1436), sortir les contacts de
câble de commande du FSC.
Démonter le FSC (3)
4
10
Page 13

Monter le nou-
2
4
1
veau FSC / le nouveau câble
coaxial
Contacts de câble de commande collés
dans le FSC :
Monter le FSC sur le câble coaxial
1
REMARQUE! En cas de montage
d'un nouveau FCS, monter les câbles de commande dans le boîtier
du FCS (blanc -> a, marron -> b,
vert -> c, jaune -> d).
REMARQUE! En cas de montage
d'un nouveau câble coaxial, retirer
les contacts sur le câble coaxial.
Dénuder les câbles de commande sur
5 mm
Glisser 20 mm de gaine thermorétrac-
3
table sur les câbles de commande (1 x
vert, 1 x jaune, 1 x blanc, 1 x marron)
Braser les câbles de commande de
couleur identique
Glisser la gaine thermorétractable sur
5
le point de brasage et provoquer la
thermorétraction de celle-ci avec le
pistolet à air chaud.
FR
Contacts de câble de commande non
collés dans le FSC :
Monter le FSC
Monter les contacts de câbles de com-
2
mande dans le boîtier du FCS (blanc > a, marron -> b, vert -> c, jaune -> d).
11
Page 14

Monter la protec-
2
tion anti-coude
Glisser la protection anti-coude sur le
1
FSC
Monter les vis de fixation
12
Page 15

In generale
Sicurezza
Attrezzi e accessori necessari
AVVISO! Una scossa elettrica può avere esiti mortali. Prima di aprire l'apparec-
chio
- Posizionare l'interruttore di rete del generatore su "O".
- Scollegare il generatore dalla rete.
- Apporvi un cartello di segnalazione comprensibile recante il divieto di riaccendere l'apparecchio.
AVVISO! Un'esecuzione errata dei lavori può causare gravi lesioni personali e
danni materiali. Le operazioni descritte di seguito devono essere eseguite esclusivamente da personale qualificato e addestrato. Attenersi a quanto riportato nel
capitolo "Norme di sicurezza" delle istruzioni per l'uso del generatore e dei componenti del sistema.
- Cacciavite TX20
Se i cavi di comando sono incollati:
- Tronchese
- Pinza spellafili
- Soffiante d'aria calda
- Guaina termoretrattile
-Saldatoio
IT
Se i cavi di comando non sono incollati:
- Attrezzo di estrazione CPC (44,0450,1436)
13
Page 16

Sostituzione dell FSC / del cavo coassiale
Smontaggio
dell'FSC (Fronius
System Connector)
(2)
(1)
(3)
Rimuovere la vite di fissaggio (1).
1
Far scorrere all'indietro la protezione
2
antipiegatura (2).
Contatti dei cavi di comando incollati
nell'FSC (3):
Troncare nella parte centrale i 4 cavi di
3
comando.
Smontare l'FSC (3).
4
Contatti dei cavi di comando non incollati nell'FSC (3):
Estrarre i contatti dei cavi di comando
3
dall'FSC con l'attrezzo di estrazione
CPC (44,0450,1436).
Smontare l'FSC (3).
4
14
Page 17

Montaggio del
2
4
1
nuovo FSC / del
nuovo cavo coassiale
Contatti dei cavi di comando incollati
nell'FSC:
Montare l'FSC sul cavo coassiale.
1
AVVERTENZA! Se si monta un
nuovo FSC, inserire i cavi di comando nel corpo esterno dell'FSC
(bianco -> a, marrone -> b, verde > c, giallo -> d).
AVVERTENZA! Se si monta un
nuovo cavo coassiale, rimuovere i
contatti dei cavi di comando sul
cavo coassiale.
Rimuovere 5 mm di rivestimento isolante dai cavi di comando.
Far scorrere la guaina termoretrattile
3
20 mm sul cavo di comando (1 x verde,
1 x giallo, 1 x bianco, 1 x marrone).
Saldare i cavi di comando con lo stesso colore.
Far scorrere la guaina termoretrattile
5
sul punto saldato e farla ritrarre con un
asciugacapelli ad aria calda.
IT
Contatti dei cavi di comando non incollati nell'FSC:
Montaggio dell'FSC
Inserire i contatti dei cavi di comando
2
nel corpo esterno dell'FSC (bianco ->
a, marrone -> b, verde -> c, giallo -> d).
15
Page 18

Montare la prote-
2
zione antipiegatura
Far scorrere la protezione antipiegatu-
1
ra sull'FSC.
Montare la vite di fissaggio.
16
Page 19

Generalidades
Seguridad
Herramientas y
medios auxiliares necesarios
¡ADVERTENCIA! Una descarga eléctrica puede ser mortal. Antes de abrir el
aparato:
- Poner el interruptor de red de la fuente de corriente en la posición - O -
- Separar la fuente de corriente de la red
- Colocar un rótulo de aviso claro y legible para impedir cualquier reconexión.
¡ADVERTENCIA! Los trabajos realizados de forma defectuosa pueden causar
graves daños personales y materiales. ¡Las actividades descritas a continuación
sólo deben ser realizadas por personal técnico debidamente instruido! Tener en
cuenta el capítulo "Indicaciones de seguridad" en el manual de instrucciones de
la fuente de corriente y de los componentes del sistema.
- Destornillador TX20
Si los cables de control están pegados:
- Alicates
- Pinzas pelacables
- Ventilador de aire caliente
- Manguera encogible en caliente
- Soldador
Si los cables de control no están pegados:
- CPC herramienta extractora (44,0450,1436)
ES
17
Page 20

FSC / Cambiar el cable coaxial
Desmontar el FSC
(Fronius System
Connector)
(2)
(1)
(3)
Retirar el tornillo de fijación (1)
1
Deslizar hacia atrás la protección con-
2
tra dobladuras (2)
Los contactos del cable de control están
pegados en el FSC (3):
Cortar los 4 cables de control en el
3
centro
Desmontar el FSC (3)
4
Los contactos del cable de control no
están pegados en el FSC (3):
Expulsar los contactos del cable de
3
control del FSC con la herramienta extractora CPC (44,0450,1436)
Desmontar el FSC (3)
4
18
Page 21

Montar el nuevo
2
4
1
FSC/el nuevo cable coaxial
Los contactos del cable de control están
pegados en el FSC:
Montar el FSC sobre el cable coaxial
1
¡OBSERVACIÓN! Si se monta un
nuevo FSC, montar los cables de
control en la caja del FSC (blanco
-> a, marrón -> b, verde -> c, amarillo -> d).
¡OBSERVACIÓN! Si se monta un
nuevo cable coaxial, retirar los
contactos de los cables de control
en el cable coaxial.
Pelar los cables de control 5 mm
Deslizar la manguera encogible en ca-
3
liente 20 mm por encima del cable de
control (1 verde, 1 amarillo, 1 blanco, 1
marrón)
Soldar indirectamente los cables de
control con el mismo color
Deslizar la manguera encogible en ca-
5
liente por el punto de soldadura indirecta y hacer que ésta encoja con un
secador de aire caliente
ES
Los contactos del cable de control no
están pegados en el FSC:
Montar el FSC
Montar los contactos del cable de con-
2
trol en la caja del FSC (blanco -> a,
marrón -> b, verde -> c, amarillo -> d)
19
Page 22

Montar la protec-
2
ción contra dobladuras
Deslizar la protección contra dobladu-
1
ras sobre el FSC
Montar el tornillo de fijación
20
Page 23

Geral
Segurança
Ferramentas e
utilitários necessários
ALERTA! Um choque elétrico pode ser fatal. Antes da abertura do aparelho
- Comutar o interruptor de rede elétrica da fonte de solda na posição - O -
- Desconectar a fonte de solda da rede elétrica
- Colocar uma placa de alerta de fácil compreensão contra o religamento
ALERTA! Trabalhos executados de forma incorreta podem causar danos graves
a pessoas e materiais. As atividades descritas em seguida devem ser executadas apenas por pessoal técnico treinado! Seguir o capítulo "Normas de Segurança" do manual de instruções da fonte de solda e dos componentes do sistema.
- Chave de fenda TX20
Se os cabos de controle estiverem colados:
- Cortador lateral
- Alicate descascador de cabos
- Ventilação de ar quente
- Tubo retrátil
- Ferro de soldar
Se os cabos de controle não estiverem colados:
- Ferramenta de extração CPC (44,0450, 1436)
PT-BR
21
Page 24

FSC / Trocar cabo coaxial
Desmontar FSC
(Fronius System
Connector)
(2)
(1)
(3)
Remover parafuso de fixação (1)
1
Empurrar a proteção contra dobra-
2
mento (2)
Os tubos de contato dos cabos de controle colados no FSC (3):
Separar 4 cabos de controle no meio
3
Desmontar FSC (3)
4
Os tubos de contato dos cabos de controle não colados no FSC (3):
Pressionar para fora do FSC os tubos
3
de contato dos cabos de controle com
ferramenta de extração CPC
(44,0450,1436)
Desmontar FSC (3)
4
22
Page 25

Montar novo FSC
2
4
1
/ novo cabo coaxial
Os tubos de contato dos cabos de controle colados no FSC:
Montar o FSC sobre o cabo coaxial
1
AVISO! Quando um novo FSC for
montado, montar os cabos de
controle na caixa FSC (branco ->
a, marrom ->b, verde ->c, amarelo
-> d).
AVISO! Se um novo tubo de con-
tato do cabo coaxial for montado,
remover os contatados dos cabos
de controle no cabo coaxial.
Descascar os cabos de controle em 5
mm
Deslizar 20 mm do tubo retrátil sobre
3
os cabos de controle ( 1 x verde, 1 x
amarelo, 1 x branco, 1 x marrom)
Soldar os cabos de controle com as
mesmas cores
Empurrar o tubo retrátil sobre o local
5
da soldagem e encolher com secadorar quente
Os tubos de contato dos cabos de controle não colados no FSC:
Montar FSC
Montar os tubos de contato dos cabos
2
de controle na caixa FSC (branco -> a,
marrom ->b, verde ->c, amarelo -> d).
PT-BR
23
Page 26

Montar a prote-
2
ção contra dobramento
Colocar a proteção contra dobramento
1
sobre o FSC
Montar o parafuso de fixação
24
Page 27

PT-BR
25
Page 28

FRONIUS INTERNATIONAL GMBH
Froniusplatz 1, A-4600 Wels, Austria
Tel: +43 (0)7242 241-0, Fax: +43 (0)7242 241-3940
Under http://www.fronius.com/addresses you will find all addresses
of our Sales & service partners and Locations
E-Mail: sales@fronius.com
www.fronius.com
www.fronius.com/addresses
 Loading...