

Fronius Additional notes for inserting wirespool/basket-type spool Installation Instruction [DE, EN]
Page 1

Zusätzliche Hinweise zum Einsetzen von Drahtspule und Korbspule
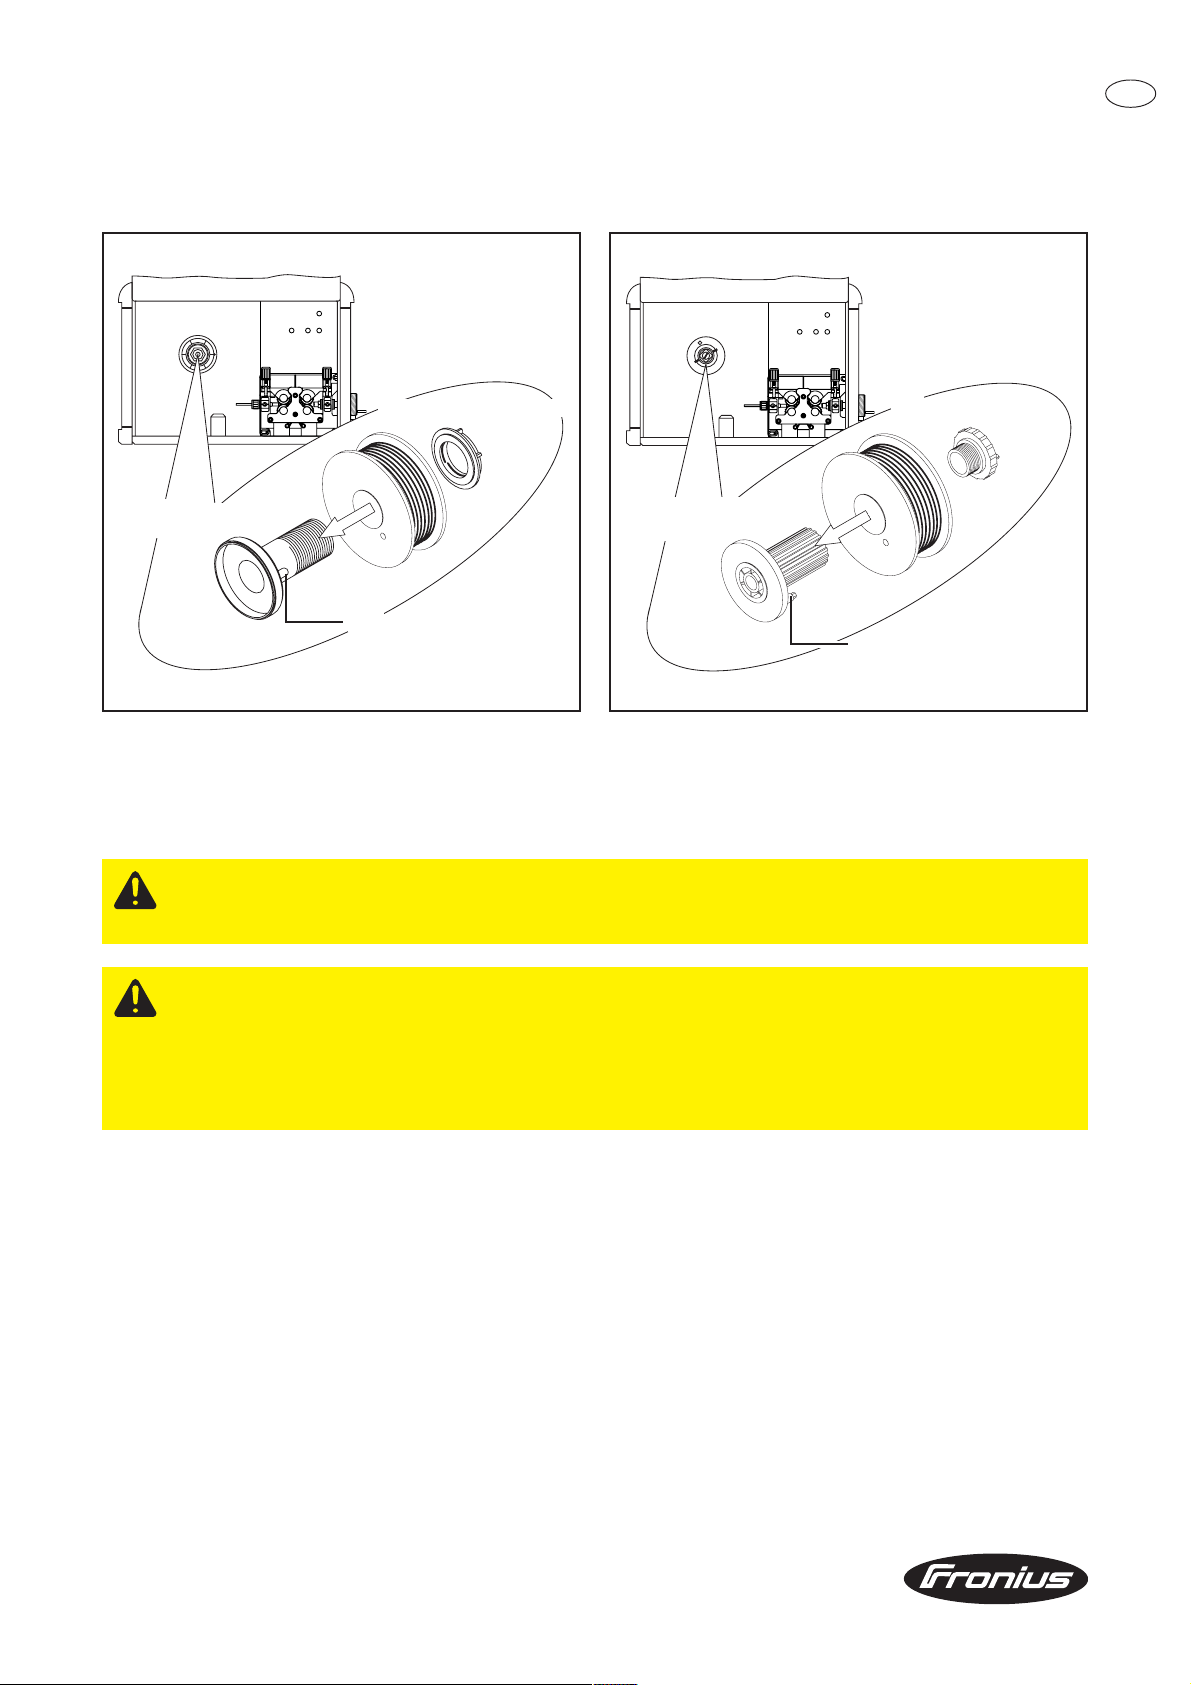
Drahtspule einsetzen
D
Drahtspulen-Sicherung
Aufnahme Drahtspule
mit Gewindeansatz
Arretierbolzen
Drahtspule einsetzen - Aufnahme Drahtspule mit Gewindeansatz
1. Netzschalter der Stromquelle in Stellung „O“ schalten
2. Linkes Seitenteil des Drahtvorschubes öffnen
3. Drahtspulen-Sicherung abschrauben
Vorsicht! Verletzungsgefahr durch Federwirkung der aufgespulten Drahtelektrode. Beim Einsetzen
der Drahtspule das Ende der Drahtelektrode gut festhalten, um Verletzungen durch zurückschnellende Drahtelektrode zu vermeiden.
Drahtspulen-Sicherung
Aufnahme Drahtspule
mit Längsrillen
Arretierbolzen
Drahtspule einsetzen - Aufnahme Drahtspule mit Längsrillen
Vorsicht! Verletzungsgefahr durch herabfallende Drahtspule. Fester Sitz der Drahtspule auf der
Aufnahme Drahtspule ist sicherzustellen:
- Arretierbolzen an der Aufnahme Drahtspule in vorgesehene Öffnung am Spulenkörper einrasten
lassen
- Drahtspulen-Sicherung fest aufschrauben
- Drahtspule während dem Aufschrauben der Drahtspulen-Sicherung festhalten und gegen
Verdrehen sichern
4. Drahtspule seitenrichtig auf Aufnahme Drahtspule aufsetzen und Drahtspulen-Sicherung aufschrauben
5. Bremswirkung mittels Spannschraube einstellen
Wichtig! Bremse so einstellen, dass die Drahtspule nach Schweißende nicht nachläuft - Spannschraube
jedoch wegen möglicher Überlastung des Motors nicht übermäßig festziehen.
6. Linkes Seitenteil schließen
Text und Abbildungen entsprechen dem technischen Stand bei Drucklegung. Änderungen vorbehalten.
42,0410,1250 012005 Fronius International GmbH, http://www.fronius.com
Page 2

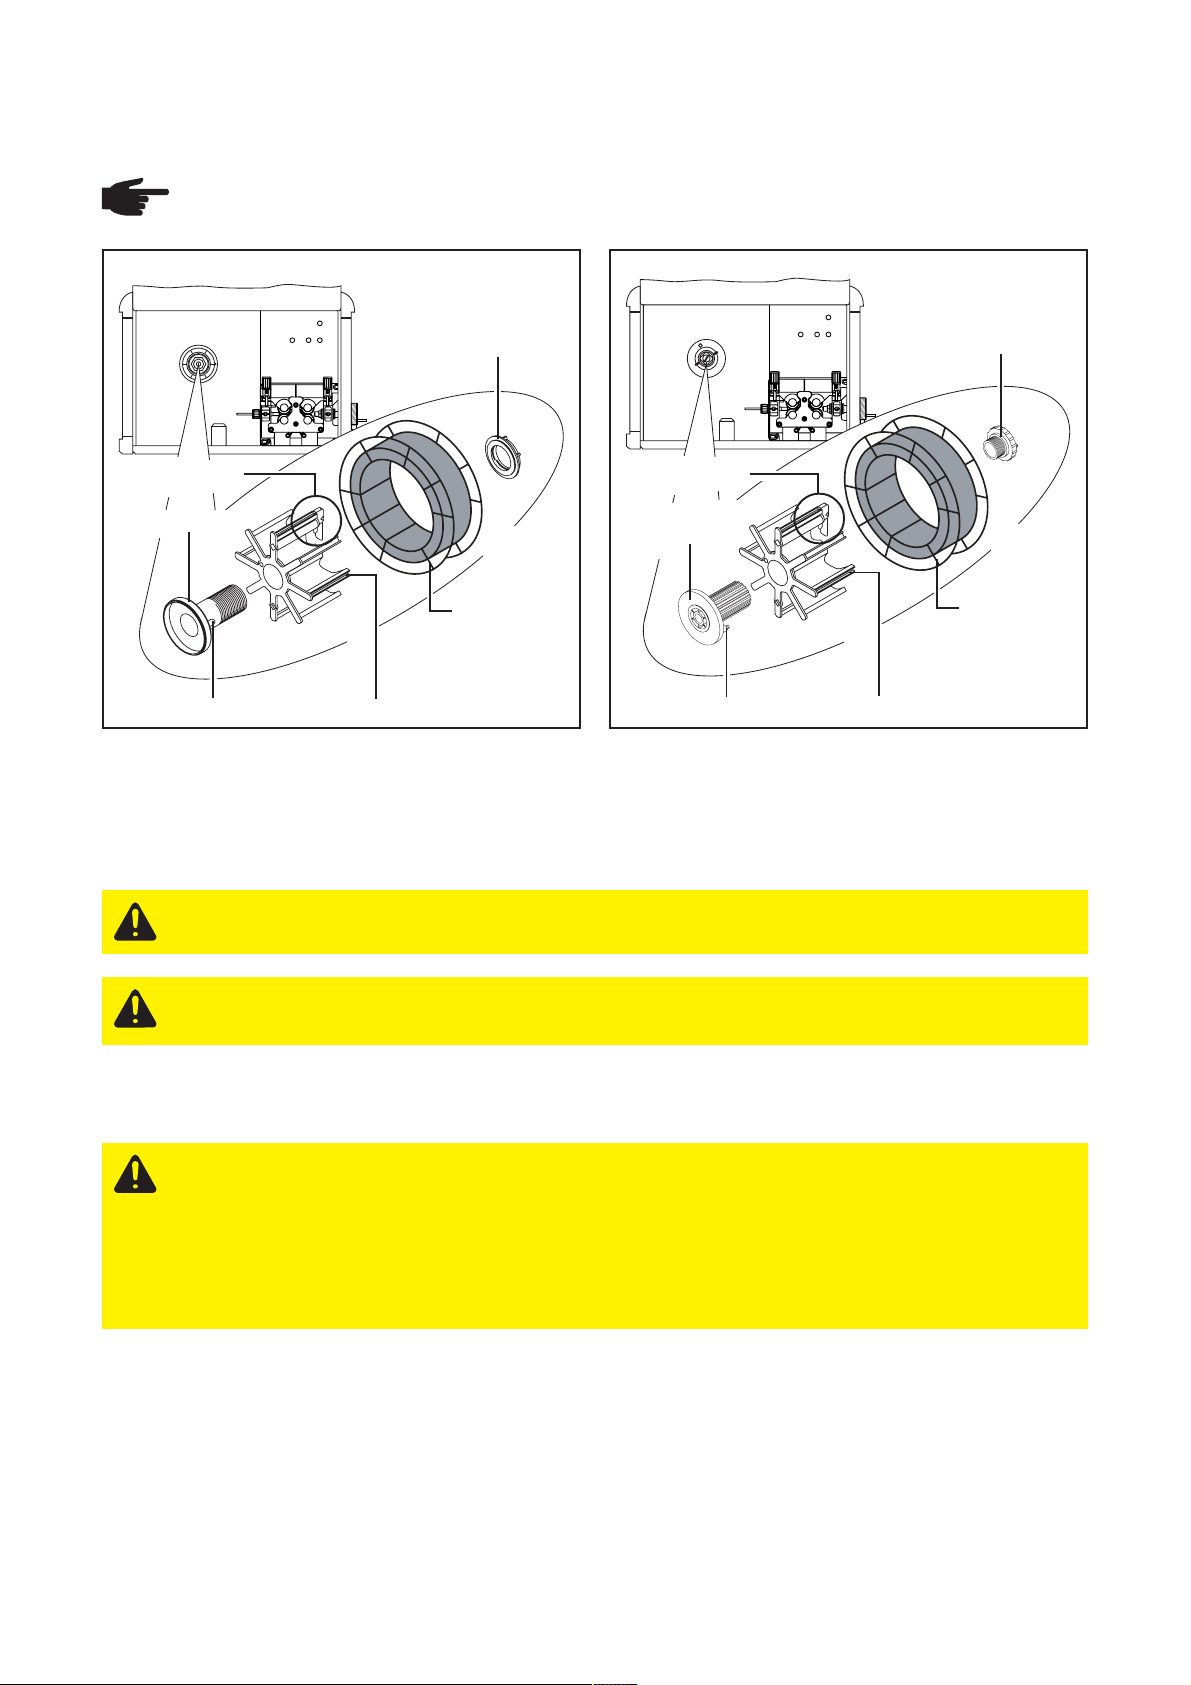
Korbspule einsetzen
Das Arbeiten mit Korbspulen erfordert einen Korbspulen-Adapter.
Hinweis! Beim Arbeiten mit Korbspulen ausschließlich den im Lieferumfang des VR 7000 enthaltenen
Korbspulen-Adapter verwenden!
Drahtspulen-Sicherung
Sicherung Korbspule
Aufnahme Drahtspule
mit Längsrillen
KorbspulenAdapter
Arretierbolzen
Korbspule einsetzen - Aufnahme Drahtspule mit Gewindeansatz Korbspule einsetzen - Aufnahme Drahtspule mit Längsrillen
Führungsnut (Beispiel)
Korbspule
Steg (Beispiel)
Sicherung Korbspule
Aufnahme Drahtspule
mit Längsrillen
KorbspulenAdapter
Arretierbolzen
Führungsnut (Beispiel)
Drahtspulen-Sicherung
Korbspule
Steg (Beispiel)
1. Netzschalter der Stromquelle in Stellung „O“ schalten
2. Linkes Seitenteil des Drahtvorschubes öffnen
3. Drahtspulen-Sicherung abschrauben
Vorsicht! Verletzungsgefahr durch Federwirkung der aufgespulten Drahtelektrode. Beim Einsetzen
der Korbspule das Ende der Drahtelektrode gut festhalten, um Verletzungen durch zurückschnellende Drahtelektrode zu vermeiden.
Vorsicht! Gefahr durch herabfallende Korbspule. Korbspule so am mitgelieferten Korbspulen-Adapter
aufsetzen, dass die Stege der Korbspule innerhalb der Führungsnuten des Korbspulen-Adapters
liegen.
4. Korbspule seitenrichtig auf Korbspulenadapter aufsetzen
5. Sicherung Korbspule am Korbspulen-Adapter quer drehen (2x)
Vorsicht! Verletzungsgefahr durch herabfallende Korbspule. Fester Sitz von Korbspulen-Adapter mit
Korbspule auf der Aufnahme Drahtspule ist sicherzustellen:
- Arretierbolzen an der Aufnahme Drahtspule in vorgesehene Öffnung am Korbspulen-Adapter
einrasten lassen
- Drahtspulen-Sicherung fest aufschrauben
- Korbspule während dem Aufschrauben der Drahtspulen-sicherung festhalten und gegen Verdrehen sichern
6. Korbspulen-Adapter mit Korbspule seitenrichtig auf Aufnahme Drahtspule aufsetzen und DrahtspulenSicherung aufschrauben
7. Bremswirkung mittels Spannschraube einstellen
Wichtig! Bremse so einstellen, dass die Drahtspule nach Schweißende nicht nachläuft - Spannschraube
jedoch wegen möglicher Überlastung des Motors nicht übermäßig festziehen.
8. Linkes Seitenteil schließen
Page 3
Additional notes for inserting wirespool and basket-type spool
Inserting wirespool
GB
Wirespool securing device
Threaded wirespool
holder
Locking bolt
Inserting the wirespool - threaded holder
Inserting the wirespool - holder with longitudinal grooves
1. Switch the power source mains switch to the “O” position
2. Open left side panel of wirefeeder
3. Unscrew wirespool securing device
Caution! Risk of injury from springiness of spooled welding wire. While inserting
the wirespool, hold the end of the welding wire firmly to avoid injuries
caused by the wire springing back.
Wirespool securing
device
Wirespool holder with
longitudinal grooves
Locking bolt
Caution! Risk of injury and damage from falling wirespool. Make sure the
wirespool sits securely on the spool holder:
- Allow the locking bolt on the spool holder to engage with the opening on the body of the spool
- Screw on wirespool securing device tightly
- To avoid twisting of the wirespool while screwing on the wirespool securing device hold tight the
wirespool
4. Mount the wirespool onto the spool holder - the right way round and Screw on wirespool securing device
5. Adjust the braking force with the clamping screw
Important! The brake should always be adjusted so that the wire does not continue
unreeling after the end of welding - but without overtightening the clamping screw, as this
would cause motor overload.
6. Close left side panel
Text and illustrations technically correct at the time of going to print. Right to effect modifications is reserved.
42,0410,1250 012005 Fronius International GmbH, http://www.fronius.com
Page 4
Inserting basket-type spool
Working with basket-type spools requires a basket spool adapter.
Note! When working with basket-type spools, use only the basket spool adapter
supplied with the VR 7000.
Wirespool securing
device
Basket-type spool
securing device
Threaded wirespool
holder
Basket-type spool
adapter
Locking bolt
Inserting basket-type spool - Threaded wirespool holder Inserting basket-type spool - Wirespool holder with longitudinal
Guideway (example)
Basket-type
spool
Bar (example)
Basket-type spool
securing device
Wirespool holder
with longitudinal
grooves
Locking bolt
grooves
Basket-type spool
adapter
Guideway (example)
Wirespool securing
device
Basket-type
spool
Bar (example)
1. Switch the power source mains switch to the “O” position
2. Open left side panel of wirefeeder
3. Screw off wirespool securing device
Caution! Risk of injury from springiness of spooled welding wire. When inserting the basket-type
spool, hold the end of the welding wire firmly to avoid injuries caused by the wire springing back.
Caution! Risk of injury and damage from falling spool. Place basket-type spool on the adapter
provided in such a way that the bars on the spool are inside the adapter guideways.
4. Mount the basket-type spool onto the basket spool adapter - the right way round
5. Turn securing device on basket spool adapter sideways (2x)
Caution! Risk of injury and damage from falling spool. Make sure that the basket spool adapter with
spool is fitted securely to the wirespool holder:
- Allow the locking bolt on the spool holder to engage with the opening on the body of the baskettype spool
- Screw on wirespool securing device tightly
- To avoid twisting of the basket-type spool while screwing on the wirespool securing device hold
tight the basket-type spool
6. Place basket spool adapter with spool the right way round on the wirespool holder and screw on wirespool
securing device
7. Adjust the braking force with the clamping screw
Important! The brake should always be adjusted so that the wire does not continue unreeling after the end of
welding - but without overtightening the clamping screw, as this would cause motor overload.
8. Close left side panel
 Loading...