

Page 1

Operating
Instructions
Acctiva Smart 25 A
EU / CH / UK / CN 充电器
Acctiva Professional 35 A
EU / CH / UK / CN 充电器
Operating Instructions
EN
Návod na obsluhu
SK
Upute za upotrebu
HR
DE: Bedienungsanleitung
BG
RO
Manualul de utilizare
Kullanım kılavuzu
TR
ZH
操作说明书
42,0410,2482 009-15062022
Page 2

Page 3

Contents
Safety rules 5
Explanation of safety notices 5
General 5
Intended use 6
Environmental conditions 6
Data protection 6
Mains connection 6
Dangers from mains current and charging current 6
Danger due to acid, gases and vapours 7
General information regarding the handling of batteries 7
Protecting yourself and others 7
Operation by children and persons with limitations 8
Safety measures in normal operation 8
EMC Device Classifications 8
EMC measures 8
Maintenance 8
Warranty and liability 9
Safety inspection 9
Markings on the device 9
Disposal 9
Copyright 9
General information 11
Principle 11
Device concept 11
Warning notices on the device 11
Setup regulations 12
Start-up 13
Safety 13
Proper use 13
Mains connection 13
Safety features - standard protection devices 14
Control elements and connections 15
General 15
Control panel 15
Plugging in options 16
Connections 16
Safety bow 17
Locking system 17
Removing covers for connections and options 17
USB update option 17
Fitting the optional bracket and strain-relief device for the charging lead 18
Handle (option) 18
Edge guard option 18
Wall bracket option 19
Preparations for security lock 19
Mounting 19
Operating modes 21
General information 21
Available operating modes 21
Selecting the operating mode 21
Charging mode 21
Buffering (Trickle) mode 21
Refresh mode 22
Battery changing mode 22
Power Supply mode 22
Device options 22
Charging mode 23
General information 23
Charging the battery 23
Interrupting the charging process 25
EN
3
Page 4

Restarting charging 25
Buffering (Trickle) mode 26
General information 26
Buffering the battery 26
Interrupting Buffering mode 27
Resuming buffering 27
Refresh mode 28
General information 28
Reactivating batteries 29
Interrupting "Refresh" charging 31
Resuming refresh charging 31
Battery changing mode 32
General information 32
Changing the battery 32
Power supply mode 34
Requirements 34
Power Supply mode 34
Device options 36
General information 36
Selecting device options 36
Configuration 36
Synergic lines 38
Safety 38
Available characteristics 38
Troubleshooting 40
Safety 40
Protective equipment 40
Charging error 41
Technical data 43
Electrical data input 43
Standards 43
Electrical data - output 43
Battery data 43
Technical data 44
Environmental conditions 44
4
Page 5

Safety rules
EN
Explanation of
safety notices
DANGER!
Indicates immediate danger.
If not avoided, death or serious injury will result.
▶
WARNING!
Indicates a potentially hazardous situation.
If not avoided, death or serious injury may result.
▶
CAUTION!
Indicates a situation where damage or injury could occur.
If not avoided, minor injury and/or damage to property may result.
▶
NOTE!
Indicates a risk of flawed results and possible damage to the equipment.
General The device has been manufactured in line with the state of the art and according
to recognized safety standards. If used incorrectly or misused, however, it can
cause:
Serious or fatal injury to the operator or third parties
-
Damage to the device and other material assets belonging to the operating
-
company
Inefficient operation of the device
-
All persons involved in commissioning, operating, maintaining and servicing the
device must:
Be suitably qualified
-
Read and follow these Operating Instructions carefully
-
The Operating Instructions must always be at hand wherever the device is being
used. In addition to the Operating Instructions, attention must also be paid to
any generally applicable and local regulations regarding accident prevention and
environmental protection.
All safety and danger notices on the device:
Must be kept in a legible state
-
Must not be damaged/marked
-
Must not be removed
-
Must not be covered, pasted, or painted over
-
For the location of the safety and danger notices on the device, refer to the section headed "General information" in the Operating Instructions for your device.
Before switching on the device, rectify any faults that could compromise safety.
This is for your personal safety!
5
Page 6

Intended use The device is to be used exclusively for its intended purpose. Any use above and
beyond this purpose is deemed improper. The manufacturer is not liable for any
damage, or unexpected or incorrect results arising out of such misuse.
Proper use also includes:
Carefully reading and following all Operating Instructions, safety and danger
-
notices
Performing all stipulated inspection and servicing work
-
Following all instructions from the battery and vehicle manufacturers
-
Proper handling of the device is essential for it to function correctly. Never pull
on the cable when handling the device.
Environmental
conditions
Operation or storage of the device outside the stipulated area will be deemed as
not in accordance with the intended purpose. The manufacturer shall not be held
liable for any damage arising from such usage.
For detailed information on the permitted environmental conditions, please refer
to the "Technical data".
Data protection The user is responsible for the safekeeping of any changes made to the factory
settings. The manufacturer accepts no liability for any deleted personal settings.
Mains connection
Devices with a higher rating may affect the energy quality of the mains due to
their current consumption.
This may affect a number device types in terms of:
Connection restrictions
-
-
Criteria with regard to the maximum permissible mains impedance
-
Criteria with regard to the minimum short-circuit power requirement
*)
at the interface with the public grid
*)
*)
see "Technical data"
Dangers from
mains current
and charging
current
6
In this case, the plant operator or the person using the device should check
whether the device may be connected, where appropriate by discussing the matter with the power supply company.
IMPORTANT! Ensure that the mains connection is earthed properly
Anyone working with battery chargers exposes themselves to numerous dangers,
e.g.:
Risk of electrocution from mains current and charging current.
-
Hazardous electromagnetic fields, which can risk the lives of those using car-
-
diac pacemakers.
An electric shock can be fatal. Every electric shock is potentially life threatening.
To avoid electric shocks while using the charger:
Do not touch any live parts inside or on the outside of the charger.
-
Under no circumstances touch the battery poles.
-
Do not short-circuit the charging cable or charging terminals.
-
Page 7

All cables and leads must be secured, undamaged, insulated and adequately dimensioned. Loose connections, scorched, damaged or inadequately dimensioned
cables and leads must be immediately repaired by authorised personnel.
EN
Danger due to
acid, gases and
vapours
Batteries contain acid which is harmful to the eyes and skin. During charging,
gases and vapours are released that may be harmful to health and are highly explosive in certain circumstances.
Only use the charger in well-ventilated areas to prevent the accumulation of explosive gases. Battery rooms are not deemed to be hazardous areas provided that
a concentration of hydrogen of less than 4% can be guaranteed by the use of natural or forced ventilation.
Maintain a distance of at least 0.5 m (19.69 in.) between the battery and charger
during the charging procedure. Possible sources of ignition such as fire and naked flames must be kept away from the battery.
The battery connection (e.g. charging terminals) must not be disconnected for
any reason during charging.
Do not inhale any of the gases and vapours released under any circumstances Make sure the area is well ventilated.
To prevent short circuits, do not place any tools or conductive metals on the battery.
Battery acid must not get into the eyes or onto the skin or clothes. Wear protective goggles and suitable protective clothing. Rinse any acid splashes thoroughly
with clean water and seek medical advice if necessary.
General information regarding
the handling of
batteries
Protecting yourself and others
Protect batteries from dirt and mechanical damage.
-
Store charged batteries in a cool place. Self discharge is kept to a minimum
-
at approx. +2 °C (35.6 °F).
Carry out a visual inspection at least once a week or as often as specified by
-
the battery manufacturer to ensure that the acid (electrolyte) level in the
battery is at the max. mark.
If any of the following occur, do not start the device (or stop immediately if
-
already in use) and have the battery checked by an authorised workshop:
uneven acid levels and/or high water consumption in individual cells
-
caused by a possible fault.
overheating of the battery above 55 °C (131 °F).
-
While the charger is in operation, keep all persons, especially children, out of the
working area. If, however, there are people in the vicinity,
warn them about all the dangers (hazardous acids and gases, danger from
-
mains and charging current, etc.),
provide suitable protective equipment.
-
Before leaving the work area, ensure that people or property cannot come to any
harm in your absence.
7
Page 8

Operation by
children and persons with limitations
This device can be used by children aged 8 years and over, as well as individuals
with reduced physical, sensory or mental capabilities, or a lack of experience and
knowledge, if such persons are under supervision or have received instruction
concerning use of the device in a safe way and if they understand the risks involved. Children must not play with the device. Children must not perform cleaning or user maintenance unless supervised.
Safety measures
in normal operation
EMC Device
Classifications
Chargers with a ground conductor must only be operated on a mains supply with
a ground conductor and a socket with a ground conductor contact. If the charger
is operated on a mains supply without a ground conductor or in a socket without
a ground conductor contact, this will be deemed gross negligence. The manufacturer shall not be held liable for any damage arising from such usage.
Only operate the charger in accordance with the degree of protection shown on
the rating plate.
Under no circumstances operate the charger if there is any evidence of damage.
Arrange for the mains cable to be checked regularly by a qualified electrician to
ensure the ground conductor is functioning properly.
Any safety devices and parts that are not functioning properly or are in imperfect
condition must be repaired by a qualified technician before switching on the
charger.
Never bypass or disable protection devices.
After installation, an accessible mains plug is required.
Devices in emission class A:
Are only designed for use in industrial settings
-
Can cause line-bound and radiated interference in other areas
-
Devices in emission class B:
Satisfy the emissions criteria for residential and industrial areas. This is also
-
true for residential areas in which the energy is supplied from the public lowvoltage mains.
EMC device classification as per the rating plate or technical data.
EMC measures In certain cases, even though a device complies with the standard limit values for
emissions, it may affect the application area for which it was designed (e.g. when
there is sensitive equipment at the same location, or if the site where the device
is installed is close to either radio or television receivers).
If this is the case, then the operating company is obliged to take appropriate action to rectify the situation.
Maintenance Before switching on, always check the mains plug and cable as well as charger
leads and charging terminals for any signs of damage.
If the surface of the device housing is dirty, clean with a soft cloth and solventfree cleaning agent only.
8
Page 9

Warranty and liability
The warranty period for the charger is 2 years from the date of invoice.
However, the manufacturer will not accept any liability if the damage was caused
by one or more of the following:
Use of the charger "not in accordance with the intended purpose"
-
Improper installation and operation.
-
Operating the charger with faulty protection devices.
-
Non-compliance with the operating instructions.
-
Unauthorised modifications to the charger.
-
Catastrophes caused by the activities of third parties and force majeure.
-
EN
Safety inspection
Markings on the
device
The manufacturer recommends that a safety inspection of the device is performed at least once every 12 months.
The safety inspection may only be performed by an appropriately qualified electrician
After any changes have been made
-
After any additional parts are installed, or after any conversions
-
After repair, care and maintenance are carried out
-
At least every twelve months
-
For safety inspections, follow the appropriate national and international standards and directives.
Further details on safety inspections can be obtained from your service centre.
They will provide you on request with any documents you may require.
Devices with the CE marking satisfy the essential requirements of the applicable
guidelines.
Devices displaying the EAC mark of conformity satisfy the requirements of the
relevant standards in Russia, Belarus, Kazakhstan, Armenia and Kyrgyzstan.
Devices displaying the CP mark of conformity satisfy the requirements of the relevant standards in Morocco.
Disposal Waste electrical and electronic equipment must be collected separately and re-
cycled in an environmentally-friendly way, in accordance with the European Directive and national legislation. Used equipment must be returned to the distributor or disposed of via an approved local collection and disposal facility. Correct
disposal of used equipment promotes the sustainable recycling of material resources. Failing to dispose of used equipment correctly can lead to adverse
health and/or environmental impacts.
Packaging materials
Separate collection according to material. Check your local authority regulations.
Crush containers to reduce size.
Copyright Copyright of these operating instructions remains with the manufacturer.
The text and illustrations are all technically correct at the time of printing. We
reserve the right to make changes. The contents of the operating instructions
shall not provide the basis for any claims whatsoever on the part of the purchaser. If you have any suggestions for improvement, or can point out any mis-
9
Page 10

takes that you have found in the instructions, we will be most grateful for your
comments.
10
Page 11

General information
In:
Out.:
Acctiva Professional 35A XX
~230V 50/60Hz;1120W
DC 2V-31V/35A
IP 40
4,010,361,xxx
Fronius International GmbH
Froniusstraße 1
A-4643 Pettenbach
EMC Emission
Class A
Ser. No.:
Part No.:
xxxxxxxx
xxxxxxxx
Ser. No.:
In:
Out.:
Part No.:
Acctiva Smart 25A XX
~230V 50/60Hz;1120W
DC 2V-31V/35A
IP 40
EMC Emission
Class A
Fronius International GmbH
Froniusstraße 1
A-4643 Pettenbach
4,010,360,xxx
xxxxxxxx
xxxxxxxx
Principle The main feature of the new Active Inverter Technology is intelligent charging.
This means that the charging behaviour adapts itself automatically to the age
and state of charge of the battery. This innovation extends the battery's service
life and reduces the amount of maintenance required, while at the same time improving efficiency.
Active Inverter Technology is based on an inverter with active rectification and an
intelligent safety cut-out. The charging current and voltage are held constant by
a digital control that is not affected by any fluctuations in the mains voltage.
Device concept The compact design reduces space requirements and makes portable use con-
siderably easier. In addition to its many existing features, the charger has a modular design that makes it easy to upgrade; it is therefore ideally equipped for future requirements. A wide range of options is available. A voltage limit provides
optimum protection for the vehicle electronics.
EN
Warning notices
on the device
A number of safety symbols can be seen on the charger's rating plate. The safety
symbols must not be removed or painted over.
Do not use the functions until you have fully read the Operating Instructions.
Possible sources of ignition, such as fire, sparks and naked flames,
must be kept away from the battery.
11
Page 12

Risk of explosion! Oxyhydrogen is generated in the battery during charging.
Battery acid is corrosive and must be kept away from eyes, skin and
clothes.
Ensure an adequate supply of fresh air during charging. Maintain a distance of at least 0.5 m (19.69 in.) between the battery and charger
during the charging procedure.
Do not dispose of used devices with domestic waste. Dispose of them
according to the safety rules.
Setup regulations
WARNING!
Danger from machines falling or toppling over.
This can result in serious injury and damage to property.
Place the device on a solid, level surface so that it remains stable or set up
▶
on a level surface according to the "Installation" section.
The "Installation" section is in the "Control elements and connections"
▶
chapter.
The device is tested to IP40 protection, meaning:
Protection against penetration by solid foreign bodies with diameters ex-
-
ceeding 1.0 mm (0.04 in.)
No protection against water
-
The device must be set up and operated in dry, closed areas that comply with degree of protection IP40.
Avoid direct wetting
-
Dust:
Ensure that metallic dust is not sucked into the system by the fan,
-
e.g. during grinding work
-
12
Page 13

Start-up
EN
Safety
Danger from incorrect operation.
This can result in severe personal injury and damage to property.
▶
▶
▶
▶
Proper use The charger is designed to charge the batteries listed below. Any use above and
beyond this purpose is deemed improper. The manufacturer shall not be liable
for any damage resulting from such use. Proper use also includes
-
-
Danger from charging dry batteries (primary cells) and non-rechargeable batteries.
This may result in serious injury and damage to property.
▶
WARNING!
Do not use the functions described here until you have fully read and understood the following documents:
Operating Instructions,
all the Operating Instructions for the system components, especially the
safety rules,
Battery and vehicle manufacturer's Operating Instructions and safety rules.
following all the instructions contained in the Operating Instructions,
regular checking of the mains and charging leads.
WARNING!
Only charge the battery types listed below.
Mains connection
The following battery types may be charged:
Wet batteries:
-
Sealed batteries with a liquid electrolyte (recognisable by the vent plugs) and
low-maintenance/maintenance-free wet batteries (MF).
Absorbent Glass Mat (AGM) batteries:
-
Sealed batteries (VRLA) with immobilised electrolyte (sealant).
Gel batteries:
-
Sealed batteries (VRLA) with immobilised electrolyte (gel).
The rating plate, which is located on the housing, contains information about the
permitted mains voltage. The device is designed for this mains voltage only. The
fuse protection required for the mains lead can be found in the "Technical data"
section. If there is no mains cable or mains plug on your version of the appliance,
fit one that conforms to national standards.
NOTE!
Danger from insufficiently dimensioned electrical installation.
This can result in serious damage to property.
The mains lead and its fuse must be dimensioned to suit the local power sup-
▶
ply. The technical data shown on the rating plate applies.
13
Page 14

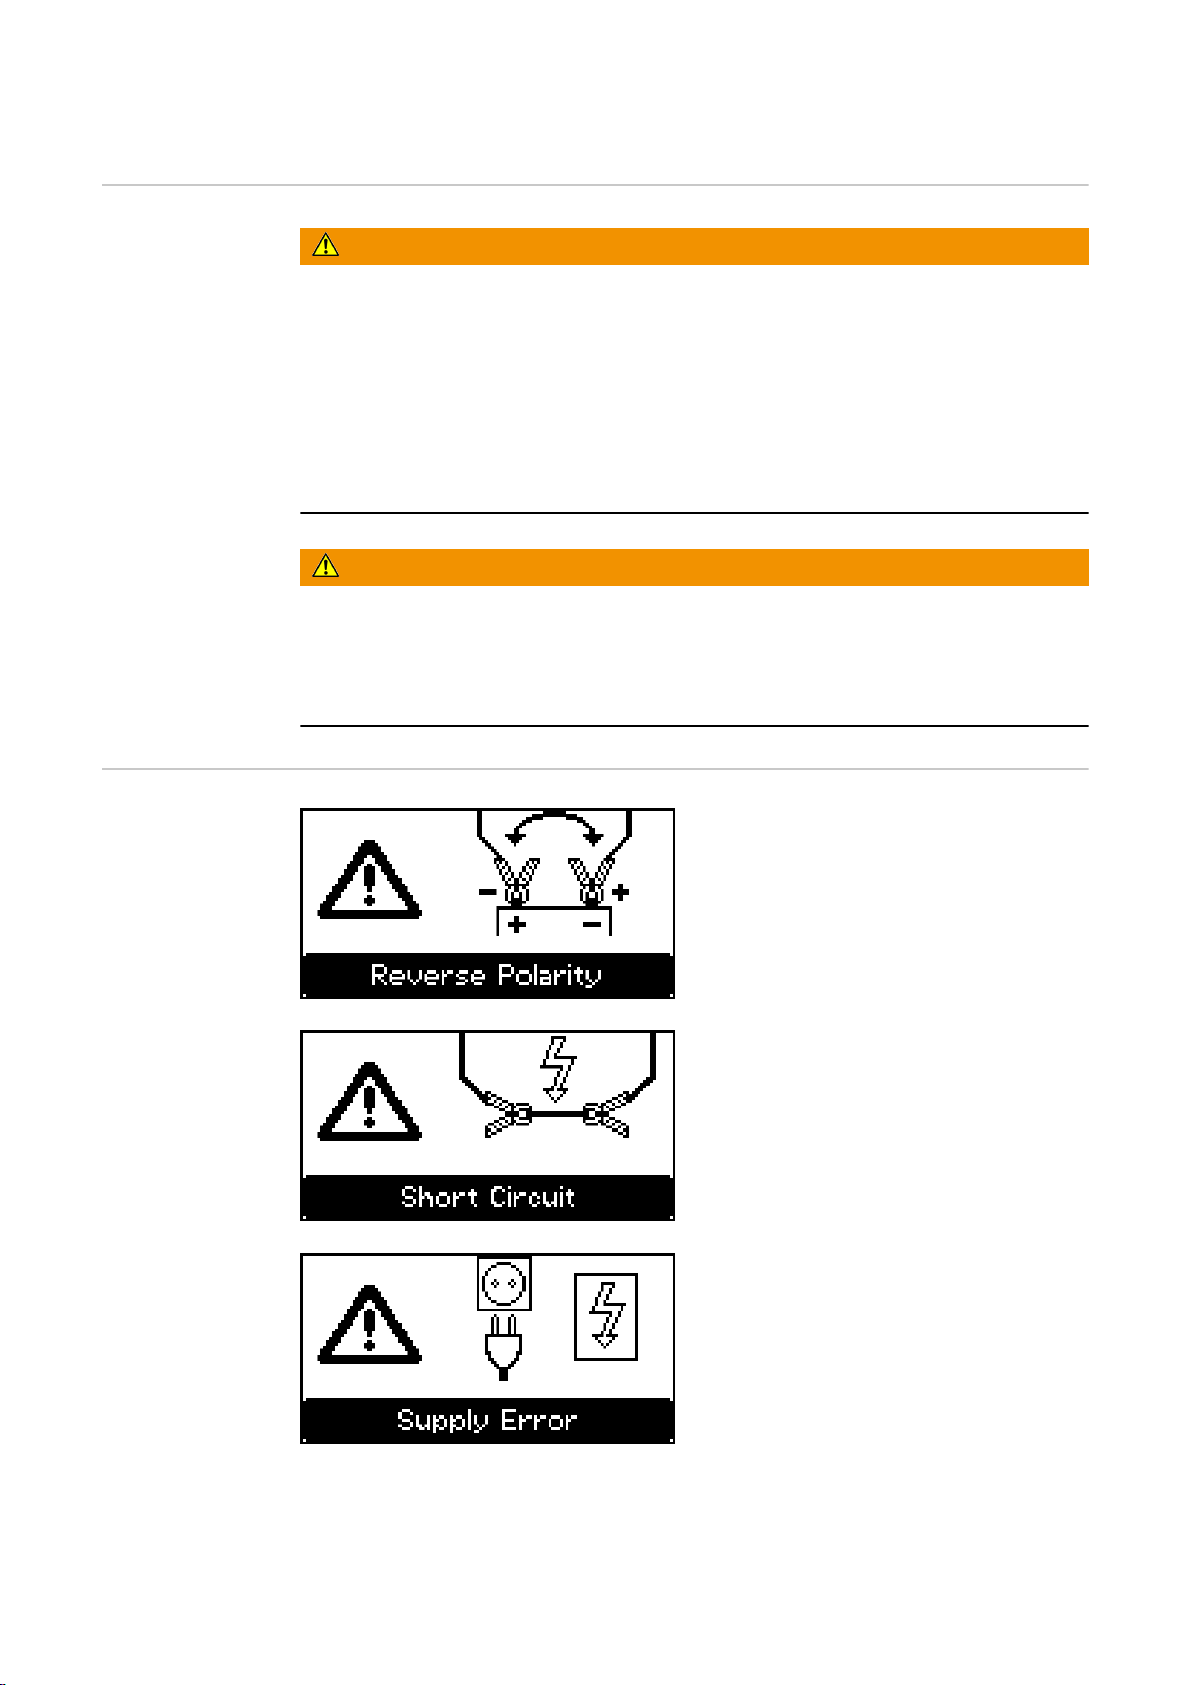
Safety features standard protection devices
The following safety features are provided as standard with the Active Inverter:
Voltage-free and spark-free terminals protect against explosions
-
Reverse polarity protection prevents the charger from being damaged or
-
destroyed
Short-circuit protection provides effective protection for the charger. The
-
fuse does not need to be replaced in the event of a short circuit
A charging time monitor provides effective protection against overcharging
-
and destruction of the battery
Overtemperature protection through derating (charging current reduced if
-
the temperature rises above the permitted level)
14
Page 15

Control elements and connections
(2)(1) (3) (4)
General Please note:
as a result of firmware updates, you may find that there are functions available
on your device that are not described in these Operating Instructions, or vice
versa.
Certain illustrations may also differ slightly from the actual controls on your
device, but these controls function in exactly the same way.
WARNING!
Danger from incorrect operation.
This can result in severe personal injury and damage to property.
Do not use the functions described here until you have read and completely
▶
understood these operating instructions.
Do not use the functions described here until you have fully read and under-
▶
stood all of the Operating Instructions for the system components, in particular the safety rules.
EN
Control panel
(4) Stop/Start key
For interrupting and resuming charging
-
Confirming selections, e.g. after the charging voltage has been selec-
-
ted from 6, 12 or 24 V using the Up/Down keys
No. Function
(1) Graphic display
(2) Menu key
Select the desired setting,
-
e.g. Ah
(3) Up/Down keys
Select the desired operat-
-
ing mode, e.g. 'Charging' or
'Battery changing'
Alter the setting that has
-
been selected by the Menu
key (2)
After connecting to a new
-
battery:
ability to manually select
the charging voltage from
6, 12 or 24 V
15
Page 16

Plugging in op-
(1)(2)
(3) (4)
(6)
(7)
(5)
tions
Connections
NOTE!
Danger from connecting options and accessories while the mains plug is
plugged in.
This can result in damage to the device and accessories.
Only connect options and system add-ons when the mains plug is unplugged
▶
and the charging leads are disconnected from the battery.
No. Function
(1) Mains cable safety bow
to relieve strain on the mains cable
The safety bow is not fitted to mains cables with the locking system.
(2) AC input - mains socket
(3) Connection P2 - I/O port - no function, can be retrofitted however
for connecting the following options:
Immobiliser device
-
Common error
-
Immobiliser device and common error
-
(4) Connection P1 - charging lead socket
used to connect the charging lead
also for connecting the temperature-controlled charging or external
start/stop options
(5) Removable display
(6) Connection P3 - Visual Port
for connecting the internal display
(7) Connection P4 - Multi Port
for connecting the following options:
Status lamp
-
Software update via USB port
-
16
Page 17

Safety bow
(1)
(2)
Locking system
EN
Removing covers
for connections
and options
USB update option
If necessary, use a screwdriver to remove:
Cover (1) for connection P4 - Multi
-
Port.
Cover (2) for connection P2 - I/O
-
port.
Leave covers (1) and (2) in place on unused P2 and P4 connections.
The USB update option allows the charger to be updated directly via the USB interface.
17
Page 18

Fitting the op-
1
2
3
4
(1) (2) (3) (4)
1
2
2
tional bracket
and strain-relief
device for the
charging lead
Handle (option)
Please note:
the torque for all screws is 2.5 Nm
(1.84 ft. lb.).
To fit the bracket:
Undo the screws (1).
-
Fit bracket (2) using the previously
-
removed screws.
To fit the strain-relief device:
Undo screw (3).
-
Fit charging lead strain-relief
-
device (4) using the previously undone screw.
Edge guard option
18
The edge guard removal process is the
reverse of the fitting process.
The bracket cannot be fitted if the
edge guard is already in place.
Page 19

Wall bracket op-
1
1
"click"
"click"
~ 120 mm
~ 4.72 inch
130 mm
5.12 inch
tion
Different wall plugs and screws will be required depending on the supporting surface. Wall plugs and screws are therefore not included in the scope of supply.
The installer is responsible for selecting the right wall plugs and screws.
EN
Preparations for
security lock
Mounting
The security lock is not contained in
the scope of supply.
A security lock can only be attached
to the groove on the housing as
-
shown.
to the groove on the housing that
-
is exactly opposite.
using spacer M8 DIN 125 or DIN
-
134, located as shown.
NOTE!
Danger due to improper installation of the charger in a switch cabinet (or in a
similar enclosed space).
This can result in damage to property.
Ensure sufficient heat dissipation using forced-air ventilation.
▶
There should be a clearance of 10 cm (3.94 in.) all around the device.
▶
The space requirement dimensions in mm (inches) illustrated below are given to
ensure that there is easy access to the plug connections:
19
Page 20

100
15,5
168
270
(10.63)
(6.61)
(3.94)
(.61)
Space requirements with edge protector
247 (9.72)
88 (3.46)
126 (4.96)
140 (5.51)
60 +20*
70 + 20*
11 + 5*
162
(6.38)
(2.76 + .79)*
(2.36 + .79)*
(.43 + .2)*
233 (9.17)
(.26)
6,5
Space requirements without edge protector, and space requirements with signal lamp and bracket
options (* space for mounting/removal)
20
Page 21

Operating modes
EN
General information
Available operating modes
Selecting the operating mode
The charger is suitable for all 6/12/24 V lead acid batteries (wet, MF, AGM and
GEL).
The following operating modes are available:
Charging
-
Buffering (Trickle) mode during vehicle diagnosis or software updates
-
Refresh
-
Power supply mode
-
Battery changing
-
Device options
-
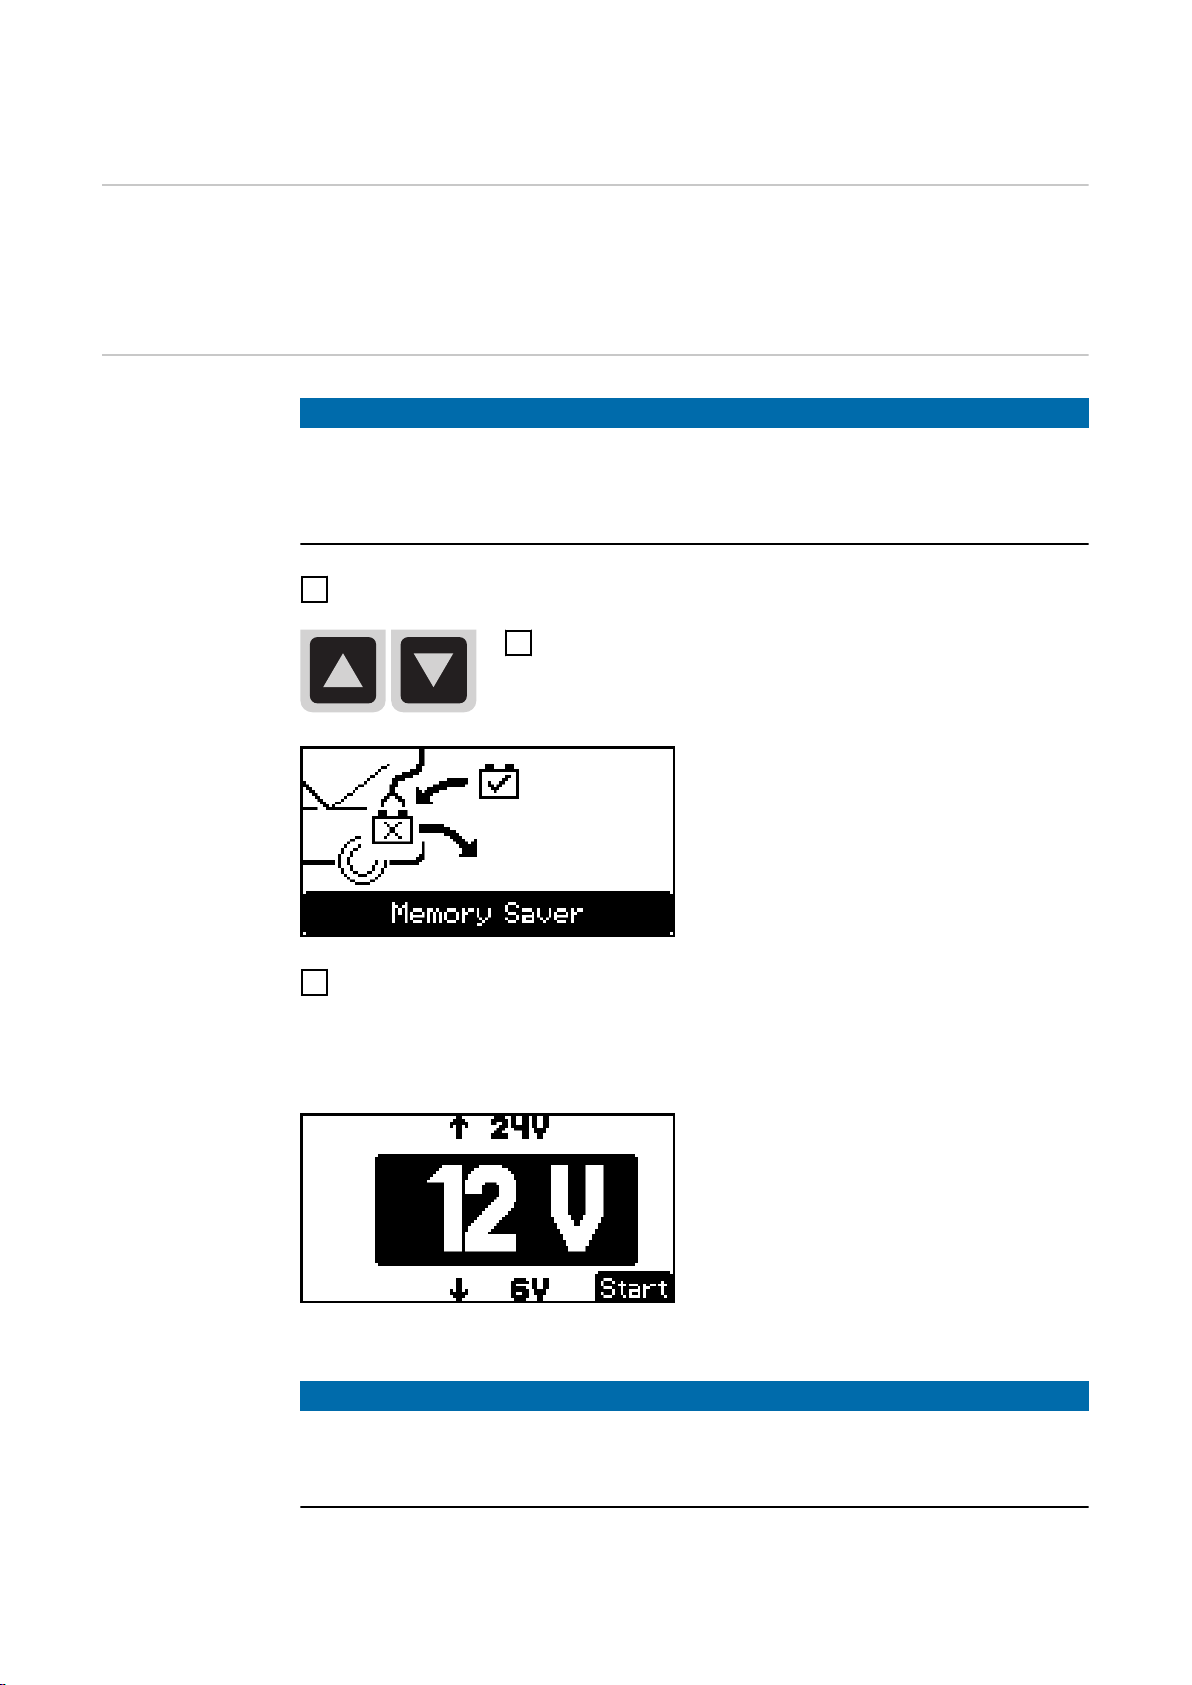
Connect mains cable to charger and plug into mains
1
The charger is on standby - 'Charging'
mode is displayed.
Select other operating modes using the Up/Down keys
2
Charging mode Charging mode is used for:
Charging or conservation charging
-
with the battery either fitted or removed
Charging while vehicle consumers
-
are switched on
Charging mode is automatically started after the charger is connected to
the mains.
Buffering
(Trickle) mode
Buffering (Trickle) mode relieves the
vehicle battery while vehicle diagnosis
or a software update is being performed.
21
Page 22

Refresh mode Refresh mode reactivates deeply dis-
charged or sulphated batteries. Refresh charging of batteries must be
carried out either in the open or in a
well-ventilated area.
Battery changing mode
Power Supply
mode
Device options The charger can be configured in a
Battery changing mode provides a continuous power supply to the vehicle
electronics while the battery is being
changed.
Power supply mode provides the
vehicle with power while repairs are
being carried out with the battery removed.
number of ways using the device options, as follows:
Language
-
Graphic display contrast
-
Configure an individual standard
-
Restore factory settings
-
Activate/deactivate Expert mode
-
Information on the hardware and
-
software version
22
Page 23

Charging mode
EN
General information
Charging the
battery
Charging mode is used for:
Charging or conservation charging with the battery either fitted or removed
-
Charging while vehicle consumers are switched on
-
NOTE!
Danger due to a faulty battery.
This can result in damage to property.
Before charging, ensure that the battery to be charged is fully functional.
▶
Plug in charger mains plug
1
Charging mode is automatically started after the charger is connected to
the mains.
Use the Menu key to select the "Ah" or "Battery type"
2
setting.
Use the Up/Down keys to enter the required value (e.g.
3
100 Ah or "Wet" battery type).
Connect the battery, observing the correct polarity. Because the charging
4
terminals are de-energised, there is no risk of sparks when connecting to the
battery, even if the charger is already connected to the mains supply.
Connect the red charging lead to the positive pole (+) of the battery
-
Connect the black charging lead to the negative pole (-) of the battery
-
The charger automatically identifies
the battery, e.g. 12 V, and starts the
charging process after 5 seconds.
If the battery voltage is not correctly
identified (e.g. in the event of a deeply
discharged battery), you have 5
seconds to enter the correct battery
voltage, as follows:
NOTE!
Danger if the wrong battery voltage is set.
This can result in damage to property.
Always ensure that the correct battery voltage is set.
▶
23
Page 24

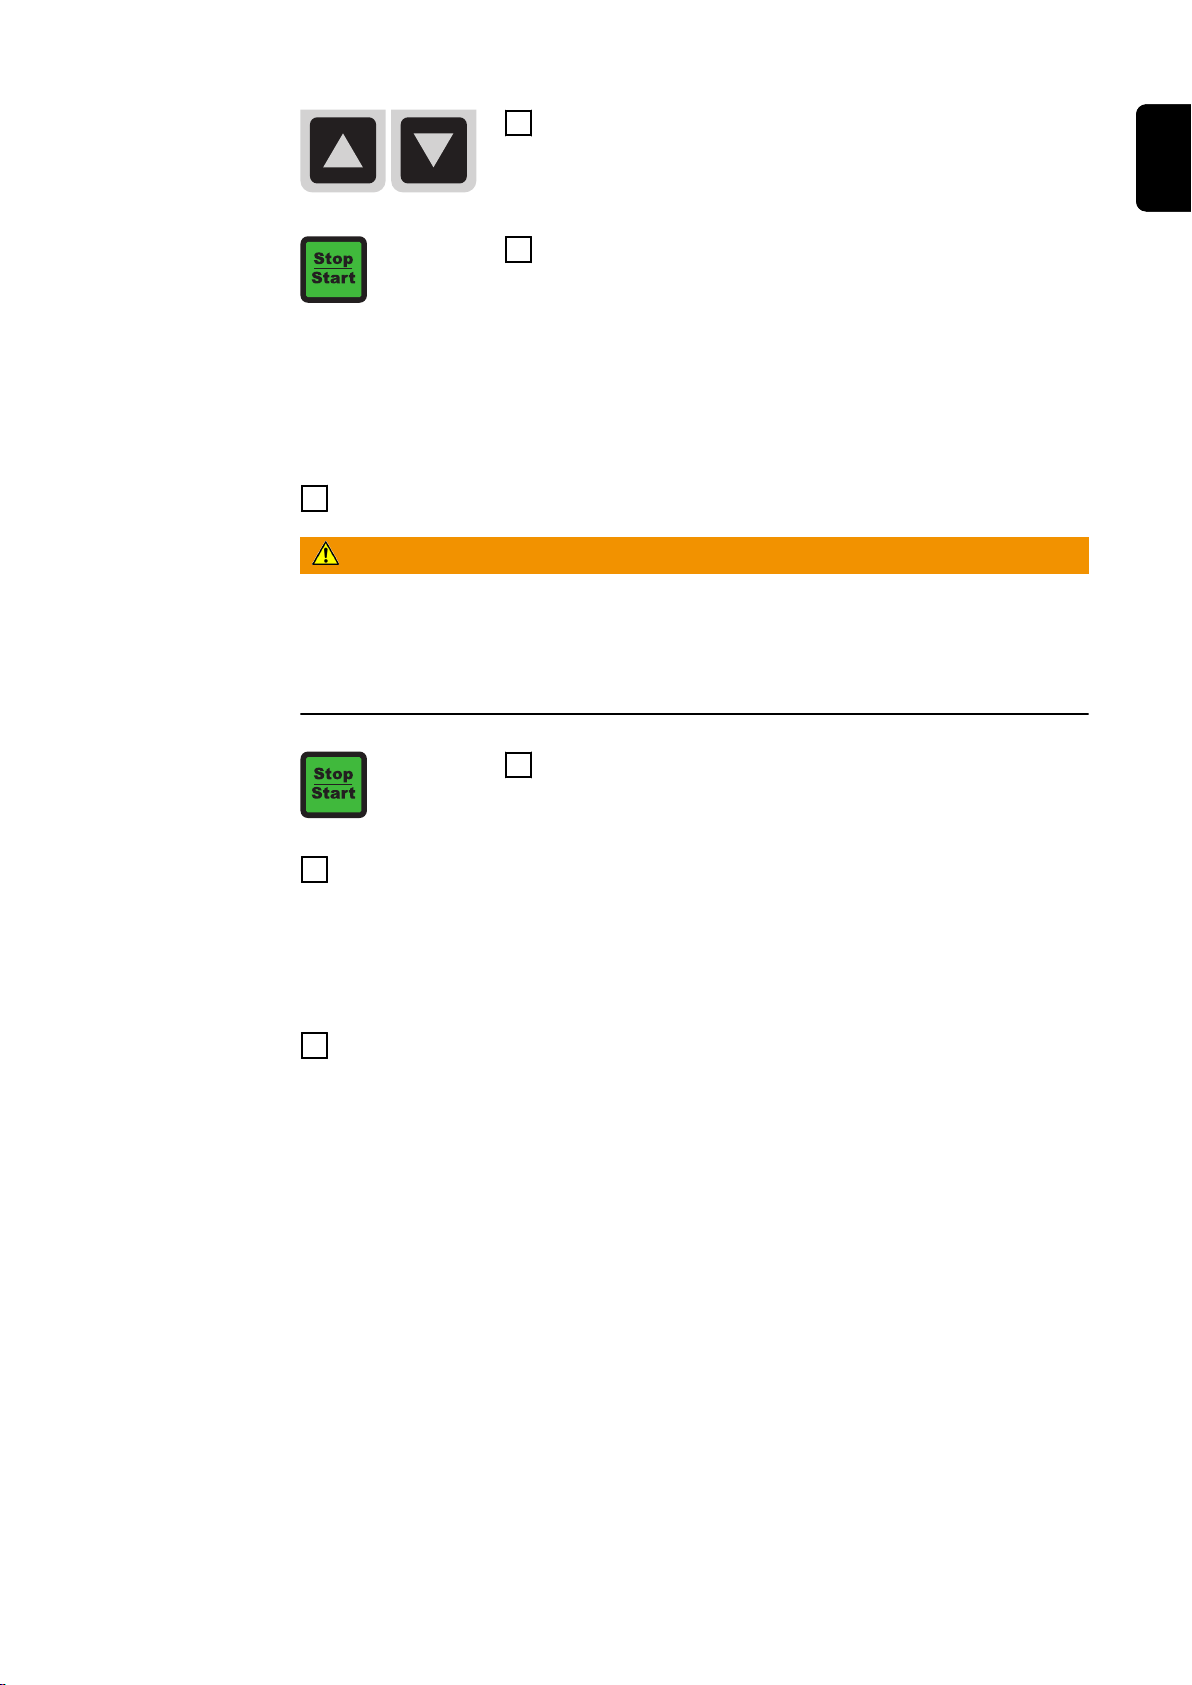
Set the correct battery voltage using the Up/Down
5
keys (6V / 12V / 24V).
Confirm the selection using the Stop/Start key
6
If the battery voltage selection window does not open, then the battery is in a
state of extreme deep-discharge (less than 2 V). In this case, it is advisable to use
Refresh mode to reactivate the deep-discharged battery. For more information,
see the "Refresh mode" section.
A corresponding warning appears
-
If Charging mode is still required despite the battery being in a state of extreme
deep-discharge
Acknowledge the warning via the OK button using the Stop/Start key.
-
Use the Up/Down keys to select the correct battery voltage in the sub-
-
sequent selection window.
Confirm the selection using the Stop/Start key
-
A set of four bars shows the state
-
of charge of the battery (e.g. three
bars represent a state of charge of
80%).
All four bars are continuously dis-
-
played.
The state of charge is 100%.
-
The battery is ready to use.
-
The battery may remain connected
-
to the charger under certain conditions*).
Conservation charging counteracts
-
battery self discharge.
WARNING!
*)
Danger if battery is not monitored during conservation charging.
Serious injury and material damage can result, in particular due to short circuits,
arcs and oxyhydrogen explosions.
Visually inspect the battery at a regular interval as specified by the manufac-
▶
turer (but at least once per week) to ensure the battery is filled to the max.
marking with acid.
In the event of the following, do not start the device or switch it off immedi-
▶
ately and have the battery checked by an authorised workshop:
Uneven acid levels or high water consumption in individual cells
Impermissible warming of the battery to above 55 °C (131 °F).
24
Page 25

WARNING!
Interrupting the
charging process
Danger following ignition of oxyhydrogen caused by sparks resulting from the
charging leads being disconnected too soon.
This can result in serious injury and damage to property.
Before disconnecting the charging leads, press the Stop/Start key to finish
▶
charging.
To end the charging process:
7
Press the Stop/Start key
-
Disconnect the charger
8
Disconnect the black charging lead from the negative pole (-) of the bat-
-
tery
Disconnect the red charging lead from the positive pole (+) on the bat-
-
tery
NOTE!
Danger from disconnecting or unplugging the charging lead during charging.
This can result in damage to connection sockets and connecting plugs.
Do not disconnect or unplug charging leads while charging.
▶
EN
Restarting charging
Press the Stop/Start key while charging
1
The charging process is interrupted
-
Press the Stop/Start button to continue charging
2
25
Page 26

Buffering (Trickle) mode
General information
Buffering the
battery
Buffering (Trickle) mode is intended exclusively for relieving the battery during a
vehicle diagnosis or software update. The power used over an extended period of
time must be less than the charger's maximum output current (25 A / 35 A), otherwise the battery will be drained. Buffering (Trickle) mode is not suitable for
fully charging the battery.
NOTE!
Danger due to a faulty battery.
This can result in damage to property.
Before buffering, ensure that the battery is fully functional.
▶
Plug in charger mains plug
1
Select Buffering mode using the up/down keys.
2
Connect the battery - the de-energised charging leads mean there are no
3
sparks when connecting to the battery, even if the charger is already connected to the mains supply.
Connect the red charging lead to the positive pole (+) of the battery
-
Connect the black charging lead to the negative pole (-) of the battery
-
The charger automatically identifies
the battery, e.g. 12 V, and starts the
buffering process after 5 seconds.
If the battery voltage is not correctly
identified (e.g. in the event of a deeply
discharged battery), you have 5
seconds to enter the correct battery
voltage, as follows:
NOTE!
Danger if the wrong battery voltage is set.
This can result in damage to property.
Always ensure that the correct battery voltage is set.
▶
26
Page 27

Set the correct battery voltage using the Up/Down
4
keys (6V / 12V / 24V).
Confirm the selection using the Stop/Start key
5
If the battery voltage selection window does not open, then the battery is in a
state of extreme deep-discharge (less than 2 V). In this case, buffering is not permitted. We recommend that the battery is replaced.
WARNING!
Danger following ignition of oxyhydrogen caused by sparks resulting from the
charging leads being disconnected too soon.
This can result in serious injury and damage to property.
Before disconnecting the charging leads, press the Stop/Start button to fin-
▶
ish buffering.
To cancel Buffering mode:
6
Press the Stop/Start key
-
EN
Interrupting
Buffering mode
Resuming buffering
Disconnect the charger
7
Disconnect the black charging lead from the negative pole (-) of the bat-
-
tery
Disconnect the red charging lead from the positive pole (+) on the bat-
-
tery
NOTE!
Danger from disconnecting or unplugging the charging leads during buffering.
This can result in damage to connection sockets and connecting plugs.
Do not disconnect or unplug charging leads while buffering.
▶
Press the Stop/Start key during buffering
1
The charging process is interrupted
-
Press the Stop/Start key
2
Buffering is resumed
-
27
Page 28

Refresh mode
General information
"Refresh" mode is used to charge the 12 V starter battery if it is suspected that
the battery has been in a state of deep discharge over a long period (e.g. battery
sulphated)
Battery is charged to maximum acid density
-
Plates are reactivated (degradation of sulphate layer)
-
WARNING!
Danger from overheated battery.
This can result in serious injury and damage to property.
Batteries must be supervised during the charging process.
▶
Monitor the battery temperature and interrupt the charging process if neces-
▶
sary.
Do not reactivate the battery in an ambient temperature of over 30 °C (86
▶
°F).
"Refresh" mode can cause the battery to reach temperatures of up to 45 °C
▶
(113 °F).
Immediately switch off the charger if the battery temperature exceeds 45 °C
▶
(113 °F).
NOTE!
Danger from "Refresh" charging on an installed vehicle battery connected to
the vehicle power supply.
This can result in damage to the vehicle electronics.
Disconnect the battery from the vehicle power supply and remove it from
▶
the vehicle before carrying out refresh charging.
The success of refresh charging depends on the degree of sulphation of the battery.
NOTE!
Danger from improper use of the "Refresh" charging function.
The battery may become damaged due to water loss or drying as a result. Make
sure that
the battery is at ambient temperature (20 - 25 °C) (68 °F - 77 °F).
▶
the battery capacity has been correctly set.
▶
the battery has been disconnected from the vehicle power supply.
▶
"Refresh" charging is carried out on batteries removed from the vehicle,
▶
either in the open (without being exposed to direct sunlight) or in well-ventilated areas.
28
Page 29

CAUTION!
Reactivating batteries
Danger from battery acid.
This can result in personal injury.
Wear eye protection and suitable protective clothing when handling battery
▶
acid.
Rinse any acid splashes immediately and thoroughly with clean water.
▶
Seek medical attention if necessary.
▶
Do not inhale any of the gases and vapours released under any circum-
▶
stances.
Refresh mode may be used on the following batteries:
Wet batteries:
-
sealed batteries with a liquid electrolyte (identifiable on the vent plugs)
After reactivating, check the acid level and top up with distilled water if necessary.
Absorbent Glass Mat (AGM) batteries:
-
sealed batteries (VRLA) with immobilised electrolyte (sealant) and maintenance-free wet batteries (MF)
NOTE!
Danger of deep-discharged batteries freezing at 0 °C (32 °F).
A frozen battery can become damaged.
Before starting refresh charging, ensure that the acid in the battery to be re-
▶
freshed is not frozen.
EN
Plug in charger mains plug
1
2
3
4
Select Refresh mode using the up/down keys.
Use the Menu key to select the "Ah" or "Battery type"
setting.
Use the Up/Down keys to enter the required value (e.g.
100 Ah or "Wet" battery type).
29
Page 30

Connect the battery - the de-energised charging leads mean there are no
5
sparks when connecting to the battery, even if the charger is already connected to the mains supply.
Connect the red charging lead to the positive pole (+) of the battery
-
Connect the black charging lead to the negative pole (-) of the battery
-
The charger automatically recognises the battery and starts the charging process
after 5 seconds.
A set of four bars shows the state
-
of charge of the battery (e.g. three
bars represent a state of charge of
80%).
(Shown symbolically; accurate
voltage indicator: roughly 14-16 V)
All four bars are continuously dis-
-
played.
The state of charge is 100%.
-
The battery is ready to use.
-
The battery may remain connected
-
to the charger under certain conditions*).
Conservation charging counteracts
-
battery self discharge.
WARNING!
*)
Danger if battery is not monitored during conservation charging.
Serious injury and material damage can result, in particular due to short circuits,
arcs and oxyhydrogen explosions.
Visually inspect the battery at a regular interval as specified by the manufac-
▶
turer (but at least once per week) to ensure the battery is filled to the max.
marking with acid.
In the event of the following, do not start the device or switch it off immedi-
▶
ately and have the battery checked by an authorised workshop:
Uneven acid levels or high water consumption in individual cells
Impermissible warming of the battery to above 55 °C (131 °F).
WARNING!
Danger following ignition of oxyhydrogen caused by sparks resulting from the
charging leads being disconnected too soon.
This can result in serious injury and damage to property.
Before disconnecting the charging leads, press the Stop/Start button to fin-
▶
ish buffering.
To terminate "Refresh" charging:
6
Press the Stop/Start key
-
30
Disconnect the charger
7
Disconnect the black charging lead from the negative pole (-) of the bat-
-
tery
Disconnect the red charging lead from the positive pole (+) on the bat-
-
tery
Page 31

Interrupting
"Refresh" charging
NOTE!
Danger due to disconnecting or unplugging the connection sockets and connecting plugs during reactivation.
This can result in damage to the connection sockets and connecting plugs.
Do not disconnect or unplug charging leads while reactivating.
▶
Press the Stop/Start key while reactivating
1
"Refresh" charging is interrupted
-
EN
Resuming refresh charging
Press the Stop/Start key
1
Refresh charging is resumed
-
31
Page 32
Battery changing mode
General information
Changing the
battery
Battery changing mode supplies the vehicle electronics with power while the battery is replaced. Before disconnecting the old battery from the vehicle electronics, the charger leads must be connected to the vehicle battery leads. This connection must remain in place until the new battery is connected.
NOTE!
Danger of incorrect voltage setting.
This can result in severe damage to the vehicle electronics.
Always set the correct voltage after connecting the charger to the vehicle
▶
battery leads.
Plug in charger mains plug
1
Select Battery changing mode using the up/down keys.
2
Connect the charging leads to the vehicle battery leads as described below -
3
the de-energised charging leads mean there are no sparks when connecting
the battery, even if the charger is already connected to the mains supply.
Connect the red charging lead to the positive (+) vehicle battery lead
-
Connect the black charging lead to the negative (-) vehicle battery lead
-
The charger automatically identifies
the battery, e.g. 12 V, and starts powering the vehicle electronics after 5
seconds.
If the battery voltage is not correctly
identified (e.g. usually the case if a battery is deeply discharged), you have 5
seconds to enter the correct battery
voltage as follows:
NOTE!
Danger if the wrong battery voltage is set.
This can result in damage to property.
Always ensure that the correct battery voltage is set.
▶
32
Page 33
Set the correct battery voltage using the Up/Down
4
keys (6V / 12V / 24V).
Confirm the selection using the Stop/Start key.
5
If the battery is in a state of extreme deep-discharge (under 2 V), a warning appears instructing the user to disconnect the battery.
Batteries in a state of extreme deep-discharge must be replaced without using
Battery changing mode.
Install and connect a new battery
6
WARNING!
Danger following ignition of oxyhydrogen caused by sparks resulting from the
charging leads being disconnected too soon.
This can result in serious injury and damage to property.
Before disconnecting the charging leads, press the Stop/Start button to fin-
▶
ish buffering.
EN
To cancel Battery changing mode:
7
Press the Stop/Start key
-
Disconnect the charger
8
Disconnect the black charging lead from the negative (-) vehicle charging
-
lead
Disconnect the red charging lead from the positive (+) vehicle charging
-
lead
Remember:
Start charging mode to charge the (as yet not fully charged) battery.
9
33
Page 34
Power supply mode
Requirements In Power supply mode, the charger leads are connected directly to the battery
leads or the vehicle jump start points. It ensures that the vehicle electronics are
supplied with power while the battery is removed during repair work. As only the
vehicle battery leads are connected to the charger, the battery voltage recognition function is not available.
Power Supply
mode
NOTE!
Danger of an incorrect vehicle-specific voltage setting.
This can result in severe damage to the vehicle electronics.
Before connecting the charger to the vehicle battery leads, ensure that the
▶
correct voltage has been set.
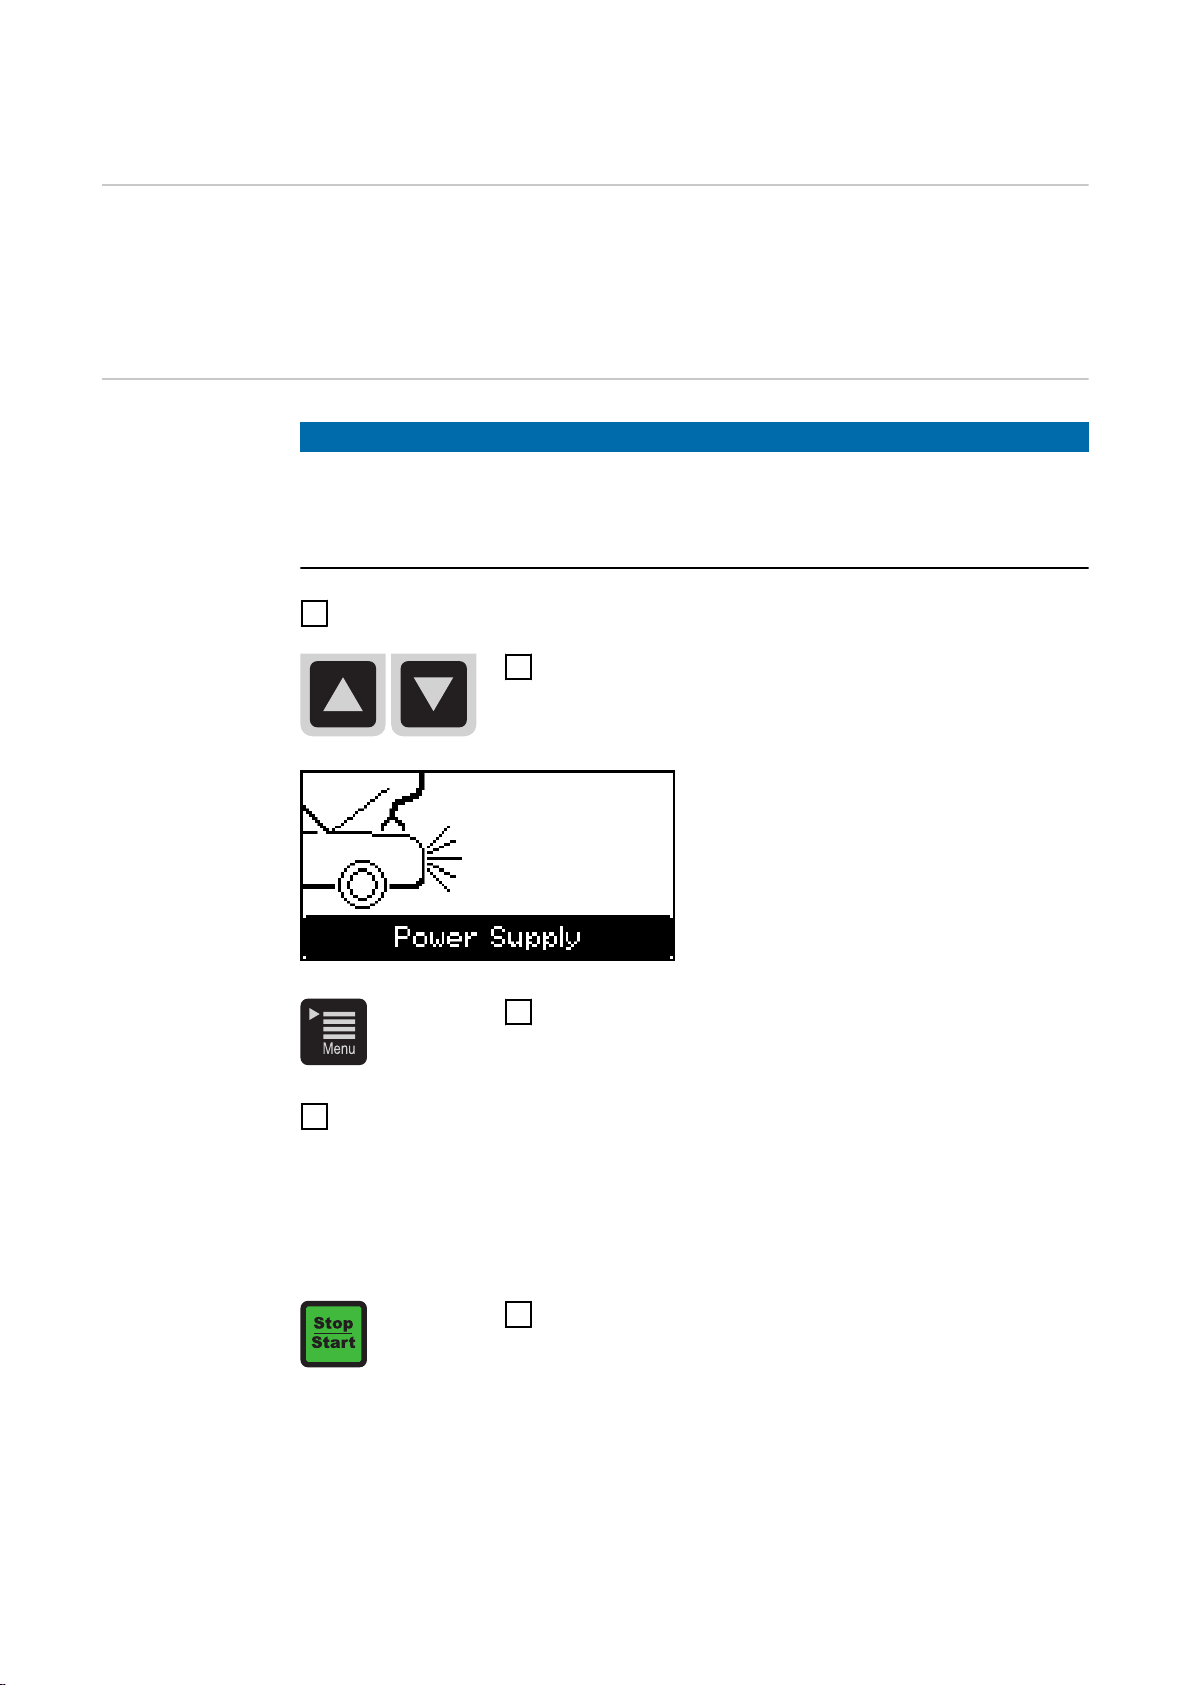
Plug in charger mains plug
1
Select Power Supply mode using the up/down keys
2
Use the Menu key to select the vehicle power supply
3
voltage (6 V / 12 V / 24 V).
Connect the charging leads to the vehicle battery leads as described below -
4
the de-energised charging leads mean there are no sparks when connecting
the battery, even if the charger is already connected to the mains supply.
Connect the red charging lead to the positive (+) vehicle battery lead
-
Connect the black charging lead to the negative (-) vehicle battery lead
-
A safety message appears on the display asking whether the charging leads
-
are connected correctly.
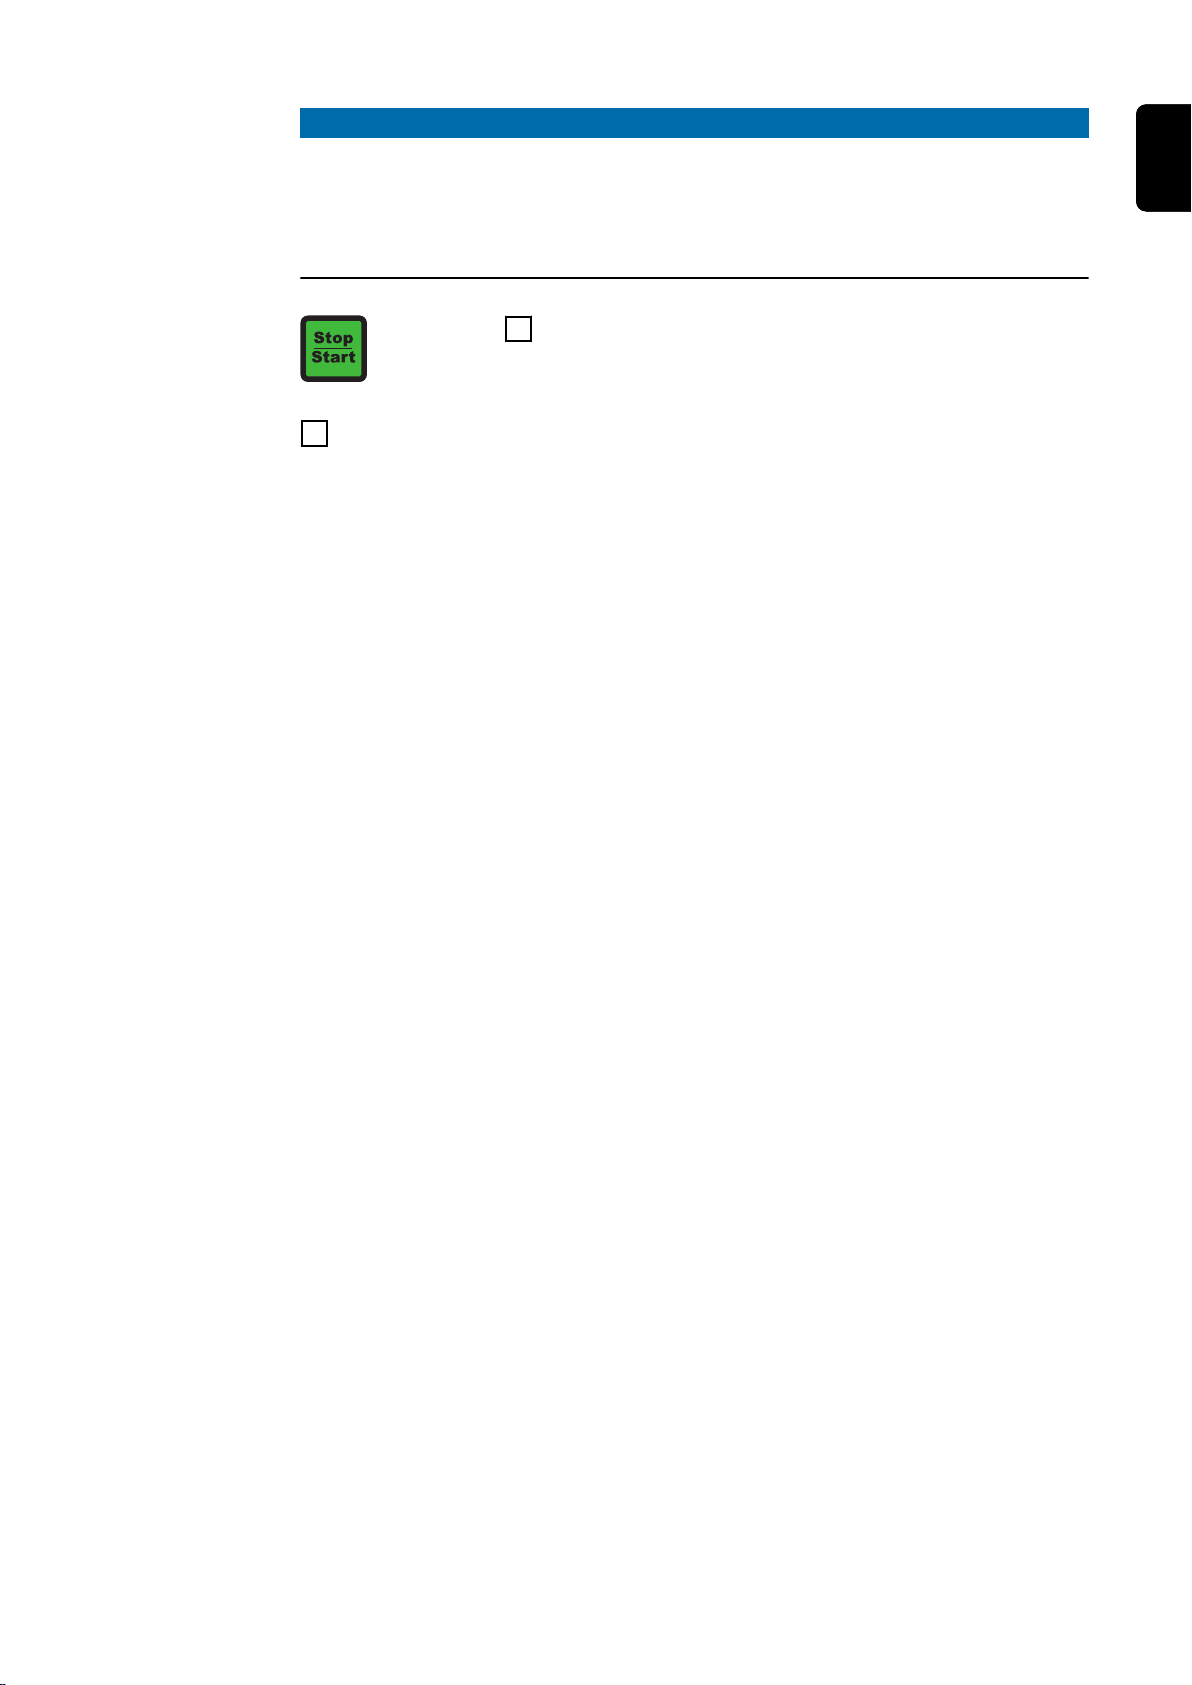
Use the Stop/Start key to confirm the safety message
5
and start supplying the vehicle electronics with power.
34
Page 35
NOTE!
Danger if the charging leads are disconnected before pressing the Stop/Start
key.
Data stored in the vehicle may be lost as a result.
Before disconnecting the charging leads, press the Stop/Start key to cancel
▶
Power Supply mode.
Finish Power Supply mode:
6
Press the Stop/Start key
-
Disconnect the charger
7
Disconnect the black charging lead from the negative (-) vehicle battery
-
lead
Disconnect the red charging lead from the positive (+) vehicle battery
-
lead
EN
35
Page 36

Device options
General information
Selecting device
options
The device options allow the following to be configured:
Language
-
Selection of language for user guide
Graphic display contrast
-
Configuration
-
an individual standard may be set
Factory setting
-
restores all device options to the factory settings
With Acctiva Professional 35A only:
-
Activate/deactivate Expert mode
Information
-
provides information on the
hardware and software version
total Ah charged
total operating time
Use the up/down keys to select the device options
1
Configuration
36
NOTE!
Danger when selecting and using individual charging lead lengths.
This can result in damage to property.
The user accepts full responsibility for shortening the charging leads sup-
▶
plied and specifying the appropriate individual charging lead lengths.
The manufacturer shall not be held liable for any damage arising from such
▶
actions.
The following parameters can be configured to create an individual standard:
Charging lead length:
1 - 10 m (3 ft. 3.37 in. - 32 ft. 9.7 in.),
-
in 0.5 m (1 ft. 7.69 in.) - adjustable stages
The following lengths may be requested in the scope of supply:
-
2.5 / 5 m (8 ft. 2.43 in. / 16 ft. 4.85 in.)
Initial values:
Page 37

Start mode (charging/buffering mode)
-
Battery capacity (3 – 350 Ah)
-
Type of battery (WET, GEL and AGM)
-
Voltage selection
-
Automatic
optionally set permanently to 6 V, 12 V or 24 V
Charging parameters:
Boost (on/off), factory setting: on
-
Boost on: shorter charging time resulting in the battery being fully charged
sooner. The full 25 A / 35 A of power available from the device is applied if
parallel consumers are detected (car radio, etc.).
Boost off means: a conventional workshop charging process is followed (fixed
charging current of 20 A per 100 Ah of specified battery capacity). Parallel
consumers (car radio, etc.) are not detected in this case.
With Acctiva Professional 35A only:
-
Expert (on/off)
Enter the following to activate Expert mode (Expert on):
Code number 1511
With the device in Charging mode, the following is enabled by Expert mode
("Expert" on):
The final charging voltage is set according to the nominal voltage (6 V, 12 V,
24 V) for WET, GEL and Absorbent Glass Mat (AGM) batteries
Customisation of the final charging voltage and the voltage for conservation
charging in USER mode
Buffering mode
-
Constant voltage may be adjusted
"Refresh" (only configurable on the Acctiva Professional 35A)
-
Enter the following to configure Refresh mode:
EN
Code number 1511
Final charging voltage and duration may be adjusted
Power Supply mode
-
Constant voltage may be adjusted
37
Page 38

Synergic lines
Safety
Available characteristics
WARNING!
Danger from incorrect operation.
This can result in severe personal injury and damage to property.
Follow the battery manufacturer's instructions.
▶
The battery must not be connected to the charger when setting parameters.
▶
Operating
mode
Charging
Buffering
mode
Battery
Charac-
teristic
WET
AGM
GEL
3
USER
)
ALL IU
IUoU
I
25
/3
5
25
/3
1
1)
5
U
1
[6/12/24V]
I
2
7.2/14.4/28.
8
7.35/14.7/2
9.4
7.05/14.1/2
-
8.2
2-30 1.9-29.9
6.75/13.5/2
7
- - Yes
U
2
[6/12/24V]
6.75/13.5/2
7
6.84/13.68/
27.36
Exp.
3)
Yes
Refresh
Power Supply
mode
Changing the
battery
I
1
I
2
U
1
U
2
WET
IUIoU
GEL
3
USER
)
IUa
NONE IU
ALL IU
25
/3
5
35
35
4)
25
/3
1)
2)
5
7.2/14.4/28.
8
7.35/14.7/2
9.4
7.05/14.1/2
8.2
2-34 - - Yes
6.75/13.5/2
7
6.75/13.5/2
7
6.75/13.5/2
4
7
NoAGM
6.84/13.68/
2
27.36
- - Yes
- - No
Main charging current [A]
Maximum device current: 25/35 A
Recharging current [A per 100 Ah of specified battery capacity]
Final charging voltage [V]
Floating charge voltage [V]
Automatic switchover to pulse charge conservation after 12 hours,
apart from user application in Expert mode.
Expert mode and USER characteristics are not available for the
Acctiva Smart 25 A battery charging system.
38
Page 39

1)
I
1
U
1
U
2
I
1
U
1
U
2
I
2
20 A per 100 Ah of specified battery capacity
2)
3)
10 A per 100 Ah of specified battery capacity
Adjustable final charging voltage and conservation charge voltage
EN
in Expert mode; for trained professionals only
4)
In Power Supply mode, the main charging current on the Acctiva
Smart 25 A charger is also I1 35 A
Charging characteristic IUoU:
I1 = Main charging current
U1 = Final charging voltage
U2 = Floating charge voltage
Refresh characteristic IUIoU:
I1 = Main charging current
U1 = Final charging voltage
I2 = Recharging current
U2 = Floating charge voltage
39
Page 40
Troubleshooting
Safety
WARNING!
Risk of electric shock.
This can result in serious injuries or death.
Before opening the device:
▶
Unplug the device from the mains.
▶
Disconnect battery.
▶
Put up an easy-to-understand warning sign to stop anybody inadvertently
▶
switching it back on again.
Using a suitable measuring instrument, ensure that electrically charged com-
▶
ponents (e.g. capacitors) have been discharged.
WARNING!
Danger from an inadequate ground conductor connection.
This can result in severe personal injury or damage to property.
The housing screws provide a suitable PE conductor connection for earthing
▶
the housing and must NOT be replaced by any other screws that do not
provide a reliable PE conductor connection.
Protective
equipment
Charger leads connected to wrong
poles, reverse polarity protection has
tripped
Remedy:
Connect battery poles correctly
-
Short circuit in the charging terminals
or charger lead, short-circuit detection
active
Remedy:
Check charger leads, contacts and
-
battery poles
Mains fault - mains voltage outside the
tolerance range
Remedy:
Check mains conditions
-
40
Page 41

Battery overvoltage
Charging error
Remedy:
-
Status codes caused by external factors:
30 Cause: Timeout in the corresponding charging phase
Remedy:
Set Ah to correct value
-
Check for parallel consumers (car radio, etc.)
-
Battery temperature too high
-
EN
Set the correct operating mode
and voltage
31 Cause: Too many Ah charged, too few Ah set
Remedy:
Set Ah to correct value
-
Check for parallel consumers (car radio, etc.)
-
Replace battery if it is faulty
-
32 Cause: Optional external temperature sensor has tripped due to under-
temperature
Remedy:
Charge the battery in an area with a more suitable temperature
-
33 Cause: Optional external temperature sensor has tripped due to over-
temperature protection
Remedy:
Allow battery to cool or charge it in an area with a more suitable
-
temperature
34 Cause: Battery voltage set too high
Remedy:
Set the correct battery voltage
-
35 Cause: Voltage below target voltage after 2 h - "Refresh" mode in analysis
phase
Remedy:
Check for parallel consumers (car radio, etc.)
-
Replace battery if it is faulty
-
36 Cause: Cell short circuit
Remedy:
Check for parallel consumers (car radio, etc.)
-
Replace battery if it is faulty
-
41
Page 42
37 Cause: Conservation charge current too high
Remedy:
Check for parallel consumers (car radio, etc.)
-
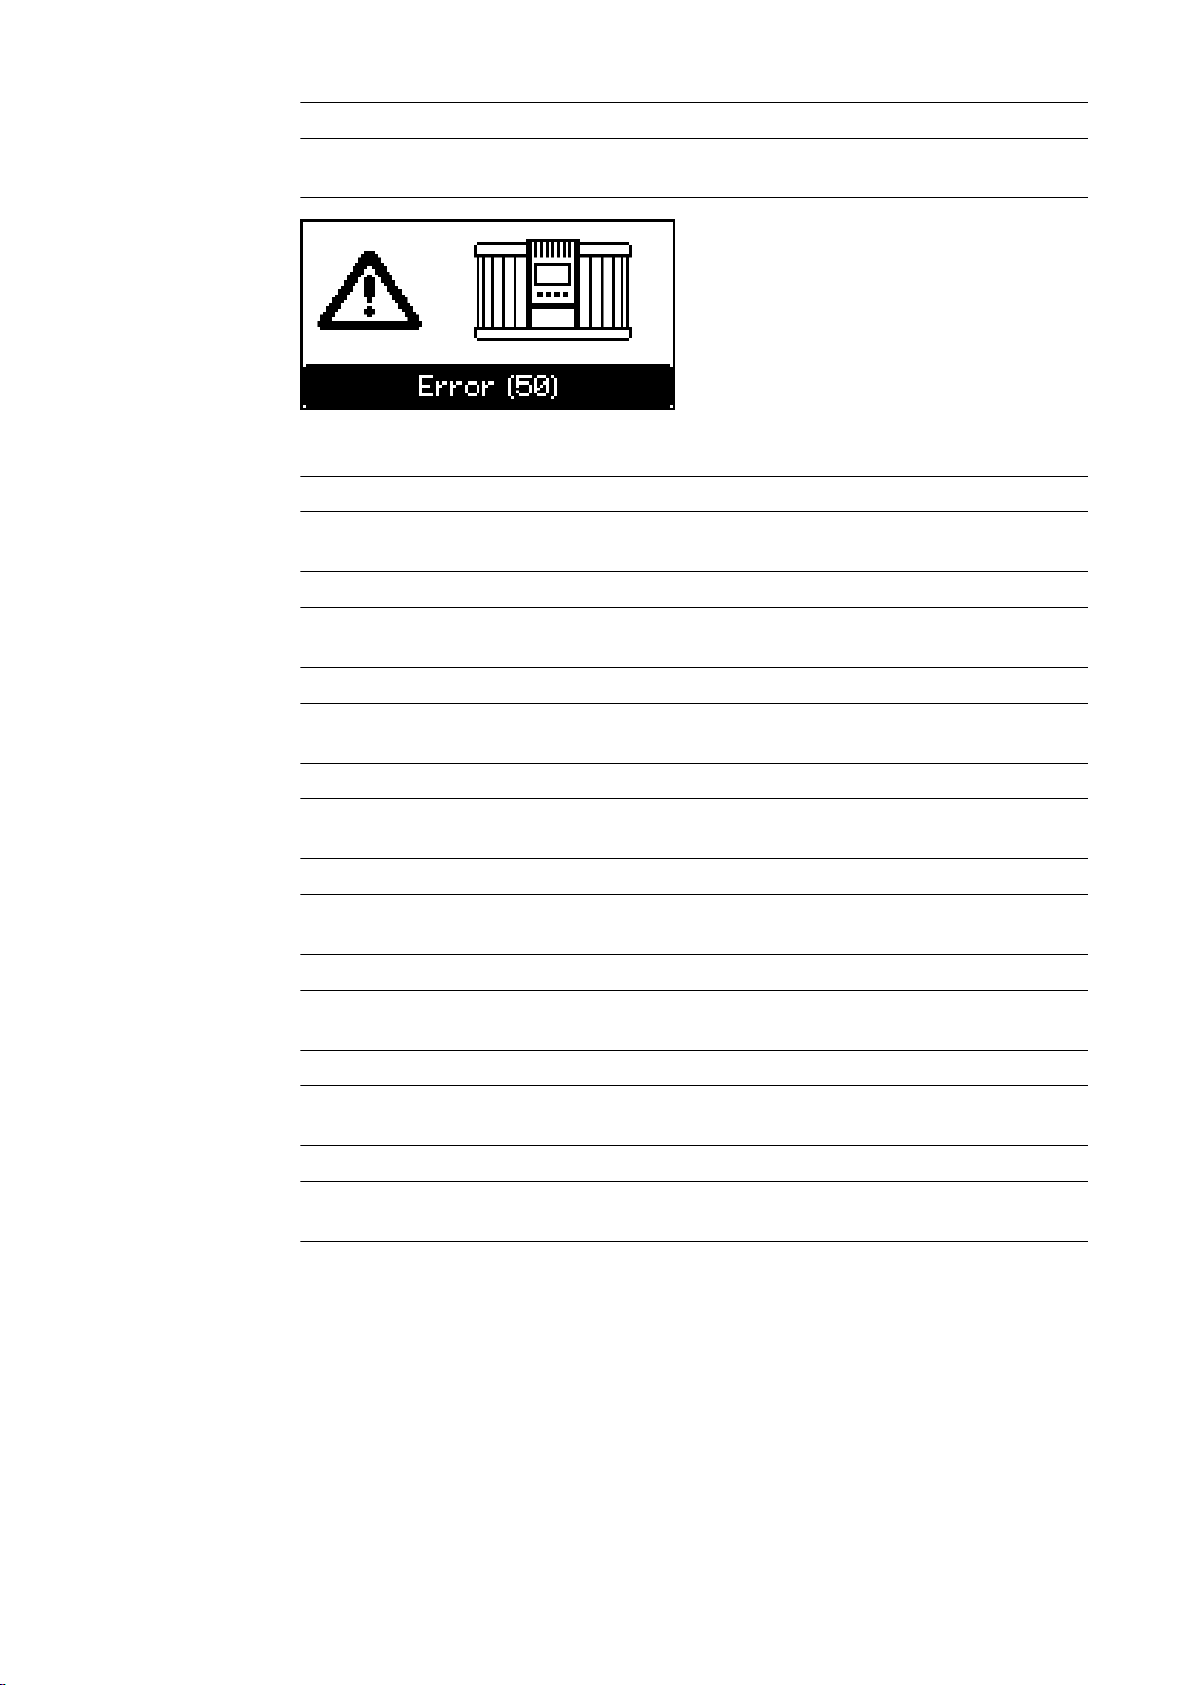
Status codes in the event of device fault:
50 Cause: Device output fuse faulty
Remedy:
51 Cause: Secondary temperature is outside permissible range
Remedy:
52 Cause: Current regulator faulty
Contact your authorised service centre
-
Contact your authorised service centre
-
Remedy:
Contact your authorised service centre
-
53 Cause: External temperature sensor faulty
Remedy:
Replace external temperature sensor
-
60 Cause: Invalid characteristic number
Remedy:
Contact your authorised service centre
-
61 Cause: Characteristic block invalid
Remedy:
Contact your authorised service centre
-
62 Cause: Incorrect checksum of calibration values
Remedy:
Contact your authorised service centre
-
63 Cause: Incorrect device type
Remedy:
Contact your authorised service centre
-
42
Page 43

Technical data
EN
Electrical data
input
Standards
Mains voltage ~ 230 V AC, +/- 15%
Grid frequency 50/60 Hz
Mains current max. 9 A eff.
Mains fuse protection max. 16 A
Efficiency max. 96%
Effective power max. 1120 W
Power input (stand-by) max. 2.4 W
Protection class I (with ground conduct-
or)
Maximum permitted mains impedance at the interface (PCC) to the public grid
EMC device class A
Marks of conformity CE
IEC 60068-2-6 Sine oscillations (10 - 150 Hz; 1.5 h / axis)
IEC 60068-2-29 Repetitive shock (25 g / 6 ms / 1000 shocks)
None
Electrical data output
Battery data
EN 60335-1 EN 60335-2-29
EN 62233 EMF standard
Nominal output voltage 6 V / 12 V / 24 V DC
Output voltage range 2 V - 31 V
Output current
Acctiva Smart 25 A
Output current
Acctiva Professional 35 A
Battery return current < 1 mA
*)
35 A in Power Supply mode
6 V / 12 V / 24 V DC 3 - 350 Ah
25 A*) at 28.8 V DC
25 A*) at 14.4 V DC
25 A*) at 7.2 V DC
35 A at 28.8 V DC
35 A at 14.4 V DC
35 A at 7.2 V DC
43
Page 44

Technical data
Cooling Convection and fan
Dimensions l x w x h 270 x 168 x 100 mm
(10.63 x 6.61 x 3.94 in.)
Weight (without cable) 2 kg (4.41 lb)
Environmental
conditions
Operating temperature -20 °C - +40 °C (>30 °C derat-
ing)
(-4 °F - +104 °F) (>86 °F derating)
Storage temperature -40 °C - +85 °C
(-40 °F - +185 °F)
Degree of protection IP40
44
Page 45

Obsah
Bezpečnostné predpisy 47
Vysvetlenie bezpečnostných upozornení 47
Všeobecné informácie 47
Použitie podľa určenia 48
Okolité podmienky 48
Bezpečnosť dát 48
Sieťová prípojka 48
Nebezpečenstvá spôsobované sieťovým a nabíjacím prúdom 48
Nebezpečenstvo vplyvom kyselín, plynov a výparov 49
Všeobecné upozornenia k manipulácii s akumulátormi 49
Vlastná ochrana a ochrana ďalších osôb 49
Obsluha deťmi a osobami so zdravotným postihnutím 50
Bezpečnostné opatrenia v normálnej prevádzke 50
Klasifikácia zariadení podľa EMK 50
Opatrenia v oblasti elektromagnetickej kompatibility 50
Údržba 50
Záruka a ručenie 51
Bezpečnostno-technická kontrola 51
Označenia na zariadení 51
Likvidácia 51
Autorské práva 51
Všeobecné informácie 52
Princíp 52
Koncepcia zariadenia 52
Výstražné upozornenia na zariadení 52
Pokyny na inštalovanie 53
Uvedenie do prevádzky 54
Bezpečnosť 54
Správne použitie 54
Sieťová prípojka 54
Koncepcia bezpečnosti – sériové ochranné zariadenia 55
Ovládacie prvky a prípojné miesta 56
Všeobecné informácie 56
Ovládací panel 56
Pripojenie doplnkového vybavenia 57
Prípojky 57
Poistný strmeň 58
Uzamykací systém 58
Odstránenie krytov pre prípojky a opcie 58
Voliteľné vybavenie: aktualizácia USB 59
Namontujte voliteľné vybavenie: prídržný strmeň a ťahové odľahčenie pre nabíjacie káble 59
Možnosť rúčky 59
Voliteľné vybavenie: chránič hrán 60
Možnosť držiaka na stenu 60
Príprava pre bezpečnostnú zámku 60
Montáž 61
Prevádzkové režimy 62
Všeobecná informácia 62
Dostupné prevádzkové režimy 62
Výber prevádzkových režimov 62
Prevádzkový režim nabíjanie 62
Prevádzkový režim vyrovnávacia prevádzka 63
Prevádzkový režim Refresh 63
Prevádzkový režim výmena akumulátora 63
Prevádzkový režim napájacieho dielu 63
Nastavenia zariadenia 63
Prevádzkový režim nabíjanie 64
Všeobecná informácia 64
Nabíjanie akumulátora 64
Prerušenie procesu nabíjania 66
SK
45
Page 46

Pokračovanie procesu nabíjania 66
Prevádzkový režim vyrovnávacia prevádzka 67
Všeobecná informácia 67
Vyrovnávanie akumulátora 67
Prerušenie vyrovnávacej prevádzky 68
Pokračovanie vyrovnávacej prevádzky 68
Prevádzkový režim „Refresh“ 69
Všeobecná informácia 69
Revitalizácia akumulátorov 70
Prerušenie nabíjania „Refresh“ 72
Pokračovanie „Refresh“ 72
Prevádzkový režim výmena akumulátora 73
Všeobecná informácia 73
Výmena akumulátora 73
Prevádzkový režim napájacieho dielu 75
Predpoklady 75
Režim napájacieho dielu 75
Nastavenia zariadenia 77
Všeobecná informácia 77
Výber prevádzkového režimu pre nastavenie zariadenia 77
Konfigurácia 77
Charakteristiky 79
Bezpečnosť 79
Dostupné charakteristiky 79
Diagnostika chýb, odstránenie chýb 81
Bezpečnosť 81
Ochranné zariadenia 81
Chyby nabíjania 82
Technické údaje 84
Elektrické údaje, vstup 84
Normy 84
Elektrické údaje, výstup 84
Údaje o akumulátore 84
Technické údaje 85
Okolité podmienky 85
46
Page 47
Bezpečnostné predpisy
Vysvetlenie
bezpečnostných
upozornení
VÝSTRAHA!
Označuje bezprostredne hroziace nebezpečenstvo.
Ak sa mu nevyhnete, môže to mať za následok smrť alebo najťažšie úrazy.
▶
NEBEZPEČENSTVO!
Označuje možnosť vzniku nebezpečnej situácie.
Ak sa jej nezabráni, dôsledkom môže byť smrť alebo najťažšie zranenia.
▶
POZOR!
Označuje potenciálne škodlivú situáciu.
Ak sa jej nezabráni, dôsledkom môžu byť ľahké alebo nepatrné zranenia, ako
▶
aj materiálne škody.
UPOZORNENIE!
Označuje možnosť nepriaznivo ovplyvnených pracovných výsledkov a poškodení
výbavy.
SK
Všeobecné informácie
Zariadenie je vyhotovené na úrovni súčasného stavu techniky a uznávaných
bezpečnostno-technických predpisov. Predsa však pri chybnej obsluhe alebo
zneužití hrozí nebezpečenstvo:
ohrozenia života a zdravia operátora alebo tretej osoby,
-
pre zariadenie a iné vecné hodnoty prevádzkovateľa,
-
znemožnenia efektívnej práce s týmto zariadením.
-
Všetky osoby, ktoré sú poverené uvedením do prevádzky, obsluhou, údržbou
a udržiavaním tohto zariadenia, musia:
byť zodpovedajúco kvalifikované,
-
kompletne si prečítať tento návod na obsluhu a postupovať presne podľa ne-
-
ho.
Tento návod na obsluhu treba mať neustále uložený na mieste použitia zariadenia. Okrem tohto návodu na obsluhu treba dodržiavať všeobecne platné, ako aj
miestne predpisy na prevenciu úrazov a na ochranu životného prostredia.
Všetky bezpečnostné pokyny a upozornenia na nebezpečenstvo na zariadení:
udržiavajte v čitateľnom stave,
-
nepoškodzujte,
-
neodstraňujte,
-
neprikrývajte, neprelepujte ani nepremaľovávajte.
-
Umiestnenie bezpečnostných pokynov a upozornení na nebezpečenstvo na zariadení nájdete v kapitole „Všeobecné informácie“ v návode na obsluhu vášho zariadenia.
Pred zapnutím zariadenia sa musia odstrániť poruchy, ktoré môžu nepriaznivo
ovplyvniť bezpečnosť.
Ide o vašu bezpečnosť!
47
Page 48

Použitie podľa
určenia
Zariadenie sa musí používať výlučne na účely zodpovedajúce jeho určeniu. Každé
iné použitie alebo použitie presahujúce tento rámec sa považuje za použitie v rozpore s určením. Výrobca neručí za takto vzniknuté škody, ani za nedostatočné či
chybné výsledky práce.
K použitiu podľa určenia takisto patrí:
kompletné prečítanie a dodržiavanie návodu na obsluhu a všetkých
-
bezpečnostných pokynov a upozornení na nebezpečenstvo,
dodržiavanie inšpekčných a údržbových prác,
-
dodržiavanie všetkých upozornení od výrobcu akumulátora a vozidla.
-
Bezchybná funkcia zariadenia závisí od manipulácie v súlade s predpismi. V žiadnom prípade zariadenie pri manipulácii s ním neťahajte za kábel.
Okolité podmienky
Prevádzkovanie alebo skladovanie zariadenia mimo uvedenej oblasti je
považované za použitie, ktoré nie je v súlade s určením. Za takto vzniknuté škody
výrobca neručí.
Presné informácie o dovolených okolitých podmienkach sa uvádzajú v technických údajoch.
Bezpečnosť dát Za dátové zaistenie zmien oproti nastaveniam z výroby je zodpovedný používateľ.
V prípade vymazaných osobných nastavení výrobca neručí.
Sieťová prípojka Zariadenia s vysokým výkonom môžu svojím prúdovým odberom ovplyvňovať
kvalitu energie v sieti.
Niektorých zariadení sa to môže dotýkať vo forme:
obmedzenia pripojenia,
-
-
požiadaviek súvisiacich s maximálnou dovolenou impedanciou siete *),
-
požiadaviek súvisiacich s minimálnym požadovaným skratovým výkonom *).
*)
Vždy v mieste pripojenia k verejnej sieti.
Pozri Technické údaje.
Nebezpečenstvá
spôsobované
sieťovým
a nabíjacím
prúdom
48
V tomto prípade sa prevádzkovateľ alebo používateľ zariadenia musí uistiť, či sa
zariadenie môže pripojiť. Podľa potreby je žiaduce sa poradiť s energetickým rozvodným podnikom.
sDÔLEŽITÉ UPOZORNENIE! Dbajte na bezpečné uzemnenie sieťovej prípojky!
Pri práci s nabíjačkami sa vystavujete početným ohrozeniam, ako napr.:
ohrozeniu elektrickým prúdom zo siete a nabíjacieho obvodu,
-
škodlivým elektromagnetickým poliam, ktoré pre nositeľov kardiostimulátor-
-
ov môžu znamenať ohrozenie života.
Zásah elektrickým prúdom môže byť smrteľný. Každý zásah elektrickým prúdom
je v zásade životunebezpečný. S cieľom zamedziť zásahom elektrickým prúdom
počas prevádzky:
sa nedotýkajte častí pod napätím vnútri zariadenia ani mimo neho,
-
v žiadnom prípade sa nedotýkajte pólov akumulátora,
-
neskratujte nabíjací kábel ani nabíjacie svorky.
-
Page 49

Všetky káble a vodiče musia byť pevné, nepoškodené, zaizolované a dostatočne
dimenzované. Voľné spojenia, pripálené, poškodené alebo poddimenzované káble
a vodiče nechajte ihneď vymeniť v autorizovanom špecializovanom podniku.
Nebezpečenstvo
vplyvom kyselín,
plynov a výparov
Akumulátory obsahujú kyseliny poškodzujúce oči a pokožku. Pri nabíjaní akumulátorov okrem toho vznikajú plyny a výpary, ktoré môžu zapríčiniť zdravotné
poškodenia a ktoré sú za určitých podmienok vysoko výbušné.
Nabíjačku používajte výhradne v dobre vetraných priestoroch, aby ste zamedzili
hromadeniu výbušných plynov. Akumulátorovne sa nepovažujú za ohrozené
výbuchom, ak je prirodzeným alebo technickým vetraním zaručená koncentrácia
vodíka menšia ako 4 %.
Počas nabíjania dodržte minimálnu vzdialenosť 0,5 m (19,69 ") medzi akumulátorom a nabíjačkou. Možné zápalné zdroje, ako aj oheň a otvorené svetlo
držte v dostatočnej vzdialenosti od akumulátora.
Počas nabíjacieho procesu v žiadnom prípade neodpájajte spojenie s akumulátorom (napr. nabíjacie svorky).
V žiadnom prípade nevdychujte vznikajúce plyny a výpary - Zabezpečte
dostatočný prívod čerstvého vzduchu.
Aby ste zamedzili skratom, na akumulátor neklaďte žiadne nástroje ani elektricky
vodivé kovy.
Akumulátorová kyselina sa v žiadnom prípade nesmie dostať do očí, na pokožku
ani odev. Noste ochranné okuliare a vhodný ochranný odev. Odstreky kyseliny
okamžite a dôkladne vypláchnite čistou vodou, v prípade potreby vyhľadajte
lekára.
SK
Všeobecné upozornenia k manipulácii s akumulátormi
Vlastná ochrana
a ochrana
ďalších osôb
Akumulátory chráňte pred nečistotami a mechanickým poškodením.
-
Nabité akumulátory skladujte v chladných priestoroch. Pri cca +2 °C (35,6 °F)
-
dochádza k najmenšiemu samovoľnému vybíjaniu.
Podľa pokynov výrobcu akumulátora alebo aspoň týždennými vizuálnymi kon-
-
trolami zabezpečte, aby bol akumulátor naplnený kyselinou (elektrolytom) až
po značku max.
Prevádzku zariadenia nespúšťajte alebo okamžite zastavte a akumulátor
-
nechajte skontrolovať v autorizovanej odbornej dielni pri:
nerovnomernom stave kyseliny alebo vysokej spotrebe vody v jednot-
-
livých článkoch, vyvolanej možným poškodením,
neprípustnom zahrievaní akumulátora nad 55 °C (131 °F).
-
Osoby, predovšetkým deti, držte v dostatočnej vzdialenosti od zariadenia a pracovnej oblasti. Ak sa však predsa v blízkosti nachádzajú osoby:
tieto poučte o všetkých nebezpečenstvách (zdravotne škodlivé kyseliny a
-
plyny, ohrozenie vplyvom sieťového a nabíjacieho prúdu, ...),
poskytnite im vhodné ochranné prostriedky.
-
Pred opustením pracovnej oblasti zabezpečte, aby aj v neprítomnosti nemohlo
dochádzať k žiadnym personálnym či materiálnym škodám.
49
Page 50

Obsluha deťmi
a osobami so
zdravotným
postihnutím
Toto zariadenie môžu používať deti vo veku 8 rokov a staršie, ako aj a osoby so
zníženými fyzickými, senzorickými alebo mentálnymi schopnosťami alebo s nedostatkom vedomostí a skúseností, pokiaľ sú pod dohľadom alebo boli poučené
o bezpečnom používaní tohto zariadenia a sú si vedomé nebezpečenstiev z toho
vyplývajúcich. Deti sa so zariadením nesmú hrať. Čistenie a používateľskú údržbu
nesmú vykonávať deti bez dozoru.
Bezpečnostné
opatrenia
v normálnej
prevádzke
Klasifikácia zariadení podľa EMK
Zariadenia s ochranným vodičom prevádzkujte len na sieti s ochranným vodičom
a so zásuvkou s kontaktom ochranného vodiča. Ak sa zariadenie prevádzkuje na
sieti bez ochranného vodiča alebo na zásuvke bez kontaktu ochranného vodiča, je
to považované za hrubú nedbalosť. Za takto vzniknuté škody výrobca neručí.
Zariadenie prevádzkujte iba podľa podmienok stanovených pre stupeň krytia
uvádzaný na výkonovom štítku.
V žiadnom prípade neuvádzajte zariadenie do prevádzky, ak vykazuje poškodenia.
Sieťový kábel nechajte pravidelne odborným elektrikárom prekontrolovať
ohľadne funkčnej spôsobilosti ochranného vodiča.
Nie plne funkčné bezpečnostné zariadenia a chybné konštrukčné diely je
pred zapnutím zariadenia potrebné nechať opraviť v autorizovanom špecializovanom podniku.
Ochranné zariadenia nikdy neobchádzajte ani nevyraďujte z prevádzky.
Po montáži je potrebná voľne prístupná sieťová zástrčka.
Zariadenia emisnej triedy A:
sú určené len na použitie v priemyselnom prostredí,
-
v inom prostredí môžu spôsobovať rušenie po vedení a vyžarovanie v závis-
-
losti od výkonu.
Zariadenia emisnej triedy B:
spĺňajú požiadavky na emisie pre obytné a priemyselné prostredie. Platí to aj
-
pre obytné prostredie, v ktorom sa napájanie energiou zabezpečuje z verejnej
nízkonapäťovej siete.
Klasifikácia zaradení EMK podľa typového štítka alebo technických údajov.
Opatrenia v oblasti elektromagnetickej kompatibility
Údržba Pred každým uvedením do prevádzky skontrolujte poškodenie sieťovej zástrčky a
V osobitných prípadoch môže napriek dodržiavaniu normalizovaných hraničných
hodnôt emisií dochádzať k negatívnemu ovplyvňovaniu prostredia danej aplikácie
(napr. ak sa na mieste inštalácie nachádzajú citlivé zariadenia alebo ak sa miesto
inštalácie nachádza v blízkosti rádiového alebo televízneho prijímača).
V takom prípade je prevádzkovateľ povinný prijať primerané opatrenia na
odstránenie rušenia.
sieťového kábla, ako aj nabíjacích vedení a nabíjacích svoriek.
Povrch krytu zariadenia pri znečistení vyčistite mäkkou handrou a výhradne čistiacimi prostriedkami neobsahujúcimi rozpúšťadlá.
50
Page 51

Záruka a ručenie Pre zariadenie platí záručná doba 2 roky od dátumu zakúpenia.
Výrobca však nepreberá žiadnu záruku, ak poškodenie súvisí s jednou alebo s viacerými nasledujúcimi príčinami:
Použitie zariadenia v rozpore s určením,
-
neodborná montáž a obsluha,
-
prevádzkovanie zariadenia s chybnými ochrannými zariadeniami,
-
nedodržiavanie upozornení v návode na obsluhu,
-
svojvoľné zmeny na zariadení,
-
katastrofické prípady vplyvom pôsobenia cudzieho telesa a vyššej moci.
-
SK
Bezpečnostnotechnická kontrola
Označenia na zariadení
Výrobca odporúča nechať vykonať bezpečnostno-technickú kontrolu zariadenia
najmenej každých 12 mesiacov.
Bezpečnostno-technickú kontrolu smie vykonávať len elektrotechnický odborník,
ktorý je na to oprávnený
po zmene,
-
po vstavbách alebo prestavbách,
-
po oprave, ošetrení a údržbe,
-
najmenej každých 12 mesiacov.
-
V rámci bezpečnostno-technickej kontroly sa riaďte príslušnými národnými
a medzinárodnými normami a smernicami.
Bližšie informácie o bezpečnostno-technickej kontrole získate v autorizovanom
servise. Tento vám na požiadanie poskytne aj potrebné podklady.
Zariadenia s označením CE vyhovujú základným požiadavkám príslušných
smerníc.
Zariadenia označené kontrolným znakom EAC spĺňajú požiadavky relevantných
smerníc pre Rusko, Bielorusko, Kazachstan, Arménsko a Kirgizsko.
Zariadenia označené kontrolným znakom CP spĺňajú požiadavky relevantných
noriem pre Maroko.
Likvidácia Staré elektrické prístroje a elektronika sa musia zbierať oddelene a recyklovať
ekologickým spôsobom v súlade s európskou smernicou a vnútroštátnymi
právnymi predpismi. Použité zariadenia odovzdajte predajcovi alebo do miestneho, autorizovaného zberného a likvidačného systému. Správnou likvidáciou
starých prístrojov podporujete trvalo udržateľnú recykláciu materiálových zdrojov. Ignorovanie takejto likvidácie môže mať negatívny vplyv na zdravie alebo
životné prostredie.
Obalové materiály
Separovaný zber. Overte si predpisy platné vo vašej obci. Zmenšite objem škatule
na minimum.
Autorské práva Autorské práva na tento návod na obsluhu zostávajú u výrobcu.
Text a vyobrazenia zodpovedajú technickému stavu pri zadaní do tlače. Zmeny sú
vyhradené. Obsah návodu na obsluhu v žiadnom prípade neopodstatňuje nároky
zo strany kupujúceho. Za zlepšovacie návrhy a upozornenia na chyby v tomto
návode na obsluhu sme vďační.
51
Page 52
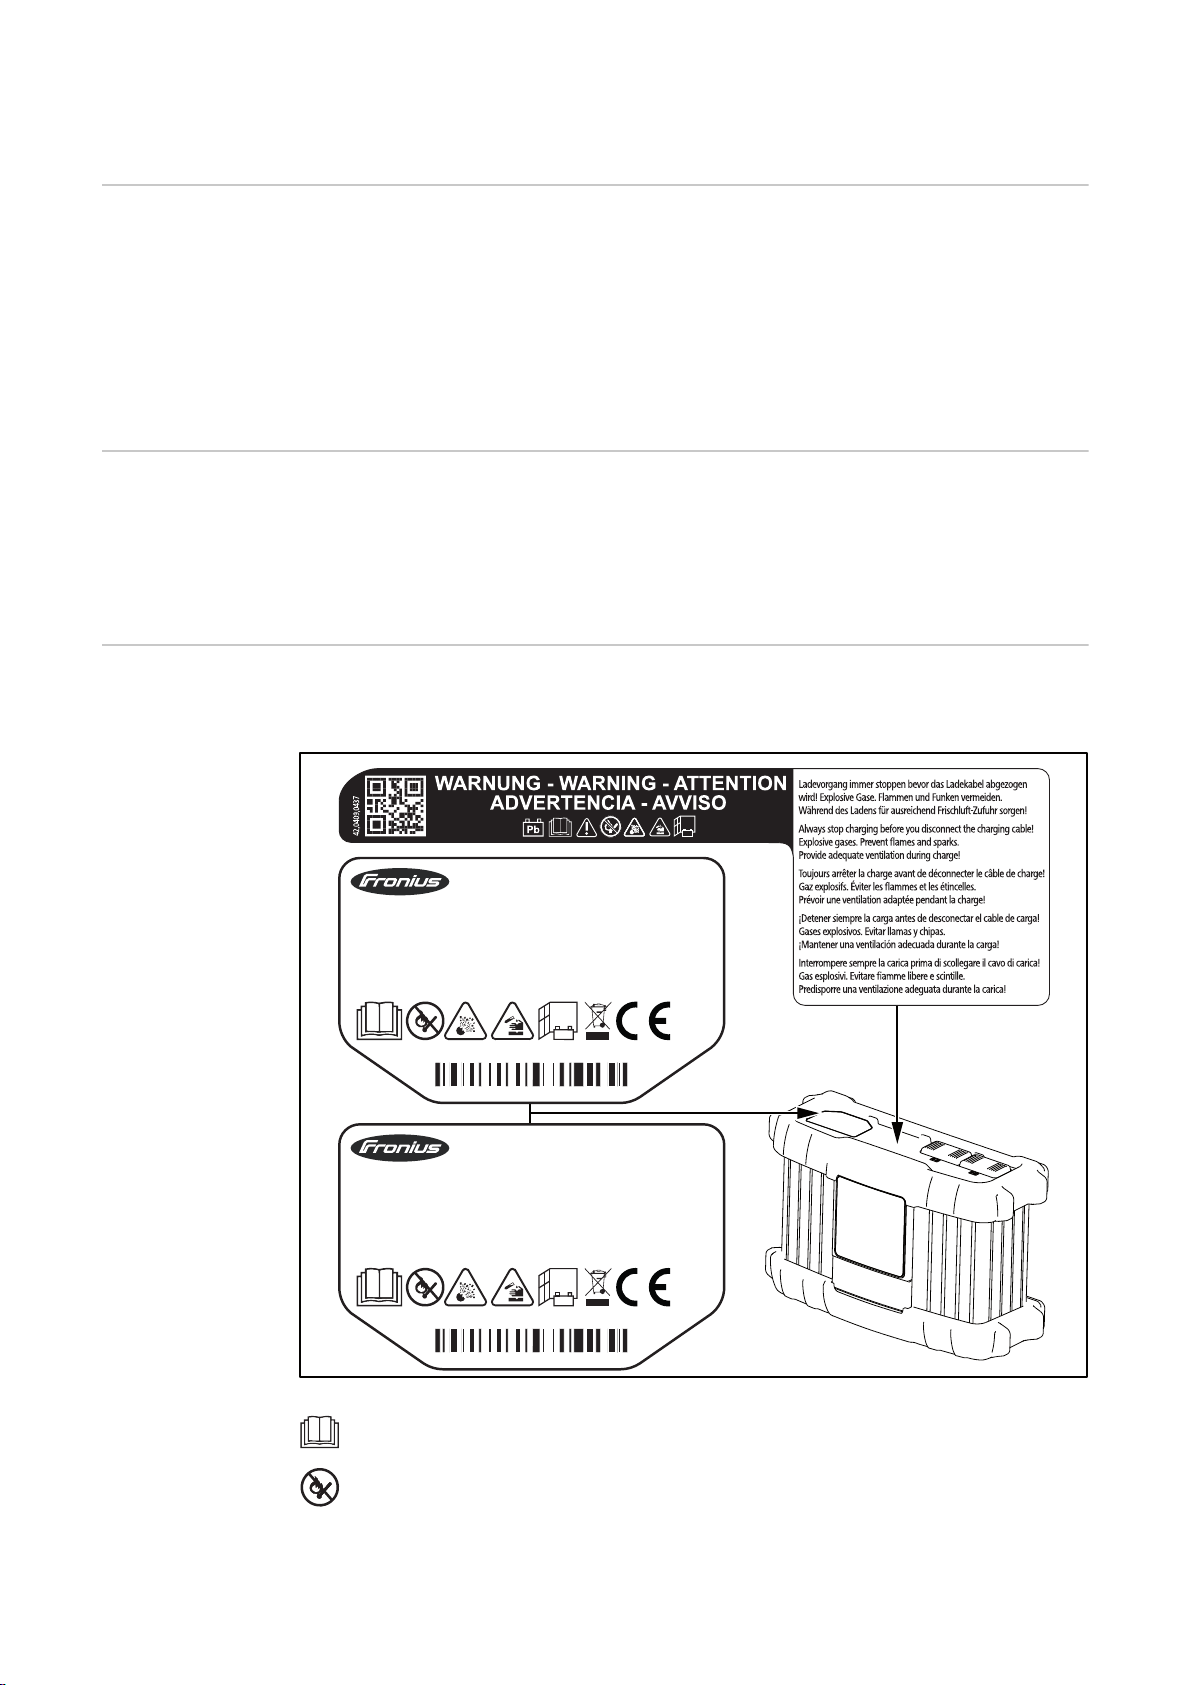
Všeobecné informácie
In:
Out.:
Acctiva Professional 35A XX
~230V 50/60Hz;1120W
DC 2V-31V/35A
IP 40
4,010,361,xxx
Fronius International GmbH
Froniusstraße 1
A-4643 Pettenbach
EMC Emission
Class A
Ser. No.:
Part No.:
xxxxxxxx
xxxxxxxx
Ser. No.:
In:
Out.:
Part No.:
Acctiva Smart 25A XX
~230V 50/60Hz;1120W
DC 2V-31V/35A
IP 40
EMC Emission
Class A
Fronius International GmbH
Froniusstraße 1
A-4643 Pettenbach
4,010,360,xxx
xxxxxxxx
xxxxxxxx
Princíp Hlavným znakom novej technológie Active Inverter je inteligentné nabíjanie.
Správanie sa pri nabíjaní pritom automaticky prispôsobuje veku a stavu nabitia akumulátora. Z tejto inovácie neprofituje len životnosť a nenáročnosť akumulátora
na údržbu, ale aj hospodárnosť.
Technológia Active Inverter sa zakladá na striedači s aktívnym usmerňovaním a
inteligentnom bezpečnostnom vypnutí. Digitálna regulácia udržiava konštantný
nabíjací prúd a napätie nezávisle od možných kolísaní sieťového napätia.
Koncepcia zariadenia
Výstražné upozornenia na zariadení
Kompaktná konštrukcia znižuje potrebu miesta a výrazne uľahčuje mobilné
použitie. Dodatočne k rozsiahlej výbave je možné nabíjačku modulovo rozšíriť, a
tým ju dokonale vybaviť do budúcnosti. Na to je k dispozícii veľký počet
doplnkového vybavenia. O optimálnu ochranu palubnej elektroniky vozidla sa
stará obmedzenie napätia.
Nabíjačka je vybavená bezpečnostnými symbolmi na výkonovom štítku.
Bezpečnostné symboly sa nesmú odstraňovať ani pretrieť iným náterom.
52
Funkcie použite až po dôslednom prečítaní návodu na obsluhu.
Možné zápalné zdroje, ako aj oheň, iskry a otvorený oheň držte
v dostatočnej vzdialenosti od akumulátora.
Page 53

Nebezpečenstvo výbuchu! Vplyvom nabíjania vzniká v akumulátore
výbušný plyn.
Akumulátorová kyselina je žieravá a v žiadnom prípade sa nesmie
dostať do očí, na pokožku ani odev.
Počas nabíjania sa postarajte o dostatočný prívod čerstvého vzduchu.
Počas nabíjania dodržte minimálnu vzdialenosť 0,5 m (19,69 in) medzi
akumulátorom a nabíjačkou.
Staré zariadenia nelikvidujte spolu s komunálnym odpadom, ale zlikvidujte ich podľa bezpečnostných predpisov.
SK
Pokyny
na inštalovanie
NEBEZPEČENSTVO!
Nebezpečenstvo preklopenia alebo padnutia zariadenia.
Následkom môžu byť vážne poranenia osôb alebo poškodenia zariadenia.
Zariadenie postavte na rovný a pevný povrch tak, aby sa neprevrátilo, alebo
▶
ho zmontujte na pevnom podklade podľa časti Montáž.
Časť Montáž sa nachádza v kapitole „Ovládacie prvky a prípojky“.
▶
Zariadenie je odskúšané podľa stupňa krytia IP 40, to znamená:
ochranu pred vniknutím pevných cudzích telies s priemerom väčším ako 1,0
-
mm (0.04 in.),
žiadnu ochranu proti vode.
-
Zariadenie sa v zmysle stupňa krytia IP 40 musí inštalovať a prevádzkovať v
suchých, zatvorených priestoroch.
Zábráňte kontaktu s vodou.
-
Prach:
Dávajte pozor na to, aby ventilátor nenasal do zariadenia prípadný kovový
-
prach,
napríklad pri brúsení.
-
53
Page 54

Uvedenie do prevádzky
Bezpečnosť
Nebezpečenstvo spôsobené nesprávnym ovládaním.
Následkom môžu byť vážne poranenia osôb alebo poškodenia zariadenia.
▶
▶
▶
▶
Správne použitie Nabíjačka slúži iba na nabíjanie nasledujúcich uvedených akumulátorov. Každé iné
použitie alebo použitie presahujúce tento rámec sa považuje za použitie v rozpore s určením. Za poškodenia z toho vyplývajúce výrobca neručí. K použitiu
podľa určenia patrí tiež:
-
-
NEBEZPEČENSTVO!
Uvedené funkcie použite až vtedy, keď si kompletne prečítate nasledujúce
dokumenty a porozumiete im:
Návod na obsluhu,
všetky návody na obsluhu systémových komponentov, najmä bezpečnostné
predpisy,
Návody na obsluhu a bezpečnostné predpisy výrobcov akumulátora či vozidla.
Dodržanie všetkých upozornení z návodu na obsluhu,
pravidelná kontrola sieťového a nabíjacieho kábla.
NEBEZPEČENSTVO!
Nebezpečenstvo pri nabíjaní suchých akumulátorov (primárnych článkov)
a nenabíjateľných akumulátorov.
Následkom môžu byť vážne poranenia osôb alebo poškodenia zariadenia.
Nabíjajte iba nasledujúce typy akumulátorov.
▶
Povoľuje sa nabíjanie nasledujúcich typov akumulátorov:
Mokré akumulátory:
-
Uzavreté akumulátory s tekutým elektrolytom (rozpoznateľný podľa záslepky) a mokré akumulátory (MF) nenáročné na údržbu alebo úplne
bezúdržbové.
Akumulátory AGM:
-
Uzavreté akumulátory (VRLA) so stanoveným elektrolytom (vláknitý materiál).
Gélové akumulátory:
-
Uzavreté akumulátory (VRLA) so stanoveným elektrolytom (gél).
Sieťová prípojka Na kryte sa nachádza výkonový štítok s údajom o prípustnom sieťovom napätí.
Zariadenie je určené len pre uvedené sieťové napätie. Informácie o požadovanom
istení sieťového prívodu nájdete v kapitole „Technické údaje“. Ak prevedenie
vášho zariadenia nemá nainštalovaný sieťový kábel ani sieťovú vidlicu, namontujte
sieťový kábel alebo sieťovú vidlicu v súlade s národnými normami.
54
UPOZORNENIE!
Nebezpečenstvo nedostatočne dimenzovanej elektroinštalácie.
Následkom môžu byť vážne materiálne škody.
Sieťový kábel a tiež jeho istenie treba nadimenzovať zodpovedajúc exis-
▶
tujúcemu prúdovému napájaniu. Platia technické údaje na výkonovom štítku.
Page 55

Koncepcia
bezpečnosti –
sériové ochranné
zariadenia
K rozsahu dodávky Active Inverter zaraďujeme nasledujúce bezpečnostné vlastnosti:
Beznapäťové a neiskrivé svorky chránia pred nebezpečenstvom výbuchu.
-
Ochrana proti prepólovaniu zamedzuje poškodeniu alebo zničeniu nabíjačky
-
Efektívnu ochranu nabíjačky ponúka ochrana proti skratu. V prípade skratu
-
nie je potrebná výmena poistky
Monitorovanie doby nabíjania chráni efektívne pred prebíjaním a zničením ak-
-
umulátora
Ochrana pred prehriatím prostredníctvom zníženia nabíjacieho prúdu pri
-
náraste teploty nad hraničný rozsah.
SK
55
Page 56
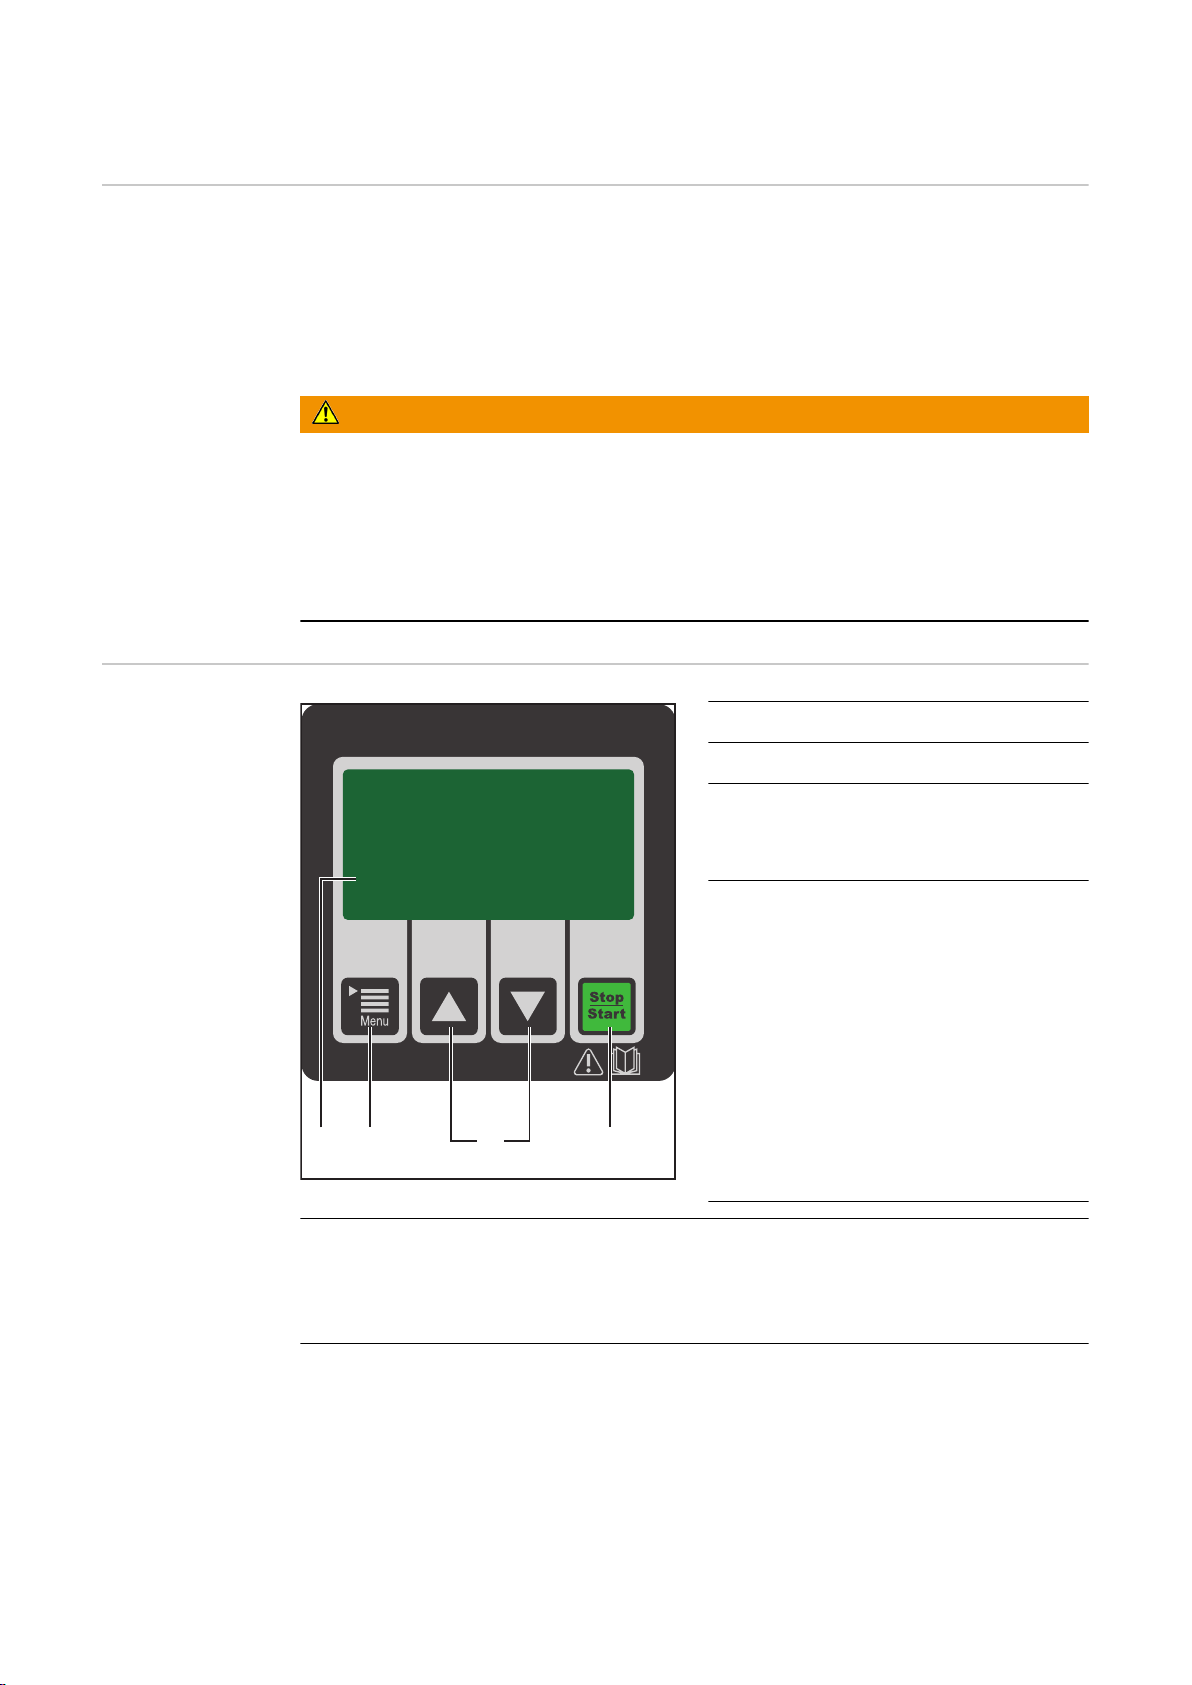
Ovládacie prvky a prípojné miesta
(2)(1) (3) (4)
Všeobecné informácie
Ovládací panel
Berte na vedomie:
V dôsledku aktualizácií firmvéru môžu byť na vašom zariadení dostupné funkcie,
ktoré nie sú popísané v tomto návode na obsluhu, alebo opačne.
Okrem toho sa môžu niektoré jednotlivé zobrazenia nepatrne líšiť od ovládacích
prvkov vo vašom zariadení. Princíp činnosti týchto ovládacích prvkov je však
identický.
NEBEZPEČENSTVO!
Nebezpečenstvo spôsobené nesprávnym ovládaním.
Následkom môžu byť vážne poranenia osôb alebo poškodenia zariadenia.
Popísané funkcie používajte až vtedy, keď si prečítate a pochopíte celý návod
▶
na obsluhu.
Popísané funkcie používajte až vtedy, keď si kompletne prečítate návod na
▶
obsluhu všetkých systémových komponentov, hlavne bezpečnostné predpisy,
a keď im porozumiete.
Č. Funkcia
(1) Grafický displej
(2) Tlačidlo ponuky
Navolenie požadovaného
-
nastavenia, napr. Ah
(4) Tlačidlo stop / štart
Prerušenie a opätovné spustenie nabíjacieho procesu
-
Potvrdenie, napr. po ručnom navolení nabíjacieho napätia 6 V / 12 V /
-
24 V pomocou tlačidiel nahor / nadol
(3) Tlačidlá nahor / nadol
Navolenie požadovaného
-
prevádzkového režimu,
napr. nabíjanie alebo
výmena akumulátora
Zmena pomocou nastavenia
-
(2) tlačidla ponuky
po pripojení akumulátora:
-
je možné ručné navolenie
nabíjacieho napätia 6 V /
12 V / 24 V
56
Page 57

Pripojenie
(1)(2)
(3) (4)
(6)
(7)
(5)
doplnkového vybavenia
Prípojky
UPOZORNENIE!
Nebezpečenstvo pri pripájaní opcií a doplnkového vybavenia počas toho, ako je
pripojená sieťová vidlica.
Následkom môžu byť materiálne škody na zariadení a príslušenstve.
Opcie a systémové rozšírenia pripájajte len vtedy, keď je vytiahnutá sieťová
▶
zásuvka a nabíjacie káble sú odpojené od akumulátora.
SK
Č. Funkcia
(1) Sieťový kábel – poistný strmeň
na odľahčenie sieťového kábla od ťahu
Poistný strmeň pri sieťovom kábli nie je vybavený uzamykacím systémom.
(2) AC Input – sieťová zásuvka
(3) Prípojka P2 – port I/O – nie je vo funkcii, avšak možné dodatočné vy-
bavenie
na pripojenie doplnkovej výbavy
Imobilizér
-
Všeobecná chyba
-
Imobilizér a všeobecná chyba
-
(4) Prípojka P1 – zásuvka nabíjacieho kábla
na pripojenie nabíjacieho kábla
dodatočne na pripojenie voliteľného vybavenia nabíjania s reguláciou podľa
potreby alebo externého štartu / zastavenia
(5) Odnímateľný displej
(6) Prípojka P3 – vizualizačný port
na pripojenie displeja interne
(7) Prípojka P4 – multiport
na pripojenie doplnkovej výbavy
Stavová žiarovka
-
Aktualizácia softvéru pomocou USB pripojenia
-
57
Page 58

Poistný strmeň
(1)
(2)
Uzamykací
systém
Odstránenie
krytov pre prípojky a opcie
58
Pokiaľ je to potrebné, pomocou skrutkovača odstráňte:
Kryt (1) pre prípojku P4 – multi-
-
port,
Kryt (2) pre prípojku P2 – port I/O.
-
Nepoužité prípojky P2 a P4 zatvorte
pomocou krytov (1) a (2).
Page 59

Voliteľné vy-
1
2
3
4
(1) (2) (3) (4)
bavenie: aktualizácia USB
Voliteľné vybavenie aktualizáciou USB umožňuje nabíjačku aktualizovať pomocou
rozhrania USB.
Namontujte
voliteľné vybavenie: prídržný
strmeň a ťahové
odľahčenie pre
nabíjacie káble
Možnosť rúčky
Berte na vedomie:
Krútiaci moment pre všetky skrutky je
2,5 Nm (1,84 ft lb).
Montáž prídržného strmeňa:
Uvoľnite skrutky (1).
-
Namontujte prídržný strmeň (2)
-
s vopred uvoľnenými skrutkami.
Montáž ťahového odľahčenia:
Uvoľnite skrutku (3).
-
Ťahové odľahčenie (4) pre nabíjacie
-
káble namontujte pomocou predtým uvoľnenej skrutky.
SK
59
Page 60

Voliteľné vy-
1
2
2
1
1
"click"
"click"
~ 120 mm
~ 4.72 inch
130 mm
5.12 inch
bavenie: chránič
hrán
Demontáž chrániča hrán sa vykonáva v
opačnom poradí ako montáž.
Pri montovanom chrániči hrán nie je
možná montáž prídržného strmeňa.
Možnosť držiaka
na stenu
Príprava pre
bezpečnostnú
zámku
V závislosti od podkladu sa vyžadujú rôzne kolíky a skrutky. Kolíky a skrutky preto
nie sú súčasťou obsahu balenia. Za správny výber vhodných kolíkov a skrutiek
zodpovedá samotný montér.
Bezpečnostná zámka nie je súčasťou
dodávky.
Upevnenie bezpečnostnej zámky je
možné iba
na drážke skrine podľa obrázka,
-
na náprotivnej drážke skrine,
-
pomocou dištančnej podložky M8
-
DIN 125 alebo DIN 134, umiestnenie podľa obrázka.
60
Page 61
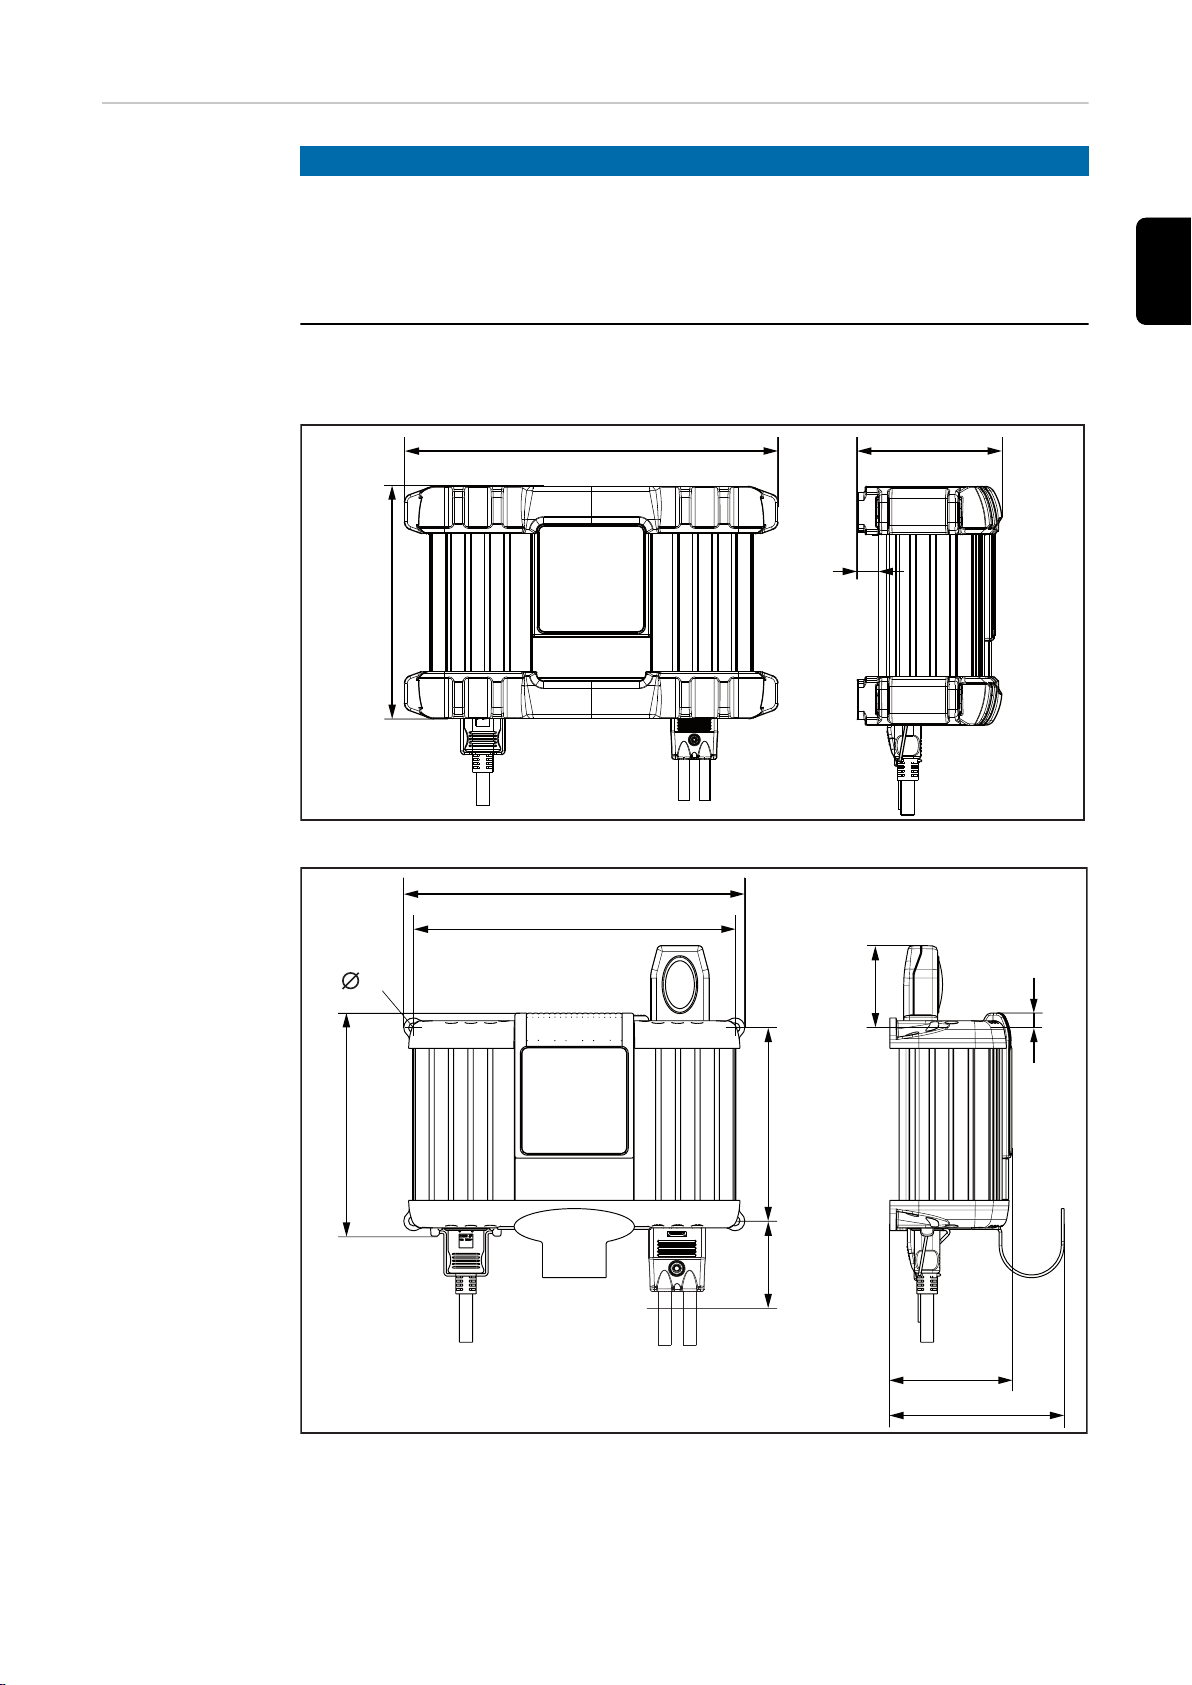
Montáž
100
15,5
168
270
(10.63)
(6.61)
(3.94)
(.61)
247 (9.72)
88 (3.46)
126 (4.96)
140 (5.51)
60 +20*
70 + 20*
11 + 5*
162
(6.38)
(2.76 + .79)*
(2.36 + .79)*
(.43 + .2)*
233 (9.17)
(.26)
6,5
UPOZORNENIE!
Nebezpečenstvo pri neodbornej montáži v skriňovom rozvádzači (alebo
v podobných uzavretých priestoroch).
Následkom môžu byť materiálne škody.
Zabezpečte dostatočný odvod tepla prostredníctvom núteného vetrania.
▶
Vzdialenosť okolo zariadenia má byť 10 cm (3,94 in).
▶
Na zabezpečenie prístupu k zásuvke vyplýva nasledujúca potreba miesta –
rozmery v mm (in.):
SK
Priestorové požiadavky s chráničom hrán
Priestorové požiadavky bez chrániča hrán, ako aj s voliteľným vybavením signálnou žiarovkou
a držiakom (* voľný priestor pre montáž/demontáž)
61
Page 62

Prevádzkové režimy
Všeobecná informácia
Dostupné
prevádzkové
režimy
Výber
prevádzkových
režimov
Nabíjačka sa hodí pre všetky 6 / 12 / 24-voltové oloveno-kyselinové akumulátory
(mokré, MF, AGM a GÉL).
Dostupné sú nasledujúce prevádzkové režimy:
Nabíjanie
-
Vyrovnávacia prevádzka diagnostiky alebo aktualizácie softvéru na vozidle
-
Refresh
-
Režim sieťového zdroja
-
Výmena akumulátora
-
Nastavenia zariadenia
-
Sieťový kábel spojte s nabíjačkou a pripojte do siete.
1
Nabíjačka sa nachádza v chode
naprázdno – zobrazí sa prevádzkový
režim nabíjania.
Prevádzkový
režim nabíjanie
Navolenie ďalších prevádzkových režimov pomocou
2
tlačidiel nahor / nadol
Prevádzkový režim nabíjanie používajte
na:
nabíjanie alebo udržiavacie
-
nabíjanie v namontovanom alebo
demontovanom stave,
nabíjanie so zapnutými spo-
-
trebičmi vo vozidle.
Prevádzkový režim nabíjanie je k
dispozícii štandardne po pripojení
nabíjačky do siete.
62
Page 63

Prevádzkový
režim vyrovnávacia prevádzka
Vyrovnávacia prevádzka odľahčuje akumulátor vozidla počas diagnostiky
alebo aktualizácie softvéru na vozidle.
SK
Prevádzkový
režim Refresh
Prevádzkový
režim výmena
akumulátora
Prevádzkový
režim napájacieho dielu
Prevádzkový režim Refresh slúži na
reaktiváciu hlboko vybitých alebo
zasírených akumulátorov. Nabíjanie Refresh sa vykonáva na vymontovanom
akumulátore, na voľnom priestranstve
alebo v dobre vetraných miestnostiach.
Prevádzkový režim výmeny akumulátora umožňuje pri výmene akumulátora neprerušované napájanie
palubnej elektroniky.
Prevádzkový režim napájacieho dielu
umožňuje napájanie vozidla počas
opravárenských prác pri vymontovanom akumulátore.
Nastavenia zariadenia
Nastavenia zariadenia umožňujú
prispôsobiť nabíjačku osobných potrebám v nasledujúcich oblastiach:
výber jazyka,
-
kontrast pre grafický displej,
-
konfigurácia individuálneho štand-
-
ardu,
obnovu výrobného nastavenia.
-
Aktivácia / deaktivácia režimu Ex-
-
pert
Informácia o verzii hardvéru a
-
softvéru.
63
Page 64

Prevádzkový režim nabíjanie
Všeobecná informácia
Nabíjanie akumulátora
Prevádzkový režim nabíjanie používajte na:
nabíjanie alebo udržiavacie nabíjanie v namontovanom alebo demontovanom
-
stave,
nabíjanie so zapnutými spotrebičmi vo vozidle.
-
UPOZORNENIE!
Nebezpečenstvo spôsobené poškodeným akumulátorom.
Následkom môžu byť materiálne škody.
Ešte pred nabíjaním sa uistite, že akumulátor, ktorý sa má nabíjať, je plne
▶
funkčný.
Zasuňte sieťovú zástrčku nabíjačky.
1
Prevádzkový režim nabíjanie je k
dispozícii štandardne po pripojení
nabíjačky do siete.
Pomocou tlačidla ponuka navoľte nastavenie Ah alebo
2
druh akumulátora.
Pomocou tlačidiel nahor / nadol zadajte hodnotu pre
3
predtým navolené nastavenie (napr. 100 Ah alebo druh
akumulátora: mokrý).
Póly akumulátora pripojte správne – z dôvodu beznapäťových nabíjacích svor-
4
iek nedochádza pri pripojení na akumulátor k tvorbe iskier, aj keď je už
nabíjačka napájaná zo siete.
Červený nabíjací kábel spojte s kladným pólom (+) akumulátora.
-
Čierny nabíjací kábel spojte so záporným pólom (-) akumulátora.
-
Nabíjačka automaticky rozpozná pripojený akumulátor, napr. 12 V a po cca piatich sekundách spustí proces
nabíjania.
Ak nebolo napätie akumulátora
správne rozpoznané (napr. pri hlboko
vybitom akumulátore), správne napätie
akumulátora zvoľte počas piatich
sekúnd nasledovne:
64
Page 65

UPOZORNENIE!
Nebezpečenstvo pri nesprávne nastavenom napätí akumulátora.
Následkom môžu byť materiálne škody.
Vždy dávajte pozor na nastavenie správneho napätia akumulátora.
▶
Príslušné napätie akumulátora nastavte pomocou
5
tlačidiel nahor / nadol (6 V / 12 V / 24 V).
Výber potvrďte tlačidlom stop / štart.
6
Ak sa pre napätie akumulátora nezobrazí výberové okno, ide o extrémne hlboko
vybitý akumulátor (pod 2 V). V tomto prípade odporúčame prevádzkový režim
„Refresh“ na reaktiváciu hlboko vybitých akumulátorov. Bližšie informácie nájdete
v odseku „Prevádzkový režim Refresh“.
Zobrazí sa príslušné varovanie.
-
Ak sa však prevádzkový režim nabíjania v prípade extrémne hlboko vybitého akumulátora aj napriek tomu vyžaduje
Tlačidlo OK na varovaní potvrďte pomocou tlačidiel stop / štart.
-
V následne zobrazenom výberovom okne navoľte pomocou tlačidiel nahor /
-
nadol správne napätie akumulátora.
Výber potvrďte tlačidlom stop / štart.
-
Rozsvecujúci sa prúžok symbol-
-
izuje stav nabitia akumulátora
(napr. 3 prúžky predstavujú stav
nabitia 80 %).
SK
Trvale sa zobrazujú všetky 4
-
prúžky.
Stav nabitia je 100 %.
-
Akumulátor je pripravený na
-
prevádzku.
Akumulátor môže za určitých pod-
-
mienok*) zostať pripojený
k nabíjačke.
Udržiavacie nabíjanie pôsobí proti
-
samovoľnému vybíjaniu akumulátora.
65
Page 66

NEBEZPEČENSTVO!
*)
Nebezpečenstvo spôsobené nestráženým akumulátorom počas udržiavacieho
nabíjania.
Následkom môžu byť vážne poranenia osôb alebo poškodenia zariadenia
spôsobené hlavne skratom, elektrickým oblúkom a výbuchom horúceho plynu.
Podľa pokynov výrobcu akumulátora alebo aspoň týždennými vizuálnymi kon-
▶
trolami zabezpečte, aby bol akumulátor naplnený kyselinou až po značku
max.
Prevádzku zariadenia nespúšťajte alebo okamžite zastavte a akumulátor
▶
nechajte skontrolovať v autorizovanej odbornej dielni pri:
nerovnomernom stave kyseliny alebo vysokej spotrebe vody v jednotlivých
článkoch,
neprípustnom zahrievaní akumulátora nad 55 °C (131 °F).
NEBEZPEČENSTVO!
Nebezpečenstvo zapálenia výbušného plynu následkom tvorby iskier pri
predčasnom odpojení nabíjacích káblov.
Následkom môžu byť vážne poranenia osôb alebo poškodenia zariadenia.
Pred odpojením nabíjacích káblov stlačte s cieľom ukončenia procesu
▶
nabíjania tlačidlo stop/štart.
Prerušenie procesu nabíjania
Ukončenie procesu nabíjania:
7
Stlačte tlačidlo stop/štart.
-
Odpojenie nabíjačky
8
Čierny nabíjací kábel odpojte od záporného pólu (-) akumulátora.
-
Červený nabíjací kábel odpojte od kladného pólu (+) akumulátora.
-
UPOZORNENIE!
Nebezpečenstvo pri odpájaní alebo oddeľovaní nabíjacieho kábla počas
nabíjania.
Následkom môžu byť materiálne škody na prípojkách a zástrčkách.
Nabíjací kábel počas režimu nabíjania nevyťahujte ani neodpájajte.
▶
Počas procesu nabíjania stlačte tlačidlo stop/štart.
1
Proces nabíjania sa preruší
-
Pokračovanie
procesu
nabíjania
66
Stlačte tlačidlo stop / štart, aby ste pokračovali v procese nabíjania.
2
Page 67

Prevádzkový režim vyrovnávacia prevádzka
Všeobecná informácia
Vyrovnávanie akumulátora
Prevádzkový režim vyrovnávacia prevádzka slúži výlučne na odľahčenie akumulátora počas diagnostiky alebo aktualizácie softvéru na vozidle. Dlhší čas musí
byť odoberaný prúd menší ako maximálny výstupný prúd nabíjačky (25 A/35 A),
inak sa akumulátor vybije. Prevádzkový režim vyrovnávacia prevádzka je vhodný
na úplné dobíjanie akumulátora.
UPOZORNENIE!
Nebezpečenstvo pri chybnom akumulátore.
Následkom môžu byť materiálne škody.
Ešte pred vyrovnávaním sa uistite, že akumulátor, ktorý sa má vyrovnávať, je
▶
plne funkčný.
Zasuňte sieťovú zástrčku nabíjačky.
1
Prevádzkový režim vyrovnávacia prevádzka navolíte
2
pomocou tlačidiel nahor / nadol.
SK
Pripojte akumulátor – z dôvodu beznapäťového nabíjacieho kábla ne-
3
dochádza pri pripojení na akumulátor k tvorbe iskier, aj keď je už nabíjačka
napájaná zo siete.
Červený nabíjací kábel spojte s kladným pólom (+) akumulátora.
-
Čierny nabíjací kábel spojte so záporným pólom (-) akumulátora.
-
Nabíjačka automaticky rozpozná pripojený akumulátor, napr. 12 V a po piatich
sekundách spustí proces vyrovnávania.
Ak nebolo napätie akumulátora
správne rozpoznané (napr. pri hlboko
vybitom akumulátore), správne napätie
akumulátora zvoľte počas piatich
sekúnd nasledovne:
UPOZORNENIE!
Nebezpečenstvo pri nesprávne nastavenom napätí akumulátora.
Následkom môžu byť materiálne škody.
Vždy dávajte pozor na nastavenie správneho napätia akumulátora.
▶
67
Page 68

Príslušné napätie akumulátora nastavte pomocou
4
tlačidiel nahor / nadol (6 V / 12 V / 24 V).
Výber potvrďte tlačidlom stop / štart.
5
Ak sa pre napätie akumulátora nezobrazí výberové okno, ide o extrémne hlboko
vybitý akumulátor (pod 2 V). V tomto prípade nie je prevádzkový režim
vyrovnávacej prevádzky povolený. Odporúčame výmenu akumulátora.
NEBEZPEČENSTVO!
Nebezpečenstvo zapálenia výbušného plynu následkom tvorby iskier pri
predčasnom odpojení nabíjacích káblov.
Následkom môžu byť vážne poranenia osôb alebo poškodenia zariadenia.
Pred odpojením nabíjacích káblov stlačte za účelom ukončenia procesu
▶
vyrovnávania tlačidlo stop / štart.
Ukončenie vyrovnávacej prevádzky:
6
Stlačte tlačidlo stop/štart.
-
Prerušenie
vyrovnávacej
prevádzky
Pokračovanie
vyrovnávacej
prevádzky
Odpojenie nabíjačky
7
Čierny nabíjací kábel odpojte od záporného pólu (-) akumulátora.
-
Červený nabíjací kábel odpojte od kladného pólu (+) akumulátora.
-
UPOZORNENIE!
Nebezpečenstvo pri odpájaní alebo oddeľovaní nabíjacieho kábla počas
vyrovnávacej prevádzky.
Následkom môžu byť materiálne škody na prípojkách a zástrčkách.
Nabíjací kábel počas režimu vyrovnávania nevyťahujte ani neodpájajte.
▶
Počas procesu vyrovnávania stlačte tlačidlo stop /
1
štart.
Proces nabíjania sa preruší
-
Stlačte tlačidlo stop / štart.
2
Vyrovnávacia prevádzka pokračuje.
-
68
Page 69

Prevádzkový režim „Refresh“
Všeobecná informácia
Prevádzkový režim „Refresh“ slúži na nabíjanie 12 V štartovacích akumulátorov,
ak sa už dlhší čas predpokladá hlboké vybitie (napr.: ak došlo k sulfatácii akumulátora).
Akumulátor sa nabije až po maximálnu hustotu kyseliny.
-
Platne sa revitalizujú (rozpustenie vrstvy sulfátu).
-
NEBEZPEČENSTVO!
Nebezpečenstvo spôsobené prehriatym akumulátorom.
Následkom môžu byť vážne poranenia osôb alebo poškodenia zariadenia.
Akumulátor nabíjajte iba pod dohľadom!
▶
Kontrolujte teplotu akumulátora a nabíjanie v danom prípade prerušte.
▶
Akumulátory, ktoré sa majú znova aktivovať, nenabíjajte pri teplote okolia nad
▶
30 °C (86 °F).
V prevádzkovom režime „Refresh“ môže akumulátor dosiahnuť teplotu až do
▶
45 °C (113 °F).
Ak teplota akumulátora presiahne teplotu 45 °C (113 °F), okamžite odpojte
▶
nabíjačku akumulátora.
UPOZORNENIE!
Nebezpečenstvo spôsobené nabíjaním typu Refresh akumulátorov, ktoré sú
nainštalované vo vozidle a pripojené k palubnej sieti.
Následkom môže byť poškodenie palubnej elektroniky.
Akumulátor pred začiatkom nabíjania typu „Refresh“ odpojte od palubnej si-
▶
ete a vymontujte ho z vozidla.
SK
Úspech nabíjania typu „Refresh“ závisí od stupňa sulfatácie akumulátora.
UPOZORNENIE!
Nebezpečenstvo spôsobené nabíjaním typu Refresh pri nesprávnom použití.
Následkom môžu byť materiálno škody na akumulátore spôsobené stratou kvapaliny alebo vyschnutím. Uistite sa, že
akumulátor mal teplotu okolia (20 – 25 °C) (68 – 77 °F),
▶
bola správne nastavená kapacita akumulátora,
▶
bol akumulátor vymontovaný z palubnej siete vozidla,
▶
sa nabíjanie typu „Refresh“ vykonávalo na vymontovanom akumulátore, na
▶
voľnom priestranstve (bez priameho slnečného žiarenia) alebo v dobre
odvetraných priestoroch.
POZOR!
Nebezpečenstvo spôsobené kyselinou akumutátora.
Následkom môžu byť zranenia osôb.
Pri zaobchádzaní s akumulátorovou kyselinou noste ochranné okuliare a
▶
vhodný ochranný odev.
Odstreky kyseliny okamžite a dôkladne vypláchnite čistou vodou.
▶
V núdzovom prípade vyhľadajte lekára.
▶
V žiadnom prípade nevdychujte vznikajúce plyny a výpary.
▶
V prevádzkovom režime „Refresh“ sú povolené nasledujúce akumulátory:
69
Page 70

mokré akumulátory:
-
uzavreté akumulátory s tekutým elektrolytom (rozpoznateľný podľa záslepky).
Po reaktivácii skontrolujte stav kyseliny a v prípade potreby doplňte destilovanú vodu.
akumulátory AGM:
-
uzavreté akumulátory (VRLA) so stanoveným elektrolytom (vláknitý materiál)
a bezúdržbové mokré akumulátory (MF),
Revitalizácia akumulátorov
UPOZORNENIE!
Nebezpečenstvo zamrznutia hĺbkovo vybitého akumulátora už pri teplotách
okolo 0 °C (32 °F).
Následkom zmrznutého akumulátora môžu byť materiálne škody.
Pred začiatkom nabíjania typu „Refresh“ zaistite, aby kyselina akumulátora,
▶
ktorý sa má revitalizovať, nebola zamrznutá.
Zasuňte sieťovú zástrčku nabíjačky.
1
Prevádzkový režim „Refresh“ navolíte pomocou
2
tlačidiel nahor / nadol.
Pomocou tlačidla ponuka navoľte nastavenie Ah alebo
3
druh akumulátora.
Pomocou tlačidiel nahor / nadol zadajte hodnotu pre
4
predtým navolené nastavenie (napr. 100 Ah alebo druh
akumulátora: mokrý).
Pripojte akumulátor – z dôvodu beznapäťového nabíjacieho kábla ne-
5
dochádza pri pripojení na akumulátor k tvorbe iskier, aj keď je už nabíjačka
napájaná zo siete.
Červený nabíjací kábel spojte s kladným pólom (+) akumulátora.
-
Čierny nabíjací kábel spojte so záporným pólom (-) akumulátora.
-
Nabíjačka automaticky rozpozná pripojený akumulátor a po piatich sekundách
spustí proces nabíjania.
70
Page 71

Rozsvecujúci sa prúžok symbol-
-
izuje stav nabitia akumulátora
(napr. 3 prúžky predstavujú stav
nabitia 80 %).
(obrázok symbolický, indikátor
napätia reálny: cca 14 – 16 V)
Trvale sa zobrazujú všetky 4
-
prúžky.
Stav nabitia je 100 %.
-
Akumulátor je pripravený na
-
prevádzku.
Akumulátor môže za určitých pod-
-
mienok*) zostať pripojený
k nabíjačke.
Udržiavacie nabíjanie pôsobí proti
-
samovoľnému vybíjaniu akumulátora.
NEBEZPEČENSTVO!
*)
Nebezpečenstvo spôsobené nestráženým akumulátorom počas udržiavacieho
nabíjania.
Následkom môžu byť vážne poranenia osôb alebo poškodenia zariadenia
spôsobené hlavne skratom, elektrickým oblúkom a výbuchom horúceho plynu.
Podľa pokynov výrobcu akumulátora alebo aspoň týždennými vizuálnymi kon-
▶
trolami zabezpečte, aby bol akumulátor naplnený kyselinou až po značku
max.
Prevádzku zariadenia nespúšťajte alebo okamžite zastavte a akumulátor
▶
nechajte skontrolovať v autorizovanej odbornej dielni pri:
nerovnomernom stave kyseliny alebo vysokej spotrebe vody v jednotlivých
článkoch,
neprípustnom zahrievaní akumulátora nad 55 °C (131 °F).
SK
NEBEZPEČENSTVO!
Nebezpečenstvo zapálenia výbušného plynu následkom tvorby iskier pri
predčasnom odpojení nabíjacích káblov.
Následkom môžu byť vážne poranenia osôb alebo poškodenia zariadenia.
Pred odpojením nabíjacích káblov stlačte za účelom ukončenia procesu
▶
vyrovnávania tlačidlo stop / štart.
Ukončenie nabíjania typu „Refresh“:
6
Stlačte tlačidlo stop/štart.
-
Odpojenie nabíjačky
7
Čierny nabíjací kábel odpojte od záporného pólu (-) akumulátora.
-
Červený nabíjací kábel odpojte od kladného pólu (+) akumulátora.
-
71
Page 72

Prerušenie
nabíjania „Refresh“
UPOZORNENIE!
Nebezpečenstvo pri vyťahovaní alebo odpájaní prípojok a zástrčiek počas revitalizácie.
Následkom môže byť poškodenie prípojok a zástrčiek.
Nabíjací kábel počas režimu revitalizácie nevyťahujte ani neodpájajte.
▶
Počas procesu revitalizácie stlačte tlačidlo stop/štart.
1
„Refresh“ sa preruší.
-
Pokračovanie
„Refresh“
Stlačte tlačidlo stop / štart.
1
„Refresh“ pokračuje.
-
72
Page 73

Prevádzkový režim výmena akumulátora
Všeobecná informácia
Výmena akumulátora
Prevádzkový režim výmeny akumulátora napája palubnú elektroniku vozidla
počas výmeny akumulátora. Ešte pred odpojením starého akumulátora z palubnej
siete vozidla, spojte vodiče nabíjačky s vodičmi akumulátora vozidla. Toto spojenie
zachovajte, až kým pripojíte nový akumulátor.
UPOZORNENIE!
Nebezpečenstvo nesprávneho nastavenia napätia.
Následkom môžu byť vážne poškodenia palubnej elektroniky zariadenia.
Po pripojení nabíjačky k vodičom akumulátora vozidla bezpodmienečne
▶
nastavte správne napätie.
Zasuňte sieťovú zástrčku nabíjačky.
1
Prevádzkový režim výmena akumulátora navolíte
2
pomocou tlačidiel nahor / nadol.
SK
Nabíjací kábel pripojte k vodičom akumulátora vozidla – z dôvodu
3
beznapäťového nabíjacieho kábla nedochádza pri pripojení k tvorbe iskier, aj
keď je už nabíjačka napájaná zo siete.
Červený nabíjací kábel spojte s kladným vodičom akumulátora (+) vozidla.
-
Čierny nabíjací kábel spojte so záporným vodičom akumulátora (-) voz-
-
idla.
Nabíjačka automaticky rozpozná pripojený akumulátor, napr. 12 V a po piatich
sekundách spustí proces nabíjania
palubnej elektroniky vozidla.
Ak nebolo napätie akumulátora
správne rozpoznané (ako je napríklad
pri hlboko vybitom akumulátore
bežné), správne napätie akumulátora
zvoľte počas piatich sekúnd nasledovne:
UPOZORNENIE!
Nebezpečenstvo pri nesprávne nastavenom napätí akumulátora.
Následkom môžu byť materiálne škody.
Vždy dávajte pozor na nastavenie správneho napätia akumulátora.
▶
73
Page 74

Príslušné napätie akumulátora nastavte pomocou
4
tlačidiel nahor / nadol (6 V / 12 V / 24 V).
Výber potvrďte tlačidlom stop / štart.
5
V prípade extrémne hlboko vybitého akumulátora (pod 2 V) sa zobrazí varovanie,
ktoré vyzýva, aby ste akumulátor odpojili.
V prípade extrémne hlboko vybitého akumulátora sa musí výmena akumulátora
vykonať bez prevádzkového režimu výmena akumulátora.
Osadenie a pripojenie nového akumulátora
6
NEBEZPEČENSTVO!
Nebezpečenstvo zapálenia výbušného plynu následkom tvorby iskier pri
predčasnom odpojení nabíjacích káblov.
Následkom môžu byť vážne poranenia osôb alebo poškodenia zariadenia.
Pred odpojením nabíjacích káblov stlačte za účelom ukončenia procesu
▶
vyrovnávania tlačidlo stop / štart.
Ukončenie prevádzkového režimu výmena akumulátora:
7
Stlačte tlačidlo stop/štart.
-
Odpojenie nabíjačky
8
Čierny nabíjací kábel odpojte od záporného vodiča nabíjačky (-) vozidla.
-
Červený nabíjací kábel odpojte od kladného vodiča nabíjačky (+) vozidla.
-
Zohľadnite:
Ak chcete nabiť nový (nie plne nabitý) akumulátor, spustite proces nabíjania.
9
74
Page 75

Prevádzkový režim napájacieho dielu
Predpoklady V prevádzkovom režime napájacieho dielu sa vodiče nabíjačky pripájajú priamo na
vodiče akumulátora alebo na body štartu s cudzou pomocou na vozidle. Tým sa
počas opravárenských zaručí napájanie palubnej elektroniky pri demontovanom
akumulátore. Tým, že sú na nabíjačku pripojené iba vodiče akumulátora vozidla,
funkcia rozpoznania napätia akumulátora nie je k dispozícii.
SK
Režim napájacieho dielu
UPOZORNENIE!
Nebezpečenstvo nesprávneho nastavenia napätia špecifického pre vozidlo.
Následkom môžu byť vážne poškodenia palubnej elektroniky zariadenia.
Pred pripojením nabíjačky k vodičom akumulátora vozidla bezpodmienečne
▶
nastavte správne napätie.
Zasuňte sieťovú zástrčku nabíjačky.
1
Prevádzkový režim napájacieho dielu navolíte pomocou
2
tlačidiel nahor / nadol.
Pomocou tlačidla ponuky nastavte napätie palubnej si-
3
ete vozidla (6 V / 12 V / 24 V).
Nabíjací kábel pripojte k vodičom akumulátora vozidla – z dôvodu
4
beznapäťového nabíjacieho kábla nedochádza pri pripojení k tvorbe iskier, aj
keď je už nabíjačka napájaná zo siete.
Červený nabíjací kábel spojte s kladným vodičom akumulátora (+) vozidla.
-
Čierny nabíjací kábel spojte so záporným vodičom akumulátora (-) voz-
-
idla.
Na displeji sa zobrazí bezpečnostná otázka, či sú vodiče nabíjačky správne
-
pripojené.
Pomocou tlačidla stop / štart bezpečnostnú otázku
5
potvrdíte a spustíte externé prúdové napájanie prúdom
palubnej elektroniky vozidla.
75
Page 76
UPOZORNENIE!
Nebezpečenstvo pri odpájaní nabíjacieho kábla, ak ste vopred nestlačili tlačidlo
stop/štart.
Následkom môže byť strata uložených údajov vo vozidle.
Pred odpojením nabíjacích káblov stlačte za účelom ukončenia režimu
▶
napájacieho dielu tlačidlo stop / štart.
Ukončenie režimu napájacieho dielu:
6
Stlačte tlačidlo stop/štart.
-
Odpojenie nabíjačky
7
Čierny nabíjací kábel odpojte od záporného vodiča akumulátora (-) voz-
-
idla.
Červený nabíjací kábel odpojte od kladného vodiča akumulátora (+) voz-
-
idla.
76
Page 77

Nastavenia zariadenia
Všeobecná informácia
Výber
prevádzkového
režimu pre
nastavenie zariadenia
Nastavenia zariadenia obsahujú nasledujúce možnosti individuálneho
prispôsobenia:
Výber jazyka
-
Výber jazyka pre navádzanie používateľa,
Kontrast grafického displeja,
-
Konfigurácia
-
nastavenie individuálneho štandardu je možné.
Výrobné nastavenie
-
na obnovu všetkých nastavení zariadenia do stavu pri vyexpedovaní,
iba pri Acctiva Professional 35 A:
-
Aktivácia / deaktivácia režimu Expert
Info
-
poskytuje informácie
o verzii hardvéru a softvéru,
o celkovo nabitých Ah
a o celkovej dobe prevádzky.
Nastavenia zariadenia navolíte pomocou tlačidiel
1
nahor / nadol.
SK
Konfigurácia
UPOZORNENIE!
Nebezpečenstvo pri výbere a použití individuálnych dĺžok nabíjacích káblov.
Následkom môžu byť materiálne škody.
Skrátenie dodaných nabíjacích káblov a nastavenie príslušnej individuálnej
▶
dĺžky nabíjacieho kábla vykonávate na vlastnú zodpovednosť.
Za škody tým vzniknuté výrobca neručí.
▶
Nasledujúce parametre je možné zmeniť na individuálny štandard:
Dĺžka nabíjacieho kábla:
1 – 10 m (3 ft. 3.37 in. - 32 ft. 9.7 in.),
-
in 0,5 m (1 ft. 7.69 in.) – nastaviteľné kroky
Rozsah dodávky voliteľne v nasledujúcich dĺžkach:
-
2,5 / 5 m (8 ft. 2.43 in. / 16 ft. 4.85 in.)
Začiatočné hodnoty:
77
Page 78

Začiatočný režim (nabíjanie / vyrovnávacia prevádzka)
-
Kapacita akumulátora (3 – 350 Ah)
-
Typ akumulátora (MOKRÝ, GÉL a AGM)
-
Navolenie napätia
-
automaticky
voliteľne 6 V, 12 V alebo 24 V fixný
Nabíjacie parametre:
Boost (ZAP/VYP), výrobné nastavenie: ZAP
-
Boost ZAP: Skrátený čas nabíjania, a teda aj rýchlejšie plné nabitie. Pri rozpoznaných paralelných spotrebičoch (autorádio, ...) sa schváli maximálny
prúd zariadenia o hodnote 25 A/35 A.
Boost VYP znamená: Nabíjanie zodpovedá bežnému nabíjaniu pre dielne
(fixný nabíjací prúd s 20 A na 100 Ah nastavenej kapacity akumulátora). V
tomto prípade sa nevykoná rozpoznanie paralelných spotrebičov
(autorádio, ...).
Iba pri Acctiva Professional 35 A:
-
„Expert“ (ZAP / VYP)
Na aktiváciu režimu Expert („Expert“ ZAP) je potrebné nasledujúce zadanie:
číslo kódu 1511.
V prevádzkovom režime nabíjania umožňuje režim Expert („Expert“ ZAP)
nastavenie napätia na konci nabíjania na menovité napätie (6 V, 12 V, 24 V)
pre MOKRÝ, GÉLOVÝ akumulátor a akumulátor AGM
prispôsobenie napätia na konci nabíjania a napätia pre udržiavacie nabíjanie v
režime USER
Vyrovnávacia prevádzka
-
Konštantné napätie, nastaviteľné
Refresh (konfigurovateľné iba pri Acctiva Professional 35 A)
-
Na konfiguráciu prevádzkového režimu „Refresh“ je potrebné nasledujúce zadanie:
číslo kódu 1511.
Napätie a doba na konci nabíjania, nastaviteľné
Režim napájacieho dielu
-
Konštantné napätie, nastaviteľné
78
Page 79

Charakteristiky
Bezpečnosť
Dostupné
charakteristiky
NEBEZPEČENSTVO!
Nebezpečenstvo spôsobené nesprávnym ovládaním.
Následkom môžu byť vážne poranenia osôb alebo poškodenia zariadenia.
Dodržujte údaje výrobcu akumulátorov.
▶
Počas nastavovania parametrov na nabíjačku nepripájajte žiaden akumulátor.
▶
Prevádzkový
režim
nabíjanie
Aku-
mulát
or
MOKR
Ý
AGM
GÉL
USER
)
3
Charak-
ter-
istika
IUoU
I
25
/3
5
1
1)
U
1
[6/12/24V]
7.2/14.4/28.
I
[6/12/24V]
2
6.75/13.5/2
8
7.35/14.7/2
9.4
7.05/14.1/2
6.84/13.68/
-
8.2
2-30 1.9-29.9
U
2
7
27.36
SK
Exp.
3)
áno
Vyrovnávacia
prevádzka
Refresh
Režim napája-
cieho dielu
Výmena aku-
mulátora
I
1
Hlavný nabíjaciu prúd [A]
maximálny prúd zariadenia: 25/35 A
I
2
Prúd dobíjania [A na 100 Ah nastavenej kapacity akumulátora]
Všetky IU
MOKR
Ý
AGM
IUIoU
GÉL
3
USER
)
IUa
žiadna IU
Všetky IU
25
/3
25
/3
5
35
2)
35
4)
25
/3
5
1)
5
6.75/13.5/2
7
7.2/14.4/28.
8
- - áno
6.75/13.5/2
4
7
7.35/14.7/2
9.4
7.05/14.1/2
6.84/13.68/
2
27.36
8.2
2-34 - - áno
6.75/13.5/2
7
6.75/13.5/2
7
- - áno
- - nie
nie
U
1
Koncové nabíjacie napätie [V]
79
Page 80

U
I
1
U
1
U
2
I
1
U
1
U
2
I
2
2
Udržiavacie nabíjacie napätie [V]
Po 12 h automatické prepnutie na impulzné udržiavanie úrovne
nabitia, okrem aplikácie User v režime Expert.
Pri nabíjačke Acctiva Smart 25 A nie je k dispozícii režim Expert ani
charakteristika USER.
1)
20 A na 100 Ah nastavenej kapacity akumulátora
2)
3)
10 A na 100 Ah nastavenej kapacity akumulátora
v režime Expert nastavené napätie na konci nabíjania a udržiavacie
napätie, iba pre vyškolený odborný personál
4)
Pri režime napájacieho dielu je hlavný nabíjací prúd aj pri nabíjačke
Acctiva Smart 25 A I1 35 A
Nabíjacia charakteristika IUoU:
I1 = hlavný nabíjací prúd
U1 = napätie na konci nabíjania
U2 = udržiavacie napätie
Charakteristika „Refresh“ IUIoU:
I1 = hlavný nabíjací prúd
U1 = napätie na konci nabíjania
I2 = prúd dobíjania
U2 = udržiavacie napätie
80
Page 81
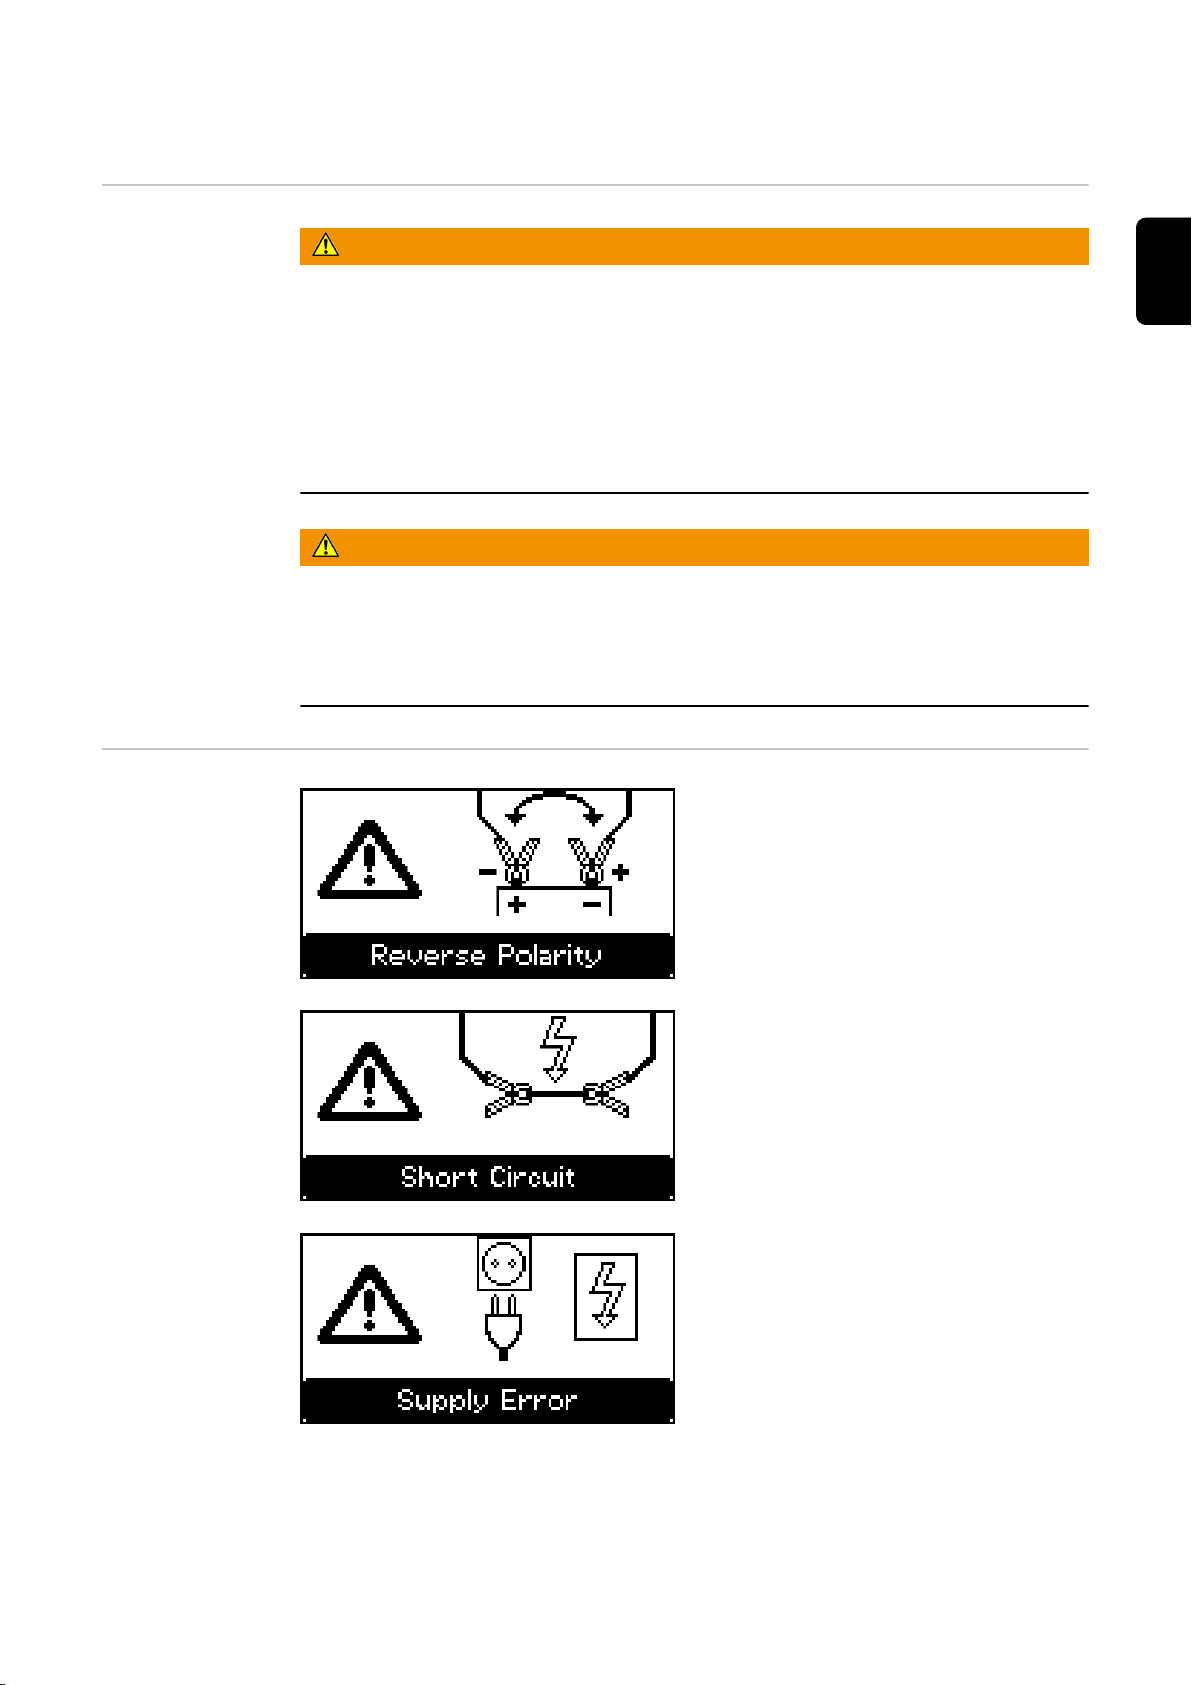
Diagnostika chýb, odstránenie chýb
Bezpečnosť
Ochranné zariadenia
NEBEZPEČENSTVO!
Nebezpečenstvo zásahu elektrického prúdu.
Následkom môžu byť vážne poranenia alebo smrť.
Pred otvorením zariadenia:
▶
Zariadenie odpojte od siete.
▶
Prerušte spojenie s akumulátorom.
▶
Osaďte zrozumiteľný bezpečnostný štítok varujúci pred opätovným zapnutím.
▶
Pomocou vhodného meracieho prístroja zabezpečte vybitie elektricky
▶
nabitých konštrukčných dielov (napr. kondenzátorov).
NEBEZPEČENSTVO!
Nebezpečenstvo nedostatočného spojenia ochranného vodiča.
Následkom môžu byť vážne poranenia osôb alebo materiálne škody.
Skrutky skrine predstavujú vhodné spojenie pre ochranný vodič na
▶
uzemnenie skrine a nesmú sa preto nahrádzať inými skrutkami bez spoľahlivého spojenia ochranného vodiča.
Vodiče nabíjačky prepólované, aktivovala sa ochrana proti prepólovaniu
SK
Odstránenie:
Akumulátor pripojte so správnou
-
polaritou
Skrat nabíjacích svoriek alebo káblov,
rozpoznanie skratu je aktívne
Odstránenie:
Skontrolujte vodiče nabíjačky, kon-
-
takty a póly akumulátora
Sieťová porucha – sieťové napätie
mimo tolerančného rozsahu
Odstránenie:
Skontrolujte podmienky siete
-
81
Page 82

Chyby nabíjania
Prepätie akumulátora
Odstránenie:
-
Stavové hlásenia s externou príčinou:
30 Príčina: Prekročenie času v príslušnej nabíjacej fáze
Odstránenie:
Správne nastavte Ah.
-
Skontrolujte paralelné spotrebiče (autorádio, ...)
-
Teplota akumulátora je príliš vysoká
-
Nastavte správny prevádzkový
režim a správne napätie
31 Príčina: Príliš veľa Ah je nabitých, príliš málo Ah je nastavených
Odstránenie:
Správne nastavte Ah.
-
Skontrolujte paralelné spotrebiče (autorádio, ...)
-
Ak je akumulátor chybný, vymeňte ho.
-
32 Príčina: Doplnkový externý senzor teploty sa aktivoval pri nedostatočnej
teplote
Odstránenie:
Akumulátor nabíjajte v klimaticky vhodnej miestnosti.
-
33 Príčina: Doplnkový externý senzor teploty sa aktivoval pri nadbytočnej
teplote
Odstránenie:
Akumulátor nechajte vychladiť alebo ho nabíjajte v klimaticky vhod-
-
nej miestnosti.
34 Príčina: Navolené príliš vysoké napätie akumulátora
Odstránenie:
Nastavte správne napätie akumulátora
-
35 Príčina: Napätie je po 2 h pod požadovaným napätím – prevádzkový režim
„Refresh“ vo fáze analýzy
Odstránenie:
Skontrolujte paralelné spotrebiče (autorádio, ...)
-
Ak je akumulátor chybný, vymeňte ho.
-
82
36 Príčina: Skrat článkov
Odstránenie:
Skontrolujte paralelné spotrebiče (autorádio, ...)
-
Ak je akumulátor chybný, vymeňte ho.
-
Page 83

37 Príčina: Prúd pri udržiavacom nabíjaní je príliš vysoký
Odstránenie:
Skontrolujte paralelné spotrebiče (autorádio, ...)
-
Stavové hlásenia pri chybe zariadenia:
50 Príčina: Chybná výstupná poistka zariadenia
Odstránenie:
51 Príčina: Sekundárna teplota mimo prípustného rozsahu
Odstránenie:
52 Príčina: Chybný regulátor prúdu
Upovedomte autorizovaný servis
-
Upovedomte autorizovaný servis
-
SK
Odstránenie:
Upovedomte autorizovaný servis
-
53 Príčina: Chybný externý senzor teploty
Odstránenie:
Vymeňte externý senzor teploty
-
60 Príčina: Neplatné číslo charakteristiky
Odstránenie:
Upovedomte autorizovaný servis
-
61 Príčina: Neplatný blok charakteristiky
Odstránenie:
Upovedomte autorizovaný servis
-
62 Príčina: nesprávna kontrolná suma hodnôt kalibrácie
Odstránenie:
Upovedomte autorizovaný servis
-
63 Príčina: nesprávny typ zariadenia
Odstránenie:
Upovedomte autorizovaný servis
-
83
Page 84

Technické údaje
Elektrické údaje,
vstup
Normy
Sieťové napätie ~ 230 V AC, +/- 15 %
Sieťová frekvencia 50/60 Hz
Sieťový prúd max. 9 A efektívne
Sieťové istenie max. 16 A
Účinnosť max. 96 %
Efektívny výkon max. 1120 W
Príkon (pohotovostná prevádzka) max. 2,4 W
Trieda ochrany I (s ochranným
vodičom)
Max. povolená impedancia siete na rozhraní (PCC)
k verejnej sieti
Trieda zariadení EMK A
Kontrolný znak CE
IEC 60068-2-6 Sínusové kmity (10 – 150 Hz; 1,5 h / os)
IEC 60068-2-29 Opakované nárazy „Repetitive shock“ (25 g / 6 ms /
1 000 nárazov)
žiadna
Elektrické údaje,
výstup
Údaje o akumulátore
EN 60335-1 EN 60335-2-29
EN 62233 Norma EMF
Menovité výstupné napätie 6 V / 12 V / 24 V DC
Rozsah výstupného napätia 2 V – 31 V
Východiskový prúd
Acctiva Smart 25 A
Východiskový prúd
Acctiva Professional 35 A
Spätný prúd akumulátora < 1 mA
*)
35 A v režime napájacieho dielu
6 V / 12 V / 24 V DC 3 – 350 Ah
25 A*) pri 28,8 V DC
25 A*) pri 14,4 V DC
25 A*) pri 7,2 V DC
35 A pri 28,8 V DC
35 A pri 14,4 V DC
35 A pri 7,2 V DC
84
Page 85

Technické údaje
Chladenie Konvekcia a ventilátor
Rozmery d x š x v 270 x 168 x 100 mm
(10.63 x 6.61 x 3.94 in.)
Hmotnosť (bez kábla) 2 kg (4.41 lb.)
SK
Okolité podmienky
Prevádzková teplota -20 °C – +40 °C (>30 C derat-
ing)
(-4 °F – +104 °F) (>86 °F derating)
Skladovacia teplota -40 °C - +85 °C
(-40 °F - +185 °F)
Stupeň krytia IP40
85
Page 86

86
Page 87

Sadržaj
Sigurnosni propisi 89
Objašnjenje sigurnosnih napomena 89
Općenito 89
Namjenska upotreba 90
Uvjeti okoline 90
Sigurnost podataka 90
Mrežni priključak 90
Opasnosti od mrežne struje i struje punjenja 90
Opasnosti od kiselina, plinova i para 91
Opće napomene o rukovanju akumulatorima 91
Osobna zaštita 91
Upotreba od strane djece i osoba s invaliditetom 91
Sigurnosne mjere tijekom normalnog rada 92
EMC kategorizacija uređaja 92
EMC mjere 92
Održavanje 92
Jamstvo i odgovornost 93
Sigurnosno-tehnička provjera 93
Oznake na uređaju 93
Odlaganje 93
Autorska prava 93
Opće informacije 94
Načelo 94
Koncept uređaja 94
Upozorenja na uređaju 94
Odredbe za postavljanje 95
Stavljanje u pogon 96
Sigurnost 96
Propisna primjena 96
Mrežni priključak 96
Sigurnosni koncept – serijski zaštitni uređaji 97
Upravljački elementi i priključci 98
Općenito 98
Upravljačka ploča 98
Priključivanje opcija 99
Priključci 99
Sigurnosni stremen 100
Sustav blokiranja 100
Uklonite poklopce za priključke i opcije 100
Opcija Update USB 100
Montaža nosača i vlačnog rasterećenja za kabel za punjenje 101
Opcionalna ručka za nošenje 101
Opcija zaštite za rubove 101
Opcija zidni nosač 102
Priprema za sigurnosnu bravu 102
Montaža 102
Načini rada 104
Opće informacije 104
Dostupni načini rada 104
Odabir načina rada 104
Način rada „punjenje” 104
Način rada „impulsni rad” 105
Način rada „Refresh” 105
Način rada „zamjena akumulatora” 105
Način rada „napajanje” 105
Postavke uređaja 105
Način rada „punjenje” 106
Opće informacije 106
Punjenje akumulatora 106
Prekid postupka punjenja 108
HR
87
Page 88

Nastavak postupka punjenja 108
Način rada „impulsni rad” 109
Opće informacije 109
Impulsni rad akumulatora 109
Prekid impulsnog rada 110
Nastavak impulsnog rada 110
Način rada „Refresh” 111
Opće informacije 111
Reaktivacija akumulatora 112
Prekid načina rada „Refresh” 113
Nastavak načina rada „Refresh” 114
Način rada „zamjena akumulatora” 115
Opće informacije 115
Zamjena akumulatora 115
Način rada „napajanje” 117
Preduvjeti 117
Način rada „napajanje” 117
Postavke uređaja 119
Opće informacije 119
Odabir načina rada „postavke uređaja” 119
Konfiguracija 119
Karakteristične krivulje 121
Sigurnost 121
Dostupne karakteristične krivulje 121
Dijagnoza grešaka, uklanjanje grešaka 123
Sigurnost 123
Sigurnosni uređaji 123
Kvar pri punjenju 124
Tehnički podaci 126
Podaci o električnoj energiji, ulaz 126
Standardi 126
Podaci o električnoj energiji, izlaz 126
Podaci o akumulatoru 126
Tehnički podaci 127
Uvjeti okoline 127
88
Page 89
Sigurnosni propisi
Objašnjenje sigurnosnih napomena
OPASNOST!
Označava neposrednu opasnost.
Ako se ona ne izbjegne, posljedice mogu biti smrtonosne ili vrlo teške ozljede.
▶
UPOZORENJE!
Označava moguću opasnu situaciju.
Ako se ona ne izbjegne, posljedice mogu biti smrtonosni i najteži oblici
▶
ozljeda.
OPREZ!
Označava moguću štetnu situaciju.
Ako se ona ne izbjegne, posljedice mogu biti male ili manje ozljede, kao i ma-
▶
terijalna šteta.
NAPOMENA!
Označava mogućnost manjkavih rezultata rada i štete na opremi.
HR
Općenito Uređaj je izrađen pomoću najnovije tehnologije i u skladu s priznatim sigurnosno-
tehničkim propisima. Međutim, nepravilna upotreba ili zloupotreba može ugroziti
život i zdravlje korisnika ili trećih osoba,
-
uređaj i ostalu imovinu korisnika,
-
učinkovit rad s uređajem.
-
Sve osobe koje sudjeluju u stavljanju u pogon, upotrebi, održavanju i servisiranju
uređaja moraju
imati odgovarajuće kvalifikacije,
-
temeljito pročitati ove upute za upotrebu te ih se strogo pridržavati.
-
Upute za upotrebu moraju se stalno čuvati na lokaciji upotrebe uređaja. Osim uputa za upotrebu, obavezno je pridržavati se općih i lokalnih propisa o sprečavanju
nesreća i zaštiti okoliša.
Sve napomene o sigurnosti i opasnostima na uređaju
držite u čitljivom stanju,
-
nemojte oštetiti,
-
nemojte ukloniti,
-
nemojte prekriti, zalijepiti ili premazati.
-
Položaje napomena o sigurnosti i opasnostima na uređaju možete pronaći u
poglavlju „Opće informacije“ u sklopu uputa za upotrebu uređaja.
Smetnje koje mogu utjecati na sigurnost moraju se ukloniti prije uključivanja
uređaja.
Riječ je o vašoj sigurnosti!
89
Page 90

Namjenska upotreba
Uređaj se smije upotrebljavati isključivo u svrhe za koje je namijenjen. Svaki drugi
oblik upotrebe smatra se nepropisnim. Proizvođač ne snosi odgovornost za tako
nastale štete ili manjkave rezultate rada.
Namjenska upotreba obuhvaća i sljedeće:
cjelovito čitanje i pridržavanje uputa za upotrebu i svih napomena o sig-
-
urnosti i opasnostima,
pravilno provođenje inspekcijskih radova i radova na održavanju,
-
pridržavanje svih napomena proizvođača baterije i vozila,
-
Besprijekoran rad uređaja ovisi o ispravnom rukovanju. Uređaj se prilikom
rukovanja ni u kojem slučaju ne smije vući za kabel.
Uvjeti okoline Upotreba ili skladištenje uređaja izvan navedenog raspona smatraju se nepropisn-
im. Proizvođač ne snosi odgovornost za tako nastale štete.
Podrobnije informacije o dopuštenim uvjetima okoline možete pronaći u
tehničkim podacima.
Sigurnost
podataka
Mrežni
priključak
Opasnosti od
mrežne struje i
struje punjenja
Korisnik je odgovoran za stvaranje pričuvne kopije promjena tvorničkih postavki.
Proizvođač ne snosi odgovornost u slučaju brisanja osobnih postavki.
Uređaji velike snage mogu zbog svoje potrošnje električne struje smanjiti energetsku kvalitetu mreže.
To može utjecati na pojedine vrste uređaja na sljedeće načine:
ograničenja priključka
-
-
zahtjevi koji se odnose na maksimalnu dopuštenu mrežnu impedanciju
-
zahtjevi koji se odnose na minimalnu dopuštenu snagu kratkog spoja
*)
na svakom priključenju na javnu mrežu
*)
*)
pogledajte Tehničke podatke
U tom slučaju rukovatelj ili korisnik uređaja mora osigurati da je priključenje
uređaja dopušteno, eventualno u konzultaciji s poduzećem za opskrbu
električnom energijom.
VAŽNO! Potrebno je sigurno uzemljiti mrežni priključak!
Pri radu s punjačima izlažete se brojnim opasnostima, kao što su npr.:
opasnost od mrežne struje i struje punjenja,
-
štetna elektromagnetska polja koja mogu ugroziti život osoba sa srčanim
-
stimulatorom.
90
Strujni udar može biti smrtonosan. Svaki strujni udar u osnovi je opasan za život.
Da biste izbjegli strujni udar tijekom rada:
nikada ne dirajte dijelove unutar i izvan uređaja koji su pod naponom,
-
nikada ne dirajte polove baterija,
-
nemojte kratko spojiti kabel ili stezaljke za punjenje.
-
Svi kabeli i žice moraju biti pričvršćeni, neoštećeni, izolirani i prikladnih dimenzija.
Labavi spojevi, spaljeni, oštećeni kabeli i žice i kabeli ili žice premalih dimenzija
moraju se odmah popraviti u ovlaštenom servisu.
Page 91

Opasnosti od
kiselina, plinova i
para
Baterije sadrže kiseline koje su štetne za oči i kožu. Prilikom punjenja baterija
nastaju plinovi i pare koji mogu naštetiti zdravlju, a u određenim uvjetima su i visokoeksplozivni.
Punjač upotrebljavajte isključivo u dobro prozračenim prostorijama kako bi se
spriječilo nakupljanje plinova. Baterijske se prostorije ne smatraju eksplozivnima
ako se prirodnom ili tehničkom ventilacijom održava koncentracija vodika manja
od 4 %.
Prilikom punjenja održavajte minimalan razmak od 0,5 m (19,69 inča) između baterije i punjača. Moguće izvore zapaljenja, kao što su vatra i otvoren izvor
svjetlosti, držite podalje od baterije.
Priključke na bateriju (npr. stezaljke za punjenje) nikada nemojte uklanjati tijekom
punjenja.
Nikada nemojte udisati nastale plinove i pare - Osigurajte odgovarajuću ventilaciju.
Da biste izbjegli kratke spojeve, ne postavljajte na bateriju alate ili električki
vodljive metale.
Kiselina iz baterija nikada ne smije dospjeti u oči, na kožu ili odjeću. Nosite zaštitne naočale i odgovarajuću zaštitnu odjeću. Ako dođe do prskanja kiseline, odmah
je temeljito isperite čistom vodom te po potrebi potražite liječničku pomoć.
HR
Opće napomene
o rukovanju akumulatorima
Osobna zaštita Osobe, a prvenstveno djeca, moraju se tijekom rada uređaja držati dalje od rad-
Zaštitite akumulatore od prljavštine i mehaničkih oštećenja.
-
Napunjene akumulatore skladištite u hladnim prostorijama. Pri temperaturi
-
od približno +2 °C (35,6 °F) dolazi do manjeg samopražnjenja.
U skladu s podacima proizvođača akumulatora ili tijekom tjednog vizualnog
-
pregleda utvrdite je li akumulator napunjen kiselinom (elektrolit) do oznake
maksimalne količine.
Ne puštajte uređaj u rad ili ga odmah zaustavite i akumulator predajte na
-
pregled u ovlašteni servis u sljedećim slučajevima:
neujednačena razina kiseline ili velika potrošnja vode u pojedinim ćeli-
-
jama uzrokovana mogućim kvarom;
nedopušteno zagrijavanje akumulatora iznad 55 °C (131 °F).
-
nog područja. Ako se osobe ipak nalaze u blizini,
obavijestite ih o svim opasnostima (kiseline i plinovi koji su štetni za zdravlje,
-
opasnost od mrežne struje i struje punjenja...),
stavite im na raspolaganje zaštitna sredstva.
-
Prije napuštanja radnog područja pobrinite se da ni u vašoj odsutnosti ne može
doći do ozljede osoba ili materijalne štete.
Upotreba od
strane djece i
osoba s invaliditetom
Ovaj uređaj smiju koristiti djeca u dobi od 8 i starija te osobe sa smanjenim tjelesnim, senzornim ili mentalnim sposobnostima ili nedostatkom iskustva i znanja ako
su pod nadzorom ili ako su upućene u sigurnu upotrebu uređaja i ako razumiju
opasnosti koje iz toga proizlaze. Djeca se ne smiju igrati uređajem. Čišćenje i korisničko održavanje ne smiju provoditi djeca bez nadzora.
91
Page 92

Sigurnosne
mjere tijekom
normalnog rada
Uređaje sa zaštitnim vodičem upotrebljavajte samo na mreži sa zaštitnim
vodičem i utičnicom s kontaktom za zaštitni vodič. Ako je uređaj priključen na
mrežu bez zaštitnog vodiča ili utičnicu bez kontakta za zaštitni vodič, to se
smatra grubim nemarom. Proizvođač ne snosi odgovornost za tako nastale štete.
Uređaj upotrebljavajte isključivo u skladu sa stupnjem zaštite navedenim na
nazivnoj pločici.
Nikada ne puštajte uređaj u pogon kada je oštećen.
Električar mora redovito provjeravati funkcionalnost zaštitnog vodiča na mrežnim
kabelima i kabelima uređaja.
Sigurnosni uređaji i komponente koji nisu potpuno funkcionalni i nisu u prihvatljivom stanju moraju se popraviti u ovlaštenom servisu prije uključenja
uređaja.
Sigurnosni uređaji ne smiju se zaobilaziti niti stavljati izvan pogona.
Nakon ugradnje potrebna je slobodno dostupna mrežna utičnica.
EMC kategorizacija uređaja
EMC mjere U posebnim slučajevima, unatoč pridržavanju standardizirane emisijske granice,
Održavanje Prije svake upotrebe provjerite jesu li mrežna utičnica, kabel za punjenje i steza-
Uređaji emisijskog razreda A:
predviđeni su samo za upotrebu u industrijskim zonama
-
u drugim područjima mogu prouzročiti smetnje povezane s vodičima i zračen-
-
jem.
Uređaji emisijskog razreda B:
ispunjavaju emisijske zahtjeve za stambene i industrijske zone. To vrijedi i za
-
stambene zone u kojima se energetska opskrba odvija putem javne niskonaponske mreže.
EMC kategorizacija uređaja prema nazivnoj pločici ili tehničkim podacima.
mogu nastupiti smetnje za predviđeno područje primjene (npr. ako se na mjestu
upotrebe nalaze osjetljivi uređaji ili ako je mjesto upotrebe u blizini radijskih ili
televizijskih prijamnika).
U tom slučaju korisnik je obvezan poduzeti mjere za uklanjanje smetnji.
ljka za punjenje oštećeni.
Ako je kućište uređaja prljavo, obrišite ga mekom tkaninom te ga očistite
isključivo sredstvom koje ne sadrži razrjeđivač.
92
Page 93

Jamstvo i odgovornost
Jamstveno razdoblje za uređaj iznosi 2 godine od datuma na računu.
Proizvođač ne preuzima nikakvu odgovornost ni za kakve štete koje su
uzrokovane nečime od sljedećeg:
Nepropisna primjena uređaja.
-
Nepropisna montaža i rukovanje.
-
Upotreba uređaja s neispravnim sigurnosnim napravama.
-
Nepridržavanje napomena u uputama za upotrebu.
-
Neovlaštene izmjene na uređaju.
-
Katastrofe uzrokovane stranim tijelima ili višom silom.
-
HR
Sigurnosnotehnička
provjera
Oznake na
uređaju
Proizvođač preporučuje da se najmanje svakih 12 mjeseci provede sigurnosnotehnička provjera.
Sigurnosno-tehničku provjeru smije obavljati samo ovlašteni električar
nakon izmjena,
-
nakon ugradnje ili dogradnje,
-
nakon popravaka i održavanja,
-
najmanje svakih 12 mjeseci.
-
Prilikom sigurnosno-tehničke provjere potrebno je pridržavati se odgovarajućih
međunarodnih i nacionalnih normi i smjernica.
Više informacija o sigurnosno-tehničkoj provjeri možete dobiti u servisnoj službi.
Ondje možete dobiti i potrebnu dokumentaciju.
Uređaji s oznakom CE ispunjavaju osnovne zahtjeve u skladu s odgovarajućim
smjernicama.
Uređaji s kontrolnim znakom EAC ispunjavaju zahtjeve relevantnih normi za
Rusiju, Bjelorusiju, Kazahstan, Armeniju i Kirgistan.
Uređaji s oznakom certifikata CP ispunjavaju zahtjeve relevantnih normi za
Maroko.
Odlaganje Otpadna električna i elektronička oprema mora se odvojeno prikupljati u skladu s
europskom direktivom i nacionalnim zakonodavstvom i reciklirati na ekološki prihvatljiv način. Rabljeni se uređaji vraćaju dobavljaču ili predaju lokalnom
ovlaštenom sustavu prikupljanja i zbrinjavanja. Ispravno zbrinjavanje otpadnog
uređaja potiče održivo recikliranje materijalnih resursa. Ignoriranje može imati
posljedice za zdravlje/okoliš.
Ambalažni materijali
Odvojeno prikupljanje. Provjerite propise vaše zajednice. Smanjite volumen kartonskih kutija.
Autorska prava Proizvođač zadržava autorska prava za ove upute za upotrebu.
Tekst i ilustracije odgovaraju tehničkom stanju u vrijeme tiskanja. Zadržavamo
pravo na izmjene. Sadržaj ovih uputa za upotrebu ne predstavlja temelj ni za kakve zahtjeve kupca. Bit ćemo vam zahvalni na prijedlozima za poboljšanja i napomene o pogreškama u uputama za upotrebu.
93
Page 94

Opće informacije
In:
Out.:
Acctiva Professional 35A XX
~230V 50/60Hz;1120W
DC 2V-31V/35A
IP 40
4,010,361,xxx
Fronius International GmbH
Froniusstraße 1
A-4643 Pettenbach
EMC Emission
Class A
Ser. No.:
Part No.:
xxxxxxxx
xxxxxxxx
Ser. No.:
In:
Out.:
Part No.:
Acctiva Smart 25A XX
~230V 50/60Hz;1120W
DC 2V-31V/35A
IP 40
EMC Emission
Class A
Fronius International GmbH
Froniusstraße 1
A-4643 Pettenbach
4,010,360,xxx
xxxxxxxx
xxxxxxxx
Načelo Glavna je značajka nove tehnologije Active Inverter Technology inteligentno pun-
jenje. Pritom se postupak punjenja automatski temelji na starosti i razini napunjenosti akumulatora. Ova inovacija pozitivno utječe na vijek trajanja i potrebni
opseg održavanja akumulatora, ali i na ekonomičnost.
Tehnologija Active Inverter Technology temelji se na pretvaraču s aktivnim ispravljanjem i na inteligentnom sigurnosnom isključivanju. Neovisno o mogućim
oscilacijama mrežnog napona, digitalni regulator održava struju i napon punjenja
konstantnim.
Koncept uređaja Kompaktna konstrukcija smanjuje potrebu za prostorom i znatno olakšava mobil-
nu primjenu. Punjač se uz opsežnu opremu može dodatno modularno proširiti i
time savršeno opremiti za buduću upotrebu. Na raspolaganju su brojne opcije.
Ograničenje napona jamči optimalnu zaštitu elektroničkog sustava u vozilu.
Upozorenja na
uređaju
Na označnoj pločici punjača nalaze se sigurnosni simboli. Sigurnosni simboli ne
smiju se ukloniti niti prebojiti.
94
Primijenite funkcije tek nakon što u potpunosti pročitate upute za upotrebu.
Moguće izvore zapaljenja, kao što su vatra, iskre i otvoren izvor
svjetlosti, držite podalje od akumulatora.
Page 95

Opasnost od eksplozije! Punjenjem u akumulatoru nastaje praskavi
plin.
Akumulatorska je kiselina korozivna i ne smije dospjeti u oči, na kožu ili
odjeću.
Osigurajte dovoljnu ventilaciju tijekom punjenja. Prilikom punjenja
održavajte minimalan razmak od 0,5 m (19,69 in) između akumulatora i
punjača.
Iskorišteni uređaji ne smiju se odlagati s kućanskim otpadom, već u skladu sa sigurnosnim propisima.
HR
Odredbe za
postavljanje
UPOZORENJE!
Opasnost od prevrtanja ili pada predmeta.
Posljedica mogu biti teške ozljede i materijalna šteta.
Uređaj postavite na ravnu, čvrstu podlogu tako da bude stabilan ili ga
▶
montirajte na čvrstu podlogu u skladu s odjeljkom „Montaža”.
Odjeljak „Montaža” nalazi se u poglavlju „Upravljački elementi i priključci”.
▶
Uređaj je ispitan u skladu sa stupnjem IP zaštite IP40 što podrazumijeva
sljedeće:
zaštitu od prodiranja krutih stranih tijela promjera većeg od 1,0 mm (0,04 in)
-
nema zaštite od vode
-
U skladu sa stupnjem IP zaštite IP40, uređaj se mora postaviti i upotrebljavati u
suhim, zatvorenim prostorijama:
izbjegavajte vlagu
-
Prašina:
pripazite da metalnu prašinu koja pada ne usisa ventilator uređaja
-
npr. prilikom bušenja
-
95
Page 96

Stavljanje u pogon
Sigurnost
Propisna
primjena
UPOZORENJE!
Opasnost od nepravilnog rukovanja.
Može doći do teških ozljeda ili materijalne štete.
Opisane funkcije primijenite tek nakon što temeljito i s razumijevanjem
▶
pročitate sljedeće dokumente:
Upute za upotrebu,
▶
sve upute za upotrebu komponenti sustava, a posebno sigurnosne propise,
▶
upute za upotrebu i sigurnosne propise proizvođača akumulatora i vozila.
▶
Punjač služi za punjenje baterija koje su navedene u nastavku. Svaki drugi oblik
upotrebe smatra se nepropisnim. Proizvođač ne snosi odgovornost za tako
nastale štete. Propisna primjena obuhvaća i sljedeće:
Pridržavanje svih napomena iz uputa za upotrebu,
-
redovitu provjeru mrežnih kabela i kabela za punjenje.
-
UPOZORENJE!
Opasnost od punjenja suhih baterija (primarnih elemenata) i jednokratnih baterija.
Posljedica mogu biti teške ozljede i materijalna šteta.
Punite samo vrste baterija koje su navedene u nastavku.
▶
Mrežni
priključak
Dopušteno je punjenje sljedećih vrsta baterija:
Mokre baterije:
-
Zatvorene baterije s tekućim elektrolitom (prepoznatljive po čepovima za zatvaranje) i mokre baterije (MF) koje zahtijevaju vrlo malo održavanja ili uopće
ne zahtijevaju održavanje.
Baterije AGM:
-
Zatvorene baterije (VRLA) s utvrđenim elektrolitom (flis).
Gel baterije:
-
Zatvorene baterije (VRLA) s utvrđenim elektrolitom (gel).
Na kućištu se nalazi označna pločica s podatkom o dopuštenom mrežnom naponu. Uređaj je dimenzioniran samo za navedeni mrežni napon. Potrebnu zaštitu
mrežnog voda možete pronaći u poglavlju „Tehnički podaci”. Ako na vašoj izvedbi
uređaja nije postavljen mrežni kabel ili mrežni utikač, montirajte ga u skladu s
nacionalnim standardima.
NAPOMENA!
Opasnost od nedovoljno dimenzionirane električne instalacije.
Posljedica može biti teška materijalna šteta.
Mrežni kabel i njegovu zaštitu potrebno je postaviti u skladu s postojećom
▶
opskrbom struje. Vrijede tehnički podaci na označnoj pločici.
96
Page 97

Sigurnosni
koncept – serijski zaštitni
uređaji
U opseg isporuke pretvarača Active Inverter uključene su sljedeće sigurnosne
značajke:
priključne stezaljke bez napona i iskri štite od eksplozije
-
zaštita od zamjene polova sprječava oštećenje ili uništenje punjača
-
zaštita od kratkog spoja pruža učinkovitu zaštitu punjača. U slučaju kratkog
-
spoja nije potrebna zamjena osigurača
praćenje vremena punjenja učinkovito štiti od prekomjernog punjenja i
-
uništavanja akumulatora
zaštita od prekomjerne temperature s pomoću „slabljenja” (smanjenje struje
-
punjača pri porastu temperature iznad graničnog područja)
HR
97
Page 98

Upravljački elementi i priključci
(2)(1) (3) (4)
Općenito Napomena:
Zbog ažuriranja firmvera na vašem uređaju mogu biti dostupne funkcije koje nisu
opisane u ovim uputama za upotrebu ili obratno.
Zbog toga se pojedine slike na upravljačkim elementima na vašem uređaju mogu
razlikovati. Način djelovanja tih upravljačkih elemenata ipak je jednak.
UPOZORENJE!
Opasnost od nepravilnog rukovanja.
Može doći do teških ozljeda ili materijalne štete.
Opisane funkcije primijenite tek nakon što temeljito i s razumijevanjem
▶
pročitate ove upute za upotrebu.
Funkcije opisane u nastavku provedite tek nakon što temeljito i s ra-
▶
zumijevanjem pročitate upute za upotrebu komponenti sustava, a osobito sigurnosne propise.
Upravljačka
ploča
(4) Tipka Stop/Start (Zaustavi/Pokreni)
prekid i nastavak postupka punjenja
-
potvrđivanje, npr. nakon ručnog odabira napona punjenja od 6 V /
-
12 V / 24 V tipkom gore/dolje
Br. Funkcija
(1) Grafički zaslon
(2) Tipka Menü (Izbornik)
odabir željene postavke,
-
npr. Ah
(3) Tipke gore/dolje
odabir željenog načina rada,
-
npr. punjenje ili zamjena akumulatora
promjena postavke
-
odabrane tipkom Menü
(Izbornik) (2)
nakon priključivanja akumu-
-
latora:
ručni odabir napona punjenja, moguće su opcije
6 V / 12 V / 24 V
98
Page 99

Priključivanje
(1)(2)
(3) (4)
(6)
(7)
(5)
opcija
NAPOMENA!
Opasnost prilikom priključivanja opcija i pribora dok je priključen mrežni utikač.
Može doći do materijalnih oštećenja na uređaju i priboru.
Opcije i proširenja sustava priključujte samo ako je mrežni utikač izvučen i ka-
▶
bel za punjenje odvojen od akumulatora.
Priključci
HR
Br. Funkcija
(1) Mrežni kabel – sigurnosni stremen
za vlačno rasterećenje mrežnog kabela
Sigurnosni stremen nije dostupan kod mrežnih kabela sa sustavom blokiranja.
(2) AC Input – mrežna utičnica
(3) Priključak P2 – priključak I/O – nije dostupan u okviru funkcije, može se
naknadno ugraditi
za priključivanje sljedećih opcija:
imobilizator
-
kumulativna greška
-
imobilizator i kumulativna greška
-
(4) Priključak P1 – utičnica za kabel za punjenje
za priključivanje kabela za punjenje
dodatno uz priključivanje opcije toplinski kontroliranog punjenja ili
vanjskog pokretanja/zaustavljanja
(5) Uklonjivi zaslon
(6) Priključak P3 – Visual Port
za interno priključivanje zaslona
(7) Priključak P4 – Multiport
za priključivanje sljedećih opcija:
statusna žaruljica
-
ažuriranje softvera s pomoću USB priključka
-
99
Page 100

Sigurnosni
(1)
(2)
stremen
Sustav blokiranja
Uklonite poklopce za
priključke i opcije
Opcija Update
USB
100
Ako je potrebno, upotrijebite odvijač:
Poklopac (1) za priključak P4 –
-
Multiport.
Poklopac (2) za priključak P2 –
-
I/O-Port.
Neupotrijebljene priključke P2 i P4 zatvorite poklopcima (1) i (2).
Opcija Update USB omogućuje ažuriranje punjača izravno putem USB sučelja.
 Loading...