

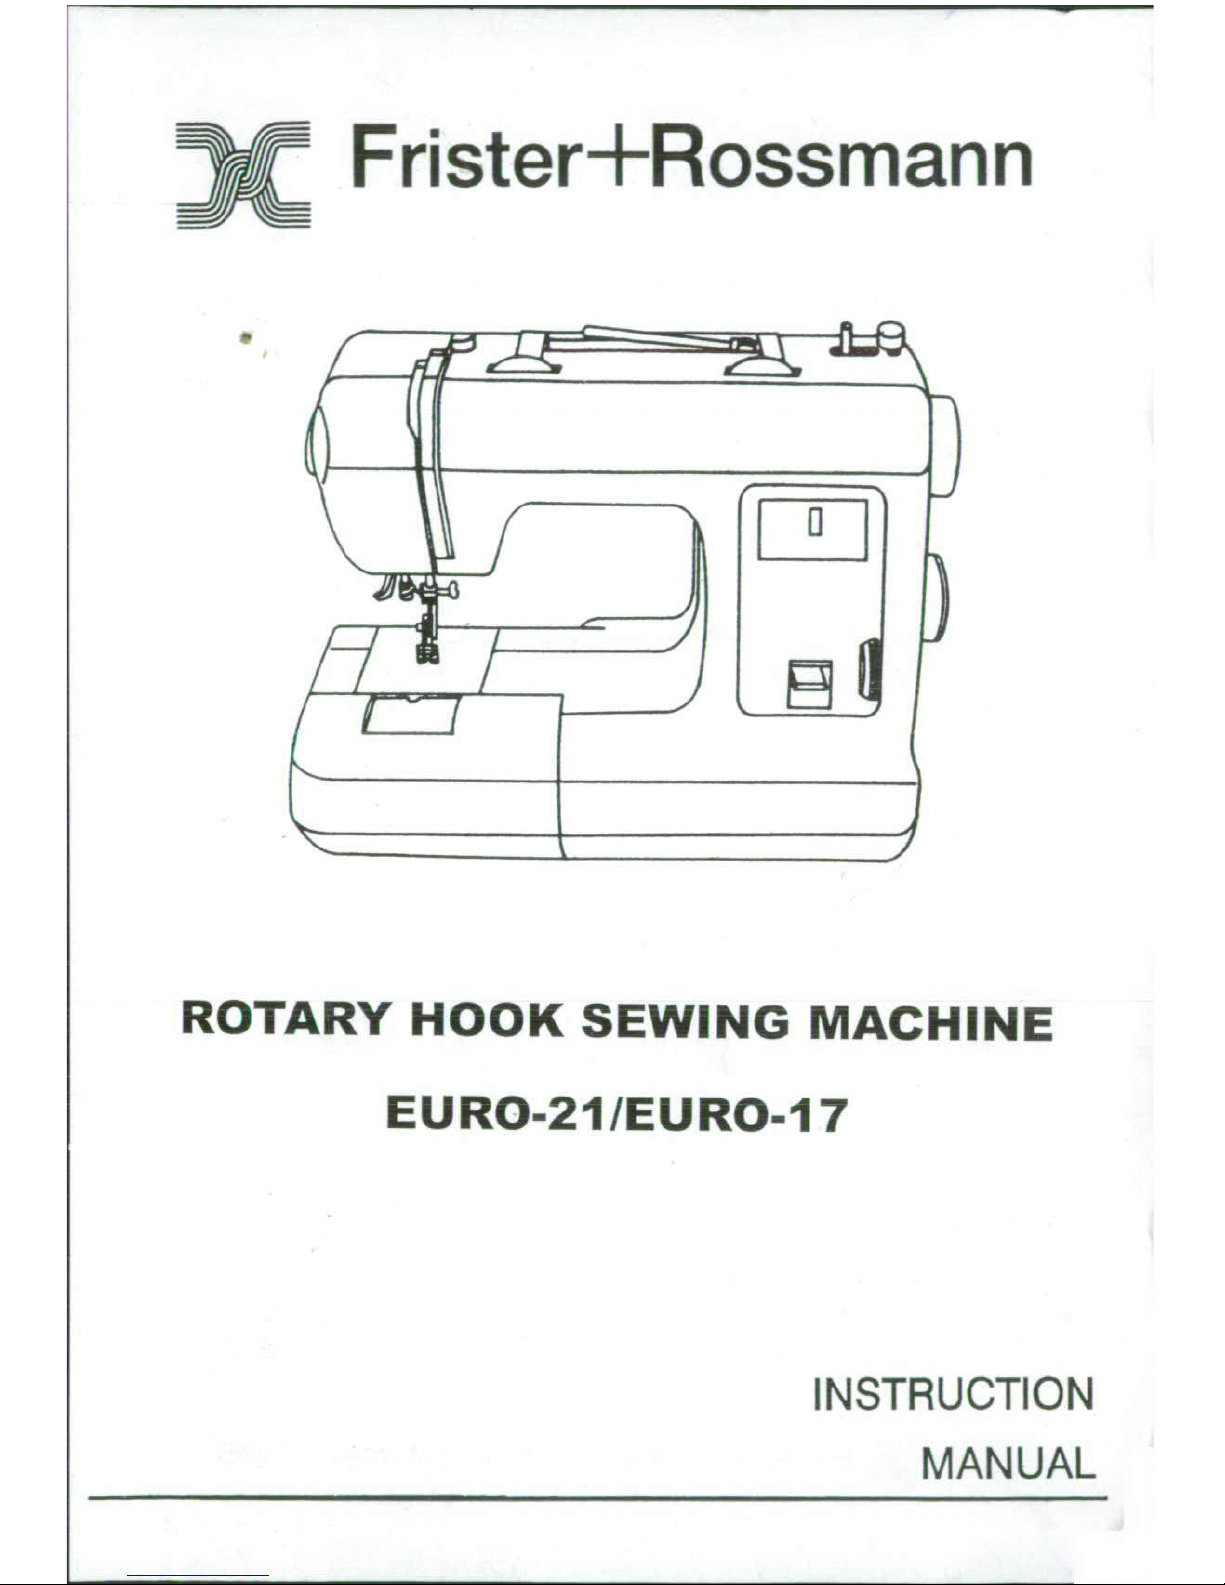
frister & rossmann EURO-21, EURO-17 Instruction Manual
X
Frister+Rossmann
ROTARY
HOOK
SEWING
MACHINE
EURO-21/EURO-17
INSTRUCTION
MANUAL
INTRODUCTION
You
are
now
the
owner
of
a
new
Sewing
Machine,
a
product
which
has
been
designed
to
carry
out
a
wide
variety
of
sewing
tasks
simply
and
efficiently.
This
Instruction
Book
has
been
written
for
you
to
help
you
use
and
enjoy
fully
the
benefits
that
it
can
provide.
Please
read
the
Book
carefully
before
you
actually
start
to
use
the
Machine
and
take.
each
operation
step
by
step.
A
thorough
understanding
of
all
the
functions
will
be
rewarded
by
many
years
of
sewing
pleasure.
If
you
have
any
questions
regarding
its
use
do
not
hesitate
to
contact
your
supplier.
PLEASE
turn
off
the
power
at
the
switch
before
leaving
the
machine
unattended.
As
soon
as
you
are
familiar
with
the
various
Parts
and
Controls
which
are
covered
in
the
first
pages
of
this
Book
you
will
wish
to
start
sewing.
Below
are
listed
a
number
of
good
habits
you
should
try
to
remember
each
time
you
sit
down
at
your
Machine.
1.Whenever
you
turn
the
Hand
Wheel
c)The
thread
type,
size
and
colour
are
manually
always
do
so
towards
you
correct
both
on
top
of
the
Machine
NEVER
away
from
you.
and
in
the
Bobbin.
2.Never
alter
any
of
the
Controls
with
d)The
threading
of
both
top
and
bottom
the
Needle
in
the
fabric
while
the
are
correct
-
eqsure
you
raise
the
Machine
is
stationary
-
otherwise
you
Presser
Foot
before
threading.
will
break
Needles.
e)Both
threads
are
drawn
back
under
3.Never
run
a
threaded
Machine
without
the
Presser
Foot.
fabric
under
the
Presser
Foot
-
f)The
correct
Presser
Foot
is
fitted
for
otherwise
the
Machine
may
'jam'
due
the
operation
you
are
going
to
sew.
to
thread
being
forced
into
the
g)The
Presser
Foot
Pressure
setting
is
Shuttle.
correct.
4.Always
practice
first
on
a
spare
piece
h)You
have
changed
the
Stitch
Selector
of
the
same
material
you
are
going
to
Control
to
your
chosen
stitch.
(Where
sew,
particularly
if
it
is
a
new
applicable.)
operation
you
have
not
used
before.
i)The
Stitch
Width
and
Stitch
Length
Controls
are
correct
-
remember
the
Then
check
the
following:
settings
given
can
only
be
as
a
guide
a)The
Presser
Foot
and
Needle
Clamp
and
may
require
adjustment
according
Screw
have
been
securely
fitted,
to
the
fabric
and
thread
you
are
using.
b)The
Needle
is
correctly
fitted
and
that
j)The
Tensions
have
been
adjusted
to
it
is
suitable
for
the
fabric
being
sewn,
produce
a
well
balanced
Stitch.
and
that
it
is
not
blunt
or
bent.
X
Frister+Rossmann
Sewing
Machines
Ltd.

INDEX
1.Getting
to
know
your
machine.................................................
1-2
2.Accessories......................................................................
3
3.Before
sewing:
Power,
Switch
.....................................................................
4
Accessory
box
....................................................................
4
Winding
the
bobbin
............................................................
5-6
Threading
upper
thread
..........................................................
7
Twin
needle
threading
(For
EURO-21
only)
.......................................
8
Removing
and
Replacing bobbin
............................................
9-10
Auto
threader
(
For
EURO-21
only
).................................................
11
Drawing
up
bobbin
thread
.....................................................
12
Replacing
needle.....................................................
..........
12
Replacing
presser
feet..........................................................
13
Fabric,
Thread
and
Needle
table
..............................................
14
Sewing
and
operation
table(
(For
EURO-21
............................
15-ISA
Sewing
and
operation
table
(
For
EURO-I?)..................................
16
4.Starting
to
sew:
Zig-zag
width
adjustment
(For
EURO-21
only)
).............................
17
Straight
stitches................................................
................
18
Reverse
sewing
.......................................................
.......
i18
Adjusting
upper
tension
..............................................
.........
19
Zig-zag
sewing
&
Seam
finishing.....................................
.......
_20
5.Special
sewing patterns:
Over-casting
sewing...........................................................
21
Straight
and
zig-zag
stretch
stitch
.........................................
__211
Blind
stitch
..............................................................
....
22-23
2
-step
buttonhole
sewing
.....
_........................
..................
24-25
Zipper
sewing
...............................................................
25-26
Three
step
zig-zag
.............................................................
26
Decorative
sewing
............................
...............................
26
Free
arm
sewing & Hemming............................
......................
27
Quilter
guide
..
.................................................................
28
Embroidery
and
Darning........................................................2M
Button
sewing........................................................
..........
29
6.Maintenance:
Cleaning
and
oiling.....................................................
......
30
Oil
inside
of
the
face
plate
.....................................................
31
Removing
and
Replacing
the
bulb
............................................
31
7.Fauit
finding
chart............................................................
32-33
1.GETTING
TO
KNOW
YOUR
MACHINE
(FRONT
VIEW)
Thread
guide
Upper
tension
dial
Take
up
lever
Bobbin
winder
spindle
Rabbi
winder
stop
Face
plate
Stitch
width
dial
(For
EURO-21
only)
Presser
foot's
Stitch
length
dial
pressure
selection
Bobbin
case
adjusting
screw
(through
hole)
Reverse
lever
Extension
table
&
accessory
box
--
1---

(REAR
VIEW)
Horizontal
spool
pin
Hand
wheel
Handle
Presser
foot
lever
Stitch
pattern
i
selector
dial
Feed
dog
height
lever
I
B/H
fine
adjustment
Power
switch
(For
qualified
technician
only)
Foot
control
socket
S/S
fine
adjustment
(For
qualified
technician
only)
Illustration
of
needle
bar
section
Threading
lever
Needle
clamp
screw
(For
EURO-21
only)
Needle
threader
(For
EURO-21
only
Bobbin & shuttle
Needle
plate
cover
Presser
foot
-2-
2.ACCESSORIES
Bobbin
Zig-zag
foot
Buttonhole
foot
Overcasting
foot
Hemmer
foot
Zipper
foot
Quilter
Blind
stitch
foot
Button
sewing
foot
Needle
Screw
driver
Buttonhole
opener
Spool
cap
-
small
Spool
cap
-
large
Oil
Extra
spool
pin
(For
EURO-21
only)
-3-
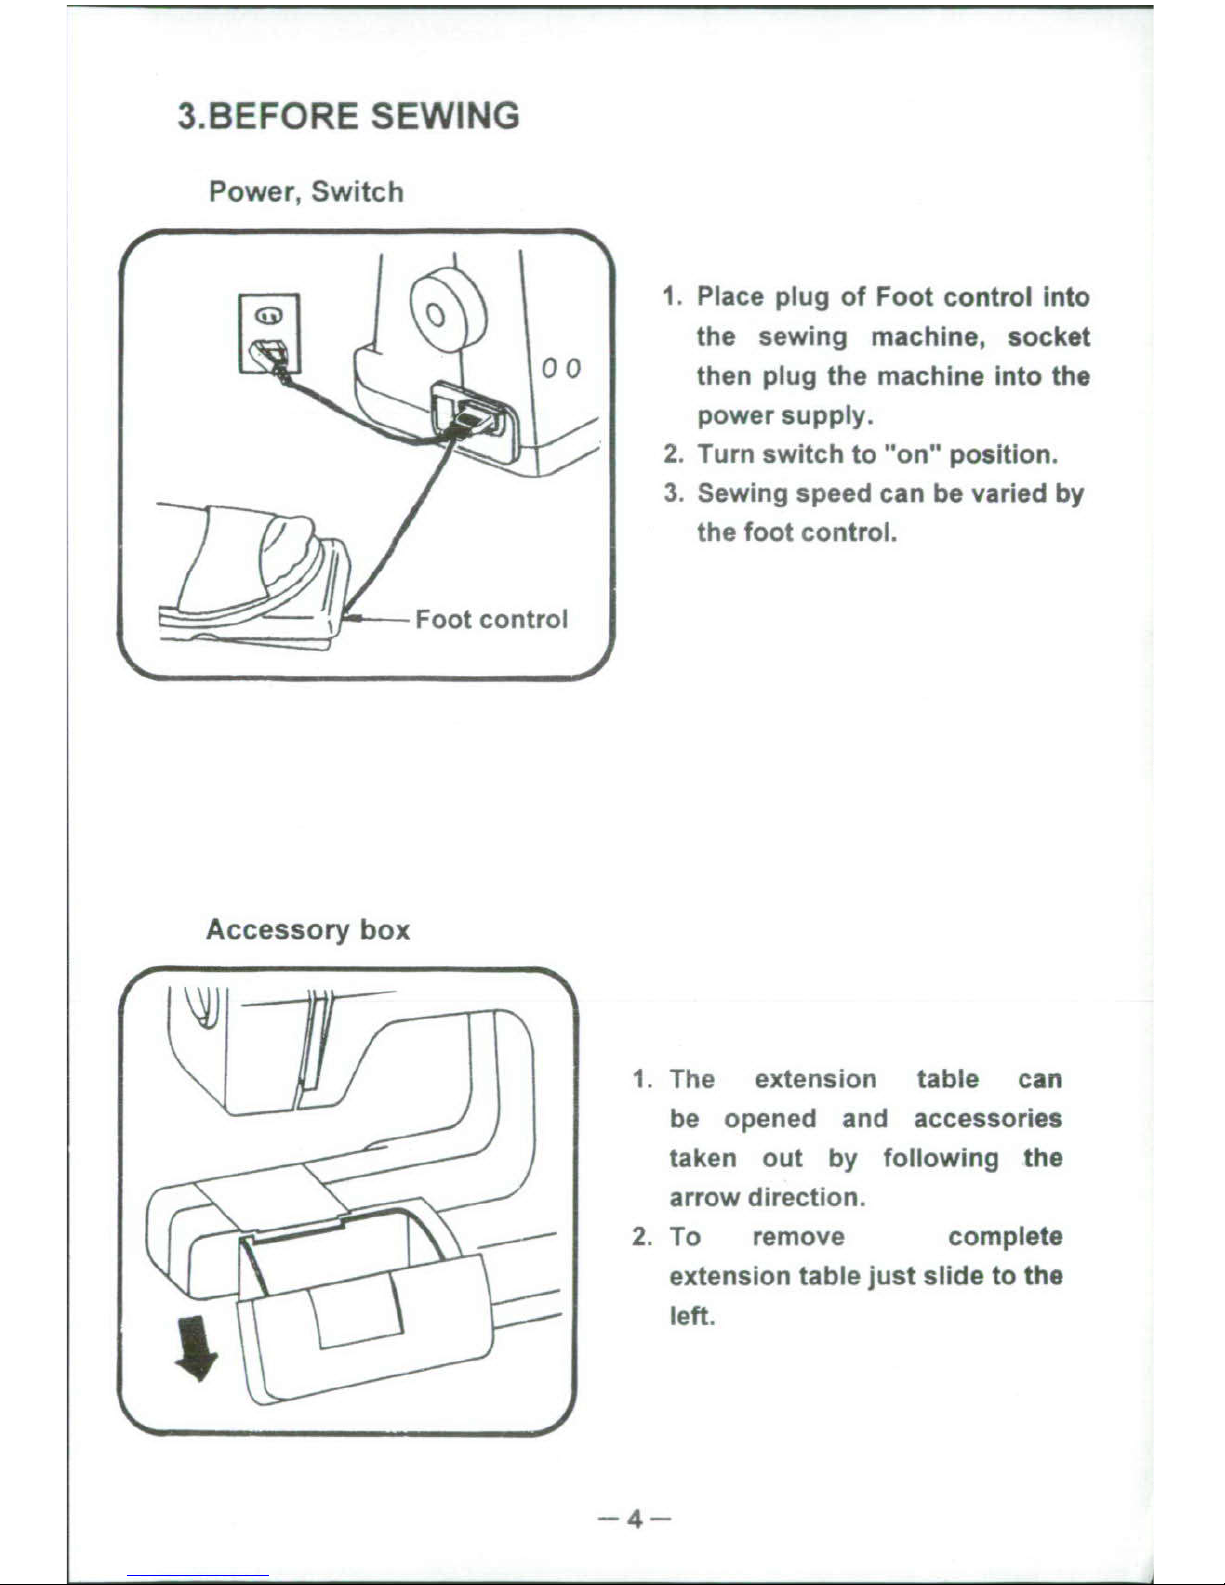
3.BEFORE
SEWING
Power,
Switch
1.
Place
plug
of
Foot
control
into
the
sewing
machine,
socket
0•
0
then
plug
the
machine
into
the
power
supply.
2.
Turn
switch to
"on"
position.
3.
Sewing
speed can
be
varied
by
Fthe
foot
control.
4
Foot
control
Accessory
box
1.
The
extension
table
can
be
opened
and
accessories
taken
out
by
following
the
arrow
direction.
2.
To
remove
complete
extension
table
just
slide
to the
L;4
left.
--4--
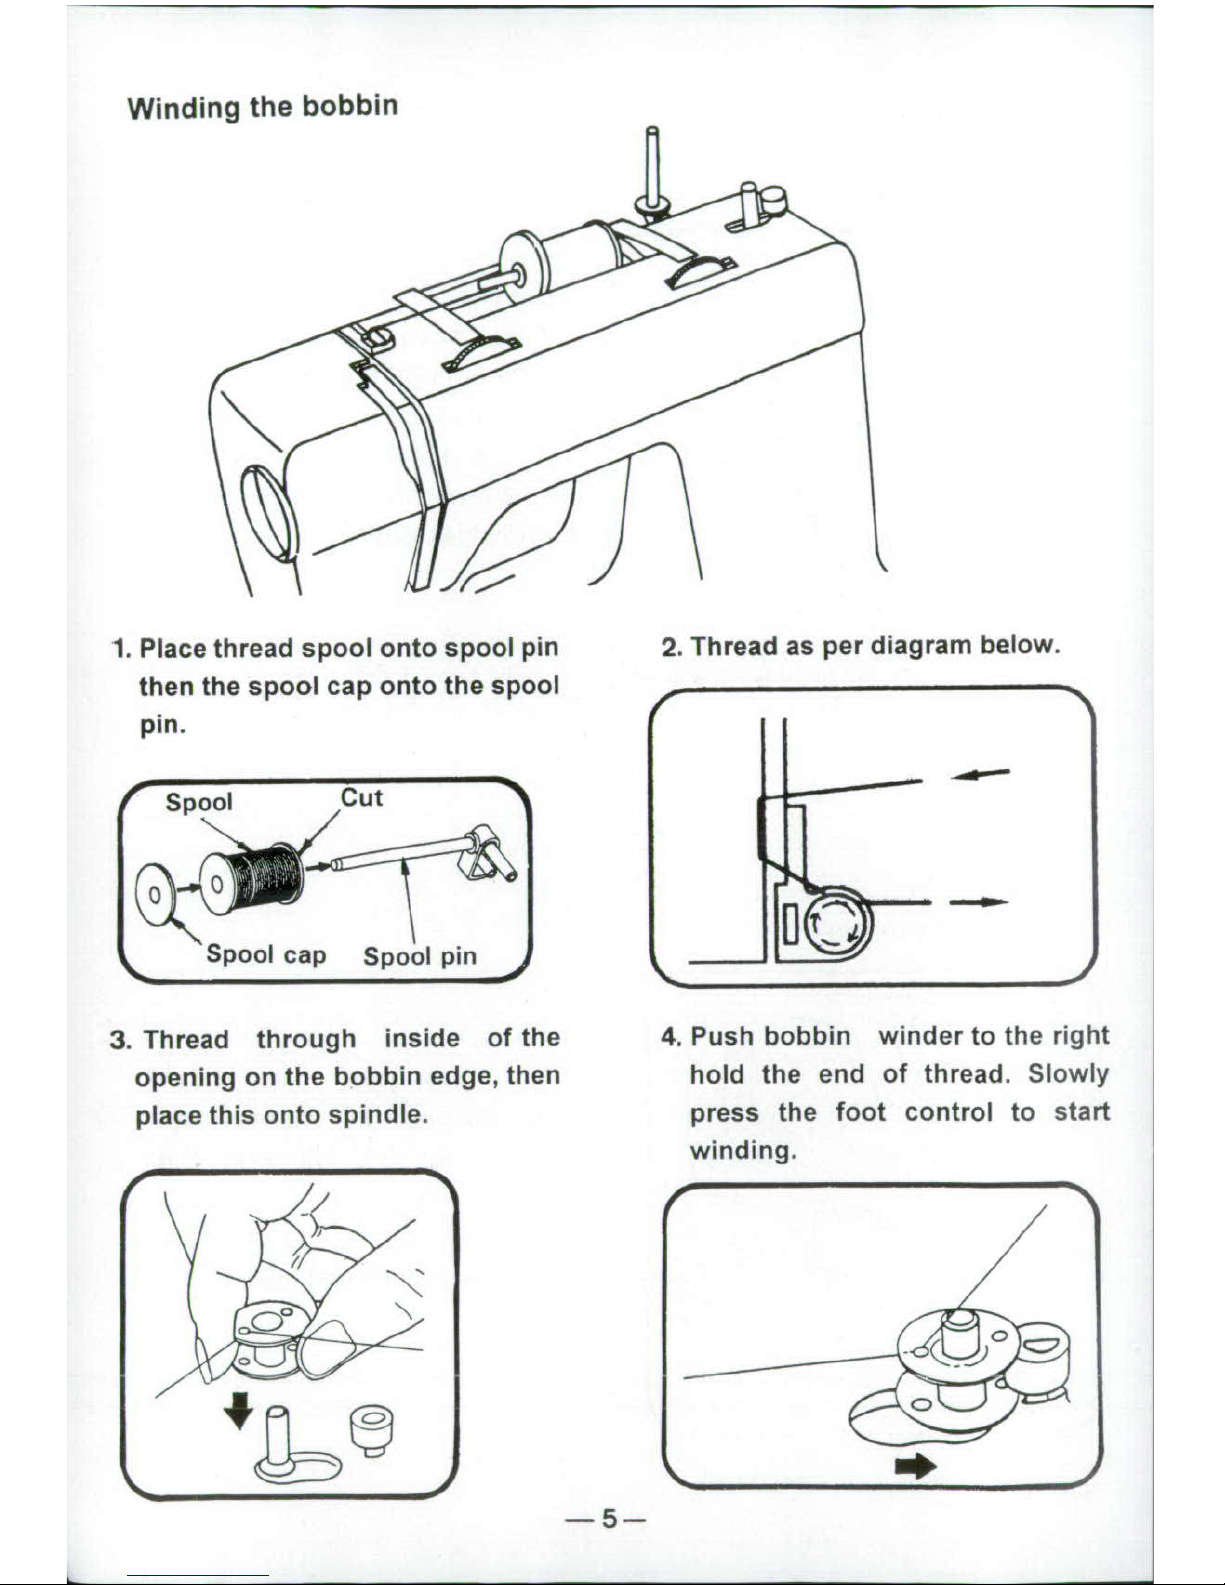
Winding
the
bobbin
1.
Place
thread
spool
onto
spool
pin
2.
Thread
as
per
diagram
below.
then
the
spool
cap
onto
the
spool
pin.
fr
Spool
Cut
Spool
cap
Spool
pin
3.
Thread
through
inside
of
the
4.
Push
bobbin
winder
to
the
right
opening
on
the
bobbin
edge,
then
hold
the
end
of
thread.
Slowly
place
this
onto
spindle,
press
the
foot
control
to
start
winding.
-
-5-
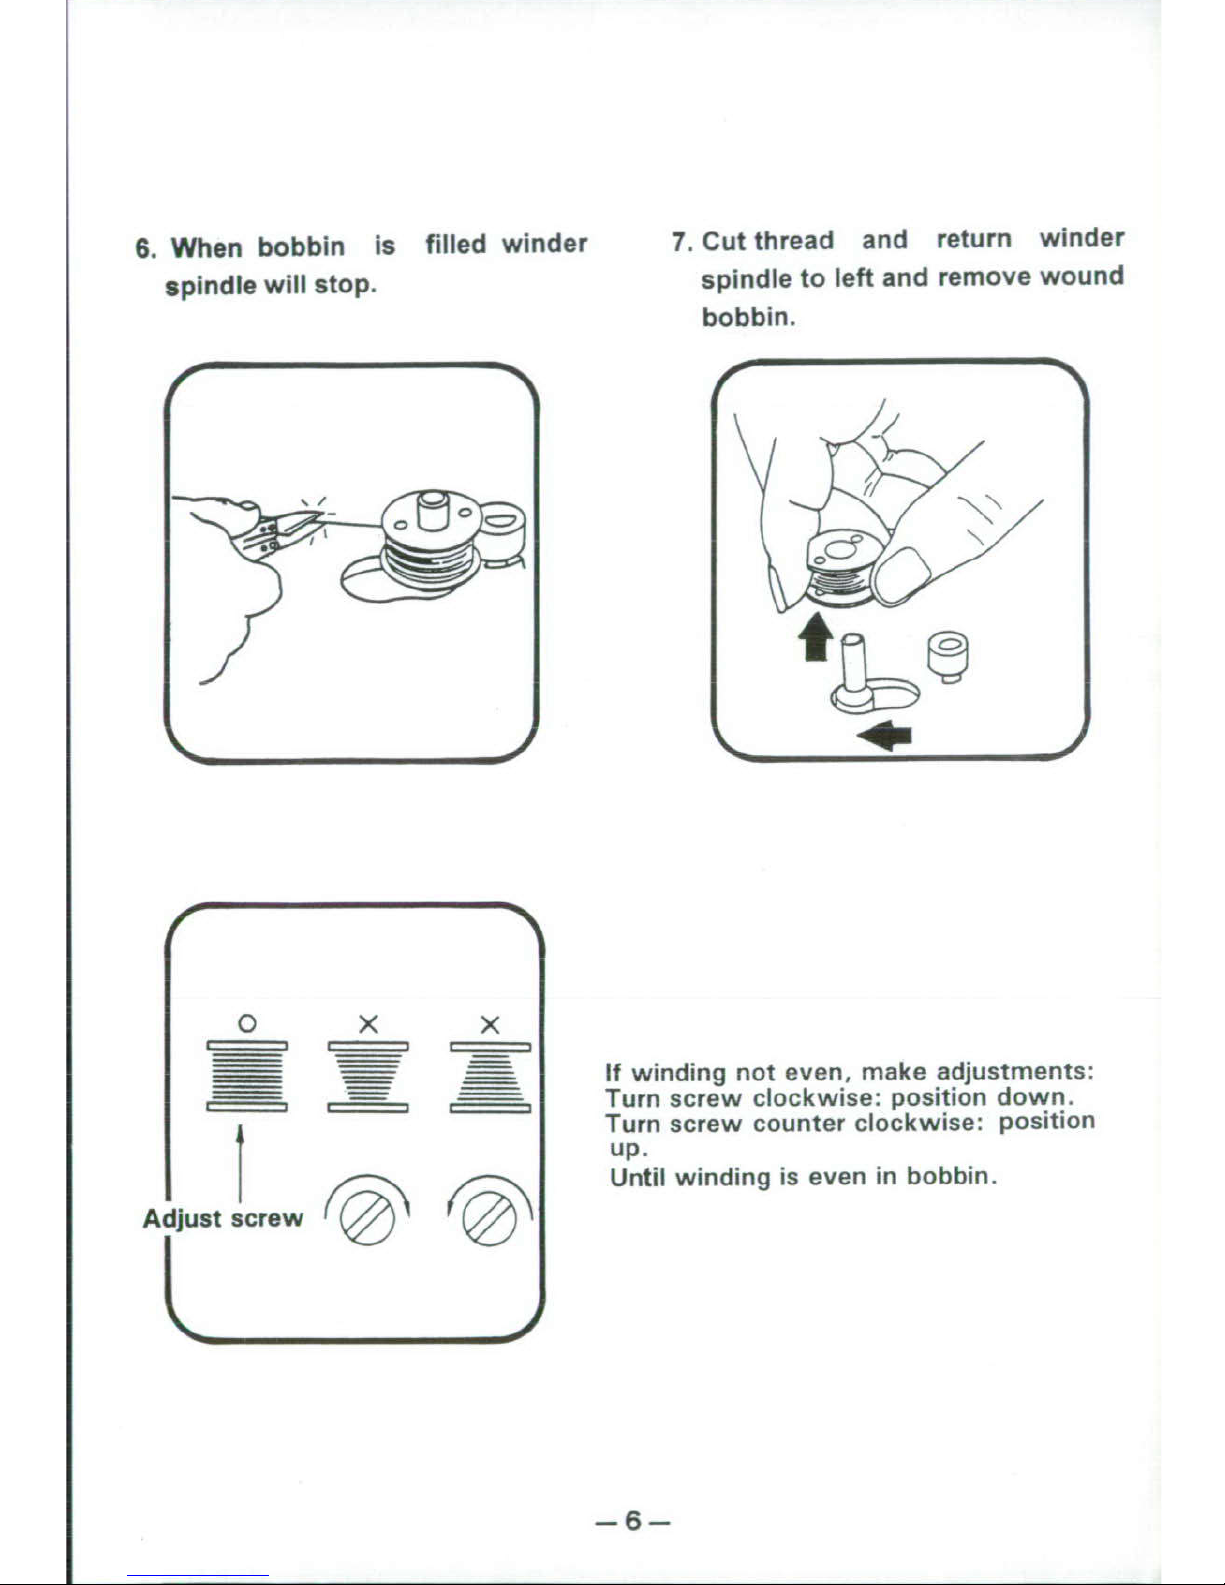
6.
When
bobbin
is
filled
winder
7.
Cut
thread
and
return
winder
spindle
will
stop.
spindle
to
left
and
remove
wound
bobbin.
0
X
x
-
-
If
winding
not
even,
make
adjustments:
Turn
screw
clockwise:
position
down.
Turn
screw
counter
clockwise:
position
up.
Until
winding
is
even
in
bobbin.
Adcjust
scrw
OO
6--
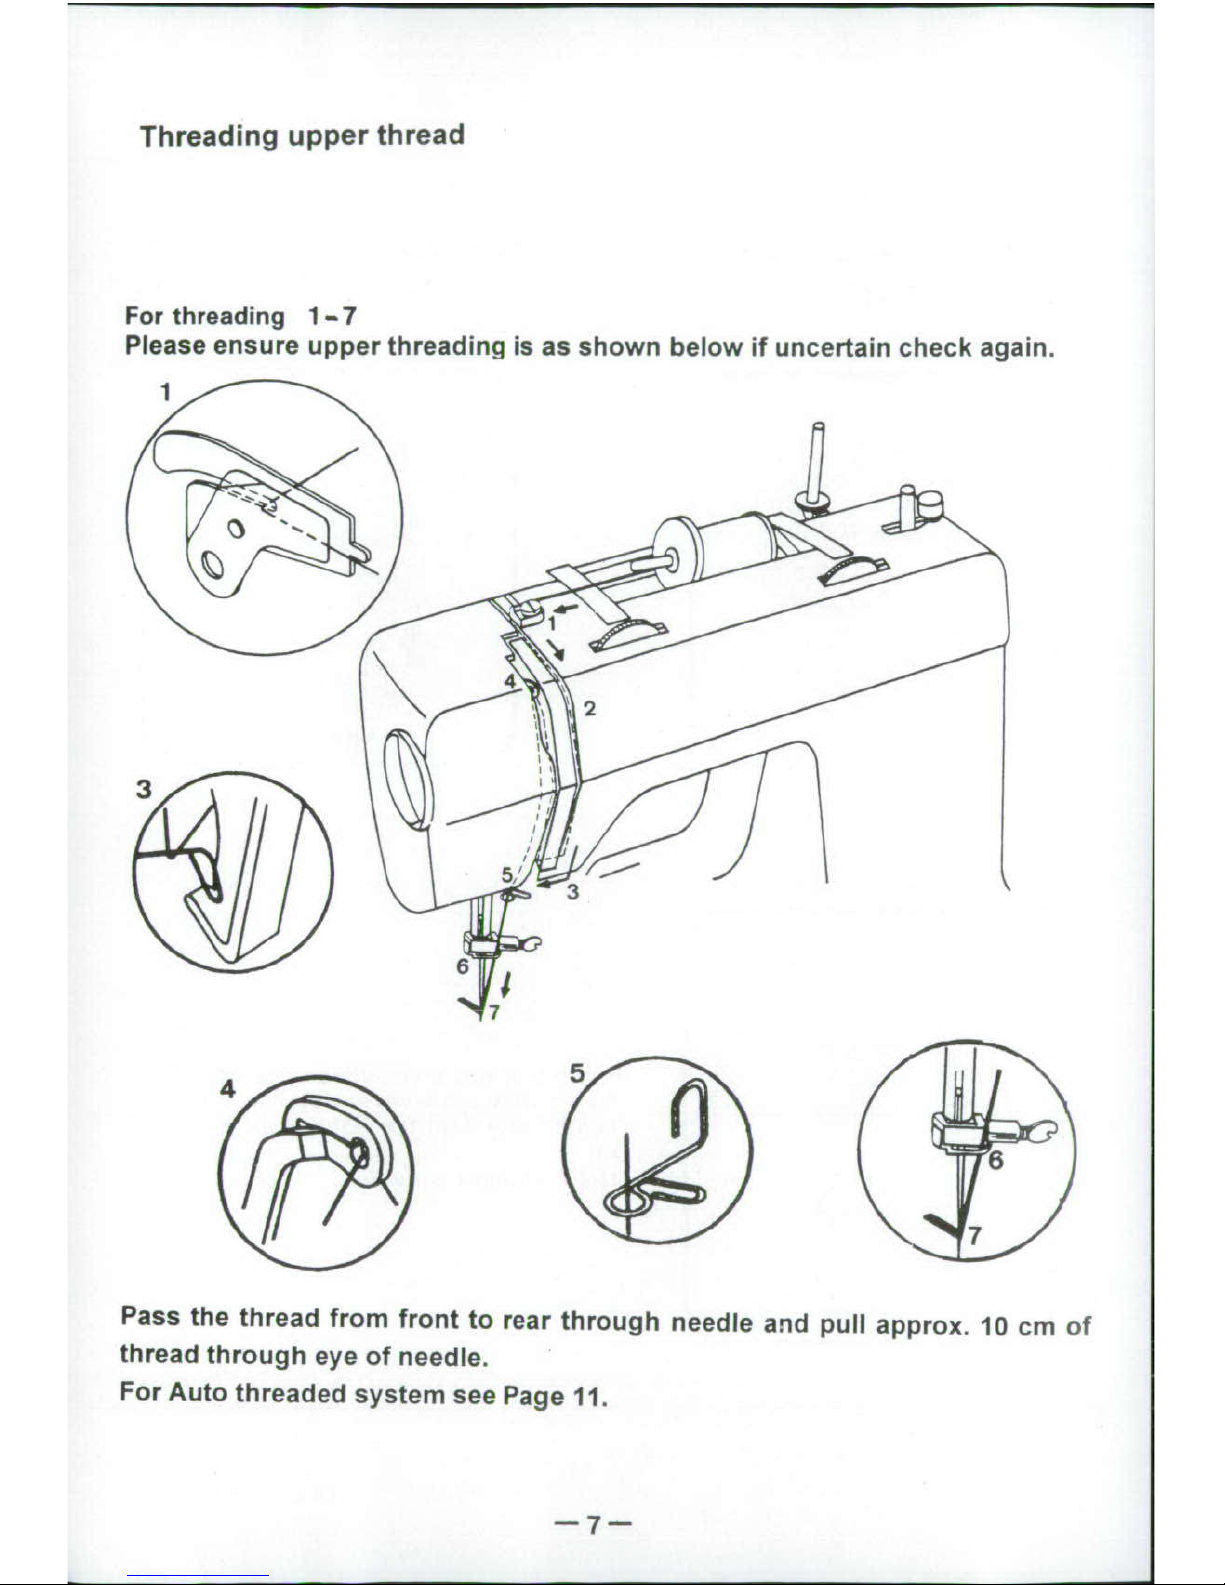
Threading
upper
thread
For
threading
1-7
Please
ensure
upper
threading
is
as
shown
below
if
uncertain
check
again.
1
44
3B
77
Pass
the
thread
from
front
to
rear
through
needle
and
pull
approx.
10
cm
of
thread
through
eye
of
needle.
For
Auto
threaded
system
see
Page
11.
-7-
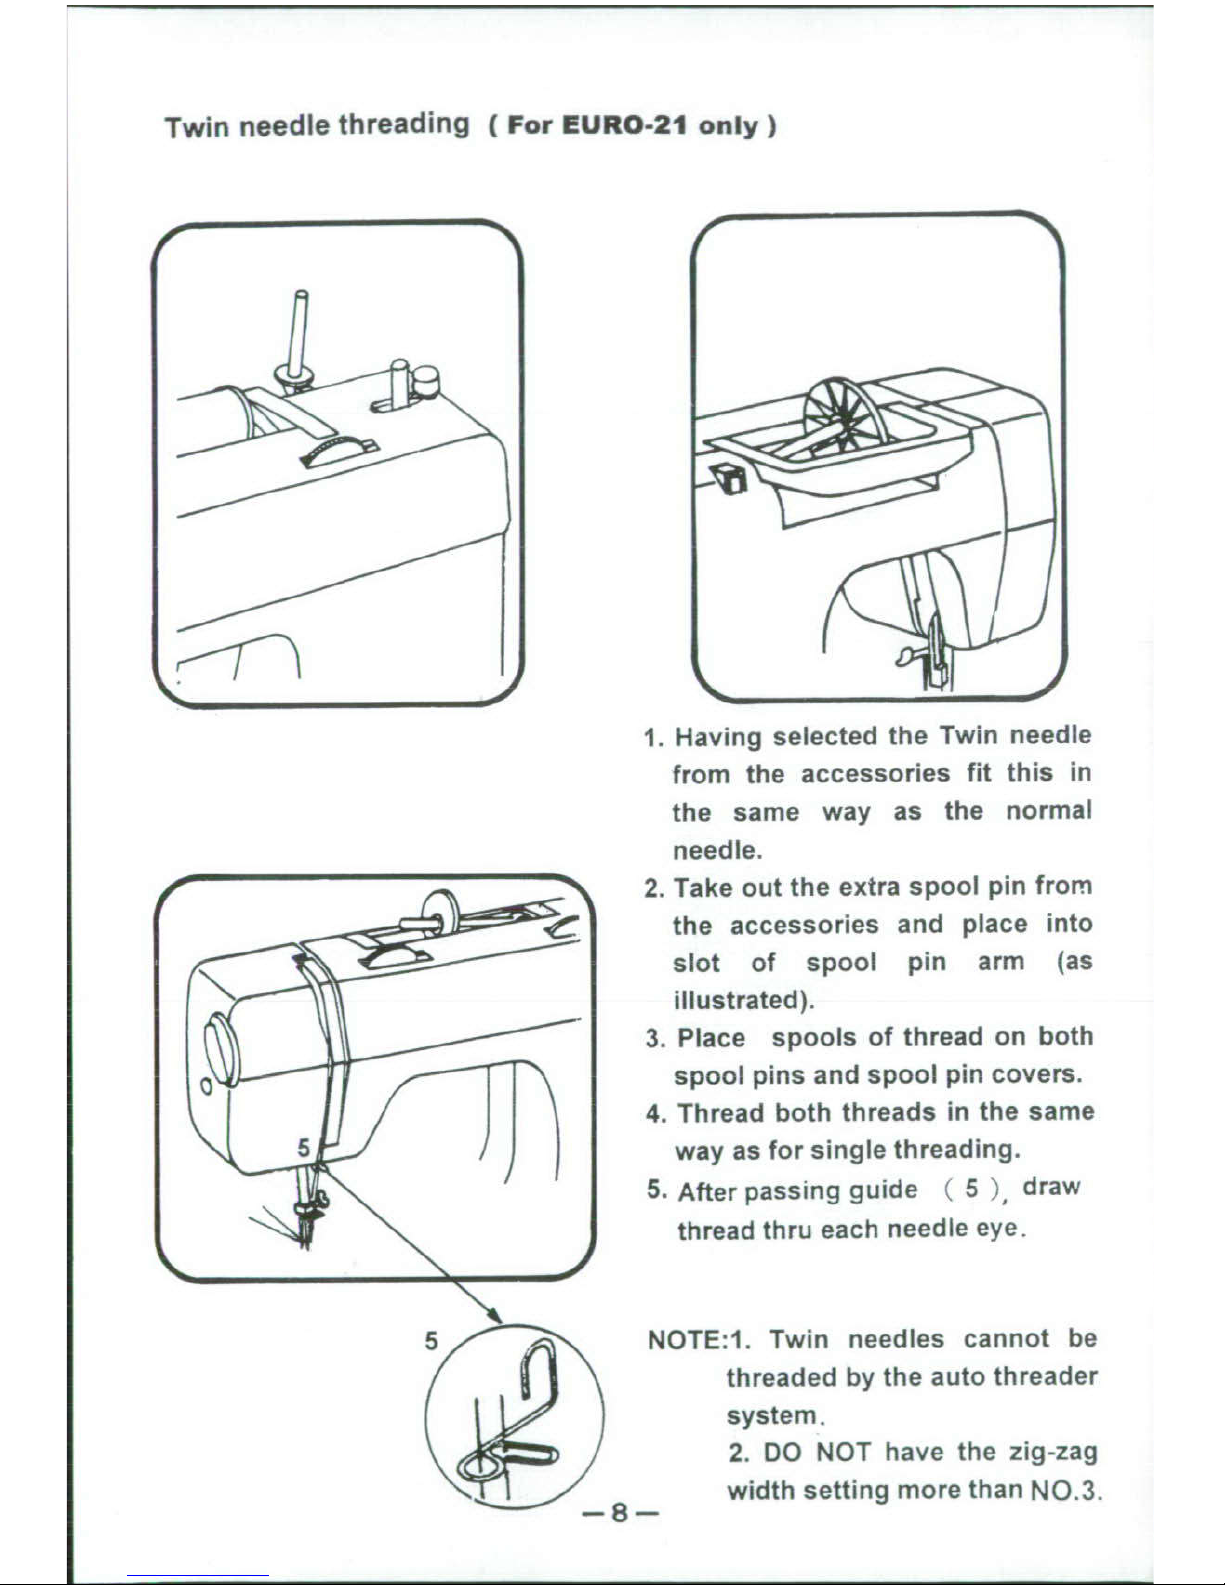
Twin
needle
threading
(For
EURO-21
only)
1.
Having
selected
the
Twin
needle
from
the
accessories
fit
this
in
the
same
way
as
the
normal
needle.
2.
Take
out
the
extra
spool
pin
from
Cthe
accessories
and
place
into
slot
of
spool
pin
arm
(as
illustrated).
3.
Place
spools
of
thread
on
both
spool
pins
and
spool
pin
covers.
4.
Thread
both
threads
in
the
same
5
way
as
for
single
threading.
5.
After
passing
guide
(
5
),
draw
thread
thru
each
needle
eye.
5
NOTE:I.
Twin
needles
cannot
be
threaded
by
the
auto
threader
system.
2.
DO
NOT
have
the
zig-zag
width
setting
more
than
NO.3.
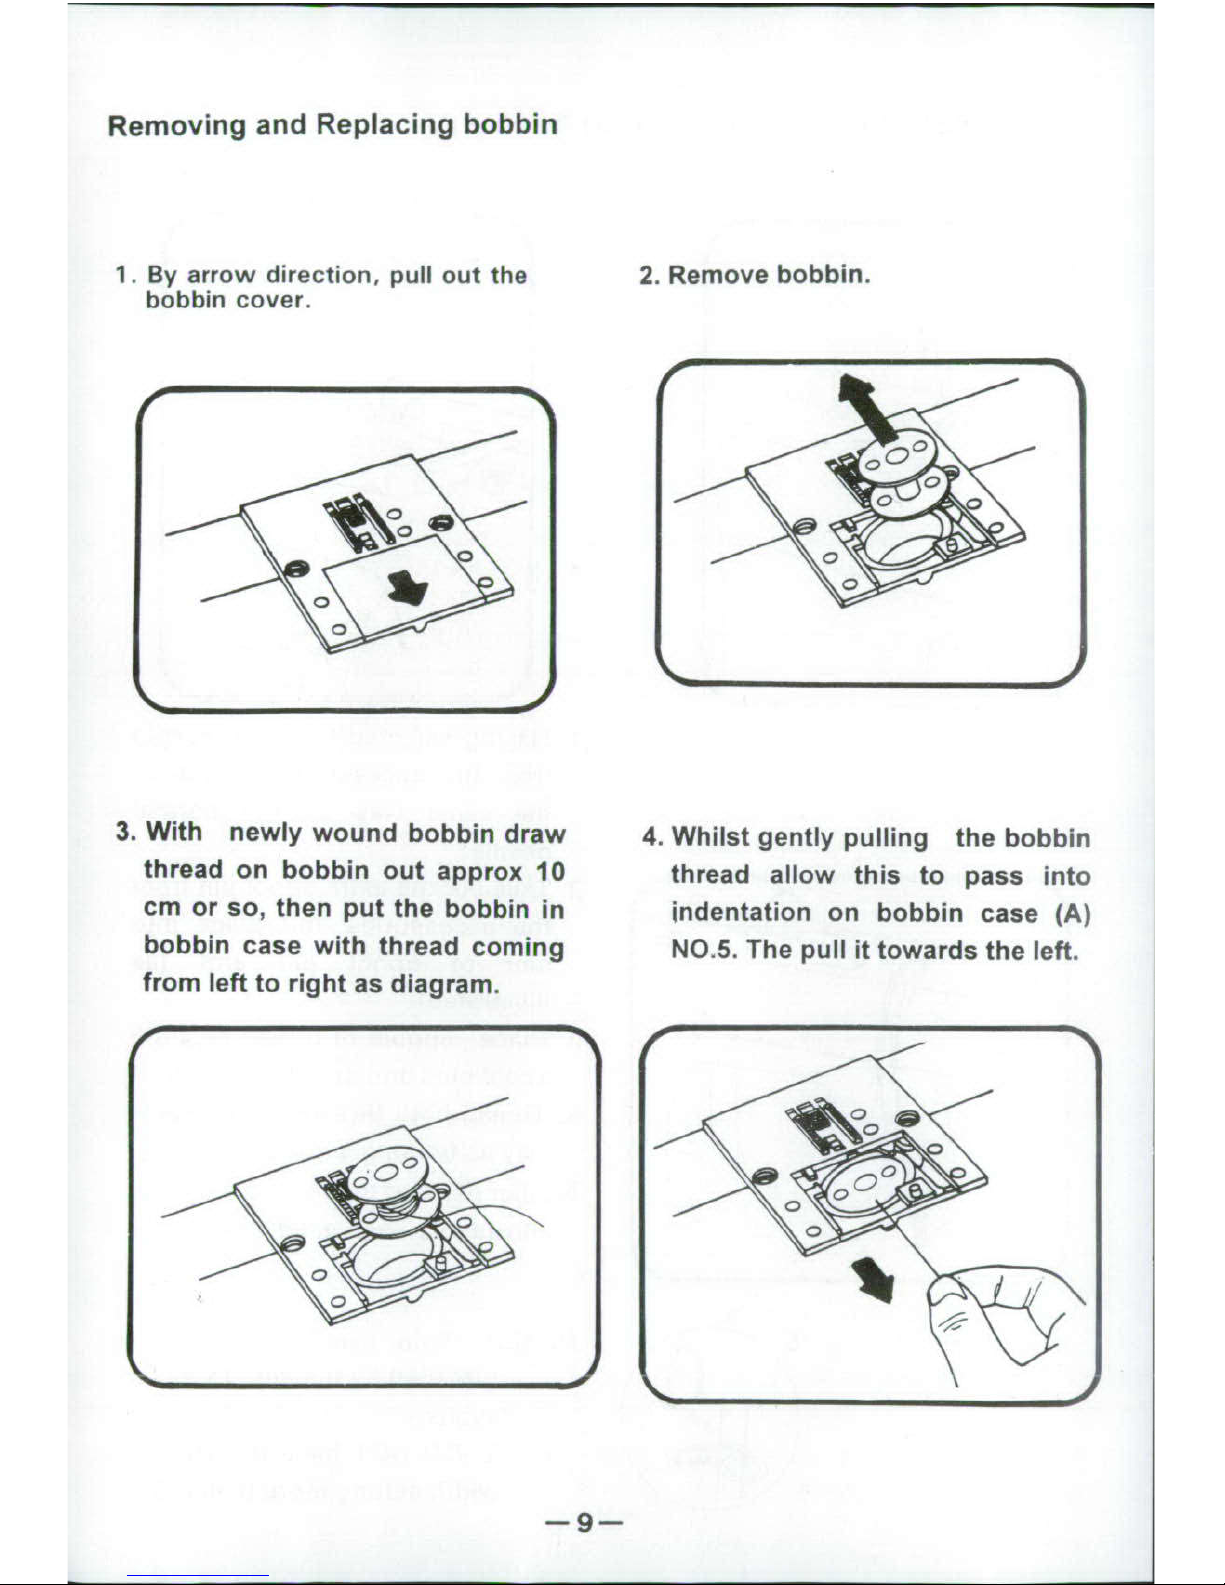
Removing
and
Replacing
bobbin
1.
By
arrow
direction,
pull
out
the
2.
Remove
bobbin.
bobbin
cover.
3.
With
newly
wound
bobbin
draw
4.
Whilst
gently
pulling
the
bobbin
thread
on
bobbin
out
approx
10
thread
allow
this
to
pass
into
cm
or
so,
then
put
the
bobbin
in
indentation
on
bobbin
case
(A)
bobbin
case
with
thread
coming
NO.5.
The
pull
it
towards
the
left.
from
left
to
right
as
diagram.
0/
-9-0
 Loading...