

Fri-Jado Bakery Multisserie Installation Manual
INSTRUCTIONS
Installation, operation and care of
DELI MULTISSERIE - ROTISSERIE OVEN MODELS
BAKERY MULTISSERIE - BAKERY OVEN MODELS
MODELS
Deli Deli Multisserie
Bakery Bakery Multisserie
Deli Multisserie
● IMPORTANT ●
READ BEFORE USING OVEN
www.frijado.com
Part-number form 912.3518 / 0904

TABLE OF CONTENTS
GENERAL............................................................................................................................5
Features and options........................................................................................................5
Ovens...............................................................................................................................6
1. INSTALLATION...............................................................................................................7
1.1 Location......................................................................................................................7
1.2 Legs / casters.............................................................................................................7
1.3 Supplemental installation instructions ........................................................................8
1.4 Installation codes and standards................................................................................9
1.5 Electrical connections.................................................................................................9
1.6 Electrical data...........................................................................................................10
1.7 Plumbing connections..............................................................................................10
2. BEFORE FIRST USE ....................................................................................................11
3. OPERATION..................................................................................................................12
3.1 Control panel............................................................................................................12
3.2 Grease discharge (only for the deli multisserie) .......................................................13
3.3 Switch the unit on and off.........................................................................................14
3.4 Start a program ........................................................................................................14
3.5 Change Grease Bag (Deli Multisserie only) .............................................................14
3.6 Pre-heat (option) ......................................................................................................15
3.7 Preparing the product...............................................................................................15
3.8 Loading products......................................................................................................15
3.9 While grilling.............................................................................................................17
3.10 Cancel a program...................................................................................................18
3.11 Unloading accessories from the oven ....................................................................18
3.12 The timer function...................................................................................................19
4. SET ................................................................................................................................20
4.1 Introduction ..............................................................................................................20
4.2 Information...............................................................................................................20
4.3 Manager...................................................................................................................21
5. PROGRAM....................................................................................................................23
5.1 Add programs...........................................................................................................23
5.2 Edit programs...........................................................................................................26
5.3 Delete programs.......................................................................................................27
5.4 Test programs..........................................................................................................28
5.4 Sort programs...........................................................................................................28
5.5 Delete all programs..................................................................................................29
5.6 Automatic switch off .................................................................................................29
6. EMERGENCY STOP.....................................................................................................30
7. DAILY CLEANING.........................................................................................................31
7.1 Automatic cleaning................................................................................................... 31
7.2 Manual cleaning.......................................................................................................34
8. PERIODICAL MAINTENANCE AND CLEANING ..........................................................35
9. MAINTENANCE.............................................................................................................36
2

3

Installation, Operation and Care of
DELI MULTISSERIE - ROTISSERIE OVEN MODELS AND
BAKERY MULTISSERIE – BAKERY OVEN MODELS
BEFORE USING THE OVEN FOR THE FIRST TIME,
CAREFULLY READ THIS ENTIRE MANUAL.
IMPORTANT NOTICE: The user is responsible for reading and following these
instructions to ensure the safe and proper installation, operation, and
maintenance of the ovens. The manufacturer expressly disclaims any and all
liability for any and all damage or injury resulting from failure to follow and
comply with these instructions, or from failure to exercise reasonable care in
the handling, operation, cleaning, and repair of the ovens and warmers, and
failure to explicitly include any warnings or instructions in this manual shall
not give rise to any claim for damages. If you have any questions concerning
the installation, operation, care, or maintenance of the ovens that are not
covered by these instructions, please contact the manufacturer at:
Fri-Jado Inc.
877 – 374 – 5236 (toll free)
SAFETY SYMBOLS
The following symbols are used throughout this manual to alert the user to specific
hazards:
= WARNING
Please read the safety instructions in this manual carefully and use the ovens only
as described in these instructions to avoid injury or damage.
KEEP THESE INSTRUCTIONS FOR FUTURE REFERENCE!
© 2008 Fri-Jado BV, Etten-Leur, The Netherlands
Customers are permitted to copy these instructions for private use.
Failure to observe this warning may result in personal injury, death, or
equipment damage.
= WARNING
Risk of electrical shock. Failure to observe this warning may result in
personal injury, death, or equipment damage.
= WARNING
Hot! Risk of burns. Wear heat-protective gloves.
4

GENERAL
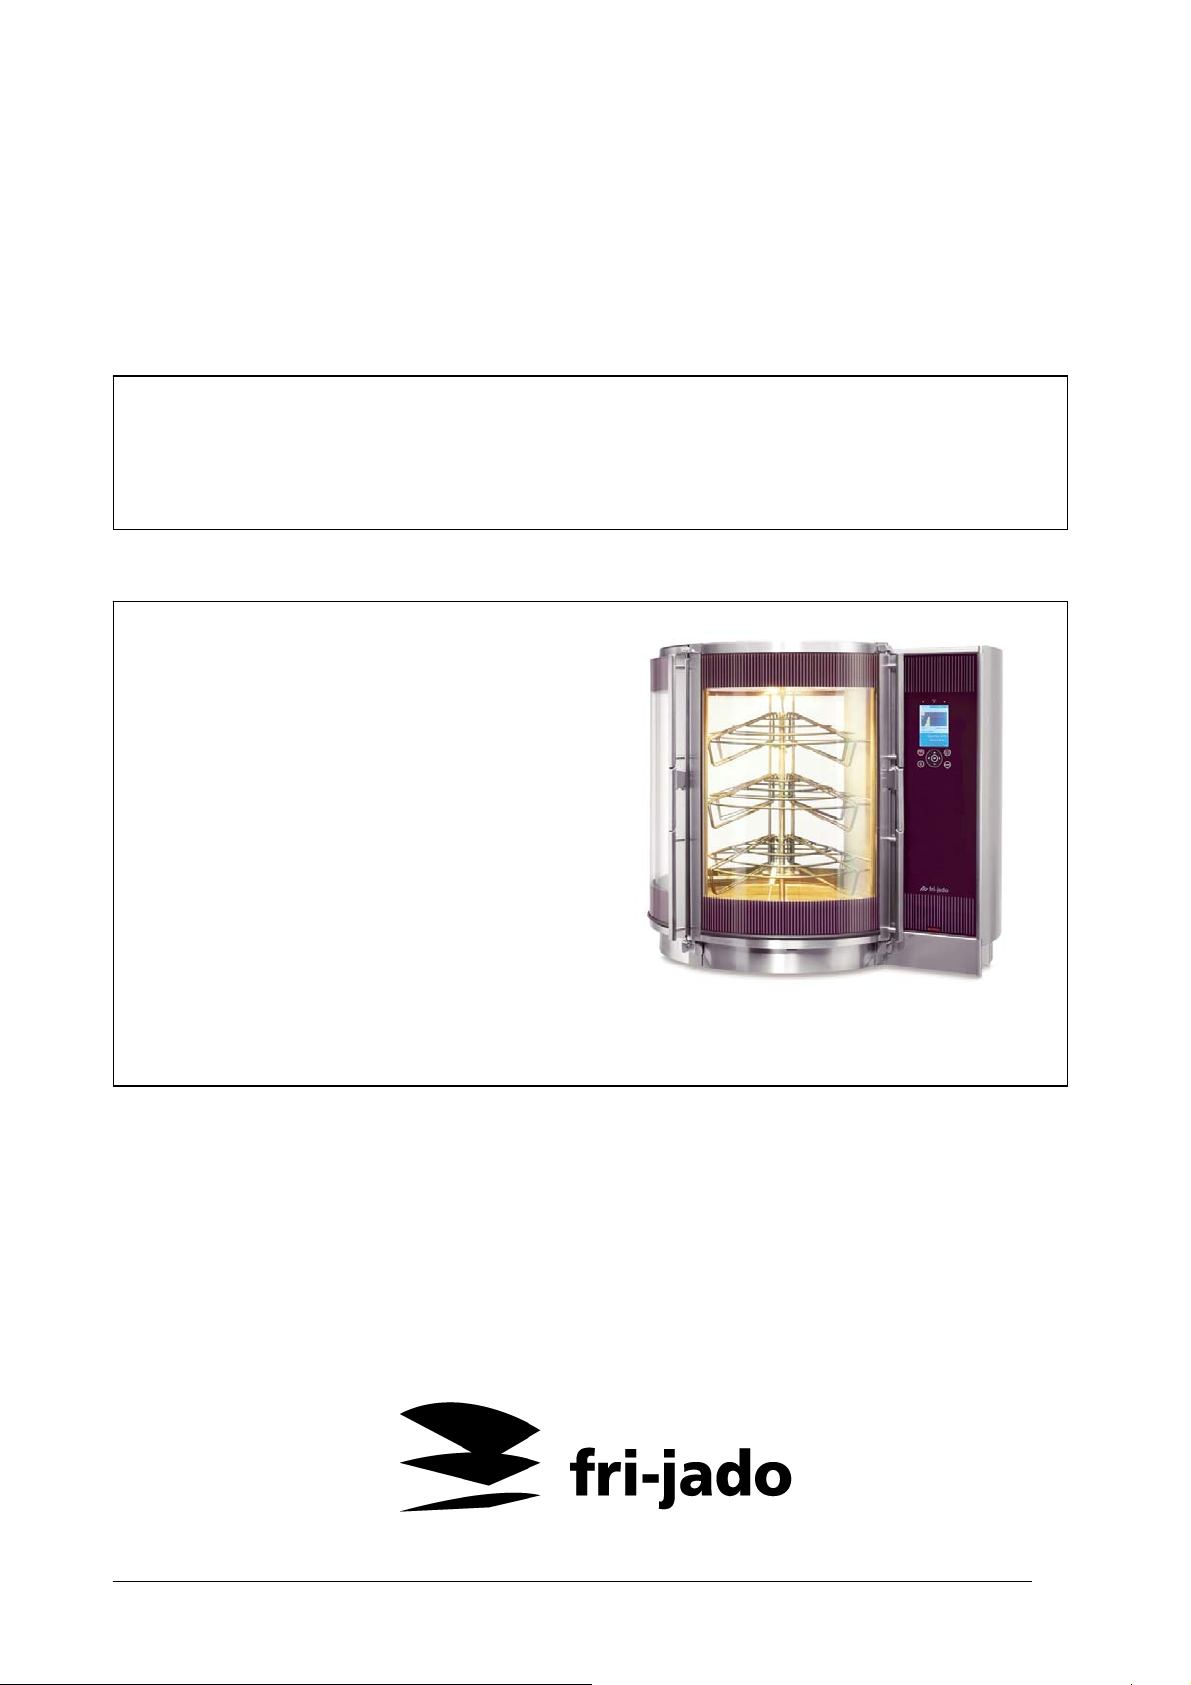
The Fri-Jado Multisserie is a completely round Rotisserie/Bakery Oven. The three rounded
glass doors give a 270° view on the cooking process.
The Multisserie has touch sensitive controls. The memory can contain up to 250 programs
with a maximum of 9 steps per program. During the cooking process a color graph is
displayed indicating the predicted and actual temperature in the oven.
The interior and exterior are made of stainless steel to make cleaning easy. All models are
fitted with an automatic cleaning system to minimize manual cleaning labor.
Ovens are available in following models:
Deli Multisserie
Bakery Multisserie
FEATURES AND OPTIONS
The following accessories are available:
Deli Multisserie Bakery Multisserie
• Chicken rack
• Meat basket
• Meat basket 2nd level
• Input tray for meat basket
• GN pan/baking tray rack
General accessories:
• Oven gloves
• Oven gloves, long
• Undercarriage, on castors
• Anti-scale filter
• Communication adapter and software
THIS PRODUCT HAS A ONE-YEAR WARRANTY FOR PARTS AND LABOR. PARTS THAT ARE NOT
COVERED BY THIS WARRANTY ARE LAMPS AND GLASS. THE SOLE AND EXCLUSIVE REMEDY OF
THE PURCHASER IS LIMITED TO REPAIR OR REPLACEMENT OF THE PRODUCT, AT THE SOLE
DISCRETION OF FRI-JADO, INC. THIS LIMITED REPAIR AND REPLACEMENT WARRANTY IS THE
SOLE WARRANTY PROVIDED FOR THIS PRODUCT AND FRI-JADO, INC. EXPRESSLY EXCLUDES
AND DISCLAIMS ALL OTHER WARRANTIES, INCLUDING MERCHANTABILITY AND FITNESS FOR A
PARTICULAR PURPOSE. THIS WARRANTY IS VOID WHERE DAMAGE RESULTS FROM IMPROPER
USE OF THE PRODUCT OR THE PURCHASER USES THE PRODUCT IMPROPERLY.
• Baking tray 40 x 60
• Baking tray 40 x 60 perforated
• Baking tray 40 x 60 perforated coated
• Rack 40 x 60
• Silicone mat 40 x 60
5

OVENS
Infrared components ensure air heating. The upper or lower component is switched on
according to need to provide even heat distribution. When using the core temperature
sensor a process or process step will be terminated when the core temperature of the
product has been reached.
The automatic injection system will create a moist climate. The duration and the number of
water pulses can be programmed.
The powerful fans suck air in through the filters in the fan plate and blow the air over the
components and along the holes on either side of the plate back into the oven. The shape
of the blow-out holes ensures even distribution of air. The fans can be set to two different
speeds for each process step. The ventilation valve in the ceiling can be opened during
the process to quickly vent off steam.
Depending on the model grease and small pieces of product residue will be collected and
stored in a grease collector bag during the preparation process. Grease and pieces of
product residue can this way be removed easily. A three-way valve will automatically
switch the drain from grease collector bag to sewer system during the cleaning cycle.
The touch-sensitive operating panel comes in a fully flat design and can therefore be
cleaned easily. A total of 250 programmes, which can each consist of 9 process steps, can
be programmed in the control.
All models have cleaning processes available that can be used to automatically clean the
oven area.
Communication through RS232 and infrared (IRDA) enables straightforward reading,
adjusting and creation of programmes through a pc. There is special software available for
this.
User programs
User programs can be programmed manually. One program can consist of a maximum of
9 steps. Time and temperature can be set in each step. Your dealer has the disposal of a
number of grilling programs that can be loaded into the oven. These programs can vary
depending on your supplier and your own preferences. The memory of the oven can
contain a maximum of 250 programs.
Automatic process correction
When a program has been tested completely for one full run and no corrections have been
made to the settings, the oven can perform an automatic process correction with every
new execution of the grilling program.
Based on the temperature during the grilling process, the oven decides if the time has to
be adjusted. This is to make sure that the same results are obtained independent of the
load of the oven. The automatic process correction can be set to time correction or
switched off.
6

1. INSTALLATION
Immediately after unpacking the oven, check for possible shipping damage. If oven is
found to be damaged after unpacking, save the packaging material and contact the carrier
within 15 days of delivery.
WARNING
Prior to installation, test the electrical service to assure that it agrees with the
specifications on the machine data plate located underneath the right back door.
1.1 LOCATION
The oven may be placed where cooking may be observed to enhance customer
awareness and must be installed on a level surface.
The installation location must allow adequate clearances for servicing and for proper
operation of the doors.
WARNING
A minimum wall clearance of 6” (152 mm) from any glass and the back panels
must be maintained.
Keep the ventilation openings free of obstacles to guarantee a good air flow in the
electrical compartment.
WARNING
Make sure that the windows stay out of the reach of children. During the grill
process the windows get hot.
1.2 LEGS / CASTERS
Each oven is furnished on 4” (100 mm) legs or placed on bases provided with casters.
Refer to the next page for INSTALLATION INSTRUCTIONS for models placed on bases
with casters.
7
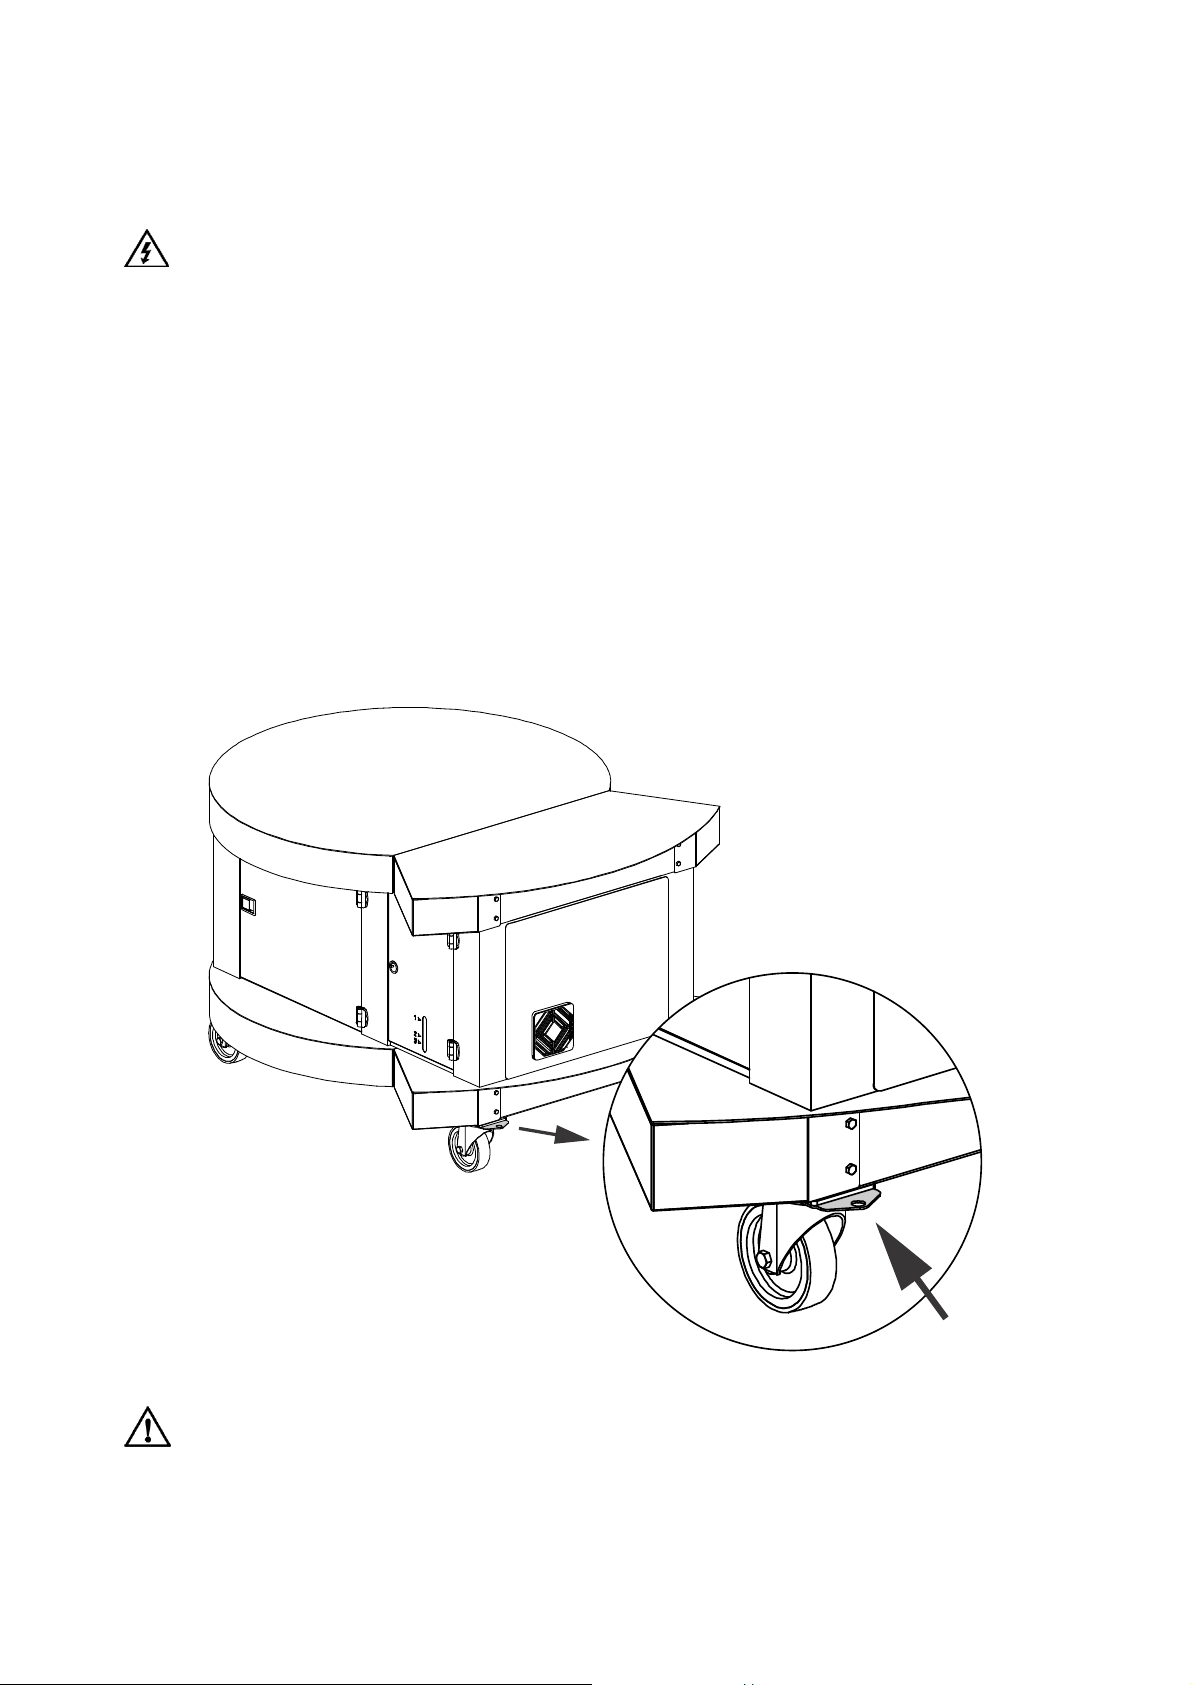
1.3 SUPPLEMENTAL INSTALLATION INSTRUCTIONS
(For models for fixed wiring and placed on bases with casters)
WARNING
Safety standards require that, when this appliance is properly connected to the electrical
power supply using a permanently connection, adequate means be provided to limit
movement of the appliance without depending on or transmitting stress to the electrical
conduit. This means that, as part of the installation, the base must be secured to the
building structure (typically either wall or floor) to limit the movement of the
appliance and, thus, helping to prevent damage to the conduit during cleaning,
maintenance and service operations.
A tether bracket, as shown on the drawing below, is installed along with the caster to one
corner of the base. The open hole in the center of the tether bracket is to be used to
secure one end of the tether (locally supplied chain, cable, etc.). The other end of the
tether is to be secured to an anchoring point in the building structure. Note: Length of
tether must be shorter than the flexible conduit to make sure that during appliance
movement, no stress is transmitted to the conduit.
Following installation, check to confirm that, when the appliance is moved to
the limits of the tether in each direction, no stress is transmitted to the
electrical conduit.
8

1.4 INSTALLATION CODES AND STANDARDS
In the United States, all Multisserie ovens must be installed according to the following
codes:
State and local codes.
National Electric Code, ANSI/NFPA (latest edition). Copies may be obtained from the
National Fire Protection Association, Batterymarch Park, Quincy, MA 02269.
In Canada, all Multisserie ovens must be installed according to the following codes:
Local codes.
Canadian Electric Code, CSA C22.1 (latest edition) available from the Canadian Standard
Association, 5060 Spectrum Way, Suite 100, Mississauga, Ontario, Canada L4W 5N6.
1.5 ELECTRICAL CONNECTIONS
WARNING
Electrical and grounding connections must comply with the applicable portions of
the national electrical code and / or other local electrical codes.
WARNING
Disconnect electrical power supply and place a tag at the disconnect switch
indicating that you are working on the circuit.
Access the electrical connection point by opening the back panel(s).
WARNING
Ensure that the electrical power supply agrees with the specifications on the
oven's data plate and complies with the wiring diagram, located behind the oven
back panel and between the fans.
Refer to the ELECTRICAL DATA chart on the next page.
9
1.6 ELECTRICAL DATA
MODEL VOLTS HERTZ PHASE AMPS
Deli Multisserie 120/208 60 3 60
Bakery Multisserie 120/208 60 3 60
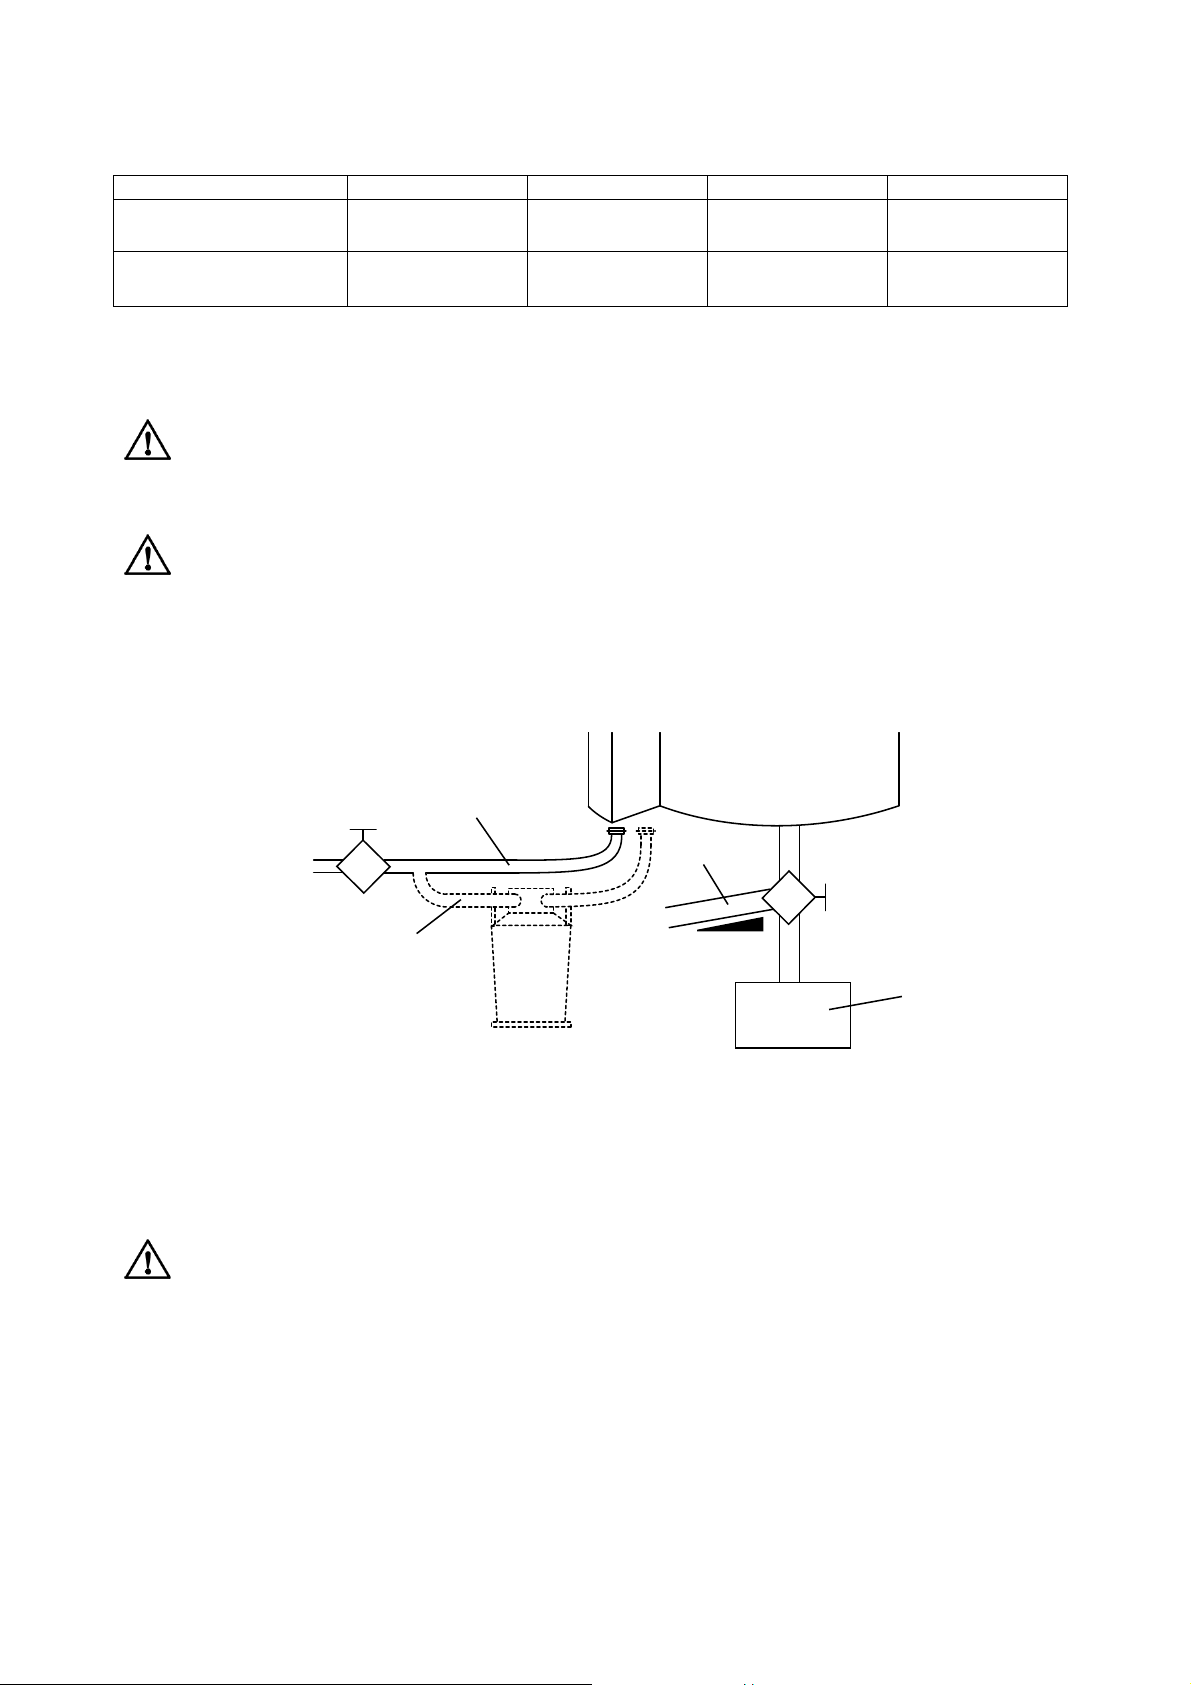
1.7 PLUMBING CONNECTIONS
WARNING
Install the equipment with adequate backflow protection that complies with
applicable federal, state and local codes.
WARNING
Depending on the executed processes the waste water of a Deli Multisserie
contains small quantities of grease. Stick to locally valid regulations regarding
the discharge of grease.
Installation overview
A
min.
2 bar
B
3/4”
min.
40 mm
A. Aerated cold water connection. (Only drinking water.)
B. Optional branching with anti-scale filter for the intake of soft water.
C. Cleaning water drainage.
D. Grease collector system (Only for Deli Multisserie).
WARNING
The use of an anti-scale filter is required with a carbonate hardness of 7 °KH or
higher. Failure to do so, could result in permanent damage to the machine.
C
min. 5%
D
10

2. BEFORE FIRST USE
WARNING
Disconnect electrical power before cleaning.
Oven must be "burned in" to release any odors that might result from heating the new
oven surfaces.
1. Clean oven, accessories, both inside and outside, with warm soapy water. Refer to
"Cleaning" in this manual for further instructions.
2. Rinse thoroughly and wipe dry with a soft clean cloth.
3. Operate oven at maximum temperature setting of 480°F (250°C) for 45 minutes.
Smoke with an unpleasant odor will normally be given off during this burn-in period.
Provide adequate room ventilation and avoid inhaling.
11
 Loading...