

Page 1
Low temperature freezer - VT Series
ES Instrucciones para el uso
RUS Инструкция по эксплуатации
GB Instructions for use
DE Bedienungsanleitung
FR Mode d’emploi
DK Brugsanvisning
Page 2

2
GB
The operating instructions should always
be available to and accessible for the
personnel! The appliance concerned
complies with CE marking regulation,
Directives and standards. Low Voltage
Directive 73/23/EEC. Electromagnetic
Compatibility Directive 89/336/EEC.
Warning
As the appliance contain a refrigerant which
are ammable it is essential to ensure that
the refrigerant pipes are not damaged.
- Keep clear of obstruction all ventilation
openings in the appliance enclosure or in
the structure for building-in.
- Do not use mechanical devices or other
means to accelerate the defrosting
process, other than those recommended
by the manufacturer.
- Do not damage the refrigerant circuit.
- Do not use electrical appliance inside
the food storage compartments of the
appliance, unless they are of the type
recommended by the manufacturer.
This appliance is not intended for use by
young children or inrm persons unless
they have been adequately supervised by a
responsible person to ensure that they can
use the appliance safely. Young children
should be supervised to ensure that they do
not play wiht the appliance.
Keep always the keys in seperate place and
out of reach of children.
Never place containers with liquids,
especially zzy drinks, in the freezer. The
liquid may cause an explosion during
the freezing process. Never touch the
refrigerating surfaces with bare hands.
Always wear gloves to prevent burning.
Old appliances
Old refrigerators and freezers are often
tted with complicated latches that can
only be opened from the outside. If you
have one of these old units stored away
somewhere, or if you scrap one, remember
to destroy the latch rst in order to prevent
children from being exposed to great
danger by getting locked inside the unit.
Before use
Before operating your new appliance,
please read the following instructions
carefully as they contain important
information on safety, installation, operation
and maintenance. Keep the instructions for
future reference.
On receipt, check to ensure that the
appliance has not been damaged.
Transport damage should be reported to the
local distributor before the appliance is put
to use. Remove the packaging. Clean the
inside of the appliance using warm water
with a mild, perfume-free detergent. Rinse
with clean water and dry thoroughly (see
cleaning instructions). Use a soft cloth.
If the appliance has been stored in cold
surroundings (colder than +5°C), it must
be allowed to stabilise for at least an hour
before being switched on.
Contents
Get to know your freezer ................ 3
Installation and start-up ................... 4
Electrical connection .......................5
Operation and function .................... 6
Parameter settings .......................... 7
Control panel commands................. 8
Defrosting ........................................9
Cleaning and maintenance ........... 10
Fault nding .................................. 11
Spare parts .................................... 12
Safeguarding the environment ......13
Wiring diagram ..............................14
Page 3

3
GB
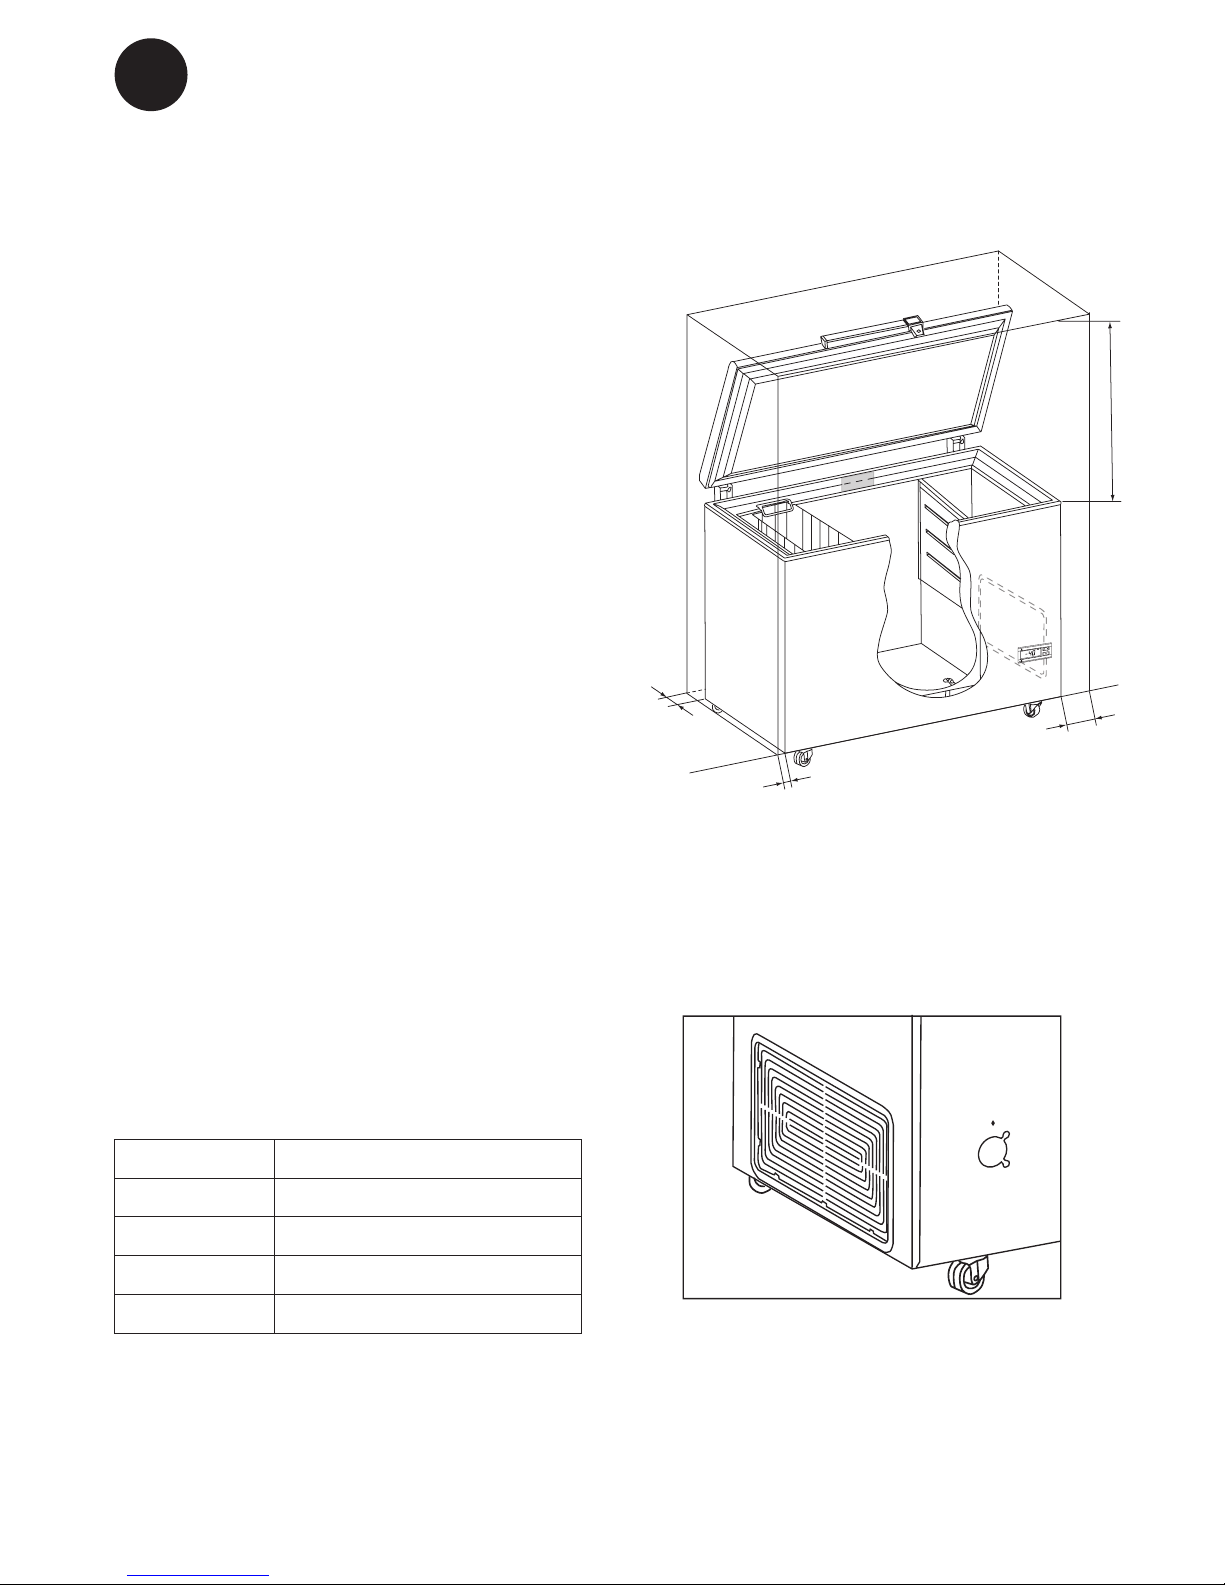
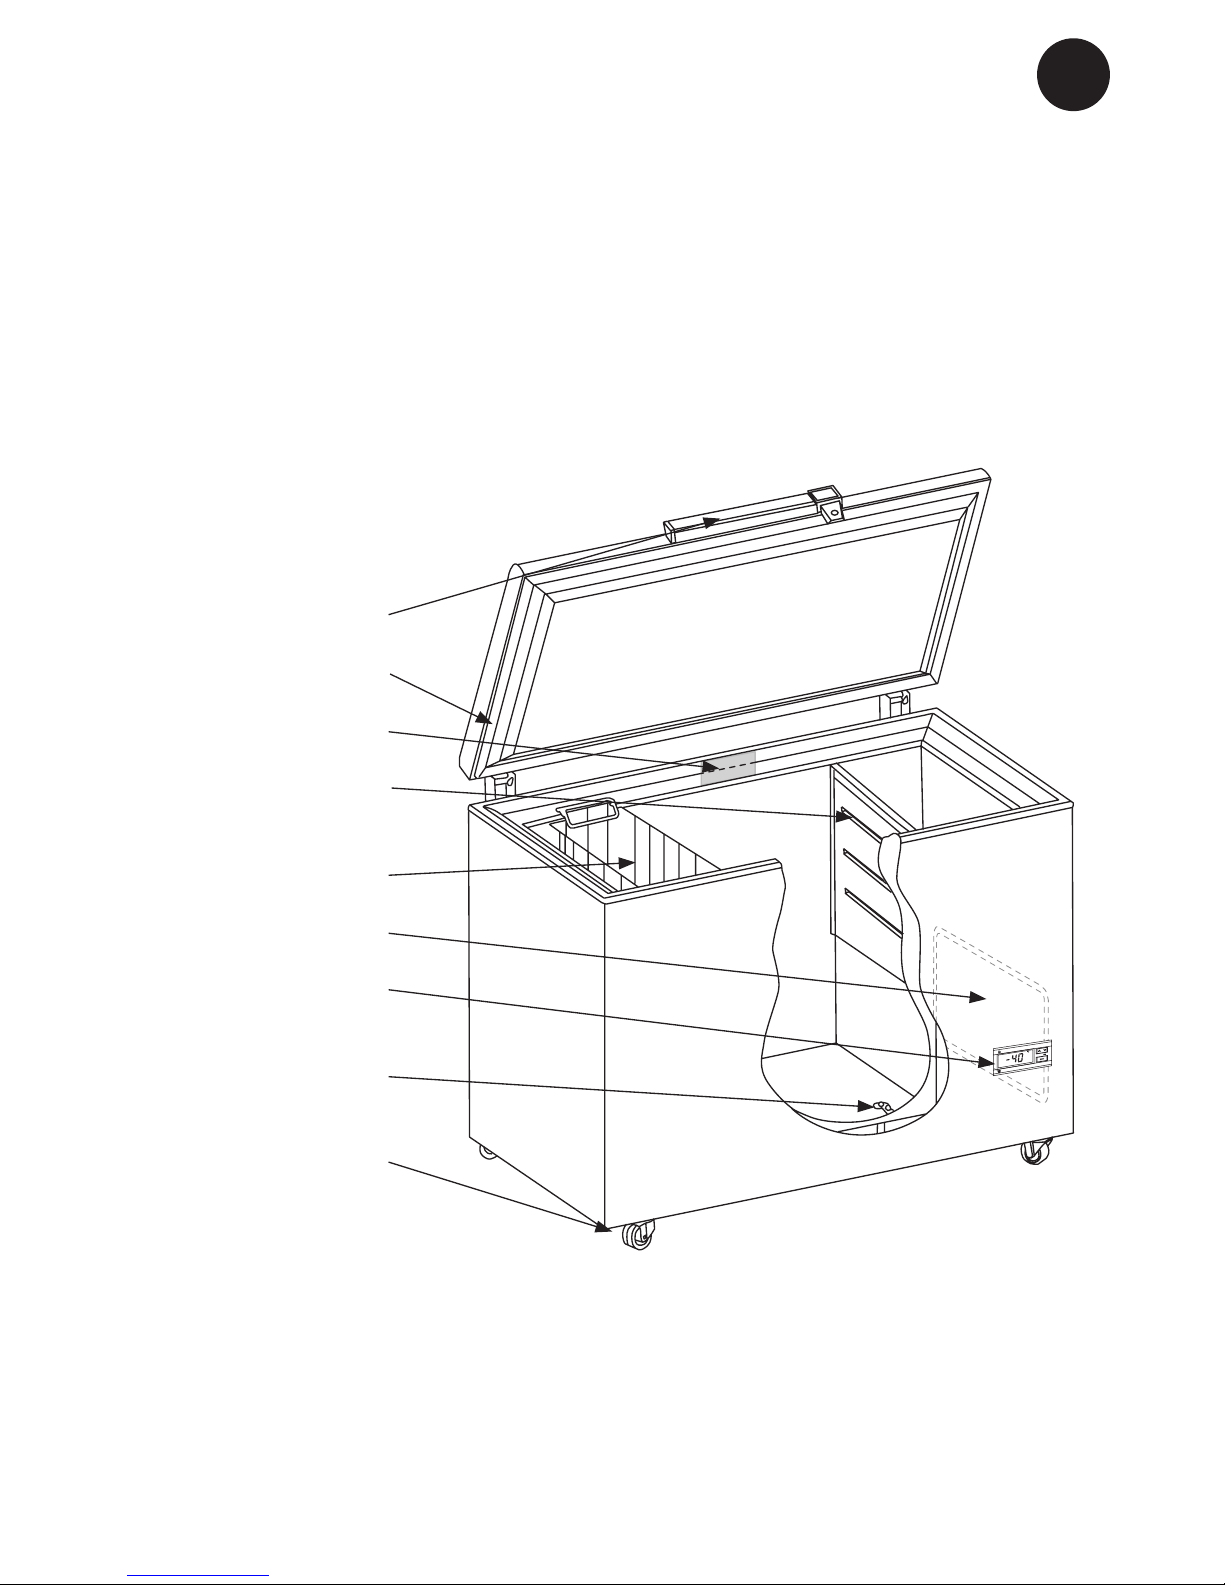
Get to know your chest freezer
Handle
Sealing strip
Nameplate
Partition/defrost
water tray
Basket
Ventilation grille
Electronic control
panel
Defrost water drain
Wheel
g. 1
Page 4

4
GB
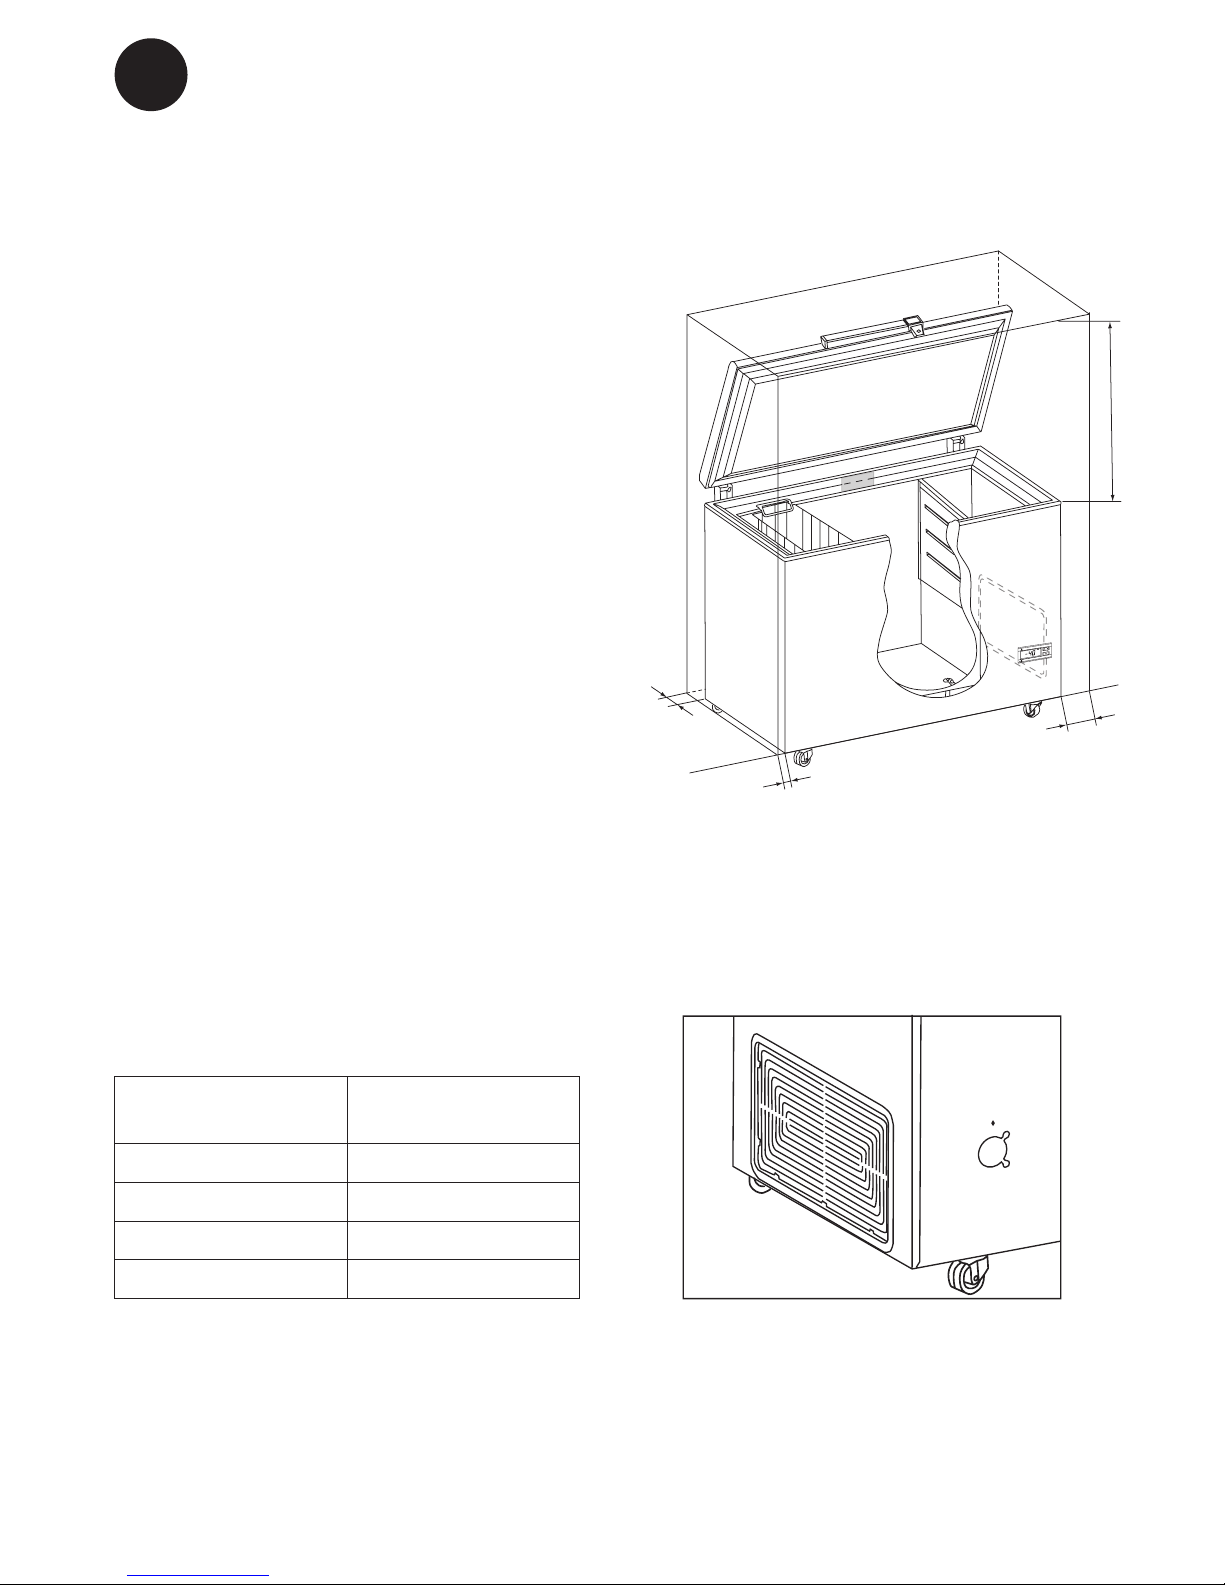
Placement
For safety and operational reasons, the
appliance must not be installed outdoors.
The appliance should be placed on a
stable, level surface in a dry, well-ventilated
room (max. 75% relative air humidity).
Never place the appliance close to sources
of heat such as cookers or radiators, and
avoid placing it in direct sunlight. Standard
EN378 species that the room in which you
install your appliance must have a volume
of 1m³ per 8 g of hydrocarbon refrigerant
used in the appliances , so as to avoid the
formation of inammeable gas/air mixtures
in the room where the appliance is located
in the event of a leak in the refrigerant
circuit. The quantity of the refrigerant used
in your appliances is indicated on the
nameplate.
Room temperature
The appliance is designed to operate at
limited ambient temperatures according to
the appliance climatic category specied
on the nameplate. Data regarding climate
Class and other technical information are
given on the nameplate on the rear of the
appliance.
Climate class Optimum room
temperature
SN +10 ºC to +32 ºC
N +16 ºC to +32 ºC
ST +18 ºC to +38 ºC
T +18 ºC to +43 ºC
Ventilation
It is important that the appliance be well
ventilated and that air can circulate unhindered above, below and around it. Figure 2
illustrates how the necessary air circulation
can be ensured.
Keep ventilation openings, in the appliance
enclosure or in the built-in structure, clear of
obstruction.
Installation and start-up
100 mm
800 mm
20 mm
100 mm
There must be at least 35 mm clearance
between the base of the appliance and the
oor.
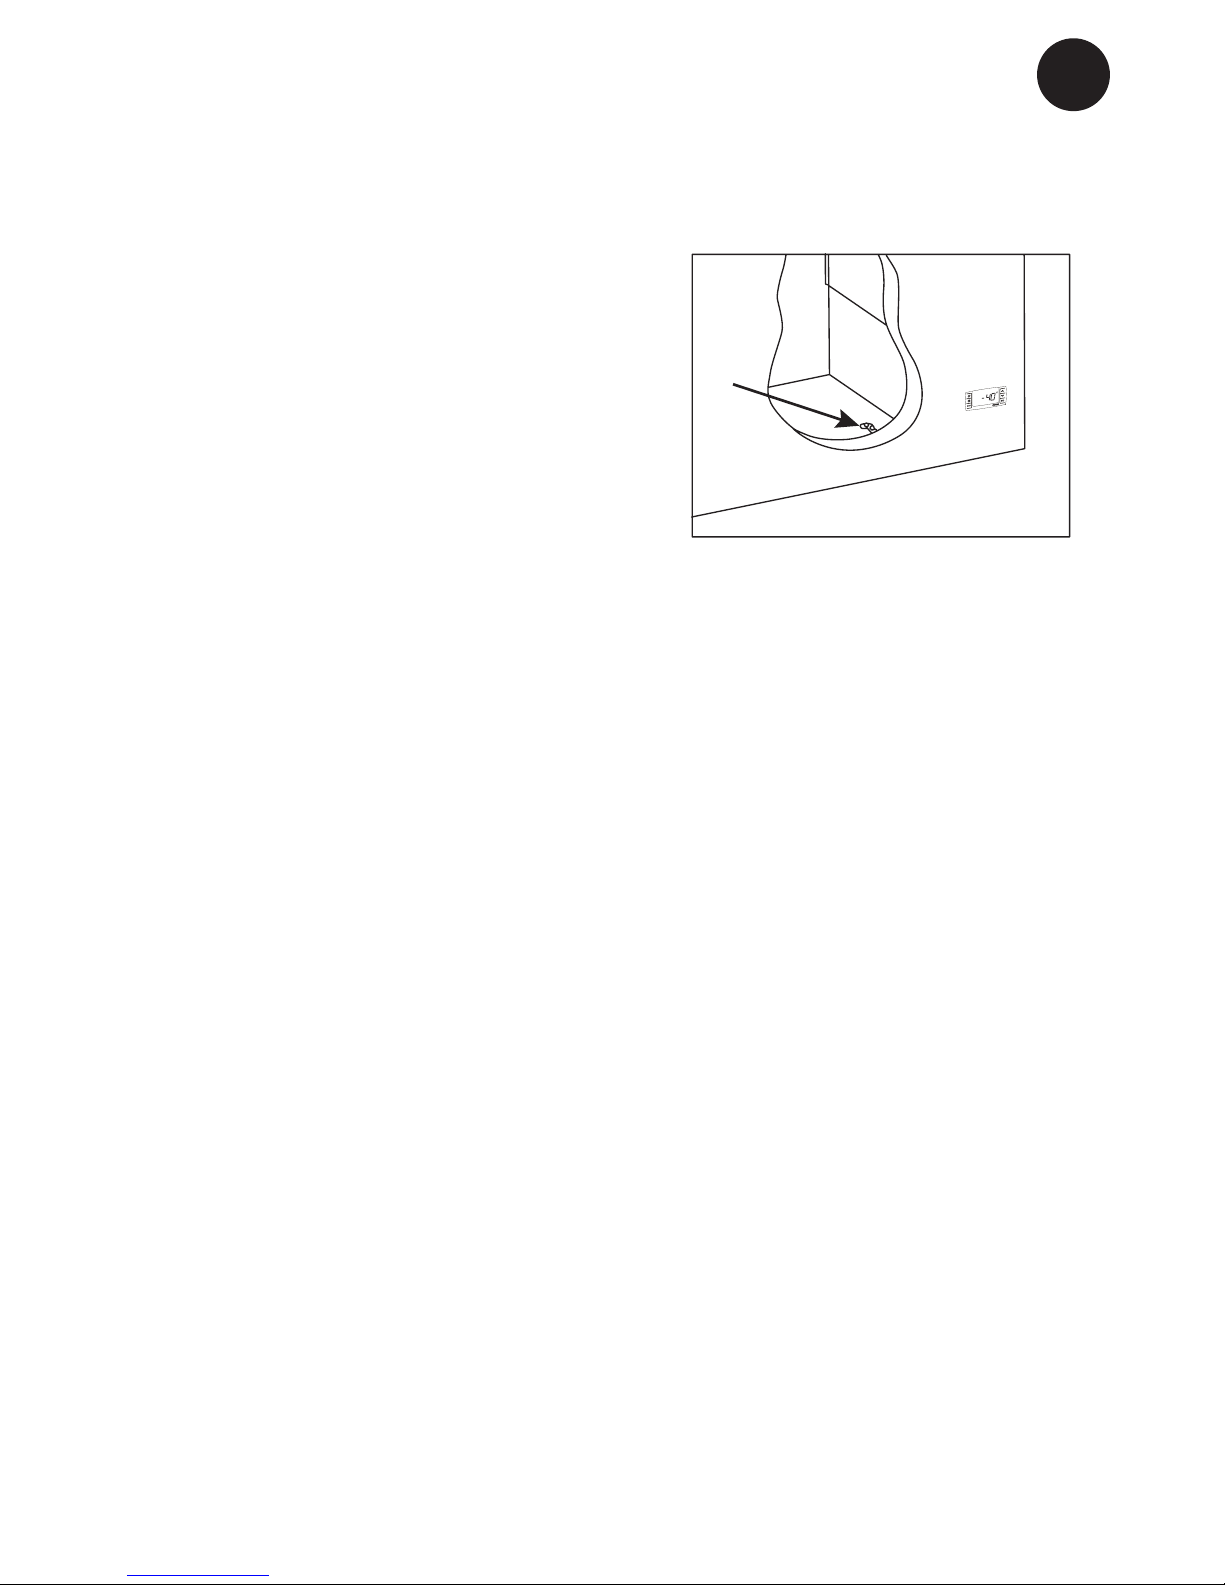
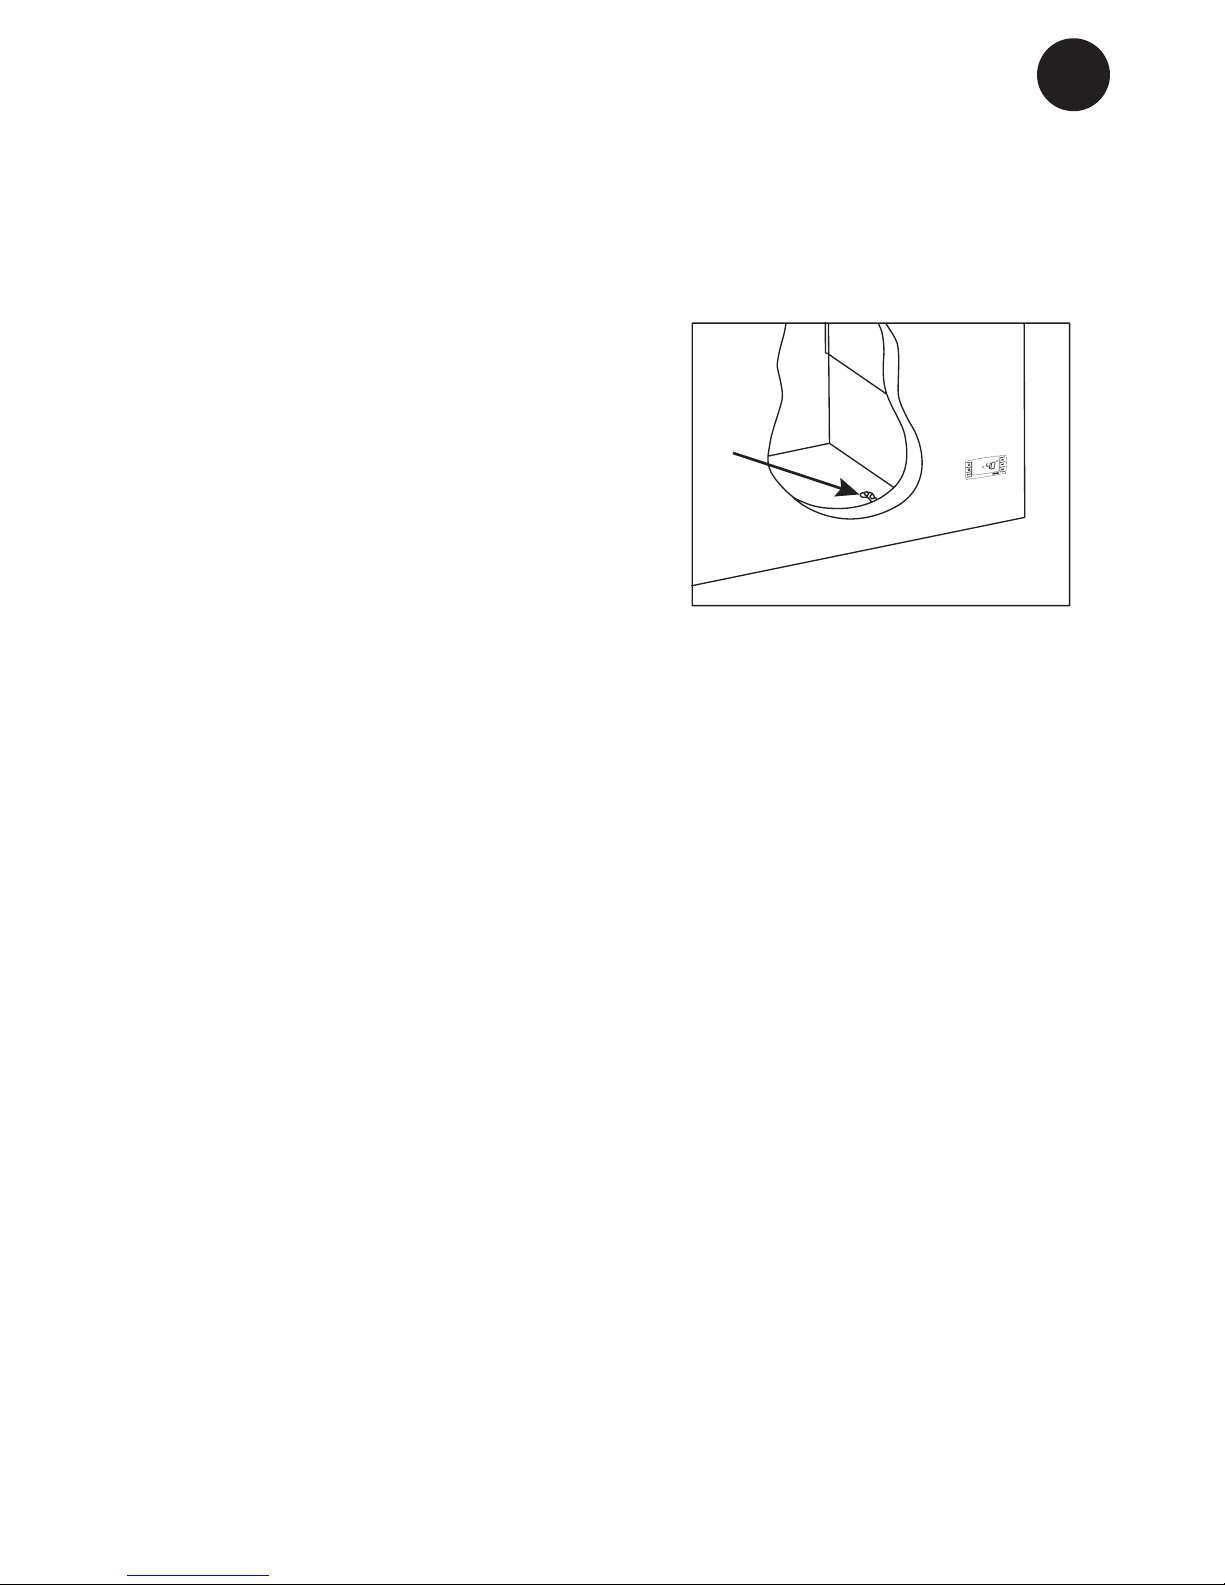
IMPORTANT! There must be free access
to the ventilation grille (g. 3).
g. 2
g. 3
Page 5

5
GB
Data regarding voltage and absorbed power
/ current are given on the nameplate which
are stated on the nameplate on the rear of
the appliance.
Electrical connection must be made in
accordance with the local regulations.
Warning
Regulations require that this appliance must
be earthed.
If the socket and plug are not of the same
type, please have the plug or socket
replaced by a qualied electrician.
Do under no circumstances use extension
leads or adaptors.
If the supply cord is damaged, it must be
replaced by the manufacturer, its service
agent or similarly qualied persons in order
to avoid a harzard.
Electrical connection
Page 6
6
GB
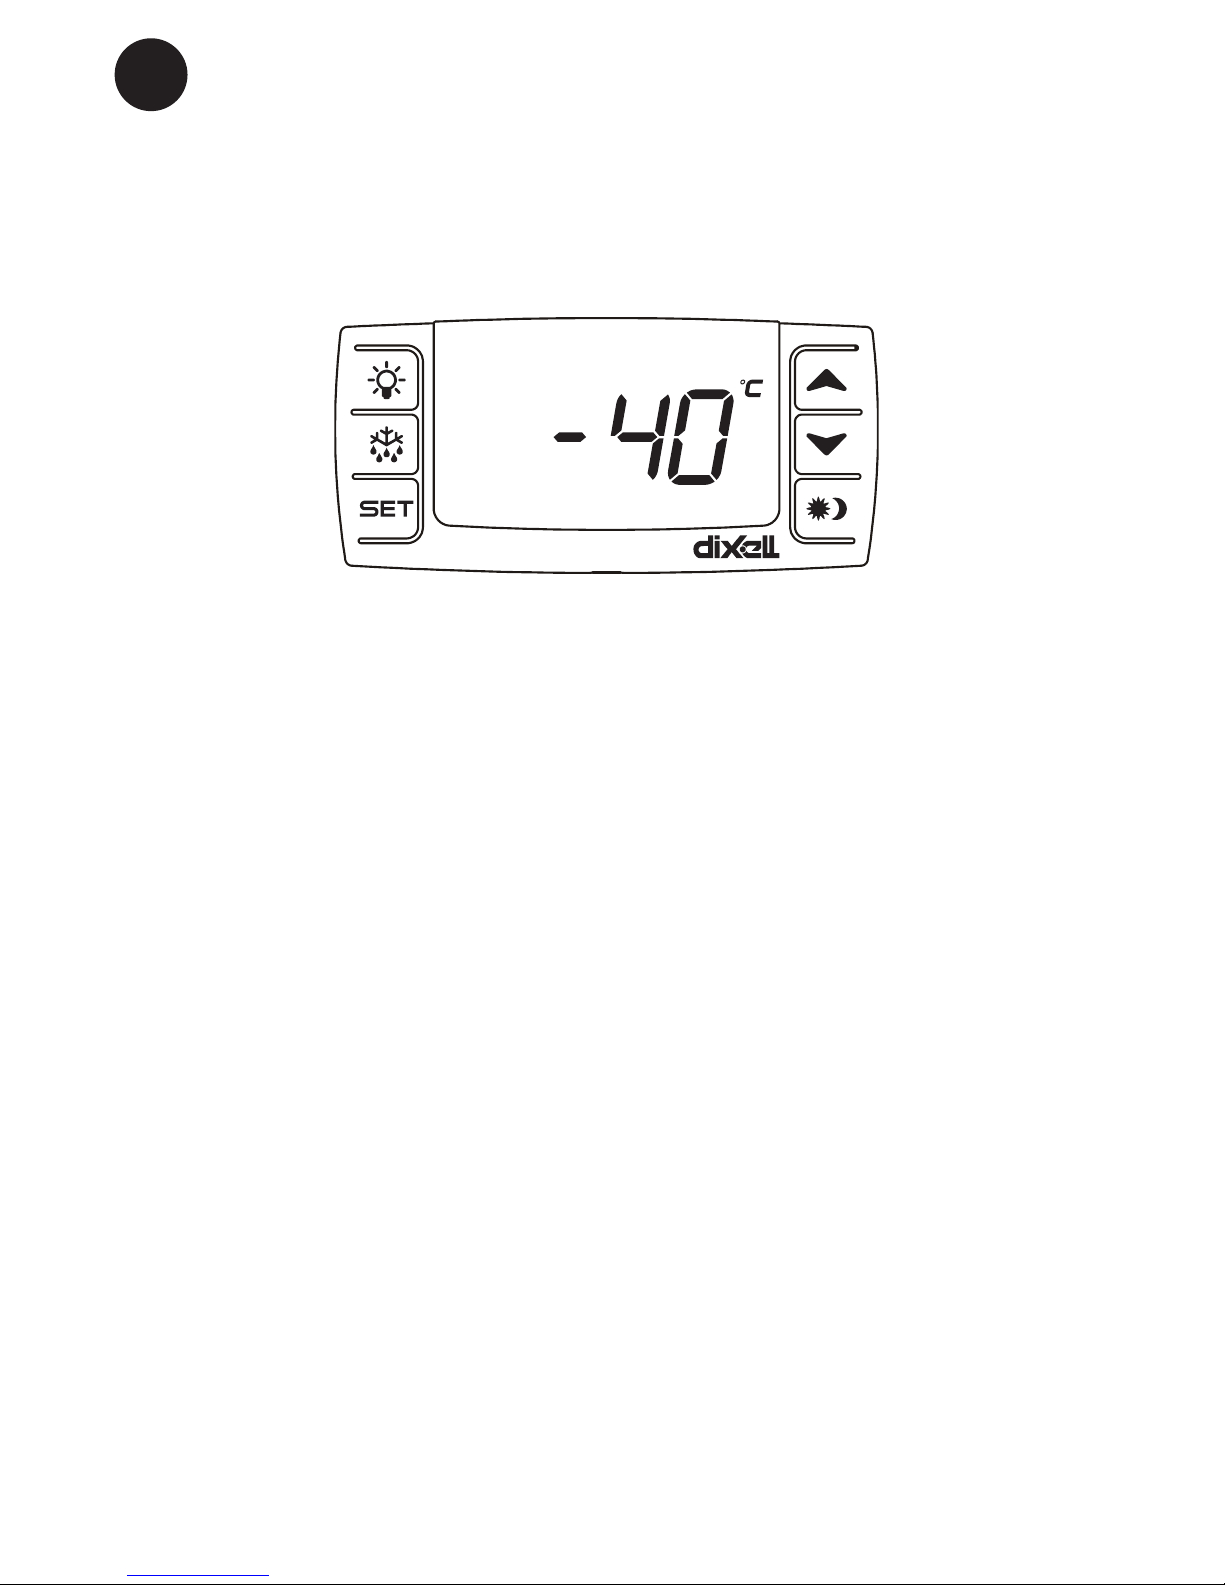
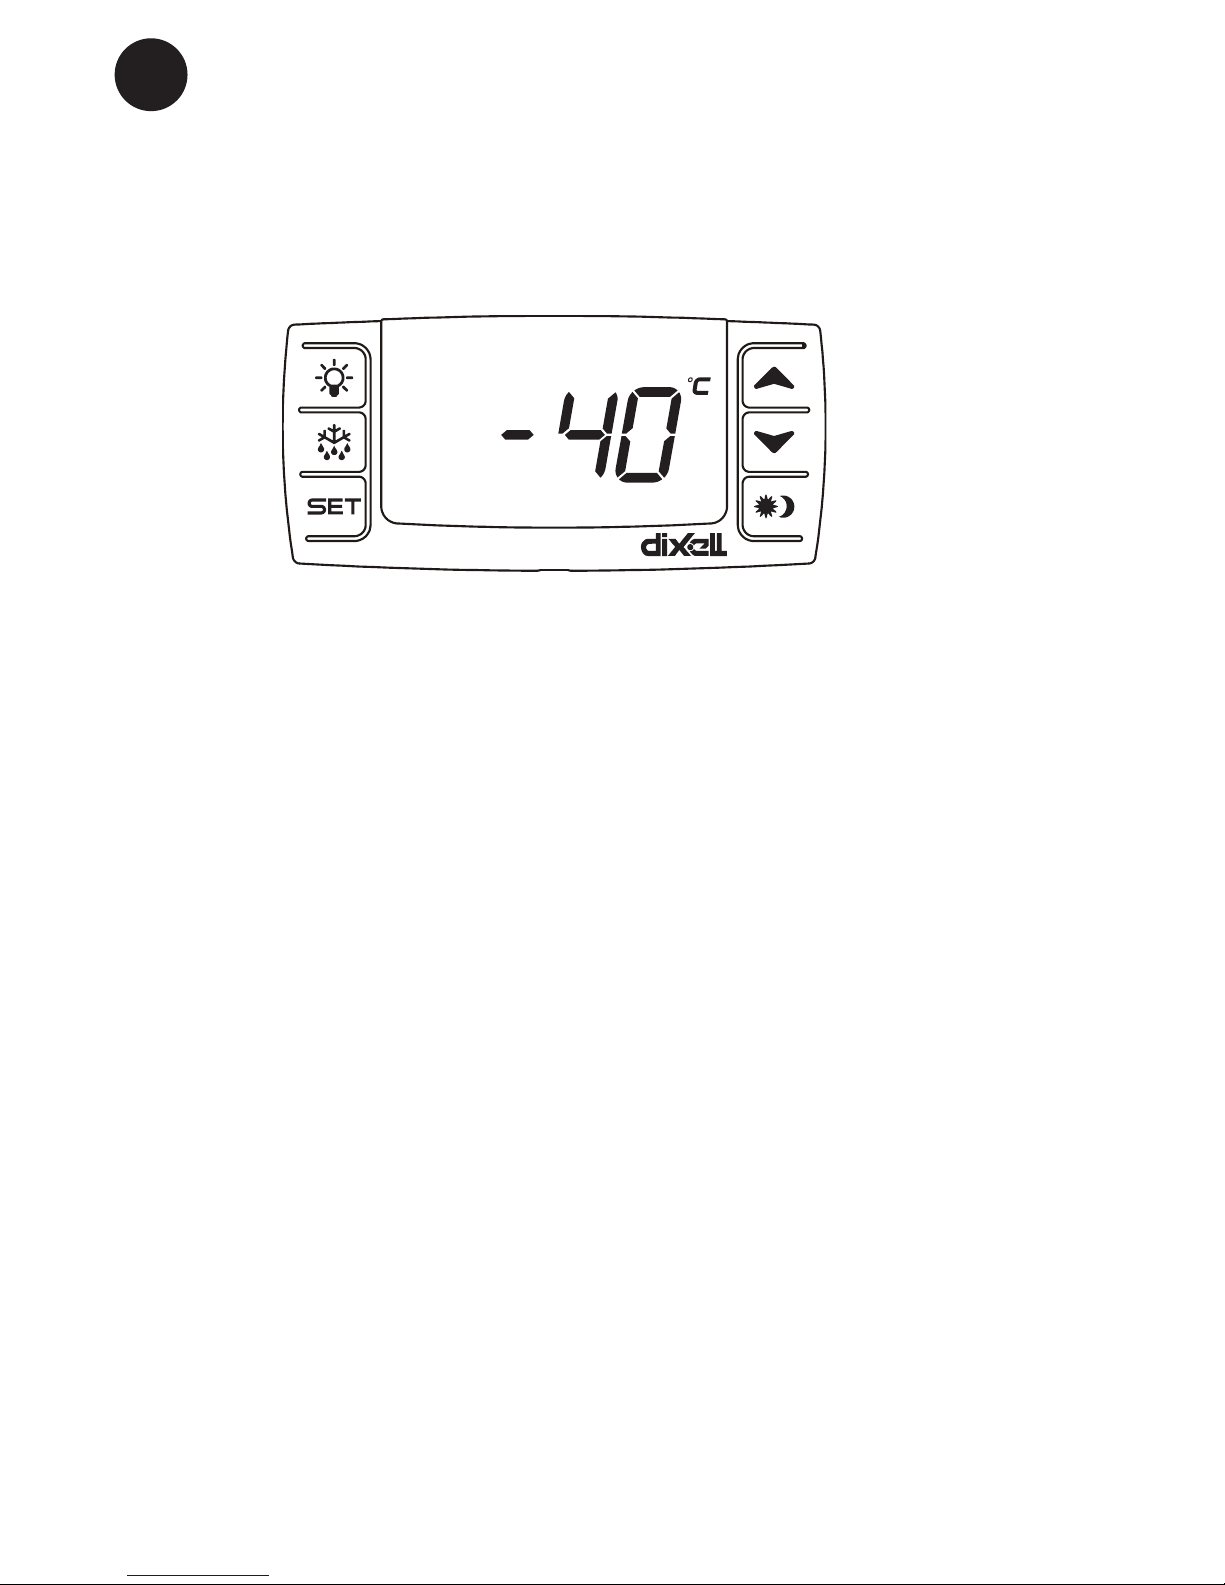
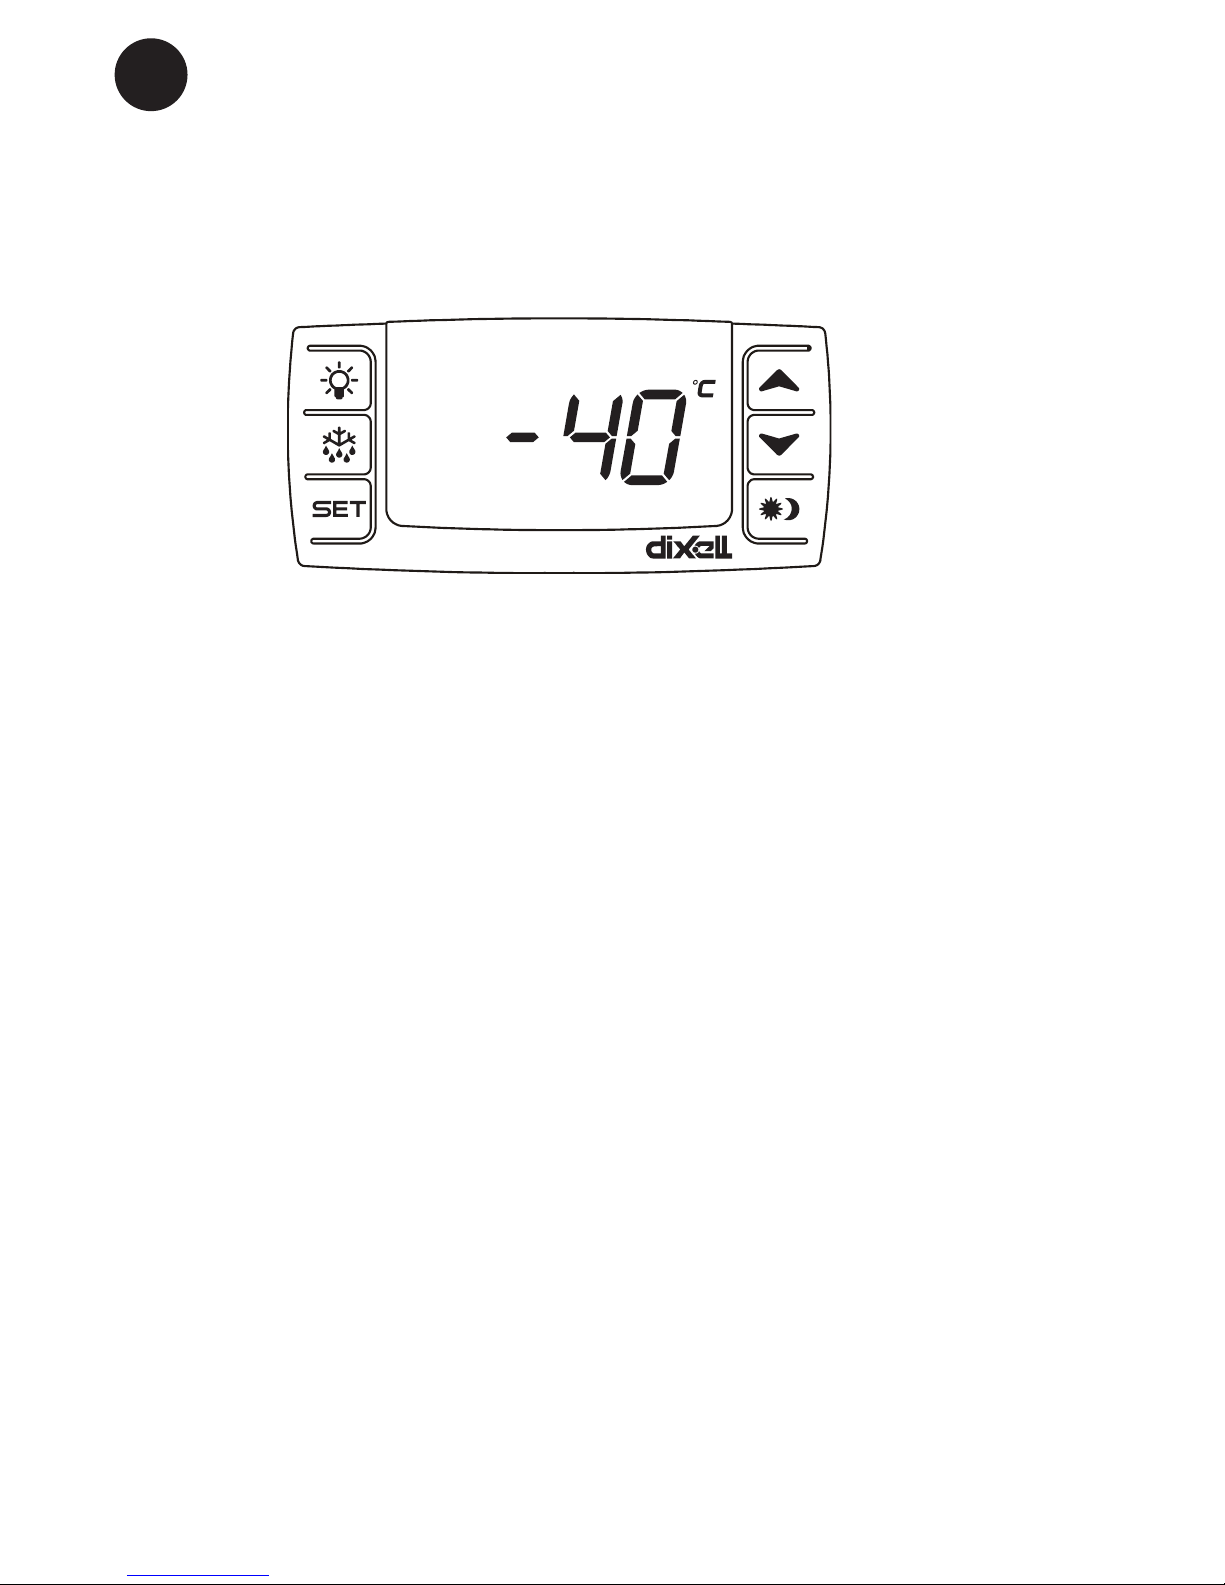
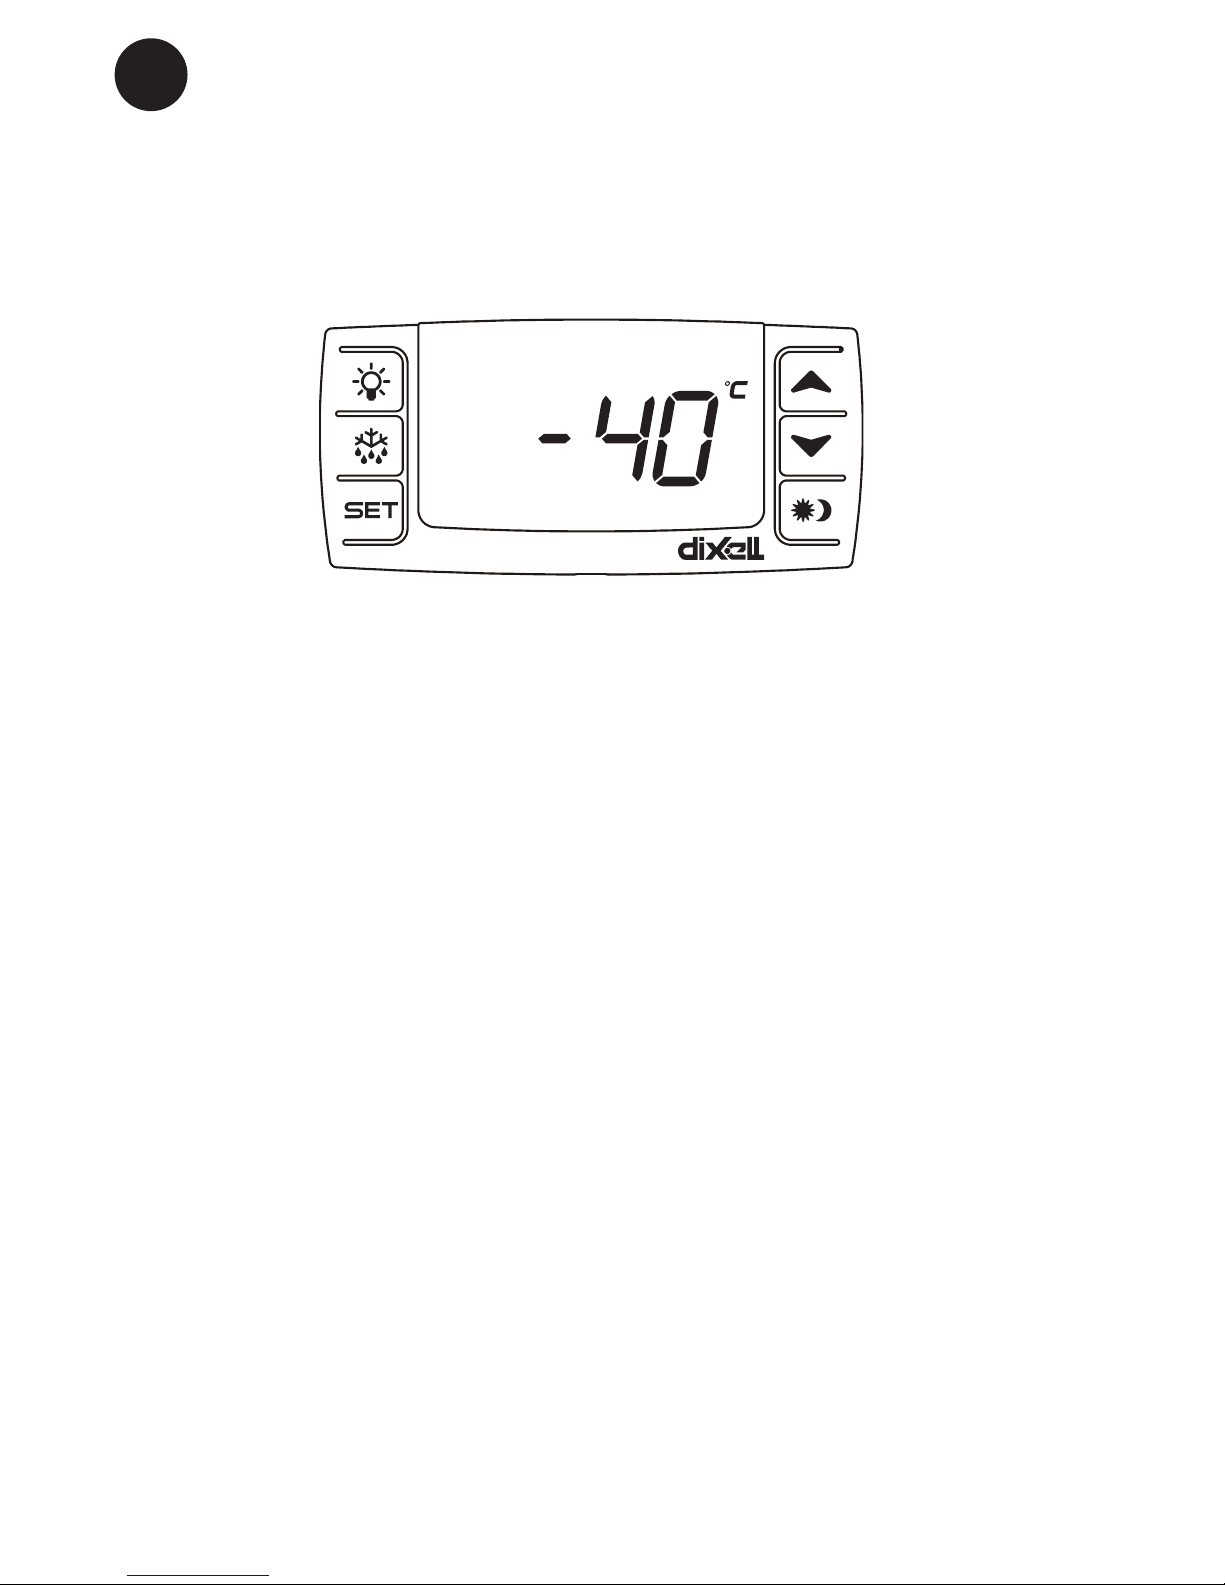
The appliance is equipped with electronic controls (g. 4).
Operation and function
For operation of the electronic control,
reference is made to the separate
instruction manual enclosed in the
appliance.
g. 4
Page 7
7
GB
The items stored in the freezer and the
humidity of the surrounding air gradually
cause frost and ice to form inside the
freezer. A thin layer of frost or ice does
not affect freezer performance, but the
thicker the layer, the higher the energy
consumption. Small amounts of loose frost
can be removed using a plastic scraper.
Never use electrical apparatus or sharp
implements as these may damage the
inside of the appliance.
When the layer of frost and ice exceeds
4-5 mm the freezer should be completely
defrosted. It is recommended that defrosting
be performed when there are no or only a
few items stored in the freezer.
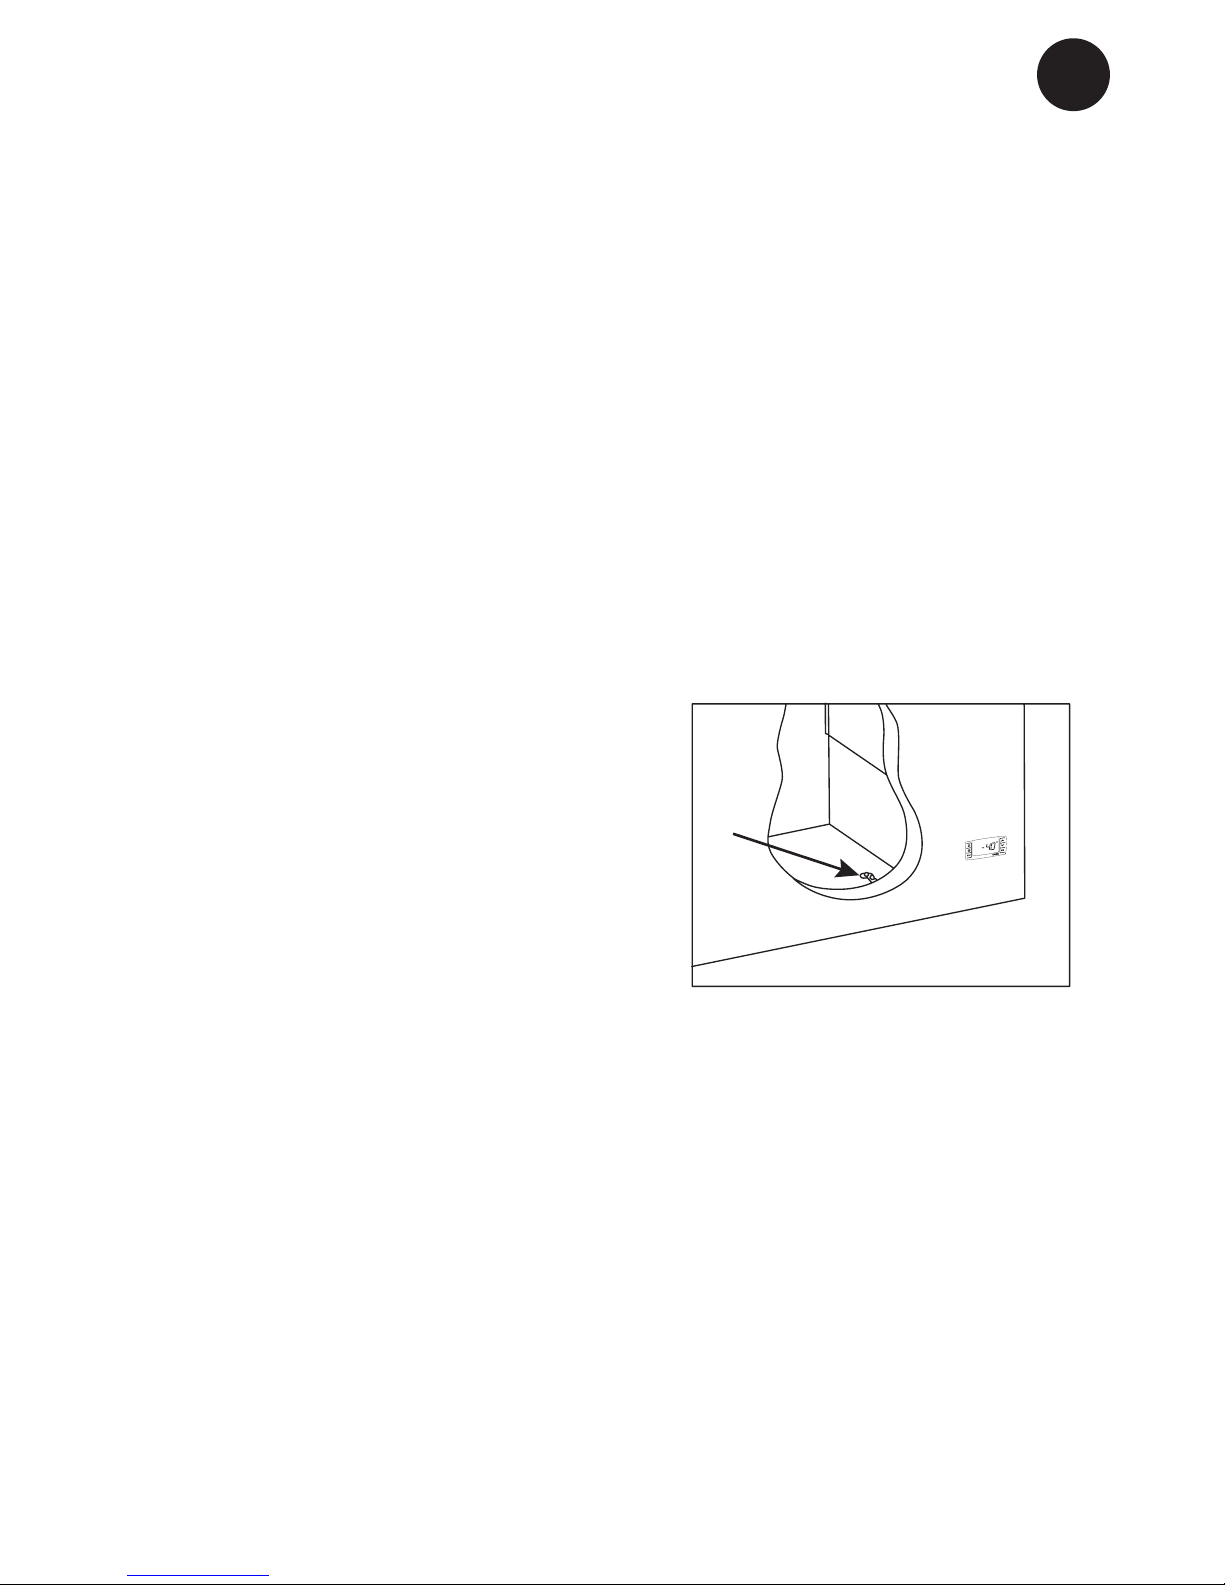
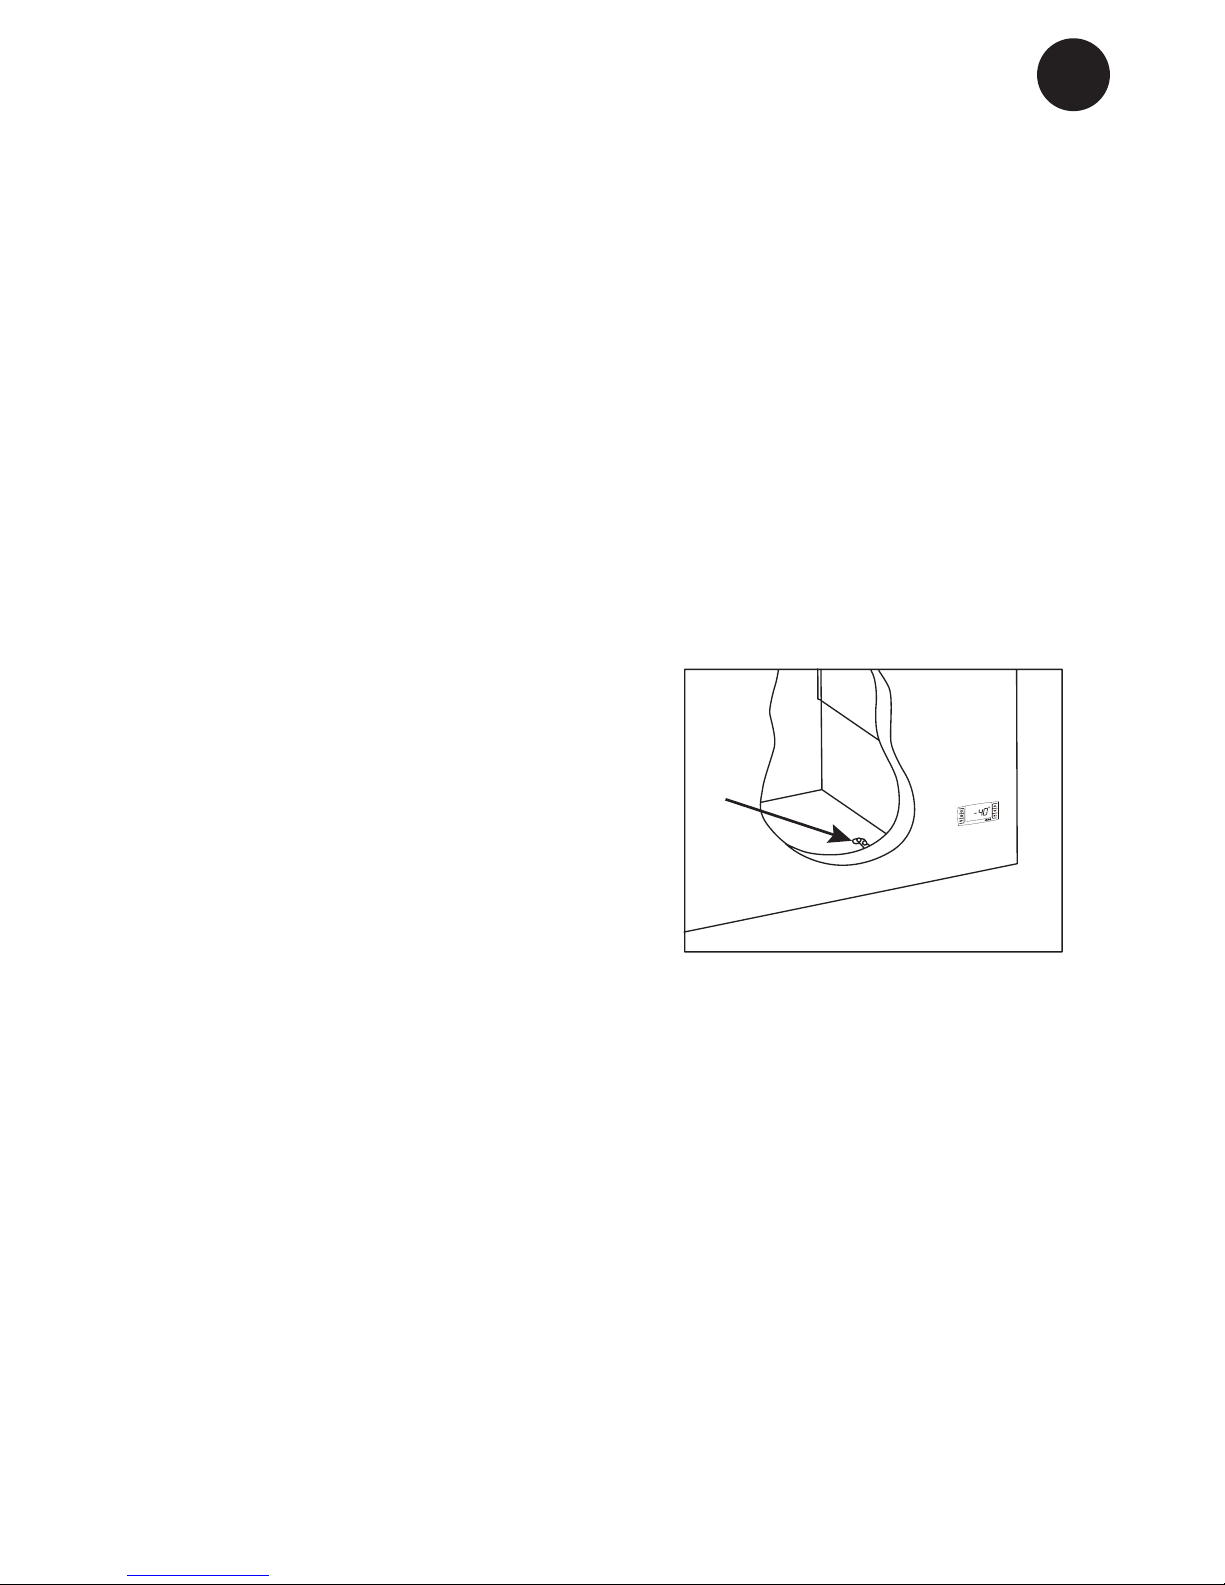
Proceed as follows:
1. Leave the freezer lid open.
2. Position the partition under the defrost
water drain.
3. Place a bowl of hot (but not boiling) water
in the freezer, close the lid and wait
approx. 30 minutes before removing
loose frost with the plastic scraper.
4. To prevent water from damaging the oor
during defrosting, it is advisable to check
the defrost water tray from time to time
and to cover the oor around the defrost
water drain to protect against ice and
splashes. When all the frost and ice have
melted, clean the inside of the appliance
using water with a mild, perfume-free
detergent. Dry the freezer with a soft
cloth.
5. Reconnect the power supply.
6. Return items to the freezer when the
required temperature has been reached.
Remember to reinsert the stopper in the
defrost water drain.
Defrosting
g. 8
Page 8

8
GB
Cleaning
Before cleaning, disconnect the power
supply and remove all loose ttings.
The appliance is best cleaned using
warm water (max. 85°C) with a little mild,
perfume-free detergent. Never use cleaning
agents that scour. Use a soft cloth. Rinse
with clean water and dry thoroughly. It is
important to prevent water from entering the
control panel.
The sealing strip around the lid must be
cleaned regularly to prevent discolouration
and prolong service life. Use clean water.
After cleaning the sealing strip, check that it
continues to provide a tight seal.
It is recommended that the wire and tubular
condensers on the rear of the appliance be
cleaned.
The ventilation grille must also be kept free
of dust and dirt. Clean it with a vacuum
cleaner.
If the appliance is not to be used for any
length of time, switch it off, disconnect the
power supply, empty it, clean the inside and
leave the lid open to allow air circulation
and prevent smells.
Cleaning and maintenance
max.
15 W
Save energy
- Keep the lid closed as much as possible.
- Check regularly that the lid closes tightly.
- Position the freezer in a cool (min. 5°C),
well-ventilated room.
- Defrost the freezer before the layer of ice
becomes excessively thick.
g. 9
Replacing the bulb
1. Disconnect the power supply by
removing the plug from the socket.
2. Remove the lamp cover by pressing it
together to release it from the two clips
(g. 9).
3. Replace the bulb(s).
4. Ret the cover and reconnect the power
supply.
Page 9

9
GB
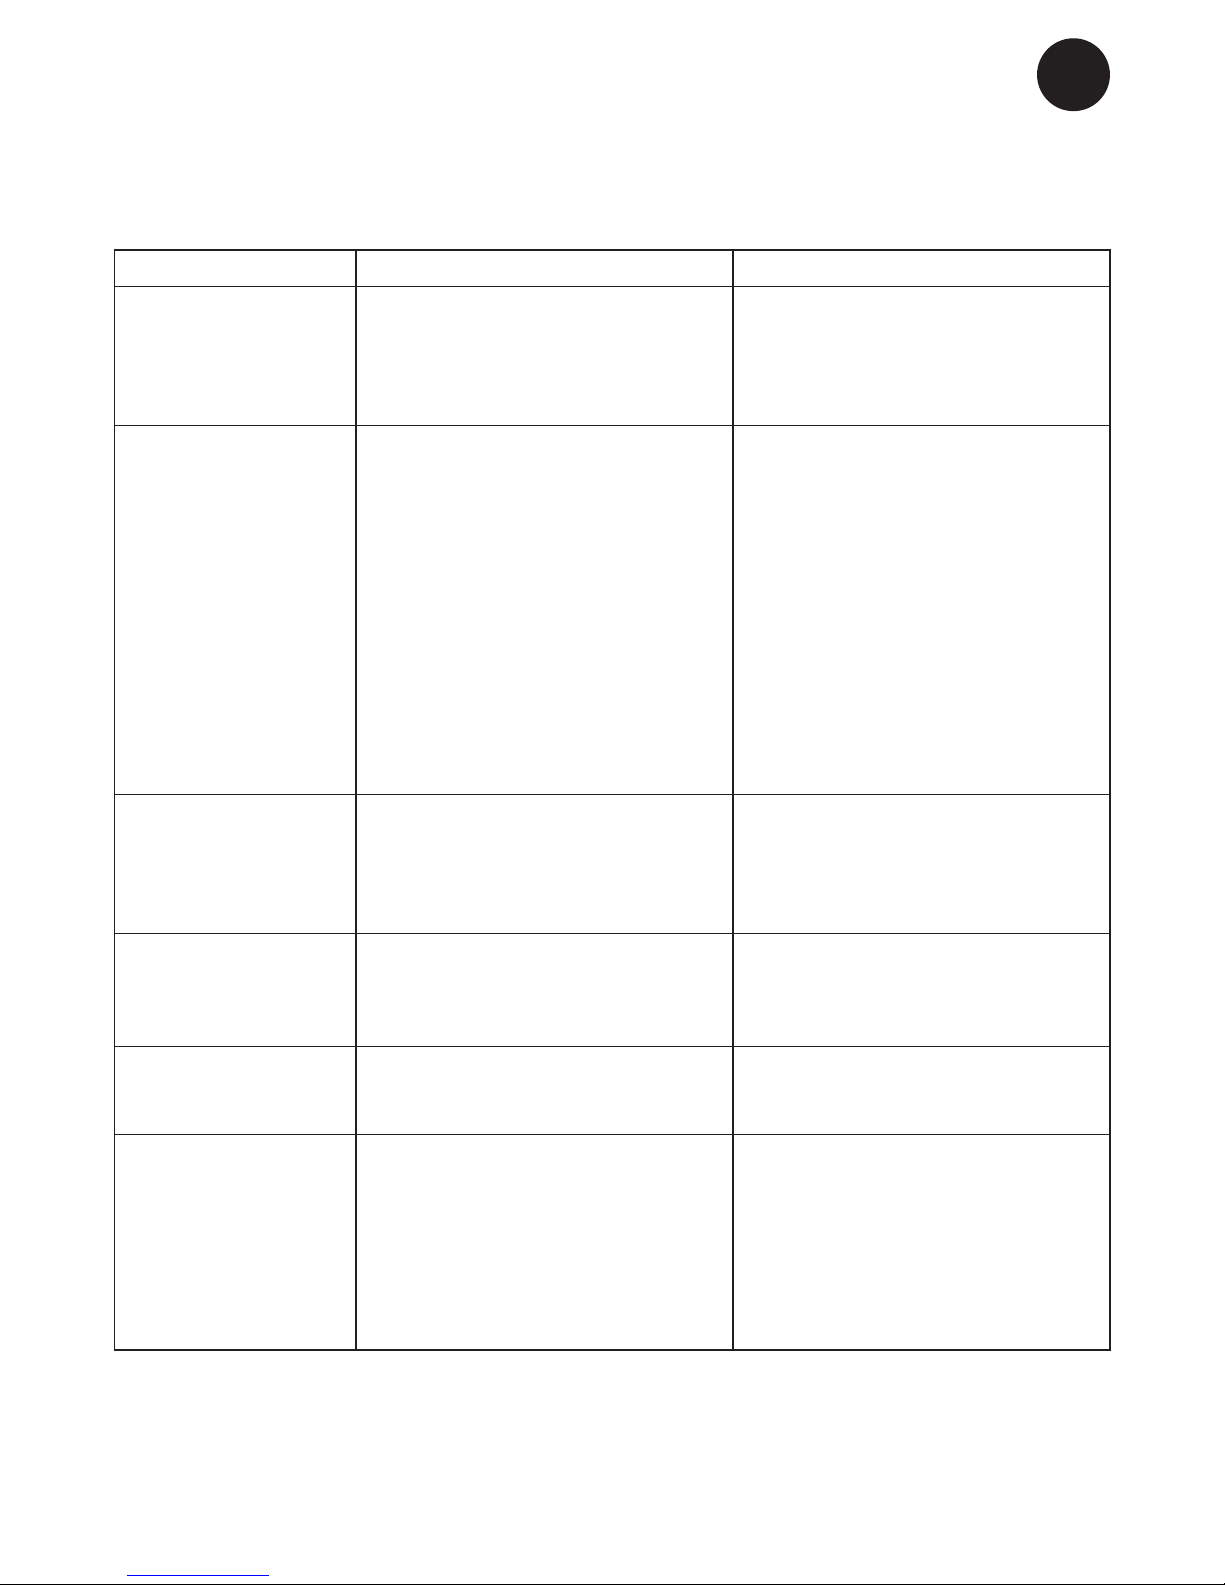
Fault nding
Fault Possible cause Remedy
No control lamps are
lit.
The appliance is switched off.
Power failure; the fuse is blown; the
appliance is not plugged in correctly.
Check the plug and socket.
Check that power is connected.
Reset the fuse.
Temperature in freezer
too high.
The ventilation grille is blocked.
The lid is not closed properly.
The quantity of items placed in the
freezer at a time is greater than the
capacity of the appliance.
Thick layer of frost and ice.
The thermostat is set too high.
Ensure unhindered air circulation.
Close the lid and wait a few hours.
Wait a few hours.
Defrost the freezer.
Set the thermostat to a lower temperature.
Temperature in freezer
too low.
The thermostat is set too low.
The lid is prevented from closing
tightly by items stored in the freezer.
Set the thermostat to a higher temperature.
Reposition items inside the freezer
and check that the lid closes tightly.
The freezer produces
large quantities of
frost.
Air humidity in the room is high.
Items placed in the freezer are giving
off moisture.
Ventilate the room more often or
move the freezer to a room with lower
humidity.
Repack items stored in the freezer.
The lid cannot be
opened.
Underpressure in freezer. Wait 2-3 minutes until the underpres-
sure has been equalised and try
again.
Vibration and unusual
noise.
The appliance is not on a level
surface.
The appliance is not free standing.
Baskets or partition are loose.
Position the freezer on a at, level
and stable surface.
Move the appliance away from other
appliances or pieces of furniture.
Check movable ttings and reposition
them.
Page 10

10
GB
Spare parts
When ordering spare parts, please state the
type, serial and production numbers of your
appliance (see g. 1 on page 3 and g. 10).
This information is given on the nameplate
on the rear of the appliance. The nameplate
contains various technical information,
including type and serial numbers.
Note: Always use approved service
technicians when your appliance is to be
repaired or replaced!
Important
Please note that changes to the
construction of the appliance or changes to
the component equipment of the appliance
will invalidate the warranty and product
liability, and the appliance cannot be used
lawfully. The approval stated on the rating
plate will also be invalidated.
Spare parts
Prod. No.: XXXX Type: XXXX
Serial No.: XXXXXXXX
g. 10
Page 11

11
GB
Packing
The packing material is entirely recyclable,
and marked with recycling symbol. Please
follow the local regulations for scrapping.
Appliance
The appliance is made of recyclable
material. The cabinet contain ammable
blowing gases and dispose of the
appliance should be according with the
local environmental regulations. Make the
appliance unusable by cutting of the power
supply cord and please, the appliance must
be delivered to an authorised centre for
recovery of refrigerant.
Safeguarding the environment
Disposal
Environmental regulations on disposal must
always be observed. When disposing of
the appliance you should contact your local
authority technical department who will
inform you of how collection and recycling
of such units take place in your area.
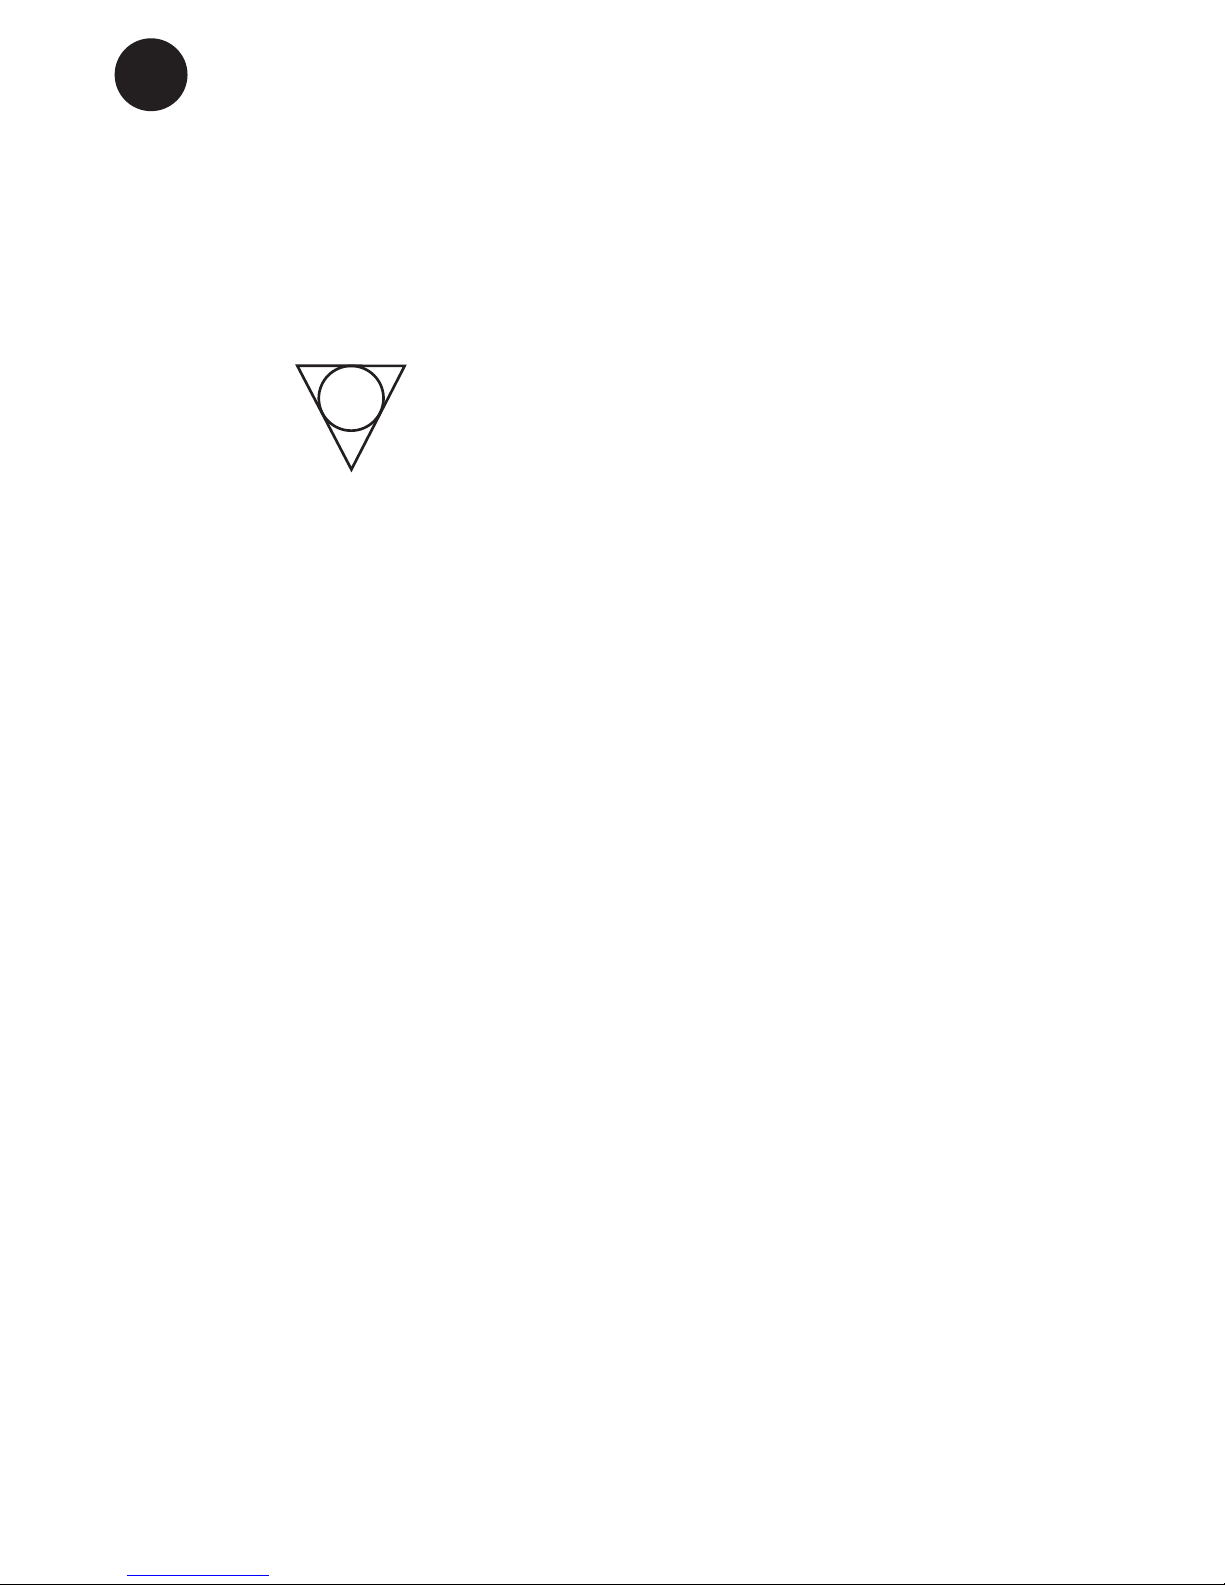
This product is marked in accordance
with EU Directive 2002/96/EC on waste
electrical and electronic equipment (WEEE).
Ensuring that the product is disposed of
correctly helps prevent potential negative
impacts on the environment and human
health. Such impacts may occur if the
product is disposed of inappropriately.
The
symbol on the product or its
accompanying documents means that the
product must not be disposed of together
with household refuse. Instead, it must be
delivered to a recycling station for electrical
and electronic equipment.
The product must be disposed of in
accordance with current environmental
regulations for the disposal of waste.
For further information on the handling,
recycling and reuse of this product, please
contact your local authorities or waste
collection company, or the dealer from
whom you purchased the product.
Page 12
2
DE
Die Bedienungsanleitung muss den
Mitarbeitern jederzeit zugänglich sein.
Dieses Gerät entspricht den Regelungen
zur CE Kennzeichnung sowie den
einschlägigen Richtlinien und Normen.
Niederspannungsrichtlinie 73/23/EWG.
EMV Richtlinie 89/336/EWG.
Warnung
Da das Gerät ein brennbares Kältemittel
enthält, dürfen die Kältemittelleitungen
niemals beschädigt sein!
- Das Verstopfen von Belüftungsöffnungen
im Gerätegehäuse oder der
Einbauumgebung ist zu vermeiden.
- Keine mechanischen Geräte oder
andere Mittel zur Beschleunigung des
Abtauvorgangs einsetzen, wenn diese
nicht ausdrücklich vom Hersteller
empfohlen sind.
- Den Kältemittelkreislauf nicht
beschädigen.
- In den Lebensmittellagerabteilen keine
elektrischen Geräte verwenden, sofern
diese nicht vom Hersteller empfohlen
sind.
Dieses Gerät ist nicht für die Bedienung
durch Kinder oder gebrechliche
Personen bestimmt, sofern sie nicht von
verantwortlichen Personen beaufsichtigt
werden, um sicherzustellen, dass sie das
Gerät sicher bedienen können. Kleine
Kinder dürfen nicht mit dem Gerät spielen.
Die Schlüssel stets separat und außerhalb
der Reichweite von Kindern aufbewahren.
Niemals Behälter mit Flüssigkeiten,
insbesondere kohlensäurehaltige Getränke,
in dem Gefriergerät aufbewahren. Die
Flüssigkeit kann beim Gefrieren eine
Explosion verursachen. Die kühlenden
Oberächen nie mit bloßer Haut
berühren. Stets Handschuhe tragen, um
Verbrennungen zu vermeiden.
Alte Geräte
Alte Kühl- und Gefriergeräte sind häug mit
komplizierten Schnappschlössern versehen,
die von innen nicht geöffnet werden
können. Falls bei Ihnen ein solches Gerät
steht, oder wenn Sie ein solches Gerät
ausrangieren, machen Sie bitte zuerst das
Schloss unbrauchbar. So verhindern Sie,
dass spielende Kinder eingesperrt werden
und in Lebensgefahr kommen können.
Vor dem Gebrauch
Vor dem Gebrauch Ihres neuen Geräts
sollten Sie diese Bedienungsanleitung
gründlich lesen. Sie enthält wichtige
Informationen zu Sicherheit, Installation,
Betrieb und Wartung. Bewahren Sie die
Bedienungsanleitung auf. Sie könnten
Sie zu einem späteren Zeitpunkt evtl.
benötigen. Kontrollieren Sie das Gerät
sofort bei Lieferung auf eventuelle
Beschädigungen. Transportschäden sind
dem Händler zu melden, bevor das Gerät in
Gebrauch genommen wird.
Verpackung entfernen. Reinigen Sie das
Gerät innen mit warmem Wasser, dem Sie
etwas unparfümiertes Spülmittel zugeben.
Mit sauberem Wasser nachwischen und
gründlich trocknen (siehe “Reinigung”).
Verwenden Sie ein weiches Tuch.
Wurde das Gefriergerät bei Temperaturen
unter +5 °C gelagert, muss vor dem ersten
Einschalten mindestens eine Stunde zur
Akklimatisierung vergehen.
Inhalt
Lernen Sie Ihr Gefriergerät kennen ...3
Inbetriebnahme und Installation .........4
Elektrischer Anschluss ......................5
Bedienung und Funktion ....................6
Parametereinstellungen .....................7
Bedienungsbefehle .............................8
Abtauen ............................................. 9
Reinigung und Wartung ..................10
Fehlersuche ..................................... 11
Ersatzteile .........................................12
Entsorgung ................................... 13
Elektroschaltplan ..............................14
Page 13

3
DE
Lernen Sie Ihr Gefriergerät kennen
Handgriff
Dichtleiste
Typenschild
Trennwand/Tauwas-
serschale
Korb
Ventilationsrost
Elektronisches Bedien-
ungsfeld
Tauwasserabuss
Rollen
Abb. 1
Page 14

4
DE
Aufstellort
Aus Sicherheits- und betriebstechnischen
Gründen darf das Gerät nicht im Freien
aufgestellt werden.
Stellen Sie das Gerät auf einen ebenen,
waagerechten und festen Untergrund in
einem trockenen, gut belüfteten Raum
(max. 75 % relative Luftfeuchtigkeit).
Stellen Sie das Gerät nicht in unmittelbarer
Nähe von Wärmequellen wie Herden oder
Heizkörpern auf, und vermeiden Sie direkte
Sonneneinstrahlung oder Wärme von
anderen Wärmequellen.
Die Norm EN 378 legt fest, dass der
Aufstellraum, in dem Ihr Gerät installiert
wird einen Rauminhalt von 1 m³ pro
8 g Kohlenwasserstoffkältemittel im
Gerät haben muss, um die Bildung
eines brennbaren Gasgemischs in dem
Aufstellraum zu verhindern, falls ein Leck
im Kältekreislauf auftritt. Die Menge des im
Gerät bendlichen Kältemittels geht aus
dem Typenschild hervor.
Raumtemperatur
Das Gerät ist zum Betrieb in dem
auf dem Typenschild angegebenen
Temperaturbereich ausgelegt. Die Angaben
zur Klimaklasse und andere technische
Daten nden Sie auf dem Typenschild an
der Geräterückseite.
Klimaklasse Zulässige
Raumtemperatur
SN +10 ºC bis +32 ºC
N +16 ºC bis +32 ºC
ST +18 ºC bis +38 ºC
T +18 ºC bis +43 ºC
Belüftung
Das Gerät muss ausreichend belüftet sein,
und die Luftzirkulation über und unter ihm
sowie seitlich von ihm darf nicht behindert
sein. Abb. 2 zeigt, wie die erforderliche
Luftzirkulation um das Gefriergerät herum
gewährleistet wird.
Inbetriebnahme und Installation
100 mm
800 mm
20 mm
100 mm
Zwischen dem Geräteboden und der
Unterlage muss der Abstand mindestens 35
mm betragen.
WICHTIG! Der Belüftungsrost muss frei
zugänglich sein (Abb. 3).
Abb. 2
Abb. 3
Page 15

5
DE
Das Gerät ist zum Anschluss an das
Wechselstromnetz bestimmt. Die Werte für
Spannung (V) und Frequenz (Hz) sind auf
dem Typenschild an der Geräterückseite
angegeben. Das Gerät ist allein an eine
eigene Steckdose anzuschließen.
Das Netzkabel ist direkt mit der Steckdose
zu verbinden. Keine Verlängerungskabel
verwenden!
Bei Beschädigung des Netzkabels
ist es durch ein gleichwertiges Teil
zu ersetzen, das vom Hersteller oder
dessen Kundendienst geliefert wird.
Elektrischer Anschluss
Page 16
6
DE
Das Gerät ist mit einer elektronischen Steuerung ausgerüstet (Abb. 4)
Bedienung und Funktion
Für die Bedienung der elektronischen
Steuerung verweisen wir auf die separate
Bedienungsanleitung im Gerät.
Abb. 4
Page 17
7
DE
Nicht vergessen, den Tauwasserablauf
wieder mit dem Stopfen zu verschließen.
Das Gefriergut und die Luftfeuchtigkeit
verursachen mit der Zeit Reif und Eis im
Innern der Gefriertruhe. Eine dünne Reifoder Eisschicht setzt die Leistung des
Geräts nicht herab, aber mit zunehmender
Stärke des Belags erhöht sich der
Energieverbrauch. Etwas loser Reif lässt
sich mit einem Kunststoffschaber entfernen.
Niemals elektrische Geräte oder scharfe
Werkzeuge zum Entfernen von Reif/Eis
verwenden, da sie das Truheninnere
beschädigen können.
Erreicht die Reif- oder Eisschicht 4-5 mm
Stärke, muss das Gerät abgetaut werden.
Wir empfehlen, das Gefriergerät abzutauen,
wenn nur wenige Waren darin gelagert sind.
Gehen Sie folgendermaßen vor:
1. Deckel offen lassen.
2. Trennwand unter Tauwasserablauf
legen.
3. Eine Schüssel mit warmem (nicht
kochendem) Wasser in das Gerät stellen
und den Deckel schließen. Ca. 30
Minuten warten und die Reifschicht dann
mit dem Kunststoffschaber entfernen.
4. Um während des Abtauvorgangs
Wasser auf dem Fußboden zu
vermeiden, ist die Tauwasserschale
regelmäßig zu kontrollieren. Der Boden
um den Tauwasserablauf herum sollte
abgedeckt werden, um ihn gegen Eis
und Wasserspritzer zu schützen.
Nachdem das Eis getaut ist, das
Gefriergerät mit einer schwachen Lösung
aus Wasser und unparfümiertem
Spülmittel reinigen. Mit einem trockenen
Tuch nachwischen.
5. Versorgungsspannung anschließen.
6. Das Lagergut kann wieder ins Gerät
gelegt werden, wenn die Temperatur
korrekt ist.
Abtauen
Abb. 8
Page 18

8
DE
Reinigung
Vor der Reinigung ist der Netzstecker zu
ziehen und das lose Zubehör aus dem
Gerät zu entfernen.
Eine Mischung aus warmem Wasser und
unparfümiertem Spülmittel (max. 85 ºC) ist
dazu am besten zur Reinigung geeignet.
Verwenden Sie keine Reinigungsmittel, die
Kratzer verursachen können. Verwenden
Sie ein weiches Tuch. Mit klarem Wasser
nachwischen und gut abtrocknen. Es darf
kein Wasser in die Bedienungselemente
gelangen.
Die Deckeldichtleiste muss regelmäßig
gereinigt werden, um Verfärbungen zu
vermeiden und lange Haltbarkeit zu
gewährleisten. Klares Wasser verwenden.
Nach der Reinigung der Dichtleiste prüfen,
ob sie dicht schließt.
Wir empfehlen die Reinigung der Drahtund Röhrenkondensatoren an der
Geräterückseite.
Den Lüftungsrost frei von Staub und
Schmutz halten. Zur Reinigung des Rosts
einen Staubsauger verwenden.
Bei längerer Außerbetriebnahme, den
Netzstecker ziehen und die Gefriertruhe
ausräumen und reinigen. Den Deckel
nicht schließen, um Geruchsbildung zu
vermeiden.
Reinigung und Wartung
max.
15 W
Sparen Sie Energie
- Deckel möglichst geschlossen halten.
- regelmäßig prüfen, dass der Deckel dicht
schließt
- die Gefriertruhe in einem kühlen (max.
5 °C), gut belüfteten Raum aufstellen.
- Gefriergerät abtauen, bevor die Eisschicht
zu dick wird.
Abb. 9
Austausch der Lampe
1. Netzstecker ziehen.
2. Lampenschirm abnehmen (Abb. 9). Den
Schirm zusammendrücken, sodass er
sich von den beiden Klipps löst.
3. Glühlampe(n) austauschen.
4. Lampenschirm wieder anbringen und
Versorgungsspannung anschließen.
Page 19
9
DE
Fehlersuche
Fehler Mögliche Ursache Abhilfe
Keine Kontrolllampe
leuchtet.
Das Gerät ist ausgeschaltet.
Stromausfall; Sicherung hat angesprochen; Netzstecker nicht richtig
eingesteckt.
Stecker und Schalter prüfen.
Prüfen, ob der Strom angeschlossen
ist. Die Sicherung muss intakt/eingeschaltet sein.
Die Temperatur im Gefrierraum ist zu hoch.
Der Belüftungsrost ist blockiert.
Der Deckel der Gefriertruhe ist nicht
ordnungsgemäß geschlossen.
Es wurde mehr neues Gefriergut in
das Gerät gelegt, als gleichzeitig
eingefroren werden kann.
Starke Reif- und Eisschicht.
Thermostat zu warm eingestellt.
Für unbehinderte Luftzirkulation
sorgen.
Deckel schließen und einige Stunden
lang warten.
Einige Stunden warten.
Gefriergerät abtauen.
Thermostat auf niedrigere Temperatur einstellen.
Temperatur im Gefriergerät zu niedrig.
Thermostat zu kalt eingestellt.
Deckel liegt auf Gefriergut auf.
Thermostat auf höhere Temperatur
einstellen.
Gefriergut umlagern und prüfen, ob
der Deckel nun dicht schließt.
Gefriergerät setzt
schnell Reif an.
Der Raum ist sehr feucht.
Das Gefriergut gibt Feuchtigkeit ab.
Häug lüften oder Gerät in einem anderen, trockeneren Raum aufstellen.
Gefriergut umpacken.
Deckel lässt sich nicht
öffnen.
Unterdruck im Gefriergerät. 2-3 Minuten warten, bis der Unter-
druck abgebaut ist, dann erneut
versuchen.
Vibrationen und
ungewöhnliche Geräusche.
Das Gerät steht nicht auf einer ebenen Unterlage.
Das Gerät steht nicht frei.
Körbe oder Trennwand sind locker.
Gerät auf eine ebene, waagerechte
und feste Unterlage stellen.
Gerät von Möbeln oder anderen
Geräten abrücken.
Die beweglichen Teile prüfen und
wieder einsetzen.
Page 20

10
DE
Ersatzteile
Bitte bei der Ersatzteilbestellung Typ- und
Seriennummer sowie Produktionsnummer
angeben (siehe Abb. 1, Seite 3 und Abb.
10). Diese Angaben nden Sie auf dem
Typenschild an der Geräterückseite.
Das Typenschild enthält verschiedene
technische Angaben, u.a. auch Typ- und
Seriennummer.
Denken Sie daran! Stets nur autorisierte
Handwerker beauftragen, wenn ein Teil
repariert oder ausgewechselt werden muss!
Wichtig
Bitte beachten, dass Eingriffe in dem Aufbau des Gerätes oder Änderungen der
Komponentenbestückung zur Folge haben,
die Garantie und Produktenhaftung entfallen, und die Anwendung des Gerätes ist
nicht zulässig. Die auf dem Typenschild
angeführte Genehmigung ist auch ungültig.
Ersatzteile
Prod. No.: XXXX Type: XXXX
Serial No.: XXXXXXXX
Abb. 10
Page 21

11
DE
Verpackung
Das Verpackungsmaterial ist vollständig
recyclebar und mit Recyclingsymbolen
gekennzeichnet. Beachten Sie bitte die bei
Ihnen gültigen Entsorgungsvorschriften.
Gerät
Das Gerät besteht aus recyclingfähigem
Material. Das Gerät enthält brennbare
Gase, und die Entsorgung hat gemäß den
jeweils geltenden Umweltbestimmungen zu
erfolgen. Bitte machen Sie das Gerät durch
Abschneiden des Netzkabels unbrauchbar,
und liefern Sie es bei einer autorisierten
Kühlgerätesammelstelle ab.
Umweltschutz
Entsorgung
Beachten Sie in jedem Fall die jeweils
geltenden Umweltschutzbestimmungen.
Bei Ihrem zuständigen Stadtreinigungsamt
können Sie erfahren, wie Abtransport und
Wiederverwertung dieser Geräte in Ihrer
Gemeinde gehandhabt werden.
Dieses Produkt ist gemäß der EURichtlinie 2002/96/EG über ausrangierte
elektrische und elektronische Ausrüstung
(WEEE) gekennzeichnet. Durch eine
ordnungsgemäße Entsorgung dieses
Produkts helfen Sie mit, potentiell negative
Folgen für die Umwelt und die Gesundheit
der Bevölkerung zu vermeiden, die durch
eine unsachgemäße Entsorgung verursacht
werden könnten.
Das Symbol
am Produkt oder auf
schriftlichem Begleitmaterial bedeutet,
dass das Produkt nicht zusammen mit
Haushaltsabfall entsorgt werden darf. Es
muss vielmehr bei einer Sammelstelle für
elektrische und elektronische Ausrüstung
abgeliefert werden.
Die Entsorgung hat gemäß den jeweils vor
Ort geltenden Umweltbestimmungen für
die Abfallentsorgung zu erfolgen. Weitere
Informationen zu Behandlung, Recycling
und Wiederverwertung dieses Produkts
bekommen Sie bei Ihren zuständigen
Behörden, der Müllabfuhr oder dem
Händler, bei dem Sie das Gerät erworben
haben.
Page 22

2
FR
Le personnel doit toujours avoir accès au
mode d’emploi. Cet appareil est conforme
aux règlements, aux directives et aux
normes de marquage CE. Directive basse
tension 73/23/CEE.
Directive CEM 89/336/CEE.
Attention !
Comme l’appareil contient un réfrigérant
qui est inammable, il est essentiel de
s’assurer que les conduites du réfrigérant
ne sont pas endommagées.
- Garder libre d’obstruction toutes les
ouvertures de ventilation de l’enceinte de
l’appareil ou celles dans la structure pour
l’encastrement.
- Ne pas utiliser d’appareils mécaniques
ou autres moyens pour accélérer
la décongélation sauf ce qui est
recommandé par le manufacturier.
- Ne pas endommager le circuit du
réfrigérant.
- Ne pas utiliser d’appareils électriques à
l’intérieur des compartiments de stockage
de la nourriture sauf s’ils sont d’un type
recommandé par le manufacturier.
Cet appareil n’est pas destiné à être
utilisé par de jeunes enfants ou des
personnes handicapées sauf si elles sont
adéquatement surveillées par une personne
responsable qui peut s’assurer qu’elles
utilisent de façon sécuritaire l’appareil. Les
jeunes enfants doivent être surveillés pour
leur interdire de jouer avec l’appareil.
Conserver les clés à un endroit distinct et
hors de portée des enfants.
Ne jamais placer de récipients contenant
des liquides, notamment des boissons
gazeuses, dans le congélateur. Le liquide
pourrait éclater durant le processus de
congélation. Ne jamais toucher les surfaces
de congélation à mains nues. Toujours
porter des gants pour éviter les brûlures.
Votre ancien appareil
Les anciens réfrigérateurs et congélateurs
sont souvent équipés de mécanismes de
fermeture compliqués ne pouvant s’ouvrir
que de l’extérieur. Avant de stocker votre
ancien appareil ou de vous en débarrasser,
toujours penser à détruire ce mécanisme
an d’éviter que les enfants en jouant
puissent rester enfermés à l’intérieur de
l’appareil au péril de leur vie.
Avant la mise en service
Avant de mettre en service votre nouvel
appareil, veuillez lire attentivement les
instructions suivantes : elles renferment
des informations importantes concernant
la sécurité, l’installation, le fonctionnement
et l’entretien. Conserver ce mode d’emploi
en lieu sûr : vous pourrez en avoir besoin
ultérieurement. À réception, contrôler
que l’appareil n’est pas endommagé. Les
dommages dûs au transport doivent être
notiés à votre fournisseur avant toute
utilisation de votre congélateur.
Enlever l’emballage. Nettoyer l’intérieur
de l’appareil à l’eau tiède additionnée de
produit à vaisselle non-agressif et sans
parfum. Rincer à l’eau claire et essuyer à
fond (voir chapitre nettoyage). Utiliser un
chiffon doux.
Si le congélateur a été stocké en
environnement froid (au-dessous de +5 °C),
il lui faudra une période d’adaptation d’au
moins 1 heure avant sa mise en marche.
Sommaire
Faites connaissance avec
votre congélateur coffre ...................3
Mise en service et installation ..........4
Raccordement électrique ................5
Utilisation et fonctionnement ............6
Réglage des paramètres .................7
Panneau de commande en façade...8
Dégivrage ........................................9
Nettoyage et entretien ...................10
Recherche des anomalies
de fonctionnement .........................11
Pièces de rechange ........................12
Mise au rebut .............................13
Diagramme électrique ....................14
Page 23

3
FR
Faites connaissance avec votre congélateur
coffre
Poignée
Joint d’étanchéité
Ecusson signalétique
Plaque de cloi-
sonnement/bac de
récupération dégivrage
Paniers
Grille de ventilation
Panneau de commande
électronique
Évacuation de l’eau de
dégivrage
Roulettes
g. 1
Page 24

4
FR
Mise en place
Pour des raisons de sécurité et de
fonctionnement, l’appareil ne doit pas être
placé à l’extérieur. Placer l’appareil bien
à l’horizontale sur un sol plan et stable,
dans un local sec et bien ventilé (max.
75% d’humidité relative). Ne jamais placer
l’appareil près de sources de chaleur telles
que cuisinières ou radiateurs, et éviter
de l’exposer directement au soleil ou à d’
autres sources de chaleur. Le standard
La norme EN378 précise que la pièce
ou vous installez l’appareil doit avoir un
volume de 1m3 par 8 g d’hydrocarbure
réfrigérant utilisé dans l’appareil pour
éviter la formation de mélanges gaz/air
inammables dans la pièce ou l’appareil
est situé en cas de fuite du circuit du
réfrigérant. La quantité d’agent réfrigérant
utilisée dans l’appareil est indiquée sur
l’écusson d’identication.
Température ambiante
L’appareil est conçu pour un
fonctionnement dans une température
ambiante limitée, selon la classe climatique
indiquée sur l’écusson signalétique. Les
données concernant la classe climatique
et d’autres renseignements techniques se
trouvent sur l’écusson signalétique placé à
l’arrière de l’appareil.
Classe
climatique
Température
ambiante autorisée
SN +10 ºC à +32 ºC
N +16 ºC à +32 ºC
ST +18 ºC à +38 ºC
T +18 ºC à +43 ºC
Ventilation
Il est important que l’appareil soit bien
ventilé et que l’air puisse circuler librement au-dessus, en dessous et autour de
l’appareil. La gure 2 montre comment assurer la circulation d’air nécessaire autour
du congélateur.
Mise en service et installation
100 mm
800 mm
20 mm
100 mm
L’espace entre le sol et le fond de l’appareil
doit être de 35 mm.
IMPORTANT! Il faut laisser un libre accès à
la grille de ventilation (g. 3).
g. 2
g. 3
Page 25

5
FR
L’appareil est prévu pour être raccordé
sur courant alternatif. La tension (V) et la
fréquence (Hz) sont indiquées sur l’écusson
signalétique xée au fond de l’appareil. Le
raccordement doit se faire sur une prise
réservée à l’appareil.
Le câble d’alimentation doit être raccordé
directement à la prise de courant.
L’utilisation de rallonge est à proscrire.
Si le câble d’alimentation est
endommagé, il doit être remplacé par
un câble de même type fourni par
le fabricant ou par son représentant
assurant le service après-vente.
Raccordement électrique
Page 26
6
FR
L’appareil est équipé d’une commande électronique (g. 4)
Utilisation et fonctionnement
Pour ce qui concerne le maniement de la
commande électronique, reportez-vous au
monde d’emploi séparé dans l’appareil.
g. 4
Page 27
7
FR
toute la glace a fondu, nettoyer le
congélateur à l’aide de produit à vaisselle
sans parfum largement dilué dans l’eau.
Essuyer avec un chiffon doux.
5. Raccordement électrique.
6. Replacer les marchandises dans
l’appareil lorsque la température a atteint
un niveau correct.
Ne pas oublier de replacer le bouchon
sur le conduit d’évacuation de l’eau de
décongélation.
L’humidité apportée par les produits et
par l’air ambiant entraîne au l du temps
la formation de givre et de glace dans
l’appareil. Une mince couche de givre
ou de glace n’a pas d’inuence sur le
fonctionnement du congélateur, mais
plus la couche devient épaisse, plus la
consommation d’énergie augmente. Une
mince couche de glace peut être enlevée à
l’aide d’un racleur en matière plastique.
Ne jamais utiliser d’appareil électrique
ou d’objet pointu qui risqueraient
d’endommager l’intérieur de l’appareil.
Lorsque la couche de givre ou de glace
atteint une épaisseur de 4 à 5 mm,
le congélateur doit être dégivré. Il est
recommandé de procéder au dégivrage au
moment où le congélateur est presque ou
complètement vide.
Procéder de la façon suivante :
1. Laisser le couvercle ouvert.
2. Placer la cloison sous le bec du conduit
de dégivrage.
3. Placer un récipient d’eau chaude (non
bouillante) dans le congélateur, fermer
le couvercle et attendre environ 30
minutes, puis enlever le givre avec un
grattoir en plastique.
4. Pour éviter un débordement d’eau sur
le sol pendant le dégivrage, surveiller le
bac de recueil de l’eau. Il faut couvrir le
sol autour du bec d’écoulement de l’eau
de dégivrage pour le protéger contre
la glace et les éclaboussures. Lorsque
Dégivrage
g. 8
Page 28

8
FR
Nettoyage
Avant le nettoyage, enlever la che et tous
les éléments non xés.
Utiliser de préférence de l’eau tiède
additionnée d’un peu de produit à vaisselle
sans parfum (max. 85 ºC). Ne jamais utiliser
de produits de nettoyage abrasifs. Utiliser
un chiffon doux. Rincer à l’eau claire et
essuyer à fond. Éviter de faire pénétrer de
l’eau dans le panneau de contrôle.
Le joint d’étanchéité du couvercle nécessite
un nettoyage régulier an d’éviter qu’il ne
se décolore et pour garantir sa longévité.
Utiliser de l’eau claire. Après nettoyage du
joint d’étanchéité du couvercle, contrôler
qu’il assure toujours son rôle.
Il est recommandé de nettoyer les
ls métalliques et les tuyaux des
condensateurs au dos de l’appareil.
La grille de ventilation doit être propre. La
nettoyer avec un aspirateur.
Au cas où l’appareil doit rester inutilisé
pendant un temps prolongé, débrancher,
vider et nettoyer l’appareil et laisser le
couvercle ouvert pour éviter la création de
mauvaises odeurs.
Nettoyage et entretien
max.
15 W
Pour économiser l’énergie
- Tenir autant que possible le couvercle
fermé.
- Contrôler régulièrement l’étanchéité du
couvercle
- Placer l’appareil dans un endroit frais
(min. 5 °C) et bien ventilé.
- Dégivrer avant que la couche de glace ne
soit trop épaisse.
g. 9
Changement d’ampoule
1. Couper le courant au niveau de la prise
et débrancher.
2. Démonter l’écran d’éclairage (g. 9).
Presser l’écran d’éclairage pour le faire
sortir des deux attaches.
3. Remplacer l’ (les) ampoule(s).
4. Remettre l’écran et le courant.
Page 29

9
FR
Recherche des anomalies de fonctionnement
Anomalie Cause possible Remède
Aucune lampe de contrôle n’est allumée.
L’appareil est éteint.
Panne de courant ; fusible grillé ou
disjoncteur déclenché ; prise mal
enfoncée.
Contrôler la che et la prise.
Contrôler l’alimentation électrique.
Contrôler le fusible ou le disjoncteur.
La température dans
la cuve du congélateur
est trop élevée.
La grille de ventilation est bloquée.
Le couvercle de l’appareil est mal
fermé.
Une quantité trop importante de produits à congeler a été placée en une
seule fois dans le congélateur.
Importante couche de givre et glace.
Le thermostat est réglé sur trop
chaud.
Veiller à la libre circulation de l’air.
Fermer le couvercle et attendre quelques heures.
Attendre quelques heures.
Dégivrer l’appareil.
Régler le thermostat sur une température plus basse.
La température dans
le congélateur est trop
bas.
Le thermostat est réglé sur une température trop froide.
Le couvercle touche des aliments
dans le congélateur.
Régler le thermostat sur une température plus haute.
Déplacer les aliments et s’assurer
que le couvercle ferme bien.
L’appareil produit
beaucoup de givre.
Le local est très humide.
Les aliments dégagent de l’humidité.
Aérer fréquemment ou transporter
le congélateur dans un local moins
humide.
Revoir l’emballage des aliments.
Le couvercle ne
s’ouvre pas.
Sous-pression dans l’appareil. Attendre 2 ou 3 minutes jusqu’à ce
que la sous-pression ait disparu et
essayer de nouveau.
Vibrations et bruits
insolites.
L’appareil n’est pas posé sur une
surface plane.
L’appareil manque d’espace.
Les paniers ou la cloison ne sont pas
xés.
Placer le congélateur sur un sol plan,
stable et horizontal.
Dégager le congélateur des meubles
et appareils qui le gênent.
Vérier la stabilité des objets non
xés.
Page 30

10
FR
Pièces de rechange
Lors de la commande de pièces de
rechange, indiquer le type, le numéro de
série et de production (voir g. 1 page 3 et
g. 10). Ces renseignements se trouvent
sur l’écusson signalétique au dos de
l’appareil. L’écusson signalétique renferme
plusieurs informations techniques, ainsi
que les numéros de type et de série de
l’appareil.
Toujours faire appel à des services agréés
en cas de réparation ou de remplacement !
Important
Veuillez noter que lors d’une intervention
dans la construction ou d’une modication des composant de l’appareil a été
fait, la garantie et responsabilité cesse, et
l’appareil ne peut pas être utilisé
légitimement. L’autorisation gurant sur la
plaque signalétique ne sera plus valable.
Pièces de rechange
Prod. No.: XXXX Type: XXXX
Serial No.: XXXXXXXX
g. 10
Page 31
11
FR
Emballage
Le matériel d’emballage est entièrement
recyclable et marqué du symbole de
recyclage. Observer les règlements locaux
concernant la mise au rebut.
L’appareil
L’appareil se compose de matériaux
recyclables. La cuve contient des gaz
inammables et explosifs. La destruction de
l’appareil doit être effectuée dans la stricte
observance des règles environnementales
locales. Rendre l’appareil inutilisable en
coupant le câble électrique et, surtout,
livrer l’appareil à un centre agréé pour la
récupération du uide frigorigène.
Sauvegarde de l’environnement
Mise au rebut
Observer les règlements environnementaux
en vigueur. Adressez-vous aux services
compétents de votre commune pour savoir
comment la collecte et le recyclage de
ce type d’appareil s’effectuent dans votre
commune.
Ce produit est estampillé selon la directive
UE 2002/96/CE concernant la mise au
rebut du matériel électrique et électronique
(WEEE). En effectuant correctement la
mise au rebut d’un produit, on aide à
prévenir d’éventuelles conséquences
négatives sur l’environnement et sur la
santé publique.
Le symbole
sur le produit ou sur les
documents l’accompagnant indique que
ce produit ne doit pas être jeté avec les
ordures ménagères. Au lieu de cela, il
faut apporter son appareil à un centre de
recyclage pour équipement électrique et
électronique.
Il doit être enlevé selon les règles
environnementales de mise au rebut
faisant loi dans la région. Pour plus ample
information concernant la manipulation,
la récupération et le recyclage de ce
produit, contacter les autorités locales ou
l’établissement qui a vendu le produit.
Page 32

2
DK
Brugsanvisningen skal altid være
tilgængelig for personalet. Dette apparat
efterkommer CE mærke regulering,
direktiver og standarder.
Lavspændingsdirektivet 73/23/EEC
EMC direktivet 89/336/EEC.
Advarsel
Da apparatet indeholder et brændbart
kølemiddel, er det meget vigtigt at sikre, at
kølemiddelrørene ikke er beskadigede.
- Hold samtlige ventilationsåbninger
i apparatet eller i
indbygningskonstruktionen fri for
blokering.
- Anvend kun de mekaniske apparater
eller andre hjælpemidler, som anbefales
af producenten, til fremskyndelse af
afrimningsprocessen.
- Undlad at beskadige kølekredsløbet.
- Anvend ikke elektrisk udstyr i apparatets
opbevaringsrum til fødevarer, medmindre
det er af en type, som anbefales af
producenten.
Dette apparat bør ikke anvendes af
små børn eller handicappede personer,
medmindre en ansvarlig person har sikret
sig, at de er i stand til anvende apparatet på
en sikker måde. Hold øje med, at små børn
ikke leger med apparatet.
Sørg altid for at opbevare nøglerne på et
separat sted og uden for børns rækkevidde.
Placer aldrig beholdere med væsker,
især ikke kulsyreholdige drikke, i
fryseren. Væsken kan forårsage en
eksplosion under frysningen. Rør aldrig
ved køleoveraderne med bare hænder.
Anvend altid arbejdshandsker for at undgå
forbrændinger.
Gamle apparater
Gamle køleskabe og frysere er ofte udstyret
med komplicerede smæklåse som kun kan
åbnes udefra. Hvis du har en sådan model
stående eller kasserer den, så husk at
ødelægge låsen først. Således forhindrer
du, at legende børn bliver indespærret og
kommer i livsfare.
Inden brug
Inden du anvender dit nye apparat bør
du læse brugsanvisningen grundigt.
Brugsanvisningen indeholder vigtige
informationer vedrørende sikkerhed,
intallation, drift og vedligeholdelse. Gem
brugsanvisningen. Du kan få brug for den
på et senere tidspunkt.
Kontroller at apparatet ikke er beskadiget
ved modtagelsen. Transportskader
skal anmeldes til forhandleren inden
fryseboksen tages i brug.
Fjern emballagen. Rengør apparatet
indvendigt med lunken vand tilsat et mildt
uparfumeret opvaskemiddel. Afvask med
rent vand og tør grundigt af (se rengøring).
Brug en blød klud.
Hvis fryseren har stået på lager i kolde
omgivelser (koldere end +5ºC), skal den
have en hvileperiode på mindst 1 time,
inden den tages i brug.
Indhold
Lær fryseboksen at kende ...............3
Ibrugtagning og installation .............. 4
El-tilslutning .....................................5
Betjening og funktion .......................6
Parameterindstillinger ...................... 7
Front panel kommandoer ................ 8
Afrimning ..........................................9
Rengøring og vedligeholdelse .......10
Fejlndingsliste .............................. 11
Reservedele .................................. 12
Bortskaffelse .................................. 13
El-diagram .....................................14
Page 33

3
DK
Lær fryseboksen at kende
Håndtag
Tætningsliste
Typeskilt
Skillevæg/tøvandsbakke
Kurv
Ventilationsrist
Elektronisk
betjeningspanel
Tøvandsaøb
Hjul
g. 1
Page 34
4
DK
Placering
Af sikkerhedsmæssige og driftsmæssige
grunde må apparatet ikke placeres
udendørs.
Stil apparatet på et plant, vandret og stabilt
underlag i et tørt og godt ventileret rum
(max. 75% relativ luftfugttighed).
Anbring ikke apparatet tæt på varmekilder
såsom komfur eller radiator og undgå at det
udsættes for direkte sollys eller varme fra
anden varmekilde.
Standard EN378 specicerer, at rummet,
hvor apparatet skal placeres, skal have
en størrelse på 1m³ pr. 8 g kulbrintekølemiddel, som anvendes i apparatet,
således at dannelsen af brændbare gas-/
luftblandinger undgås i rummet, hvor
apparatet er placeret i tilfælde af en læk
i kølekredsløbet. Mængden af kølemidlet
som anvendes i apparatet fremgår af
typeskiltet
Rumtemperaturen
Apparatet er beregnet til drift ved
begrænsede omgivelsestemperaturer
i overensstemmelse med produktets
klimaklasse, som fremgår af typeskiltet.
Oplysninger om klimaklasse samt
andre tekniske informationer er anført
på typeskiltet, som er placeret bag på
apparatet.
Klimaklasse Tilladt rumtemperatur
SN +10 ºC til +32 ºC
N +16 ºC til +32 ºC
ST +18 ºC til +38 ºC
T +18 ºC til +43 ºC
Ventilation
Det er vigtigt, at apparatet får tilstrækkelig
ventilation og at der er uhindret
luftcirkulation over, under og omkring
det. Figur 2 viser, hvordan du sikrer den
nødvendige cirkulation omkring fryseren.
Ibrugtagning og installation
100 mm
800 mm
20 mm
100 mm
Mellem fryserens bund og gulvet skal der
være et mellemrum på 35 mm.
VIGTIGT! Der skal være fri adgang til
ventilationsristen (g. 3).
g. 2
g. 3
Page 35

5
DK
Apparatet er beregnet for tilslutning til
vekselstrøm. Tilslutningsværdierne for
spændig (V) og frekvens (Hz) er vist på
typeskiltet bag på apparatet. Tilslutning skal
ske til en selvstændig stikkontakt.
Netledningen skal tilsluttes direkte
til stikkontakten. Anvend ikke
forlængerledning.
Beskadiges netledningen, skal den
udskiftes med en tilsvarende type, som
leveres af fabrikanten eller dennes
servicerepræsentant.
El-tilslutning
Page 36
6
DK
Apparatet er udstyret med en elektronisk styring (g. 4)
Betjening og funktion
For betjening af den elektroniske styring
henvises til separat brugsvejledning vedlagt
inde i apparatet.
g. 4
Page 37

7
DK
Varerne og fugtigheden i luften forårsager
efterhånden rim- og isdannelse i boksen.
Et tyndt lag rim eller is nedsætter ikke
fryserens funktion, men jo tykkere
belægningen er, desto højere bliver
energiforbruget. Lidt løst rim kan skrabes af
med en plastikskraber.
Brug aldrig elektriske apparater eller
skarpe genstande, da det kan beskadige
de indvendige dele i apparatet.
Når rim- og isdannelsen er 4-5 mm tyk skal
fryseren afrimes. Det anbefales at afrime
fryseren når der er få eller ingen varer i
fryseren.
Gå frem på følgende måde:
1. Lad låget stå åben.
2. Placer skillevæggen under
tøvandsudløbet.
3. Sæt en skål med varmt vand (ikke
kogende) i fryseren, luk låget og vent
ca. 30 minutter, hvorefter rimlaget
fjernes med plastskraberen.
4. For at undgå vand på gulvet under
optøningsprocessen, skal man holde
opsyn med tøvandsbakken. Man bør
afdække gulvet omkring tøvandsaøbet
for at beskytte imod is og vandstænk.
Når isen er smeltet, gøres fryseren
ren med en svag opløsning af vand og
uparfumeret opvaskemiddel. Tør af med
en blød klud.
5. Tilslut strømmen.
6. Varerne kan lægges ind i apparatet igen
når temperaturen er korrekt.
Husk at sætte proppen i tøvandsaøbet
igen.
Afrimning
g. 8
Page 38

8
DK
Rengøring
Inden rengøring skal stikproppen tages ud
og alt løst tilbehør fjernes.
Fryseboksen rengøres bedst med en
opløsning af lunkent vand tilsat lidt
uparfumeret opvaskemiddel (max. 85 ºC).
Anvend ikke rengøringsmidler der kan
ridse. Brug en blød klud. Vask efter med
rent vand og tør grundigt af. Undgå at der
kommer vand ind i betjeningspanelet.
Tætningslisten rundt ved låget kræver
jævnlig rengøring for at undgå misfarvning
og sikre lang holdbarhed. Brug rent vand.
Efter rengøring af lågets tætningsliste bør
du kontrollere om den fortsat slutter tæt.
Rengøring af tråd- og rørkondensatorer på
apparatets bagside anbefales.
Ventillationsristen skal holdes fri for snavs
og skidt. Rengøres med støvsuger.
Tages apparatet ud af drift i længere tid,
afbryd strømmen og tag stikket ud, tøm og
rengør fryseboksen og lad låget stå åbent,
for at undgå lugtgener.
Rengøring og vedligeholdelse
max.
15 W
Spar energi
- hold låget lukket så meget som muligt.
- jævnligt kontrollér at låget lukker tæt
- installer fryseren i et køligt (min. 5ºC) og
godt ventilleret rum.
- afrim fryseren inden islaget bliver for tykt.
g. 9
Udskiftning af pære
1. Afbryd strømmen ved kontakten og tag
stikket ud.
2. Afmonter lysskærmen (g. 9). Klem
lysskærmen sammen, så lysskærmen
løsnes fra de to klips.
3. Udskift lyspæren(e).
4. Monter lysskærmen og tilslut strømmen.
Page 39
9
DK
Fejlndningsliste
Fejl Mulig årsag Afhjælpning
Ingen kontrollamper
lyser.
Apparatet er slukket.
Strømsvigt; sikringen er slået fra;
netstikket er ikke sat rigtigt i.
Kontrollér stik og kontakt.
Kontrollér om strømmen er tilsluttet.
Sikringen skal være slået til.
Temperaturen i fryserummet er for høj.
Ventilationsristen er blokeret.
Fryserens låg er ikke lukket rigtigt.
Der er lagt ere varer i på éen gang
end fryseren har kapacitet til.
Kraftig rim og islag.
Termostat er indstillet for varmt.
Sørg for at der er uhindret luftcirkulation.
Luk låget og vent et par timer.
Vent et par timer.
Afrim fryseren.
Indstil termostat til koldere position.
Temperaturen i fryseren er for lav.
Termostaten er indstillet for koldt.
Låget støder mod varer i fryseren.
Indstil termostat til varmere position.
Flyt rundt på varerne og kontrollér at
låget kan lukke rigtigt.
Fryseren rimer kraftigt. Rummet er meget fugtigt.
Fugtafgivelse fra varerne.
Luft hyppigt ud eller yt fryseren til et
rum med mindre fugt.
Ompak varerne.
Låget kan ikke åbnes. Undertryk i fryseren. Vent 2-3 minutter indtil undertrykket
er forsvundet og prøv igen.
Vibrationer og ualmindelig støj.
Apparatet står ikke på en plan ade.
Apparatet er ikke fritstående.
Kurve eller skillevæg er løse.
Placer fryseboksen på et plant vandret og stabilt underlag.
Flyt apparatet væk fra møbler eller
andre apparater.
Kontrollér de ytbar dele og isæt dem
igen.
Page 40

10
DK
Reservedele
Angiv venligst type- og serienummer
samt prod. nummer, når du bestiller
reservedele (se g. 1 side 3 og g. 10).
Disse oplysninger nder du på typeskiltet
bag på apparatet. Typeskiltet, indeholder
forskellige tekniske oplysninger, samt typeog serienummer.
Husk altid at bruge autoriserede
håndværkere, hvis der er noget der skal
repareres eller udskiftes!
Vigtigt
Vær opmærksom på at ved indgreb
i apparatets opbygning, ændring af
apparatets komponentbestykning bortfalder
garanti og produktansvar og apparatet kan
ikke lovligt anvendes. Godkendelse anført
på mærkeskilt er ligeledes ugyldig.
Reservedele
Prod. No.: XXXX Type: XXXX
Serial No.: XXXXXXXX
g. 10
Page 41

11
DK
Emballage
Emballagen er fuldstændig genanvendelig
og mærket med genbrugssymbolet. Følg
venligst de lokale myndigheders regler for
genbrug af emballage.
Produkt
Produktet er fremstillet af genanvendeligt
materiale. Fryseren indeholder brandfarlige
blæsegasser, og bortskaffelse af
fryseren skal ske i overensstemmelse
med myndighedernes miljøregler.
Gør fryseren ubrugelig ved at skære
strømforsyningsledningen af og sørg for, at
fryseren aeveres til et kvaliceret center,
hvor kølemidlet aftappes og genanvendes.
Miljøbeskyttelse
Vær opmærksom på gældende miljøregler.
Kommunens tekniske forvaltning kan
oplyse dig om hvordan opsamling og
genanvendelse af sådanne apparater
foregår i kommunen.
Dette produkt er mærket i henhold til EUdirektiv 2002/96/EF om Kasseret elektrisk
og elektronisk udstyr (WEEE).
Ved at sikre, at dette produkt bliver skrottet
korrekt, hjælper man med til at forhindre
potentielle, negative konsekvenser for
miljøet og folkesundheden, der kunne opstå
gennem uhensigtsmæssig bortskaffelse af
dette produkt.
Symbolet
på produktet eller på
dokumenterne, der ledsager produktet,
angiver, at produktet ikke må bortskaffes
sammen med husholdningsaffaldet.
Det skal i stedet aeveres på en
genbrugsstation for elektrisk og elektronisk
udstyr.
Det skal skrottes i henhold til gældende
lokale miljøregler for bortskaffelse af affald.
For yderligere oplysninger om håndtering,
genvinding og genbrug af dette produkt
bedes man kontakte de lokale myndigheder,
renovationsselskabet eller forretningen,
hvor produktet er købt.
Page 42

2
ES
Las instrucciones de uso deberán estar
siempre disponibles para el personal.
Este electrodoméstico cumple con las
normativas, directivas y estándares de la
marca CE.
Directiva de Bajo Voltaje 73/23/CEE
Directiva EMC 89/336/CEE.
Advertencia
Puesto que el aparato contiene un
refrigerante que es inamable, es
vital asegurarse de que los tubos del
refrigerante no sufran daños.
- No obstruya ninguna abertura de
ventilación de la caja del electrodoméstico
o de la estructura para integrarlo.
- No utilice dispositivos mecánicos ni
otros medios para acelerar el proceso
de descongelación que no sean los
recomendados por el fabricante.
- No dañe el circuito del refrigerante.
- No utilice aparatos eléctricos dentro de los
compartimentos de almacenamiento de
alimentos del aparato, a menos que sean
del tipo recomendado por el fabricante.
No deben usar este aparato niños
pequeños ni personas débiles, salvo
en caso de que estén vigilados por una
persona responsable que se ocupe de que
lo utilicen sin peligro. Debería vigilarse a los
niños pequeños para asegurarse de que no
jueguen con el aparato.
Mantenga siempre las llaves en lugar
separado y fuera del alcance de los niños.
Nunca coloque recipientes con líquidos,
especialmente bebidas gaseosas, en
el congelador. El líquido puede causar
una explosión durante el proceso de
congelación. Nunca toque las supercies
refrigerantes con las manos sin protección.
Siempre use guantes para prevenir las
quemaduras.
Electrodomésticos caducados
Los refrigeradores y congeladores
caducados a menudo vienen equipados
con cerrojos complicados que únicamente
pueden abrirse desde el exterior. Si tiene
una de estas unidades almacenada en
algún lugar, o si desecha alguna, no se
olvide de destruir primero el cerrojo. De
esta forma impedirá que los niños queden
atrapados en el interior y que su vida corra
peligro.
Antes del uso
Antes de poner en marcha su
electrodoméstico, deberá leer atentamente
las instrucciones de uso. Las instrucciones
de uso contienen datos importantes sobre
la seguridad, instalación, funcionamiento y
mantenimiento. Guarde las instrucciones
de uso. Pueden resultarle necesarias más
adelante. Al recibir el aparato, inspecciónelo
para cerciorarse de que no se haya dañado
durante el transporte. Le recomendamos
informar al proveedor local sobre los daños
ocurridos durante el transporte antes de
poner en funcionamiento el congelador
horizontal. Retire el material de embalaje.
Limpie el interior del aparato con agua
tibia y un detergente suave sin perfume.
Enjuague con agua limpia y seque
completamente (véanse las instrucciones
de limpieza). Utilice un paño blando.
Si el congelador se almacena en entornos
fríos (a temperaturas inferiores a +5°C),
deberá estar apagado como mínimo 1 hora
antes de entrar en funcionamiento.
Índice
Conozca su congelador .................. 3
Instalación y puesta
en marcha inicial ............................. 4
Conexión eléctrica .......................... 5
Operación y funcionamiento ............ 6
Valores paramétricos ...................... 7
Órdenes del panel frontal ................. 8
Descongelación ............................... 9
Limpieza y mantenimiento ............ 10
Lista de localización de fallos ....... 11
Repuestos ...................................... 12
Eliminación del aparato ..............13
Diagrama eléctrico......................... 14
Page 43
3
ES
Conozca su congelador
Tirador
Burlete
Placa del fabricante
Separador/bandeja de
agua de descongelación
Cesta
Rejilla de ventilación
Panel de control elec-
trónico
Desagüe de agua de
descongelación
Rueda
Figura 1
Page 44
4
ES
Ubicación
Por motivos de seguridad y funcionamiento,
no se debe instalar el aparato en exteriores.
Coloque el aparato sobre una supercie
nivelada, horizontal y estable en una
habitación seca y bien ventilada (con un
máximo de 75% de humedad relativa del
aire). Nunca lo coloque cerca de fuentes
de calor tales como estufas o radiadores, y
evite colocarlo bajo la luz solar directa o el
calor de otra fuente térmica.
La Norma EN378 establece que el local
donde se coloque el aparato deberá tener
un tamaño de 1m³ por 8 g del refrigerante
de hidrocarburos usado en los aparatos,
a n de evitar la formación de aleaciones
combustibles de gas/aire en la habitación
donde esté situado el aparato, en caso de
fugas en el circuito refrigerante. La cantidad
de refrigerante utilizada en el aparato gura
en la placa del fabricante.
Temperatura ambiente
El aparato está diseñado para funcionar
en temperaturas ambiente limitadas
de acuerdo con la clase climática del
electrodoméstico, que se indica en la placa
del fabricante. En la placa del fabricante
detrás del aparato se incluye información
sobre la clase climática y otros aspectos
técnicos.
Clase de clima Temperatura
ambiente óptima
SN +10 ºC a +32 ºC
N +16 ºC a +32 ºC
ST +18 ºC a +38 ºC
T +18 ºC a +43 ºC
Ventilación
Es importante que el congelador esté bien
ventilado y que el aire pueda circular sin
obstáculos por arriba, debajo y alrededor
del mismo. La Figura 2 indica cómo asegurar la circulación necesaria alrededor del
congelador.
Instalación y puesta en marcha inicial
100 mm
800 mm
20 mm
100 mm
Entre la base del congelador y el suelo
debe haber un espacio de 35 mm.
IMPORTANTE! Debe haber libre acceso a
la rejilla de ventilación (gura 3).
Figura 2
Figura 3
Page 45

5
ES
El aparato está diseñado para funcionar
con corriente alterna. El voltaje (V)
necesario y la frecuencia (Hz) se indican
en la placa del fabricante en la parte
posterior del congelador. Se debe conectar
la alimentación eléctrica a través de un
enchufe mural independiente.
El conductor principal debe acoplarse
directamente al enchufe mural. No utilice
extensiones de cable.
Si se daña el conductor principal, será
necesario reemplazarlo con un tipo de
conductor equivalente suministrado por
el fabricante o por un centro de servicio
autorizado.
Conexión eléctrica
Page 46

6
ES
El aparato está equipado con controles electrónicos (gura 4)
Operación y funcionamiento
Para funcionar el regulador vea por favor el
libro de instrucción dentro de la aplicación.
gura 4
Page 47
7
ES
se haya derretido todo el hielo, limpie
el interior con una solución de agua y
detergente sin perfume. Pase un paño
blando.
5. Conecte la alimentación eléctrica.
6. Los artículos podrán volverse a colocar
en el aparato cuando la temperatura sea
la adecuada.
Recuerde volver a colocar el tapón en el
desagüe de agua de descongelación.
Los artículos almacenados y la humedad
del aire generan gradualmente escarcha
y hielo en el congelador. Una capa
delgada de escarcha o hielo no afecta al
funcionamiento del congelador, pero a
medida que aumenta el grosor de la capa,
será mayor el consumo energético. Se
puede retirar la escarcha suelta con ayuda
de un raspador plástico.
Nunca use aparatos eléctricos o
instrumentos alados ya que con ello se
puede dañar el interior del aparato.
Cuando la capa de escarcha exceda de 4-5
mm de grosor será necesario descongelar
el congelador. Se recomienda descongelar
el congelador cuando hayan pocos o
ningún artículo en el electrodoméstico.
Proceda de la manera siguiente:
1. Deje abierta la tapa.
2. Coloque el separador bajo la salida del
agua de descongelación.
3. Coloque un recipiente de agua caliente
(pero no hirviente) en el congelador,
cierre la tapa y espere aprox. 30
minutos, raspando a continuación la
capa de escarcha con el raspador de
plástico.
4. Para prevenir que el suelo se moje
durante el proceso de descongelación,
es necesario vigilar la bandeja de agua
de descongelación. Debería cubrirse el
suelo alrededor del desagüe de agua de
descongelación como protección contra
el hielo y las salpicaduras. Cuando
Descongelación
Figura 8
Page 48

8
ES
Limpieza
Antes de limpiar el aparato debe extraerse
el enchufe y vaciar el interior de todos los
accesorios móviles.
El congelador se limpia de forma óptima
con una solución de agua tibia a la que se
añade un poco de detergente sin perfume
(máx. 85º C). Nunca use agentes de
limpieza abrasivos. Utilice un paño blando.
Enjuague con agua limpia y séquelo
completamente. Es importante impedir que
el agua entre en el panel de control.
Es necesario limpiar regularmente el burlete
de la tapa para prevenir la decoloración y
para prolongar la vida útil de servicio. Use
agua limpia. Después de limpiar el burlete,
verique que continúe proporcionando un
sello hermético.
Se recomienda limpiar los condensadores
de alambre y de tubo detrás del aparato.
Debe mantenerse la rejilla de ventilación
libre de suciedad e impurezas. Debe
limpiarse con una aspiradora.
Si el aparato no se va a utilizar durante un
tiempo, desconéctelo y extraiga el enchufe,
vacíe y limpie el congelador y deje la tapa
abierta para prevenir malos olores.
Limpieza y mantenimiento
max.
15 W
Ahorre energía
- Mantenga cerrada la tapa el mayor tiempo
posible.
- Compruebe periódicamente que la tapa
cierre herméticamente
- Instale el congelador en una habitación
fresca (mín. 5°C) y bien ventilada.
- Descongele el congelador antes de que
la capa de hielo se vuelva demasiado
espesa.
Figura 9
Cambio de bombilla
1. Desconecte la corriente eléctrica en el
interruptor y extraiga el enchufe.
2. Desmonte la pantalla de la luz (gura 9).
Oprima la pantalla de la luz para que se
libere de las dos grapas.
3. Cambie la(s) bombilla(s).
4. Monte la pantalla y conecte la corriente
eléctrica.
Page 49
9
ES
Lista de localización de fallos
Fallo Causa posible Solución
No se encienden las
luces de control.
El aparato está apagado.
Interrupción de alimentación
eléctrica; el fusible está fundido; el
electrodoméstico no está enchufado
correctamente.
Controle la clavija y el interruptor.
Verique que esté conectada la
alimentación eléctrica. Restablezca
el fusible.
La temperatura en el
congelador es demasiado alta.
Está bloqueada la rejilla de ventilación.
No se ha cerrado correctamente la
tapa del congelador.
La cantidad de artículos colocados
de una vez en el congelador es mayor que la capacidad del congelador.
Capa gruesa de escarcha y hielo.
Se ha seleccionado una temperatura
demasiado elevada para el termostato.
Procure que no se bloquee la circulación del aire.
Cierre la tapa y espere un par de
horas.
Espere un par de horas.
Descongele el congelador.
Seleccione un valor más bajo de temperatura para el termostato.
La temperatura en el
congelador es demasiado baja.
Se ha seleccionado una temperatura
demasiado baja para el termostato.
La tapa hace contacto con los productos en el congelador.
Seleccione una temperatura más
elevada para el termostato.
Cambie la posición de los artículos
y compruebe que la tapa cierre correctamente.
El congelador se cubre
de escarcha.
La habitación es muy húmeda.
Los artículos emiten humedad.
Airee con frecuencia o traslade el
congelador a una habitación menos
húmeda.
Envuelva de nuevo los artículos.
La tapa no puede
abrirse.
Descenso de presión en el congelador.
Espere 2-3 minutos hasta que desaparezca el descenso de presión y
pruebe de nuevo.
Vibración y ruidos
molestos.
El aparato no está nivelado.
El aparato hace contacto con otros
elementos.
Las cestas o el separador están
sueltos.
Coloque el congelador sobre una
base nivelada y estable.
Aléjelo de muebles u otros aparatos.
Inspeccione los accesorios móviles y
colóquelos de nuevo.
Page 50

10
ES
Repuestos
Por favor indique el tipo de producto y
número de serie, así como el de producción
al hacer pedidos de repuestos (véase
la gura 1, página 3 y la gura 10). Esta
información se incluye en la placa del
fabricante situada detrás del aparato.
La placa del fabricante contiene diversa
información técnica, incluido el tipo de
aparato y el número de serie.
Aviso: ¡Siempre use los centros
autorizados de servicio cuando su
electrodoméstico necesite reparaciones o
repuestos!
Importante
Tenga Ud. en cuenta que en caso de
modicación de la construcción del aparato,
y cambio del montaje de los componentes
caduca la garantía y la responsabilidad del
producto, y el electrodoméstico no puede
utilizarse legalmente. Caduca asimismo la
validez de la autorización de
que va provista la placa del fabricante.
Repuestos
Prod. No.: XXXX Type: XXXX
Serial No.: XXXXXXXX
Figura 10
Page 51
11
ES
Embalaje
El material de embalaje es totalmente
reciclable y va marcado con un símbolo de
reciclado. Por favor, respete la normativa
local para el desguace.
Aparato
El aparato está fabricado con material
reciclable. La caja contiene gases
inamables explosivos, y la eliminación
del aparato debería respetar la normativa
medioambiental local. Asegúrese de que
no pueda usarse el aparato cortando el
cordón de la fuente energética, y entregue
por favor el aparato en un centro autorizado
para la recuperación del refrigerante.
Protección medioambiental
Eliminación del aparato
Al desechar el electrodoméstico es
imperativo cumplir las normativas
de protección del medio ambiente.
Para desechar el electrodoméstico le
recomendamos comunicarse con el
departamento técnico de la autoridad
pertinente en su localidad, donde le
informarán sobre cómo se realizan la
recolección y el reciclaje de dichas
unidades en su región.
Este producto lleva la marca
correspondiente de la Directiva 2002/96/
CE de la UE sobre residuos de aparatos
eléctricos y electrónicos (WEEE).
Asegurando que el producto se deseche
correctamente, se contribuye a evitar los
potenciales efectos nocivos en el medio
ambiente y la salud que podrían surgir
debido a una eliminación indebida del
mismo.
El símbolo
que lleva el producto o la
documentación adjunta indica que dicho
producto no debe eliminarse junto con los
residuos domésticos. En cambio deberá ser
depositado en una planta de reciclaje para
material eléctrico y electrónico.
Deberá ser eliminado de acuerdo con la
legislación medioambiental local vigente
para la eliminación de residuos. Para más
información sobre el manejo, reciclaje
y recuperación del producto, puede Ud.
dirigirse a las autoridades locales, las
compañías de recogida de residuos o el
comercio donde se adquirió el mismo.
Page 52

2
RUS
Инструкция по эксплуатации изделия
всегда должна быть в распоряжении
персонала. Настоящее изделие
удовлетворяет требованиям
законодательства, директив и стандартов
ЕС. Директива Совета ЕС 73/23 по
оборудованию, применяемому в
определенном диапазоне напряжений.
Директива ЭМС 89/336/EEC.
Меры предосторожности-
Warning
Поскольку данное изделие содержит
горючий хладагент, важно не допускать
повреждения трубопроводов хладагента.
- Следите за тем, чтобы все
вентиляционные отверстия в кожухе
изделия или конструкции, в которую оно
встроено, были открыты.
- Для ускорения процесса
размораживания не разрешается
использовать никаких механических
предметов или других средств, кроме
рекомендованных изготовителем.
- Оберегайте контур хладагента от
повреждений.
- Внутри отсеков для хранения пищевых
продуктов ларя нельзя использовать
электрические устройства, исключая
те, которые относятся к типу,
рекомендованному изготовителем.
Данное изделие не рассчитано на
использование детьми или немощными
людьми, если только за ними нет
надлежащего контроля со стороны
ответственного лица, позволяющего
обеспечить безопасное использование.
Необходимо присматривать за детьми
для того, чтобы они не играли с
изделием.
Храните ключи в отдельном месте,
недоступном для детей.
Никогда не кладите в морозильный
ларь емкости с жидкостями, особенно
газированными. При замораживании
жидкость может привести к взрыву.
Не дотрагивайтесь до морозильных
поверхностей голыми руками. Всегда
надевайте защитные перчатки во
избежание травм.
Старые изделия
Старые холодильники и морозильники
часто оснащались сложными защелками,
открыть которые можно только снаружи.
Если у вас где-то хранится одно из таких
старых изделий или вы собираетесь
его выбросить, не забудьте в первую
очередь вывести из строя защелку. Это
необходимо, чтобы уберечь детей от
очень серьезной опасности оказаться
запертыми внутри.
Перед началом эксплуатации
Прежде чем приступать к эксплуатации
вновь приобретенного изделия,
внимательно прочтите настоящую
инструкцию. Инструкция содержит
важную информацию по технике
безопасности, установке, эксплуатации и
техническому обслуживанию. Сохраните
эту инструкцию. Она может понадобиться
вам в будущем.
При получении изделия убедитесь в
том, что оно не имеет повреждений. О
повреждениях, полученных во время
транспортировки, следует доложить
местному дистрибьютору прежде, чем
вводить изделие в эксплуатацию.
Удалите упаковку. Вымойте изделие
внутри теплым водным раствором
мягкого моющего средства без запаха.
Тщательно промойте чистой водой
и вытрите насухо (см. инструкции по
мойке). Используйте мягкую ткань.
Если изделие хранилось в холодных
условиях (при температуре ниже +5°C),
следует подождать не менее часа для
стабилизации перед включением.
Содержание
Общий вид морозильного ларя .......3
Установка и ввод в эксплуатацию ... 4
Электрическое подключение ......... 5
Настройка и режимы работы ........... 6
Установка параметров ..................... 7
Команды панели управления ........... 8
Размораживание .............................. 9
Очистка и обслуживание ............... 10
Поиск и устранение
неисправностей ...............................11
Запасные части ............................... 12
Утилизация ..................................... 13
Электрическая схема ..................... 14
Page 53

3
RUS
Общий вид морозильного ларя
Рукоятка
Уплотнительная
полоса
Табличка с
паспортными данными
Перегородка/поддон
для талой воды
Корзинка
Вентиляционная
решетка
Электронная панель
управления
Сток талой воды
Колесо
рис. 1
Page 54

4
RUS
Размещение
Исходя из соображений безопасности
и правил эксплуатации, устанавливать
изделие на открытом воздухе
запрещается. Установите изделие на
твердой горизонтальной поверхности
в сухом, хорошо проветриваемом
помещении (макс. относит. влажность
воздуха 75%). Не размещайте изделие
вблизи источников тепла, например,
кухонных плит и отопительных батарей и
не подвергайте его воздействию прямого
солнечного света и иных источников
тепла. В соответствии с требованиями
стандарта EN378 помещение для
установки изделия должно иметь объем
1 м³ на каждые 8 г углеводородного
хладагента, используемого в изделии,
для того, чтобы избежать образования
огнеопасных смесей газа и воздуха в
помещении, где находится изделие, в
случае утечки хладагента. Количество
используемого хладагента указано на
табличке с паспортными данными.
Температура в помещении
Изделие рассчитано на эксплуатацию
в ограниченном диапазоне температур
окружающего воздуха в соответствии со
своей климатической категорией, которая
указана на табличке с паспортными
данными. Данные по климатическому
классу и другая техническая информация
приведены на табличке с паспортными
данными на задней стенке изделия.
Климатический
класс
Оптимальная
температура в
помещении
SN +10 ºC до +32 ºC
N +16 ºC до +32 ºC
ST +18 ºC до +38 ºC
T +18 ºC до +43 ºC
Вентиляция
Важно обеспечить хорошую
вентиляцию изделия и возможность
беспрепятственной циркуляции воздуха
над ним, под ним и вокруг него. На рис. 2
показано, как обеспечить необходимую
циркуляцию воздуха.
Установка и ввод в эксплуатацию
100 mm
800 mm
20 mm
100 mm
Между днищем изделия и полом должен
быть зазор не менее 35 мм.
ВНИМАНИЕ! Необходимо обеспечить
свободный доступ к вентиляционной
решетке (рис. 3).
рис. 2
рис. 3
Page 55

5
RUS
Изделие рассчитано на подключение к
источнику переменного тока. Требуемое
напряжение (В) и частота тока (Гц)
указаны на табличке с паспортными
данными внутри морозильного ларя.
Подключение осуществляется через
независимую настенную розетку.
Вилка шнура питания вставляется
непосредственно в розетку.
Использование удлинителей не
допускается.
В случае повреждения проводов
питания их следует заменить
проводами соответствующего типа,
полученными от изготовителя или из
официального сервисного центра.
Электрическое подключение
Page 56

6
RUS
Изделие оборудовано электронной системой управления (рис. 4)
Настройка и режимы работы
Для операции электронного контроля,
ссылка сделана к отдельной инструкции,
приложенной в приборе.
рис. 4
Page 57

7
RUS
слабым водяным раствором моющего
средства без запаха. Вытрите ларь
насухо мягкой тканью.
5. Подключите электропитание.
6. Когда температура достигнет нужного
уровня, продукты можно вновь
поместить в ларь.
Не забудьте вернуть на место заглушку
сливного отверстия.
Иней образуется в результате контакта
воздуха, содержащего влагу, с
холодными поверхностями морозильного
ларя. Тонкий слой инея или льда не
нарушает работу морозильного ларя,
но по мере утолщения слоя льда
увеличивается потребление энергии.
Тонкий слой инея можно удалять с
помощью пластмассового скребка.
Никогда не используйте для удаления
инея электроприборы или острые
предметы, поскольку они могут
повредить внутренние детали ларя.
Когда толщина слоя инея или льда
достигнет 4-5 мм, морозильный ларь
следует разморозить. Размораживать
ларь следует, когда в нем мало или
совсем нет продуктов.
Проделайте следующее:
1. Откройте крышку ларя.
2. Поместите перегородку ниже уровня
стока талой воды.
3. Поставьте в ларь миску с горячей
(но не кипящей) водой и на 30
мин закройте крышку ларя, после
чего удалите иней с помощью
пластмассового скребка.
4. Чтобы не заливать пол водой во
время размораживания, следите
за состоянием поддона для талой
воды. Часть пола рядом со сливным
отверстием для талой воды следует
накрывать, чтобы защитить от воды и
льда. Когда лед растает, помойте ларь
Размораживание
рис. 8
Page 58

8
RUS
Мойка
Перед мойкой выньте вилку
электропитания и достаньте все
извлекаемые принадлежности.
Морозильный ларь следует мыть
снаружи и внутри теплой водой c
добавлением моющего средства без
запаха (макс. 85 ºC). Не применяйте
абразивные моющие средства.
Используйте мягкую ткань. Промойте
ларь чистой водой и насухо вытрите.
Важно не допустить попадания воды на
панель управления.
Уплотнительную полоску крышки следует
регулярно мыть для продления срока
службы и во избежание обесцвечивания.
Используйте чистую воду. После очистки
уплотнительной полосы убедитесь в
том, что она по-прежнему обеспечивает
герметичное закрытие ларя.
Рекомендуется производить очистку
проволочных и трубчатых конденсаторов
на задней стенке ларя.
Вентиляционная решетка также
должна освобождаться от грязи и пыли.
Очищайте ее с помощью пылесоса.
Если ларь не используется длительное
время, отключите электропитание,
выньте вилку из розетки, освободите
и вымойте ларь и оставьте крышку
открытой во избежание образования
неприятных запахов.
Очистка и обслуживание
max.
15 W
Экономия энергии
- держите крышку закрытой всегда, когда
это возможно.
- регулярно проверяйте герметичность
прилегания крышки
- размещайте ларь в холодном (не
ниже 5ºC) помещении с хорошей
вентиляцией
- размораживайте ларь до того, как слой
льда станет излишне толстым.
рис. 9
Замена лампочки
1. Отключите электропитание и выньте
вилку из розетки.
2. Снимите крышку лампы (рис. 9).
Нажмите на крышку так, чтобы
извлечь ее из двух фиксаторов.
3. Замените лампочку(e).
4. Установите крышку на место и
подключите электропитание.
Page 59

9
RUS
Поиск и устранение неисправностей
Неисправность Возможная причина Способ устранения
Контрольные лампы
не горят.
Изделие выключено.
Нарушение электропитания;
перегорел предохранитель; вилка
шнура питания неправильно
вставлена в розетку.
Проверьте вилку и розетку.
Убедитесь в наличии питания.
Проверьте предохранитель.
Температура в
морозильном ларе
завышена.
Засорена вентиляционная
решетка.
Крышка ларя не закрыта
надлежащим образом.
Количество продуктов,
помещенных в морозильный
ларь, превышает его
производительность.
Толстый слой инея и льда.
Термостат настроен на слишком
высокую температуру.
Обеспечьте нормальную
циркуляцию воздуха.
Закройте крышку и подождите
несколько часов.
Подождите несколько часов.
Разморозьте морозильный ларь.
Настройте термостат на более
низкую температуру.
Температура в
морозильном ларе
слишком низкая.
Термостат настроен на слишком
низкую температуру.
Крышка не закрыта плотно: этому
мешают продукты в морозильном
ларе.
Настройте термостат на более
высокую температуру.
Переложите продукты в
морозильном ларе и убедитесь
в том, что крышка закрывается
герметично.
Количество инея в
морозильном ларе
слишком велико.
Высокая влажность воздуха в
помещении.
Продукты отдают влагу.
Чаще проветривайте помещение
или переставьте морозильный
ларь в помещение с более низкой
влажностью.
Перепакуйте продукты.
Крышка не
открывается.
Отрицательное давление в
морозильном ларе.
Подождите 2-3 минуты до
устранения отрицательного
давления и повторите попытку.
Вибрации и
необычный шум.
Поверхность, на которой
установлен ларь,
негоризонтальная.
Ларь касается окружающих
предметов.
Корзины или перегородка не
закреплены.
Разместите ларь на плоской,
горизонтальной и устойчивой
поверхности.
Отодвиньте ларь от других изделий
или мебели.
Проверьте извлекаемые
принадлежности и переустановите
их.
Page 60

10
RUS
Запасные части
При заказе запчастей указывайте
тип изделия, а также его серийный
и заводской номер (см. рис.1 на стр.
3 и рис. 10). Эти сведения вы всегда
можете найти на паспортной табличке
аппарата. Паспортная табличка содержит
различные технические данные, включая
тип изделия и серийный номер.
Примечание: При необходимости
ремонта или замены частей вашего
изделия обращайтесь только в
официальные сервисные центры!
Внимание
Пожалуйста имейте в виду, что
при вмешательстве в конструкцию
аппарата, а также изменении состава
его компонентов и деталей, гарантия
и ответственность становятся
недействительными, и аппарат не
может быть использован легально.
Сертификация, указанная в
спецификации внутри аппарата, также
теряет свою силу.
Запасные части
Prod. No.: XXXX Type: XXXX
Serial No.: XXXXXXXX
рис. 10
Page 61

11
RUS
Упаковка
Упаковочный материал допускает полное
рециклирование и имеет маркировку в
виде символа рециклинга. Соблюдайте
предписания местных органов власти в
отношении его утилизации.
Изделие
Изделие изготовлено из рециклируемого
материала. Ларь содержит горючие газы,
и его утилизация должна осуществляться
в соответствии с предписаниями местных
органов экологического надзора.
Сделайте изделие непригодным к
использованию, отрезав шнур питания,
и помните, что его следует доставить
в специализированный центр для
утилизации хладагента.
Защита окружающей среды
Утилизация
Учитывайте положения местного
законодательства по охране окружающей
среды. Технический отдел местного
органа власти должен предоставить вам
информацию о правилах утилизации
такого рода изделий.
Данное изделие имеет маркировку
согласно Европейской директиве
2002/96/EC по отходам электрического
и электронного оборудования (WEEE).
Обеспечив правильную утилизацию
изделия, вы будет способствовать
предотвращению отрицательного
влияния на окружающую среду и
людей, которое могло бы иметь место
в случае неправильного направления в
переработку этого изделия.
Символ
, имеющийся на изделии и
в документации, прилагаемой к нему,
указывает на то, что с изделием нельзя
обращаться как с бытовыми отходами.
Вместо этого, его следует доставить
в специализированный пункт сбора
отходов электрического и электронного
оборудования.
Утилизация должна производиться
в соответствии с действующим
законодательством по охране
окружающей среды. Для получения
более подробной информации
по переработке, утилизации и
рециклированию этого изделия
свяжитесь с местными властями, вашей
службой сбора бытовых отходов или
дилером, у которого вы приобрели
изделие.
Page 62

Page 63

Page 64

8120044-01
GB Frigor/Vibocold reserves the right to alter specications without prior notice.
DE Recht auf Änderungen vorbehalten.
FR Nous nous réservons le droit d’apporter toutes modications à nos produits
DK Ret til ændringer forbeholdes
ES La empresa se reserva el derecho a efectuar modicaciones
RUS Frigor/Vibocold оставляет за собой право на изменение спецификаций без
предварительного уведомления.
 Loading...