

FRIGOGLASS Smart-300, Smart-450L SZ, Smart-800, Smart-900L HD, Smart-900L SD User Manual
...
Smart-300 [R290]
Smart-450L [R290]
Smart-450L SZ [R290]
Smart-800 [R290]
Smart-900L HD [R290]
Smart-900L SD [R290]
Smart-1300 HD [R290]
Smart-1300 SD [R290]
ENG FRA NLD ESP ELL DEU ITA
G
User Manual
EN
This User Manual was originally written in English.
Please read the instructions carefully before using this ICM.
FRA
NLD
ESP
ELL
DEU
Manuel d'utilisation
Ce manuel d’utilisation a été initialement rédigé en langue anglaise.
Avant d'utiliser votre PIC, veuillez lire attentivement ce manuel.
Gebruikershandleiding
Deze gebruikershandleiding werd oorspronkelijk in het Engels
geschreven.
Lees de instructies zorgvuldig voordat u de ICM gaat gebruiken.
Manual de usuario
Este manual de usuario se redactó originalmente en inglés.
Lea atentamente las instrucciones antes de utilizar este ICM.
Οδηγός χρήσης
Αυτός ο οδηγός χρήσης συντάχθηκε αρχικά στα Αγγλικά.
Διαβάστε προσεκτικά τις οδηγίες πριν χρησιμοποιήσετε αυτό το ψυγείο.
Benutzerhandbuch
Die Originalsprache dieses Benutzerhandbuchs ist Englisch.
Lesen Sie diese Gebrauchsanweisung vor der Inbetriebnahme des
Kühlgeräts bitte sorgfältig durch.
Manuale d’uso
Il manuale d'uso è stato originariamente redatto in lingua inglese.
ITA
Prima di usare questo refrigeratore, vi preghiamo di leggere
attentamente le istruzioni.
2
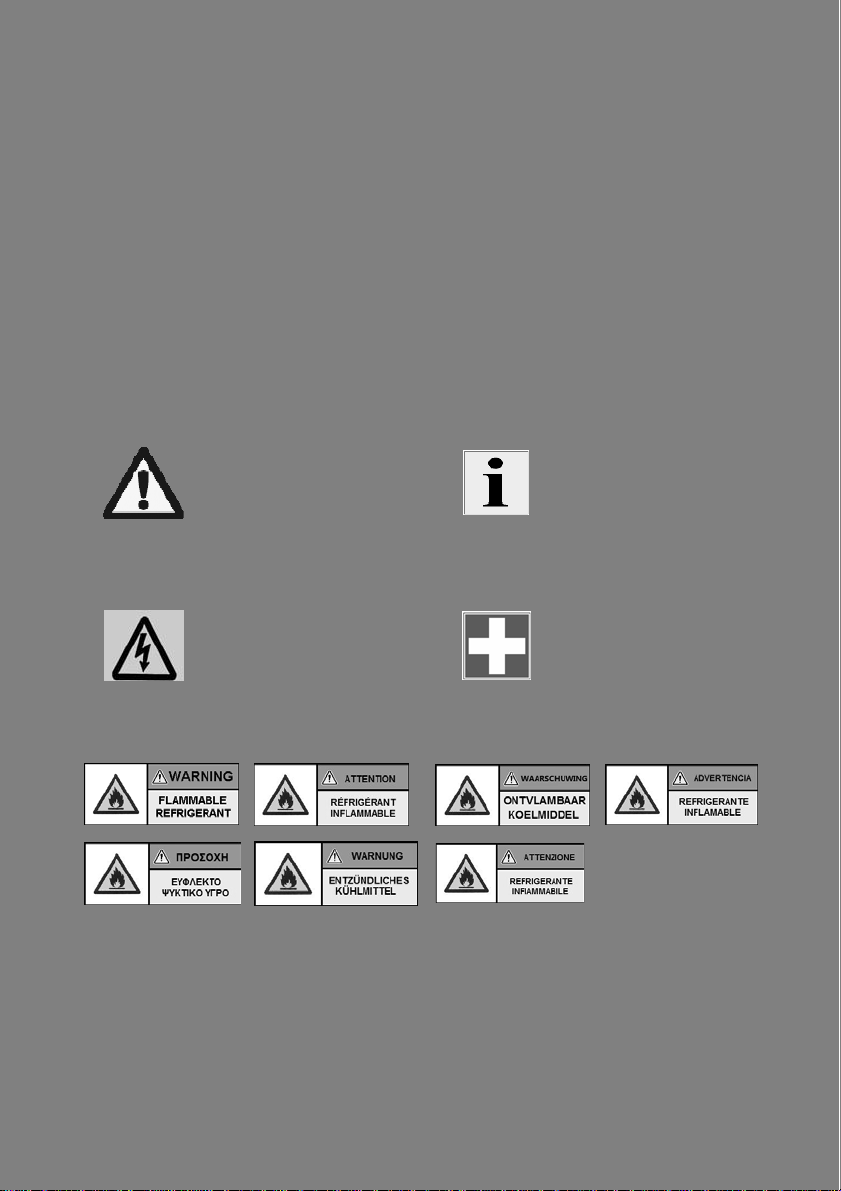
Please see below the meaning of the symbols used throughout the manual, for your better
understanding.
Pour mieux comprendre les instructions, veuillez consulter, ci-dessous, la signification des
symboles qui sont utilisés dans le manuel.
Zoek voor een goed begrip hieronder de betekenis op van de symbolen die in de gehele
handleiding gebruikt worden.
Consulte a continuación la interpretación de los símbolos utilizados en todo el manual para
su mejor comprensión.
Ανατρέξτε παρακάτω για να δείτε επεξηγήσεις των συμβόλων που χρησιμοποιούνται στον
οδηγό, για καλύτερη κατανόηση.
Im Folgenden finden Sie zum besseren Verständnis eine Erläuterung der in diesem
Handbuch verwendeten Symbole.
Troverete qui di seguito il significato dei simboli usati nel manuale.
WARNING
AVERTISSEMENT
WAARSCHUWING
ADVERTENCIA
ΠΡΟΕΙΔΟΠΟΙΗΣΗ
WARNUNG
ATTENZIONE
CAUTION
ATTENTION
VOORZICHTIG
¡ATENCIÓN!
ΚΙΝΔΥΝΟΣ
VORSICHT!
ATTENZIONE
INFORMATION
INFORMATION
INFORMATIE
INFORMACIÓN
ΠΛΗΡΟΦΟΡΙΕΣ
INFORMATIONEN
INFORMAZIONI
FIRST AID
PREMIERS SECOURS
EERSTE HULP
PRIMEROS AUXILIOS
ΠΡΩΤΕΣ ΒΟΗΘΕΙΕΣ
ERSTE HILFE
PRONTO SOCCORSO
ENG
Table of Contents
1. Foreword ................................................... 8
2. Technical description ................................. 8
2.1 General ...................................................... 8
2.2 Climate classification ................................. 8
2.3 Technical specifications ............................. 8
2.4 Physical dimensions .................................. 8
2.5 Maximum weight per shelf ......................... 8
3. Installation & operation .............................. 9
3.1 ICM placement instructions ..................... 10
3.2 Shelf installation instructions ................... 11
3.3 Connection to the mains supply .............. 11
3.4 Operation instructions .............................. 12
4. Electronic controller ................................. 12
4.1 Knowing your
ECOBOX / HEC Controller .................... 12
4.2 Knowing your
Danfoss ERC-112 Controller ................. 13
5. Door blocking system ............................ 13
5.1 Application with hinged door ICMs .......... 13
5.2 Application with sliding door ICMs ........... 13
6. Locking system ...................................... 13
6.1 Instructions for using the padlock
provision .................................................. 13
6.2 Instructions for using the eye-lock ........... 14
6.3 Instructions for using the transport lock
of the rotoshelf for the Smart-900 ............ 14
7. Night Cover ............................................ 15
8. RCCB* ..................................................... 15
9. PRCD .................................................... 16
10. Care & cleaning ....................................... 17
11. Troubleshooting ....................................... 17
12. First aid .................................................... 19
13. Disposal of the unit .................................. 19
14. Recycling information .............................. 19
15. Warranty .................................................. 2 0
APPENDIX A: Handling & transportation
guidelines ................................................ 20
APPENDIX B: Preventive maintenance
guidelines ................................................ 20
APPENDIX C: Guidelines to prevent corrosion
of the cabinet ........................................... 21
* optional feature, depending on the model
FRA
Table des matières
1. Avant-propos .......................................... 22
2. Description technique ............................. 22
2.1. Généralités ............................................. 22
2.2. Classification climat ................................ 22
2.3. Caractéristiques techniques .................... 22
2.4. Dimensions ............................................. 22
2.5. Poids maximum par rayon ...................... 23
3. Installation & mise en service ................. 23
3.1. Instructions de mise en place du PIC ..... 24
3.2. Instructions d’installation du rayon .......... 25
3.3. Branchement sur le secteur .................... 26
3.4. Instructions d’utilisation ........................... 26
4. Commande électronique ......................... 27
4.1. Connaître votre commande
ECOBOX / HEC .................................... 27
4.2. Faire connaissance avec votre commande
Danfoss ERC-112 ................................. 27
5. Système de fermeture automatique de la
porte ...................................................... 27
5.1. Application pour PIC à porte(s)
sur gonds ................................................ 27
5.2. Application pour PIC à porte(s)
coulissante(s) .......................................... 27
6. Dispositif de verrouillage ....................... 28
6.1. Mode d’emploi du dispositif cadenas ...... 28
6.2. Mode d’emploi du dispositif de
verrouillage à œil .................................... 28
6.3. Mode d’emploi du verrouillage de
transport du rayon rotatif de Smart-900. . 29
7. Couvercle de nuit .................................. 29
8. RCCB* .................................................... 30
9. PRCD .................................................... 30
10. Soin & Nettoyage .................................... 31
11. Dépannage ............................................. 32
12. Premiers secours .................................... 33
13. Élimination de l’unité ............................... 34
14. Informations concernant le recyclage ..... 34
15. Garantie .................................................. 3 5
ANNEXE A : Instructions pour la manutention
& le transport .......................................... 35
ANNEXE B :Instructions concernant la
maintenance préventive .......................... 35
ANNEXE C : Instructions pour prévenir la
corrosion de la cabine ............................. 36
* option disponible en fonction du modèle

NLD
ESP
Inhoudsopgave Índice
1. Voorwoord ............................................... 37
2. Technische beschrijving .......................... 37
2.1 Algemeen ................................................ 37
2.2 Klimaat klasse ......................................... 37
2.3 Technische specificaties .......................... 37
2.4 Afmetingen .............................................. 37
2.5 Maximaal gewicht per schap ................... 38
3. Installatie en bediening ............................ 38
3.1 Instructies voor de installatie van
de ICM ..................................................... 39
3.2 Instructies voor de installatie van het
schap ....................................................... 40
3.3 Aansluiting op het elektriciteitsnet ........... 40
3.4 Instructies voor de bediening ................... 41
4. Elektronische regelaar ............................. 41
4.1 Ken uw ECOBOX / HEC regelaar .......... 41
4.2 Ken uw Danfoss ERC-112 Controller .... 42
5. Deurblokkeersysteem ............................ 42
5.1 ICM-toepassingen met een
scharnierende deur.................................. 42
5.2 ICM-toepassingen met een schuifdeur .... 42
6. Vergrendelsysteem ................................ 43
6.1 Instructies voor het gebruik van het
hangslot ................................................... 43
6.2 Instructies voor het gebruik van het
oogslot ..................................................... 43
6.3 Instructies voor het gebruik van de
transportvergrendeling van de rotoshelf
voor de Smart-900. .................................. 44
7. Nachtafdekking ...................................... 44
8. Aardlekschakelaar*.................................. 45
9. PRCD .................................................... 46
10. Verzorging en reiniging ............................ 46
11. Problemen oplossen ................................ 47
12. Eerste hulp .............................................. 48
13. De eenheid afdanken .............................. 49
14. Informatie over recycling ......................... 49
15. Garantie ................................................... 50
BIJLAGE A: Richtlijnen voor laden, lossen en
vervoer .................................................... 50
BIJLAGE B: Richtlijnen voor preventief
onderhoud ............................................... 50
BIJLAGE C: Richtlijnen om corrosie van de
kast te vermijden ..................................... 51
* optioneel kenmerk, afhankelijk van het model
1. Prefacio ................................................... 5 2
2. Descripción técnica ................................. 52
2.1. Generalidades ......................................... 52
2.2. Condición ambiental ................................ 52
2.3. Especificaciones técnicas ....................... 52
2.4. Dimensiones físicas ................................ 52
2.5. Peso máximo por estante ....................... 53
3. Instalación y funcionamiento ................... 53
3.1. Instrucciones de colocación del ICM ....... 54
3.2. Instrucciones de instalación del estante .. 55
3.3. Conexión al suministro principal .............. 56
3.4. Instrucciones de funcionamiento ............. 56
4. Controlador eléctrico ............................... 57
4.1. Conozca su controlador
ECOBOX / HEC .................................... 57
4.2. Conozca su controlador
Danfoss ERC-112 ................................. 57
5. Sistema de bloqueo de la puerta ........... 57
5.1. Aplicación con ICM de puertas
batientes ................................................. 57
5.2. Aplicación con ICM de puertas
correderas ............................................... 57
6. Sistema de cierre .................................. 58
6.1. Instrucciones para utilizar el dispositivo
del candado............................................. 58
6.2. Instrucciones para utilizar el cierre
de ojo ...................................................... 58
6.3. Instrucciones para usar el bloqueo de
transporte del rotoestante para el
Smart-900. .............................................. 59
7. Cubierta nocturna .................................. 59
8. RCCB* .................................................... 60
9. PRCD .................................................... 60
10. Cuidado y limpieza .................................. 61
11. Resolución de problemas ........................ 62
12. Primeros auxilios ..................................... 63
13. Eliminación de la unidad ......................... 64
14. Información de reciclaje .......................... 64
15. Garantía .................................................. 6 5
ANEXO A: Directrices de manejo y transporte . 65
ANEXO B: Directrices de mantenimiento
preventivo................................................ 65
ANEXO C: Directrices para prevenir la
corrosión del gabinete ............................. 66
* característica opcional, en función del modelo

ELL
DEU
Πίνακας περιεχομένων Inhaltsverzeichnis
1. Πρόλογος ................................................ 67
2. Τεχνική περιγραφή .................................. 67
2.1. Γενικά ...................................................... 67
2.2. Κατηγορία κλίματος ................................. 67
2.3. Τεχνικές προδιαγραφές ........................... 67
2.4. Διαστάσεις μονάδας ................................ 67
2.5. Μέγιστο βάρος ανά σχάρα ....................... 68
3. Εγκατάσταση & λειτουργία ...................... 68
3.1. Οδηγίες εγκατάστασης του ψυγείου ........ 69
3.2. Οδηγίες εγκατάστασης της σχάρας ......... 70
3.3. Σύνδεση με την κεντρική παροχή
ρεύματος ................................................. 71
3.4. Οδηγίες λειτουργίας ................................. 71
4. Ηλεκτρονικό χειριστήριο .......................... 72
4.1. Παρουσίαση του χειριστηρίου
ECOBOX / HEC ..................................... 72
4.2. Παρουσίαση του χειριστηρίου
Danfoss ERC-112 .................................. 72
5. Σύστημα αποκλεισμού πόρτας .............. 72
5.1. Εφαρμογή σε ψυγεία με αρθρωτή πόρτα 72
5.2. Εφαρμογή σε ψυγεία με συρόμενες
πόρτες ..................................................... 72
6. Σύστημα κλειδώματος ............................ 73
6.1. Οδηγίες για τη χρήση του λουκέτου ......... 73
6.2. Οδηγίες για τη χρήση της κλειδαριάς ....... 73
6.3. Οδηγίες σχετικά με τη χρήση της
ασφάλειας μεταφοράς του
περιστρεφόμενου ραφιού για τα ψυγεία
Smart-900. ............................................... 74
7. Κάλυμμα νυκτός..................................... 74
8. RCCB* ..................................................... 75
9. PRCD .................................................... 75
10. Φροντίδα και καθαρισμός ........................ 76
11. Επίλυση προβλημάτων ........................... 77
12. Πρώτες βοήθειες ..................................... 78
13. Απόρριψη της μονάδας ........................... 79
14. Πληροφορίες σχετικά με την ανακύκλωση79
15. Εγγύηση .................................................. 80
ΠΑΡΑΡΤΗΜΑ Α: Οδηγίες αντιμετώπισης &
μεταφοράς ............................................... 80
ΠΑΡΑΡΤΗΜΑ Β: Προληπτικές οδηγίες
συντήρησης ............................................. 80
ΠΑΡΑΡΤΗΜΑ Γ: Οδηγίες για αποφυγή
διάβρωσης του θαλάμου ......................... 81
* προαιρετικό χαρακτηριστικό, ανάλογα με το
μοντέλο
1. Vorwort ................................................... 82
2. Technische Beschreibung ....................... 82
2.1. Allgemeines ............................................ 82
2.2. Klimaklassifikation ................................... 82
2.3. Technische Spezifikationen .................... 82
2.4. Abmessungen ......................................... 82
2.5. Max. Gewicht pro Regal .......................... 83
3. Installation & Betrieb ............................... 83
3.1. Installationsanweisungen für ihr
Kühlgerät ................................................ 84
3.2. Installationsanweisungen für die Regale . 85
3.3. Anschluss der Stromversorgung ............. 86
3.4. Bedienungsanleitung .............................. 86
4. Elektronische Steuergeräte ..................... 87
4.1. Informationen zu ECOBOX / HEC
Steuereinheit* ......................................... 87
4.2. Informationen zur Steuereinheit
Danfoss ERC-112* .................................. 87
5. Tür- Sperrsystem* ................................... 87
5.1. Verwendung bei Kühlgeräten mit
Flügeltüren .............................................. 87
5.2. Verwendung bei Kühlgeräten mit
Schiebetüren ........................................... 87
6. Verriegelungssystem* ............................. 88
6.1. Gebrauchsanleitung für die
Vorhängeschloss-Option ......................... 88
6.2. Gebrauchsanleitung für das
Zylinderschloss ....................................... 88
6.3. Gebrauchsanleitung für die
Transportverriegelung des Drehregals bei
Smart-900. .............................................. 89
7. Nachtabdeckung* .................................... 89
8. FI-Schalter* ............................................. 90
9. PRCD* .................................................... 90
10. Pflege & Reinigung ................................. 91
11. Beseitigung von Störungen ..................... 92
12. Erste Hilfe ............................................... 93
13. Entsorgung des Kühlgeräts ..................... 94
14. Informationen zum Recycling .................. 94
15. Garantie .................................................. 9 5
ANHANG A: Richtlinien für handhabung &
transport .................................................. 95
ANHANG B: Richtlinien für die präventive
wartung ................................................... 95
ANHANG C: Richtlinien für den
korrosionsschutz des kühlschranks ........ 96
* Sonderzubehör, je nach Modell

ITA
INDICE
1. Premessa ................................................ 97
2. Descrizione tecnica ................................. 97
2.1. Generale .................................................. 97
2.2. Classe climatica....................................... 97
2.3. Specifiche tecniche.................................. 97
2.4. Dimensioni ............................................... 9 7
2.5. Peso massimo per ripiano ....................... 98
3. Installazione e funzionamento ................. 98
3.1. ICM Istruzioni d'installazione ................... 99
3.2. Istruzioni di montaggio dei ripiani .......... 100
3.3. Collegamento alla rete elettrica ............. 101
3.4. Istruzioni per il funzionamento ............... 101
4. Controllo elettronico ............................... 102
4.1. Conoscere il regolatore
ECOBOX / HEC* ................................... 102
4.2. Conoscere il proprio Regolatore
Danfoss ERC-112* ................................ 102
5. Sistema di blocco sportello* .................. 102
5.1. Applicazione per ICM con porta
incernierata ............................................ 102
5.2. Applicazione per ICM con porta
scorrevole .............................................. 102
6. Sistema di chiusura* .............................. 103
6.1. Istruzioni per l'uso del dispositivo con
lucchetto ................................................ 103
6.2. Istruzioni per l'uso della serratura .......... 103
6.3. Istruzioni per l'utilizzo del blocco della
rotazione dei ripiani per i Smart-900 ...... 104
7. Copertura notturna* ............................... 104
8. Interruttore differenziale* ....................... 104
9. PRCD* ................................................... 105
10. Manutenzione e pulizia .......................... 106
11. Risoluzione dei problemi ....................... 106
12. Pronto Soccorso .................................... 108
13. Smaltimento del refrigeratore ................ 108
14. Informazioni sul riciclo ........................... 108
15. Garanzia ................................................ 109
APPENDICE A: Istruzioni per la gestione e il
trasporto ................................................ 110
APPENDICE B: Istruzioni di manutenzione
preventiva .............................................. 110
APPENDICE C: Istruzioni per prevenire la
corrosione del refrigeratore ................... 111
* funzione opzionale, a seconda del modello
W
]
ENG
1. Foreword
Thank you for purchasing this new Ice Cold Merchandiser (ICM) from Frigoglass. Before using this
unit please read the instructions below carefully. A well-maintained Frigoglass ICM will help you
increase your sales and profits.
2. Technical description
2.1 General
The merchandiser must be connected to a grounded mains outlet with fuse rating of 10-16A. The
outlet must be easily accessible for the purposes of installation and servicing.
2.2 Climate classification
According to climate specifications, models Smart-300 [R290], Smart-800 [R290], Smart-900L SD
[R290], Smart-900L HD [R290], Smart-1300 HD [R290] and Smart-1300 SD [R290] are Class "4",
namely ambient temperature of 30°C and 55% humidity; models Smart-450L SZ T [R290] and Smart450L [R290] are Class “5”, namely ambient temperature of 40⁰C and 40% humidity.
2.3 Technical specifications
Rating Voltage / Frequency 220-240 V / 50 Hz
Defrosting Automatic
2.4 Physical dimensions
idth
Model
Smart-300 [R290
(mm)
Depth
(mm)
495 625
Smart-450L [R290] 596 624
Smart-450L SZ T [R290] 596 629
Smart-800 [R290] 785 785
Smart-900L SD [R290] 890 730
Smart-900L HD [R290] 890 732
Smart-1300 HD [R290] 1310 7401 21392 1281 200
Smart-1300 SD [R290] 1310 7383 21392 1212 210
1
Excluding handle & 80mm back spacer
2
Including rollers & hinge cover
3
Excluding 80mm back spacer
2.5 Maximum weight per shelf
Model Maximum weight per shelf (kg)
Smart-300 [R290]
Smart-450L [R290]
8
Height
(mm)
1
1619
1
2014
1
20142 427 112
1
2139
3
2014
1
2014
Volume
(Lt)
2
258 75
2
427 105
2
778 145
2
722 159
2
823 152
Net Weight (kg)
24
28
ENG
Model Maximum weight per shelf (kg)
Smart-450L SZ T [R290]
Smart-800 [R290]
Smart-900L SD [R290] 61
Smart-900L HD [R290] 70
Smart-1300 HD [R290] 50
Smart-1300 SD [R290] 45
Models Smart-300 [R290], Smart-450L [R290], Smart-450L SZ T
[R290], Smart-800 [R290], Smart-900L SD [R290], Smart-900L HD
[R290], Smart-1300 HD [R290] and Smart-1300 SD [R290] are
equipped with HC refrigerant, and have been tested and proven
to be safe according to related standards.
All necessary actions for safe usage & maintenance of this
appliance are described in this manual and need to be followed
carefully. This appliance must be installed only by a suitably
qualified person.
28
65
3. Installation & operation
Failure to comply with the instructions may result in high-energy
consumption, poor performance of the unit and void warranty.
Keep clear of obstruction all ventilation openings in the appliance
enclosure or in the structure for building-in
Do not use mechanical devices or other means to accelerate the
defrosting process, other than those recommended by the
manufacturer
Do not damage the refrigerant circuit
Do not use electrical appliances inside the food storage
compartments of the appliance, unless they are of the type
recommended by the manufacturer
If the supply cord is damaged, it must be replaced by the
manufacturer, its service agent or similarly qualified persons in order
to avoid a hazard.
9
ENG
Do not place the merchandiser:
in direct sunlight or near heat sources (radiators, stoves & other
heating equipment)
outdoors, without protection from rain that prevents water falling
directly on the merchadiser
in climate conditions for which it is not certified
in extreme environmental conditions (i.e. exposure to saline
humidity)
on a surface with an angle more than 5o
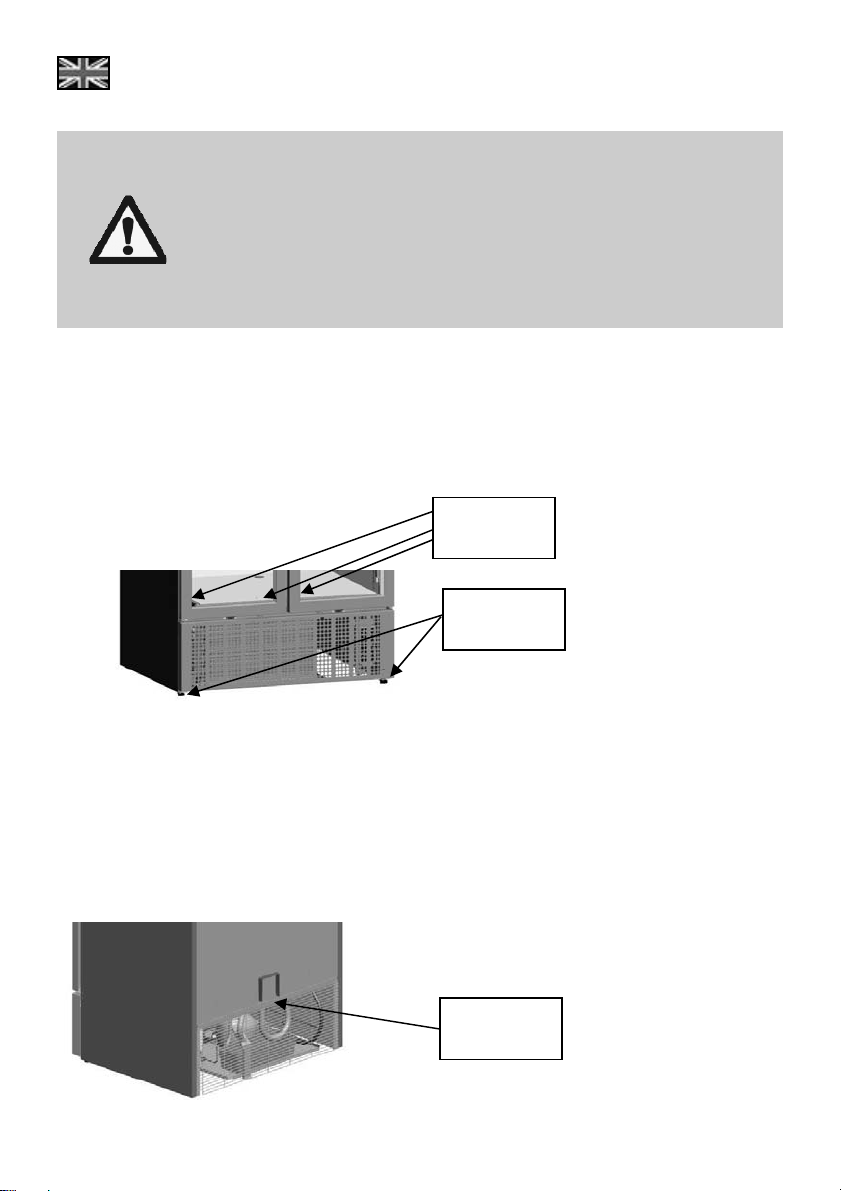
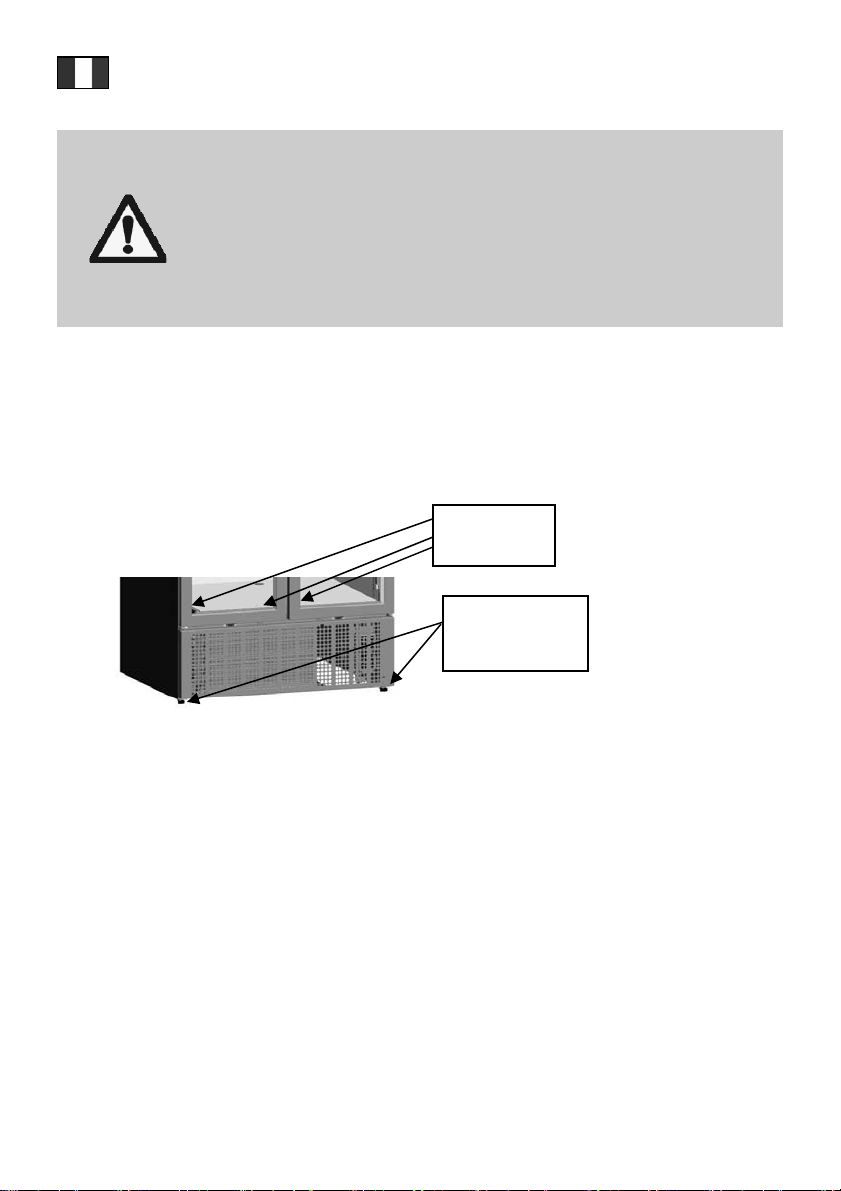
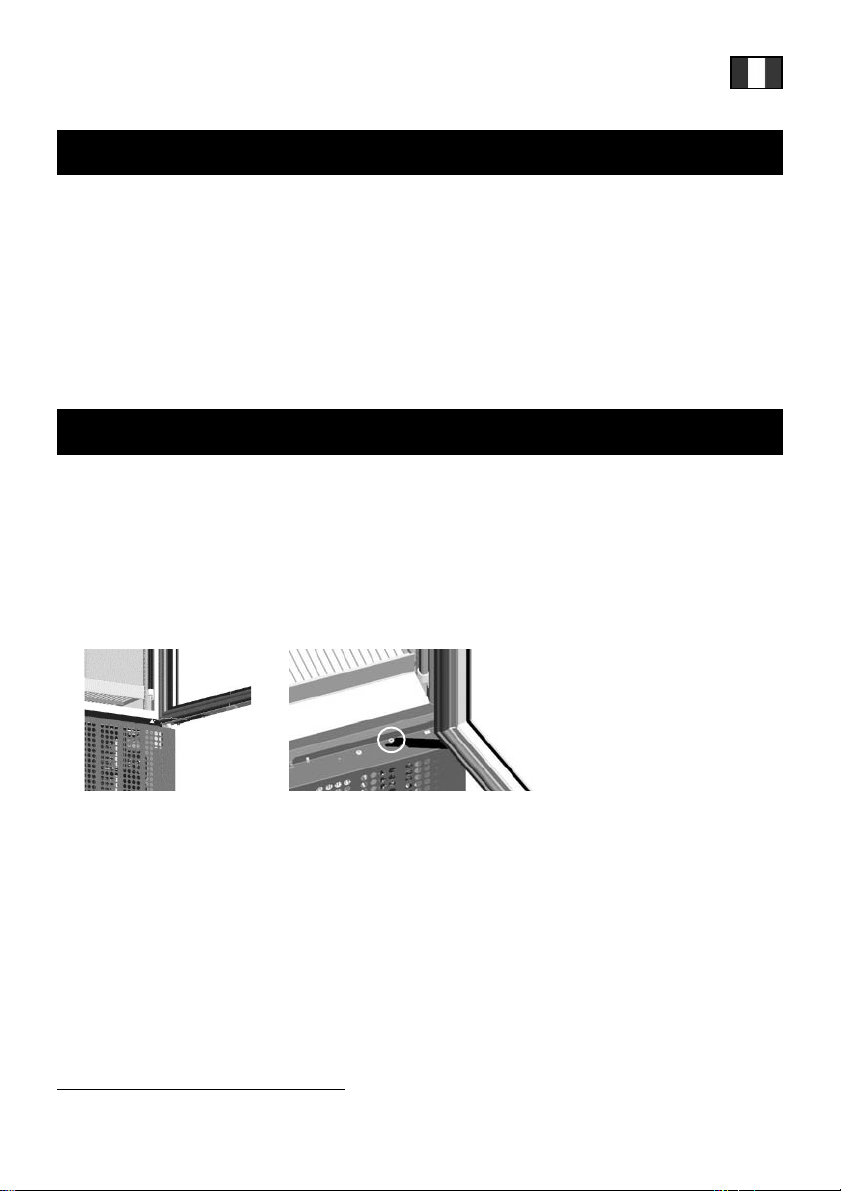
3.1 ICM placement instructions
a. After unpacking, check the cabinet for any damage caused during transportation. In the event of
damage, please contact the forwarding company.
b. Always ensure that your merchandiser is installed on a stable surface/floor and is properly
leveled. There are 2 adjustable feet for all models at the front under the chassis.
Check
points
Level feet at
the front
Please, adjust until the ICM levels and check using a spirit level, if available. Take necessary
precautions if lifting is needed during installation. Keep unauthorised people away from the cooler until
installation is completed.
c. The merchandiser must stand upright for at least 1 hour after transportation and prior to start-up.
This gives the oil time to run back to the compressor after transit and installation.
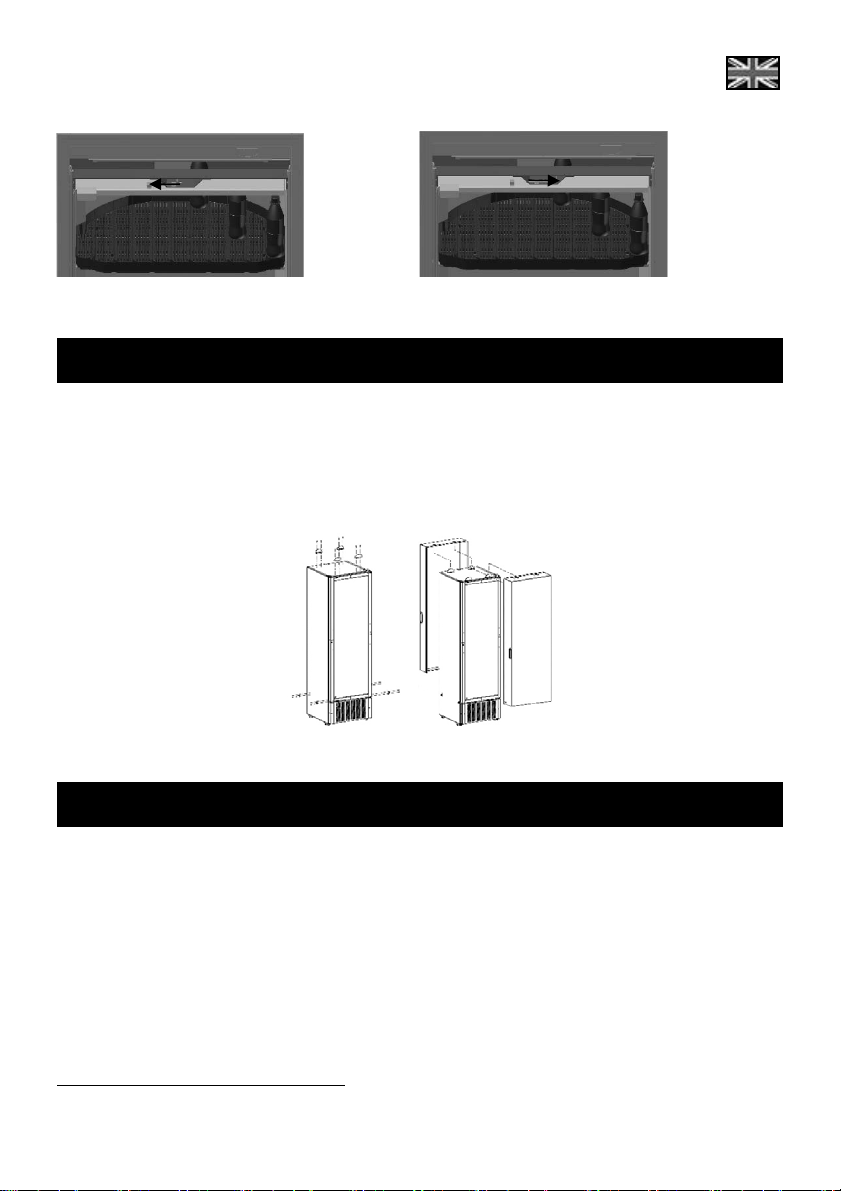
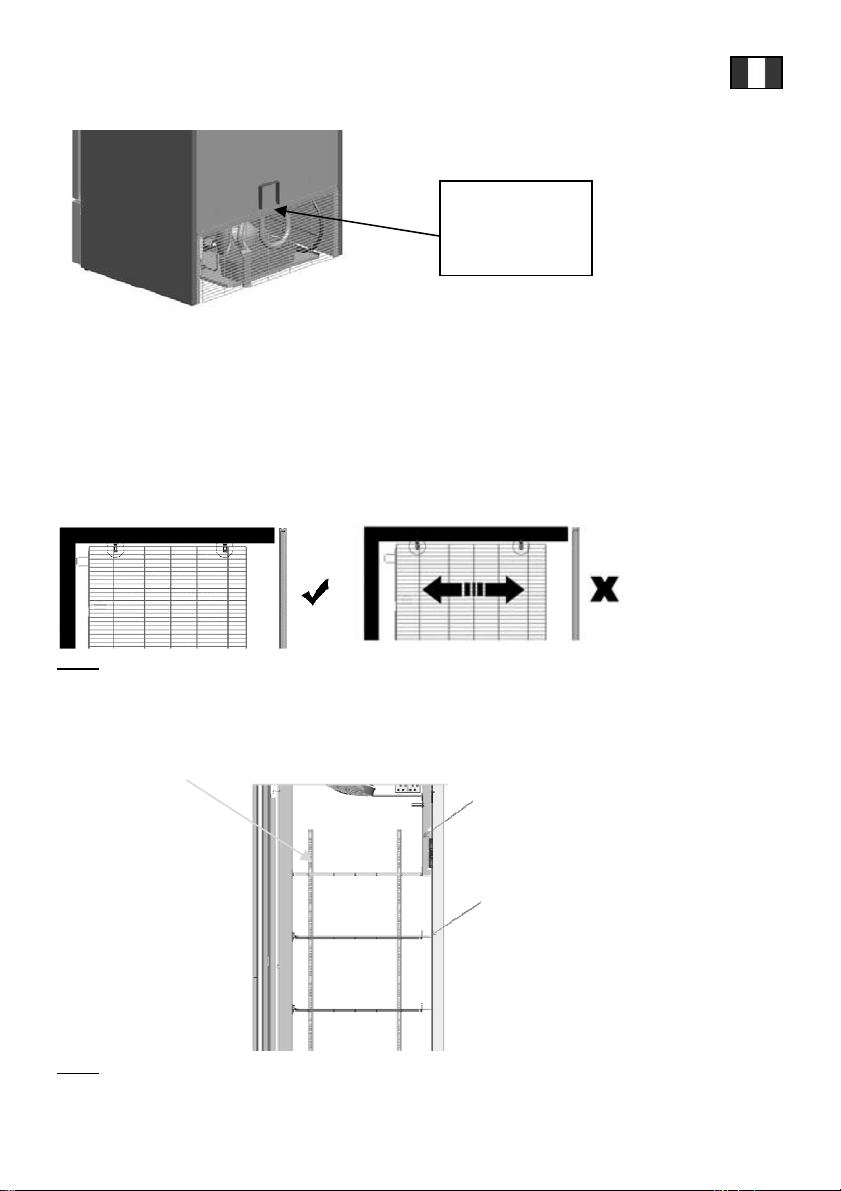
d. Allow a minimum gap of 100mm at the back. To make that possible, please turn the back spacer
as shown below.
e. Do not place anything on top of the cooler.
10
Rotate back
spacer
ENG
Note: Relocation of the ICM inside the outlet
a. Empty the ICM and unplug from mains supply.
b. Fully extract the leveling feet.
c. Move the unit to the desired location with the assistance of another person.
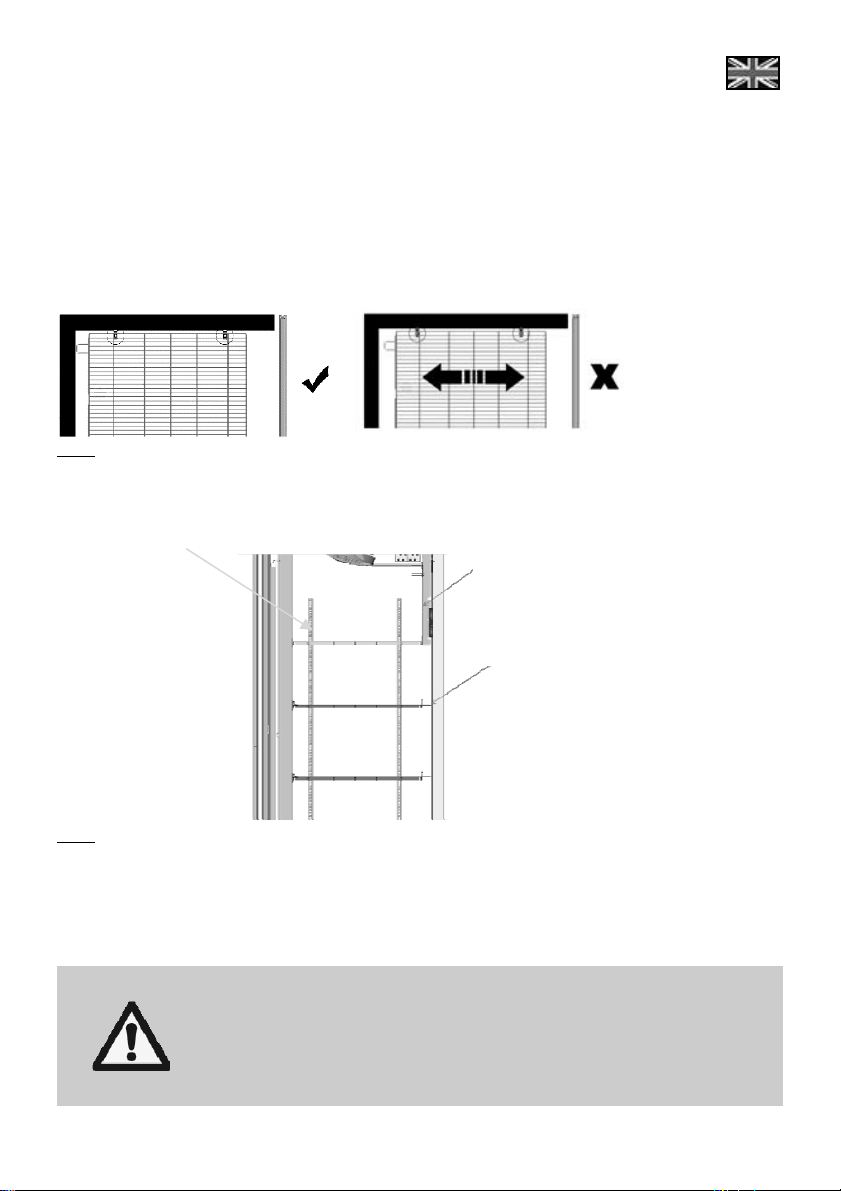
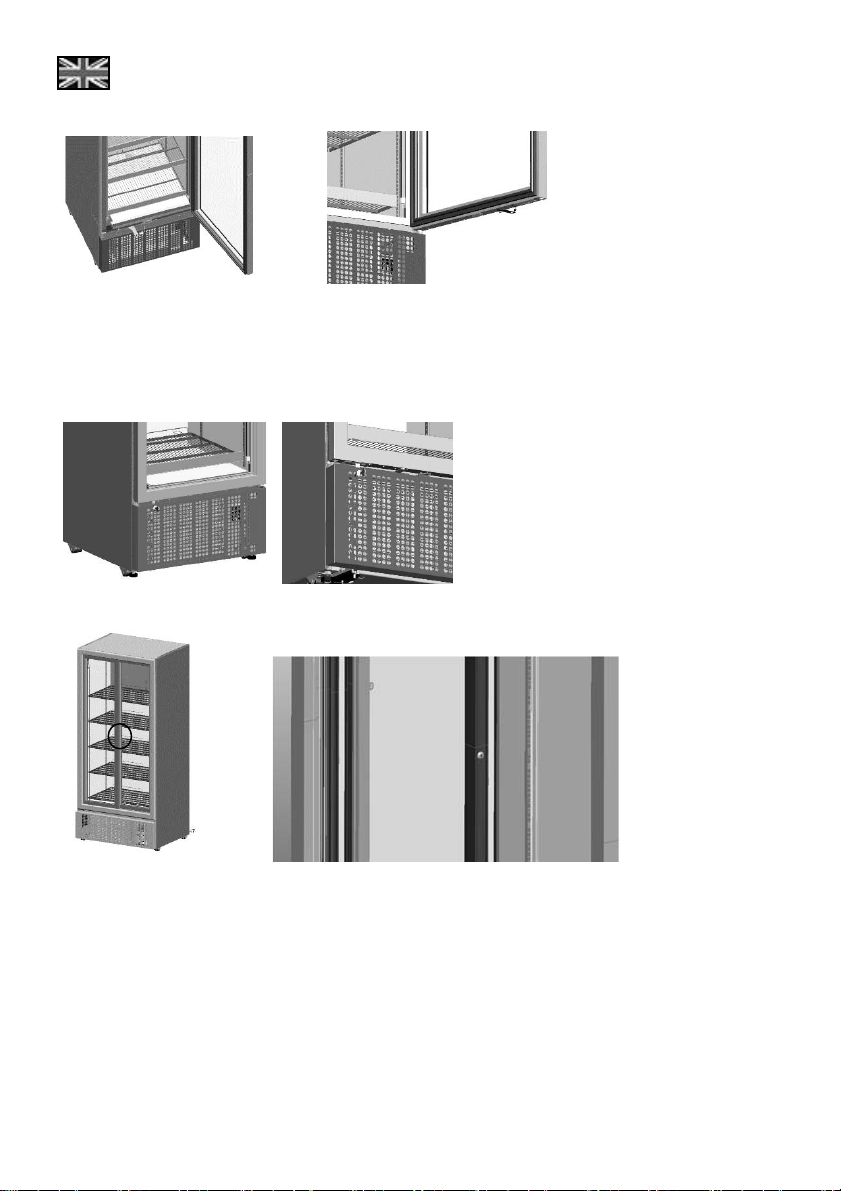
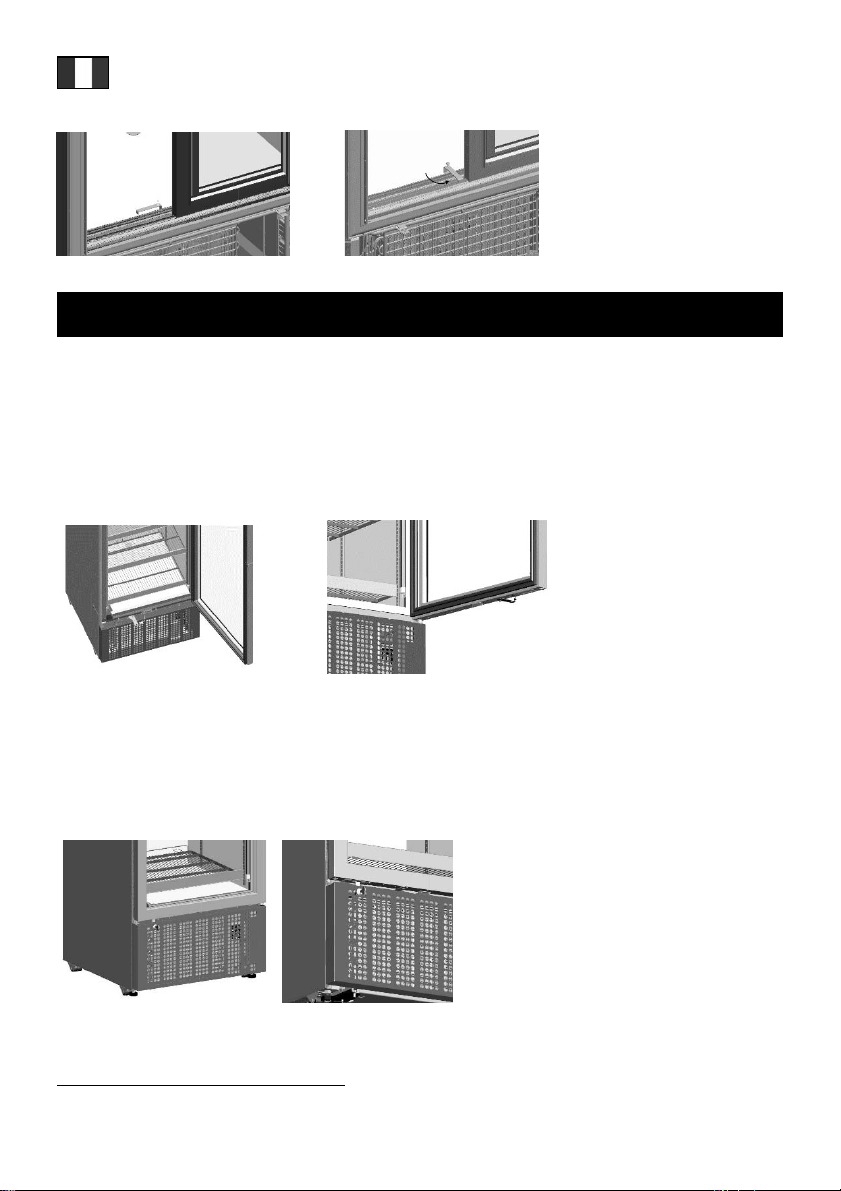
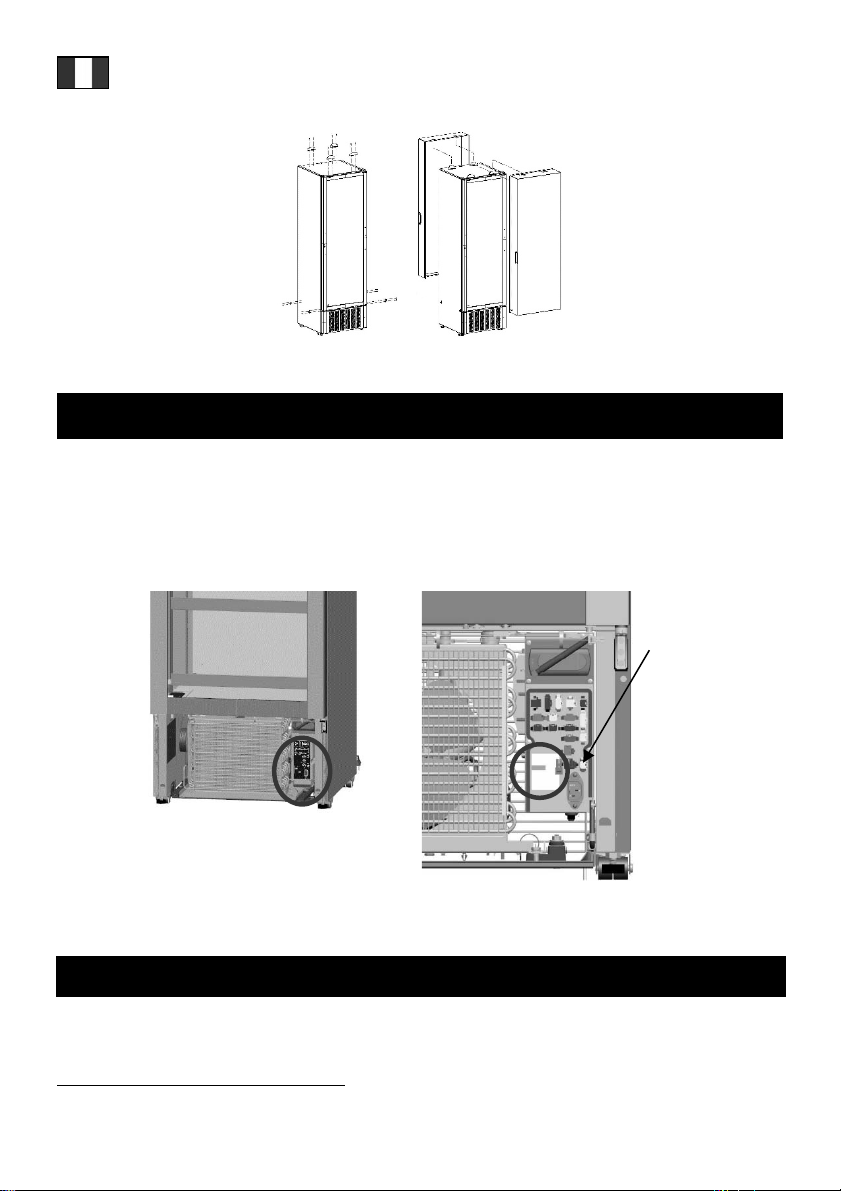
3.2 Shelf installation instructions
To adjust the shelf first unload it, lift it and unclip the shelf clips (4). Place the clips in the desired
position and reposition the shelf. Make sure that the horizontal metal rods at the bottom of the shelf
are between the front and back shelf clips, as shown below.
Note: Specifically, the Smart-450L, 500 & 800 models are each equipped with 4 shelves with spacers
(on the back side) and one shelf without spacer.
The shelf without spacer has to be placed on top level in order to fit with the additional metal part for
air circulation, as shown in below pictures.
Shelf without spacer
Note: When using the optional front visibility shelving system, please follow the installation instructions
included in the shelving kit.
3.3 Connection to the mains supply
Connect the ICM to a 220-240 Volts power supply on a 10-16A fused & grounded socket. Do not use
extension cables.
Do not connect the merchandiser to:
a non grounded wall socket or power line
improper supply voltage and frequency
power supply that does not comply with the safety regulations
Additional metal part
Shelf with spacer
of the appliance or with current legislation on electrical
installations
11
ENG
If the mains cord supplied is not long enough, do not use an
extension lead. Ask an authorised electrician to replace the cord
with a longer one, if such is described in the list of authorised
spare parts only.
Do not plug the cooler into a multiple outlet strip.
Route the mains cord in such a way that it is protected from
damage and does not pose a risk of tripping.
3.4 Operation instructions
Do not use the merchandiser to store food.
Do not store explosive substances such as aerosol cans with a
flammable propellant in this appliance.
This appliance is not intended for use by young children or handicapped
or infirm persons unless they are adequately supervised by a
responsible person who will ensure the safe operation of the appliance
on their part. Young children should be supervised to ensure that they
do not play with the appliance.
Do not operate the appliance with any of the cover sheets and guards
open.
Energy saving tips:
For energy saving and for the ICM’s better performance:
Load your ICM at night-time so that the drinks are cold once you get there in the morning.
Store your back-up stock in a cool and/or dark place so that when reloaded, the ICM will need
much less time to cool them down.
Wipe moisture off the products before you place them in the ICM.
Avoid opening the door for long periods of time.
4. Electronic controller
4.1 Knowing your ECOBOX / HEC Controller
For instructions of the functionality of ECOBOX/ HEC Controller and its related optional features,
please visit the following website link: http://www.frigoglass.com/manuals/.
*
optional feature, depending on the model
12
*

ENG
4.2 Knowing your Danfoss ERC-112 Controller*
For instructions of the functionality of Danfoss ERC-112 Controller and its related optional features,
please visit the following website link: http://www.frigoglass.com/manuals/.
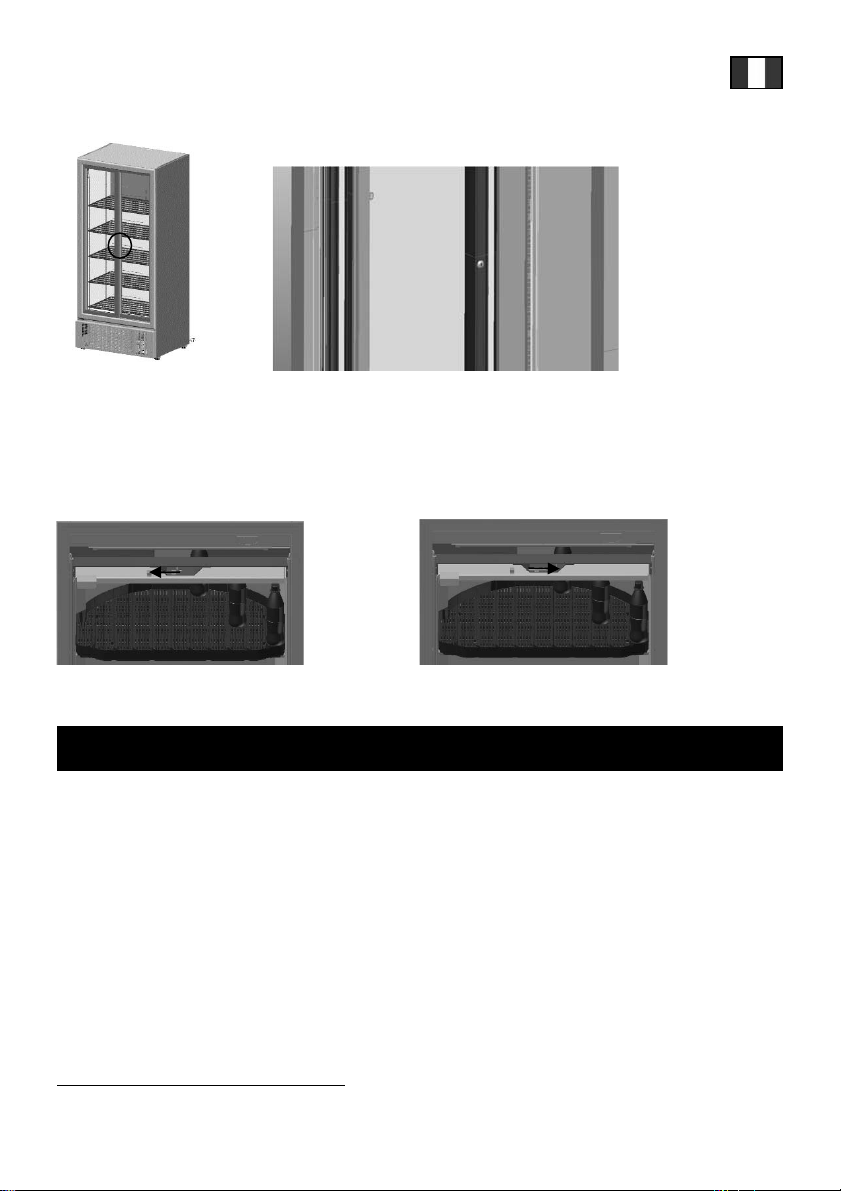
5. Door blocking system
In using the door blocking system, please follow the steps below
5.1 Application with hinged door ICMs
Step 1: Open the door to an angle greater than 110 degrees
Step 2: Rotate the door blocker towards the cabin (as shown in the picture)
Step 3: Door blocker stops on the screw located over the grid (as shown in the picture)
Step 4: Open the door to release the door blocker from the stopping point and rotate to the initial
position
5.2 Application with sliding door ICMs
Step 1: Open the left door (same procedure also for right door)
Step 2: Lift up and rotate the door blocker towards the cabin (as shown in the picture)
Step 3: Place door blocker vertical to door guides (as shown in the picture). Door blocker will be
blocked at door guides walls and prevent the door to close.
Step 4: Release the door blocker from the stopping point and rotate to the initial position
6. Locking system
6.1 Instructions for using the padlock provision
Step 1: Open the door
Step 2: Rotate the locking system blade placed on the grid (as shown in the picture)
Step 3: Rotate the locking system blade placed on the door (as shown in the picture)
Step 4: Close the door and place the pad lock through the blade holes to secure cooler
*
optional feature, depending on the model
13
ENG
Step 2 Step 3
6.2 Instructions for using the eye-lock
Step 1: Close the door
Step 2: Place the key to the front grilles lock and rotate 90° (as shown in the picture)
Step 3: Door is locked. Key withdrawals in both locked and unlocked position
For sliding door coolers the eye-lock is positioned on the middle of external door plastic profile side
Sliding door version coolers
6.3 Instructions for using the transport lock of the rotoshelf for the Smart-900
Step 1: Open the door
Step 2: Slide the locking system blade (located at the middle of the top bar of the shelf holding
structure).
Step 3: Rotoshelf is locked.
14
ENG
Locked Unlocked
7. Night Cover*
In placing the night cover, please follow the steps bellow
Step 1: Drill holes on top and sides of cooler and apply the supporting blades and latches (as shown
in the picture and described in the installation instructions that are included in the night cover
kit).
Step 2: Fix night cover on the front side of the assembly and use padlock to secure it, as shown in
the picture (the back side assembly can be used to store night cover when the cooler is in
use).
Step 1 Step 2
8. RCCB*
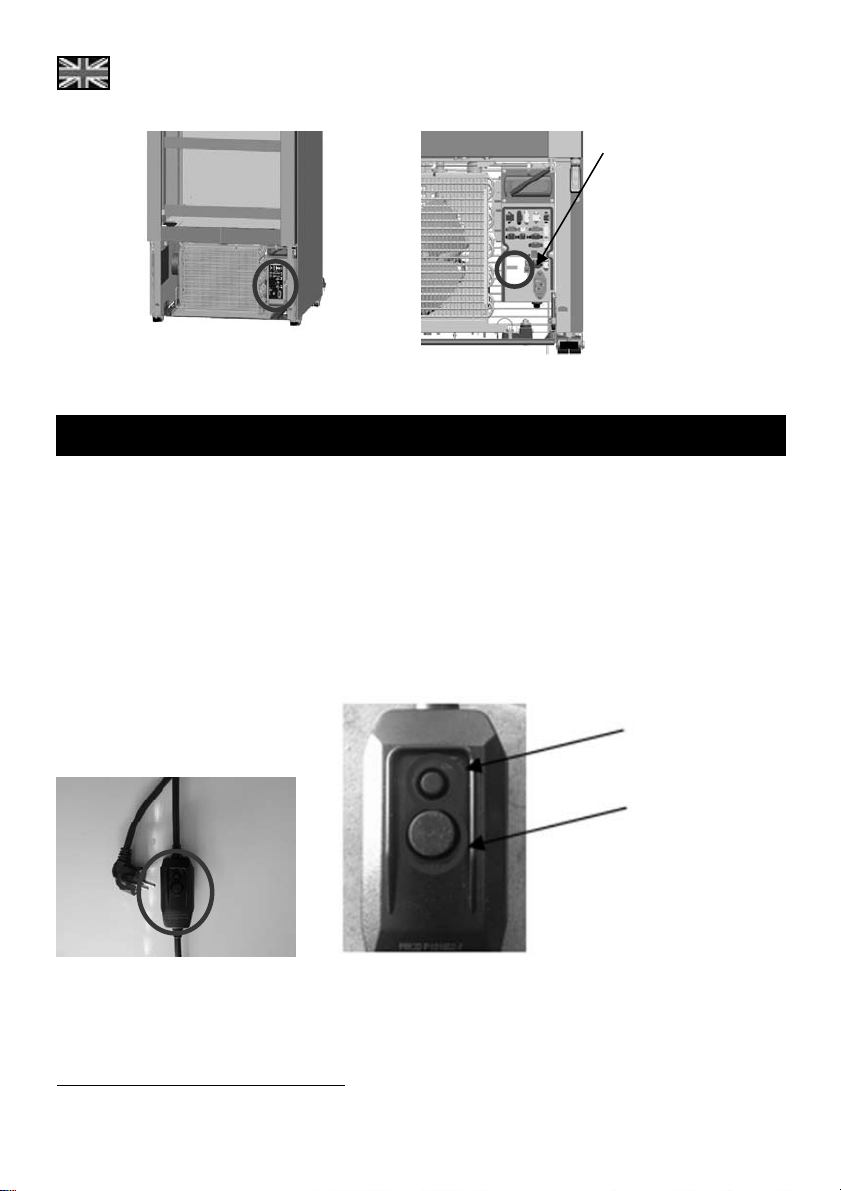
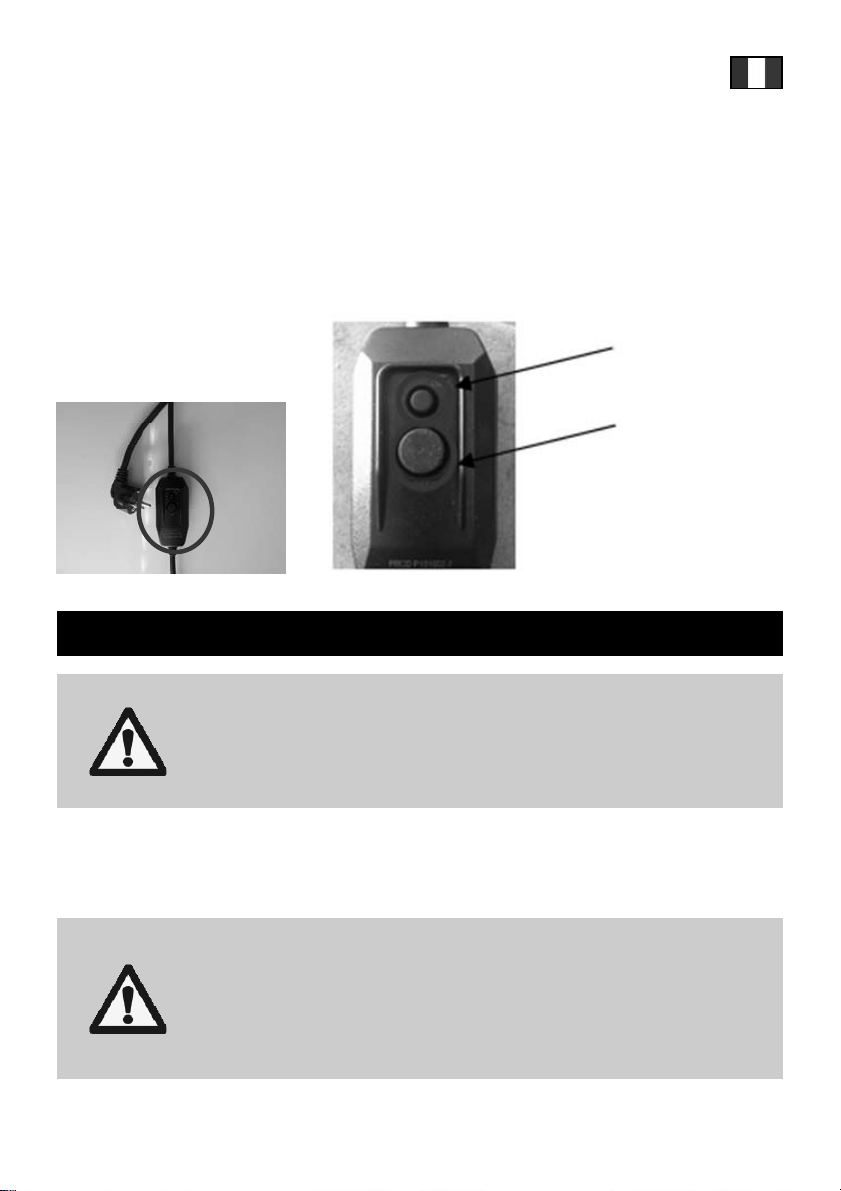
In accessing the RCCB, please follow the steps below
Step 1: Remove the grid to get access to the electrical box (that is marked in circle in the respective
Step 2: Remove the connectors’ cover of the electrical box
Step 3: Access the RCCB switch (that is marked in circle in the respective picture below and
*
optional feature
picture below)
indicated also on the sticker on the front of the cover)
RCCB
15
ENG
Step 1
Step 2, 3
9. PRCD*
The PRCD device is integrated to the power cord of the unit (as shown in picture below), close to the
wall plug.
The PRCD device features two buttons; the small one is the “test” button and is used to check the
operational status of the PRCD. The bigger button is the “reset” and is used to rearm the PRCD after a
triggering event.
When plugging off the power cord a test needs to be perfomred to ensure proper operation of the
PRCD. Please follow the steps below:
Step 1: Plug into power.
Step 2: Press (small) “TEST” button. The (big) “RESET” button should pop-up.
Step 3: Press the “RESET” button again. Do not use the device if it fails!
TEST button
RESET button
*
optional feature
16
ENG
10. Care & cleaning
Prior to any cleaning (inside or outside the device) procedure,
unplug the ICM! Remove the plug and make sure that the
operator can check from any of the points which he has access
It is important to clean the merchandiser at least twice a year. In order to avoid mold formation,
odours, etc. product compartments must be thoroughly cleaned. The interior of the ICM should be
cleaned with a mildly soapy cloth and the glass surface using a window-cleaning agent.
that the cable is unplugged.
Never use a water hose or high pressure jet to clean the cooler.
In case the merchandiser is placed in very dusty and/or greasy
environment, the regular cleaning of the condenser by an
authorised technician is mandatory.
Keep the cooler in a stable position during cleaning, do not step
on or lean over the cooler.
Do not clean with sharp objects, flammable or corrosive liquids
or sprays.
11. Troubleshooting
All access to the cooling system and electrical parts (changing lighting or
refrigeration deck) must be performed by authorised personnel only.
Models Smart-300 [R290], Smart-450L [R290], Smart-450L SZ T
[R290], Smart-800 [R290], Smart-900L SD [R290], Smart-900L HD
[R290], Smart-1300 HD [R290] and Smart-1300 SD [R290] are
equipped with HC refrigerant. All service operations on cooling
mechanism & gas charging should be performed in a wellventilated environment or in open air. Do not smoke during
maintenance.
UNPLUG THE COOLER PRIOR TO ANY MAINTENANCE OR SERVICE
OPERATIONS. REMOVE THE PLUG AND MAKE SURE THAT THE
OPERATOR CAN CHECK FROM ANY OF THE POINTS WHICH HE
HAS ACCESS THAT THE CABLE IS UNPLUGGED.
After maintenance operations, make sure that the grounding
connections are in place before assembling the covers. Make sure
you use the same fastening components and covers.
17
ENG
If any electrical components need to be replaced, use only the
appropriate components in the spare part list supplied by the
technical service department of Frigoglass.
Keep the glass door of the cooler closed during maintenance. If the
If the ICM is not functioning properly or is out of order, please check the following before calling the
authorised service provider:
FAULT POSSIBLE REASONS HANDLING
The ICM does not
work.
The ICM does not
cool.
The ICM does not
cool.
The ICM makes
noise.
There is water on
the floor.
The lights don’t
work.
If after all the above-mentioned checks the problem with your ICM remains, contact the customer
service department of your supplier and provide the following information:
Type of ICM
Serial number of the ICM
Brief description of the problem / observation
18
compressor needs to be replaced, you may need to use adequate
support to stabilize the cooler.
After maintenance operations make sure that the strain relief, which
supports the supply cord, is assembled properly.
Power cord not plugged in. Plug it in.
No power supply at the socket. Check the outlet fuse.
The ICM has recently been reloaded
with warm products. It takes some time
to cool warm products down.
The ICM is loaded in such a way that
the air circulation in the interior is getting
blocked.
The door does not seal properly.
Leakage in the cooling system.
Intense metallic noise. Call a Service technician.
Inclined or not even floor.
The drainage hole for the condensate
water is blocked.
There is a leakage in the tray. Call a Service technician.
The lighting or the transformer are out of
order
Preferably, reload the ICM before night
closing.
Load the ICM according to the
standards you have been provided
with by the company.
Repair the doors for proper closing
(this type of repair should be
performed by an authorised
technician).
Repair the leakage (this type of repair
should be performed by an authorised
technician).
Level the ICM properly by adjusting its
feet. Placing a spirit level on the top of
the ICM will assist you in leveling it.
Unblock the drainage hole.
Call a Service technician.
ENG
12. First aid
In case of accident, it is recommended:
ACCIDENT IMMEDIATE ACTION
Inhalation of refrigerant Take deep breaths of clean air. If irritation persists, contact a doctor.
Contact with eyes
Contact with skin
Wash your eyes thoroughly with plenty of water for at least 15 minutes
and then consult a doctor.
Wash immediately with water.
13. Disposal of the unit
For detailed information regarding the recycling of this product, please contact your local city office,
your waste disposal service or the manufacturer through its service agent. By ensuring this product is
disposed of properly, you will help prevent potential negative consequences for the environment and
human health, which could otherwise incur by this product’s inappropriate disposal.
14. Recycling information
1. Based on the objectives of environmental policy according to the European Community (EC)
directives for Waste Electrical and Electronic Equipment (WEEE)
protect and improve the quality of the environment, protect human health and utilize natural
resources prudently and rationally. As an end user, you are kindly requested to do the following:
• If the appliance has stopped working, even after troubleshooting; first check if it can be
repaired, before disposing it. Contact your distributor or supplier for further information on
possible repairs of your appliance, if in doubt.
• If the appliance has reached its “End of Lifecycle” (EOL), in other words, the appliance is not
repairable or re-usable; do not dispose of the appliance as unsorted municipal waste. Instead,
ensure that it is collected separately from a recycling company.
Note: The disposal of electronic and electrical appliances in landfill sites or through incineration
creates a number of environmental problems. When obsolete materials are not recycled, raw materials
have to be processed to make new products. This represents significant loss of resources as the
energy, transport and environmental damage caused by these processes is considerable.
• To help in the recovery and recycling process of this appliance, do not dismantle or break parts
off the appliance prior to collection. By removing parts off the appliance, you can reduce its
recyclability rate.
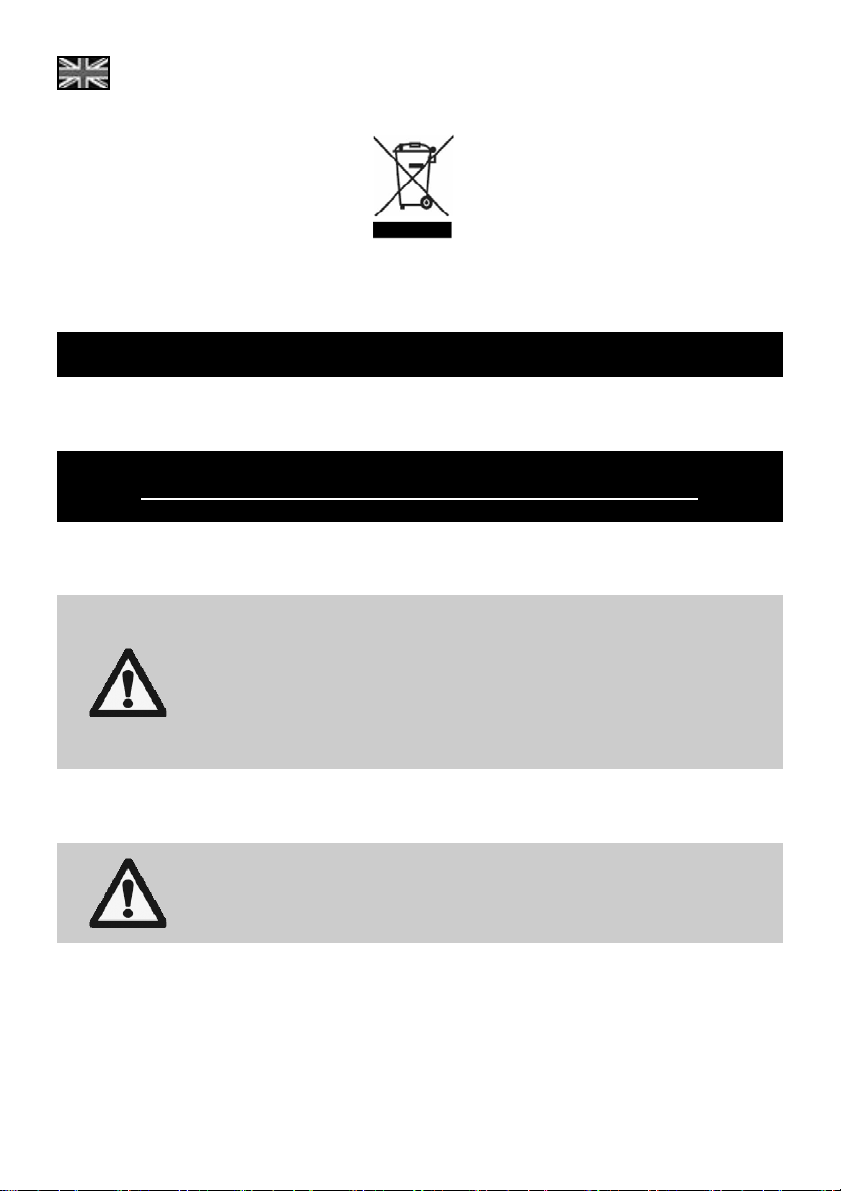
2. The symbol shown in Fig 1 below, which is also on the Product Label inside the appliance,
indicates the need for separate collection of electrical and electronic equipment based on the
European Community (EC) WEEE Directive.
*
References
Waste Electrical and Electronic Equipment (WEEE) European Community (EC) Directive Nr. 2002/96/EC
*
which aim to preserve,
19
ENG
3. Finally, observe any recycling laws applicable to your community or country.
Figure 1 - Crossed-Out Wheeled Bin
15. Warranty
The appliance is covered by a warranty as this has been agreed upon sale.
FOR AUTHORISED SERVICE PERSONNEL ONLY
HANDLING & TRANSPORTATION GUIDELINES
The merchandiser should always be transported:
in upright position (unless otherwise authorised by the supplier)
with the doors closed and stoppers for the sliding door models
in its original packaging or similar one.
Cooler temperature during storage or transportation should not be below
-20oC or above + 60oC
PRIOR TO ANY CLEANING (INSIDE OR OUTSIDE THE DEVICE) OR
MAINTENANCE PROCEDURE, UNPLUG THE ICM! REMOVE THE PLUG
AND MAKE SURE THAT THE OPERATOR CAN CHECK FROM ANY OF
THE POINTS WHICH HE HAS ACCESS THAT THE CABLE IS
UNPLUGGED.
It is mandatory that an authorised service agent performs the following operations during the
Preventive Maintenance of an ICM once or twice a year, using a vacuum cleaner:
Cleaning of the condenser
Cleaning of the dust filters (if applicable).
If the ICM is placed in an environment where dust is accumulated on the condenser, then the
condenser has to be cleaned more often.
PREVENTIVE MAINTENANCE GUIDELINES
APPENDIX A
APPENDIX B
20

ENG
Additionally, it is recommended that the following operations are carried out during preventive
maintenance:
1. Mechanical system:
Check that the equipment is correctly positioned and leveled.
Check that the front and back grid are fixed in place.
Check the self-closing system of the door.
Check that the fan support and fan grid are fixed in place.
Check the draining system and unclog if necessary.
2. Electrical system:
Check the power cable (replace if needed).
Check the illumination system.
Check the electrical connections.
Check that the electrical box cover of the thermostat or the electronic controller is properly
installed.
Check that components that might have been replaced during servicing are original.
3. Refrigeration system:
Check that the compressor is functioning properly.
Check the starting relay, the overload and the capacitor. The Supplier recommends that the
compressor's starting relays and overloads be replaced every 3-4 years.
Check the fan motor condenser and fan motor evaporator.
Check that the thermostat or the electronic controller and its components are functioning properly.
Check the cooling performance of the ICM.
Check the cooling circuit using the appropriate leak detector in case there is any concern or sign
of refrigerant leak.
APPENDIX C
GUIDELINES TO PREVENT CORROSION OF THE CABINET
1. Avoid damages resulting from improper installation & operation, improper maintenance &
cleaning, as well as improper handling and transportation, as per paragraphs 3, 5 and the
Appendix A above.
2. Do not perform unauthorised adaptations, modifications or adjustments to the cabinet.
21
FRA
1. Avant-propos
Nous vous remercions d’avoir fait l’acquisition du nouveau Présentoir Ice Cold (PIC) de Frigoglass.
Avant d'utiliser cette unité, veuillez lire attentivement ce mode d'emploi. Un présentoir Frigoglass bien
entretenu vous permettra d'accroître vos ventes et les profits de votre entreprise.
2. Description technique
2.1. Généralités
Le présentoir doit être branché sur une prise secteur mise à la terre et équipée d’un fusible d'au
moins 10-16 A. La prise de courant doit être facile d'accès, pour des raisons d'installation et
d'entretien.
2.2. Classification climat
Selon les spécifications climatiques, les modèles Smart-300 [R290], Smart-800 [R290], Smart-900L
SD [R290], Smart-900L HD [R290], Smart-1300 HD [R290] et Smart-1300 SD [R290] sont classés "4",
à savoir une température ambiante de 30°C et 55% d’humidité. Les modèles Smart-450L SZ T [R290]
et Smart-450L [R290] sont classés “5”, à savoir une température ambiante de 40⁰C et 40% d’humidité.
2.3. Caractéristiques techniques
Tension nominale / Fréquence 220-240 V / 50 Hz
Dégivrage Automatique
2.4. Dimensions
Modèle
Largeur
(mm)
Smart-300 [R290] 495 625
Smart-450L [R290] 596 624
Smart-450L SZ T [R290] 596 629
Smart-800 [R290] 785 785
Smart-900L SD [R290] 890 730
Smart-900L HD [R290] 890 732
Smart-1300 HD [R290] 1310 7401 21392 1281 200
Smart-1300 SD [R290] 1310 7383 21392 1212 210
1
Hors poignée et dispositif d'espacement arrière 80 mm
2
Roulettes & couvercle de gond inclus
3
Hors dispositif d’espacement arrière 80 mm
Profondeur
(mm)
1
1
1
1
3
1
Hauteur
(mm)
1619
2014
Volume
(L)
2
258 75
2
427 105
Poids net (kg)
20142 427 112
2
2139
2014
2014
778 145
2
722 159
2
823 152
22
FRA
2.5. Poids maximum par rayon
Modèle Poids maximum par rayon (kg)
Smart-300 [R290]
Smart-450L [R290]
Smart-450L SZ T [R290]
Smart-800 [R290]
Smart-900L SD [R290] 61
Smart-900L HD [R290] 70
Smart-1300 HD [R290] 50
Smart-1300 SD [R290] 45
Les modèles Smart-300 [R290], Smart-450L [R290], Smart-450L
SZ T [R290], Smart-800 [R290], Smart-900L SD [R290], Smart900L HD [R290], Smart-1300 HD [R290] et Smart-1300 SD [R290]
sont équipés de réfrigérant HC et sont testés et avérés sûrs,
conformément aux normes pertinentes.
Toutes les tâches nécessaires à une utilisation et un entretien
sûrs de cet appareil sont décrites dans ce manuel. Veillez à les
exécuter comme indiqué. Cet appareil doit être installé
uniquement par du personnel qualifié.
24
28
28
65
3. Installation & mise en service
Ne pas respecter les consignes est susceptible de donner lieu à une
consommation d’énergie excessive et à un faible niveau de performance
de l’unité, mais aussi d'annuler la garantie.
Αssurez-vous que les orifices d'aération de l'appareil ou de la
structure d'encastrement ne sont pas obstrués.
Ne pas utiliser de moyens mécaniques ou autres pour accélérer le
processus de dégivrage, à l’exception de ceux recommandés par le
fabricant.
Ne pas endommager le circuit du réfrigérant.
Ne pas utiliser d'appareils électriques à l'intérieur du compartiment
de conservation des aliments, à moins qu'il ne s'agisse d'appareils
de type recommandé par le fabricant.
Si le cordon d'alimentation est endommagé, il faut le faire remplacer
par le fabricant, son agent d'entretien ou toute personne aux
qualifications similaires, afin d'éviter tout danger.
23
FRA
Ne pas placer le présentoir :
à la lumière directe du soleil ou à proximité de sources de chaleur
(radiateurs, cuisinières ou autres appareils produisant de la chaleur)
en plein air, sans protection adéquate contre la pluie
dans des conditions climatiques par rapport auxquelles l’appareil
3.1. Instructions de mise en place du PIC
a. Après avoir retiré l’emballage, vérifiez la cabine pour tout dommage qui aurait pu avoir été
causée durant le transport. Si vous constatez quelque dommage, veuillez contacter la société
de transport.
b. Veillez toujours à ce que votre présentoir soit installé sur une surface/sol bien plat et
correctement à niveau. Il existe 2 pieds réglables, pour tous les modèles, à l'avant, sous le
châssis.
n’est pas certifié
dans des conditions environnementales extrêmes (c'est-à-dire,
exposition à l’humidité saline)
sur une surface inclinée dont l’angle est supérieur à 5 °.
Points de
contrôle
Pieds de mise à
niveau situés à
l'avant
Veuillez les régler jusqu’à ce que le PIC soit à niveau et vérifiez à l’aide d’un niveau à bulle, le cas
échéant. Prenez les précautions nécessaires, s'il est nécessaire de soulever l'appareil durant
l'installation. Veuillez éloigner du présentoir les personnes non autorisées, jusqu’à ce que l’installation
soit achevée.
c. Le présentoir doit rester debout pendant au moins 1 heure avant de le brancher sur le secteur,
après le transport. Cela donne la possibilité à l'huile de regagner le compresseur, après le
transport et l'installation.
d. Prévoir un espace d’au moins 100 mm, à l'arrière. Pour ce faire, veuillez tourner le dispositif
d'espacement arrière comme indiqué ci-dessous.
e. Ne posez rien au sommet du meuble réfrigéré.
24
FRA
Tourner le
dispositif
d'espacement
arrière
Note : Déplacement du PIC à l'intérieur du point de vente
a. Vider le PIC et le débrancher du secteur.
b. Faites ressortir entièrement les pieds permettant de mettre l'unité parfaitement droite.
c. Déplacer l'unité à l'endroit souhaité (faites-vous aider).
3.2. Instructions d’installation du rayon
Pour régler la position du rayon, retirez d'abord les produits, soulevez le rayon et libérez les dispositifs
de fixation des rayons (4). Placez-les dans la position souhaitée et remettez le rayon en place.
Assurez-vous que les barres métalliques horizontales du bas du rayon se trouvent entre les dispositifs
de fixation avant et arrière du rayon, comme indiqué ci-dessous.
Note : Les modèles Smart-450L, 500 & 800 sont spécialement équipés de 4 rayons avec dispositif
d'espacement (à l'arrière) et d'un rayon sans dispositif d'espacement.
Le rayon sans dispositif d'espacement doit être placé au niveau le plus élevé, pour s'adapter à
l'élément métallique supplémentaire destiné à assurer la circulation de l'air, comme indiqué aux
images ci-dessous.
Rayon sans
dispositif
d'espacement
Note : Veuillez suivre les instructions d'installation incluses dans le kit de rayonnage lors de l'utilisation
du système frontal de rayons en option.
Élément métallique
supplémentaire
Rayon à dispositif
d'espacement
25
FRA
3.3. Branchement sur le secteur
Branchez le PIC sur une prise d'alimentation 220-240 volts, à fusible incorporé de 10-16 A et mise à la
terre. N'utilisez pas de rallonges.
Ne pas brancher le présentoir sur :
une prise murale ou un câble non mis à la terre
tension et fréquence non adaptées
une source d’alimentation qui ne respecte pas les règlements en
matière de sécurité de l’appareil ou la législation en vigueur
concernant les installations électriques
Si le câble de branchement sur secteur n'est pas suffisamment
long, n'utilisez pas de rallonge. Demandez à un électricien agréé
de remplacer le câble par un autre, plus long. Celui-ci doit
figurer dans la liste des pièces de rechange autorisées.
Ne pas brancher le présentoir sur une prise multiple.
Disposez le câble de branchement sur secteur de manière à ce
qu’il soit protégé et qu’il ne pose pas de risque de chute.
3.4. Instructions d’utilisation
Ne pas utiliser le présentoir pour conserver des aliments.
Ne pas stocker, dans cet appareil, de substances explosives tels que les
bouteilles aérosols contenant du gaz propulseur inflammable.
Cet appareil n’est pas destiné à être utilisé par de jeunes enfants ou par
des personnes handicapées sans supervision adéquate par une
personne responsable qui assurera la sécurité d’utilisation de l’appareil.
Il convient de surveiller les enfants pour s’assurer qu’ils ne jouent pas
avec l’appareil.
Ne pas mettre l'appareil en service si les couvercles et protections sont
ouverts.
Conseils pour l'économie d'énergie :
Pour économiser de l'énergie tout en assurant le meilleur rendement du PIC :
Remplissez votre PIC le soir, pour disposer de boissons bien fraiches lorsque vous arrivez le
matin.
Entreposez vos produits de stock dans un endroit frais et/ou à l'abri de la lumière de manière à
ce que, lorsque vous le remplissez, votre PIC ait besoin de nettement moins de temps pour les
refroidir.
Essuyez l'humidité qui se trouve sur les produits que vous placez dans le PIC.
Évitez de garder la porte ouverte de manière prolongée.
26
FRA
4. Commande électronique
4.1. Connaître votre commande ECOBOX / HEC*
Pour des instructions concernant la fonctionnalité de la commande ECOBOX/ HEC Controller et ses
caractéristiques proposées en option, veuillez consulter le lien suivant :
http://www.frigoglass.com/manuals/.
4.2. Faire connaissance avec votre commande Danfoss ERC-112
Pour des instructions concernant la fonctionnalité de la commande Danfoss ERC-112 Controller et ses
caractéristiques proposées en option, veuillez consulter le lien suivant :
http://www.frigoglass.com/manuals/.
5. Système de fermeture automatique de la porte
Afin d’utiliser le dispositif de blocage de porte, veuillez suivre les étapes suivantes.
5.1. Application pour PIC à porte(s) sur gonds
1e étape : Ouvrir la porte à un angle supérieur à 110 degrés
2e étape : Tourner le dispositif de fermeture automatique vers la cabine (comme indiqué sur l'image)
3e étape : Le dispositif de fermeture automatique s'arrête sur la vis qui se situe au-dessus de la grille
4e étape : Ouvrir la porte pour libérer le dispositif de fermeture de la porte depuis le point de
(comme indiqué sur l'image)
fermeture et tourner à la position de départ
5.2. Application pour PIC à porte(s) coulissante(s)
1e étape : Ouvrir la porte de gauche (suivre la même procédure pour la porte de droite)
2e étape : Soulever la porte et tourner le bloquer de porte en direction de la cabine (comme indiqué
sur l’image)
3e étape : Placer le bloqueur de porte verticalement par rapport aux guides de la porte (comme
indiqué à l’image). Le bloqueur de porte sera bloqué sur les parois des guides des portes
et empêchera celles-ci de se refermer.
4e étape : Relâcher le bloqueur de porte du point de blocage et le tourner en position initiale
*
option disponible en fonction du modèle
27
FRA
6. Dispositif de verrouillage*
6.1. Mode d’emploi du dispositif cadenas
1e étape : Ouvrir la porte
2e étape : Tourner la lame du dispositif de verrouillage qui se trouve sur la grille (comme indiqué sur
3e étape : Tourner la lame du dispositif de verrouillage qui se trouve sur la porte (comme indiqué sur
4e étape : Fermer la porte et passer le cadenas dans les trous de la lame pour verrouiller le
2e étape 3e étape
6.2. Mode d’emploi du dispositif de verrouillage à œil
1e étape : Fermer la porte
2e étape : Introduire la clef dans la serrure située sur la grille avant et tourner à 90° (comme indiqué
3e étape : La porte est fermée. La clef peut-être retirée quand elle est tant en position verrouillée
l'image)
l'image)
présentoir
sur l’image)
qu’en position déverrouillée.
Pour les modèles à porte(s) coulissante(s), le verrouillage à œil se situe au milieu du côté du profil en
plastique externe de la porte
*
option disponible en fonction du modèle
28
FRA
Meubles réfrigérants version porte coulissante
6.3. Mode d’emploi du verrouillage de transport du rayon rotatif de Smart-900.
1e étape : Ouvrir la porte
2e étape : Faire glisser la lame du dispositif de verrouillage (située au milieu de la barre supérieure
de la structure de maintien du rayon).
3e étape : Le rayon rotatif est verrouillé.
Verrouillé Déverrouillé
7. Couvercle de nuit*
Afin de mettre en place la protection de nuit, veuillez suivre les étapes suivantes.
1e étape : Forer des trous au sommet et sur les côtés du présentoir et mettre en place les lames et
2e étape : Mettre en place le couvercle de nuit sur la partie avant de l'assemblage et utiliser un
les loquets (comme indiqué sur l'image et décrit dans les instructions d'installation
incluses dans le kit de couvercle de nuit).
cadenas pour le verrouiller, comme indiqué sur l'image (l'assemblage à l'arrière peut être
utilisé pour entreposer le couvercle de nuit lorsque le présentoir est en service).
*
en option
29
FRA
1e étape 2e étape
8. RCCB*
Afin d’accéder au disjoncteur télécommande (RCCB), veuillez suivre les étapes suivantes.
1e étape : Retirer la grille pour accéder au boîtier électrique (identifié par un cercle dans l'image ci-
2e étape : Retirer le couvercle des connecteurs du boîtier électrique
3e étape : Accéder à l'interrupteur RCCB (identifié par un cercle dans l'image ci-dessous et
dessous)
également sur l'autocollant sur le devant du couvercle)
1e étape
2e, 3e étapes
RCCB
9. PRCD*
Le dispositif PRCD est intégré au cordon d’alimentation de l’unité (comme indiqué sur l'image cidessous), à proximité de la prise murale.
*
en option
30
FRA
Le dispositif PRCD est équipé de deux boutons : le petit est le bouton « essai » (test) et permet de
vérifier l’état de fonctionnement du PRCD. Le plus grand bouton a pour fonction de réinitialiser (reset)
le PRCD après un évènement déclencheur.
Lorsque vous débranchez le cordon d’alimentation, il convient d’effectuer un essai pour s’assurer que
le PRCD fonctionne correctement. Veuillez suivre les étapes suivantes :
1e étape : Branchez le cordon.
2e étape : Appuyer sur le (petit) bouton « TEST ». Le (grand) bouton « RESET » doit ressortir.
3e étape : Appuyer à nouveau sur le bouton « RESET ». Ne pas utiliser l’appareil si l’essai échoue !
Bouton TEST
Bouton RESET
10. Soin & Nettoyage
Avant d’effectuer des tâches de nettoyage (à l’intérieur ou à
l’extérieur de l’appareil) ou d’entretien, veillez à débrancher le
PIC ! Retirez la prise d'alimentation et assurez-vous que
l'opérateur est en mesure de vérifier, quel que soit le point
Il est important de nettoyer le présentoir au moins deux fois par an. Afin d'éviter la formation de
moisissure, d'odeurs, etc., les compartiments à produits doivent être nettoyés scrupuleusement.
Nettoyer l’intérieur du PIC à l’aide d’un tissu imbibé d’eau savonneuse douce et les vitres à l'aide d'un
produit de nettoyage de vitres.
d'accès, que le câble n'est pas branché.
Ne jamais utiliser de tuyau à eau ni de jet d’eau haute pression
pour nettoyer le présentoir.
Si le présentoir est installé dans un milieu particulièrement
poussiéreux et/ou gras, il faut que le condensateur soit
régulièrement nettoyé par un technicien agréé.
Maintenez le meuble réfrigéré en position stable durant le
nettoyage, ne passez pas au-dessus et ne vous penchez pas
sur le meuble.
Ne pas nettoyer à l'aide d'objets pointus, de liquides ou de
sprays inflammables ou corrosifs.
31

FRA
11. Dépannage
L’accès au système de refroidissement et aux éléments électriques
(remplacement de led ou compartiment de réfrigération) n’est autorisé
qu’au personnel qualifié.
Les modèles Smart-300 [R290], Smart-450L [R290], Smart-450L
SZ T [R290], Smart-800 [R290], Smart-900L SD [R290], Smart900L HD [R290], Smart-1300 HD [R290] et Smart-1300 SD [R290]
sont équipés de réfrigérant HC. Toutes les tâches d’entretien
sur le système de refroidissement & de recharge en gaz doivent
être effectuées dans un environnement bien aéré ou en plein air.
Ne pas fumer durant les tâches de maintenance.
DÉBRANCHER L’APPAREIL AVANT TOUTE TÂCHE DE
MAINTENANCE OU D’ENTRETIEN. RETIRER LA PRISE
D'ALIMENTATION ET S'ASSURER QUE L'OPÉRATEUR EST EN
MESURE DE VÉRIFIER, QUEL QUE SOIT LE POINT OU IL A ACCÈS,
QUE LE CÂBLE N'EST PAS BRANCHÉ.
Une fois les tâches de maintenance réalisées, s’assurer que les
connexions de mise à la terre sont bien en place, avant de monter
les couvercles. Veillez à utiliser les mêmes éléments de fixation et
les mêmes couvercles.
S'il faut remplacer des éléments électriques, utiliser uniquement les
Si le rendement du PIC n’est pas satisfaisant ou s’il ne fonctionne pas du tout, avant de contacter le
service d'entretien agréé, veuillez vérifier les points suivants :
PROBLÈME RAISONS POSSIBLES SOLUTION
Le PIC ne
fonctionne pas.
32
pièces appropriées reprises dans la liste des pièces de rechange
fournie par le service technique de Frigoglass.
Garder fermée la porte vitrée de l’appareil durant l’entretien. En cas
de remplacement de l'appareil, utilisez le soutien adéquat pour
stabiliser l'appareil.
Une fois les tâches de maintenance réalisées, s’assurer que le
réducteur de tension, qui soutient le cordon d’alimentation, est
monté correctement.
Le câble d'alimentation n'est pas
branché.
La prise de courant n'est pas alimentée. Vérifier le fusible de la prise.
Branchez-le.

FRA
PROBLÈME RAISONS POSSIBLES SOLUTION
Le PIC a récemment été rechargé de
produits chauds. Le rafraîchissement
des produits chauds peut prendre un
certain temps.
Le PIC est rempli de manière telle que
la circulation de l'air à l'intérieur est
Le PIC ne
refroidit pas.
Le PIC fait du
bruit.
Il y a de l'eau au
sol.
Les lumières ne
fonctionnent pas.
Si, après avoir procédé aux vérifications mentionnées ci-dessus, le problème que présente votre PIC
persiste, veuillez contacter le service clientèle de votre fournisseur et donner les informations
suivantes :
Modèle de PIC
Numéro de série du PIC
Brève description du problème / remarques
empêchée.
La porte ne ferme pas correctement.
Il y a une fuite dans le système de
refroidissement.
Bruit métallique intense. Appelez un technicien d'entretien.
Sol incliné ou courbe.
L'orifice de drainage de l'eau condensée
est bouché.
Il y a une fuite du plateau. Appelez un technicien d'entretien.
La lampe ou le transformateur sont
défectueux.
De préférence, remplissez le PIC le
soir, avant la fermeture.
Chargez le PIC selon les critères qui
vous ont été fournis par la société.
Réparez les portes pour en assurer la
fermeture correcte (ce type de
réparation doit être effectué par un
technicien agréé).
Réparez la fuite (ce type de réparation
doit être effectuée par un technicien
agréé).
Mettez le PIC bien droit en réglant les
pieds de l'unité. Si vous placez un
niveau à bulle au sommet du PIC, cela
vous aidera à mettre le meuble à
niveau.
Libérez l'orifice de drainage.
Appelez un technicien d'entretien.
12. Premiers secours
En cas d'accident, il est recommandé de :
ACCIDENT ACTION À ENTREPRENDRE IMMÉDIATEMENT
Inhalation de réfrigérant
Contact avec les yeux
Contact avec la peau
Respirez profondément de l'air frais. Si l'irritation persiste, contactez
un médecin.
Rincez abondamment à l'eau pendant au moins 15 minutes et, ensuite,
consultez un médecin.
Rincez immédiatement à l'eau.
33

FRA
13. Élimination de l’unité
Pour obtenir des informations détaillées sur le recyclage de ce produit, veuillez contacter le service
municipal local, le service local de gestion des déchets ou le fabricant, par le biais de son agent
d’entretien. En veillant à ce que ce produit soit éliminé correctement, vous aiderez à prévenir les
conséquences négatives possibles pour l’environnement et la santé humaine qui pourraient résulter
d’une gestion inappropriée de ce produit à la fin de son cycle de vie.
14. Informations concernant le recyclage
1. Selon les objectifs de la politique en matière d’environnement conformément aux directives de
la Communauté européenne (CE) sur les Déchets d’équipements électriques et électroniques
*
qui vise à préserver, à protéger et à améliorer la qualité de l’environnement, à protéger
(DEEE)
la santé des personnes et à utiliser les ressources naturelles de façon prudente et rationnelle.
En tant qu'utilisateur final, il vous est demandé :
• Si l’appareil ne fonctionne plus, même après le dépannage, veuillez vérifier s'il peut être réparé,
avant de le mettre au rebut. Contactez votre distributeur ou fournisseur pour en savoir plus sur
les possibilités de réparer votre appareil, en cas de doute.
• Si l’appareil a atteint la « fin de son cycle de vie » (FCV), en d’autres termes, s'il n’est plus
réparable ni réutilisable : ne jetez pas l’appareil comme déchet municipal non trié. Arrangezvous plutôt pour qu'il soit collecté séparément par une entreprise de recyclage.
Note : Le rejet d’appareils électriques et électroniques dans des décharges publiques en fouille ou par
incinération est source d’un certain nombre de problèmes environnementaux. Lorsque des matériels
anciens ne sont pas recyclés, des matières premières doivent être traitées pour créer de nouveaux
produits. Ceci représente une perte significative de ressources ; de même, les pertes occasionnées
par ces procédés sont importantes des points de vue de l'énergie, du transport et de l'environnement.
• Pour permettre la récupération et le recyclage de cet appareil, ne le démontez pas et ne cassez
pas de parties de l’appareil avant qu’il soit récupéré. En retirant des parties de l’appareil, vous
en réduirez probablement le taux de recyclabilité.
2. Le symbole de la Fig. 1 ci-dessous, qui se trouve également sur l'étiquette du produit à
l'intérieur de l'appareil, vous informe sur le besoin de procéder à la récupération séparée des
appareils électriques et électroniques, conformément à la directive DEEE des Communautés
européennes (CE).
Image 1 – Poubelle à roulettes Barrée
*
Références
Directive n° 2002/96/CE sur les déchets d’équipements électriques et électroniques (DEEE) des Communautés
européennes
34

FRA
3. Enfin, veuillez respecter les lois sur le recyclage qui sont applicables dans votre commune ou
dans votre pays.
15. Garantie
Cet appareil est couvert par une garantie telle qu'elle a été convenue au moment de la vente.
RÉSERVÉ AU PERSONNEL D’ENTRETIEN AGRÉÉ
INSTRUCTIONS POUR LA MANUTENTION & LE TRANSPORT
Le réfrigérateur doit toujours être transporté :
en position debout (à moins qu’il en soit autrement autorisé par le
fournisseur)
les portes fermées et les dispositifs bloquants des portes
coulissantes en place, le cas échéant
dans son emballage d'origine ou dans un emballage similaire.
La température de l'appareil lors du stockage ou du transport ne doit pas
descendre en dessous de -20 °C ou dépasser 60 °C
Les tâches d'entretien suivantes doivent obligatoirement être effectuées par un agent d'entretien
agréé durant l'entretien préventif du PIC une ou deux fois par, à l’aide d’un aspirateur :
Nettoyage du condensateur
Nettoyage des filtres à poussière (le cas échéant)
Si le PIC se trouve dans un environnement où la poussière s’accumule sur le condensateur, celui-ci
doit être nettoyé plus fréquemment.
En outre, il est recommandé de mener les tâches suivantes durant l’entretien préventif :
1. Système mécanique:
Vérifier que l'équipement est bien positionné et à niveau.
Vérifier que les grilles avant et arrière sont bien en place.
INSTRUCTIONS CONCERNANT LA MAINTENANCE PRÉVENTIVE
AVANT D’EFFECTUER DES TÂCHES DE NETTOYAGE (À L’INTÉRIEUR
OU À L’EXTÉRIEUR DE L’APPAREIL) OU D’ENTRETIEN, VEUILLEZ
DÉBRANCHER LE PIC ! RETIRER LA PRISE D'ALIMENTATION ET
S'ASSURER QUE L'OPÉRATEUR EST EN MESURE DE VÉRIFIER, QUEL
QUE SOIT LE POINT OU IL A ACCÈS, QUE LE CÂBLE N'EST PAS
BRANCHÉ.
ANNEXE A
ANNEXE B
35

FRA
Vérifier le dispositif de fermeture automatique de la porte.
Vérifier que le support et la grille du ventilateur sont bien en place.
Vérifier l'opération du dispositif de drainage et le déboucher, le cas échéant.
2. Système électrique:
Vérifier l'état du câble d'alimentation (remplacer, le cas échéant).
Vérifier le système d'éclairage.
Vérifier les connexions électriques.
Vérifier que le couvercle du coffret de branchement du thermostat ou de la commande
électronique est correctement installé.
Vérifier que les composants susceptibles d'avoir été remplacés lors de la maintenance sont des
pièces originales.
3. Système de réfrigération:
Vérifier que le compresseur fonctionnement correctement.
Vérifier que le relais de démarrage, la surcharge et le condensateur. Le Fournisseur recommande
que les relais de démarrage du compresseur et les surcharges soient remplacés tous les 3 ou 4
ans.
Vérifier le condensateur du moteur du ventilateur et l'évaporateur du moteur du ventilateur.
Vérifier que le thermostat ou la commande électronique et leurs composants fonctionnent
correctement.
Vérifier le rendement du PIC en termes de refroidissement.
Vérifier le circuit de réfrigération à l'aide du détecteur de fuite adéquat, s'il y a quelque
préoccupation ou signe de fuite de réfrigérant.
ANNEXE C
INSTRUCTIONS POUR PRÉVENIR LA CORROSION DE LA CABINE
1. Évitez d'endommager l'appareil suite à l'installation et à l'opération inadéquates, à la maintenance
et au nettoyage inadéquats, ainsi que suite à la manutention et au transport inadéquats. À cet
effet, veuillez consulter les paragraphes 3, 5 et l'Annexe A, ci-dessus.
2. Ne pas effectuer d’adaptations, modifications ou réglages non autorisés, dans la cabine.
36

NLD
1. Voorwoord
Wij danken u voor de aankoop van deze nieuwe Ice Cold Merchandiser (ICM) van Frigoglass. Lees
de instructies hieronder met aandacht, voordat u deze eenheid in gebruik neemt. Een goed
onderhoud van Frigoglass ICM zal u helpen meer te verkopen en meer winst te maken.
2. Technische beschrijving
2.1 Algemeen
Het koelmeubel moet worden aangesloten op een geaard stopcontact met een zekering van 10-16A.
Het stopcontact moet gemakkelijk bereikbaar zijn voor installatie en service.
2.2 Klimaat klasse
Volgens de klimaatspecificaties zijn de modellen Smart-300 [R290], Smart-800 [R290], Smart-900L
SD [R290], Smart-900L HD [R290], Smart-1300 HD [R290] en Smart-1300 SD [R290] Klasse "4",
voornamelijk voor een omgevingstemperatuur van 30°C met een vochtigheidsgraad van 55%; de
modellen Smart-450L SZ T [R290] en Smart-450L [R290] zijn Klasse “5”, voornamelijk voor een
omgevingstemperatuur van 40⁰C met een vochtigheidsgraad van 40%
2.3 Technische specificaties
Nominale spanning / Frequentie 220-240 V / 50 Hz
Ontdooiing Automatisch
2.4 Afmetingen
Model
Breedte
(mm)
Smart-300 [R290] 495 625
Smart-450L [R290] 596 624
Smart-450L SZ T [R290] 596 629
Smart-800 [R290] 785 785
Smart-900L SD [R290] 890 730
Smart-900L HD [R290] 890 732
Smart-1300 HD [R290] 1310 7401 21392 1281 200
Smart-1300 SD [R290] 1310 7383 21392 1212 210
1
Zonder handgreep en afstandhouder van 80 mm
2
Met wielen & scharnierafdekking
3
Zonder afstandhouder van 80mm
Diepte
(mm)
1
1
1
1
3
1
Hoogte
(mm)
1619
2014
Volume
(Lt)
2
258 75
2
427 105
Nettogewicht (kg)
20142 427 112
2
2139
2014
2014
778 145
2
722 159
2
823 152
37

NLD
2.5 Maximaal gewicht per schap
Model Maximaal gewicht per schap (kg)
Smart-300 [R290]
Smart-450L [R290]
Smart-450L SZ T [R290]
Smart-800 [R290]
Smart-900L SD [R290] 61
Smart-900L HD [R290] 70
Smart-1300 HD [R290] 50
Smart-1300 SD [R290] 45
De modellen Smart-300 [R290], Smart-450L [R290], Smart-450L
SZ T [R290], Smart-800 [R290], Smart-900L SD [R290], Smart900L HD [R290], Smart-1300 HD [R290] en Smart-1300 SD [R290]
zijn voorzien van het koelmiddel HC en getest en veilig gebleken
volgens de bijbehorende normen.
Alle handelingen die nodig zijn voor een veilig gebruik en
onderhoud van dit apparaat worden in deze handleiding
beschreven en moeten zorgvuldig gevolgd worden. Dit apparaat
mag uitsluitend door iemand met de geschikte kwalificaties
geïnstalleerd worden.
3. Installatie en bediening
24
28
28
65
38
Als de instructies niet worden opgevolgd kan dit leiden tot een hoog
energieverbruik, slechte prestaties van de eenheid en het vervallen van
de garantie.
Houd alle ventilatie-openingen in de ombouw van het apparaat of in
de inbouwstructuur vrij van obstructies.
Gebruik geen mechanische of andere middelen om het
ontdooiingsproces te versnellen anders dan die aanbevolen door de
fabrikant.
Beschadig het koelcircuit niet.
Gebruik geen elektrische apparaten in de compartimenten voor
levensmiddelenopslag van het apparaat, tenzij van het type dat
aanbevolen is door de fabricant.
Als de netkabel is beschadigd, moet deze worden vervangen door de
fabrikant, de dealers of vergelijkbaar gekwalificeerd personeel, om
een gevaarlijke situatie te voorkomen.

NLD
Plaats het koelmeubel niet:
in rechtstreeks zonlicht of dichtbij warmtebronnen (radiatoren,
kachels en andere verwarmingstoestellen)
buiten, zonder bescherming tegen regen die voorkomt dat water
rechtstreeks op het koelmeubel valt
in weersomstandigheden waarvoor geen certificatie gegeven is
in extreme milieuomstandigheden (d.i. overmatige blootstelling aan
zilte vochtigheid)
op een oppervlak met een hellingshoek van meer dan 5o
3.1 Instructies voor de installatie van de ICM
a. Controleer het koelmeubel na het uitpakken op eventuele transportschade. Neem in geval van
schade contact op met de transporteur.
b. Controleer altijd of uw koelmeubel op een stabiel oppervlak/stabiele vloer geïnstalleerd is en
correct waterpas staat. Er zijn 2 instelbare voetjes voor alle modellen aan de voorkant onder
het frame.
Controlepunten
Stelvoet aan
de voorzijde
Stel deze zo af dat de ICM vlak staat en controleer t dit met een waterpas, als die beschikbaar is. Tref
de benodigde voorzorgsmaatregelen als optillen nodig is tijdens de installatie. Houd onbevoegden op
afstand tot het koelmeubel volledig geïnstalleerd is.
c. Het koelmeubelt moet na het transport minstens 1 uur rechtop staan voordat hij opgestart mag
worden. Op die manier krijgt de olie de tijd om naar de compressor terug te stromen na het
vervoer en de installatie.
d. Laat aan de achterkant een ruimte van minimaal 100 mm vrij. Draai de afstandhouder op de
achterkant hiervoor om, zoals hieronder getoond wordt.
e. Plaats niets bovenop het koelmeubel.
Draai de
afstandhouder
39

NLD
Opmerking: Nieuwe opstelling van de ICM binnen het verkooppunt
a. Leeg de ICM en trek de stekker uit het stopcontact.
b. Trek de verstelpoten volledig uit.
c. Verplaats de eenheid naar de gewenste locatie met behulp van een ander persoon.
3.2 Instructies voor de installatie van het schap
Om het schap af te stellen, moet het eerst leeg gemaakt worden, til het schap op en maak de
schapklemmen (4) los. Zet de klemmen in de gewenste stand en plaats het schap terug. Controleer of
de horizontale metalen staven aan de onderkant van het schap zich tussen de klemmen op de
voorkant en de achterkant van het schap bevinden, zoals hieronder getoond wordt.
Opmerking: De modellen Smart-450L, 500 & 800 zijn ieder uitgerust met 4 schappen met
afstandhouders (op de achterkant) en één schap zonder afstandhouder.
Het schap zonder afstandhouder moet in de bovenste positie worden aangebracht om in het extra
metalen onderdeel voor de luchtcirculatie te passen, zoals onderstaande afbeeldingen tonen.
Schap zonder
afstandhouder
Opmerking: Als het optionele systeem van frontaal zichtbare schappen gebruikt wordt, volg dan de
installatie-instructies op die deel uitmaken van de kit met schappen.
3.3 Aansluiting op het elektriciteitsnet
Sluit de ICM aan op het elektriciteitsnet van 220-240 Volt via een geaard stopcontact dat beveiligd is
met een zekering van 10-16 A. Gebruik geen verlengsnoeren.
Sluit het koelmeubel niet aan op:
een niet geaard stopcontact of een niet geaarde stroomleiding
onjuiste voedingsspanning en -frequentie
40
een stroomvoorziening die niet voldoet aan de veiligheidsregels
Extra metalen
onderdeel
Schap met
afstandhouder
van het apparaat of aan de van kracht zijnde wetgeving op het
gebied van elektrische installaties

NLD
Als het geleverde stroomsnoer niet lang genoeg is, gebruik dan
geen verlengsnoer. Vraag een erkende elektricien om het snoer
door een langer snoer te vervangen, maar alleen als een
dergelijk snoer beschreven wordt in de lijst met geautoriseerde
reserveonderdelen.
3.4 Instructies voor de bediening
Tips voor energiebesparing:
Om energie te besparen en voor betere prestaties van de ICM:
Vul de ICM 's nachts zodat dedranken koel zijn wanneer u 's morgens aankomt.
Sla uw reservevoorraad op in een koele en/of donkere ruimte, zodat de ICM veel minder tijd
nodig heeft om deze af te koelen.
Veeg de producten droog voordat u ze in de ICM plaatst.
Vermijd de deur lange tijd open te houden.
Sluit het koelmeubel niet aan op een stekkerdoos.
Leg het netsnoer zodanig dat het tegen schade beschermd
wordt en geen struikelgevaar oplevert.
Gebruik het koelmeubel niet voor het bewaren van levensmiddelen.
Bewaar geen explosieve stoffen zoals spuitbussen met een brandbaar
drijfgas in dit apparat.
Dit apparaat is niet bedoeld om te worden gebruikt door jonge kinderen
of door personen met een lichamelijke of verstandelijke beperking, tenzij
onder passend toezicht van iemand die verantwoordelijk voor hen is en
die de veilige werking van het apparaat voor hen zal garanderen. Jonge
kinderen moeten onder toezicht staan om er zeker van te zijn dat ze niet
met het apparaat spelen.
Gebruik het apparaat niet met geopende afdekplaten en
beschermpanelen.
4. Elektronische regelaar
4.1 Ken uw ECOBOX / HEC regelaar*
Bezoek voor instructies over de werking van de ECOBOX/ HEC Controller en de bijbehorende
optionele kenmerken de volgende website-link: http://www.frigoglass.com/manuals/.
*
optioneel kenmerk, afhankelijk van het model
41

NLD
4.2 Ken uw Danfoss ERC-112 Controller
Bezoek voor instructies over de werking van de Danfoss ERC-112 Controller en de bijbehorende
optionele kenmerken de volgende website-link: http://www.frigoglass.com/manuals/.
5. Deurblokkeersysteem*
Volg de volgende stappen om het deurblokkeersysteem te gebruiken.
5.1 ICM-toepassingen met een scharnierende deur
Stap 1: Open de deur met een hoek van meer dan 110 graden
Stap 2: Draai de deurblokkering naar de kast toe (zoals de afbeelding toont)
Stap 3: De deurblokkering stopt op de schroef die zich op het rooster bevindt (zoals de afbeelding
Stap 4: Open de deur om de deurblokkering vrij te geven uit het stoppunt en draai de blokkering
toont)
naar de oorspronkelijke stand
5.2 ICM-toepassingen met een schuifdeur
Stap 1: Open de linkerdeur (zelfde procedure als voor de rechterdeur)
Stap 2: Til de deurblokkering op en draai deze naar de kast toe (zoals weergegeven in de
afbeelding)
Stap 3: Plaats de deurblokkering verticaal op de deurgeleiding (zoals weergegeven in de
afbeelding). De deurblokkering wordt geblokkeerd door de wanden van de deurgeleiding en
voorkomen dat de deur sluit.
Stap 4: Ontgrendel de deurblokkering vanaf het stoppunt en draai de blokkering naar de
oorspronkelijke stand
*
optioneel kenmerk
42

NLD
6. Vergrendelsysteem
6.1 Instructies voor het gebruik van het hangslot
Stap 1: Open de deur
Stap 2: Draai aan de hendel van het vergrendelsysteem, die zich op het rooster bevindt (zoals de
Stap 3: Draai aan de hendel van het vergrendelsysteem die zich op de deur bevindt (zoals de
Stap 4: Sluit de deur en voer het hangslot door de gaten van de hendels om het koelmeubel te
Stap 2 Stap 3
6.2 Instructies voor het gebruik van het oogslot
Stap 1: Sluit de deur
Stap 2: Plaats de sleutel op de roosters aan de voorkant en draai hem 90° (zoals weergegeven in
Stap 3: De deur is vergrendeld. U kunt de sleutel er zowel in de vergrendelde als ontgrendelde
afbeelding toont)
afbeelding toont)
vergrendelen
de afbeelding)
stand uithalen.
Bij koelapparaten met schuifdeuren bevindt het oogslot zich in het midden van de plastic profielzijde
van de externe deur
43

NLD
Koelapparaten met een schuifdeur
6.3 Instructies voor het gebruik van de transportvergrendeling van de rotoshelf voor de
Smart-900.
Stap 1: Open de deur
Stap 2: Verschuif het blad van het vergrendelsysteem (gesitueerd op het midden van de bovenste
balk van de draagstructuur van het schap).
Stap 3: Rotoshelf is vergrendeld.
Vergrendeld Ontgrendeld
7. Nachtafdekking*
Volg de onderstaande stappen om de nachtafdekking te plaatsen.
Stap 1: Boor gaten op de bovenkant en de zijkanten van de koeler en breng de steunbladen en
Stap 2: Bevestig de nachtafdekking op de voorkant l en breng een hangslot aan om het koelmeubel
grendels aan (zoals de afbeelding toont en beschreven wordt in de installatie-instructies die
bij de kit van de nachtafdekking gevoegd zijn).
te vergrendelen, zoals de afbeelding toont (het montagedeel van de achterkant kan worden
gebruikt om de nachtafdekking op te bergen wanneer het koelmeubel in gebruik is).
*
optioneel kenmerk
44

NLD
Stap 1 Stap 2
8. Aardlekschakelaar*
Volg de onderstaande stappen om toegang te krijgen tot de aardlekschakelaar.
Stap 1: Verwijder het rooster om toegang te krijgen tot het elektriciteitskastje (dat op de
Stap 2: Verwijder de afdekking van de connectoren van het elektriciteitskastje
Stap 3: Toegang tot de aardlekschakelaar (die op de respectievelijke afbeelding hieronder in de
respectievelijke afbeelding in de cirkel getoond wordt)
cirkel getoond wordt en ook op de sticker op de voorkant van de afdekking staat)
Stap 1
Stap 2, 3
45

NLD
9. PRCD*
De PRCD-voorziening is geïntegreerd in de voedingskabel van de eenheid (zoals onderstaande
afbeelding toont), dichtbij de netstekker.
De PRCD-voorziening heeft twee knoppen. De kleinste is de testknop waarmee de werking van de
PRCD kan worden gecontroleerd. De grote knop is de resetknop. Deze wordt gebruikt om de PRCD
weer in te stellen nadat deze is afgegaan.
Wanneer het netsnoer losgemaakt wordt, moet een test uitgevoerd worden om de correcte werking
van de PRCD te controleren. Volg onderstaande stappen:
Stap 1: Sluit het netsnoer aan.
Stap 2: Druk op de (kleine) “TEST”-knop. De (grote) “RESET”-knop moet verschijnen.
Stap 3: Druk opnieuw op de “RESET”-knop. Gebruik het apparaat niet als het mislukt!
TEST-knop
RESET-knop
10. Verzorging en reiniging
Alvorens de ICM te reinigen (binnenkant of buitenkant van het
apparaat) moet de stekker uit het stopcontact getrokken
worden! Trek de stekker uit het stopcontact en zorg ervoor dat
de operator vanuit de punten waartoe hij zich toegang verschaft
Het is belangrijk het koelmeubel minstens twee keer per jaar te reinigen. Om te voorkomen dat
schimmels, onaangename geuren en dergelijke zich ontwikkelen, moeten ook de
productcompartimenten grondig gereinigd worden. De binnenkant van de ICM moet gereinigd worden
met een doek met mild zeepsop en het glazen oppervlak moet gereinigd worden met een glasreiniger.
*
optioneel kenmerk
46
kan zien dat het snoer uit het stopcontact getrokken is.
Gebruik voor de reiniging van het koelmeubel nooit een
waterslang of een hogedrukreiniger.

NLD
Indien het koelmeubel in een zeer stoffige en/of vettige
omgeving geplaatst is, is het verplicht de condensor regelmatig
te laten reinigen door een bevoegd technicus.
Houd het koelmeubel in een stabiele positie tijdens de reiniging,
ga niet op het koelmeubel staan en leun er niet tegen.
Gebruik voor het reinigen geen scherpe voorwerpen, brandbare
of corrosieve vloeistoffen of sprays.
11. Problemen oplossen
De toegang tot het koelsysteem en de elektrische onderdelen (voor de
vervanging van de verlichting of het koeldek) is alleen voorbehouden aan
geautoriseerd personeel.
De modellen Smart-300 [R290], Smart-450L [R290], Smart-450L
SZ T [R290], Smart-800 [R290], Smart-900L SD [R290], Smart900L HD [R290], Smart-1300 HD [R290] en Smart-1300 SD [R290]
zijn voorzien van het koelmiddel HC. Alle servicewerkzaamheden op het koelmechanisme en voor het vullen met
gas moeten worden uitgevoerd in een goed geventileerde
ruimte of in de open lucht. Niet roken tijdens het onderhoud.
TREK DE STEKKER VAN HET KOELMEUBEL UIT HET
STOPCONTACT ALVORENS ONDERHOUDS- OF
SERVICEWERKZAAMHEDEN UIT TE VOEREN. TREK DE STEKKER
UIT HET STOPCONTACT EN CONTROLEER OF DE OPERATOR
VANUIT IEDERE POSITIE DIE HIJ KAN BEREIKEN KAN ZIEN DAT DE
STEKKER UIT HET STOPCONTACT GETROKKEN IS.
Controleer na de onderhoudswerkzaamheden of de
aardverbindingen weer in positie gebracht zijn alvorens de
afdekkingen aan te brengen. Controleer of u dezelfde
bevestigingselementen en afdekkingen gebruikt.
Als elektrische componenten vervangen moeten worden, gebruik
Als de ICM niet correct werkt of defect is, controleer dan de volgende punten alvorens contact op te
nemen met de erkende klantendienst:
dan uitsluitend geschikte componenten uit de lijst van
reserveonderdelen die door de technische dienst van Frigoglass
wordt geleverd.
Houd de glazen deur van het koelmeubel gesloten tijdens het
onderhoud. Als de compressor vervangen moet worden, heeft u
misschien een geschikte ondersteuning nodig om de koeler te
stabiliseren.
Controleer na het onderhoud of de kabelgeleider die het netsnoer
ondersteunt correct gemonteerd is.
47

NLD
DEFECT MOGELIJKE OORZAKEN INGREEP
De ICM werkt
niet.
De ICM koelt niet.
De ICM maakt
lawaai.
Er is water op de
vloer.
De verlichting
werkt niet.
Als het probleem met uw ICM blijft aanhouden, na al deze controles te hebben uitgevoerd, neem dan
contact op met de klantendienst van uw leverancier en verstrek daarbij de volgende informatie:
Type ICM
Serienummer van de ICM
Korte beschrijving van het probleem / vaststelling
Netsnoer niet aangesloten. Steek de stekker in het stopcontact.
Het stopcontact staat niet onder
spanning.
De ICM is net met warme producten
gevuld. Het duurt even om warme
producten te koelen.
De ICM is zodanig geladen dat de
luchtcirculatie binnenin geblokkeerd is.
De deur sluit niet goed.
Lek in het koelsysteem.
Sterk metaalachtig geluid. Bel een servicetechnicus.
De vloer helt of is niet vlak.
Het afvoergat voor condenswater is
verstopt.
Er is een lek in de bak. Bel een servicetechnicus.
De lampen of de transformator zijn
defect
Controleer de zekering van het
stopcontact.
Vul de ICM bij voorkeur vóór de
avondsluiting.
Vul de ICM volgens de regels die u
door het bedrijf verstrekt zijn.
Repareer de deuren zodat ze goed
sluiten (dit soort reparaties moet door
een erkend technicus worden
uitgevoerd).
Repareer het lek (dit soort reparaties
moet door een erkend technicus
worden uitgevoerd).
Zet de ICM op juiste wijze waterpas
door de voetjes af te stellen. Door een
waterpas bovenop de ICM te leggen,
kunt u hem gemakkelijker perfect
horizontaal zetten.
Maak het afvoergat vrij.
Bel een servicetechnicus.
12. Eerste hulp
Aanbevelingen in geval van ongeval:
ONGEVAL ONMIDDELIJKE INGREEP
Inademen van
koelmiddel
Contact met de ogen
Contact met de huid
48
Adem verschillende keren diep zuivere lucht in. Als de irritatie blijft
aanhouden, neem dan contact op met een arts.
Spoel de ogen grondig met water gedurende minstens 15 minuten en
raadpleeg een arts.
Spoel de huid onmiddellijk af met water.

NLD
13. De eenheid afdanken
Neem voor gedetailleerde inlichtingen over het recyclen van dit product contact op met de
gemeentelijke instanties, de dienst voor afvalverwerking of de fabrikant, via diens klantendienst. Door
ervoor te zorgen dat dit product correct wordt afgedankt, helpt u mogelijke negatieve gevolgen voor de
gezondheid van mens en milieu te voorkomen, die door een onjuiste afvalverwerking van dit product
veroorzaakt kunnen worden.
14. Informatie over recycling
1. Gebaseerd op de milieubeleiddoelstellingen volgens de richtlijnen van de Europese
Gemeenschap (EG) voor Afgedankte Elektrische en Elektronische Apparatuur (AEEA)
gericht zijn op de bescherming en verbetering van de kwaliteit van het milieu, de bescherming
van de volksgezondheid en een behoedzaam en rationeel gebruik van natuurlijke hulpbronnen.
Als eindgebruiker wordt u vriendelijk verzocht het volgende te doen:
• Als het apparaat niet meer werkt, zelfs nadat de ingrepen voor het verhelpen van de problemen
uitgevoerd zijn, controleer dan eerst of een reparatie van het apparaat mogelijk is, voordat u het
afdankt. Neem contact op met de groothandelaar of de leverancier voor informatie over
mogelijke reparaties van uw apparaat, als u twijfelt.
• Als het apparaat het “einde van zijn levenscyclus” bereikt heeft, dus niet meer repareerbaar of
herbruikbaar is, dank het apparaat dan niet af als ongesorteerde huishoudelijke afval.
Controleer daarentegen of het gescheiden ingezameld wordt door een recyclingbedrijf.
Opmerking: Het weggooien van elektronische en elektrische apparaten op stortplaatsen of via
verbranding veroorzaakt een aantal milieuproblemen. Wanneer verouderde materialen niet worden
gerecycled, moeten grondstoffen worden gebruikt om nieuwe producten te vervaardigen. Dat betekent
een aanzienlijk verlies van hulpbronnen, aangezien bij deze processen veel energie verbruikt wordt,
transport nodig is en milieuhinder ontstaat.
• Om bij te dragen aan het proces van terugwinning en recycling van dit apparaat dient u het
apparaat niet te ontmantelen of onderdelen eruit te halen voordat het wordt opgehaald. Door
delen van het apparaat te verwijderen vermindert u mogelijk de mate waarin het gerecycled kan
worden.
2. Het symbool dat fig 1 hieronder toont, dat ook op het productetiket binnenin het apparaat te
zien is, geeft aan dat het nodig is elektrische en elektronische uitrustingen apart in te zamelen
volgens de AEEA-richtlijn van de Europese Gemeenschap (EG).
*
, die
Figuur 1 - Doorgekruiste vuilnisbak
3. Neem tot slot de wetgeving in acht die in uw plaats of land van kracht is.
*
Verwijzingen
Afgedankte Elektrische en Elektronische Apparatuur (AEEA) Richtlijn van de Europese Gemeenschap (EG) nr.
2002/96/EG
49

NLD
15. Garantie
Het apparaat wordt gedekt door een garantie die bij de verkoop overeengekomen is.
ALLEEN VOOR ERKEND SERVICEPERSONEEL
RICHTLIJNEN VOOR LADEN, LOSSEN EN VERVOER
Het koelmeubel moet altijd als volgt worden vervoerd:
rechtop staand (tenzij de leverancier een andere autorisatie hiervoor
verstrekt heeft)
met gesloten deuren en met stoppers voor modellen met
schuifdeuren
in de originele verpakking of een gelijkaardige verpakking.
De temperatuur van de koeler mag tijdens opslag of transport niet onder
de -20oC of boven de + 60oC komen
Het is verplicht dat een erkende servicedienst een of twee keer per jaar met behulp van een stofzuiger
de volgende handelingen uitvoert in het kader van preventief onderhoud van de ICM:
Reinigen van de condensor
Reinigen van de stoffilters (indien van toepassing).
Als de ICM in een omgeving staat waar stof op de condensor gevormd wordt, dan moet de condensor
vaker gereinigd worden.
Bovendien is het raadzaam om tijdens het preventief onderhoud de volgende handelingen uit te
voeren:
1. Mechanisch systeem:
Controleer of de uitrusting correct opgesteld is en horizontaal staat.
Controleer of de roosters op voor- en achterkant correct bevestigd zijn.
Controleer het zelfsluitende systeem van de deur.
Controleer of de steun van de ventilator en het rooster van de ventilator correct bevestigd zijn.
50
RICHTLIJNEN VOOR PREVENTIEF ONDERHOUD
ALVORENS DE ICM TE REINIGEN (BINNEN- OF BUITENKANT) MOET DE
STEKKER UIT HET STOPCONTACT GETROKKEN WORDEN! TREK DE
STEKKER UIT HET STOPCONTACT EN CONTROLEER OF DE
OPERATOR VANUIT IEDERE POSITIE DIE HIJ KAN BEREIKEN KAN ZIEN
DAT DE STEKKER UIT HET STOPCONTACT GETROKKEN IS.
BIJLAGE A
BIJLAGE B

NLD
Controleer het afvoersysteem en ontstop het indien nodig.
2. Elektrisch systeem:
Controleer het netsnoer (vervang het indien nodig).
Controleer het verlichtingssysteem.
Controleer de elektrische verbindingen.
Controleer of de afdekking van het elektriciteitskastje van de thermostaat of de elektronische
regelaar correct geïnstalleerd is.
Controleer of de componenten die tijdens het onderhoud mogelijk ervangen zijn originele
componenten zijn.
3. Koelsysteem:
Controleer of de compressor correct werkt.
Controleer het startrelais, de overbelastingsbeveiliging en de condensator. De leverancier beveelt
aan de overbelastingsbeveiligingen en de startrelais van de compressor iedere 3-4 jaar te
vervangen.
Controleer de condensor en de verdamper van de ventilatormotor.
Controleer of de thermostaat of de elektronische regelaar en de componenten ervan correct
werken.
Controleer de koelprestaties van de ICM.
Controleer het koelcircuit met behulp van een geschikte lekdetector als vermoed wordt dat er een
koelmiddellek is.
BIJLAGE C
RICHTLIJNEN OM CORROSIE VAN DE KAST TE VERMIJDEN
1. Vermijd schade die te wijten is aan een onjuiste installatie, een onjuiste werking, , onjuiste
onderhouds- en reinigingswerkzaamheden, alsook onjuist laden, lossen en vervoer, zoals
beschreven is in paragrafen 3, 5 en Bijlage A hierboven.
2. Voer geen ongeautoriseerde aanpassingen, wijzigingen of instellingen op de kast uit.
51

SPA
1. Prefacio
Gracias por adquirir su nuevo expositor refrigerador (ICM, por su sigla en inglés) de Frigoglass. Antes
de utilizar su unidad, lea detenidamente las instrucciones a continuación. Un ICM Frigoglass con
buen mantenimiento le ayudará a aumentar sus ventas y ganancias.
2. Descripción técnica
2.1. Generalidades
El expositor debe estar enchufado a un conector de salida a tierra con un fusible con un valor nominal
de 10-16 A. Debe ser posible acceder fácilmente a la salida a los efectos de instalación y reparaciones.
2.2. Condición ambiental
Según las especificaciones ambientales, los modelos Smart-300 [R290], Smart-800 [R290], Smart900L SD [R290], Smart-900L HD [R290], Smart-1300 HD [R290] y Smart-1300 SD [R290] son de
clase “4”, lo que significa 30 °C de temperatura ambiente y un 55 % de humedad; los modelos Smart450L SZ T [R290] y Smart-450L [R290] son de clase "5", lo que significa 40 °C de temperatura
ambiente y un 40 % de humedad.
2.3. Especificaciones técnicas
Voltaje nominal / Frecuencia 220-240 V / 50 Hz
Descongelamiento Automático
2.4. Dimensiones físicas
Modelo
Anchura
(mm)
Smart-300 [R290] 495 625
Smart-450L [R290] 596 624
Smart-450L SZ T [R290] 596 629
Smart-800 [R290] 785 785
Smart-900L SD [R290] 890 730
Smart-900L HD [R290] 890 732
Smart-1300 HD [R290] 1310 7401 21392 1281 200
Smart-1300 SD [R290] 1310 7383 21392 1212 210
1
Excluyendo la manija y el espaciador trasero de 80 mm
2
Incluyendo rodillos y cubierta de la bisagra
3
Excluyendo el espaciador de 80 mm
52
Profundidad
(mm)
1
1
1
1
3
1
Altura
(mm)
1619
2014
Volumen
(Lt)
2
258 75
2
427 105
Peso neto (kg)
20142 427 112
2
2139
2014
2014
778 145
2
722 159
2
823 152

SPA
2.5. Peso máximo por estante
Modelo Peso máximo por estante (kg)
Smart-300 [R290]
Smart-450L [R290]
Smart-450L SZ T [R290]
Smart-800 [R290]
Smart-900L SD [R290] 61
Smart-900L HD [R290] 70
Smart-1300 HD [R290] 50
Smart-1300 SD [R290] 45
Los modelos Smart-300 [R290], Smart-450L [R290], Smart-450L
SZ T [R290], Smart-800 [R290], Smart-900L SD [R290], Smart900L HD [R290], Smart-1300 HD [R290] y Smart-1300 SD [R290]
están equipados con refrigerante HC y han sido probados y
sometidos a ensayos de seguridad de acuerdo con los
estándares pertinentes.
Todas las acciones necesarias para el uso y el mantenimiento
seguros de este aparato se describen en este manual y han de
observarse con atención. Este aparato debe instalarse
únicamente por una persona cualificada de manera apropiada.
24
28
28
65
3. Instalación y funcionamiento
Si no se siguen las instrucciones se podría provocar un alto consumo de
energía y un bajo rendimiento de la unidad y anular la garantía.
Mantenga libre de obstrucciones todas las aberturas de ventilación
en el gabinete del aparato o en la estructura de incorporación.
No utilice dispositivos mecánicos ni otros medios para acelerar el
proceso de descongelamiento distintos de los recomendados por el
fabricante.
No dañe el circuito del refrigerante.
No use electrodomésticos dentro de los compartimentos de
almacenamiento de alimentos del aparato, a menos que sean del tipo
recomendado por el fabricante.
Si el cable de alimentación está dañado, debe sustituirse por el que
recomiende el fabricante, su agente de servicio técnico o una
persona igualmente calificada para evitar peligros.
53

SPA
No instale el expositor:
en la luz solar directa o cerca de fuentes de calor (radiadores, estufas
y otros equipos de calefacción)
al aire libre, sin protección adecuada contra la lluvia, que evita que el
agua caiga directamente sobre el expositor
en condiciones atmosféricas para las que no está certificado
en condiciones medioambientales extremas (es decir, exposición a la
humedad salina)
en un ángulo superior a 5o
3.1. Instrucciones de colocación del ICM
a. Después del desembalaje, revise el gabinete para ver si se produjo algún daño durante el
transporte. En caso de daño, póngase en contacto con la compañía de transporte.
b. Asegúrese siempre de que su expositor está instalado en una superficie estable/piso y está
nivelado adecuadamente. Hay 2 patas ajustables para todos los modelos en la parte delantera
bajo el chasis.
Puntos de
control
Patas de nivel en la
parte delantera
Ajústelas hasta los niveles del ICM y revíselas usando una burbuja de aire, en caso de estar
disponible. Tome las precauciones necesarias si es necesario levantar el refrigerador durante la
instalación. Mantenga a las personas no autorizadas lejos del mismo hasta que la instalación haya
finalizado.
c. El expositor debe estar en posición vertical durante al menos 1 hora antes hacerlo funcionar
después del transporte. Esto le da al aceite tiempo para que vuelva al compresor después del
transporte e instalación.
d. Permita una separación mínima de 100 mm en la parte posterior. Para que sea posible, gire el
espaciador trasero tal y como se muestra a continuación.
e. No coloque nada en la parte superior del refrigerador.
54

SPA
p
Gire el
espaciador
trasero.
Nota: Reubicación del ICM dentro del punto de venta
a. Vacíe el ICM y desenchufe del suministro principal.
b. Extraiga completamente la pata niveladora.
c. Mueva la unidad en la posición deseada con la ayuda de otra persona.
3.2. Instrucciones de instalación del estante
Para ajustar el estante, descárguelo, levántelo y suelte sus ganchos (4). Colóquelos en la posición
deseada y vuelva a colocar el estante. Asegúrese de que las barras metálicas horizontales en la parte
inferior del estante estén entre los ganchos frontales y posteriores del estante, tal y como se muestra
a continuación.
Nota: En concreto, cada uno de los modelos Smart-450L, 500 & 800 están equipados con 4 estantes
con espaciadores (en la parte posterior) y un estante sin espaciador.
El estante sin espaciador tiene que colocarse en el nivel superior con el fin de que encaje en la pieza
metálica adicional para la circulación de aire, tal y como se muestra en las imágenes siguientes.
Estante sin
aciador
es
Nota: Cuando utilice el sistema de estanterías de visibilidad delantera opcional, siga las instrucciones
de instalación incluidas en el kit de estanterías.
Pieza metálica
adicional
Estante con
espaciador
55

SPA
3.3. Conexión al suministro principal
Conecte el ICM a una corriente eléctrica de 220-240 voltios en una toma de corriente protegida por
fusibles de 10-16A y conectada a tierra. No use cables de extensión.
No conecte el expositor a:
una toma de corriente de pared o línea de corriente sin conexión
a tierra
una frecuencia y tensión de alimentación inadecuadas
una fuente de alimentación que no se ajusta a la normativa de
seguridad del aparato o a la legislación vigente sobre
instalaciones eléctricas
Si el cable de alimentación proporcionado no tiene el largo
adecuado, no use un cable de extensión. Pida a un electricista
autorizado que reemplace el cable con uno más largo, si este se
describe únicamente en la lista de piezas de repuesto
autorizadas.
No enchufe el refrigerador a una banda de enchufes múltiples.
Pase el cable de alimentación de tal manera que esté protegido
contra daños y no entrañe un riesgo de tropezar.
3.4. Instrucciones de funcionamiento
No utilice el comerciante para almacenar alimentos.
No almacene sustancias explosivas como aerosoles con propulsante
inflamable en este aparato.
Este aparato no está diseñado para que lo utilicen niños pequeños,
discapacitados ni personas enfermas a menos que una persona
responsable los supervise para garantizar un empleo seguro. Los niños
pequeños deberán vigilarse para garantizar que no juegan con el
aparato.
No ponga el aparato en funcionamiento con las hojas de cobertura o las
rejillas de protección abiertas.
Consejos para ahorro de energía:
Para ahorro de energía y un mejor rendimiento del ICM:
Cargue su ICM en horas de la noche, de manera que pueda tener bebidas frías una vez que se
levante en la mañana.
Guarde su stock de reserva en un lugar frío y oscuro para que cuando recargue el ICM necesite
mucho menos tiempo para refrigerarlo.
Limpie la humedad de los productos antes de colocarlos en el ICM.
Evite abrir la puerta durante períodos prolongados.
56

SPA
4. Controlador eléctrico
4.1. Conozca su controlador ECOBOX / HEC*
Para obtener instrucciones sobre la funcionalidad del ECOBOX/controlador HEC y sus características
opcionales correspondientes, visite el siguiente enlace a la página web:
http://www.frigoglass.com/manuals/.
4.2. Conozca su controlador Danfoss ERC-112
Para obtener instrucciones sobre la funcionalidad del controlador Danfoss ERC-112 y sus
características opcionales correspondientes, visite el siguiente enlace a la página web:
http://www.frigoglass.com/manuals/.
5. Sistema de bloqueo de la puerta
Para utilizar el sistema de bloqueo de la puerta, siga los pasos a continuación.
5.1. Aplicación con ICM de puertas batientes
Paso 1: Abra la puerta con un ángulo mayor de 110 grados
Paso 2: Gire el bloqueador de la puerta hacia la cabina (como se muestra en la imagen)
Paso 3: El bloqueador de la puerta se detiene en el tornillo situado sobre la rejilla (como se muestra
Paso 4: Abra la puerta para liberar el bloqueador de la puerta desde el punto de parada y gire hasta
en la imagen)
la posición inicial
5.2. Aplicación con ICM de puertas correderas
Paso 1: Abra la puerta izquierda (mismo procedimiento también para la puerta derecha)
Paso 2: Eleve y gire el bloqueador de la puerta hacia la cabina (como se muestra en la imagen)
Paso 3: Coloque el bloqueador de la puerta en posición vertical a las guías de la puerta (como se
muestra en la imagen). El bloqueador de la puerta se bloqueará en las paredes de las guías
de la puerta e impedirá que se cierre la puerta.
Paso 4: Libere el bloqueador de la puerta desde el punto de parada y gire hasta la posición inicial.
*
característica opcional, en función del modelo
57

SPA
6. Sistema de cierre*
6.1. Instrucciones para utilizar el dispositivo del candado
Paso 1: Abra la puerta
Paso 2: Gire la cuchilla del sistema de cierre colocada en la rejilla (como se muestra en la imagen)
Paso 3: Gire la cuchilla del sistema de cierre colocada en la puerta (como se muestra en la imagen)
Paso 4: Cierre la puerta y coloque el candado a través de los orificios de la cuchilla para asegurar el
Paso 2 Paso 3
6.2. Instrucciones para utilizar el cierre de ojo
Paso 1: Cierre la puerta
Paso 2: Gire la llave hacia el cierre de las rejillas delanteras y gire 90° (como se muestra en la
Paso 3: La puerta está cerrada. Retire la llave tanto en la posición cerrada como en la no cerrada.
refrigerador
imagen)
Para los refrigeradores de puertas correderas, el cierre de ojo está situado en el centro del lado del
perfil de plástico de la puerta exterior
*
característica opcional
58

SPA
Refrigeradores de versión de puertas correderas
6.3. Instrucciones para usar el bloqueo de transporte del rotoestante para el Smart-900.
Paso 1: Abra la puerta:
Paso 2: Deslice la cuchilla del sistema de cierre (situada en el centro de la barra superior de la
estructura de sujeción de estantes).
Paso 3: El rotoestante está bloqueado.
Bloqueado Desbloqueado
7. Cubierta nocturna*
Para colocar la cubierta nocturna, siga los pasos a continuación.
Paso 1: Perfore orificios en la parte superior y los lados del refrigerador y aplique las cuchillas de
Paso 2: Fije la cubierta nocturna en el lado delantero del conjunto y utilice el candado para
soporte y los pestillos (como se muestra en la imagen y se describe en las instrucciones de
instalación que se incluyen en el kit de cubierta nocturna).
asegurarla, como se muestra en la imagen (el conjunto del lado trasero puede utilizarse
para almacenar la cubierta nocturna cuando el refrigerador esté en uso).
*
característica opcional
59

SPA
Paso 1 Paso 2
8. RCCB*
Para acceder al RCCB, siga los pasos a continuación.
Paso 1: Retire la rejilla para obtener acceso al cuadro eléctrico (que está marcado en el círculo en la
Paso 2: Retire la cubierta de los conectores del cuadro eléctrico.
Paso 3: Acceda al interruptor RCCB (que está marcado en el círculo en la imagen correspondiente
imagen correspondiente más abajo).
más abajo y también indicada en la pegatina de la parte delantera de la cubierta).
RCCB
Paso 1
Pasos 2,3
9. PRCD*
El dispositivo PRCD está integrado en el cable de alimentación de la unidad (como se muestra en la
imagen), cerca del enchufe de pared.
*
característica opcional
60

SPA
El dispositivo PRCD dispone de dos botones; el pequeño es el botón "prueba" y se utiliza para
comprobar el estado operativo del PRCD. El botón más grande es el de "reajuste" y se utiliza para
rearmar el PRCD después de un acontecimiento desencadenante.
Al desconectar el cable de alimentación se debe realizar una prueba para asegurar el correcto
funcionamiento del PRCD. Siga los pasos siguientes:
Paso 1: Enchúfelo a la corriente.
Paso 2: Pulse el (pequeño) botón de "PRUEBA". Deberá aparecer el botón (grande) de
"REAJUSTE".
Paso 3: Pulse de nuevo el botón de "REAJUSTE". ¡No utilice el dispositivo si falla!
Botón de PRUEBA
Botón de REAJUSTE
10. Cuidado y limpieza
¡Antes de efectuar algún procedimiento de limpieza (dentro o
fuera del aparato), desenchufe el ICM! Retire el enchufe y
asegúrese de que el operador puede comprobar desde
cualquiera de los puntos a los que tenga acceso que el cable
Es importante que limpie el expositor como mínimo dos veces al año. Para evitar la formación de
moho, olores, etc., deben limpiarse por completo los compartimentos del producto. La parte interior
del ICM tiene que limpiarse con un paño empapado en agua jabonosa suave y la superficie de vidrio
debe limpiarse usando un producto para limpieza de vidrios.
está desenchufado.
Nunca utilice una manguera de agua o chorro de alta presión
para limpiar el refrigerador.
En caso de que el expositor se coloque en un entorno con
mucho polvo y/o grasa, se recomienda encarecidamente la
limpieza regular del condensador por un técnico autorizado.
Mantenga el refrigerador en una posición estable durante la
limpieza, no camine ni se apoye sobre él.
No lo limpie con objetos cortantes, líquidos inflamables o
corrosivos ni aerosoles.
61

SPA
11. Resolución de problemas
Todo el acceso al sistema de refrigeración y las piezas eléctricas (cambio
de una lámpara o una plataforma de refrigeración) debe realizarlo solo
personal autorizado.
Los modelos Smart-300 [R290], Smart-450L [R290], Smart-450L
SZ T [R290], Smart-800 [R290], Smart-900L SD [R290], Smart900L HD [R290], Smart-1300 HD [R290] y Smart-1300 SD [R290]
están equipados con refrigerante HC. Las operaciones de
reparación en un mecanismo de enfriado y carga de gas
deberán aplicarse en un entorno bien ventilado o en una zona
abierta. No fume durante el mantenimiento.
¡ANTES DE EFECTUAR ALGÚN PROCEDIMIENTO DE LIMPIEZA O
MANTENIMIENTO, DESENCHUFE EL REFRIGERADOR! RETIRE EL
ENCHUFE Y ASEGÚRESE DE QUE EL OPERADOR PUEDE
COMPROBAR DESDE CUALQUIERA DE LOS PUNTOS A LOS QUE
TENGA ACCESO QUE EL CABLE ESTÁ DESENCHUFADO.
Tras las operaciones de mantenimiento asegúrese de que las
conexiones de puesta a tierra están en su lugar antes de ensamblar
las cubiertas. Asegúrese de que está utilizando los mismos
componentes y cubiertas de sujeción.
Si es necesario sustituir un componente eléctrico, utilice sólo el
Si el ICM no está funcionando adecuadamente o está descompuesto, revise los siguientes elementos
antes de llamar al proveedor de servicio técnico.
FALLO POSIBLES RAZONES MANEJO
El ICM no
funciona.
62
componente apropiado de una lista de piezas de repuesto
proporcionada por el departamento de servicio técnico de
Frigoglass.
Mantenga la puerta de vidrio del refrigerador cerrada durante el
mantenimiento. Si el compresor necesita sustituirse, es posible que
tenga que utilizar un soporte adecuado para estabilizar el
refrigerador.
Tras las operaciones de mantenimiento, asegúrese de que la
liberación de tensión que sostiene el cable de alimentación se
ensambla de manera adecuada.
El cable de alimentación no está
enchufado.
No hay electricidad en la toma de
corriente.
Enchúfelo.
Compruebe el fusible.

SPA
FALLO POSIBLES RAZONES MANEJO
El ICM se ha recargado recientemente
con productos tibios. Se requiere algún
tiempo para enfriarlos.
El ICM se carga de manera tal que la
circulación de aire en el interior se
El ICM no
refrigera.
El ICM hace
ruido.
Hay agua en el
piso.
Las luces no
funcionan.
Si después de haber realizado todas las revisiones antes mencionadas aún persiste el problema con
su ICM, póngase en contacto con el departamento de servicio al cliente de su proveedor y entréguele
la siguiente información:
Tipo de ICM
Número de serie del ICM
Breve descripción del problema u observación
bloquea.
La puerta no se sella adecuadamente.
Hay filtración en el sistema de enfriado.
Intenso ruido metálico. Llame a un técnico de servicio.
Piso inclinado o curvo.
El orificio de drenaje para el agua
condensada está bloqueado.
Hay filtración en la bandeja. Llame a un técnico de servicio.
Las luces o el transformador están
descompuestos
De preferencia, recargue el ICM antes
del cierre en la noche.
Cargue el ICM de acuerdo con los
estándares que le ha proporcionado la
compañía.
Repare las puertas a fin de que
cierren adecuadamente (este tipo de
reparación debe ser hecha por un
técnico autorizado).
Repare la filtración (este tipo de
reparación debe ser hecha por un
técnico autorizado).
Nivele el ICM adecuadamente
ajustando sus patas. El colocar un
nivel de burbuja de aire en la parte
superior del ICM ayudará a nivelarlo.
Desbloquee el orificio de drenaje.
Llame a un técnico de servicio.
12. Primeros auxilios
En caso de accidente, se recomienda:
ACCIDENTE ACCIÓN INMEDIATA
Inhalación de
refrigerante
Contacto con los ojos
Contacto con la piel Lave inmediatamente con agua.
Respire profundamente inhalando aire limpio. Si la irritación
persiste, contacte con un médico.
Lave los ojos con abundante agua durante al menos 15 minutos y luego
consulte a un médico.
63

SPA
13. Eliminación de la unidad
Para obtener información detallada sobre el reciclaje de este producto, póngase en contacto con la
oficina local de su ciudad, su servicio de eliminación de residuos o el fabricante a través de su agente
de servicio. Al garantizar que este producto se elimine correctamente, ayudará a prevenir potenciales
consecuencias negativas para el medio ambiente y la salud humana, que podrían verse afectados por
una eliminación inadecuada de este producto.
14. Información de reciclaje
1. Basándose en los objetivos de la política ambiental de acuerdo con las directivas de Residuos
de Aparatos Eléctricos y Electrónicos (WEEE, por su sigla en inglés) de la Unión Europea
*
, cuyo objetivo es preservar, proteger y mejorar la calidad del medio ambiente, proteger la
(UE)
salud humana y utilizar recursos naturales de manera prudente y racional. Como usuario final,
se le solicita amablemente que:
• Si el aparato ha dejado de funcionar, aun después la resolución de problemas, primero vea si
puede repararse antes de desecharlo. Si tiene dudas, póngase en contacto con su distribuidor
o proveedor para obtener mayor información sobre posibles reparaciones de su aparato.
• Si el aparato ha llegado al “Final de su vida útil” (EOL, por su sigla en inglés), en otras
palabras, el aparato no puede repararse o reutilizarse, no lo deseche como residuo municipal
sin clasificar. En su lugar, asegúrese de que se recoja por separado por una compañía de
reciclaje.
Nota: La eliminación de aparatos electrónicos y eléctricos en rellenos sanitarios o mediante
incineración crea varios problemas ambientales. Cuando los materiales obsoletos no se reciclan, la
materia prima tiene que procesarse para fabricar nuevos productos. Esto representa una significativa
pérdida de recursos, ya que el daño de energía, transporte y ambiental que provocan estos procesos
es considerable.
• Para ayudar en el proceso de recuperación y reciclaje de este aparato, no desarme o rompa
las piezas del aparato antes de que se recoja. Al sacar las piezas del aparato, puede reducir su
índice de capacidad de reciclaje.
2. El símbolo que aparece en la Fig.1 abajo, que también se encuentra en la etiqueta del producto
dentro del aparato, indica que se debe hacer una recolección aparte de equipos eléctricos y
electrónicos, basándose en las Directivas WEEE de la Comunidad Europea (CE).
Figura 1- Contenedor con ruedas con una cruz
3. Finalmente, cumpla con las leyes vigentes sobre reciclaje que se apliquen a su comunidad y
país.
*
Referencias
Directiva de Residuos de Aparatos Eléctricos y Electrónicos (WEEE, por su sigla en inglés) de la Unión Europea
(UE) N° 2002/96/CE
64

SPA
15. Garantía
El aparato está cubierto con una garantía según se acordó esto tras la venta.
SOLO PARA EL PERSONAL DE SERVICIO AUTORIZADO
DIRECTRICES DE MANEJO Y TRANSPORTE
El expositor siempre deberá transportarse:
en posición vertical (a menos que se autorice otra cosa por el
proveedor)
con las puertas cerradas y los tapones para los modelos con
puertas correderas
en su envase original o uno similar
La temperatura del refrigerador durante el almacenamiento o el
transporte no deberá ser inferior a -20 oC ni superior a +60 ºC
Es obligatorio que un agente de servicio autorizado realice las siguientes operaciones durante el
Mantenimiento Preventivo de un ICM, una o dos veces al año, con una aspiradora:
Limpieza del condensador
Limpieza de los filtros de polvo (si procede).
Si el ICM está situado en un entorno donde el polvo se acumula en el condensador, entonces el
condensador tiene que limpiarse más a menudo.
Además, se recomienda que se realicen las siguientes operaciones durante el mantenimiento
preventivo:
1. Sistema mecánico:
Compruebe que el equipo está correctamente colocado y nivelado.
Compruebe que las rejas frontal y posterior se fijan en su lugar.
Compruebe el sistema de cierre automático de la puerta.
Compruebe que el soporte del ventilador y la reja del ventilador se fijan en su lugar.
Compruebe el sistema de drenaje y desobstrúyalo si es necesario.
DIRECTRICES DE MANTENIMIENTO PREVENTIVO
¡ANTES DE EFECTUAR ALGÚN PROCEDIMIENTO DE LIMPIEZA
(DENTRO O FUERA DEL APARATO) O MANTENIMIENTO, DESENCHUFE
EL ICM! RETIRE EL ENCHUFE Y ASEGÚRESE DE QUE EL OPERADOR
PUEDE COMPROBAR DESDE CUALQUIERA DE LOS PUNTOS A LOS
QUE TENGA ACCESO QUE EL CABLE ESTÁ DESENCHUFADO.
ANEXO A
ANEXO B
65

SPA
2. Sistema eléctrico:
Compruebe el cable de alimentación (reemplácelo si es necesario).
Compruebe el sistema de iluminación.
Compruebe las conexiones eléctricas.
Compruebe que la tapa de la caja eléctrica del termostato o el controlador electrónico está
instalado correctamente.
Compruebe que los componentes que podrían haber sido reemplazados durante el servicio son
originales.
3. Sistema de refrigeración:
Compruebe que el compresor está funcionando correctamente.
Compruebe el relé de arranque, la sobrecarga y el capacitor. El Proveedor recomienda que los
relés de arranque y las sobrecargas del compresor se reemplacen cada 3-4 años.
Compruebe el condensador del motor del ventilador y el evaporador del motor del ventilador.
Compruebe que el termostato o el controlador electrónico y sus componentes están funcionando
correctamente.
Compruebe el rendimiento de la refrigeración del ICM.
Compruebe el circuito de refrigeración mediante el detector de fugas adecuado en caso de que
haya alguna preocupación o signo de fuga del refrigerante.
ANEXO C
DIRECTRICES PARA PREVENIR LA CORROSIÓN DEL GABINETE
1. Evite daños derivados de una instalación y operación incorrectas, el mantenimiento y la limpieza
inadecuados, así como un manejo y transporte inadecuados, según los apartados 3, 5 y el Anexo
A antes citado.
No lleve a cabo adaptaciones, modificaciones o ajustes no autorizados en el gabinete.
2.
66

ELL
]
1. Πρόλογος
Συγχαρητήρια για την αγορά του νέου ψυγείου της Frigoglass. Πριν χρησιμοποιήσετε την μονάδα,
διαβάστε προσεκτικά τις παρακάτω οδηγίες. Ένα σωστά διατηρημένο ψυγείο της Frigoglass θα σας
βοηθήσει να αυξήσετε τις πωλήσεις και τα κέρδη σας.
2. Τεχνική περιγραφή
2.1. Γενικά
Το ψυγείο πρέπει να είναι συνδεδεμένο σε γειωμένη πρίζα της κεντρικής παροχής ρεύματος με
ασφάλεια 10-16Α. Είναι απαραίτητο η πρόσβαση στην πρίζα να είναι απρόσκοπτη, ώστε να μπορείτε
να εγκαταστήσετε και να επισκευάσετε το ψυγείο.
2.2. Κατηγορία κλίματος
Σύμφωνα με τις προδιαγραφές κατηγορίας κλίματος, τα μοντέλα Smart-300 [R290], Smart-800 [R290],
Smart-900L SD [R290], Smart-900L HD [R290], Smart-1300 HD [R290] και Smart-1300 SD [R290] είναι
κατηγορίας "4", δηλαδή με θερμοκρασία περιβάλλοντος 30°C και υγρασία 55%; τα μοντέλα Smart-450L
SZ T [R290] και Smart-450L [R290] είναι κατηγορίας "5", δηλαδή με θερμοκρασία περιβάλλοντος 40⁰C
και υγρασία 40%.
2.3. Τεχνικές προδιαγραφές
Ονομαστική τάση/Συχνότητα 220-240 V/ 50 Hz
Απόψυξη Αυτόματη
2.4. Διαστάσεις μονάδας
Μοντέλο
Πλάτος
(mm)
Smart-300 [R290] 495 625
Smart-450L [R290
Smart-450L SZ T [R290] 596 629
Smart-800 [R290] 785 785
Smart-900L SD [R290] 890 730
Smart-900L HD [R290] 890 732
Smart-1300 HD [R290] 1310 7401 21392 1281 200
Smart-1300 SD [R290] 1310 7383 21392 1212 210
1
Χωρίς τη λαβή και το πίσω διαχωριστικό των 80 mm
2
Συμπεριλαμβάνονται ροδάκια και κάλυμμα μεντεσέ
3
Χωρίς το πίσω διαχωριστικό των 80 mm
Βάθος
(mm)
596 624
Ύψος
(mm)
1
1619
1
2014
1
20142 427 112
1
2139
3
2014
1
2014
Όγκος
(Lt)
2
258 75
2
427 105
2
778 145
2
722 159
2
823 152
Καθαρό βάρος (kg)
67

ELL
2.5. Μέγιστο βάρος ανά σχάρα
Μοντέλο Μέγιστο βάρος ανά σχάρα (kg)
Smart-300 [R290]
Smart-450L [R290]
Smart-450L SZ T [R290]
Smart-800 [R290]
Smart-900L SD [R290] 61
Smart-900L HD [R290] 70
Smart-1300 HD [R290] 50
Smart-1300 SD [R290] 45
Τα μοντέλα Smart-300 [R290], Smart-450L [R290], Smart-450L
SZ T [R290], Smart-800 [R290], Smart-900L SD [R290], Smart900L HD [R290], Smart-1300 HD [R290] και Smart-1300 SD
[R290] περιλαμβάνουν ψυκτικό HC και έχουν περάσει από
δοκιμές και ελέγχους που απέδειξαν την ασφάλειά τους
σύμφωνα με τα σχετικά πρότυπα.
Όλες οι απαραίτητες ενέργειες για την ασφαλή χρήση και
συντήρηση αυτής της συσκευής περιγράφονται στον παρόντα
οδηγό και πρέπει να τηρούνται προσεκτικά. Η εγκατάσταση
αυτής της συσκευής θα πρέπει να γίνεται μόνο από κατάλληλα
καταρτισμένο άτομο.
3. Εγκατάσταση & λειτουργία
24
28
28
65
68
Η μη συμμόρφωση με τις οδηγίες μπορεί να οδηγήσει σε υψηλή
κατανάλωση ενέργειας, κακή απόδοση της μονάδας και ακύρωση της
εγγύησης.
Αφήστε ελεύθερο το χώρο γύρω από κάθε άνοιγμα αερισμού στο
περίβλημα της συσκευής ή στη δομή για ενσωμάτωση της συσκευής.
Μη χρησιμοποιείτε μηχανικές συσκευές ή άλλα μέσα για την
επιτάχυνση της διαδικασίας απόψυξης, εκτός από αυτά που
συνιστώνται από τον κατασκευαστή.
Μην προκαλείτε φθορές στο κύκλωμα ψύξης.
Μην χρησιμοποιείτε ηλεκτρικές συσκευές στους χώρους φύλαξης
τροφίμων της συσκευής, εκτός και εάν υπάγονται στους τύπους που
συνιστώνται από τον κατασκευαστή.
Εάν το καλώδιο τροφοδοσίας έχει φθαρεί, για την αποφυγή κάθε
κινδύνου πρέπει να αντικατασταθεί από τον κατασκευαστή, τον
αντιπρόσωπό του ή κατάλληλα εξουσιοδοτημένο προσωπικό.

ELL
Μην τοποθετείτε το ψυγείο:
κάτω από άμεσο ηλιακό φως ή κοντά σε πηγές θερμότητας
(καλοριφέρ, σόμπες & άλλο εξοπλισμό θέρμανσης)
σε εξωτερικούς χώρους χωρίς προστασία από τη βροχή που έχει
σαν αποτέλεσμα το ψυγείο να έρχεται σε άμεση επαφή με το νερό
σε κλιματικές συνθήκες για τις οποίες δεν διαθέτει πιστοποίηση
σε ακραίες περιβαλλοντικές συνθήκες (π.χ. έκθεση σε υγρασία που
περιέχει άλμη)
σε επιφάνεια με κλίση μεγαλύτερη των 5o
3.1. Οδηγίες εγκατάστασης του ψυγείου
α. Αφού αφαιρέσετε τη συσκευασία από το θάλαμο συντήρησης, ελέγξτε για τυχόν ζημιές που
προκλήθηκαν κατά τη μεταφορά. Σε περίπτωση ζημιάς, επικοινωνήστε με τη μεταφορική
εταιρεία.
β. Βεβαιωθείτε πως έχετε εγκαταστήσει το ψυγείο σας σε ομαλό πάτωμα/επιφάνεια. Υπάρχουν 2
προσαρμοζόμενα στηρίγματα για όλα τα μοντέλα στο μπροστινό μέρος, κάτω από το ψυγείο.
Ενδείξεις
Στηρίγματα
ευθυγράμμισης στο
μπροστινό μέρος
Προσαρμόστε έως ότου το ψυγείο να ευθυγραμμιστεί και ελέγξτε το με αλφάδι, εάν είναι διαθέσιμο.
Λάβετε τις απαραίτητες προφυλάξεις σε περίπτωση όπου απαιτείται να σηκώσετε κάτι κατά την
εγκατάσταση. Κρατάτε τα μη εξουσιοδοτημένα άτομα μακριά από το ψυγείο, έως ότου ολοκληρωθεί η
εγκατάσταση.
γ. Το ψυγείο θα πρέπει να παραμείνει σε όρθια θέση για τουλάχιστον 1 ώρα μετά τη μεταφορά
πριν το εκκινήσετε. Έτσι, δίνεται χρόνος στο λιπαντικό να επιστρέψει στο συμπιεστή μετά τη
μεταφορά και την εγκατάσταση.
δ. Αφήστε κενό τουλάχιστον 100 χιλ. στο πίσω μέρος. Για να το κάνετε αυτό, περιστρέψτε το πίσω
διαχωριστικό όπως εμφανίζεται παρακάτω.
ε. Μην τοποθετείτε τίποτε επάνω στο ψυγείο.
69

ELL
Περιστρέψτε το
πίσω
διαχωριστικό
Σημείωση: Αλλαγή της θέσης του ψυγείου εντός του καταστήματος
α. Αδειάστε το ψυγείο και αποσυνδέστε το από την πρίζα.
β. Τραβήξτε εντελώς το στήριγμα ευθυγράμμισης.
γ. Μεταφέρετε το ψυγείο στην επιθυμητή θέση με τη βοήθεια δεύτερου ατόμου.
3.2. Οδηγίες εγκατάστασης της σχάρας
Για να τοποθετήσετε τη σχάρα, πρώτα ανασηκώστε τη και απασφαλίστε τα κλιπ σχαρών (4).
Τοποθετήστε τα κλιπ στην επιθυμητή θέση και επανατοποθετήστε τη σχάρα. Βεβαιωθείτε ότι οι
οριζόντιες μεταλλικές ράβδοι στο κάτω μέρος της σχάρας βρίσκονται μεταξύ των εμπρόσθιων και των
οπίσθιων κλιπ, όπως φαίνεται παρακάτω.
Σημείωση: Συγκεκριμένα, τα μοντέλα Smart-450L, 500 & 800 περιλαμβάνουν 4 σχάρες με
διαχωριστικά (στο πίσω μέρος) και μια σχάρα χωρίς διαχωριστικό.
Η σχάρα χωρίς διαχωριστικό θα πρέπει να τοποθετηθεί στο επάνω επίπεδο προκειμένου να χωράει
με το πρόσθετο μεταλλικό μέρος για την κυκλοφορία του αέρα, όπως εμφανίζεται στις παρακάτω
εικόνες.
Σχάρα χωρίς
διαχωριστικό
Πρόσθετο μεταλλικό
μέρος
Σχάρα με
διαχωριστικό
Σημείωση: Όταν χρησιμοποιείτε το προαιρετικό εμπρόσθιο σύστημα σχαρών, ακολουθήστε τις οδηγίες
τοποθέτησης που περιλαμβάνονται στο κιτ.
70

ELL
3.3. Σύνδεση με την κεντρική παροχή ρεύματος
Συνδέστε το ψυγείο σε παροχή ρεύματος 220-240V με βύσμα τουλάχιστον 10-16A με ενσωματωμένη
ασφάλεια και γείωση (σούκο). Μην χρησιμοποιείτε καλώδια προέκτασης.
Μη συνδέετε το ψυγείο σε:
μη γειωμένη πρίζα ή γραμμή τροφοδοσίας ρεύματος
λανθασμένη τάση και συχνότητα τροφοδοσίας
3.4. Οδηγίες λειτουργίας
τροφοδοσία που δεν είναι σε συμμόρφωση με τους
κανονισμούς ασφαλείας της συσκευής ή με την τρέχουσα
νομοθεσία για τις ηλεκτρικές εγκαταστάσεις
Αν το μήκος του καλωδίου τροφοδοσίας που παρέχεται με το
ψυγείο δεν επαρκεί, μην χρησιμοποιήσετε προέκταση
καλωδίου. Ζητήστε από επαγγελματία ηλεκτρολόγο να
αντικαταστήσει το καλώδιο με ένα μακρύτερο, εάν αυτό
προβλέπεται στη λίστα των εγκεκριμένων ανταλλακτικών.
Μη συνδέετε το ψυγείο σε πολύπριζο.
Δρομολογήστε το καλώδιο τροφοδοσίας κατά τρόπο ώστε να
προστατεύεται από ζημιές και να μην υπάρχει κίνδυνος να
σκοντάψει κάποιος επάνω του.
Μη χρησιμοποιείτε το ψυγείο για τη φύλαξη τροφίμων.
Μην φυλάσσετε εντός της συσκευής εκρηκτικές ουσίες, όπως δοχεία για
αεροζόλ με εύφλεκτη ύλη.
Η συσκευή δεν προορίζεται για χρήση από μικρά παιδιά ή άτομα με
ειδικές ανάγκες με εξαίρεση την επαρκή επίβλεψή τους από υπεύθυνο
άτομο που να εξασφαλίζει το σωστό χειρισμό της συσκευής. Απαιτείται
επίβλεψη ώστε τα παιδιά να μην παίζουν με τη συσκευή.
Μην θέτετε τη συσκευή σε λειτουργία με ανοιχτά τα καλύμματα ή τα
προστατευτικά εξαρτήματα.
Συμβουλές για εξοικονόμηση ενέργειας:
Για εξοικονόμηση ενέργειας και καλύτερη λειτουργία του ψυγείου:
Γεμίζετε το ψυγείο τη νύχτα έτσι ώστε τα ποτά να είναι παγωμένα το πρωί.
Αποθηκεύετε όλο το εφεδρικό σας εμπόρευμα σε δροσερό ή/και σκιερό μέρος, ώστε όταν
τοποθετηθεί στο ψυγείο να απαιτηθεί λιγότερος χρόνο για την ψύξη του.
Απομακρύνετε την υγρασία από τα προϊόντα πριν τα τοποθετήσετε στο ψυγείο.
Αποφεύγετε να κρατάτε την πόρτα ανοικτή για μεγάλο διάστημα.
71

ELL
4. Ηλεκτρονικό χειριστήριο
4.1. Παρουσίαση του χειριστηρίου ECOBOX / HEC*
Για οδηγίες σχετικά με τη χρήση του χειριστηρίου ECOBOX/ HEC και τις σχετικές προαιρετικές
λειτουργίες, ανατρέξτε στον παρακάτω σύνδεσμο: http://www.frigoglass.com/manuals/.
4.2. Παρουσίαση του χειριστηρίου Danfoss ERC-112
Για οδηγίες σχετικά με τη χρήση του χειριστηρίου Danfoss ERC-112 και τις σχετικές προαιρετικές
λειτουργίες, ανατρέξτε στον παρακάτω σύνδεσμο: http://www.frigoglass.com/manuals/.
5. Σύστημα αποκλεισμού πόρτας
Για να χρησιμοποιήσετε το σύστημα μπλοκαρίσμαος πόρτας ακολουθήστε τα βήματα
παρακάτω.
5.1. Εφαρμογή σε ψυγεία με αρθρωτή πόρτα
Βήμα 1: Ανοίξτε την πόρτα σε γωνία άνω των 110 μοιρών
Βήμα 2: Περιστρέψτε το σύστημα μπλοκαρίσματος της πόρτας προς το θάλαμο (όπως
Βήμα 3: Το σύστημα μπλοκαρίσματος της πόρτας σταματά στη βίδα που βρίσκεται επάνω στο
Βήμα 4: Ανοίξτε την πόρτα για να απελευθερώσετε το σύστημα μπλοκαρίσματος της πόρτας από
εμφανίζεται στην εικόνα)
πλέγμα (όπως εμφανίζεται στην εικόνα)
το σημείο μπλοκαρίσματος και περιστρέψτε στην αρχική θέση
5.2. Εφαρμογή σε ψυγεία με συρόμενες πόρτες
Βήμα 1: Ανοίξτε την αριστερή πόρτα (η ίδια διαδικασία ισχύει και για τη δεξιά πόρτα)
Βήμα 2: Ανασηκώστε και περιστρέψτε το σύστημα μπλοκαρίσματος της πόρτας προς το θάλαμο
(όπως φαίνεται στην εικόνα)
Βήμα 3: Τοποθετήστε το σύστημα μπλοκαρίσματος κάθετα προς τους οδηγούς της πόρτας (όπως
φαίνεται στην εικόνα). Το σύστημα μπλοκαρίσματος θα μπλοκάρει στα τοιχώματα των
οδηγών αποτρέποντας το κλείσιμο της πόρτας.
Βήμα 4: Απελευθερώσετε το σύστημα μπλοκαρίσματος από το σημείο μπλοκαρίσματος και
περιστρέψτε στην αρχική θέση.
*
προαιρετικό χαρακτηριστικό, ανάλογα με το μοντέλο
72

ELL
6. Σύστημα κλειδώματος
6.1. Οδηγίες για τη χρήση του λουκέτου
Βήμα 1: Ανοίξτε την πόρτα
Βήμα 2: Περιστρέψτε το έλασμα του συστήματος κλειδώματος που βρίσκεται στο πλέγμα (όπως
Βήμα 3: Περιστρέψτε το έλασμα του συστήματος κλειδώματος που βρίσκεται στην πόρτα (όπως
Βήμα 4: Κλείστε την πόρτα και τοποθετήστε το λουκέτο διαμέσου των οπών του ελάσματος για να
Βήμα 2 Βήμα 3
6.2. Οδηγίες για τη χρήση της κλειδαριάς
Βήμα 1: Κλείστε την πόρτα
Βήμα 2: Τοποθετήστε το κλειδί στην κλειδαριά της μπροστινής σχάρας και περιστρέψτε κατά 90°
Βήμα 3: Η πόρτα έχει ασφαλίσει. Μπορείτε να τραβήξετε το κλείδι είτε από τη θέση κλειδώματος είτε
εμφανίζεται στην εικόνα)
εμφανίζεται στην εικόνα)
κλειδώσετε το ψυγείο
(όπως φαίνεται στην εικόνα)
από τη θέση ξεκλειδώματος
Στα ψυγεία με συρόμενες πόρτες, η κλειδαριά βρίσκεται στο μέσο του πλαστικού εξωτερικού
καλύμματος της πόρτας
73

ELL
Ψυγεία με συρόμενες πόρτες
6.3. Οδηγίες σχετικά με τη χρήση της ασφάλειας μεταφοράς του περιστρεφόμενου ραφιού για
τα ψυγεία Smart-900.
Βήμα 1: Ανοίξτε την πόρτα
Βήμα 2: Σύρετε το έλασμα του συστήματος ασφάλισης (το οποίο βρίσκεται στο μέσο της άνω ράβδου
της δομής στήριξης σχαρών).
Βήμα 3: Το περιστρεφόμενο ράφι έχει ασφαλίσει.
Ασφαλισμένο Μη ασφαλισμένο
7. Κάλυμμα νυκτός*
Για να τοποθετήσετε το κάλυμμα νυκτός ακολουθήστε τα βήματα παρακάτω.
Βήμα 1: Ανοίξτε οπές στο επάνω και στα πλαϊνά μέρη του ψυγείου και τοποθετήστε τα
Βήμα 2: Στερεώστε το κάλυμμα νυκτός στο μπροστινό μέρος της διάταξης και χρησιμοποιήστε ένα
υποστηρικτικά ελάσματα και ασφάλειες (όπως φαίνεται στην εικόνα και σύμφωνα με τις
οδηγίες εγκατάστασης που περιλαμβάνονται στη συσκευασία του καλύμματος νυκτός).
λουκέτο για να το ασφαλίσετε, όπως εμφανίζεται στην εικόνα (η διάταξη του πίσω μέρους
μπορεί επίσης να χρησιμοποιηθεί για την αποθήκευση του καλύμματος νυκτός όταν το
ψυγείο είναι σε χρήση).
*
προαιρετικό χαρακτηριστικό
74

ELL
Βήμα 1 Βήμα 2
8. RCCB*
Για να αποκτήσετε πρόσβαση στο διακόπτη RCCB ακολουθήστε τα βήματα παρακάτω.
Βήμα 1: Αφαιρέστε το πλέγμα για να αποκτήσετε πρόσβαση στο κέντρο ελέγχου του ηλεκτρικού
Βήμα 2: Αφαιρέστε το κάλυμμα των βυσμάτων του ηλεκτρικού συστήματος
Βήμα 3: Προσπελάστε το διακόπτη RCCB (που σημειώνεται με κύκλο στην αντίστοιχη εικόνα
συστήματος (σημειώνεται με κύκλο στην αντίστοιχη εικόνα παρακάτω)
παρακάτω και στο αυτοκόλλητο στην πρόσοψη του καλύμματος)
RCCB
Βήμα 1
Βήμα 2,3
9. PRCD*
Η διάταξη PRCD είναι ενσωματωμένη στο καλώδιο τροφοδοσίας (όπως φαίνεται στην εικόνα
παρακάτω), κοντά στο βύσμα.
Η διάταξη PRCD έχει δύο κουμπιά. Το μικρό είναι το κουμπί "ελέγχου" και χρησιμοποιείται για τον
έλεγχο της λειτουργίας της διάταξης PRCD. Το μεγάλο κουμπί είναι το κουμπί "επαναφοράς" και
χρησιμοποιείται για την επαναφορά της διάταξης PRCD μετά από κάποιο συμβάν ενεργοποίησης.
*
προαιρετικό χαρακτηριστικό
75
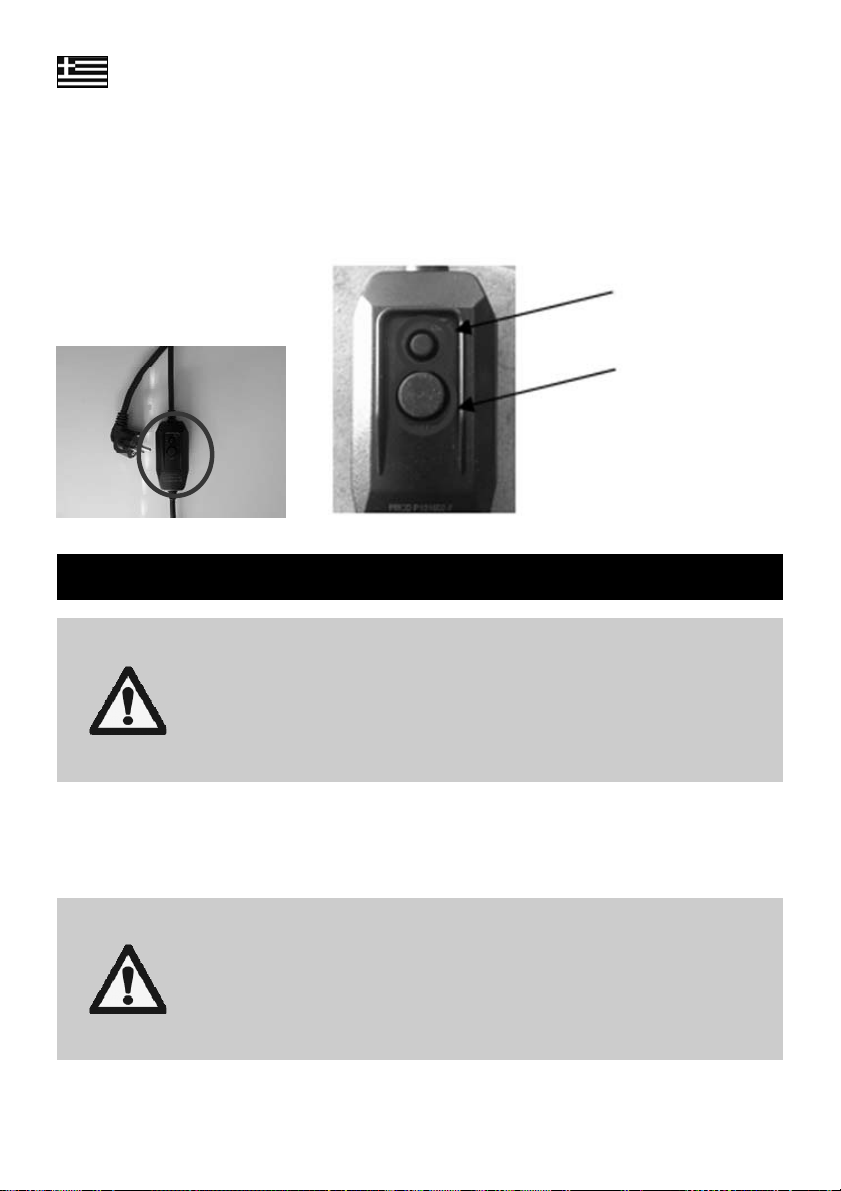
ELL
Όταν αποσυνδέετε το καλώδιο τροφοδοσίας, πρέπει να πραγματοποιήσετε δοκιμή για να
εξασφαλίσετε τη σωστή λειτουργία του PRCD. Ακολουθήστε τα παρακάτω βήματα:
Βήμα 1: Συνδέστε το καλώδιο στην πρίζα.
Βήμα 2: Πατήστε το (μικρό) κουμπί “TEST”. Αναδύεται το (μεγάλο) κουμπί “RESET”.
Βήμα 3: Πατήστε ξανά το κουμπί “RESET”. Μη χρησιμοποιείτε τη συσκευή εάν η λειτουργία
αποτύχει!
Κουμπί TEST
Κουμπί RESET
10. Φροντίδα και καθαρισμός
Πριν από οποιονδήποτε καθαρισμό (του εσωτερικού ή του
εξωτερικού της συσκευής), αποσυνδέστε το ψυγείο από την
παροχή ρεύματος! Βγάλτε το βύσμα και βεβαιωθείτε ότι ο
χειριστής μπορεί να ελέγξει από οποιοδήποτε από τα σημεία
στα οποία έχει πρόσβαση, ότι το καλώδιο έχει αποσυνδεθεί
Είναι σημαντικό να καθαρίζετε το ψυγείο τουλάχιστον δύο φορές το χρόνο. Προκειμένου να αποφύγετε
τη δημιουργία μούχλας, οσμών, κλπ., τα διαμερίσματα των προϊόντων πρέπει να καθαρίζονται
διεξοδικά. Το εσωτερικό του ψυγείου πρέπει να καθαρίζεται με ένα πανί ελαφρώς νοτισμένο με
σαπουνάδα και η γυάλινη επιφάνεια με προϊόντα καθαρισμού για τζάμια.
από την πρίζα.
Μην πλένετε ποτέ το ψυγείο με λάστιχα ή αντλίες νερού υψηλής
πίεσης.
Σε περίπτωση που το ψυγείο έχει τοποθετηθεί σε λιπαρό
περιβάλλον ή/και σε περιβάλλον με πολλή σκόνη, ο τακτικός
καθαρισμός του συμπυκνωτή από εξουσιοδοτημένο τεχνικό
είναι υποχρεωτικός.
Κατά τον καθαρισμό του, διατηρείτε το ψυγείο σε σταθερή θέση,
μην πατάτε επάνω και μην ακουμπάτε στο ψυγείο
Μην χρησιμοποιείτε για τον καθαρισμό αιχμηρά αντικείμενα,
εύφλεκτα ή διαβρωτικά υγρά ή σπρέι.
76

ELL
11. Επίλυση προβλημάτων
Η πρόσβαση στο σύστημα ψύξης και στα ηλεκτρικά μέρη (αλλαγή
λάμπας ή θαλάμου) θα πρέπει να γίνεται μόνο από εξειδικευμένο
προσωπικό.
Τα μοντέλα Smart-300 [R290], Smart-450L [R290], Smart-450L
SZ T [R290], Smart-800 [R290], Smart-900L SD [R290], Smart900L HD [R290], Smart-1300 HD [R290] και Smart-1300 SD
[R290] περιλαμβάνουν ψυκτικό HC. Όλες οι εργασίες σέρβις του
μηχανισμού ψύξης και το γέμισμα του αερίου θα πρέπει να
γίνονται σε καλά αεριζόμενο περιβάλλον ή σε ανοικτό χώρο.
ΑΠΟΣΥΝΔΕΣΤΕ ΤΟ ΨΥΓΕΙΟ ΑΠΟ ΤΟ ΡΕΥΜΑ ΠΡΙΝ
Αφού ολοκληρώσετε τις εργασίες συντήρησης, βεβαιωθείτε ότι έχει
Εάν απαιτείται αντικατάσταση ηλεκτρικών εξαρτημάτων,
Κρατάτε τη γυάλινη πόρτα κλειστή κατά τη συντήρηση. Εάν πρέπει
Μετά το πέρας των εργασιών συντήρησης, βεβαιωθείτε ότι η διάταξη
Εάν η απόδοση του ψυγείου δεν είναι η αναμενόμενη ή δεν λειτουργεί καθόλου, ελέγξτε τα παρακάτω
πριν καλέσετε τον εξουσιοδοτημένο παροχέα υπηρεσιών:
ΠΡΟΒΛΗΜΑ ΠΙΘΑΝΕΣ ΑΙΤΙΕΣ ΑΝΤΙΜΕΤΩΠΙΣΗ
Το ψυγείο δεν
λειτουργεί.
Το ψυγείο δεν
παράγει ψύξη.
Το καλώδιο τροφοδοσίας δεν είναι
συνδεδεμένο.
Η πρίζα δεν έχει ρεύμα. Ελέγξτε την ασφάλεια.
Τοποθετήσατε πρόσφατα ζεστά
προϊόντα στο ψυγείο. Χρειάζεται
κάποιος χρόνος για την ψύξη ζεστών
προϊόντων.
Μην καπνίζετε κατά τις εργασίες επισκευής.
ΠΡΑΓΜΑΤΟΠΟΙΗΣΕΤΕ ΟΠΟΙΑΔΗΠΟΤΕ ΕΡΓΑΣΙΑ ΣΥΝΤΗΡΗΣΗΣ Ή
ΕΠΙΣΚΕΥΗΣ. ΒΓΑΛΤΕ ΤΟ ΒΥΣΜΑ ΚΑΙ ΒΕΒΑΙΩΘΕΙΤΕ ΟΤΙ Ο
ΧΕΙΡΙΣΤΗΣ ΜΠΟΡΕΙ ΝΑ ΕΛΕΓΞΕΙ ΑΠΟ ΟΠΟΙΟΔΗΠΟΤΕ ΑΠΟ ΤΑ
ΣΗΜΕΙΑ ΣΤΑ ΟΠΟΙΑ ΕΧΕΙ ΠΡΟΣΒΑΣΗ, ΟΤΙ ΤΟ ΚΑΛΩΔΙΟ ΕΧΕΙ
ΑΠΟΣΥΝΔΕΘΕΙ ΑΠΟ ΤΗΝ ΠΡΙΖΑ.
συνδεθεί η γείωση και μετά τοποθετήστε τα καλύμματα. Φροντίστε
να χρησιμοποιείτε τα ίδια εξαρτήματα σύνδεσης και τα ίδια
καλύμματα.
χρησιμοποιήστε μόνο κατάλληλα ανταλλακτικά εξαρτήματα που
παρουσιάζονται στη λίστα η οποία παρέχεται από την υπηρεσία
τεχνικής υποστήριξης της Frigoglass.
να γίνει αντικατάσταση του συμπυκνωτή, ίσως χρειαστεί κατάλληλη
υποστήριξη για την σταθεροποίηση του ψυγείου.
για τη μείωση της μηχανικής καταπόνησης, η οποία στηρίζει το
καλώδιο τροφοδοσίας, έχει τοποθετηθεί σωστά.
Συνδέστε το καλώδιο.
Κατά προτίμηση γεμίστε εκ νέου το
ψυγείο πριν να κλείσετε το μαγαζί σας
για τη νύχτα.
77

Υ
ELL
ΠΡΟΒΛΗΜΑ ΠΙΘΑΝΕΣ ΑΙΤΙΕΣ ΑΝΤΙΜΕΤΩΠΙΣΗ
Το ψυγείο έχει φορτωθεί με τέτοιο τρόπο
ώστε να εμποδίζεται η κανονική ροή
αέρα στο εσωτερικό του.
Το ψυγείο δεν
παράγει ψύξη.
Το ψυγείο κάνει
θόρυβο φορές.
πάρχει νερό στο
πάτωμα.
Τα φώτα δεν
λειτουργούν.
Αν μετά από όλους τους προαναφερθέντες ελέγχους το πρόβλημα του ψυγείου παραμένει,
επικοινωνήστε με το τμήμα εξυπηρέτησης πελατών του προμηθευτή σας και δώστε τις ακόλουθες
πληροφορίες:
Τύπος του ψυγείου
Αριθμός σειράς του ψυγείου
Σύντομη περιγραφή προβλήματος / παρατηρήσεις
Οι πόρτες δεν κλείνουν κανονικά.
Το ψυκτικό σύστημα έχει διαρροή.
Έντονος μεταλλικός θόρυβος. Καλέστε τεχνικό.
Κεκλιμένο ή ανώμαλο έδαφος.
Η οπή αποστράγγισης για το νερό που
προκύπτει από τη συμπύκνωση έχει
φράξει.
Ο δίσκος έχει διαρροή. Καλέστε τεχνικό.
Ο φωτισμός ή ο μετασχηματιστής δεν
λειτουργεί
Τοποθετήστε προϊόντα στο ψυγείο
σύμφωνα με τις προδιαγραφές που
σας έχουν δοθεί από την εταιρεία.
Επισκευάστε τις πόρτες ώστε να
κλείνουν σωστά (αυτού του είδους η
επισκευή θα πρέπει να γίνεται από
εξουσιοδοτημένο τεχνικό)
Επισκευάστε τη διαρροή (αυτού του
είδους η επισκευή θα πρέπει να γίνεται
από εξουσιοδοτημένο τεχνικό)
Ευθυγραμμίστε σωστά το ψυγείο
προσαρμόζοντας τα στηρίγματά του.
Αν τοποθετήσετε ένα αλφάδι σε
οριζόντια θέση στην κορυφή του
ψυγείου, αυτό θα σας βοηθήσει στην
ευθυγράμμισή του.
Καθαρίστε την οπή αποστράγγισης.
Καλέστε τεχνικό.
12. Πρώτες βοήθειες
Σε περίπτωση ατυχήματος προτείνεται:
ΑΤΥΧΗΜΑ ΑΜΕΣΗ ΑΝΤΙΜΕΤΩΠΙΣΗ
Εισπνοή ψυκτικού
Επαφή με τα μάτια
Επαφή με το δέρμα Ξεπλύνετε αμέσως με νερό.
78
Εισπνεύστε καθαρό αέρα. Αν ο ερεθισμός συνεχιστεί,
επικοινωνήστε με γιατρό.
Ξεπλύνετε καλά τα μάτια σας με άφθονο νερό για τουλάχιστον 15 λεπτά
και, στη συνέχεια, συμβουλευτείτε γιατρό

ELL
13. Απόρριψη της μονάδας
Για λεπτομερείς πληροφορίες σχετικά με την ανακύκλωση αυτού του προϊόντος, επικοινωνήστε με την
τοπική υπηρεσία αποκομιδής απορριμμάτων ή με τον κατασκευαστή μέσω του αντιπροσώπου του.
Εφόσον εξασφαλίσετε ότι η απόρριψη του προϊόντος έχει γίνει σωστά, μπορείτε να αποφύγετε πιθανές
αρνητικές συνέπειες για το περιβάλλον και την ανθρώπινη υγεία, οι οποίες θα προέκυπταν σε
περίπτωση μη κατάλληλης απόρριψης αυτού του προϊόντος.
14. Πληροφορίες σχετικά με την ανακύκλωση
1. Οι στόχοι της περιβαλλοντικής πολιτικής που ορίζονται από τις οδηγίες της Ευρωπαϊκής
Κοινότητας σχετικά με τα Απόβλητα Ηλεκτρολογικού και Ηλεκτρονικού Εξοπλισμού (ΑΗΗΕ)
αποσκοπούν στη διατήρηση, την προάσπιση και τη βελτίωση του περιβάλλοντος, τη διαφύλαξη
της ανθρώπινης υγείας και την αξιοποίηση των φυσικών πόρων με φρόνηση και ορθολογισμό.
Ως τελικός χρήστης, παρακαλείστε για τα εξής:
• Εάν η συσκευή πάψει να λειτουργεί για κάποιο λόγο, ακόμη και αφού ακολουθήσετε τις οδηγίες
για την αντιμετώπιση του προβλήματος, ελέγξτε πρώτα εάν επιδέχεται επισκευής πριν την
απορρίψετε. Επικοινωνήστε με τον διανομέα ή τον προμηθευτή για περισσότερες πληροφορίες
σχετικά με τις πιθανές λύσεις επισκευής της συσκευής σας, εάν έχετε αμφιβολίες.
• Εάν η συσκευή έχει φτάσει στο τέλος κύκλου ζωής της, με άλλα λόγια, αν δεν επιδέχεται
επισκευής ή άλλης μεταχείρισης, μην απορρίπτετε τη συσκευή μαζί με τα οικιακά απορρίμματα.
Φροντίστε να παραληφθεί χωριστά από αρμόδια εταιρεία ανακύκλωσης.
Σημείωση: Η απόρριψη ηλεκτρικών και ηλεκτρονικών συσκευών σε χώρους υγειονομικής ταφής ή η
χρήση της μεθόδου της αποτέφρωσης προκαλεί πληθώρα περιβαλλοντικών προβλημάτων. Όταν δεν
ανακυκλώνονται πεπαλαιωμένα υλικά, οι πρώτες ύλες πρέπει να υποστούν επεξεργασία για να
χρησιμοποιηθούν σε νέα προϊόντα. Το γεγονός αυτό έχει ως αποτέλεσμα μεγάλη απώλεια πόρων
καθώς η κατανάλωση ενέργειας, μεταφορικών μέσων και η περιβαλλοντική ζημιά που προκαλείται
από τις εν λόγω διαδικασίες είναι σημαντική.
• Για να συμβάλλετε στη διαδικασία ανάκτησης και ανακύκλωσης της συσκευής, μην την
αποσυναρμολογείτε ή αφαιρείτε μέρη της πριν από την παραλαβή. Η αφαίρεση τμημάτων της
συσκευής μπορεί να μειώσει το βαθμό ανακυκλωσιμότητάς της.
2. Το σύμβολο που εμφανίζεται στην παρακάτω Εικόνα 1, το οποίο αναπαρίσταται και στην
ετικέτα του προϊόντος εντός της συσκευής, δηλώνει ότι η συσκευή πρέπει να συλλεχθεί χωριστά
με βάση τις Οδηγίες περί Αποβλήτων Ηλεκτρολογικού και Ηλεκτρονικού Εξοπλισμού της
Ευρωπαϊκής Κοινότητας.
*
Εικόνα 1 – Διαγραμμένος κάδος με ρόδες
*
Παραπομπές:
Οδηγία 2002/96/ΕΚ της Ευρωπαϊκής Ένωσης περί Αποβλήτων Ηλεκτρολογικού και Ηλεκτρονικού Εξοπλισμού
(ΑΗΗΕ)
79

ELL
3. Τέλος, τηρήστε την τοπική νομοθεσία περί ανακύκλωσης που ισχύει στην επαρχία ή την πόλη
σας.
15. Εγγύηση
Η συσκευή καλύπτεται από την εγγύηση, όπως αυτή είχε συμφωνηθεί κατά την αγορά.
ΜΟΝΟ ΓΙΑ ΚΑΤΑΡΤΙΣΜΕΝΟ ΠΡΟΣΩΠΙΚΟ
ΟΔΗΓΙΕΣ ΑΝΤΙΜΕΤΩΠΙΣΗΣ & ΜΕΤΑΦΟΡΑΣ
Το ψυγείο θα πρέπει να μεταφέρεται πάντοτε:
σε όρθια θέση (εκτός εάν υπάρχει κάποια άλλη εξουσιοδότηση από
τον πάροχο)
με τις πόρτες κλειστές και τα στόπερ κλειστά στα μοντέλα με
συρόμενες πόρτες
στην αρχική του συσκευασία ή σε κάποια παρόμοια με αυτήν.
Η θερμοκρασία του ψυγείου κατά την αποθήκευση ή τη μεταφορά του δεν
πρέπει να πέφτει κάτω από τους -20oC ή να ξεπερνάει τους +60oC
ΠΡΙΝ ΑΠΟ ΟΠΟΙΟΝΔΗΠΟΤΕ ΚΑΘΑΡΙΣΜΟ Ή ΣΥΝΤΗΡΗΣΗ (ΤΟΥ
ΕΣΩΤΕΡΙΚΟΥ Ή ΤΟΥ ΕΞΩΤΕΡΙΚΟΥ ΤΗΣ ΣΥΣΚΕΥΗΣ), ΑΠΟΣΥΝΔΕΣΤΕ ΤΟ
ΨΥΓΕΙΟ ΑΠΟ ΤΗΝ ΠΑΡΟΧΗ ΡΕΥΜΑΤΟΣ! ΒΓΑΛΤΕ ΤΟ ΒΥΣΜΑ ΚΑΙ
ΒΕΒΑΙΩΘΕΙΤΕ ΟΤΙ Ο ΧΕΙΡΙΣΤΗΣ ΜΠΟΡΕΙ ΝΑ ΕΛΕΓΞΕΙ ΑΠΟ
ΟΠΟΙΟΔΗΠΟΤΕ ΑΠΟ ΤΑ ΣΗΜΕΙΑ ΣΤΑ ΟΠΟΙΑ ΕΧΕΙ ΠΡΟΣΒΑΣΗ, ΟΤΙ ΤΟ
Είναι απαραίτητο να πραγματοποιούνται οι παρακάτω εργασίες από έναν εξουσιοδοτημένο
εκπρόσωπο σέρβις κατά τη διάρκεια της προληπτικής συντήρησης του ψυγείου, μια ή δύο φορές το
χρόνο και με τη χρήση ηλεκτρικής σκούπας:
Καθαρισμός του συμπυκνωτή
Καθαρισμός των φίλτρων σκόνης (εφόσον υπάρχουν).
Εάν το ψυγείο είναι τοποθετημένο σε ένα περιβάλλον όπου συσσωρεύεται σκόνη στο συμπυκνωτή,
τότε ο συμπυκνωτής θα πρέπει να καθαρίζεται πιο συχνά.
Επιπλέον, συνιστάται να εκτελούνται οι παρακάτω λειτουργίες κατά την προληπτική συντήρηση:
1. Μηχανικό σύστημα:
Βεβαιωθείτε ότι ο εξοπλισμός έχει τοποθετηθεί και ευθυγραμμιστεί σωστά.
80
ΚΑΛΩΔΙΟ ΕΧΕΙ ΑΠΟΣΥΝΔΕΘΕΙ ΑΠΟ ΤΗΝ ΠΡΙΖΑ.
ΠΡΟΛΗΠΤΙΚΕΣ ΟΔΗΓΙΕΣ ΣΥΝΤΗΡΗΣΗΣ
ΠΑΡΑΡΤΗΜΑ Α
ΠΑΡΑΡΤΗΜΑ Β

ELL
Βεβαιωθείτε ότι το εμπρός και πίσω πλέγμα είναι στερεωμένα στη θέση τους.
Ελέγξτε το σύστημα αυτόματου κλεισίματος της πόρτας.
Βεβαιωθείτε ότι το στήριγμα του ανεμιστήρα καθώς και το πλέγμα του είναι στερεωμένα στη θέση
τους.
Ελέγξτε το σύστημα απορροής και καθαρίστε το από τυχόν αποφράξεις εφόσον
χρειάζεται.
2. Ηλεκτρικό σύστημα:
Ελέγξτε το καλώδιο τροφοδοσίας (αντικαταστήστε το εφόσον απαιτείται).
Ελέγξτε το σύστημα φωτισμού.
Ελέγξτε τις ηλεκτρικές συνδέσεις.
Βεβαιωθείτε ότι το κάλυμμα του ηλεκτρικού πίνακα του θερμοστάτη ή το ηλεκτρονικό σύστημα
ελέγχου έχουν εγκατασταθεί σωστά.
Βεβαιωθείτε ότι τα εξαρτήματα που ενδεχομένως να έχουν αντικατασταθεί κατά το σέρβις είναι
γνήσια.
3. Σύστημα ψύξης:
Βεβαιωθείτε ότι ο συμπιεστής λειτουργεί σωστά.
Ελέγξτε το ρελέ εκκίνησης, το διακόπτη υπερφόρτισης και τον πυκνωτή. Ο προμηθευτής συνιστά
να γίνεται αντικατάσταση των ρελέ εκκίνησης και υπερφόρτωσης του συμπιεστή κάθε 3-4 χρόνια.
Ελέγξτε το συμπυκνωτή του μοτέρ του ανεμιστήρα και τον εξατμιστή του μοτέρ του ανεμιστήρα.
Βεβαιωθείτε ότι ο θερμοστάτης ή ότι το ηλεκτρονικό σύστημα ελέγχου και τα στοιχεία του
λειτουργούν σωστά.
Ελέγξτε την απόδοση ψύξης του ψυγείου.
Ελέγξτε το κύκλωμα ψύξης με μια κατάλληλη συσκευή εντοπισμού διαρροών σε περίπτωση όπου
υπάρχει οποιαδήποτε ανησυχία ή ένδειξη για διαρροή ψυκτικού.
ΠΑΡΑΡΤΗΜΑ Γ
ΟΔΗΓΙΕΣ ΓΙΑ ΑΠΟΦΥΓΗ ΔΙΑΒΡΩΣΗΣ ΤΟΥ ΘΑΛΑΜΟΥ
1. Αποφύγετε ζημιές που προκύπτουν από μη κατάλληλη τοποθέτηση και λειτουργία, λανθασμένη
συντήρηση και καθαρισμό καθώς και μη κατάλληλη αντιμετώπιση και μεταφορά, όπως
περιγράφονται στις παραγράφους 3, 5 και στο Παράρτημα A.
2. Μην πραγματοποιείτε μη εξουσιοδοτημένες προσαρμογές, μετατροπές ή αλλαγές του θαλάμου.
81

DEU
1. Vorwort
Vielen Dank für Ihren Kauf dieses neuen Ice Cold Merchandiser (ICM, gewerblich genutztes
Kühlgerät) von Frigoglass. Lesen Sie die unten stehenden Anweisungen sorgfältig durch, bevor Sie
dieses Gerät in Betrieb nehmen. Ein gut gewartetes Frigoglass-Kühlgerät hilft Ihnen dabei, die
Verkaufszahlen und den Gewinn zu steigern.
2. Technische Beschreibung
2.1. Allgemeines
Das Kühlgerät muss an einer geerdeten Stromversorgung mit einer Sicherung von 10-16A
angeschlossen werden. Die Steckdose muss zu Installations- und Wartungszwecken leicht zugänglich
sein.
2.2. Klimaklassifikation
Gemäß den Klimaspezifikationen sind die Modelle Smart-300 [R290], Smart-800 [R290], Smart-900L
SD [R290], Smart-900L HD [R290], Smart-1300 HD [R290] und Smart-1300 SD [R290] der Klimaklasse
"4" zugeordnet. Sie eignen sich demnach für eine Umgebungstemperatur von 30°C und eine
Luftfeuchtigkeit von 55%. Die Modelle Smart-450L SZ T [R290] und Smart-450L [R290] sind der
Klimaklasse "5" zugeordnet und eignen sich demnach für eine Umgebungstemperatur von 40°C und
eine Luftfeuchtigkeit von 40%.
2.3. Technische Spezifikationen
Nennspannung / Frequenz 220-240 V / 50 Hz
Enteisung Automatisch
2.4. Abmessungen
Modell
Breite
(mm)
Smart-300 [R290] 495 625
Smart-450L [R290] 596 624
Smart-450L SZ T [R290] 596 629
Smart-800 [R290]
Smart-900L SD [R290] 890 730
Smart-900L HD [R290] 890 732
Smart-1300 HD [R290] 1310 7401 21392 1281 200
Smart-1300 SD [R290] 1310 7383 21392 1212 210
1
Ohne Türgriff & 80mm Abstandstück auf der Rückseite
2
Einschließlich Rollen & Türscharnier-Abdeckung
3
Ohne 80mm Abstandstück auf der Rückseite
82
Tiefe
(mm)
785 785
Höhe
(mm)
1
1619
1
2014
1
20142 427 112
1
2139
3
2014
1
2014
Volumen
(l)
2
258 75
2
427 105
2
778 145
2
722 159
2
823 152
Nettogewicht (kg)

DEU
2.5. Max. Gewicht pro Regal
Modell Höchstgewicht pro Regal (kg)
Smart-300 [R290]
Smart-450L [R290]
Smart-450L SZ T [R290]
Smart-800 [R290]
Smart-900L SD [R290]
Smart-900L HD [R290]
Smart-1300 HD [R290]
Smart-1300 SD [R290]
24
28
28
65
61
70
50
45
Die Modelle Smart-300 [R290], Smart-450L [R290], Smart-450L
SZ T [R290], Smart-800 [R290], Smart-900L SD [R290], Smart900L HD [R290], Smart-1300 HD [R290] und Smart-1300 SD
[R290] sind mit einem HC-Kühlmittel ausgestattet, wurden
getestet und sind entsprechend den geltenden Normen
erwiesenermaßen sicher.
Alle nötigen Handlungen für die Sicherheit beim Gebrauch & der
Wartung dieses Geräts sind in dieser Anleitung beschrieben
und müssen genau befolgt werden. Dieses Gerät darf nur von
qualifizierten Fachkraft installiert werden.
3. Installation & Betrieb
Bei Nichtbeachtung der Anweisungen kann es zu einem sehr hohen
Energieverbrauch, zu verminderter Leistung des Geräts kommen. Auch
verfällt die Garantie.
Halten Sie alle Belüftungsöffnungen des Geräts oder des
Installationsorts frei.
Verwenden Sie für eine schnellere Enteisung keine anderen
mechanischen Geräte oder sonstige Hilfsmittel als die vom Hersteller
empfohlenen.
Beschädigen Sie nicht den Kühlungsbereich
Keine elektrischen Geräte innerhalb des Lebensmittellagerraumes
betreiben, die nicht vom Hersteller freigegeben sind.
Falls das Stromkabel beschädigt ist, ist es zur Vermeidung von
Schäden oder Gefahren stets vom Hersteller, seinem Kundendienst
oder einer entsprechend qualifizierten Person auszutauschen.
83

DEU
Platzieren Sie das Kühlgerät nicht:
im direkten Sonnenlicht oder in der Nähe von Wärmequellen
(Heizungen, Öfen & andere Heizgeräte)
im Freien ohne ausreichenden Regenschutz, der das direkte
Auftreffen von Wasser auf das Kühlgerät verhindert
unter Klimabedingungen, für die es nicht zertifiziert ist
unter Extrembedingungen (z.B. Exposition gegenüber salziger
Feuchtigkeit)
auf einer Oberfläche mit über 5°Neigung
3.1. Installationsanweisungen für ihr Kühlgerät
a. Überprüfen Sie das Gerät nach dem Auspacken auf Transportschäden. Im Falle eines
Schadens setzen Sie sich bitte mit dem Lieferunternehmen in Verbindung.
b. Versichern Sie sich, dass Ihr Kühlschrank auf einem stabilen, ausreichend ebenen Boden /
Tresen aufgestellt ist. Unter dem Schrankkorpus aller Modelle befinden sich vorne 2
höhenverstellbare Füße.
Kontrollpunkte
Einstellung der
Nivellierfüße
vorne
Bitte stellen Sie diese ein, bis das ICM horizontal ausgerichtet ist und überprüfen Sie dies nach
Möglichkeit mit einer Wasserwaage. Treffen Sie die nötigen Vorsichtsmaßnahmen, wenn das Gerät
bei der Installation angehoben werden muss. Halten Sie unbefugte Personen vom Kühler fern, bis die
Installation abgeschlossen ist.
c. Nach dem Transport den Kühlschrank vor dem Einschalten mindestens 1 Stunde in aufrechter
Position stehen lassen. Dies gibt dem Öl Zeit, nach dem Transport und der Installation wieder in
den Verdichter zurückzufließen.
d. Sorgen Sie für mindestens 100 mm Freiraum auf der Geräterückseite. Dazu drehen Sie das
Abstandstück auf der Rückseite wie unten abgebildet.
e. Stellen Sie nichts auf das Kühlgerät.
84

DEU
Abstandstüc
k auf der
Rückseite
Hinweis: Umstellung des Kühlgeräts innerhalb des Geschäfts
a. Entleeren Sie das Kühlgerät und trennen Sie es von der Stromversorgung.
b. Ziehen Sie die Nivellierfüße ganz heraus.
c. Verschieben Sie die Einheit in die gewünschte Position. Lassen Sie sich von einer anderen
Person helfen.
3.2. Installationsanweisungen für die Regale
Um die Höhe des Regals zu ändern, leeren Sie es, heben Sie es an, und entfernen Sie die
Regalhalterungen (4). Platzieren Sie die Stifte auf die gewόnschte Position und legen Sie das Regal
wieder ein. Achten Sie darauf, dass sich die horizontal verlaufenden Metallleisten unter dem Regal
zwischen den vorderen und hinteren Regalhalterungen befinden, wie unten abgebildet.
Hinweis: Die Modelle Smart-450L, 500 & 800 sind speziell mit jeweils 4 Regalen mit Abstandstücken
(auf der Rückseite) und einem Regal ohne Abstandstück ausgestattet.
Das Regal ohne Abstandstück muss zuoberst installiert werden, anliegend am zusätzlichen
Luftzirkulations- Metallelement, wie auf der Abbildung ersichtlich.
Regal ohne
Abstandstück
Hinweis: Bei der Verwendung des optionalen vorderen Sichtbarkeit Regalsystems, folgen Sie bitte die
beigelegten Installationsanweisungen des Regalsatzes.
Zusätzliches
Metallelement
Regal mit Abstandstück
85

DEU
3.3. Anschluss der Stromversorgung
Schließen Sie das Kühlgerät an einer Steckdose mit 220-240 Volt Stromversorgung, mit Sicherung 1016A & Erdung an. Keine Verlängerungskabel verwenden.
Das Kühlgerät darf nicht angeschlossen werden an:
einer nicht geerdeten Wandsteckdose oder Stromleitung
eine ungeeignete Spannung und Frequenz.
eine Stromversorgung, welche die Sicherheitsvorschriften des
Geräts oder die für elektrische Installationen geltenden Gesetze
nicht befolgt
Falls das mitgelieferte Hauptkabel nicht lang genug ist, kein
Verlängerungskabel verwenden. Lassen Sie das Kabel von
einem autorisierten Elektriker gegen ein längeres austauschen,
nur falls es in der Liste der autorisierten Ersatzteilen
beschrieben ist.
Schließen Sie den Kühler nicht an eine Mehrfachsteckdose an
Verlegen Sie die Netzkabel so, dass es vor Beschädigung
geschützt ist und keine Stolperfalle darstellt.
3.4. Bedienungsanleitung
Verwenden Sie den Kühler nicht zum Lagern von Lebensmitteln.
Lagern Sie keine explosiven Mittel wie etwa Spraydosen mit einem
brennbarem Treibmittel in diesem Gerät.
Dieses Gerät eignet sich nicht zum Gebrauch durch kleine Kinder,
Behinderte oder gebrechliche Menschen, sofern sie nicht angemessen
von einer verantwortlichen Person beaufsichtigt werden, die den
sicheren Betrieb des Geräts gewährleistet. Kleine Kinder müssen
beaufsichtigt werden, um sicherzustellen, dass sie nicht mit dem Gerät
spielen.
Nehmen Sie das Gerät nicht in Betrieb, falls irgendwelche Abdeckungen
oder Schutzeinrichtungen offen sind
Energiespartipps:
Um Energie zu sparen und die Kühlleistung zu verbessern:
Füllen Sie Ihr Kühlgerät nachts auf, so dass Sie gleich in der morgens kalte Getränke haben.
Lagern Sie Ihre Vorräte an einem kühlen und/oder dunklen Ort, damit nach dem Auffüllen des
Kühlgeräts weniger Zeit für die Kühlung erforderlich ist.
Wischen Sie Feuchtigkeit von den Produkten, bevor Sie sie in das Kühlgerät stellen.
Lassen Sie die Tür nicht für lange Zeit geöffnet.
86

DEU
4. Elektronische Steuergeräte
4.1. Informationen zu ECOBOX / HEC Steuereinheit*
Anweisungen zu den Funktionen der Steuereinheit ECOBOX/HEC und des entsprechenden
Sonderzubehörs finden Sie unter dem folgenden Link: http://www.frigoglass.com/manuals/.
4.2. Informationen zur Steuereinheit Danfoss ERC-112*
Anweisungen zu den Funktionen der Steuereinheit Danfoss ERC-112 und des entsprechenden
Sonderzubehörs finden Sie unter dem folgenden Link: http://www.frigoglass.com/manuals/.
5. Tür- Sperrsystem*
Zur Verwendung des Tür-Sperrsystems gehen Sie bitte folgendermaßen vor
5.1. Verwendung bei Kühlgeräten mit Flügeltüren
Schritt 1: Tür in einem Öffnungswinkel von über 110 Grad öffnen
Schritt 2: Türsperrung in Richtung Kühlschrank drehen (s. Abbildung)
Schritt 3: Die Türsperrung stoppt an der Schraube über dem Gitter (s. Abbildung)
Schritt 4: Tür öffnen, um die Türsperrung vom Haltepunkt freizugeben und diese in die
Ausgangsposition zurückdrehen
5.2. Verwendung bei Kühlgeräten mit Schiebetüren
Schritt 1: Linke Tür öffnen (für die rechte Tür in gleicher Weise vorgehen)
Schritt 2: Türsperre anheben und in Richtung Kühlkammer drehen (s. Abbildung)
Schritt 3: Türsperre vertikal zu den Türführungen platzieren (s. Abbildung). Die Türsperre wird an den
Türführungs-Wänden blockiert und verhindert das Schließen der Tür
Schritt 4: Türsperre vom Arretierungspunkt lösen und in die ursprüngliche Position zurückdrehen
*
Sonderzubehör, je nach Modell
87

DEU
6. Verriegelungssystem*
6.1. Gebrauchsanleitung für die Vorhängeschloss-Option
Schritt 1: Tür öffnen
Schritt 2: Verriegelungs-Blatt auf dem Gitter drehen (s. Abbildung)
Schritt 3: Verriegelungs-Blatt auf der Tür drehen (s. Abbildung)
Schritt 4: Tür schließen und das Vorhängeschloss durch die Löcher der Verriegelungsblätter führen,
Schritt 2 Schritt 3
6.2. Gebrauchsanleitung für das Zylinderschloss
Schritt 1: Tür schließen
Schritt 2: Schlüssel in das Schloss auf dem Frontgitter stecken und um 90° drehen (s. Abbildung)
Schritt 3: Die Tür ist nun verriegelt. Der Schlüssel kann sowohl in verriegelter als auch in geöffneter
Position entfernt werden
um den Kühler zu sichern
Bei Kühlgeräten mit Schiebetür befindet sich das Zylinderschloss in der Mitte der Kunststoffprofil-Seite
der äußeren Tür.
*
Sonderzubehör, je nach Modell
88

DEU
Kühler mit Schiebetür
6.3. Gebrauchsanleitung für die Transportverriegelung des Drehregals bei Smart-900.
Schritt 1: Tür öffnen
Schritt 2: Schieber des Verriegelungssystems betätigen (in der Mitte der oberen Leiste der
Regalhalterung).
Schritt 3: Das Drehregal ist verriegelt.
Verriegelt Freigegeben
7. Nachtabdeckung*
Zum Aufsetzen der Nachtabdeckung gehen Sie bitte folgendermaßen vor
Schritt 1: Bohren Sie Löcher auf der Oberseite und seitlich des Kühlers und bringen Sie die
Schritt 2: Befestigen Sie die Nachtabdeckung auf der Vorderseite der Anordnung und sichern Sie
Halterungsblätter und -riegel an (s. Abbildung und beigelegte Installationsanweisungen des
Nachtabdeckungssets).
diese mit einem Vorhängeschloss, wie abgebildet (die Rückseiten-Anordnung kann zum
Verstauen der Nachtabdeckung während des Gebrauchs des Kühlers verwendet werden).
*
Sonderzubehör
89

DEU
Schritt 1 Schritt 2
8. FI-Schalter*
Um Zugang zum FI-Schalter zu erhalten, gehen Sie bitte folgendermaßen vor
Schritt 1: Gitter entfernen, um Zugang zum Elektrikkasten zu gewährleisten (markiert mit einem Kreis
Schritt 2: Anschlussabdeckung des Elektrikkastens entfernen
Schritt 3: Zugang zum FI-Schalter (markiert mit einem Kreis in der entsprechenden Abbildung unten
in der entsprechenden Abbildung unten)
und im Aufkleber auf der Vorderseite der Abdeckung)
Schritt 1
Schritt 2,3
FI-Schalter
9. PRCD*
Das PRCD-Gerät ist in der Nähe des Wandsteckers im Stromkabel der Einheit eingebaut (siehe
Abbildung unten).
*
Sonderzubehör
90

DEU
Das PRCD-Gerät ist mit zwei Schaltern ausgestattet; der kleinere ist der "Testschalter" und wird zur
Überprüfung des Betriebsstatus des PRCD verwendet. Der größere Schalter ist der "Reset-Schalter"
und wird zum Zurücksetzen des PRCD nach einem Auslösen verwendet.
Wenn das Stromkabel ausgesteckt wird, muss anschließend ein Test durchgeführt werden, um die
korrekte Funktion des PRCD zu gewährleisten. Bitte gehen Sie wie folgt vor:
Schritt 1: Kabel einstecken.
Schritt 2: (Kleine) „TEST“-Schalter drücken. Der (große) „RESET“-Schalter sollte herausspringen.
Schritt 3: „RESET“-Schalter erneut drücken. Gerät nicht verwenden, wenn der Test fehlschlägt!
TEST-Schalter
RESET-Schalter
10. Pflege & Reinigung
Vor jedem Reinigungsvorgang (innen im Gerät oder außen am
Gerät) immer den Netzstecker des Kühlgeräts ziehen! Ziehen
Sie den Stecker und vergewissern Sie sich, dass der Bediener
von jedem für ihn zugänglichen Punkt aus kontrollieren kann,
Das Kühlgerät ist auf jeden Fall mindestens zwei Mal pro Jahr zu reinigen. Um Schimmelbildung,
Geruchsbildung usw. zu vermeiden, müssen die Produktfächer gründlich gereinigt werden. Reinigen
Sie das Innere des Kühlgeräts mit einem mit Seifenwasser angefeuchteten Tuch. Für die
Glasoberflächen verwenden Sie einen Fensterreiniger.
ob der Stecker gezogen ist..
Das Kühlgerät nicht mit einem Wasserschlauch oder einem
Hochdruckreiniger reinigen.
Falls das Kühlgerät in sehr staubiger und/oder fettiger
Umgebung angebracht worden ist, muss der Kondensator
regelmäßig von einem qualifizierten Techniker gereinigt werden.
Halten Sie das Kühlgerät während der Reinigung in stabiler
Position. Stehen Sie nicht auf das Kühlgerät und lehnen Sie
sich nicht darüber.
Nicht mit scharfen Gegenständen, entflammbaren oder
ätzenden Flüssigkeiten oder Sprays reinigen.
91

DEU
11. Beseitigung von Störungen
Nur autorisiertes Fachpersonal darf auf das Kühlsystem und elektrische
Komponenten zugreifen (Auswechseln der Lampen oder des Kühldecks).
Die Modelle Smart-300 [R290], Smart-450L [R290], Smart-450L
SZ T [R290], Smart-800 [R290], Smart-900L SD [R290], Smart900L HD [R290], Smart-1300 HD [R290] und Smart-1300 SD
[R290] sind mit einem HC-Kühlmittel ausgestattet.
Wartungsarbeiten am Kühlmechanismus & das Auffüllen von
Gas dürfen nur in einem gut belüfteten Raum oder im Freien
durchgeführt werden. Rauchen Sie nicht während der
Wartungsarbeiten.
VOR JEDER INSTANDHALTUNG ODER WARTUNG DEN STECKER
DES KÜHLGERÄTS ZIEHEN. ZIEHEN SIE DEN STECKER UND
VERGEWISSERN SIE SICH, DASS DER BEDIENER VON JEDEM FÜR
IHN ZUGÄNGLICHEN PUNKT AUS KONTROLLIEREN KANN, OB DER
STECKER GEZOGEN IST.
Stellen Sie nach Wartungsarbeiten sicher, dass die
Erdungsanschlüsse an Ort und Stelle sind, bevor Sie die
Abdeckungen aufsetzen. Vergewissern Sie sich, dass Sie dieselben
Befestigungen und Abdeckungen verwenden.
Falls ein elektrisches Teil ersetzt werden muss, verwenden Sie
Wenn das Kühlgerät nicht ordnungsgemäß arbeitet oder defekt ist, überprüfen Sie Folgendes, bevor
Sie sich an den autorisierten Wartungsanbieter wenden:
STÖRUNG MÖGLICHE URSACHEN BEHEBUNG
Das Kühlgerät
funktioniert nicht.
Das Kühlgerät
kühlt nicht.
92
ausschließlich die entsprechenden Teile aus der beiliegenden
Ersatzteilliste des technischen Kundendiensts von Frigoglass.
Die Glastür des Kühlgeräts muss während der Wartung geschlossen
bleiben. Falls der Verdichter ersetzt werden muss, müssen Sie
eventuell den Kühler mit einer geeigneten Stütze sichern.
Vergewissern Sie sich nach Wartungsarbeiten, dass die
Zugentlastung, die das Stromkabel unterstützt, richtig angebracht
ist.
Stromkabel nicht angeschlossen. Stecken Sie es ein.
Keine Stromversorgung an der
Steckdose.
Das Kühlgerät wurde kürzlich mit
warmen Produkten nachgefüllt. Die
Kühlung von warmen Produkten dauert
etwas.
Prüfen Sie die Steckdosensicherung.
Füllen Sie das Kühlgerät vorzugsweise
abends vor dem Schließen nach.

DEU
STÖRUNG MÖGLICHE URSACHEN BEHEBUNG
Das Gerät ist so gefüllt, dass die
Luftzirkulation im Inneren blockiert ist.
Das Kühlgerät
kühlt nicht.
Das Kühlregal
macht
Geräusche.
Auf dem
Kühlschrankbode
n ist Wasser.
Die Beleuchtung
funktioniert nicht.
Falls das Problem auch nach der Überprüfung der obigen Punkte weiter besteht, wenden Sie sich bitte
unter Angabe der folgenden Informationen an den Kundendienst Ihres Anbieters:
Kühlgerät-Modell
Seriennummer des Kühlgeräts
Kurze Beschreibung des Problems / der Beobachtung
Die Tür schließt nicht richtig.
Leck im Kühlsystem.
Starke metallische Geräusche.
Boden mit Neigung oder nicht eben.
Das Abflussrohr für das Kondenswasser
ist verstopft.
Das Auffangbecken ist undicht.
Die Beleuchtung oder der Transformator
ist defekt.
Füllen Sie das Kühlgerät gemäß den
Vorgaben des Unternehmens auf.
Türen reparieren, dass sie korrekt
schließen (Diese Art von Reparatur
muss von einem autorisierten
Techniker durchgeführt werden).
Reparieren Sie das Leck. (Dies sollte
von einem autorisierten Techniker
durchgeführt werden.)
Wenden Sie sich an einen
Wartungstechniker.
Stellen Sie das Kühlgerät mithilfe der
verstellbaren Füße eben ein. Eine
Wasserwaage auf dem Kühlgerät hilft
bei der Nivellierung des Geräts.
Verstopfung im Abflussrohr beheben.
Wenden Sie sich an einen
Wartungstechniker.
Wenden Sie sich an einen
Wartungstechniker.
12. Erste Hilfe
Im Falle eines Unfalls ist wie folgt vorzugehen:
UNFALL SOFORTMASSNAHMEN
Einatmung des
Kühlmittels
Kontakt mit den Augen
Kontakt mit der Haut
Tief an der frischen Luft durchatmen. Sollten die Symptome
andauern, ist ein Arzt aufzusuchen.
Augen mindestens 15 Minuten mit reichlich Wasser gründlich spülen und
anschließend einen Arzt aufsuchen
Sofort mit reichlich Wasser waschen.
93

DEU
13. Entsorgung des Kühlgeräts
Detaillierte Informationen zum Recycling dieses Produkts erhalten Sie bei Ihrer Stadtverwaltung,
Ihrem örtlichen Abfalldienst oder über den Wartungsvertreter auch beim Hersteller. Durch Ihren
Beitrag zum korrekten Entsorgen dieses Produkts schützen Sie die Umwelt und die Gesundheit Ihrer
Mitmenschen.Umwelt und Gesundheit werden durch falsches Entsorgen gefährdet.
14. Informationen zum Recycling
1. Auf der Grundlage der Zielsetzung der Umweltpolitik nach der Richtlinien der Europäischen
Gemeinschaft (EG) für Elektrische und Elektronische Altgeräte (WEEE)
Bewahrung, zum Schutz und zur Verbesserung der Umweltqualität und dem Schutz der
menschlichen Gesundheit sowie zur umsichtigen, vernünftigen Nutzung natürlicher Ressourcen
beitragen sollen. Als Endnutzer werden Sie daher um folgendes gebeten:
• Sollte das Gerät auch nach Behebung der Störung nicht ordnungsgemäß funktionieren, prüfen
Sie zunächst, ob es repariert werden kann, bevor Sie es entsorgen. Wenden Sie sich im
Zweifelsfall für weitere Informationen über eine mögliche Reparatur Ihres Geräts an Ihren
Verkäufer oder Anbieter.
• Sollte das Gerät sein „Ende des Lebenszyklus“ erreicht haben, d. h., das Gerät kann nicht mehr
repariert oder wiederverwendet werden, entsorgen Sie das Gerät bitte nicht im Hausmüll.
Stellen Sie stattdessen sicher, dass es getrennt von einem Recyclingunternehmen abgeholt
wird.
Hinweis: Die ordnungswidrige Entsorgung elektrischer und elektronischer Geräte in der freien Natur
verursacht eine Reihe von Umweltschäden. Werden die Altmaterialien nicht recycelt, so müssen
Rohstoffe verwendet werden, um neue Produkte herzustellen. Dies stellt eine erhebliche
Verschwendung von Ressourcen dar, da diese Prozesse riesige Mengen an Energie benötigen, mit
Transportaufwand verbunden sind und umweltschädlich sind.
• Um den Entsorgungs- und Recyclingprozess dieses Geräts nicht zu behindern, entfernen oder
brechen Sie vor der Entsorgung keine Teile des Geräts ab. Durch die Entfernung von
Geräteteilen kann es zu verminderter Recycling-Fähigkeit kommen.
2. Das Symbol in Abb. 1, das auch auf dem Produktsiegel im Gerät abgebildet ist, verweist auf
den Bedarf einer getrennten Entsorgung elektrischer und elektronischer Geräte gemäß der
WEEE-Richtlinien der Europäischen Gemeinschaft (EG).
*
, welche zur
Abb. 1 - Durchgestrichene Mülltonne
3. Beachten Sie bitte auch alle Recyclinggesetze ihrer Gemeinde oder Ihres Landes.
*
Referenzen
Richtlinie über Elektrische und Elektronische Altgeräte (WEEE) der Europäischen Gemeinschaft (EG) Nr.
2002/96/EG
94

DEU
15. Garantie
Für das Gerät wird wie beim Kauf vereinbart eine Garantie gewährt.
NUR FÜR AUTORISIERTES WARTUNGSPERSONAL
RICHTLINIEN FÜR HANDHABUNG & TRANSPORT
Das Kühlgerät muss immer folgendermaßen transportiert werden:
Aufrecht (sofern es der Hersteller nicht anders vorschreibt)
mit geschlossenen Türen und Stoppern bei Schiebetür-Modellen
in der Originalverpackung oder in ähnlicher Verpackung.
Die Kühlertemperatur sollte während der Aufbewahrung oder dem
Transport nicht unter -20°C oder über +60°C liegen
Die folgenden Vorgänge müssen von einer autorisierten Wartungs-Fachkraft bei der präventiven
Wartung eines Kühlgeräts unbedingt ein bis zwei Mal pro Jahr mit einem Staubsauger durchgeführt
werden:
Reinigung des Kondensators
Reinigung des Staubfilters (wenn vorhanden).
Wenn das Kühlgerät in einer Umgebung steht, in der sich Staub auf dem Kondensator ansammelt,
muss der Kondensator häufiger gereinigt werden.
Außerdem empfehlen wir, bei der präventiven Wartung die folgenden Vorgänge durchzuführen:
1. Mechanisches System
Überprüfen Sie, ob die Ausrüstung korrekt platziert und nivelliert ist.
Überprüfen Sie, ob die Gitter auf der Vorder-und Rückseite korrekt platziert und befestigt sind.
Überprüfen Sie das Selbstschließ-System der Tür.
Überprüfen Sie, ob die Ventilatorhalterung und das Ventilatorgitter korrekt platziert und befestigt
sind.
Überprüfen Sie das Abflusssystem und beheben Sie ggf. Verstopfungen.
RICHTLINIEN FÜR DIE PRÄVENTIVE WARTUNG
VOR JEDEM REINIGUNGSVORGANG (INNEN IM GERÄT ODER AUSSEN
AM GERÄT) IMMER DEN NETZSTECKER DES KÜHLGERÄTS ZIEHEN!
ZIEHEN SIE DEN STECKER UND VERGEWISSERN SIE SICH, DASS DER
BEDIENER VON JEDEM FÜR IHN ZUGÄNGLICHEN PUNKT AUS
KONTROLLIEREN KANN, OB DER STECKER GEZOGEN IST.
ANHANG A
ANHANG B
95

DEU
2. Elektrisches System
Überprüfen Sie das Stromkabel (bei Bedarf ersetzen).
Überprüfen Sie das Beleuchtungssystem.
Überprüfen Sie die elektrischen Anschlüsse.
Überprüfen Sie, ob die Elektrikkasten-Abdeckung des Thermostats bzw. des elektronischen
Steuergeräts korrekt installiert ist.
Überprüfen Sie, ob eventuell bei der Wartung ersetzte Komponenten Originalkomponenten sind.
3. Kühlsystem:
Überprüfen Sie, ob der Verdichter korrekt funktioniert.
Überprüfen Sie das Steuerrelais, die Überlastsicherung und den Kondensator. Der Hersteller
empfiehlt, die Steuerrelais und Überlastsicherungen des Verdichters alle 3-4 Jahre zu ersetzen.
Überprüfen Sie den Kondensator des Ventilatormotors und den Verdampfer des Ventilatormotors.
Überprüfen Sie, ob der Thermostat bzw. die elektronische Steuerung und ihre Komponenten
korrekt funktionieren.
Überprüfen Sie die Kühlleistung des Kühlgeräts.
Überprüfen Sie den Kühlkreislauf mithilfe eines geeigneten Lecksuchgeräts, falls ein Verdacht
oder Anzeichen für ein Kühlmittelleck bestehen.
ANHANG C
RICHTLINIEN FÜR DEN KORROSIONSSCHUTZ DES KÜHLSCHRANKS
1. Vermeiden Sie Beschädigungen infolge von unsachgemäßer Installation & Verwendung,
unsachgemäßer Wartung & Reinigung und unsachgemäßer Handhabung und unsachgemäßem
Transport, indem Sie die Abschnitte 3, 5 und Anhang A oben beachten.
2. Nehmen Sie keine eigenmächtigen Anpassungen, Änderungen oder Einstellungen am
Kühlschrank vor.
96

ITA
1. Premessa
Vi ringraziamo per aver acquistato il nuovo Ice Cold Merchandiser (ICM) di Frigoglass. Prima di usare
questo espositore refrigerato, vi preghiamo di leggere attentamente le istruzioni. Un espositore
refrigerato Frigoglass ben tenuto vi aiuterà ad aumentare le vendite e i profitti.
2. Descrizione tecnica
2.1. Generale
Il refrigeratore deve essere collegato a una presa messa a terra con un fusibile di valore compreso tra
10A e 16A. La presa deve essere facilmente accessibile ai fini di installazione ed uso.
2.2. Classe climatica
In base alla specifiche climatiche, i modelli Smart-300 [R290], Smart-800 [R290], Smart-900L SD
[R290], Smart-900L HD [R290], Smart-1300 HD [R290] e Smart-1300 SD [R290] sono di classe "4",
ovvero temperatura ambiente di 30°C e 55% di umidità; i modelli Smart-450L SZ T [R290] e Smart450L [R290] sono di classe “5”, ovvero temperatura ambiente di 40⁰C e 40% di umidità.
2.3. Specifiche tecniche
Voltaggio 220-240 V / 50 Hz
Sbrinamento Automatico
2.4. Dimensioni
Modello
Larghezza
(mm)
Smart-300 [R290] 495 625
Smart-450L [R290] 596 624
Smart-450L SZ T [R290] 596 629
Smart-800 [R290] 785 785
Smart-900L SD [R290] 890 730
Smart-900L HD [R290] 890 732
Smart-1300 HD [R290] 1310 7401 21392 1281 200
Smart-1300 SD [R290] 1310 7383 21392 1212 210
1
Esclusa la maniglia e il distanziatore posteriore di 80mm
2
comprese le ruote e i copricardini
3
Escluso il distanziatore posteriore di 80mm
Profondità
(mm)
1
1
1
1
3
1
Altezza
(mm)
1619
2014
Capacità
(lt)
2
258 75
2
427 105
Peso netto
20142 427 112
2
2139
2014
2014
778 145
2
722 159
2
823 152
(kg)
97

ITA
2.5. Peso massimo per ripiano
Modello Peso massimo per ripiano (kg)
Smart-300 [R290]
Smart-450L [R290]
Smart-450L SZ T [R290]
Smart-800 [R290]
Smart-900L SD [R290] 61
Smart-900L HD [R290] 70
Smart-1300 HD [R290] 50
Smart-1300 SD [R290] 45
I modelli Smart-300 [R290], Smart-450L [R290], Smart-450L SZ T
[R290], Smart-800 [R290], Smart-900L SD [R290], Smart-900L HD
[R290], Smart-1300 HD [R290] e Smart-1300 SD [R290] sono
dotati di refrigerante HC, sono stati testati ed è stato dimostrato
che sono sicuri, sulla base delle relative norme.
Questo manuale illustra tutte le operazioni necessarie per
l'utilizzo sicuro e la manutenzione dell'apparecchiatura ed è
necessario seguirlo con attenzione. Il montaggio deve essere
eseguito da un operatore adeguatamente qualificato.
3. Installazione e funzionamento
24
28
28
65
98
Il mancato rispetto di queste istruzioni potrebbe comportare un alto
consumo di energia, scarse prestazioni e invalidare la garanzia.
Mantenere sempre libere le aperture per la ventilazione nell'area
circostante l'apparecchiatura o nella struttura in cui è incassata.
Non usare strumenti meccanici o altri mezzi per accelerare lo
sbrinamento, oltre a quelli raccomandati dal produttore
Non danneggiare il circuito del refrigerante
Non usare apparecchi elettrici dentro i compartimenti per la
conservazione degli alimenti a meno che questi non siano consigliati
dal produttore.
Se il cavo di alimentazione è danneggiato, per evitare rischi, deve
essere sostituito dal fabbricante, dal suo servizio di assistenza o da
una persona che abbia simile competenza.

ITA
Non collocare il distributore:
alla luce diretta del sole o vicino a fonti di calore (radiatori, stufe o
altri elementi riscaldanti)
all'aperto, senza protezione dalla pioggia che impedisca all'acqua di
cadere direttamente sull'espositore refrigerato
in condizioni climatiche per le quali non è certificato
in condizioni ambientali estreme (ad es. esposizione in ambienti
umidi ad elevato contenuto salino)
su una superficie in pendenza con inclinazione maggiore di 5 gradi.
3.1. ICM Istruzioni d'installazione
a. Dopo aver disimballato l’unità, controllare che non vi sia alcun danno causato dal trasporto. In
caso di riscontro di danni, contattare la ditta che ha effettuato il trasporto.
b. Assicurarsi sempre che il refrigeratore sia installato su una superficie a livello. Tutti i modelli
sono dotati di 2 piedini regolabili nella parte anteriore sotto il telaio.
Punti di
controllo
Piedino di
livellamento
centrale
Effettuare la regolazione fino a livellamento completo del refrigeratore e verificare con una livella a
bolla d'aria, se disponibile. Usare le precauzioni necessarie se è necessario inclinare il refrigeratore
durante l'istallazione. Tenere lontane dal refrigeratore le persone non autorizzate fino a che
l'istallazione non è completa.
c. L’espositore deve rimanere in posizione eretta per almeno 1 ora prima della messa in funzione
dopo il trasporto per dare all’olio il tempo di raggiungere il compressore dopo il trasporto e
l’installazione.
d. Dietro, lasciare uno spazio di minimo 100mm ruotando i distanziatori come nella figura che
segue.
e. Non mettere niente sulla parte superiore del refrigeratore.
99

ITA
Ruotare il
distanziatore
Nota: Trasferimento del refrigeratore
a. Svuotare il refrigeratore e scollegare la presa della corrente.
b. Estrarre completamente i piedini regolabili.
c. Spostare il refrigeratore nel luogo desiderato con l’aiuto di un’altra persona.
3.2. Istruzioni di montaggio dei ripiani
Per regolare il ripiano è necessario svuotarlo, sollevarlo e sganciare i ganci del ripiano (4). Mettere i
ganci nella posizione desiderata e riposizionare il ripiano. Assicurarsi che le bacchette metalliche nella
parte inferiore del ripiano si trovino tra i ganci anteriori e quelli posteriori del ripiano, come mostrato
sotto.
Nota: I modelli Smart- 450L, 500 e 800 sono specificamente attrezzati con 4 ripiani con distanziatori
(nella parte posteriore) e un ripiano senza distanziatore.
Il ripiano privo di distanziatore deve essere posizionato come primo in alto, montato sulla parte
metallica supplementare per la ventilazione, come illustrato nelle seguenti figure.
Ripiano senza
distanziatore
Parte metallica
supplementare
Ripiano con
distanziatore
Nota: Quando si usa il sistema opzionale di visibilità frontale dei ripiani, seguire le istruzioni di
installazione contenute nel kit ripiani.
100
 Loading...