


Built-In Downdraft Cooktop
RC36DE60PB
36" Electric
Product Dimensions
Width 36-3/4"
Depth 22-1/16"
Height (Min.)/(Max.) 18-19/32"/ 23-3/8"
More Easy-To-Use Features
Hot Surface Indicators
Smoothtop Ceramic Glass
Cooking Surface
3 Ducting Options
Dishwasher-Safe Filter
Available in:
Black
(B)
Elements
Right Front
Right Rear
Left Front
Left Rear
Size
6" / 9"/ 12"
6"
9"
5" / 7"
Watts
800/ 1,900/
3,000
1,200
3,200
750 / 1,800
Signature Features
Downdraft System
Whisks away odors and smoke without
the need for overhead ventilation.
Ready-Select® Controls
Select options or control cooking
temperature with our easy-to-use
controls.
PowerPlus® Boil
Boil water faster.
SpaceWise® Bridge
Element
A flexible element lets you combine
two elements into one to fit larger
cookware.
frigidaire.com
Features
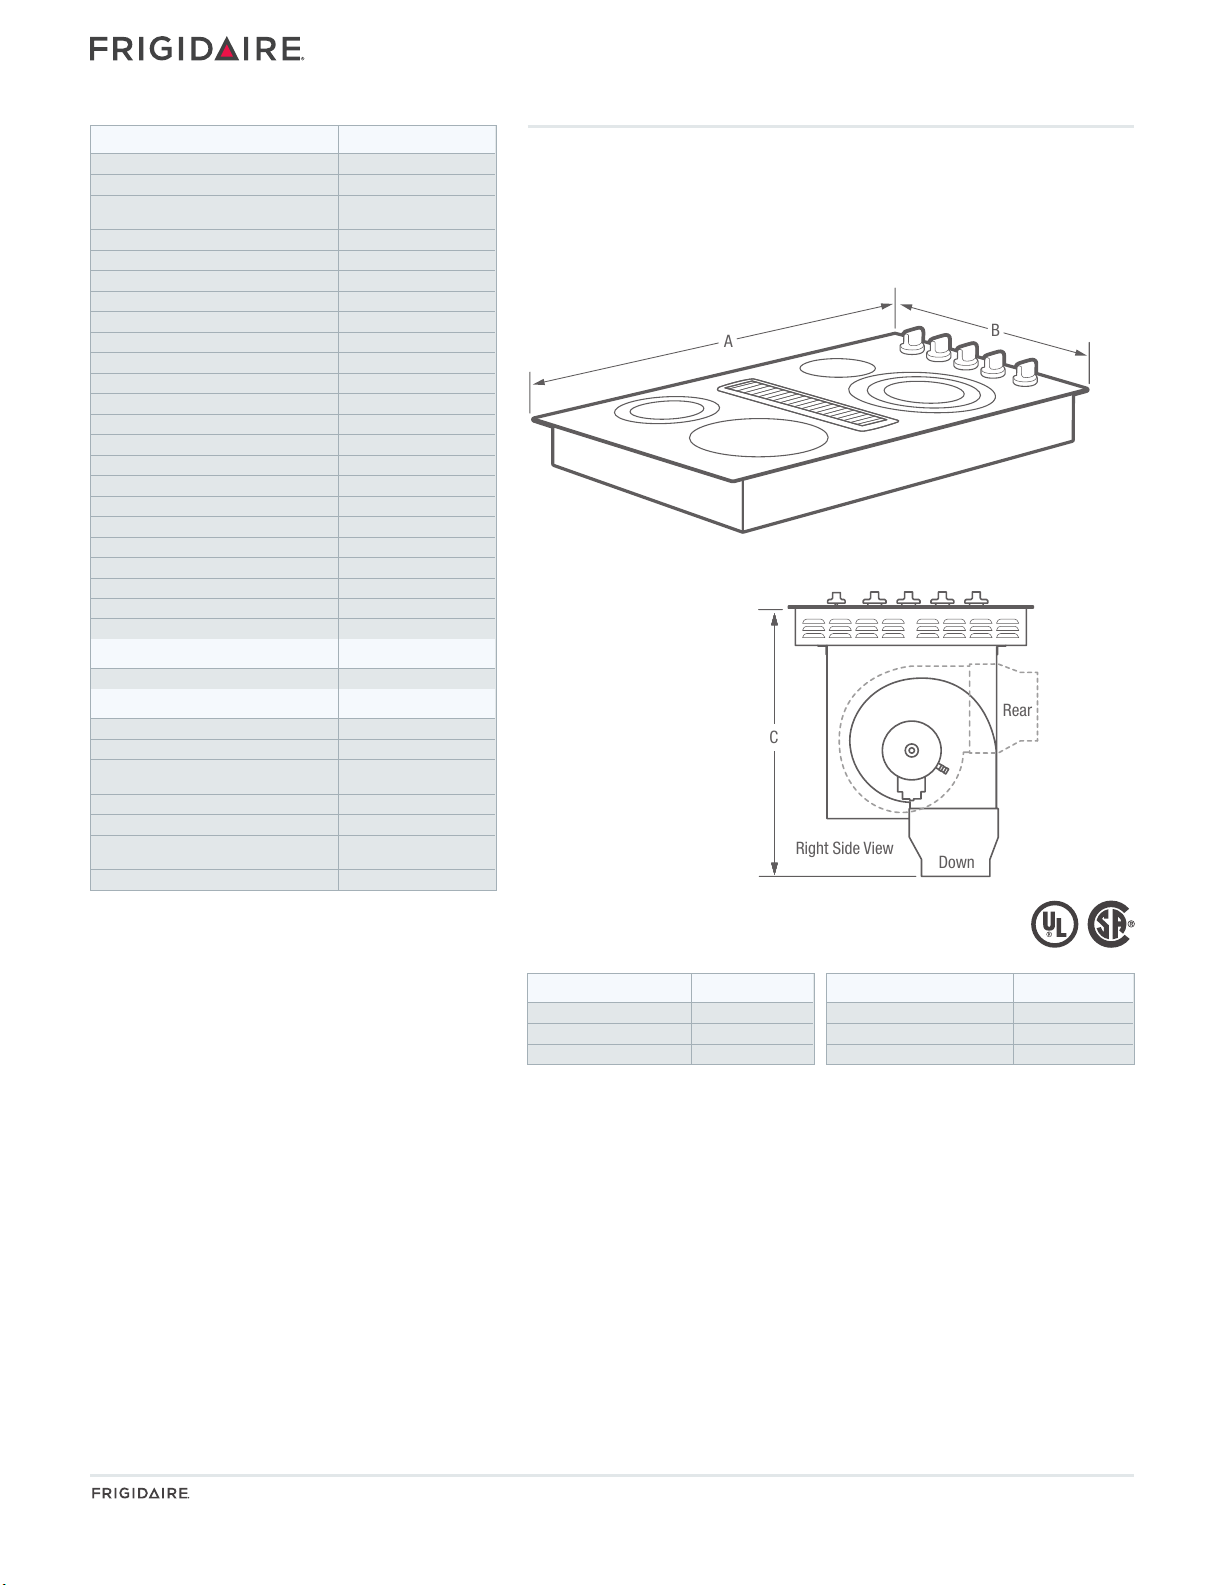
A
B
C
Rear
Right Side View
Down
Controls
Surface Type
Right Front Element (Watts)
Right Rear Element (Watts)
Left Front Element (Watts)
Left Rear Element (Watts)
Center Element (Watts)
Hot Surface Indicators
Control Location
Knob Color
Knob Type
Nominal Width
Installation Type
Style
Air Discharge
Air Delivery (CFM)
Intake Area
Blower Type
Sound Level (dBA)
Fan Speeds
Dishwasher-Safe Stainless Steel Filters
Exhaust Duct
Duct Required
Ready-Select®
Black Ceramic Glass
6"/ 9"/ 12" -
800 / 1,900 / 3,000
6" - 1,200
9" - 3,200
5" / 7" - 750 / 1,800
Yes
Right Side
Black
Plastic
36"
Built-In Downdraft
In-Cabinet
Rear, Down
1
500
39 Sq. In.
Centrifugal
70
3-Speed
1
External
3-1/4" x 10" or 6" Round
Optional Accessories
Alternate Duct Transition Kit
PN #5304488297
Specifications
Power Supply Connection Location
Voltage Rating
Connected Load
(kW Rating) @ 240 / 208 Volts
2
Amps @ 240 / 208 Volts
Minimum Circuit Required (Amps)
Approved for Electric Single
Wall Oven Combination Installation
Shipping Weight (Approx.)
1
Down discharge can also be adapted for alternate ductwork installation
providing left or right exhaust, by ordering Alternate Duct Transition Kit
(PN # 5304488297).
2
Single phase 3- or 4-wire cable, 120 / 240 or 120 / 208 Volt, 60 Hertz AC
only electrical supply with ground required on separate circuit fused on
both sides of line.
Right Front
240V /208V / 60Hz
40.8/35.7
50
50
80 Lbs.
Built-In Downdraft Cooktop
NOTE: For planning purposes only. Always consult local and national electric codes.
Refer to Product Installation Guide for detailed installation instructions on the web
at frigidaire.com.
Product Dimensions
A - Width
B - Depth
C - Height (Min.)/(Max.)
3
Overall height determined by discharge direction.
36-3/4"
22-1/16"
3
18-19/32"/23-3/8"
RC36DE60PB 36" Electric
Cutout Dimensions
Width (Min.)/(Max.)
Depth (Min.)/(Max.)
Height (Min.)/(Max.)
34-1/2"/34-5/8"
21-1/8"/21-1/4"
18-19/32"/23-3/8"
Granite Countertop
Installation Kit available.
•
USA
10200 David Taylor Drive
•
CANADA
RC36DE60P 06/16 © 2016 Electrolux Home Products, Inc.
5855 Terry Fox Way
•
Charlotte, NC 28262
•
Mississauga, ON L5V 3E4
•
1-800-FRIGIDAIRE
•
1-800-265-8352
•
frigidaire.com
•
frigidaire.ca
Accessories information available
on the web at frigidaire.com
Specifications
subject to change.

Built-In Downdraft Cooktop
36" Electric Cooktop/Downdraft Vent (RC36DE60P)
Non Branded
13"
max.
cabinet
depth
9" min. to nearest
combustible wall
(each side of unit)
30" min. for
unprotected
cabinet bottom
24" min.
for protected
cabinet bottom
36"
18"
min.
1" minimum flat distance
from cutout edge
1" minimum flat distance
from cutout edge
21
1
/8" min.
211/4" max.
34
1
/2" min.
34
5/8" max.
34
7
/32"
20
27
/32"
3
9/32"
36
3/4"
22
1
/16"
Ventilation
unit not shown
beneath cooktop.
24"
For ventilation unit ductwork preparation and
installation planning information, refer to 36"
Electric Cooktop Ductwork Preparation page.
36" Electric Cooktop
with Ventilation Unit
Right Side View
Rear Discharge
Right Side View
Down Discharge
21
11/16"
18
19/32"
23
3
/8"
RC36DE60PB 36" Electric
Built-In Cooktop Specifications
•
Shipping Weight (approx.) – 80 Lbs.
•
Single phase 3- or 4-wire cable, 120 / 240 or 120 / 208 Volt, 60 Hertz
AC only electrical supply with ground required on separate circuit
fused on both sides of line.
•
Connected Load (kW Rating) @ 240 / 208 Volts = 40.8 / 35.7 kW
•
Amps @ 240 / 208 Volts = 50 Amps
•
Recommended Circuit Breaker – 50 Amps
•
Always consult local and national electric codes.
•
For detailed electrical supply location, refer to 36" Electric Cooktop
(RC36DE60P) Ductwork Preparation page.
•
Locate cooktop between wall studs or floor joists so that ductwork
may be installed properly.
•
Installing cooktop into pre-existing base cabinets may require
modifications. Cabinets with drawers require drawers be removed
and drawer fronts attached to cabinet face. Verify internal length
and width of cabinet base because sides or back wall may need cut
out and corner braces removed to accommodate unit.
•
Countertop opening MUST be cut based on dimensions shown, cut
squarely with sides parallel to each other and with front and rear
perpendicular to cabinet sides.
•
Pre-formed countertops with raised lip and radius at base of
backsplash may not allow enough flat area for proper installation.
Minimum 1" distance required from rear and front edge of cooktop
cutout.
•
Overhead cabinetry should not exceed a 13" maximum depth.
•
Absolute minimum horizontal distance between overhead cabinets
installed to either side of appliance must be no less than 36".
•
Allow 30" minimum clearance between top of cooktop platform
and bottom of unprotected wood or metal overhead cabinet; or 24"
minimum clearance when bottom of wood or metal overhead cabinet
is protected by not less than 1/8" flame-retardant millboard covered
with not less than No. 28 MSG sheet steel, 0.015" stainless steel,
0.024" aluminum or 0.020" copper.
•
Allow 9" minimum required clearance from left edge and right edge
of cooktop to nearest combustible wall on each side.
Ductwork Preparation
•
For ventilation unit ductwork preparation and planning
information, refer to 36" Electric Cooktop (RC36DE60P) Ductwork
Preparation page.
•
Down discharge can also be adapted for alternate ductwork
installation providing left or right exhaust, by ordering Alternate
Duct Transition Kit (PN # 5304488297).
Note: For planning purposes only. Refer to Product Installation Guide
on the web at frigidaire.com for detailed instructions.
Optional Accessories
•
Granite Countertop Installation Kit – (PN # 903061-9010).
•
Alternate Duct Transition Kit – (PN # 5304488297).
USA • 10200 David Taylor Drive • Charlotte, NC 28262 • 1-800-FRIGIDAIRE • frigidaire.com
•
CANADA
RC36DE60P 06/16 © 2016 Electrolux Home Products, Inc.
5855 Terry Fox Way • Mississauga, ON L5V 3E4 • 1-800-265-8352 • frigidaire.ca
Accessories information available
on the web at frigidaire.com
Specifications
subject to change.

Built-In Downdraft Cooktop
36" Electric Downdraft Cooktop –
Ductwork Preparation
Cutout
center
22
3/4"
3
3/4"
6"
RC36DE60PB 36" Electric
36" Electric Downdraft Cooktop –
Electrical Supply Location
Ductwork Preparation
Ventilation unit comes detached from cooktop.
To ensure proper installation, refer to 36" Electric Downdraft
Cooktop Specifications page for planning information, and
installation guide on web for complete installation details
including countertop and cabinet requirements.
Ducting Options
On floor, through floor or through wall.
Exhaust Outlet Locations –
Cut exhaust outlet hole in wall or floor based on
desired installation. Exhaust duct MUST be located
between wall studs or floor joists.
1
3/16"
Cutout
center
8
27/32"
Cabinet
side wall
Cutout
center
4
1/2"5
1/2"6"
C
L
Cabinet
side wall
Countertop
surface
Electrical
Installation Note:
Locate junction
box under cabinet
within shaded
area shown and
run 120/240 or
120/208 Volt, AC
wire from main
circuit panel.
3
1
3/16"
Rear Wall
Exhaust Outlet
Built-In Cooktop Ductwork Preparation
•
Ventilation unit comes detached from cooktop. To ensure proper
installation, refer to 36" Electric Downdraft Cooktop Specifications
page for planning information, and installation guide on web for
complete installation details including countertop and cabinet
requirements.
•
Ducting Options – On floor, through floor or through wall.
•
Ventilation Unit Discharge Options – Rear or down.
•
Down discharge can also be adapted for alternate ductwork
installation providing left or right exhaust, by ordering Alternate
Duct Transition Kit (PN # 5304488297).
•
Consider ductwork location and desired installation before cutting
exhaust outlet hole in cabinet. For proper installation, cooktop
exhaust duct MUST be located between wall studs or floor joists.
•
Vent exhaust air outside only and NOT into any concealed space.
•
Exhaust Duct Required – Galvanized or aluminum duct in 6" round
or 3-1/4" x 10" rectangular, or combination of both. PVC should
be used if installing under concrete slab.
•
Local building code must be followed in specifying approved type
and schedule of ALL duct used; always use appropriate roof or
wall cap with damper.
Bottom
Exhaust Outlet
27/32"
Alternate Duct Transition Kit
Alternate
Side Exhaust
Outlets
•
For maximum efficiency, use shortest, straightest duct run possible.
Unit operates most efficiently with up to 100 equivalent feet of duct.
(Refer to Calculating Duct Length Table in Product Installation Guide.)
•
Flexible ducting is not recommended due to severely restricted
airflow; if blower outlet and floor or wall duct location do NOT align,
flexible METAL ducting can be used to adapt to offset.
•
Thermal breaks such as short section of nonmetallic duct, should
be used in areas of extreme cold. Cold weather installations should
have additional backdraft damper installed.
Note: For planning purposes only. Refer to Product Installation Guide
on the web at frigidaire.com for detailed instructions.
Optional Accessories
•
Alternate Duct Transition Kit – (PN # 5304488297).
PN #5304488297
Available for use with
left or right exhaust
ductwork.
USA • 10200 David Taylor Drive • Charlotte, NC 28262 • 1-800-FRIGIDAIRE • frigidaire.com
•
CANADA
RC36DE60P 06/16 © 2016 Electrolux Home Products, Inc.
5855 Terry Fox Way • Mississauga, ON L5V 3E4 • 1-800-265-8352 • frigidaire.ca
Accessories information available
on the web at frigidaire.com
Specifications
subject to change.
 Loading...