


R530D
RG533D
R433BD
R433MD
RG434MD
Electric Ranges
Frigidaire
Ranges
Record in the space provided
below the Model No. and
Serial No. of this appliance.
These numbers are found on
the serial plate located inside
the oven door along the up-
per left corner of the oven
framework.
Model No.
Serial No.
Retain these numbers for
future reference.
IMPORTANT:
Keep a copy of your bill of sale.
The dare on the bin establishes the
warranty period should service be
required. Where appropriate,
place the bin of sale in an envelope
and tape it to the back or side of
the appliance. If serv4ce is per-
formed, it is in your best interest
to obtain and keep all receipts.
Contents
Before using the range ................................................................ 2
Important safeguards ................................................................. 3-5
Energy saving ideas ..................................................................... 6
Surface cooking ........................................................................ 6-8
Using the oven ....................................................................... 9-11
Baking .................................................................................. 11-13
Roasting ................................................................................ 13,14
Braising .................................................................................... 15
Broiling ................................................................................. 15-17
Cleaning................................................................................ 18-20
Adjusting temperature control knob............................................. 21
Accessories ............................................................................... 21
Avoid-Service checklist........................................................... 22-24
Problems .................................................................................. 25
Wan'anty.................................................................................. 28
@1986 White Consolidated Industries
All fights reserved.
Before Using the Range
Make sure the range is properly installed mad leveled. It must be
grounded and properly connected to 240 or 208 volt electric supply.
On slide-in models, be sure leveling legs are replaced after the ship°
ping skid is removed from the range. If necessary, raise or lower
the leveling legs as shown in the drawing. Adjustments can be made
by turniug clockwise or counterclockwise as needed.
Remove all tape before the range is used. If any glue remains,
touch the residue with the sticky side of tape already removed. Or, use
a cloth soaked with isopropyl (rubbing) alcohol. Use caution because
rubbing alcohol is flammable. Rinse with warm water and wipe dry.
IMPORTANT SAFEGUARDS
Be safety conscious. The preparation of food in an oven or on
a range requires temperatures that could cause severe burns. Before
using this new appliance, carefully read and follow the safety instruc-
tions below.
o
Destroy the carton and plastic bags after the range is unpacked.
Children might use them for play. Cartons covered with rugs, bed-
spreads or plastic sheets can become airtight chambers. Remove
all staples from the carton. Staples can cause severe cuts and
destroy finishes if they come in contact with other appliances
or furniture.
2. Remove the oven door from any unused range if it is
to be stored or discarded.
3. Have the range installed and grounded in accordance with local
codes by a qualified installer to prevent any shock hazard and
assure stability during operation. Installation instructions are locat-
ed on the back panel of the range. Ask your dealer to recommend
a qualified installer and an authorized repair service.
4. Know how to disconnect power to the range at the circuit breaker
or fuse box in an emergency or when servicing is required. Have
the installer show you and label the proper switch or fuse at the
electrical disconnect box.
o
Wear proper apparel when operating the range. Loose-
fitting or hanging garments should never be worn while using
the appliance.
6. Use dry potholders. Wet or damp potholders on hot surfaces
could result in burns from steam. Do not let the potholder touch
hot heating areas. Do not use a towel or other bulky cloth instead
of a potholder.
DO
7. Always place an oven rack in the desired location while "the oven
is cool. If a rack must be moved when the oven is hot, grasp the
rack in the center, and do not let the potholder contact the hot
heating element in the oven.
1
Make sure the reflector pans are always in place under the surface
elements. This avoids possible damage to wiring or components
underneath and improves cooking efficiency.
°
Determine pan size by the type and amount of food to be cooked.
Using the proper pan size helps conserve energy. Select utensils
with flat bottoms large enough to cover the surface unit heating
area. The use of undersized utensils will expose a portion of the
heating area and could result in serious clothing ignition accidents
as well as boilovers.
10. Turn utensil handles inward, but not extending over
other surface units. This will help minimize the possibility
of burns, ignition of flammable materials, and spillage due to acci-
dental contact with the utensil.

IMPORTANT SAFEGUARDS
(continued)
DO 11.
12.
13.
14.
15.
When heating fat or grease, watch it closely. It will catch
fire if allowed to become too hot.
Stand away from the oven when opening the oven door.
Let hot air or steam escape before removing or replacing food.
Keep the oven vent unobstructed. It is located beneath the
right rear surface unit. Touching the surfaces in this area when
the oven is being operated may cause severe burns. Also, do not
place plastic or heat-sensitive items on or near the surface unit.
These items could melt or ignite.
Clean the range regularly to keep all parts free of grease which
could catch fire. Exhaust fan ventilating hoods and grease filters
should be kept clean. Do not allow grease to accumulate. Greasy
deposits in the fan could catch fire. When flaming foods under
the hood, turn the fan off. The fan, if operating, could spread
the flame. Refer to the hood manufacturer's instructions for
cleaning.
Cured or frozen meats and most fruits and vegetables can be
cooked automatically with the oven TIMED, but foods of a highly
perishable nature, such as milk, eggs, fish, poultry or pork, should
not be put in the oven before cooking unless they are c_Silled in
the refrigerator first and do not stand more than one hour before
cooking starts.
DO NOT 1.
3.
Never leave children alone or unattended in the area
where an appliance is in use. They should never be allowed
to sit or stand on any part of the appliance. As children grow,
teach them the proper, safe use of all appliances.
CAUTION: Do not store items of interest to children in the cabi-
nets above a range or on the backguard of a range--children climb-
ing on the range to reach the items could be seriously injured.
Never use the range to warm or heat the room. Operating
surface units at the HIGH setting, without pots or pans on the
units, could cause damage to the knobs and controls.
.
DO NOT TOUCH SURFACE UNITS, AREAS NEAR THESE
UNITS, HEATING ELEMENTS OR INTERIOR SURFACES
OF THE OVEN. Both surface units and oven heating elements
may be hot even though they" are dark in color. Areas near surface
units and interior surfaces of an oven become hot enough to cause
burns. Other surfaces of the appliance may become hot enough
to cause burns--these include the cooktop, surfaces facing the
cooktop, the oven vent openings and surfaces near these openings,
oven doors and windows.
5. Never leave the range unattended while the surface
units are on. Boilovers may cause smoking, greasy spillovers
may catch fire, or a pan which has boiled dry may melt.
6. Do not let clothing or other flammable materials contact surface
units, areas near units, heating elements or interior surfaces of
the oven until they have had sufficient time to cool.
7. Do not store flammable materials in the oven, near the
surface units or in the storage drawer.
. Never immerse or soak the removable surface elements
in water. Surface elements clean themselves during normal oper-
ation or can be wiped with a damp, sudsy cloth when the elements
are off and cool. Be sure the elements are off and cool before
touching them. CAUTION: Even when the elements appear dark
in color, they may be hot.
9. Do not use aluminum [oil to line surface unit reflector pans. Do
not use aluminum foil to line the oven bottom except as instructed
in this Owner's Guide. Improper use of aluminum foil may result
in a shock or fire hazard.
10. Do not use glass, earthenware or other ceramic-type cooking uten-
sils [or rangetop cooking unless recommended by the utensil
manufacturer. Utensils of this type may break with sudden heat
changes; most are designed to be used only in the oven.
11.Do not heat unopened food containers. Build-upof pres-
sure may cause the container to burstand resultin injury.
12. Do not use water on grease fires. Smother the fire with a
pan lid, or use baking soda, a dry chemical or foam-type extin-
guisher.
DO NOT
13. Do not repair or replace any part of the appliance unless it is speci-
ficaI1y recommended in this Owner's Guide. To prevent personal
injury and damage to the range, servicing should be done only
by a qualified technician.
14. Never modify or alter the construction of the range such as
removal of leveling legs, panels, wire covers or any other per-
manent part of the product.

Energy Saving Ideas
• Turn surface units off before cooking is completed. The unit will
Surface Cooking
stay hot long enough to finish the cooking process.
_"- __ _ •Uselids. A lid traps steam and uses it to speed up the cooking
_ time.
process. If you have a pressure cooker or vegetable steamer, use
it. You I1waste fewer vitamins and cut energy costs at the same
• Use medium weight, flat bottomed pans that match the sizes of
the elements. Pick pans made of a metal that conducts heat well.
• Bring frozen foods to room temperature before cooking.
• Never use the range to heat the kitchen. Using your range without
utensils or pans to absorb the element's heat risks damaging the
surface and the controls.
Oven Cooking
• Preheat the oven only when a recipe tells you. Put roasts and casse-
roles into a cold oven and then turn the oven on.
Opening the oven door to check on foods wastes electricity.
Use the oven to prepare complete meals. For instance, start a roast,
add vegetables when the meat is half-cooked, and then warm rolls
or dessert after the main dishes are cooked.
• Make it a habit to turn the oven off before you remove the cooked
food from it.
('(( ))'I
Surface Cooking
Setting surface controls
Push in and turn the surface unit control in either direction to the
desired setting. Start most cooking operations on a higher setting,
then turn to a lower setting to finish cooking. A glowing red element
indicates that heat and energy are being wasted. The controls do
not have to be set exactly on a particular mark. Use the marks as
a guide and adjust the control as needed.
The surface signal light glows when any surface element
is on. A glance at the light when cooking is finished is an easy check
to be sure all controls are turned off.
The suggested settings below are based on cooking in medium
weight aluminum pans with lids. Settings may vary when using other
types of pans.
Setting
Type of Cooking
Start most foods
HI
Bring water to a boil
Pan broiling
Continue a rapid boil
7-8
Fry
Deep fat fry
Maintain a slow boil
4-6
Thicken sauces, gravies
Steam
Keep foods cooking
2-4
Poach
Stew
Keep warm
1-SIM
Melt
Simmer
Choosing Utensils
For best results and energy conservation, choose utensils which have
the following:
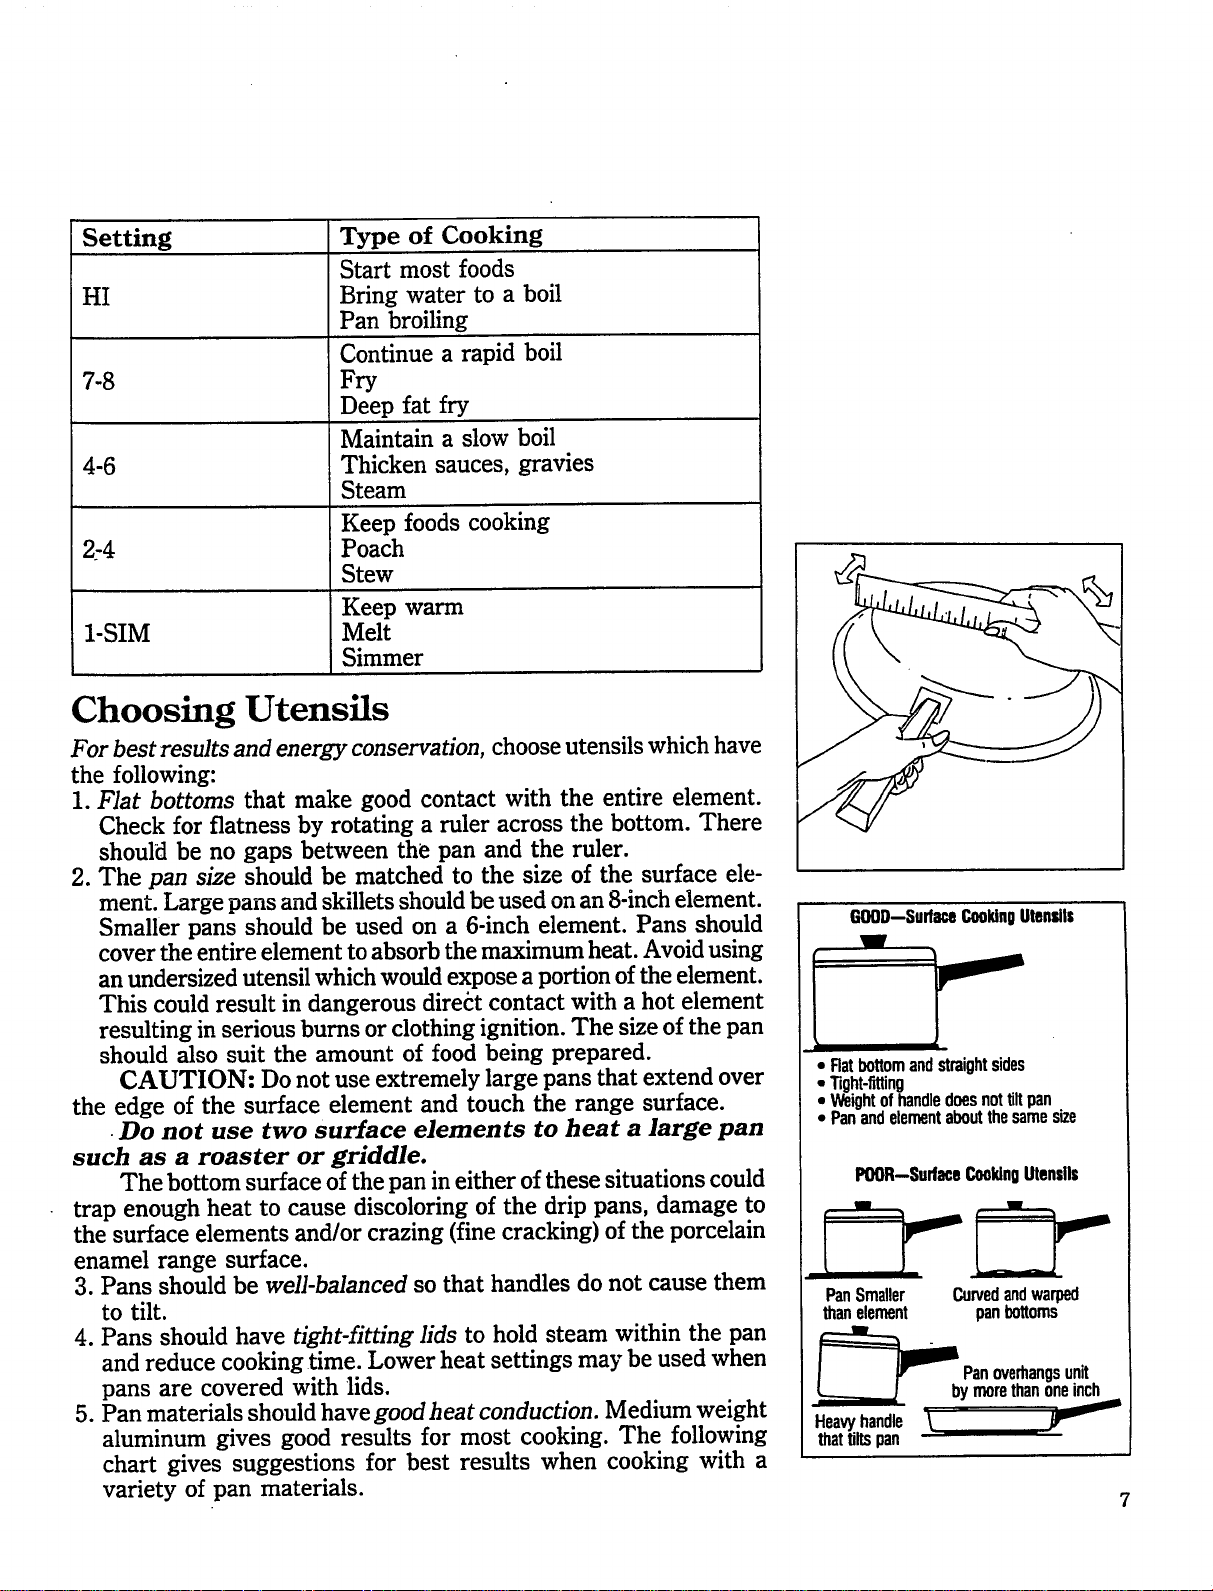
1. Flat bottoms that make good contact with the entire element.
Check for flatness by rotating a ruler across the bottom. There
should be no gaps between the pan and the ruler.
2. The pan size should be matched to the size of the surface ele-
ment. Large pans and skillets should be used on an 8-inch element.
Smaller pans should be used on a 6-inch element. Pans should
cover the entire element to absorb the maximum heat. Avoid using
an undersized utensil which would expose a portion of the element.
This could result in dangerous direct contact with a hot element
resulting in serious burns or clothing ignition. The size of the pan
should also suit the amount of food being prepared.
CAUTION: Do not use extremely large pans that extend over
the edge of the surface element and touch the range surface.
•Do not use two surface elements to heat a large pan
such as a roaster or griddle.
The bottom surface of the pan in either of these situations could
trap enough heat to cause discoloring of the drip pans, damage to
the surface elements and/or crazing (fine cracking) of the porcelain
enamel range surface.
3. Pans should be well-balanced so that handles do not cause them
to tilt.
4. Pans should have tight-fitting lids to hold steam within the pan
and reduce cooking time. Lower heat settings may be used when
pans are covered with lids.
5. Pan materials should have good heat conduction. Medium weight
aluminum gives good results for most cooking. The following
chart gives suggestions for best results when cooking with a
variety of pan materials.
GOOD--SurfaceCookingUtensils
I
Ratbottomandstraightsides
Tight-fitting
Weightofhandledoesnottiltpan
• Panandelementaboutthesamesize
POOR--SurfaceCookingUtensils
PanSmaller Curvedandwarped
thanelement panbottoms
Panoverhangsunit
ymorethanoneinch
Heavyhandle "_ _'-
thattiltspan
7
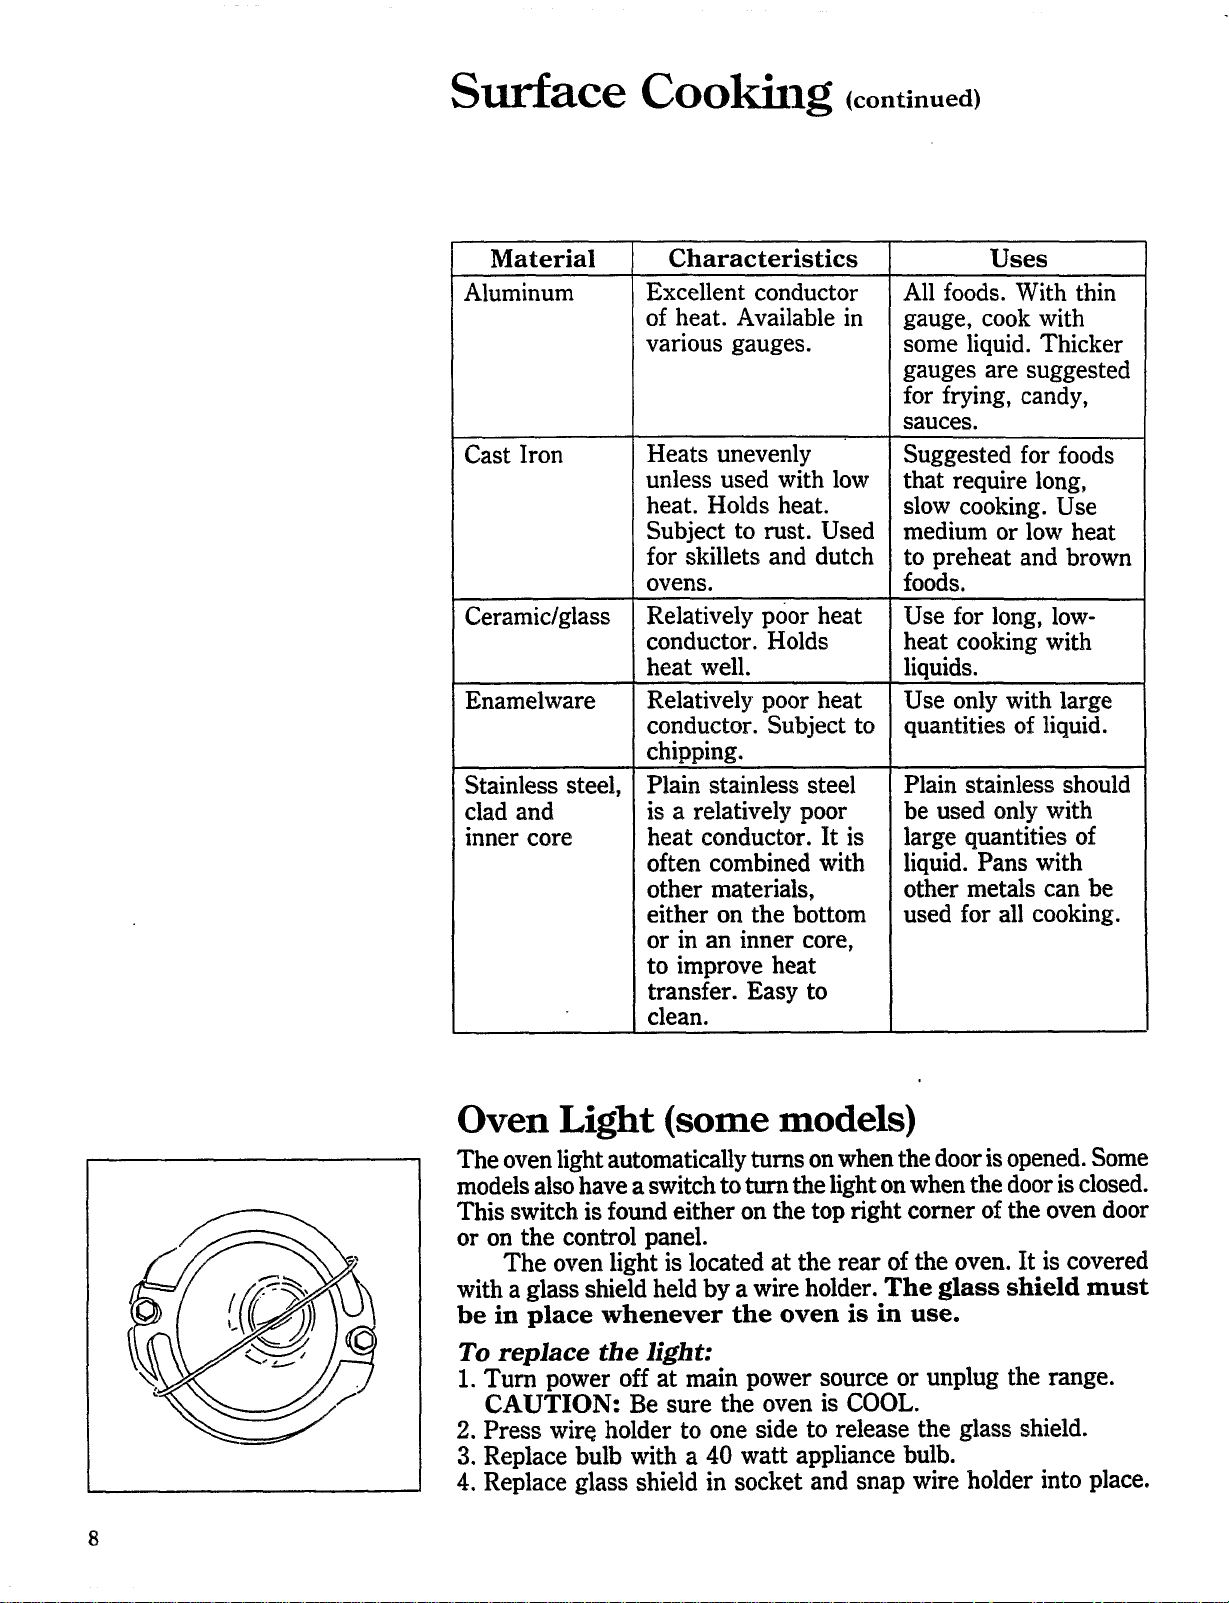
Surface Cooking (continued)
Material Uses
Aluminum
Cast Iron
Ceramic/glass
Enamelware
Stainless steel,
clad and
inner core
Characteristics
Excellent conductor
of heat. Available in
various gauges.
Heats unevenly
unless used with low
heat. Holds heat.
Subject to rust. Used
for skillets and dutch
ovens.
Relatively poor heat
conductor. Holds
heat well.
Relatively poor heat
conductor. Subject to
chipping.
Plain stainless steel
is a relatively poor
heat conductor. It is
often combined with
other materials,
either on the bottom
or in an inner core,
to improve heat
transfer. Easy to
clean.
All foods. With thin
gauge, cook with
some liquid. Thicker
gauges are suggested
for frying, candy,
sauces.
Suggested for foods
that require long,
slow cooking. Use
medium or low heat
to preheat and brown
foods.
Use for long, low-
heat cooking with
liquids.
Use only with large
quantities of liquid.
Plain stainless should
be used only with
large quantities of
liquid. Pans with
other metals can be
used for all cooking.
Oven Light (some models)
The oven light automatically turns on when the door is opened. Some
models also have a switch to turn the light on when the door is dosed.
This switch is found either on the top fight corner of the oven door
or on the control panel.
The oven light is located at the rear of the oven. It is covered
with a glass shield held by a wire holder. The glass shield must
be in place whenever the oven is in use.
To replace the light:
1. Turn power off at main power source or unplug the range.
CAUTION: Be sure the oven is COOL.
2. Press wire holder to one side to release the glass shield.
3. Replace bulb with a 40 watt appliance bulb.
4. Replace glass shield in socket and snap wire holder into place.
Using The Oven
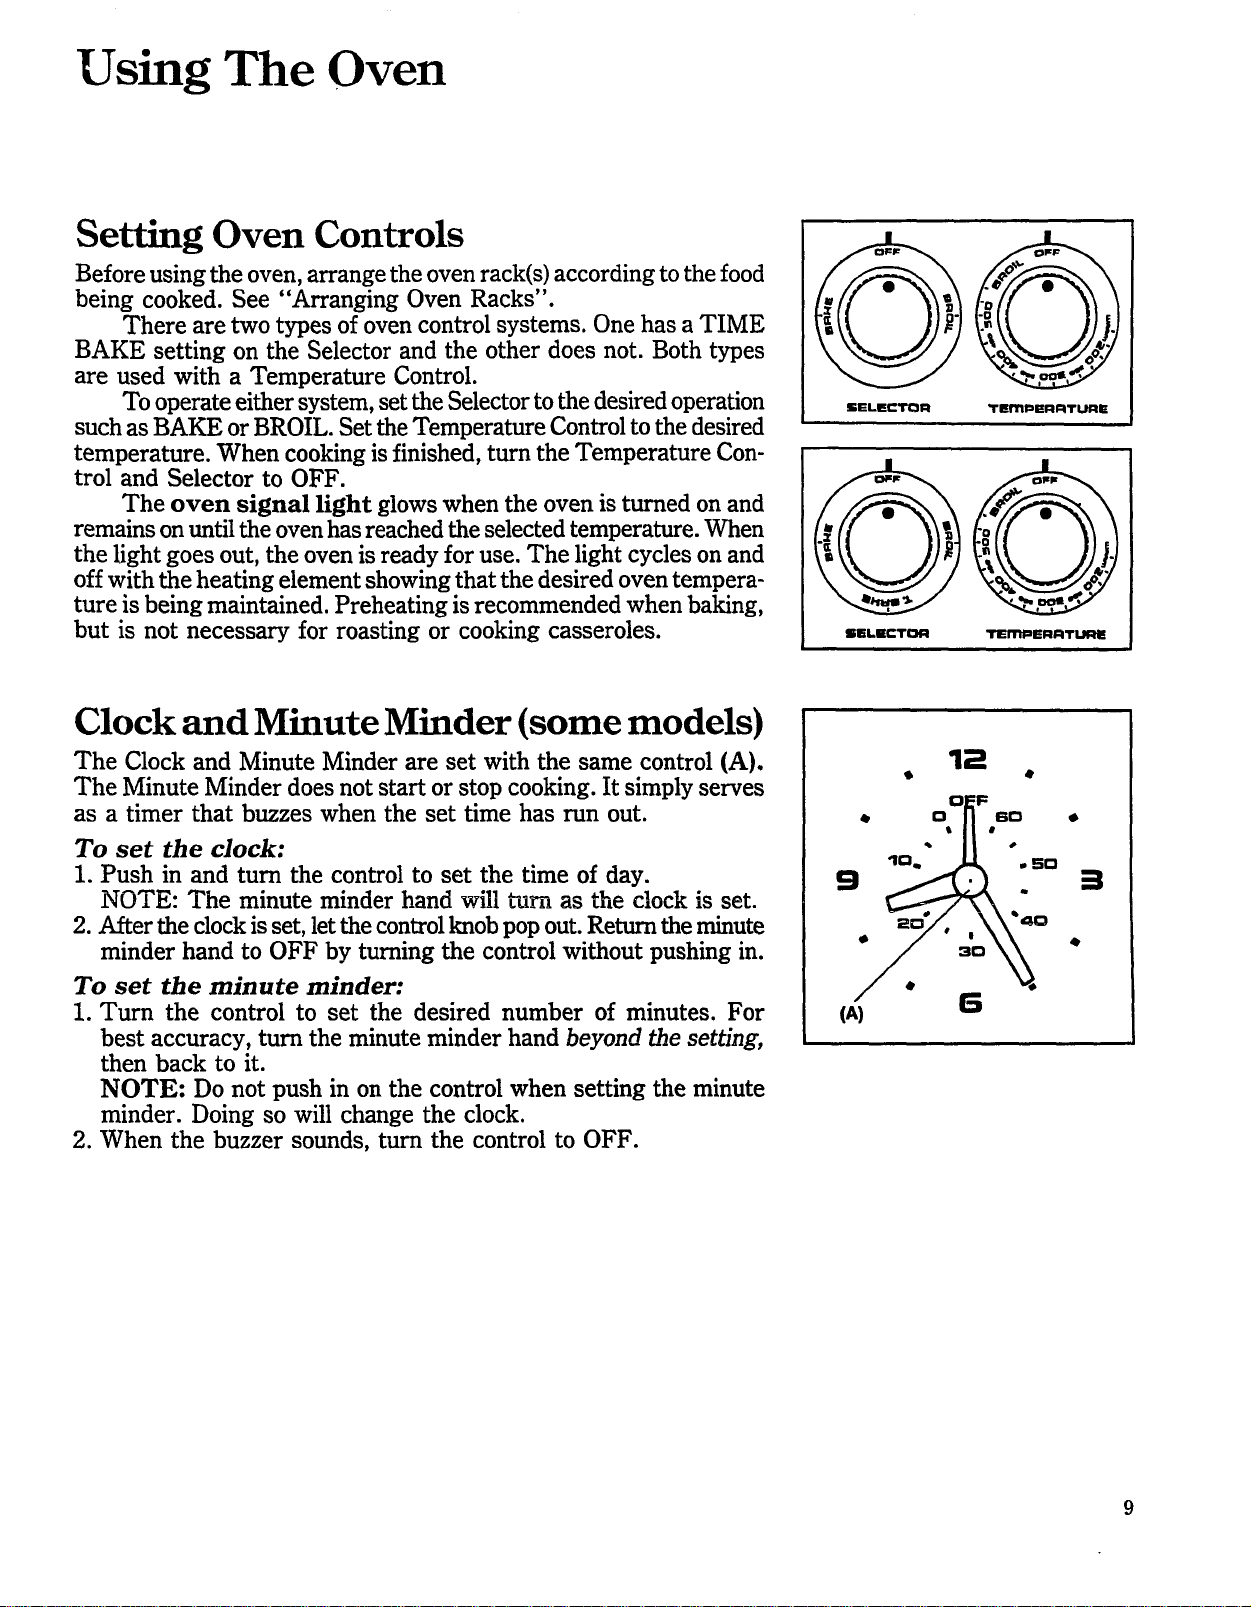
Setting Oven Controls
Before using the oven, arrange the oven rack(s) according to the food
being cooked. See "Arranging Oven Racks".
There are two types of oven control systems. One has a TIME
BAKE setting on the Selector and the other does not. Both types
are used with a Temperature Control.
To operate either system, set the Selector to the desired operation
such as BAKE or BROIL. Set the Temperature Control to the desired
temperature. When cooking is finished, turn the Temperature Con-
trol and Selector to OFF.
The oven signal light glows when the oven is turned on and
remains on until the oven has reached the selected temperature. When
the light goes out, the oven is ready for use. The light cycles on and
off with the heating element showing that the desired oven tempera-
ture is being maintained. Preheating is recommended when baking,
but is not necessary for roasting or cooking casseroles. SELtCTOR TEIrT_ERATLIII:W
Clock and Minute Minder (some models)
The Clock and Minute Minder are set with the same control (A).
The Minute Minder does not start or stop cooking. It simply serves
as a timer that buzzes when the set time has run out.
To set the clock:
1. Push in and turn the control to set the time of day.
NOTE: The minute minder hand will _rn as the clock is set.
2. After the clock is set, let the control knob pop out. Return the minute
minder hand to OFF by turning the control without pushing in.
To set the minute minder:
1. Turn the control to set the desired number of minutes. For
best accuracy, turn the minute minder hand beyond the setting,
then back to it.
NOTE: Do not push in on the control when setting the minute
minder. Doing so will change the clock.
2. When the buzzer sounds, turn the control to OFF.
• 12 °
• O?_Fe60 •
10,, _' ,_ ",. SO
9 . 3
.( :a

star_ s_oD
1TM 12
:
6 6
NOTE: Mter using the oven
with automatic timing, be
sure to turn the Selector and
Temperature Control to OFF.
Using the Oven (continued)
Automatic Timed Oven (some models)
The automatic timer will turn the oven on and off at the times you
choose. Before setting the oven for automatic timing, be sure the
clock shows the correct time of day.
Most foods can be cooked with automatic timing. However, foods
that can spoil such as milk, eggs, fish, poultry or meat should be
chilled in the refrigerator first. Even when chilled, they should not
stand in the oven more than one hour before cooking starts. Foods
which are frozen can be held for longer times before cooking. Food
3
should be served soon after the oven shuts off.
To Start and Stop Oven Automatically:
1. Be sure the clock shows the correct time of day.
2. Place the food in the oven.
3. Push in and turn the Start Time knob to the time you want to
start cooking.
4. Push in and turn the Stop Time knob to the time you want to
stop cooking.
5. Set the Temperature Control to the desired temperature.
6. Set the Selector to TIME BAKE.
7. When cooking is finished, turn the Temperature Control and
Selector to OFF.
To Start Oven Immediately and Stop Automatically:
1. Be sure the clock shows the correct time of day.
2. Place the food in the oven.
3. Push in and turn the Stop Time knob to the time you want to
stop cooking.
4. Be sure the Start Time knob shows the same time as the clock
on the range. If not, turn the knob to the time on the clock. The
knob will then pop out.
5. Set Temperature Control to the desired temperature.
6. Set the Oven Selector to TIME BAKE.
7. When cooking is finished, turn the Temperature Control and
Selector to OFF.
10

Oven Cooking
Oven Vent
The oven is vented through the right rear surface unit. When the
oven is on, warm air is released through the unit. This venting is
necessary for proper air circulation in the oven and good baking
results. Utensils can be placed on the surface unit when the oven
is on, but they will become hot.
Arranging Oven Racks
Arrange the oven racks while the oven is cool. To remove,
pull rack forward until it stops. Lift up at front and slide out. To
replace, fit rack onto guides. Tilt front upward and slide into place.
To bake on one rack, place rack on guide second from the bot-
tom of the oven. To bake on two racks, place flat rack on guide second
from the top and the other rack on the bottom guide.
Baking
Selecting bakeware
To insure good baking results, use the proper baking pan.
Darkened pans are not suitable. Tin-coated, stainless steel and warped
or dented pans do not heat evenly and cause uneven baking.
Cakes, meat loaves, quick breads, pies or yeast breads bake best
in medium-weight aluminum or glass pans. When using glass pans,
reduce the oven temperature by 25 °F.
Cookies, biscuits or cream puffs bake best on medium-weight
aluminum sheets with no sides or very low sides. Baking sheets should
be small enough to allow two inches for air circulation on all sides.
Be sure to use the pan size recommended in the recipe. A batter
baked in a pan larger than the recipe recommends will usually be
crisper than it should be--if baked in a pan smaller than recom-
mended, it may overflow. When using pans of unusual shape, fill
to the top with water, measure the water and use 1/2that amount
of batter.
Baking hints
1. Always follow recipe or package instructions. Use the recom-
mended pan size. Cooking times may vary in high altitude
areas.
2. Baking results will be better if pans are centered as much as
possible. Be sure pans do not touch each other, the door, sides
or back of the oven. Allow about two inches of space around
each pan for air circulation.
11

Baking (continued)
3. When two cakes or pies are baked at the same time, place one
pan on each rack, using the second and fourth rack positions
from the top. Stagger the pans in the center of the oven so one
is not directly under or over the other.
4. Set the timer for the shortest time recommended in the recipe.
Check food. If it is not done, allow more time.
5. Do not open the door while baking since the oven temperature
drops whenever the door is opened. This could cause poor
results and lengthen baking times.
6. A cake is done when the surface springs back after a light
finger tap or when an inserted toothpick comes out clean. There
should be little, if any, shrinkage from the edge of the pan.
7. After removing from oven, allow the cake to cool on a rack for
10 to 15 minutes. Then remove the cake from the pan. This
cooling helps to prevent cracking or tearing. A cake should not
be frosted (unless otherwise stated in the recipe) until it has cooled.
Common Baking Problems...Causes and
Corrections
Cookies and biscuits burn on the bottom
Oven preheating time too short; oven rack over-crowded; dark pan
absorbs heat too fast.
Allow oven'to preheat to the selected_,temperature before
placing food in oven. Choose pan sizes that,will,permit about
2 inches of air space on all sides when placed in the oven. Use
a medium-weight aluminum baking sheet:
Cakes too dark on top
Oven preheating time too short..
Allow oven to preheat to the selected temperfiture before
placing food in the oven.
Cakes not done in the center
Oven too hot; incorrect pan size; pan not centered in oven.
Set thermostat 25 ° lower than recommended temperature. Use
pan size suggested in recipe. Use rack position 2 or 3 and place
pan so there is about two inches of space on all sides of pan.
1€)

Cakes not level
Range or oven rack not level; pan too close to oven wall or rack over-
crowded; pan warped.
Place a marked glass measuring cup filled with some water
on the center of the oven rack. If the water level is uneven,
refer to the installation instructions for leveling the range. Be
sure to allow about 2 inches of clearance on all sides of each
pan in the oven. Use pans that are not dented or warped.
Foods not done when cooking time is up
Oven too cool; oven crowded; oven door opened too frequently.
...... . ..... ..... ,.. .
Set oven thermostat 25 ° higher than suggested and bake the
recommended time. Be sure to remove all pans from the oven
except the ones to be used for baking. Open oven door only
after shortest recommended baking time.
Roasting
Roasting is a dry heat method for cooking tender cuts of meat and
poultry. Place roasts fat side up on a rack in a shallow uncovered
pan. Use the bottom or next to bottom rack position. Set the oven
temperature for 325 °F. Basting is not necessary.
Roasting hints
1. Use a meat thermometer to judge the degree of doneness. Insert
into the thickest part of meat. The tip should not be in contact
with bone, gristle or fat. For stuffed poultry, insert into the center
of stuffing. For unstuffed turkeys, insert into the inner side of
the thigh.
2. Frozen roasts may be cooked without thawing. Allow an addi-
tional 20 minutes per pound cooking time.
3. For easier carving, allow roast or poultry to stand 20 minutes
after cooking is completed.
13

Roasting (continued)
Meat Roasting Chart
Food Approx. min. per lb. Internal meat temp.
Beef
Standing rib Rare--20-22 140 °
Rolled rib Rare--30-32 140 °
Rolled rump Medium--34-37 160 °
Sirloin tip Rare--30-32 140 °
Pork (fresh)
Loin Well done--30-35 170 °
Cushion shoulder Well done--35-40 170 °
Shoulder butt Well done--45-50 170 °
Pork (smoked)
Shoulder (whole) Well done--30-35 160 °
Shoulder (boned) Well done--40-45 160 °
Ham
Ham (whole) Well done--20-25 160 o
Ham (precooked) Well done--12-15 140 °
Shoulder butt or picnic Well done--30-35 170 °
Veal
Leg Well done--25 170 °
Loin Well done--30-35 170 °
Shoulder (whole) Well done--25 170 °
Shoulder (boned) Well done--40-45 170 °
Lamb
Leg Well done--30-35 180 °
Shoulder (whole) Well done--30-35 180 °
Shoulder (boned) Well done--40-45 180 °
Poultry
Chicken Well done--35-40 180-185 °
Capon Well done--35-40 180-185 °
Duck Well done--40-45 180-185 °
Goose Well done--25-30 180-185 °
Turkey 6 to 16 lbs. Well done--20-25 180-185 °
16 to 20 Ibs. Well done--18-20 180-185 °
over 20 lbs. Well done--15-18 180-185 °
Medium--24-27 160 °
Well done--29-32 170 °
Medium--34-37 160 °
Well done--39-42 170 °
Well done--39-42 170 °
Medium--35-38 160 °
Well done--45-48 170 °
14

Braising
Braising is a moist heat method for cooking less tender cuts of
meat. First brown meat in an uncovered pan on the top of the range.
Use only enough fat to prevent sticking. Then place browned meat
in a pan with a tight-fitting cover. Add a small amount of liquid,
cover and place in a 325 °F oven until tender. Braised meat is
cooked until well-done to tenderize it. Braising usually requires 2
to 3 or more hours depending on the type and size. of meat.
Broiling
Broiling is a quick method of cooking foods by direct radiant heat.
Foods are placed under the upper heating element of the oven. Broil-
ing results and timing depend upon the distance between the food
and the broiling element.
Preheating
Preheating is suggested when searing rare steaks. Preheat the broil
element for 2 to 3 minutes. (Remove the broiler pan before preheating.
Foods will stick if placed on hot metal.) Preheating is not necessary
when broiling meats well-done.
To broil:
1. Place the rack in the desired position close to the top of the oven.
Position the rack closer to the broiling element for rare steaks and
chops. Position it further away for slow, thorough cooking of we!l-
done foods.
Rack Position From Top
1
2
3
2. Set both the Temperature Control and the Selector to BROIL.
3. Place food on the cool broiler grid. Be sure the grid is in place
with the slots down so grease will drain into the pan.
4. Place the broiler pan in the oven. Leave the door open at the
broil stop position. The door remains in this position without
closing.
5. Broiling times vary, so watch closely. Time depends on thickness
and aging of meat, fat. content and the doneness preferred. The
first side usually requires a few minutes longer than the second
side. Frozen meats require 3 to 5 additional minutes per side.
Rare steaks and chops,
hamburgers
Medium steaks and chops,
ham slice, fish
Well-done such as chicken,
lobster
Food
15

Broiling (continued)
Broiling hints
* Select meat that is tender and has some marbling of fat.
• For best results, steaks and chops should be at least I inch thick.
• To keep meat from curling, slit fatty edge in several places. Do
not cut into lean.
• Brush chicken and fish with butter several times while broiling.
Other foods may also be brushed with butter for flavor and better
browning. When broiling fish, grease the broiler grid to prevent stick-
ing or place fish on a small piece of aluminum foil.
• Turn steaks and chops only once.
• Fish should be placed skin side down. Thin fillets should not be
turned. Thicker fish steaks should be turned once.
• Always pull the rack out to the stop position before turning or
removing food.
• Use tongs to turn meat to control loss of juices.
• To test for doneness, cut a slit in the steak near the bone and check
the inside color.
• Precooked vegetables and fruit may be broiled. Add during
second half of broil time. Brush with melted butter or margarine.
• Trim outer layer of fat from steaks and chops to reduce spattering.
• To make cleaning easier, line the bottom of the broiler pan with
aluminum foil. DO NOT USE FOIL ON THE BROILER GRID.
• To prevent grease from baking on, remove the broiler pan from
the oven as soon as cooking is complete. Pour off grease. Soak pan
in HOT sudsy water.
• Clean the broiler pan as soon as possible after each use. If necessary-,
use soap-filled steel wool pads. Heavy scouring may scratch the grid.
CAUTION: Should a broiler fire occur, close the oven door
and turn off the control. If the fire continues, throw baking soda on
the fire. DO NOT PUT WATER OR FLOUR ON THE FIRE. Flour
may be explosive.
Broiling chart
This chart is for ovens operating on a 240 volt circuit. If the oven
is operating on a 208 volt circuit, broiling times will increase by 3-5
minutes. The time and broil settings given in this chart should be
used only as a'guide. Increase or decrease broiling times, or move
the broiling pan to a different rack position to suit personal preference
for doneness. If the food you are broiling is not listed in the time
chart, watch the item closely.
16

Broiling Chart
Food Thickness 1st Side 2nd Side
BEEF STEAKS
Rare 1 inch 5-7 3-4
Medium 1 inch 9-11 4-6
Well-done 1 inch 11-13 9-11
BEEF STEAKS (Frozen) -.
Rare 1 inch 7-11 4-5
Medium 1 inch 13-16 6-9
Well-done 1 inch 16-19 13-16
BEEF STEAKS
Rare 1½ inch 9-11 6-8
Medium 1½ inch 13-15 8-10
Well-done 1½ inch 17-19 16-18
GROUND BEEF PATTIES
Rare ½ inch 4-5 3.4
Medium ½ inch 6-7 4-5
Well-done ½ inch 8-9 6-7
LAMB CHOPS 1 inch 10-12 9-11
CALF'S LIVER ¥4 inch 5-6 3-4
CHICKEN (halved) 1½ lb. 25-30 10-12
HAM SLICE 1 inch 11-12 10-11
FISH
Whole 11-16 9-14
Steaks 6-7 4-5
FRANKFURTERS 7-8 5-7
Approximate Minutes
17

Cleaning
Before cleaning any part of
the range, be sure all heat-
ing elements are turned
OFF and are cool.
General cleaning, outside
Remove spillovers and stains as they occur using a soft cloth
and sudsy water. If necessary, use a plastic or nylon scrubber. Always
rinse well with clean water.
Clean the range after each use to prevent soil build-up.
Use a mixture of mild detergent and hot water to remove light soil.
Rinse with a damp cloth and wipe dry. Be sure to wring excess
moisture from the cloth before wiping any range surface.
Different surfaces require special cleaning to remove heavy soil.
Follow the instructions below.
ALUMINUM--Use detergent on a damp cloth to clean range
trim pieces. Do not scour or use all-purpose cleaners, ammonia,
powdered cleansers or commercial oven cleaners. They can scratch
and discolor aluminum.
GLASS, PAINT AND PLASTIC--These finishes are used
in areas where soiling should not be severe. For built-up grease, make
a detergent and water paste. Apply to soil for 30 to 60 minutes, then
wipe with a dry paper towel. Rinse with a damp cloth and dry. Lightly
rub glass with a very wet, new soapy scouring pad. Be careful not
to scratch the surface.
PORCELAIN ENAMEL--Gentle scouring with a soapy
scouring pad will remove most stubborn spots. If necessary, cover
spots with an ammonia-soaked paper towel for 30-40 minutes. Rub
gently with soap-filled scouring pad and rinse with a mixture of clear
water and vinegar. Wipe dry. Remove all cleaners or the porcelain
may become damaged during future heating. DO NOT use spray
oven cleaners on the range top.
STAINLESS STEEL, CHROME--Cover stubborn spots
with an ammonia-soaked paper towel for 30 to 40 minutes. A soap-
filled scouring pad may be used carefully, but not on a mirror finish.
Cleaners made for use with stainless steel, chrome or copper may
be used. Bluish stains on these materials are caused by over-heating
and cannot be removed.
18
Lift-up range top
The range top is hinged and may be raised to clean the panel
underneath. To raise the top, grasp the sides and lift from the front.
A swing-up rod will support the top in its raised positon.
CAUTION: When lowering the top, grasp the sides with finger-
tips only. Be careful not to pinch fingers.
Do not drop or bend the range top when raising or lowering.
This could damage the surface.

Surface elements
Both the oven and the surface heating elements clean themselves
when they are turned on. Food spilled on a hot unit will burn off.
Food spilled on a cool unit may be cleaned with a damp cloth--any
remaining soil will burn off the next time the element is used.
Surface elements unplug and can be removed to make cleaning
easier. To remove, lift up edge of element opposite terminal. Lift
just enough to clear the trim ring, then remove. NEVER IMMERSE
A SURFACE ELEMENT IN WATER.
Reflector pans
Remove the reflector pans and wash in hot sudsy water. Rinse and
dry while still warm. Hard-to-remove soil can be removed using a
nylon scrubber and mild liquid detergent and water. Do not use a
steel wool scouring pad.
To replace the reflector pan and element:
1. Line up the opening of the reflector pan with terminal guide.
2. Slide the terminals through the opening and into place.
3. Press down on the edge of the element until it rests on the edge
of the pan.
Control knobs
Control knobs are removable. With the controls in the OFF position,
pull each knob straight off the shaft. Clean the control panel with
a hot, sudsy cloth, then dry.
To replace, line up the OFF positions on both the knob and
the control panel. Push the knob onto the shaft.
Removing oven door
The oven door may be removed to make cleaning inside the oven
easier. Open the door tothe broil stop position, then lift up and
out. CAUTION: The door is heavy.
The hinge arms will support the door in a standing position.
However, for safe temporary storage, lay the door flat.
To replace the door:
1. Be sure hinge arms are in the open position (A).
2. Hold the door at the sides near the top. Insert hinge arms into
range slots. Push the bottom of the door in with your knee.
3. Hinge arms must go into the range slots evenly. The bottom
comers of the door should be in as far as they can go.
4. If the door does not line up with the oven frame, remove the
door and repeat the above steps.
/
/
/
J
i
I
(A)
/
19

Cleaning o muod)
Cleaning the inside
ALWAYS LET THE OVEN COOL BEFORE CLEANING.
To make clean-up easier, aluminum foil may be used to cover the
oven bottom. Place the foil UNDER the lower heating element. Be
sure the foil does not touch the element. Leave a 1/2-inch clearance
along the front to prevent the foil from wrinkling when the doorcloses.
Replace the foil when it becomes soiled.
DO NOT line the oven walls, top or any racks with foil. Doing
so will destroy the heat distribution in the oven. Foods will not cook
properly.
The lower heating element may be raised slightly to make clean-
hageasier. Use one hand to lift the element as the other hand wipes
underneath.
Light soil--Remove with hot sudsy water as soon as oven cools.
Always rinse with clear water. Regular cleaning of spills and spat-
ters will help reduce the number of major cleanings.
Stubborn spots--Wipe with ammonia to soften. A dish of
ammonia left in the oven for several hours or overnight will help
loosen greasy soil. Clean the softened spots with hot sudsy water
and rinse well.
Heavy soil--Use a soap-filled scouring pad or commercial oven
cleaner. Select a non-abrasive cleaner and follow label directions.
Wear rubber gloves to protect your hands.
Oven racks--Follow the directions under "Heavy soil."
2O

Adjusting Temperature
Control Knob
The temperature in the oven has been set at the factory. When first
using the oven, be sure to follow recipe times and temperatures.
Then, if you think the oven should be hotter or cooler, the tem-
perature control knob can be adjusted. Before adjusting the knob,
test a recipe by using a temperature 25 °F higher or lower than the
temperature recommended. The baking results should help you to
decide how much of an adjustment is needed. The knob can be ad-
justed up to 50 °F hotter or 50 °F coole-_, in steps of 25 °F.
To adjust the temperature control knob
1. With the temperature control in the "OFF" position, pull the knob
straight off the shaft.
2. Look at the back of the knob. There are five small indicator lines
next to the screw. The center line indicates the original factory
setting, and the screw is located directly on that line.
3. Using a screwdriver, loosen the two screws about one turn each.
4. To increase or decrease the temperature, hold the knob "A" and
turn the knob skirt "B", moving the indicator screw closer to
"HOTTER" or "COOLER". Each notch increases or decreases
the temperature 25 °F. The screw will click into place on each
notch as the knob skirt is turned.
5. When you reach the desired adjustment, tighten both screws.
6. To replace the temperature control knob, line up the fiat sides
of both the knob and the shaft. Then push the knob into place.
NOTE: Once an adjustment is made, the "OFF" position will vary
from the reference mark on the backguard depending on the am_ount
of adjustment.
Examples of use:
After following recipe instructions for baking a cake, you have decided
the oven is 25 o too cool; proceed as follows:
1. Remove temperature knob from range.
2. Loosen both screws on the knob back.
3. Since you have determined your oven is cooking too cool, you want
to increase the temperature.
4. Move the indicator.screw one notch toward "HOTTER" by turning
the knob skirt.
5. Tighten both screws, and replace knob back onto shaft.
Accessories
(a) (A)
Accessories are available at extra charge from your Frigidaire dealer
or Frigidaire Authorized Service Agency.
Frigidaire Surface Renewer. Order Part No. 9948629.
Side Panels for Slide-in Ranges. Order Part No. KAEPD.
Backguard for Slide-in Ranges_ Order Part No. BP-30D*0.
21

Avoid-Service Checklist
Before you call for ser_4ce, review this list. It may save you
time and expense. The list includes common occurrences that are
not the result of defective workmanship or materials in this appliance.
FINDYOURPROBLEMHERE
RANGEDOESNOTOPERATE
Entirerange doesnot operate.
Ovendoesnot operate.
POSSIBLECAUSE
1. House fuse has blown or circuit breaker
has tripped.
2. Cord/plugnot plugged into wall/floor
receptacle.
3. Cord/plug not installed and/or
connected.
4. Short in cord/plug.
5. Cord/plug connection burnt at input
terminal block.
6. Power outage. Check house lights to
be sure."
1. No power to range.
2. Selector not set properly.
3. Temperature Control not set properly.
4. Automatic Timed Oven set incorrectly
(some models).
HOWTO FIX IT
1. Check and/or replace fuse. Reset circuit
breaker.
1. Make sure it is plugged tightly into
outlet.
1. Not supplied with range. Contact your
dealer, installing agent or service.
1. Replace cord/plug.
1. Shut off power to range at house
junction box.
2. Replace cord/plug and/or terminal
block. Contact dealer or installing agent.
1. Call local electric company.
1. Follow steps under "Range does not
operate."
1. S_t Selector for flmction of your choice.
1. Make sure the Temperature Control is set
at the temperature of your choice.
I. For manual baking, the Selector should
be set at BAKE and the Temperature
Control set at the desired temperature.
Oven signal light should glow.
2. For baking to be started now and shut
off automatically, the Stop Time must be
set. Make sure the range clock shows the
correct time of day and the Start Time is
the same as the clock time. Selector must
be set at TIME BAKE. Oven signal light
should glow.
3. For baking to be started later and shut
off automatically, the Start Time and the
Stop Time must be set. Make sure the
range clock shows the correct time of
day. Selector must be set at TIME
BAKE. Oven signal light should not come
on until delayed start begins.
22

FIND YOUR PROBLEMHERE
POSSIBLECAUSE
HOW TO FIX IT
Surfaceunitdoesnotheat.
Ovenlightdoesnotwork.
INSTALLATION
Rangenotlevel.
Cannotmoveapplianceeasily. Appliance
must be easilyaccessiblefor service.
1. No power to range.
2. Low heat setting.
3. Elements not seated properly in
terminal.
4. Bent terminals on surface unit.
5. Incorrect control turnedon.
1. Burned-outlight bulb.
1. Poorinstallation.
2. Weak, unstablefloor.
3. Kitchen cabinet misalignment may
make range appear to be unlevel.
I. Cabinets not square or are built intoo
tight.
2. Carpetinginterferes with range.
3. Shortcord/plug set.
4. Poor flooring.
1. Check steps under "Range does not
operate."
1. At extremely low heat settings, the sur-
face unit indicator light may come on
before the surface unitstarts to operate.
Turn the control to a slightly higher
setting until the unit comes on.
1. Turn control to OFF. Be sure surface
unit is COOL.Lift outsurface unit. Posi-
tion unit properly, following instructions.
1. Turn control to OFF. Be sure surface
unit is COOL.Lift out surface unit.
Straightenterminals.Positionunit properly
and replace, following instructions.
i. Be sure to use correct control for unit
to be used:
1. Replace following instructions under
oven light.
I. Place oven rack incenter of oven.
Place a level on the oven rack. Adjust the
range leveling legs until the level indicates
that the rackis level.
2. Contact carpenterto correct sagging or
sloping floor.
3. When oven is level, cooktop may not
appear to be level with countertop.
1. Besure flooris level and can
adequately support range.
2. Contact carpenter to correct sagging or
sloping floor.
1. Be sure cabinets are square andhave
sufficient room for range clearance.
2. Contact cabinet maker to correct
problem.
1. Contact builder or installer to make
appliance accessible.
1. Provide sufficient space so range can
be lifted over carpet.
1. Install alonger cord/plug.
1. Be sure floor is level and can support
weight of range.
23

Avoid-Servic Checklist
FINDYOURPROBLEMHERE
SURFACEUNITS
Surfaceunittoohotornothotenough.
Ddppansarepittingormstiq.
Drippansturningcolorordistortedout
of shape.
BROILING
Ovensmokesexcessivelyduringbroiling.
POSSIBLECAUSE
1. Incorrect control setting.
2. Lightweight or warped pans.
1. SpiUoversin/on drippans.
2. Normal environment.
1. Bottom surface of cookware extends
beyond surface unit and touches range
surface. Using cookware of this type can
cause high enough temperatures to
discolor the drippans.
I.Oven doordosed.
2. Meat too close to element.
3.Meat notproperlyprepared.
4. Gridon broiler panwrong side up.
Grease not draining into bottom pan.
5. Oven needs to be cleaned. Grease has
built up onoven surface.
HOWTOFIXIT
1. Adjust control setting. Raise or lower
setting until properamount ofheat is
obtained. Dial markings are an indicator
of "relative" heat settings and will vary
slightly.
1. Use only flat, evenly balanced, medium
_r heavyweight cookware. Flat pans heat
etter than warped pans. Cookware
materials and weight of the material
affect heating. Heavy and medium-weight
pans heat evenly. Because lightweight
pans heat unevenly, foods may burn
easily.
i.Foodswithacids,suchastomatoes,if
allowedtostandin/onpanswillcausecor-
rosion.Remove and wash drippansas
soonaspossibleafteraspillover.
1.Houses alongseacoastareexposedto
saltair.Protectpansas much as possible
from directexposuretosaltair.
1. Do not use cookware of this type.
Replacement drip pans may be purchased
from yourdealer.
I.Doorshouldbeopened to broilstop
position.
1. Reposition the rack to provide proper
clearance between the meat and the
element.
2. Preheat broil element for quick searing
operation.
1. Remove excess fat from meat. Slash
remaining fat edges to prevent curling,
but do not cut into lean.
1. Always place the grid on the broiler
pan with the ribs up and the slots down to
allow grease to drip into pan.
1. Regular cleaning is necessary when
broiling frequently. Oldgrease or food
spatters cause excessive smoking.
24

Problems
To avoid unnecessary cost and inconvenience, make a few simple
checks before calling for service. Be sure you have followed the
instructions in this manual. Incorrect control settings often cause
problems. Check fuses and circuit breakers if the product does not
operate.
If you are unable to locate the cause of a problem, call for service.
Insist on factory service by a Consolidated Sure Service center or
a Frigidaire authorized independent service agency.
If You Have a Problem With Your
Appliance, Follow These Steps, In Order:
1. Read the Avoid-Service Checklist. This could help prevent
charges for an unnecessary service call, both during and after the
warranty period. Common occurrences and their solutions can be
found in the checklist.
2. Call Frigidaire Service. If your problem cannot be solved
by using the Avoid-Service Checklist, call the local Consolidated
Sure Service center or Frigidaire Authorized Service Agent.
3. Write Frigidaire Customer Relations. If service cannot be
obtained or the service you receive is not satisfactory, for assistance
you may write:
PLEASE DO
THIS NOW!
The self-addressed PROD-
UCT REGISTRATION
CARD should be filled in
completely, signed, and
returned.
This information will
register your product and
help us to serve you quickly
in the future if the occasion
should so demand.
Frigidaire Appliance Company
Customer Relations Department
300 PhiMpi Road
Columbus, Ohio 43228
4. Place the name, address and telephone number of your
service agent in the spaces below.
Product and feature specifications as described or
illustrated are subject to change without notice.
8#,FF ._gFHZ'£
Nationwide
The Consolidated Sure Service
symbol means prompt, complete,
professional service by thou-
sands of trained technicians any-
where you live or move in the
U.S.A.
25

26

27

Your Frigidaire Range is protected by this warranty
FULLONE-YEARWARRANTY(.ExcludingAlaska)
FrigidaireCompanywanantsthatFrigidairewillrepair,withoutcharge,
anydefectormalfunctionoccurringinthisRangeduringthefirstyear
afterdateofpurchasebytheoriginalconsumer-owner.
THISWARRANTYDOESNOTAPPLY:
1.To conditionsresultingfrom (A) improperinstallation,or (B)
incorrectelectriccurrent.
2. To conditionsresultingfrom consumerdamage,suchas: (A)
impropermaintenance,or(B)misuse,abuse,accident,alteration.
3. If the odginalsedalnumbercannotbe.readilydetermined.
4. Toservicecallsnotinvolvingmalfunctionordefectsinmaterialsor
workmanshipandnaturallytheconsumershallpayforsuchcalls.
5.ToRangesinstalledoutsidethecontinentalUnitedStatesandHawaii.
6. If used inanycommercialapplication.
7. Tolightbulbsorfluorescenttubes.
8. ToRangesinstalledin theStateofAlaska.
LIMITEDWARRANTY--Applicableto the Stateof Alaska
IntheStateofAlaskaalloftheprovisionsofthefullwarrantyandthe
exclusionsthereunderlistedonthis formareunchangedexceptthat
Frigidairedoesnotpayforthe costofthe technician'straveltoyour
homenorforthecostoftransportingtheproducttohisshop.Youare
responsiblefor thesecharges.
Thiswarrantygivesyouspecificlegalrights,andyoumayalsohave
otherrightswhichvaryfrom stateto state.
Thisisthe onlywrittenwarrantyapplicableto FrigidaireRangesand
Frigidaireneitherassumesnorauthorizesanyoneto assumefor it any
otherobligationor liabilityinconnectionwithsuchRanges.FRIGIDAIRE
SHALLNOTBEUABLEFORCONSEQUENTIALDAMAGESSUCHAS
PROPERTYDAMAGESANDINCIDENTALEXPENSESRESULTINGFROM
BREACHOFTHISWRITTENWARRANTYORANYIMPUEDWAR-
PANTIES.
Somestatesdonotallowtheexclusionorlimitationofinddentalorcon-
sequentialdamagessothislimitationorexclusionmaynotapplytoyou.
FORSERVICEUNDERTHISWARRANTY
Contact&nyauthorizedFdgidalreservicingdealer,orif_ereisaquestion
asto whereto obtainwarrantyservice,writeourCustomerRelations
Departmentat thisaddress.
FrigidaireCompany
AdivisionofWhiteConsolidatedIndustries,Inc.
300 PhillipiRoad
Columbus,Ohio43228
Productfeaturesorspecificationsas describedorillustratedaresubjectto changewithoutnotice.
=II:Hgidaire"
Oneofthel_ite £onso/ida_,dIndustries
!
18-O05-02
PIN 5006324
f
Litho in U.S.A.
 Loading...