

Frigidaire PLEW30S3ACA Owner’s Manual
Warm & Serve
mFRIGIDAIRE
Owner's
Guide
CONTENTS Page
Product Registration ........................... 2
Important Safety Instructions .........3-4
BeforeSetting Warmer
DrawerControl .................................... 4
SettingWarmer DrawerControl .......... 5
GeneralCleaning.............................. 6-7
Avoid ServiceChecklist ....................... 8
Installation Instructions ................9-11
Warranty............................................ 12
Espa_ol ....................................... 13-24
Franqais....................................... 25-36
Drawer
the
LOOK of better performance
318201001 (0010) Rev, A
Engl!sh_ pages 1-12 Espanol- paginas13-24 Fran_ais- pages 25-36
Product Registration
Register Your Product
The self-addressed PRODUCT
REGISTRATION CARD should be filled in
completely, signed and returned to
Electrolux Home Products North America.
Thank you for choosing this appliance. The information contained within this
Owner's Guide will instruct you on how to properly install, operate and care for
your appliance. Pleaseread through the information contained inyour literature
pack to learn more about your new appliance.
Record Your Model and Serial Numbers
Record in the space provided below the model and serial numbers found on the
right side of the drawer frame,
Model Number:
Serial Number:
Date of Purchase:
ThisOwner's Guide containsgeneral operating instructions for your appliance and
feature information for several models. Your range may not have all the
described features. The graphics shown are representational. The graphics on
your range may not look exactly like those shown.
Note: The instructions appearing inthis Owner's Guide are not meant to cover
every possible condition and situation that may occur. Common sense and
caution must be practiced when installing, operating and maintaining any
appliance.
Important: Keep a copy of your bill of sale,
The date on the bill establishes the warranty period service be required. Placeit
where it can be easily retrieved, If service is performed while the appliance is
under warranty, you may have to show your bill of sale,
@ 2000 White Consolidated Industries
All rights reserved
2
IMPORTANT SAFETY INSTRUCTIONS
Read all instructions before using this appliance.
Save these instructions for future reference.
This guide contains important safety symbols and instructions. Pleasepay special attention to these symbols and follow all
instructions given. Here isa brief explanation of the use of these symbols,
_fhis symbol will help alert you to situations that _l_l_'_'_This symbol will help alert you to situations
may cause serious bodily harm, death or property damage, that may cause bodily injury or property damage.
• Remove all tape and packaging wrap before using the
warmer drawer. Destroy the carton and plastic bags
after unpacking the appliance. Never allow children to
play with packaging material.
• Properlnstallation--Besureyourapplianceisproperly
installed and grounded by a qualified technician in
accordance with the National Electrical Code ANSI/
NFPA No. 70--latest edition in the U.S.A., or CSA
C22.1, Part I in Canada, and local code requirements.
Install only per installation instructions provided in this
manual,
Ask your dealer to recommend aqualified technician and an
authorized repair service. Know how to disconnect the
electrical power to the drawer at the circuit breaker or fuse
box in case of an emergency.
• User Servicing--Do not repair or replace any part of
the appliance unless specifically recommended in the
manuals. All other servicing should be done only by a
qualified technician to reduce the risk of personal injury and
damage to the appliance.
• Nevermodifyoraltertheconstructionofadrawerby
removing panels, wire covers, locking plates, or any
other part of the product.
_O REDUCETHE
• ALL WARMER
DRAWERSCAN
TIP.
• INJURYTO
PERSONS COULD
RESULT.
• INSTALL ANTI-TIP
DEVICE PACKED
WITH WARMER
DRAWER.
• SEE INSTALLATION
INSTRUCTIONS.
RISKOFTIPPINGOF THE
WARMER DRAWER,THE
DRAWER MUST BE SECUREDBY
PROPERLYINSTALLEDANTI-TIP
LOCKING PLATESPROVIDED
WITH THE DRAWER.TO CHECK
IFTHE LOCKING PLATESARE
INSTALLEDPROPERLY,GRASP
THE HANDLE OF THE OPEN
DRAWER AND SEEIFTHE
DRAWERWILL SLIDEOUT OF
THE OPENING. REFERTO THE
INSTALLATION INSTRUCTIONS
FORPROPERLOCKING PLATE _Never use your appliance for warming or
INSTALLATION.
_tepping, leaning or sitting on the door or
drawer can result in serious injuries and may also cause
damage to the warmer drawer. Do not allow children to
climb or play around the drawer, An open drawer, when hot,
may cause burns,
• Storage in or on Appliance--Flammable materials
should not be stored in the drawer. Thisincludes paper,
plastic and cloth items, such ascookbooks, plasticware and
towels, aswe!l asflammable liquids. Donot store explosives,
such as aerosol cans, on or near the warmer drawer,
Flammable materials may explode and result in fire or
property damage.
• Do not leave children alone. Children should not be
left alone or unattended in the area where an
appliance is in use. They should never be allowed to sit or
stand on any part of the appliance.
• DO NOTTOUCH INTERIOR SURFACESOFTHE WARMER
DRAWER. Surfaces may be hot even though they are dark
in color, During and after use, do not touch, or let clothing
or other flammable materials touch these areas until they
have had sufficient time to cool.
• Wear Proper Apparel--Loose-fitting or hanging
garments should never be worn while using the
appliance. Donot let clothing or other flammable materials
contact hot surfaces,
• Use Only Dry Potholders--Moist or damp potholders
on hot surfaces may result in burns from steam. Do not
let the potholders touch hot heating elements. Do not usea
towel or other bulky cloth instead of a potholder.
• Do Not Heat Unopened Food Containers--Build-up of
pressure may cause the container to burst and result in
injury.
• IMPORTANT--Do not attempt to operate the warmer
drawer during a power failure. If the power fails,
always turn the control off. If the drawer isnot turned off
and the power resumes, the drawer may begin to operate
again. Food left unattended could spoil,
heating the room.
_Do not usethe warmer drawer for storage.
3
IMPORTANT SAFETY INSTRUCTIONS(continued)
IMPORTANTINSTRUCTIONSFORUSINGYOURWARM& IMPORTANT INSTRUCTIONS FOR CLEANING YOUR
SERVEDRAWER WARM & SERVEDRAWER
• Protective Liners Donotusealuminumfoiltolinewarmer • Clean the drawer regularly to keep all parts free of
drawer. An) o[ne/use of projective liners or alumlndm fo
may resul[ in poor 3erforma nceor damage to tne appliance
Only use aluminum foil asrecommended for baking if used
as a cover placed on the food
• Glazed Cooking Utensils Onb certain types of glass
glass/ceramic, ceramic ear[nenware or orner glazed
u[ensNs are SultaDle for use A/imou[ D/eaKIng oue Yo[ne
sudden change _n[emperature. Check the manufacturer's
recommendations.
• UseCareWhen Opening Warmer Drawer Stand to[ne
sideof the unit when opening the door of a hot drawer. Let
hot air or steam escape before _muremove o//eplace food
in the warmer clrawer.
• Placement of Warmer Drawer Racks--Always place rack
In desired ocation while drawer is cool, If rack must De
moved while hot useex[reme cauuon, use oornoluers and
glasF the rack Nl[n both hands [o reDosition. Do not let
Dotholders contact the hot element or interior ofthewarmer
drawer. Remove all utensils from the rack before removing
rack
grease that could catch fire. Do not allow grease to
accumulate. GreasyQeposl[s COUldcatch fire
• Kitchen cleaners/aerosols Always follow the
rr _nufacturer'srecommended directions for use. Beaware
that excessresidue from cleane/s ano aerosols may _gnlte
causing uamage and/or injury
SAVE THESE INSTRUCTIONS
Before Setting Warmer
Drawer Control
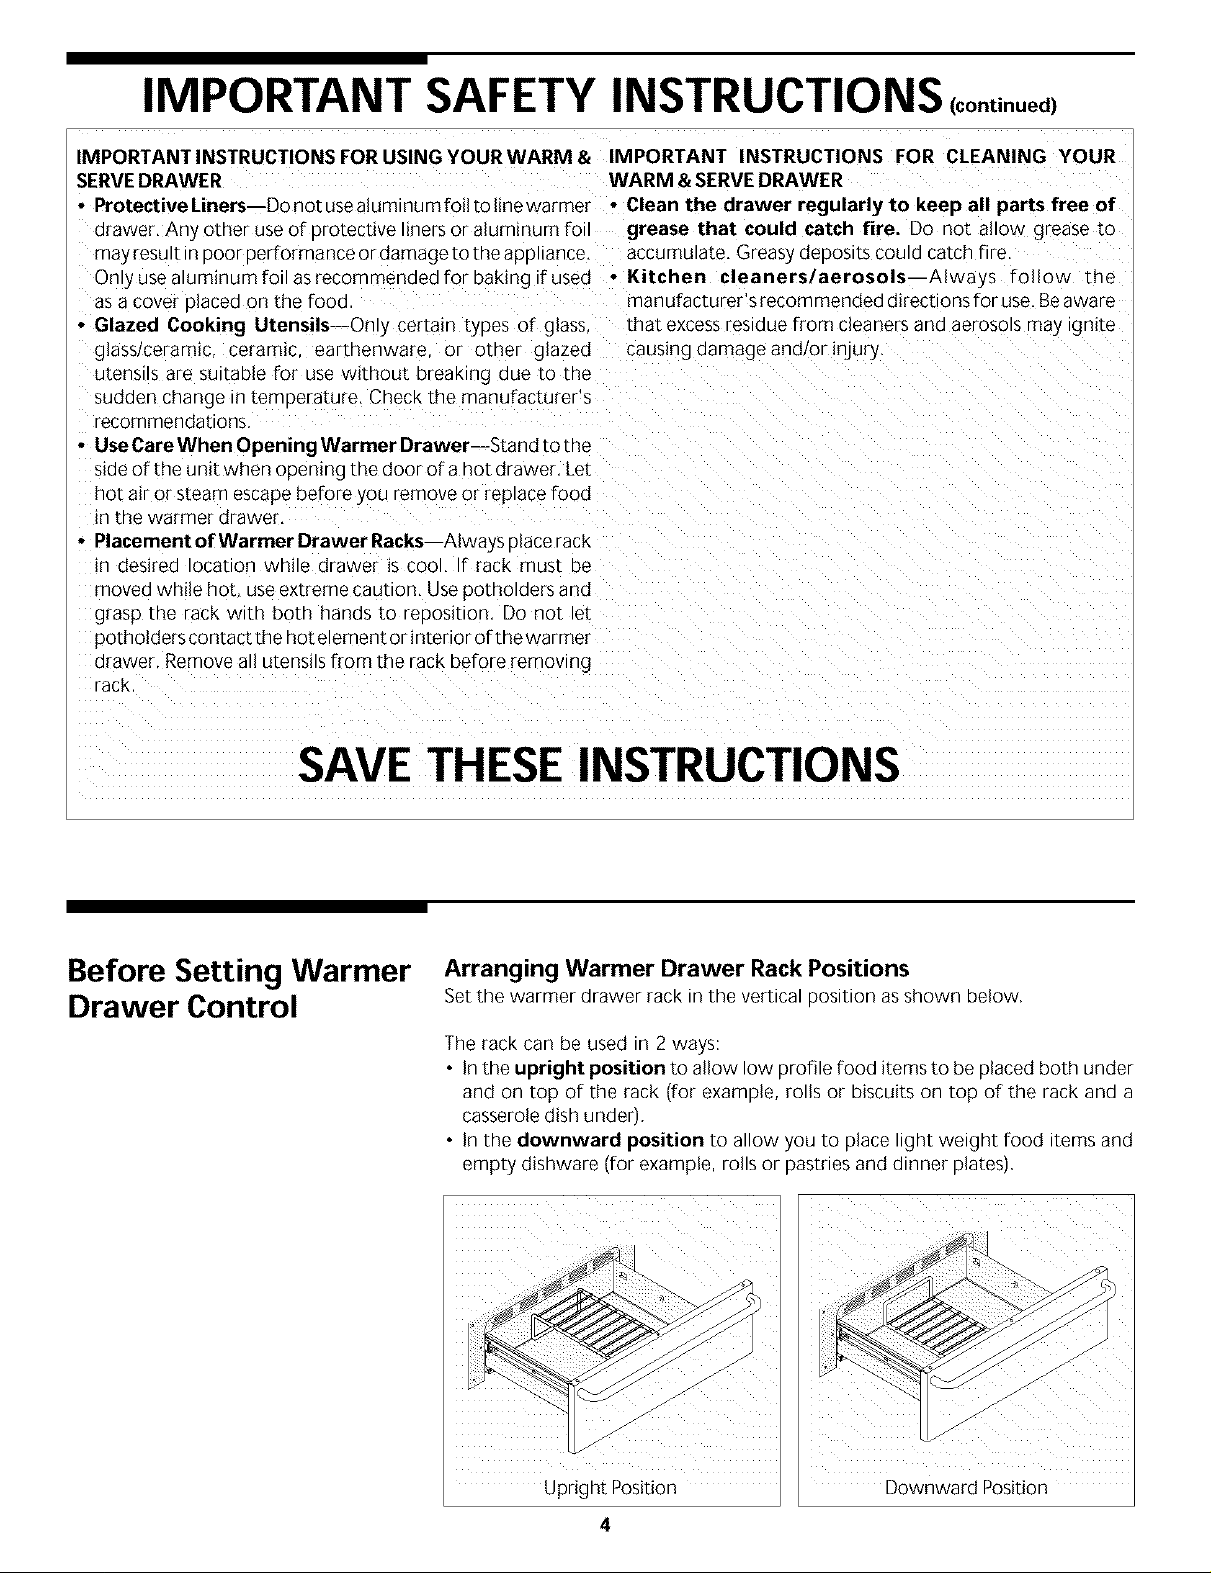
Arranging Warmer Drawer Rack Positions
Setthe warmer drawer rack in the vertical position asshown below,
The rack can be used in 2 ways:
• Inthe upright position to allow low profile food items to be placed both under
and on top of the rack (for example, rolls or biscuits on top of the rack and a
casserole dish under),
• In the downward position to allow you to place light weight food items and
empty dishware (for example, rolls or pastries and dinner plates),
Upright Position Downward Position
4
Setting Warmer
Drawer Control
Usethe warmer drawer to keePhot fo0ds I
hot such as:vegetables, gravies, meats, I
casseroles,biscuits and r0!ls, pastriesand
heated d nner p ares.
The warmer drawer is equipped with a 1
Catch which may require extra force J
when opening and closing the drawer, j
To Operate the Warmer Drawer
The purpose of the warmer drawer is to keep hot cooked foods at serving tem-
perature. Always start with hot food. It is not recommended to heat cold food in
the warmer draweR
All food placed in the warmer drawer should be covered with a lid or aluminum foil
to maintain moisture and softness. Do not cover crisp foods. Do not use plastic
wrap to cover food. Plastic may melt onto the drawer and be very difficult
to clean.
Useonly dishware, utensils and cookware recommended for oven usein the warmer
drawer
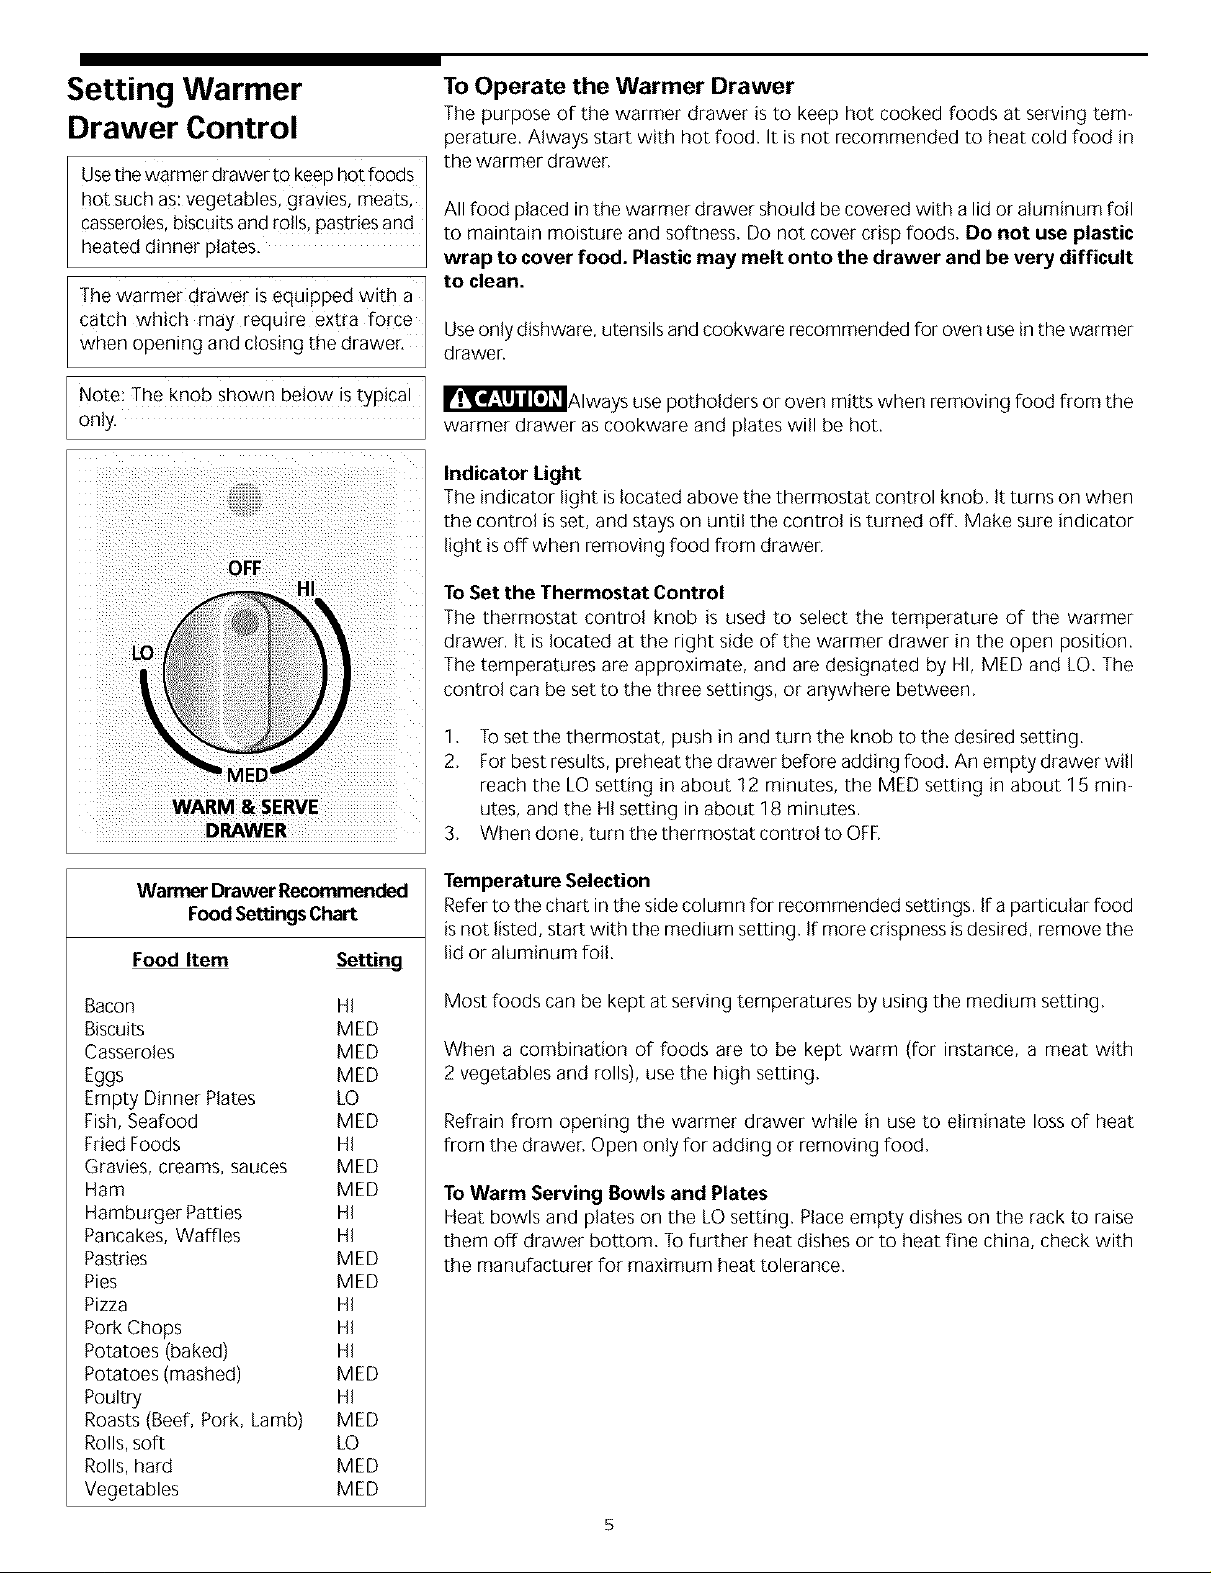
Note! The knob ShOWnbelow is typical 1
only.
OFF
HI
LO
WARM&SERVE
DRAWER
Warmer Drawer Recommended
FoodSettingsChart
Food Item Setting
_Always use potholders or oven mitts when removing food from the
warmer drawer as cookware and plates will be hot.
Indicator Light
The indicator light islocated above the thermostat control knob. It turns on when
the control isset, and stayson until the control is turned off. Make sure indicator
light is offwhen removing food from drawer
To Set the Thermostat Control
The thermostat control knob is used to select the temperature of the warmer
drawer. It is located at the right side of the warmer drawer in the open position.
The temperatures are approximate, and are designated by HI, MED and LO.The
control can be set to the three settings, or anywhere between.
1. Toset the thermostat, push in and turn the knob to the desired setting.
2. Forbest results, preheat the drawer before adding food. An empty drawer will
reach the LO setting in about 12 minutes, the MED setting in about 15 min-
utes, and the HI setting in about 18 minutes.
3. When done, turn the thermostat control to OFE
Temperature Selection
Referto the chart in the sidecolumn for recommended settings. If a particular food
isnot listed, start with the medium setting. If more crispness isdesired, remove the
lid or aluminum foil.
Bacon HI
Biscuits MED
Casseroles MED
Eggs MED
Empty Dinner Plates LO
Fish, Seafood MED
Fried Foods HI
Gravies, creams, sauces MED
Ham MED
Hamburger Patties HI
Pancakes, Waffles HI
Pastries MED
Pies MED
Pizza HI
Pork Chops HI
Potatoes (baked) HI
Potatoes (mashed) M ED
Poultry HI
Roasts (Beef, Pork, Lamb) MED
Rolls,soft LO
Rolls, hard MED
Vegetables MED
Most foods can be kept at serving temperatures by using the medium setting.
When a combination of foods are to be kept warm (for instance, a meat with
2 vegetables and rolls), use the high setting.
Refrain from opening the warmer drawer while in use to eliminate loss of heat
from the draweR Open only for adding or removing food.
To Warm Serving Bowls and Plates
Heat bowls and plates on the LO setting. Placeempty dishes on the rack to raise
them off drawer bottom. To further heat dishes or to heat fine china, check with
the manufacturer for maximum heat tolerance.
5
General Cleaning
Surfaces How to Clean
Vinyl Use hot, soapy water and a cloth. Dry with a clean cloth.
Toremove control knob, turn to the OFFposition; grasp firmly and pull straight offthe shaft.
Control Knobs, Control Panel Clean with a cloth soaked in soapy water. Rinsewith aclean water and adishcloth. Besure
to squeeze excesswater from the cloth before wiping the panel; especially when wiping
around the controls. Excesswater in or around the controls may cause damage to the
appliance. To replace knob after cleaning, line up the flat sides of both the knob and the
shaft; then push the knob into place.
StainlessSteel Cleaners made especially for stainless steel are recommended. Always follow the
Door manufacturer's instructions. Besure to rinse the cleaners. DO NO]" clean the door gasket.
The door gasket is essential for a good seal. Care should be taken not to rub, damage or
remove the gasket.
Porcelain Enamel Gentle scouring with a soapy scouring pad will remove most spots. Rinsewith a 1:1 solution
Door Liner, Body Parts and of clear water and ammonia. If necessary, cover difficult spots with an ammonia-soaked
Drawer Cavity paper towel for 30 to 40 minutes. Rinsewith clean water and adamp cloth, and then scrub
with a soap-filled scouring pad. Rinseand wipe dry with a clean cloth. Remove all cleaners
or the porcelain may become damaged during future heating. DO NOT use spray oven
cleaners.
Cleaning Various Parts of Your Appliance
Before cleaning any part of the drawer, be sure control isturned OFFand the drawer
is COOL. REMOVE SPILLOVERSAND HEAVY SOILING AS SOON AS POSSIBLE.
REGULARCLEANINGSWILLREDUCETHENUMBEROFMAJOR CLEANINGSLATER.
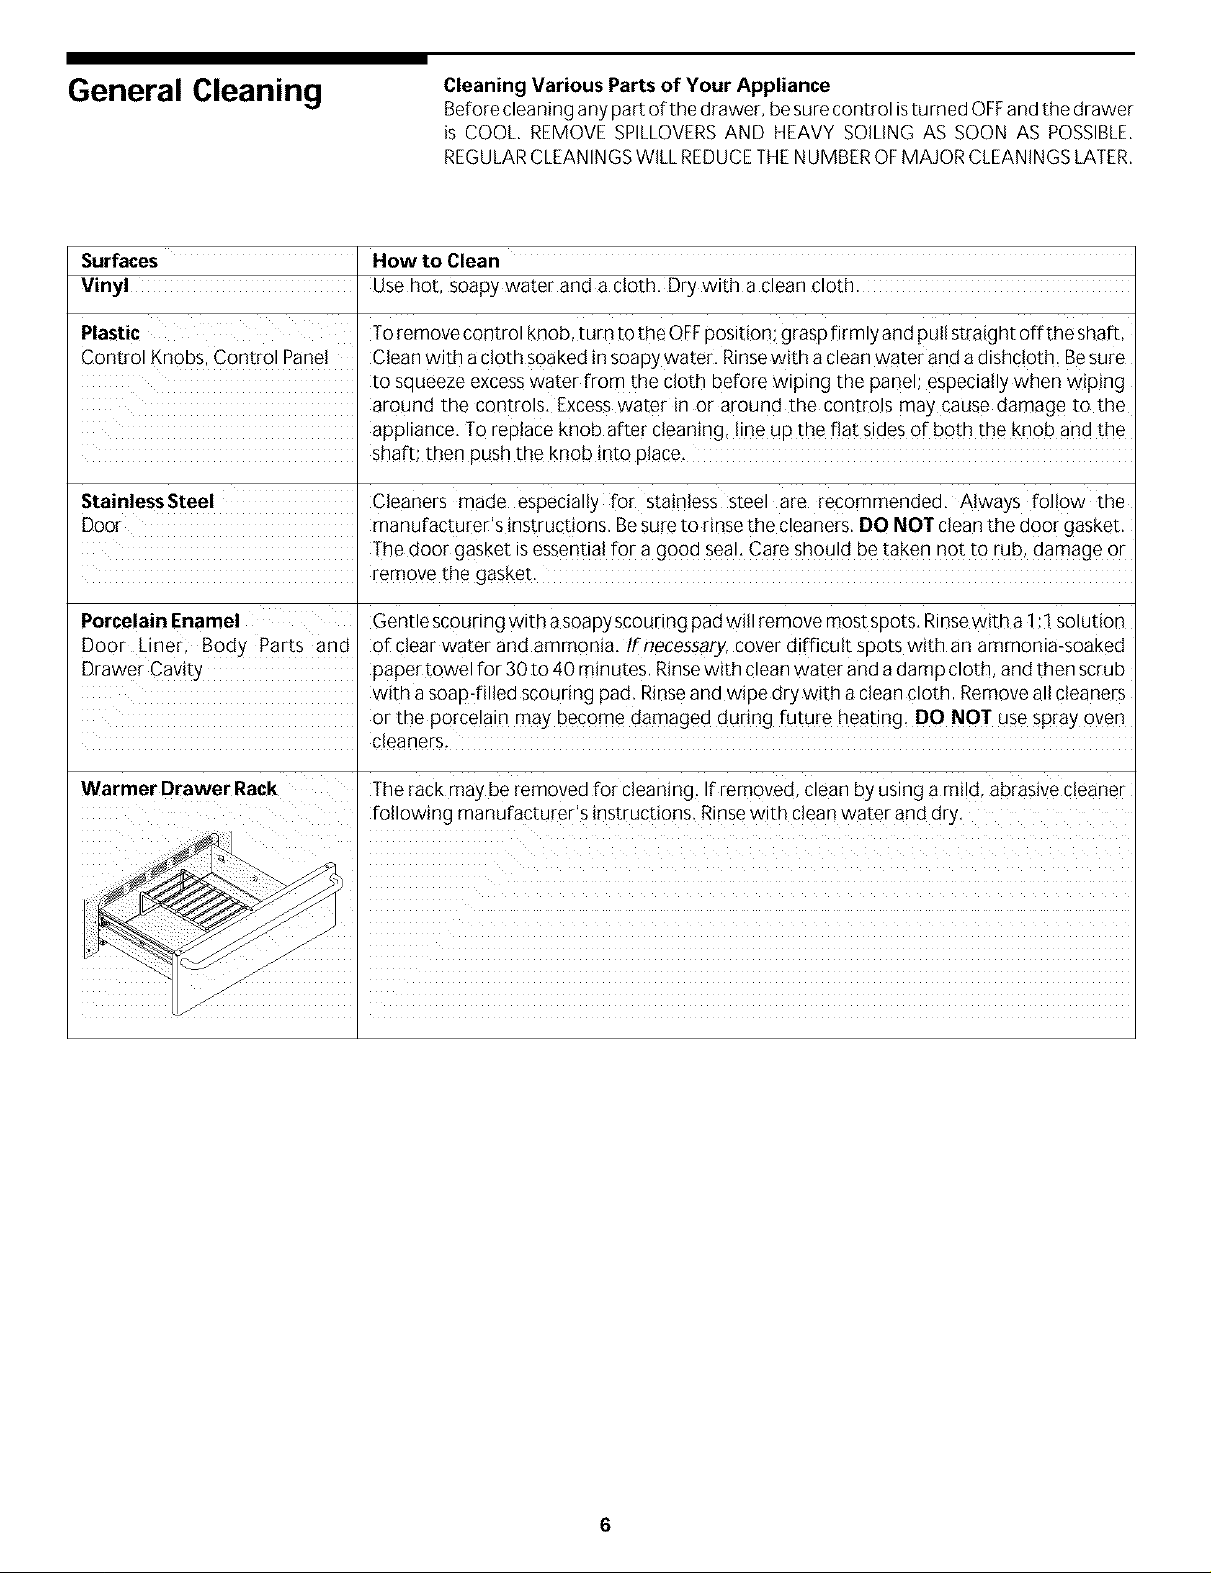
The rack may be removed for cleaning. If removed, clean by using amild, abrasive cleaner
following manufacturer" s instructions. Rinsewith clean water and dry.
J
General Cleaning
(continued)
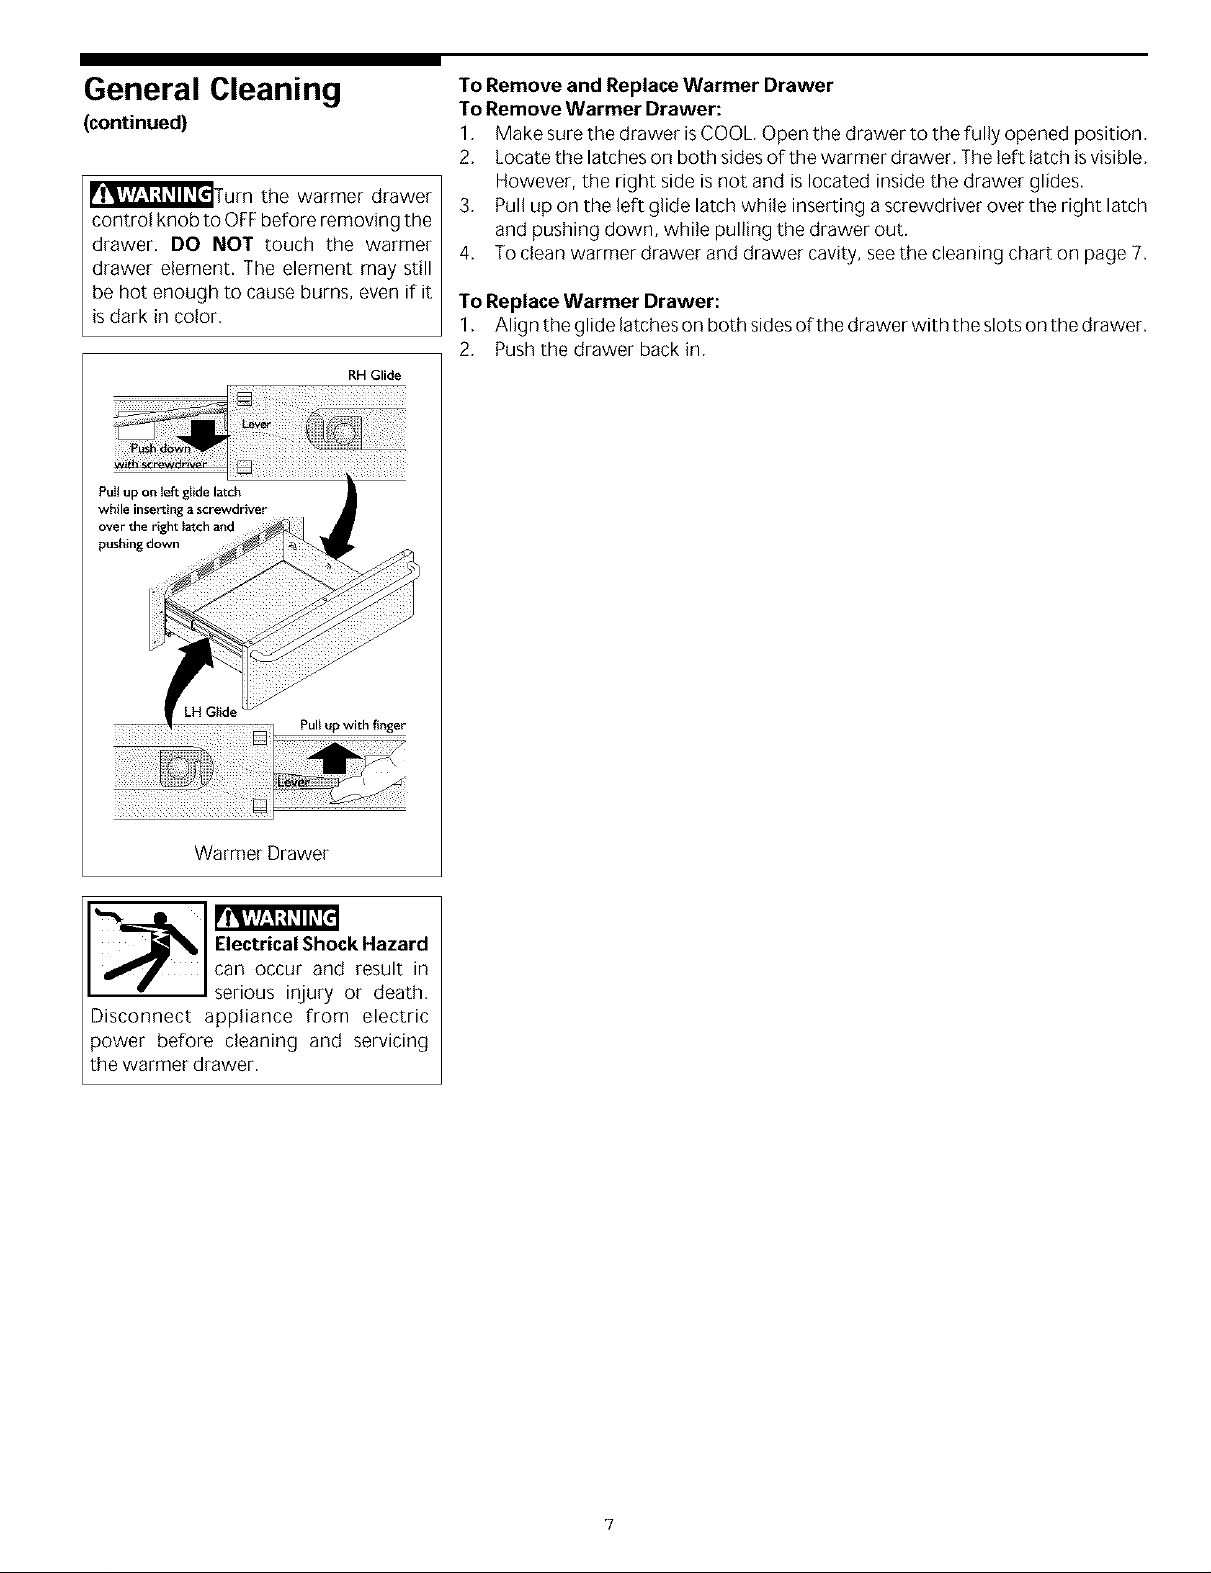
_Turn the warmer drawer
control knob to OFFbefore removing the
drawer. DO NOT touch the warmer
drawer element. The element may still
be hot enough to cause burns, even if it
is dark in color.
RH Glide
Putl up on teft glide latch
while inserting a screwdriver
over the right latch and
pushing down
To Remove and Replace Warmer Drawer
To Remove Warmer Drawer:
1, Make sure the drawer isCOOL, Open the drawer to the fully opened position.
2, Locate the latches on both sides of the warmer drawer, The left latch isvisible,
However, the right side isnot and is located inside the drawer glides.
3, Pull up on the left glide latch while inserting a screwdriver over the right latch
and pushing down, while pulling the drawer out.
4, To clean warmer drawer and drawer cavity, see the cleaning chart on page 7.
To Replace Warmer Drawer:
1, Align the glide latches on both sidesof the drawer with the slots on the drawer.
2, Push the drawer back in,
Pultup with finger
Warmer Drawer
Electrical Shock Hazard
can occur and result in
serious injury or death.
Disconnect appliance from electric
before cleaning and servicing
?
Avoid Service Checklist Beforeyou ca//forservice, review this list. It may save you time and expense. The
list includes common occurrences that are not the result of defective workmanship
or materials in this appliance.
OCCURRENCE
Drawer is not level.
Cannot move appliance easily.
Appliance must be accessible for
service.
Warmer drawer does not operate.
POSSIBLE CAUSE/SOLUTION
Poor installation. Place a level on the cutout bottom. Make sure bottom is level.
Besure cutout bottom isstrong and stable enough to adequately support drawer
(and wall oven, if applicable),
Cabinets not square or are built in too tightly, Contact builder or installer to make
appliance accessible,
Make sure cord/plug is plugged tightly into outlet.
Service wiring isnot complete. Contact your dealer, installing agent or authorized
servicer.
Power outage, Check house lights to be sure. Call your local electric company for
service,
INSTALLATION AND SERVICE MUST BE PERFORMED BY A QUALIFIED INSTALLER.
IMPORTANT: SAVE FOR LOCAL ELECTRICAL INSPECTOR'S USE.
READ AND SAVE THESE INSTRUCTIONS FOR FUTURE REFERENCE.
_'l"=V-q:t_lh_[=lFOR YOUR SAFETY: Do not store or use gasoline or other flammable vapors and liquids in the
vicinity of this or any other appliance.
GENERALINFORMATION
The Warm & Serve Drawer can be used:
As a stand alone appliance
As a combination Warm & Serve Drawer with a30" (76 cm) builtqn oven mounted above
IMPORTANT: The warmer drawer must be installed on a leveled surface from left to right, rear to front,
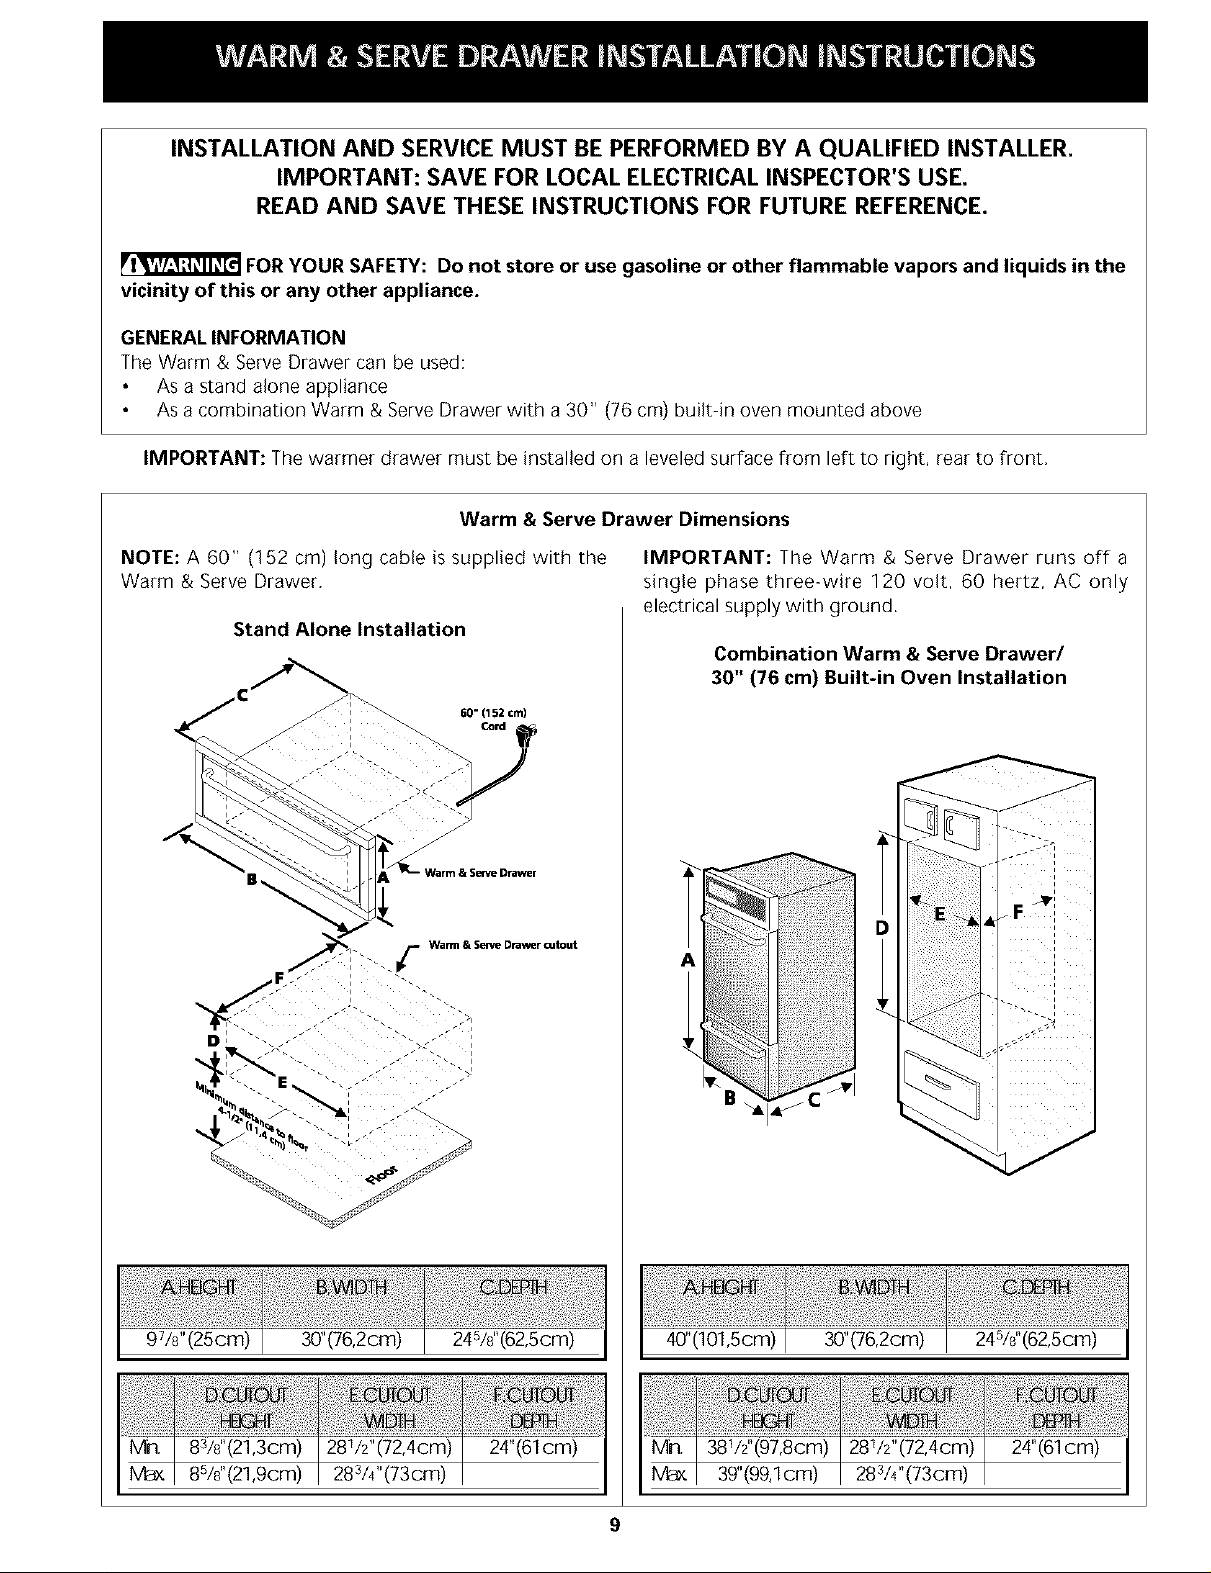
Warm & Serve Drawer Dimensions
NOTE: A 60" (152 cm) long cable is supplied with the
Warm & Serve Drawer,
Stand Alone Installation
._/r" Warm & Serve Drawer oJtout
D I
IMPORTANT: The Warm & Serve Drawer runs off a
single phase three-wire 120 volt, 60 hertz, AC only
electrical supply with ground.
Combination Warm & Serve Drawer/
30" (76 cm) Built-in Oven Installation
97/s"(25cm) 30"(76,2cm) 24s/s"(62,5cm)
8s/s"(21,3cm) 281/2"(72,4cm) 24"(61cm)
85/s"(21,9cm) 283/4"(73cm)
40"(101,5cm) 30"(76,2cm) 245/s"(62,5cm)
381/2"(97,8cm) 281/2"(72,4cm) 24"(61cm)
39"(99,1cm) 283/4"(73cm)
9
Important Notes to the Installer
1, Read all instructions contained in these installation
instructions before installing appliance,
2, Remove all packing material from appliance before
connecting the electrical supply.
3, Observe all governing codes and ordinances.
4, Besure to leavethese instructions with the consumer,
Important Note to the Consumer
Keep these instructions for future reference,
IMPORTANT SAFETY
INSTRUCTIONS
• Be sure your appliance is installed and plugged
into a 120 Volt grounded outlet.
• This appliance must be electrically grounded in
accordance with the National Electrical Code ANSI/
NFPA No. 70--latest edition in the United States,
or CSA C22.1, Part 1 in Canada, and local code
requirements.
Tools You Will Need
Phillips® Screwdriver
Pencil
Ruler or Tape Measure and Straight-edge
Hand Saw or Saber Saw
Spirit Level
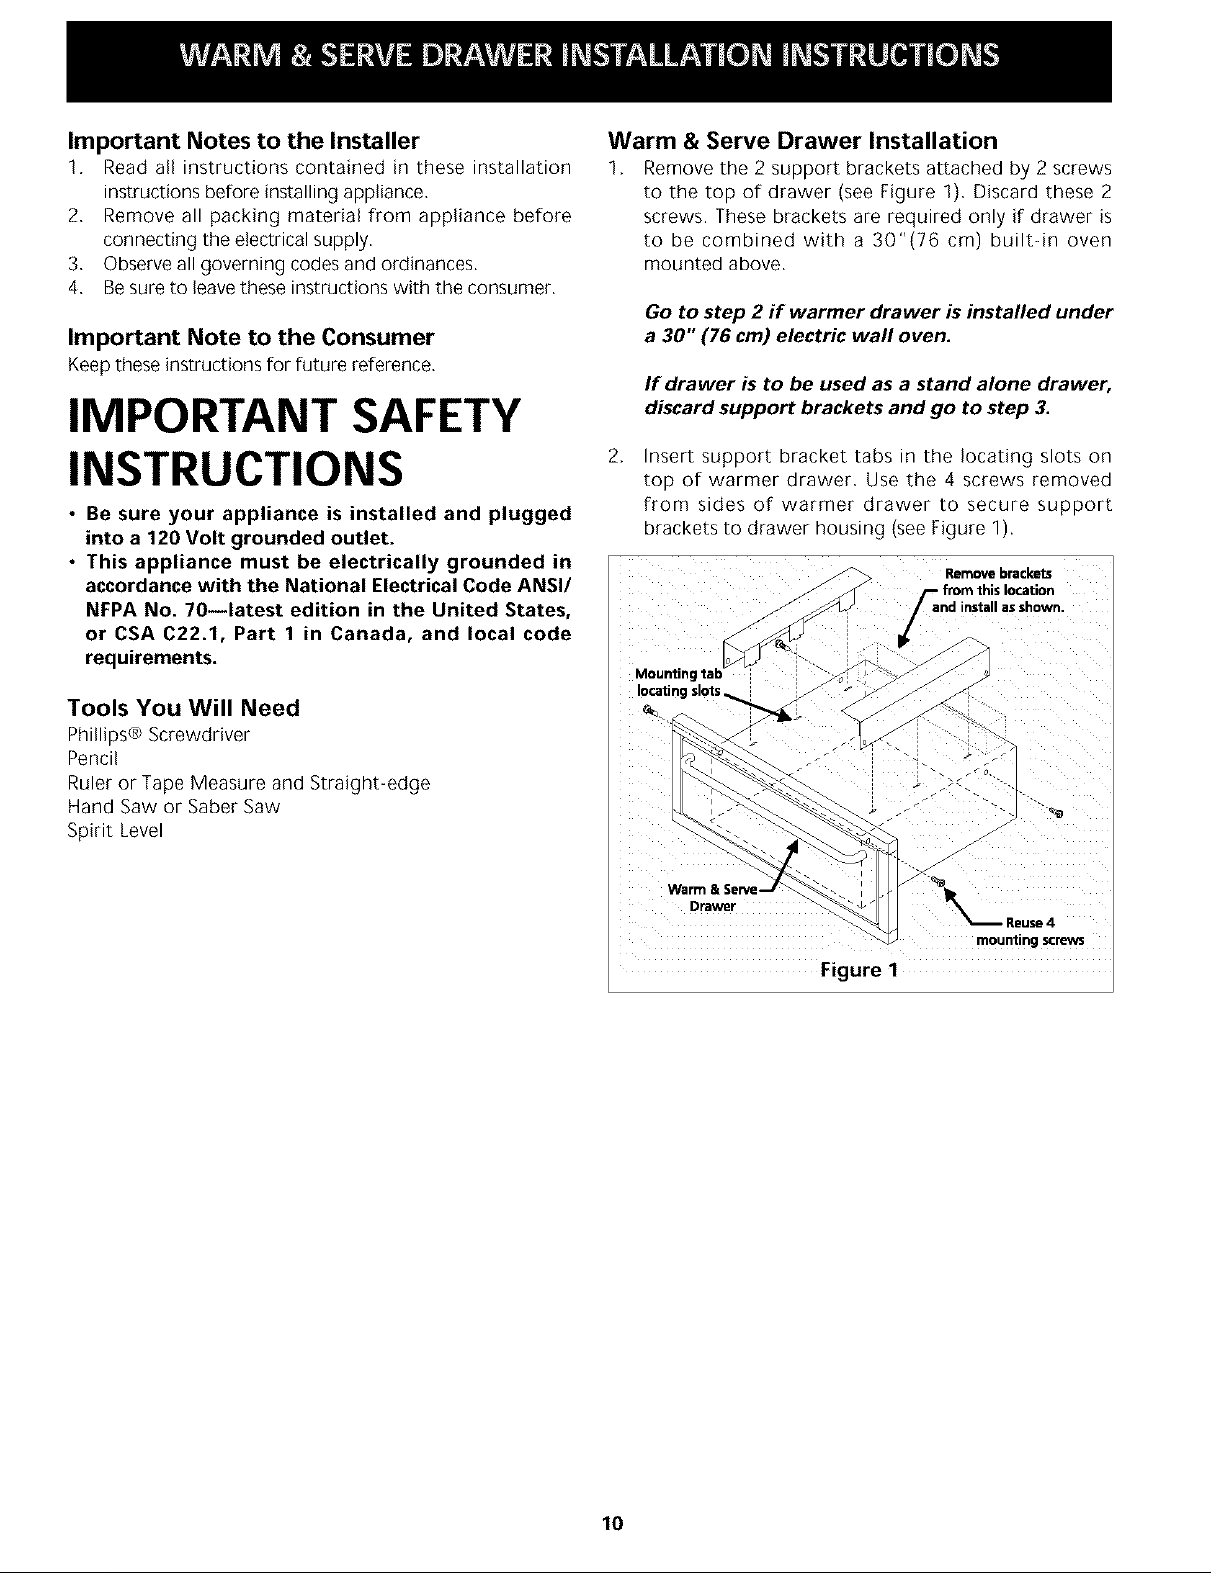
Warm & Serve Drawer Installation
1,
Remove the 2 support brackets attached by 2 screws
to the top of drawer (see Figure 1), Discard these 2
screws. These brackets are required only if drawer is
to be combined with a 30"(76 cm) built-in oven
mounted above,
Go to step 2 if warmer drawer is installed under
a 30" (76 cm) electric wall oven.
If drawer is to be used as a stand alone drawer,
discard support brackets and go to step 3.
2,
Insert support bracket tabs in the locating slots on
top of warmer drawer, Use the 4 screws removed
from sides of warmer drawer to secure support
brackets to drawer housing (seeFigure 1).
Removebrackets
from this location
Fand install as shown.
1
Mounting
/
Warm & Serve-
Drawer
Reuse4
mounting screws
Figure 1
10
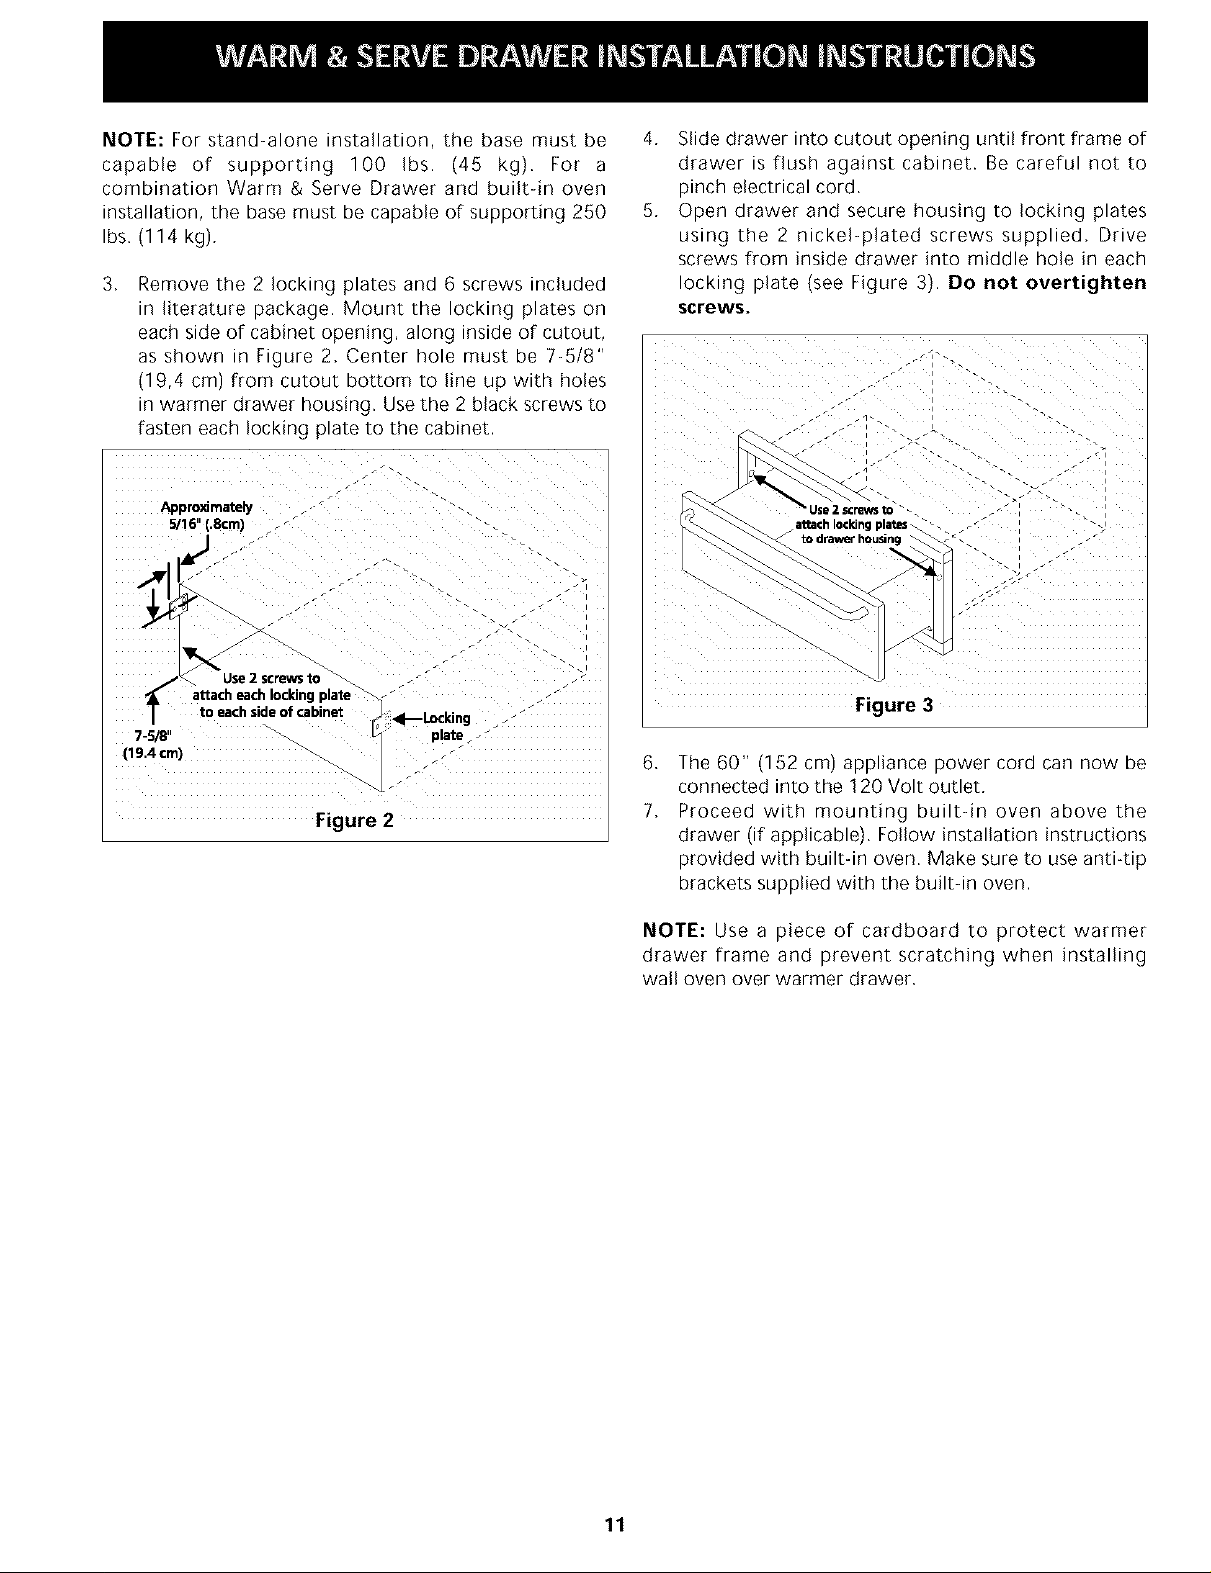
NOTE: For stand-alone installation, the base must be 4,
capable of supporting 100 Ibs. (45 kg). For a
combination Warm & Serve Drawer and built-in oven
installation, the base must be capable of supporting 250 5,
Ibs. (114 kg),
,
Remove the 2 locking plates and 6 screws included
in literature package. Mount the locking plates on
each s_de of cabinet c pening a_ong ns_ae of cutout
as ShOWn ,, _ gure 2 Center ROle mus[ De 7-5/8
(19.4 cm from cutout DO[[Om ro _neup w_tn holes
n wa/mer drawer housln J Use the 2 black screws [o
fasteR each lOCKing [ ate to the cabinet
Appro_mately
5/16 (.8cm)
Use 2 screws to
attach each locking plate
7-5/8"
(19.4 cm)
to each side of cabinet <l_Locking
plate
Figure 2
Slide drawer into cutout opening until front frame of
drawer is flush against cabinet. Be careful not to
[)inch electrical cord,
Open drawer and secure housing to locking plates
using the 2 nickel-plated screws supplied, Drive
screws from inside drawer into middle hole in each
locking plate (see Figure 3). De not overtighten
screws.
attach Iocldngplates_ _- ! : .,
to draw_ housing .
Figure 3
,
The 60" (152 cm) appliance power cord can now be
connected into the 120 Volt outlet,
7,
Proceed with mounting built-in oven above the
drawer (if applicable), Follow installation instructions
provided with built-in oven. Make sure to use anti-tip
brackets supplied with the built-in oven.
NOTE: Use a piece of cardboard to protect warmer
drawer frame and prevent scratching when installing
wall oven over warmer drawer,
11
 Loading...