

Page 1
Dishwasher
Product Registration Card
Please fill in completely, sign and return promptly!
Use & Care Manual
4400 Series
Safety
Instructions .....................................2
Operating
Instructions ................................. 3-5
Preparing and
Loading Dishes ........................ 6-9
Dishwasher Dispenser
and Detergents ......................10-11
Factors Affecting
Performance .................................11
Care and
Cleaning ..........................................12
Solutions to Common
Dishwashing Problems ...13-15
Record All Information For
Future Reference
Brand: Purchase Date:
Model #:
Serial #:
Questions? 1-800-944-9044
(United States)
1-800-265-8352
(Canada)
Visit our Web Site at
www.frigidaire.com
Consumer Services
Warranty & Service ...............................16
Versión en español
Si desea obtener una copia en español de este Manual
del Usuario, sírvase escribir a la dirección que se incluye a
continuación. Solicite la P/N 6 920249 A, Spanish Use & Care
Manual, Electrolux Major Appliances North America,
P.O. Box 212378, Augusta, GA 30917.
READ AND SAVE THESE INSTRUCTIONS P/N 6 920248 A
Page 2
Important Safety Instructions
What You Need to Know About Safety
Instructions
Warning and Important Safety Instructions
appearing in this guide are not meant to cover
all possible conditions and situations that may
occur. Common sense, caution and care must be
exercised when installing, maintaining or operating
the dishwasher.
Always contact the manufacturer about problems
or conditions you do not understand.
Recognize Safety Symbols, Words, Labels
WARNING – Hazards or unsafe practices
which COULD result in severe personal injury
or death.
CAUTION – Hazards or unsafe practices
which COULD result in minor personal injury
or property damage.
Important Safety Instructions
Check with the installer to make sure the
appliance has been properly grounded to
avoid possible electrical shock. Be sure you
read the important personal safety instructions
before you use this dishwasher.
Products with a label have been listed with
Underwriter’s Laboratories, Inc. – those with
a CSA tag have been listed with Canadian
Standards Association. Nevertheless, as with any
other equipment using electricity and moving parts,
there is a potential hazard.
When using your dishwasher, follow basic
precautions, including the following:
1. Read all instructions before using the
dishwasher.
2. Use the dishwasher only for its intended
function.
©2005 Electrolux Major Appliances North America, a division
of Electrolux Home Products, Inc. All rights reserved.
3. Disconnect electrical power to dishwasher before
attempting to service.
4. To avoid electrical shock hazard, the sides and
back must be enclosed and the front panels must
be attached before electrical power is applied
to the dishwasher. Refer to the installation
instructions for proper grounding procedures.
5. Connect to a properly rated, protected and sized
power supply circuit to avoid electrical overload.
6. Children should never be permitted to operate,
or play in, with, or around this dishwasher.
7. To reduce the risk of injury when loading items
to be washed, sharp or pointed items should be
located with the handles up. Also, load sharp
items so they are not likely to damage the door
seal.
8. Do not touch the heating element on the bottom
of the tub during or at the completion of a cycle.
It will be hot.
9. Use only detergents and rinse additives
designed for a residential automatic dishwasher.
Never use soap, laundry detergent, or hand
washing detergent in your dishwasher. Keep
these products out of reach of children.
10. Do not sit, stand on or abuse the door or dish
racks of the dishwasher.
11. Under certain conditions, hydrogen gas may
be produced in a hot water system that has not
been used for two weeks or more. Hydrogen
gas is explosive. If the hot water system has
not been used for such a period, turn on all
hot water faucets and let the water flow from
each for several minutes. This will release
any accumulated hydrogen gas. As the gas is
flammable, do not smoke or use an open flame
during this process.
12. Do not wash plastic items unless marked
“dishwasher safe” or the equivalent. For plastic
items not so marked, check the manufacturer’s
recommendations.
13. Do not tamper with controls.
14. To prevent accidental child entrapment and
suffocation risks, always remove the door to the
washing compartment when removing an old
dishwasher from service or discarding it.
15. Use caution when unloading the dishwasher.
Dishes will be hot if unloaded shortly after a
cycle has completed.
16. Certified residential dishwashers are not
intended for licensed food establishments.
17. To avoid water, mold or mildew damage to your
home, inlet and drain hose connections should
be checked periodically for leaks.
SAVE THESE
INSTRUCTIONS
2
Printed in U.S.A.
Page 3
Operating Instructions
Getting Started
1. Load dishwasher (See Preparing and Loading
Dishes).
2. Add detergent (See Dishwasher Dispenser &
Detergents).
3. Add rinse aid, if needed (See Rinse Aid).
4. Select desired Cycle (See Cycle Chart). The
indicator light above the pad will glow when
selected.
5. Select desired Options (See Options). The
indicator light above the pad will glow when
selected.
6. Close door to latch.
7. Run hot water faucet nearest dishwasher until
water is hot. Turn water off.
8. To start, press Start/Cancel pad.
Note: The dishwasher is programmed to
remember your last cycle so you do not have to
reset each time. To start the dishwasher using
the same cycle and options selected on the
previous wash, just press the Start/Cancel pad.
Wash Cycle Selections
Note: Cycle times are approximate and will vary
with options selected. Hot water is necessary to
activate dishwasher detergent and melt fatty food
soils. An automatic sensor will check the incoming
water temperature and, if it is not hot enough, the
timer will be delayed for automatic water heating
in the main wash of all cycles. This happens even
when Hi-Temp option has not been selected. When
Hi-Temp is selected, an even higher temperature
will be guaranteed to handle heavier soil loads.
Status Indicator Lights
When the Sanitize option is selected, the Sanitized
light will glow when the Sanitize cycle is finished.
If the dishwasher did not properly sanitize the
dishes, the light will not come on. This can happen
if the cycle is interrupted. The light will remain on
until the door is opened for 30 seconds.
The Clean light will come on at end of cycle and
remain on until door is opened for 30 seconds.
1H-24……….. Number of delay start hours.
The last hour will count down in
minutes.
MINUTES…...… Number of minutes left in cycle
(1-99).
Note: The time remaining could suddenly increase
or drop several minutes. This means the turbidity
sensor has checked the soil level and determined
if additional water fills are needed or if water fills
can be deleted.
3
Page 4

Operating Instructions (continued)
The Smart Soil Turbidity Sensor checks the soil level on your dishes in the Normal Wash cycle. Depending on
soil level, the sensor will determine if additional water fills are needed to clean the dishes or if water fills can
be deleted. Cycle time will vary based on the amount of soil on the dishes. Cycle time will also vary based on
the options selected and the incoming water temperature.
Cycle Description Time
(Approx.
Minutes)
Heavy Wash Long cycle for heavy
food soils.
Normal Wash Medium cycle for
average food soils.
Smart Soil Turbidity
Sensor is active with
this cycle.
China Crystal Short cycle for light
food soils.
Rinse Only Rinses dishes being
held until there is a full
load.
Quick Wash Quick cycle for light
food soils. Does not
include drying time.
* Number of fills will vary depending on the soil level of each load.
132 2 washes/3 rinses
97-117 1-2 washes*/1-2
82 1 wash/2 rinses
9 1 rinse
38 1 wash/1 rinse
Number of
Washes/
Rinses
rinses*
IMPORTANT:
• Depending on water temperature, there may be time added to the cycle to bring water up to
temperature.
• Only the following certified cycles with Sanitize option selected have been designed to meet NSF
requirements (NSF/ANSI 184 Residential Dishwasher) for sanitization: Heavy Wash, Normal Wash
and China Crystal.
4
Page 5

Operating Instructions (continued)
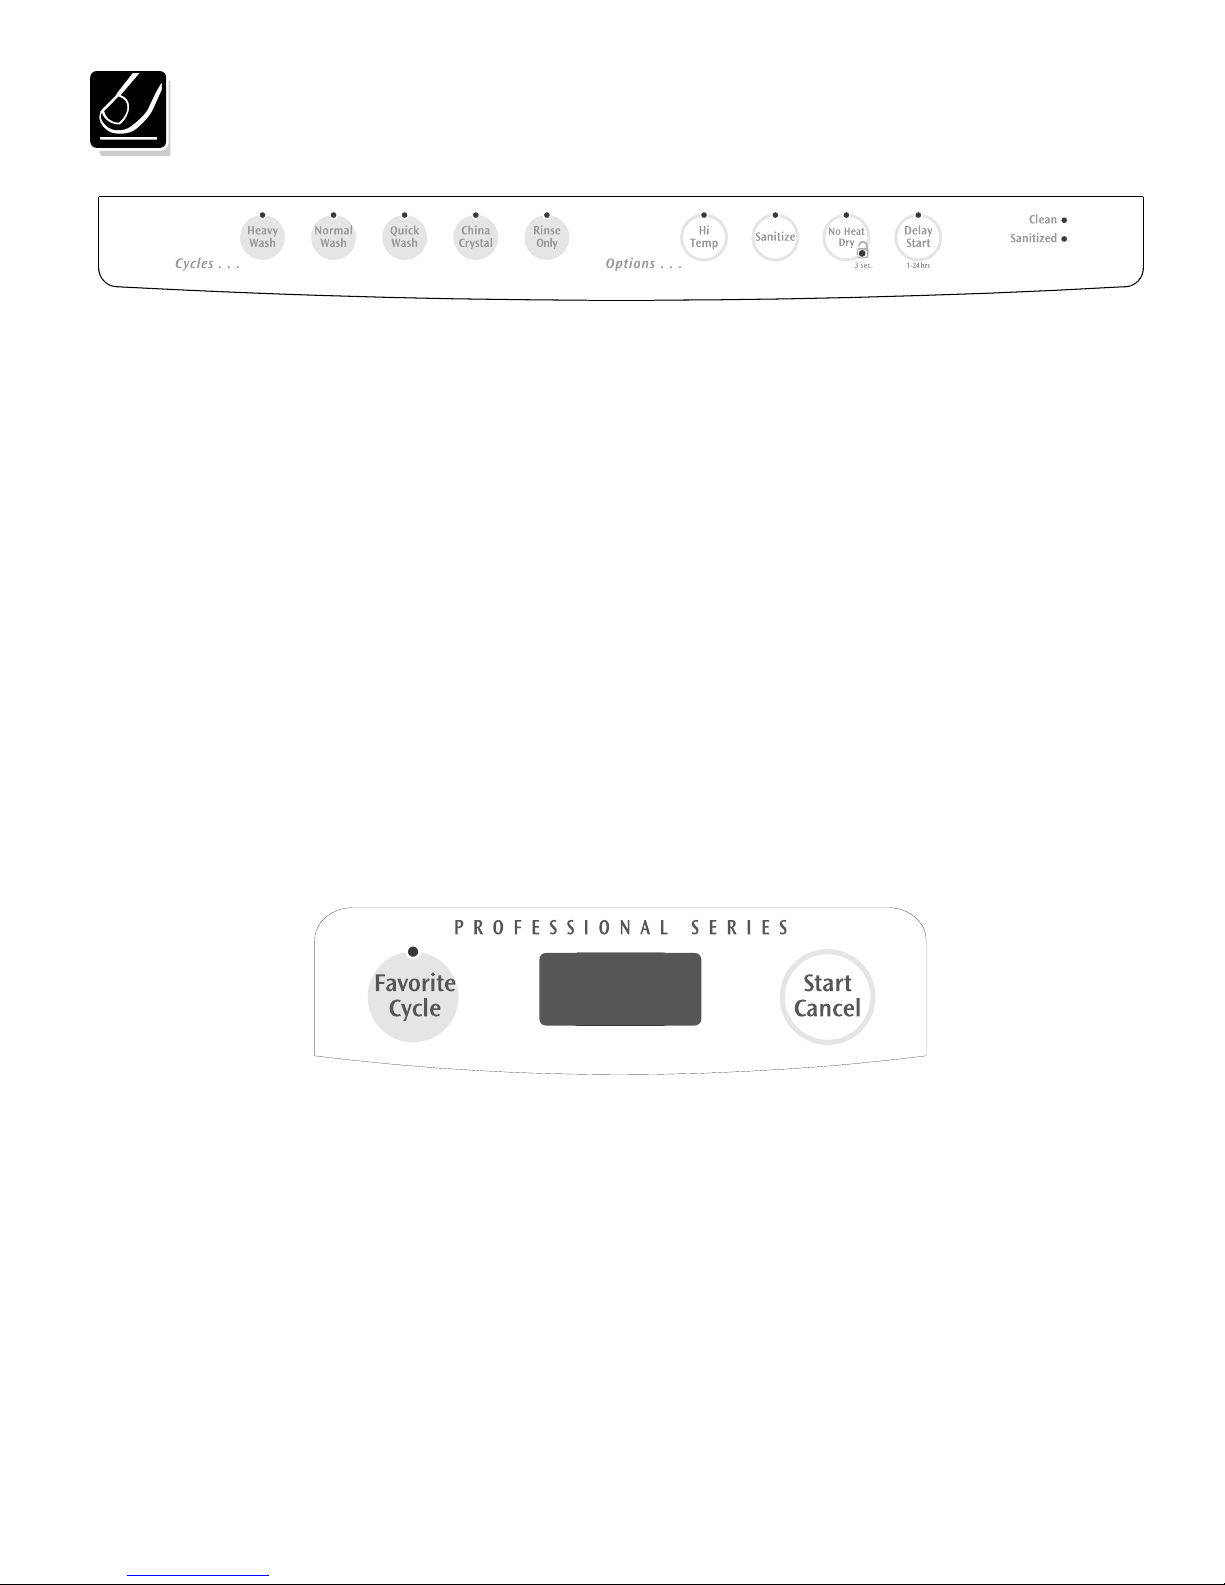
Options Selections
Favorite Cycle
The Favorite Cycle option allows you to program
your preferred cycle and options into one button.
Once programmed, simply press the Favorite
Cycle button followed by the Start/Cancel pad.
To program the Favorite Cycle button:
1) Select your preferred cycle and options
2) Hold the Favorite Cycle button for 3 seconds
The display will flash for 2 seconds indicating the
Favorite Cycle option has been programmed.
To change the Favorite Cycle option, simply repeat
steps one and two above.
Hi-Temp
When Hi-Temp option is selected, the dishwasher
heats water in the main wash to approximately
140° F (60° C).
This increase in water temperature helps
dishwasher detergent remove food grease and
soil from dishes more effectively and aids in
drying. Hi-Temp option can be used with all cycles
except Quick Wash and Rinse Only. Hi-Temp is
automatically provided when Heavy Wash cycle is
selected, but the indicator light is not lit.
Sanitize Option
To sanitize your dishes and glassware, select the
Sanitize option. When selected, the light above
the pad will come on and remain on until end of
cycle. The water temperature in the final rinse will
be raised to 154° F (68° C), assuring bacteria is
destroyed. This option is available in Heavy Wash,
Normal Wash and China Crystal cycles. Only
these sanitization cycles have been designed to
meet NSF requirements.
The cycle time will be extended until the proper
water temperature is reached. Washing action will
continue during the water heating delay. For best
results, the incoming water temperature should be
at least 120° F (49° C).
The sanitize criteria may not be satisfied if there is
an interruption of the cycle, power failure or if the
incoming water temperature is below 120° F
(49° C).
To turn off the Sanitize option, press the pad a
second time. The light above the pad will turn off.
No Heat Dry
No Heat Dry option saves electricity since the
heating element is off during drying portion of
cycle. When selected, the light above the pad
will come on and remain on until end of cycle. To
speed the drying process, open the door slightly
after the cycle is complete. Some water droplets
may remain on door and tub and in areas where
dishes touch silverware basket and rack.
To select heated dry, press the pad a second time.
The light above the pad will turn off. Heated dry
provides faster drying since the heating element is
on during the drying portion of the cycle.
When an option is selected, the light above the
pad will come on and remain on until end of cycle.
To turn off the option, press the pad a second time.
The light above the pad will turn off.
Child Lock Controls
To prevent children from accidently changing the
dishwasher cycle or starting the dishwasher, lock
the dishwasher controls by pressing and holding
the No Heat Dry pad for 3 seconds. An indicator
light on the lock graphic pad will illuminate when
the controls are locked and no new selections
can be made until the lock is released. To unlock
the controls, press the No Heat Dry pad until the
indicator light goes out.
Delay Start
The Delay Start option allows you to automatically
delay starting your dishwasher from 1-24 hours
depending on your model.
Press the Delay Start pad until the desired delay
time shows in the Status window. A light will come
on indicating the delay start hours and will remain
on until cycle starts.
To cancel the Delay Start option and begin the
cycle before the delay period is over, press the
Start/Cancel pad.
To Cancel a Cycle
You can cancel a cycle anytime during the cycle.
Press Start/Cancel pad and the dishwasher will
start a 2 minute drain. At the end of the drain,
select the desired cycle. Pressing Start/Cancel
again during drain cancels the draining process.
5
Page 6
Preparing and Loading Dishes
Dish Preparation
Scrape away large pieces of food, bones, pits,
toothpicks, etc. The continuous filtered wash
system will remove remaining food particles.
Burned-on foods should be loosened before
loading. Empty liquids from glasses and cups.
Foods such as mustard, mayonnaise, vinegar,
lemon juice and tomato based products may
cause discoloration of stainless steel and plastics
if allowed to sit for a long period of time. Unless
the dishwasher is to be operated at once, it is best
to rinse off these food soils.
• Load racks so that large items do not
prevent the detergent dispenser from opening.
• Check manufacturer's recommendations before
washing items in question.
• If the dishwasher
drains into a food
disposer, be
sure disposer is
completely empty
before starting
dishwasher.
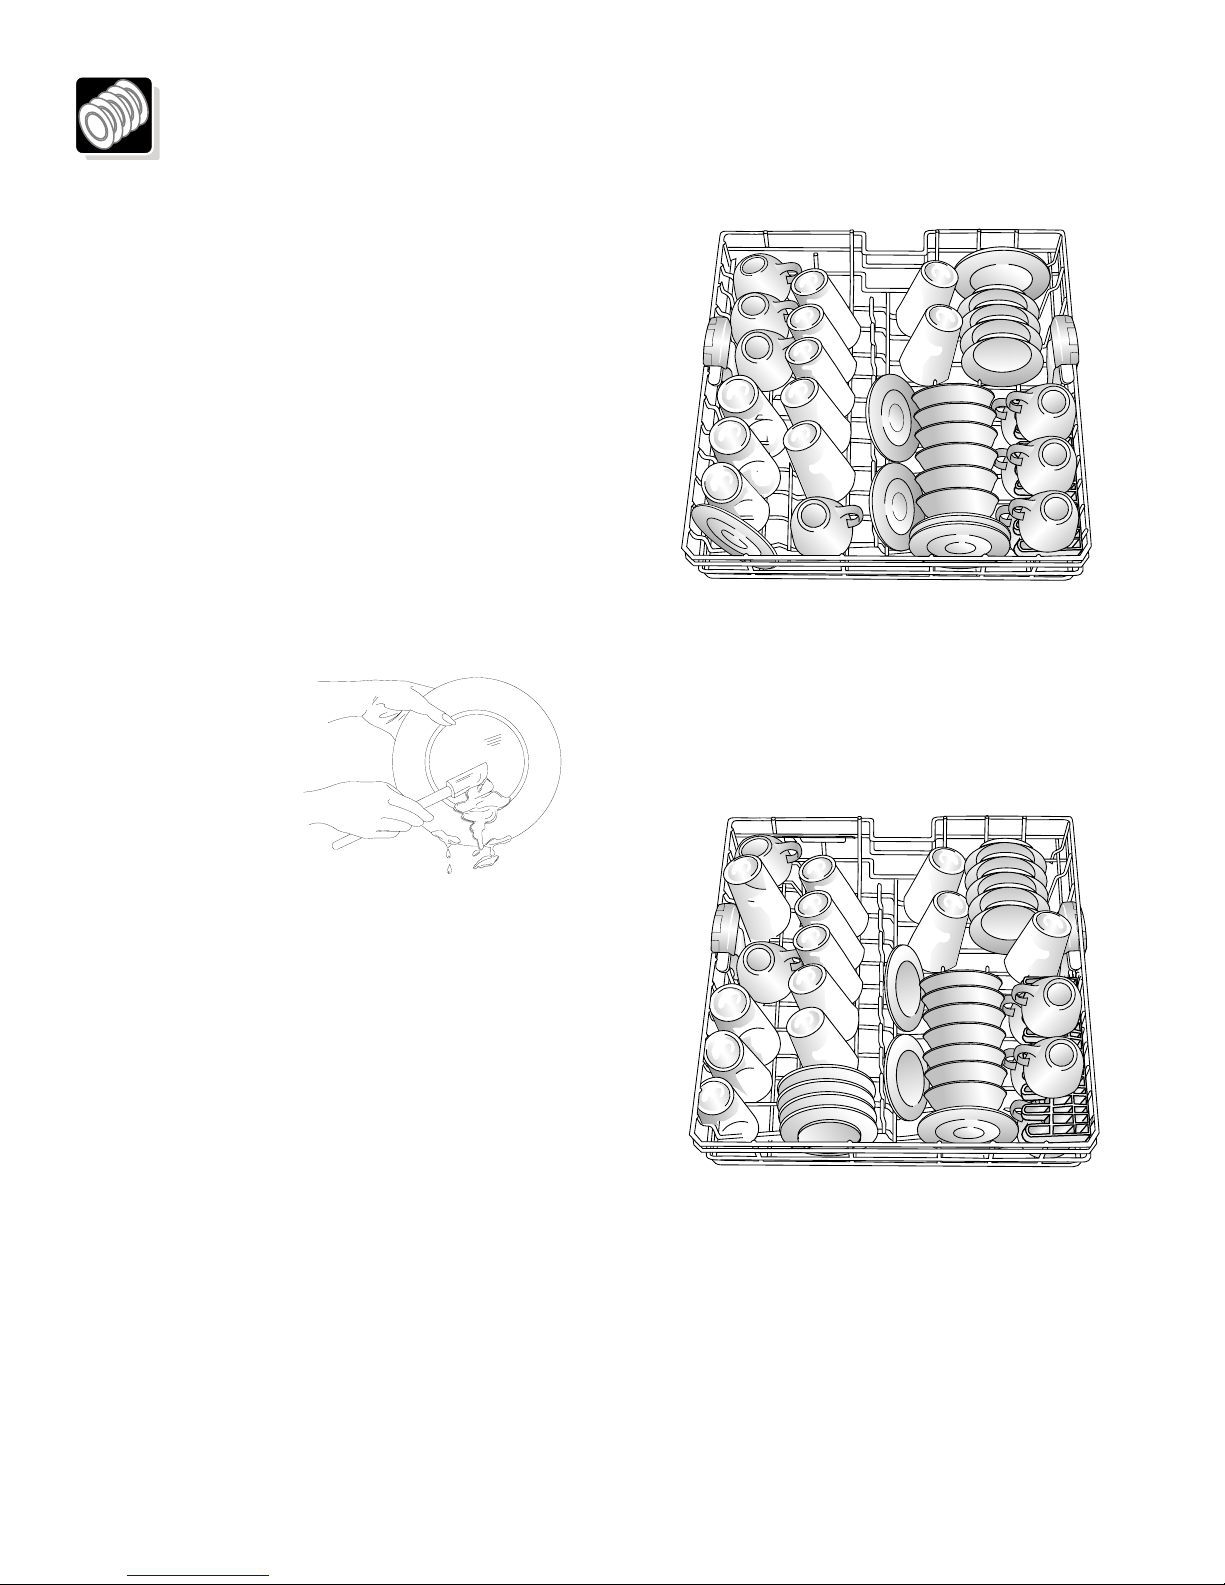
10 place settings standard loading pattern.
(For best washing performance, the upper rack
should be in the raised position.)
Loading the
Top Rack
The upper rack is designed for flexibility in loading
a wide variety of items including cups, glasses,
stemware, small plates, bowls, etc.
Load glasses in top rack. Damage may occur if
placed in bottom rack.
Load plastic items in top rack only. Melting may
occur if placed in bottom rack.
Load items with open ends facing down for better
cleaning and draining.
Damage may occur if delicate items touch each
other during dishwasher operation.
Be sure nothing protrudes through the bottom of
the rack to block rotation of middle spray arm.
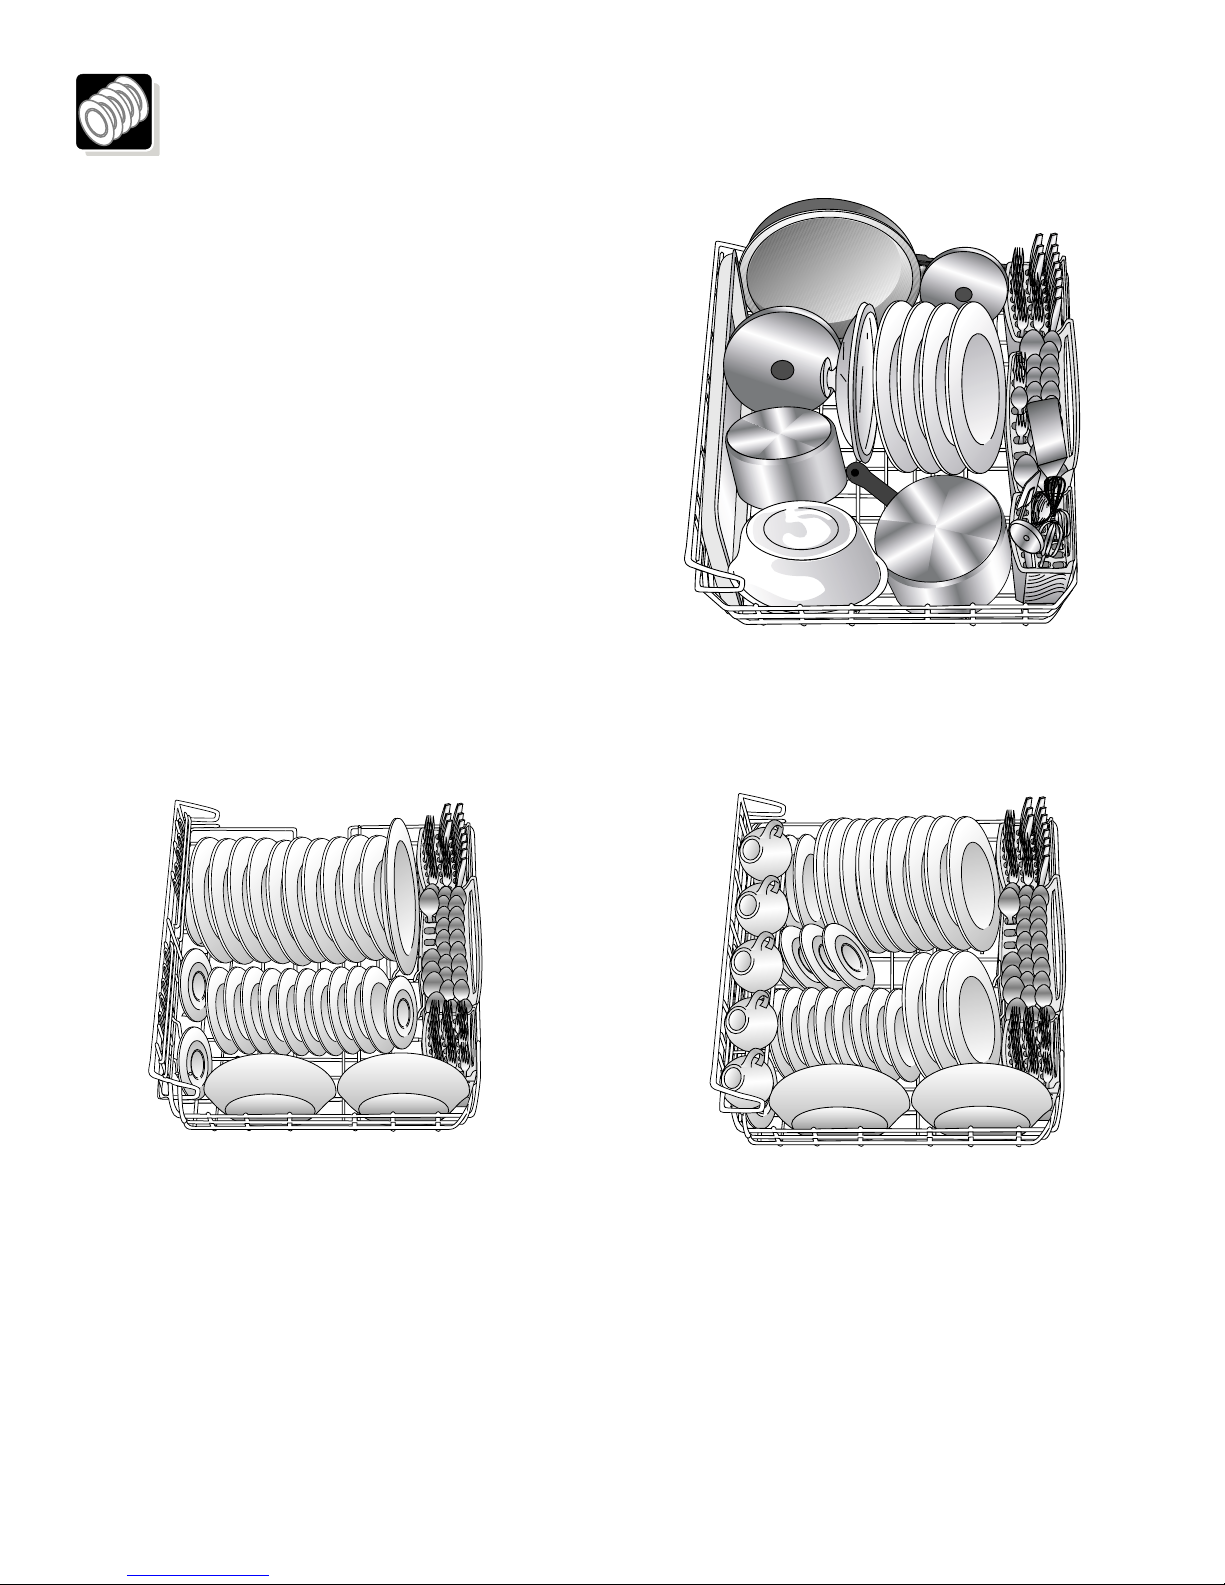
12 place settings standard loading pattern.
(For best washing performance, the upper rack
should be in the raised position.)
Use the fold-down cup shelf or a cup
shelf/stemware holder. They can be used to load
two levels of cups, juice glasses, and other short
items. Stagger items on upper level so that water
can reach all inside surfaces. Fold the cup shelf up
to load tall glasses.
6
Page 7
Preparing and Loading Dishes (continued)
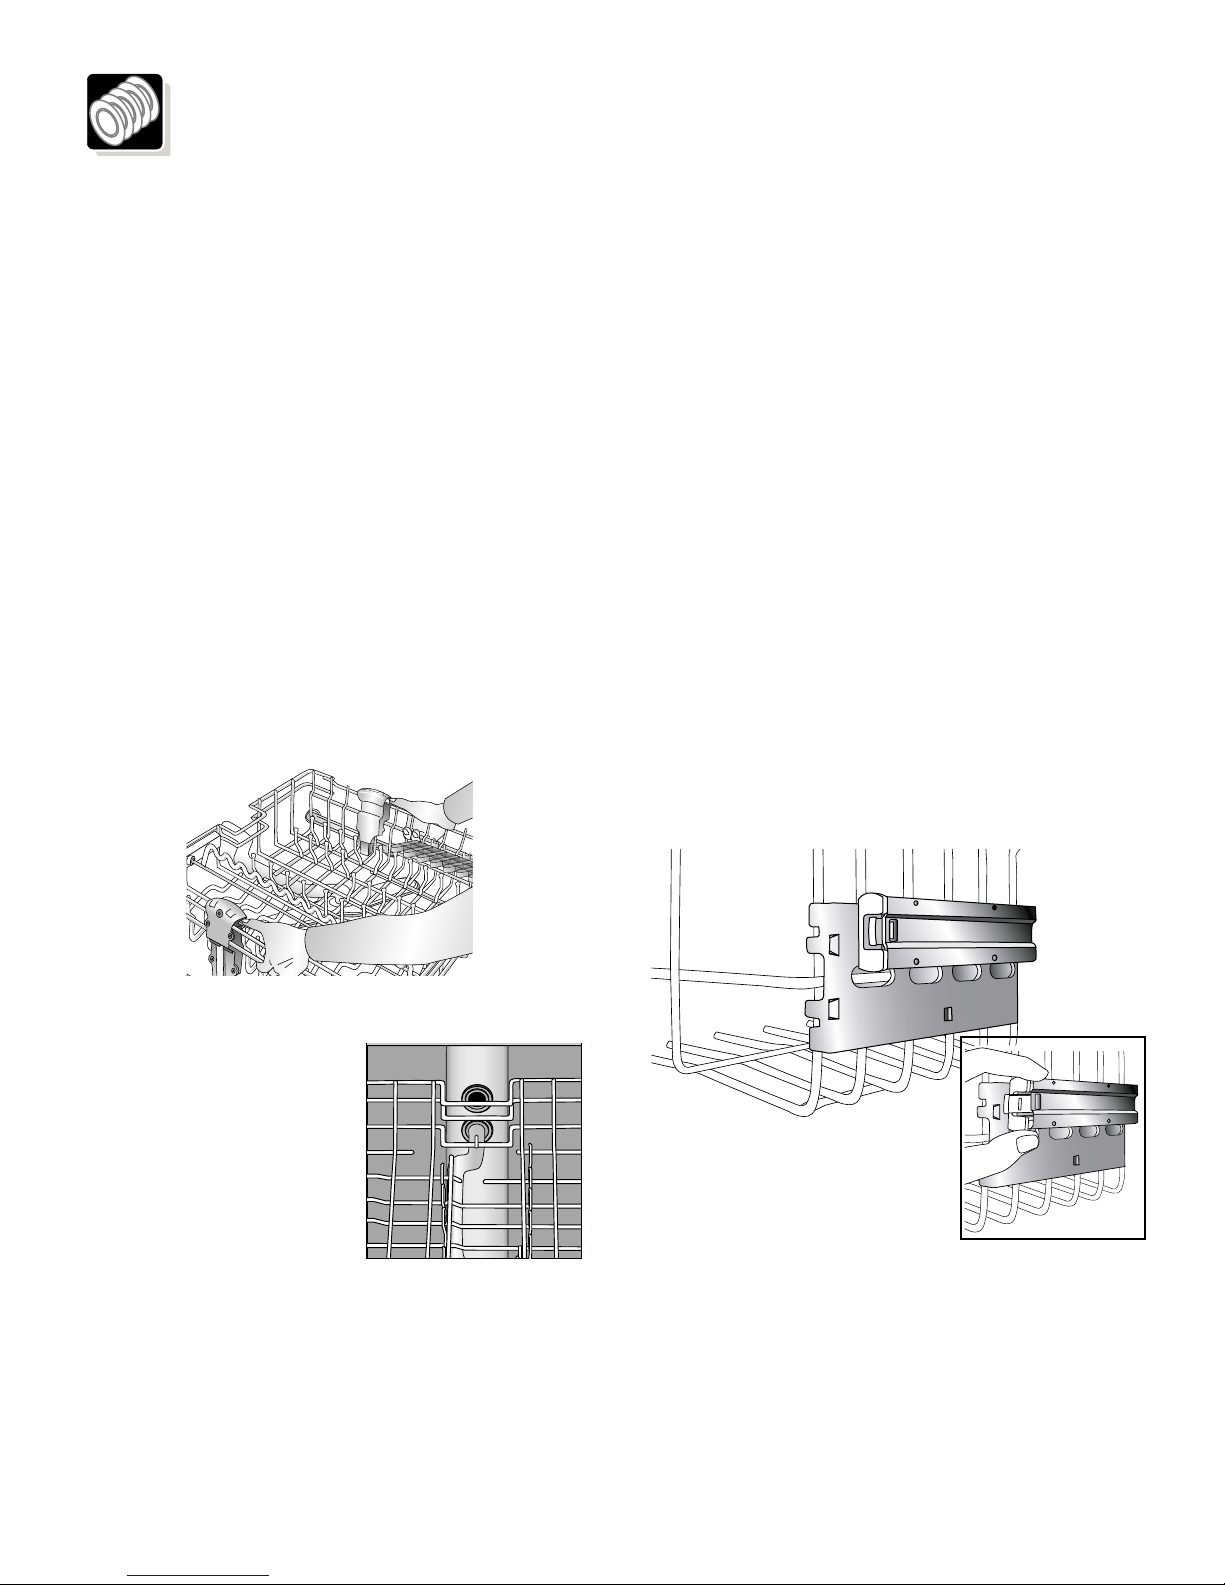
Adjustable Upper Rack
The adjustable upper rack can be raised or
lowered to accommodate taller plates, platters,
pans, etc. optimizing usable space in both upper
and lower racks. Full-size dinner plates can be
loaded in the upper rack if it is in the lower position.
Always adjust the upper rack before loading.
To lower the rack:
1. Pull the rack fully out.
2. Place thumbs on each lever on the adjuster
while holding rack with both hands.
3. Press down on the levers with thumbs and
push rack down. The rack will come to a stop
when it is in position.
To raise the rack:
1. Pull the rack fully out.
2. Place hands on both sides and lift up until
rack comes to a stop and latches in place.
Removing the upper rack
The rack can be removed when tall or oversized
items need to be loaded into the lower rack.
Unload the rack before removing it from the
dishwasher.
To remove rack with tab-lock rack stops:
1. Roll the rack 1 ⁄ 3 to 1 ⁄ 2 of the way out.
2. Locate the rack stops at the end of each
track. Squeeze the tab in the middle of the
rack stop and pull the rack stop straight out.
Take care to support the rack while removing
the rack stops.
3. Roll the rack all the way out of the track and
remove from the dishwasher.
To replace:
1. Replace the dishwasher rack by guiding the
wheels into the tracks.
2. Push each rack stop squarely into the end of
the track until the catch pops into the small
hole on the side of the track.
Notes:
• The dishwasher will not
operate correctly if the
wash arm is not aligned
with one of the water inlet
holes on back wall of the
dishwasher.
• The left and right side
adjusters on the racks
must both be fully in the upward or downward
position for proper connection.
7
Page 8
Preparing and Loading Dishes (continued)
Loading the Lower Rack
The lower rack is best for plates, saucers, bowls,
and cookware. Large items should be placed
along the edge so they do not block the spray arm
rotation. For best results, place bowls, casseroles,
and sauce pans with soiled surface facing down or
toward the center. Tilt slightly for better drainage.
Make sure tall items do not block spray arm
rotation.
Be sure pan handles do not protrude through the
bottom of the rack and block the spray arm rotation.
Fold-down Tines
The fold-down tines in the lower rack make loading
those extra large and hard-to-fit items easier. The
tines may be left up for normal use or folded down
for more flexible loading. Fold down for more
space to load large pots or pans.
10 place settings standard loading pattern.
4 saucers
located
under shelf
➔
12 place settings standard loading pattern.
8
Page 9
Preparing and Loading Dishes (continued)
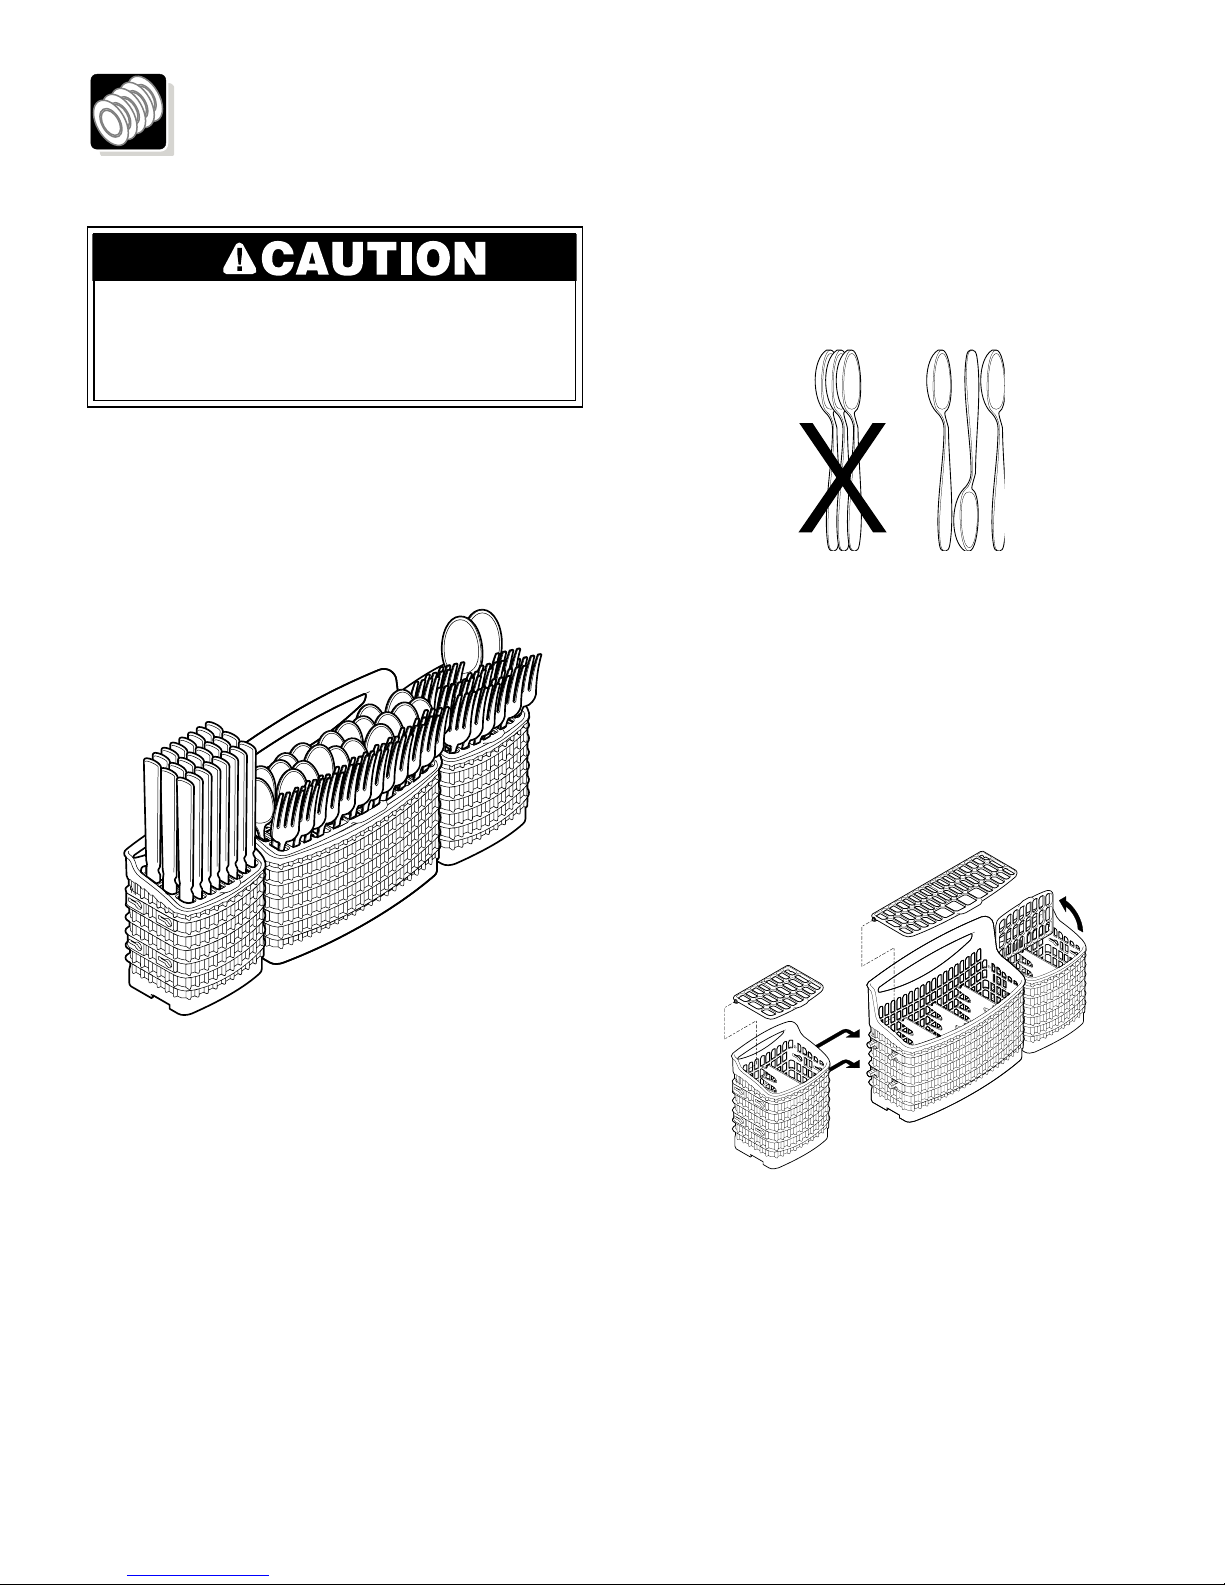
Loading the Silverware Basket
Cut Injury
Load sharp items (knives, skewers, etc.) pointing
down. Failure to do so may result in injury.
Load the silverware basket while it is in the bottom
rack or take the basket out for loading on a counter
or table.
Place small items like baby bottle caps, jar lids,
corn cob holders, etc., in a covered section. Close
the cover to hold small items in place.
When covers are up, mix items in each section of
the basket with some pointing up and some down
to avoid nesting. Water spray cannot reach nested
items.
To remove small basket:
Use suggested loading patterns, as shown, to
increase washability of your silverware.
Be sure nothing protrudes through bottom of
basket or rack to block the spray arm.
Do not mix silver and stainless to avoid damaging
the silver finish.
The silverware basket can be separated and
placed in several locations in the bottom rack.
Load silverware in all sections or just one,
depending on your load.
1. Hold the center basket and one small basket.
Slide the small basket back to release the tabs
from the corresponding slots.
2. Pull the baskets apart.
Adding a Dish
To add or remove items after wash cycle starts:
• Unlatch door and wait a few seconds until wash
action stops before opening.
• Add the item and wait a few seconds to allow
cold air to slowly expand inside dishwasher.
• Close door firmly to latch and resume cycle.
9
Page 10
Dishwasher Dispenser & Detergents
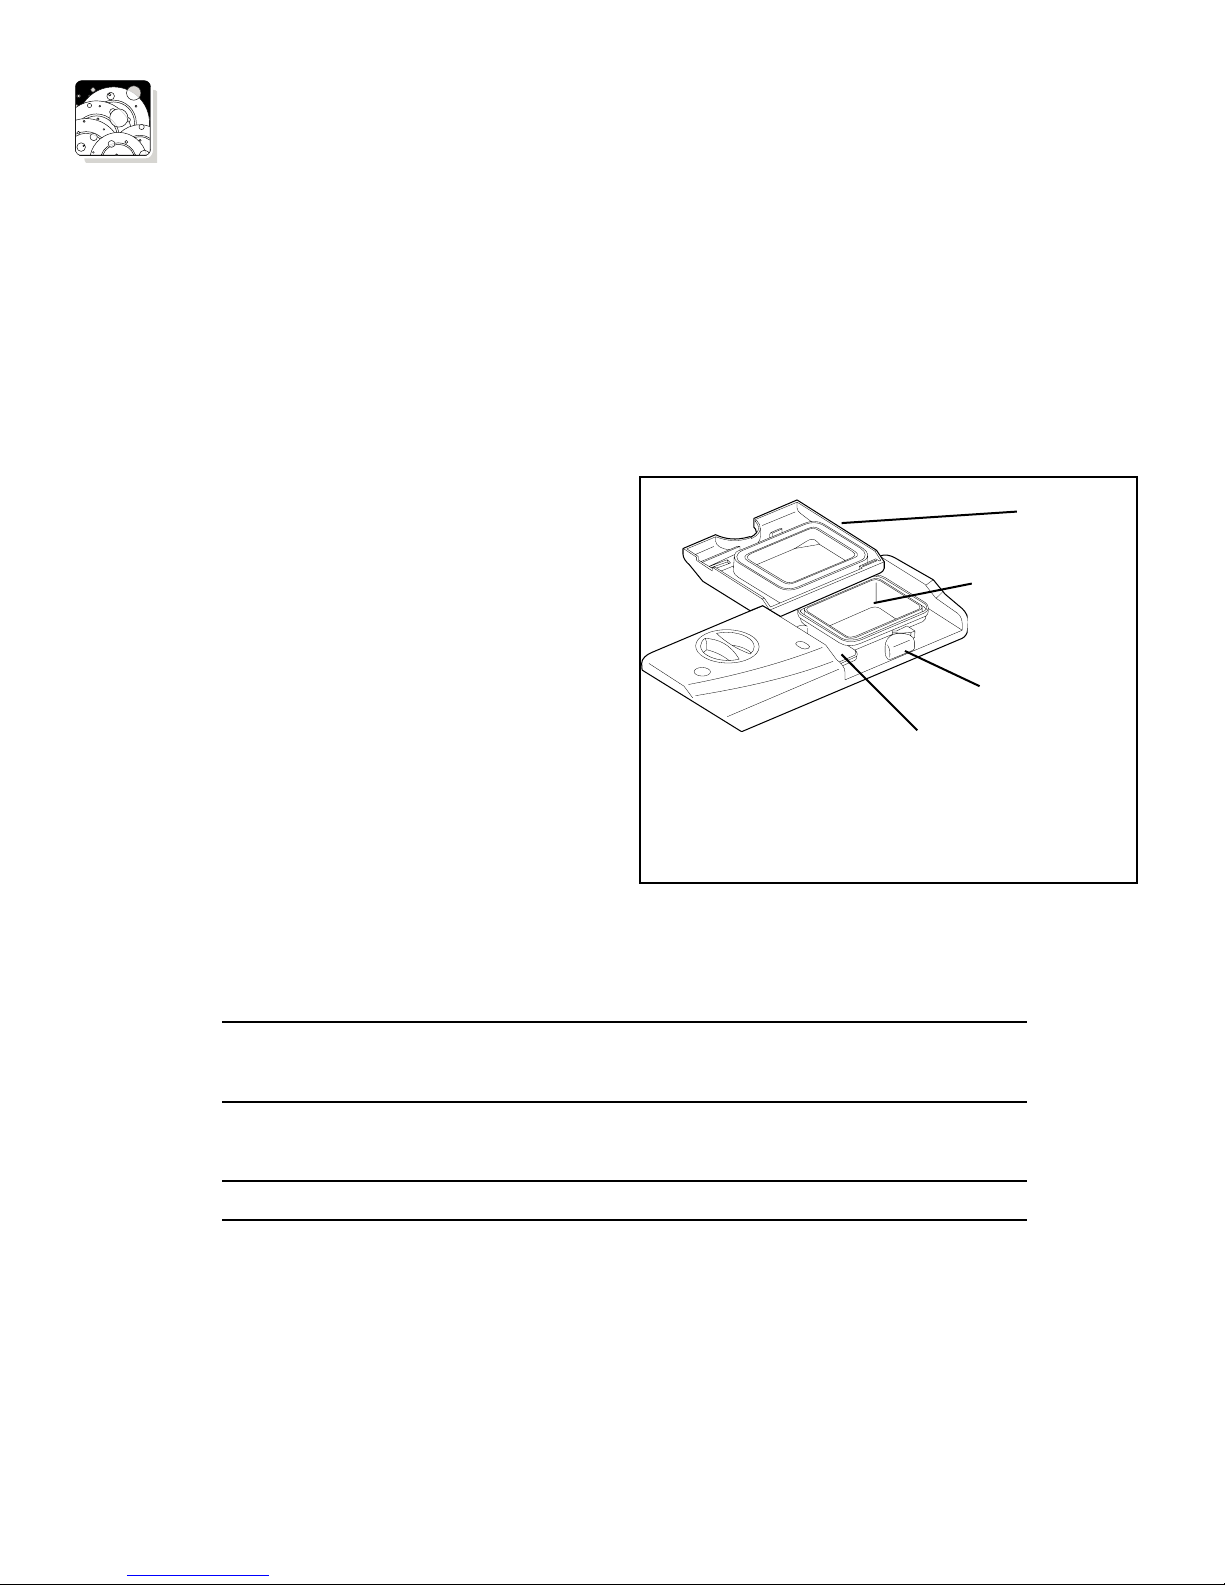
Filling the Detergent Dispenser
The detergent dispenser has one main wash
and one pre-wash cup. The covered cup opens
automatically to release detergent.
• Use only fresh automatic dishwashing
detergent. Other detergents will cause
over-sudsing.
• When using automatic dishwashing detergent
tabs, place one tab in main wash cup and
close.
• Add detergent just before starting cycle.
• Store detergent in a cool, dry location. Moist
or caked detergent will not dissolve properly.
How much Detergent to use
The amount of detergent to use depends on the
water hardness. Water hardness is measured in
grains per gallon (gpg). Using too little detergent
can result in poor cleaning and hard water filming or
spotting. Using too much detergent in soft water can
cause a permanent film called etching. Your local
water company, water softener company or county
extension agent can tell you the water hardness in
your area.
cover
main wash cup
cover latch
pre-wash cup
Note: If the cover is closed on the main wash
cup, open by pressing the cover latch.
Water
Hardness*
Soft (0-4 gpg) Light Soil
Medium
(5-9 gpg)
Hard (10-12 gpg) All Levels 5 tsp 8 tsp
*Your local water utility or state university extension service can tell you the degree of water hardness in your area.
*Note: For very hard water, detergent alone may not be enough. A water softener is recommended to improve
water quality and dishwashing performance. Try adding more detergent at the beginning of the main wash portion
of the cycle. As a rule, use 1 teaspoon for each grain above 12. Unlatch the door, open slowly and add detergent
to the bottom of the tub. Close the door to latch and the dishwasher will continue through the cycle.
Soil
Level
Normal Soil
Heavy Soil
Light Soil
Normal Soil
Heavy Soil
Pre-Wash
Detergent
2 tsp
4 tsp
4 tsp
4 tsp
4 tsp
5 tsp
Main
Detergent
6 tsp
6 tsp
7 tsp
6 tsp
6 tsp
7 tsp
10
Page 11
Dishwasher
Factors Affecting
Dispenser &
Detergents (continued)
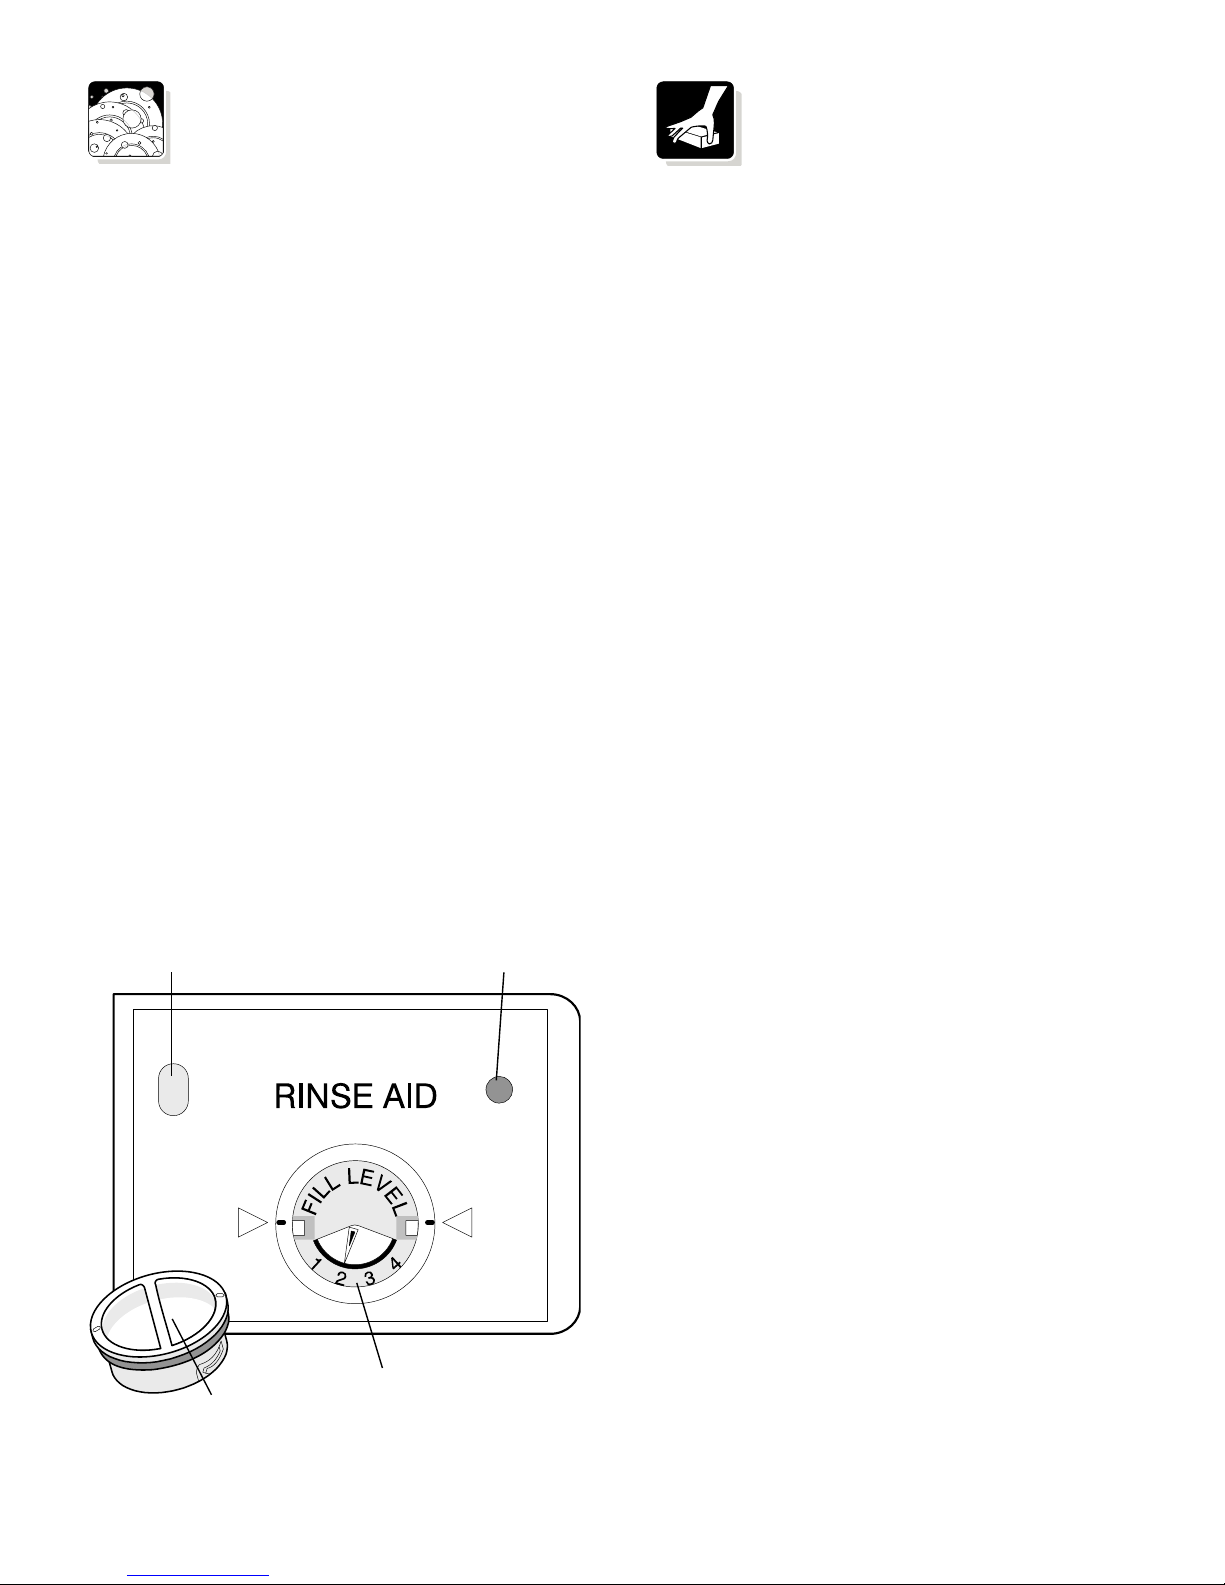
Rinse Aid
Rinse aid greatly improves drying and reduces
water spots and filming. Water "sheets" off
dishes rather than forming water droplets that cling
and leave spots.
A dispenser, located next to the detergent cup,
automatically releases a measured amount of
rinse aid during the last rinse. If spotting and poor
drying are problems, increase the amount of rinse
aid dispensed by rotating the dial to a higher
number. The dial is located under the dispenser
cap. The indicator will be dark when full and will
show clear when it is time to refill.
To add liquid rinse aid, turn dispenser cap 1/4 turn
counterclockwise and lift out. Pour in rinse aid until
liquid touches the indicated fill level. Replace cap.
Do not overfill since this can cause over-sudsing.
Wipe up any spills with a damp cloth.
Performance
Water Pressure
The hot water line to dishwasher must provide
water pressure between 20 and 120 psi.
Low water pressure may occur when laundry or
showers are in operation. Wait until water use is
reduced before starting dishwasher.
Water Temperature
Hot water is needed for best dishwashing and
drying results. Water entering dishwasher should
be at least 120° F (49° C) to give satisfactory
results.
To check water temperature entering dishwasher:
• Turn on hot water faucet nearest dishwasher for
several minutes to clear cool water from pipes.
• Hold a candy or meat thermometer in stream of
water to check the temperature.
• If temperature is below 120° F (49° C), have
a qualified person raise the hot water heater
thermostat setting.
The dispenser holds enough for 35 to 140 washes,
depending on setting.
Dispenser Opening
Indicator
Important: Before starting a cycle, run hot
water to clear cool water from pipe.
Dispenser Cap
Adjustable setting
11
Page 12

Care and Cleaning
Burn Hazard
Allow heating element to cool
before cleaning the interior.
Failure to do so can result in
burns.
Outside—Occasionally wipe with a mild,
nonabrasive detergent and water. Rinse and dry.
Inside—The inside of the dishwasher is self-
cleaning with normal use. If needed, clean around
the tub gasket area with a damp cloth.
Note: Hard water may cause lime deposit buildup
on the interior of the dishwasher. For cleaning
instructions see “Removing Spots and Film”
section.
Overfill Protector—keeps dishwasher from
overfilling and is located in the right front corner of
the tub.
• Clean occasionally
with household cleaner
containing vinegar to
dissolve any buildup.
• Overfill protector should
move up and down freely
about one inch. If it does
not move, lift and clean
underneath.
Care of Drain Air Gap
If a drain air gap was installed for your built-in
dishwasher, check to make sure it is clean so
the dishwasher will drain properly. A drain air gap
is usually mounted on countertop and can be
inspected by removing the cover. This is not part of
your dishwasher and is not covered by warranty.
Property Damage Hazard
Freezing temperatures may cause water lines to
rupture. Be sure all supply lines to and
circulating lines within dishwasher are protected.
Failure to do so could result in property damage.
Winterizing
A dishwasher left in an unheated place should be
protected from freezing. Have a qualified person
do the following:
To Disconnect Service:
1. Turn off electrical power to the dishwasher at
the supply source by removing fuses or turning
off the circuit breaker.
2. Shut off water supply.
3. Place a pan under the inlet valve. Disconnect
water line from inlet valve and drain into pan.
4. Disconnect drain line from pump and drain
water into pan.
Note: See Installation Instructions for more
details.
To Restore Service:
1. Reconnect the water, drain, and electrical
power supply.
2. Turn on water and electrical power supply.
3. Fill both detergent cups and run dishwasher
through a Heavy Wash cycle.
4. Check connections to make sure they do not
leak.
Note: See Installation Instructions for more
details.
12
Page 13

Solutions to Common Dishwashing Problems
Before calling for service, review this list. It
may save you both time and expense. This
list includes common experiences that are
not the result of defective workmanship or
material in your dishwasher.
Food Soils Left on Dishes
• Choose another cycle for longer washing
time.
• Check rack loading section for proper
loading—avoid nesting items.
• Home water pressure may be too low—
should be 20 to 120 pounds per square inch
(psi).
• Check incoming water temperature. It
should be at least 120° F (49° C). (See
Factors Affecting Performance.)
• Check water hardness. For extremely hard
water, it may be necessary to install a water
softener. (See Detergent Chart.)
• Use fresh detergent.
• Make sure items are not blocking the spray
arms, preventing them from rotating.
• Rack Adjusters/Docking. (See Adjusting
Upper Rack.)
Dishes not Dry
• Make sure No Heat Dry is not selected.
• Make sure the rinse aid dispenser is filled.
• Increase the amount of rinse aid. (See
Rinse Aid.)
• Check the incoming water temperature. Be
sure it is at least 120° F (49° C).
• Check for proper loading—avoid nesting
items.
• Plastic items may need to be towel dried.
• Cups with a concave bottom will collect
water.
Glassware/Flatware Spotted or
Cloudy
• Check water hardness. For extremely hard
water, it may be necessary to install a water
softener. (See Detergent Chart.)
• Water temperature may be low. Avoid
extremely low or high temperatures. (See
Factors Affecting Performance.)
• Avoid overloading and improper loading.
(See Preparing and Loading Dishes.)
• Use fresh detergent. Old detergent is
ineffective.
• Make sure rinse aid dispenser is filled.
• Check to see that proper amount of
detergent is being used for cycle selected.
Also, check phosphate level. (See Filling
the Detergent Dispenser.)
• Home water pressure may be too low—it
should be 20 to 120 pounds per square inch
(psi).
Dishware Chipped
• Load with care and do not overload. (See
Preparing and Loading Dishes.)
• Place delicate items in top rack.
• Place glasses securely against tines and
not over tines.
• Load items so they are secure and don’t jar
loose when moving racks in and out. Move
racks in and out slowly.
• Make sure tall glasses and stemware will
clear top of tub when rack is pushed in.
• Fine antique china and crystal should be
hand-washed.
13
Page 14

Solutions to Common Dishwashing
Problems (continued)
Dishware Stained or Discolored
• Tea and coffee can stain cups. Remove the
stains by hand washing in a solution of 1/2
cup (120 ml) bleach and one quart (1 L) of
warm water. Rinse thoroughly.
• Iron deposits in water can cause a yellow
or brown film. A special filter installed in the
water supply line will correct this problem.
(See Removing Spots and Film.)
• Aluminum utensils can leave gray/black
marks when they rub against other items.
Load properly.
• Certain high acid foods can cause
discoloration of stainless steel and plastics
if allowed to sit for a long period. Use the
Rinse Only cycle or rinse by hand if not
operating dishwasher at once.
• Mixing stainless steel and silver utensils
in silverware basket can cause pitting of
the stainless steel blades. Avoid mixing
stainless steel and silver.
• Use Detergent containing chlorine bleach.
Etching
• Using too much detergent in soft or
softened water causes etching that cannot
be removed.
• Adjust the amount of detergent based on
the water hardness. (Check Detergent
Chart.)
• Lower the water temperature if higher than
140° F.
• Use No Heat Dry option.
• Do not select options that will increase
wash time and heat.
Detergent Left in Cups
• Detergent may be old. Discard and use
fresh detergent.
• Be sure water action can reach the
dispenser.
• Check to see if cycle has been completed.
• Make sure items do not prevent the
detergent dispenser from opening.
Dishwasher Leaks
• Use only fresh detergent designed for
automatic dishwashers. Measure detergent
carefully. Try a different brand.
• Spilled rinse aid can cause foam and lead
to overflowing. Wipe up any spills with a
damp cloth.
• Check to see that dishwasher is level.
(See Installation Instructions.)
Normal Sounds You Will Hear
• Normal sounds include water fill, water
circulation and motor sounds.
Dishwasher Won’t Run
• Check to see if circuit breaker is tripped or if
a fuse is blown.
• Make sure water supply is turned on.
• Check to see if cycle is set correctly.
(See Operating Instructions.)
• Is dishwasher set for Delay Start option?
• Make sure door is closed and latched.
• Make sure Start/Cancel button is pressed.
14
Page 15

Solutions to Common Dishwashing
Problems (continued)
Dishwasher Does Not Drain Properly
• If unit is hooked up to a food waste
disposer, make sure the disposer is empty.
• Check to see if the knockout plug has
been removed from inside the food waste
disposer inlet.
• Check to see if drain hose is kinked.
• Make sure cycle is complete, not in a
pause.
Cycle Takes a Long Time
• Is cycle in a water heating delay?
• Has the Delay Start option been selected?
• Has the Sanitize option been selected?
Dishwasher Won’t Fill
• Is water supply turned on?
• Does overfill protector move up and down
freely? (See Overfill Protector section.)
Dishwasher Has an Odor
• Soiled dishes left in dishwasher too long
can create an odor. Use Rinse Only cycle.
• There will be a “new” smell when first
installed. This is normal.
• Check to see if unit is draining properly.
(See Dishwasher Does Not Drain Properly.)
• Place 2 tablespoons of baking soda into
detergent dispenser and run through a
Quick Wash cycle.
Stains on Tub Interior
• Washing large amounts of dishware with
tomato based soil can cause a pink/
orange appearance. This will not affect
performance and will gradually fade over
time. Pre-rinsing or using the Rinse Only
cycle for dishware with tomato base soil will
reduce the chance of staining. Using No
Heat Dry option will lessen staining.
• Try using a detergent containing chlorine
bleach.
Removing Spots and Film
Hard water can cause lime deposit buildup
on the interior of the dishwasher. Dishes and
glasses may also get spots and film for a
number of reasons. (See Glassware/Flatware
Spotted or Cloudy section.) To remove
buildup, spots and film, clean using the
following instructions:
1. Load clean dishes and glasses in normal
manner. Do not load any metal utensils or
silverware.
2. Do not add detergent.
3. Select the Normal Wash cycle. Close and
latch door. Press Start/Cancel pad.
4. Allow dishwasher to run until it starts
the second water fill (approximately 10
minutes).
5. Unlatch and open door and pour 2
cups of white vinegar into the bottom of
dishwasher.
6. Close and latch door and allow cycle to
finish.
Note: If these conditions persist, a home
water softener should be considered.
15
Page 16

Major Appliance Warranty Information
Your appliance is covered by a one year limited warranty. For one year from your original date of
purchase, Electrolux will pay all costs for repairing or replacing any parts of this appliance that prove to
be defective in materials or workmanship when such appliance is installed, used and maintained in
accordance with the provided instructions.
Exclusions
This warranty does not cover the following:
1. Products with original serial numbers that have been removed, altered or cannot be readily determined.
2. Product that has been transferred from its original owner to another party or removed outside the USA or
Canada.
3. Rust on the interior or exterior of the unit.
4. Products purchased "as-is" are not covered by this warranty.
5. Food loss due to any refrigerator or freezer failures.
6. Products used in a commercial setting.
7. Service calls which do not involve malfunction or defects in materials or workmanship, or for appliances
not in ordinary household use or used other than in accordance with the provided instructions.
8. Service calls to correct the installation of your appliance or to instruct you how to use your appliance.
9. Expenses for making the appliance accessible for servicing, such as removal of trim, cupboards, shelves,
etc.,which are not a part of the appliance when it is shipped from the factory.
10. Service calls to repair or replace appliance light bulbs, air filters, water filters, other consumables, or
knobs, handles, or other cosmetic parts.
11. Surcharges including, but not limited to, any after hour, weekend, or holiday service calls, tolls, ferry trip
charges, or mileage expense for service calls to remote areas, including the state of Alaska.
12. Damages to the finish of appliance or home incurred during installation, including but not limited to floors,
cabinets, walls, etc.
13. Damages caused by: services performed by unauthorized service companies; use of parts other than
genuine Electrolux parts or parts obtained from persons other than authorized service companies; or
external causes such as abuse, misuse, inadequate power supply, accidents, fires, or acts of God.
DISCLAIMER OF IMPLIED WARRANTIES; LIMITATION OF REMEDIES
CUSTOMER’S SOLE AND EXCLUSIVE REMEDY UNDER THIS LIMITED WARRANTY SHALL BE PRODUCT
REPAIR OR REPLACEMENT AS PROVIDED HEREIN. CLAIMS BASED ON IMPLIED WARRANTIES,
INCLUDING WARRANTIES OF MERCHANTABILITY OR FITNESS FOR A PARTICULAR PURPOSE, ARE
LIMITED TO ONE YEAR OR THE SHORTEST PERIOD ALLOWED BY LAW, BUT NOT LESS THAN ONE YEAR.
ELECTROLUX SHALL NOT BE LIABLE FOR CONSEQUENTIAL OR INCIDENTAL DAMAGES SUCH AS
PROPERTY DAMAGE AND INCIDENTAL EXPENSES RESULTING FROM ANY BREACH OF THIS WRITTEN
LIMITED WARRANTY OR ANY IMPLIED WARRANTY. SOME STATES AND PROVINCES DO NOT ALLOW THE
EXCLUSION OR LIMITATION OF INCIDENTAL OR CONSEQUENTIAL DAMAGES, OR LIMITATIONS ON THE
DURATION OF IMPLIED WARRANTIES, SO THESE LIMITATIONS OR EXCLUSIONS MAY NOT APPLY TO
YOU. THIS WRITTEN WARRANTY GIVES YOU SPECIFIC LEGAL RIGHTS. YOU MAY ALSO HAVE OTHER
RIGHTS THAT VARY FROM STATE TO STATE.
If You Need
Service
This warranty only applies in the USA and Canada. In the USA, your appliance is warranted by Electrolux Major Appliances
North America, a division of Electrolux Home Products, Inc. In Canada, your appliance is warranted by Electrolux Canada
Corp. Electrolux authorizes no person to change or add to any obligations under this warranty. Obligations for service and
parts under this warranty must be performed by Electrolux or an authorized service company. Product features or
specifications as described or illustrated are subject to change without notice.
USA
1.800.944.9044
Electrolux Major Appliances
North America
P.O. Box 212378
Augusta, GA 30907
Keep your receipt, delivery slip, or some other appropriate payment record to establish the warranty period
should service be required. If service is performed, it is in your best interest to obtain and keep all receipts.
Service under this warranty must be obtained by contacting Electrolux at the addresses or phone
numbers below.
Canada
1.800.668.4606
Electrolux Canada Corp.
5855 Terry Fox Way
Mississauga, Ontario, Canada
L5V 3E4
Page 17

Lave-vaisselle
Carte d’enregistrement
du produit
Veuillez remplir en entier, signez et retournez
rapidement !
Manuel d’utilisation et
d’entretien
Série 4400
Instructions de sécurité .......18
Mode d’emploi........................19-22
Préparation et chargement
de la vaisselle ........................ 23-26
Distributeur et détergents
du lave-vaisselle ................. 27-28
Facteurs affectant
le rendement ................................28
Entretien et nettoyage ...........29
Enregistrez toute l’information à
titre de référence future
Marque : Date d’achat :
N° de modèle :
N° de série :
Questions ? 1-800-944-9044
(États-Unis)
1-800-265-8352
(Canada)
Visitez notre site Web à
www.frigidaire.com
Solutions aux problèmes
courants de lavage ....... ...30-32
Services à la clientèle
Garantie et service ...............................36
Versión en español
Si desea obtener una copia en español de este Manual
del Usuario, sírvase escribir a la dirección que se incluye a
continuación. Solicite la P/N 6 920249 A, Spanish Use & Care
Manual, Electrolux Major Appliances North America,
P.O. Box 212378, Augusta, GA 30917.
LISEZ ET CONSERVEZ CES INSTRUCTIONS P/N 6 920248 A
Page 18

Importantes instructions de sécurité
Ce que vous devez savoir au sujet des
instructions de sécurité
Les avertissements et instructions de sécurité
importantes apparaissant dans ce guide ne couvrent
pas toutes les conditions et situations possibles qui
pourraient apparaître. Il faut utiliser son bon sens, être
prudent et attentif en installant, entretenant et utilisant
le lave-vaisselle.
Contactez toujours le fabricant au sujet de problèmes
ou conditions que vous ne comprenez pas.
Reconnaissez les symboles, les termes, les
étiquettes de sécurité
AVERTISSEMENT – Des dangers ou pratiques
dangereuses qui POURRAIENT mener à de graves
blessures ou à la mort.
MISE EN GARDE – Des dangers ou des pratiques
dangereuses qui POURRAIENT mener à des
blessures mineures ou à des dommages à la
propriété.
Importantes instructions de sécurité
Vérifiez auprès de l’installateur pour vous assurer
que la mise à terre de l’appareil est bien effectuée
pour éviter tout choc électrique possible. Assurezvous de lire les instructions de sécurité personnelle
importantes avant d’utiliser ce lave-vaisselle.
Les produits avec une étiquette sont homologués
par l’Underwriter’s Laboratories, Inc. - ceux portant
une étiquette CSA sont homologués par l’Association
canadienne de normalisation. Néanmoins comme pour
tout autre équipement utilisant de l’électricité et des
pièces mobiles, il y a un danger possible.
En utilisant votre lave-vaisselle, suivez des
précautions de base, y compris ce qui suit :
1. Lisez toutes les instructions avant d’utiliser le lavevaisselle.
2. Utilisez l’appareil seulement pour l’usage auquel il est
destiné.
©2005 Electrolux Major Appliances North America, a division of
Electrolux Home Products, Inc. Tous droits réservés.
3. Coupez le courant au lave-vaisselle avant d’essayer de
le réparer.
4. Pour éviter tout danger de choc électrique, les côtés et
l’arrière doivent être refermés et les panneaux avant
doivent être fixés avant de mettre le lave-vaisselle sous
tension. Reportez-vous aux instructions d’installation
pour les procédures de mise à la terre appropriées.
5. Branchez à un circuit d’alimentation de taille, d’une
valeur nominale et protégé correctement pour éviter
toute surcharge électrique.
6. Vous ne devriez jamais laisser les enfants utiliser ou
jouer dans, avec ou autour de ce lave-vaisselle.
7. Pour réduire le risque de blessures en chargeant
des articles à laver, les articles pointus ou tranchants
devraient être placés avec les manches vers le
haut. Chargez aussi les articles pointus pour qu’ils
n’endommagent pas le joint étanche de la porte.
8. Ne touchez pas l’élément chauffant au bas de la cuve
durant ou à la fin d’un cycle. Ce sera chaud.
9. Utilisez seulement des détergents et des additifs de
rinçage conçus pour un lave-vaisselle automatique
résidentiel. N’utilisez jamais de savon, de détergent
de lavage ou de détergent pour les mains dans votre
lave-vaisselle. Gardez ces produits hors de portée des
enfants.
10. Ne vous asseyez pas, ne montez pas et n’utilisez pas
mal la porte ou les paniers du lave-vaisselle.
11. Sous certaines conditions, de l’hydrogène peut se former
dans un système d’eau chaude qui n’a pas été utilisé
pendant deux semaines ou plus. L’hydrogène est un gaz
explosif. Si le système d’eau chaude n’a pas été utilisé
pendant une certaine période, ouvrez tous les robinets
d’eau chaude et laissez l’eau couler pendant quelques
minutes. Ceci dégagera tout hydrogène accumulé.
Puisque le gaz est inflammable, ne fumez pas et
n’utilisez pas de flamme nue durant ce processus.
12. Ne lavez pas les articles de plastique à moins qu’ils ne
portent la mention « convient pour le lave-vaisselle » ou
l’équivalent. Pour les articles de plastique qui ne portent
pas cette mention, vérifiez les recommandations du
fabricant.
13. Ne modifiez pas les commandes.
14. Pour éviter qu’un enfant ne s’enferme accidentellement
et tout danger de suffocation, retirez toujours la porte du
compartiment de lavage lorsque vous mettez un lavevaisselle hors service pour le faire réparer ou le jeter.
15. Soyez prudent en déchargeant le lave-vaisselle. La
vaisselle sera chaude si elle est déchargée aussitôt
après la fin d’un cycle.
16. Les lave-vaisselle certifiés pour un usage résidentiel
ne conviennent pas pour une utilisation dans des
établissements de restauration sous licence.
17. Pour éviter des dommages causés par l’eau ou la
moisissure à votre maison, vérifiez régulièrement les
raccords des boyaux d’entrée et de drainage.
CONSERVEZ CES
INSTRUCTIONS
18
Imprimé aux É.-U.
Page 19

Mode d’emploi
Point de départ
1. Chargez le lave-vaisselle (voir Préparation et
chargement de la vaisselle).
2. Ajoutez du détergent ( voir Distributeur et
détergents de lave-vaisselle).
3. Ajoutez un produit de rinçage, au besoin (voir
Produit de rinçage).
4. Choisissez le cycle voulu (voir le Tableau des
cycles) Le voyant au-dessus de la touche
s’allumera suite au choix.
5. Choisissez les Options désirées (voir les
Options). Le voyant au-dessus de la touche
s’allumera suite au choix.
6. Fermez la porte pour la verrouiller.
7. Ouvrez le robinet d’eau chaude le plus près du
lave-vaisselle jusqu’à ce que l’eau soit chaude.
Fermez l’eau.
8. Pour commencer, appuyez sur la touche Start/
Cancel (Démarrer/Annuler)
Remarque : Le lave-vaisselle est programmé
pour se rappeler votre dernier cycle pour que
vous n’ayez pas besoin de le réinitialiser à
chaque fois. Pour démarrer le lave-vaisselle en
utilisant le même cycle et les options choisies
lors du dernier lavage, appuyez simplement sur
la touche Start/Cancel.
Choix de cycle de lavage
Remarque : Les temps de cycle sont approximatifs
et varient selon les options choisies. L’eau chaude
est nécessaire pour activer le détergent du lavevaisselle et pour faire fondre les résidus gras. Un
détecteur automatique vérifiera la température de
l’eau d’arrivée et, si elle n’est pas assez chaude,
la minuterie sera retardée pour le réchauffement
automatique de l’eau de lavage principal de tous
les cycles. Ceci se produit même si l’option HiTemp (Haute température) n’a pas été choisie.
Lorsque Hi-Temp est choisie, une température
encore plus élevée sera garantie pour traiter les
charges plus sales.
Voyants de statut
Lorsque l’option Sanitize (Désinfection) est
choisie, le voyant de désinfection s’allumera à
la fin du cycle. Si le lave-vaisselle ne désinfecte
pas correctement la vaisselle, le voyant ne
s’allumera pas. Ceci peut se produire si le cycle
est interrompu. Le voyant restera allumé jusqu’à
ce que la porte soit ouverte pendant 30 secondes.
Le voyant Clean (Nettoyer) s’allume à la fin du
cycle et reste allumé jusqu’à ce que la porte soit
ouverte pendant 30 secondes.
1H-24........... Nombre d’heures de démarrage
retardé. La dernière heure
fera un compte à rebours en
minutes.
MINUTES......... Nombre de minutes restantes
du cycle (1 à 99).
Remarque : Le temps restant pourrait augmenter
ou diminuer soudainement de plusieurs minutes.
Ceci signifie que le détecteur de turbidité a vérifié
le niveau de saleté et déterminé s’il faut remplir
d’eau à nouveau ou si les remplissages peuvent
être retirés.
19
Page 20

Mode d’emploi (suite)
Le détecteur intelligent de turbidité de saleté vérifie le niveau de saleté de votre vaisselle dans le cycle
Normal Wash (Lavage normal). Selon le niveau de saleté, le détecteur déterminera s’il faut d’autres
remplissages d’eau pour nettoyer la vaisselle ou si les remplissages peuvent être supprimés. Le temps de
cycle variera selon la saleté de la vaisselle. Le temps de cycle variera aussi selon les options choisies et la
température d’eau d’entrée.
Cycle Description Durée
(Minutes
approximatives)
Heavy Wash
(Lavage très
sale)
Normal Wash
(Lavage normal)
China Crystal
(Vaisselle verres)
Rinçage
seulement
Lavage rapide Cycle rapide pour une
Long cycle pour la
vaisselle très sale.
Cycle moyen pour une
saleté moyenne. Le
détecteur intelligent de
turbidité de saleté est
actif sous ce cycle.
Cycle court pour une
faible saleté.
Rince la vaisselle
qu’on conserve jusqu’à
ce qu’il y ait une
charge complète.
faible saleté. N’inclut
pas le temps de
séchage.
132 2 lavages/3 rinçages
97-117 1-2 lavages*/1-2
82 1 lavage/2 rinçages
9 1 rinçage
38 1 lavage/1 rinçage
Nombre de
lavages/
rinçages
rinçages*
* Le nombre de remplissages variera selon le niveau de saleté de chaque charge.
IMPORTANT:
• Selon la température de l’eau, le cycle pourrait durer plus longtemps pour amener l’eau à la
température voulue.
• Seulement les cycles certifiés suivants avec l’option Sanitize (Désinfection) choisie ont été
conçus pour répondre aux exigences NSF (NSF/ANSI 184 residential dishwasher (Lave-vaisselle
résidentiel)) de désinfection : Heavy Wash , Normal Wash et China Crystal.
20
Page 21

Mode d’emploi (suite)
Choix d’options
Favorite Cycle (Cycle préféré)
L’option Favorite Cycle vous permet de
programmer votre cycle préféré et les options
en un seul bouton. Après la programmation,
enfoncez tout simplement le bouton Favorite Cycle
suivi de la touche Start/Cancel (démarrer/annuler).
Pour programmer le bouton Favorite Cycle :
1) Choisissez votre cycle préféré et les options
2) Enfoncez le bouton Favorite Cycle pendant 3
secondes
L’affichage clignotera pendant 2 secondes
indiquant que l’option Favorite Cycle a été
programmée.
Pour changer l’option de Favorite Cycle,
répétez tout simplement les étapes une et deux
précédentes.
Hi-Temp (Haute température)
Lorsque l’option Hi-Temp est choisie, le lavevaisselle réchauffe l’eau du lavage principal à
environ 60° C (140° F).
Cette augmentation de la température de l’eau
aide le détergent du lave-vaisselle à éliminer la
graisse alimentaire et la saleté de la vaisselle
plus efficacement et aide aussi au séchage.
L’option Hi-Temp peut servir avec tous les cycles
sauf Quick Wash (Lavage rapide) et Rinse
(Rinçage) seulement. L’option Hi-Temp est offerte
automatiquement lorsque vous choisissez le cycle
Heavy Wash (Lavage très sale), mais le voyant ne
s’allume pas.
Option de désinfection
Pour désinfecter votre vaisselle et votre verrerie,
choisissez l’option Sanitize (Désinfection).
Avec cette option, le voyant au-dessus de la
touche s’allume et reste allumé jusqu’à la fin du
cycle. La température de l’eau du rinçage final
montera à 68° C (154° F) pour faire en sorte que
les bactéries soient détruites. Cette option est
disponible pour les cycles Heavy Wash , Normal
Wash (Lavage normal) et China Crystal (Vaisselle
verrerie). Seulement ces cycles de désinfection
répondent aux exigences de la NSF.
Le temps du cycle sera prolongé jusqu’à ce que
la température appropriée de l’eau soit atteinte.
Le lavage se poursuivra durant la période de
réchauffement d’eau supplémentaire.
Pour de meilleurs résultats, la température de
l’eau d’entrée devrait être d’au moins 49° C
(120° F). Les critères de désinfection pourraient
ne pas être satisfaisants s’il y a une interruption de
cycle, une panne d’électricité ou si la température
de l’eau d’entrée est inférieure à 49° C
(120° F).
Pour arrêter l’option Sanitize, appuyez sur la
touche une deuxième fois. Le voyant au-dessus de
la touche s’éteindra.
No Heat Dry (Séchage sans chaleur)
L’option No Heat Dry conserve l’électricité puisque
l’élément chauffant est éteint durant la partie
de séchage du cycle. Sous ce choix, le voyant
au-dessus de la touche s’allume et reste allumé
jusqu’à la fin du cycle. Pour accélérer le processus
de séchage, ouvrez un peu la porte après la fin
du cycle. Certaines gouttelettes d’eau peuvent
s’accumuler sur la porte et sur la cuve ainsi qu’à
certains endroits où la vaisselle touche le panier à
ustensiles et le râtelier à vaisselle.
Pour choisir un séchage à chaud, enfoncez la
touche à nouveau. Le voyant au-dessus de la
touche s’éteindra. Le séchage à chaud permet
de sécher plus rapidement puisque l’élément
chauffant est allumé durant la partie de séchage
du cycle.
Lorsqu’une option est choisie, le voyant au-dessus
de la touche s’allume et reste allumé jusqu’à la
fin du cycle. Pour arrêter l’option, appuyez sur la
touche une deuxième fois. Le voyant au-dessus de
la touche s’éteindra.
Commandes de verrouillage pour les
enfants
Pour éviter que les enfants changent
accidentellement le cycle du lave-vaisselle ou le
fassent démarrer, verrouillez les commandes du
lave-vaisselle en enfonçant et gardant enfoncé
21
Page 22

Mode d’emploi (suite)
la touche No Heat Dry pendant 3 secondes. Un
voyant sur la touche graphique de verrouillage
s’allume lorsque les commandes sont bloquées
et aucune autre nouvelle sélection n’est choisie
jusqu’au dégagement du verrou. Pour déverrouiller
les commandes, enfoncez la touche No Heat Dry
(Séchage sans chaleur) jusqu’à ce que le voyant
s’éteigne.
Delay Start (Démarrage retardé)
L’option Delay Start vous permet de retarder
automatiquement le démarrage de votre lavevaisselle pendant 1 à 24 heures selon votre
modèle.
Enfoncez la touche Delay Start jusqu’à ce que
l’heure de délai voulue apparaisse à la fenêtre
d’état. Un voyant s’allume indiquant les heures
de démarrage retardé et reste allumé jusqu’au
démarrage du cycle.
Pour annuler cette option et lancer le cycle avant
la fin de la période de délai, appuyez sur la touche
Start/Cancel (Démarrer/annuler).
Pour annuler un cycle
Vous pouvez annuler un cycle en tout temps
durant le cycle. Enfoncez la touche Start/Cancel
et le lave-vaisselle commence un drainage de 2
minutes. À la fin du drainage, choisissez le cycle
voulu. Enfoncez la touche Start/Cancel à nouveau
durant le drainage pour l’annuler.
22
Page 23

Préparation et chargement de la vaisselle
Préparation de la vaisselle
Grattez et enlevez tous les gros morceaux
d’aliments, les os, les noyaux, les cure-dents,
etc. Le système de lavage à filtration continue
enlèvera le reste des particules d’aliments. Vous
devriez aussi décoller les aliments brûlés avant
le chargement. Videz le liquide des verres et des
tasses.
Les aliments tels que la moutarde, la mayonnaise,
le vinaigre, le jus de citron et les produits à base
de tomates peuvent décolorer l’acier inoxydable
et les plastiques s’ils restent en place pendant
longtemps. À moins que le lave-vaisselle ne soit
utilisé immédiatement, il est préférable de rincer
ces saletés.
• Chargez les paniers pour que les gros articles
ne gênent pas l’ouverture du distributeur de
détergent.
• Vérifiez les recommandations du fabricant
avant de laver ces articles.
• Si le lave-vaisselle se
vidange dans un broyeur
d’aliments, assurez-
vous que le distributeur
soit bien vide avant de
démarrer le lave-vaisselle.
Motif de chargement standard de 10 couverts
(Pour le meilleur rendement de lavage, le panier
supérieur devrait être en position relevée.)
Chargement du panier
supérieur
Le panier supérieur est conçu pour la flexibilité
de charge d’une variété d’articles y compris les
tasses, les verres, les verres à pied, les petites
assiettes, les bols, etc.
Mettez les verres dans le panier supérieur. Si vous
les placez dans le panier inférieur, ils pourraient
être endommagés.
Chargez les articles de plastique seulement dans
le panier supérieur. Ils pourraient fondre dans le
panier inférieur.
Chargez les articles aux extrémités ouvertes, face
vers le bas pour mieux les nettoyer et les vider.
Si les articles délicats se touchent durant le
lavage, ils pourraient être endommagés.
Assurez-vous que rien ne ressorte au bas du
panier pour bloquer la rotation du bras gicleur du
milieu.
Motif de chargement standard de 12 couverts
(Pour un lavage plus efficace, le panier supérieur
devrait être en position relevée.)
Utilisez le panier de tasses rabattable ou un
support de verres à pied/tablette à tasses.
Ils peuvent servir à charger deux niveaux de
tasses, verres à jus et autres articles plus courts.
Répartissez les articles sur le niveau supérieur
pour que l’eau puisse atteindre toutes les surfaces
intérieures. Repliez la tablette à tasses vers le
haut pour charger les verres plus grands.
23
Page 24

Préparation et chargement de la vaisselle (suite)
Panier supérieur ajustable
Le panier supérieur ajustable peut être relevé
ou abaissé pour accommoder les assiettes plus
grandes, les plats de service, les casseroles, etc.
optimisant l’espace utilisable des paniers supérieur
et inférieur. Vous pouvez charger des assiettes
pleine grandeur dans le panier supérieur si ce
dernier est en position abaissée. Ajustez toujours
le panier supérieur avant le chargement.
Pour abaisser le panier :
1. Sortez le panier aussi loin que possible.
2. Placez les pouces sur chaque levier de
l’ajusteur en tenant le panier des deux mains.
3. Enfoncez les leviers avec les pouces et
poussez le panier vers le bas. Le panier
s’arrêtera en position.
Pour relever le panier :
1. Sortez le panier aussi loin que possible.
2. Placez les mains des deux côtés et soulevez
jusqu’à ce que le panier s’arrête et se
verrouille en place.
Retrait du panier supérieur
Le panier se retire lorsque des articles
surdimensionnés ou très grands doivent être
chargés dans le panier inférieur. Déchargez le
panier avant de le retirer du lave-vaisselle.
Pour retirer le panier avec des butées de
panier à languettes de sûreté :
1. Sortez le panier à environ un tiers à la moitié.
2. Trouvez les butées de panier à l’extrémité de
chaque panier. Pressez la languette au milieu
de la butée du panier et tirez la butée pour la
sortir complètement. Attention de supporter le
panier en retirant les butées.
3. Roulez le panier jusqu’au bout du rail et
retirez-le du lave-vaisselle.
Pour le replacer :
1. Replacez le panier du lave-vaisselle en
guidant les roues dans les rails.
2. Poussez bien chaque butée du panier dans
l’extrémité du rail jusqu’à ce que le verrou
entre dans le petit trou sur le côté du rail.
Remarques :
• Le lave-vaisselle ne
fonctionnera pas
correctement si le bras
de lavage n’est pas
aligné avec l’un des trous
d’entrée d’eau sur la paroi
arrière du lave-vaisselle.
• Les ajusteurs des côtés
gauche et droit sur les paniers doivent être tous
deux en position entièrement vers le haut ou vers
le bas pour une bonne connexion.
24
Page 25

Préparation et chargement de la vaisselle (suite)
Chargement du panier inférieur
Le panier inférieur convient pour les assiettes,
les soucoupes, les bols et les casseroles. Placez
les gros articles le long du bord pour qu’ils ne
bloquent pas la rotation du bras gicleur. Pour de
meilleurs résultats, placez les bols, les casseroles
et les poêles avec leur surface sale vers le bas ou
vers le centre. Penchez un peu pour un meilleur
drainage.
Assurez-vous que les grands articles ne bloquent
pas la rotation du bras gicleur.
Assurez-vous que les poignées des casseroles
ne ressortent pas à travers le bas du panier pour
bloquer la rotation du bras gicleur.
Tiges repliables
Les tiges repliables du panier inférieur facilitent le
chargement des articles extra larges et difficiles à
charger. Les tiges peuvent rester levées pour une
utilisation normale ou repliées pour un chargement
plus flexible. Repliez pour avoir plus d’espace pour
charger les grosses casseroles ou poêles.
Mode de chargement standard de 10 couverts.
4 soucoupes
sous le panier
➔
Mode de chargement standard de 12 couverts.
25
Page 26

Préparation et chargement de la vaisselle (suite)
Chargement du panier à
ustensiles
Risque de coupures
Placez les articles tranchants ou coupants
(couteaux, brochettes, etc.) avec la pointe vers
le bas, sinon il pourrait y avoir des blessures.
Chargez le panier à ustensiles tandis qu’il est dans
le panier inférieur ou sortez le panier pour charger
sur un comptoir ou une table.
Placez les petits articles comme les bouchons de
bouteille de bébé, les bouchons de bocaux, les
porte-blé d’inde etc., dans une section couverte.
Fermez le couvercle pour retenir les petits articles
en place.
Lorsque les couvercles sont relevés, mélangez
les articles dans chaque section du panier avec
certains pointant vers le haut et d’autres vers le
bas pour éviter de les emboîter. Les jets d’eau ne
peuvent pas atteindre les articles emboîtés.
Pour retirer le petit panier :
1. Tenez le panier central et un petit panier. Glissez
le petit panier vers l’arrière pour dégager les
languettes des fentes correspondantes.
2. Séparez les paniers.
Utilisez les modes de chargement suggérés, tel
qu’illustrés, pour augmenter la lavabilité de vos
ustensiles.
Assurez-vous que rien ne ressorte au bas du
panier ou que le panier ne bloque le bras gicleur.
Ne mélangez pas l’argent et l’acier inoxydable
pour éviter d’endommager le fini d’argent.
Le panier à ustensiles peut se séparer et être
placé à différents endroits dans le panier inférieur.
Chargez les ustensiles dans toutes les sections ou
dans une seule selon votre charge.
Ajout de vaisselle
Pour ajouter ou retirer les articles après le début
du cycle de lavage.
• Déverrouillez la porte et attendez quelques
secondes jusqu’à la fin du lavage avant d’ouvrir.
• Ajoutez l’article et attendez quelques secondes
pour permettre à l’air froid de se diffuser
lentement à l’intérieur du lave-vaisselle.
• Fermez la porte bien fermement pour la
verrouiller et reprenez le cycle.
26
Page 27

Distributeur et détergents du lave-vaisselle
Remplissage du distributeur de
détergent
Le distributeur de détergent a un godet de lavage
principal et un de pré-lavage. Le godet couvert
s’ouvre automatiquement pour dégager le
détergent.
• Utilisez seulement un détergent de lavevaisselle automatique. D’autres détergents
formeront trop de mousse.
• Lorsque vous utilisez des tablettes de
détergent pour lave-vaisselle automatique,
placez une tablette dans le godet de lavage
principal et fermez.
• Ajoutez du détergent juste avant de lancer le
cycle.
• Rangez le détergent dans un endroit sec et
frais. Un détergent humide ou solidifié ne se
dissout pas correctement.
Quelle quantité de détergent
utiliser
La quantité de détergent à utiliser dépend de
la dureté de l’eau. Cette dernière se mesure en
grains par gallon. Utiliser trop peu de détergent
peut mener à un mauvais nettoyage et une
pellicule ou des taches se forment sur la vaisselle.
Trop de détergent dans de l’eau douce peut
mener à une pellicule permanente que l’on appelle
une attaque. La société locale des eaux, une
entreprise d’adoucisseur d’eau ou tout agent du
comté peut vous indiquer la dureté de l’eau de
votre région.
couvercle
godet de
lavage principal
verrou du
couvercle
godet de
pré-lavagea
Remarque : Si le couvercle est fermé sur
le godet de lavage principal, ouvrez en
pressant le verrou du couvercle.
Dureté de
l’eau*
Douce (0 à
4 grains par
gallon)
Moyen (5 à
9 grains par
gallon)
Dure (10 à
12 grains par
gallon)
* Votre compagnie de services publics locaux ou votre service d’éducation permanente universitaire d’État peut vous
indiquer le niveau de dureté de l’eau dans votre région.
* Remarque : Pour l’eau très dure, le détergent seul pourrait ne pas suffire. Il est recommandé d’utiliser un
adoucisseur d’eau pour améliorer la qualité de l’eau et le rendement du lave-vaisselle. Essayez d’ajouter
plus de détergent au début de la partie de lavage principal du cycle. En règle générale, utilisez 1 cuillerée à
thé pour chaque grain au-dessus de 12. Déverrouillez la porte, ouvrez lentement et ajoutez du détergent au
fond de la cuve. Fermez la porte pour la verrouiller et le lave-vaisselle continuera jusqu’à la fin du cycle.
Saleté niveau Pré-lavage
détergent
Peu sale
Saleté normale
Très sale
Peu sale
Saleté normale
Très sale
Tous les niveaux 5 c. à t. 8 c. à t.
2 c. à t.
4 c. à t.
4 c. à t.
4 c. à t.
4 c. à t.
5 c. à t.
Détergent
principal
6 c. à t.
6 c. à t.
7 c. à t.
6 c. à t.
6 c. à t.
7 c. à t.
27
Page 28

Distributeur et
Facteurs affectant la
détergents du
lave-vaisselle (suite)
Produit de rinçage
Le produit de rinçage améliore beaucoup le
séchage et réduit les taches et les pellicules
d’eau. L’eau « glisse » sur la vaisselle et ne forme
pas de gouttelettes qui s’accrochent et qui laissent
des taches.
Un distributeur, près du godet de détergent,
verse automatiquement une quantité mesurée de
produit de rinçage durant le dernier rinçage. S’il y
a des taches et un mauvais séchage, augmentez
la quantité de produit de rinçage en tournant le
cadran vers un chiffre plus élevé. Le cadran se
trouve sous le godet du distributeur. Le voyant est
foncé lorsqu’il est plein et s’éclaircit lorsqu’il faut le
remplir à nouveau.
Pour ajouter un produit de rinçage liquide, tournez
le bouchon du distributeur d’un quart de tour en
sens inverse des aiguilles d’une montre, soulevez
et sortez. Versez le produit de rinçage et jusqu’à
ce que le liquide atteigne le niveau de remplissage
indiqué. Replacez le bouchon.
Ne remplissez pas trop puisque ceci peut créer
trop de mousse. Essuyez tout déversement avec
un chiffon humide.
Le distributeur contient suffisamment de produit
pour 35 à 140 lavages, selon le réglage.
Ouverture du distributeur
Voyant
performance
Pression d’eau
La conduite d’eau chaude au lave-vaisselle doit
fournir une pression entre 20 et 120 lb/po2.
Il pourrait y avoir une baisse de la pression d’eau
lorsque vous lavez le linge et prenez une douche
en même temps. Attendez que la consommation
d’eau diminue avant de démarrer le lave-vaisselle.
Température de l’eau
L’eau chaude est nécessaire pour les meilleurs
résultats de lavage et séchage de la vaisselle.
Pour des résultats satisfaisants, l’eau introduite
dans le lave-vaisselle devrait atteindre au moins
49° C (120° F).
Pour vérifier la température de l’eau pénétrant
dans le lave-vaisselle :
• Ouvrez le robinet d’eau chaude le plus proche
du lave-vaisselle pendant plusieurs minutes
pour purger l’eau tiède de la canalisation.
• Placez un thermomètre à bonbon ou à
viande dans le courant d’eau pour vérifier la
température.
• Si elle est inférieure à 49° C (120° F),
demandez à une personne qualifiée
d’augmenter le réglage du thermostat du
chauffe-eau.
Important : Avant de lancer un cycle, faites
couler l’eau chaude pour purger l’eau froide de
la canalisation.
Réglage ajustable
Bouchon de
distributeur
28
Page 29

Entretien et nettoyage
Danger de brûlure
Laissez l’élément chauffant
refroidir avant de nettoyer
l’intérieur, sinon des brûlures
pourraient survenir.
Extérieur— À l’occasion, essuyez avec un
détergent doux, non abrasif et de l’eau. Rincez et
asséchez.
Intérieur—L’intérieur du lave-vaisselle est auto-
nettoyant avec une utilisation normale. Nettoyez,
au besoin, autour du joint d’étanchéité de la cuve
avec un chiffon humide.
Remarque : L’eau dure peut causer une
accumulation de calcaire à l’intérieur du lavevaisselle. Pour les instructions de nettoyage,
consultez la section « Pour enlever les taches et
pellicules ».
Trop-plein—empêche le lave-vaisselle de trop
se remplir et il se trouve dans le coin droit avant de
la cuve.
• Nettoyez-le à l’occasion
avec un nettoyant
domestique contenant
du vinaigre pour
dissoudre toute
accumulation.
• Le trop-plein doit
pouvoir se déplacer
facilement vers le haut
et vers le bas d’environ un pouce. Si tel n’est
pas le cas, soulevez-le et nettoyez le dessous.
Entretien du tuyau de ventilation de
vidange
Si un tuyau de ventilation de vidange et installé
pour votre lave-vaisselle encastré, vérifiez pour
vous assurer qu’il soit propre pour que le lavevaisselle se vidange correctement. Un tel tuyau est
normalement installé sur le comptoir et s’inspecte
en retirant le couvercle. Il ne fait pas partie de
votre lave-vaisselle et n’est pas couvert par la
garantie.
Danger de dommage à la propriété
Des fuites aux conduites d’eau peuvent survenir
à cause du gel. Assurez-vous que toutes les
conduites d’eau vers le lave-vaisselle et ses
canalisations intérieures sont protégées.
Si ce n’est pas le cas, il pourrait résulter des
dommages à la propriété.
Hivérisation
Un lave-vaisselle laissé à un endroit non chauffé
doit être protégé contre le gel. Demandez à une
personne qualifiée de faire ce qui suit :
Pour couper le service :
1. Coupez le courant au lave-vaisselle à la source
d’alimentation en retirant les fusibles ou en
fermant le disjoncteur.
2. Coupez l’alimentation d’eau.
3. Placez un récipient sous le robinet d’entrée.
Débranchez la canalisation d’eau du robinet
d’entrée et vidangez dans le récipient.
4. Débranchez la canalisation d’eau de la pompe
et vidangez l’eau dans le récipient.
Remarque : Consultez les instructions
d’installation pour plus de détails.
Pour remettre en service :
1. Rebranchez l’eau, le tuyau de vidange et le
courant électrique.
2. Ouvrez l’eau et remettez le courant électrique.
3. Remplissez les deux godets de détergent et
faites fonctionner le lave-vaisselle en cycle
Heavy Wash (Lavage très sale).
4. Vérifiez les connexions pour vous assurer qu’il
n’y ait aucune fuite.
Remarque : Consultez les instructions
d’installation pour plus de détails.
29
Page 30

Solutions aux problèmes courants de lavage
Avant d’appeler le service, consultez cette
liste. Vous pourriez épargner du temps et de
l’argent. Cette liste porte sur les problèmes
d’utilisation courante qui ne découlent pas
d’un défaut de fabrication ni de matériaux de
votre lave-vaisselle.
Saletés alimentaires restent sur la
vaisselle
• Choisissez un autre cycle de lavage plus
long.
• Reportez-vous à la section de chargement
du panier pour vous assurer d’avoir un bon
chargement - évitez l’emboîtement des
articles.
• La pression d’eau résidentielle pourrait être
trop basse —elle devrait être de 20 à 120
lb/po2.
• Vérifiez la température de l’eau d’entrée.
Elle devrait être d’au moins 49° C (120° F).
(Reportez-vous aux facteurs affectant le
rendement.)
• Vérifiez la dureté de l’eau. Pour l’eau
extrêmement dure, il faudra peut-être
installer un adoucisseur d’eau. (Reportezvous au tableau de détergent.)
• Utilisez du détergent frais.
• Assurez-vous que les articles ne bloquent
pas les bras gicleurs, les empêchant de
tourner.
• Ajusteurs/amarrage de paniers (Reportezvous à Ajustement du panier supérieur.)
La vaisselle ne sèche pas
• Assurez-vous de ne pas avoir choisi
Séchage sans chaleur.
• Assurez-vous que le distributeur du produit
de rinçage soit rempli.
• Augmentez la quantité de produit de
rinçage. (Reportez-vous à Produit de
rinçage.)
• Vérifiez la température de l’eau pénétrant.
Assurez-vous qu’elle soit d’au moins 49° C
(120° F).
• Vérifiez si le chargement est approprie évitez l’emboîtement des articles.
• Les articles de plastique devront peut-être
être asséchés à la serviette.
• Les godets à fond concave peuvent
accumuler de l’eau.
Verres/ustensiles tachés ou troubles
• Vérifiez la dureté de l’eau. Pour une eau
extrêmement dure, il faudra peut-être
installer un adoucisseur d’eau. (Reportezvous au tableau de détergent.)
• La température de l’eau pourrait être basse.
Évitez les températures extrêmement
basses ou élevées. (Reportez-vous aux
facteurs affectant le rendement.)
• Évitez toute surcharge et un mauvais
chargement. (Voir Préparation et
chargement de la vaisselle.)
• Utilisez du détergent frais. Le vieux
détergent est inefficace.
• Assurez-vous que le distributeur du produit
de rinçage soit rempli.
• Vérifiez que la bonne quantité de détergent
soit utilisée pour le cycle choisi. Vérifiez
aussi le niveau de phosphate. (Reportezvous à Remplissage du distributeur de
détergent.)
• La pression d’eau résidentielle pourrait être
trop basse —elle devrait être de 20 à 120
lb/po2.
Vaisselle ébréchée
• Chargez avec soin sans surcharger. (Voir
Préparation et chargement de la vaisselle.)
• Placez les articles délicats dans le panier
supérieur.
• Placez les verres bien en place contre les
tiges du panier et non pas sur elles.
• Chargez les articles pour qu’ils restent
en place et ne bougent pas en entrant et
sortant les paniers. Déplacez les paniers
lentement.
• Assurez-vous que les grands verres et les
verres à pied ne touchent pas le haut de la
cuve lorsque le panier est dans la cuve.
• La porcelaine ancienne et le cristal doivent
être lavés à la main.
30
Page 31

Solutions aux problèmes courants de lavage (suite)
Vaisselle tachée ou décolorée
• Le thé et le café peuvent tacher les tasses.
Retirez les taches en lavant à la main avec
une solution de 1/2 tasse (120 ml) d’eau de
Javel et une pinte (1 litre) d’eau tiède. Bien
rincer.
• Les dépôts de fer dans l’eau peuvent
causer une pellicule jaune ou brune. Un
filtre spécial installé dans la conduite
d’alimentation d’eau corrigera ce problème.
(Reportez-vous à « Pour enlever les taches
et pellicules ».)
• Les ustensiles en aluminium peuvent laisser
des marques grises/noires lorsqu’ils sont
frottés contre d’autres articles. Chargez
correctement.
• Certains aliments très acides peuvent
entraîner une décoloration de l’acier
inoxydable et des plastiques si la vaisselle
reste longtemps dans le lave-vaisselle.
Utilisez seulement le cycle Rinse Only
(Rinçage seulement) ou rincez à la main si
vous ne prévoyez pas faire fonctionner le
lave-vaisselle tout de suite.
• Le mélange des ustensiles d’acier
inoxydable et d’argent dans le panier à
ustensiles peut provoquer des taches sur
les lames d’acier inoxydable. Évitez de
mélanger l’acier inoxydable et l’argent.
• Utilisez du détergent contenant un agent au
chlore.
Pellicule blanchâtre
• Une pellicule indélébile peut se former s’il y
a trop de détergent dans de l’eau douce ou
adoucie.
• Ajustez la quantité de détergent à utiliser
selon la dureté de l’eau. (Reportez-vous au
tableau de détergent.)
• Abaissez la température de l’eau si elle
dépasse 60° C (140° F).
• Utilisez l’option No Heat Dry (Séchage sans
chaleur).
• Ne choisissez pas les options qui
augmenteront le temps de lavage et la
chaleur.
Dépôt de détergent dans les godets
• Le détergent peut être vieux. Jetez-le et
utilisez du détergent frais.
• Assurez-vous que l’eau puisse atteindre le
distributeur.
• Vérifiez si le cycle est terminé.
• Assurez-vous que les articles n’empêchent
pas le distributeur de détergent de s’ouvrir.
Fuites du lave-vaisselle
• Utilisez seulement un détergent frais conçu
pour les lave-vaisselle automatiques.
Mesurez attentivement le détergent.
Essayez une marque différente.
• Le produit de rinçage renversé peut créer
de la mousse et mener à un débordement.
Essuyez tout déversement avec un chiffon
humide.
• Vérifiez si le lave-vaisselle est de
niveau. (Reportez-vous aux Instructions
d’installation.)
Bruits normaux que vous entendrez
• Les bruits normaux incluent le remplissage,
la circulation d’eau et le bruit du moteur.
Le lave-vaisselle ne fonctionne pas
• Vérifiez si le disjoncteur est déclenché ou si
un fusible est grillé.
• Assurez-vous que l’alimentation d’eau soit
ouverte.
• Vérifiez si le cycle est réglé correctement.
(Reportez-vous au Mode d’emploi.)
• Est-ce que le lave-vaisselle est réglé pour
l’option Delay Start (Démarrage retardé) ?
• Assurez-vous que la porte soit fermée et
verrouillée.
• Assurez-vous que le bouton Start/Cancel
(Démarrage/annuler) soit enfoncé.
31
Page 32

Solutions aux problèmes courants de lavage (suite)
Le lave-vaisselle ne se vidange pas
correctement
• Si le lave-vaisselle est branché à un
broyeur, assurez-vous que ce dernier soit
vide.
• Vérifiez si le bouchon d’arrêt a été retiré de
l’intérieur du broyeur.
• Vérifiez si le boyau de drainage est plié.
• Assurez-vous que le cycle soit terminé, non
pas en pause.
Ce cycle prend beaucoup de temps
• Est-ce que le cycle est en période de
réchauffement de l’eau ?
• Est-ce que vous avez choisi l’option Delay
Start (Démarrage retardé) ?
• Est-ce que vous avez choisi l’option
Sanitize (Désinfection) ?
Le lave-vaisselle ne se remplit pas
• Est-ce que l’alimentation d’eau est
ouverte ?
• Est-ce que le trop-plein se déplace
facilement vers le haut et vers le bas ?
(Reportez-vous à la section Trop-plein.)
Le lave-vaisselle a une odeur
• La vaisselle sale laissée trop longtemps
peut créer une odeur. Utilisez le cycle Rinse
Only (Rinçage seulement).
• Il y aura une odeur de « neuf » après son
installation. C’est normal.
• Vérifiez si l’unité se vidange correctement.
(Reportez-vous à Le lave-vaisselle ne se
vidange pas correctement.)
• Ajoutez 2 cuillerées à table de bicarbonate
de sodium dans le distributeur de détergent
et faites un cycle Quick Wash (Lavage
rapide).
Taches à l’intérieur de la cuve
• La cuve peut prendre une couleur rosée/
orangée lors du lavage d’une grande
quantité de vaisselle avec des dépôts de
tomate. Ceci n’affecte pas le rendement
et disparaîtra graduellement au fil du
temps. Un pré-rinçage ou l’utilisation du
cycle Rinse Only pour la vaisselle tachée
de tomate réduira les risques de taches.
Utilisez l’option No Heat Dry (Séchage sans
chaleur) pour réduire les taches.
• Essayez d’utiliser un détergent contenant
un agent au chlore.
Enlever les taches et pellicules
L’eau dure peut causer une accumulation
de calcaire à l’intérieur du lave-vaisselle. La
vaisselle et les verres peuvent aussi avoir
des taches et des pellicules pour un certain
nombre de raisons. (Reportez-vous à la
section Verres/ustensiles tachés ou troubles.)
Pour retirer l’accumulation, les taches et les
pellicules, nettoyez selon les instructions
suivantes :
1. Chargez la vaisselle et les verres propres
de la manière normale. Ne chargez pas
d’ustensiles en métal ni l’argenterie.
2. N’ajoutez pas de détergent.
3. Choisissez le cycle Normal Wash
(Lavage normal). Fermez et verrouillez
la porte. Enfoncez la touche Start/Cancel
(démarrer).
4. Laissez le lave-vaisselle fonctionner
jusqu’au début du deuxième remplissage
(environ 10 minutes).
5. Déverrouillez et ouvrez la porte, versez 2
tasses de vinaigre blanc dans le bas du
lave-vaisselle.
6. Fermez et verrouillez la porte et attendez
la fin du cycle.
Remarque : Si les conditions ne changement
pas, il faudrait envisager la pose d’un
adoucisseur d’eau résidentiel.
32
Page 33

Remarques
33
Page 34

Remarques
34
Page 35

Remarques
35
Page 36

Informations sur la garantie des gros électroménagers
Votre appareil est couvert par une garantie limitée d’un an. Pendant un an à partir de la date d’achat originale,
Electrolux assumera les coûts des réparations ou du remplacement des pièces de cet appareil qui présente un
défaut de fabrication ou de matériau, si cet appareil est installé, utilisé et entretenu selon les instructions fournies
avec celui-ci.
Exclusions
Si vous avez
besoin d’une
réparation
Cette garantie ne couvre pas ce qui suit :
1. Les produits dont le numéro de série original a été enlevé, modifié ou qui n’est pas facilement déterminable.
2. Les produits qui ont été transférés de leur propriétaire inital à une autre partie ou qui ne sont plus aux États-Unis ou
au Canada.
3. La rouille à l’intérieur ou à l’extérieur de l’appareil.
4. Les produits vendus « tels quels » ne sont pas couverts par cette garantie.
5. Les aliments perdus en raison de pannes du réfrigérateur ou du congélateur.
6. Les produits utilisés dans les établissements commerciaux.
7. Les appels de service qui ne concernent pas un malfonctionnement, un défaut de fabrication ou un vice de matériau
ou pour les appareils qui ne font pas l’objet d’un usage domestique ou qui ne sont pas utilisés conformément aux
instructions fournies.
8. Les appels de service pour vérifier l’installation de votre appareil ou pour obtenir des instructions sur la façon
d’utiliser votre appareil.
9. Les frais qui rendent l’appareil accessible pour une réparation, par exemple enlever des garnitures, les armoires, les
étagères, etc. qui ne faisaient pas partie de l’appareil lorsqu’il a quitté l’usine.
10. Les appels de service au sujet de la réparation ou du remplacement des ampoules, des filtres à air, des filtres à eau,
d’autre matériel ou des boutons, poignées ou autres pièces esthétiques.
11. Les frais supplémentaires, y compris, sans s’y limiter, les appels de service après les heures normales de bureau,
le week-end ou les jours fériés, les droits et péages, les frais de convoyage ou les frais de déplacement pour les
appels de service dans des endroits isolés, notamment l’État de l’Alaska.
12. Les dommages causés au fini de l’appareil ou à la maison pendant l’installation, y compris, sans s’y limiter, aux
planchers, aux armoires, aux murs, etc.
13. Les dommages causés par : des réparations faites par des techniciens non autorisés; l’utilisation de pièces autres
que les pièces Electrolux d’origine qui n’ont pas été obtenues par l’entremise d’un réparateur autorisé; ou les
causes étrangères comme l’abus, l’alimentation électrique inadéquate ou les cas de force majeure.
AVIS DE NON-RESPONSABILITÉ SUR LES GARANTIES IMPLICITES; LIMITATIONS DES RECOURS
L’UNIQUE RECOURS DU CLIENT EN VERTU DE CETTE GARANTIE LIMITÉE EST LA RÉPARATION OU LE
REMPLACEMENT DU PRODUIT COMME DÉCRIT PRÉCÉDEMMENT. LES DEMANDES BASÉES SUR DES
GARANTIES IMPLICITES, Y COMPRIS LES GARANTIES IMPLICITES DE QUALITÉ MARCHANDE ET D’ADAPTATION À
UN USAGE PARTICULIER SONT LIMITÉES À AU MOINS UN AN OU À LA PÉRIODE LA PLUS COURTE PERMISE PAR LA
LOI. ELECTROLUX NE SERA PAS TENUE RESPONSABLE DES DOMMAGES DIRECTS OU INDIRECTS NI DES
DOMMAGES MATÉRIELS ET DES DÉPENSES IMPRÉVUES RÉSULTANT D’UNE VIOLATION DE CETTE GARANTIE
ÉCRITE OU DE TOUTE AUTRE GARANTIE IMPLICITE. CERTAINS ÉTATS ET CERTAINES PROVINCES NE PERMETTENT
PAS DE RESTRICTION OU D’EXEMPTION SUR LES DOMMAGES DIRECTS OU INDIRECTS OU DE RESTRICTION SUR
LES GARANTIES IMPLICITES. DANS CE CAS, CES RESTRICTIONS OU EXEMPTIONS POURRAIENT NE PAS ÊTRE
APPLICABLES. CETTE GARANTIE ÉCRITE VOUS PROCURE DES DROITS LÉGAUX SPÉCIFIQUES. IL SE PEUT QUE
VOUS AYEZ D’AUTRES DROITS QUI VARIENT SELON L’ÉTAT OU LA PROVINCE.
Conservez votre reçu, votre bon de livraison ou une autre preuve valide de paiement pour établir la période de la garantie
dans le cas où vous devriez faire appel aux services d’un technicien autorisé. Si une réparation doit être effectuée,
veuillez obtenir et conserver tous les reçus.
Le service auquel vous avez recours en vertu de cette garantie doit être obtenu en communiquant avec Electrolux à
l’adresse ou aux numéros de téléphone indiqués ci-dessous.
Cette garantie n’est valide qu’aux États-Unis et au Canada. Aux États-Unis, votre appareil est garanti par Electrolux Major Appliances
North America, une division de Electrolux Home Products, Inc. Au Canada, votre appareil est garanti par Electrolux Canada Corp.
Personne n’est autorisé à modifier ou à ajouter aux obligations contenues dans cette garantie. Les obligations de cette garantie
concernant la réparation et les pièces doivent être remplies par Electrolux ou par une compagnie de réparation autorisée. Les
caractéristiques et spécifications décrites ou illustrées peuvent être modifiées sans préavis.
ÉTATS-UNIS
1.800.944.9044
Electrolux Major Appliances
North America
Case postale 212378
Augusta, GA 30907, ÉTATS-UNIS
1.800.668.4606
Canada
Electrolux Canada Corp.
5855 Terry Fox Way
Mississauga, Ontario, Canada
L5V 3E4
 Loading...