

Page 1
All about the
Use & Care
of your
Important Safeguards ............................................... 2
Parts and Features ................................................ 3-4
Prior to Using Your Panini Grill/Griddle .................... 5
Cooking with Your Panini Grill/Griddle ..................... 5
Cleaning and Maintenance ....................................... 6
Panini Grill/Griddle
TA BLE OF C ONTEN T S
900253214-UM (December 2011)
Problem Solving......................................................... 6
Warranty Information ................................................ 7
Spanish User’s Manual ........................................ 8-15
French User’s Manual ........................................ 16-23
www.frigidaire.com USA & Canada 1-888-845-7330
Page 2

IMPORTANT SAFEGUARDS
When using electrical appliances, basic
safety precautions should always be
followed, including the following:
1. READ ALL INSTRUCTIONS.
2. Do not touch hot surfaces. Use handles or knobs.
3. To protect against fire, electric shock, and injury to
persons, DO NOT IMMERSE OR PARTIALLY
IMMERSE CORD, PLUG, OR APPLIANCE in
water or other liquids.
4. Close supervision is necessary when any
appliance is used by or near children.
5. Unplug from outlet when not in use and before
cleaning. Allow to cool before putting on or taking
off parts, and before cleaning appliance.
6. Do not operate any appliance with a damaged
cord or plug, or after the appliance has
malfunctioned or has been damaged in any
manner. Return the appliance to the nearest
authorized service center for examination, repair
or adjustment.
7. The use of accessory attachments not
recommended by the appliance manufacturer
may result in fire, electrical shock, or risk of injury
to persons.
8. Do not use outdoors.
9. Do not let the power cord touch hot surfaces or
hang over edge of table or counter where it can
be pulled on by children or tripped over
unintentionally.
10. Do not place on or near hot gas or electric burner,
or in a heated oven or in a microwave oven.
11. Preheat the unit until the green "ready" light turns
on.
12. Unplug the unit when finished using.
13. Do not use appliance for other than intended use.
14. Extreme caution must be exercised when moving
an appliance containing hot oil or other hot
liquids.
15. To disconnect, turn the control to the OFF setting,
then remove plug from wall outlet. Never unplug
by pulling on the cord.
16. To prevent burns or injury, exercise extreme
caution when disposing of hot grease or other hot
liquids and when removing or transporting the drip
tray as the contents may be hot.
17. Do not clean with metal scouring pads. Pieces
can break off the pad and touch electrical parts
involving a risk of electrical shock.
18. Do not place cardboard, plastic, paper or other
flammable materials in or on the appliance.
19. While in operation, a fire may occur if the
appliance is covered or touching flammable
material, including curtains, draperies, walls, and
the like. Do not store or lay any item on the
appliance during operation.
20. WARNING: TO REDUCE THE RISK OF FIRE OR
ELECTRIC SHOCK, ONLY AUTHORIZED
PERSONNEL SHOULD DO REPAIRS.
SAVE THESE INSTRUCTIONS
Consumer Safety Information
THIS UNIT IS FOR HOUSEHOLD USE ONLY.
Polarized Plug
This appliance has a polarized plug (one blade is wider
than the other). To reduce the risk of electric shock, this
plug will fit in a polarized outlet only one way. If the plug
does not fit fully into the outlet, reverse the plug and
reinsert. If it still does not fit, contact a qualified
electrician. Do not modify the plug in any way.
CAUTION
Short cord Instructions: Your Panini Press Grill and
Griddle appliance is fitted with a short power supply
cord as a safety precaution to prevent personal injury
or property damage resulting from pulling, tripping or
becoming entangled with a longer cord. Do not allow
children to use or be near this appliance without close
adult supervision. If an extension cord is used, (1) the
marked electrical rating of the cord set or extension
cord should be at least as great as the electrical rating
of the appliance, (2) the cord should be arranged so
that it will not drape over the countertop or tabletop
where it can be pulled on by children or tripped over,
(3) If the appliance is of the grounded type, the
extension should be a grounding 3-wire cord.
Electrical Power
If the electric circuit is overloaded with other appliances,
your appliance may not operate properly. It should be
operated on a separate electric circuit from other
appliances.
2
Page 3
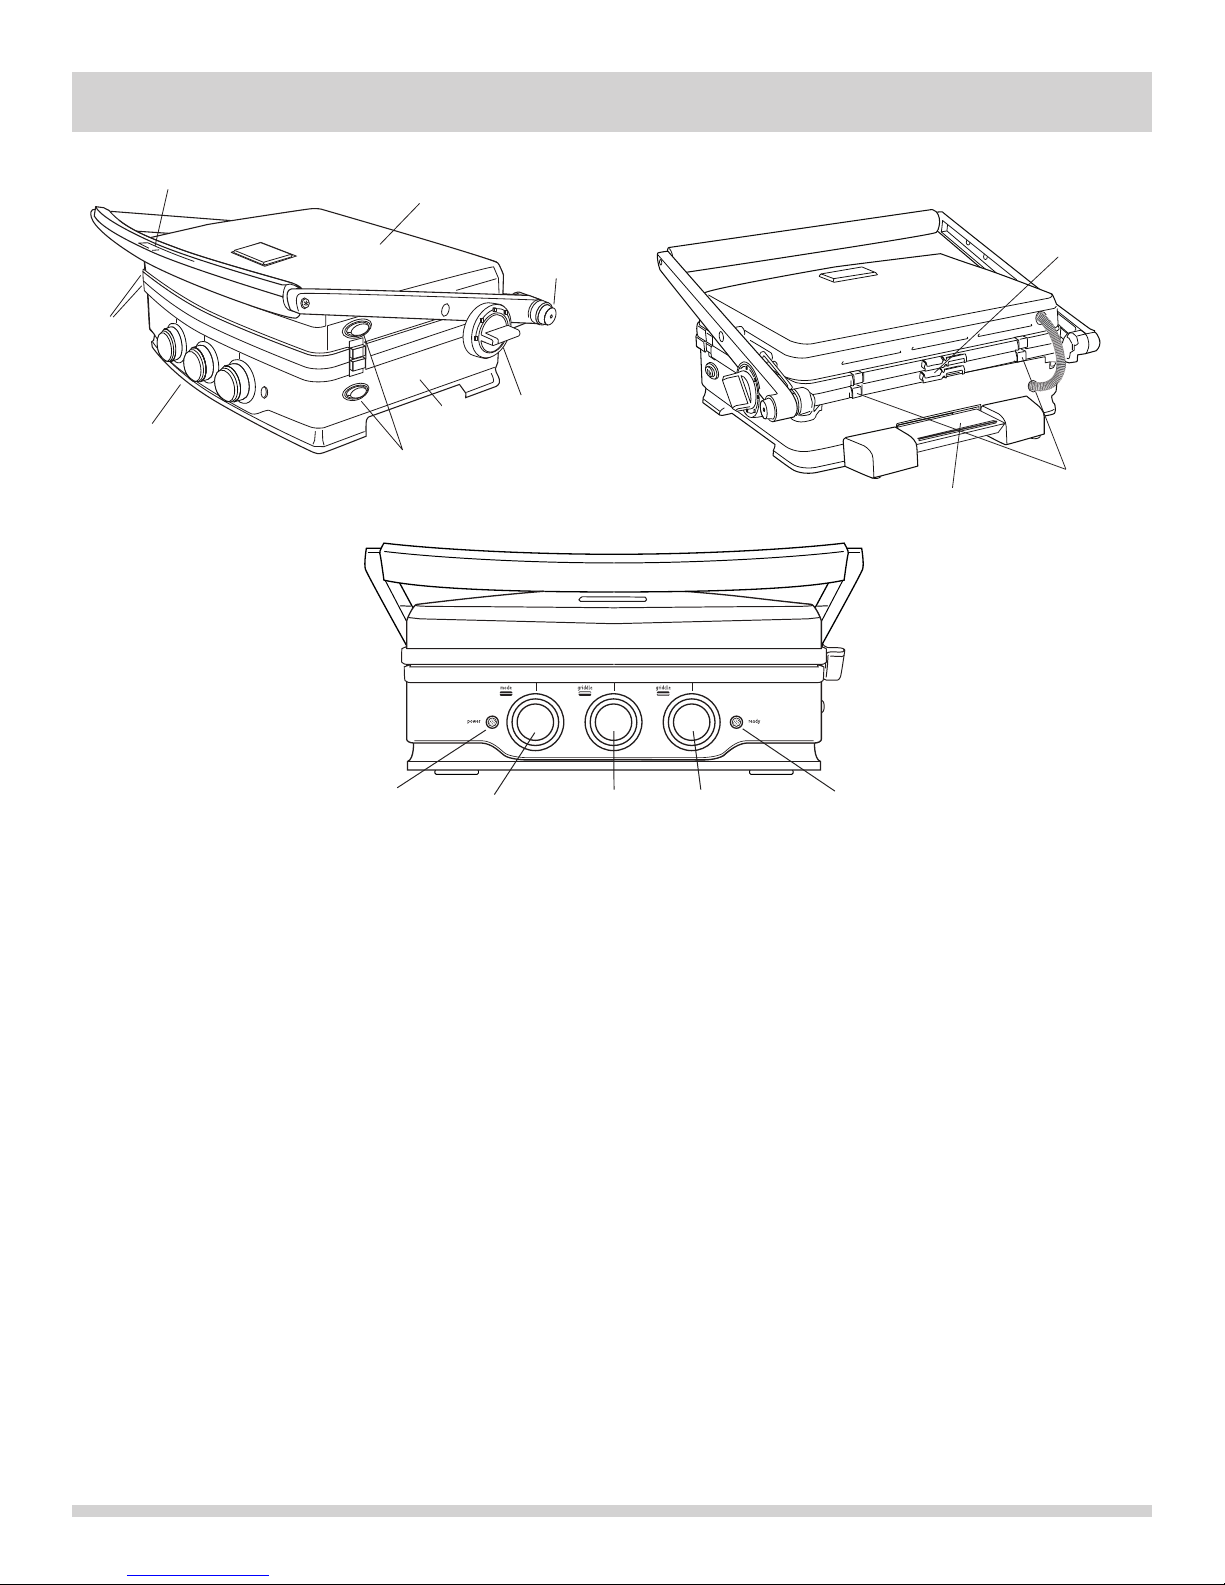
PARTS AND FEATURES
Handle
Grill/
Griddle
Plates
Control Panel
Lid
Base
Grill/Griddle Plate
Release Buttons
Open-Flat
Hinge
Release
Button
Lid Height
Adjustment &
Lock Knob
Control Panel
Drip Tray
Grease drip
spout (on back
of grill/griddle
plates)
Metal tabs
(to secure
grill/griddle
plates)
Power
Indicator
Light
Mode
Control
Base Plate
Temperature
Control
Power Indicator Light
Light will illuminate when appliance is plugged in and
mode is set on low, medium, high, or griddle. Power
indicator light will not illuminate when the mode control
is turned to ‘panini’ or to ‘off.’
Mode Control
Use this control to set the temperature for making
panini sandwiches, to select the griddle mode, and to
turn the appliance off. In panini mode, both grill/griddle
plates will be heated to Low, Medium, or High, based
on the selected setting. When the mode is set to
griddle, temperature is controlled by the two
temperature control knobs.
Dual Temperature Control
Dual controls allow you to set different temperatures for
the two grill/griddle plates. The center knob controls the
temperature of the plate on the base, and the right knob
controls the temperature of the plate on the lid. Each
plate can be adjusted independently to temperatures
from 150°F to 450°F. This is ideal when using the panini
grill/griddle in the open flat position, as it allows you to
cook different foods at different temperatures.
Upper Plate
Temperature
Control
Ready
Light
Ready Light
The ready light will illuminate when the cooking plates
reach the selected temperature. If you are using the
griddle function and have set two different
temperatures, the light will turn on when the hotter
temperature is reached.
Product Specifications
Model number FPPG12K7MS
Volts 120V AC only
Hertz 60 HZ
Rated wattage, total 1500 watts
Rated wattage, upper
heating element 700 watts
Rated wattage, lower
heating element 800 watts
Dimensions Width 7 in. (180 mm)
Depth 14.2 in. (360 mm)
Height 15.75 in (400 mm)
Cooking surface 240 sq. in. (120 sq. in. per
cooking plate)
3
Page 4

PARTS AND FEATURES, CONTINUED
Grill Surface
Height Adj. &
Lock Knob
Griddle Surface
Hinge
Release
Button
Lid Height Adjustment and Lock
This feature allows you to set the lid height at four
different stopping points for more cooking flexibility.
This is ideal when cooking delicate foods such as fish
or panini sandwiches with soft or delicate ingredients.
To adjust, rotate height adjustment knob clockwise
(toward the back) to one of four height settings.
This feature also allows you to lock the lid in its closed
position for safe and easy transport. To lock, turn knob
counter-clockwise (toward the front).
CAUTION
Do not attempt to move or transport the panini
grill/griddle while it is still hot or when there is
anything in the drip tray.
Drip Tray
Grill/Griddle Plates
The grill/griddle plates are removable, reversible, and
dishwasher safe for easy cleaning. Either plate will fit
both the top and bottom position. One side of each
plate has raised ribs for making panini sandwiches and
grilling; the other side is smooth for using as a griddle
or flat grill. Any combination of grill/griddle plate
configurations can be used in either the closed or open
flat position. Be careful to avoid scratching the nonstick surface to prolong the life of the coating.
Drip Tray
The drip tray catches grease and drippings and should
be emptied and cleaned after each use.
Open-Flat Hinge Release Button
When using the panini grill/griddle as a panini press or
press grill, the lid will stop in the upright position to
allow you to add or remove food from the cooking
surface. For use as a griddle or table-top grill, press the
open-flat hinge release button while grasping the
handle and rotate the lid all the way open until the
handle rests on the table or counter.
CAUTION
Be sure the entire panini grill/griddle is placed on a
flat, level, and stable surface.
4
Grill/Griddle Plate
Release Buttons
Removing and Installing
Grill/Griddle Plates
Be sure plates are cool before attempting to remove
them. Open the panini grill/griddle to the flat position
and press the grill/griddle plate release buttons. Lift
each plate up and out from under the metal tabs
located between the two plates.
To install the plates, open the panini grill/griddle to the
flat position and slide one plate at a time under the
metal tabs located between the two plates. Next, press
each plate down to latch the side clamps. Be sure the
plates are properly secured before use.
Page 5

PRIOR TO USING YOUR PANINI GRILL/GRIDDLE
1. Carefully unpack the contents from the box. Check
to make sure that all accessories are accounted for
and that the panini grill/griddle and accessories
ppear to be free from any damage. If you discover
a
any damage or missing parts, please contact our
customer service department at 1-888-845-7330
prior to plugging the unit in.
COOKING WITH YOUR PANINI GRILL/GRIDDLE
Your panini grill/griddle offers a number of cooking
options to meet your needs. It can be used in the
closed position as a panini press and contact grill or in
the open flat position as a griddle or table-top grill. In
either cooking position, you can use either side of the
grill/griddle plates – smooth or ribbed. You can also mix
and match the grill/griddle plates for even greater
flexibility in food preparation.
To use as a Panini Sandwich
Maker or Press Grill
1. Install both grill/griddle plates with ribbed sides
facing out. Place the panini grill/griddle in the
closed position.
2. Plug in the unit.
3. Adjust the mode control to the desired panini heat
level of Low, Medium, or High. This will control the
temperature of both the top and bottom plates.
4. The ready light will illuminate when the desired
temperature is reached.
5. Open the lid to the upright position, place your
panini sandwich on the grill plate and close the lid.
If desired, use the lid height adjustment to limit how
far down the lid presses (see page 4).
6. When cooked to the desired level, remove your
panini sandwich and enjoy!
Use this same process to grill hamburgers, steaks, and
many other foods. Turn the grill/griddle plates to the
smooth sides to grill flat-iron style steaks, quesadillas,
and much more.
2. Remove any printed material or tape from the
panini grill/griddle.
3. Remove, wash, and dry the drip tray and
grill/griddle plates (see Removing and Installing
Grill/Griddle Plates, page 4).
4. Install the grill/griddle plates and drip tray back into
the panini grill/griddle.
To use as a Griddle
1. Install both grill/griddle plates with smooth sides
facing out. Place the panini grill/griddle in the open
flat position. (See Open Flat Hinge Release Button,
page 4)
2. Plug in the unit.
3. Turn the mode control to ‘Griddle.’
4. Set both temperature control knobs to the desired
heat, from 150°F to 450°F. The middle knob will
control temperature of the base (front) plate. The
right knob will control the temperature of the lid
(back) plate.
5. The ready light will illuminate when the desired
temperature is reached. If you have set two
different temperatures, the light will turn on when
the hotter temperature is reached.
6. The griddle is now ready to use!
To use as an indoor table-top grill, turn the grill/griddle
plates with ribbed sides facing out. You can also use a
combination of one grill plate and one griddle plate to
suit your particular cooking needs.
WARNING
➡
IMPORTANT
Check all meats with a food thermometer to ensure
they are properly cooked.
Electrical Shock Hazard
Plug the unit into a properly grounded electrical outlet.
Failure to follow these instructions can result in death,
fire, or electrical shock.
5
Page 6

CLEANING AND MAINTENANCE
• Prior to cleaning, turn the panini grill/griddle off and
unplug it.
• Allow ample time for all surfaces of the panini
grill/griddle to cool completely.
• Empty the drip tray. Carefully slide the drip tray out
the back of the panini grill/griddle and dispose of the
contents appropriately. Wash the drip tray by hand or
in the top rack of the dishwasher. Be sure the drip
tray is dry before inserting it back into the panini
grill/griddle.
• Wash the grill/griddle plates in the dishwasher or
wash by hand in warm soapy water. Rinse and dry.
Be sure plates are thoroughly dry before placing
back in the panini grill/griddle.
PROBLEM SOLVING
• For daily cleaning, wipe the outside surface with a
clean, damp cloth. To further enhance the lid’s
tainless steel exterior finish, Frigidaire
s
recommends Ecossential Stainless Steel Cleaner,
by SmartChoice™. You can order online at
http://frigidaire.stores.yahoo.net or by phone,
1-800-599-7579.
CAUTION
To prevent burns or injury, use extreme caution when
removing and transporting the drip tray, as contents
may be hot. Never move or transport the panini
grill/griddle without first checking to be sure the drip
tray is empty.
Problem Solutions
Can’t lift lid • Check the lock knob. To unlock, turn knob clockwise (see page 4).
Grill/griddle plate is not heating • Check to be sure appliance is plugged in.
• Be sure both grill/griddle plates are in correct position and properly
secured (see page 4).
• If using ‘panini’ mode, select either Low, Medium or High
temperature.
• If using ‘griddle’ mode, be sure you have set the temperature for both
plates (see page 5).
6
Page 7

SMALL DOMESTIC APPLIANCE WARRANTY
Your appliance is covered by a one-year limited warranty. For one year from your original date of
urchase, Electrolux will pay all costs for repairing or replacing any parts of this appliance that prove
p
o be defective in materials or workmanship when such appliance is installed, used and maintained in
t
accordance with the provided instructions.
Exclusions This warranty does not cover the following:
1. Products with original serial numbers that have been removed, altered or cannot be readily determined.
2. Product that has been transferred from its original owner to another party or removed outside the USA or
Canada.
. Rust on the interior or exterior of the unit.
3
4. Products purchased “as-is” are not covered by this warranty.
5. Food loss due to any refrigerator or freezer failures.
6. Products used in a commercial setting.
7. Service calls which do not involve malfunction or defects in materials or workmanship, or for appliances
not in ordinary household use or used other than in accordance with the provided instructions.
8. Service calls to correct the installation of your appliance or to instruct you how to use your appliance.
9. Expenses for making the appliance accessible for servicing, such as removal of trim, cupboards, shelves,
etc., which are not a part of the appliance when it is shipped from the factory.
10. Service calls to repair or replace appliance light bulbs, air filters, water filters, other consumables, or
knobs, handles, or other cosmetic parts.
11. Surcharges including, but not limited to, any after hour, weekend, or holiday service calls, tolls, ferry trip
charges, or mileage expense for service calls to remote areas, including the state of Alaska.
12. Damages to the finish of appliance or home incurred during installation, including but not limited to floors,
cabinets, walls, etc.
13. Damages caused by: services performed by unauthorized service companies; use of parts other than
genuine Electrolux parts or parts obtained from persons other than authorized service companies; or
external causes such as abuse, misuse, inadequate power supply, accidents, fires, or acts of God.
DISCLAIMER OF IMPLIED WARRANTIES; LIMITATION OF REMEDIES
CUSTOMER’S SOLE AND EXCLUSIVE REMEDY UNDER THIS LIMITED WARRANTY SHALL BE PRODUCT
REPAIR OR REPLACEMENT AS PROVIDED HEREIN. CLAIMS BASED ON IMPLIED WARRANTIES,
INCLUDING WARRANTIES OF MERCHANTABILITY OR FITNESS FOR A PARTICULAR PURPOSE, ARE
LIMITED TO ONE YEAR OR THE SHORTEST PERIOD ALLOWED BY LAW, BUT NOT LESS THAN ONE YEAR.
ELECTROLUX SHALL NOT BE LIABLE FOR CONSEQUENTIAL OR INCIDENTAL DAMAGES SUCH AS
PROPERTY DAMAGE AND INCIDENTAL EXPENSES RESULTING FROM ANY BREACH OF THIS WRITTEN
LIMITED WARRANTY OR ANY IMPLIED WARRANTY. SOME STATES AND PROVINCES DO NOT ALLOW THE
EXCLUSION OR LIMITATION OF INCIDENTAL OR CONSEQUENTIAL DAMAGES, OR LIMITATIONS ON THE
DURATION OF IMPLIED WARRANTIES, SO THESE LIMITATIONS OR EXCLUSIONS MAY NOT APPLY TO
YOU. THIS WRITTEN WARRANTY GIVES YOU SPECIFIC LEGAL RIGHTS. YOU MAY ALSO HAVE OTHER
RIGHTS THAT VARY FROM STATE TO STATE.
If You Need Keep your receipt, delivery slip, or some other appropriate payment record to establish the warranty period
Service should service be required. If service is performed, it is in your best interest to obtain and keep all
receipts. Service under this warranty must be obtained by contacting Electrolux at the addresses
or phone numbers below.
This warranty only applies in the USA and Canada. In the USA, your appliance is warranted by Electrolux Major Appliances
North America, a division of Electrolux Home Products, Inc. In Canada, your appliance is warranted by Electrolux Canada Corp.
Electrolux authorizes no person to change or add to any obligations under this warranty. Obligations for service and parts under
this warranty must be performed by Electrolux or an authorized service company. Product features or
specifications as described or illustrated are subject to change without notice.
USA Canada
1.888-845-7330 1.888-845-7330
Electrolux Home Products, Inc. Electrolux Canada Corp.
10200 David Taylor Drive 5855 Terry Fox Way
Charlotte, NC 28262 Mississauga, Ontario, Canada
L5V 3E4
Printed in China
 Loading...