

Frigidaire Microwave Oven, Over-the-Range Microwave Oven with Convenience Pad Use & Care Manual
Over-the-Range
Microwave Oven
with Convenience Pad
Visit the Frigidaire Web Site at: http://www.frigidaire.com
Welcome..........................................2
Important Safety Instructions .....3-6
Features and Specifications ..........7
Before Operating ............................8
Questions or for Service Call:
1-888-312-2117
Manual Operation ..................... 9-14
Convenience Operation ......... 15-16
Cooking Charts ...................... 17-18
Care & Cleaning ..................... 19-20
Before You Call
Solutions to Common Problems........................ 21
Warranty ......................... Back Page
READ AND SAVE THESE INSTRUCTIONS
p/n 316495004 rev B (0706)

Welcome & Congratulations
Product Registration
Be sure to register your product. The
self-addressed PRODUCT
REGISTRATION CARD should be filled
in completely, signed and returned to
Electrolux Home Products.
Congratulations on your purchase of a new microwave! At Electrolux Home
Products, we are very proud of our product and are completely committed to
providing you with the best service possible. Your satisfaction is our number
one priority.
We know you’ll enjoy your new microwave and Thank You for choosing our product.
We hope you consider us for future purchases.
PLEASE CAREFULLY READ AND SAVE THESE INSTRUCTIONS
This Use & Care Manual provides specific operating instructions for your model.
Use your microwave only as instructed in this manual. These instructions are
not meant to cover every possible condition and situation that may occur.
Common sense and caution must be practiced when installing, operating and
maintaining any appliance.
Be sure to record your model and serial number. The serial plate is located on
the back of the microwave oven.
Please record your model and serial number and date of purchase in
the spaces provided below for future reference in case your microwave
should ever require servicing:
This Use & Care Manual contains
general operating instructions for your
appliance and feature information for
several models. Your microwave may
not have all the described features. The
graphics shown are representative. The
graphics on your microwave may not
look exactly like those shown.
Model Number:
Serial Number:
Purchase Date:
© 2007 Electrolux Home Products, Inc.
All rights reserved.
2

Important Safety Instructions
What You Need to
Know About Safety
Instructions
Warning and Important Safety Instructions appearing in the
Use & Care Guide are not meant to cover all possible
conditions and situations that may occur. Common sense,
caution, and care must be exercised when installing,
maintaining or operating a microwave.
Always contact your dealer, distributor, service agent or
manufacturer about problems or conditions you do not
understand.
Recognize Safety
Symbols, Words, Labels
SAVE THESE INSTRUCTIONS
3
Important Safety Instructions
Federal
Communications
Grounding Instructions
Commission Radio
Frequency Interference
Statement (U.S.A. Only)
SAVE THESE INSTRUCTIONS
4
Important Safety Instructions
Precautions to Avoid
Possible Exposure to
Excessive Microwave
Energy
Adhere to the following precautions:
• DO NOT attempt to operate this oven with the door open
since open door operation can result in harmful exposure
to microwave energy. It is important not to defeat or
tampler with the safety interlock switches.
• DO NOT place any object between the oven front face
and the door or allow soil or cleaner residue to
accumulate on sealing surfaces.
• DO NOT use any cleaning materials on the oven door
gasket. Doing so could cause damage.
• DO NOT operate the oven if it is damaged. It is
particularly important that the oven door close properly
and that there is no damage to:
1. door (bent),
2. hinges and latches (broken or loosended),
3. door seals and sealing surfaces.
• Oven should not be be adjusted or repaired by anyone
except properaly qualified service personnel.
SAVE THESE INSTRUCTIONS
5

Important Safety Instructions
When using electrical appliances, basic safety
precautions should be followed to reduce the risk of
burns, electric shocks, fire or injury to persons or
exposure to excessive microvave energy.
• READ ALL instructions before using oven.
• READ AND FOLLOW the specific “PRECAUTIONS
TO AVOID POSSIBLE EXPOSURE TO EXCESSIVE
MICROWAVE ENERGY” on page 5.
• Install or locate this oven ONLY in accordance with
the installation instructions in this Use & Care
Manual.
• Some products such as whole eggs and sealed
containers - for example, closed jars - are able to
explode and SHOULD NOT be HEATED in this oven.
• Use this oven ONLY for its intended use as described
in this Use & Care Manual. Do not use corrosive
chemicals or vapors in this oven. This type of oven is
specifically designed to heat, cook, or dry food. It is
not designed for industrial or laboratory use.
• As with any appliance, CLOSE SUPERVISION is
necessary when used by CHILDREN or INFIRM
PERSONS.
• Review the door cleaning instructions in the Care &
Cleaning section.
• DO NOT heat baby bottles in oven.
• Baby food jars shall be open when heated and
contents stirred or shaken before consumption, in
order to avoid burns.
• DO NOT use this oven for commercial purposes. It is
made for household use only.
• DO NOT operate this oven if it has a damaged cord or
power plug, if it is not working properly, or if it has
been damaged or dropped.
• This oven, including power cord, must be serviced
ONLY by qualified service personnel. Special tools are
required to service oven. Contact nearest authorized
service facility for examination, repair, or adjustment.
• DO NOT cover or block any vents, openings or filters
on the oven.
• DO NOT store this oven outdoors. DO NOT use this
appliance near water - for example, near a kitchen
sink, in a wet basement, near a swimming pool or
similar locations.
• DO NOT immerse cord or plug in water.
• Keep cord AWAY from HEATED surfaces.
• DO NOT let cord hang over edge of table or counter.
• Review the door cleaning instructions in the Care &
Cleaning section.
• Clean the ventillating hood frequently.
• DO NOT allow grease to accumulate on the hood or
filters.
• Use care when cleaning the ventilating hood filters.
Corrosive cleaning agents such as lye-based oven
cleaners may damage the filters.
• When flaming foods under the hood, turn the fan on.
• Suitable for use above both gas and electric cooking
equipment 36 inches or less wide.
To avoid the risk of fir in the oven cavity: injury to persons
or exposure to excessive microvave energy.
• DO NOT overcook food. Carefully attend oven when
paper, plastic or other combustible materials are
placed inside the oven to facilitate cooking.
• Remove wire twist-ties from paper or plastic bags
before placing bag in oven.
SAVE THESE INSTRUCTIONS
• If materials inside the oven ignite, keep oven door
CLOSED, turn oven off and disconnect the power cord,
or shut off power at the fuse or circuit breaker panel.
• DO NOT use this oven cavity for storage. DO NOT
leave paper products, cooking utensils or food in the
caity when not in use.
6
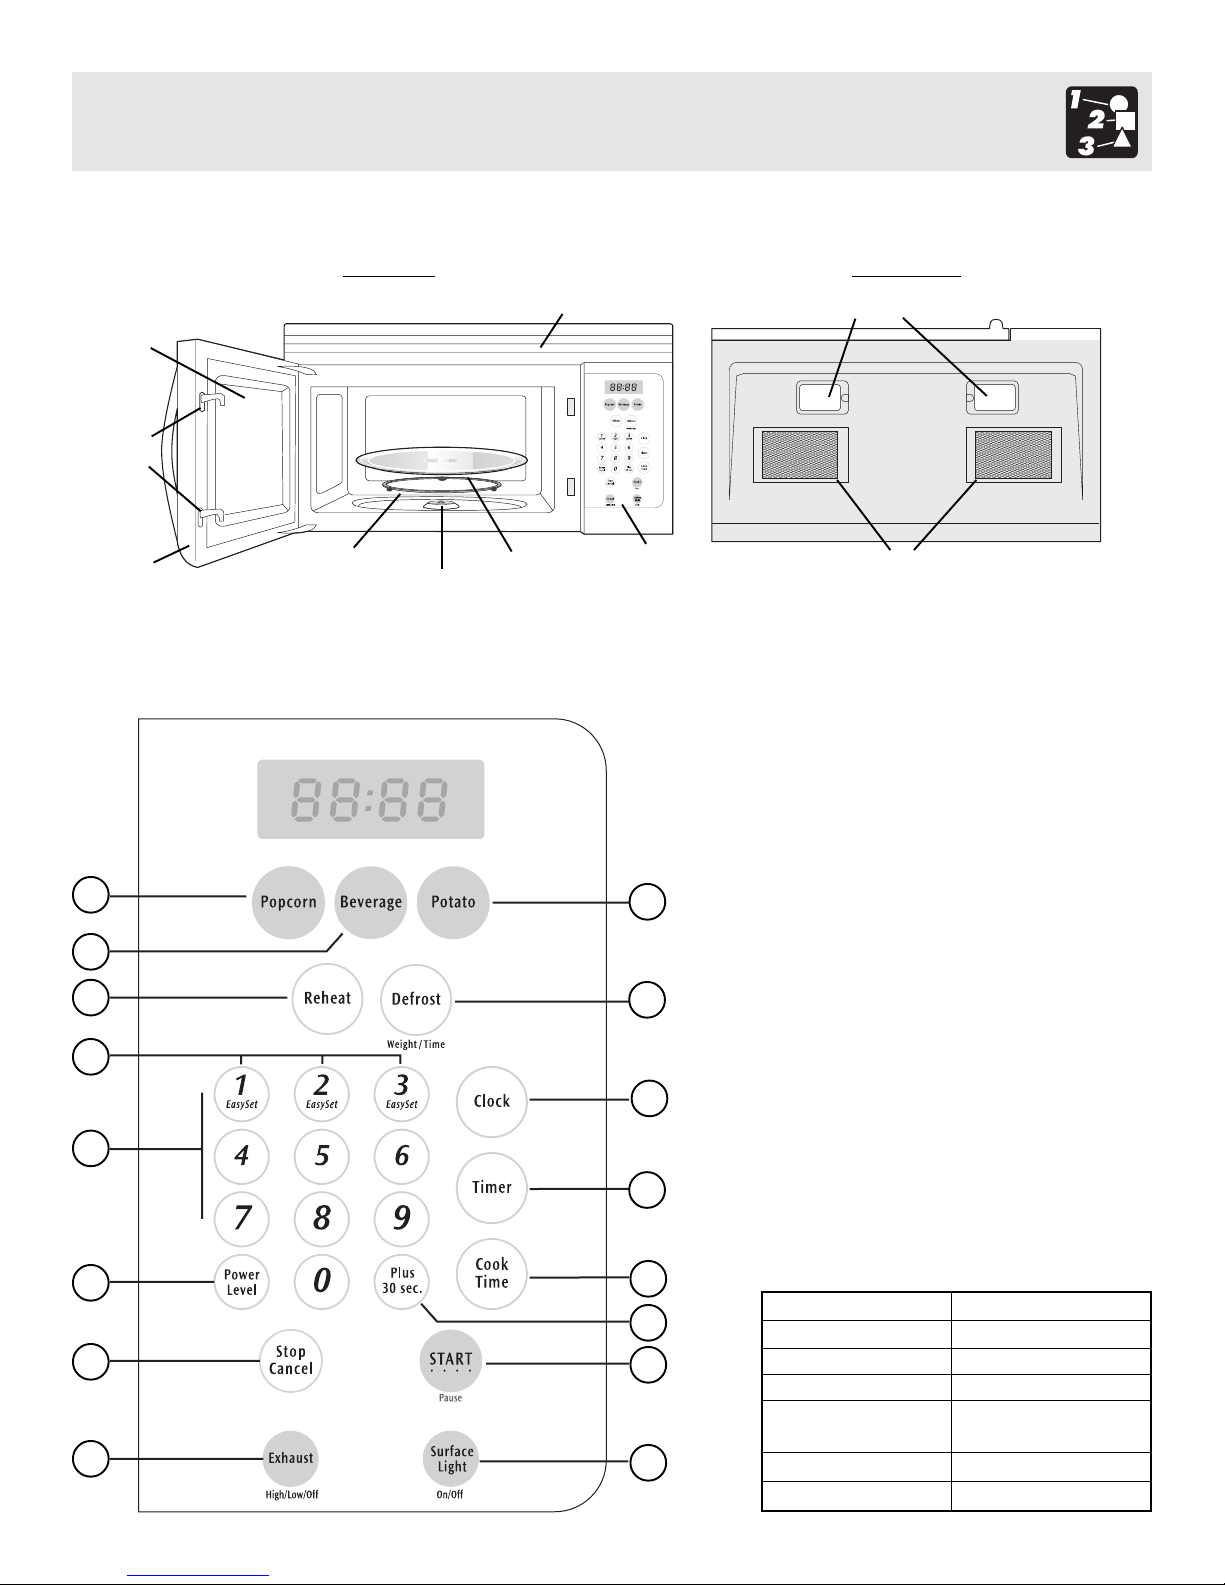
Microwave features
Features & Specifications
Window
Interlock
system
Door
assembly
1
2
4
6
7
Turntable
ring
assembly
Front View
Turntable
Shaft
Front Vent Grill
Turntable
glass
tray
Control
panel
Control panel
(1) Popcorn
(2) Beverage
(3) Potato (1-3 potatoes)
(4)
(5)
(6) EasySet (3 instant key settings)
(7) numeric pads (0 thru 9)
3
(8) Clock
(9)
(10) Cook Time
(11)
5
(12) +30 sec ~ Press this pad to add 30
(13) START/Pause
8
(14) Stop/Cancel
(15)
(16)
9
Reheat
Defrost
Timer
Power Level
seconds to cook time. Each press will add
additional 30 seconds to the cook time.
Exhaust (High/Low/Off
exhaust fan on, off or to adjust fan speed.
Surface Light
surface lights on or off.
Bottom View
Surface lights
Ventilation
filters
(3 different settings)
time
(by
(10 power levels available)
~ Press this pad to turn the
weight)
or
Front
Rear
~ Use to turn the
11
14
15
10
12
13
16
7
Oven specifications
Power Supply
Input Power
Cooking Power
Frequency
Outer Dimensions
(WxHxD)
Cavity Volume
Net Weight
120VAC, 60 Hz
1,550W
1,000W
2,450 MHz
29.88”x15.75”x 15.04”
1.5 cubic ft.
65.04 lbs.
Before Operating
Learn more about your
microwave oven
• To avoid risk of personal injury or property damage, do
not operate the microwave oven empty.
• To avoid risk of personal injury or property damage, do
not use stoneware, aluminum foil, metal utensils, or
metal trimmed utensils in the microwave oven.
Microwave utensil guide
Use
• Oven proof glass (specifically treated
for high intensity heat):
Utility dishes, loaf dishes, pie plates,
cake plates, liquid measuring cups,
casseroles and bowls without metallic
trim.
• China:
Bowls, cups, serving plates and platters
without metallic trim.
Plastic:
•
Plastic wrap (as a cover) - lay the plastic
wrap loosely over the dish and press it to
the sides. Vent plastic wrap by turning
back one edge slightly to allow excess
steam to escape. The dish should be
deep enough so that the plastic wrap will
not touch the food. Use plastic dishes,
cups, semi-rigid freezer containers and
plastic bags for short cooking times. Use
these with care because the plastic may
soften from the heat of the food.
•
Paper:
Paper towls, waxed paper, paper napkins
and paper plates with no metallic trim or
design. Look for the manufacturer’s label
for any special instructions for use in the
microwave oven.
• Metal utensils:
Metal shields the food from microwave energy and produces uneven
cooking. Also, avoid metal skewers, thermometers or foil trays. Metal
utensils can cause arcing, which can damage your microwave oven.
• Metal decoration:
Bowls, cups, serving plates and platters without metallic trim.
• Aluminum foil:
Avoid large sheets of aluminum foil because they hinder cooking and
may cause harmful arcing. Use small pieces of foil to shield poultry
legs and wings. Keep ALL aluminum foil at least 1 inch from the side
walls of the oven cavity and door of the microwave.
•
Wood:
Wooden bowls and boards will dry out and may split or crack when
you use them in the microwave oven. Baskets made of wood will react
in the same way.
•
Tightly covered utensils:
Be sure to leave openings for steam to escape from covered
cookware. Pierce plastic pouches of vegetables or other food items
before cooking. Tightly closed pouches may explode.
•
Brown paper:
Avoid using brown paper bags. They absorb heat and can burn.
•
Flawed or chipped cooking utensils:
Any utensil that is cracked, flawed or chipped may break in the oven.
• Metal twist ties:
Remove metal twist ties from plastic or paper bags. They become hot
and could cause a fire.
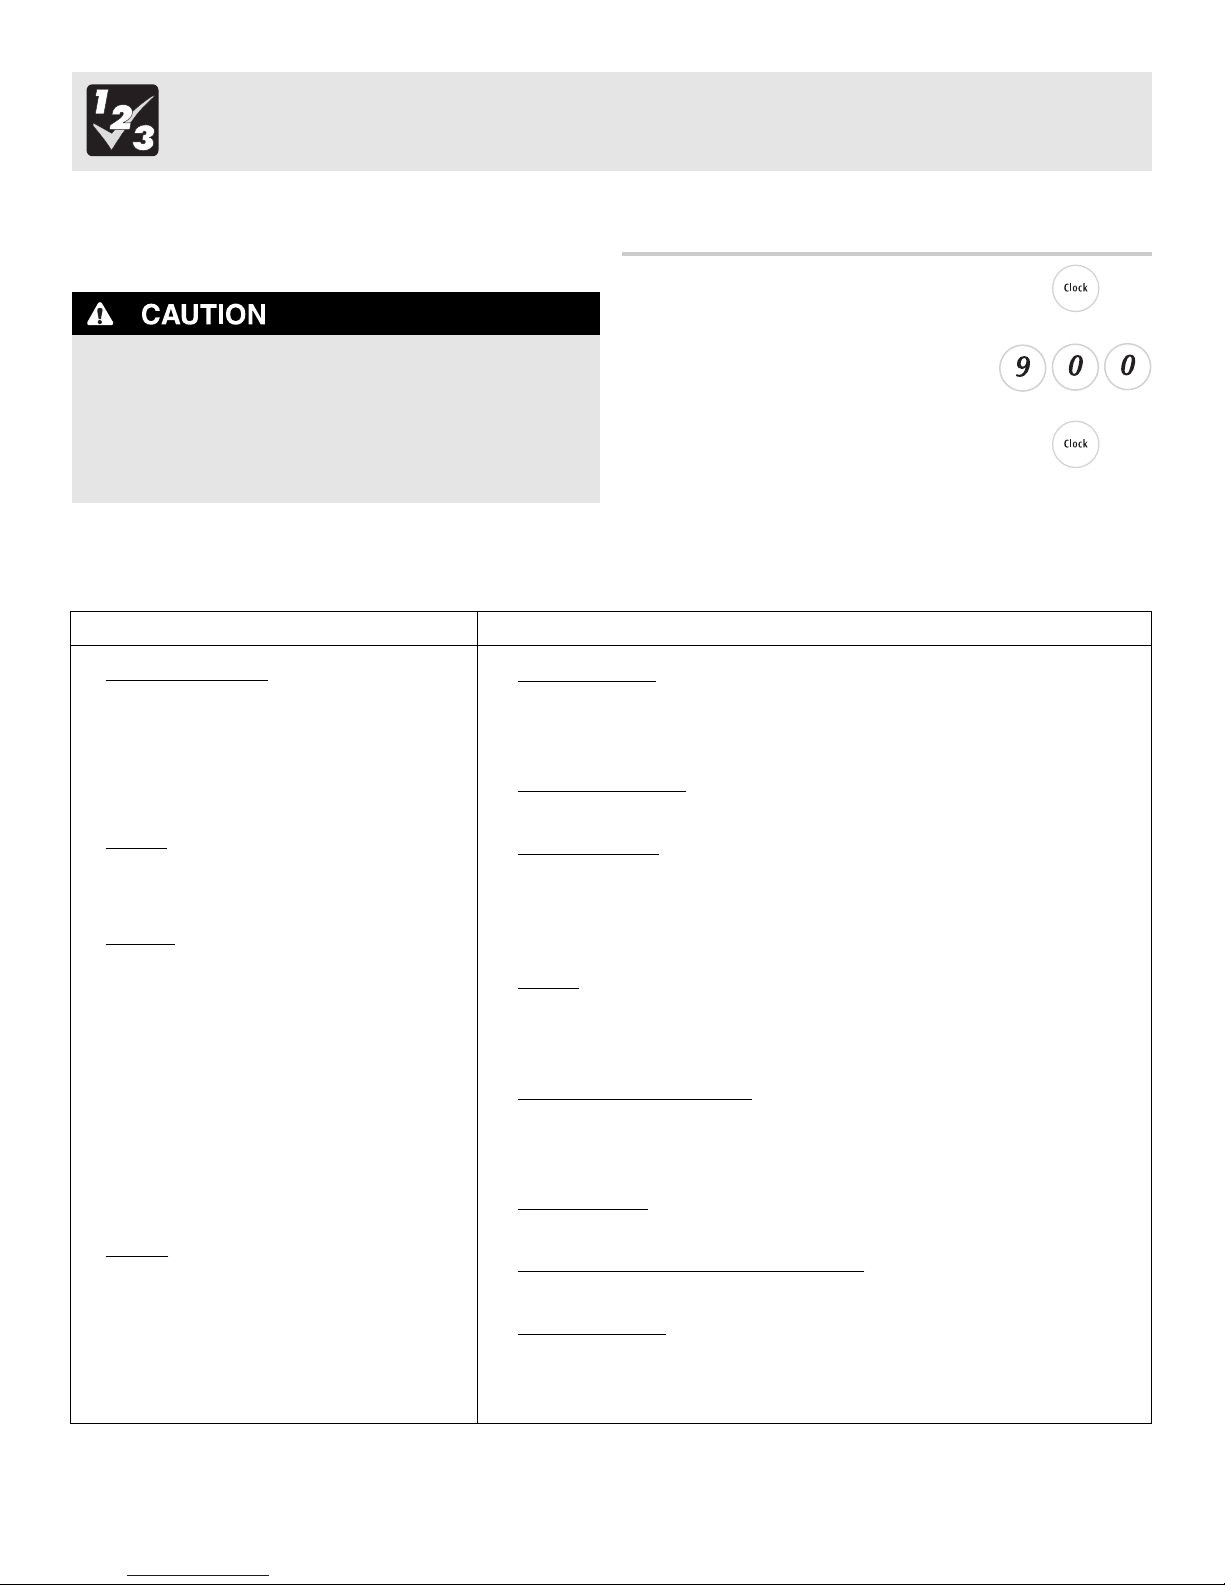
Setting the clock
Example: setting clock display for 9:00:
1. Touch Clock
touch twice for PM.
Enter time using number pads.
.
2
Clock
Touch
.
3
pad once for AM,
pad again.
Do not use
8

Manual Operation
Setting the timer
Example: setting timer for 5 minutes:
1. Touch Timer pad once.
2. Enter desired time using number pads.
3. Touch Timer pad.
When the timer has reached the end of set time, you will
hear beep alerts indicating the timer has run out.
Exhaust High / Low / Off
The exhaust ventilation moves steam and other cooking
vapors from the cooking surface of the range below the
microwave oven.
To operate the exhaust vent, Touch the
Exhaust High/Low/Off pad once for the
highest speed setting. Touch the pad again to
choose the Low speed setting and a 3rd time
to turn the exhaust ventilation off.
Note: If the temperature gets too hot around the microwave
oven, the fan in the exhaust vent hood will automatically turn
on at the LOW setting to cool the oven. The will
automatically turn off when the internal parts are cool. When
this occurs, the vent cannot be turned off.
Control Lock
You may lock the control panel to prevent the microwave
from being accidentally started or used by children.
The control lock feature is very useful when cleaning the
control panel. The lock will prevent accidental programming
when wiping the control panel clean.
Example: to set the control lock ON:
Touch and hold the Stop/Cancel pad for more
than 3 seconds. The Lock icon will appear in
the display window along with 2 beeps.
Example: to change the control lock from ON to OFF:
Touch and hold the Stop/Cancel pad for
more than 3 seconds. The Lock icon will
disappear in the display window.
hold for 3
seconds
hold for 3
seconds
Using EasySet
Microwave heating or cooking may be quickly set at 100%
power level for 1, 2 or 3 minutes. Use the number keys 1, 2
or 3 to choose the desired minutes of cook time (this option
will only work using the 1, 2 or 3 numeric pads):
Example: to quickly heat for 2 minutes at 100% power:
Surface Light / On / Off
Touch the Surface Light/On/Off pad
once for a cooking surface light. Press the
pad again to turn the light off.
Touch number pads 1, 2 or 3 for desired
minutes of cook time.
Note: the EasySet function cannot be set when using the
Defrost (by weight) feature.
9

Manual Operation
Heating with high power level
Example: to heat for 5 minutes at 100% power:
1. Press
2. Use the number pads to enter
3. Touch
When heating has finished you will hear 5 beeps and
"Good" will display.
Cook Time
desired heating time (cook time may
be set up to 99 minutes and 99
seconds).
START
pad.
pad.
Heating with lower power levels
Using the highest power level to heat foods with does not
always give the best results when some types of food need
slower cooking, such as roasts, baked goods or custards.
Your oven has nine other power levels you may choose.
Example: to heat for 4 minutes at 70% power:
1. Press
2. Use the number pads to enter desired
Cook Time.
heating time (cook time may be set
up to 99 minutes and 99 seconds).
Heating with multiple cooking stages
For best results, some microwave recipes call for different
power levels or different lengths of time for cooking. Your
microwave may be set to change from one stage to another
automatically (2 stages maximum).
Example: to cook food for 3 minutes at 80% power and
then 50% power for 6 minutes 30 seconds:
1. Press Cook Time.
2. Use the number pads to enter
heating time for the 1st stage (cook
time may be set up to 99 minutes
and 99 seconds).
3. Press Power Level pad once.
4. Use the number keys to enter power
level for the 1st stage.
in the display (80 % power).
5. Press Cook Time pad for 2nd
stage.
6. Use the number pads to enter
heating time for the 2nd stage (cook
time may be set up to 99 minutes
and 99 seconds).
7. Press Power Level pad for 2nd
stage.
PL8
appears
3. Press Power Level pad once for
power level 10 (100% power).
4. Use the number key to change the
appears in the
power level to 7.
display (70 % power).
5. Press
When heating has finished you will hear 5 beeps and
"Good" will display.
START
PL7
pad.
8. Use the number key to enter power
level for the 2nd stage. PL5 appears
in the display (50 % power).
9. Press
When heating has finished you will hear 5 beeps and
"Good" will display.
Note:
stage - 100% =10.
10
START
Power level must always be programmed for first
pad.

Manual Operation
Using the Pause key
If at anytime your microwave recipe would require that the
food be turned or require you to stop the microwave during
the cooking process you may do so after starting the
microwave with the START/Pause pad.
To pause the microwave during cooking:
1. Touch
2. Touch
Adding cook time (Plus 30 sec.)
This time-saving feature will let you quickly add 30 seconds
to any cook time already set when cooking at a 100%
power level. This feature may only be used while cooking
and with cook time remaining. Each press of this pad will
add 30 seconds to the cook time.
Example: to add 1 minute of cook time at the default
power level of 100%:
START/Pause
START/Pause
resume cooking.
pad once.
pad again to
Setting Defrost (by Weight)
Example: to defrost 1lb. of food with the default power
level and cook time determined automatically:
1. Press Defrost pad once. 0.0 will
appear in the display.
2. Use the numeric pads to input weight
of food to defrost in pounds (10 = 1lb.)
You may enter any weight from 0.3 to
6.0lbs.
3. Press
When defrosting has finished you will hear 5 beeps and
"Good" will display.
Note:
feature to start. A valid weight entry is 0.3 to 6.0 pounds.
START
The weight amount must be a valid entry for this
pad.
Setting Defrost (by Time)
Example: to defrost food with the default 30% power level
for 5 minutes:
Plus 30 sec.
Press
pad twice.
1. Press
2. Use the number pads to enter desired
3. Press START pad.
When heating has finished you will hear 5 beeps and "Good"
will display.
Note:
weight) or defrost (by time) because the defrost performance
will be adversely affected.
Defrost
appear in the display.
defrost time (defrost time may be set
up to 99 minutes and 99 seconds).
Power levels cannot be changed for both defrost (by
pad twice.
0:00
will
Special notes for defrosting by time
After pressing
•
count down remaining defrost time. The oven will beep
twice during the defrost cycle. At this time open the door
and turn the food if needed and remove any portions that
have already thawed. Touch the START/Pause key to
resume the defrost cycle.
START/Pause
key, the display will
• When heating has finished you will hear 5 beeps.
11

Manual Operation
Defrosting tips
When using the
•
entered should always be pounds (valid entries are from
0.3 to 6.0 pounds).
•
Use both
raw food items only. Defrosting gives best results when
food to be thawed is a minimum of 0°F (taken directly
from a true freezer). If the food has been stored in a
refrigerator-freezer that does not maintain a temperature
of 5° F or below, always program a lower food weight or
lower cook time to prevent cooking the food.
If the frozen food is stored outside the freezer for up to 20
•
minutes, enter a reduced cook time or weight.
defrost weight
defrost weight
Defrosting suggestions for meats
For best results, please read these suggestions when defrosting meats.
feature, the weight
defrost time
and
features for
• The shape of the package will alter the defrosting time.
Shallow rectangular food packets defrost more quickly
than a deep frozen block of food.
•
Separate pieces as they begin to defrost. Separated
frozen pieces of food defrost better.
Shield warm areas of food with small pieces of foil if they
•
start to become warm.
• You may use small pieces of aluminum foil to shield food
items like chicken wings, leg tips and fish tails, but do
not allow the foil to touch the oven cavity walls when
defrosting.
Meat
• Roast beef or pork
• Steaks, chops or fish
• Ground meat
• Whole chicken
• Chicken pieces
Normal amount
2.5 to 6 lbs.
(40 to 96 oz.)
0.5 to 3 lbs.
(8 to 48 oz.)
0.5 to 3 lbs.
(8 to 48 oz.)
2.5 to 6 lbs.
(40 to 96 oz.)
0.5 to 3 lbs.
(8 to 48 oz.)
Suggestions
Start with the food placed fat side down. After each stage, turn the
food over and shield any warm portions with narrow strips of aluminum
foil. Let stand, covered for 15-30 minutes.
After each stage, rearrange the food. If there are any warm or thawed
portions of food, shield them with narrow flat pieces of aluminum foil.
Remove any pieces of food that are nearly defrosted. Let stand,
covered for about 5 to 10 minutes.
After each stage, remove any pieces of food that are nearly defrosted.
Let stand, covered with foil for 5 to 10 minutes.
Remove giblets before freezing poultry. Start defrsoting with the
breast side down. After the 1st stage, turn the chicken over and
shield any warm portions with narrow strips of aluminum foil. After the
2nd stage, again shield any warm portions with narrow strips of
aluminum foil. Let stand, covered, for 30 to 60 minutes in the
refrigerator.
After each stage, rearrange or remove any pieces of food that are
nearly defrosted. Let stand for 10-20 minutes.
12

Reheat
Manual Operation
The reheat feature provides 3 quick preset settings based
on serving size to reheat food for your cooking convenience.
Example: to reheat 24 ounces of food.
1. Press Reheat pad 3 times to reheat
24oz. of food. 24oz will appear in the
display (see reheat category table).
2. Press START pad.
Reheat cooking suggestions
Reheat
Dinner plate
Directions
Use only pre-cooked, refrigerated foods. Cover plate with vented plastic wrap or
waxed paper, tucked under plate. If food is not as hot as you prefer after heating
with Reheat, continue heating using manual time and power level settings.
Contents: • 3-4 oz. met, poultry or fish (up to 6 oz. with bone)
• ½ cup starch (potatoes, pasta, rice, etc.)
• ½ cup of vegetables (about 3-4 oz.)
Reheat Category
8 ounces of food
16 ounces of food
24 ounces of food
Press
once
twice
3 times
1 serving
Display
8 oz
16 oz
24 oz
Amount
(1 plate)
Casserole
Pasta
Cover plate with lid or vented plastic wrap. If food is not as hot as you prefer after
heating with Reheat, continue heating using manual time and power level settings.
Stir foods once before serving.
Contents: • Casserole-refrigerated foods (for example beef stew or lasagna)
• Pasta-Canned spaghetti and ravioli, refrigerated foods.
1 to 4 servings
13

Manual Operation
Suggested power levels for cooking
The 10 power levels available with this microwave will help
you to adjust to the power output best suited for the food
type you are preparing. As with any food prepartion in the
microwave, it is best to follow the microwave instructions
that are printed on food packaging.
The table below provides suggested power levels for various
types of food that you can be prepare in the microwave.
10
9
Microwave
output
100 %
90 %
Use to prepare when:
• Boiling water.
• Cooking ground beef.
• Making candy.
• Cooking fresh fruits & vegetables
• Cooking fish & poultry.
• Preheating browning dish.
• Reheating beverages.
• Cooking bacon slices.
• Reheating meat slices quickly.
• Saute onions, celery & green
peppers.
Power
level
High
Suggestions for getting
the best results
To help you achieve the best possible results from your
microwave oven, read the following suggestions below;
• Storage temperature
Foods taken from the freezer or refrigerator take longer to
cook than the same foods would at room temperature.
• Size
Small pieces of food cook faster than large ones. Pieces
similar in size and shape will cook more evenly when
cooked together. For more even results, reduce the
power levels when cooking large pieces of food.
• Natural moisture
Very moist foods cook more evenly because microwave
energy heats water molecules very efficiently.
• Stirring
Stir foods such as casseroles and vegetable from the
outside to the center to distribute the heat more evenly.
This will allow the food to cook faster. Constant stirring is
not necessary.
8
80 %
• All reheating.
• Cooking scrambled eggs.
• Turn over items
Turn over foods such as pork chops, roasts or whole
cauliflower halfway through the cook time. This will help
7
6
70 %
60 %
• Cooking breads & cereal
products.
• Cooking cheese dishes & veal.
• Cakes, muffins, brownies &
cupcakes.
• Cooking pasta.
to expose all sides equally to microwave energy.
• Food placement
Place delicate areas of food items, such as asparagus
tips, toward the center of the turntable tray.
• Food arrangement
5
4
3
2
1
50 %
40 %
30 %
20 %
10 %
• Cooking meats & whole poultry.
• Cooking custard.
• Cooking spare ribs, rib roast &
sirloin roast.
• Cooking less tender cuts of meat.
• Reheating frozen packaged foods.
• Thawing meat, poultry & seafood.
• Cooking small quantities of food.
• Finish cooking casseroles, stew &
some sauces.
• Softening butter & cream cheese.
• Heating small amounts of food.
• Softening ice cream.
• Raise yeast dough.
Arrange unevenly shaped foods, such as chicken pieces
or salmon, with the thicker or meatier parts toward the
outside of the turntable tray.
• Let the food stand
After removing the food from the microwave, cover the
food with foil or a casserole lid and let it stand to finish
cooking. This will help the food finish in the center and
avoids overcooking the out edges, The length of stand
time depends on the density and surface area of the food
items.
• Wrapping in paper towels or waxed paper
Sandwiches and many other food types containing prebaked bread should be wrapped prior to placing in the
microwave to help prevent the food items fro drying out
while heating.
14

Convenience Operation
Popcorn
• DO NOT
popping corn.
The popcorn feature lets you pop 3 different commercially
packaged microwave popcorn sized bags. Use the table
below to determine the setting to use.
Amount
1.75 oz. (default setting)
3.0 oz.
3.5 oz.
Example: to pop a 3.0 oz. bag of popcorn automatically.
1. Press Popcorn pad (1, 2 or 3 times - refer
to table above to change for bag size).
leave micowave oven unattended while
Press popcorn pad
once
2 times
3 times
Beverage
The beverage feature heats 1, 2 or 3 cups of beverage. Use
the table below to determine the setting to use.
Amount
1 cup ( about 8.8 oz.)
2 cups (about 17.6 oz.)
3 cups (about 26.4 oz.)
Example: to heat 1 cup of a beverage.
1. Press Beverage pad (1, 2 or 3 times refer to table above to change number of
servings).
2. Press
The microwave will beep 5 times when finished.
START
pad.
Press beverage pad
once (default setting)
2 times
3 times
pad.
2. Press
The microwave will beep 5 times when finished.
START
Potato
The potato feature cooks 1, 2 or 3 (cooking times based on
8 to 24 oz.) potatoes automatically. Use the table below to
determine the setting to use.
Amount
1 potato (default setting)
2 potatoes
3 potatoes
Example: to cook 1 potato automatically.
1. Press Potato pad (1, 2 or 3 times - refer
to table above to change quantity).
2. Press START pad.
Press potato pad
once
2 times
3 times
The microwave will beep 5 times when finished.
Notes:
• Before cooking, pierce potatoes with fork several times.
• After cookings, let potatoes stand for 5 minutes.
15

Convenience Operation
Convenience cooking suggestions
Convenience category
Popcorn
Potato
Beverage
Amount
1.75,3.0,
3.5 oz.
1 pkg.
1,2,3
potatoes
8,16,24 oz.
1,2,3
cups
(8 oz,16 oz,
24 oz.)
Suggestions
Cook a single “microwave-only” bag of popcorn at a time. Use caution when
removing and opening the hot popcorn bag from the oven. Let microwave oven cool
down at least 5 minutes before using again.
Pierce each potato several times using a fork. Place on turntable in spoke-like
fashion. After cooking, let stand for 3-5 minutes. Let oven cool for at least 5
minutes before using again. Use the start/+30sec pad to increase cook time for
larger potatoes.
Use a microwave-safe measuring cup or mug; do not cover. Place the beverage in
the microwave. After heating, stir well. Let oven cool for at least 5 minutes before
using again. Beverages heated with the beverage category may be very hot.
Remove the container with care.
16

Cooking Charts
Cooking meat in your microwave
Be sure to place prepared meats on a microwave-safe roasting rack in a microwave-safe dish. Start cooking the meat fat
side down and if necessary, use narrow strips of aluminum foil to shield any bone tips or thin meat areas. After cooking,
check the temperature in several places before letting the meat stand the recommended time. Please note that the
temperatures in the following charts are temperatures at removal time; the temperature will rise during the standing period.
Meat
• Roast beef boneless
(up to 4 lbs.)
• Roast pork boneless
or bone-in
(up to 4 lbs.)
* Expect a 10° F rise in the temperature during the standing period.
Meat
• Beef
• Pork
• Poultry
Power level
High (10) for
first 5 minutes,
then medium (5)
High (10) for
first 5 minutes,
then medium (5)
Doneness
Medium
Well Done
Medium
Well Done
Dark meat
Light meat
Cook time
12-17 min./lb. for
160° F (Medium)
14-19 min./lb. for
170° F (Well Done)
15-20 min./lb. for
170° F
(Well Done)
Remove from oven
150° F
160° F
150° F
160° F
170° F
160° F
Directions
Place roast beef fat-side down on roasting
rack. Cover with wax paper. Turn over half way
through cooking. Let stand* 10-15 minutes.
Place roast pork fat-side down on roasting
rack. Cover with wax paper. Turn over half way
through cooking. Let stand* 10-15 minutes.
After standing (10-15 min.)
150° F
160° F
150° F
160° F
170° F
160° F
Cooking poultry in your microwave
Be sure to place poultry on a microwave-safe roasting rack in a microwave-safe dish. Cover poultry with wax paper to
prevent splattering. Use narrow strips of aluminum foil to shield any bone tips or thin meat areas, or areas that start to
overcook. After cooking, check the temperature in several places before letting the meat stand the recommended time.
Poultry
• Whole chicken
(up to 4 lbs.)
• Chicken pieces
(up to 4 lbs.)
Cook time/power level
Cook time: 7-10 min. /lb.
180° F dark meat
170° F dark meat
Power level: medium high (7)
Cook time: 7-10 min. /lb.
180° F dark meat
170° F dark meat
Power level: medium high (7)
Cooking eggs in your microwave
• Never cook eggs in the shell and never warm hardcooked eggs in the shell; they can explode.
• Always pierce whole eggs to keep them from bursting.
Directions
Place chicken breast-side down on roasting rack. Cover with wax
paper. Turn over half way through cooking. Cook until juices run
clear and meat near bone is no longer pink. Let stand for 5-10 min.
Place chicken bone-side down on dish, with thickest portions
toward the inside of dish. Cover with wax paper. Turn over half way
through cooking. Cook until juices run clear and meat near bone is
no longer pink. Let stand for 5-10 min.
• Cook eggs just until set; they will become tough if
overcooked.
17

Cooking Charts
Cooking vegetables in your microwave
• Vegetables should be washed just before cooking.
Rarely is extra water needed. If dense vegetables such
as potatoes, carrots and greens are being cooked, add
about ¼ cup of water.
• Small vegetables (sliced carrots, peas, lima beans, etc.)
will cook faster than larger vegetables.
• Whole vegetables, such as potatoes, acorn squash or
corn on the cob, should be arranged in a circle on the
turntable before cooking. The will cook more evenly if
turned over halfway through cooking.
• Always place vegetables like asparagus and broccoli
with the stem ends pointing towards the edge of the dish
and the tips toward the center.
Cooking seafood in your microwave
Place fish on a microwave-safe roasting rack in a microwave-safe dish. Be sure to always cook fish until it flakes easily
with a fork. Use a tight cover to steam fish; a lighter cover of wax paper or paper towel provides less steaming. And be sure
not to overcook fish; check it for doneness at a minimum cooking time before cooking longer.
• When cooking cut vegetables, always cover the dish with
a lid or vented microwavable plastic wrap.
• Whole, unpeeled vegetables such as potatoes, squash,
eggplant, etc., should have their skin pricked in several
locations before cooking to prevent them from bursting.
• For more even cooking, stir or rearrange whole
vegetables halfway through the cook time.
• Most of the time, the denser the food the longer the
required standing time. For example, a baked potato
should stand for 5 minutes before serving, while a dish of
peas may be served immediately.
Seafood
Fish steaks
Up to 1½ lbs.
Fish fillets
Up to 1½ lbs.
Shrimp
Up to 1½ lbs.
Cook time/power level
Cook time: 7-11 min./lb.
Power level: med-high (7)
Cook time: 4-8 min./lb.
Power level: med-high (7)
Cook time: 4-6½ min./lb.
Power level: med-high (7)
Directions
Arrange fish on roasting rack with meaty portions towards the outside of
rack. Cover with wax paper. Turn over and rearrange halfway through cook
time. Cook until fish flakes easily with fork. Let stand 3-5 mins.
Arrange fillets in a baking dish, thuring any thin pieces under. Cover with wax
paper. If over ½ inch thick, turn over and rearrange halfway through cook
time. Cook until fish flakes easily with fork. Let stand 2-3 mins.
Arrange shrimp in a baking dish without overlapping or layering. Cover with
wax paper. Cook until firm and opaue, stirring 2 or 3 times. Let stand 5 mins.
18

Care & Cleaning
Cleaning the exhaust filters
The oven ventilation exhaust filters should be removed and
cleaned often; generally at least once every month.
To avoid risk of personal injury or property damage, do
not operate oven hood without filters properly in place.
Surface lights
Front
Rear
Ventilation
filters
Surface light replacement
To avoid risk of personal injury or property damage, wear
gloves when replacing the light bulbs.
1. Unplug the microwave oven or turn off power at the main
circuit breaker.
2. Remove the bulb cover mounting screws at both light
positions under the microwave.
3. Replace bulb with 40 watt appliance bulb.
4. Replace bulb cover and mounting screw.
1. To remove the exhaust ventilation filters, slide the filter to
the rear. Then pull filter downward and push to the other
side. The filter will drop out. Repeat for the 2nd filter.
2. Soak the ventilation filters in hot water using a mild
detergent. Rinse well and shake to dry.
ammonia or wash in a dishwasher. The aluminum
on the filter will corrode and darken.
Do not use
5. Plug the microwave back into the power supply or turn
the power back on at the main circuit breaker.
3. To reinstall the exhaust ventilation filter, slide it into the
side slot, then push up and toward oven to lock.
Reinstall the 2nd filter using the same procedure.
19

Cleaning suggestions
Care & Cleaning
For best performance and for safety reasons, keep the oven
clean inside and outside. Take special care to keep the
inner door panel and oven fron frame free of food and grease
build-up.
Never use rough scouring powder or pads on the
microwave. Wipe the microwave oven inside and out with a
soft cloth and and warm (not hot) mild detergent solution.
Then rinse and wipe completely dry.
Wipe spatters immediately with a wet paper towel,
especially after cooking greasy foods like chicken or bacon.
Clean your microwave oven weekly or more often, if needed.
Follow these instructions to clean and care for your
microwave oven:
• Keep the inside (cavity) of the oven clean. Food particles
and spilled liquids can stick to the oven walls, causing
the oven to work less efficiently.
• Wipe up spills immediately. Use a damp, clean cloth
and mild soap. DO NOT use harsh detergents or
abrasive cleaners.
• Wash the oven door window with very mild soap and
water. Be sure to use a soft clean cloth to avoid
scratching.
• If steam accumulates inside or outside the oven door,
wipe with a soft cloth. Steam can accumulate when
operating the oven in high humidity and in no way
indicates microwave leakage.
• Never operate the oven without food in the oven cavity;
this can damage the magnetron tube or glass tray. You
may wish to leave a cup of water standing inside the oven
when it is not in use to prevent damage if the oven is
accidentally turned on.
• To help loosen baked-on food particles or liquids, heat 2
cups of water (add the juice of 1 lemon if you desire to
keep the oven fresh smelling) in a 4 cup measuring glass
at High power for 5 minutes or until boiling. Let stand in
oven cavity for 1 or 2 minutes.
• Remove the glass turntable tray from the oven when
cleaning the oven cavity or tray. To prevent the glass
turntable from breaking, handle with care and do not put
it in water immediately after cooking. Wash the turntable
tray in warm sudsy water or in the dishwasher.
• Clean the outside surface of the microwave with soap
and a clean damp cloth. Dry with a clean soft cloth. To
prevent damage to the operating parts of the oven, do not
let water seep into any vents or openings.
20

Troubleshooting guide
Before You Call
Solutions to Common Problems
If you have a problem you cannot solve, please do not
hesitate to call our service line:
Questions or for Service Call:
1-888-312-2117
Before you call a repair person for your microwave, check
the list below for possible easy solutions to some common
problems.
Neither the microwave’s display or oven operates -
• Properly insert the plug into a grounded power outlet.
• If the outlet is controlled by a wall switch, make sure the
wall switch is turned on.
• Remove the plug from the outlet, wait 10 seconds, then
plug the microwave in again.
• Reset the household circuit breaker or replace any blown
fuses.
• Plug a different appliance into the power outlet. If the
other appliance will not operate, have a qualified
electrician repair the outlet.
• Plug the microwave into a different power outlet.
The oven display works, but the oven will not operate -
• Make sure the oven door is closed securely and
completely.
• Check to see if packing material or other materials are
stuck to the door seal.
• Check for damage to the oven door.
• Press the STOP/cancel pad twice and attempt to re-
enter cooking instructions.
• Plug a different appliance into the power outlet. If the
other appliance will not operate, have a qualified
electrician repair the outlet.
• Plug the microwave into a different power outlet.
The power goes off before the cook time has elapsed -
• If there has been a power interruption, remove the plug
from the outlet; wait 10 seconds, then plug the
microwave in again. If there was a power outage, the
time indicator in the display will show 00:00.
• Reset the clock and any cooking instructions.
• Reset the household circuit breaker or replace any blown
fuses.
• Press the STOP/cancel pad twice and attempt to re-
enter cooking instructions.
• Plug a different appliance into the power outlet. If the
other appliance will not operate, have a qualified
electrician repair the outlet.
• Plug the microwave into a different power outlet.
Food is cooking too slowy -
• Make sure the oven is on a seperate 20 amp circuit line.
Operating another appliance on the same circuit can
cause a voltage drop. If necessary, move the microwave
to its own circuit.
You see sparks or arcing -
• Remove any metallic utensils, cookware or metal ties
from the oven cavity. If using aluminum foil, use only
narrow strips and allow at least one inch between the foil
and the interior oven walls.
The turntable makes noises or sticks -
• Clean the turntable, roller ring and oven cavity bottom.
• Make sure the turntable and roller ring are positioned
correctly.
Using your microwave causes TV or radio interference -
• This is similar to the interference caused by other small
appliances, such as hair dryers. Move your microwave
further away from other appliances, like your TV or radio.
Please note : If the oven is set to cook for more than 25
minutes at 100% power level, it will automatically adjust
itself to a 70% power level after 25 minutes to avoid
overcooking.
21

Notes
22

Notes
23

Major Appliance Warranty Information
Your appliance is covered by a one year limited warranty. For one year from your original date of
purchase, Electrolux will pay all costs for repairing or replacing any parts of this appliance that prove to be
defective in materials or workmanship when such appliance is installed, used and maintained in
accordance with the provided instructions.
Exclusions
This warranty does not cover the following:
1. Products with original serial numbers that have been removed, altered or cannot be readily determined.
2. Product that has been transferred from its original owner to another party or removed outside the USA or
Canada.
3. Rust on the interior or exterior of the unit.
4. Products purchased "as-is" are not covered by this warranty.
5. Food loss due to any refrigerator or freezer failures.
6. Products used in a commercial setting.
7. Service calls which do not involve malfunction or defects in materials or workmanship, or for appliances
not in ordinary household use or used other than in accordance with the provided instructions.
8. Service calls to correct the installation of your appliance or to instruct you how to use your appliance.
9. Expenses for making the appliance accessible for servicing, such as removal of trim, cupboards,
shelves, etc.,which are not a part of the appliance when it is shipped from the factory.
10. Service calls to repair or replace appliance light bulbs, air filters, water filters, other consumables, or
knobs, handles, or other cosmetic parts.
11. Surcharges including, but not limited to, any after hour, weekend, or holiday service calls, tolls, ferry trip
charges, or mileage expense for service calls to remote areas, including the state of Alaska.
12. Damages to the finish of appliance or home incurred during installation, including but not limited to
floors, cabinets, walls, etc.
13. Damages caused by: services performed by unauthorized service companies; use of parts other than
genuine Electrolux parts or parts obtained from persons other than authorized service companies; or
external causes such as abuse, misuse, inadequate power supply, accidents, fires, or acts of God.
DISCLAIMER OF IMPLIED WARRANTIES; LIMITATION OF REMEDIES
CUSTOMER’S SOLE AND EXCLUSIVE REMEDY UNDER THIS LIMITED WARRANTY SHALL BE PRODUCT
REPAIR OR REPLACEMENT AS PROVIDED HEREIN. CLAIMS BASED ON IMPLIED WARRANTIES,
INCLUDING WARRANTIES OF MERCHANTABILITY OR FITNESS FOR A PARTICULAR PURPOSE, ARE
LIMITED TO ONE YEAR OR THE SHORTEST PERIOD ALLOWED BY LAW, BUT NOT LESS THAN ONE YEAR.
ELECTROLUX SHALL NOT BE LIABLE FOR CONSEQUENTIAL OR INCIDENTAL DAMAGES SUCH AS
PROPERTY DAMAGE AND INCIDENTAL EXPENSES RESULTING FROM ANY BREACH OF THIS WRITTEN
LIMITED WARRANTY OR ANY IMPLIED WARRANTY. SOME STATES AND PROVINCES DO NOT ALLOW THE
EXCLUSION OR LIMITATION OF INCIDENTAL OR CONSEQUENTIAL DAMAGES, OR LIMITATIONS ON THE
DURATION OF IMPLIED WARRANTIES, SO THESE LIMITATIONS OR EXCLUSIONS MAY NOT APPLY TO
YOU. THIS WRITTEN WARRANTY GIVES YOU SPECIFIC LEGAL RIGHTS. YOU MAY ALSO HAVE OTHER
RIGHTS THAT VARY FROM STATE TO STATE.
If You Need
Service
This warranty only applies in the USA and Canada. In the USA, your appliance is warranted by Electrolux Major Appliances
North America, a division of Electrolux Home Products, Inc. In Canada, your appliance is warranted by Electrolux Canada
Corp. Electrolux authorizes no person to change or add to any obligations under this warranty. Obligations for service and
parts under this warranty must be performed by Electrolux or an authorized service company. Product features or
specifications as described or illustrated are subject to change without notice.
USA
1.888.312.2117
Electrolux Major Appliances
North America
P.O. Box 212378
Augusta, GA 30907
Keep your receipt, delivery slip, or some other appropriate payment record to establish the warranty period
should service be required. If service is performed, it is in your best interest to obtain and keep all receipts.
Service under this warranty must be obtained by contacting Electrolux at the addresses or phone
numbers below.
Canada
1.800.668.4606
Electrolux Canada Corp.
5855 Terry Fox Way
Mississauga, Ontario, Canada
L5V 3E4

Surface de cuisson à induction
Manuel d’utilisation et d’entretien
FRANÇAIS
Sears Canada Inc., Toronto, Ontario, Canada, M5B 2B8
www.sears.ca
318200641 (0607) Rev. A

Table des matières
Garantie sur appareil Kenmore Elite ............................ 2
MESURES DE SÉCURITÉ IMPORTANTES ................. 3 - 4
Enregistrement du produit ............................................. 4
Emplacement de la plaque signalétique ..................... 4
Caractéristiques de la surface de
cuisson à induction ................................................... 4 - 5
Messages des contrôleurs de la
surface de cuisson à induction ...................................... 6
Avant d’utiliser la surface de cuisson ...................... 7 - 9
Réglage des contrôles des zones de cuisson ......... 9 -12
• Comment utiliser les touches tactiles............................ 9
• Régler les zones de cuisson .................................... 9 -10
IMPORTANT:
Conservez une copie de votre facture. La date inscrite sur celle-ci sert à établir la période de couverture de la garantie, au
cas où vous devriez faire appel au service à la clientèle. Si un appel de service s'avérait nécessaire, alors que l'appareil est
encore couvert par la garantie, il se pourrait qu'on vous demande de présenter cette facture.
• Recommandations de préchauffage ..............................10
• Fonction “Garder chaud” ...............................................10
• Minuterie ...................................................................... 11
• Verrouillage des contrôles ............................................ 11
• Partage de la puissance ...............................................12
• Bruits de fond lors du fonctionnement...........................12
Entretien général & nettoyage ................................ 12-14
• Nettoyage des composantes
de la surface de cuisson .............................................. 12
• Netoyage et entretien de la surface de
cuisson en vitrocéramique ....................................... 13-14
Avant d’appeler ........................................................ 14-15
Contrats d’entretien.......................................................16
Garantie sur appareil Kenmore Elite
Garantie limitée d’un an
Si le produit est installé, utilisé et entretenu selon toutes les instructions fournies et qu’il présente un problème relié à un
défaut de fabrication ou à un vice de matériau au cours de l’année suivant la date d’achat, téléphonez au 1-800-LE-FOYER
pour obtenir une réparation gratuite de l’appareil. Si cet appareil est utilisé à d’autres fins que l’usage familial privé, cette
garantie est valide seulement pendant 90 jours suivant la date d’achat.
GARANTIE LIMITÉE DE CINQ ANS
Pendant la deuxième année jusqu’à la cinquième année à partir de la date d’achat, Sears s’engage à fournir les pièces
suivantes sans frais, si leur défaut est causé par une des raisons énumérées ci-dessous, dans la mesure où la cuisinière
est installée et utilisée selon le Guide d’installation et d’entretien. Le client doit défrayer les coûts de la main-d’oeuvre pour
l’installation.
• La table de cuisson en vitrocéramique, si le défaut est causé par un choc thermique.
• Les éléments de surface, s’ils présentent un défaut.
Cette garantie couvre seulement les défauts de fabrication ou les vices de matériau. Sears ne couvre PAS les frais reliés :
1. Aux articles consomptibles qui sont sujets à l’usure normale, incluant, sans en exclure d’autres, filtres, courroies,
ampoules, et sacs.
2. À la visite d’un réparateur pour démontrer l’installation, l’utilisation et l’entretien appropriés de l’appareil.
3. À la visite d’un réparateur pour nettoyer ou entretenir l’appareil.
4. Aux dommages ou pannes causés par une mauvaise installation, utilisation ou entretien qui n’ont pas été effectués selon
toutes les instructions fournies avec ce produit.
5. Aux dommages ou pannes causés par un accident, un abus, une mauvaise utilisation ou toute utilisation autre que celle
pour laquelle il a été conçu.
6. Aux dommages ou pannes causés par l’utilisation de détergents, nettoyants, produits chimiques ou accessoires autres
que ceux recommandés dans toutes les instructions fournies avec ce produit.
7. Aux dommages affectant les pièces ou les systèmes ou aux pannes causés par des modifications du produit non
autorisées.
Exonération de garanties implicites; limitations des recours
L’unique recours du client en vertu de cette garantie limitée est la réparation du produit comme décrit précédemment. Les
garanties implicites, y compris les garanties implicites de qualité marchande et d’adaptation à un usage particulier sont
limitées à un an ou à la période la plus courte permise par la loi. Sears ne peut être tenu responsable des dommages directs
et indirects. Certains États et certaines provinces ne permettent pas de restriction ou d’exemption sur les dommages
directs ou indirects, ou de restriction sur les garanties implicites de qualité marchande ou d’adaptation à un usage
particulier. Dans ce cas, ces restrictions ou exemptions pourraient ne pas être applicables.
Cette garantie est valide seulement si ce produit est utilisé aux États-Unis ou au Canada.
Cette garantie vous donne des droits juridiques spécifiques et vous pouvez aussi bénéficier d’autres droits qui varient d’un
État à un autre, ou d’une province à une autre.
Sears Roebuck and Co., Dept. 817WA Hoffman Estates, IL 60179, ÉTATS-UNIS
Sears Canada Inc., Toronto, Ontario, Canada M5B 2B8
Imprimé aux États-Unis
2
MC

Mesures de sécurité importantes
Lisez ces instructions avant d'utiliser l'appareil. Conservez ce manuel pour référence future.
Ce guide contient des instructions et symboles de sécurité importants. Veuillez faire particulièrement attention à ces
symboles et suivre les instructions données. Voici une brève explication de ces symboles.
Ce symbole vous prévient des situations qui risquent d'entraîner de graves blessures, la mort ou des
dommages matériels.
Ce symbole vous prévient des situations pouvant entraîner des blessures ou dommages matériels.
Cet appareil a été testé et est conforme aux restrictions des
dispositifs digitaux de classe B, exigées à la Partie 18 des
règlements de la FCC. Ces restrictions ont été établies pour
procurer une protection raisonnable contre les interférences
nocives à l’intérieur d’installations résidentielles. Cet appareil
génère, utilise et peut émettre des fréquences radio qui
peuvent causer des interférences avec les appareils
récepteurs, s’il n’est pas installé conformément aux
instructions d’installation. Cependant il n’y a pas de garantie
que ce type d’interférence ne se produira pas dans un certain
type de résidence. Si cet appareil cause des interférences
nuisant à la réception de la radio ou de la télévision, lesquelles
ont été identifiées en allumant et éteignant l’appareil, l’usager
est invité à essayer de corriger la situation en suivant une ou
plusieurs des suggestions suivantes :
• Réorienter ou déplacer l’antenne de réception.
• Augmenter la distance entre la surface de cuisson et
l’appareil récepteur.
• Brancher la surface de cuisson dans une autre prise ou
un circuit différent de celle ou celui utilisé par l’appareil
récepteur.
Les personnes possédant un stimulateur
cardiaque ou autre dispositif médical semblable doivent faire
attention lorsqu’ils utilisent ou lorsqu’ils se trouvent à proximité
d’un appareil à induction en fonction. Le champ
électromagnétique créé par l’appareil peut affecter le
fonctionnement du stimulateur cardiaque ou autre dispositif
médical. Consultez votre médecin ou le manufacturier du
dispositif médical pour lui parler de votre situation particulière.
• Enlevez tout le ruban et le matériau d'emballage
avant d'utiliser l'appareil. Détruisez le cartonnage et
les sacs en plastique après le déballage de
l'appareil. Ne laissez jamais les enfants jouer avec le
matériau d'emballage.
• Installation: Assurez-vous que l'appareil est
correctement installé et mis à la terre par un
technicien qualifié, conformément à la dernière
édition de la norme n° 70 ANSI/NFPA du “National
Electrical Code” aux États Unis, ou au Canada, à la
norme C22.1 de l'ACNOR, code canadien de
l'électricité, partie 1, ainsi qu'aux codes de la région.
N'installez l'appareil que selon les instructions
d'installation fournies dans la documentation.
• Installation. Sachez comment couper le courant
électrique de l'appareil à la boîte de fusibles ou au
coupe-circuit en cas d'urgence.
• Entretien par l'usager. Ne réparez pas ou ne
remplacez pas des pièces de l'appareil à moins
d'une recommandation précise dans les guides.
Toutes les réparations doivent être faites par un technicien
qualifié afin de réduire les risques de blessure et de
dommage à l'appareil. Sears pièces et service est le
centre de réparation recommandé pour cet appareil.
• Ne modifiez jamais l'appareil, que ce soit en enlevant
des panneaux, protège fils ou toutes autres pièces
permanentes.
• Rangement sur l'appareil: ne rangez pas des
matériaux inflammables près des éléments de
surface. Ceci inclut des papiers, plastiques, tissus, livres
de cuisine, objets en plastique et torchons, ainsi que des
liquides inflammables. N'y posez pas ou n'y rangez pas des
produits explosifs comme une bombe aérosol. Les produits
inflammables pourraient exploser et allumer un feu ou
causer des dommages matériels.
Ne rangez pas des articles pouvant
intéresser les enfants dans les armoires au-dessus de
l'appareil.
• Ne laissez pas les enfants seuls ou sans surveillance
dans un lieu où un appareil fonctionne. Ne les laissez
jamais s'asseoir ou se tenir debout sur l'appareil.
NE TOUCHEZ PAS AUX ZONES DE
CUISSON OU AUX SURFACES À PROXIMITÉ DE CELLESCI. Les zones de cuisson peuvent être chaudes à cause de la
chaleur résiduelle et ce, même si elles sont de couleur foncée.
Les régions près de ces zones peuvent devenir suffisamment
chaudes pour causer des brûlures. Pendant et après toute
utilisation, ne touchez pas et ne laissez pas les vêtements ou
autres produits inflammables entrer en contact avec ces zones,
à moins qu’elles n’aient eu le temps de se refroidir.
N'utilisez jamais votre appareil
pour réchauffer ou chauffer une pièce.
• Portez des vêtements appropriés. Ne portez jamais
de vêtements amples ou flottants en utilisant cet
appareil. Ne laissez pas les matériaux inflammables et
les vêtements venir en contact avec des surfaces chaudes.
• N'éteignez pas les feux de friture avec de l'eau ou de
la farine. Étouffez les feux avec un couvercle ou du
bicarbonate de soude ou avec un extincteur à poudre
sèche ou à mousse.
• En chauffant de l'huile ou de la graisse, restez près de
l'appareil. La graisse et/ou l'huile peuvent prendre feu si
elles devenaient trop chaudes.
• N'utilisez que des gants isolants secs. Des gants
mouillés ou humides en contact avec des surfaces
chaudes peuvent causer des brûlures par la vapeur.
Ne laissez pas les gants isolants toucher les éléments. Ne
vous servez pas de torchon ni de chiffon à la place d'un
gant isolant.
• Ne réchauffez pas des contenants non ouverts.
L'accumulation de pression peut faire exploser le
contenant et causer des blessures.
3
FRANÇAIS

Mesures de sécurité importantes
INSTRUCTIONS DE SÉCURITÉ
IMPORTANTES POUR L'UTILISATION DE
VOTRE TABLE DE CUISSON À INDUCTION
• Vous devez savoir quel contrôle commande chacun
des éléments de la surface de cuisson.
• Nettoyez souvent votre appareil pour enlever la
graisse sur toutes ses parties car cette graisse risque
de prendre feu. Le ventilateur de la hotte et les filtres de
graisse doivent demeurer propres en tout temps. Ne
laissez pas la graisse s'y accumuler. Les accumulations
de graisse dans le ventilateur pourraient prendre feu.
Mettez le ventilateur en marche lorsque vous faites
flamber des aliments. Reportez-vous aux instructions du
fabricant sur le nettoyage de la hotte.
• Utilisez la grosseur de casseroles appropriée. Cet
appareil est équipé de ZONES DE CUISSON de
différentes grosseurs. Choisissez les ustensiles ayant un
dessous plat, assez large pour recouvrir la zone de
cuisson. Le capteur magnétique ne permettra pas à la
zone de cuisson de fonctionner sans ustensile.
• Les poignées des ustensiles doivent être tournées
vers l'intérieur, sans surplomber les zones de
cuisson adjacentes, afin de réduire les risques de
brûlures, de combustion et de renversement causés par le
contact involontaire avec un ustensile.
• Ne laissez jamais les zones de cuisson en marche
sans surveillance. Les débordements peuvent causer de
la fumée, les éclaboussures de graisse sont susceptibles
de prendre feu et les ustensiles dont le contenu s'est
évaporé peuvent fondre.
• Protecteur. N'utilisez pas de papier d'aluminium pour
recouvrir quelque partie que ce soit de la table de
cuisson. Utilisez le papier d'aluminium seulement pour
recouvrir les aliments lors de la cuisson tel qu'indiqué
dans les recettes. Toute autre utilisation de protecteurs
ou de papier d'aluminium est susceptible de causer un
choc électrique, un feu ou un court-circuit.
• Ustensiles vitrifiés. En raison des brusques
changements de température, on ne peut utiliser avec la
surface de cuisson que certains ustensiles en verre, en
vitrocéramique, en céramique ou en terre cuite ou autres
ustensiles vitrifiés, sans risquer qu'ils se fendent. Vérifiez
les recommandations du fabricant quant à leur utilisation
sur une surface de cuisson.
• Hotte de ventilation - La hotte de ventilation installée au-
dessus de votre appareil devrait être nettoyée
régulièrement. Ceci empêchera la graisse provenant de la
vapeur de cuisson de s’accumuler sur la hotte ou ses
filtres.
POUR SURFACE DE CUISSON EN
VITROCÉRAMIQUE SEULEMENT
• Ne cuisinez pas ou ne nettoyez pas une surface de
cuisson brisée. Si la surface de cuisson se brise, les
solutions nettoyantes et les éclaboussures peuvent
pénétrer dans la plaque de cuisson brisée, et créer un
risque de choc électrique. Communiquez avec un
technicien qualifié immédiatement.
• Nettoyez soigneusement la surface de cuisson. Si
une éponge ou un chiffon humide est utilisé pour essuyer
des renversements sur une surface chaude, faites
attention afin d'éviter de vous brûler par la vapeur. Certains
nettoyants peuvent produire de la fumée nocive s'ils sont
appliqués sur une surface chaude.
• Ne déposez pas d'ustensiles chauds sur la vitre
froide de la table de cuisson. Cela pourrait la briser.
• Ne faites pas glisser les plats sur la surface
vitrocéramique. Ils peuvent causer des éraflures en
surface.
• Ne laissez pas les plats s’évaporer à sec - Ceci peut
causer des dommages permanents tels que bris, fusion ou
marques sur la surface vitrocéramique. (Ce type de
dommage n’est pas couvert par la garantie).
Enregistrement du produit
Numéro du modèle: ________________________________
Numéro de série: __________________________________
Date de l’achat: ___________________________________
LIRE ET CONSERVER CES INFORMATIONS.
Conserver votre reçu d’achat pour référence future
Caractéristiques de la surface de cuisson à induction
SURFACE DE CUISSON PLUS FROIDE - Une caractéristique unique à la surface de cuisson à induction est qu’elle de-
meure beaucoup plus froide qu’une surface de cuisson en vitrocéramique régulière.
Les zones de cuisson peuvent paraître froides lorsqu’elles sont en fonction ou après avoir été éteintes.
Attention, la surface de cuisson peut être CHAUDE et causer des brûlures. Cette chaleur provient des ustensiles et est
transférée à la surface de cuisson par ces derniers.
CAPTEURS MAGNÉTIQUES - Des capteurs détectent automatiquement si l’ustensile est magnétique et préviennent les
mises en marche accidentelles des zones de cuisson.
DÉTECTION DE LA DIMENSION DE L’USTENSILE - Des capteurs détectent automatiquement et adaptent les zones de
cuisson à la dimension de l’ustensile utilisé.
EFFICACITÉ - La surface de cuisson à induction chauffe plus rapidement en utilisant moins d’énergie. Ce processus de
cuisson procure une ébullition plus rapide.
Emplacement de la plaque
signalétique
La plaque signalétique est
située sous le châssis de la
surface de cuisson
4

Caractéristiques de la surface de cuisson à induction
LIRE CES INSTRUCTIONS ATTENTIVEMENT AVANT D’UTILISER L’APPAREIL
I
I
N
D
U
C
T
I
O
N
N
D
U
C
T
I
O
N
I
N
D
U
C
T
I
O
1
I
N
D
U
C
T
I
O
N
N
5
3
I
N
D
U
C
T
I
O
N
4
2
FRANÇAIS
11
67 9
On/Off On/Off On/Off On/Off On/Off
8
Fig 1.
Contrôleur principal de
11
6 7 8 9 10
la surface de cuisson
16
13
23
10
Contrôleur de la zone de
cuisson (à 5 endroits)
20
18
17
Fig 2.
1. Zone de cuisson arrière gauche.
2. Zone de cuisson avant gauche.
3. Zone de cuisson arrière droite.
4. Zone de cuisson avant droite.
5. Zone de cuisson centrale.
6. Contrôleur de la zone de cuisson avant gauche.
7. Contrôleur de la zone de cuisson arrière gauche.
8. Contrôleur de la zone de cuisson centrale.
9. Contrôleur de la zone de cuisson arrière droite.
10. Contrôleur de la zone de cuisson avant droite.
11. Contrôleur principal de l’appareil (Fig. 2).
12. Touche de mise en marche de l’appareil.
13. Lampe témoin de mise en marche.
14. Touche de réglage de la fonction “Garder chaud”.
(Voir pages 6 et 10).
15. Touche de la fonction “Verrouillage des
commandes” (pp. 6 & 11).
1415
12
2122
19
Fig 3.
16. Lampe témoin de la fonction “Verrouillage des commandes”
(Voir pp. 6 & 11).
17. Touches flèches ascendante et descendante de la fonction
“Minuterie” (p.11).
18. Écran de la fonction “Minuterie” (affiche jusqu’à 99 minutes - p.
11).
19. Touche de la fonction “Mise en marche/arrêt” de la zone de
cuisson (une touche pour chaque zone de cuisson).
20. Lampe témoin de la fonction “Mise en marche/arrêt” de la zone
de cuisson (une touche pour chaque zone de cuisson).
21. Touche flèche ascendante pour régler la puissance de la zone
de cuisson (une touche pour chaque zone de cuisson).
22. Touche flèche descendante pour régler la puissance de la zone
de cuisson (une touche pour chaque zone de cuisson).
23. Écran pour l’affichage de la puissance de la zone de cuisson
(un écran pour chaque zone de cuisson).
5

Messages des contrôleurs de la surface de cuisson à induction
Messages de l’écran ou témoins lumineux du contrôleur principal
VERROUILLAGE DES COMMANDES- Cette caractéristique permet de verrouiller les contrôles
de la surface de cuisson et ce seulement lorsqu’elle est en position arrêt. Touchez et
maintenez la touche VERROUILLAGE pendant 5 secondes. Un signal sonore se fait entendre
et le témoin lumineux s’allume (Fig. 5). Une fois les contrôles verrouillés, aucun écran et
Fig. 4 Fig. 5
Fig. 6 Fig. 7
aucune zone ne pourront être activés. Pour annuler la caractéristique verrouillage, touchez et
maintenez la touche VERROUILLAGE pendant 5 secondes. Un signal sonore se fait entendre,
le témoin lumineux s’éteint (Fig. 4) et la surface de cuisson peut alors être utilisée (Voir la
page 11 pour plus d’instructions).
MISE EN MARCHE DE L’APPAREIL- La touche de mise en marche (POWER) de la surface de
cuisson démarre l’appareil. Pour allumer la surface de cuisson, touchez et maintenez la touche
POWER (mise en marche) pendant 2 secondes. Un signal sonore se fait entendre et le témoin
lumineux s’allume (Voir Fig. 7). La surface de cuisson est prête à être utilisée. Si aucune fonction
n’est activée pendant les 10 secondes qui suivent, la surface de cuisson s’éteint
automatiquement. Pour éteindre la surface de cuisson, touchez et maintenez la touche POWER
pendant 1 seconde. Un signal sonore se fait entendre et le témoin lumineux s’éteint (Voir fig. 6).
Fig. 8 Fig. 9
Fig. 10 Fig. 11
Fig. 12 Fig.13
NIVEAUX DE PUISSANCE - Chaque zone de cuisson a son propre écran. Les zones de cuisson possèdent
15 niveaux de puissance. Lesquels sont
Fig. 14
les puissances suivantes
PP
est
P ou “Amplificateur de puissance” laquelle fournit 125% du niveau de puissance le plus élevé pendant
PP
10 minutes (Voir fig.13). Chaque fois qu’une des touches flèches est touchée (ou qu’elle est maintenue), tous
les niveaux de puissance défilent (voir pages 9-11 pour les instructions complètes).
Codes d’erreur E00 à E11 - Les écrans des zones de cuisson affichent
du contrôleur principal affiche des chiffres (Fig. 9) en même temps, ceci indique un code
d’erreur. Pour le service après vente téléphonez au 1-800-LE-FOYER® (Voir les numéros de
téléphone dans ce manuel).
EE
E
(Fig. 8) et l’écran
EE
Messages des écrans ou témoins lumineux des contrôleurs des zones
de cuisson
TOUCHE MISE EN MARCHE DE LA ZONE DE CUISSON - Chacune des zones de cuisson
possède une touche de mise en marche (ON/OFF). Une fois l’appareil mis en marche,
touchez la touche de mise en marche (ON/OFF) de la zone de cuisson désirée.
l’écran. Si la touche flèche ascendante ou la touche flèche descendante, qui correspond à la
zone de cuisson activée, n’est pas touchée dans les 5 secondes qui suivent, la zone de
cuisson et la surface de cuisson s’éteignent. Pour régler la puissance, touchez une fois la
touche flèche ascendante ou la touche flèche descendante qui correspond à la zone de
cuisson utilisée. Le témoin lumineux de la surface de cuisson s’allume (Fig. 11). Pour éteindre
la zone de cuisson, touchez la touche de mise en marche (ON/OFF) une fois. Le témoin
lumineux s’éteint (Fig. 10).
2. 2.
2. (2.5),
2. 2.
1 1
1 (Fig. 12),
1 1
3. 3.
3. (3.5),
3. 3.
4. 4.
4. (4.5),
4. 4.
22
33
44
3,
33
4,
44
55
5,
55
2,
22
5. 5.
5. (5.5) et
5. 5.
66
77
88
6,
66
6. 6.
6. (6.5; voir Fig. 14). La plus haute puissance
6. 6.
99
7,
8,
9; incluant des demis niveaux pour
77
88
99
00
0 apparaît à
00
CHALEUR RÉSIDUELLE - Lorsqu’une zone de cuisson a été utilisée et éteinte,
Fig. 15
Fig. 16
Fig. 17
l’écran de cette zone si cette dernière est trop chaude. Le message
de cuisson ait suffisamment refroidi.
Les zones de cuisson peuvent paraître froides lorsqu’elles sont en fonction ou après avoir été
éteintes. Attention, la surface de cuisson peut être CHAUDE et causer des brûlures. Cette chaleur provient
des ustensiles et est transférée à la surface de cuisson par ces derniers.
GARDER CHAUD - Utiliser la touche WARM (ou LOW) pour activer la fonction GARDER CHAUD sur
n’importe quelle zone de cuisson. La zone de cuisson désirée doit être mise en marche, ensuite touchez une
fois la touche WARM qui se trouve avec les touches du contrôleur principal.
zone de cuisson correspondante (Voir fig. 16 & page 10 pour les informations complètes).
DETECTION D’USTENSILE - Chaque zone de cuisson possède un détecteur d’ustensile. Le message
fig. 17) apparaît à l’écran de la zone de cuisson activée si cette dernière ne détecte pas d’ustensile parce qu’il
a été bougé, qu’il n’est pas correctement centré, ou qu’il n’est pas fait d’un matériau magnétique.
HH
H (Voir fig. 15) apparaît à
HH
HH
H demeure affiché jusqu’à ce que la zone
HH
LL
L (LOW) apparaît à l’écran de la
LL
FF
F (Voir
FF
6

Avant d’utiliser la surface de cuisson
UTILISER LE TYPE D’USTENSILE ADÉQUAT - Le capteur magnétique de la zone de
cuisson situé sous la surface de cuisson requiert l’utilisation d’ustensile de cuisson fait
de matériau magnétique pour débuter le processus de chauffage.
Au moment de l’achat d’ustensiles, choisissez des ustensiles spécialement identifiés par
le fabricant pour l’utilisation sur les tables de cuisson à induction. Si vous n’êtes pas
certain, utilisez un aimant pour vérifier si l’ustensile fonctionnera sur une table à induction.
Si l’aimant est attiré et colle au fond de l’ustensile, ceci indique que le type de matériel de
l’ustensile est adéquat pour la cuisson sur les appareils à induction (Voir fig. 18).
Il est recommandé de toujours utiliser des ustensiles en acier inoxydable lourds, de qualité supérieure sur la surface de
cuisson à induction. Ceci réduit grandement le risque d’endommager la surface de vitrocéramique.
Tous les ustensiles, peut importe la qualité, peuvent égratigner la surface s’ils sont glissés. Ils doivent en tout temps être
soulevés pour être déplacés. Avec le temps, le fait de glisser les ustensiles sur la surface de vitrocéramique changera
l’apparence de cette dernière. Éventuellement, l’accumulation d’égratignures ou de marques métalliques rendra le
nettoyage de la surface de cuisson difficile et son apparence en sera affectée.
Dimension minimale requise des ustensiles pour chaque zone de cuisson
Moulure décorative
Fig. 18
NOTE: Le fond de
l’ustensile ne doit pas
excéder la zone de
cuisson de plus de 1/2”
(13mm).
On/Off On/Off On/Off On/Off On/Off
FRANÇAIS
Moulure
décorative
Zone de cuisson
avant gauche
Zone de cuisson
arrière gauche
UTILISER UN USTENSILE DE DIMENSION APPROPRIÉE - Les zones de cuisson requièrent des ustensiles de dimension
MINIMALE différente, vérifiez chacune des zones pour connaître la dimension minimale acceptée (Fig. 19). L’anneau
intérieur dessiné sur la surface de cuisson est le guide, l’ustensile doit avoir une circonférence MINIMALE égale à cet
anneau. Le fond de l’ustensile doit recouvrir complètement cet anneau pour permettre un bon fonctionnement de la zone de
cuisson.
L’anneau plus grand dont la ligne est plus épaisse aide à déterminer la dimension MAXIMALE que l’ustensile doit avoir.
Centrez l’ustensile et assurez-vous que ce dernier ne dépasse pas de plus de 1/2" (13mm) la ligne plus épaisse de la zone
de cuisson (voir l’exemple à la figure 19). L’ustensile doit être en contact DIRECT avec la surface de vitrocéramique. Il ne
doit pas toucher aux moulures décoratives de l’appareil (illustré à la figure 19).
NOTE: Si un ustensile de matériau adéquat et correctement centré mais TROP PETIT est utilisé sur une zone de cuisson,
l’écran de cette zone affichera le code d’erreur F et l’ustensile ne chauffera pas.
Zone de cuisson
au centre
7
Zone de cuisson
arrière droite
Zone de cuisson
avant droite
Fig. 19

Avant d’utiliser la surface de cuisson
Utiliser des ustensiles de qualité
en bonne condition
Le fond des ustensiles utilisés sur la
surface de cuisson à induction doit être plat
afin d’avoir un bon contact avec la surface
de cuisson. Vérifiez si le fond de l’ustensile
est plat en faisant tourner une règle sur ce
dernier. Il ne devrait pas y avoir d'espace
entre l’ustensile et la règle (Figure 21).
Assurez-vous de suivre les
recommandations pour l'utilisation
d'ustensiles de cuisine comme indiqué à la
figure 20.
De plus, rappelez-vous:
• d’utiliser des ustensiles faits de matériau
adéquat pour les surfaces de cuisson à
induction (Voir la figure 18).
• d’utiliser des ustensiles de bonne qualité
avec des fonds solides ce qui permettra
d’obtenir une meilleure distribution de la
chaleur et des résultats de cuisson plus
homogènes.
• que la taille de l’ustensile doit
correspondre à la quantité d’aliments à
faire cuire.
• de ne pas laisser les plats s’évaporer
à sec - Ceci peut causer des dommages
permanents tels que bris, fusion ou
marques sur la surface vitrocéramique.
(Ce type de dommage n’est pas couvert
par la garantie).
• de ne pas utiliser des ustensiles souillés
avec des dépôts de graisse. Utilisez
toujours des ustensiles faciles à nettoyer.
Ustensiles recommandés pour surfaces de
cuisson à induction
INCORRECT CORRECT
• Non centré sur la zone de
cuisson.
• Fond incurvé et déformé.
Dimension min.
• L’ustensile est plus petit que la
grandeur minimale requise pour la
zone de cuisson utilisée. (Voir fig.
19).
• Correctement centré sur la zone
de cuisson.
• Fond plat et côtés droits.
Dimension min.
• L’ustensile est de diamètre
semblable ou supérieur à la zone
de cuisson (Voir fig. 19).
Fig. 21
Les zones de cuisson
peuvent paraître froides lorsqu’elles sont en
fonction et après avoir été éteintes. Atten-
tion, la surface de cuisson peut être
CHAUDE et causer des brûlures. Cette
chaleur provient des ustensiles et est
transférée à la surface de cuisson par ces
derniers.
NE TOUCHEZ PAS LES
USTENSILES CHAUDS avec les mains
nues. Utilisez toujours des gants isolants
afin de protéger vos mains de toutes
brûlures.
NE GLISSEZ PAS
d’ustensiles sur la surface de cuisson.
Ceci pourrait causer des dommages
permanents à la surface en vitrocéramique.
• L’ustensile est déposé sur la
moulure ou n’est pas complètement
déposé sur la zone de cuisson.
• La poignée est trop lourde et fait
basculer l’ustensile.
NOTEZ que l’une ou l’autre des conditions incorrectes énumérées ci
haut sera détectée par le capteur situé sous la surface de cuisson en
vitrocéramique. Si l’ustensile ne rencontre pas une de ces conditions,
une ou plusieurs zones de cuisson ne fonctionneront pas et l’écran de
la zone ou des zones concernée(s) affichera(ont)
corriger le problème avant d’essayer de réactiver la zone de cuisson.
8
• L’ustensile repose complètement
sur la zone de cuisson.
• L’ustensile est bien équilibré.
Fig. 20
FF
F. Vous devez donc
FF

Avant d’utiliser la surface de cuisson
Avant d’utiliser votre table de cuisson pour la première fois, appliquez la crème de nettoyage pour table de cuisson
recommandée sur la surface en vitrocéramique (visitez notre site internet www.sears.com pour commander de la crème
nettoyante de remplacement, le numéro de l’item est 40079). Frottez avec un linge ou un tampon anti-rayures non abrasif.
Ceci facilitera le nettoyage des résidus de cuisson. La crème de nettoyage spéciale pour table de cuisson laisse un fini
protecteur qui permet d’éviter les égratignures et les éraflures.
Réglage des contrôles des zones de cuisson
Comment utiliser les touches tactiles
La façon recommandée d’utiliser les touches tactiles est montrée à la figure 22.
Assurez-vous que votre doigt est bien placé au centre de la touche tel que montré.
Si le doigt n’est pas bien placé, au centre de la touche, les contrôles ne
répondront pas à la demande.
Touchez légèrement la touche avec la portion plate du doigt. N’utilisez pas
seulement l’extrémité du doigt
Fig. 22
Régler les zones de cuisson
La surface de cuisson à induction possède plusieurs zones de cuisson conçues pour l’utilisation de différentes grosseurs
d’ustensiles. Assurez-vous de rencontrer les dimensions minimale et maximale requises (Fig. 19) pour la zone de cuisson
utilisée et pour la quantité de nourriture à préparer. Placez l’ustensile et la nourriture à cuire sur la zone de cuisson AVANT
de régler le contrôle de la zone.
FRANÇAIS
Mise en marche d’une ou de plusieurs zones de cuisson:
1. Placez l’ustensile et la nourriture à préparer sur la zone de cuisson désirée. Assurez-vous de bien centrer l’ustensile
sur la zone en couvrant complètement l’anneau délimitant le diamètre minimum requis. NOTEZ que si les requis
demandés par la zone de cuisson ne sont pas rencontrés (Voir la figure 20), le capteur détectera le problème et le
code d’erreur
poursuivre.
2. Touchez et maintenez pendant 2 secondes (ou jusqu’à ce qu’un signal sonore se fasse entendre). Le témoin
lumineux de mise en marche situé au-dessus de la touche S’ALLUME. NOTE: Si aucune autre touche n’est
activée dans les 20 secondes qui suivent, la surface de cuisson s’éteindra automatiquement.
3. Pour démarrer une ou plusieurs zones de cuisson, touchez doucement de la zone désirée. Un signal sonore se
fait entendre et l’écran de la zone de cuisson choisie affiche
réglée pour cette zone. NOTE: Si aucune touche n’est activée dans les 10 secondes qui suivent, la zone de cuisson
s’éteindra.
4. Réglez la zone de cuisson à la température désirée en touchant ou . Si est touché en premier, le
contrôleur débutera avec le niveau de puissance maximum “Amplificateur de puissance” (l’écran de la zone de
cuisson affiche
avec le réglage 1.0 (l’écran de la zone affiche
NOTE: Touchez une fois ou à répétition ou pour ajuster le niveau de puissance de la zone de cuisson en
tout temps lors du processus de cuisson (pour voir défiler rapidement les niveaux de puissance, touchez et maintenez
FF
F s’affichera à l’écran de la zone de cuisson concernée. Le problème devra être corrigé avant de
FF
00
0 ce qui indique qu’aucune puissance n’a encore été
00
PP
P
et un signal sonore se fait entendre). Si est touché en premier, la zone de cuisson débute
PP
11
1
et un signal sonore se fait entendre).
11
les touches ou jusqu’à ce que le niveau de puissance désiré apparaisse). Une fois la zone de cuisson
réglée, la nourriture commence à chauffer au niveau de puissance réglé jusqu’à ce que ce dernier soit modifié
manuellement. Pour plus d’informations concernant les niveaux de puissance disponibles, référez-vous à la section
“Niveaux de puissance” à la page 6.
9

Réglage des contrôles des zones de cuisson
Mise en marche d’une ou de plusieurs zones de cuisson: (suite)
NOTES IMPORTANTES CONCERNANT L’UTILISATION DE L’APPAREIL:
• Des débordements ou des objets déposés sur les contrôles peuvent entraîner l’arrêt de la surface de cuisson.
Nettoyez les débordements ou enlevez les objets.
• Assurez-vous que les orifices de ventilation ne sont pas bloqués. Si les orifices de ventilation sont obstrués le capteur
interne éteindra l’appareil afin de lui éviter une surchauffe.
• Si un ustensile est déplacé du centre de la zone de cuisson, lorsque cette dernière fonctionne, quelle que soit la
raison, le capteur détectera la situation et arrêtera la zone. L’écran de la zone de cuisson concernée affichera
dernière puissance sélectionnée sur cette zone de cuisson. La zone de cuisson enregistre la dernière puissance
sélectionnée sur cette zone pendant 3 minutes avant d’éteindre cette dernière.
Pour éteindre les zones de cuisson:
1. Lorsque la cuisson est terminée, touchez pour ÉTEINDRE la zone de cuisson.
2. Le témoin lumineux situé au-dessus de la touche de la zone mise hors tension s’éteint. Un signal sonore se
FF
F et la
FF
fait entendre et l’écran affiche
secondes qui suivent. S’il n’y a pas d’autres zones de cuisson en marche et que les autres touches ne sont pas
activées, la surface de cuisson s’éteint automatiquement après 20 secondes.
3. Lorsqu’une zone de cuisson est éteinte, son écran affiche
que la surface est chaude et ce, même si cette dernière est à la position arrêt (OFF).
Les zones de cuisson peuvent paraître froides lorsqu’elles sont en fonction ou après avoir été éteintes.
Attention, la surface de cuisson peut être CHAUDE et causer des brûlures. Cette chaleur provient des ustensiles et est
transférée à la surface de cuisson par ces derniers.
00
0. Si aucune autre touche n’est activée, la zone de cuisson s’éteint dans les 10
00
HH
H si elle est chaude. L’écran affiche
HH
H H
H aussi longtemps
H H
Recommandations de préchauffage
Lorsque vous préchauffez un ustensile, surveillez-le de près. Chaque fois qu’un appareil électroménager est en fonction,
l’utilisateur doit toujours porter attention à la cuisson et demeurer attentif jusqu’à ce que le processus de cuisson soit
terminé.
N’oubliez pas que le processus de cuisson par induction diminue le temps de préchauffage des ustensiles.
Fonction “Garder chaud”
La caractéristique “Garder chaud” peut être utilisée avec chacune des zones de cuisson.
Pour activer la fonction “Garder chaud”
1. Pour activer la fonction “Garder chaud” avec n’importe quelle zone de cuisson, touchez de la zone de cuisson
utilisée.
2. Touchez la touche située parmi les touches du contrôleur principal. L’écran de la zone de cuisson affiche
(LOW) indiquant que la zone est correctement réglée en mode “Garder chaud”. Si aucune touche n’est activée dans les
5 secondes qui suivent, le contrôleur règle la zone mise en marche en mode “Garder chaud” automatiquement. (Voir la
figure 16).
10
LL
L
LL

Réglage des contrôles des zones de cuisson
Minuterie
La minuterie est très utile lorsque les recettes demandent des temps de cuisson précis. La minuterie peut être réglée pour
n’importe quel laps de temps compris entre 1 et 99 minutes. L’écran situé à la gauche de la touche Minuterie (Timer UP/
DOWN) débutera un compte à rebours aussitôt que la minuterie aura été réglée.
Réglage de la minuterie:
1. Touchez
, le temps est augmenté ou diminué par intervalles de 1 minute (jusqu’à
2. Lorsque le temps désiré est réglé, relâchez la touche. Le petit point à droite des chiffres clignote à l’écran. Lorsque
l’écran le petit point s’éteint, la minuterie débute le compte à rebours. Une fois le temps écoulé, le contrôleur émet un
long signal sonore.
Pour annuler le réglage de la minuterie:
1. Touchez et en même temps ou touchez et maintenez et jusqu’à ce que l’écran affiche
2. Si vous annulez la fonction minuterie en maintenant les touches jusqu’à ce que l’écran affiche
une fois que
3. L’écran clignote momentanément et ensuite arrête de clignoter. Le temps réglé disparaît indiquant que la fonction
minuterie est désactivée.
situé sous le mot “TIMER”. Chaque fois que vous touchez et relâchez la touche ou la touche
9999
99 minutes).
9999
0000
00, relâchez les touches
0000
0000
00 est atteint.
0000
0000
00.
0000
Verrouillage des contrôles
Les contrôles des zones de cuisson de l’appareil peuvent être verrouillés afin de prévenir une mise en marche accidentelle.
Pour activer la fonction verrouillage:
1. Cette fonction ne peut pas être activée si l’appareil n’est pas à la position arrêt (OFF). Lorsque la surface de cuisson
est en position arrêt (OFF), touchez et maintenez jusqu’à ce qu’un signal sonore se fasse entendre (environ 1
seconde). Le témoin lumineux situé au-dessus de la touche s’éteint.
FRANÇAIS
2. Touchez jusqu’à ce qu’un signal sonore se fasse entendre (après environ 5 secondes). Le témoin lumineux
verrouillage situé au-dessus de la touche s’allume indiquant que la fonction verrouillage est active. Ceci
empêche la surface de cuisson d’être activée accidentellement (Voir la figure 5)
Pour désactiver la fonction verrouillage:
1. Touchez jusqu’à ce qu’un signal sonore se fasse entendre (après environ 5 secondes). Le témoin lumineux
verrouillage situé au-dessus de la touche s’éteint indiquant que la fonction verrouillage est désactivée. La surface
de cuisson ainsi que les fonctions de cette dernière peuvent alors être utilisées normalement (Voir la figure 4).
2. Si la surface de cuisson doit être utilisée, touchez et maintenez jusqu’à ce qu’un signal sonore se fasse
entendre (après environ 1 seconde). Le témoin lumineux de mise en marche situé au-dessus de la touche
s’allume (Voir la figure 7). Vous pouvez maintenant utiliser les zones de cuisson.
11

Réglage des contrôles des zones de cuisson
Partage de la puissance
Votre table de cuisson possède cinq
éléments à induction divisés en trois
zones de chauffage: soit la section de
droite, la section de gauche et celle du
centre. Ces zones sont alimentées par
trois onduleurs différents, un pour chaque
zone de chauffage. Deux éléments d’une
N
même zone de chauffage partagent la
puissance d’un onduleur. L’élément de la
zone centrale a son propre ondulateur.
Si les deux éléments d’une même zone
de chauffage sont utilisés, le réglage du
dernier élément réglé sera maintenu
tandis que le réglage du premier élément
sera un peu diminué.
Zone de chauffage -
CONSEILS CONCERNANT LE
PARTAGE DE LA PUISSANCE DE
L’ONDULEUR
température de l’élément dont vous voulez maintenir la puissance en dernier. Vous pouvez aussi opter pour le maintien de la
puissance des deux ustensiles en même temps, en plaçant un ustensile sur la zone de chauffage de droite et le second sur la
zone de gauche. (voir Fig. 23).
: Rappelez-vous de régler la
section de gauche
Fig. 23
Zone de chauffage -
section de droite
Bruits de fond lors du fonctionnement
La technologie utilisée sur les surfaces de cuisson à induction crée des bruits de fond inhabituels. Ces bruits sont normaux
et font parti du fonctionnement normal de l’appareil.
Notez que ces bruits sont plus présents lorsque la plus haute puissance “Amplificateur de puissance” (Power BOOST) est
utilisée. Bien entendu, un bruit très fort n’est pas relié au fonctionnement normal d’une surface de cuisson possédant la
technologie à induction.
Entretien général et nettoyage
Nettoyage des composantes de la surface de cuisson
Avant de nettoyer toute composante de l’appareil, assurez-vous que toutes les commandes sont à la position Arrêt (position OFF)
et qu’elle est FROIDE. NETTOYEZ LA NOURRITURE RENVERSÉE ET LA SALETÉ EXCÉDENTAIRE LE PLUS RAPIDEMENT
POSSIBLE. UN ENTRETIEN RÉGULIER RÉDUIT LA NÉCESSITÉ D’EFFECTUER DES NETTOYAGES MAJEURS À L’AVENIR.
Surfaces
Acier inoxydable, Chrome
Moulures décoratives
Méthodes de nettoyage
Nettoyez l’acier inoxydable avec un linge et de l’eau chaude savonneuse. Rincez avec
un linge et de l’eau propre. N’utilisez pas de produit de nettoyage comportant des
concentrations élevées de chlore ou de chlorures. N’utilisez pas de produits de
récurage agressifs. N’utilisez que des produits destinés à la cuisine et qui sont spécialement
conçus pour le nettoyage de l’acier inoxydable. Assurez-vous de rincer les produits de la
surface, sinon il en résulterait des taches bleuâtres lors de chauffage subséquent, qui ne
pourraient pas être enlevées.
Surface de cuisson en
vitrocéramique
Référez-vous à la section Nettoyage et entretien de la surface de cuisson en
vitrocéramique dans ce présent manuel.
12

On/Off On/Off On/Off On/Off On/Off
Entretien général et nettoyage
Nettoyage et entretien de la surface de cuisson en vitrocéramique (certains modèles)
Un nettoyage régulier et approprié est essentiel pour maintenir en bon état
votre surface de cuisson en vitrocéramique.
Avant d’utiliser votre table de cuisson pour la première fois, appliquez la crème de nettoyage pour table de cuisson
recommandée sur la surface en vitrocéramique. Frottez avec un linge ou un tampon anti-rayures non abrasifs. Ceci
facilitera le nettoyage des résidus de cuisson. La crème de nettoyage spéciale pour table de cuisson laisse un fini
protecteur qui permet d’éviter les égratignures et les éraflures.
Le frottement d’ustensiles à fond recouvert de cuivre ou d’aluminium peut
entraîner des marques de métal sur la surface de la table de cuisson. Ces
marques doivent être enlevées immédiatement une fois que la table de
cuisson a refroidi, en utilisant la crème de nettoyage. Les marques de
métal peuvent devenir permanentes si elles ne sont pas retirées avant
d’utiliser à nouveau la table de cuisson.
Les ustensiles de cuisine (fonte, métal, céramique ou verre) dont les fonds
sont inégaux peuvent marquer ou égratigner la surface de la table de
cuisson. Ne faites pas glisser de verre ou de métal sur la table de
cuisson. N’utilisez pas d’ustensiles qui ont de la saleté accumulée
sur leur fond; remplacez-les par des ustensiles propres. N’utilisez pas
votre table de cuisson comme planche à découper ou comme surface de travail. Ne
cuisinez pas directement, sans ustensile, les aliments sur la surface de la table de
cuisson. Ne faites pas tomber d’objets lourds ou durs sur la surface; ceci risquerait de la casser.
Fig. 24
FRANÇAIS
Recommandations pour le nettoyage de la surface de cuisson en vitrocéramique
Avant de nettoyer la surface de cuisson, assurez-vous que tous les contrôles sont à la position arrêt et
que la surface de cuisson est bien froide.
N'appliquez jamais de détergent sur une surface de cuisson en vitrocéramique avant qu'elle ne
soit complètement froide. Les vapeurs nocives qui seraient générées peuvent nuire à votre santé et la réaction
chimique pourrait endommager la surface de cuisson.
Saleté légère à modérée:
Appliquez quelques gouttes de crème de nettoyage pour table de cuisson directement sur la table de cuisson. Utilisez de
l’essuie-tout ou un tampon anti-rayures en plastique non abrasif pour nettoyer la totalité de la surface de cuisson.
Assurez-vous que celle-ci est bien propre, sans résidu.
Saleté épaisse, brûlée:
Appliquez quelques gouttes de crème de nettoyage pour table de cuisson directement sur la partie salie. Frottez la zone
tachée avec un tampon anti-rayures en plastique non abrasif, en appuyant le cas échéant. N’utilisez pas l’éponge avec
laquelle vous avez nettoyé la table de cuisson pour d’autres usages.
S’il reste encore de la saleté, grattez soigneusement celle-ci à l’aide d’un grattoir à
lame de rasoir, en le tenant à un angle de 30 degrés par rapport à la surface. Retirez
les saletés détachées avec une crème de nettoyage pour table de cuisson et frottez la
surface jusqu’à ce qu’elle soit propre.
REMARQUE IMPORTANTE : La surface de cuisson en vitrocéramique peut être
endommagée par l’utilisation d’un tampon abrasif. N’utilisez que des produits de
nettoyage qui ont été spécialement conçus pour les surfaces de cuisson en
vitrocéramique.
Plastiques ou aliments à teneur élevée en sucre:
Ces saletés doivent être enlevées immédiatement si elles sont renversées ou si elles
Fig. 25
ont fondu sur la surface en vitrocéramique. Des dommages permanents (comme la
piqûre de la surface) peuvent se produire si ces saletés ne sont pas enlevées
immédiatement. Après avoir éteint les éléments de surface, servez-vous d’un grattoir
à lame de rasoir ou d’une spatule en métal et d’un gant de cuisine pour gratter la saleté
de la surface (comme sur l’illustration). Laissez la table de cuisson refroidir et servezvous de la même méthode pour les saletés épaisses ou qui ont carbonisé.
13

Entretien général et nettoyage
N'utilisez pas les produits suivants sur la surface de cuisson en
vitrocéramique (voir Fig. 26):
• Produits de nettoyage abrasifs ou des tampons, tel que les tampons
métalliques et certains tampons en nylon. Ils peuvent égratigner la
surface de cuisson et la rendre plus difficile à nettoyer.
• Produits de nettoyage agressifs, comme des agents de blanchissage, de
l'ammoniaque ou des nettoyants chimiques pour le four car ils peuvent
marquer ou décolorer la surface de cuisson.
• N'utilisez pas des tampons, des éponges, des linges ou des papiers
essuie-tout sales, ils peuvent laisser de la saleté ou de la charpie sur la
surface de cuisson et causer des brûlures ou de la décoloration.
Précautions à prendre avec l'emploi de papier d'aluminium et
de récipients en aluminium
1) Papier d'aluminium - L'emploi de papier d'aluminium peut endommager la
surface de cuisson; Ne jamais l'utiliser.
2) Récipients en aluminium - L'aluminium fond à une température plus basse
que celle des autres métaux. Vous devez être vigilant lorsque vous employez de
tels récipients. Si toute l'eau s'évapore, des dommages permanents à la surface
de cuisson peuvent en résulter: égratignure, fusion et même bris de la surface.
Nettoyage de l’acier inoxydable
Certains modèles sont équipés de pièces en acier inoxydable. Un entretien et un
nettoyage particuliers sont requis pour maintenir la belle apparence des pièces en
acier inoxydable. Référez-vous au tableau de Nettoyage Général pour les instruc-
tions de nettoyage.
NOTE DE NETTOYAGE IMPORTANTE:
Du liquide, des serviettes ou des objets sur le panneau de contrôle peuvent causer
l’affichage d’un code d’erreur ou un arrêt momentané des touches de contrôle.
Tampons
Fig. 26
récureurs
pour four
Nettoyant
Ammoniaque
Javellisant
N’UTILISEZ PAS de produit
nettoyant sur une surface de
cuisson chaude. La fumée causée
par la chaleur et le nettoyant peut
nuire à votre santé et la surface de
cuisson vitrocéramique peut être
endommagée. N’utilisez pas de
produits de nettoyage pour
fours sur la surface de cuisson.
Des dommages au fini ou aux
pièces de l’appareil peuvent
se produire.
Avant d'appeler
• Solutions aux problèmes courants
Avant d’appeler un agent de service après-vente, consultez cette liste. Elle pourrait vous économiser temps et argent.
Cette liste décrit des situations courantes qui ne sont causées ni par un défaut de fabrication ni par un matériau défectueux.
PROBLÈME
Aucune partie de
l’appareil ne fonctionne
L’appareil s’éteint
durant la cuisson
La zone de cuisson est
trop chaude ou pas
assez chaude
CAUSE POSSIBLE/SOLUTION
1. Les contrôles sont verrouillés. Désactivez la fonction verrouillage (Voir la page 11 pour de
plus amples informations). 2. Assurez-vous que le coupe-circuit est enclenché et que la
surface de cuisson est correctement branchée. 3. Le câblage de l'appareil n'est pas
complété. Appeler au 1-800-LE-FOYER
lumières de la maison. Appelez la compagnie d'électricité.
1. Le dispositif d’arrêt automatique de l’appareil a mis hors tension la surface de cuisson
parce qu’elle était en marche sans arrêt depuis plus de 18 heures. 2. Le capteur de chaleur
interne a détecté une température trop élevée à l’intérieur de la surface de cuisson. Assurezvous que les orifices d’aération ne sont pas obstrués. Référez-vous au feuillet
d’instructions d’installation fourni avec l’appareil pour connaître l’installation
adéquate. 3. Des débordements ou des objets touchent aux contrôles. Nettoyez les
contrôles ou retirez les objets. Redémarrez la surface de cuisson.
1. Réglage de la puissance incorrect. Augmentez ou baissez le réglage jusqu'à l'obtention de
la bonne quantité de chaleur.
MC
pour le service. 4. Panne de courant. Vérifiez les
14

Avant d'appeler
• Solutions aux problèmes courants
PROBLÈME CAUSE POSSIBLE/SOLUTION
La zone de cuisson ne
cuit pas la nourriture
La nourriture ne cuit pas
uniformément
Mauvais résultats de
cuisson
L’écran d’une zone de
cuisson affiche E et
celui du contrôleur
principal affiche un
doce d’erreur à deux
chiffres
1. Il n’y a pas d’ustensile sur la zone de cuisson ou le matériau de l’ustensile n’est pas bon
pour les surfaces de cuisson à induction (Voir les figures 18 & 20). 2. La base de l’ustensile
est trop petite pour la zone de cuisson utilisée (Voir la figure 19). 3. L’ustensile est incurvé ou
en mauvaise condition (Voir les figures 20 & 21). 4. L’ustensile n’est pas centré sur la zone de
cuisson (Voir la figure 20). 5. L’ustensile repose sur la moulure ou n’est pas en contact direct
avec la zone de cuisson (Voir les figures 19 & 20). 6. L'appareil n'est pas sous tension. Suivez
les étapes de la section “Aucune partie de l’appareil ne fonctionne” plus haut. 7. Mauvais
contrôle utilisé. Assurez-vous que le contrôle de la zone utilisée est ACTIVÉ.
1. Des ustensiles légers ou déformés ont été utilisés. Assurez-vous de la qualité de l’ustensile
(Voir figures 20 & 21). 2. Employez seulement des ustensiles à fond plat, équilibrés lourds ou
très lourds. Les ustensiles lourds ou très lourds filtrent la chaleur également. Puisque les
ustensiles légers chauffent inégalement, les aliments peuvent brûler facilement. (voir p. 8 pour
plus d’informations). 3. Mauvais réglage. Augmentez ou baissez le réglage jusqu'à l'obtention de
la bonne quantité de chaleur.
FRANÇAIS
1. Plusieurs facteurs affectent les résultats de cuisson. Ajustez le réglage de la puissance
recommandé dans les recettes ou ajustez le temps de cuisson. 2. Des ustensiles légers ou
déformés ont été utilisés. Utilisez des ustensiles plus lourds et de meilleure qualité pour
permettre aux aliments de cuire plus uniformément.
1. Le contrôleur principal de la surface de cuisson a détecté un défaut ou un code d’erreur.
Essayez de débrancher et rebrancher l’appareil dans le but de réinitialiser le contrôleur. Si
l’erreur réapparaît, notez le code et débranchez l’appareil. Appelez 1-800-LE-FOYER® pour
vous aidez.
F clignote
continuellement à
l’écran d’une zone de
cuisson.
Marques métalliques sur
la surface
vitrocéramique.
Égratignures ou
marques d'abrasion sur
la surface
vitrocéramique.
Marques brunes sur la
surface vitrocéramique.
Zone de décoloration
sur la surface
vitrocéramique.
1. Le capteur magnétique ne détecte pas l’ustensile. Vérifiez l’ustensile à l’aide d’un aimant
afin de vous assurez que ce dernier est compatible avec l’induction.
L’ustensile a été retiré de la zone de cuisson sans que cette dernière ait été mise à la
position arrêt (OFF). Replacez l’ustensile sur la zone de cuisson et éteignez la zone de
cuisson. 2. L’ustensile n’est pas centré correctement sur la zone de cuisson. Référez-vous à
la figure 20 pour plus d’informations.
1. Glissement ou frottement d'ustensiles en métal sur la surface de cuisson. Ne faites pas
glisser l'ustensile en métal sur celle-ci. Utilisez un produit de nettoyage doux pour enlever ces
marques. Reportez-vous à la section Nettoyage général dans ce guide (Voir page 13).
1. Des particules grossières (comme sel ou sable) se trouvent entre la surface et l'ustensile.
Assurez-vous que la surface de cuisson et le fond des ustensiles sont propres avant de les
utiliser. De petites égratignures ne gênent pas la cuisson et deviennent moins visibles à
l'usage. 2. Des produits de nettoyage non recommandés pour la vitrocéramique ont été
utilisés. Reportez-vous à la section Nettoyage général dans ce guide. 3. Des ustensiles à
fond inégal ont été utilisés. Utilisez SEULEMENT des ustensiles à fond plat et lisse. (Voir
figures 20 & 21).
1. De la nourriture a débordé sur la surface. Enlevez la saleté à l'aide d'un grattoir armé d'une
lame de rasoir. Reportez-vous à la section Nettoyage général dans ce guide. (Voir page 13).
1. Dépôts minéraux en provenance de l'eau et de la nourriture. Enlevez ces dépôts en
appliquant de la crème de nettoyage pour surface de cuisson. N'utilisez que des ustensiles à
fond sec et propre.
15

CONTRATS DE PROTECTION
Aux États-Unis
Contrats de protection principaux
Nous vous félicitons pour votre achat. De par sa conception
et sa fabrication, votre nouvel appareil Kenmore® vous
fournira de nombreuses années de service fiable. Mais,
comme tout autre produit, il pourrait nécessiter des
réparations ou travaux d’entretien de temps à autre. C’est
dans ces circonstances qu’un contrat de protection principal
vous permettra d’éviter soucis et dépenses.
Souscrivez maintenant à un contrat de protection principal
pour vous protéger contre les problèmes et dépenses
inattendues.
Le contrat de protection principal vous permettra également
de maximiser la longévité de votre nouvel appareil. Voici ce
qu’il inclut:
Service après-vente dispensé par 12 000
9
professionnels, spécialistes des réparations des
appareils ménagers.
Service après-vente illimité, et gratuité (pièces et
9
main-d’œuvre) de toutes les réparations couvertes
Garantie de performance – remplacement du produit
9
couvert s’il subit plus de trois défaillances pendant une
période de douze mois.
Remplacement du produit couvert s’il ne peut être
9
réparé.
Contrôle annuel d’entretien préventif sur demande de
9
l’utilisateur – sans frais additionnel.
Accès instantané à un service d’aide par téléphone –
9
fourniture d’instruction et d’information non technique sur
les produits réparés à domicile, et prise de rendez-vous
pour toute intervention.
Protection contre les surtensions et les dommages
9
imputables aux fluctuations de l’alimentation électrique.
Remboursement des frais de location d’un appareil
9
dans le cas où le produit réparé n’est pas disponible à la
date promise.
Lorsque vous êtes protégé par le contrat de protection, il
suffit d’un appel téléphonique pour demander une
intervention. Vous pouvez téléphoner à tout moment du jour
ou de la nuit, ou fixer un rendez-vous en ligne.
Sears dispose d’une équipe de 12 000 professionnels
spécialistes des réparations qui ont accès à plus de
4,5 millions d’accessoires et de pièces de qualité. C’est le
genre de professionnalisme sur lequel vous pouvez compter,
et qui vous aidera à maximiser la longévité de votre nouvel
appareil. Souscrivez sans attendre à votre contrat de
protection.
Certaines limitations et exclusions sont applicables.
Pour les prix et de l’information additionnelle,
composez le 1-800-827-6655.
Au Canada
Contrats d’entretien
Votre achat a une valeur supplémentaire parce que vous
pouvez compter sur le HomeCentral® de Sears pour un
service après-vente. Avec plus de 2 400 spécialistes formés
à l’entretien et un accès à plus de 1 000 000 pièces et
d’accessoires, nous avons les outils, les pièces, le savoir et
le talent pour répondre à votre demande: nous réparons ce
que nous vendons.
Votre appareil Kenmore® est conçu, fabriqué et essayé pour
vous assurer des années d’un fonctionnement fiable.
Cependant, comme tout appareil ménager, il peut nécessiter
un entretien de temps à autre. Le contrat d’entretien Sears
vous offre un remarquable programme de service à un prix
abordable.
Le contrat d’entretien Sears
• C’est votre manière d’acheter un service pour demain au
prix d’aujourd’hui.
• Élimine les factures de réparation résultant d’usure normale.
• Fournit une assistance non technique et informative.
• Même si vous n’avez pas besoin de réparation, vous fournit
un contrôle d’entretien préventif annuel à votre demande,
pour vous assurer que votre appareil est en bon état de
marche.
Certaines limites s’appliquent. Pour de plus amples
informations sur les contrats d’Entretien Sears Canada,
composez le 1-800-361-6665.
Service d’installation Sears
Pour l’installation garantie par les professionnels Sears de
tout appareil ménager ou de produit comme système
d’ouverture de porte de garage ou chauffe-eau, aux É.-U.
composez le 1-800-4-MY-HOME
®
.
16
 Loading...