

Page 1
WW
ASHER OPERAASHER OPERA
W
ASHER OPERA
WW
ASHER OPERAASHER OPERA
TING INSTRUCTIONSTING INSTRUCTIONS
TING INSTRUCTIONS
TING INSTRUCTIONSTING INSTRUCTIONS
MLXE/MLXG42REMLXE/MLXG42RE
MLXE/MLXG42RE
MLXE/MLXG42REMLXE/MLXG42RE
Versión en españolVersión en español
Versión en español
Versión en españolVersión en español
Si desea obtener una copia en español de estas
Instrucciones de Funcionamiento, sírvase escribir la
dirección que se incluye a continuación.
Solicite la P/N 131547200.
Spanish Owner's Guides
Frigidaire Company
P. O. Box 9061
Dublin, Ohio 43017-0961
BeforBefor
Befor
BeforBefor
CenterCenter
Center
CenterCenter
Read your laundry center Owner's Guide.Read your laundry center Owner's Guide.
Read your laundry center Owner's Guide. It has
Read your laundry center Owner's Guide.Read your laundry center Owner's Guide.
important safety and warranty information. It also has
many suggestions for obtaining the best washing results.
or injury to persons, read the IMPORTANT SAFETY
INSTRUCTIONS in your laundry center Owner's Guide
before operating this appliance.
e Operating Ye Operating Y
e Operating Y
e Operating Ye Operating Y
To reduce the risk of fire, electric shock,
our Laundrour Laundr
our Laundr
our Laundrour Laundr
Operating StepsOperating Steps
Operating Steps
Operating StepsOperating Steps
Sort laundry into loads that can be washedSort laundry into loads that can be washed
1.
Sort laundry into loads that can be washed
Sort laundry into loads that can be washedSort laundry into loads that can be washed
together.together.
together.
together.together.
Prepare items for washingPrepare items for washing
2.
Prepare items for washing.
Prepare items for washingPrepare items for washing
Pretreat stains and heavy soil.Pretreat stains and heavy soil.
3.
Pretreat stains and heavy soil.
Pretreat stains and heavy soil.Pretreat stains and heavy soil.
Add the measured amount of detergent toAdd the measured amount of detergent to
4.
Add the measured amount of detergent to
Add the measured amount of detergent toAdd the measured amount of detergent to
the washer before adding the laundry load.the washer before adding the laundry load.
the washer before adding the laundry load.
the washer before adding the laundry load.the washer before adding the laundry load.
yy
y
yy
If desired, add liquid bleach to the BleachIf desired, add liquid bleach to the Bleach
5.
If desired, add liquid bleach to the Bleach
If desired, add liquid bleach to the BleachIf desired, add liquid bleach to the Bleach
Dispenser.Dispenser.
Dispenser.
Dispenser.Dispenser.
Add the laundry load to the wash tubAdd the laundry load to the wash tub
6.
Add the laundry load to the wash tub.
Add the laundry load to the wash tubAdd the laundry load to the wash tub
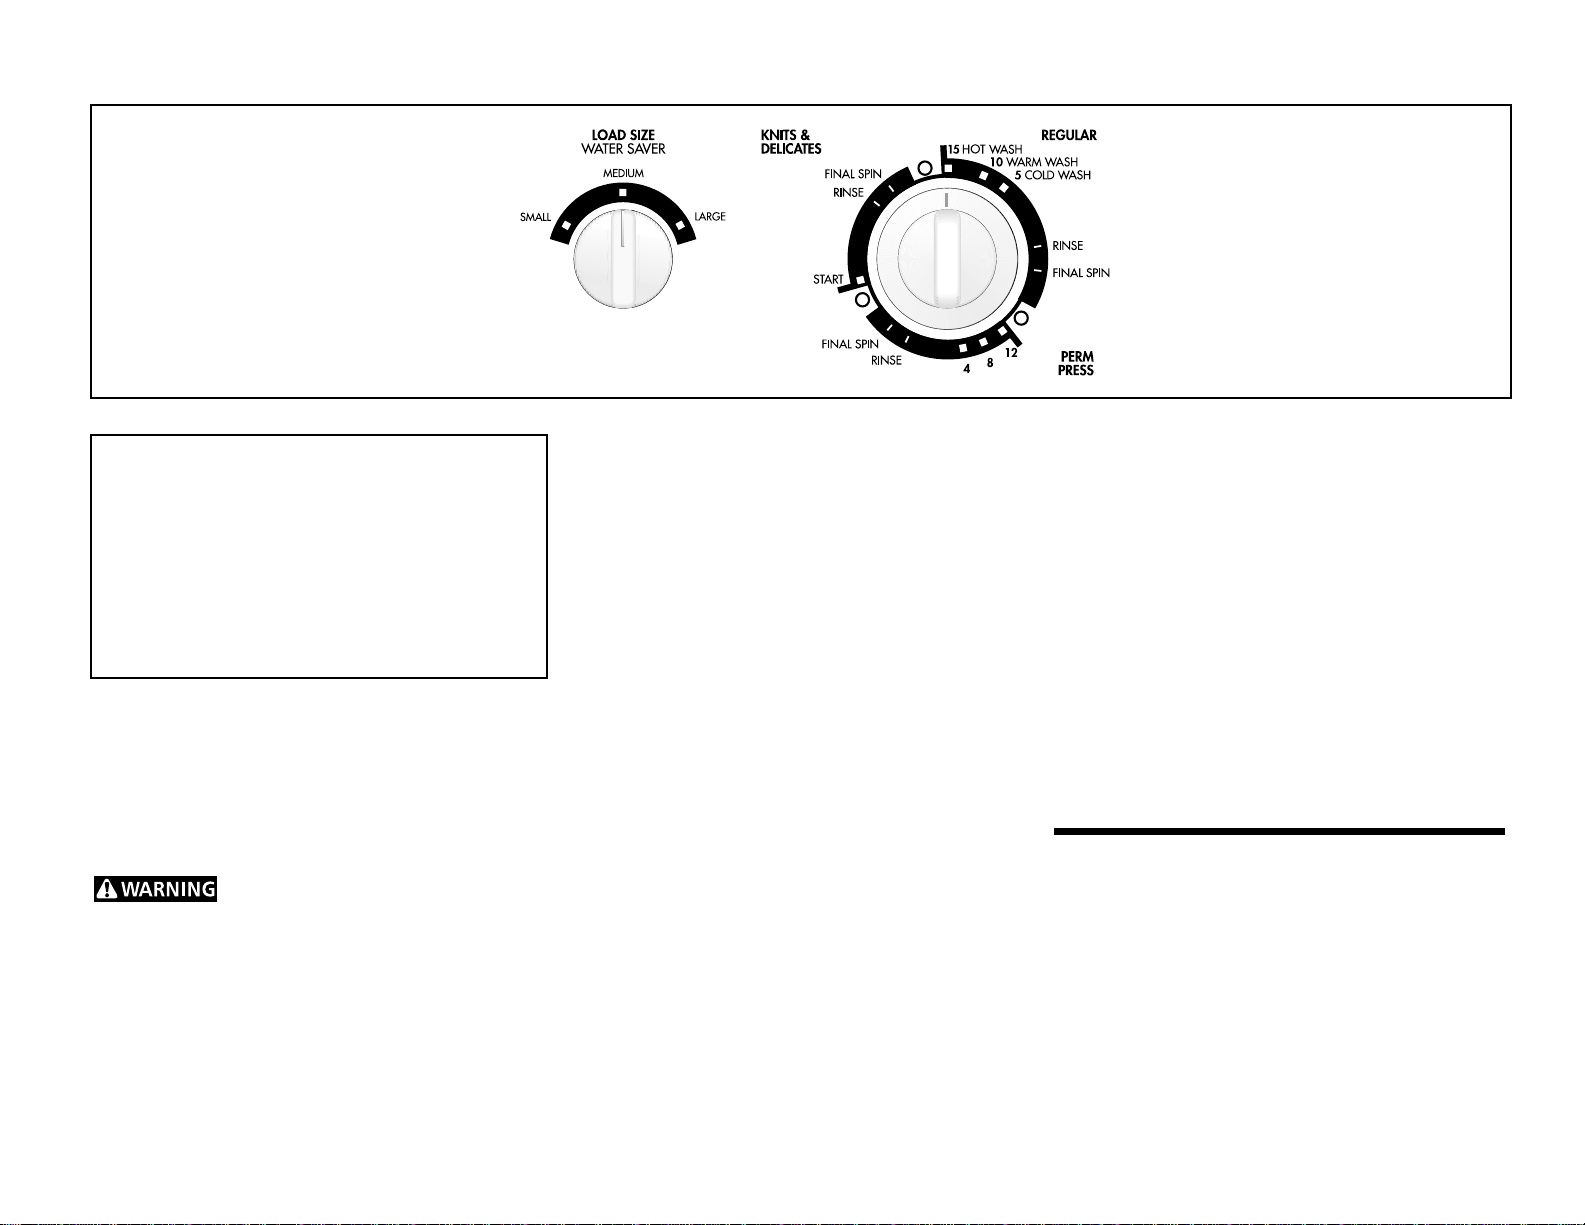
Set the Load Size control according to type,Set the Load Size control according to type,
7.
Set the Load Size control according to type,
Set the Load Size control according to type,Set the Load Size control according to type,
size, and soil level of the load.size, and soil level of the load.
size, and soil level of the load.
size, and soil level of the load.size, and soil level of the load.
Push in the cycle selector knob and turn itPush in the cycle selector knob and turn it
8.
Push in the cycle selector knob and turn it
Push in the cycle selector knob and turn itPush in the cycle selector knob and turn it
clockwise to the desired wash cycle. clockwise to the desired wash cycle.
clockwise to the desired wash cycle. See
clockwise to the desired wash cycle. clockwise to the desired wash cycle.
Cycle Selection Cycle Selection
Cycle Selection for cycle descriptions and
Cycle Selection Cycle Selection
Control Settings ChartControl Settings Chart
Control Settings Chart for suggested cycle
Control Settings ChartControl Settings Chart
settings.
Start the washer by closing the lid and pullingStart the washer by closing the lid and pulling
9.
Start the washer by closing the lid and pulling
Start the washer by closing the lid and pullingStart the washer by closing the lid and pulling
out the cycle selector knob.out the cycle selector knob.
out the cycle selector knob. The washer will
out the cycle selector knob.out the cycle selector knob.
operate with the lid open; however, the tub will
not spin unless the lid is closed.
To stop the washer, push in the cycle selector
knob. To change a cycle, push in the cycle
selector knob and turn it clockwise to the desired
setting. Pull out the knob to restart the washer.
If desired, add diluted liquid fabric softenerIf desired, add diluted liquid fabric softener
10.
If desired, add diluted liquid fabric softener
If desired, add diluted liquid fabric softenerIf desired, add diluted liquid fabric softener
during the final rinse.during the final rinse.
during the final rinse.
during the final rinse.during the final rinse.
Remove items when the cycle is completed.Remove items when the cycle is completed.
11.
Remove items when the cycle is completed.
Remove items when the cycle is completed.Remove items when the cycle is completed.
As a safety measure, the lid will AUTOMATICALLY LOCK during the spin portion of each
cycle. The lid will automatically unlock
approximately 1 minute after the end of the spin
cycle.
Cycle SelectionCycle Selection
Cycle Selection
Cycle SelectionCycle Selection
For best results, follow the fabric care label directions
on items to be washed. Check the
Chart Chart
Chart (reverse side) if the care label is not available.
Chart Chart
The Regular, Perm Press and Knits & Delicates cycles
provide a spray rinse during the first spin, followed by
a deep rinse and a final spin.
(continued, reverse side)
Control SettingsControl Settings
Control Settings
Control SettingsControl Settings
P/N 131546800 (9512)
Page 2

Cycle Selection Cycle Selection
Cycle Selection
Cycle Selection Cycle Selection
(continued)(continued)
(continued)
(continued)(continued)
Control Settings ChartControl Settings Chart
Control Settings Chart
Control Settings ChartControl Settings Chart
Regular CycleRegular Cycle
Regular Cycle
Regular CycleRegular Cycle
Up to 15 minutes of wash agitation for most fabrics.
--
15 hot15 hot
-
15 hot 15 minutes of wash agitation. A hot
--
15 hot15 hot
water wash and cold water rinse are
provided for heavily soiled items.
--
10 warm10 warm
-
10 warm 10 minutes of wash agitation. A warm
--
10 warm10 warm
water wash and cold water rinse are
provided for normally soiled items.
--
5 cold5 cold
-
5 cold 5 minutes of wash agitation. A cold
--
5 cold5 cold
water wash and cold water rinse are
provided for lightly soiled items.
Perm Press CyclePerm Press Cycle
Perm Press Cycle
Perm Press CyclePerm Press Cycle
Up to 12 minutes of wash agitation for cottons and
blends with a no-iron finish.
--
1212
-
1 2 12 minutes of wash agitation. A hot water
--
1212
wash and cold water rinse are provided for
heavily soiled permanent press items.
--
88
-
8 8 minutes of wash agitation. A warm
--
88
water wash and cold water rinse are
provided for normally soiled permanent
press items.
--
44
-
4 4 minutes of wash agitation. A cold water
--
44
wash and cold water rinse are provided for
lightly soiled permanent press items.
Locate fabric type and read across guide for suggested wash and rinse temperatures,
wash cycle and cycle settings.
This is only a general guide. For best results, follow fabric care label directions onThis is only a general guide. For best results, follow fabric care label directions on
This is only a general guide. For best results, follow fabric care label directions on
This is only a general guide. For best results, follow fabric care label directions onThis is only a general guide. For best results, follow fabric care label directions on
specific items to be washed.specific items to be washed.
specific items to be washed.
specific items to be washed.specific items to be washed.
TemperatureTemperature
Temperature
TemperatureTemperature
(Wash / Rinse)(Wash / Rinse)
(Wash / Rinse)
Fabric TypeFabric Type
Fabric Type
Fabric TypeFabric Type
REGULARREGULAR
REGULAR
REGULARREGULAR
(Wash / Rinse)(Wash / Rinse)
Wash CycleWash Cycle
Wash Cycle
Wash CycleWash Cycle
Cycle SettingCycle Setting
Cycle Setting
Cycle SettingCycle Setting
Heavily Soiled
Colorfast & White
Cotton & Linen
Hot Cold
Regular
15 hot
Lightly Soiled
Colorfast & White
Cotton & Linen
Warm Cold
Regular
10 warm
Noncolorfast
Bright Colors
All Fabrics
PERMANENT PRESSPERMANENT PRESS
PERMANENT PRESS
PERMANENT PRESSPERMANENT PRESS
White or
Heavily Soiled
Colored or
Lightly Soiled
Cold Cold
Warm or
Hot Cold
Cold or
Warm Cold
Regular
Perm Press
Perm Press
5 cold
8 warm or
12 hot
4 cold or
8 warm
Knits & Delicates CycleKnits & Delicates Cycle
Knits & Delicates Cycle
Knits & Delicates CycleKnits & Delicates Cycle
Eight minutes of wash/pause action. A warm water
wash and cold water rinse are provided for knit and
delicate items.
Printed in U. S. A.
KNITS/DELICATESKNITS/DELICATES
KNITS/DELICATES
KNITS/DELICATESKNITS/DELICATES
Knitted Fabrics
Delicates
Washable Woolens
*Always set the Knits & Delicates cycle to begin at the START position.*Always set the Knits & Delicates cycle to begin at the START position.
*Always set the Knits & Delicates cycle to begin at the START position.
*Always set the Knits & Delicates cycle to begin at the START position.*Always set the Knits & Delicates cycle to begin at the START position.
Warm Cold
Warm Cold
Warm Cold
Knits & Delicates
Knits & Delicates
Knits & Delicates
Start* (8)
Start* (8)
Start* (8)
P/N 131546800 (9512)
Page 3

DRDR
YER OPERAYER OPERA
DR
YER OPERA
DRDR
YER OPERAYER OPERA
Versión en españolVersión en español
Versión en español
Versión en españolVersión en español
Si desea obtener una copia en español de estas
Instrucciones de Funcionamiento, sírvase escribir a
la dirección que se incluye a continuación.
Solicite la P/N 131547100.
Spanish Owner's Guides
Frigidaire Company
P. O. Box 9061
Dublin, Ohio 43017-0961
BeforBefor
Befor
BeforBefor
CenterCenter
Center
CenterCenter
Read your laundry center Owner's Guide.Read your laundry center Owner's Guide.
Read your laundry center Owner's Guide. It has
Read your laundry center Owner's Guide.Read your laundry center Owner's Guide.
important safety and warranty information. It also has
many suggestions for obtaining the best drying results.
or injury to persons, read the IMPORTANT SAFETY
INSTRUCTIONS in your laundry center Owner's Guide
before operating this appliance.
e Operating Ye Operating Y
e Operating Y
e Operating Ye Operating Y
To reduce the risk of fire, electric shock,
TING INSTRUCTIONSTING INSTRUCTIONS
TING INSTRUCTIONS
TING INSTRUCTIONSTING INSTRUCTIONS
our Laundrour Laundr
our Laundr
our Laundrour Laundr
Operating StepsOperating Steps
Operating Steps
Operating StepsOperating Steps
Prepare items for drying.Prepare items for drying.
1.
Prepare items for drying.
Prepare items for drying.Prepare items for drying.
Check that lint screen is clean and properly inCheck that lint screen is clean and properly in
2.
Check that lint screen is clean and properly in
Check that lint screen is clean and properly inCheck that lint screen is clean and properly in
place.place.
place.
place.place.
Load the dryer.Load the dryer.
3.
Load the dryer. If desired, add a dryer fabric
Load the dryer.Load the dryer.
softener sheet.
Close the dryer door.Close the dryer door.
4.
Close the dryer door.
Close the dryer door.Close the dryer door.
Turn cycle selector clockwise to desired setting.Turn cycle selector clockwise to desired setting.
5.
Turn cycle selector clockwise to desired setting.
Turn cycle selector clockwise to desired setting.Turn cycle selector clockwise to desired setting.
Start dryer. Start dryer.
6.
Start dryer. Push the Push to Start button for 2
Start dryer. Start dryer.
yy
y
yy
seconds.
At end of cycle, remove items immediately andAt end of cycle, remove items immediately and
7.
At end of cycle, remove items immediately and
At end of cycle, remove items immediately andAt end of cycle, remove items immediately and
hang or fold.hang or fold.
hang or fold.
hang or fold.hang or fold.
Clean lint screen after every load.Clean lint screen after every load.
8.
Clean lint screen after every load.
Clean lint screen after every load.Clean lint screen after every load.
Cycle SettingsCycle Settings
Cycle Settings
Cycle SettingsCycle Settings
Turn the cycle selector clockwise to the desired cycle and
setting.
Each cycle ends with a cool down period. The heat
automatically turns off and the load continues to tumble
for 5-10 minutes. This reduces wrinkling and makes
items easier to handle during unloading.
Drying time varies depending on size and dampness of
load, weight and fabric type. Room temperature and
humidity, type of installation and electrical voltage or gas
pressure can also affect drying time.
MLXE/MLXG42REMLXE/MLXG42RE
MLXE/MLXG42RE
MLXE/MLXG42REMLXE/MLXG42RE
AUTO DRY-HIGH HEAT AUTO DRY-HIGH HEAT
AUTO DRY-HIGH HEAT is recommended for regular
AUTO DRY-HIGH HEAT AUTO DRY-HIGH HEAT
and permanent press items that can be tumble dried at
high heat. The Auto Dry-High Heat cycle determines
drying time automatically.
For items requiring more drying time, set the cycle
selector on MORE DRY. For items requiring less drying
time, set the cycle selector on LESS DRY.
This cycle works best with items of similar fabric, weight
and construction.
TIME DRY-LOW HEAT TIME DRY-LOW HEAT
TIME DRY-LOW HEAT provides up to 90 minutes of
TIME DRY-LOW HEAT TIME DRY-LOW HEAT
drying time at low heat for permanent press, knit and
delicate items.
AIR FLUFF-NO HEATAIR FLUFF-NO HEAT
AIR FLUFF-NO HEAT provides up to 30 minutes of
AIR FLUFF-NO HEATAIR FLUFF-NO HEAT
tumbling without heat. Use Air Fluff-No Heat to freshen
clothing, pillows or blankets or to dust draperies. Heatsensitive items such as plastics, foam rubber or similarly
textured rubber-like materials or items containing feathers
or down should be dried
cycle.
To avoid fire hazard, do not use heat to
dry items containing feathers or down, foam rubber,
plastics, or similarly textured, rubber-like materials. Use
Air Fluff-No Heat cycle only.
only only
only with the Air Fluff-No Heat
only only
P/N 131546900 (9512)
Page 4

Control Settings ChartControl Settings Chart
Control Settings Chart
Control Settings ChartControl Settings Chart
Always consult fabric care labels before drying. For items without labels, follow suggested settings below. The suggested drying
times are approximate. Actual time needed will vary depending on size and dampness of load, weight and fabric type. Room
temperature and humidity, type of installation and electrical voltage or gas pressure can also affect drying time. Items dried in a
dryer operating on a 208 volt circuit instead of a 240 volt circuit require 20% more drying time than listed.
fire hazard, do not use heat to dry items containing feathers or down, foam rubber, plastics, or similarly textured,fire hazard, do not use heat to dry items containing feathers or down, foam rubber, plastics, or similarly textured,
fire hazard, do not use heat to dry items containing feathers or down, foam rubber, plastics, or similarly textured,
fire hazard, do not use heat to dry items containing feathers or down, foam rubber, plastics, or similarly textured,fire hazard, do not use heat to dry items containing feathers or down, foam rubber, plastics, or similarly textured,
rubber-like materials. Use Air Fluff-No Heat setting only.rubber-like materials. Use Air Fluff-No Heat setting only.
rubber-like materials. Use Air Fluff-No Heat setting only.
rubber-like materials. Use Air Fluff-No Heat setting only.rubber-like materials. Use Air Fluff-No Heat setting only.
TYPE OF LOADTYPE OF LOAD
TYPE OF LOAD
TYPE OF LOADTYPE OF LOAD
CYCLE SETTINGCYCLE SETTING
CYCLE SETTING
CYCLE SETTINGCYCLE SETTING
TIMETIME
TIME
TIMETIME
To avoid To avoid
To avoid
To avoid To avoid
Bedspreads, chenille
Blankets
Cotton
Electric
Wool
Synthetics or blends
Cottons, linens
Full dry
Damp dry, for ironing
Curtains
Cottons or cotton blends
Sheer synthetics
Heavy synthetics
To freshen all types
Delicates - sheer lingerie and blouses,
nylon items, washable silk and
washable rayon
Glass fiber
Items containing elastic
Auto Dry-High Heat
Auto Dry-High Heat
Electric blankets can be partially dried in dryer if recommended by manufacturer. Tumble with dry
towels to cushion electrical parts. Remove blanket while still damp. Finish drying by hanging across
two parallel lines or rods. Block to original dimensions.
Follow label instructions. Place on flat surface and gently stretch to block to original dimensions.
Time Dry-Low Heat
Auto Dry-High Heat
Time Dry-Low Heat
Dry in small loads. Remove as soon as dryer stops.
Auto Dry-High Heat
Time Dry-Low Heat
Time Dry-Low Heat
Air Fluff-No Heat
Time Dry-Low Heat
Do not dry glass fiber items in dryer unless recommended by manufacturer. Small glass particles
left in the drum can be picked up by the next load and may cause skin irritation.
Time Dry-Low Heat.
Remove while elastic is still damp.
30-45 minutes; check frequently
30 minutes; check frequently
30 minutes
30-45 minutes
15 minutes
15-30 minutes; check frequently
30-45 minutes
Items to be fluffed, freshened or dusted
Knits
Cotton or cotton blends
Synthetics
Wool
Permanent Press
100% cotton
100% synthetics and blends
Pillows
Plastics
Rugs (4'x6')
Slipcovers
Table linens, damp dry for ironing
Tennis shoes
Wrinkled, but not soiled,
permanent press or knit items
Air Fluff-No Heat
Time Dry-Low Heat
Time Dry-Low Heat
See manufacturer's care label.
Remove immediately. Hang or fold.
Time Dry-Low Heat
Time Dry-Low Heat
See
absorb excess moisture.
See
absorb excess moisture.
See
Select temperature and cycle setting according to fabric. Remove when slightly damp.
Time Dry-Low Heat
Always consult care labels when drying tennis shoes. Improper care can permanently damage some
shoes. Air dry or dry on drying rack (available on some models).
Time Dry-Low Heat
Remove immediately. Hang or fold.
above.
above.
above.
Add several dry bath towels to
Air Fluff-No Heat
Add several dry bath towels to
Air Fluff-No Heat
See manufacturer's care label.
15 minutes
30-45 minutes
30 minutes; check frequently
30-45 minutes
30-45 minutes
30 minutes
15 minutes
15-30 minutes
15 minutes
Printed in U.S.A.
P/N 131546900 (9512)
 Loading...