

Page 1
CONV
DELAY
CLEAN
BROIL
TIMED
LOCK
PRE-
BAKE
ON TIMER
CONV
DELAY
CLEAN
BROIL
TIMED
LOCK
PRE-
BAKE
ELECTRONIC OVEN CONTROL
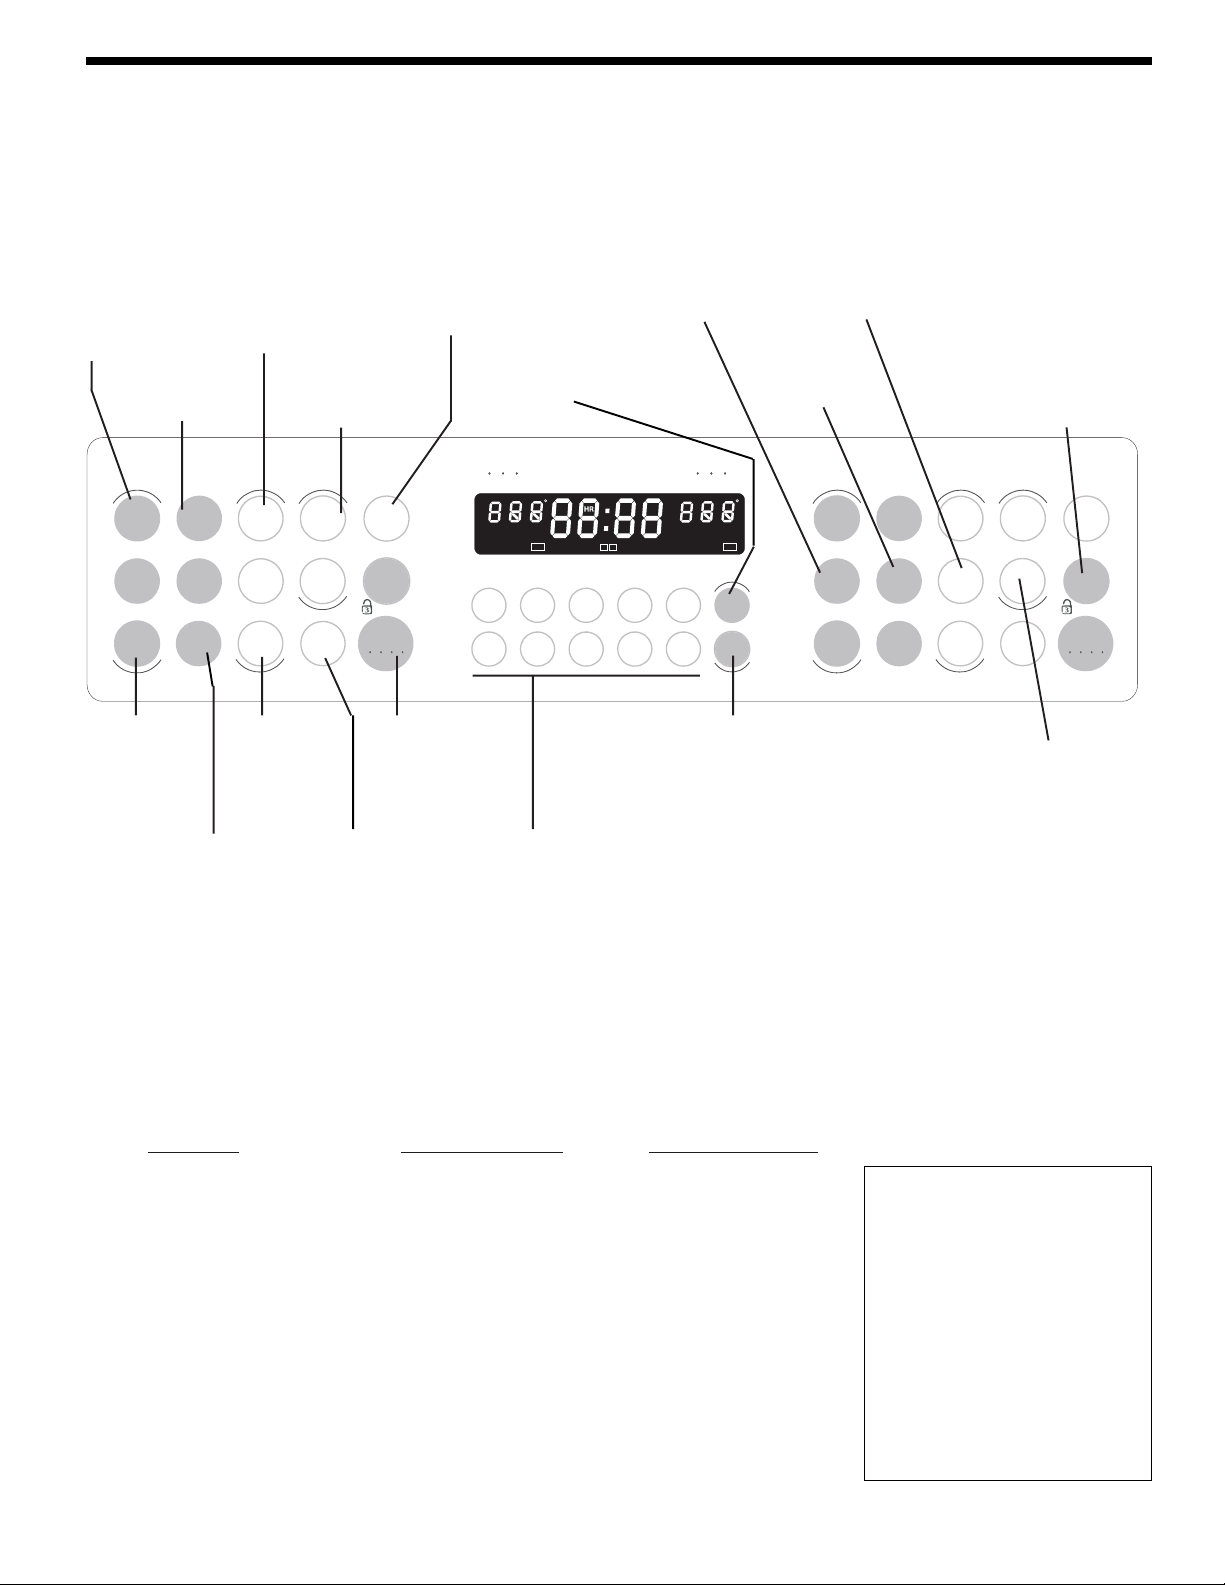
Control Pad Features
READ THE INSTRUCTIONS CAREFULLY BEFORE USING THE OVEN. For satisfactory use of your oven, become
familiar with the various features and functions of the oven as described below. Detailed instructions for each feature
and function follow later in this Use & Care Guide.
Convection
Bake— Use to
select the
Convection
Bake feature.
Preheat—Used
to preheat the
oven.
Speed
Clean— Use
to select the
Speed Clean
feature.
Bake Time— Used
to enter the length of
the baking time.
Oven Interior
Light— Used to turn
oven interior light
ON and OFF.
Clock— Used to
set the time of day.
Convection
Convert— Use to
select the Convection
Convert feature.
Clean— Use to
select the SelfClean feature.
Bake—Used to
select the bake
function.
ClearOff— Used to clear
any function previously
entered except the time of
day and minute timer. Press
STOP CLEAR to stop
cooking. Also the STOP
CLEAR pad is used to
activate oven lockout setting.
Conv
bake
Conv
convert
Conv
roast
Pre
heat
Bake
Broil
Convection
Roast— Use
to select the
convection
roasting mode.
Upper Oven
Speed
clean
Cle an
Maxx
clean
Bake
time
Start
time
Keep
warm
Maxx Clean—
Use to select
the Maxx
Clean feature.
P
Oven
light
Clear
/Off
Controls
START
R
B
CONV
DELAY
CLEAN
UPPER OVEN LOWER OVEN
123
6
Start — Use to
start all oven
features (not used
with Oven Light).
Even-Cook Convection Ovens
STOP ON TIMER
4
P
R
B
CONV
DELAY
CLEAN
5
0
BROIL
TIMED
LOCK
PREBAKE
ON
Clock
Timer
On/Off
AM
PM
BROIL
PRE-
TIMED
BAKE
LOCK
ON
CLEAN OVEN
1
789
2
Timer On/Off — Used to set or cancel
the minute timer. The minute timer
does not start or stop cooking. Also,
TIMER SET/OFF Pad is used to set
the Continuous Bake Feature.
Conv
bake
Conv
convert
Conv
roast
Lower Oven
Pre
heat
Bake
Broil
Speed
clean
Cle an
Maxx
clean
Bake
time
Start
time
Keep
warm
Oven
light
Clear
/Off
Controls
START
Start Time — Used to
set the desired start time
for baking. May be used
with COOK TIME to
program a delayed bake
Broil— Used to
select the
variable broil
function.
Warm & Hold—
Used to set the
Warm & Hold
feature.
0 Thru 9 Number Pads—
Use to enter temperature
and times.
cycle.
Minimum and Maximum Control Pad Settings
All of the features listed below have minimum and maximum time or temperature settings that may be entered into the control.
An ENTRY acceptance beep will sound each time a control pad is touched (the Oven Lockout pad is delayed 3 seconds).
An ENTRY ERROR tone (3 short beeps) will sound if the entry of the temperature or time is below the minimum or above the
maximum settings for the feature.
FEATURE MINIMUM VALUE MAXIMUM VALUE
PREHEAT TEMP. 170°F/77°C 550°F/288°C
BAKE TEMP. 170°F/77°C 550°F/288°C
BROIL TEMP. 400°F/204°C HI-550°F/288°C
KITCHEN TIMER 12 Hr. 0:01 Min. 11:50 Hr./Min.
24 Hr. 0:01 Min. 11:50 Hr./Min.
CLOCK TIME 12 Hr. 1:00 Hr./Min. 12:59 Hr./Min.
24 Hr. 0:00 Hr./Min. 23:59 Hr./Min.
OVEN COOK TIME 12 Hr. 0:01 Min. 11:50 Hr./Min.
24 Hr. 0:01 Min. 11:50Hr./Min.
CONVECTION BAKE 325°F/163°C 550°F/288°C
CONVECTION ROAST 300°F/149°C 550°F/288°C
1
Versión en español
Si desea obtener una copia en
español de este Manual del
Usuario, sírvase escribir a la
dirección que se incluye a
continuación. Solicite la P/N
318200133E.
Spanish Owner's Guides
Frigidaire Company
P. O. Box 9061
Dublin, Ohio 43017-0961
318200133 (0407) Rev. A
Page 2
Setting the Clock
Setting the Clock
The CLOCK
Clock
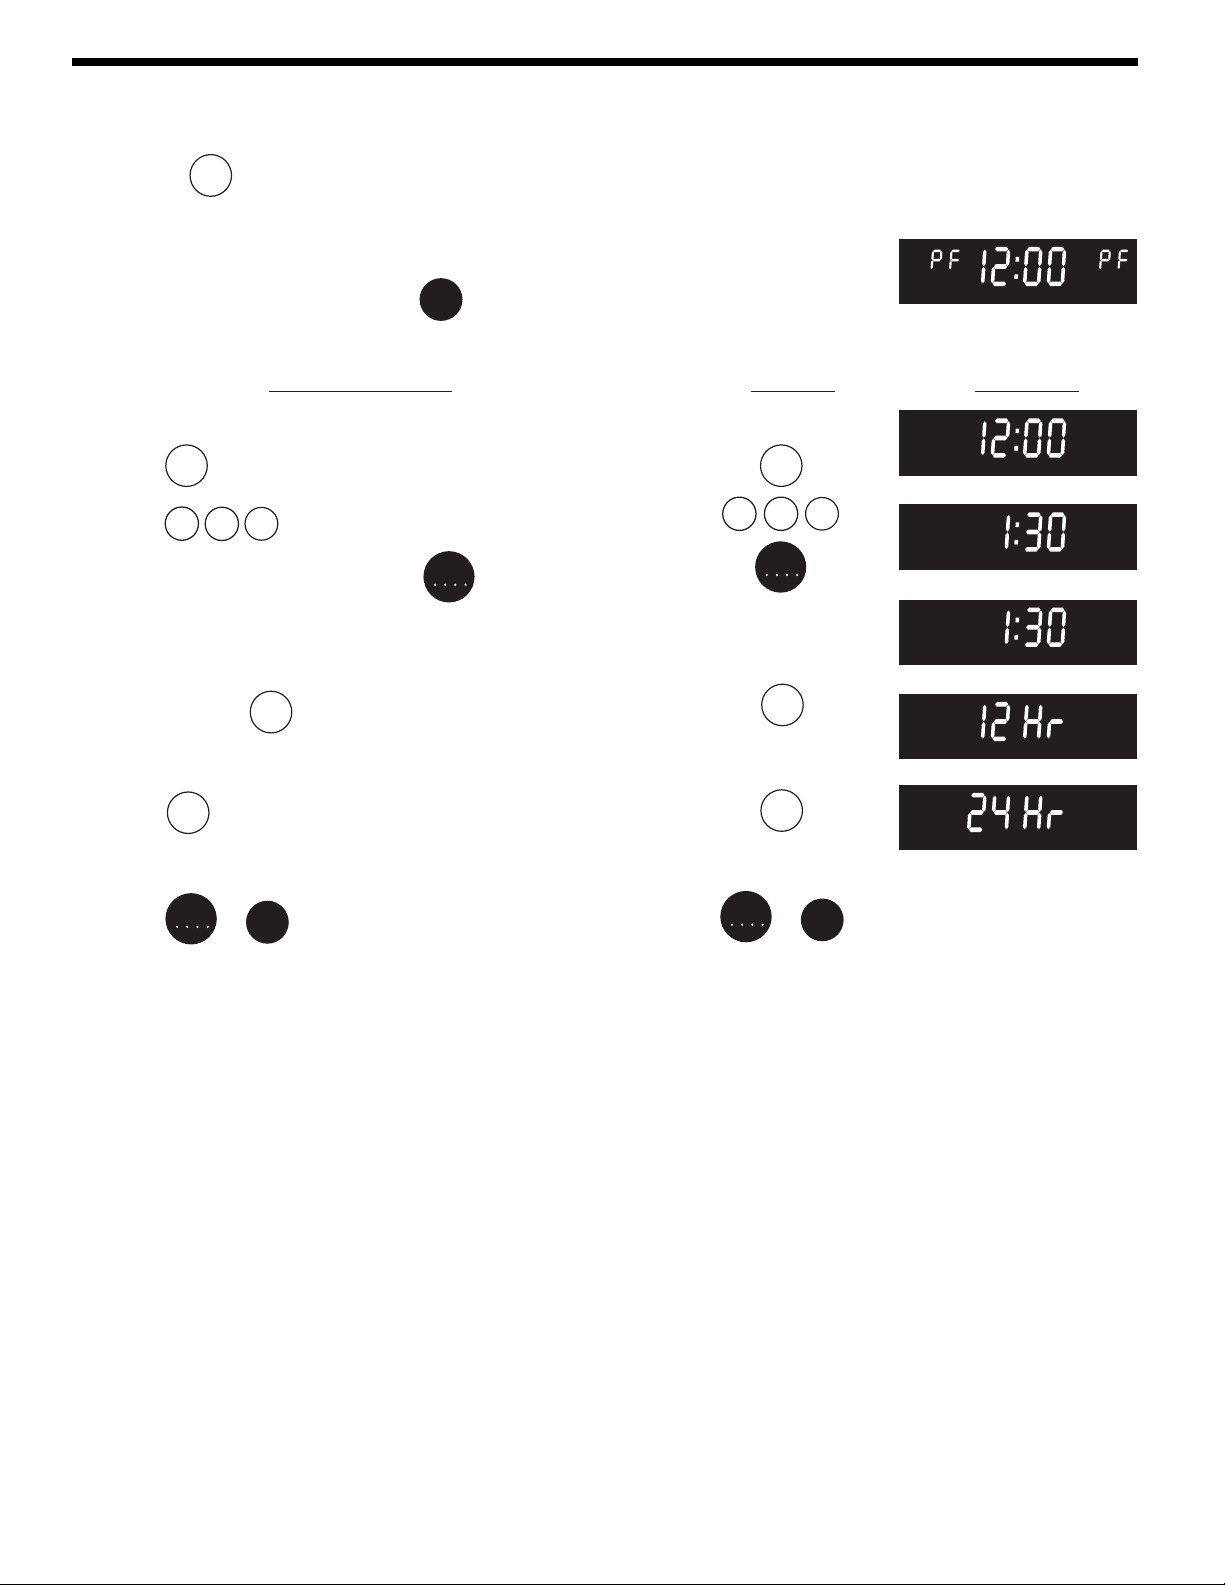
pad is used to set the clock. The clock may be set for 12 or 24 hour time
of day operation. The clock has been preset at the factory for the 12 hour operation. When
the range is first plugged in, or when the power supply to the range has been interrupted, the
timer in the display will flash with "PF" (power failure, See Figure 1).
When PF appears in the display, press
Clear
. A beep will sound and PF will disappear.
/Off
INSTRUCTIONS PRESS DISPLAY
To set the clock (example below for 1:30)
1. Press
Clock
. "TIME" will appear in the display (Figure 2).
2. Press 1 3 0 pads to set the time of day to 1:30 (Figure 3).
"TIME" will stay in the display. Press
START
. "TIME" will disappear
and the clock will start (Figure 4).
1
Clock
3
START
0
Changing between 12 or 24 hour time of day display
1. Press and hold
Clock
for 7 seconds (Figure 3). After 7 seconds,
"12Hr" (Figure 5) or "24Hr" (Figure 6) will appear in the display and
the control will beep once.
Clock
for 7 seconds
Figure 1
TIME
Figure 2
TIME
Figure 3
Figure 4
Figure 5
2. Press
Clean
to switch between the 12 and 24 hour time of day
display. The display will show either "12Hr" (Figure 5) or "24Hr"
(Figure 6).
3. Press
START
or
Clear
or wait 5 seconds to accept the change.
/Off
4. Reset the correct time as described in To set the Clock above.
Please note that if the 24 hour time of day mode was chosen, the
clock will now display time from 0:00 through 23:59 hours.
START
Clean
or
Clear
/Off
Figure 6
2
Page 3
Setting the Clock
Setting Continuous Bake or 12 Hour Energy Saving
The KITCHEN TIMER
Timer
and CLEAN
On/OOff
Clean
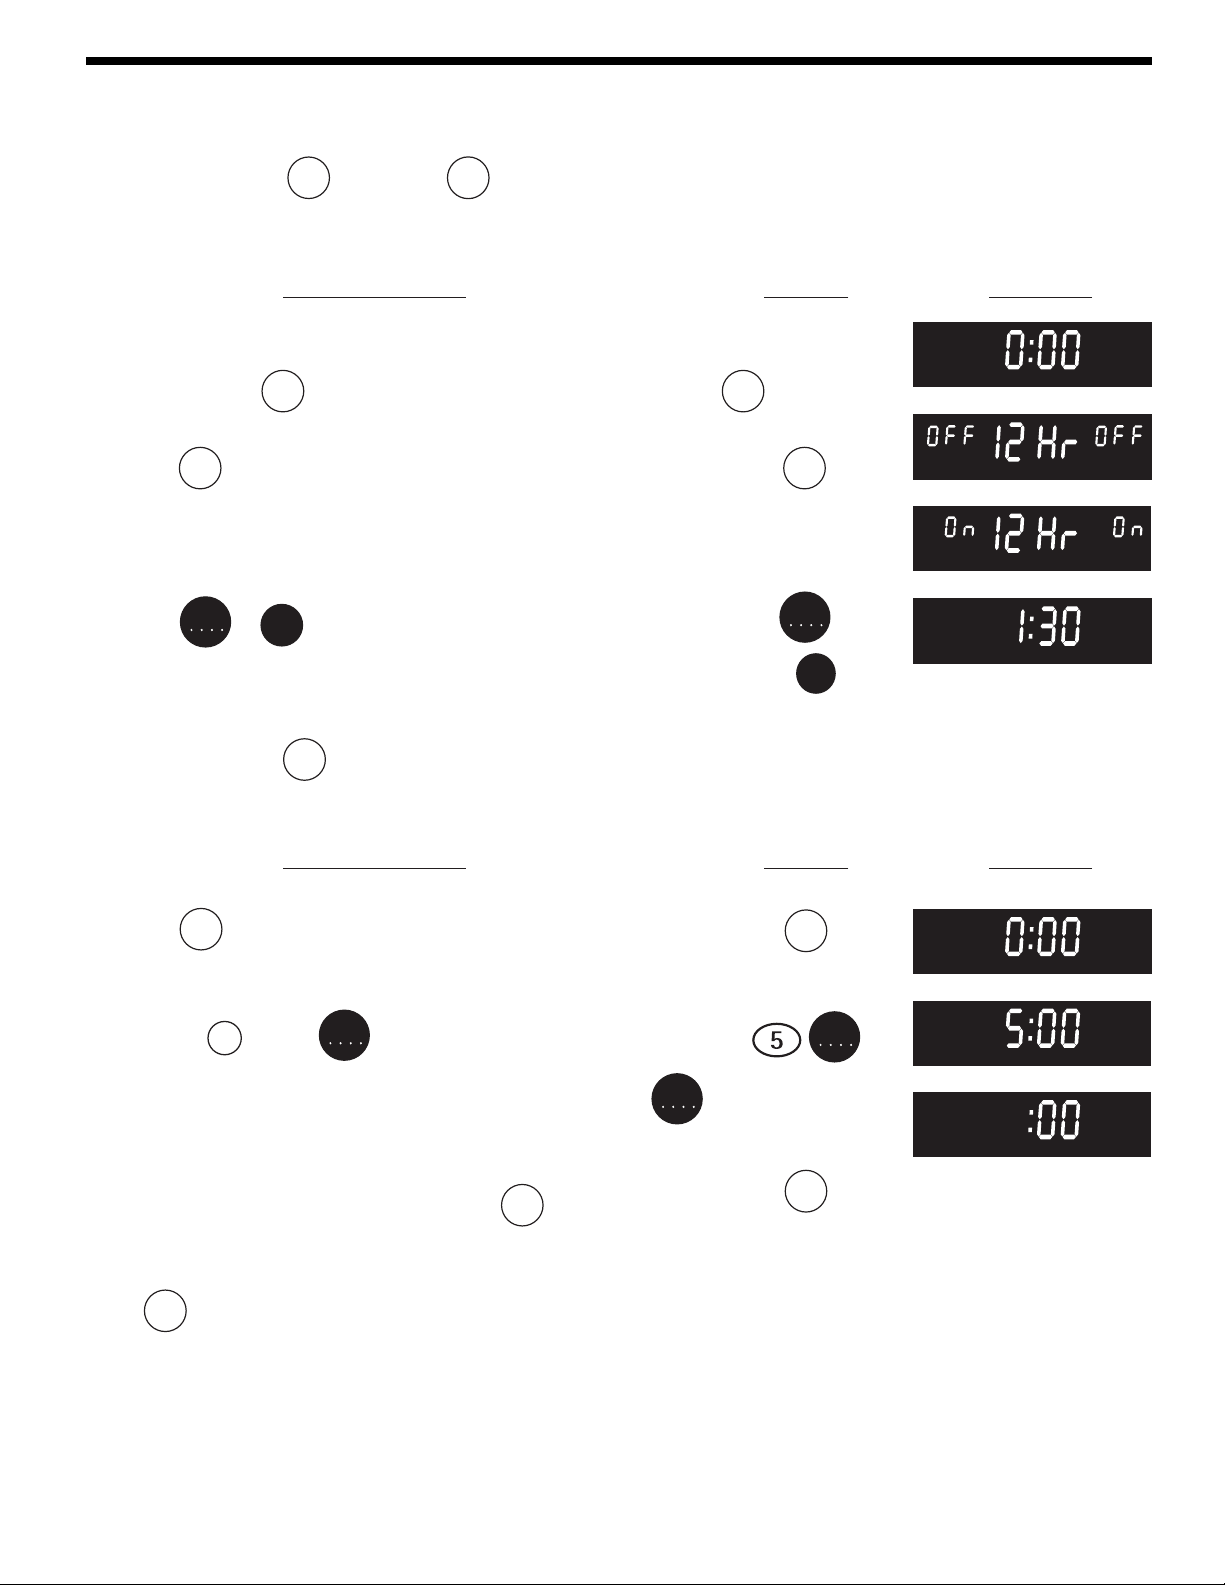
pads control the Continuous Bake or 12 Hour Energy Saving features. The
oven control has a factory preset built-in 12 Hour Energy Saving feature that will shut off the oven if the oven control is
left on for more than 11 hours and 59 minutes. The oven can be programmed to override this feature for Continuous
Baking.
INSTRUCTIONS PRESS DISPLAY
To set the control for Continuous Bake or 12 Hour
Energy Saving features
1. Press and hold
Timer
for 7 seconds (Figure 1). After 7 seconds
On/OOff
"Off 12Hr Off will appear in the display (Figure 2).
2. Press
Clean
to switch between the 12 Hour Energy Saving and
continuous bake features. Note: "On 12Hr On" (Figure 3) in the
display indicates the control is set for the 12 Hour Energy Saving
mode and "Off 12Hr Off" indicates the control is set for the
Continuous Bake feature (Figure 2).
3. Press
START
or
Clear
or wait 5 seconds to accept the change.
/Off
(Figure 4; display will return to time of day).
Timer
for 7 seconds
On/OOff
Clean
START
or
Clear
/Off
Figure 1
Figure 2
Figure 3
Figure 4
TIMER
Setting Kitchen Timer
The KITCHEN TIMER
Timer
pad controls the Kitchen Timer feature. The Kitchen Timer serves as an extra timer in the kitchen
On/OOff
that will beep when the set time has run out. It does not start or stop cooking. The Kitchen Timer feature can be used during
any of the other oven control functions. Refer to “Minumum and Maximum Control Pad Settings” for time amount settings.
INSTRUCTIONS PRESS DISPLAY
To set the Kitchen Timer (example: 5 minutes)
1. Press
Timer
. "0:00" will appear and "TIMER" will flash in the
On/OOff
display (Figure 5).
2. Press the number pads to set the desired time in the display
(example 5). Press
"5:00" and "TIMER" will stay in the display (Figure 6). Note: If
START
. The time will begin to count down with
START
is not pressed the timer will return to the time of day.
3. When the set time has run out, ":00" and "TIMER" will show in the
display (Figure 7). The oven will beep until
Timer
is pressed.
On/OOff
Timer
On/OOff
Timer
On/OOff
TIMER
Figure 5
START
TIMER
Figure 6
TIMER
Figure 7
To cancel the Kitchen Timer before the set time has run out
Press
display will return to the time of day.
Timer
twice until the clock displays ":0:00" and "TIMER". The
On/OOff
3
Page 4
Consumer Defined Control
LOCK
LOCK
Note: The Consumer Defined Control features are adjustments to the control that will not affect cooking results. These include
the Oven Lockout, Temperature Display and Silent Control Operation features
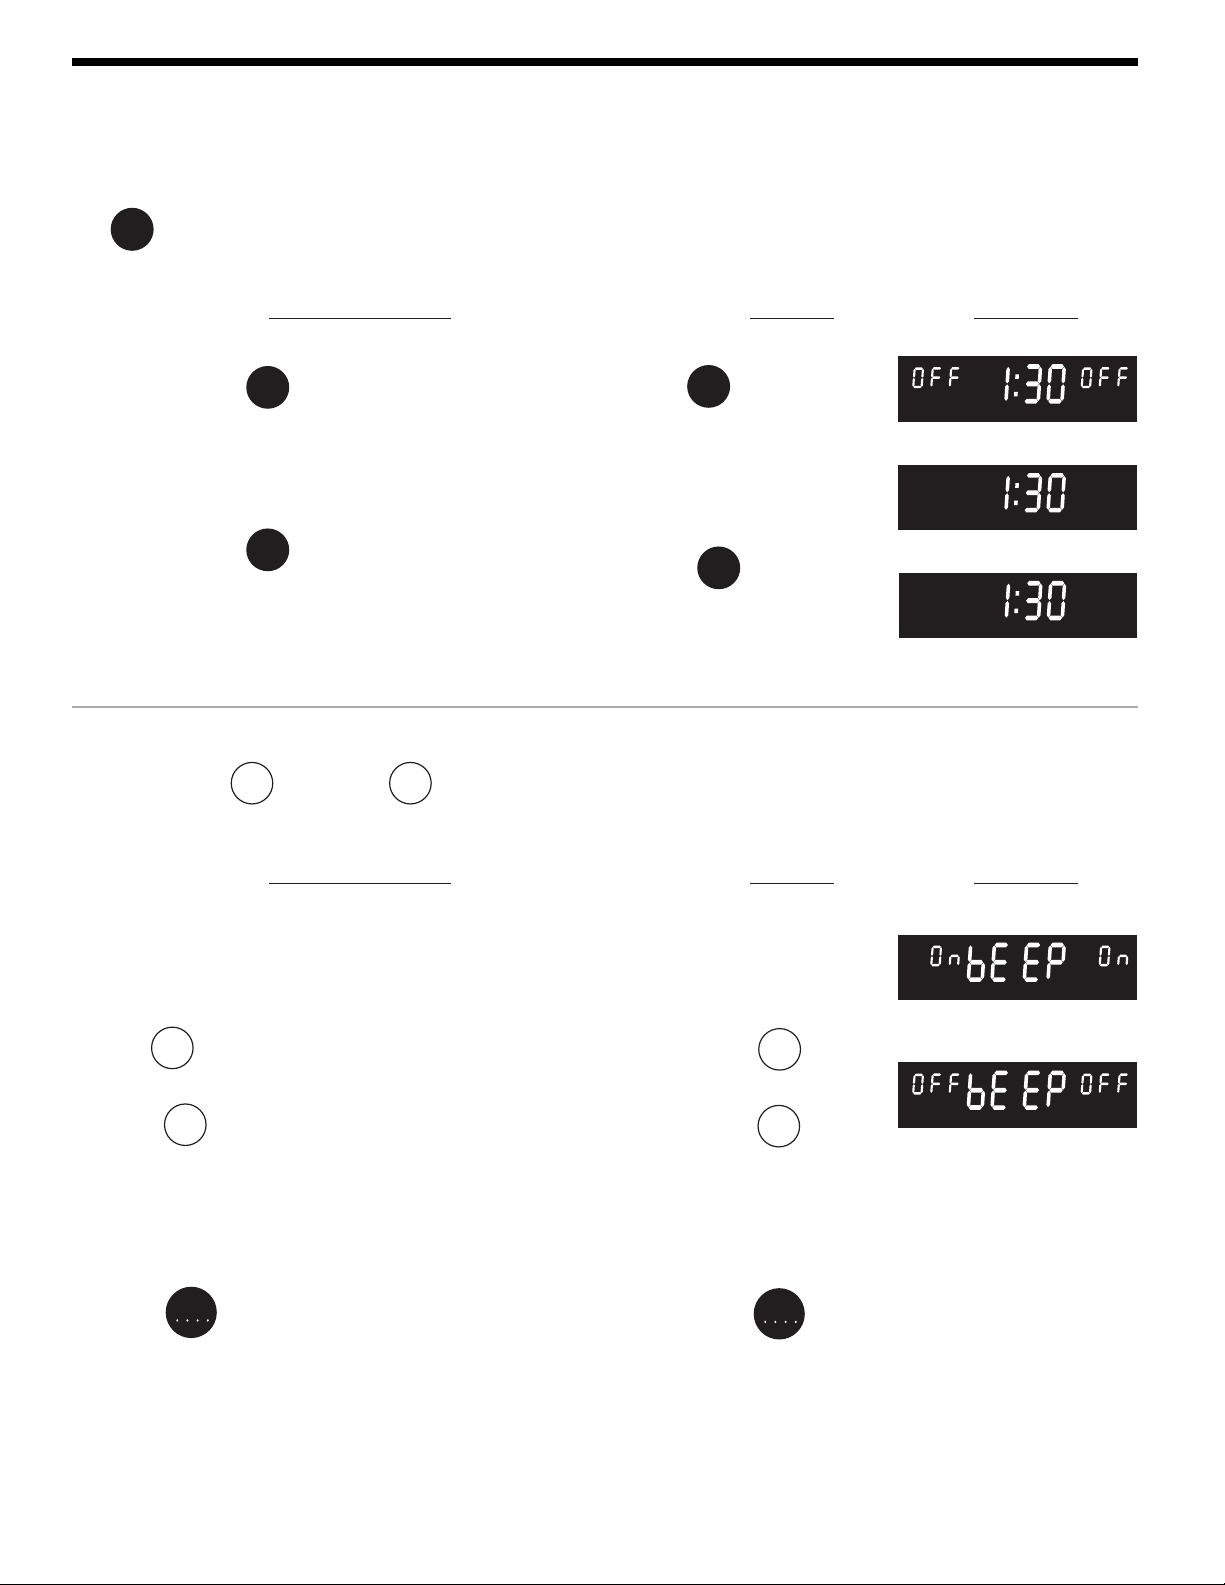
Setting Oven Lockout Feature
Clear
The
the Oven from being turned on. It does not disable the interior oven lights.
To activate the Oven Lockout feature
1. Press and hold
2. After 3 seconds "Off" will appear in the display and a beep will
pad controls the Oven Lockout feature. The Oven Lockout feature automatically locks the oven door and prevents
/Off
INSTRUCTIONS PRESS DISPLAY
Clear
for 3 seconds (Figure 1).
/Off
sound. Once the oven door is locked "LOCK" will appear in the
display (Figure 1).
Clear
for 3 seconds
/Off
LOCK LOCK
Figure 1
To reactivate normal oven operation:
1. Press and hold
disappear from the display and "LOCK" will stay until the oven door
Clear
for 3 seconds. A beep will sound. "Off" will
/Off
Clear
for 3 seconds
/Off
LOCK LOCK
Figure 2
has completely unlocked (Figure 2).
2. The wall oven is again fully operational (Figure 3).
Figure 3
Setting Silent Control Operation
The START TIME
Start
and CLEAN
time
feature allows the oven control to be operated without sounds or beeps whenever necessary. If desired the control can be
programmed for silent operation and later returned to operating with all the normal sounds and beeps.
Clean
pads control the Silent Control operation feature. The Silent Control operation
INSTRUCTIONS PRESS DISPLAY
To change control from normal sound operation to
silent control operation
1. To tell if your range is set for normal or silent operation press and
Start
hold
for 7 seconds. "On bEEp On" will appear in the display
time
(Figure 4).
Start
time
for 7 seconds
Figure 4
2. Press
Clean
to switch between normal sound operation and silent
operation mode. The display will show either "On bEEp On"
(Figure 4) or "Off bEEp Off" (Figure 5).
If "On bEEp On" appears (Figure 4), the control will operate with
normal sounds and beeps. If "Off bEEp Off" appears (Figure 5),
the control is in the silent operation mode.
3. Press
START
or wait 5 seconds to accept the change.
Clean
START
Figure 5
4
Page 5
Consumer Defined Control Features
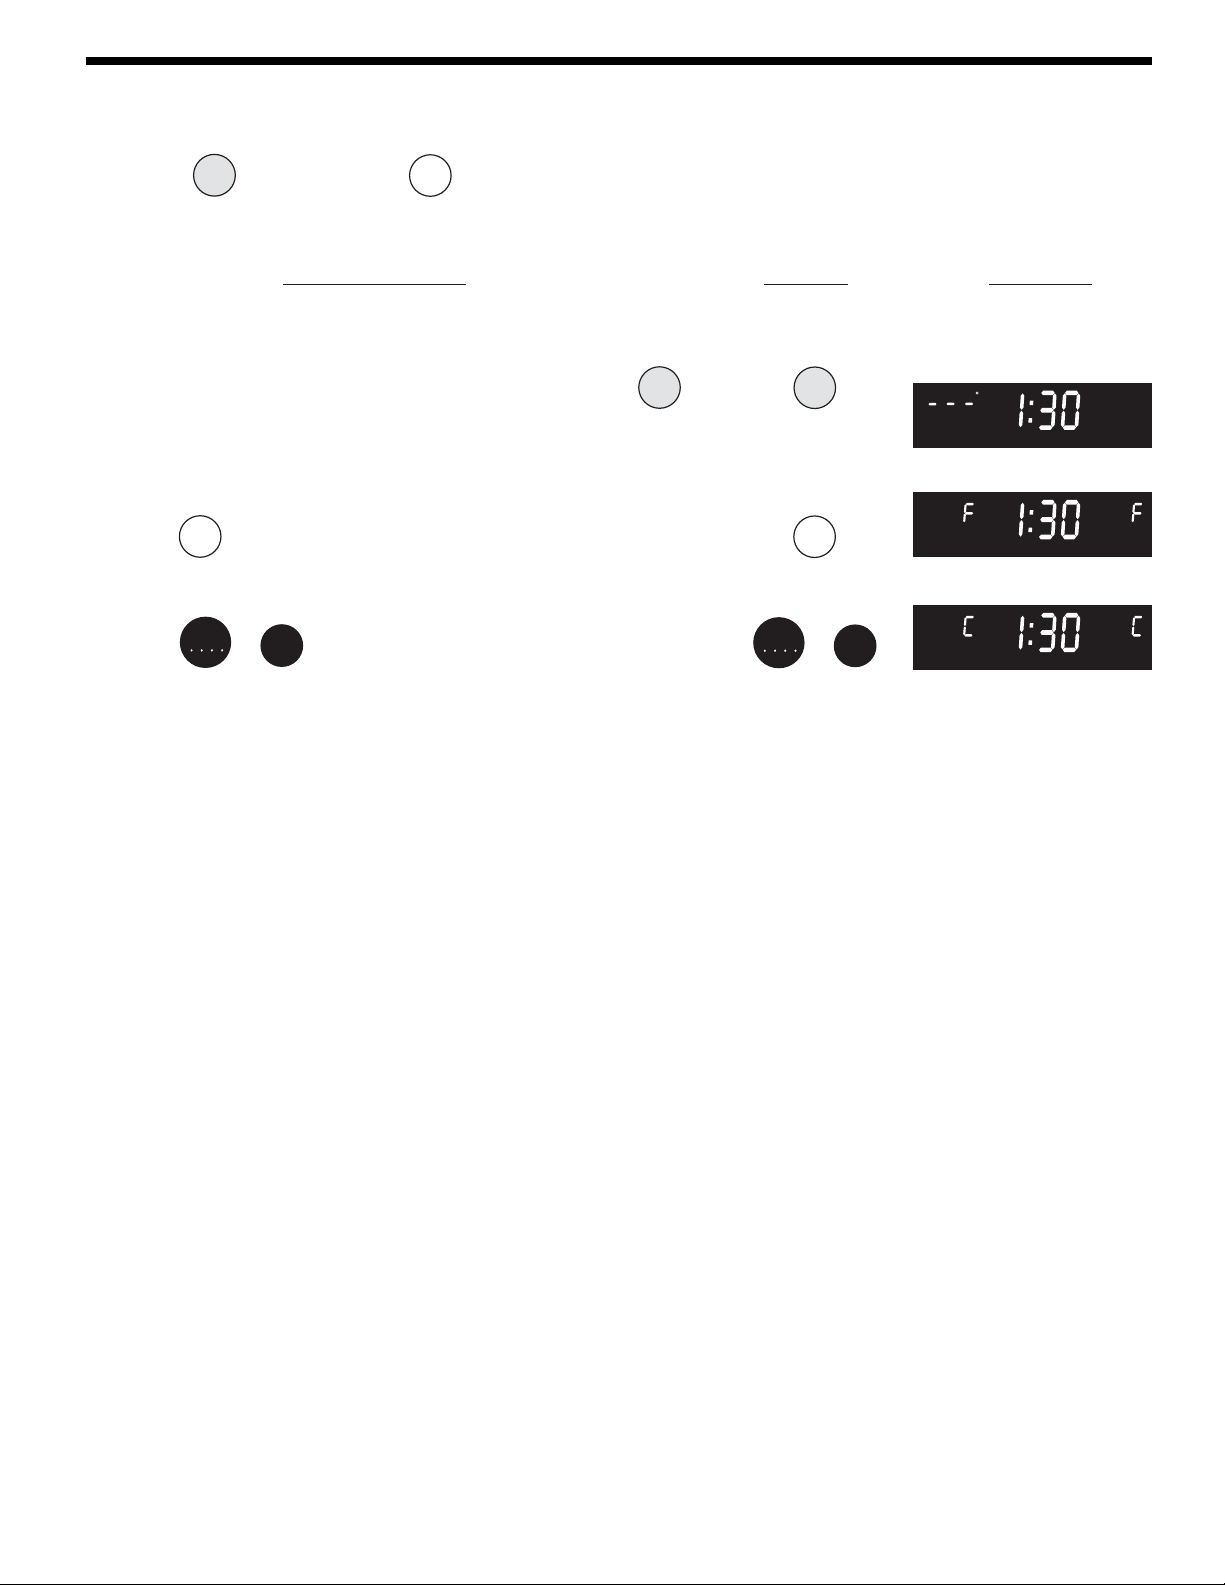
Setting Temperature Display — Fahrenheit or Celsius
The BROIL
Broil
and FLEX CLEAN
Clean
pads control the Fahrenheit or Celsius temperature display modes. The oven
control can be programmed to display temperatures in Fahrenheit or Celsius. The oven has been preset at the factory to
display in Fahrenheit.
INSTRUCTIONS PRESS DISPLAY
To change display from Fahrenheit to Celsius or
Celsius to Fahrenheit
1. To tell if the display is set for Fahrenheit or Celsius press
(figure 1) and hold for 7 seconds; Wait untill "F" or "C" appears.
If "F" appears, the display is set to show temperatures in
Fahrenheit (Figure 2). If "C" appears, the display is set to show
temperatures in Celsius (Figure 3).
2. Press
Clean
to switch between Fahrenheit or Celsius display
modes. The display will show either "F" (Figure 2) or "C"
(Figure 3).
3. Press
START
or
Clear
or wait 5 seconds to accept the change.
/Off
Broil
Broil
for 7seconds
Clean
or
Clear
/Off
START
BROIL
Figure 1
Figure 2
Figure 3
5
Page 6
PREBAKE
PREBAKE
PREBAKE
Setting Oven Controls
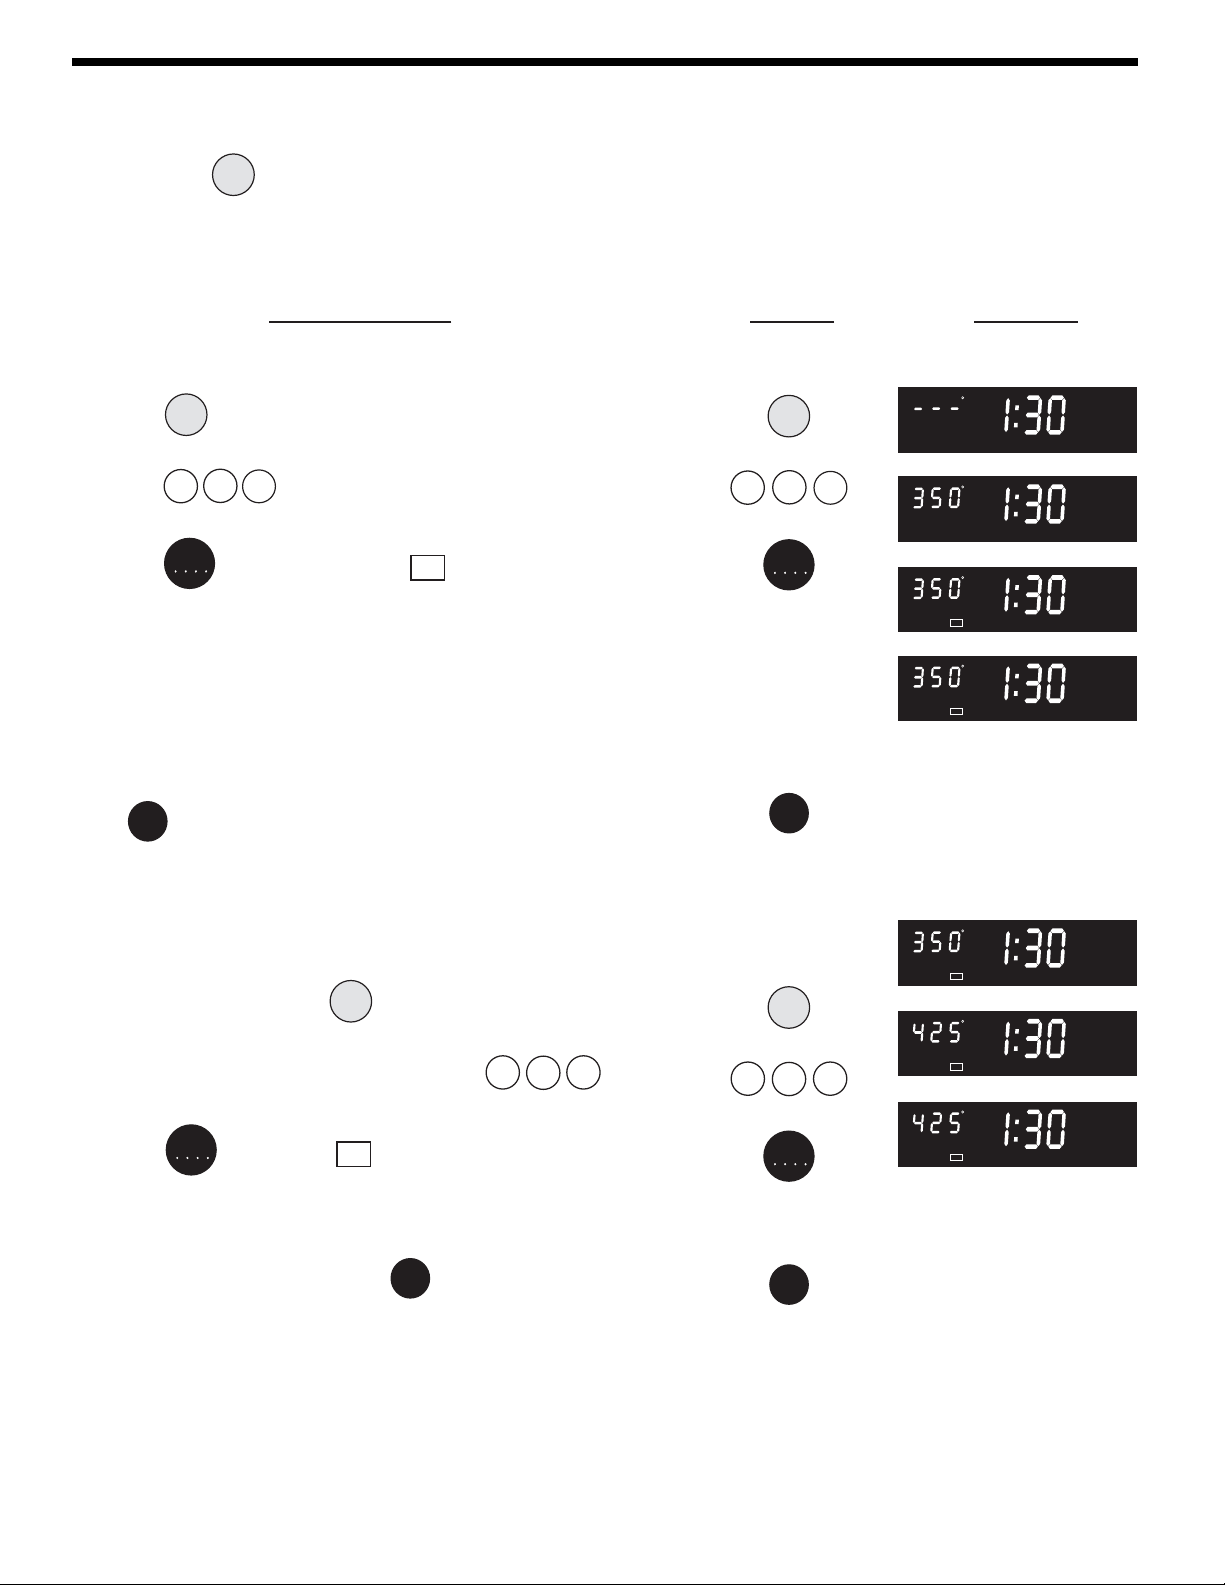
Setting Preheat
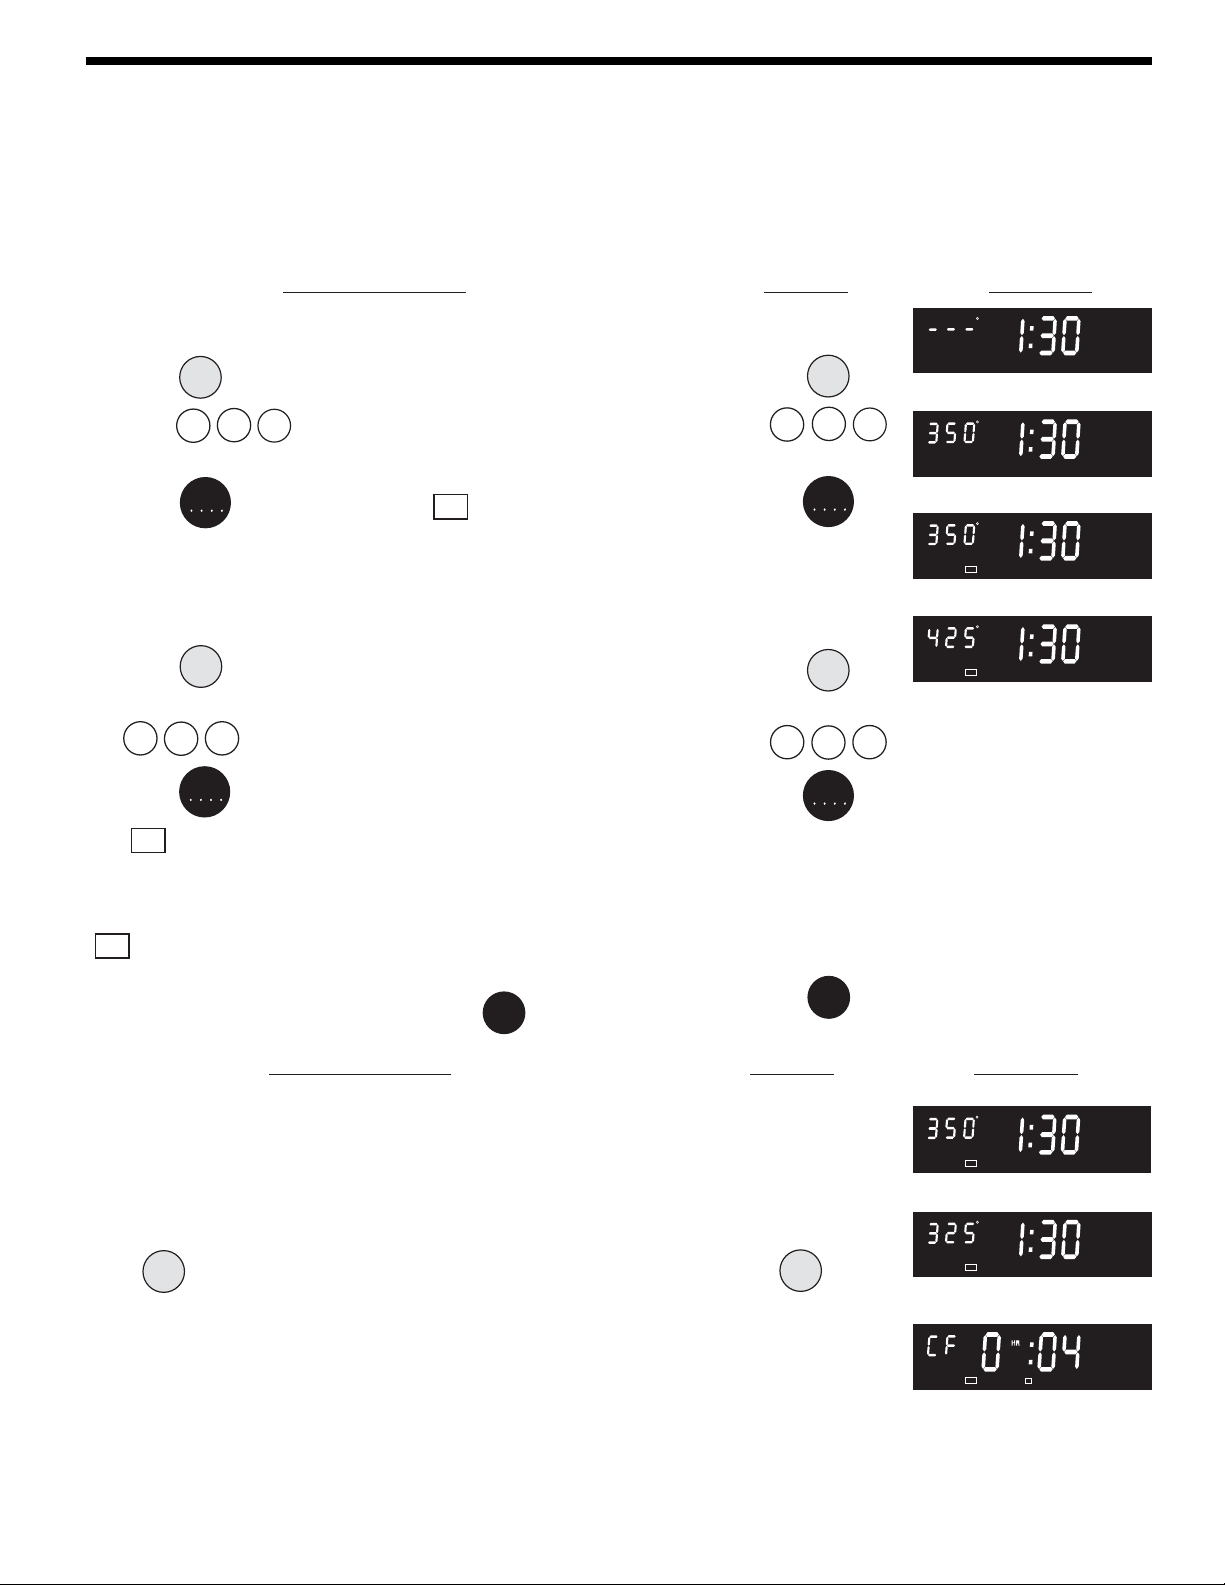
The PREHEAT
indicate when to place the food in the oven. Use this feature when recipes call for preheating. Preheating is not necessary
when roasting or cooking casseroles. The oven can be programmed to preheat at any temperature between 170°F to 550°F
(77°C to 288°C).
To set the Preheat temperature for 350°F
1. Arrange the interior oven racks.
2. Press
(Figure 1).
3. Press 3 5 0. "350°" and "BAKE" will appear in the display
(Figure 2).
4. Press
Pre
pad controls the Preheat feature. The Preheat feature will bring the oven up to temperature and then
Heat
INSTRUCTIONS PRESS DISPLAY
Pre
. "- - - °" and "BAKE" will appear in the display
Heat
START
. "PRE", "BAKE" and "ON" will appear in the display
3
Pre
Heat
5
START
BAKE
Figure 1
0
BAKE
Figure 2
as the oven heats and reaches 350°F (Figure 3).
Note: After the oven has reached the desired temperature (this
example, 350°F) the control will beep and the "PRE" light will turn off
and oven temperature will be displayed (Figure 4). If you missed
hearing the beep, you can tell that oven has reached preheat temperature
if "PRE" has disapeared from the display. Once the oven has
preheated, PLACE FOOD IN THE OVEN. The "BAKE" light will stay
on.
Press
Clear
when baking is complete or to cancel the preheat feature.
/Off
To change Preheat temperature while oven is
preheating (example: changing from 350 to 425°F)
If it is necessary to change the preheat temperature while the oven is
preheating to the original temperature:
1. While preheating, press
(Figure 5)
2. Enter the new preheat temperature. Press 4 2 5. "425°"
and "BAKE" will appear in the display.
3. Press
START
. "PRE" and "ON " will appear in the display as the
oven heats to 425°F (Figure 6). A beep will sound once the oven
temperature reaches 425°F and the display will show "425°" and
"BAKE" (Figure 7).
4. When baking is complete press
Pre
. "BAKE" will flash in the display
Heat
Clear
.
/Off
4
Clear
/Off
Pre
Heat
2
START
Clear
/Off
PRE-
BAKE
ON
Figure 3
BAKE
ON
Figure 4
PRE-
BAKE
ON
Figure 5
PRE-
BAKE
BAKE
ON
ON
Figure 6
5
Figure 7
6
Page 7
Setting Oven Controls
PREBAKE
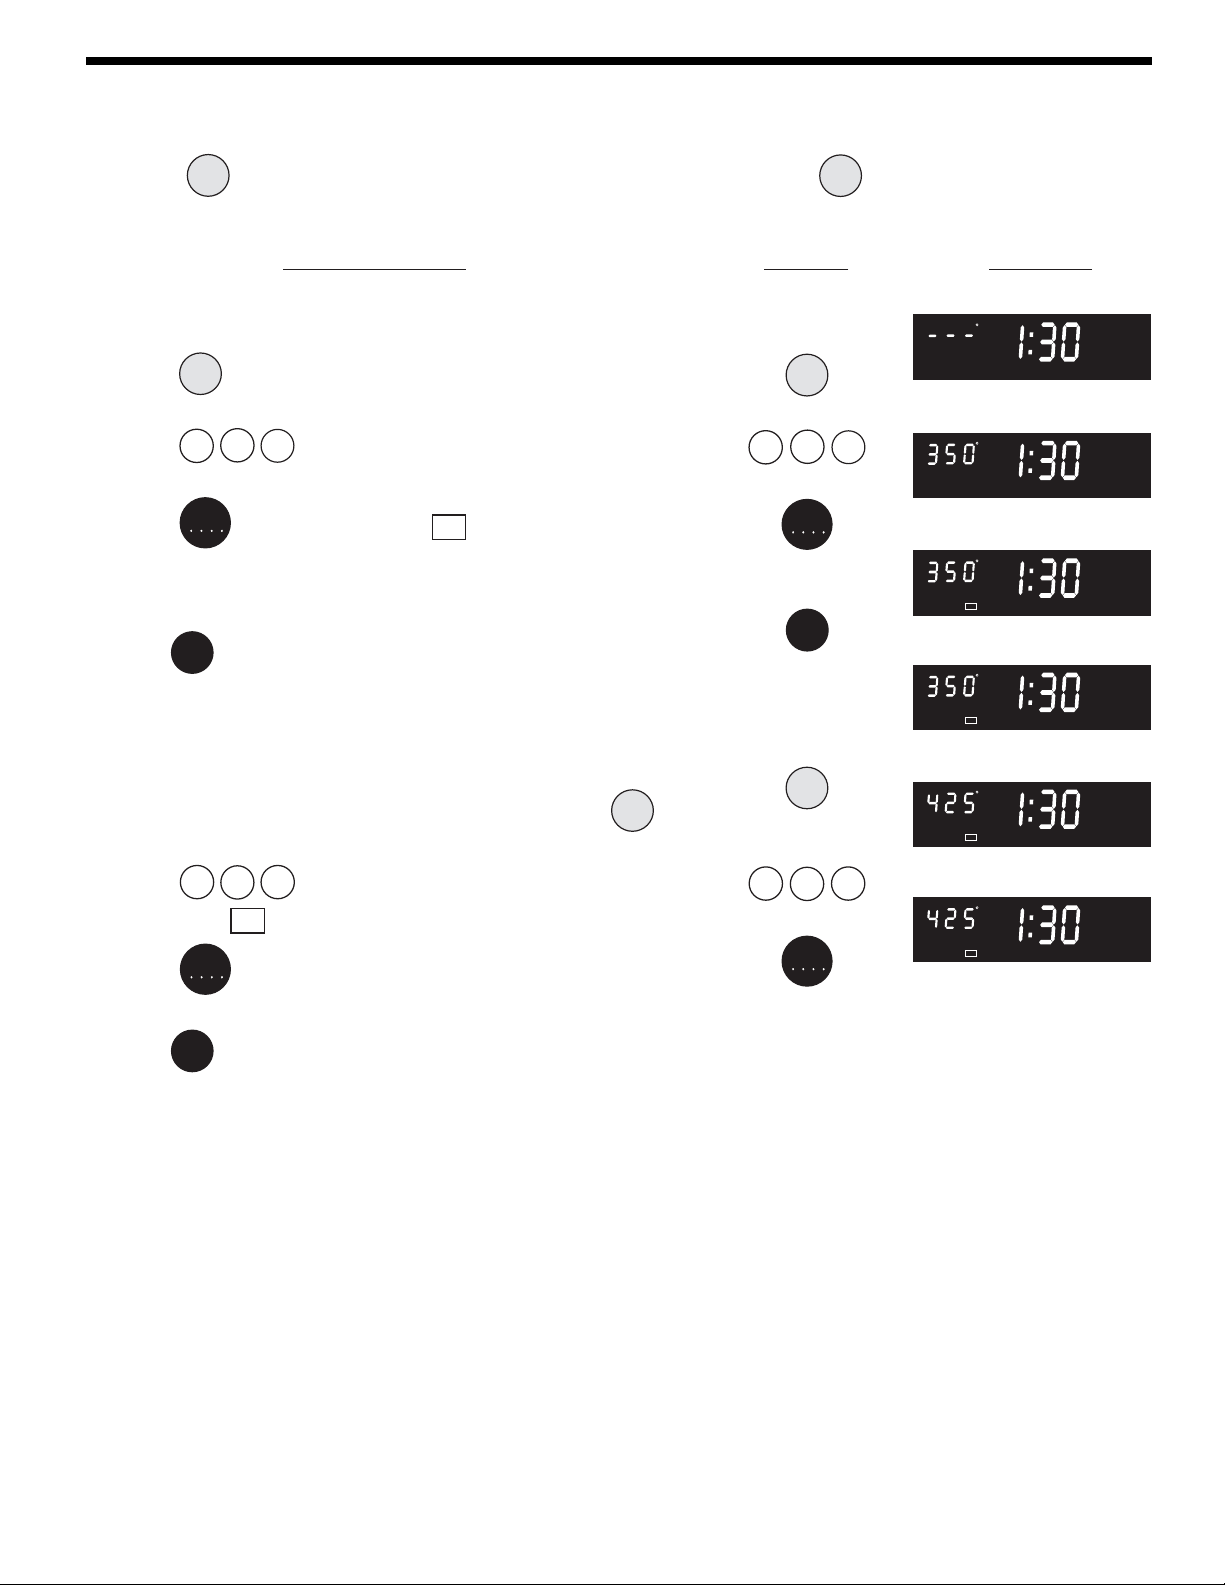
Setting Bake
Bake
Pre
Preheat Feature for instructions.
Heat
BAKE
Figure 1
The BAKE
Bake
pad controls normal baking. If preheating is necessary, refer to the
The oven can be programmed to bake at any temperature from 170° F to 550° F (The sample shown below is for 350°F).
INSTRUCTIONS PRESS DISPLAY
To set the Bake Temperature to 350°F
1. Arrange interior oven racks and place food in oven.
2. Press
display (Figure 1).
Bake
, "- - - °" will appear and "BAKE" will flash in the
3. Press
5 0 (Figure 2). "BAKE" will continue to flash
3
and "350°" will appear in the display.
4. Press
START
. "PRE", "BAKE" and "ON " will appear in the
display as the oven heats to 350°F (Figure 3). A beep will sound
once the oven temperature reaches 350°F. The display will
show "350°" and "BAKE"(Figure 4).
Pressing
Clear
will cancel the Bake feature at any time.
/Off
To change the Bake Temperature (example:
changing from 350° to 425°F)
1. After the oven has already been set to bake at 350°F and the
oven temperature needs to be changed to 425°F, press
(Figure 4) and "BAKE" will flash in the display.
2. Press 4 2 5 (Figure 5). "BAKE" will continue to flash
"425°" and "ON " will appear in the display.
3. Press
START
. "BAKE" and "425°" will stay in the display (See
Figure 6).
Pressing
Clear
will cancel the Bake feature at any time.
/Off
Bake
3
4
5
START
Clear
/Off
Bake
2
START
0
BAKE
Figure 2
PREBAKE
ON
Figure 3
BAKE
ON
Figure 4
BAKE
ON
Figure 5
5
BAKE
ON
Figure 6
7
Page 8
PREBAKE
Setting Oven Controls
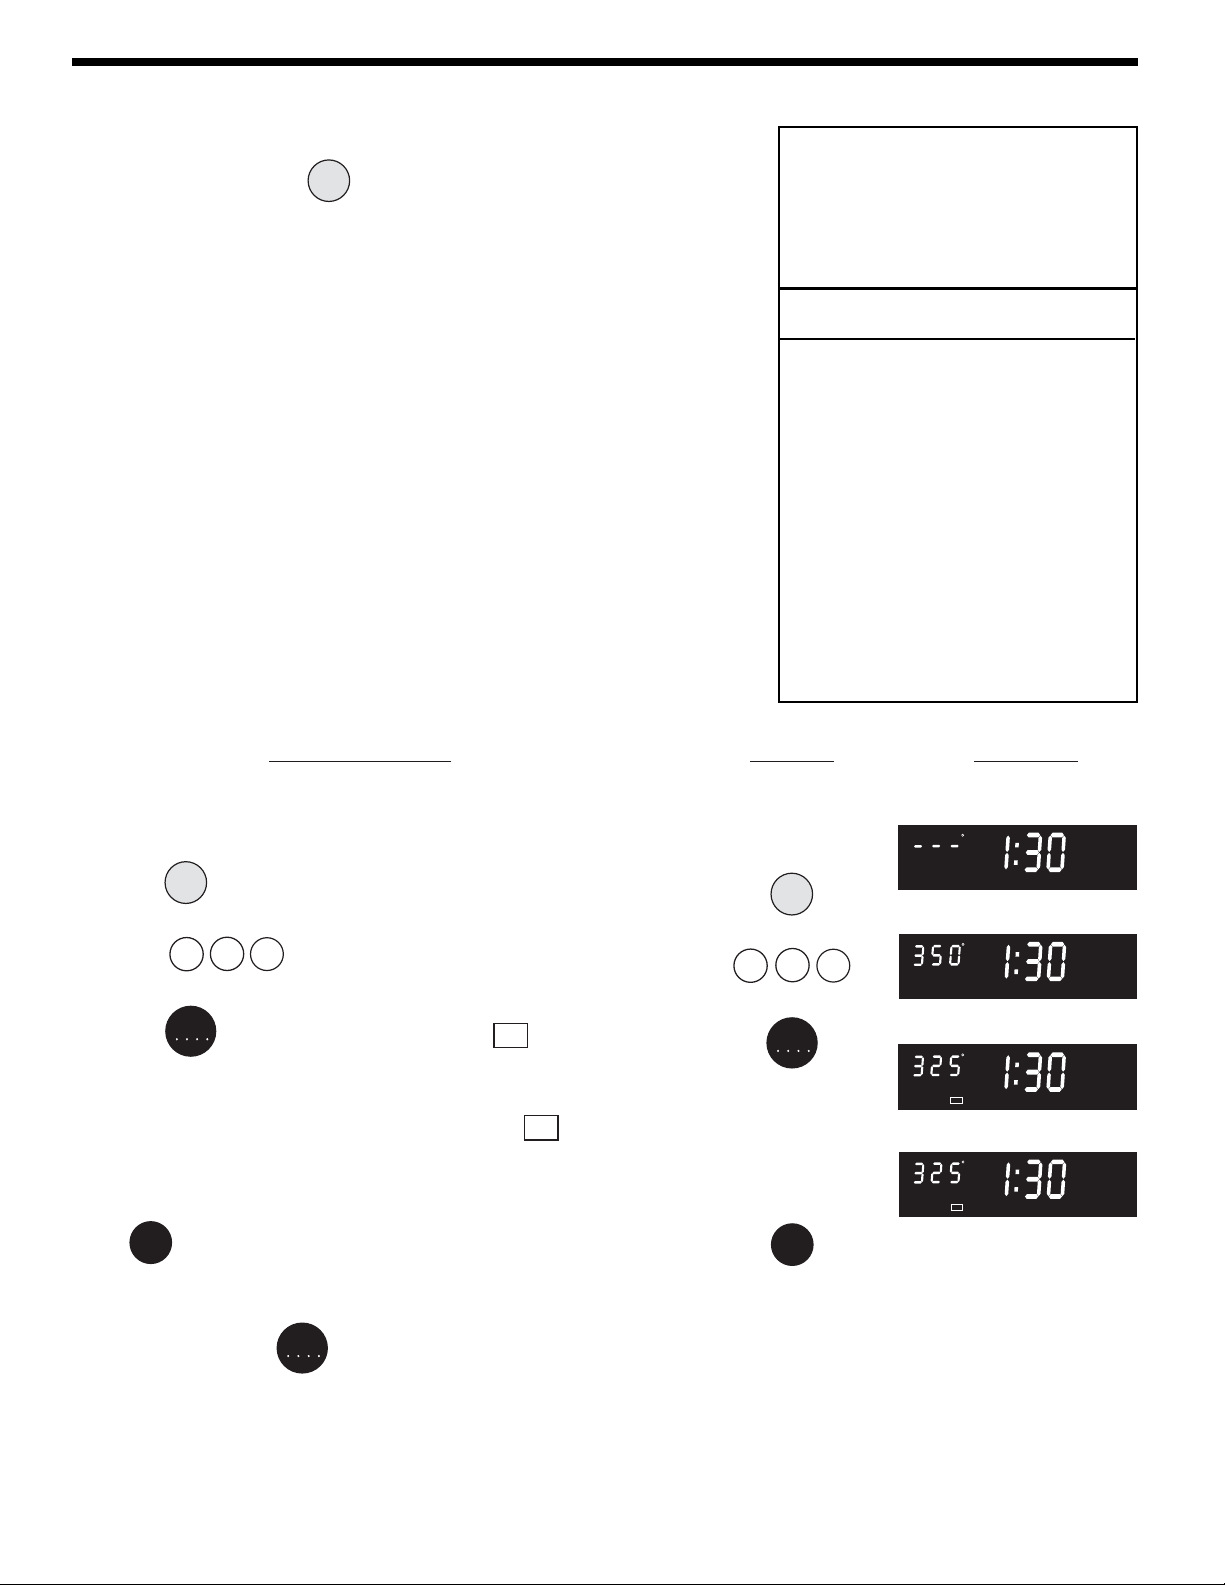
Setting Convection Bake
The CONVECTION BAKE
the Convection Bake feature when cooking speed is desired. The oven can be
programmed for Convection baking at any temperature between 325° F (149° C)
to 550° F (288° C).
Convection baking uses a fan to circulate the oven's heat evenly and continuously
within the oven. This improved heat distribution allows for fast, even cooking and
browning results. It also gives better baking results when using 2 or 3 racks at the
same time. Breads and pastries brown more evenly. Convection Bake cooks
most foods faster and more evenly than conventional baking.
Conv
pad controls the Convection Bake feature. Use
bake
General Convection Bake Instructions
1. When using Convection Bake, decrease your normal cooking times as shown
aside. Adjust the cook time for desired doneness as needed. Time reductions
will vary depending on the amount and type of food to be cooked. Cookies and
biscuits should be baked on pans with no sides or very low sides to allow
heated air to circulate around the food. Food baked on pans with a dark finish
will cook faster.
2. Preheating is not necessary when cooking casseroles with Convection Bake.
3. When using Convection Bake with a single rack, place oven rack in position
2 or 3. If cooking on multiple racks, place the oven racks in positions 2 and
3.
Benefits of Convection Bake:
—Some foods cook up to 30% faster,
saving time and energy.
—Multiple rack baking.
—No special pans or bakeware needed.
Foods for CONVECTION BAKE pad
*Decrease normal cook time by:
Frozen foods, pies, ............. 15-25 %
pastries and pizza
Refrigerator cookies ............ 15-35 %
Refrigerator biscuits ............ 15-30 %
Rolls & Breads.................... 20-25%
Fresh Pies/Pastries ............ 10-20 %
Begin with the maximum reduction in
cook times and adjust as needed.
*Recommended reduction in cook times
based on brands of food items tested.
Cook times may vary with your specific
brand of food item.
INSTRUCTIONS PRESS DISPLAY
To set the oven for Convection Bake and temperature to
350°F
1. Arrange interior oven racks and place food in oven.
2. Press
display (Figure 1).
3. Press 3 5 0. "CONV BAKE" and "350°"will appear in the
display (Figure 2).
4. Press
display (Figure 3).The temperature will be decreased to 325° F.
A beep will sound once the oven temperature reaches 325° F and the
display will show "325°", "CONV BAKE" and "ON " (Figure 4).
Note: The convection fan will start AS SOON AS the oven is set for
Convection Bake.
Press
time.
Conv
. "CONV BAKE" will flash and "- - -°" will appear in the
bake
START
. "CONV BAKE", "PRE" and "ON " will appear in the
Clear
to stop Convection Bake or cancel Convection Bake at any
/Off
3
Conv
bake
5
START
Clear
/Off
CONV
BAKE
Figure 1
0
CONV
BAKE
Figure 2
CONV PRE-
BAKE
ON
Figure 3
CONV
BAKE
ON
Figure 4
Note: As soon as the
decreased by 25°F (14°C).
START
pad is pressed the set temperature will be
8
Page 9
Setting Oven Controls
PRE-
PRE-
PREBAKE
Setting Convection Roast
This method of cooking enables you to obtain the best results when roasting. Allow your oven to preheat before roasting.
A beep will let you know when the convection roast temperature is reached. The oven can be programmed to convection
roast at any temperature from 300°F to 550°F (149°C to 288°C). Remember to use tested recipes with times adjusted for
convection roasting when using the convection mode. Times may be reduced by as much as 30% when using the
convection feature.
INSTRUCTIONS PRESS DISPLAY
To Set the oven to Convection Roast at 350°F
1. Arrange oven racks.
2. Press
3. Enter
Conv
, "- - - °" will be displayed; "CONV" will flash (Figure 1).
roast
5 0 using the number pads. "CONV" and "350°"
3
will be displayed (Figure 2).
3
Conv
roast
5
CONV
Figure 1
0
CONV
4. Press
START
, "CONV", "PRE" and "ON" will be displayed. A beep
will sound once the oven temperature reaches 350° (Figure 3).
To change the preset Convection Roast Temperature
(example: 425°F)
1. Press
2. Enter the desired roasting temperature using the number pads
3. Press
"ON" will be displayed.
After the oven has reached the desired temperature, "PRE" will
diappear the control will beep and "CONV" light will stay on. The
"ON" light will turn on and off as the oven maintains its temperature.
When convection roasting is complete press
Conv
, "CONV" will flash.
roast
2 5 (Figure 4).
4
START
the current oven temperature, "CONV", "PRE" and
Clear
/Off
.
INSTRUCTIONS PRESS DISPLAY
4
START
Conv
roast
2
START
Clear
/Off
Figure 2
CONV PRE-
ON
Figure 3
CONV PRE-
ON
Figure 4
5
Setting Convection Convert
This function is used to convert a normal baking to a convection
baking.
Be sure your oven is baking in a normal baking mode (Figure 5).
Press
decreased to convection baking temperature (Figure 6).
Note: For a timed convection convert.
After 75% of the cook time, the controll will beep 3 times and "CF"
(check food) will appear in the display (Figure 7). At this time the oven
control will sound 3 long beeps at regular intervals until baking has
finished.
Conv
. "CONV" should now be displayed and the temperature
convert
9
Conv
convert
CONV
CONV
PREBAKE
BAKE
TIMED BAKE
ON
ON
ON
Figure 5
Figure 6
1
OVEN
Figure 7
TIME
Page 10
PREBAKE
PREBAKE
TIME
PREBAKE
TIME
PREBAKE
Setting Oven Controls
Setting Timed Bake, Timed Convection Bake or Timed Convection Roast
The BAKE
Bake
or CONVECTION BAKE
Conv
or CONVECTION ROAST
bake
Timed Bake feature. The automatic timer of the Timed Bake feature will turn the oven OFF after cooking for the desired
amount of time you selected.
INSTRUCTIONS PRESS DISPLAY
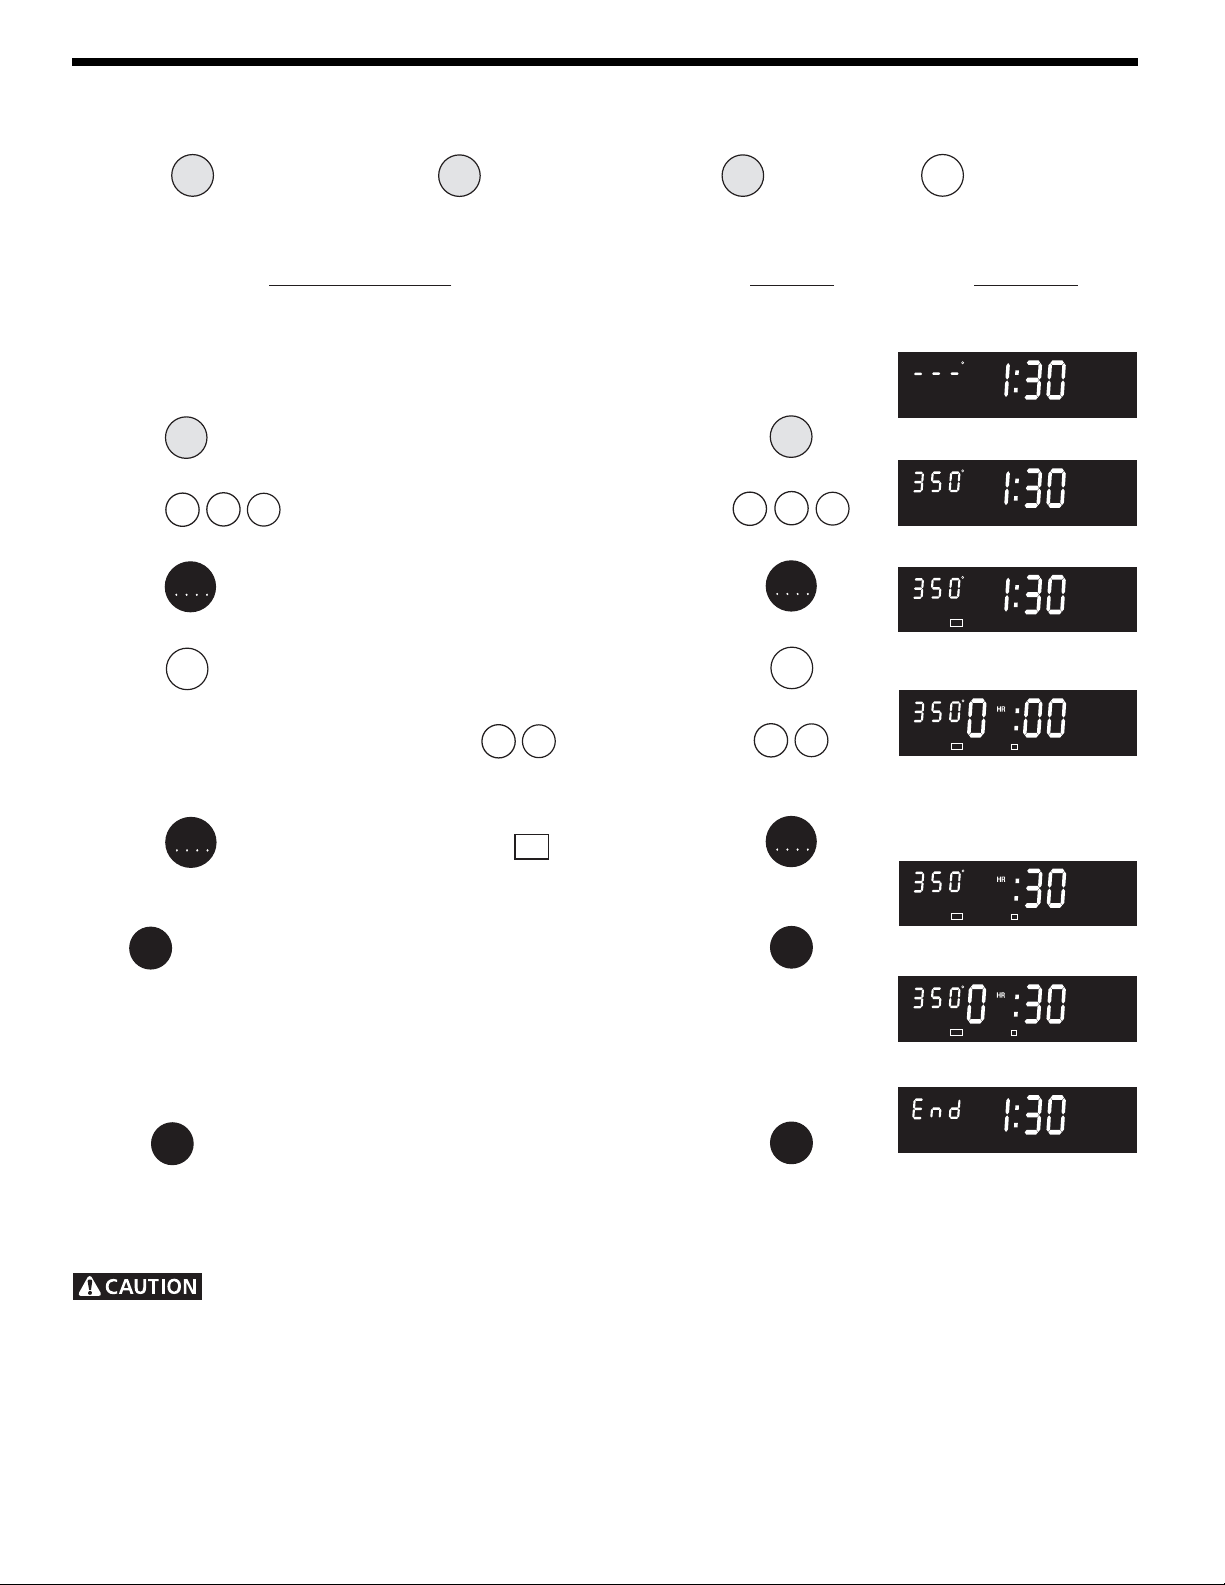
To program the oven to begin baking immediately and to shut off
automatically (example : Bake at 350°F for 30 minutes)
1. Be sure the clock is set for the correct time of day.
2. Arrange interior oven rack(s) and place the food in the oven.
3. Press
display (Figure 1).
4. Press
"350°" will appear in the display.
Bake
, "- - - °" will appear and "BAKE" will flash in the
5 0 (Figure 2). "BAKE" will continue to flash and
3
Conv
and BAKE TIME
roast
Bake
5
3
0
Bake
pads control the
time
BAKE
Figure 1
BAKE
Figure 2
5. Press
START
. "PRE", "BAKE" and "350°" will appear in the
display (See Figure 3).
6. Press
Bake
. "OVEN 1" and "TIME" will flash; The current time
time
will change to 0 hr :00 (Figure 4).
7. Enter the desired baking time by pressing 3 0.
Note: Baking time can be set for any amount of time between 1
minute to 11 hours and 50 minutes.
8. Press
START
. "PRE", "TIMED", "BAKE" and "ON" should now be
displayed. Once the Timed Bake feature has started, the current
time remaining will be displayed (Figure 6).
Press
Clear
when baking has finished or at any time to cancel the
/Off
Timed Bake feature.
When the timed bake finishes:
1. "End" and the time of day will show in display. The oven will shut
off automatically (Figure 7).
2. The control will beep 3 times. And "End"will remain in the display
Clear
until
is pressed.
/Off
START
Bake
3
START
Clear
Clear
time
/Off
/Off
PRE-
BAKE
ON
Figure 3
PRE-
0
BAKE
ON
OVEN
1
TIME
Figure 4
PRE-
BAKE
ON
OVEN
1
TIME
Figure 5
PRE-
TIMED
BAKE
ON
OVEN
1
TIME
Figure 6
Figure 7
NOTE: Remember that the lowest BAKE temperature is 170°F
and that the lowest CONVECTION BAKE temperature is 325°F.
Use caution with the TIMED BAKE or DELAYED TIME BAKE features. Use the automatic timer when cooking
cured or frozen meats and most fruits and vegetables. Foods that can easily spoil such as milk, eggs, fish, meat or poultry,
should be chilled in the refrigerator first. Even when chilled, they should not stand in the oven for more than 1 hour before
cooking begins, and should be removed promptly when cooking is completed. Eating spoiled food can result in sickness from
food poisoning.
10
Page 11
PREBAKE
PREBAKE
Setting Oven Controls
PREBAKE
DELAY
OVEN
TIME
PREBAKE
OVEN
TIME
PREBAKE
TIME
Setting Delayed Timed Bake or Delayed Timed Convection Bake
The BAKE
Bake
or CONVECTION BAKE
Conv
,CONVECTION ROAST
bake
control the Delayed Time Bake feature. The automatic timer of the Delayed Time Bake will turn the oven on and off at the time
you select in advance. Note: If your clock is set for normal 12 hour display mode the Delayed Timed Bake or Delayed Timed
Convection Bake cycle can never be set to start more than 12 hours in advance. To set for Delayed Timed Bake or Delayed
Timed Convection Bake 12-24 hours in advance set the control for the 24 hour time of day display mode.
INSTRUCTIONS PRESS DISPLAY
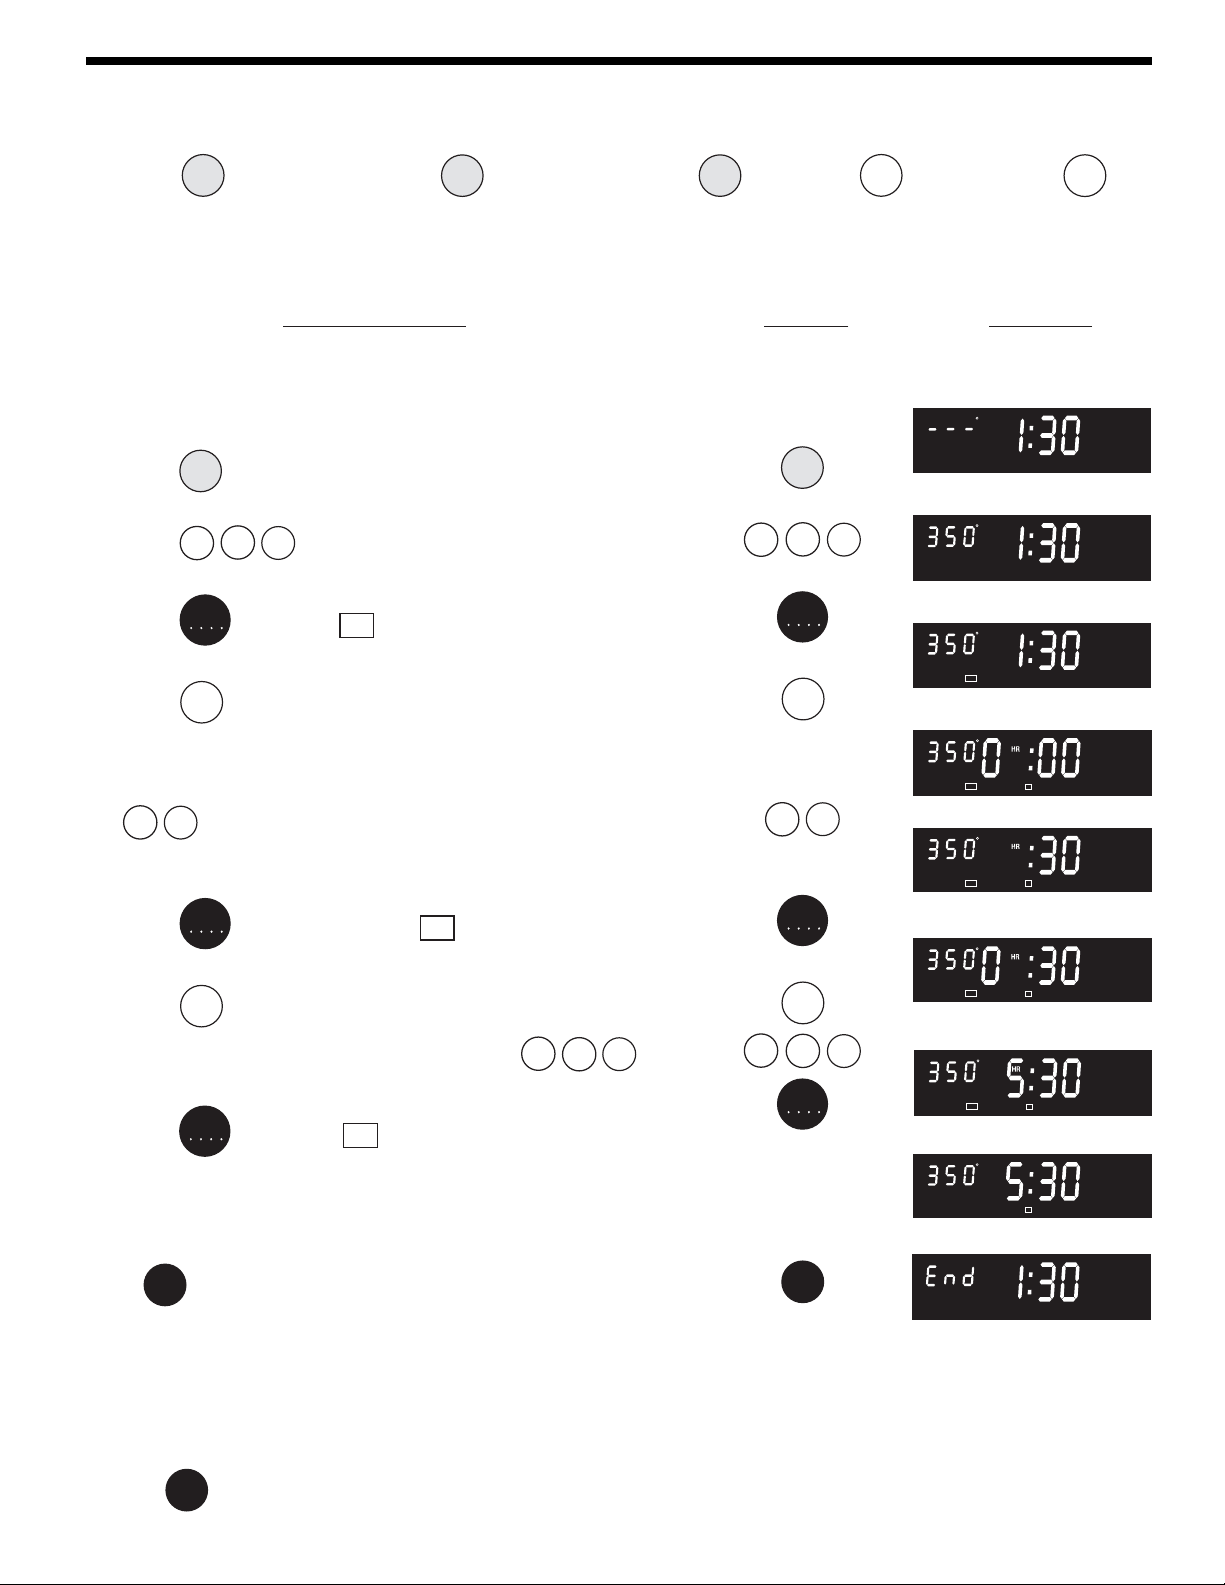
To program the oven for a delayed BAKE start time and to shut off automatically
(example: baking at 350°F, starting at 5:30 and baking for 30 minutes)
1. Be sure that the clock is set with the correct time of day.
2. Arrange interior oven rack(s) and place the food in the oven.
3. Press
(Figure 1).
4. Press
"350°" will appear in the display.
5. Press
Bake
. "- - -°" will appear and "BAKE" will flash in the display
5 0 (Figure 2). "BAKE" will continue to flash and
3
START
. "BAKE", "ON" and "350°" will stay in the display.
Conv
, BAKE TIME
roast
3
Bake
5
START
Bake
and START TIME
time
BAKE
Start
time
pads
Figure 1
0
BAKE
Figure 2
(See Figure 3).
6. Press
Bake
. "OVEN 1" and "TIME" will flash, the current time will
time
change to "0 hr : 00" and "350°" will remain in the display (Figure
4).
7. Enter the desired baking time using the number pads by pressing
0. "OVEN 1" and "TIME" will flash; (Figure 5). Note: Baking
3
time can be set for any amount of time from 1 minute to 11 hours
and 50 minutes.
8 Press
START
. "TIMED", "BAKE", "ON" and "350°" will remain in the
display (Figure 6).
9. Press
Start
. "OVEN 1" and "TIME" will flash in the display. Enter
time
the desired start time using the number pads 5 3 0 (Figure
7).
10. Press
START
."PRE" and "ON"will disapear and "DELAY" will
appear in the display (Figure 8). When Delayed Time Bake starts,
"DELAY" will disappear and the display clock will swich to the
countdown of the oven cook time. The oven will sart to bake at the
previously selected temperature (Figure 8).
Press
Clear
when baking has completed or at any time to cancel the
/Off
Delayed Time Bake feature.
5
Bake
time
3
START
Start
time
3
START
Clear
/Off
PREBAKE
ON
Figure 3
PRE-
BAKE
ON
0
PRE-
BAKE
ON
1
OVEN
Figure 4
1
OVEN
TIME
TIME
Figure 5
PRE-
TIMED
BAKE
ON
OVEN
1
TIME
Figure 6
0
PRE-
TIMED
BAKE
DELAY
ON
TIMED BAKE
1
OVEN
Figure 7
1
OVEN
Figure 8
Figure 9
TIME
TIME
When the set bake time runs out:
1. "End" will appear in the display and the oven will shut off
automatically (Figure 9).
2. The control will beep 3 times. And "End"will remain in the display
Clear
until
is pressed.
/Off
11
Page 12
PREBAKE
Setting Oven Controls
Setting the Keep Warm Feature
The Keep Warm
Warm feature will keep oven baked foods warm for serving up to 3 hours after cooking has finished. After 3 hours the Keep
Warm feature will shut the oven OFF. The Keep Warm feature may be used without any other cooking operations or can be
used after cooking has finished using BAKE, CONVECTION BAKE or CONVECTION ROAST.
The Keep Warm feature may be used with TIMED BAKE if you wish to have the Keep Warm feature turn ON automatically
when cooking has finished. The Timed Bake features require you to set start time and the amount of cooking time. With this
information the control can calculate the time when cooking will complete and can then start the Keep Warm feature
automatically.
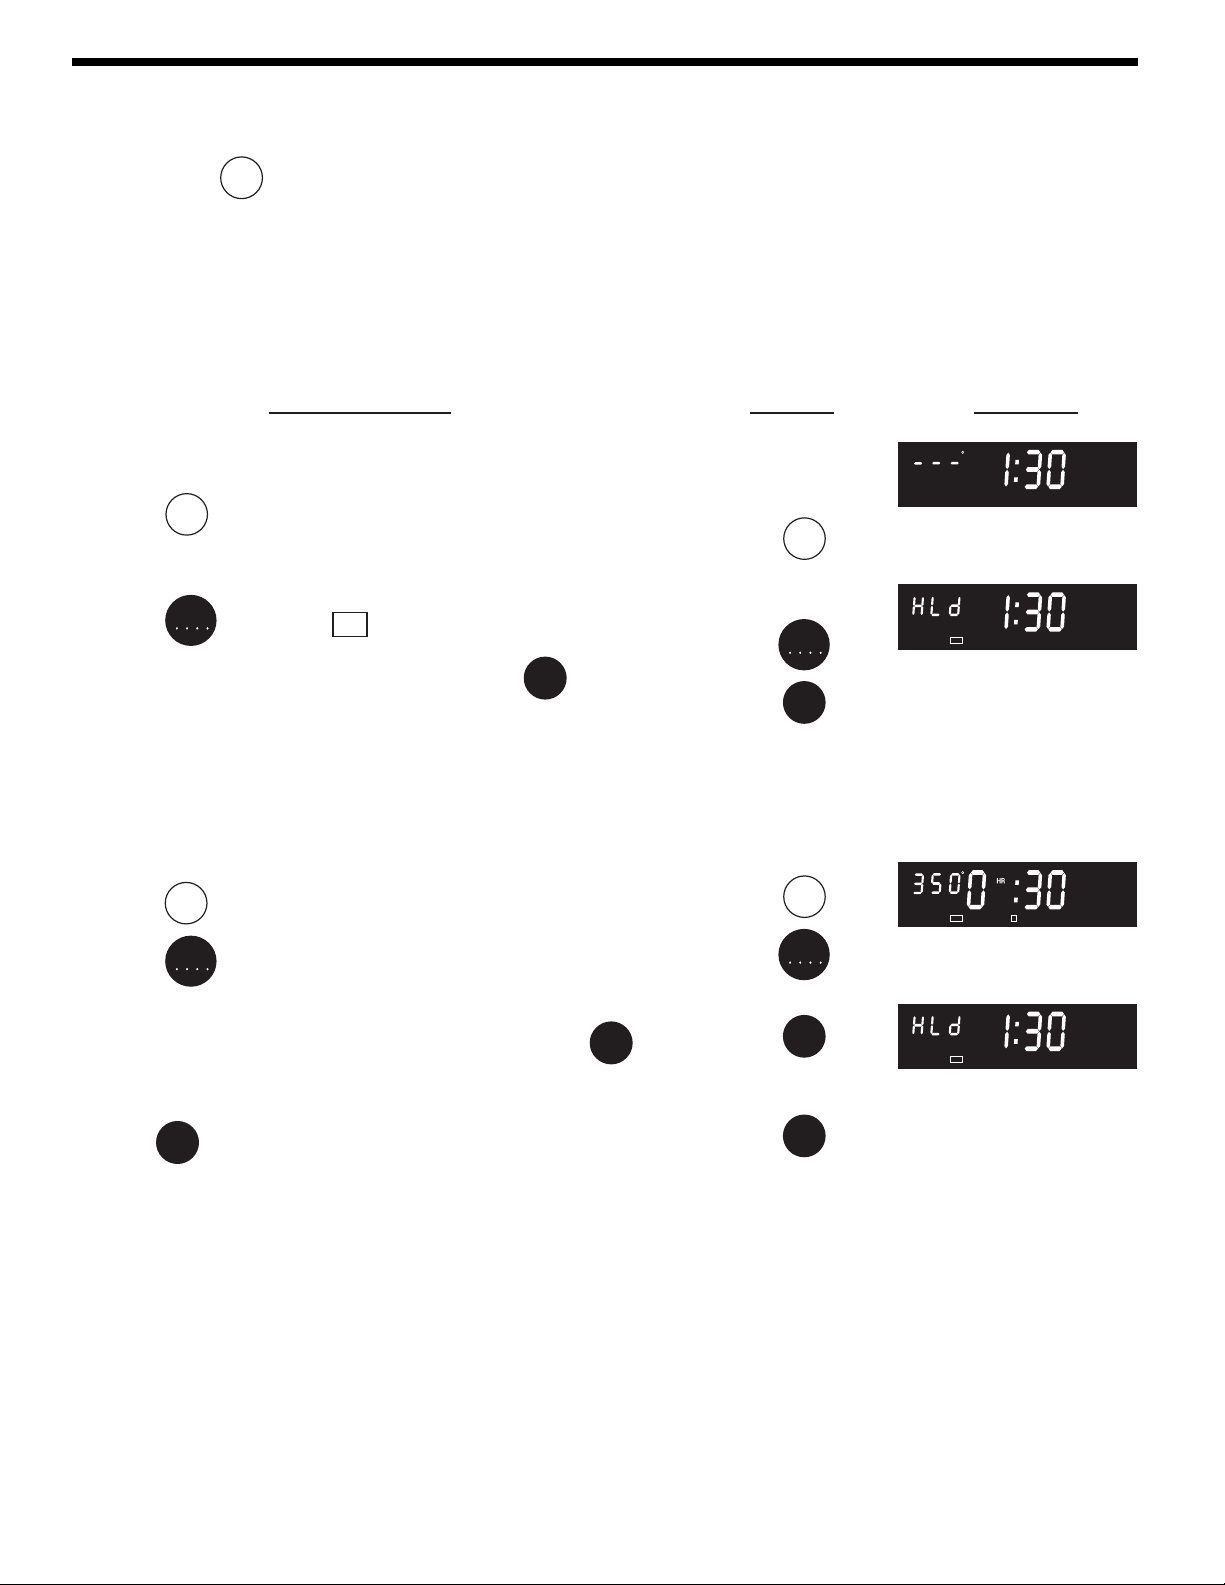
To set Keep Warm:
1. Arrange interior oven racks and place food in oven.
2. Press
Note: If no pad is touched within 5 seconds the request to turn ON
Keep Warm feature will be cancelled.
Keep
pad turns ON the Keep Warm feature and will maintain an oven temperature of 170°F (77°C). The Keep
Warm
INSTRUCTIONS PRESS DISPLAY
Keep
. "- - -°" will appear in the display (Figure 1).
Warm
Keep
Warm
Figure 1
3. Press
4. To turn the Keep Warm OFF at any time press
START
. "HLd" and "ON" will appear in the display (Figure 2).
Clear
.
/Off
Note: The Keep Warm feature will automatically turn OFF after 3
hours.
To set Keep Warm to turn ON automatically:
1. Arrange interior oven racks and place food in oven. Set the oven
properly for Timed Bake or Delayed Timed Bake.
2. Press
3. Press
Bake has finished (See Figure 4).
4. To turn the Keep Warm feature OFF at any time press
Note: The Keep Warm feature will automatically turn OFF after 3
hours.
Pressing
Keep
. (Figure 3)
Warm
START
. The "HLd" will appear in the display after Timed
Clear
at any time will stop all oven baking operations.
/Off
Clear
/Off
.
START
Clear
/Off
Keep
Warm
START
Clear
/Off
Clear
/Off
TIMED
PRE-
BAKE
ON
ON
ON
Figure 2
1
OVEN
Figure 3
Figure 4
TIME
12
Page 13
Setting Oven Controls
Setting Broil
The BROIL
Broil
pad controls the Broil feature. When broiling, heat radiates downward from the oven broiler for even coverage.
The Broil feature is preset to start broiling at 550°F; however, the Broil feature temperature may be set between 400°F and 550°F.
This range includes a Searing Grill for searing meats.
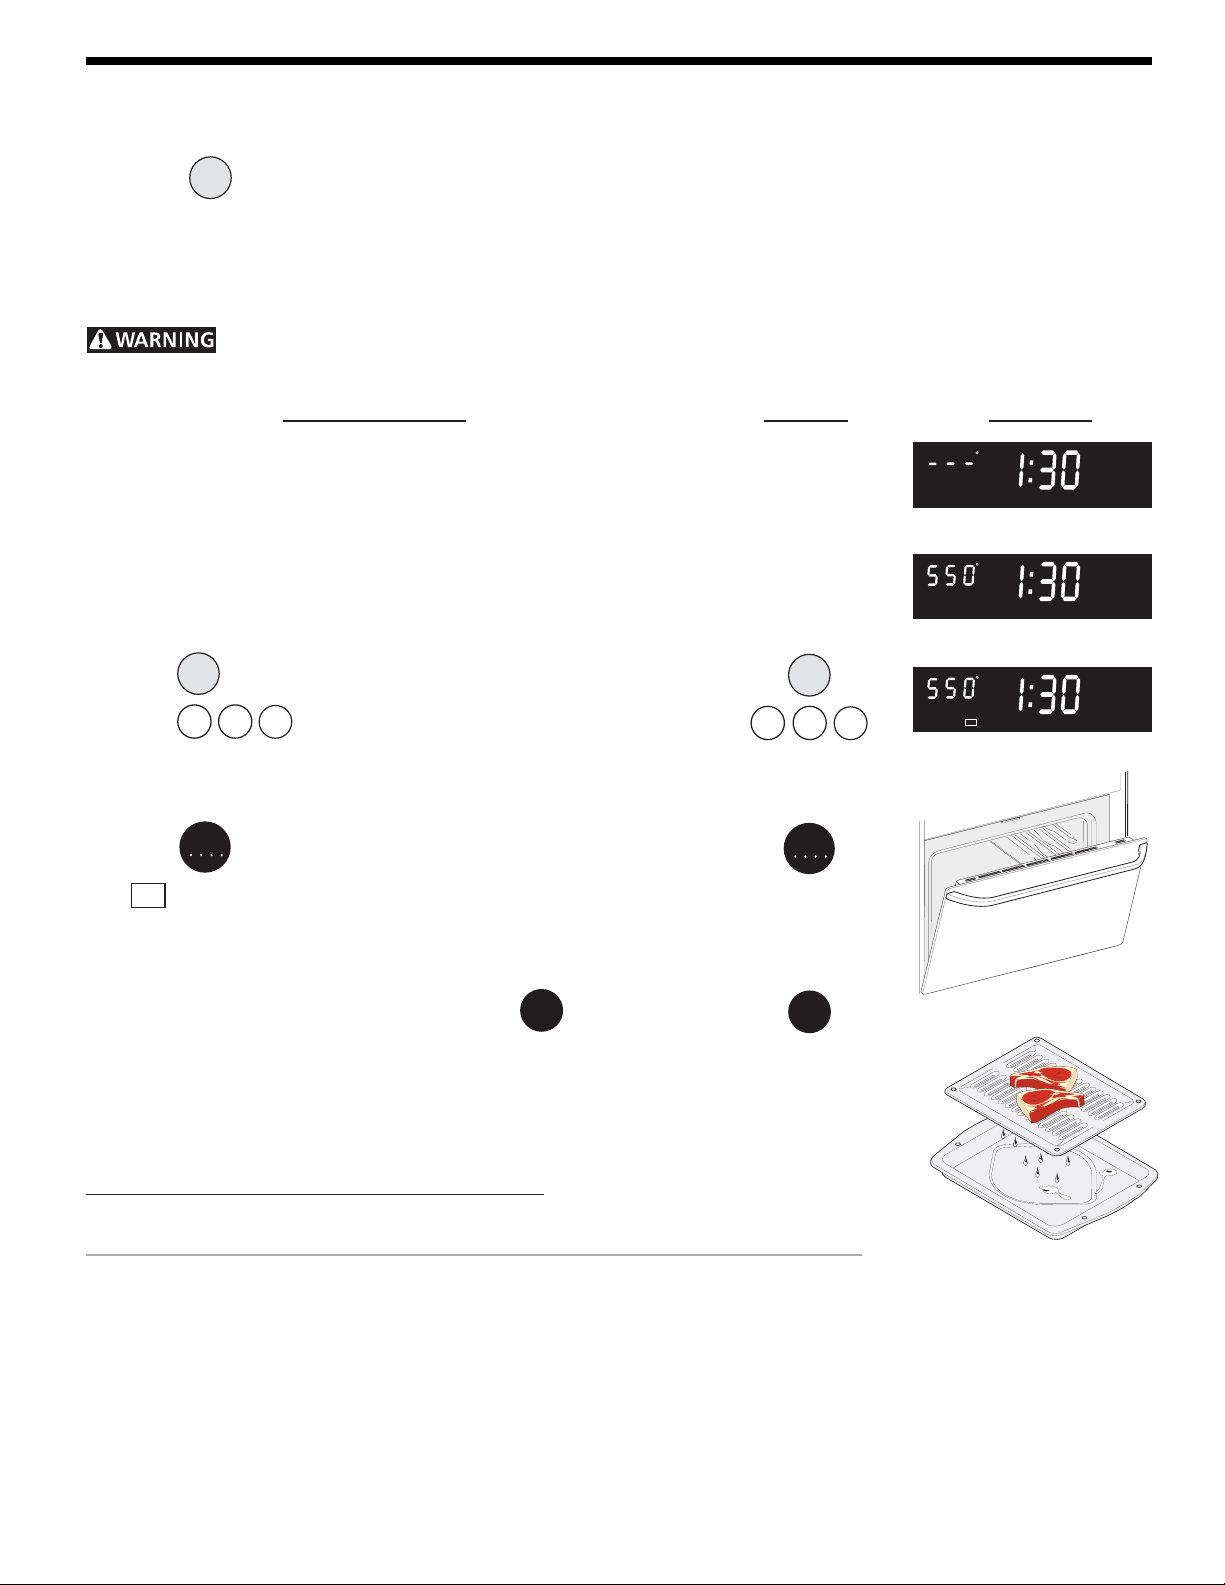
The broil pan and broil pan insert used together allow dripping grease to drain and be kept away from the high heat of the oven
broiler. DO NOT use the broil pan without the insert (See Figure 5). DO NOT cover the broil pan insert with foil. The exposed
grease could catch fire.
Should an oven fire occur, leave the oven door closed and turn off the oven. If the fire continues, throw baking
soda on the fire or use a fire extinguisher. DO NOT put water or flour on the fire. Flour may be explosive and water can cause
a grease fire to spread and cause personal injury.
INSTRUCTIONS PRESS DISPLAY
To set the oven to broil at the default setting (550°F):
1. Place the broiler pan insert on the broiler pan. Then place the food on
the broiler pan insert. DO NOT use the broiler pan without the insert.
DO NOT cover the broiler insert with foil. The exposed grease could
ignite.
2. Arrange the interior oven rack and place the broiler pan on the rack.
Be sure to center the broiler pan directly under the broiler element.
Make sure the oven door is in the broil stop position (See Figure
4).
3. Press
Broil
. "BROIL" will flash and "- - -°" will appear (Figure 1).
4. press 5 5 0."BROIL" will continue to flash (Figure 2).
5. If a lower broil temperature is desired (minimum broil temperature
setting is 400°F (204°C)), press the desired temperature before
continuing to step 6.
Broil
5 5
0
BROIL
BROIL
BROIL
Figure 1
Figure 2
ON
Figure 3
6. Press
START
. The oven will begin to broil. "BROIL", "550°" and
START
"ON" will appear in the display (Figure 3).
7. Broil on one side until food is browned; turn and cook on the second
side. Season and serve. Note: Always pull the rack out to the stop
position before turning or removing food.
8. To cancel broiling or if finished broiling press
Clear
/Off
.
Clear
/Off
Broiling Times
Use the following table for approximate broiling times. Increase or decrease broiling times, or
move the broiling pan to a different rack position to suit for doneness. If the food you are broiling
is not listed in the table, follow the instructions provided in your cookbook and watch the item
closely.
Electric Range Broiling Table Recommendations
Food Rack Temp Cook Time
Item Position Setting
Steak 1" thick 2nd 550° F 6:00 4:00 Rare
2nd 550° F 7:00 5:00 Medium
Pork Chops 3/4" thick 2nd 550° F 8:00 6:00 Well
Chicken - Bone In 3rd 450° F 20:00 10:00 Well
Chicken - Boneless 2nd 450° F 8:00 6:00 Well
Fish 2nd 500° F 13:00 n/a Well
Shrimp 3rd 550° F 5:00 n/a Well
Hamburger 1" thick 2nd 550° F 9:00 7:00 Medium
3rd 550° F 10:00 8:00 Well
1st side 2nd side
Doneness
Broil Stop Position
Figure 4
Figure 5
13
Page 14
Setting Oven Controls
To Set the Sabbath Feature (for use on the Jewish Sabbath & Holidays)
The BAKE TIME
Bake
time
and
Start
START TIME pads are used to set the Sabbath feature. The Sabbath feature may only
time
be used with the
Bake
pad. The oven temperature may be set higher or lower after setting the Sabbath feature (the oven
temperature adjustment feature should be used only during Jewish Holidays), however the display will not visibly show or
provide any audible tones indicating whether the change occurred correctly. Once the oven is properly set using Bake
with the Sabbath feature active, the oven will remain continuously ON until cancelled. This will override the factory
preset 12-Hour Energy Saving feature.
If the oven light will be needed during the Sabbath, press
Oven
before activating the Sabbath feature. Once the oven
light
light is turned ON and the Sabbath feature is active, the oven light will remain ON until the Sabbath feature is turned
OFF. If the oven light needs to be OFF, be sure to turn the oven light OFF before activating the Sabbath feature.
IMPORTANT NOTES: It is not advised to attempt to activate any other program feature other than BAKE while the
Sabbath feature is active. ONLY the following key pads will function after setting the Sabbath feature; 0 to 9,
&
Clear
. ALL OTHER KEYPADS will not function once the Sabbath feature is properly activated.
/Off
START
Bake
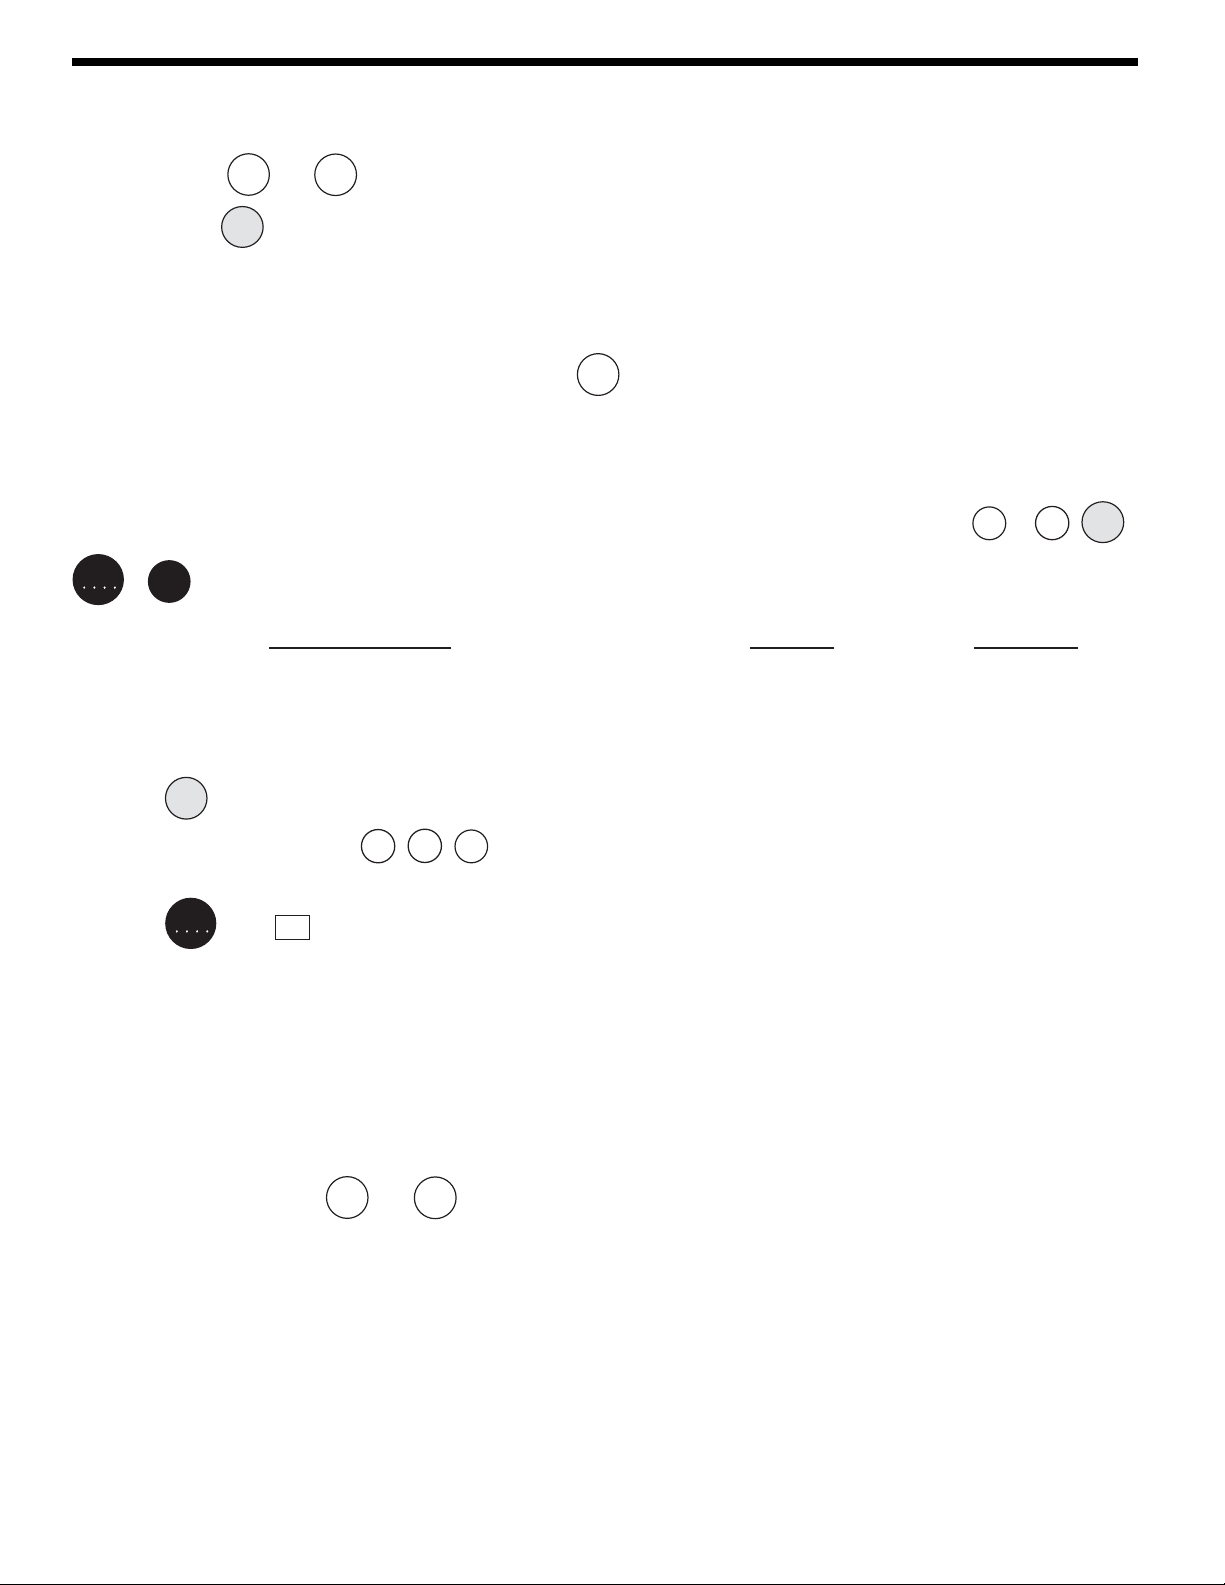
INSTRUCTIONS PRESS DISPLAY
To Program the Oven to Begin Baking Immediately &
activate the Sabbath feature (example: baking at 350°F)
1. Be sure that the clock is set with the correct time of day.
2. Place the food in the oven.
3. Press
Bake
. "- - - °" appears in the display (Figure 1).
,
4. Within 5 seconds, press the 3, 5, 0. The display will show
"350°F (177°C)." (Figure 2).
5. Press
START
. The "ON" indicator light will be displayed (Figure 3).
6. If you desire to set the oven control for a Timed Bake or Delayed
Start Bake do so at this time. If not, skip this step and continue to
step 6. Refer to the Timed Bake (complete steps 6-8) / Delayed Start
Bake (complete steps 6-10) section for complete instructions.
Remember the oven will shut down after using Timed Bake or Delay
Start Bake and therefore may only be used once during the Sabbath/
Jewish Holidays. The maximum Delayed Start Bake time is 11 hours
& 59 minutes.
7. The oven will turn ON and begin heating.
8. Press and hold both the
Bake
time
and
Start
pads for at least 3 seconds. " -
time
- -" will appear in the display (Figure 4). Press
14
Page 15

Setting Oven Controls
To Set the Sabbath Feature (for use on the Jewish Sabbath & Holidays) (continued)
INSTRUCTIONS PRESS DISPLAY
Note: You may change the oven temperature once baking has
started by pressing
Bake
, the numeric key pads for the
C
S
TOP
LEAR
temperature you want (example for 425°C press 4, 2, 5)
and then pressing
START
(for Jewish Holidays only). Remember
4
2
START
5
that the oven control will no longer beep or display any
further changes once the oven is set for the Sabbath feature.
9. The oven may be turned OFF at any time by first pressing
Clear
/Off
Clear
/Off
pad (this will turn the oven and the Sabbath feature OFF). SAb
will disappear from the display.
Should you experience a power failure or interruption, the oven will shut off. When power is returned the oven will not
turn back on automatically. The oven will remember that it is set for the Sabbath and the food may be safely removed
from the oven while still in the Sabbath feature, however the oven cannot be turned back on until after the Sabbath.
After the Sabbath observance turn OFF the Sabbath feature by pressing
Clear
pad. SAb will disappear from the display
/Off
and the oven may be used with all normal functions. For further assistance, guidelines for proper usage, and a complete
list of models with the Sabbath feature, please visit the web at http:\\www.star-k.org.
15
Page 16
Self-Cleaning
CLEAN
TIME
CLEAN
TIME
CLEAN
OVEN
TIME
To Start the Self-Clean Cycle
The SPEED CLEAN
Speed
clean
, CLEAN
Clean
and MAXX CLEAN
Cleaning feature. If you are planning to use the oven directly after a self-clean cycle
remember to allow time for the oven to cool down and the oven door to unlock. This
normally takes about one hour. So a 3 hour self-clean cycle will actually take about 4
hours to complete.
*It is recommend to use a
average soils, and a
Speed
cycle (2 hour) for light soils, a
clean
Maxx
cycle (4 hour) for heavy soils (to assure satisfactory
clean
results).
NOTE: During a Self-Cleaning cycle the second oven will be disabled.
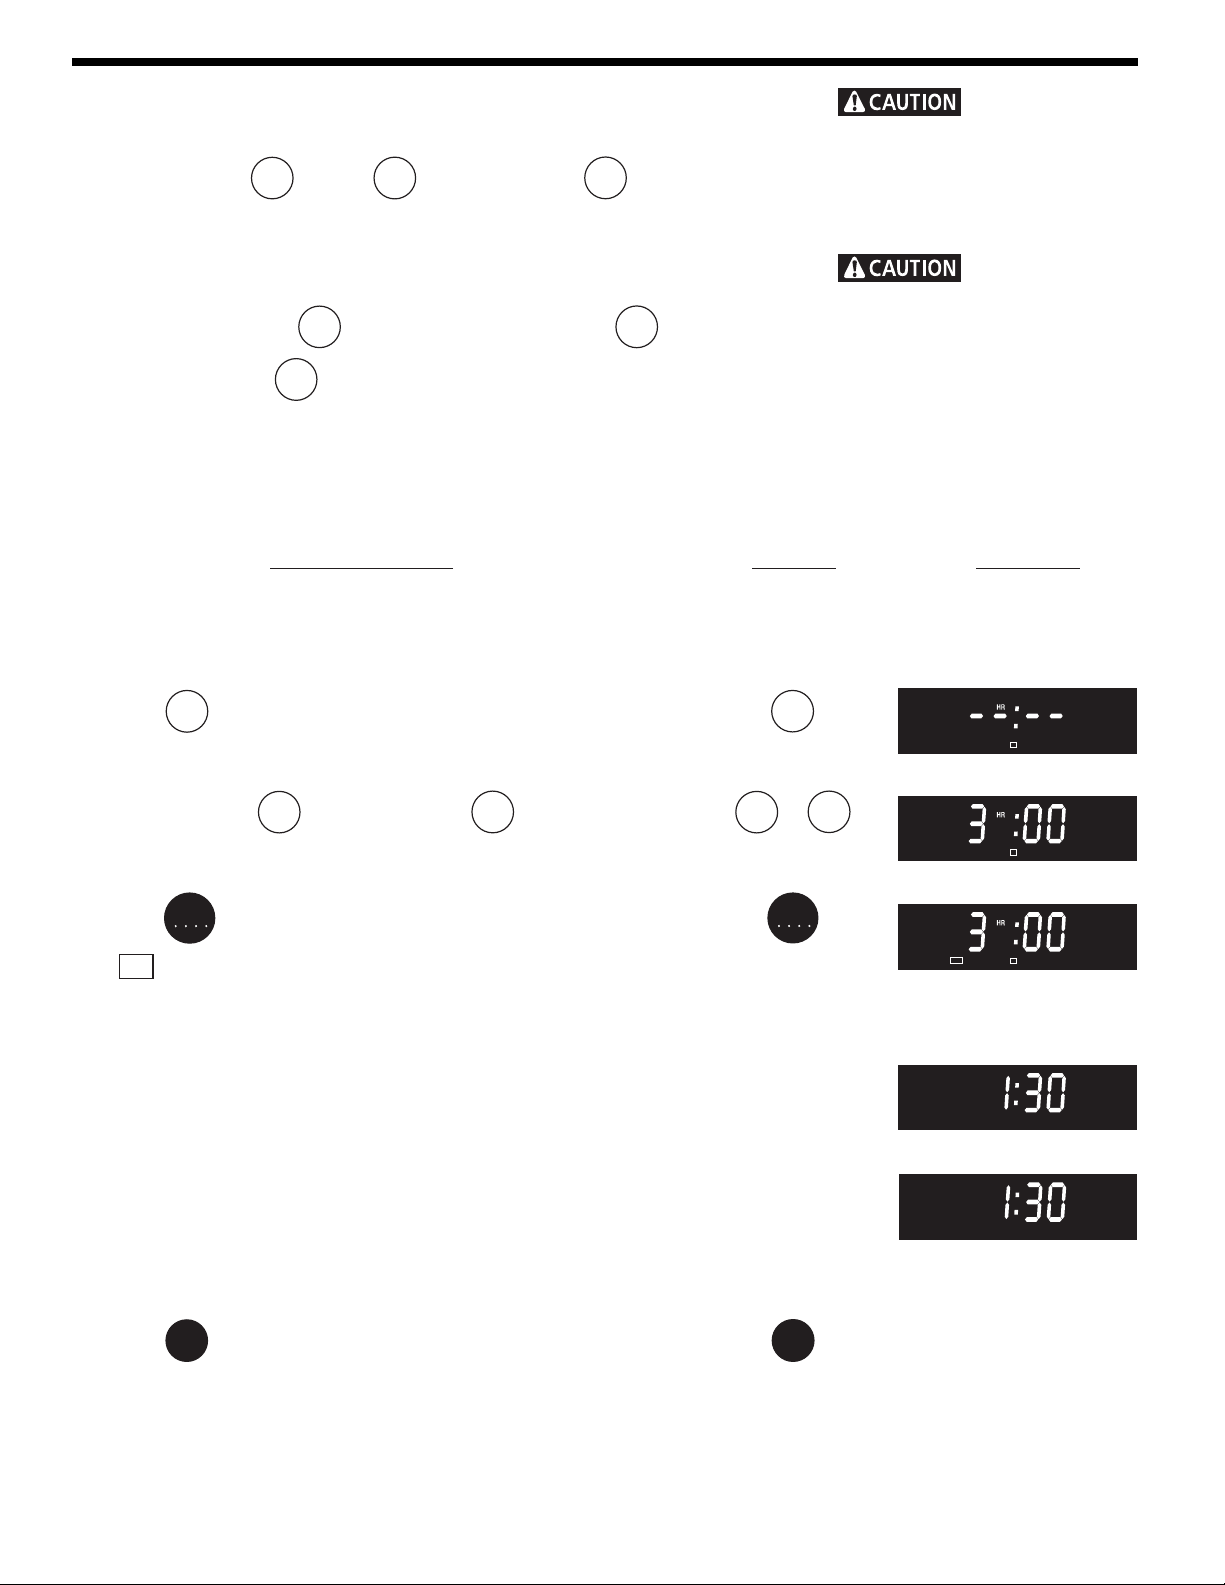
INSTRUCTIONS PRESS DISPLAY
To set the controls for a 3 hour Self-Cleaning cycle
to start immediately and shut off automatically
1. Be sure the clock is set with the correct time of day and the oven
door is closed.
Maxx
pads control the Self-
clean
Clean
cycle (3 hour) for
To avoid possible
burns use care when opening the
oven door after the Self-Cleaning
cycle. Stand to the side of the oven
when opening the door to allow hot
air or steam to escape.
DO NOT force the
oven door open. This can damage
the automatic door locking system.
Use caution and avoid possible
burns when opening the door after
the Self-Cleaning cycle has
completed. The oven may still be
VERY HOT.
NOTE: A smoke eliminator in the
oven vent converts most of the soil
into a colorless vapor.
2. Press
Clean
. "CLEAN", "1" and "TIME" will flash in the display
(Figure 1). The control will automatically clean for a 3 hour period
(default self-cleaning cycle time). Note: If a 2 or 4 hour clean time
is desired, press
Speed
for 2 hour or press
clean
Maxx
for a 4 hour clean
clean
time. Set the cleaning time based on the amount of soil: light,
medium or heavy (* See above).
3. Press
START
.Once the door has locked, "CLEAN", "LOCK" and
"ON" will appear in the display (Figure 3).
4. When flex clean finishes, lock will remain in the display until the
door has unlocked (Figure 4).
Note: Allow about 15 seconds for the oven door lock to close.
When the Self-Clean Cycle is Completed
1. The time of day and "LOCK"will remain in the display (Figure 4).
2. Once the oven has cooled down for approximately 1 HOUR, and
"LOCK" is no longer displayed, the oven door can then be opened
(Figure 5).
Stopping or Interrupting a Self-Cleaning Cycle
If it becomes necessary to stop or interrupt a self-cleaning cycle due
to excessive smoke or fire in the oven:
1. Press
2. The oven door can only be opened after the oven has cooled down
for approximately 1 HOUR, and "LOCK" is no longer displayed
(Figure 5).
Clear
/Off
.
Speed
clean
Clean
or
START
Clear
/Off
Maxx
clean
CLEAN
CLEAN
CLEAN
LOCK
LOCK
CLEAN
CLEAN
ON
1
Figure 1
1
Figure 2
1
OVEN
Figure 3
Figure 4
Figure 5
TIME
TIME
TIME
16
Page 17
Oven Cleaning
DELAY
CLEAN
To Start the delayed Self-Clean Cycle
The SPEED CLEAN
Speed
clean
, CLEAN
Clean
, MAXX CLEAN
controls the Delayed Self-Clean operation. The automatic timer will turn the oven on and off at the time you select in advance.
Be sure to review TO START THE SELF-CLEAN CYCLE for recommended clean times.
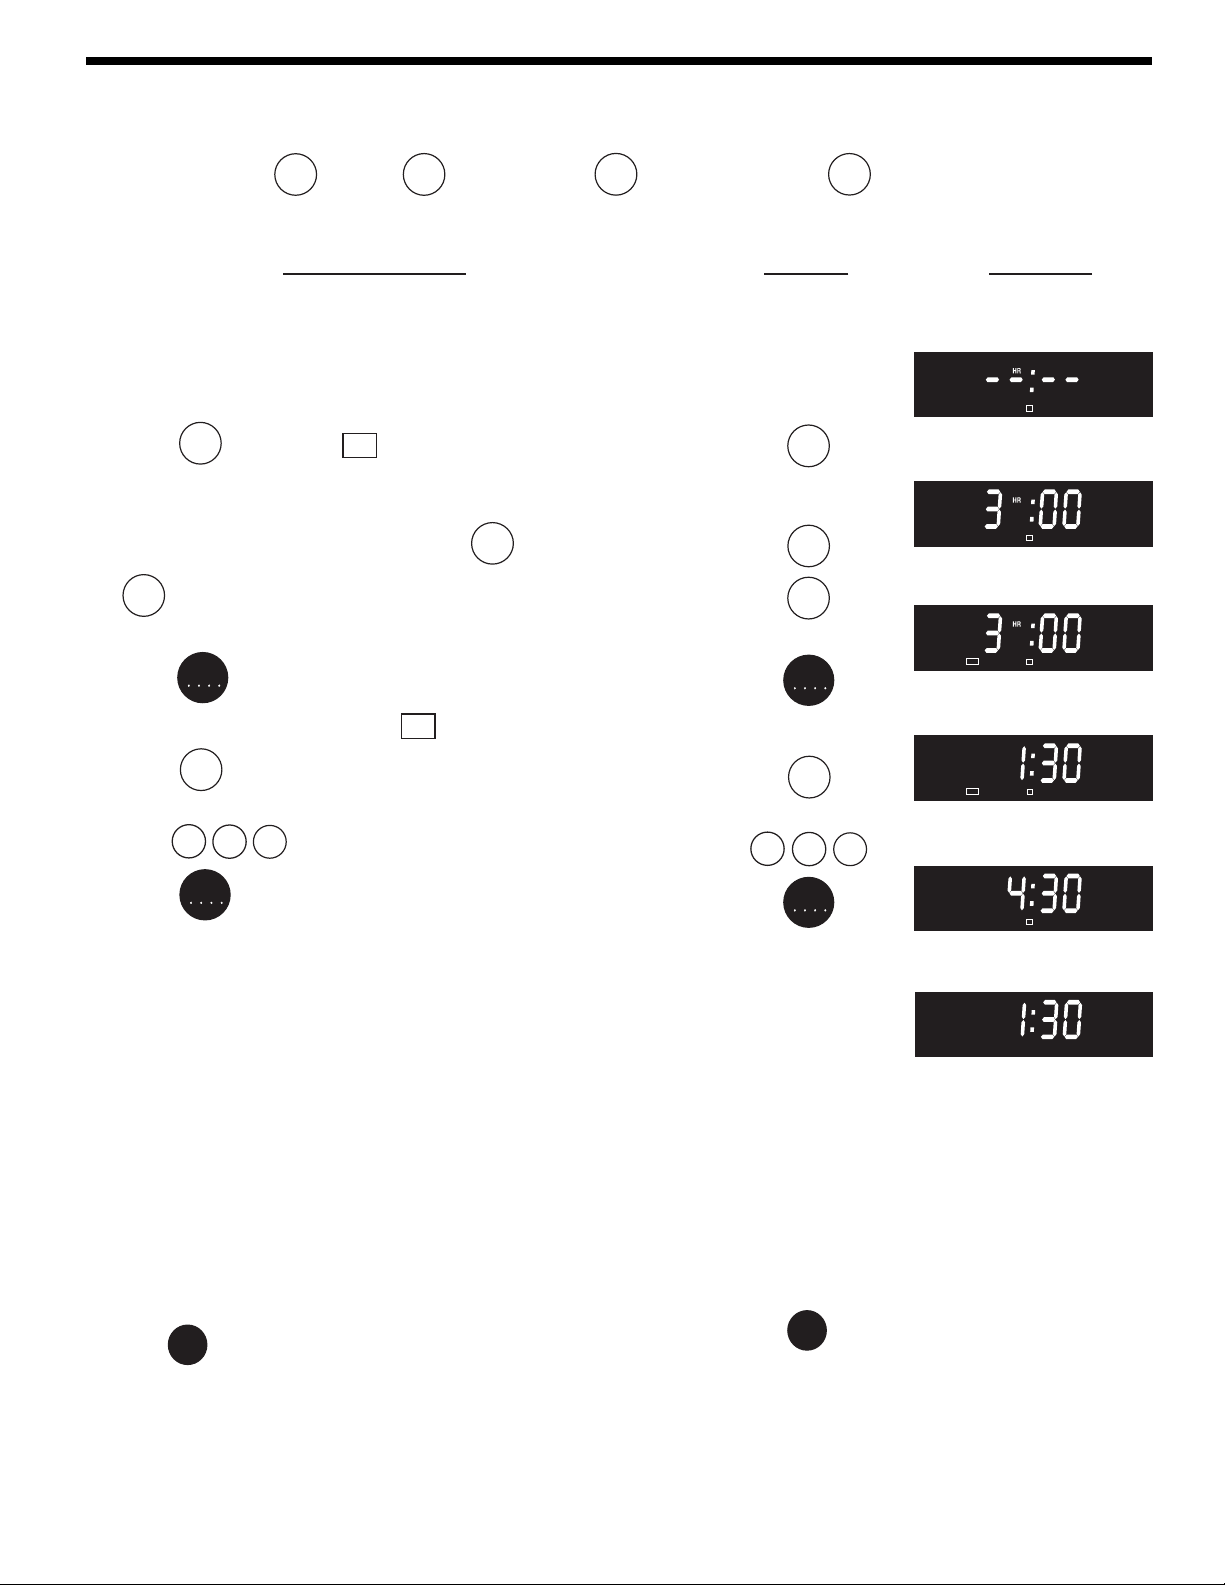
INSTRUCTIONS PRESS DISPLAY
To set the control for the Self-Cleaning Cycle to start
at a delayed time and shut off automatically (example:
3 hour self-clean cycle to start at 4:30)
1. Be sure the clock is set with the correct time of day and the oven
door is closed.
2. Press
display (Figure 1). The control will automatically clean for a 3
hour period (default self-cleaning cycle time)(Figure 2). Note: If a
2 or 4 hour clean time is desired, press
amount of soil: light, medium or heavy.
4. Press
Clean
. "CLEAN", "ON" and "TIME" will flash in the
Speed
for 2 hour or press
clean
Maxx
for a 4 hour clean time. Set the cleaning time based on the
clean
START
."OVEN" will appear in the display. Once the door has
Maxx
and DELAY START
clean
Clean
Speed
clean
Maxx
clean
START
Start
pads and length of clean cycle,
time
CLEAN CLEAN
1
Figure 1
CLEAN CLEAN
1
Figure 2
ON
CLEAN LOCK
OVEN
1
Figure 3
TIME
TIME
TIME
locked "CLEAN", "LOCK" and "ON" will be displayed (Figure 3).
5. Press
Start
. Time will be displayed."OVEN 1" and "TIME" will
time
flash (Figure 4). Enter the desired start time using the number
pads 4 3 0 (Figure 4).
6. Press
START
. "CLEAN", "DELAY", "LOCK", "OVEN1" and "TIME"
will be displayed (Figure 5).
7. As soon as the control is set, the motor driven oven door lock will
begin to close automatically. Once the door has been locked the
"LOCK" indicator light will go on.
8. The control will start the self-cleaning at the set start time, for the
period of time previously selected. At that time, the icon
"DELAY" will go out.
When the Self-Clean Cycle is Completed
1. The display will return to the time of day (Figure 6).
2. Once the oven has cooled down for approximately 1 HOUR, the oven
door can then be opened (Figure 7).
Stopping or Interrupting a Self-Cleaning Cycle:
If it becomes necessary to stop or interrupt a self-cleaning cycle due
to excessive smoke or fire in the oven:
1. Press
Clear
/Off
.
4
Start
time
3
START
Clear
/Off
ON
CLEAN LOCK
OVEN
1
TIME
Figure 4
0
DELAY
LOCK OVEN
CLEAN
1
Figure 5
Figure 6
TIME
2. Once the oven has cooled down for approximately 1 HOUR and the "LOCK" is no longer displayed, the oven door
can then be opened (Figure 6).
Note: If your clock is set for normal 12 hour display mode the Delayed Self-Clean cycle can never be set to start more
than 12 hours in advance. To set for Delayed Self-Clean Cycle 12-24 hours in advance set the control for the 24 hour
time of day display mode.
17
Page 18
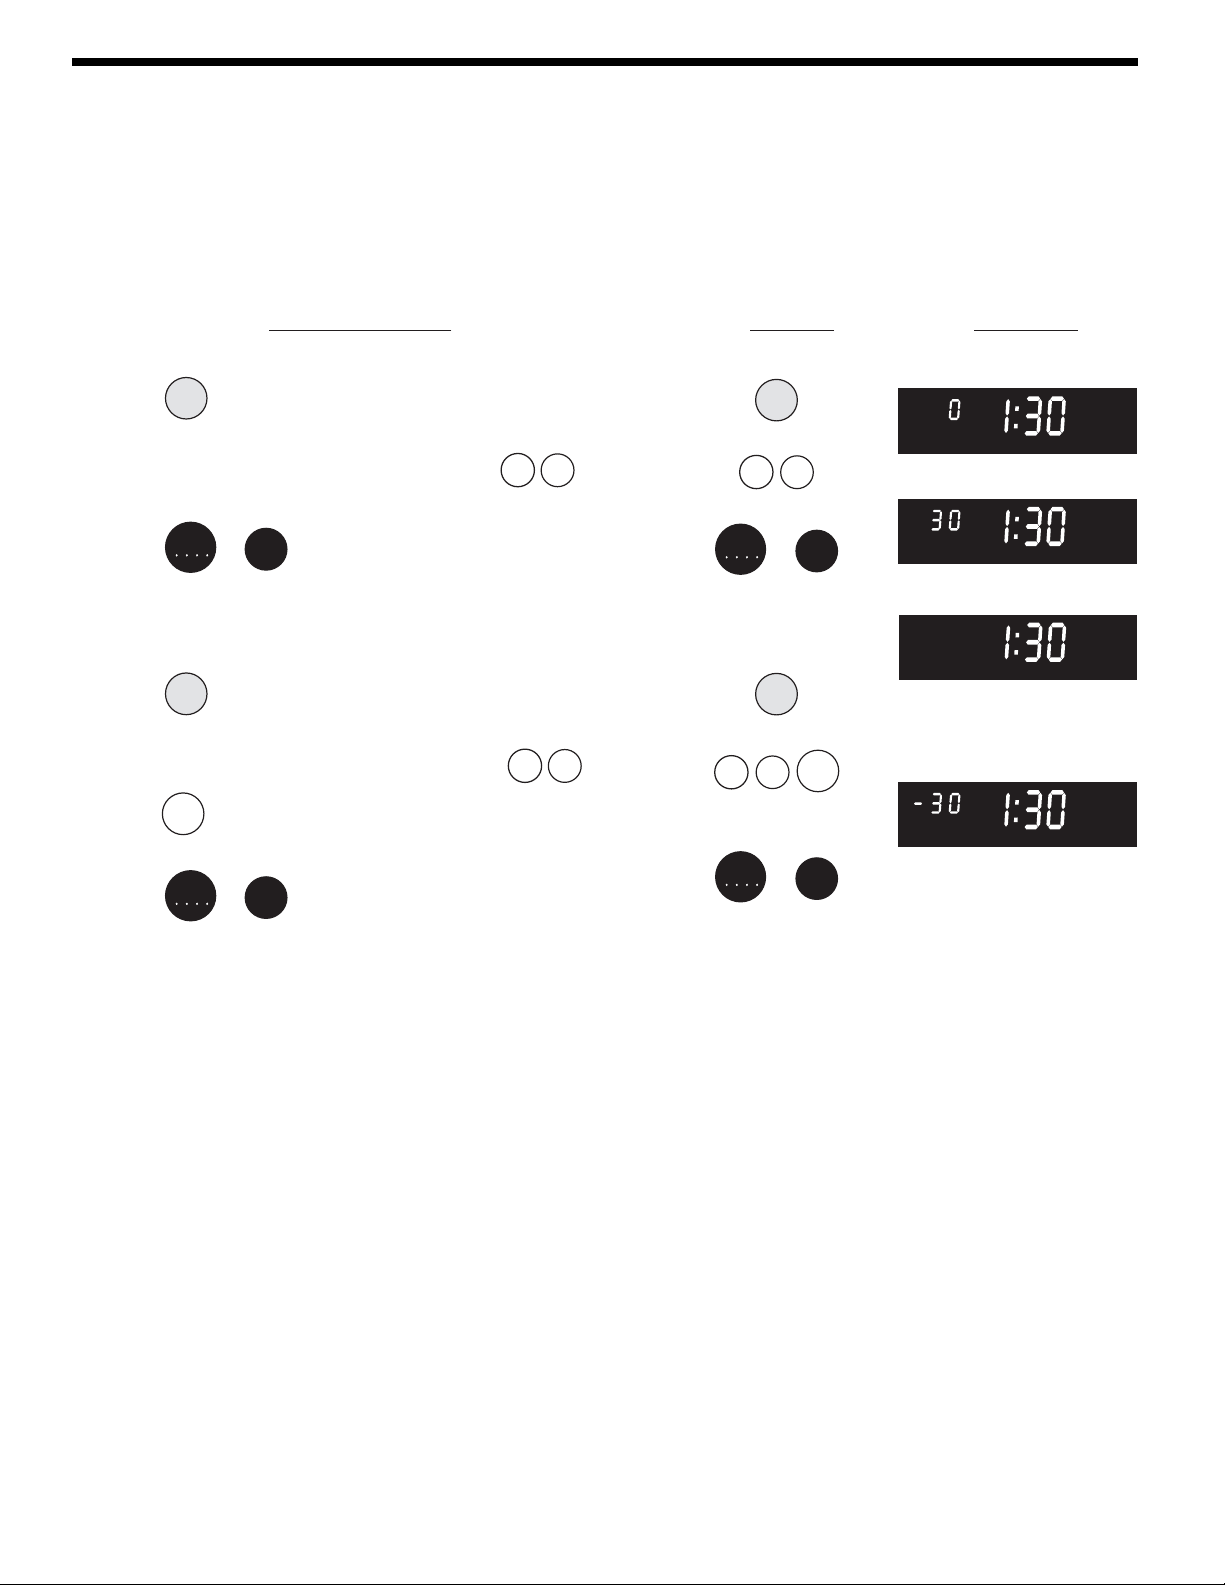
Adjusting Oven Temperature
The temperature in the oven has been pre-set at the factory. When first using the oven,
be sure to follow recipe times and temperatures. If you think the oven temperature is
cooking too hot or too cool for the temperature you select, you can adjust the actual
oven temperature to be more or less than what is displayed. Before adjusting, test a
recipe by using a temperature setting that is higher or lower than the recommended
temperature. The baking results should help you to decide how much of an adjustment
is needed.
INSTRUCTIONS PRESS DISPLAY
To adjust the oven temperature higher
1. Press
Bake
for 6 seconds (Figure 1).
2. To increase the temperature use the number pads to enter the
desired offset temperature. (Example 30°F)
0 (Figure 2).
3
The temperature may be increased as much as 35°F (19°C).
3. Press
START
or
Clear
to accept the temperature change and the
/Off
display will return to the time of day (Figure 3).
START
3
Bake
or
0
Clear
/Off
To adjust the oven temperature lower
1. Press
Bake
for 6 seconds (Figure 1).
Bake
Note: The oven
temperature adjustments
made with this feature will
not change the Self-Clean
cycle temperature or the
Broil temperature.
Figure 1
Figure 2
Figure 3
2. To decrease the temperature use the number pads to enter the
desired offset temperature. (Example -30°F) 3 0 and then
Clean
press
(Figure 4). The temperature may be decreased as
much as -35°F (-19°C).
3. Press
START
or
Clear
to accept the temperature change and the
/Off
display will return to the time of day (Figure 3).
3
START
0
or
Clean
Clear
/Off
Figure 4
18
Page 19

Notes
19
Page 20

Notes
20
 Loading...