


,_i!i!il:_:i!i!!I!I__ '_i_i_iiiilCiiiiiiiiiiiiii!i!_!ii_iii_i_ii,,,_,_,,_,ii_
OWNER'SGUIDE
READ AND SAVE THESE INSTRUCTIONS
Record the Model No. and Serial No. of this freezer in the space provided below.
Model No.
Serial No.
Keep these numbers for future reference.
IMPORTANT: Keep a copy of your bill of sale. The date on the bill establishes
the warranty period should service be required. If service is performed, it is in your
best interest to obtain and keep all receipts.
Contents
2
3
4
4-5
5-6
7
7
8-9
10
11
12
This Owner's Guide provides specific operating instructions for your model. Use
the freezer only as instructed in this Owner's Guide.
Important Safety Instructions
First Steps
Setting the Temperature Control
Freezer Optional Features
Care and Cleaning
Power Failure/Freezer Failure
Energy Saving Ideas
Avoid Service Checklist
Warranty in the United States
Service Information in Canada
Warranty in Canada
Version en espahol
Si desea obtener una copia en espahol de este Manual del Usuario, sirvase escribir la
direccion que se incluye a continuacion. Solicite la PIN 216760500.
Spanish Owner's Guides
Electrolux Home Products
P.O. Box 212378
Augusta, GA 30917
Product and feature specifications as described or illustrated are subject to change without notice.
FREEZER
PIN216760400 (0008)
Important Safety
Instructions
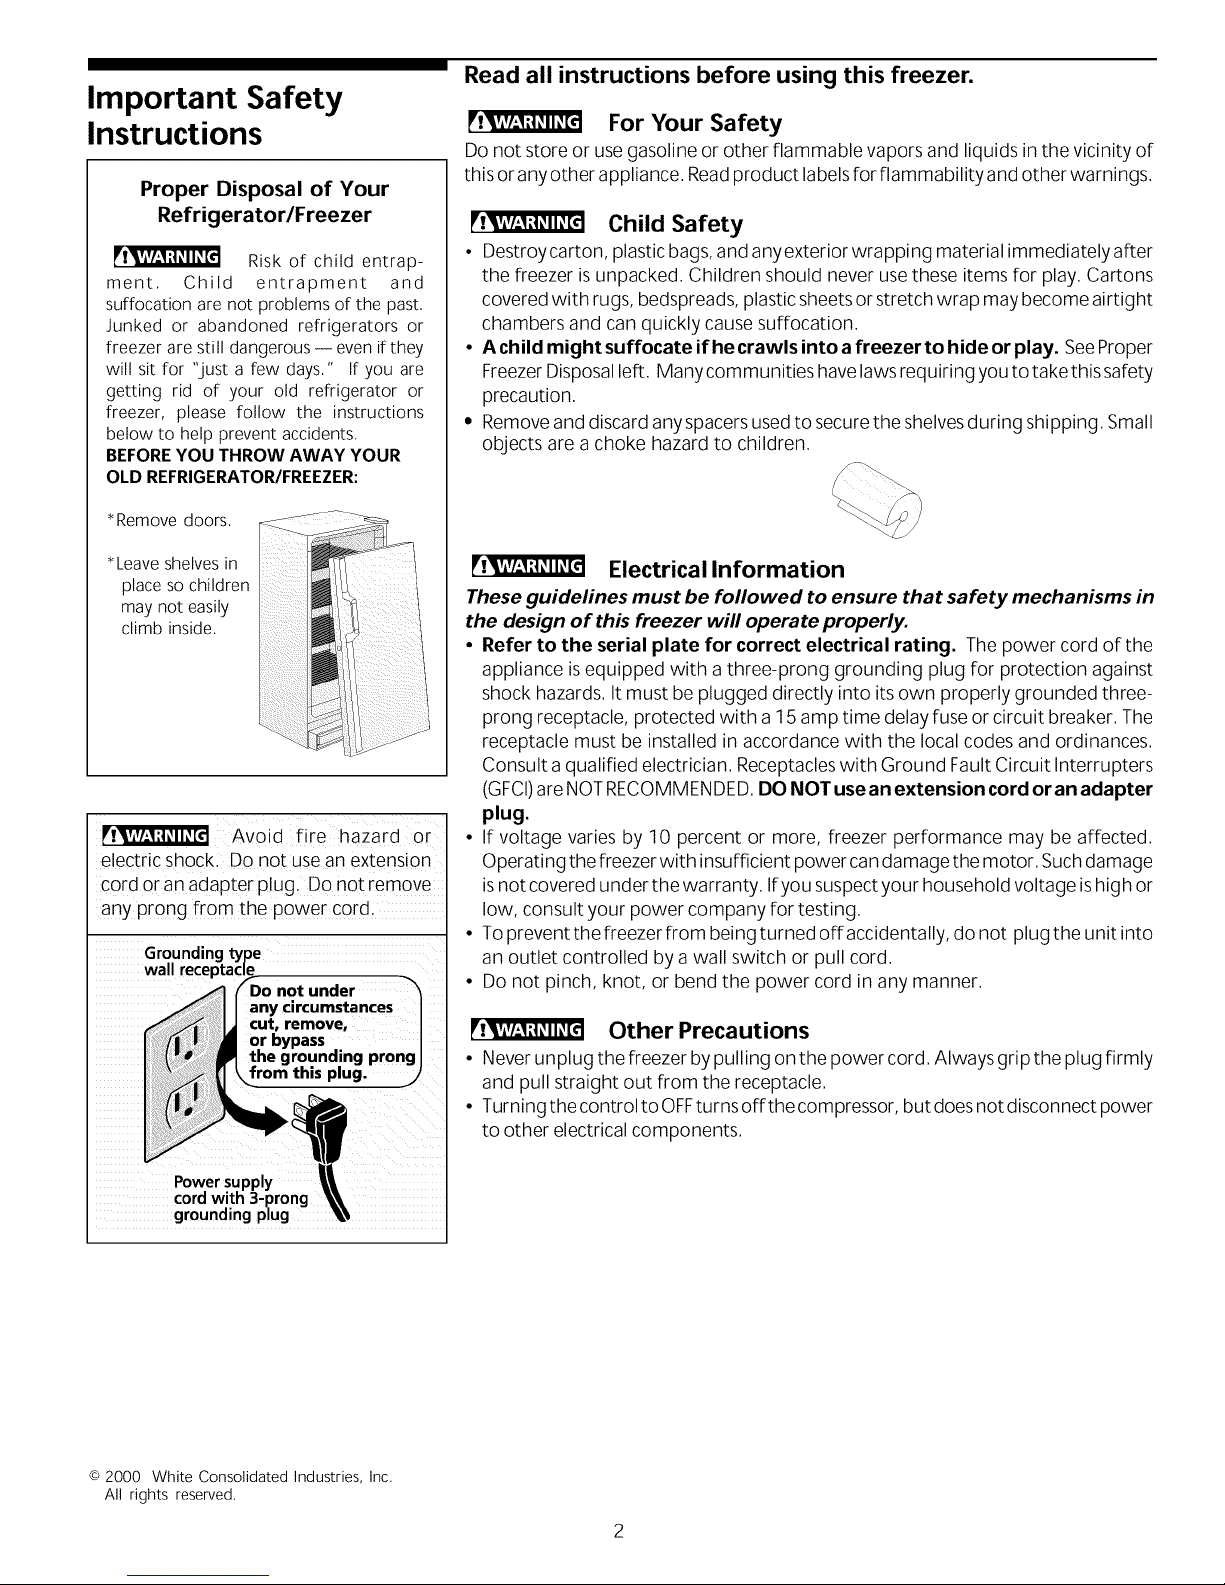
Proper Disposal of Your
Refrigerator/Freezer
VI'IIW-'I ;t_11_[€
ment. Child entrapment and
suffocation are not problems of the past.
Junked or abandoned refrigerators or
freezer are still dangerous- even if they
will sit for "just a few days." If you are
getting rid of your old refrigerator or
freezer, please follow the instructions
below to help prevent accidents.
BEFOREYOU THROW AWAY YOUR
OLD REFRIGERATOR/FREEZER:
* Remove doors.
Risk of child entrap-
Read all instructions before using this freezer.
For Your Safety
Do not store or use gasoline or other flammable vapors and liquids in the vicinity of
this or any other appliance. Readproduct labelsfor flammabilityand other warnings.
rf_viv_€
• Destroycarton, plastic bags, and anyexterior wrapping material immediatelyafter
the freezer isunpacked. Children should never usethese items for play. Cartons
covered with rugs, bedspreads, plastic sheetsor stretch wrap may become airtight
chambers and can quickly cause suffocation.
• A child might suffocate if he crawls into a freezer to hide or play. SeeProper
FreezerDisposalleft. Many communities havelaws requiring you to take this safety
precaution.
• Remove and discard any spacers used to secure the shelvesduring shipping. Small
objects are a choke hazard to children.
Child Safety
* Leave shelves in
place so children
may not easily
climb inside.
F!",'/-'l;t#ll#[_l Avoid fire hazard or
electric shock: Do not usean extension
cord or an adapter p!ug, Do not remove
any prong from the power cord.
Grounding type
wall receptac/
not
Electrical Information
These guidelines must be followed to ensure that safety mechanisms in
the design of this freezer will operate properly.
• Refer to the serial plate for correct electrical rating. The power cord of the
appliance isequipped with a three-prong grounding plug for protection against
shock hazards. It must be plugged directly into its own properly grounded three-
prong receptacle, protected with a 15 amp time delayfuse or circuit breaker. The
receptacle must be installed in accordance with the local codes and ordinances.
Consult a qualified electrician. Receptacleswith Ground Fault Circuit Interrupters
(GFCI)areNOTRECOMMENDED.DO NOT use an extension cord oran adapter
plug.
• If voltage varies by 10 percent or more, freezer performance may be affected.
Operating the freezer with insufficient power can damage the motor. Suchdamage
isnot covered under the warranty. If you suspect your household voltage ishigh or
low, consult your power company for testing.
• To prevent the freezer from being turned off accidentally, do not plug the unit into
an outlet controlled by a wall switch or pull cord.
• Do not pinch, knot, or bend the power cord in any manner.
Other Precautions
• Never unplug the freezer bypulling on the power cord. Always grip the plug firmly
and pull straight out from the receptacle.
• Turning the control to OFFturns off the compressor, but doesnot disconnect power
to other electrical components.
Power supply
cord with 3,prong
grounding plug
© 2000 White Consolidated Industries, Inc.
All rights reserved.
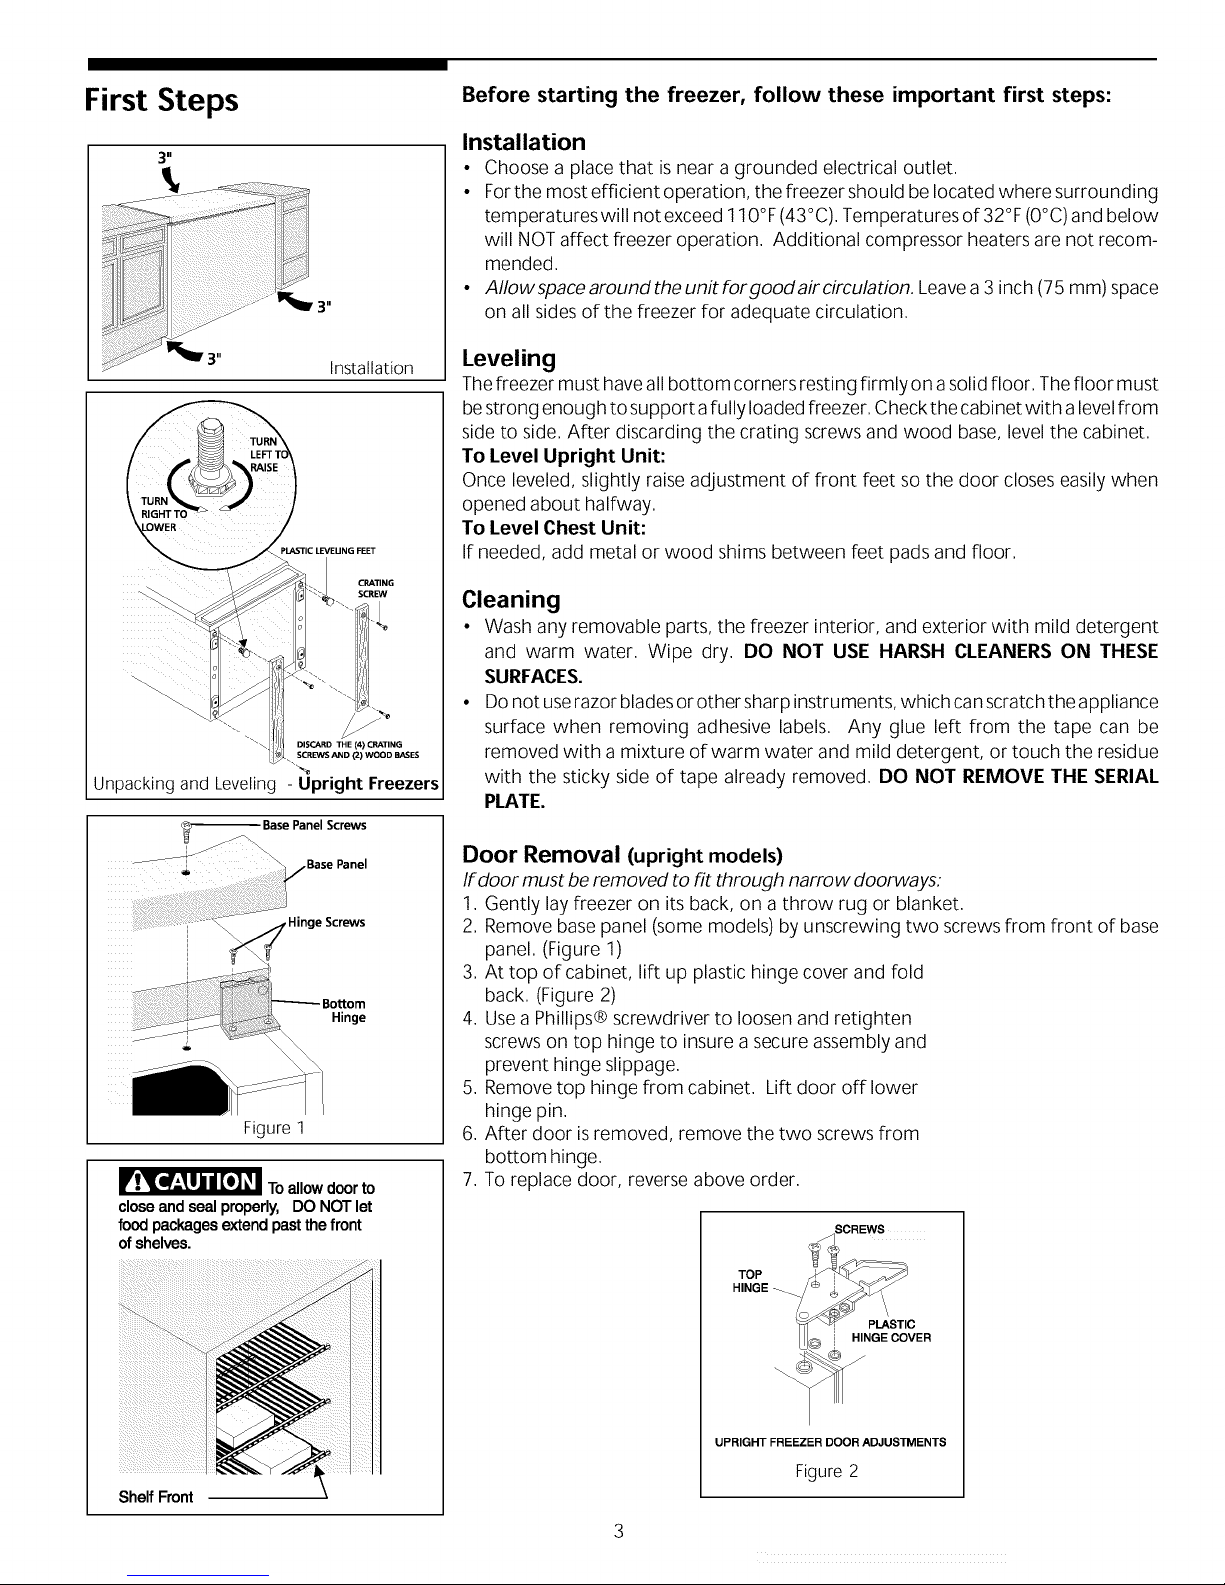
First Steps
3 II
Before starting the freezer, follow these important first steps:
Installation
• Choose a place that is near a grounded electrical outlet.
• For the most efficient operation, the freezer should be located where surrounding
temperatures will not exceed 1IO°F(43°C).Temperatures of 32°F (O°C)and below
will NOTaffect freezer operation. Additional compressor heaters are not recom-
mended.
• AIIow space around the unit for good air circulation. Leavea3 inch (75 mm)space
on all sides of the freezer for adequate circulation.
Installation
DISCARD THE (4) CRATING
SCREWS AND (2) WOOD BASES
Unpacking and Leveling - Upright Freezers
_To allow door to
closeandsealproperly,DO NOTlet
foodpackagesextendpastthefront
ofshelves.
%
Base Panel Screws
,Base Pane
e Screws
Hinge
I
Figure 1
Leveling
Thefreezer must haveall bottom corners resting firmly on a solid floor, Thefloor must
bestrong enough to support afully loaded freezer, Checkthe cabinet with a levelfrom
side to side, After discarding the crating screws and wood base, level the cabinet,
To Level Upright Unit:
Once leveled, slightly raiseadjustment of front feet so the door closes easily when
opened about halfway.
To Level Chest Unit:
If needed, add metal or wood shims between feet pads and floor.
Cleaning
• Wash any removable parts, the freezer interior, and exterior with mild detergent
and warm water. Wipe dry. DO NOT USE HARSH CLEANERS ON THESE
SURFACES.
• Do not userazor bladesor other sharp instruments, which can scratch the appliance
surface when removing adhesive labels. Any glue left from the tape can be
removed with a mixture of warm water and mild detergent, or touch the residue
with the sticky side of tape already removed. DO NOT REMOVE THE SERIAL
PLATE.
Door Removal (upright models)
If door must be removed to fit through narrow doorways:
1. Gently lay freezer on its back, on a throw rug or blanket.
2. Remove base panel (some models) by unscrewing two screws from front of base
panel. (Figure 1)
3. At top of cabinet, lift up plastic hinge cover and fold
back. (Figure 2)
4. Usea Phillips® screwdriver to loosen and retighten
screws on top hinge to insure a secure assembly and
prevent hinge slippage.
5. Remove top hinge from cabinet. Lift door off lower
hinge pin.
6. After door is removed, remove the two screws from
bottom hinge.
7. To replace door, reverse above order.
SCREWS
Shelf Front
TOP _C
HINGE_t_ ,I
UPRIGHT FREEZER DOOR ADJUSTMENTS
i HINGE COVER
Figure2
Setting the
Temperature Control
Cool Down Period
For safe food storage, allow 4 hours for the freezer to cool down completely, The
freezer will run continuously for the first several hours, Foodsthat are already frozen
may be placed in the freezer after the first few hours of operation, Unfrozen foods
should NOT be loaded into the freezer until the freezer has operated for 4 hours,
When loading the freezer, freeze only 3 pounds of fresh food per cubic foot of
freezer space at one time, Distribute packages to be frozen evenly throughout the
freezer, It is not necessaryto turn the control knob to a colder setting while freezing
food.
Temperature Control
Thetemperature control is located inside the freezer on upright models, and on the
left outside wall on chest models, The temperature is factory preset to provide
satisfactory food storage temperatures, However, the temperature control is
adjustable to provide a range of temperatures for your personal satisfaction, If a
colder temperature isdesired, turn the temperature control knob to coldest and allow
several hours for temperatures to stabilize between adjustments,
Freezer Optional
Features
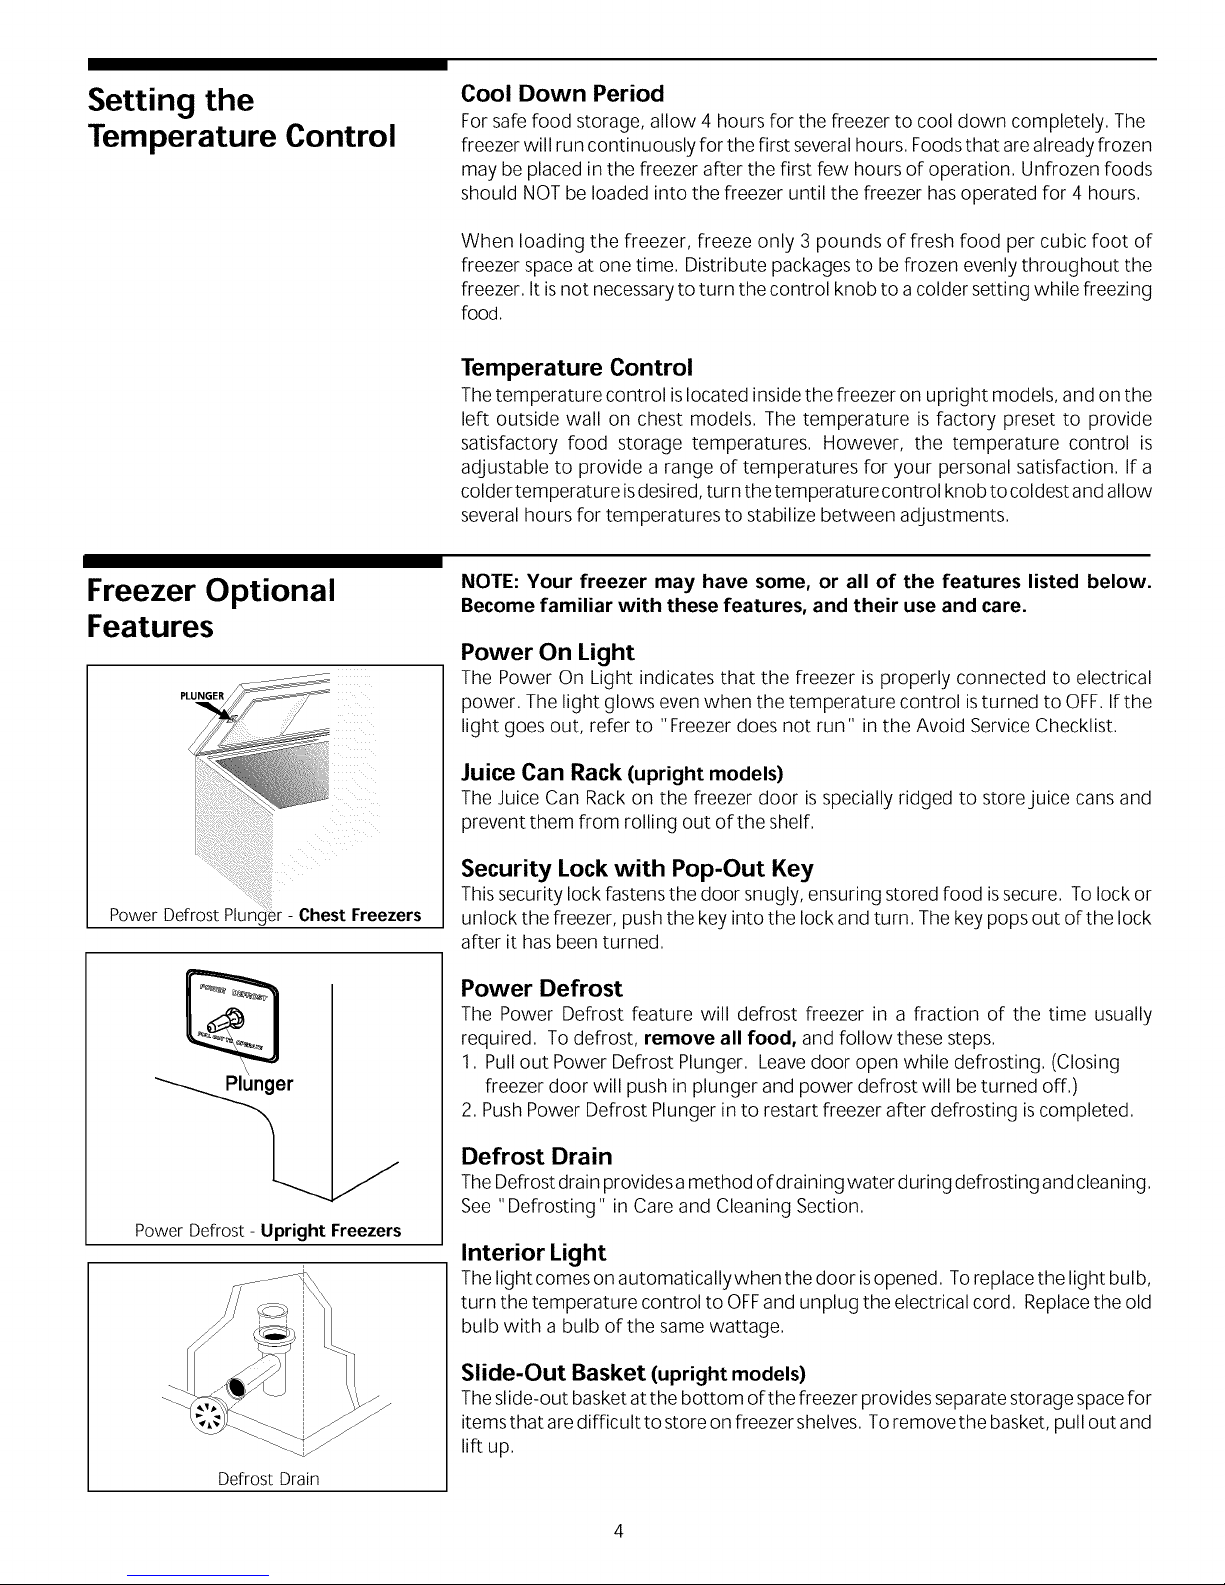
PLUNGER
Power Defrost Plun( - Chest Freezers
Power Defrost - Upright Freezers
NOTE: Your freezer may have some, or all of the features listed below.
Become familiar with these features, and their use and care.
Power On Light
The Power On Light indicates that the freezer is properly connected to electrical
power, The light glows even when the temperature control is turned to OFF, If the
light goes out, refer to "Freezer does not run" in the Avoid Service Checklist,
Juice Can Rack (upright models)
The Juice Can Rackon the freezer door is specially ridged to store juice cans and
prevent them from rolling out of the shelf,
Security Lock with Pop-Out Key
This security lock fastens the door snugly, ensuring stored food is secure, To lock or
unlock the freezer, push the key into the lock and turn, The keypops out of the lock
after it has been turned,
Power Defrost
The Power Defrost feature will defrost freezer in a fraction of the time usually
required, To defrost, remove all food, and follow these steps,
1, Pull out Power Defrost Plunger, Leavedoor open while defrosting, (Closing
freezer door will push in plunger and power defrost will be turned off,)
2, Push Power Defrost Plunger in to restart freezer after defrosting iscompleted,
Defrost Drain
TheDefrost drain provides a method ofdraining water during defrosting and cleaning,
See "Defrosting" in Care and Cleaning Section,
Interior Light
Thelight comes on automatically when the door isopened, Toreplace the light bulb,
turn the temperature control to OFFand unplug the electrical cord, Replacethe old
bulb with a bulb of the same wattage,
Defrost Drain
Slide-Out Basket (upright models)
Theslide-out basket at the bottom of the freezer provides separate storage spacefor
items that aredifficult to store on freezer shelves, To remove the basket, pull out and
lift up,
4
Freezer Optional
Features (continued)
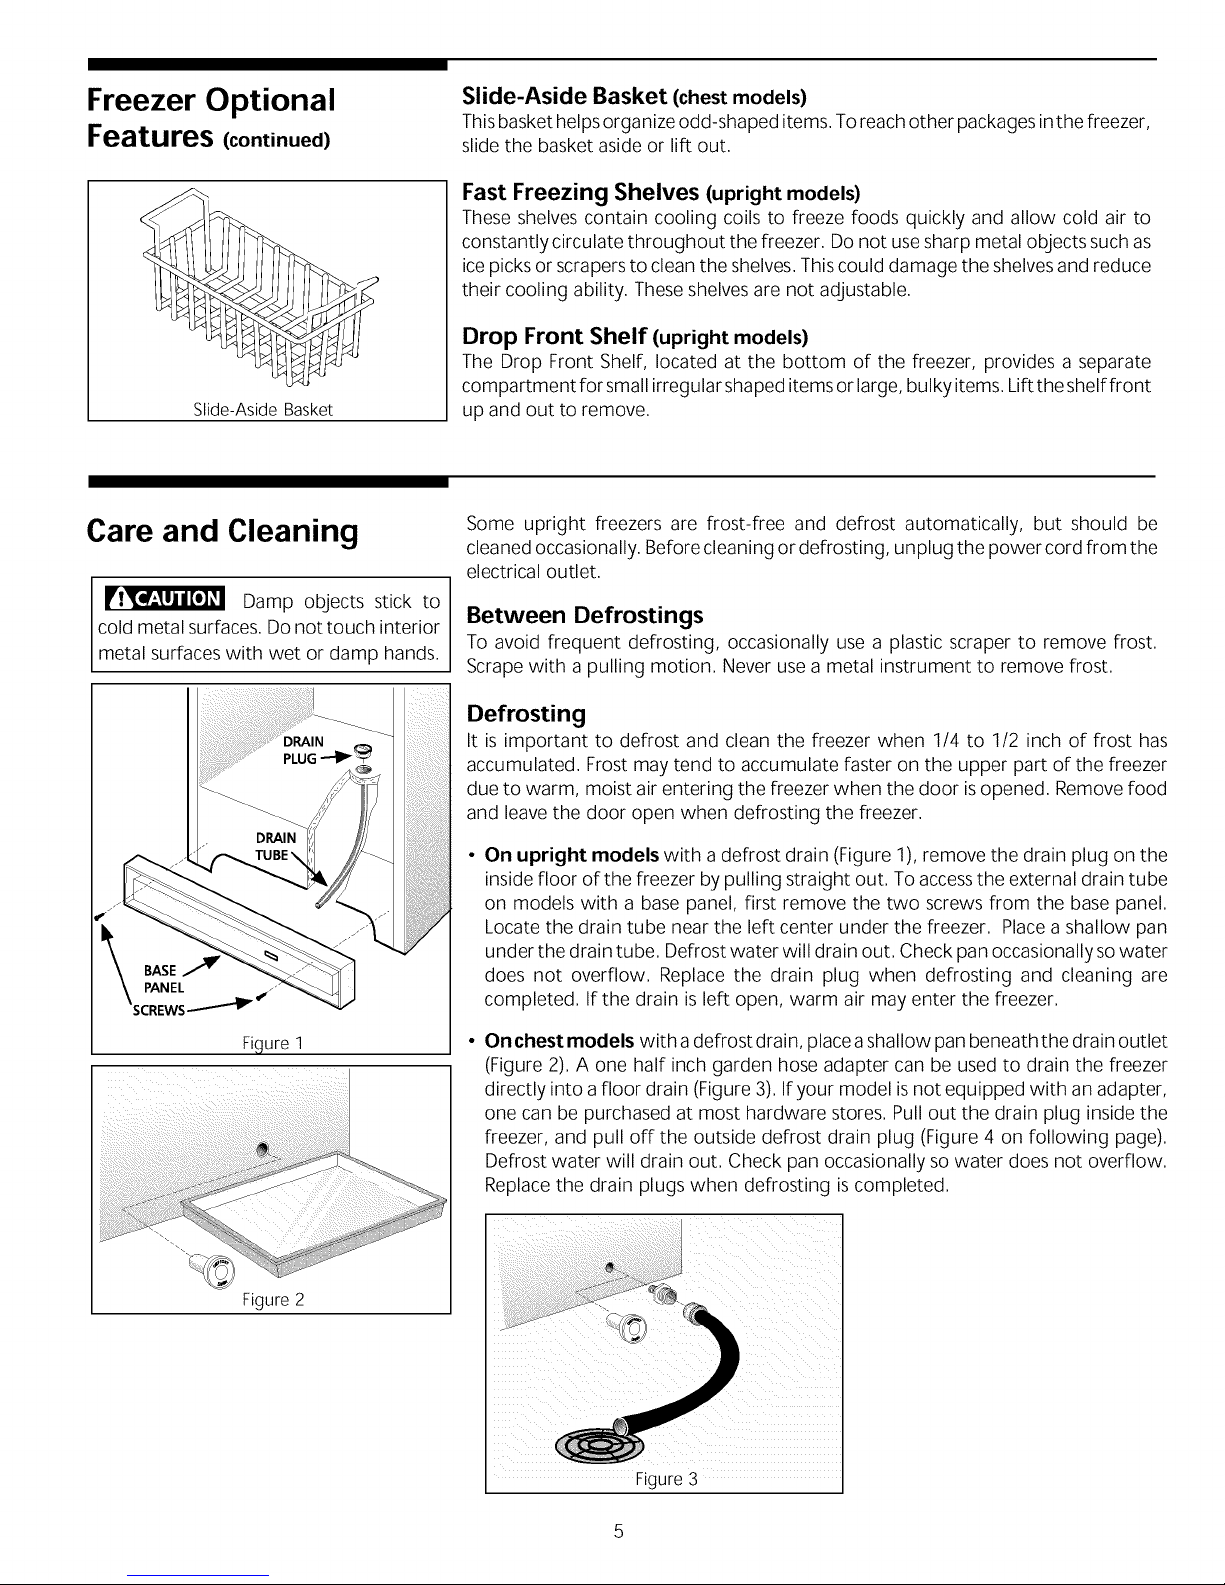
Slide-Aside Basket
Slide-Aside Basket (chest models)
This basket helpsorganize odd-shaped items, To reach other packages inthe freezer,
slide the basket aside or lift out,
Fast Freezing Shelves (upright models)
These shelves contain cooling coilsto freeze foods quickly and allow cold air to
constantly circulate throughout the freezer, Do not usesharp metal objects such as
icepicks or scrapers to clean the shelves, Thiscould damage the shelvesand reduce
their cooling ability, Theseshelves are not adjustable,
Drop Front Shelf (upright models)
The Drop Front Shelf, located at the bottom of the freezer, provides a separate
compartment for small irregular shaped items or large, bulky items, Liftthe shelf front
up and out to remove,
Care and Cleaning
Damp objects stick to
cold metal surfaces, Do not touch interior
metal surfaces with wet or damp hands,
Fi ure 1
Some upright freezers are frost-free and defrost automatically, but should be
cleaned occasionally, Before cleaning or defrosting, unplug the power cord from the
electrical outlet,
Between Defrostings
To avoid frequent defrosting, occasionally use a plastic scraper to remove frost,
Scrape with a pulling motion, Never use a metal instrument to remove frost,
Defrosting
It is important to defrost and clean the freezer when 1/4 to 1/2 inch of frost has
accumulated, Frost may tend to accumulate faster on the upper part of the freezer
due to warm, moist air entering the freezer when the door is opened, Remove food
and leave the door open when defrosting the freezer,
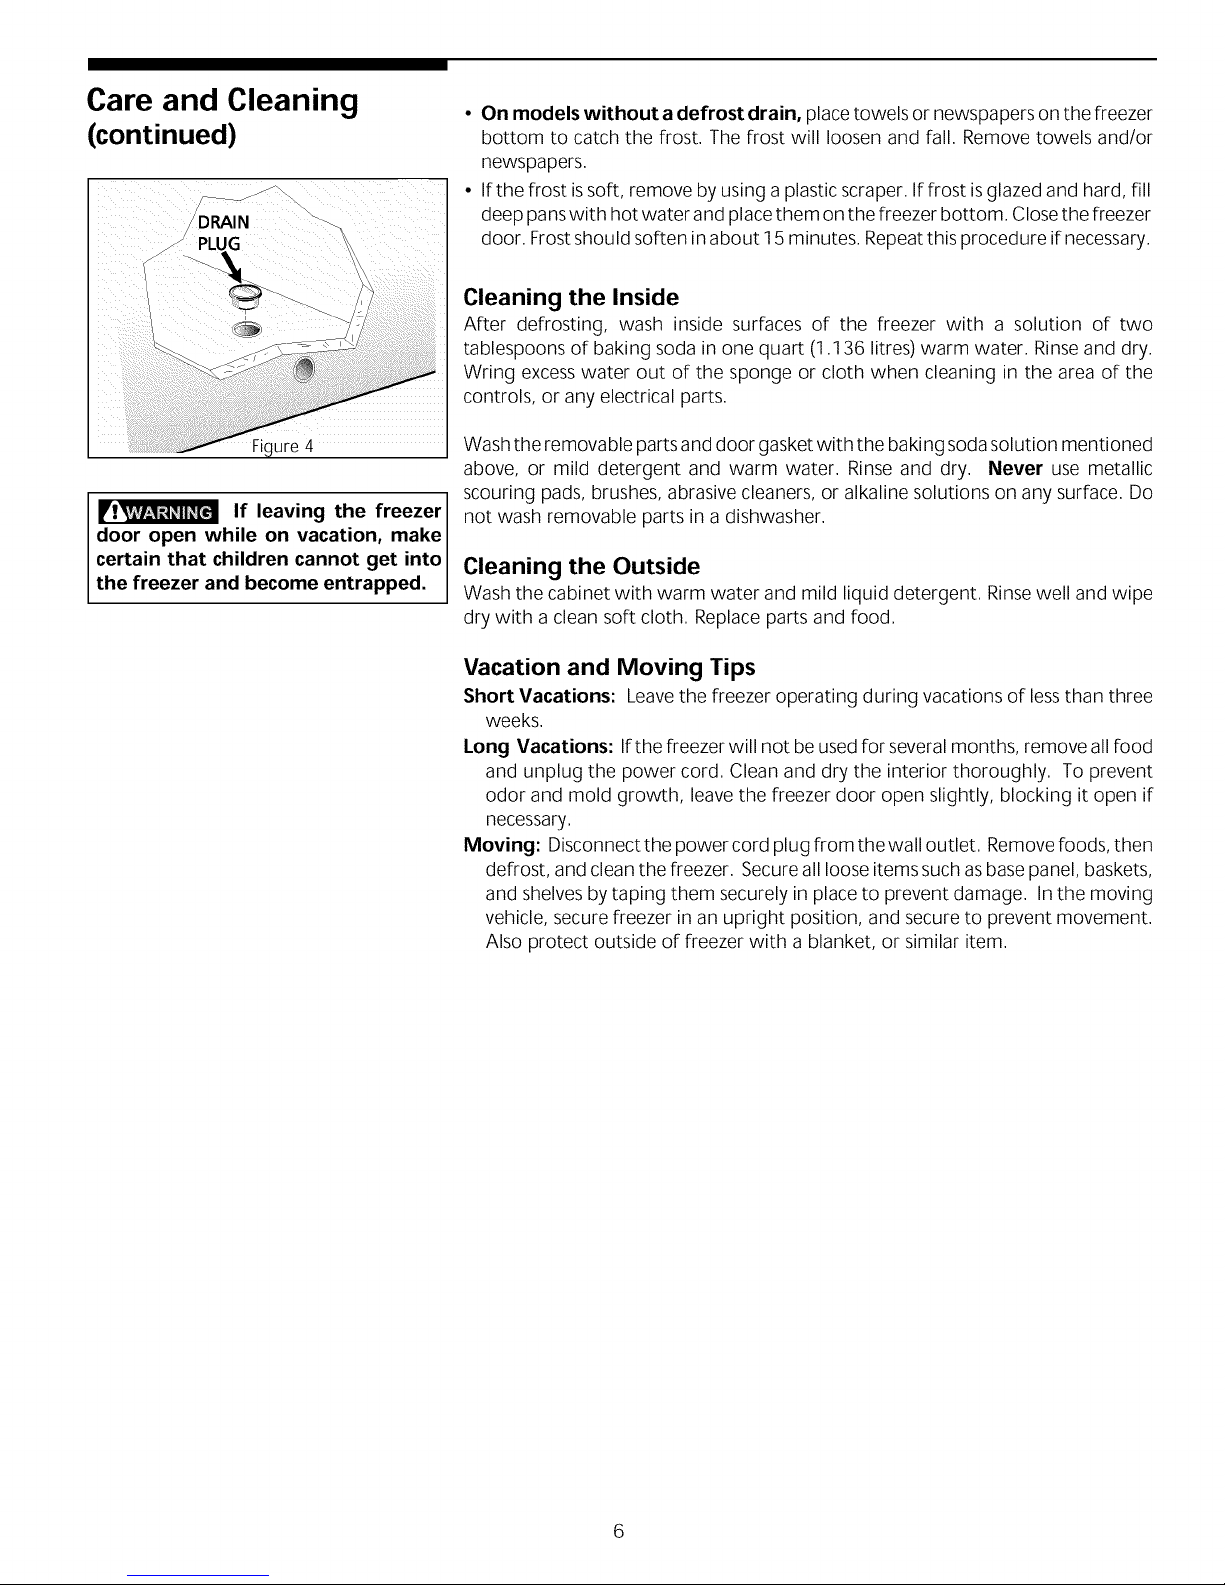
On upright models with a defrost drain (Figure 1), remove the drain plug on the
inside floor of the freezer by pulling straight out, To accessthe external drain tube
on models with a base panel, first remove the two screws from the base panel,
Locate the drain tube near the left center under the freezer, Placea shallow pan
under the drain tube, Defrost water will drain out, Check pan occasionally so water
does not overflow, Replace the drain plug when defrosting and cleaning are
completed, If the drain is left open, warm air may enter the freezer,
On chest models with a defrost drain, placea shallow pan beneath the drain outlet
(Figure 2), A one half inch garden hose adapter can be used to drain the freezer
directly into a floor drain (Figure 3), If your model is not equipped with an adapter,
one can be purchased at most hardware stores, Pull out the drain plug inside the
freezer, and pull off the outside defrost drain plug (Figure 4 on following page),
Defrost water will drain out, Check pan occasionally so water does not overflow,
Replace the drain plugs when defrosting iscompleted,
Figure 2
Figure 3
Care and Cleaning
(continued)
• On models without a defrost drain, place towels or newspapers on the freezer
bottom to catch the frost, The frost will loosen and fall, Remove towels and/or
newspapers,
• If the frost issoft, remove by using a plastic scraper, If frost isglazed and hard, fill
deep panswith hot water and placethem on the freezer bottom, Close the freezer
door, Frostshould soften in about 15 minutes, Repeat this procedure if necessary,
Cleaning the Inside
After defrosting, wash inside surfaces of the freezer with a solution of two
tablespoons of baking soda in one quart (1,136 litres) warm water, Rinseand dry,
Wring excess water out of the sponge or cloth when cleaning in the area of the
controls, or any electrical parts,
Fi_ure 4
If leaving the freezer
door open while on vacation, make
certain that children cannot get into
the freezer and become entrapped.
Wash the removable partsand door gasket with the baking sodasolution mentioned
above, or mild detergent and warm water. Rinse and dry. Never use metallic
scouring pads, brushes, abrasive cleaners, or alkaline solutions on any surface. Do
not wash removable parts in a dishwasher.
Cleaning the Outside
Wash the cabinet with warm water and mild liquid detergent. Rinsewell and wipe
dry with a clean soft cloth. Replace parts and food.
Vacation and Moving Tips
Short Vacations: Leavethe freezer operating during vacations of lessthan three
weeks,
Long Vacations: Ifthe freezer will not be usedfor several months, remove all food
and unplug the power cord, Clean and dry the interior thoroughly, To prevent
odor and mold growth, leave the freezer door open slightly, blocking it open if
necessary,
Moving: Disconnect the power cord plug from the wall outlet, Removefoods, then
defrost, and clean the freezer, Secure all loose items such as base panel, baskets,
and shelves bytaping them securely in place to prevent damage, In the moving
vehicle, secure freezer in an upright position, and secure to prevent movement,
Also protect outside of freezer with a blanket, or similar item,
6
Power Failure/
Freezer Failure
Do not open freezer door
unnecessarily if freezer is
off for several hours.
If a power failure occurs, frozen foods will stay frozen for at least 24 hours if the
freezer is kept closed, If the power failure continues, pack seven or eight pounds
of dry iceinto the freezer every 24 hours, Look in the Yellow Pagesunder "Dry Ice,"
"Dairies," or "Ice Cream Manufacturers" for local dry icesuppliers, Always wear
gloves and usecaution when handling dry ice,
If the freezer has stopped operating, see "Freezer does not run" in the Avoid
Service Checklist Section of this manual, If you cannot solve the problem, call an
authorized servicer immediately,
If the freezer remains off for several hours, follow the directions above for the use
of dry ice during a power failure, If necessary,take the food to a local locker plant
until the freezer isready to operate, Look in the Yellow Pagesunder "Frozen Food
Locker Plants,"
Energy Saving Ideas
• The freezer should be located in the coolest area of the room, away from heat
producing appliances or heating ducts, and out of direct sunlight,
• Let hot foods cool to room temperature before placing in the freezer,
Overloading the freezer forces the compressor to run longer, Foods that freeze
too slowly may lose quality, or spoil,
• Besure to wrap foods properly, and wipe containers dry before placing them in
the freezer, This cuts down on frost build-up inside the freezer,
• Freezer shelves should not be lined with aluminum foil, wax paper, or paper
toweling, Liners interfere with cold air circulation, making the freezer less
efficient,
• Organize and label food to reduce door openings and extended searches,
Remove as many items as needed at one time, and close the door as soon as
possible,
Avoid Service Checklist
OCCURRENCE
FREEZERDOES NOT RUN
Before calling for service, review this list. It may save you both time and
expense. This list includes common occurrences that are not the result of
defective workmanship or materials in this appliance.
SOLUTION
Check to be sure freezer is not plugged into a circuit that has ground fault interrupt. If you
are unsure about the outlet, have it checked by a certified technician.
Temperature control is in the OFFposition. See Setting the Temperature Control Section.
Freezer may not be plugged in, or plug may be loose. Be sure plug is tightly pushed into
electrical outlet.
House fuse has blown, or circuit breaker hastripped. Check/reset circuit breaker, or replace
fuse with 15 amp. time delay fuse.
Power outage. Check house lights. Call local electric company.
Freezer runs too much or too long.
Temperatures inside the freezer are Temperature control issettoo cold. Turn the control to awarmer setting. Allow several hours
too cold. for the temperature to stabilize.
Temperatures inside the freezer are too Temperature control is set too warm. Turn the control to a colder setting. Allow several hours
warm. for the temperature to stabilize.
Room or outside weather is hot. It is normal for the freezer to work harder under these
conditions.
Freezer had recently been disconnected for a period of time. Freezer requires 4 hours to cool
down completely.
Large amounts of warm or hot food have been stored recently. Warm food will cause the
freezer to run more until the desired temperature is reached.
Door is kept open too long or too frequently. Warm air enters the freezer every time the door
is opened. Open the door less often.
Freezer door may be slightly open. See Occurrence "Door Problems."
Temperature control isset too cold. Turn the control knob to awarmer setting. Allow several
hours for the temperature to stabilize.
Freezer gasket is dirty, worn, cracked, or poorly fitted, Clean or change gasket, Leaksin the
door seal will cause freezer to run longer in order to maintain desired temperature,
Door is kept open too long or isopened too frequently. Warm air enters the freezer everytime
the door is opened. Open the door less often.
Temperature of external freezer The exterior freezer walls can be as much as 30°F warmer than room temperature. This is
surface is warm. normal while the compressor works to transfer heat from inside the freezer cabinet.
SOUND AND NOISE
Louder sound levels whenever Modern freezers have increased storage capacity and more even temperatures. They require
freezer is on. a high efficiency compressor. When the surrounding noise level is low, you might hear the
Louder sound levels when compressor Freezer operates at higher pressures during the start of the ON cycle. This is normal. Sound
comes on. will level off or disappear as freezer continues to run.
Popping or cracking sound when
compressor comes on.
Door may be open slightly. See Occurrence section "Door Problems."
Large amounts of warm or hot food might have been stored recently. Wait until the freezer
has had a chance to reach its selected temperature.
Freezer has recently been disconnected for a period of time. Freezer requires 4 hours to cool
down completely.
compressor runninq while it cools the interior.
Metal parts undergo expansion and contraction, asin hot water pipes. This isnormal. Sound
will level off or disappear as freezer continues to run.
8
OCCURRENCE SOLUTION
SOUND AND NOISE (cont'd)
Bubbling or gurgling sound, like water Refrigerant (used to cool freezer) iscirculating throughout the system. This is normal.
boiling.
Vibrating or rattling noise. Freezer is not level. It rocks on the floor when it is moved slightly. Level the unit. Refer to
"Leveling" in the First Steps Section.
Floor isuneven or weak. Freezer rocks on the floor when it is moved slightly. Besure floor can
adequately support freezer. Level the freezer by putting wood or metal shims under part of
the freezer.
Freezer istouching the wall. Relevel the freezer or move freezer slightly. Refer to "Leveling"
WATER/MOISTURE/FROST
INSIDE FREEZER
in the First Steps Section.
Moisture forms on inside freezer walls.
WATER/MOISTURE/FROST
OUTSIDE FREEZER
Moisture forms on outside of
freezer.
ODOR IN FREEZER
DOOR PROBLEMS
Door will not close.
LIGHT BULB IS NOT ON
Weather ishot and humid, which increases internal rate of frost build-up. This is normal.
Door is sliqhtly open. See Occurrence "Door Problems."
Door is kept open too long, or is opened too frequently. Open the door lessoften.
Door is slightly open, causing the cold air from inside the freezer to meet warm moist air from
outside. See "Door Problems" in the Occurrence Section.
Interior needs to be cleaned. Clean interior with sponge, warm water, and baking soda.
Foods with strong odors are in the freezer. Cover the food tightly.
Freezeris not level. It rocks on the floor when it ismoved slightly. This condition can force the
cabinet out of square and misalign the door. Refer to "Leveling" in the First Steps Section.
Floor is uneven or weak. Freezer rocks on the floor when it is moved slightly. Level the floor
by using metal or wood shims under the freezer or brace floor supporting the freezer.
Light bulb is burned out. Follow directions under "Interior Light" in the Freezer Features
Section.
No electric current is reaching the freezer. See Occurrence "Freezer Does Not Run."
9
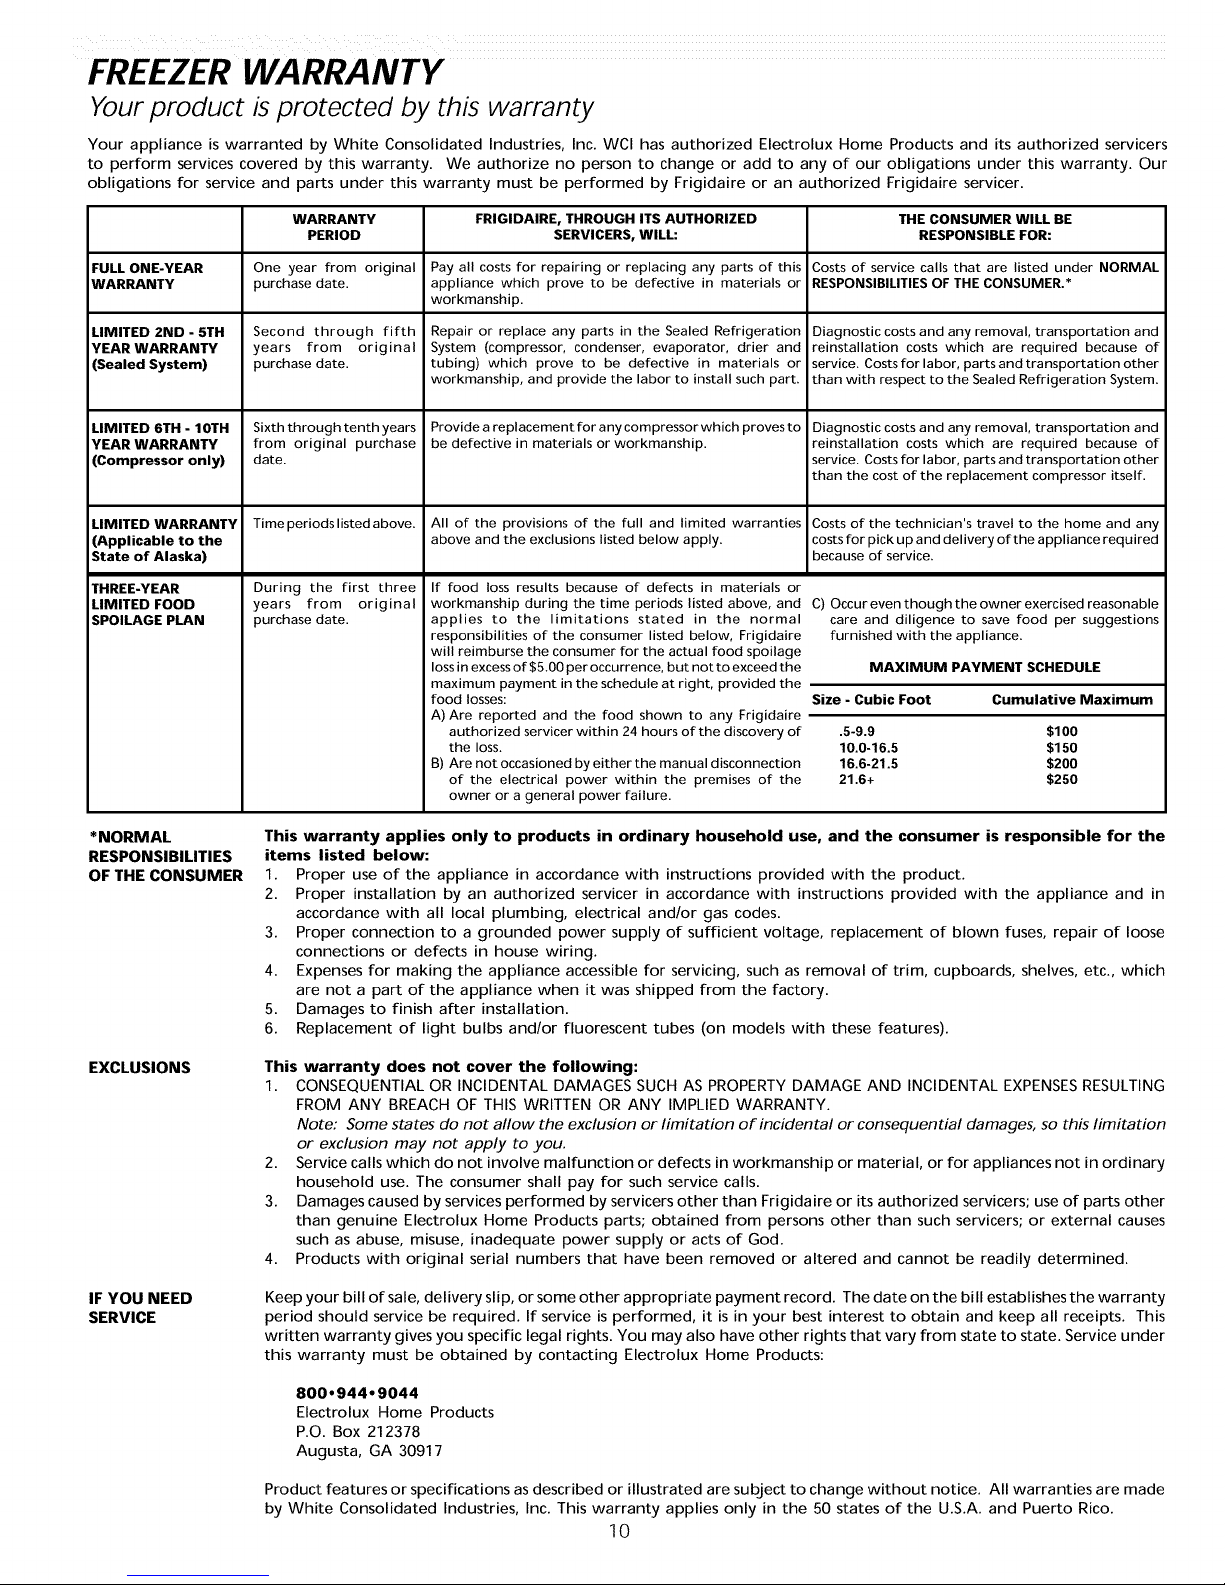
FREEZER WARRANTY
Your product is protected by this warranty
Your appliance is warranted by White Consolidated Industries, Inc. WCl has authorized Electrolux Home Products and its authorized servicers
to perform services covered by this warranty. We authorize no person to change or add to any of our obligations under this warranty. Our
obligations for service and parts under this warranty must be performed by Frigidaire or an authorized Frigidaire servicer.
FULL ONE-YEAR
WARRANTY
LIMITED 2ND - 5TH
YEAR WARRANTY
(Sealed System)
WARRANTY
PERIOD
One year from original
purchase date.
Second through fifth
years from original
purchase date.
FRIGIDAIRE, THROUGH ITS AUTHORIZED
SERVICERS, WILL:
Pay all costs for repairing or replacing any parts of this
appliance which prove to be defective in materials or
workmanship.
Repair or replace any parts in the Sealed Refrigeration
System (compressor, condenser, evaporator, drier and
tubing) which prove to be defective in materials or
workmanship, and provide the labor to install such part.
Costs of service calls that are listed under NORMAL
RESPONSIBILITIES OF THE CONSUMER.*
Diagnostic costs and any removal, transportation and
reinstallation costs which are required because of
service. Costs for labor, parts and transportation other
than with respect to the Sealed Refrigeration System.
THE CONSUMER WILL BE
RESPONSIBLE FOR:
LIMITED 6TH-10TH
YEAR WARRANTY
(Compressor only)
LIMITED WARRANTY
(Applicable to the
State of Alaska)
THREE-YEAR
LIMITED FOOD
SPOILAGE PLAN
*NORMAL
RESPONSIBILITIES
OF THE CONSUMER
Sixth through tenth years
from original purchase
date.
Time periods listed above.
During the first three
years from original
purchase date.
Provide a replacement for any compressor which proves to
be defective in materials or workmanship.
All of the provisions of the full and limited warranties
above and the exclusions listed below apply.
If food loss results because of defects in materials or
workmanship during the time periods listed above, and
applies to the limitations stated in the normal
responsibilities of the consumer listed below, Frigidaire
will reimburse the consumer for the actual food spoilage
loss in excess of $5.00 per occurrence, but not to exceed the
maximum payment in the schedule at right, provided the
food losses:
A) Are reported and the food shown to any Frigidaire
authorized servicer within 24 hours of the discovery of
the loss.
B) Are not occasioned by either the manual disconnection
of the electrical power within the premises of the
owner or a general power failure.
Diagnostic costs and any removal, transportation and
reinstallation costs which are required because of
service. Costs for labor, parts and transportation other
than the cost of the replacement compressor itself.
Costs of the technician's travel to the home and any
costs for pick up and delivery of the appliance required
because of service.
C) Occur even though the owner exercised reasonable
care and diligence to save food per suggestions
furnished with the appliance.
MAXIMUM PAYMENT SCHEDULE
Size - Cubic Foot Cumulative Maximum
.5-9.9 $100
10.0-16.5 $150
16.6-21.5 $200
21.6+ $250
This warranty applies only to products in ordinary household use, and the consumer is responsible for the
items listed below:
1. Proper use of the appliance in accordance with instructions provided with the product.
2. Proper installation by an authorized servicer in accordance with instructions provided with the appliance and in
accordance with all local plumbing, electrical and/or gas codes.
3. Proper connection to a grounded power supply of sufficient voltage, replacement of blown fuses, repair of loose
connections or defects in house wiring.
4. Expenses for making the appliance accessible for servicing, such as removal of trim, cupboards, shelves, etc., which
are not a part of the appliance when it was shipped from the factory.
5. Damages to finish after installation.
6. Replacement of light bulbs and/or fluorescent tubes (on models with these features).
EXCLUSIONS
This warranty does not cover the following:
1. CONSEQUENTIAL OR INCIDENTAL DAMAGES SUCH AS PROPERTY DAMAGE AND INCIDENTAL EXPENSES RESULTING
FROM ANY BREACH OF THIS WRITTEN OR ANY IMPLIED WARRANTY.
Note: Some states do not allow the exclusion or limitation of incidental or consequential damages, so this limitation
or exclusion may not apply to you.
2. Service calls which do not involve malfunction or defects in workmanship or material, or for appliances not in ordinary
household use. The consumer shall pay for such service calls.
3. Damages caused by services performed by servicers other than Frigidaire or its authorized servicers; use of parts other
than genuine Electrolux Home Products parts; obtained from persons other than such servicers; or external causes
such as abuse, misuse, inadequate power supply or acts of God.
4. Products with original serial numbers that have been removed or altered and cannot be readily determined.
IF YOU NEED
SERVICE
Keep your bill of sale, delivery slip, or some other appropriate payment record. The date on the bill establishes the warranty
period should service be required. If service is performed, it is in your best interest to obtain and keep all receipts. This
written warranty gives you specific legal rights. You may also have other rights that vary from state to state. Service under
this warranty must be obtained by contacting Electrolux Home Products:
800.944.9044
Electrolux Home Products
P.O. Box 212378
Augusta, GA 30917
Product features or specifications as described or illustrated are subject to change without notice. All warranties are made
by White Consolidated Industries, Inc. This warranty applies only in the 50 states of the U.S.A. and Puerto Rico.
10
Service Information in
Canada Only
To avoid unnecessary cost and inconvenience, make a few simple checks
before calling for service. Common occurrences and their solutions can be
found in the Avoid Service Checklist. Be sure you have followed the
instructions in this manual.
If you are unable to locate the cause of a problem, call for service. Insist on
factory service by an authorized FRIGIDAIREPARTSAND SERVICEdepot.
FRIGIDAIRE PARTS AND SERVICE
All Frigidaire appliances are backed by FRIGIDAIREPARTSAND SERVICE,one of
Canada's largest parts and service networks.
The Frigidaire reputation means you can enjoy complete professional service
from one of our hundreds of trained technicians across the country.
FRIGIDAIRE PARTS AND SERVICE
7075 Ordan Drive
Mississauga, Ontario
L5T 1K6
Place the name, address and telephone number of your service depot in
the spaces below.
Product and feature specifications as described or illustrated are
subject to change without notice.
11
FRIGIDAIR
FREEZER
WARRANTY in Canada
WARRANTOR:
Frigidaire Home Products of Canada
7075 Ordan Drive
Mississauga, Ontario
L5T 1K6
WARRANTY PERIOD:
For the first year after purchase by the original consumer/owner:
For the second, third, fourth and fifth year after purchase by the original
consumer/owner:
For the sixth, seventh, eighth, ninth and tenth year after purchase by the
original consumer/owner.
FREEZER FOOD SPOILAGE PLAN
In addition, in the event of loss of food due to spoilage as a result of a mechanical failure or an inoperative component of the freezer due to faulty workmanship
or materials, the following freezer food spoilage plan applies, The cumulative total responsibility, as outlined below, shall not be exceeded for any given freezer,
Type of freezer
5 cu. ft/142 litres to
11.9 cu. ft./337.1 litres
12.0 cu. ft./340 litres to
23.0 cu. ft./651.5 litres
Plan period
1st through 5th year after date of purchase
by original consumer/owner
1st through 5th year after date of purchase
by original consumer/owner
For service under this warranty, contact your local dealer/retailer,
authorized FRIGIDAIRE PARTS AND SERVICE depot, or:
FRIGIDAIRE PARTS AND SERVICE
7075 Ordan Drive
Mississauga, Ontario
L5T 1 K6
Tel: (905) 565-9200
Fax: (905) 565-0937
WARRANTOR WILL THROUGH ITS AUTHORIZED SERVICE DEPOT:
Pay cost to repair or replace any defective parts (including service and
labour charge).
Pay cost (including service and labour charge) to repair or replace
defective parts of the sealed refrigeration system consisting of the
compressor, evaporator, condenser, interconnecting tubing, drier and
refrigeration charge.
Pay cost (excluding service and labour charge) to replace a defective
motor compressor.
Frigidaire will pay
A cumulative total
of up to $200.
A cumulative total
of up to $400.
Consumer/Owner will pay
First $25 of each claim
First $25 of each claim
Claim forms may be obtained from your local dealer/retailer, authorized FRIGIDAIRE PARTS AND SERVICE depot or from the office shown above and must
be submitted to the warranty department within thirty (30) days of the loss,
Where a claim is submitted under the Freezer Food Spoilage Plan, such claim constitutes a waiver by the consumer/owner of any other right to remedy to which
he/she is otherwise entitled by law with respect to the loss of food due to spoilage as a result of mechanical failure or an inoperative component of the freezer
due to faulty workmanship or materials.
WARRANTY APPLIES TO:
a) Products purchased and installed in Canada for personal single family household use.
b) Defects resulting or arising out of the manufacturing process.
c) Products bearing legible manufacturer's model and serial numbers.
d) Replacement parts only for the remainder of the original warranty.
WARRANTY DOES NOT APPLY TO:
a) Transportation damage.
b) Supply and replacement of porcelain, fuses, glass and light bulbs.
c) Parts and service supplied or obtained from other than FRIGIDAIREPARTSAND SERVICEor FRIGIDAIRE PARTSAND SERVICEauthorized depots.
d) Damage or failure as the result of abuse, improper or commercial use.
CONSUMER/OWNER RESPONSIBILITY:
a) To provide proof of the original date of purchase by means of a bill of sale or payment record verifying purchase date.
b) To pay all costs to make the appliance readily accessible for service.
c) To ensure proper power supply and connection of the appliance to same.
d) Proper installation, control setting and care of finish.
This warranty is in addition to any statutory warranties contained in any applicable legislation. The terms and conditions of this warranty are not intended
to exclude or limit your rights under those statutes. The warrantor however reserves the right to charge transportation and travelling costs for distances
in excess of 48 kilometres (30 miles) from the nearest FRIGIDAIRE PARTSAND SERVICE authorized service depot.
This warranty plus the statutory warranties mentioned are the only warranties given to the consumer/owner for this product.
12
GUIDEDEL'UTI LISATEUR
_ : ii _i_!!i_ii _ii _ii iil _ _i_i_i_!ii:i_
LISEZETCONSERVEZCESINSTRUCTIONS
Inscrivez ci-dessous le numero de modele et le numero de serie de ce congelateur.
N° de modele
N° de serie
Conservez ces numeros.
IMPORTANT: Conservez une copie de votre facture. La date qui y figure etablit
la periode de garantie, au cas ou vous auriez besoin de faire reparer votre appareil.
Si vous faites reparer votre appareil, il sera preferable que vous ayez deja demande
et garde tous les re_us.
Table des matieres
2
3
4
4-5
5-6
7
7
8-9
10
11
Ce guide de I'utilisateur donne des directives particulieres a ce modele. N'utilisez
le congelateur que de la fa_on indiquee dans ce guide.
Importantes mesures de securite
Pour bien commencer
Reglage de la commande de temperature
Caracteristiques du congelateur
Entretien et nettoyage
Panne de courant/panne de congelateur
I_conomies d'energie
Liste de contrOle anti-panne
Information sur le service apres-vente
Garantie (Canada)
Lesspecifications et caracteristiques des modeles, decrites ou illustrees, sont modifiables sans preavis.
i ii i ii iii
CONGELATEUR
PIECEN° 216760400 (0008)
Importantes mesures
de securite
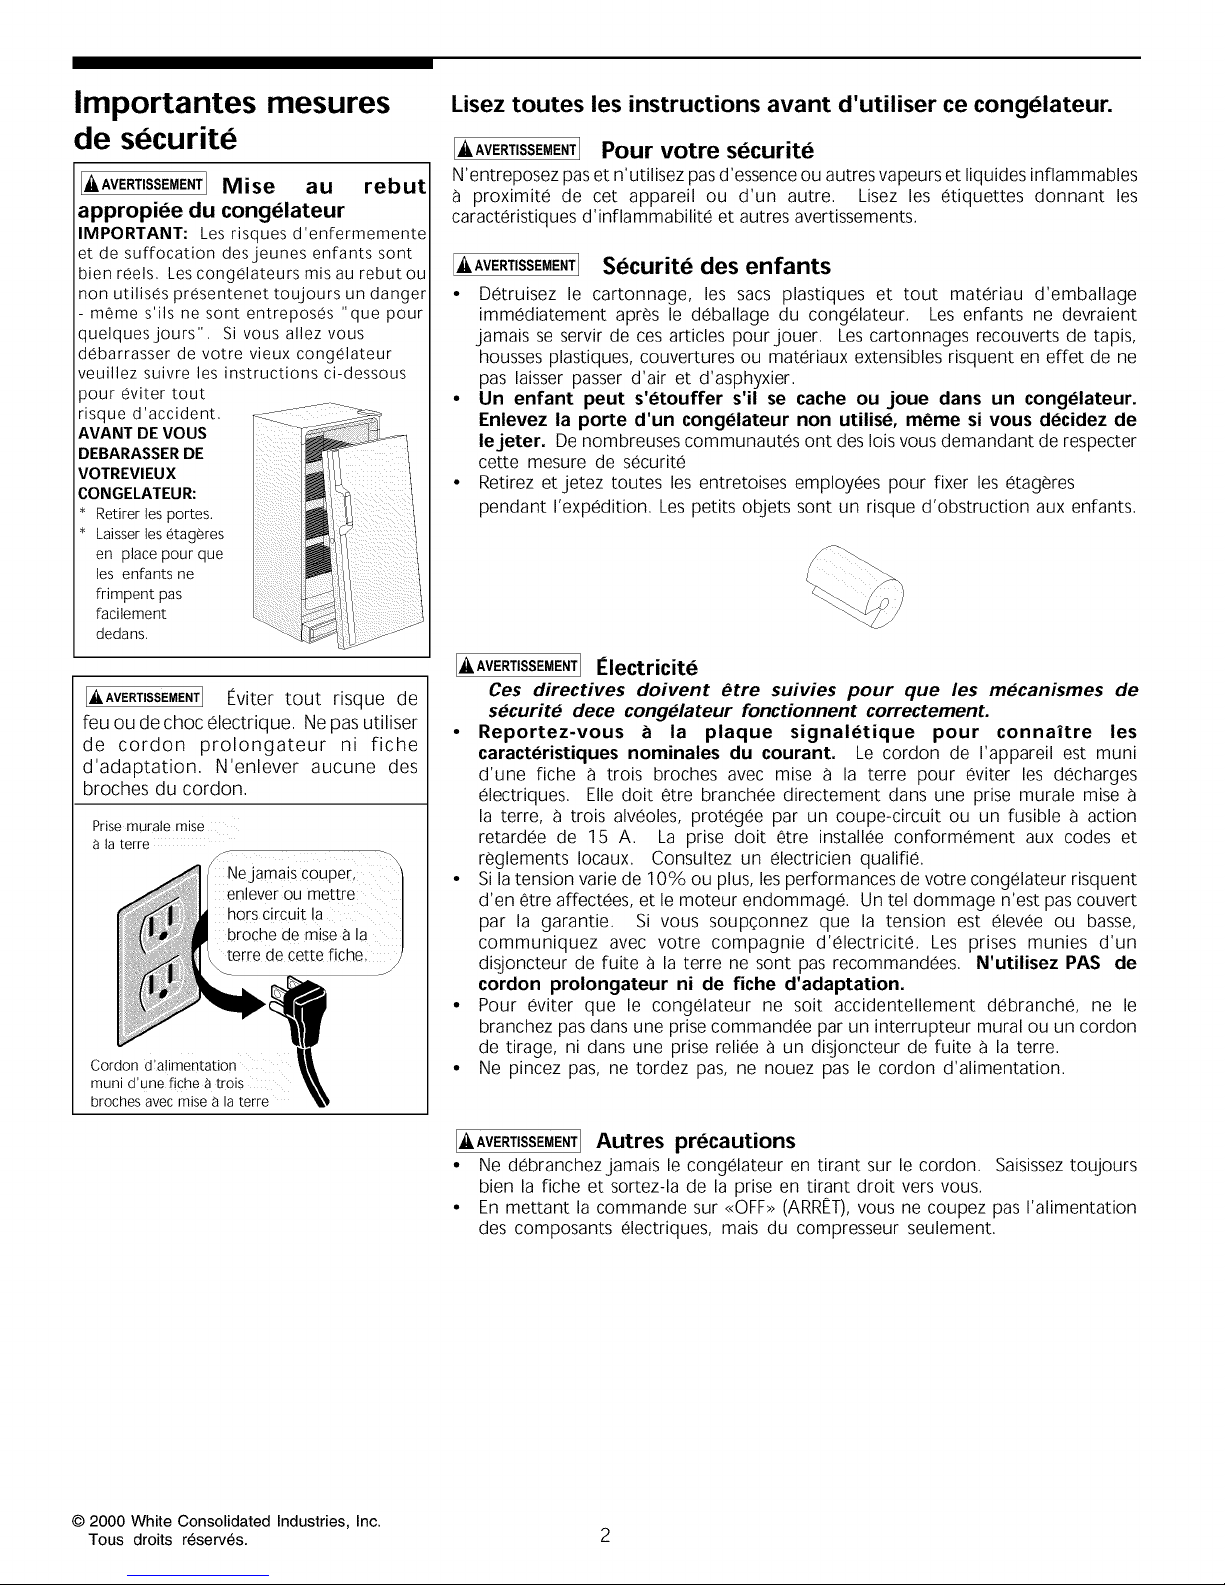
_AVERTISSEMENT] Mise au rebut
appropiee du congelateur
IMPORTANT: Les risques d'enfermemente
et de suffocation desjeunes enfants sont
bien reels, Les congelateurs mis au rebut ou
non utilises presentenet toujours un danger
- meme s'ils ne sont entreposes "que pour
quelquesjours", Sivousallezvous
debarrasser de votre vieux congelateur
veuillez suivre les instructions ci-dessous
pour eviter tout
risque d'accident. _---_
AVANTDE VOUS
DEBARASSERDE
VOTREVIEUX
CONGELATEUR:
Retirerlesportes.
Laisserlesetageres
en placepourque
les enfantsne
ffimpent pas
facilement
dedans.
[_AVERTISSEMENTI Eviter tout risque de
feu ou de choc electrique, Ne pas utiliser
de cordon prolongateur ni fiche
d'adaptation, N'enlever aucune des
broches du cordon.
Prisemurale raise
a la terre
_ NejamaiS cOuPeg
enleve ou mett
hors circuit la q
brOChe de mise 8 la
_erre de cette fiche,/
Cordon d'alimentation
muni d'une fiche 8 trois
broches avec mise 8 la terre
Lisez toutes les instructions avant d'utiliser ce congelateur.
[-_=AVERTISSEMENTI Pour votre securite
N'entreposez pas et n'utilisez pas d'essence ou autres vapeurs et liquides inflammables
proximite de cet appareil ou d'un autre. Lisez les etiquettes donnant les
caracteristiques d'inflammabilite et autres avertissements.
IAAVERTISSEMENTISecurite des enfants
• Detruisez le cartonnage, les sacs plastiques et tout materiau d'emballage
immediatement apres le deballage du congelateur. Les enfants ne devraient
jamais se servir de ces articles pour jouer. Les cartonnages recouverts de tapis,
housses plastiques, couvertures ou materiaux extensibles risquent en effet de ne
pas laisser passer d'air et d'asphyxier.
• Un enfant peut s'etouffer s'il se cache ou joue dans un congelateur.
Enlevez la porte d'un congelateur non utilise, mCme si vous decidez de
lejeter. De nombreuses communautes ont des lois vous demandant de respecter
cette mesure de securite
• Retirez etjetez routes les entretoises employees pour fixer les etageres
pendant I'expedition. Les petits objets sont un risque d'obstruction aux enfants.
[_ AVERTISSEMENTII_lectricite
Ces directives doivent _tre suivies pour que les rnecanisrnes de
securite dece congelateur fonctionnent correctement.
• Reportez-vous b la plaque signaletique pour connaitre les
caracteristiques nominales du courant. Le cordon de I'appareil est muni
d'une fiche a trois broches avec mise a la terre pour eviter les decharges
electriques. Elle dolt etre branchee directement dans une prise murale mise
la terre, a trois alveoles, protegee par un coupe-circuit ou un fusible a action
retardee de 15 A. La prise dolt etre installee conformement aux codes et
reglements Iocaux. Consultez un electricien qualifie.
• Sila tension varie de 10% ou plus, les performances de votre congelateur risquent
d'en etre affectees, et le moteur endommage. Un tel dommage n'est pas couvert
par la garantie. Si vous soup(;onnez que la tension est elevee ou basse,
communiquez avec votre compagnie d'electricite. Les prises munies d'un
disjoncteur de fuite a la terre ne sont pas recommandees. N'utilisez PA$ de
cordon prolongateur ni de fiche d'adaptation.
• Pour eviter que le congelateur ne soit accidentellement debranche, ne le
branchez pas dans une prise commandee par un interrupteur mural ou un cordon
de tirage, ni dans une prise reliee a un disjoncteur de fuite a la terre.
• Ne pincez pas, ne tordez pas, ne nouez pas le cordon d'alimentation.
© 2000 White Consolidated Industries, Inc.
Tous droits r_serv_s. 2
[_AVERTISSEMENTI Autres precautions
• Ne debranchezjamais le congelateur en tirant sur le cordon. Saisissez toujours
bien la fiche et sortez-la de la prise en tirant droit vers vous.
• En mettant la commande sur <<OFF>>(ARRET), vous ne coupez pas I'alimentation
des composants electriques, mais du compresseur seulement.
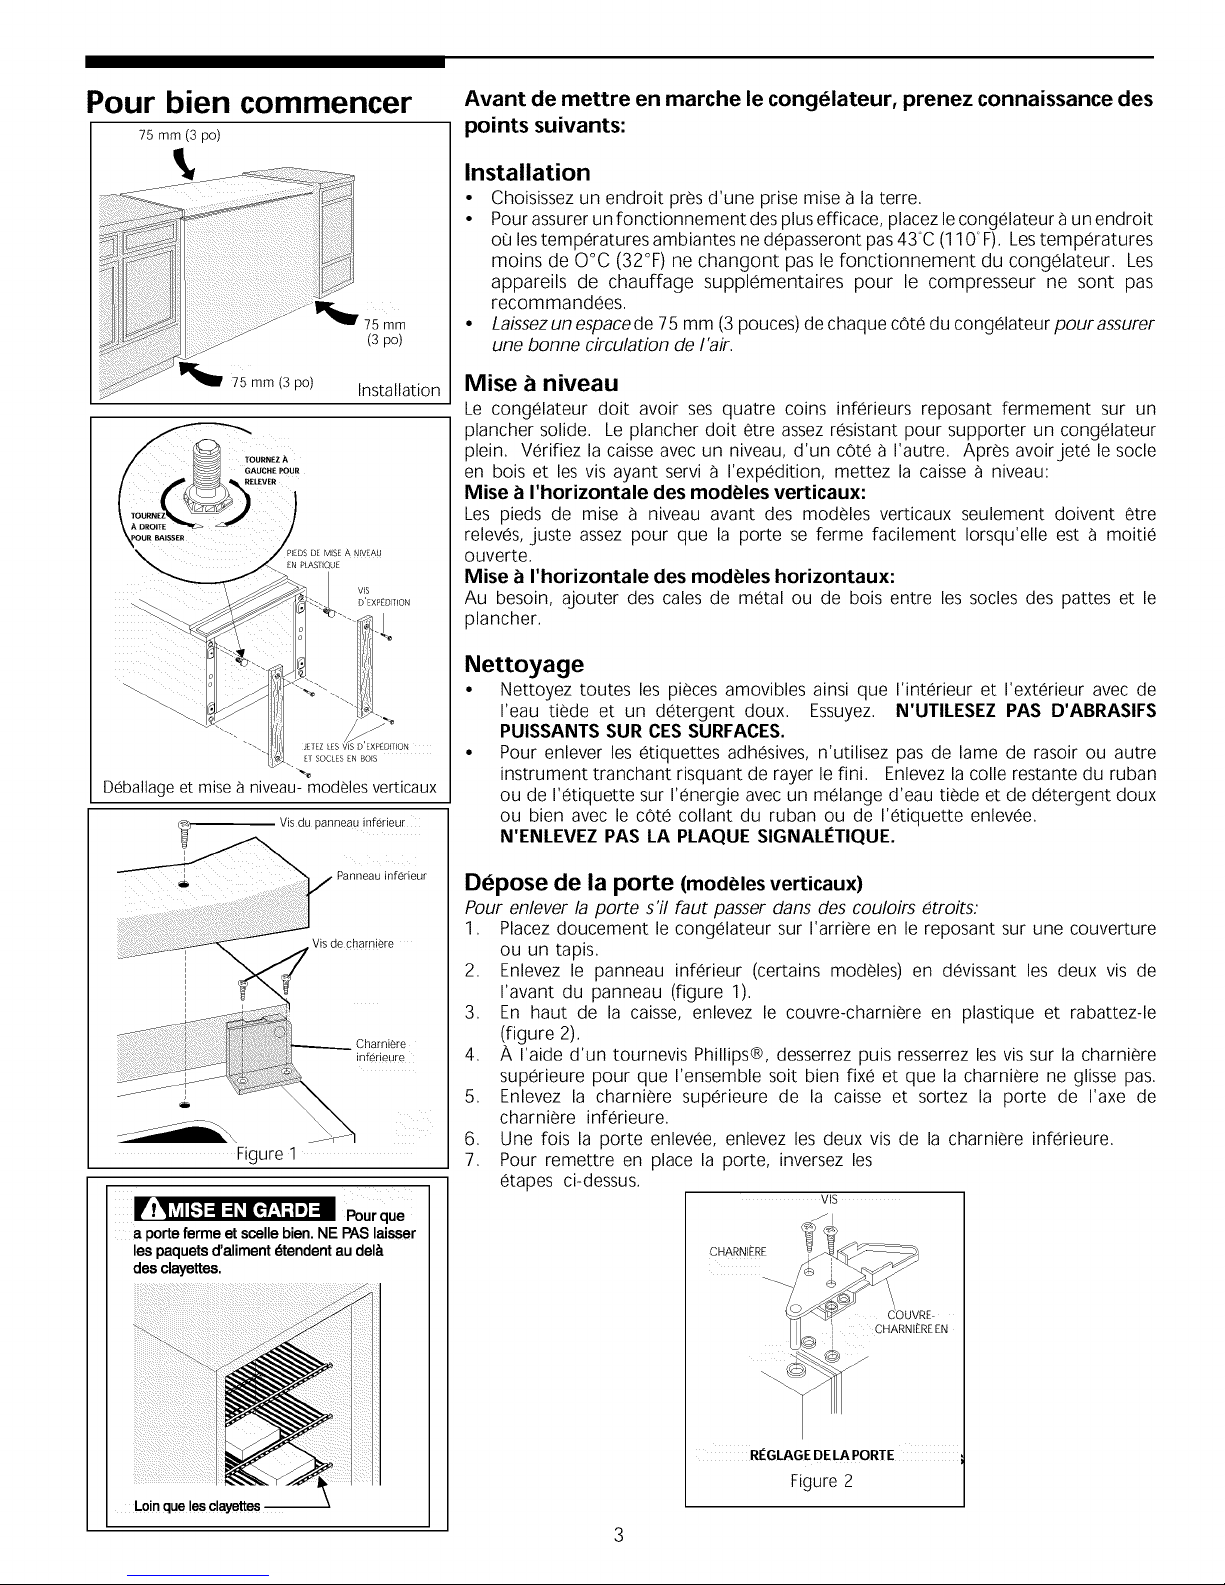
Pour bien commencer
75 mm (3 po)
Avant de mettre en marche le congelateur, prenez connaissance des
points suivants:
Installation
• Choisissez un endroit pres d'une prise mise a la terre.
• Pour assurer un fonctionnement des plus efficace, placez le congelateur a un endroit
o0 les temperatures ambiantes ne depasseront pas 43°C (110 °F). Les temperatures
moins de O°C (32°F) ne changont pas le fonctionnement du congelateur. Les
appareils de chauffage supplementaires pour le compresseur ne sont pas
recommandees.
• laissezun espacede 75 mm (3 pouces) de chaque cote du congelateur pour assurer
une bonne circulation de Fair.
_75 mm (3 po) Installation
GAUCHE_UR
_[EDS DE MSE A NEVEAU
Deballage et mise 8 niveau-modeles verticaux
Vis du panneau inferieur
inferieur
, Vis de charniere
Charniere
in[erieure
Figure 1
!It!5=',1_ ==='i_'-_-'lD]== Pourque
aportefermeetscellebien.NE PASlaisser
lespaquetsd'alirnentdtendentaudel&
desclayettes.
Mise a niveau
Le congelateur dolt avoir ses quatre coins inferieurs reposant fermement sur un
plancher solide. Le plancher dolt etre assez resistant pour supporter un congelateur
plein. Verifiez la caisse avec un niveau, d'un cote a I'autre. Apres avoirjete le socle
en bois et les vis ayant servia I'expedition, mettez la caisse a niveau:
Mise a I'horizontale des modeles verticaux:
Les pieds de mise a niveau avant des modeles verticaux seulement doivent etre
releves, juste assez pour que la porte se ferme facilement Iorsqu'elle est a moitie
ouverte.
Mise a I'horizontale des modeles horizontaux:
Au besoin, ajouter des cales de metal ou de bois entre les socles des pattes et le
plancher.
Nettoyage
• Nettoyez routes les pieces amovibles ainsi que I'interieur et I'exterieur avec de
I'eau tiede et un detergent doux. Essuyez. N'UTILESEZ PA$ D'ABRASIF$
PUISSANTS SUR CES SURFACES.
• Pour enlever les etiquettes adhesives, n'utilisez pas de lame de rasoir ou autre
instrument tranchant risquant de rayer le fini. Enlevez la colle restante du ruban
ou de I'etiquette sur I'energie avec un melange d'eau tiede et de detergent doux
ou bien avec le cote collant du ruban ou de I'etiquette enlevee.
N'ENLEVEZ PAS LA PLAQUE SIGNALI_TIQUE.
Depose de la porte (modeles verticaux)
Pour enlever la porte s'il faut passer dans des couloirs etroits:
1, Placez doucement le congelateur sur I'arriere en le reposant sur une couverture
ou un tapis,
2, Enlevez le panneau inferieur (certains modeles) en devissant les deux vis de
I'avant du panneau (figure 1),
3, En haut de la caisse, enlevez le couvre-charniere en plastique et rabattez-le
(figure 2),
4, A I'aide d'un tournevis Phillips®, desserrez puis resserrez les vis sur la charniere
superieure pour que I'ensemble soit bien fixe et que la charniere ne glisse pas,
5, Enlevez la charniere superieure de la caisse et sortez la porte de I'axe de
charniere inferieure,
6, Une fob la porte enlevee, enlevez les deux vis de la charniere inferieure,
7, Pour remettre en place la porte, inversez les
etapes ci-dessus,
VIS
Loin que !es c!ayettes
_OUVRE-
] CHARNIEREEN
\
RI_GLAGE DE LA PORTE
Figure 2
 Loading...