

Frigidaire GLTF2940ES0, GLTF2940FB - Front Load Washer Datasheet
Washer Tech Data Sheet
P/N 134408500
This information is intended for Qualified Technicians Only.
CAUTION: DISCONNECT ELECTRICAL CURRENT BEFORE SERVICING
Please Return This Sheet to its Envelope in the Product for Future Reference
Contents Page
Error code explanation........................................1-2
Diagnostics ....................................................... ....2
Error Code Chart.............................................. .....3
T est s................................................................ ...4-5
Françis.............................................................. 6-10
Wiring diagram......................................................1 1
The electronic controls of the 3.0 Cu. Ft. horizontal axis washers have self diagnostics codes built in that cover most products
failures.
Model differences:
• Better models have a digital readout display
• Good models do not have a digital readout display
In the Better Models line, the failure codes will appear in the display as an E followed by two numbers, a number and a letter
or two letters. The control will beep and the Door Lock, Wash, Rinse, Final Spin and Control indicator lights will flash.
Example: E14. To stop the flashing and beeping, the customer may touch the Pause Cancel button. The error code remains
stored in the control but once the problem is corrected, it does not effect the operation of the washer . If the failure is something
that the customer can correct (such as the water faucets being turned off), the washer will operate normally the next time it is
started.
In the Good Models line, the control signals the failure code by flashing the five indicator lights of Door Lock, Wash, Rinse,
Final Spin and Control for the first number or letter after the E and the Start indicator light for the second number or letter
after the E. When a failure occurs, the washer stops or pauses and the control beeps and flashes the five indicator light s to tell
the customer that a failure has occurred. T o stop the flashing and beeping, the customer may touch the Pause Cancel button.
The error code remains stored in the control but once the problem is corrected, it does not effect the operation of the washer .
If the failure is something that the customer can correct (such as the water faucets being turned off), the washer will operate
normally the next time it is started.
To recall an error code,
• Wake the machine by pressing any button
• Wait 5 seconds
• Press and hold the Start and Pause Cancel buttons simultaneously
• All LEDs will go blank and after a few seconds the control will signal the stored code using audible beeps and blinking
LEDs. The control will repeatedly signal the code, as long as the Start and Pause Cancel buttons are pressed.
A two-second p ause between repeat s af fords you the ability to make accurate counts to identify the correct error codes.
Please Note the following...... on a small number of washers with serial number prefix XC4,
if the previous procedure does not perform as specified, follow the option below:
• Follow all previous steps but instead of pressing Start and Pause Cancel buttons,
press and hold Options and Pause Cancel buttons.
If the washer is a Better Model, the error code will appear in the display. Troubleshoot problem by using charts on the
following pages.
If the washer is a Good Model, the five indicator lights of Door Lock, Wash, Rinse, Final Spin and Control will flash the
number of times for the first digit of the code and the Start indicator light will flash the number of times for the second digit.
Take separate count s of each indicator light, then repeat to confirm in order to be accurate in identifying the proper error code.
The code is obtained by counting the number of times the lights flash. Example E24: The five indicator lights would flash twice
indicating the 2 and the START indicator light will flash four times indicating the 4. The five indicator lights and the START
indicator light start flashing at the same time.
The control will pause for 2 seconds, then repeat the code as long as the two buttons are pressed and held.
Note: A letter appearing in the code stands for a number higher than nine:
A = 10 B = 11 C = 12 D = 13 E = 14 F = 15
Example Code F1: the first digit would be 15 and the second digit would be 1. If this code would appear on a washer in the
Good model line, the five indicator lights would blink fifteen times and the START indicator light would blink once. Troubleshoot
problem by using charts on the following pages.
Quick Check
If there is no error displayed and the washer momentarily starts then turns back of f:
1. Listen for a relay closure inside the motor control shortly after the START key is pressed. If this happens, the
motor control has power.
2. Check the 5 pin connector wiring between the console control and the motor control.
1
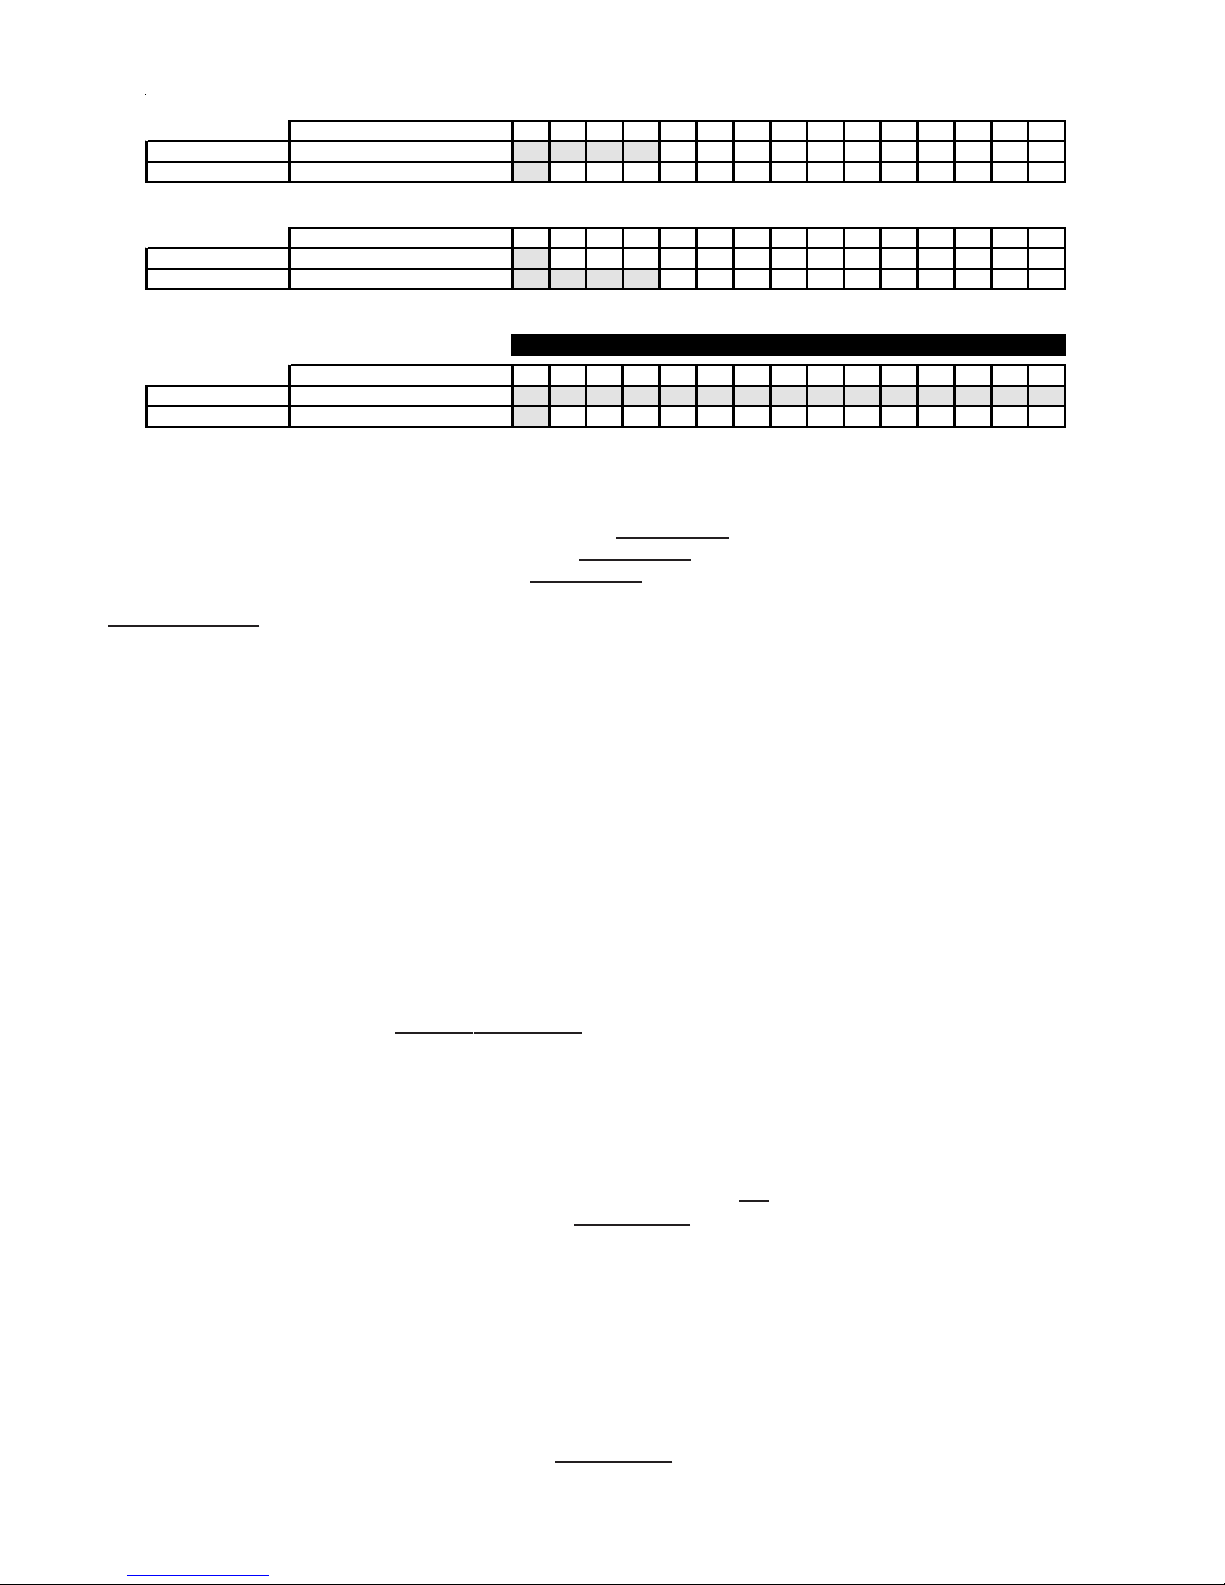
Examples: Identifying Error Codes on non-digital display models:
P/N 134408500
The follo wing LED F lashes and B eeps sign al E4 1 (E rror code
COUNT>>>>>> 123456789ABCDEF
1st C ode Digit 5 Vertical LED Flashes XXXX
2nd Cod e Digit Start LED Fla shes X
The follo wing LED F lashes and B eeps sign al E1 4 (E rror code 14) R e ed S w itc h
COUNT>>>>>> 123456789ABCDEF
1st C ode Digit 5 Vertical LED Flashes X
2nd Cod e Digit Start LED Fla shes XXXX
The follo wing LED F lashes and B eeps sign al EF 1 (E rror code F1) Clogged P um p
1 2 3 4 5 6 7 8 9 101112131415
COUNT>>>>>> 123456789ABCDEF
1st C ode Digit 5 Vertical LED Flashes XXXXXXXXXXXXXXX
2nd Cod e Digit Start LED Fla shes X
) D oor O pen
41
Diagnostic T est:
The diagnostic test is performed by using the Program Knob. To ST A R T THE TEST:
• On non-digital display models, turn the Program Knob to start position, Drain/Spin.
• On digital display models, turn the Program Knob to start position, T ouch Up. (NOTE: If the model has a timer dial that
can be rotated 360°, turn the Program Knob to
start position, Drain/Spin.
• Press Pause Cancel to turn off LEDs.
• Within 5 seconds, press and hold the Option and Pause Cancel buttons until LEDs start sequentially chasing, then
release buttons.
1. All the LEDs will sequentially light. Pressing a button below a light cluster will light all the LEDs in that cluster at one time
to confirm functionality.
2. Turn the program knob (1) click clockwise from the start position. The hot water solenoid will activate and hot water
should enter through the detergent compartment.
3. Turn the program knob (2) clicks from the start position. The bleach water solenoid will activate and cold water should
enter through the bleach compartment.
4. Turn the program knob (3) clicks from the start position. The bleach and the wash water solenoids will activate and cold
water should enter through the softener compartment.
5. Turn the program knob (4) clicks from the start position. The door lock solenoid will activate.
6. Turn the program knob (5) clicks from the start position. The door lock solenoid will deactivate and the loading door can
be opened.
7. Turn the program knob (6) clicks from the start position. The washer will fill and tumble.
8. Turn the program knob (7) clicks from the start position. The washer will fill and spin (leakage test).
9. Turn the program knob (8) clicks from the start position. The drain pump and door lock solenoid will activate and the
washer will operate in high spin.
SAFETY WARNING: If power is removed during this test, the door can be opened. To
prevent injury , DO NOT put your hands inside when the tub is rot ating.
10. T urn the program knob (9) clicks from the st art position. The control will signal the last error code.
Exiting Diagnostic Mode
There are two options for exiting the Diagnostic Test mode and returning the washer to normal operation:
a) Unplug the power cord, wait 5-8 seconds, then reconnect the power cord
OR
b) Turn the program knob clockwise 2 or 3 clicks af ter the Start Position. Press Options and Pause Cancel buttons together
for a few seconds until wash cycle LEDs appear.
If a situation arises where you cannot exit the Diagnostic mode as described above and the bank of 5 LED’s on the
right end remain ON regardless of Program Knob position, a combination of pushed buttons may have caused the
control to enter a special factory test mode. Disconnect power to reset the control to return washer to normal
operation is this occurs.
T o clear latest stored error code:
Place the control into Diagnostic test Mode.
• Turn the program knob clockwise 9 clicks from the Start Position. The control will signal the last error code.
• Press and hold the Options and Pause Cancel buttons for 3 seconds. The code will be cleared.
• Exit Diagnostic Mode to return the washer to normal operation.
2
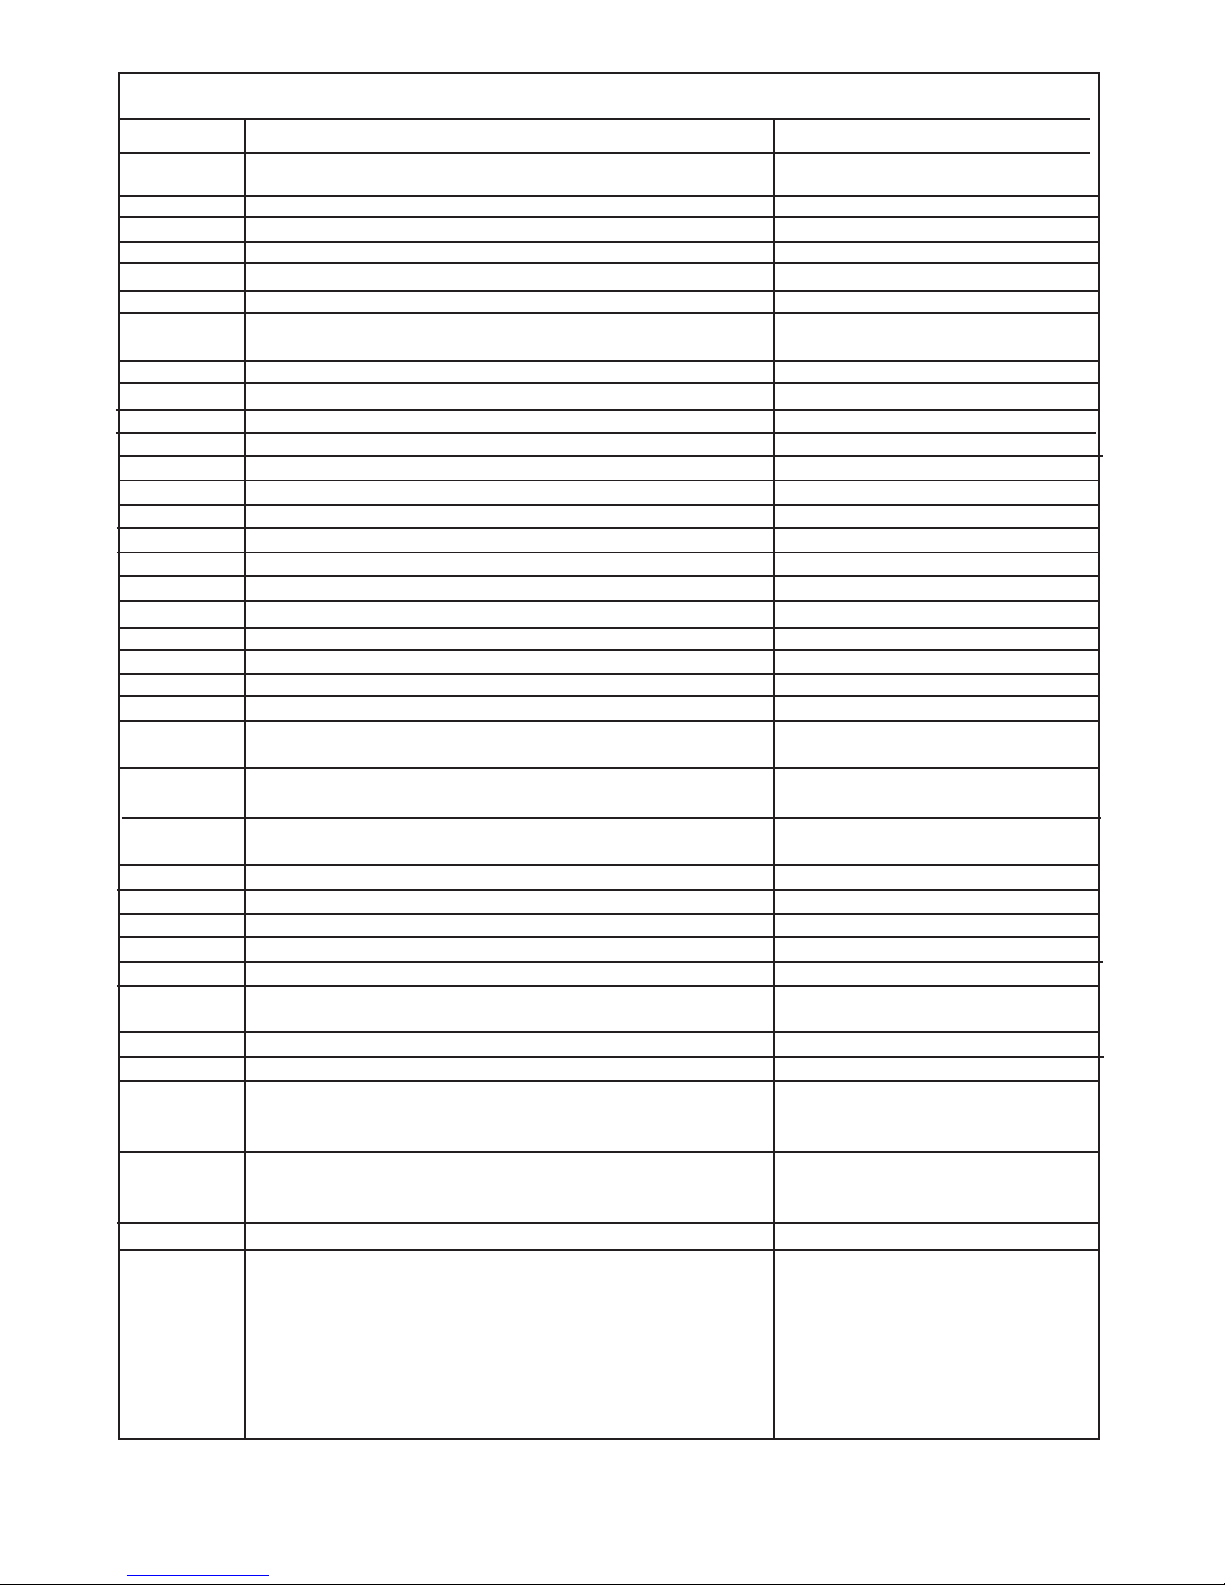
Error code chart
P/N 134408500
Error code Fault condition Check
E11 Fill time too long. Refer to test (1).
E13 Water leak in tub or air leak in air bell. Refer to test (2).
E14 Reed switch. Refer to test (3).
E21 Water not pumping out fast enough. Refer to test (4).
E23 Drain pump relay on control board failed. Replace control board.
E24 Drain pump relay on control board failed. Replace control board.
E31 Better models. Pressure sensor not communicating Refer to test (5).
with control board.
E35 Better models. Pressure sensor indicates water overfill. Refer to test (6).
E41 Control board thinks the door switch is open. Refer to test (7).
E42 Door remains locked after cycle is completed. Refer to test (8).
E43 Control board problem. Replace the control board.
E44 Control board problem. Replace the control board.
E45 Control board problem. Replace the control board.
E46 Control board problem. Replace the control board.
E47 Board thinks the door PTC circuit is open in spin. Refer to test (9)
E48 Board thinks the door PTC circuit is closed. Refer to test (9)
E52 Bad signal from tacho generator. Refer to test (10)
E55 Motor overheating. Refer to test (1 1)
E56 High motor current. Refer to test (1 1)
E57 High current on inverter. Refer to test (11)
E58 High current on motor phase. Refer to test (11)
E59 No tacho signal for 3 seconds. Refer to test (12)
E5A High temperature on heat sink. Replace the speed control
board.
E5B High temperature on heat sink. Replace the speed control
board.
E5C High temperature on heat sink. Replace the speed control
board.
E5D Communication problem. Refer to test (13)
E5E Communication problem. Refer to test (13)
E5F Communication problem. Refer to test (13)
E67 Input voltage on microprocessor incorrect. Replace the control board.
E75 Better models only. Water temperature sensor circuit. Refer to test (14)
E76 Better model only. NTC temperature for the cold water Hot and cold water hoses
valve over the limits. switched.
E95 Communication error. Replace the control board.
EB1 Incoming power frequency out of limits. Refer to test (15)
EB2 Incoming line voltage above 130 V AC. Check voltage at the outlet. If
below 130 V AC, replace the
control board.
EB3 Incoming line voltage below 90 V AC. Check voltage at the outlet. If
above 90 V AC, replace the
control board.
EF1 Clogged drain pump. Unclog the drain pump.
EF2 To much soap. Advise customer to reduce
the amount of soap they are
using.
3
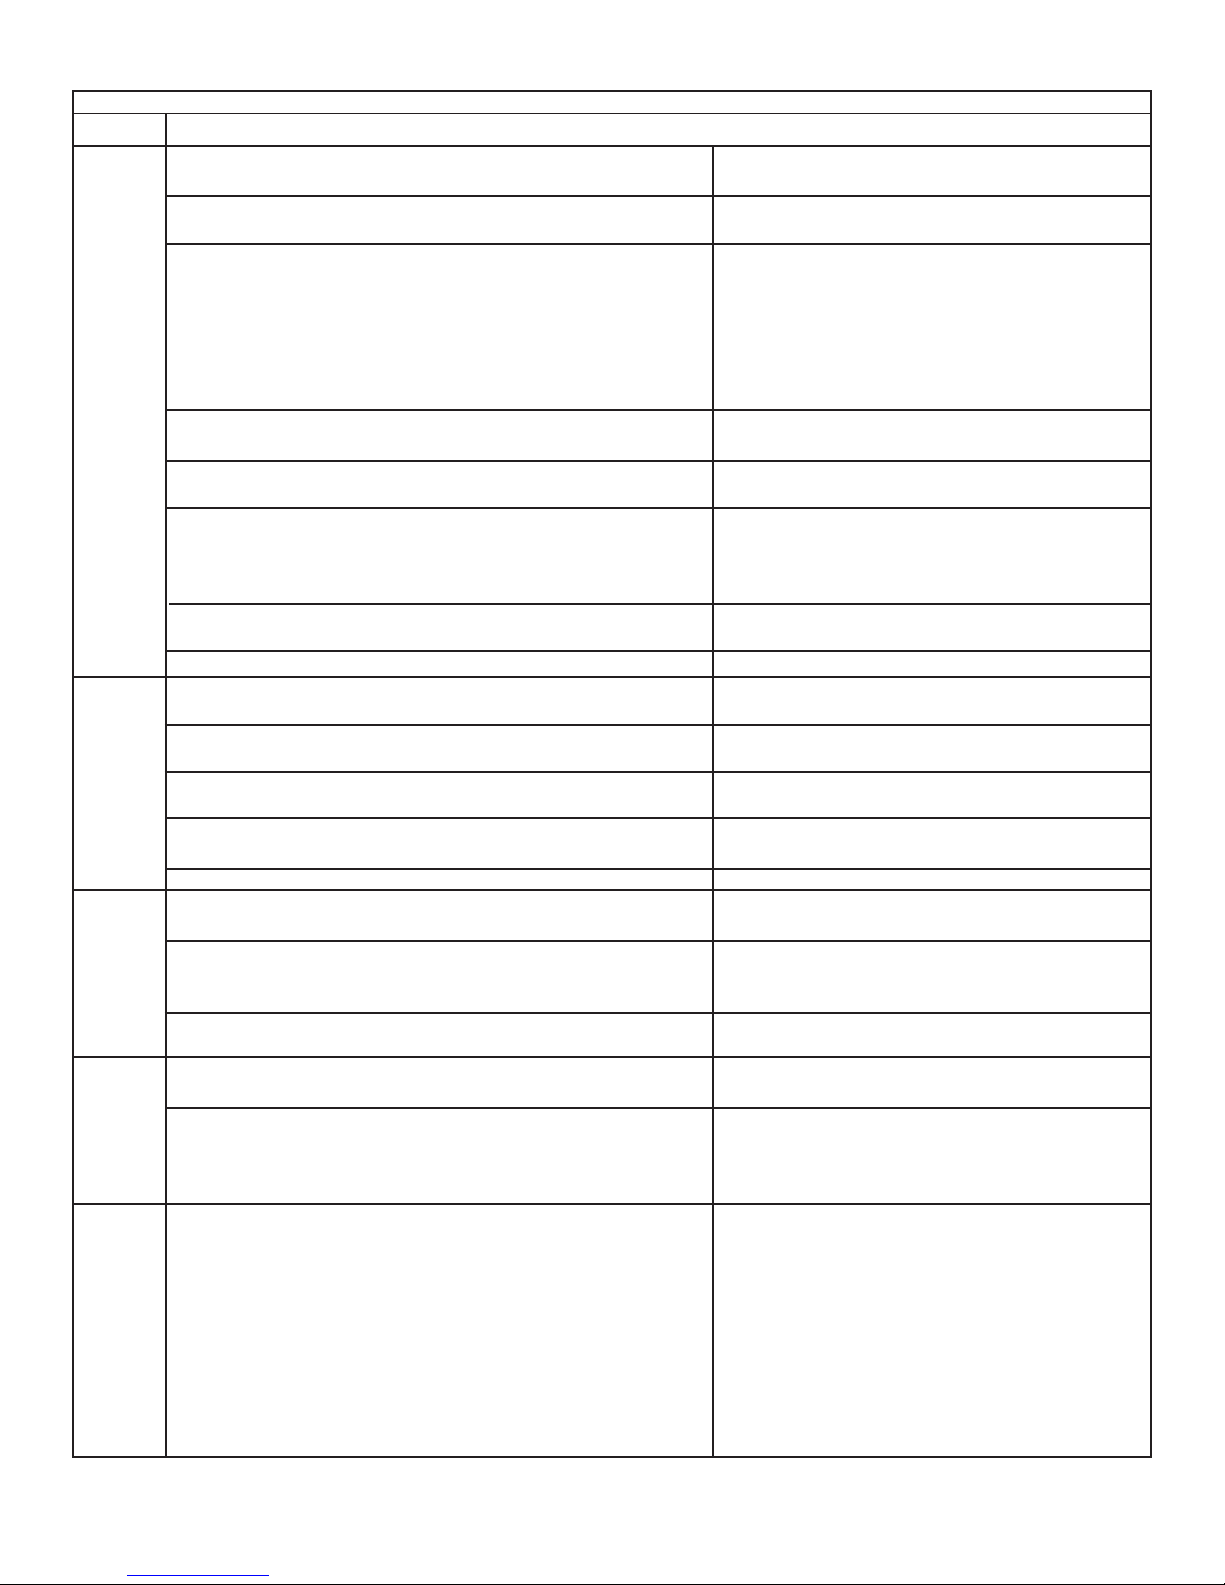
Test
P/N 134408500
Test Check Correction
Test 1:
Test 2:
Test 3:
Test 4:
Test 5:
1. Is the incoming water flow normal?
2. Are the incoming water faucets turned
3. Is the incoming water pressure above (30) psi.
4. Does the fill water continue enter the washer?
5. Remove power from the washer. Did the water fill
stop?
6. Good models, check the pressure switch.
7. Better models, replace the pressure sensor.
8. Replace the control board.
1. Is the washer leaking water?
2. Is there an air leak in the air bell system?
3. Good models, check the pressure switch.
4. Better models, replace the pressure sensor.
5. Replace the control board.
1. Is the dispenser drawer closed?
2. Remove the drawer and check the magnet.
3. Open the console and check the reed switch.
1. Check the drain hose for restrictions.
2. Start the washer and check for 120 VAC at the
drain pump.
Inspect the wiring between the pressure sensor and
the control board.
Yes. Go to step (4).
No. Go to step (2)
No. Turn water faucets on.
Yes. Go to step (3).
No. Have customer correct pressure
problem.
Yes. Check for kinked or blocked
incoming water hoses, clean
the incoming water screens. If
problem still remains, replace the
water inlet valve assembly .
Yes. Go to step (5).
No. Go to step (6)
Yes. Go to step (6)
No. Replace the inlet valve assembly .
Pressure switch checks good.
Go to step (8).
Pressure switch checks bad. Replace
pressure switch.
If this did not correct the problem, go to
step 8.
Y es. Correct water leak.
No. Go to step (2)
Yes. Correct the air leak problem.
No. Go to step (3-4)
Defective. Replace the pressure switch.
Good. Go to step (5)
If this did not correct the problem, go to
step 5.
No. Close the drawer.
Yes. Go to step (2).
Magnet missing or defective. Replace the
magnet.
Magnet good. Go to step (3).
Defective. Replace the reed switch.
Good. Replace the control board.
Restriction. Correct problem.
No restriction. Go to step (2).
Zero. Replace the control board.
120 VAC. Remove the pump and check for
blockage. If blocked, remove the restriction,
if not, replace the pump.
Defective wiring. Correct wiring.
Good wiring. Replace the pressure sensor.
If this does not correct the problem, replace
the control board.
4
 Loading...