

Frigidaire FEFB9200ES0, GLEQ2152ES - Electric Dryer, FGFB9200ES Operating Instructions Manual
Before Operating Your Dryer
Read your dryer Owner’s Guide. It has impor-
tant safety and warranty information. It also has
many suggestions for best drying results.
To reduce the risk of fire, electric
shock or injury to persons, read the IMPORT ANT
SAFETY INSTRUCTIONS in your dryer Owner’s
Guide before operating this appliance.
Operating Steps
Read “Drying Procedures” in your Owner’s Guide.
It explains these operating steps in detail.
1. Prepare items for drying.
2. Check that lint screen is clean and in place.
3. Load the dryer. If desired, add a dryer fabric
softener sheet. Close the door.
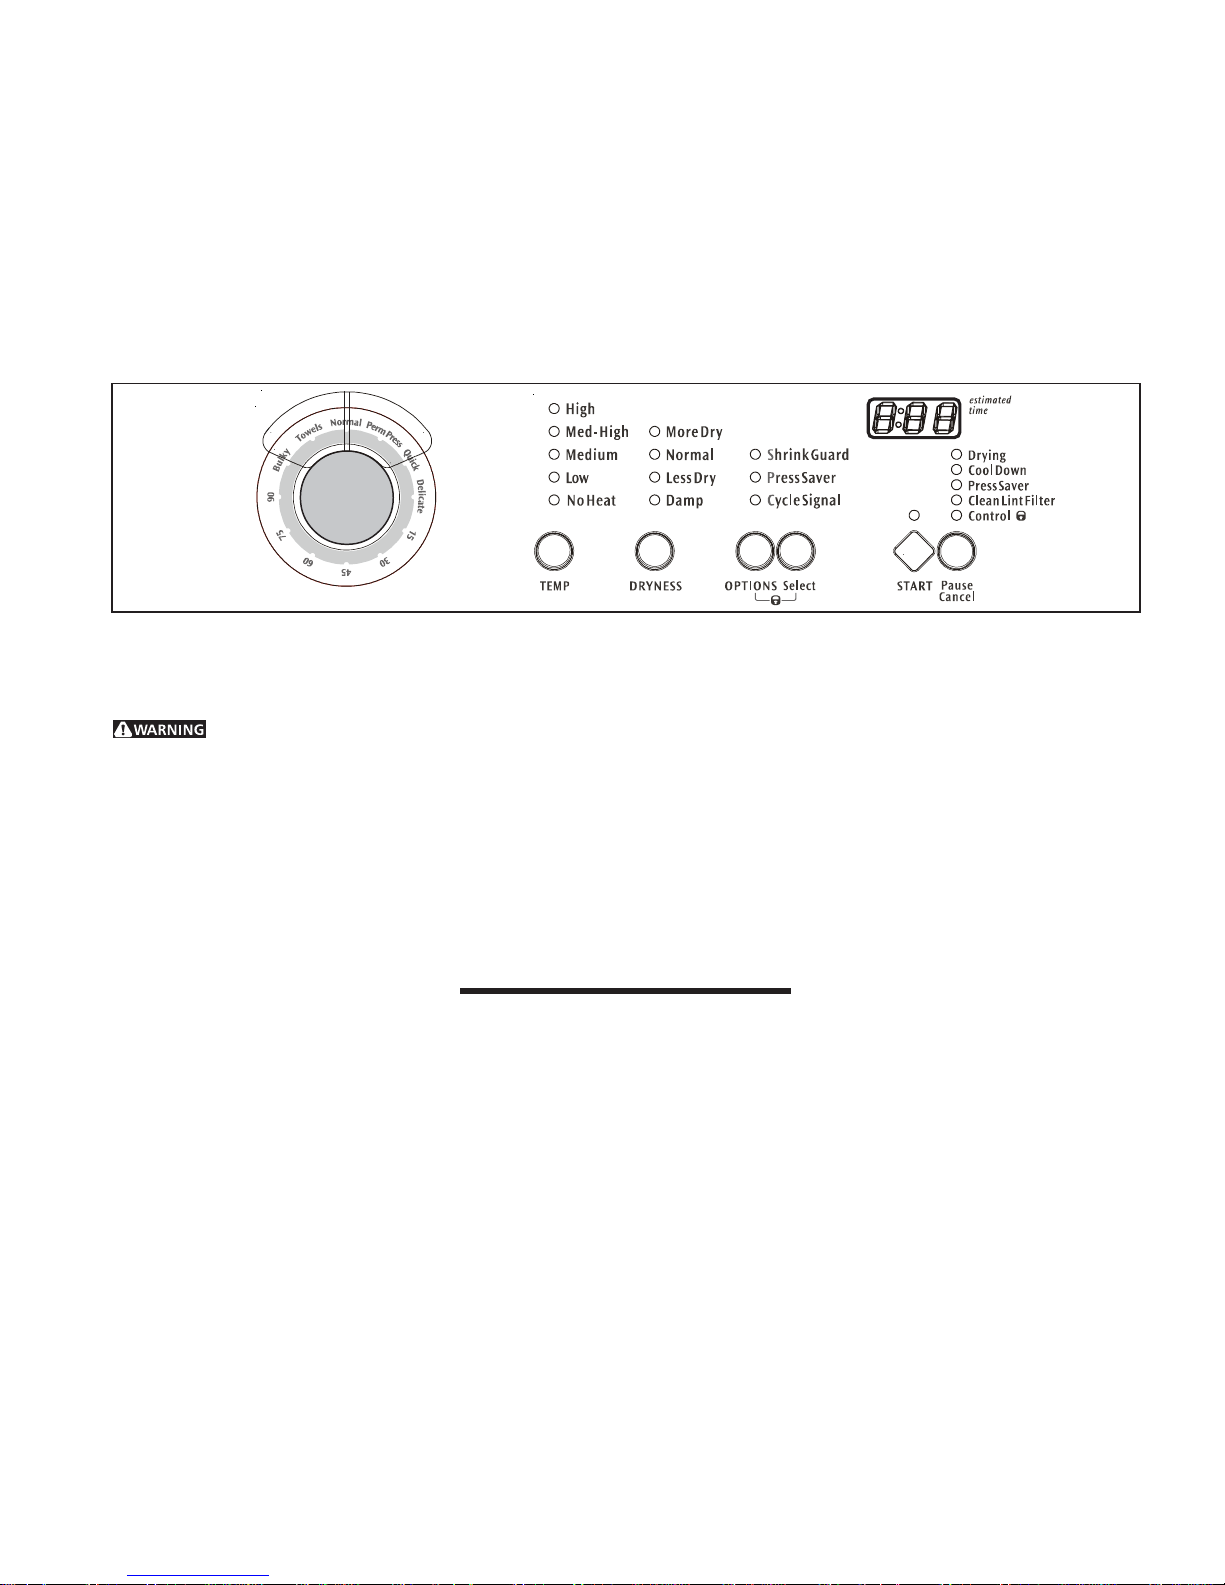
4. Select the cycle and drying temperature for each
load. T o change the temperature, turn the TEMP
knob to the desired temperature.
5. A suitable drying temperature, dryness level and
options will automatically be displayed for each
cycle. To change the temperature or dryness
level, press TEMP or DRYNESS until the desired selection is made. To select an option,
press OPTIONS until the indicator for a desired
option flashes, then press SELECT .
7. Press STAR T to begin the cycle.
• T o p ause the cycle or change settings,
press PAUSE/CANCEL once.To resume
the cycle, press START again.
• T o stop or change the cycle, press
PAUSE/CANCEL twice.
8. A signal will sound at the end of the cycle and
periodically during Press Saver when the Cycle
Signal option is selected. When the cycle ends,
remove items immediately and hang or fold.
9. Clean the lint screen after every load.
PN 134431300A (0501)
DRYER OPERATING INSTRUCTIONS
Towels
Select this Auto Dry cycle for towel loads.
Normal
Select this Auto Dry cycle for cotton items.
Perm Press
Select this Auto Dry cycle for cottons and blends
with a no-iron finish.
Cycle Selection
For best results, follow the fabric care label instructions on items to be dried.
Auto Dry
Applies to Towels, Bulky, Normal, Perm Press,
Sport and Delicate cycles. Auto Dry cycles take
the guesswork out of drying time. The load will automatically be dried at the selected temperature to
the desired dryness level. The dryer senses the
moisture level of the load as it tumbles through
heated air.
Follow the same steps to delete an option. If a
temperature, dryness level or option is not available for a cycle, it will not light.
6. The changes you make will be remembered the
next time that cycle is selected. See the “Dryer
Settings Chart” for more details.
Auto Dry cycles save time and energy and protect
fabrics.When the load has reached the selected
dryness level, it will continue to tumble, unheated,
during a Cool Down period. This helps reduce wrinkling and makes items easier to handle during unloading.
Drying time varies depending on size and dampness of load, weight and fabric type. Room temperature and humidity, type of ventillation system,
electrical voltage or gas pressure can also affect
drying time.
Delicate
Select this Auto Dry cycle for knits and delicate
items.
Quick
Select this cycle to quickly dry a small load made
up of just a few items. It provides approximately 20
minutes of tumbling followed by a 10-minute cool
down period.
PN 134431300A (0501)
Select Damp Dry for items you wish to partially
dry before hanging or ironing.
Note: T o prevent over-drying, not every
dryness level is available with every cycle.
Dryness Level
T o change the dryness level, press DRYNESS until the desired selection is made. Select Normal
for most loads.
Occasionally a load may seem too damp or overdried at the end of the cycle. To increase drying
time for similar loads in the future, select More
Dry. For loads requiring less drying time, select
Less Dry.
Options
T o select an option, press OPTIONS until the indicator for the desired option flashes, then press SELECT . If an option is not available for a cycle, the
indicator will not light. Follow the same steps to
delete an option.
The Cycle Signal will sound at the end of the cycle
and periodically during Press Saver.
Select Shrink Guard to lower the initial drying
temperature to protect fabrics from overdrying.
Select Press Saver if the dried load might not be
removed promptly at the end of the cycle. The dry
load will continue tumbling without heat for 30 minutes to help reduce wrinkling. When the Cycle
Signal is selected, a beep will be heard periodically. The load may be removed any time during
Press Saver.
Dryer Features
Control
T o avoid having someone accidentally start or stop
the dryer, press OPTIONS and SELECT at the same
time until the Control indicator is lighted. To
remove the control lock, press OPTIONS and SELECT again.
Status Lights
The following indicators may be lighted during the
cycle:
• Drying
• Cool Down
• Press Saver
• Clean Lint Filter
• Control
Bulky
Select this cycle to dry a comforter, blanket, sleeping bag or similar item.Cool Down is approximately
10 minutes.
Timed Dry
To manually select the drying time for any load,
turn the knob to a numbered setting. Drying times
from 15 to 90 minutes are available in 15-minute
increments. You will not be able to select a cycle
or dryness level. Timed Dry is recommended when
using the No Heat option.
Note: T o change cycles, press PAUSE/CANCEL
twice.
Cycle Selection (Con’t)
Cycle Adjustments
A suitable combination of drying temperature,
dryness level and options will automatically be
displayed for each cycle. The settings can be
changed before the cycle is started. Those
adjustments will automatically be remembered each
time that cycle is selected. If a temperature, dryness level or option is not recommened for a cycle,
the indicator will not light. See the “Dryer Settings
Chart” for more details.
If changes are attempted after the cycle starts, the
status lights will blink and the signal will beep 3
times. The cycle must be paused before the settings can be changed. Press PAUSE/CANCEL
once to pause the cycle and change settings.
T o avoid fire hazard, do not use heat
to dry items containing feathers or down, foam rubber, plastic, or similarly textured, rubber-like materials. Use the No Heat setting only.
High heat is recommended for sturdy fabrics.
Medium High heat is recommended for most cot-
ton fabrics.
Medium heat is recommended for wrinkle free, per-
manent press and lightweight fabrics.
Low heat is recommended for delicate fabrics.
Drying Temperature
For best results, follow the fabric care label
instructions on items to be dried. To change the
drying temperature, press TEMP to scroll to the
desired heat. T o protect your wardrobe, not all temperatures are available with every cycle.
No Heat should only be used with a Timed Dry
setting to dry items containing feathers, down, foam
rubber, plastics or rubber-like materials; to freshen
clothing, pillows or blankets; or to dust draperies.
Note: Using No Heat in any Auto Dry cycle
will result in long drying times and /or wet
loads at the end of the cycle.
 Loading...