

Frigidaire FWTE09M3FEUJW, FWTE12M3FEJW, FWTE09M1FEJW, FWTE09M1FEUJW, FWTE12M3FEUJW Instruction Manual
...
Models:
FWTE09M3FEJW
FWTE09M3FEUJW
FWTE09M1FEJW
FWTE09M1FEUJW
FWTE12M3FEJW
FWTE12M3FEUJW
FWTE12M1FEJW
FWTE12M1FEUJW
FWTE15M3FEJW
FWTE15M3FEUJW
FWTE15M1FEJW
FWTE15M1FEUJW
FWTE18M3FEJW
FWTE18M3FEUJW
FWTE18M1FEJW
FWTE18M1FEUJW
W13(0-3)FM_English_101201P(1)
INSTRUCTIONS MANUAL
W A S H IN G M A C HI N E
Read all instructions prior to using
appliance and keep this manual for future reference.

Thank you for choosing Frigidaire for your washing machine brand. Our washing
machines are developed with high technical and quality standards, with features
to offer you even more comfort.
Read all instructions before using this appliance. This book contains valuable
information about operation, care and service. Keep it in a safe place.
You expect all this from Frigidaire…and we deliver.
Your laundry never looked so good.
Welcome to the world of
simple handling and no worries.
This product can not be treated as household waste. Instead shall be handed
over to the applicable collection point for the recycling of electrical and
electronic equipment. By ensuring this product is disposed of correctly, you will
help prevent potential negative consequences for the environment and human
health, which could otherwise be caused by inappropriate waste handling of
this product. For more detail information about recycling of this product, please
contact your local city office, your household waste disposal service or the shop
where you purchased the product.
Environmental advices
Contents
The washing machine you bought might be different from the one shown on the
figures of this user manual, however the overview image should be similar.
Please read the information regarding to operation.
This washing machine is for household use only.
The washing machine you bought might have a different plug from the one
shown on the figures of this user manual, however the one you bought is
according to your country requirements.
Safety.......................................................................................................03
Washer descripcition.................................................................................04
Installation...............................................................................................05
Operation.................................................................................................10
Cleaning and maintenance........................................................................14
Tips and advices........................................................................................16
Troubleshooting.......................................................................................20
Wiring diagram...........................................................................................21
Technical information.................................................................................22
01 02
Attention

unless specifically recommended in
this manual.
Do not fasten, twist or tie the power
cord. Do not try to fix it. If it is
damaged, request the visit of a
professional technician. If the power
cord is damaged, it should be
replaced by the manufacturer, service
technician or a qualified person to
prevent any risk.
After placing the washing machine,
check if it is not over the power cord.
It is dangerous to modify the
specifications or characterisc of the
washing machine.
Never place lit candles on the
equipment as they may start fires.
Never place the washing machine on
a carpet.
Be sure that the hose is connected
and the water supply is turned on.
Never put your hands into the tub
during operation. The clothes could
entangle around your hands and
cause an accident.
Don´t handle the electric motor.
After using, unplug and remove the
water hose inlet.
The hot water temperature should not
exceed 50°C
Do not store gasoline, cleaning
solvents, kerosene, cooking oils,
waxes, etc on or near the washer.
These substances give off vapors or
Children
Avoid accidents, after removing
washer from its packing, keep
packing material out of children's
reach.
Do not let children play with or
around and use the washer, even
when it is turned off.
Safety
User / Installer
Only plug the washing machine
directly in the current if it is correctly
grounded and with the certain
voltage.
No connection of the grounding wire
with the neutral wire, otherwise the
cabinet will be charged, which is
likely to cause the danger of electric
shock.
The socket and the grounding wire
must be installed by an electrician to
prevent incorrect installation, and to
guarantee a safe use of electricity.
Do not install the washer in high
humidity areas or exposed to the
weather.
Conect the plug firmly.
We do not recommend the use of an
extension cord or adapter plug.
Unplug the washer before cleaning.
Never unplug washer by pulling on
power cord. Use the plug.
All repairs and servicing must be
performed by an authorized servicer
chemical reactions that could ignite
or explode.
Do not use the machine when your
hands and feet are wet to avoid
electrical unloadings.
Please keep the plug clean for better
performance.
Always read and follow fabric care
product labels.
Do not place heavy or hot objects on
top of the washer. They can damage
the finish or controls.
Get away from fire and heat: Never
place candles, insect repellents,
incense, cigars or other flammable
vapors or liquids, electric ovens,
heaters or other appliances that emit
heat near the washer to avoid
accidents or fire.
This washing machine is for domestic
use only. It is not reccomended for
commercial or industrial use.
Do not wash laundries of paint and
gasoline to avoid fire risk.
Do not block the air intake of the
base while the washer is working.
03 04
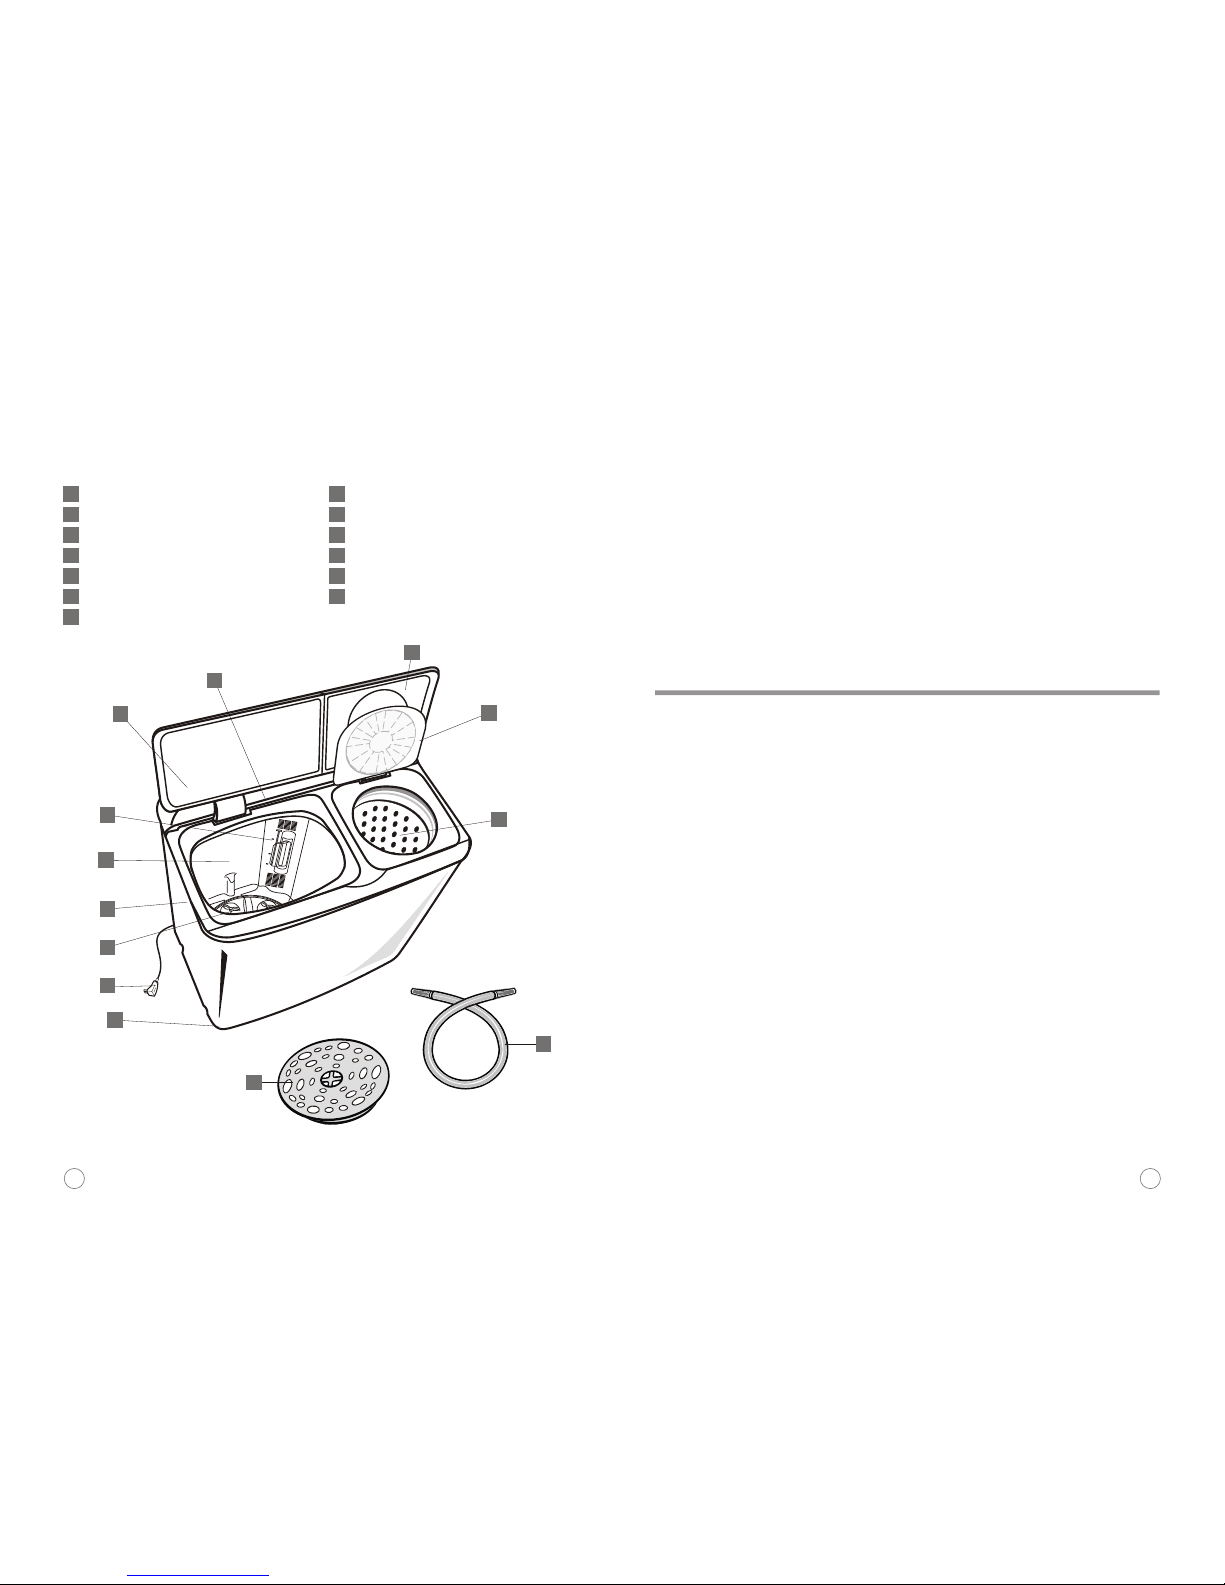
Wash cover
Control panel
Spin cover
Frame
Spin tub
Lint filter
Wash tub
Name of parts
Case
Pulsator
Plug
Base
Safety cover
Water inlet hose
Washer description
Installation
The installation must be carried out by authorized people and in agreement with
the instructions indicated by the manufacturer.
Incorrect installation could cause personal damages.
Location of washer
The washing machine should be placed inside the room with a flat floor, which
is convenient for water supply and drain, has low moisture and no direct
sunshine, and does not freeze in winter.
1. If the washing machine is not placed flat (the inclination angle is over 2 ), it
may cause great vibration or automatic check and rectification or other
abnormal circumstances will often take place in the course of spinning.
2. Never place the washing machine on a carpet.
3. Get away from fire and heat.
Unpack
Take the washing machine to the place to be installed and unpacked it. All the
material of the packing, including the foam of the base must be retire, if not the
washing machine will not work.
Installation of water inlet pipe
1. Put the water inlet pipe screw on to the tap.
2. Tightly screw another end of water inlet hose on water inlet valve.
1
1 8
2 9
3 10
4 11
5 12
6 13
7
6
7
8
9
10
11
12
13
2
3
4
5
05 06
Attention
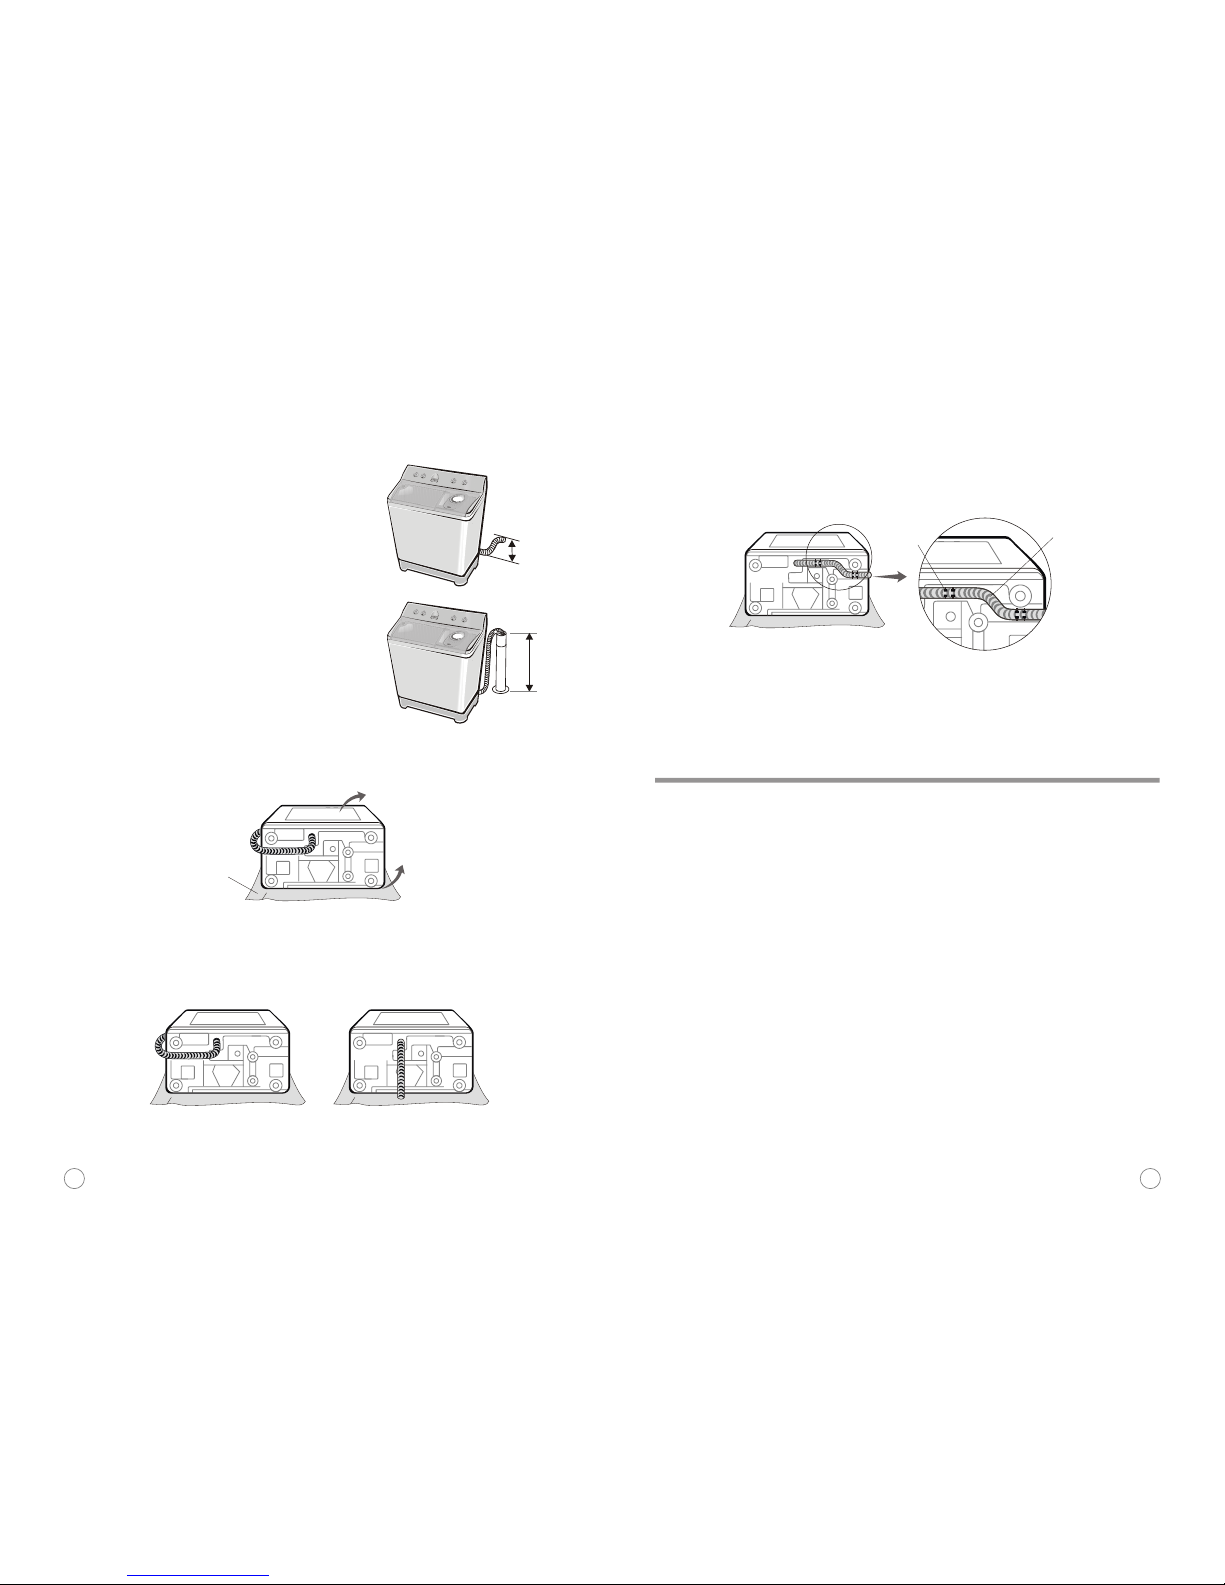
Installation of drain hose
1. Without pump: The hose should be
less than 10cm, or it can not drain
completely.
2. With pump: Hang the drain hose (with
hook) over a drain outlet (a drain pipe,
bath or sink) not higler 1.2 metres
above floor level (up drain).
The factory installation position of the drain hose is shown in Figure 1.
Change the direction of the drain hose
The hose protrudes out from washing side. Lay down the machine on the soft
object with its face towards the ground. Take the hose out from the fixing
groove. (Figure 2).
Figure 1
Back
Front
Soft object
Figure 2
Along with the groove of the washing tub side, insert the hose with the step 1 to
3 and spread it to the washing side (Figure 3)
Figure 3
Latch
Drain hose
Insert the hose in the groove by hand, do not destroy the hose.
It had better put the outlet of the drain hose into the nearby drainage
permanently, which can save the trouble that the drain hose has to be
connected each time before use. If the drainage is far from the washing
machine, it can be solved by connection of the drain hoses head with end to
extend.
Drain faults will be caused when the drain hose is blocked.
No trampling on or pressing the hose.
Power source and grounding
1. Consult the technical specification chart to verify the distribution's network
voltage.
2. The socket and the grounding wire must be installed by an electrician to
prevent incorrect installation or use of the socket, and to guarantee the
safety of use of electricity.
3. No connection of the grounding wire with the neutral wire, otherwise the
cabinet will be charged, which is likely to cause the danger of electric
shock.
4. Do not fasten, twist or tie the power cord. Do not try to fix it. If it is
H < 120mm
H < 10cm
H
H
07 08
Attention

damaged, request the visit of a professional technician. If the power cord is
damaged, it should be replaced by the manufacturer, service technician or a
qualified person to prevent any risk.
5. It is dangerous to modify the specifications or characterisc of the washing
machine.
6. Save practices for energy usage: Please connect the plug to the dedicated
outlet. Whenever you have to connect or disconect the unit, always do it by
holding the cable by the plug and not by the cable.
7. Please do not pull out or insert the plug with wet hands to avoid electric
shocking.
8. Please keep the plug clean for better performance.
9. Please disconnect the unit from the power supply if it is not in use.
Control panel
Precaution to washing
01. Put the drain hose down into the
water drain area.
02. Insert the water inlet hose
securely into the top water inlet.
03. Checking pocket of clothes to
avoid coins, clips and etc.
04. Reversing the clothes that are
easy teaseled.
05. To resist clothes 's crossing,
please cross their sleeves or the
ties in advance.
06. Separating clothes if they are
easily fading color.
07. Separate clothes by color, dirty
degree and fabric type.
08. To put delicate clothes into
washing net bag.
09.Zipping the clothes if they have in
advance.
10.The laundry should be able to
circulate enough in the washing
tub.
Operation
Wash timer selector
Wash selector
Washing water inlet
Spin selector
Spin timer selector
The illustrations in this manual are for
reference only. The product that you
have bought may be slightly different
from the one illustrated in this
manual. Please refer to the
information related to the model you
have
Control panel is based on a typical
model, the function should be the
same on your washers, even if the
appearance is a little different.
09 10
1
1 4
2 5
3
2 3 4 5
Attention

How to use the bleacher
1. Fill the water to the specified level, and pour the bleacher into wash tub.
2. The colourful clothes are apt to fade, so the bleacher is forbidden to use.
3. The bleacher should not contact with clothes directly.
4. The use of bleacher, refers to its instruction.
5. The powder bleacher can be used after dissolved.
How to use washing powder
Detergent consumption
1. Generally 1.4g per liter of water, more or less consumption accordingly for
different detergent.
Dissolved in the tub
1. Fill small quantity of water.
2. Add some washing powder run for 30 seconds to dissolve it completely.
3. Put the clothes in and select the proper water level.
Quick dissolving
1. Put the clothes in and select the proper water level.
2. Put the powder in and stir.
The powder is more prone to pollute the clothes than the detergent, therefore
please use it with proper quantity.
Washing instructions
1. Put the water inlet hose into the wash inlet.
2. Fill the water to the specified level and add dissolved washing powder.
3. Put in the clothes, please add the water if the water is not enough.
4. Select the program according to clothes.
5. Select the wash time according to clothes.
6. After washing, set the “Washing-drain selector” to “drain” position to empty
the water.
11 12
Midway spinning
1. Put the clothes in spin tub
smoothly.
2. Spin.
a) Press the safety cover properly.
Even thought a few clothes, press
the cover too.
b) Close the spin cover.
c) Spin for 1 ~ 2 minutes.
3. Rinse and foam-removing spinning
a) Open the spin cover.
b) Put the inlet hose into the spin
inlet and fill water for 1 minute.
c) Close the cover, spin for 1 ~ 2
minutes.
Inner Lid
Supports
Spin
tub
Spin Time
Clothes
Spin Time
4~5 min.
Bedsheet,
blanket
2~ 4 min.
Underwear
(knitwear)
1 ~ 2 min.
Sweater(fabric)
1 min.
Thin clothes
To do spinning and draining or rinsing (filling water) together, please first do
spinning for about 1 minute, then do draining or rinsing, otherwise the spinning
will stop owing to too much water stored in the spin tub.
Despues de usar la maquina, desconéctela y saque la manguera de flujo de
agua.
Attention
Attention

Internal parts
Once a month, pour a liter of bleach (chlorinated water) into drum. Select high
water level "Normal" program. Let the Washing Machine complete wash cycle
to guarantee total removal of bleach.
Cleaning must be performed to prevent stains on clothes, due to accumulation
of fabric softener and soap residue.
Cleaning the lint filter
1. While pressing down on the button, pull the lint filter out.
2. Turn the filter net inside out and rinse with water.
3. After cleaning, insert edge of filter into the notch and push the filter into
place while pressing the button down.
Gabinet care
To clean the cabinet off the water and dirt with soft cloth, no detergent, volatile
and other chemicals used to avoid surface destroying.
Cleaning dirty drain valve
1. Take off the overflow filter cover, loose the belt and screw off the valve cover
in counter-clockwise, to take valve rod and other parts out then remove dirt
inside.
2. Reverse the above steps to make all parts reverting.
Cleaning and maintenance
13 14
Rinse (filling water)
1. Put clothes in the wash tub and select the suitable water flow according to
the clothes.
2. Adjust the wash timer to 5-7minutes to do rinsing.
Rinse with water (Repeat the midway spinning and rinse for 2-3 times)
1. Put clothes in the washing tub and select the suitable water flow according
to the clothes.
2. Fill water to the specified level.

How to clean dirty pump (only for models with pump)
1. Take off the back cover off the washer, press the clip at the drain hole of
pump, and pull out the drain hose.
2. Clean the pump from the drain hole of pump.
Freezing prevention
1. Turn off the water faucet, pull off the inlet hose and empty all water from the
inlet hose.
2. Put down drain hose and switch the indicator to ‘‘drain’’ position to empty all
water from wash tub.
If freezing happens to
1. Put the inlet hose in warm water of 50ºC.
2. Have about 2 liter of warm water less than 50ºC into the wash tub for 10
minutes.
3. Install inlet hose and turn on the water faucet to ensure inlet and outlet of
Tips and advices
White and color clothes must be
washed separately to prevent
transferring dye from one item to
another.
To check if a piece of clothing fades,
soak a small area.
Place a white cloth over it and iron. If
the white cloth stains, the fabric will
fade.
Check clothing label to make sure it
can be machine-washed.
Follow instructions on label.
Woolen items must always be
washed separately, in cold water.
Do not use bleach in woolen clothes,
silk, leather and Lycra, spandex.
Wash separately cotton and linen
clothes from synthetic fabric (nylon,
spandex, polyamide, etc…), as they
require different washing process.
Do not use dry cleaning chemical
products in your Washer.
Do not use Washer to starch clothes.
Stain removal
Adhesive tape, chewing gum, rubber
cement: Apply ice. Scrape off excess.
Place stain face down on paper
towels. Saturate with prewash stain
remover or nonflammable dry
deaning fluid.
Baby formula, dairy products, egg:
Use product containing enzymes to
pretreat or soak stains. Soak for 30
minutes or more. Wash.
Blood: Rinse with cold water. Rub
with bar soap. Or, pretreat or soak
with product containing enzymes.
Wash using bleach safe for fabric.
Candle wax, crayon: Scrape off
surface wax. Place stain face down
between paper towels. Press with
warm iron until wax is absorbed.
Replace paper towels frequently.
Treat remaining stain with prewash
stain remover or nonflammable dry
cleaning fluid. Hand wash to remove
solvent. Wash using bleach safe for
fabric.
Chocolate: Pretreat or soak in warm
water using product containing
enzymes. Wash using bleach safe for
fabric.
Collar or cuff soil, cosmetics: Use
packaged color remover. Wash using
bleach safe for fabric.
Grass: Pretreat or soak in warm water
using product containing enzymes.
Wash using bleach safe for fabric.
Grease, oil, tar (butter, fats, salad
dressing, cooking oils, car grease,
motor oils): Scrape residue from
fabric. Pretreat. Wash using hottest
water safe for fabric. For heavy satins
and tar, apply nonflammable dry
cleaning fluid to back of stain.
Replace towels under stain
frequently. Rinse thoroughly. Wash
using hottest water safe for fabric.
Ink: Some inks may be impossible to
remove. Washing may set some inks.
Use prewash stain remover,
denatured alcohol or nonflammable
dry deaning fluid.
15 16

International symbols
These symbols are included on clothing labels to help with your washing.
INTERNATIONAL SYMBOLS
Heavy
Delicate
Maximum
Wash
Temperature
60ºC
Maximum
Wash
Temperature
40ºC
Maximum
Wash
Temperature
95ºC
Maximum
Wash
Temperature
30ºC
Hand
Wash
Do not
Wash
Bleach Bleach in
Cold Water
Do not
Bleach
Iron
Maximum
Iron
Temperature
200ºC
Maximum
Iron
Temperature
150ºC
Maximum
Iron
Temperature
110ºC
Do not iron
Professional
Dry
Cleaning
Professional
Dry Cleaning
with Any Solvent
Professional
Dry Cleaning with
Specific Solvent
Professional
Dry Cleaning with
Specific Solvent
Do not
Dry Clean
Dry Dry Flat Drip Dry Hang to Dry Do not
Tumble Dry
High Temperature
Low Temperature
Tumble Dry
Mildew, scorch: Wash with chlortine
bleach if safe for fabric. Or soak in
oxygen bleach and hot water before
washing. Badly mildewed fabrics may
be permanently damaged.
Mud: Brush off dry mud. Pretreat or
soak with product containing
enzymes.
Mustard, tomato: Pretreat with
prewash stain remover. Wash using
bleach safe for fabric.
Nail polish: May be impossible to
remove. Place stain face down on
paper towels. Apply nail polish
remover to back of stain. Repeat,
replacing paper towels frequently. Do
not use on acetate fabrics.
Paint, varnish:
a) Water based: Rinse fabric in cool
water while stain is wet. Wash. Once
paint is dry, it cannot be removed.
b) Oil based and varnish: Use solvent
recommended on can label. Rinse
thoroughly before washing.
Perspiration: Use prewash stain
remover or rub with bar soap. Rinse.
Wash using nonchlorine bleach in
hottest water safe for fabric.
Rust, Browon or yellow discoloration:
For spots, use rust remover safe for
fabric. For discoloration of an entire
load, use detergent and nonchlorine
bleach. Do not use chlorine bleach
because it may intensify
discoloration.
Shoe polish:
a) Liquid: Pretreat with a paste of
granular detergent and water.
b) Paste: Scrape residue from fabric.
Pretreat with prewash stain remover
or nonflammable dry cleaning fluid.
Rinse. Rub detergent into dampened
area. Wash using bleach safe for
fabric.
Urine, vomit, mucus, feces: Pretreat
or soak in product containing
enzymes. Wash using bleach safe for
fabric.
17 18

Diaper
Underwear
Nightgown
T-shirt
Shirt
Pair of Jeans
Sweatshirt (adult)
Pajamas
Pillowcase
Sheet (single)
Sheet (double)
Bedspread (single)
Bedspread (double)
Hand Towel
Bath Towel
Tablecloth
Dishcloth
Duvet (single)
Duvet (double)
50
50
100
100
180
800
700
400
100
500
700
1.000
1.300
150
450
500
60
900
1.800
WEIGHT (G)ITEM
Clothes weight chart
To avoid water and energy waste, try to use the complete load size.
Troubleshooting
If your washer does not work well, check the table below for probable cause
and / or solutions.
If the problem cannot be solved call our Technical Service Center.
If Washer does not work
Wash program dial is not setcorrectly
Position the dial at beginning of the mark of the
selected
Power outage
Wait until it is restored.
Electric circuit (socket, wiring, breakers) in bad
condition.
Check electric circuit and, if necessary, call an
electrician.
‘‘Washer timer’’ or ‘‘Spin timer’’ in ‘‘0’’ position.
Set the ‘‘Wash timer’’ or ‘‘Spin timer’’ to desired time.
An adaptor was used for the socket or extension.
Do not use adaptors. Change socket. Do not use
extension cord.
Noises / Vibration
Washer not leveled.
Level the washer
Stained Clothes
Too much soap and / or fabric softener.
Use recommended amount.
Water Supply is dirty.
Install filter on the faucet.
Washing Machine was not properly cleaned.
Clean Machine as recommended.
No draining
Disconnected hose.
Connect the hose.
Drain hose or inner pipe freezed.
Defrost the hose or the internal tubing.
Water outlet hose is pinched or doubled.
Fix hose or reposition it.
Lint on Clothes
Clothes from different fabrics were washed together.
Select clothes according to wash program or
according to tips.
Washing Machine is touching wall / piece of furniture.
Move Washer.
Clothes are not properly placed inside drum.
Place the items properly.
Coins or other sundries inside the wash tub.
Take the coins or other sundries inside the wash tub.
19 20

Wiring diagram
Models without pump
Models without pump
Models with pump
21 22
Purple
Capacitor
Blue
Blue
Blue
Grey
Brown
Brown
Brown
Yellow
Yellow
Yellow
Yellow
Brown
Yellow
Grey
Green/Yellow
Green/Yellow
Green/Yellow
N
E
L
Black
White
Brown
Spin Motor
Wash
Motor
Fuse
Filter
Lid Switch Spin Timer
Wash Timer
Select Switch
Drain Switch
Pump
Black
Brown
Purple
Blue
Blue
Blue
Brown
Brown
Brown
Yellow
Yellow
Yellow
Yellow
Brown
Capacitor
Grey
Yellow
Grey
Grey
Grey
Green/Yellow
Green/Yellow
Green/Yellow
N
E
L
Black
White
Brown
Spin Motor
Wash
Motor
Fuse
Filter
Lid Switch Spin Timer
Wash Timer
Select Switch
Green
9 kg
120V
60 Hz
560 W
400 W
160 W
--
70 L
800x945x465 mm
25 kg
12 kg
120V
60 Hz
620 W
460 W
160 W
--
80 L
870x1010x500 mm
29 kg
15 kg
120V
60 Hz
680 W
500 W
180 W
--
95 L
930x1010x540 mm
31 kg
Technical information
FWLT1111BUHW
FWLT1111BUHW
FWLT1111BUHW
9 kg
110V
50 Hz
560 W
400 W
160 W
--
70 L
800x945x465 mm
25 kg
12 kg
110V
50 Hz
620 W
460 W
160 W
--
80 L
870x1010x500 mm
29 kg
15 kg
110V
50 Hz
680 W
500 W
180 W
--
95 L
930x1010x540 mm
31 kg
FWLT0811BUHW
FWLT0811BUHW
FWLT0811BUHW
Capacity
Rated voltage
Rated frequency
Maximum input power
Wash power
Spin power
Pump power
Amount of water
Overall dimensions (WxHxD)
Net weight
Capacity
Rated voltage
Rated frequency
Maximum input power
Wash power
Spin power
Pump power
Amount of water
Overall dimensions (WxHxD)
Net weight
Capacity
Rated voltage
Rated frequency
Maximum input power
Wash power
Spin power
Pump power
Amount of water
Overall dimensions (WxHxD)
Net weight
Technical information
FWTE09M3FEUJW
FWTE12M3FEUJW
FWTE15M3FEUJW
FWTE09M1FEUJW
FWTE12M1FEUJW
FWTE15M1FEUJW

21 22
Models with pump
18 kg
120V
60 Hz
700 W
500 W
200 W
--
105 L
983x1050x560 mm
34 kg
18 kg
120V
60 Hz
730 W
500 W
200 W
30 W
105 L
983x1050x560 mm
34 kg
FWLT1111BUHW
FWLT1111BUHW
18 kg
110V
50 Hz
700 W
500 W
200 W
--
105 L
983x1050x560 mm
34 kg
18 kg
110V
50 Hz
730 W
500 W
200 W
30 W
105 L
983x1050x560 mm
34 kg
FWLT0811BUHW
FWLT0811BUHW
Capacity
Rated voltage
Rated frequency
Maximum input power
Wash power
Spin power
Pump power
Amount of water
Overall dimensions (WxHxD)
Net weight
Capacity
Rated voltage
Rated frequency
Maximum input power
Wash power
Spin power
Pump power
Amount of water
Overall dimensions (WxHxD)
Net weight
FWTE18M3FEUJW
FWTE18M3FEJW
FWTE18M1FEUJW
FWTE18M1FEJW
9 kg
120V
60 Hz
590 W
400 W
160 W
30 W
70 L
800x945x465 mm
25 kg
12 kg
120V
60 Hz
650 W
460 W
160 W
30 W
80 L
870x1010x500 mm
29 kg
15 kg
120V
60 Hz
710 W
500 W
180 W
30 W
95 L
930x1010x540 mm
31 kg
FWLT1111BUHW
FWLT1111BUHW
FWLT1111BUHW
9 kg
110V
50 Hz
590 W
400 W
160 W
30 W
70 L
800x945x465 mm
25 kg
12 kg
110V
50 Hz
650 W
460 W
160 W
30 W
80 L
870x1010x500 mm
29 kg
15 kg
110V
50 Hz
710 W
500 W
180 W
30 W
95 L
930x1010x540 mm
31 kg
FWLT0811BUHW
FWLT0811BUHW
FWLT0811BUHW
Capacity
Rated voltage
Rated frequency
Maximum input power
Wash power
Spin power
Pump power
Amount of water
Overall dimensions (WxHxD)
Net weight
Capacity
Rated voltage
Rated frequency
Maximum input power
Wash power
Spin power
Pump power
Amount of water
Overall dimensions (WxHxD)
Net weight
Capacity
Rated voltage
Rated frequency
Maximum input power
Wash power
Spin power
Pump power
Amount of water
Overall dimensions (WxHxD)
Net weight
FWTE09M3FEJW
FWTE12M3FEJW
FWTE15M3FEJW
FWTE09M1FEJW
FWTE12M1FEJW
FWTE15M1FEJW

Notes
Notes
23 24
 Loading...