

Frigidaire FWAB17M3ESPW, FWAB20M5EEPW, FWAB20M3ESPW, FWAB20M3EEPW, FWAB17M3EEPW User Manual
...
Lavadora/WaSHING MaCHINE
MANUAL DE INSTRUCCIONES/
USER MANUAL
MODELOS/MODELS
Ld17Y, FWaB17M3ESPW, FWaB17M3EEPW, FWaB17M5EEPW
Ld20Y, FWaB20M3ESPW, FWaB20M3EEPW, FWaB20M5EEPW
2
En este manual encontrará todas las informaciones
para su seguridad y el uso adecuado de su Lavadora.
Lea todas las instrucciones antes de utilizar el
aparato y guárdelas para futuras referencias.
La etiqueta de identificación donde están las
informaciones del código, modelo, fabricante y
otras, será utilizada por el Servicio técnico caso
su Lavadora necesite reparo. No la retire del local
dónde está pegada.
Consejos Ambientales
El material del embalaje es
reciclable. Procure seleccionar
plásticos, papel y cartón para
enviarlas a compañías de reciclaje.
Este aparato no se puede tratar
como basura doméstica. En vez de
eso, se debe entregar al centro de colecta selectiva
para reciclaje de equipos electro-electrónicos.
Manual del Usuario
Para Niños
Evite accidentes. Después de desempacar a la
Lavadora, mantenga al material de embalaje fuera
del alcance de los niños.
No permita que la Lavadora sea manipulada por
niños, aunque esté apagada.
Los ninõs deben supervisarse para asegurar que
ellos no empleen los aparatos como juguete.
Para el Usuario / Instalador
1. Seguridad
1. Seguridad ..................................................2
2. Descripción de la Lavadora .....................3
3. Instalación .................................................5
4. Cómo Usar ................................................7
5. Panel de Control ....................................... 9
6. Programas de Lavado ............................ 11
7. Limpieza y Mantenimiento ....................12
8. Solución de Problemas ..........................13
9. Sugerencias y Consejos ........................ 16
10. Símbolos Internacionales ....................17
11. Diagrama Eléctrico ...............................18
12. Especificacioes Técnicas .................... 19
Índice
Este aparato no se destina para utilizarse
por personas (incluyendo niños) cuyas
capacidades físicas, sensoriales o mentales
sean diferentes o estén reducidas, o carezcan
de experiencia o conocimiento, a menos que
dichas personas reciban una supervisión
o capacitación para el funcionamiento del
aparato por una persona responsable de su
seguridad.
Desconecte a la Lavadora del tomacorriente
cada vez que se limpie o se haga mantenimiento.
Nunca desconecte a la Lavadora del
tomacorriente halándolo por el cable eléctrico.
Use el enchufe.
No altere el enchufe de su Lavadora.
Si el cordón de alimentación es danãdo, éste
debe sustituirse por ele frabricante, por su
agente de servicio autorizado o por personal
calificado con el fin de evitar un peligro.
Tenga cuidado para que la Lavadora no
permanezca apoyada sobre el cable eléctrico.
Es peligroso modificar las especificaciones o
características de la Lavadora.
Nunca instale a la lavadora sobre desagües,
ya que la espuma que vuelve de los mismos
puede dañar a la Lavadora.
Nunca instale a la Lavadora sobre alfombras
y moquetas.
IMPORTANTE
ATENCIÓN
Nunca deje velas o inciensos prendidos sobre
la lavadora porque puede provocar incendios.
Sistema de Seguridad
Su Lavadora posse una traba de seguridad en la tapa
para evitar accidentes. Esta traba es accionada sólo
durante el proceso de centrifugación.
Después de la centrifugación o después
de cualquier interrupción del proceso de
centrifugación, espere unos minutos para
la liberación de la tapa. Este tiempo es
suficiente para evitar accidentes.
3
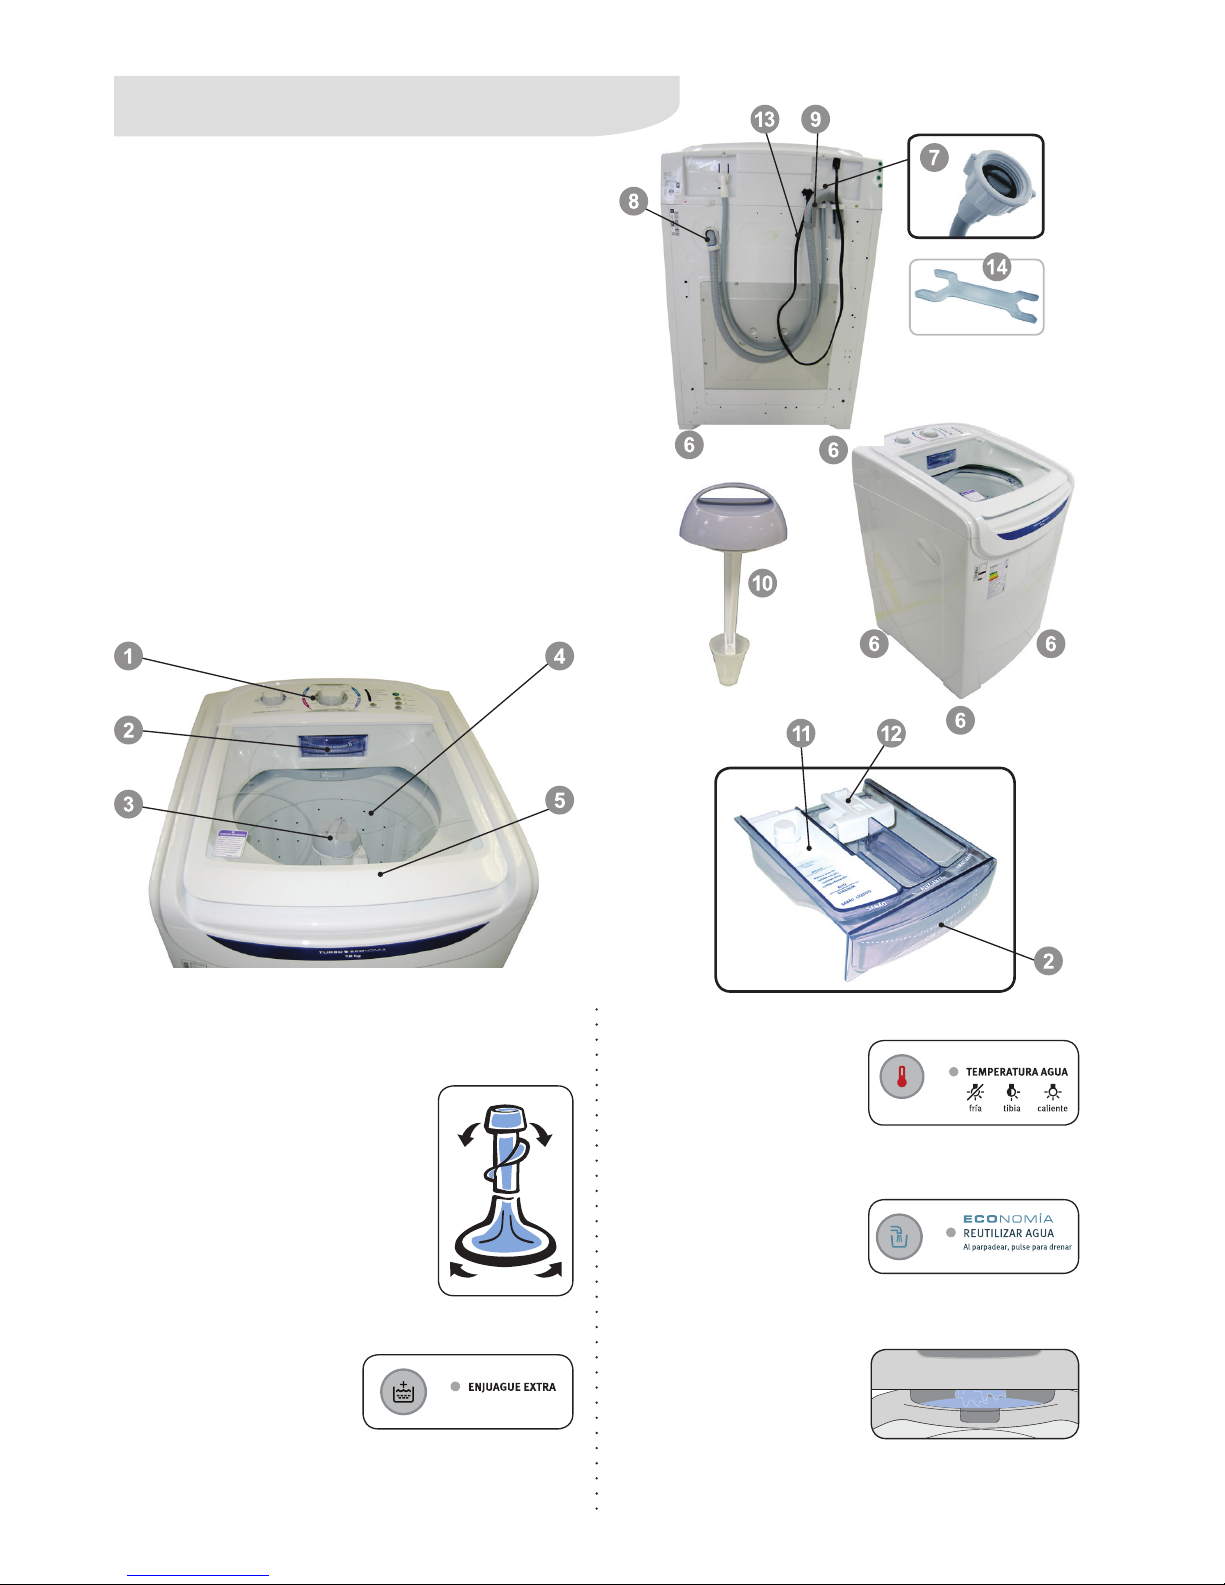
2.
Descripción de la Lavadora
Piezas
1. Panel de control (ver páginas 9 y 10)
2. Gaveta distribuidora de jabón, suavizante y blanqueador
3. Agitador (dentro de la Lavadora)
4. Tambor (dentro de la Lavadora)
5. Tapa
6. Patas niveladoras (4)
7. Manguera de entrada de agua y filtro (ya conectado
a la manguera)
8. Manguera de salida de agua (atrás de la Lavadora)
9. Curva plástica de la manguera de salida
10. Filtro de pelusas (dentro de la Lavadora)
11. Dispensador removible para jabón líquido
12. Indicador de nivel de blanqueador y suavizante
13. Cable eléctrico
14. Llave para nivelar de las patas
Opção Temperatura da Água
Permite elegir la
temperatura del agua de
lavado entre fría, tibia o
caliente.
Opção Economia
Esta función es utilizada
cuando desea reutilizar
el agua de lavado y/o
enjuague.
Diluidor Inteligente
Promueve la mezcla previa
de jabón, blanqueador y
suavizante con el agua,
para evitar que estos
componentes recaigan directamente sobre la ropa
y causen manchas.
Sistema Best-Cleaning (sólo en el
modelo FWAB17M3ESPW)
El agitador con doble acción posee
dos partes. La parte superior, que
tiene la función de empujar a las
ropas hacia abajo, y la parte inferior,
que efectivamente hace el lavado
de las ropas. Durante la agitación,
el tambor eventualmente puede
girar, dependiendo del nivel de
agua y de la cantidad de ropa.
Opción Enjuague Extra
Tiene la función de hacer
con que la lavadora realice
un enjuague adicional.
DILUIÇÃO
INTELIGENTE
4
PROGRAMA TENIS
Especialmente desarrollado para lavar tenis.
Procedimiento de lavado:
1. Retire los cordones del tenis. No es necesario
retirar la plantilla del tenis
para el lavado.
2. Coloque los tenis (dos
pares por ciclo de lavado)
en el tambor.
3. Coloque el nivel mínimo
de jabón en la gaveta.
4. Cierre la tapa.
5. En la tecla "NIVELES DE AGUA" seleccione el
nivel "Bajo/Tenis" y en el botón "PROGRAMA DE
LAVADO" seleccione el programa Tenis.
6. Encienda a la Lavadora.
7. Después del término del ciclo de lavado, retire
los tenis.
Recomendaciones
• Antes de colocar los tenis en la Lavadora, verifique
las recomendaciones de lavado descritas por el
fabricante del tenis.
• Retire residuos solidos de la suela (piedras,
barro, goma de mascar, etc.) antes de lavarlos
en la Lavadora.
• Nunca lave ropas con los tenis.
• Siempre retire los cordones de los tenis antes
del lavado evitando que éstos se enrollen en el
agitador.
• No coloque cordones SUELTOS dentro de la
Lavadora.
• Distribuya los tenis en el tambor.
• No utilice blanqueador y/o suavizante para lavar
los tenis.
• No es necesario retirar la plantilla del tenis para
el lavado.
• No se deberán lavar tenis con suela demasiado
rígida, con trabas o encajes (botas de fútbol o
zapatillas para bicicletas), calzados de seguridad
(con punteras metálicas o plásticas) o cualquier
otro tipo de calzado que pueda comprometer a la
Lavadora y sus accesorios, así como dañar algún
detalle del propio calzado.
REUTILIZAR AGUA
Opción Economía
Esta función se utiliza cuando se desea reciclar el
agua de lavado y/o de enjuague. Para activarla,
presione la tecla “ECONOMÍA”.
La Lavadora realiza todo programa de lavado
seleccionado y antes de la etapa de drenaje
permanece en “stand-by” (espera) con la indicación
luminosa intermitente. En este momento, se debe
utilizar las opciones de reciclaje de agua abajo:
1 - Reciclaje de Agua en el Lavado de Ropas
Cuando la indicación luminosa esté intermitente,
desconecte a la lavadora, abra la tapa de la
Lavadora y retira las ropas ya lavadas. Coloque las
ropas sucias en el agua con jabón, cierre la tapa,
seleccione el programa de lavado y encienda a
la lavadora seleccionando la tecla "ENCENDER/
APAGAR".
• Cuando vaya a utilizar el reciclaje de
agua para lavado, separe la cantidad
adecuada de ropas observando la
cantidad de agua existente en la
Lavadora.
• Nunca recicle el agua con suavizante
para lavado, pues sus ropas podrán
mancharse.
• Lave las ropas claras y menos sucias
antes de las más sucias y oscuras para
evitar que se manchen las ropas.
Después de utilizar el reciclaje de agua
en el drenaje, reposicione a la manguera
de salida de agua en la borda del tanque
o en la entrada del desagüe.
IMPORTANTE
IMPORTANTE
2 - Reciclaje de Agua en el Drenaje
La indicación luminosa permanecerá intermitente
hasta que se seleccione la tecla “ECONOMÍA” y
libere la etapa de Drenaje. Para el reciclaje del
agua, posicione la manguera de salida de agua
en el recipiente que deberá almacenar el agua
(cubo, tanque o cuenca) antes de presionar la tecla
“ECONOMÍA”.
Para interrumpir el drenaje, basta seleccionar la
tecla “ECONOMÍA” o abrir la tapa y la Lavadora
permanecerá en “stand-by” (espera) hasta que se
accione la tecla “ECONOMÍA” nuevamente o hasta
que se cierre la tapa de la Lavadora.
5
3. Instalación
Para su tranquilidad, llame un servicio técnico
altamente calificado para instalar su Lavadora. Se
cobrará una tarifa de instalación para este servicio.
Retirada del Embalaje
Levante a la Lavadora con la
ayuda de otra persona y remueva
la base del embalaje.
Retire todo el embalaje antes de
conectar a la Lavadora.
Escoger el Local
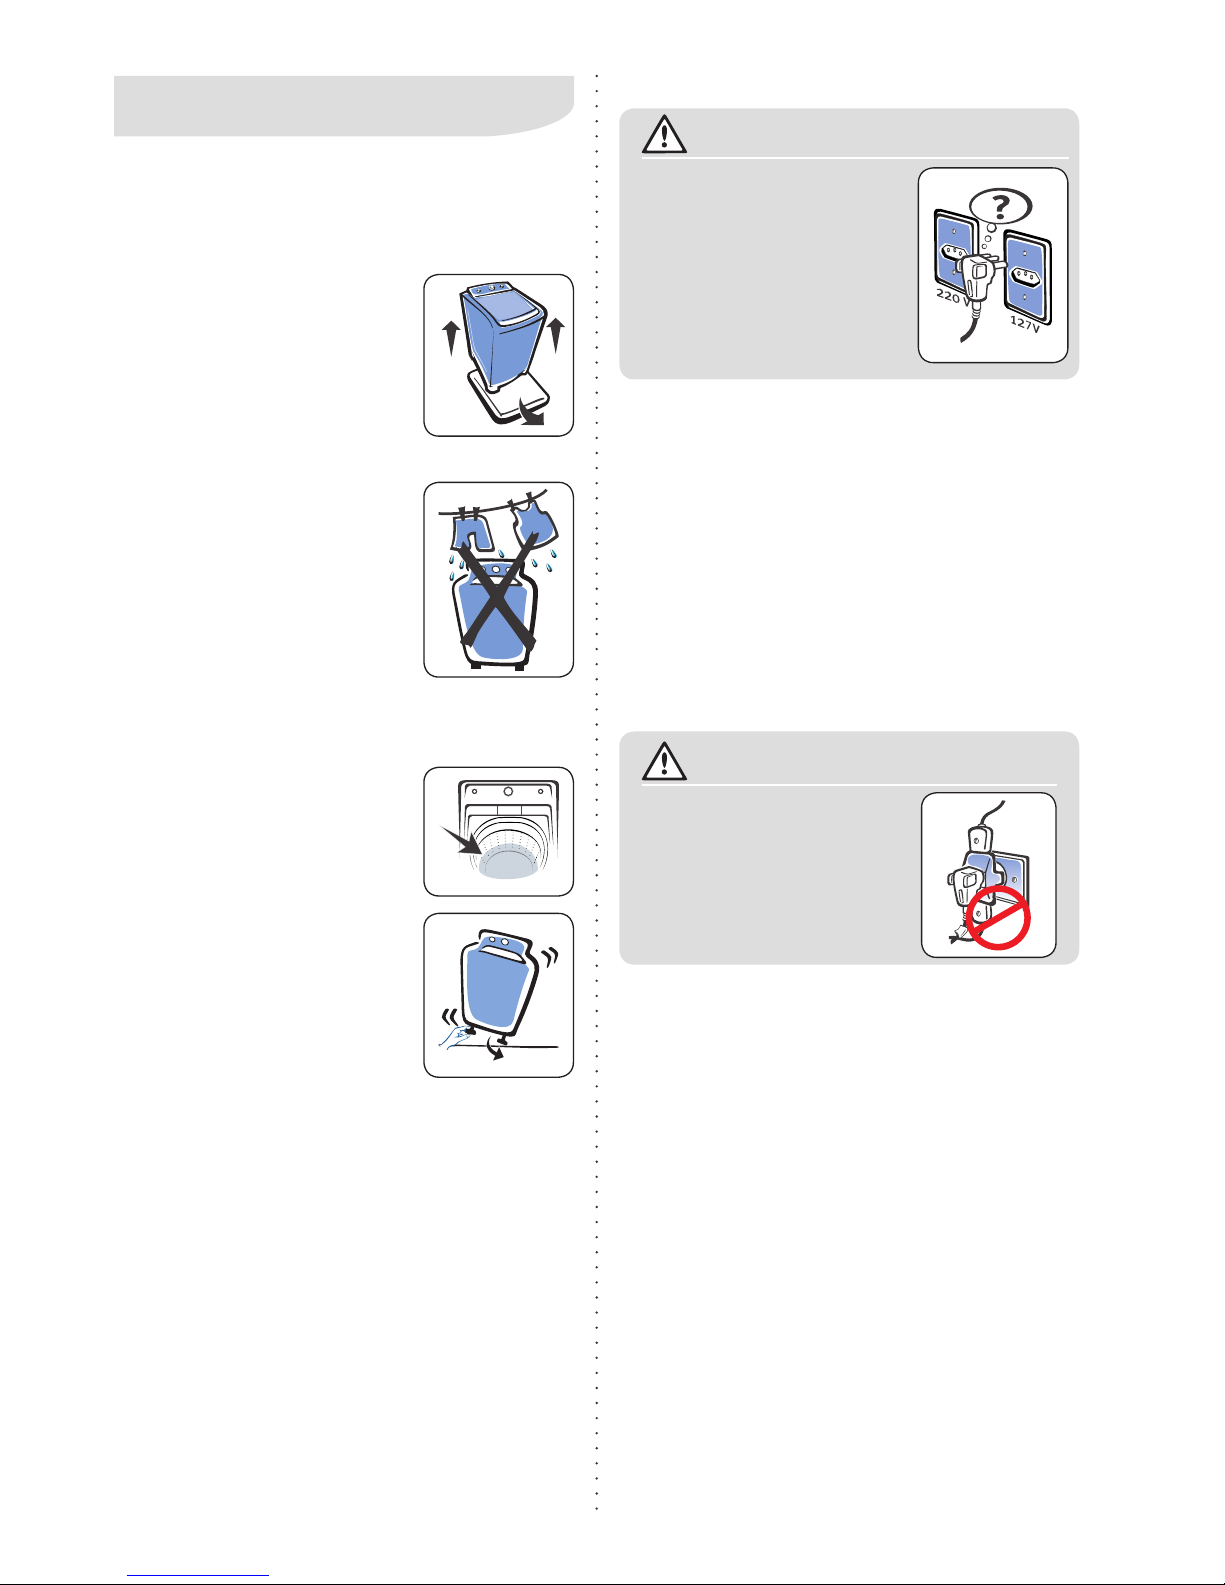
Evite instalar su Lavadora
debajo de tendederos y locales
expuestos a lluvia, goteras o
exceso de humedad (ej.: baño).
Nunca bote agua en el panel
de su Lavadora ya que puede
dañarla. Use apenas un paño
húmedo para limpiar el panel.
Nivelación
Certifíquese que la Lavadora está
apoyada correctamente.
Llénela con agua en nivel
bajo y verifique si el agua está
acompañando los furos del
tambor de lavado en una misma
línea.
Caso no lo esté, regule las patas
con la ayuda de la llave que
acompaña al producto (ver
página 3).
Todas las patas deben estar
apoyadas al piso para evitar
trepidaciones y ruidos.
No utilice patas diferentes de las originales.
Existe una protección para evitar daños al sistema
eléctrico de su Lavadora.
Si su Lavadora 127 V se conecta a una tensión
diferente a la de la etiqueta (220 V) o si su lavadora
220 V se conecta a una tensión diferente a de
la etiqueta (127 V), un sistema automático de
reconocimiento de tensión hará con que la Lavadora
no funcione. Sin embargo, no causará ningún
daño al sistema eléctrico de la Lavadora. En estos
casos, la luz axul de la tecla "PRENDE/APAGA"
permanece intermitente. Desconecte el enchufe del
tomacorriente y verifique si la tensión esta correcta.
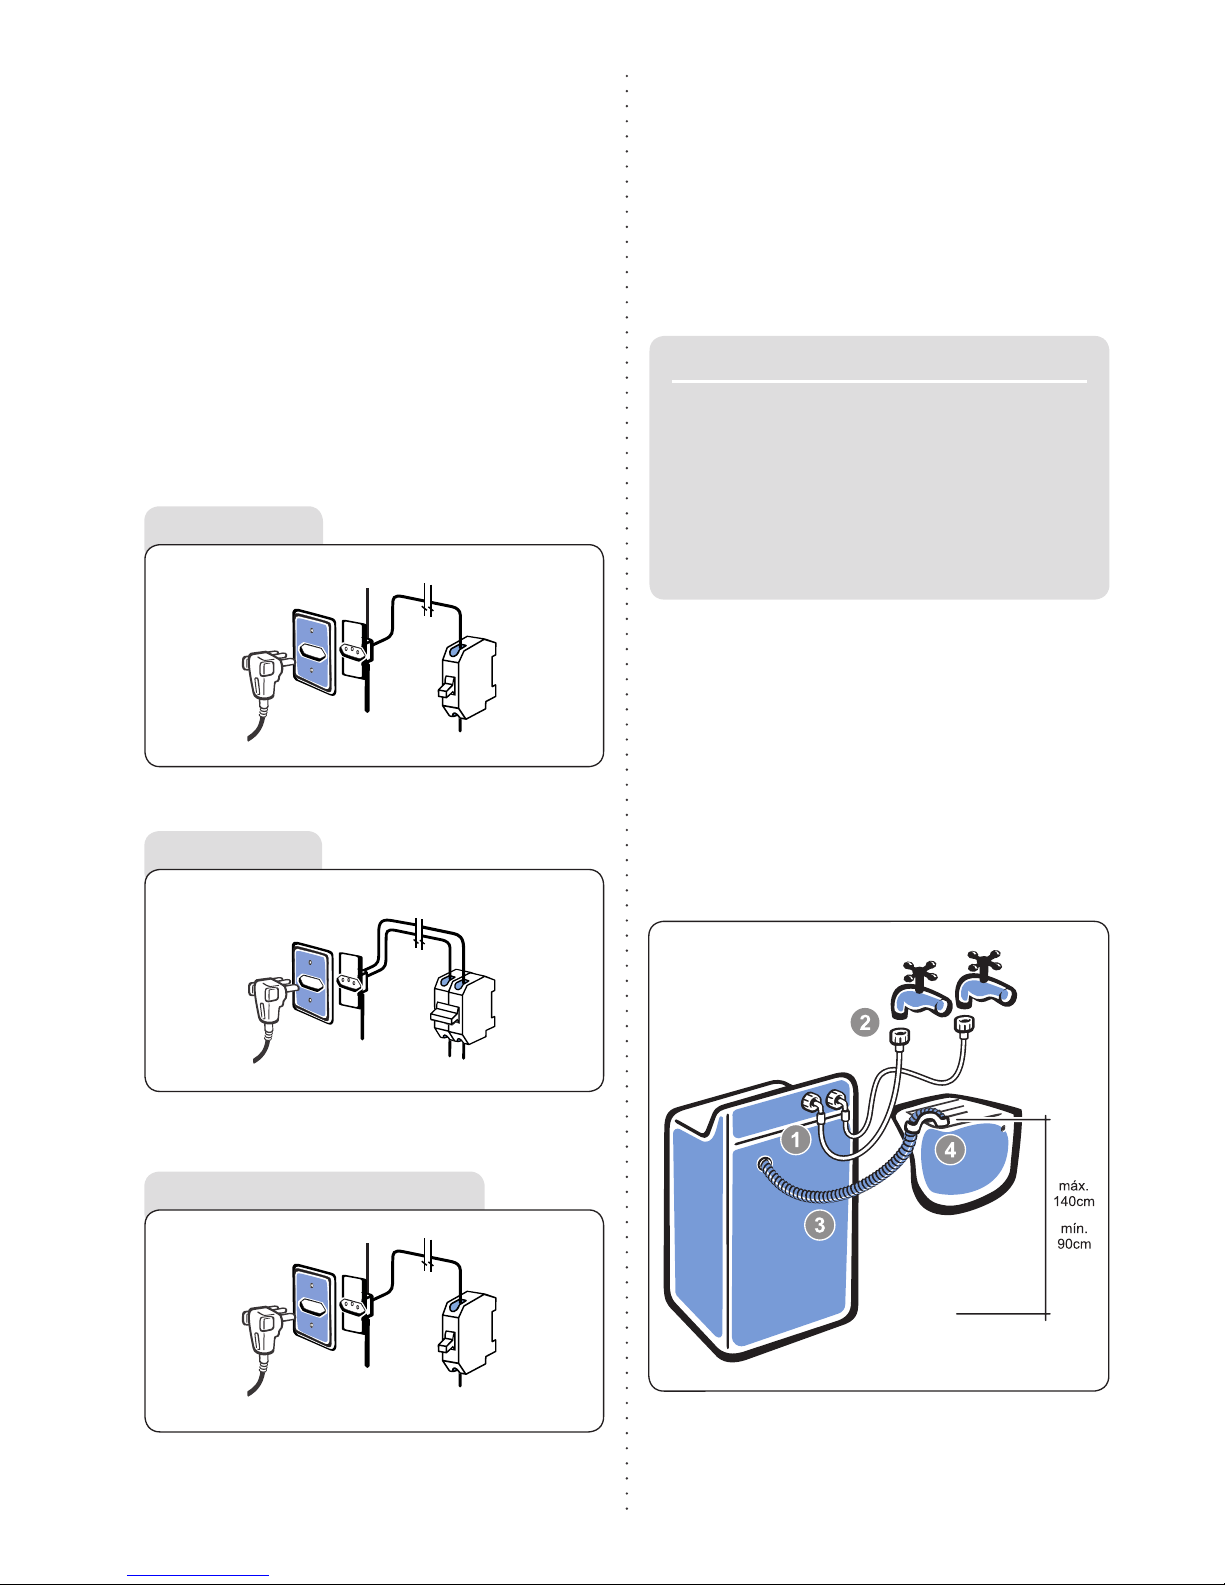
Instalación Eléctrica
ATENCIÓN
Conecte su Lavadora a un
tomacorriente exclusivo,
no utilice extensiones
o adaptadores dobles o
multiples.
ATENCIÓN
Antes de conectar su
Lavadora, verifique si
la tensión (voltaje) del
tomacorriente donde se
conectará la Lavadora es
igual a la tensión indicada
en la etiqueta localizada
cerca al enchufe (en el
cable eléctrico).
Caso el tomacorriente de su residencia no se
encuentre en el padrón, recomendamos que
providencie la substitución y adecuación de la misma
con un electricista de su confianza.
Recordamos que para aprovechar el avance y
seguridad, es necesario aterrar el tomacorriente,
conforme la norma de instalaciones eléctricas. Caso
tenga dudas, consulte a un profesional del área.
6
Instalación Hidráulica
Manguera de Entrada de Agua (1)
Encaje la punta de la manguera, la que viene suelta,
al grifo de manera que quede bien enroscada (2).
Abra al grifo y verifique si no existen fugas.
El uso del grifo de entrada del agua con rosca 3/4”
es obligatorio.
El uso de grifos de baja calidad dañará a la manguera
de su lavadora causando fugas de agua.
Manguera de Salida de Agua (3)
Posicione la manguera de salida de desagüe o en la
borda del tanque (4) con altura máxima de 140 cm
y mínima de 90 cm para el funcionamiento perfecto
de su Lavadora.
Coloque la manguera dentro del tubo con un máximo
de 20 cm en la salida del desagüe.
Al colocar la manguera en la borda del tanque,
certifíquese de que la punta de la manguera no
quede sumergida en el agua del tanque, pues el
agua podrá retornar para dentro de la Lavadora.
La manguera es fornecida con un
filtro que dificulta la entrada de sucio
que pueda venir a través de la red de
abastecimiento de agua. La lavadora no
se puede usar sin el filtro, bajo el riesgo
de dañar el producto o perder la garantía.
Utilice la manguera que acompaña el
producto. No use mangueras viejas.
IMPORTANTE
Cable a Tierra
Caso su lavadora posea un cable a tierra (verde o
verde/amarillo) cerca del cable eléctrico, éste se
debe conectar a un punto de aterramiento adecuado.
No conecte el cable tierra a grifos, tuberías de agua,
tubos eléctricos o de gas o al cable neutro de la red.
Si su aparato está equipado con un enchufe de 3
pines, conéctelo a un tomacorriente adecuado con
aterramiento. No se puede cortar al pino a tierra del
enchufe.
Disyuntores
La instalación de disyuntores exclusivos para la
Lavadora es obligatoria. En caso de duda con
relación al sistema eléctrico de su residencia,
consulte la concesionaria de energía eléctrica.
Para la Lavadora 127 V, utilice un disyuntor de 20
A en la fase.
Tensión 127 V
Cable Fase
Aterramiento
Llave
Disyuntora
20 A
Neutro
Para la Lavadora 220 V (entre dos fases), utilice un
disyuntor bipolar de 15 A.
Algunas regiones poseen 220 V entre fase y neutro.
En este caso, utilice un disyuntor de 15 A en la fase.
Tomacorriente
Enchufe
Nunca enmiende la manguera de salida de agua en
otra manguera para aumentar su longitud ya que
podrá dañar el sistema interno de salida de agua.
Tensión 220 V
Aterramiento
Tomacorriente
Enchufe
Cable Fase
Llave
Disyuntora
15 A
Bipolar
Tensión 220 V - Monofásico
Cable Fase
Aterramiento
Llave
Disyuntora
15 A
Neutro
Tomacorriente
Enchufe

7
2,4m
4. Cómo Usar
Para el mejor desempeño de su lavadora, siga las
instrucciones abajo:
1º
Separe a las ropas blancas de las coloridas y por
tipo de tejido. Abra las ropas y colóquelas pieza
por pieza en pilas pequeñas, distribuyéndolas de
manera uniforme alrededor del tambor, cuidando
para no enrollar las ropas en el agitador. Las piezas
pesadas y voluminosas deberán ser colocadas
primero para que queden en la parte baja (ver peso
de las ropas pág. 17).
2º
Coloque el jabón en la
gaveta distribuidora.
Siempre use jabón de
buena calidad y no
ultrapase la cantidad
recomendada para
no causar daños a
su Lavadora y evitar
anchas en la ropa.
Su Lavadora tiene un compartimento especial para
el uso de jabón líquido.
Obs:. La cantidad de jabón se puede cambiar para
ropas muy sucias. Haga la adecuación de acuerdo
con el nivel de suciedad.
Vea la cantidad recomendada en las tablas abajo.
3º
Suavizante: Coloque el suavizante sin ultrapasar la indicación de MÁX en la gaveta. Caso se
ultrapase este nivel, el suavizante saldrá antes
del tiempo adecuado pudiendo manchar las
ropas. Siempre use suavizante de buena calidad
y en la cantidad recomendada.
Se recomienda diluir al suavizante con un poco
de agua antes de abastecer el recipiente.
17 kg
20 kg
Presión del Agua
Para garantizar una presión adecuada de llenado, la
altura mínima entre la base de la caja de agua y la
entrada de lavadora debe de ser de 2,4m.
Nota: La presión de entrada de agua debe de estar
entre 0,02 a 0,81 MPa (2,4 a 81 metros de columna
de agua). Caso la presión del agua de su residencia
sea mayor, use un reductor de presión.
En algunos locales, es posible que el agua sea
fornecida sucia. En este caso, instale un filtro de
pasaje de agua en el grifo para evitar manchas en
la ropa.
Este filtro se puede adquirir en la Red Nacional de
Servicio Autorizado.
8
ropa. El llenado, tanto del agua para el lavado como
para el enjuague, se hace a través de la Dilución
Inteligente. El agua entra en la gaveta distribuidora y
envía el jabón, blanqueador o suavizante. La mezcla
se dirige en primer lugar al Diluidor Inteligente,
donde es previamente disuelta. Luego esta mezcla
(ya disuelta) se conduce directamente a la parte
inferior del tambor, es decir, el proceso de llenado
de la lavadora es desde la parte inferior del tambor
hacia arriba.
8º
Si quiere, utilice las
opciones de lavado
eligiendo la tecla
:
- Economía;
- Enjuague Extra;
- Temperatura del Agua.
Las opciones son independientes. Usted puede
usar la combinación que desea.
9º
Caso quiera modificar las
etapas de lavado, presione la
tecla “SALTAR ETAPA” hasta
que la indicación luminosa esté
en la posición deseada
.
10º
Espere 5 segundos y la Lavadora comenzará a
funcionar. Al final de cada programa,
la Lavadora
apagará automáticamente y la luz azul al lado
de la tecla “PRENDE/APAGA” permanecerá
apagada.
7º
Conecte la Lavadora presionando la
tecla “PRENDE/APAGA”.
La luz azul se
encenderá al lado de la tecla indicando
que la lavadora está encendida.
Durante el llenado de la
lavadora, no se puede
ver el agua que cae
directamente sobre la
Después de presionar la tecla Prende/Apaga,
todavía es posible cambiar la programación.
Después de este cambio, espere 5 segundos
para que la Lavadora inicie el ciclo de lavado
nuevamente.
Caso el proceso de lavado sea interrumpido
antes del término del ciclo término (ejemplos:
queda de energía, accionar la tecla Prende/
Apaga) al encender nuevamente a la
Lavadora, el ciclo vuelve a la posición inicial.
ATENCIÓN
Se recomienda no llenar
la Lavadora con la ayuda
de un cubo o manguera.
4º
Blanqueador (sólo líquido): Coloque
el blanqueador hasta la indicación MÁX en
la gaveta. Caso se ultrapase este nivel, el
blanqueador saldrá antes de tiempo, pudiendo
causar manchas en la ropa. Use el blanqueador
adecuado al tipo de ropa. Se recomienda
que se use blanqueador sólo para ropas
blancas. Para ropas coloridas se debe usar
un blanqueador especial, blanqueador común
puede mancharlas.
El uso de suavizante y blanqueador es
opcional.
5º
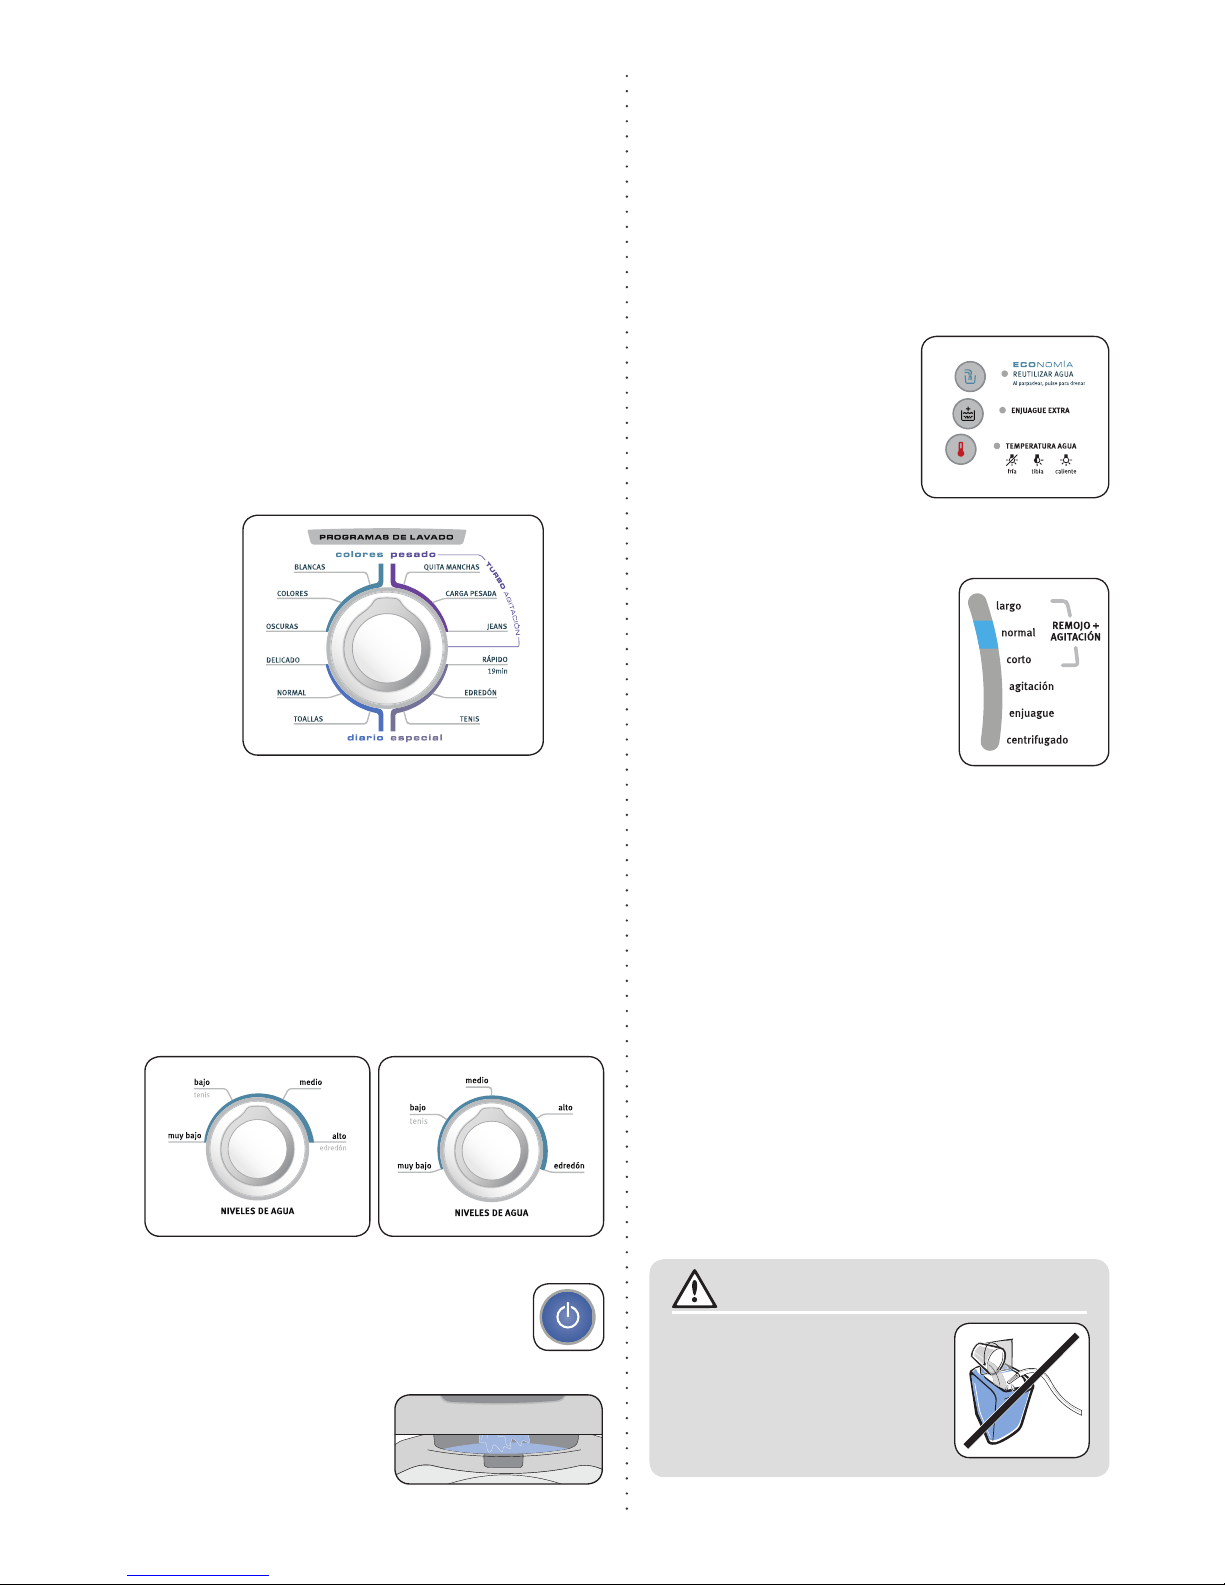
En el botón “Programas de Lavado”, seleccione el
tipo de programa que desea ejecutar de acuerdo
con la ropa por lavar. Este botón se puede girar para
cualquier lado
.
6º
Seleccione el nivel de agua conforme la cantidad
de ropa
. La cantidad de agua también se puede
cambiar dependiendo de la cantidad de ropa
a lavar. Muy ropa abultada cuando está seca,
puede indicar un nivel de agua mayor que
lo necesario. Haga adecuación de acuerdo
con la ropa a lavar. Las ropas deben moverse
libremente durante el lavado. Durante el proceso
de entrada de agua, la tapa de la Lavadora debe
permanecer cerrada.
DILUIÇÃO
INTELIGENTE
17 kg 20 kg
9
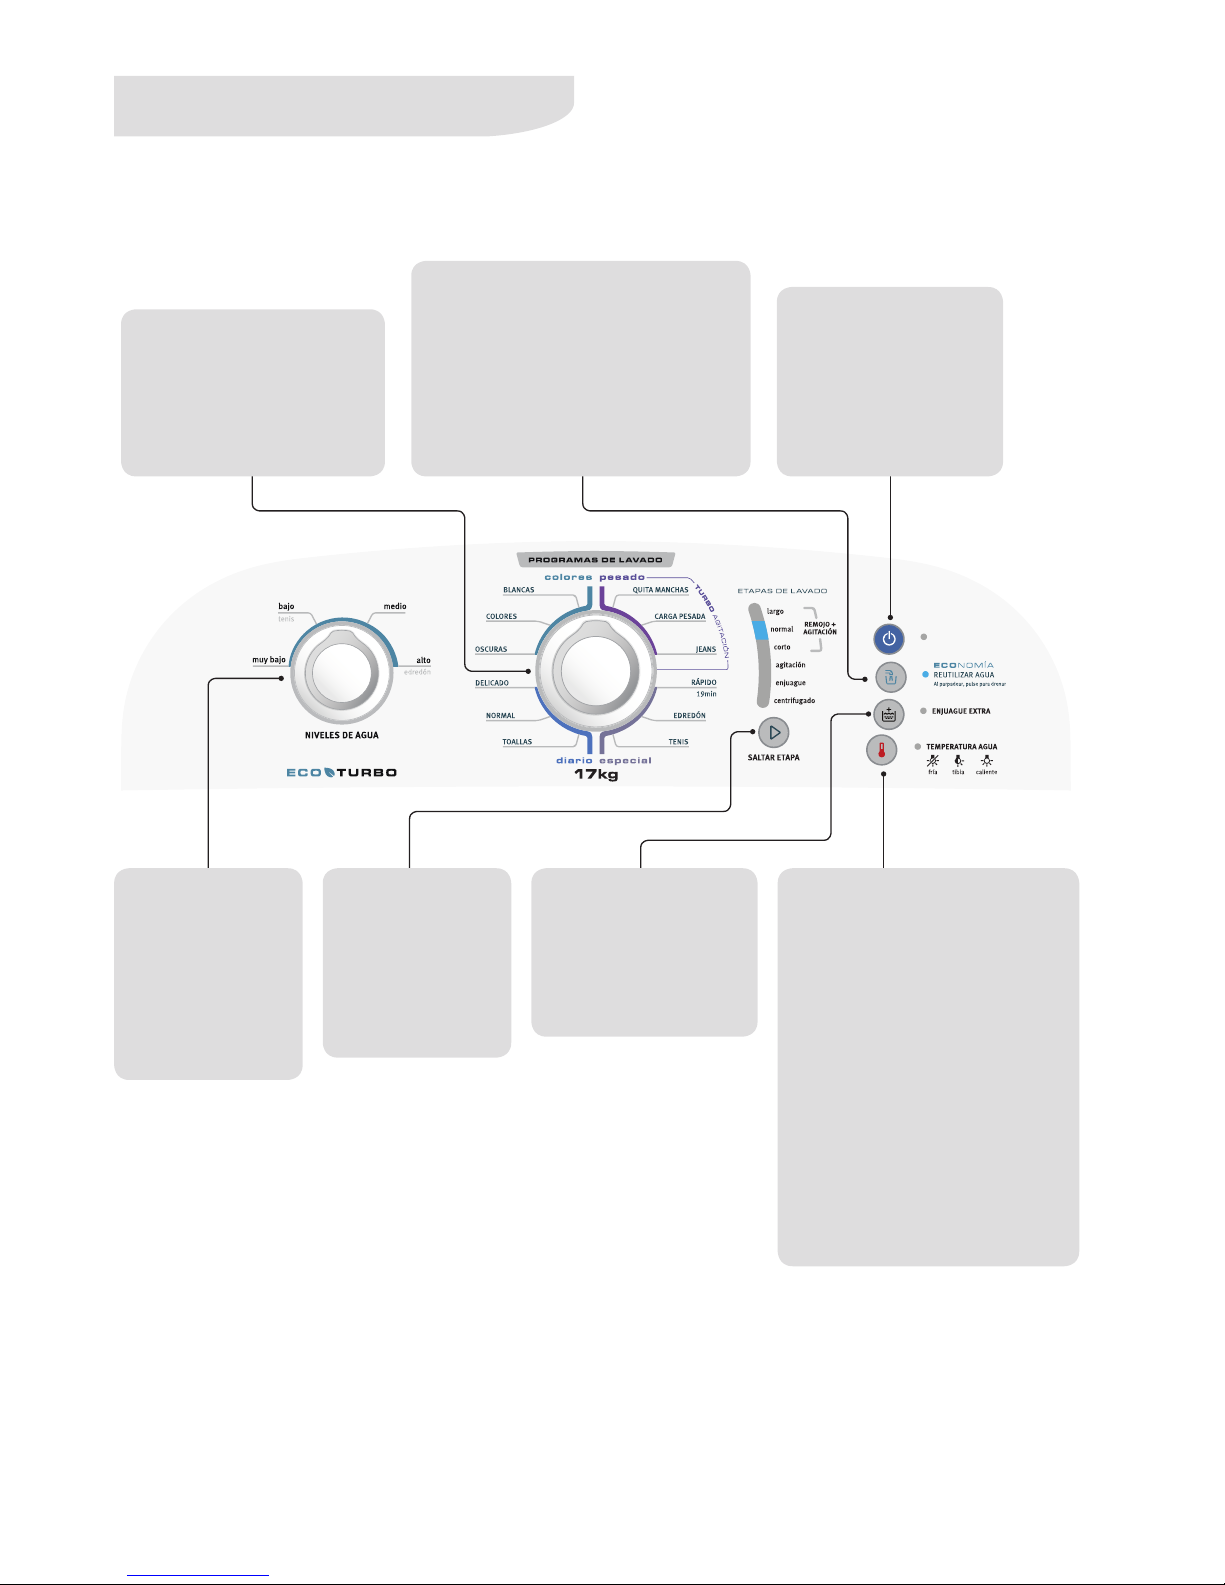
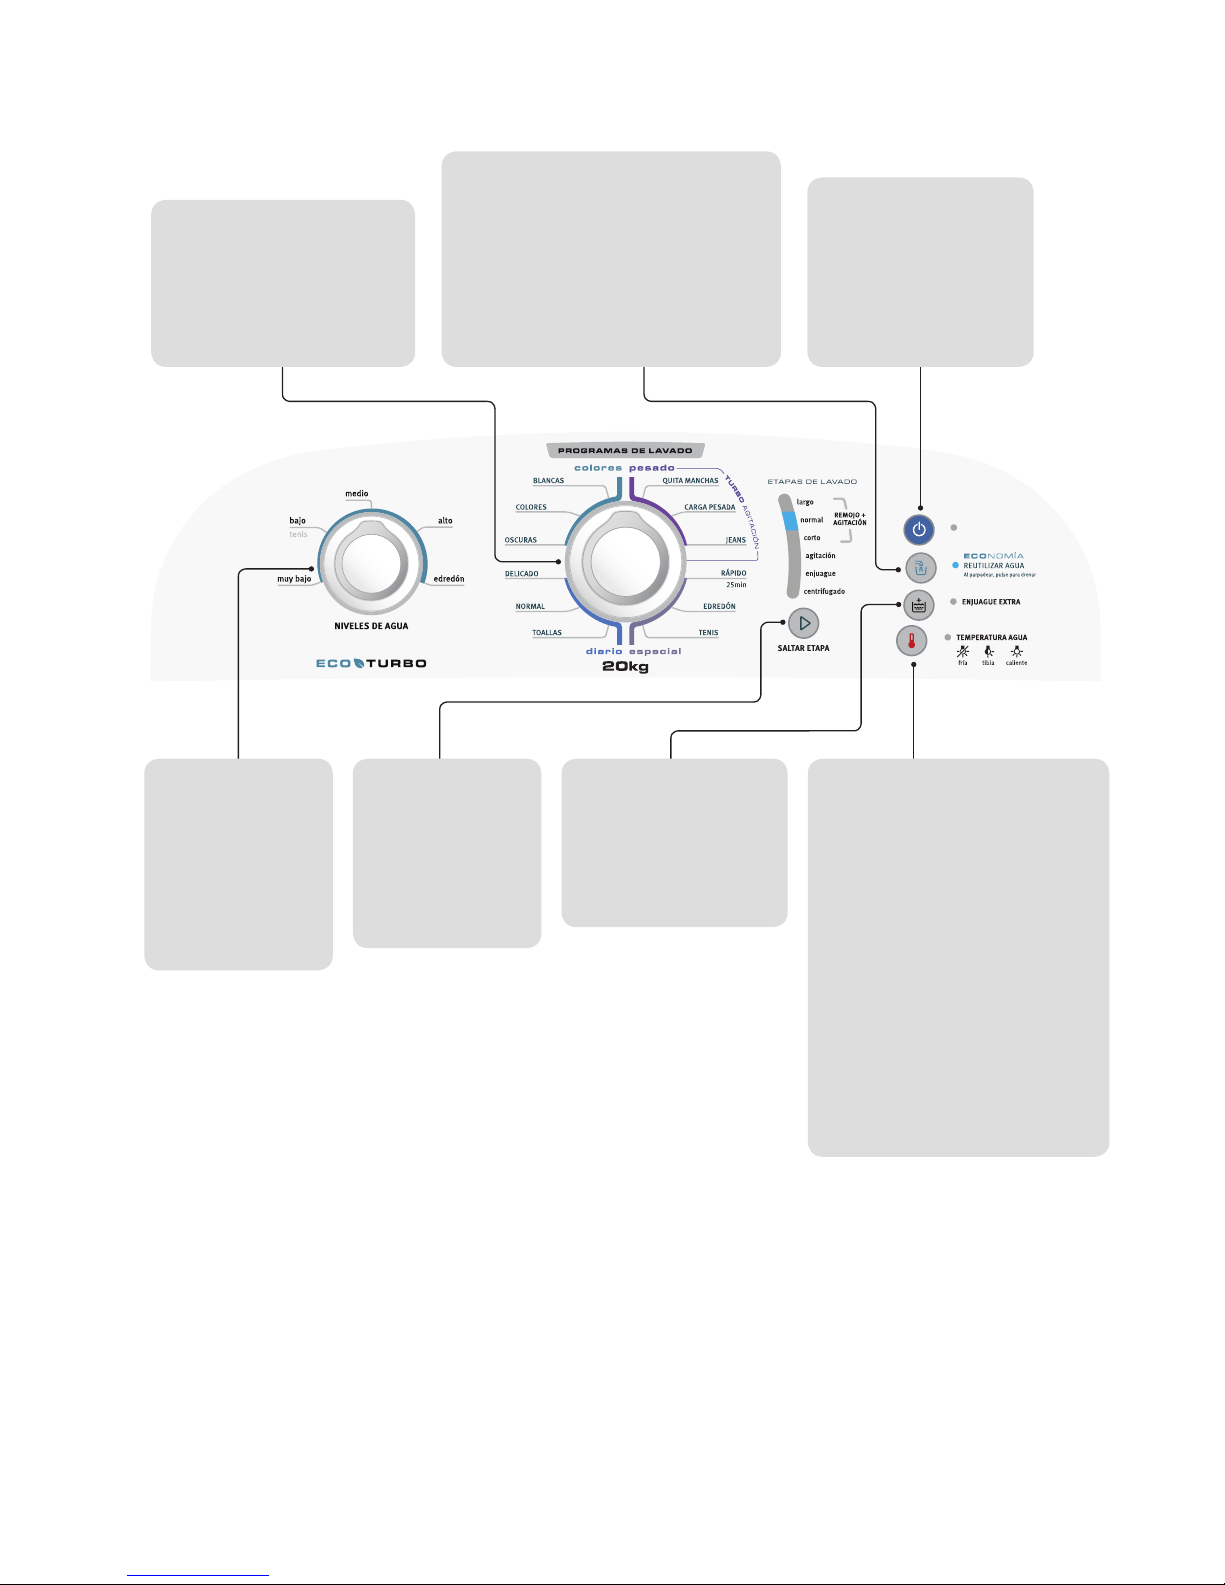
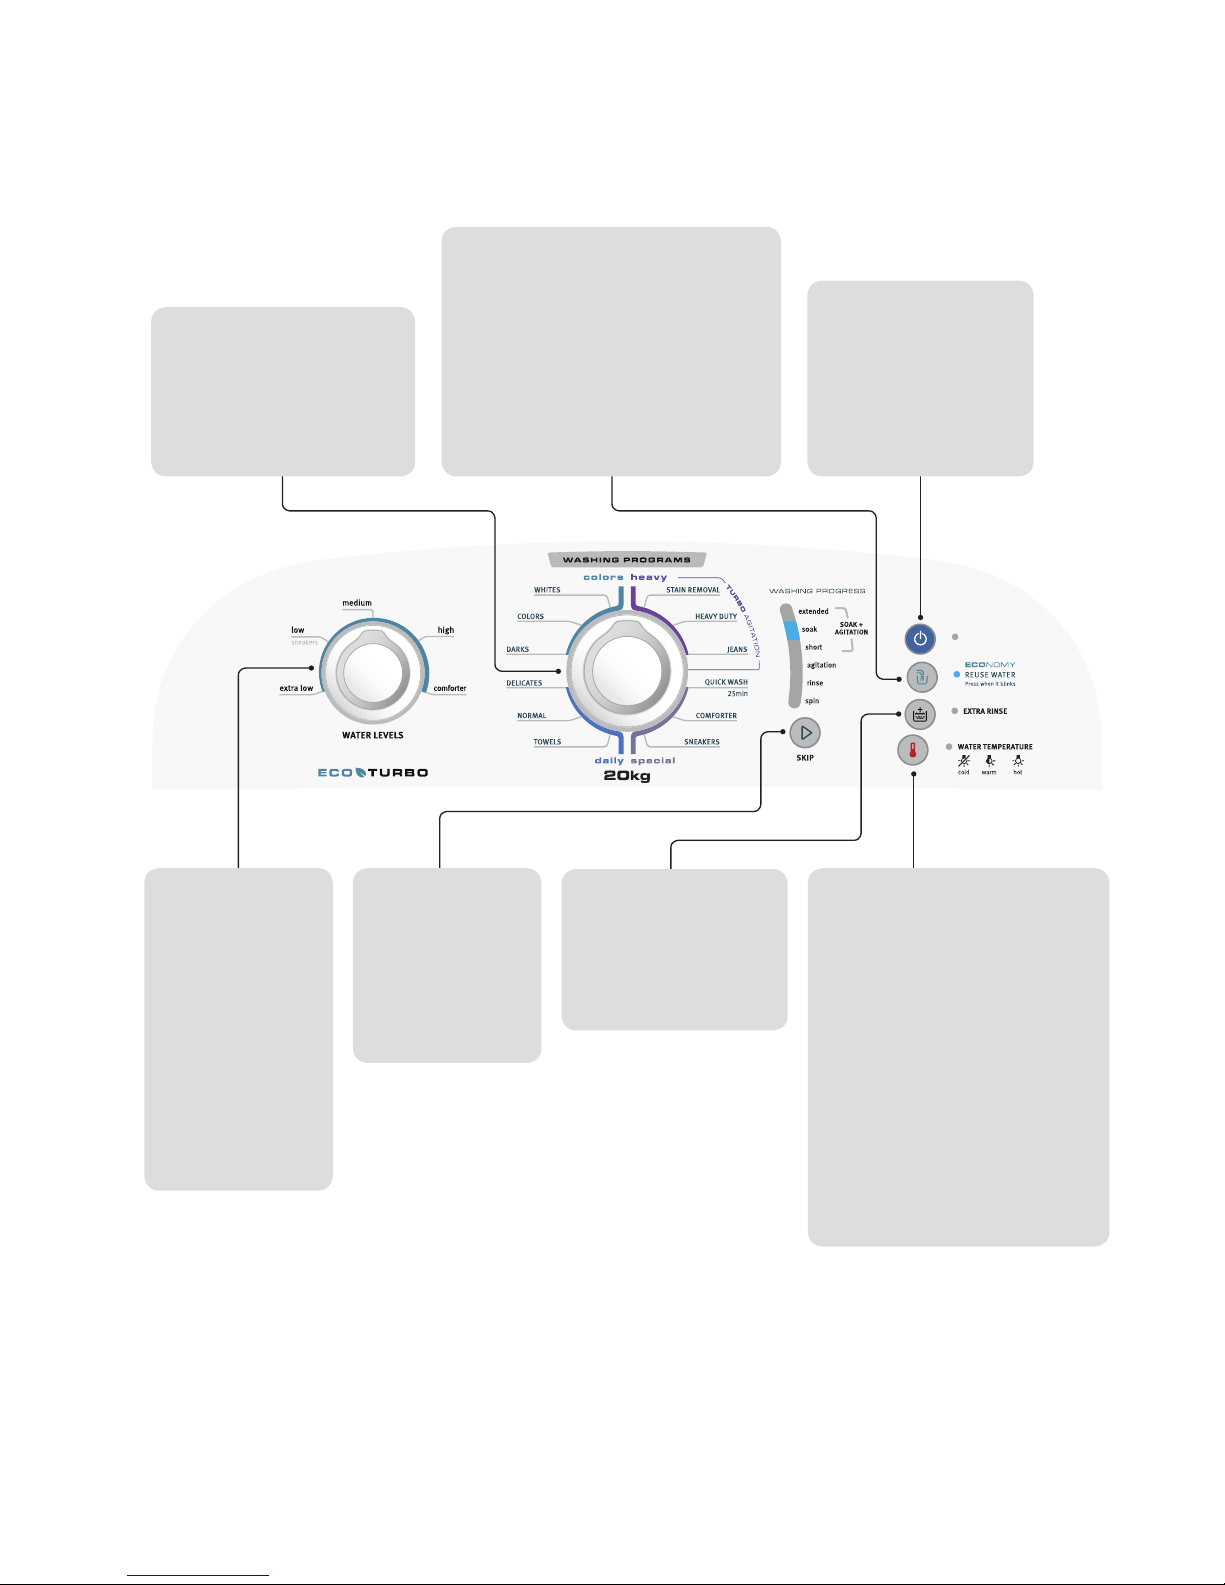
5. Panel de Control
Modelo 17 kg
Botón
PROGRAMAS DE
LAVADO
Gire este botón para
escoger el programa
deseado, de acuerdo
con el tipo de ropa
y el tipo de lavado
deseado.
Tecla TEMPERATURA DEL
AGUA
Pulse esta tecla para seleccionar
la temperatura del agua. Agua
fría - luz LED apagado - es la
configuración predeterminada.
Pulse una vez para el agua tibia
– luz LED parpadeante, pulse de
nuevo para el agua caliente – luz
LED permanece encendida, pulse
una vez más para volver al agua fría
- LED luz apagada.
Esta tecla sólo se puede
seleccionar en los seguintes
programas: Blancas, Quita
Manchas, Carga Pesada, Rápido
19, Toallas y Normal.
Tecla PRENDE/
APAGA
Presione esta tecla para
encender a la Lavadora.
La luz azul se encenderá.
Para apagar, presione la
tecla nuevamente. La luz
azul se apagará.
Botón NIVELES DE AGUA
Gire este botón hacia la
derecha o hacia la izquierda
(entre los niveles de Muy Bajo
y Alto) para elegir el nivel de
agua más adecuado a la
cantidad de ropa a lavar.
Tecla ECONOMÍA
Presione esta tecla para activar el
reciclaje del agua o para iniciar el
drenaje de reciclaje del agua. La luz azul
encendida indica que la función esta
accionada.
La luz azul intermitente indica que el
lavado está parado esperando el inicio
del reciclaje del agua.
Tecla ENJUAGUE
EXTRA
Presione la tecla para que
la Lavadora realice un
enjuague adicional. La luz
azul encendida indica que
la función está accionada.
Tecla SALTAR
ETAPA
Presione esta tecla
para Seleccionar/
Saltar las etapas de
lavado. La luz azul
indicará la etapa
seleccionada.
10
Modelo 20 kg
Botón
PROGRAMAS DE
LAVADO
Gire este botón para
escoger el programa
deseado, de acuerdo
con el tipo de ropa
y el tipo de lavado
deseado.
Tecla TEMPERATURA DEL
AGUA
Pulse esta tecla para seleccionar
la temperatura del agua. Agua
fría - luz LED apagado - es la
configuración predeterminada.
Pulse una vez para el agua tibia
– luz LED parpadeante, pulse de
nuevo para el agua caliente – luz
LED permanece encendida, pulse
una vez más para volver al agua fría
- LED luz apagada.
Esta tecla sólo se puede
seleccionar en los seguintes
programas: Blancas, Quita
Manchas, Carga Pesada, Rápido
25, Toallas y Normal.
Botón NIVELES DE AGUA
Gire este botón hacia la
derecha o hacia la izquierda
(entre los niveles de Muy Bajo
y Alto) para elegir el nivel de
agua más adecuado a la
cantidad de ropa a lavar.
Tecla ENJUAGUE
EXTRA
Presione la tecla para que
la Lavadora realice un
enjuague adicional. La luz
azul encendida indica que
la función está accionada.
Tecla SALTAR
ETAPA
Presione esta tecla
para Seleccionar/
Saltar las etapas de
lavado. La luz azul
indicará la etapa
seleccionada.
Tecla PRENDE/
APAGA
Presione esta tecla para
encender a la Lavadora.
La luz azul se encenderá.
Para apagar, presione la
tecla nuevamente. La luz
azul se apagará.
Tecla ECONOMÍA
Presione esta tecla para activar el
reciclaje del agua o para iniciar el
drenaje de reciclaje del agua. La luz azul
encendida indica que la función esta
accionada.
La luz azul intermitente indica que el
lavado está parado esperando el inicio
del reciclaje del agua.
11
ATENCIÓN
Al seleccionar un “Programa de Lavado”, la Lavadora automáticamente escoge la Etapa de Lavado más
adecuada. En este caso, el tiempo aproximado de duración de cada programa será conforme indicada en
la figura abajo:
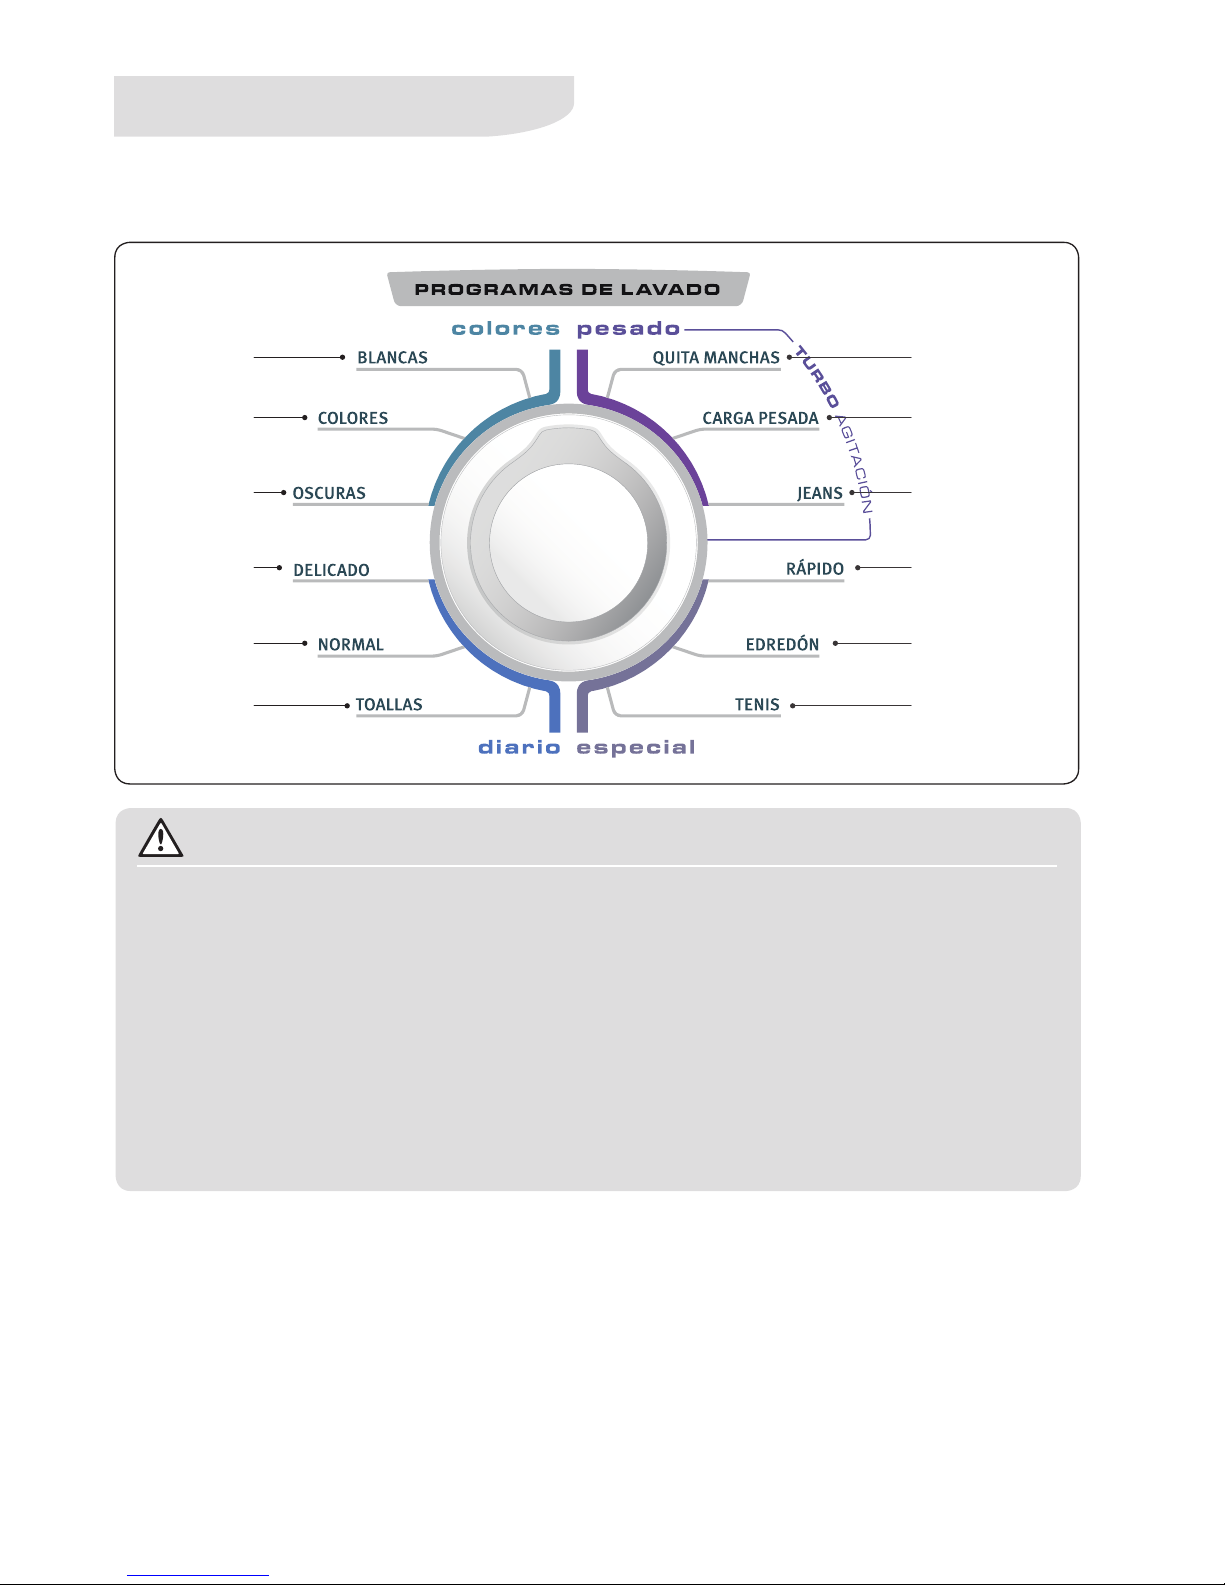
6.
Programas de Lavado
En el tiempo de duración de los programas, no se consideró el tiempo necesario para
llenar y drenar la Lavadora.
Cuando seleccionar el programa "TENIS", lavar solamente 2 pares por ciclo de lavado.
Para los programas "DELICADO" y "TENIS", la opción TEMPERATURA AGUA no puede ser
seleccionada.
El tiempo de duración de los programas no considera el tiempo adicional para la
realización del ENJUAGUE DOBLE, con excepción de los programas TENIS, TOALLAS,
OSCURAS, COLORES, DELICADO y EDREDÓN que ya realizán 2 enjuagues. Si esta tecla si
acciona en otros programas, el tiempo de duración será mayor do que el indicado arriba.
Si altera la etapa de lavado seleccionada automaticamente por la lavarropa, el tiempo
total podrá ser diferente del indicado.
1h 51 min 1h 25 min
1h 09 min
57 min 1h 14 min
3h
58 min 19 min (17kg)
25 min (20kg)
1h 05 min 1h 21 min
1h 20 min 2h
12
3. Retire los indicadores
de nivel y el dispensador
de jabón líquido (si está
en la gaveta) del interior
de la gaveta distribuidora
y lávelos.
4. Si es necesario, la parte
interior también se puede
lavar, con la ayuda de una
escova pequeña.
Las piezas de la gaveta
pueden ser limpias
utilizando agua, jabón, paño o escova pequeña
para remover los residuos.
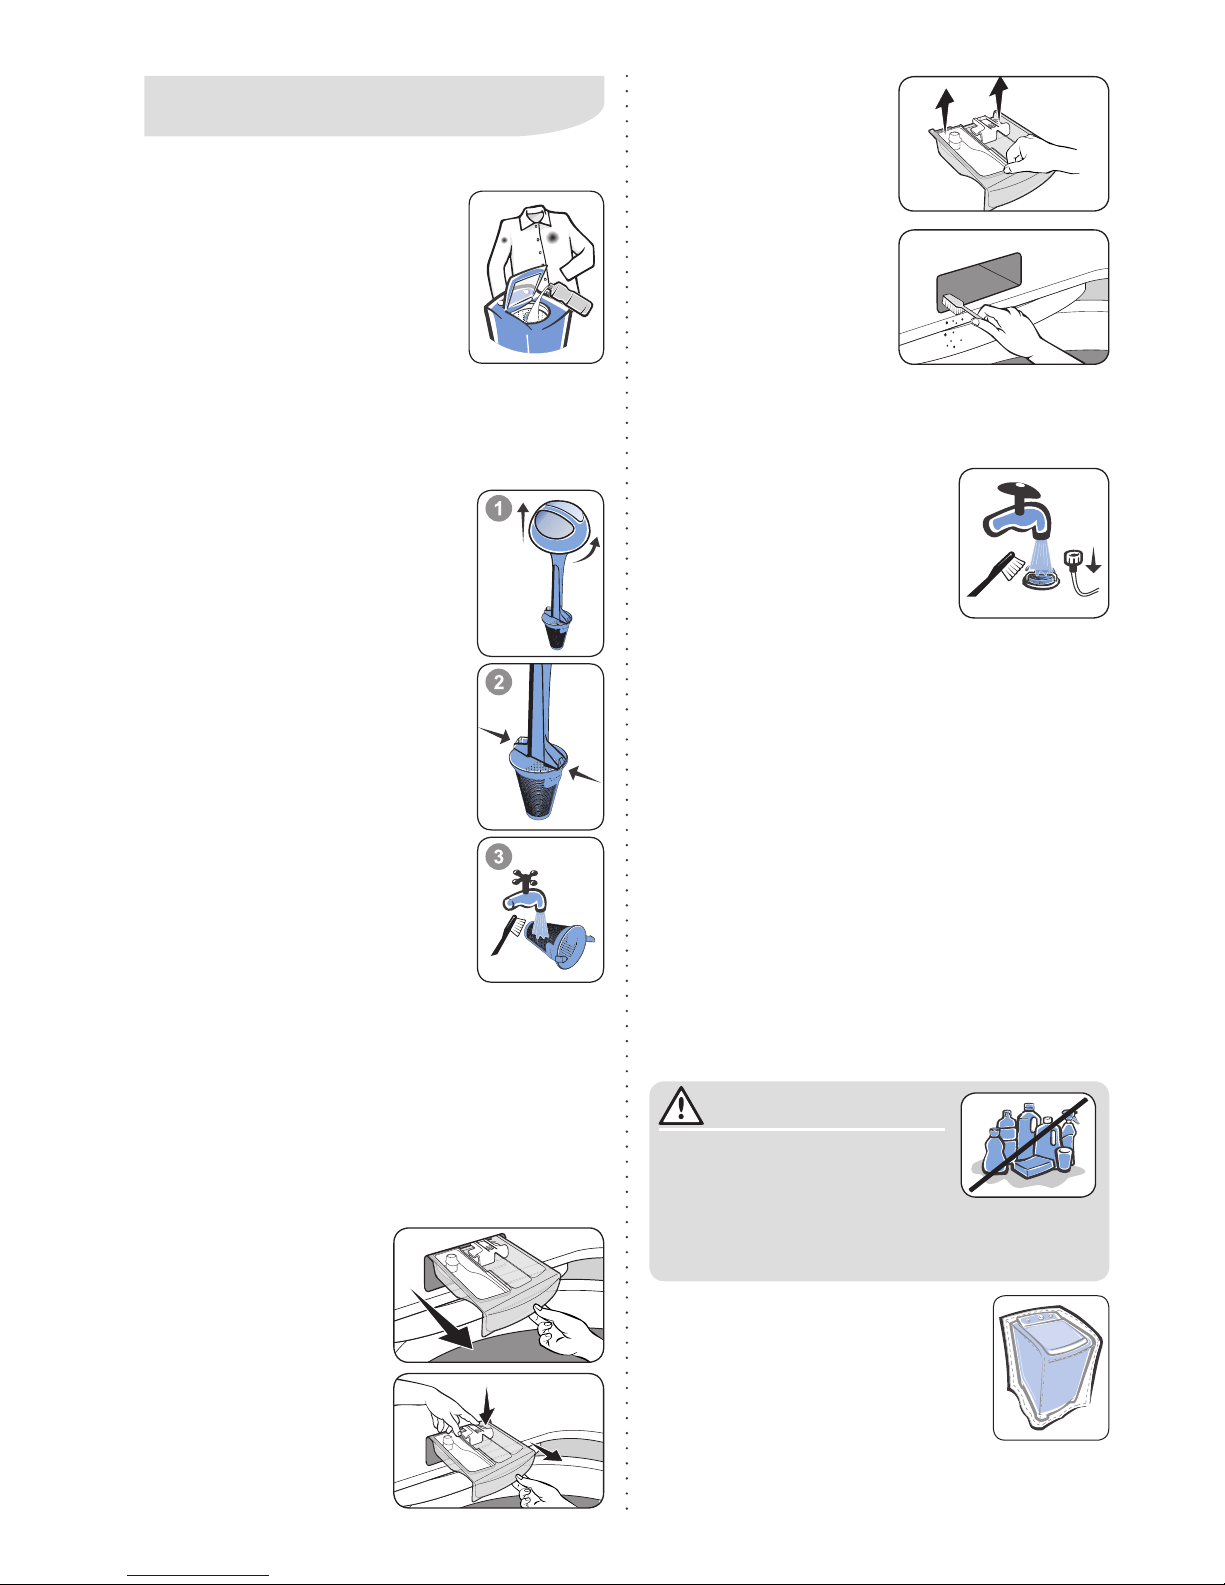
Filtro de Agua
Cierre la entrada de agua.
Desconecte la extremidad de la
manguera del grifo y retire el filtro.
Limpie el filtro con un chorro de
agua. Caso haya dificultades para
remover las impurezas, utilice un
cepillo pequeño y suave. Este
procedimiento se debe hacer periódicamente para
evitar la obstrucción de la manguera. Caso el filtro
esté dañado y necesite ser substituido, entre en
contacto con el Servicio Autorizado.
No se olvide de recolocar el filtro en la
manguera y abrir al grifo nuevamente.
La lavadora no se debe utilizar sin filtro, bajo
el riesgo de daños al producto y pérdida de
garantía.
Vidrio de la Tapa
Después de cada lavado, limpie con un paño suave
y húmedo.
Parte Externa
Limpie con agua tibia y jabón neutro. Después de
la limpieza, seque con un paño suave. Para evitar
accionamientos accidentales, se recomienda retirar
el enchufe del tomacorriente durante la limpieza.
7. Limpieza y Mantenimiento
Parte Interna
Limpie la parte interna de la
Lavadora por lo menos una vez
por mes. Coloque un litro de
blanqueador dentro del tambor.
Seleccione el nivel Alto de agua y
el programa "QUITA MANCHAS".
Deje que la lavadora complete el
ciclo para garantizar la remoción
total del blanqueador.
Esta limpieza se debe hacer para evitar manchas
en las ropas, causadas por residuos acumulados
en la lavadora en función del uso excesivo de jabón
y suavizante.
Filtro de Pelusas
El filtro de pelusas tiene como función
retener las pelusas eliminadas de las
ropas durante el lavado.
Para la conservación y eficiencia
de este filtro, se recomienda que
se limpie después de cada ciclo
de lavado.
• Para limpiar el filtro gire y tire la
tapa hacia arriba (fig 1).
• Presione las trabas laterales para
remover el filtro (fig.2).
• Retire a la pelusa y en seguida
lave en agua corriente (fig.3).
• Encaje el filtro en su alojamiento,
garantizando que esté debidamente
posicionado.
• Coloque al filtro en el agitador y
encájelo hasta el final.
Recomendaciones:
Al final de cada ciclo de lavado, limpie el
filtro. El acúmulo de pelusas en el filtro puede
causar la obstrucción de la malla, causando el
transbordamiento de la pelusa retenidos dentro del
tambor de la Lavadora.
Para limpiar el filtro, apenas use agua corriente. No
utilice productos de limpieza ni cepillos que puedan
comprometer a la malla del filtro.
Gaveta
Para limpiar la gaveta
distribuidora de la
Lararropas, haga lo
siguiente
1. Abra la gaveta en su
totalidad.
2. Para remover la gaveta,
presione la traba con una
mano y con la otra saque
la gaveta.
ATENCIÓN
Nunca limpie su Lavadora
con fluidos inflamables
como: alcohol, querosene,
gasolina, disolvente, solventes, productos
químicos o abrasivos, como: detergentes,
ácidos o vinagres.
Capa Original Frigidaire
La capa original Frigidaire se puede
adquirir en la Red Nacional de
Servicio Autorizado.

13
8. Solución de Problemas
Asistência al Consumidor
Caso su Lavadora presente algún problema de funcionamiento, verifique las probables causas y correcciones.
Caso las correcciones sugeridas no sean suficientes, llame al Servicio Autorizado que está a su disposición.
Problema Probables Causas Correcciones
Si la Lavadora no
funciona
El botón “PROGRAMAS DE LAVADO”
no está correctamente posicionado.
Posicione el botón en el programa deseado.
La tecla "PRENDE/APAGA" no está con
la luz azul encendida.
Presione la tecla y espere 5 segundos.
La Lavadora está en la etapa de
remojo.
Espere el término de remojo.
El enchufe no está conectado
debidamente en el tomacorriente.
Verifique el enchufe y el tomacorriente en el cual
está conectada la Lavadora.
El circuito eléctrico (tomacorriente,
cables, disyuntores) está en malas
condiciones.
Verifique el circuito eléctrico. Caso sea necesario,
llame a un electricista.
Falta de energía eléctrica. Espere el retorno de la energía.
La tapa de la Lavadora está abierta. Cierre la tapa.
Se usó un adaptador para
tomacorriente o extensión.
No utilice adaptador, cambie el tomacorriente. No
utilice extensión
La tensión de la red está baja.
Llame a un electricista para verificar la
tensión de la red de su residencia.
La tensión está incorrecta. Verifique la tensión correcta para su Lavadora.
Si la agitación
está lenta
El programa de lavado "DELICADO" fue
seleccionado.
Durante el lavado delicado, la agitación es más
lenta para no dañar la ropa. No necesita corrección.
Si la Lavadora
no drena/no
centrifuga
La manguera de salida de agua está
demasiado alta.
Posicione la manguera a una altura máxima de 140 cm.
La manguera de salida está con la
punta sumergida en agua.
No deje a la punta de la manguera de salida
sumergida cuando el tanque esté lleno.
La tapa de la Lavadora está abierta. Cierre la tapa.
La manguera de salida de agua está
doblada o estrangulada.
Desobstruya la manguera.
Si la Lavadora
presenta
vibraciones/
ruidos
La Lavadora no está nivelada. Nivele la Lavadora.
La Lavadora está encostada en la
pared o en algún mueble.
Aparte a la Lavadora.
La ropa está mal distribuida en el
tambor.
Distribuya bien a las ropas y no las enrolle en el
agitador.
La base del embalaje no fue removida. Retire todo el embalaje.
Ruidos durante la centrifugación.
La bomba de drenaje permanece encendida
causando un ruido característico, lo que es normal.
Ruidos durante el inicio de la
centrifugación.
Es normal que ocurra contacto interno entre el
tambor y la lateral de la lavadora. Eso no afecta el
funcionamiento de la lavadora.

14
Problema Probables Causas Correcciones
Si la Lavadora se
llena y drena al
mismo tiempo
Se colocaron más de 20 cm de la
manguera en la salida del desagüe.
Coloque a la manguera a un máximo de 20 cm en
la salida del desagüe.
La manguera de salida de agua fue
enmendada.
La manguera de salida de agua no se puede
enmendar. Verifique la instalación hidráulica de la
residencia.
La manguera de salida de agua está
demasiado bajo.
Posicione la manguera de salida de agua a una
altura mínima de 90 cm.
Ruido de agua
dentro de la
Lavadora
Sistema de equilibrio.
Es normal, pues la Lavadora posee un sistema de
equilibrio con un líquido que permanece dentro
de anillo del tambor. Este líquido fue desarrollado
especialmente para no causar daños a la Lavadora.
El agua no entra
en la Lavadora
El grifo está cerrado. Abra al grifo para que entre agua.
El filtro de la manguera de entrada de
agua está entupido.
Limpie el filtro.
No sale agua del grifo. Verifique el sistema hidráulico de la residencia.
La manguera de entrada de agua está
doblada o estrangulada.
Desobstruya la manguera.
La tensión esta incorrecta. Verifique la tensión correcta para su Lavadora.
Si el suavizante/
blanqueador sale
antes de tiempo
Se ultrapasó el nivel máximo. No ultrapase el nivel máximo de la gaveta.
Si el suavizante
no sale
Suavizante demasiado viscoso
(espeso).
Diluya al suavizante con un poco de agua.
Si la ropa
permanece
manchada
Cantidad excesiva de suavizante y/o
jabón.
Use la cantidad recomendada en la página 7.
El agua de la residencia está sucia. Instale un filtro en el grifo.
No se ha limpiado la parte interna de
la lavadora.
Limpie a la Lavadora de acuerdo con Limpieza y
Mantenimiento en la página 12.
Se misturaron ropas con tipos y colores
de tejidos muy diferentes
Separe a las ropas de acuerdo con el tipo y color
de tejido conforme Sugerencias y Consejos en la
página 16.
La ropa no es adecuada para lavar en
la Lavadora.
Observe instrucciones en la etiqueta de la ropa. Ver
también Símbolos Internacionales en la página 17.
Si existen pelusas
en la ropa
Se misturaron ropas de tejidos
diferentes.
Separe las ropas conforme Programas de Lavado
en la página 11 o conforme Sugerencias y
Consejos en la página 16.
Filtro de pelusa sucio. Limpie el filtro de pelusas.
Si el tambor baja Sistema de suspensión de la Lavadora.
Es normal que el tambor baje cuando está lleno de
agua y ropa.
Si la tapa no abre
La traba de seguridad está accionada.
La Lavadora está en la etapa de
centrifugación.
Aguarde algunos minutos para liberar la tapa (ver
página 2).

15
Problema
Probables Causas Correcciones
Si la luz azul de
las opciones
de lavado no se
enciande y la
tecla emite una
señal sonora
intermitente
cuando es
accionada
La opción de lavado seleccionada
no es permitida para el programa
seleccionado, por ejemplo:
- programa "DELICADO" + opción
"TEMPERATURA AGUA".
No accione esta opción de lavado para ese programa.
La etapa de lavado está en enjuague.
No es permitido accionar ninguna acción de lavado
cuando la lavadora ya está en la etapa enjuague.
Si la luz azul de
la tecla Prende/
Apaga permanece
intermitente
Lavadora conectada a la tensión
incorrecta.
Conecte a la lavadora en la tensión correcta.
Si después del
inicio del lavado,
la luz azul no se
enciende y la
tecla emite una
señal sonora
intermitente al
intentar activar
una de las
opciones de
lavado
No es posible activar esta opción
durante la ejecución de una etapa del
ciclo.
Active la opción antes del inicio de la etapa o del
ciclo.

16
ATENCIÓN
9.
Sugerencias y Consejos
• Siempre busque leer las recomendaciones de
lavado de la etiqueta de las ropas antes de lavarlas
para que las mismas no se dañen.
• Las ropas blancas y coloridas se deben lavar
separadamente para evitar la transferencia de
colorantes entre las piezas que pueden causar
manchas.
• Para verificar si la ropa descolora, humedezca
una parte de la ropa, coloque un pedazo de tejido
blanco sobre el área humedecida y pase con una
plancha caliente. Si el color del tejido se mancha
el tejido blanco, la ropa descolora.
• Solo lave tejidos que permiten el uso en lavadora
siguiendo las instrucciones indicadas en las
etiquetas de las ropas.
• No use blanqueador en ropas de lana, seda, cuero
y lycra-elastano, para no dañarlas.
• Lave separadamente a las ropas de algodón y
lino separadas de las ropas de material sintético
(nylon, elastano…) ya que cada tipo de tejido
requiere un lavado diferente.
• No use productos químicos apropiados para
limpieza en seco.
• No utilice a la Lavadora para engomar ropas.
• Cuando se ausente de su residencia por un
periodo prolongado, se recomienda desconectar
a la Lavadora del tomacorriente y cerrar el grifo de
entrada de agua.
• Para obtener un mejor desempeño de la Lavadora
y evitar daños a las ropas, se recomienda
que siempre coloque a las ropas pesadas y/o
voluminosas debajo.
Eliminación de Manchas
Es posible que determinadas manchas no se
eliminen con agua y jabón. Por tanto, aconsejamos
cuidados especiales antes del lavado.
• Sangre: Enjuague con agua fría, aplique agua
oxigenada (volumen 10) sobre la mancha y lave
normalmente.
• Grasa: Aplique talco sobre la mancha, espera
algunos minutos, retire el exceso de talco y lave
normalmente.
• Herrumbre: Aplique mistura de sal y limón o
producto específico contra moho, deje actuar por
algunos minutos y lave normalmente. En manchas
antiguas, la estructura del tejido puede haber sido
atacada y puede rasgar con más facilidad.
• Moho: Lave con blanqueador a las ropas blancas
resistentes al cloro. Para ropas coloridas, no
resistentes a cloro, lave la región manchada con
leche.
• Tinta esferográfica: Coloque la región manchada
sobre tejido absorbente, humedezca con acetona
(excepto en seda artificial) o alcohol, estregue con
un cepillo y lave normalmente.
• Lápiz Labial: Aplique acetona (excepto en seda
artificial) o alcohol sobre la mancha, deje actuar
por algunos minutos y lave normalmente.
Protegiendo el Medio Ambiente
Si tiene que lavar una cantidad menor de ropas,
coloque solo la cantidad adecuada de agua usando
el botón “NIVEL DE AGUA”.
Aproveche el agua del lavado y enjuague para
otros servicios de limpieza como en pisos y aceras.
Para esto, basta seleccionar la tecla “ECONOMÍA”
direccionando la manguera de salida de agua para
el tanque o cubo. Para agotar al agua, seleccione la
tecla “ECONOMÍA” que estará intermitente.
Evite colocar demasiado jabón para no tener que
repetir el enjuague desnecesariamente.
•
Retire los objetos de los bolsillos (clavos, palitos, alfileres, clips, tornillos,
monedas, etc.) Éstos pueden causar daños serios a la Lavadora y a las ropas,
pudiendo ocasionar la pérdida de la garantía.
• Coloque piezas pequeñas dentro de fundas de almohadas o sacos apropia-
dos para no dañarlos.
• Cierre los botones de presión y cremalleras para que no se dañen y no se
enganchen en otras ropas.
• Refuerce o retire los botones flojos.
• Se recomienda no lavar las ropas y cobertores de animales domésticos,
pues el exceso de pelos puede dañar a la lavadora.
• Se recomienda no reparar o remendar las piezas irregulares para que no se dañen.
• Para lavar cortinas, amarre la parte que contiene las ruedas y/o ganchos dentro de un saco apropiado
para el lavado de ropas, de esta forma eliminando la necesidad de retirarlos.

17
Peso de las Ropas
La capacidad máxima de esta Lavadora se refiere a
una carga estándar de 17 kg o 20 kg, compuesta
por sábanas, fundas de almohada y toallas de
algodón, cuya composición, dimensión y peso son
especificados bajo normas internacionales.
La tabla de peso de las ropas presentada en la
siguiente página es orientativa. Para un buen desarrollo
de su producto, se debe considerar el volumen de
las ropas, prevaleciendo sobre el peso de las ropas.
Por ejemplo, artículos con relleno de espuma, tejidos
sintéticos y edredones pueden estar abajo del límite de
capacidad. Sin embargo, el volumen es mayor que la
capacidad del tambor y no permite el acomodamiento
de 17 kg o 20 kg de ese tipo de ropa.
Por otro lado, tejidos pesados (ejemplo: jeans,
toallas de ducha) que quedan compactados dentro
del tambor de la lavadora pueden perjudicar el
desempeño de
lavado.
10. Símbolos Internacionales
Estos símbolos son presentados en las etiquetas
de las ropas con el objetivo de ayudar a seleccionar
la mejor manera de tratarla.
Tabla de Peso de las Ropas
Peso orientativo de ropa seca
Tipo de Ropa Peso (g)
Pañal 50
Roupa Interior 50
Camiseta 150
Camisa 250
Pantalón de Brin /Jeans 800
Pantalón de Brin /Jeans Infantil 400
Conjunto Sudadera Adulto 700
Conjunto Sudadera Infantil 500
Pijama 400
Funda 120
Sábana Individual 500
Sábana Doble 800
Cubierta Individual 1.000
Cubierta Doble 1.300
Toalla de Rostro 200
Toalla de Ducha 500
Toalla de Mesa 500
Paño de cocina 80
Edredón Individual 900
Edredón Doble 1.800

18
11. Diagrama Eléctrico
LEYENDA/LEGEND
BR
PR
VM
AZ
CZ
LR
AM
LI
AZCL
VD-AM
MR
RS
BLANCO
NEGRO
ROJO
AZUL
GRIS
NARANJA
AMARILLO
LILAS
AZUL CLARO
VERDE-AMARILLO
MARRÓN
ROSA
WHITE
BLACK
RED
BLUE
GRAY
ORANGE
YELLOW
PURPLE
LIGHT BLUE
YELLOW-GREEN
BROWN
PINK
BOARD
AC1
AC2
CCW
CW
1
2
3
4
5
6
7
8
9
10
11
CN2
PMP
BRK
SFT
ECO
HT1
HT2
CLD
IN0
IN1
LID
PRS
D0
COM
-5V
D1
D2
D3
1
2
3
4
5
6
CN3
INTERFACE
12345
6
BOARD
POWER
FLAT CABLE
12345
6
CN4
CONECTOR
DE SERVIÇO
1
2
3
4
5
6
7
8
9
CN1
TMR
127/220V
1 (MR)
PTC
2
3
4
LID LOCK
2 (MR)
8 (AZ)
8 (AZ)
COLD VALV E
SOFTENER VALVE
14 (LR)
13 (BR)
19 (CZ)
6 (CZ)
20 (CZ)
4 (CZ)
1
2345678
3 (CZ)
17 (AM)
7 (PR)
13 (BR)
14 (LR)
18 (AZ)
18 (AZ)
12 (RS)
12 (RS)
(RS)
(RS)
9 (AM)
9 (AM)
10 (VM)
10 (VM)1111 (LI)
17 (AM)
EMENDA
1 (VD-AM)
3 (RS)
7 (AM)
INDUCTOR
CAPACITOR
M
1
2
3
CLUTCH
Motor
MOTOR
Pump
9 (CZ)
1234567
8
16 (VD-AM)
16 (VD-AM)
2 (AM)
4 (LI)
5 (VM)
8 (CZ)
10 (CZ)
6 (VM)
6 (VM)
15 (RS)
(RS)
TOP HARNESS
BOTTOM HARNESS
13 (CZ)
5 (CZ)
22
PRESSURE SENSOR
21 (AZ)
14 (VM)
2 (AM)
4 (LI)
3 (RS)
11(AZ)
11(AZ)
HOT VALVE
22
6 (CZ)
Retire al cable eléctrico del tomacorriente antes de ejecutar cualquier reparo o
manutención para no ocurrir el riesgo de choque eléctrico. El descumplimiento de esta
recomendación puede resultar en serios daños o muerte.
ATENCIÓN

19
12. Especificaciones Técnicas
Consumo aproximado de agua
Consumo aproximado de agua por ciclo (en vacío y sin Enjuague
Extra y con presión de entrada de agua de 0,24 MPa)
Nivel de agua 17 kg 20 kg
Muy Bajo 90 litros 100 litros
Bajo/Tenis 122 litros 126 litros
Medio 159 litros 172 litros
Alto/Edredón 204 litros -
Alto - 207 litros
Edredón - 238 litros
*Esta capacidad se refiere a una carga estándar, compuesta por sábanas, fundas de almohada y toallas de algodón.
**Con la lavadora vacía y tensión nominal.
Esta Lavadora se debe utilizar solo para uso doméstico.
IMPORTANTE
Tensión máxima y mínima
127 V 220 V
Mínima: 116 V Mínima: 201 V
Máxima: 133 V Máxima: 231 V
Modelo 17 kg 20 kg
Tensión 127/220V 127/220V
Peso neto 47,5 kg 49 kg
Dimensiones (altura × ancho × profundidad) 102 × 66 × 73 cm 102 × 66 × 73 cm
Altura máxima con la tapa abierta 143cm 143cm
Número de programas 12 12
Capacidad de ropa seca * 17 kg 20 kg
Frecuencia 60 - 50 Hz 60 - 50 Hz
Rotación na centrifugación ** 727 rpm 729 rpm
Presión de entrada de agua
2,4 a 81 metros de columna
de agua (0,02 a 0,81 MPa)
2,4 a 81 metros de columna
de agua (0,02 a 0,81 MPa)

20
In this manual you will find all information for your
safety and proper use of your washing machine.
Read all instructions before using it and keep them
for future reference.
The identification label where the information code,
model, manufacturer and others are, will be used by
the Frigidaire Service Station if your machine needs
repair. Do not remove the local where it is attached.
Environmental tips
The packaging material is
recyclable. Try to select plastics,
paper and cardboard to be sent
to recycling companies.
This device can not be treated
as household waste. Instead,
you must provide the selective collection center
for recycling electrical and electronic equipment.
User Manual
For children
Avoid accidents. After unpacking the machine, keep
the packing material away from children. Do not
allow the machine to be handled by children, even
if it is off. Children should be supervised to ensure
they do not use the devices as a toy.
For User / Installer
1. Safety
Index
This product is not intended for use
by persons (including children) with
physical, sensory or mental capabilities,
or by persons with no experience and
knowledge, unless they have received
instructions regarding the use of the
product or under the supervision a person
responsible for their safety.
Turn the washing machine off from the
socket during cleaning or maintenance.
Never disconnect the washing machine
from the socket pulling on the cord. Use
the plug.
Do not change the plug of your washing
machine. If the power cord is damaged,
it must be replaced by the manufacturer,
his service station or a similarly qualified
in order to avoid risk.
Make sure that the washing machine does
not rest over of the cord.
It is dangerous to change the specifications
or characteristics of the machine.
Never install the washing machine over
sewage drains, because the foam which
returns from it can damage the product.
Never install the washing machine on
carpets.
IMPORTANT
Safety System
Your machine has a safety lock on the lid to
avoid accidents. This lock is actuated only during
spinning.
After spinning or after any interruption of the
spinning, wait a few minutes to release the
lid. This time is enough to prevent accidents.
WARNING
Never leave lit candles or incense on the
product, at risk of fire.
1. Safety
2. Washing Machine description
3. Installation
4. How to use
5. Control Panel
6. Washing Programs
7. Cleaning and Maintenance
8. Troubleshooting
9. Tips and Advices
10. International Symbols
11. Electrical Diagram
12. Technical Specifications
20
21
23
25
27
29
30
31
34
35
36
37

21
Best-Cleaning System (only in
FWAB17M3EEPW/ FWAB17M5EEPW
models)
The dual action agitator has two
parts. The upper part, which has
the function of pushing down
the clothes, and the bottom part,
which effectively makes the clothes
washing. During agitation, the drum
may eventually turn, depending on
the water level and the amount of
clothing.
Extra Rinse Option
Its function is to provide an
extra rinse.
Water Temperature Option
Allows you to choose
the water temperature
of washing among cold,
warm or hot.
Economy Option
This function is used when
you want to reuse the
washing and/or rinsing water.
Intelligent Diluter
Makes a prior mixture of
bleach and softener with
water to prevent these
components fall directly on
clothing causing stains.
2. Washing Machine description
Parts
1. Control Panel (see pages 27 and 28)
2. Soap, softener and bleach dispenser
3. Agitator (inside the machine)
4. Drum (inside the machine)
5. Lid
6. Leveling leg (4)
7. Water inlet hose and filter (already connected
to the hose)
8. Water outlet hose (behind the machine)
9. Plastic curve from outlet hose
10. Lint filter (inside the machine)
11. Removable dispenser for liquid soap
12. Bleach and softener level indicator
13. Power cord
14. Wrench to level the feet
DILUIÇÃO
INTELIGENTE
22
SNEAKERS PROGRAM
Specially developed to wash sneakers.
Washing procedure:
1. Remove the sneakers
shoelaces. It is not
necessary to remove the
insole of the sneakers for
washing.
2. Place a maximum of
two pairs per cycle in
the drum.
3. Put the minimum level of soap in the dispenser.
4. Close the lid.
5. In the WATER LEVELS button select the level Low/
Sneakers and in the WASH PROGRAM button,
select the sneakers program.
6. Turn the machine ON.
7. At the end of the washing cycle, remove the
sneakers.
Recommendations
• Before placing the sneakers in the washing
machine, check the washing recommendations
described by the sneakers manufacturer.
• Remove from insole solid waste (stones, clay,
gum, etc.) before washing the sneakers in the
washing machine.
• Never wash clothes along with sneakers.
• Always remove the shoelaces of your sneakers
before washing to prevent them becoming
wrapped in the agitator.
• Do not put the shoelace LOOSE inside the washing
machine.
• Distribute the shoes in the drum.
• Do not use bleach and/or softener for washing
sneakers.
• Cannot be washed shoes with very rigid soles,
with locks or fittings (football bots or sneakers for
bicycles), safety shoes (with metal or plastic toe)
or any type of footwear that may compromise the
washing machine and accessories, as well as
damage some detail the shoes itself.
WATER REUSE
Economy Option
This function is used when you want to reuse the
water of washing and/or rinsing. To set it, press the
Eco Water Reuse key.
The Washing machine makes all the washing
program selected and, before the drainage step,
remains in stand by, with the LED flashing. At this
moment the options of re-use below must be used:
1. Water reuse in the clothes washing
When the LED starts blinking, turn the washing
machine off, open the lid and remove the washed
clothes. Put the dirt clothes in the water with soap,
close the lid, select the washing program and turn
the washing machine on, pressing the ON/OFF key.
• When reuse water for washing, separate
the adequate quantity of clothes
observing the quantity of water in the
washing machine.
• Never reuse water with softener for
washing because the clothes can spot.
• Wash the clear and less dirty clothes
before the most dirty and dark to avoid
spots in them.
After using the water reuse in the
drainage, you must replace the drain
hose in the spin bowl border or in the
sewer inlet.
IMPORTANT
IMPORTANT
2. Water reuse in drainage
The LED will be blinking until the ECONOMY key is
pressed to release the drainage step. To reuse the
water position the water exit hose in the recipient
that will store the water (pail, tank or basin), and
press the ECONOMY key.
To stop the drainage just press the ECONOMY key
again or open the lid: the washing machine will be
in stand by until press the ECONOMY key or close
the machine lid.

23
3. Installation
For your tranquility call the Frigidaire Service Station
to install your washing machine. Installation fee is
charged for this service.
Unpacking
Lift the product with the help of
another person, and remove the
package base.
Remove the whole packagebefore
turn the product on.
Location
Avoid installing your product
under clotheslines and places
exposed to rain, excessive
moisture or leaks (eg bathroom).
Never throw water on the panel of
the product, as it may damage it.
For panel cleaning, use only a
damp cloth.
Leveling
Be sure the washing machine is
resting properly.
Fill it with water at low level and
check if water is accompanying
the drum holes on the same line.
If it is not, adjust the feet, adjust
the feet by rotating them manually.
All feet must be supported on
the floor. This will prevent shake
and noise.
Do not use feet different from
the original ones.
Electrical installation
WARNING
Before connecting your
product, check if the voltage
in the socket where the
product will be plugged
is the same to the voltage
indicated on label located
near the plug (power cord).
There is a protection to prevent damage to the
electrical system of your washing machine.
If your washing machine 127V is connected to a
voltage different from the label (220V) or if your
machine 220V is connected to a voltage different
from the label (127V), an automatic recognition
system of voltage will not allow the washing machine
to works. However, it will not cause any damage
to the electrical system of the machine. In these
cases, the light blue of the ON / OFF key will blink.
Disconnect the plug from the outlet and see if the
voltage is correct.
If the outlet of your residence is still in the old
standard, we recommend its replacement and
adjustment with an electrician you trust.
Remember that to take advantage of the progress
and safety, it's necessary to ground the outlet, as the
electrical installation standard. If in doubt, consult a
professional in the area.
WARNING
Connect your product to
an exclusive socket, do not
use extension cords or T
type adaptors. Do not use
adaptors.

24
Ground Wire
If your washing machine has a ground wire (green
or green/yellow) near the power cord it must be
connected to a suitable grounding point. Do not
connect the ground wire to taps, water, electric or
gas pipes or to the neutral wire.
If your machine is equipped with a 3-pin plug,
connect it to an appropriate grounded outlet. The
ground wire pin of the plug cannot be cut.
Circuit breakers
It is mandatory to install an exclusive circuit breaker
for the washing machine. If in doubt regarding the
electrical system of your residence, consult the
energy provider.
For a 127V washing machine, use a 20A circuit
breaker in phase.
Voltage 127V
Phase wire
Ground wire
Circuit
breaker
20A
Neuter
Outlet
Plug
Voltage 220V
For a 220V washing machine (between two phases),
use a 15A bipolar circuit breaker.
Phase wire
Ground wire
Bipolar
circuit
breaker
15A
Outlet
Plug
Voltage 220 V - Monophase
Some areas have 220V between phase and neutral.
In this case, use a circuit breaker of 15A in phase.
Phase wire
Ground wire
Circuit
breaker
15A
Neuter
Outlet
Plug
The hose has a filter that prevents
admission of any kind dirt that can
come through the water supply net. The
machine cannot be used without the
filter, this could damage the machine and
would cause lost of warranty.
A new set of hoses is provided and must
be installed in this product. Do not use
old hoses.
IMPORTANT
Hydraulic installation
Water inlet hose (1)
Attach the end of the hose that comes loose on
faucet, so it is fully threaded (2).
Open the faucet and check for leaks. It is required to
use a faucet at water inlet with thread 3/4".
The use of low quality faucet will damage the hose
of your washing machine causing water leakages.
Water outlet hose (3)
Place the hose in the drain outlet or at the edge of
the laundry sink (4) with a maximum height of 140cm
and a minimum of 90cm for the proper operation
of your product.
Place the hose into the tube in a maximum of 20cm
in the drain outlet.
When putting the hose on the edge of the laundry
sink, make sure the hose end is not submerged
in water tank, because the water can return to the
inside of the washing machine.
Never attach the drain hose in another hose to
increase the length; it may damage the internal
system of water outlet.

25
2,4m
4. How to use
1º
2º
3º
For the best performance of your washing machine,
follow the instructions below:
17kg
20kg
Water Pressure
To ensure a proper filling pressure, there must be
a minimum height of 2,4 m between the base of
the water reservoir and the washing machine inlet.
Note: The water inlet pressure must be between
0.02 to 0.81 MPa (2.4 to 81 meters water column).
If the water pressure of residence is higher, use a
pressure reducer. In some places, it is possible that
the water supplied is dirty. In this case, install a filter
in the faucet to avoid stains on clothes.
This filter can be bought at Frigidaire Service Station.
Softener: Place the softener until the MAX
indication in the dispenser. If this level is
exceeded, the softener will leave before the
proper time and may cause stains on clothes.
Always use good quality fabric softener and
the recommended
amount. Softeners concentrates are most
recommended.
Dilute fabric softener in some water before fill
the dispenser.
Clothes
Quantity
Water
Level
Soap
Quantity
Conforter Conforter Min.
until 17kg Conforter Max.
until 9kg High Max.
until 7kg Medium Med.
2 pairs of sneakers Low/Sneakers Min.
until 4kg Low/Sneakers Min.
until 2,5kg Extra Low Min.
Clothes
Quantity
Water
Level
Soap
Quantity
Conforter Conforter Min.
until 20kg Conforter Max.
until 11kg High Max.
until 8kg Medium Med.
2 pairs of sneakers Low/Sneakers Min.
until 4,5kg Low/Sneakers Min.
until 3kg Extra Low Min.
Sort laundry by color
and fabric type.
Unfold the clothes
and put them piece
by piece in small
piles, distributing
them evenly around
the agitator, careful
not to wrap the clothes on it. Heavy and bulky
items must be placed first so that they are
below. (see the weight clothes on page 35).
Put the soap in the dispenser. Always use
a good quality soap and do not exceed the
recommended amount, to not damage your
product and prevent stains on clothes.
Your machine has a special compartment for
liquid soap. Note: The amount of soap can
be changed for very dirty clothes. Make the
adjustment according to the level of dirt.
See the recommended amount in tables below.

26
Select the water level according to the
amount of clothing. The amount of water
can also be changed depending on the
amount of laundry. Too bulky clothing when
dry, may indicate a higher level of water than
necessary. Make adjustment according to
the laundry. The clothes should move freely
during wash. During the water inlet process,
the washing machine lid must remain closed
Turn the product on by pressing
the ON/OFF key. A blue light will
light next to the key indicating
the machine is ON.
After pressing the ON/OFF key, the
programming may still be changed. After
this change wait 5 seconds for the washing
machine starts working again.
If you stop the washing process before
the end of the complete cycle (examples:
blackout, the ON/OFF key pressed), when
turns the washing machine ON again, the
cycle restarts.
Bleach (liquid only): Place the bleach
until the MAX indication in the dispenser. If
this level is exceeded, the bleach will come
out before the proper time and may cause
stains on clothes.
Use the appropriate bleach according to the
type of clothes. We recommend using bleach
only for white clothes. For colored clothes
use use special bleach; common bleach
can stain them.
The use of softener and bleach is
optional.
Using button WASHING PROGRAMS,
select the type of program you want to run
according to clothes to be washed. This
button can be turned to both sides.
DILUIÇÃO
INTELIGENTE
4º
8º
9º
10º
5º
6º
7º
During the filling of
your machine, you
can not see the water
falling directly on the
clothes. The filling both washing and rising, is
done by Intelligent Dilution. The water enters
by the dispenser carrying soap, bleach or
softener.
The mixture is first directed to the Intelligent
Dilution, where is previously dissolved/
diluted. Then this mixture (already dissolved/
diluted) is driven directly to the drum bottom,
ie the filling process of your washer happens
from drum bottom up.
If you want, use the
washing options
by pressing the
corresponding key:
- Economy;
- Extra Rinse;
- Water Temperature.
The options are independent. You can use in
any combination.
If you want to change the
washing steps, press the
SKIP STEP key until the
indicator light is in the
desired position.
Wait 5 seconds and the machine starts
working. At the end of each program the
washer automatically turns OFF and the
blue light next to the ON/OFF key turns OFF.
WARNING
Do not fill the washing
machine with the help of a
bucket or hose.
17kg 20kg

27
5. Control Panel
WATER LEVELS
button
Turn this button
to the right or to
the left (between
levels of Extra
Low and High)
to choose the
most appropriate
level of water to
the amount of
laundry.
WASHING PROGRAMS
button
Turn to select the desired
program, according to the
type of clothing and the
desired type of washing
EXTRA RINSE key
Press this key to
perform an extra rinse.
The blue light indicates
that the function is
activated.
ON/OFF key
Press this button to
turn the machine ON.
The blue light comes
on. To turn OFF, press
the key again. The
blue light will turn off.
SKIP STEP key
Press this key
to select the
washing steps.
The blue light
indicates the
selected step.
ECONOMY key
Press this key to activate the reuse
of water or to start the drainage of
water reuse.
The blue light lighted indicates the
function is activated. The blue light
flashing indicates the washing is
stopped, waiting for the beginning
of the water reuse.
Model 17kg
WATER TEMPERATURE key
Press it to select the water
temperature. Cold water - LED
off - is the default setting.
Press once for warm water
- flashing LED, press for hot
water - LED stays on, press
again to return to the cold
water - LED light off. This key
can only be selected in the
following programs: Stain
Removal, Heavy Duty, Quick
Wash 25, Bedding & Towels,
Normal and White.
28
Model 20kg
WATER LEVELS
button
Turn this button
to the right or to
the left (between
levels of Extra
Low and High)
to choose the
most appropriate
level of water to
the amount of
laundry.
WASHING PROGRAMS
button
Turn to select the desired
program, according to the
type of clothing and the
desired type of washing
EXTRA RINSE key
Press this key to
perform an extra rinse.
The blue light indicates
that the function is
activated.
ON/OFF key
Press this button to
turn the machine ON.
The blue light comes
on. To turn OFF, press
the key again. The
blue light will turn off.
SKIP STEP key
Press this key
to select the
washing steps.
The blue light
indicates the
selected step.
ECONOMY key
Press this key to activate the reuse
of water or to start the drainage of
water reuse.
The blue light lighted indicates the
function is activated. The blue light
flashing indicates the washing is
stopped, waiting for the beginning
of the water reuse.
WATER TEMPERATURE key
Press it to select the water
temperature. Cold water - LED
off - is the default setting.
Press once for warm water
- flashing LED, press for hot
water - LED stays on, press
again to return to the cold
water - LED light off. This key
can only be selected in the
following programs: Stain
Removal, Heavy Duty, Quick
Wash 25, Bedding & Towels,
Normal and White.

29
1h 51 min 1h 25 min
1h 09 min
57 min 1h 14 min
3h
58 min 19 min (17kg)
25 min (20kg)
1h 05 min 1h 21 min
1h 20 min 2h
When selecting a Washing Program the washing machine will automatically choose the most appropriate
Wash Step. In this case, the approximate time duration of each program will be as indicated in the figure below:
6. Washing programs
WARNING
In the duration of the programs was not considered the time required to fill and drain
the washing machine.
When the SNEAKERS program is selected, washed only 2 pairs per wash cycle.
For the JEANS, COMFORTER, DARKS, COLORS, DELICATES and SNEAKERS programs,
the WATER TEMPERATURE option cannot be selected.
If the washer step automatically selected by the machine is changed, the total time of
program will be different from that indicated.

30
Never clean your washing
machine with flammable
fluids as alcohol, kerosene,
gasoline, paint thinner,
solvents, chemicals or
abrasives products as detergents, acids
or vinegar.
3. Remove the level indicators
and the liquid soap
dispenser (if they are in the
dispenser) from inside the
dispenser and wash them.
4. If necessary, the inside can
be cleaned using a small
brush.
The pieces of the drawer can
be cleaned using water, soap,
a cloth or a brush to remove
small wastes.
Water Filter
Close the water inlet. Disconnect
the end of the hose from the
faucet and remove the filter.
Clean the filter with a flush of
water. If you have difficulties when
removing the impurities, use a
small soft brush. This procedure should be done
periodically to prevent the filter clogging. If the filter is
damaged and needs to be changed, call Frigidaire
Service Center.
Do not forget to replace the filter in the hose
and open the faucet again.
The machine should not be used without the
filter under the risk of damage the product.
Glass lid
After each washing, clean it with a soft and moist
cloth.
Ouside
Clean it with warm water and neutral soap.
After cleaning, wipe it with a soft cloth. To avoid
accidentally turning the machine on when cleaning,
is recommended to remove the plug from the
socket.
7. Cleaning and Maintenance
Internal part
Clean the inside of the washing
machine at least once a month.
Put 1 liter of bleach in the drum.
Select the High water level and
the Stain Removal program. Let
the washing machine complete
the cycle to ensure the complete
removal of bleach.
This cleaning should be done to prevent spots
in clothes, caused by accumulated waste in the
washing machine due to excessive use of soap
and softener.
Lint filter
The lint filter function is to retain the
eliminated lint from clothes during
washing.
To preserving and efficiency of this
filter is recommended clean it after
each washing cycle.
1. To clean the filter, turn and pull
the lid of the agitator upwards
(Figure 1).
2. Press the side locks to remove
the filter (fig 2).
3. Wash the filter in water and, if
necessary, use a small brush that
does not damage the mesh filter
(figure 3).
4. Place the filter on its housing,
ensuring that it is properly
positioned.
5. Place the lid in the agitator and
attach it until the end.
Recommendations
The accumulation of lint in the filter can cause the
clogging in the mesh. To clean the filter, use only
running water.
Do not use cleaners or brushes which can damage
the filter mesh.
Dispenser drawer
To clean the dispenser,
proceed as follows:
1. Open the drawer
completely.
2. To remove it, push down
on the latch with one hand
and with the other, pull the
drawer out.
Frigidaire Original Cover
The original cover is available at the
Frigidaire Service Station.
WARNING

31
8. Troubleshooting
Customer Assistance
If your product has functioning problems, check the probable causes and corrections. If the suggested
corrections are not sufficient, call the Frigidaire Service Center.
Problem Probable Causes Corrections
If the washing
machine doesn't
work
The Washing Programs knob is not
properly positioned.
Position the knob on the chosen program.
The blue LED of the ON/OFF key is
not ON.
Press the key and wait for 5 seconds.
The machine is in the soaking step. Please wait the end of the soak step.
The plug is not properly connected to
the outlet.
Check the plug and outlet in which the machine is
connected.
The electrical circuit (outlet, power cord,
circuit breaker) is in bad condition.
Check the electrical circuit. If necessary, call an
electrician.
Blackout. Wait for the return of the energy.
The washing machine lid is opened. Close the lid.
It is been used an adaptor ou extension
cord.
Do not use adaptors, replace the socket. Do not use
extension cord.
The supply voltage is low.
Call an electrician to check the electric net voltage
in your home.
Wrong voltage. Check the correct voltage for your washing machine.
If agitation is low. The Delicate program was selected.
During the Delicate washing the agitation is slower
to not damage clothing. Does not require correction.
If the washing
machine doesn’t
drain/spin.
The drain hose is too high. Place the hose to a maximum height of 140cm.
The end of the drain hose in the laundry
sink is submerged in water.
Do not let the end of the drain hose stay submerged
when the laundry sink is full.
The washing machine lid is opened. Close the lid.
The drain hose is folded or strangled. Unfold or clean the drain hose.
The option ECONOMY - REUSE WATER
was selected.
Press the key ECONOMY to start the draining. The
blue light indicates that the function is activated.
Vibration/noises.
The machine is not leveled. Level the washing machine.
The machine is against the wall or to a
furniture.
Take the washing machine far from the wall or
furniture.
The clothes are badly distributed in the
drum.
Distribute the clothes correctly and do not wrap
them in agitator.
The package base has not been
removed.
Remove all package parts.
Noise during spin.
The drain pump is turned ON causing a
characteristic noise, which is normal.
Noise during the start of spin.
It is normal to occur in some cases the contact
between the drum and the inside of the washing
machine. This does not affect the operation of the
washing machine.

32
Problem Probable Causes Corrections
If the washing
machine fills and
drain at the same
time.
It was placed more than 20cm o f the
drain hose in the drain outlet.
Place it at maximum of to 20 cm of drain hose in the
drain outlet.
The outlet hose water was amended.
The drain hose can not be amended. Check the
hydraulic installation of the residence.
The drain hose is too low.
Position the drain hose at a minimum height of
90cm.
Noise of water
inside the
washing machine.
Balancing system.
It is normal because your washing machine has a
balancing system with a liquid which is inside the
drum. This liquid is especially developed to not
cause damage to your washing machine.
Water doesn’t
enter in the
washing machine.
The faucet is closed. Open the faucet.
The filter in the water inlet hose is
clogged.
Clean the filter.
No water comes out of the faucet. Check the hydraulic system of the residence.
The inlet hose is folded or strangled. Unfold or clear the hose.
Wrong voltage. Check the correct voltage for your washing machine.
If softener/bleach
comes before its
time.
The maximum level was exceeded.
Do not exceed the maximum level indicated in the
dispenser.
If the softener
doesn’t exit.
Softener too dense. Dilute softener with a little of water.
If the clothes get
stained.
Too much softener and/or soap. Use the quantity recommended on page 25.
The water of the house is dirty. Install a filter in the faucet.
Internal cleaning of the washing
machine wasn’t done.
Clean the washing machine as recommendations.
It was mixed clothes of different fabrics.
Separate the clothes according to the table
programs indicated on the panel, or according to
Tips and Advice.
The clothes are not adequate to wash in
the washing machine.
Check the instructions in the clothes labels. See
either the International Symbols on page 35.
There are lints in
the clothes.
It was mixed clothes of different fabrics.
Separate the clothes according to the table
programs indicated on the panel, or according to
Tips and Advice.
The lint filter is dirty. Clean the lint filter.
If the drum
downs.
Washing machine suspension system.
It is normal the drum downs when full of clothes and
water.
If the lid does not
open.
The safety lock is activated.
The machine is in the spinning step.
Wait a few minutes to release the lid (see page 20).

33
Problem Probable Causes Corrections
If the blue light
of the washing
options doesn’t
turn ON and
the key beeps
intermittently
when pressed.
The option selected is not allowed
to washing program selected, eg.:
- "DELICATE" promgram + "WATER
TEMPERATURE" option.
Do not operate this washing option for that washing
program.
The washing step is in rinse step.
It is not allowed any washing option when the washing
machine is in the rinse step.
If the blue light of
the ON/OFF key is
flashing.
Wrong voltage. Connect the machine to the correct voltage.
If after start of
washing, when
trying operating
one of the
washing options
the blue light
does not lights
and the key beeps
intermittently.
You cannot trigger this option during
execution of the step cycle.
Select the option before the step or cycle.

34
9. Tips and Advice
• Always try to check the recommendations of the
label of the clothes before washing or drying
them, to not damage them.
• White and colored clothes should be washed
separately to prevent transfer of colorants
between parts, staining them.
• To check if clothes discolor, soak a part of the
clothes, place a piece of white fabric on the
wetted area and iron. If the fabric color stains the
white fabric, it discolors.
• Wash only fabrics that can be washed in
washing/dryer machines machines, following the
instructions in clothing labels.
• Do not use bleach wool, silk, leather and lycraelastane clothes, to not damage them.
• Wash separately clothes of cotton and linen,
from the clothes of synthetic material (nylon,
elastane…) because each type of fabric requires
a different cleaning
• Do not use chemicals products indicated to dry
washing.
• Do not use the washing machine for starch
clothes.
• When you leave the house for a long time, it is
recommended to turn the machine OFF from the
socket and turn the faucet OFF.
• For best performance of the machine and prevent
damage to clothes, it is always recommended
put the heavy and/or bulky clothes underneath.
Removal of Stains
It is possible that certain stains are not removed with
soap and water. It is therefore advisable special care
before washing.
• Blood: Rinse with cool water, apply oxygen water
(volume 10) on the stain and wash normallly.
• Oil: Apply talcum powder on the stain, wait a
few minutes, remove excess powder and wash
normally.
• Rust: Apply mixture of salt and lemon or specific
product against rust, leave it for a few minutes and
wash normally. In old stains the fabric structure
may have been attacked and tear more easily.
• Mustiness: For white clothing resistant to chlorine,
wash with bleach. For colored clothes and not
resistant to chlorine, rinse the stained area with
milk.
• Ballpoint ink: Place the stained area on absorbent
tissue, moisten with acetone (except rayon) or
alcohol, rub with brush and wash normally.
• Lipstick: Apply acetone (except rayon) or alcohol
on the stain, leave it for some minutes and wash
normally.
Protecting the Environment
If you have to wash fewer clothes, load only the
correct amount of water using the WATER LEVEL
key.
Reuse the water from washing and rinsing to other
cleaning services such as floors and sidewalks. To
do this, just press the "ECONOMY" key and direct
the water outlet hose to the tank or bucket.
To drain the water, press the "ECONOMY" key that
will blink. Avoid putting too much soap to not have
to rinse repeat unnecessarily.
WARNING
• Remove objects from pockets (nails, toothpicks, pins, clips,
screws, coins, etc.) They can cause serious damage to washing
machine and the clothes and may result in loss of warranty.
• Put small items in appropriate bags or pillowcases, not to damage
them.
• Close push buttons and zippers so they cannot be damaged and
not engage in other clothes.
• Reinforce or remove loose buttons.
• It is recommended not to wash clothes and blankets of pets, because the excess of
hair can damage the machine.
• It is recommended repair or darn uneven pieces to not spoil.
• To wash curtains, tie the part that contains the wheels and/or hooks in a bag suitable
for washing clothes, thus eliminating the need to remove them.

35
10. International Symbols
These symbols appear on the labels clothing, to help
in the selection of the the best way to treat them.
Weight of Clothes
The maximum capacity of this machine refers to
a standard load of 17kg or 20kg, composed of
sheets, pillowcases and cotton towels, whose
composition, size and weight are specified under
international standards.
The table of clothes weight is for guidance clothes.
For a better performance of this product the volume
of the clothes should be considered prevailing on
the weight of the clothes. For example, articles filled
with foam and synthetic fabrics and duvets may be
below of the limit of capacity. However, the volume
is higher than the capacity of the drum and does
not allow the accommodation of 17kg or 20kg of
such clothes.
On the other hand, heavy fabrics (example: trousers
jeans, bath towels) that are compressed in the
drum of the washing machine may impair washing
performance.
Table of Clothes Weight
Approximate weight of dry clothes
Type of clothing Weight (g)
Nappy 50
Underwear 50
T-Shirt 150
Shirt 250
Pant denim/jeans 800
Pant denim/jeans children's 400
Sweatshirt set adult 700
Sweatshirt set adult children 500
Pajamas 400
Pillowcase 120
Sheet single 500
Sheet double 800
Bedspread single 1.000
Bedspread double 1.300
Face Towel 200
Bath Towel 500
Table cloth 500
Dishcloth 80
Duvet single 900
Duvet double 1.800

36
11. Electric Diagram
WARNING
Remove the power cord from the electric socket before performing any repair or
maintenance to avoid the risk of electric shock. Failure to do so can result in serious
injury or death.
LEYENDA/LEGEND
BR
PR
VM
AZ
CZ
LR
AM
LI
AZCL
VD-AM
MR
RS
BLANCO
NEGRO
ROJO
AZUL
GRIS
NARANJA
AMARILLO
LILAS
AZUL CLARO
VERDE-AMARILLO
MARRÓN
ROSA
WHITE
BLACK
RED
BLUE
GRAY
ORANGE
YELLOW
PURPLE
LIGHT BLUE
YELLOW-GREEN
BROWN
PINK
BOARD
AC1
AC2
CCW
CW
1
2
3
4
5
6
7
8
9
10
11
CN2
PMP
BRK
SFT
ECO
HT1
HT2
CLD
IN0
IN1
LID
PRS
D0
COM
-5V
D1
D2
D3
1
2
3
4
5
6
CN3
INTERFACE
12345
6
BOARD
POWER
FLAT CABLE
12345
6
CN4
CONECTOR
DE SERVIÇO
1
2
3
4
5
6
7
8
9
CN1
TMR
127/220V
1 (MR)
PTC
2
3
4
LID LOCK
2 (MR)
8 (AZ)
8 (AZ)
COLD VALV E
SOFTENER VALVE
14 (LR)
13 (BR)
19 (CZ)
6 (CZ)
20 (CZ)
4 (CZ)
1
2345678
3 (CZ)
17 (AM)
7 (PR)
13 (BR)
14 (LR)
18 (AZ)
18 (AZ)
12 (RS)
12 (RS)
(RS)
(RS)
9 (AM)
9 (AM)
10 (VM)
10 (VM)1111 (LI)
17 (AM)
EMENDA
1 (VD-AM)
3 (RS)
7 (AM)
INDUCTOR
CAPACITOR
M
1
2
3
CLUTCH
Motor
MOTOR
Pump
9 (CZ)
1234567
8
16 (VD-AM)
16 (VD-AM)
2 (AM)
4 (LI)
5 (VM)
8 (CZ)
10 (CZ)
6 (VM)
6 (VM)
15 (RS)
(RS)
TOP HARNESS
BOTTOM HARNESS
13 (CZ)
5 (CZ)
22
PRESSURE SENSOR
21 (AZ)
14 (VM)
2 (AM)
4 (LI)
3 (RS)
11(AZ)
11(AZ)
HOT VALVE
22
6 (CZ)
37
12. Technical Specifications
Water approximate consumption
Approximate water consumption per cycle (empty, with water inlet
pressure of 0.24 MPa)
Water Level 17 kg 20 kg
Extra Low 90 liters 100 liters
Low/Sneakers 122 liters 126 liters
Medium 159 liters 172 liters
High/Conforter 204 liters -
High - 207 liters
Conforter - 238 liters
*This capacity refers to a standard load, consisting of sheets, pillowcases and cotton towels.
**With the empty washer and nominal voltage.
Model 17 kg 20 kg
Voltage 127/220 V 127/220 V
Net Weight 47,5 kg 49 kg
Dimensions (height × width × depht) 111 × 66 × 73 cm 111 × 66 × 73 cm
Maximum height with lid open 145 cm 145 cm
Number of programs 12 12
Dry cloth capacity * 17 kg 20 kg
Frequency 50 - 60 Hz 50 - 60 Hz
Rotation in spinning ** 727 rpm 729 rpm
Water inler pressure
2,4 a 81 meters of water
column (0,02 a 0,81MPa)
2,4 a 81 meters of water
column (0,02 a 0,81MPa)
This washing machine should be used
only for domestic purposes
IMPORTANT
Maximum and Minimum Voltage
127 V 220 V
Minimum: 116 V Minimum: 201 V
Maximum: 133 V Maximum: 231 V

38
Notes

39
Notes

a04196003/a
G0010375/003
Jul/16
www.electrolux.com
 Loading...