

Frigidaire FTE5200SBRE Operating Instructions Manual
1
SFGSJHFSBUPS
PQFSBUJOH
JOTUSVDUJPOT

2
CONTENTS
Important safety instructions . . . . . . . . . . . . . . . . . . . . . 3
Installing your new appliance . . . . . . . . . . . . . . . . . . . . . 4
Ventilation around your appliance. . . . . . . . . . . . . . . . 4
Installing your refrigerator . . . . . . . . . . . . . . . . . . . . 4
Initial start-up . . . . . . . . . . . . . . . . . . . . . . . . . . . . . . . 5
Electronic display controls – electronic models . . . . . . . . . . 6
Controlling the temperature . . . . . . . . . . . . . . . . . . . 6
Changing the freezer temperature . . . . . . . . . . . . . . . 6
Changing the refrigerator temperature . . . . . . . . . . . . 6
Quick freeze function. . . . . . . . . . . . . . . . . . . . . . . . 6
Freezer temperature alarm . . . . . . . . . . . . . . . . . . . . 6
Door alarm . . . . . . . . . . . . . . . . . . . . . . . . . . . . . . 6
Child Lock . . . . . . . . . . . . . . . . . . . . . . . . . . . . . . . 6
Drinks chill timer. . . . . . . . . . . . . . . . . . . . . . . . . . . 6
Energy e ciency . . . . . . . . . . . . . . . . . . . . . . . . . . 7
Normal mode . . . . . . . . . . . . . . . . . . . . . . . . . . 7
Eco mode. . . . . . . . . . . . . . . . . . . . . . . . . . . . . 7
Holiday mode . . . . . . . . . . . . . . . . . . . . . . . . . . 7
Other features (electronic models only) . . . . . . . . . . . . . . 7
Manual (rotary) controls – manual models . . . . . . . . . . . . . 8
Controlling the temperature . . . . . . . . . . . . . . . . . . . 8
Using your appliance . . . . . . . . . . . . . . . . . . . . . . . . . . 9
Door storage bins . . . . . . . . . . . . . . . . . . . . . . . . . . 9
Dairy compartment . . . . . . . . . . . . . . . . . . . . . . . . . 9
Deli bin. . . . . . . . . . . . . . . . . . . . . . . . . . . . . . . . . 9
Crisper bin. . . . . . . . . . . . . . . . . . . . . . . . . . . . . . . 9
Storesafe™ lockable bins. . . . . . . . . . . . . . . . . . . . . . 9
SpillSafe™ glass shelves . . . . . . . . . . . . . . . . . . . . . 10
Bottle Holder . . . . . . . . . . . . . . . . . . . . . . . . . . . . 10
Freezer Drawers . . . . . . . . . . . . . . . . . . . . . . . . . . 10
Twist Ice & Serve . . . . . . . . . . . . . . . . . . . . . . . . . . 11
Care and maintenance . . . . . . . . . . . . . . . . . . . . . . . . 11
Changing the light bulb . . . . . . . . . . . . . . . . . . . . . 11
General information . . . . . . . . . . . . . . . . . . . . . . . . . . 12
Cleaning the appliance. . . . . . . . . . . . . . . . . . . . . . 12
Safety. . . . . . . . . . . . . . . . . . . . . . . . . . . . . . . . . 12
Switching o your appliance . . . . . . . . . . . . . . . . . . 12
Troubleshooting . . . . . . . . . . . . . . . . . . . . . . . . . . . . 13
Congratulations and thank you for choosing our refrigerator/
freezer. We are sure you will nd your new appliance a pleasure
to use. Before you use the appliance, we recommend that
you read through the relevant sections of this manual, which
provides a description of your appliance and its functions.
To avoid the risks that are always present when you use an
electric appliance, it is important that the appliance is installed
correctly and that you read the safety instructions carefully to
avoid misuse and hazards.
We recommend that you keep this instruction booklet
for future reference and pass it on to any future owners.
After unpacking the appliance, please check it is not damaged.
If in doubt, do not use the appliance but contact
your nearest
approved Service Centre or the dealer you bought the
refrigerator from.
ENVIRONMENTAL TIPS
INFORMATION ON DISPOSAL FOR USERS
• Most of the packing materials are recyclable. Please dispose
of those materials through your local recycling depot or by
placing them in appropriate collection containers.
• If you wish to discard this product, please contact your local
authorities and ask for the correct method of disposal.
• Local authorities will have the latest information regarding
safe disposal of the product.
• Incorrect disposal may expose the user to injury from sharp
objects, ammable gasses or cause environmental damage.
• Refrigerant gasses within the unit should only be discharged
by quali ed persons. A licence may be required by your local
authorities to discharge or reclaim the refrigerant gasses.
Incorrect discharge of gasses may expose the user to injury
from ammable gasses or cause environmental damage.
Subject to change without notice
Condition of use
This appliance is intended to be used in household and similar
applications such as,
- Sta kitchen areas in shops, o ces and other working
environments;
- Farm houses and by clients in hotels, motels and other
residential type environments;
- Bed and breakfast type environments;
- Catering and similar non-retail applications;
CONTENTSCONGRATULATIONS
3
SAFETY
WARNING
• When you dispose of your old refrigerators and freezers,
remove any doors. Children can su ocate if they get trapped
inside.
• This appliance contains insulation formed with ammable
blowing gases. Avoid safety hazards by carefully disposing of
this appliance.
• This appliance is not intended for use by persons (including
children) with reduced physical, sensory or mental
capabilities, or lack or experience or knowledge, unless they
have been given supervision or instruction concering use of
the appliance by a person responsible for their safety.
Children should be supervised to ensure that they do not
play with the appliance.
R600A REFRIGERANT WARNING
T
his appliance may contain a small quantity of
environmentally friendly, but flammable, non-synthetic R600a
refrigerant. The data label inside the refrigerator will state the
type of refrigerant and the amount in grams.
Avoid safety hazards by carefully installing, handling,
servicing and disposing of this appliance.
Ensure that the tubing of the refrigerant circuit is not
damaged during transportation and installation.
• Leaking refrigerant may cause eye injuries or ignite.
• The room for installing appliance must be at least 1m3 per
8g of refrigerant. The amount of refrigerant in the appliance
can be found on the rating plate inside the appliance.
•
This appliance contains insulation formed with ammable
blowing gases. For safety reasons, take care when you dispose of
it.
• When you dispose of your old refrigerators or freezers
remove any doors. Children can su ocate if they get trapped
inside a discarded unit.
WARNING
The appliance must be plugged into its own
dedicated 220-240V, 50Hz AC electrical outlet.
Ensure that the electric outlet is properly earthed
to ground. Consult a quali ed electrician if you are
unsure.
The plug must be accessible when the appliance is in
position.
Do not use an extension cord or adapter plug.
If the supply cord is damaged, it must be replaced
by the manufacturer, its service agent or similarly
quali ed persons in order to avoid a hazard.
Unplug the appliance before cleaning and before
changing the light bulb to avoid electric shock.
Never unplug the appliance by pulling on the power
cord. Always grip the plug rmly, and pull straight
out of the receptacle to prevent damaging the power
cord.
Choose a location that is not too cold – the temperature
should be above 10°C.
Put the appliance in a dry place, avoiding areas
of high moisture or humidity.
Don’t put the appliance in frosty or unprotected
areas, for example in a garage or on a verandah.
Don’t put the appliance in direct sunlight.
Don’t put the appliance near stoves, res or heaters.
Do not use mechanical devices or other means to
accelerate the defrosting process, other than those
recommended by the manufacturer.
Do not damage the refrigerant circuit.
Do not use electrical appliances inside the food
storage compartments of the appliance, unless they
are of the type recommended by the manufacturer.
Do not store explosive substances such as aerosol
cans with ammable propellant in this appliance.
If pressurised aerosol containers bear the word
ammable and/or a small ame symbol, do not store
them inside any refrigerator. If you do so you may cause
an explosion.
Keep the ventilation openings, in the appliance
enclosure or in the built-in structure, clear of obstruction
Never store zzy drinks in the freezer compartment
Never lick icy foods when they rst come out of the
freezer, this can burn your lips and mouth.
IMPORTANT SAFETY INSTRUCTIONS
SWITCHING OFF YOUR REFRIGERATOR
If you switch o your refrigerator for an extended period,
follow these steps to reduce the chances of mould:
1. Remove all food.
2. Remove the power plug from the power point.
3. Thoroughly clean and dry the Interior.
4. Ensure that all the doors are wedged open slightly for air
circulation.

4
INSTALLATION
(x)
50mm
30mm
30mm
Recommended
airspace
CABINET
DOOR
350mm
550mm for telescopic drawer models
(y)
ADEQUATE VENTILATION AROUND YOUR REFRIGERATOR.
The diagram below shows the recommended airspace to
allow for ventilation of your refrigerator.
If you don’t have a cupboard with a rear gap, the
recommended clearance area on top increases from 50mm
to 90mm (x) and from 32mm to 72mm (y). When
positioned in a corner area, spacing of at least 350mm
on the hinge side will allow the doors to open enough to
enable the removal of bins and shelves.
Note: For those models with telescopic extension slide-out
bins, the clearance required increases from 350mm to
550mm for top mount and bottom mount models, and to
450mm for the all refrigerator model to allow full access to
the bins’ contents as well as bin removal.
NOTE:
Doors are designed to sit proud of cabinetry (not ush).
The clearances shown above are the recommended
minimum clearances. The clearance at the rear must not
exceed 75mm.
INSTALLING YOUR REFRIGERATOR
Your new refrigerator should arrive with the front adjustable
rollers wound down, to tilt the top backwards by about
10mm from upright. This will allow your refrigerator door to
self-close, providing a consistent closed seal.
The stability foot should also be wound fully up so it will not
interfere with the operation of the rollers (see diagram in
Step 3).
CAUTION
The rollers are designed for forward or backward movement
only. They are not castors. Moving the refrigerator sideways
may damage your oor and the rollers.
INSTALLING YOUR NEW APPLIANCE
1. Roll the refrigerator into place.
2. The top of the refrigerator should be tilted back by
10mm (see diagram on left). This will allow the doors to
self-close providing a consistent door seal.
3. If the refrigerator isn’t tilted back, you can adjust the
two front rollers by turning the large, plastic roller nut.
(see diagram below). One turn of the nut increases the
height of the refrigerator by 10mm. If you have di culty
turning the roller nut, have someone tilt the refrigerator
back, so you have better access. Alternatively, you can
access the rollers from the side, using a at screwdriver.
(See diagram below).
4. Check the alignment of the refrigerator to the
surrounding cupboards to see if it is level. You can
adjust the level with the rollers as detailed in step 3.
5. If you nd your refrigerator rocks from corner to corner,
it means your oor is uneven. Find a piece of plastic or
hardboard etc. and pack it rmly under the roller.
6. On certain oor surfaces, the refrigerator may roll
forward during normal operation. Where provided, a
“Roller Stop” can be placed under the front rollers.
7. You may now need to ne-tune the installation by
repeating Steps 3, 4 and 5.
10mm
Height adjustable
front rollers
Fixed
rear rollers
Large plastic
roller nut
Stability foot
wound up
Top of refrigerator
is level ie. horizontal
Adjust front rollers
for uneveness of floor
eg. wind this roller
down or up
Aligned to
cupboards
ie. even gap
Roller Stop
5
INSTALLATION
INITIAL STARTUP
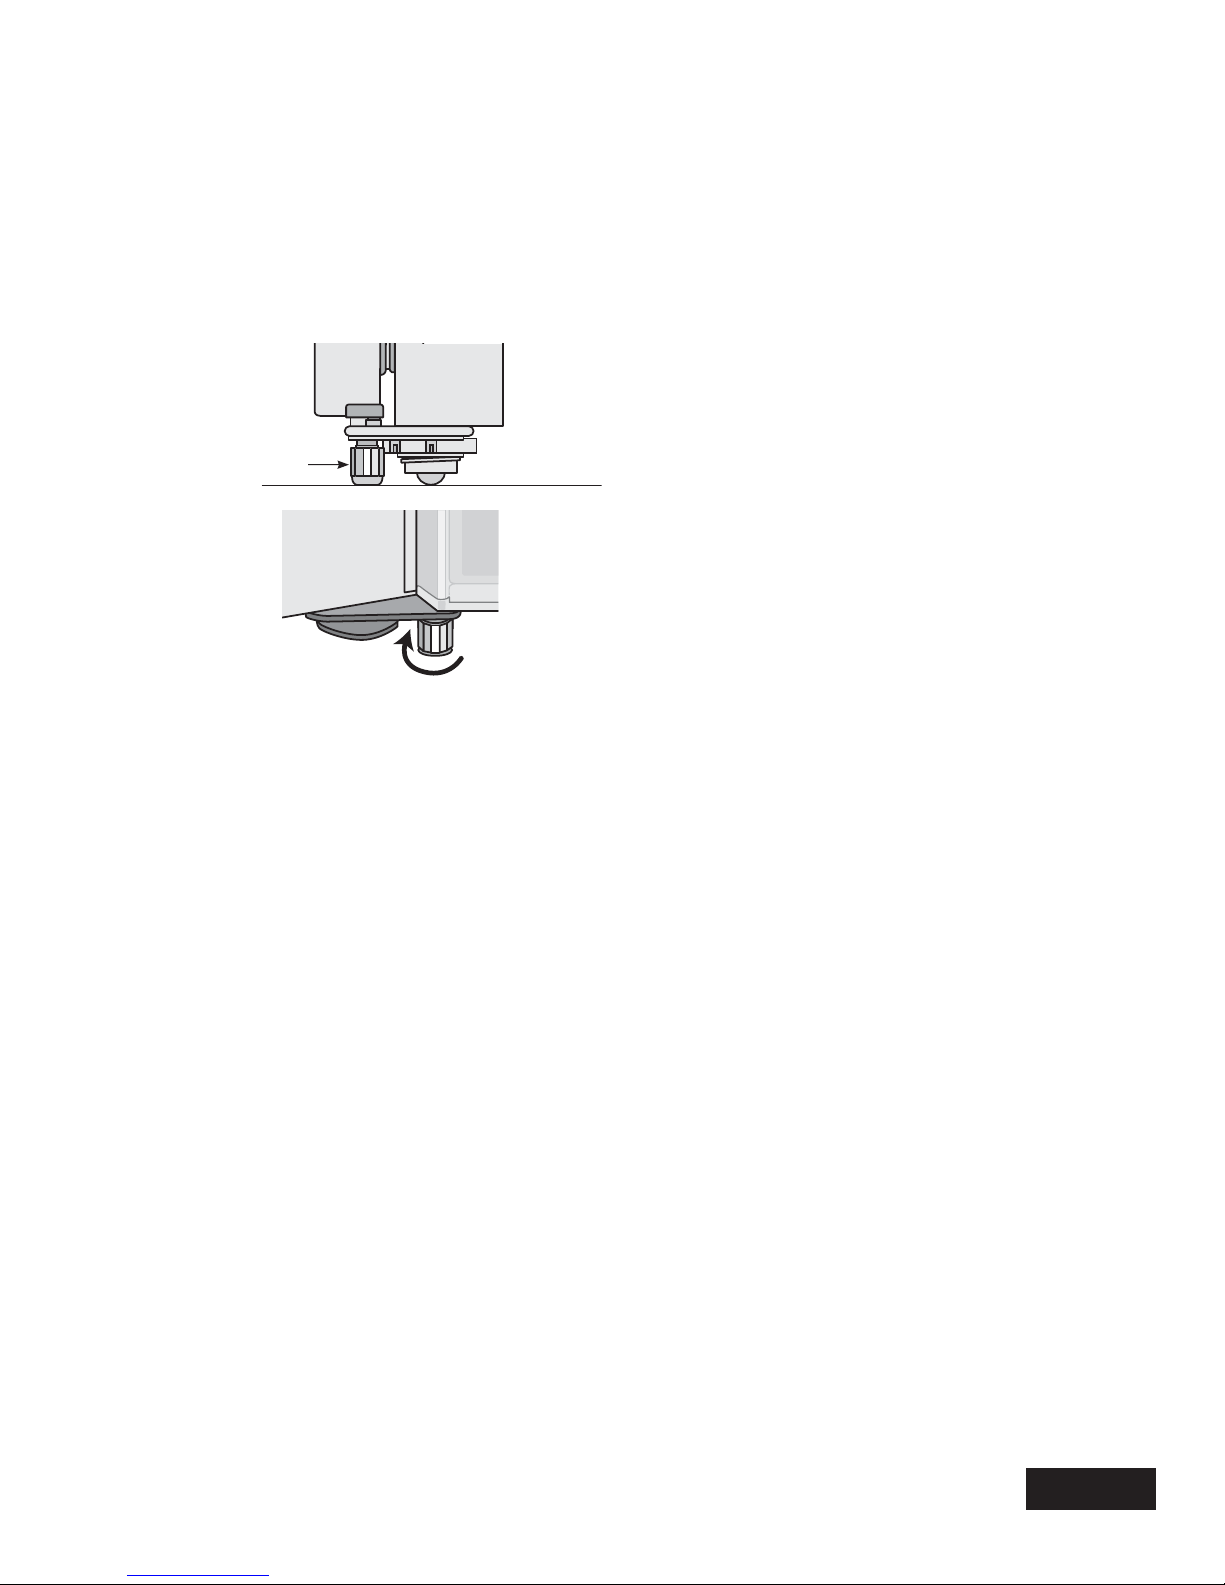
8. When you have the appliance in its nal position, it
needs to be stablisied. Wind the stability foot down
to the oor until it just makes contact with the oor. Lift
the front of the appliance to take the weight o the
stability foot, then turn it ¼ turn further to ensure rm
contact with the oor. Whenever you need to move the
appliance, be sure to wind the foot back up so that the
appliance can roll freely and be sure to reset it when
reinstalling.
9. Clean your refrigerator thoroughly following the
instructions on page 11 and wipe o any dust that has
accumulated during shipping.
10. Plug your refrigerator straight into its own power point
and never use a double adapter. If you need to roll the
refrigerator to get to the plug, remember to raise the
stability foot rst.
11. Before you put any food in your refrigerator, it’s
recommended you leave it on for 2 or 3 hours to check
it is running properly.
When correctly installed, your appliance should:
• have adequate clearance to the back and sides for air
circulation.
• be aligned to the surrounding cupboards.
• have doors that will self-close from a partially open position.
Congratulations! You have successfully installed your new
refrigerator.
Refrigerators work by transferring heat from the food inside
to the outside air. This operation makes the back and sides
of the refrigerator (particularly at start-up) feel warm – which
is normal.
Avoid placing food against the air vents in the refrigerator,
as it a ects the e cient circulation. If the door is opened
frequently, a light frosting will occasionally occur on the
freezer’s interior. This is normal and will clear after a few
days. If the freezer door is accidentally kept open, a heavy
frost will coat the inside walls and should be removed.
Your new refrigerator uses a high-speed compressor,
along with other energy-e cient components, which may
make unusual sounds. These sounds simply indicate your
refrigerator is working how it should. They include:
• Compressor running noises;
• Air movement noise from the small fan motor;
• A gurgling sound, similar to water boiling;
• A popping noise, heard during automatic defrosting;
and
• A clicking noise, prior to compressor start-up.
Further details can be found on page 13
Stabilising foot
wound down
side view
front view
 Loading...