

Frigidaire FRS26KF6EWC, FRS6R5EMBK, FRS26KF6EMC, FRS26KF6EBC, FRS26KF6EMB Owner's Care & Use Manual
...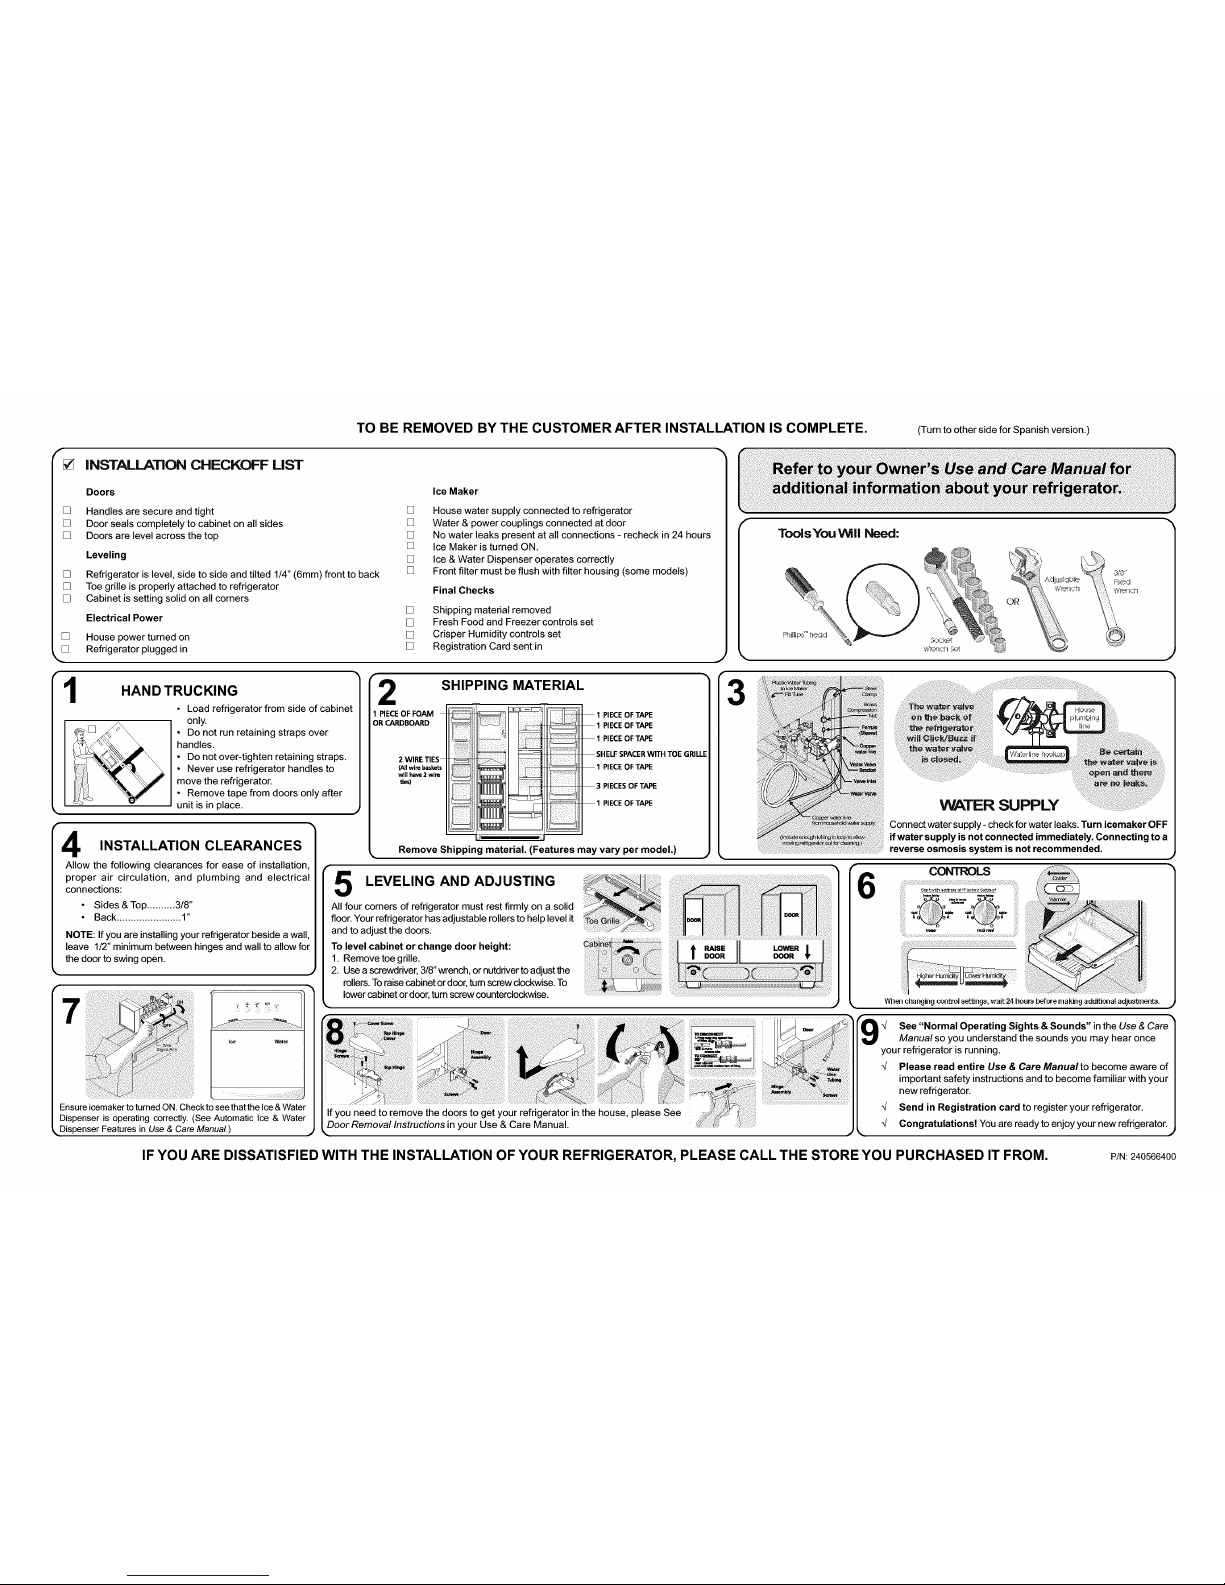
TO BE REMOVED BY THE CUSTOMERAFTER INSTALLATION IS COMPLETE. (TurntoothersideforSpanishversion.)
f
[]
[]
[]
INSTALLATION CHECKOFF LIST
Doors
[] Handles are secure and tight
[] Door seals completely to cabinet on all sides
[] Doors are level across the top
Leveling
[] Refrigerator is level, side to side and tilted 1/4" (6mm) front to back
[] Toe grille is properly attached to refrigerator
[] Cabinet is setting solid on alt corners
Electrical Power
House power turned on
Refrigerator plugged in
Ice Maker
[] House water supply connected to refrigerator
[] Water & power couplings connected at door
[] No water leaks present at alt connections - recheck in 24 hours
[] Ice Maker is turned ON.
[] Ice & Water Dispenser operates correctly
[] Front filter must be flush with filter housing (some models)
Final Checks
[] Shipping material removed
[] Fresh Food and Freezer controls set
[] Crisper Humidity controls set
[] Registration Card sent in
f
Tools You Will Need:
OR
1
HAND TRUCKING
• Load refrigerator from side of cabinel
only.
• Do not run retaining straps over
handles.
• Do not over-tighten retaining straps.
• Never use refrigerator handles to
move the refrigerator.
• Remove tape from doors only after
unit is in place.
INSTALLATION CLEARANCES
Allow the following clearances for ease of installation
proper air circulation, and plumbing and electrica
connections:
Sides & Top.......... 3/8"
Back....................... 1"
NOTE: If you are installing your refrigerator beside a wall,
leave 1/2" minimum between hinges and walt to allow for
the door to swing open.
Ice Wate_r
Ensure icemaker to turned ON, Check to see that the Ice & Water
Dispenser is operating correctly. (See Automatic Ice & Water
Dispenser Features in Use & Care Manual.) ,j
[2
1 PIECEOFTAPE
1 PIECEOFTAPE
1 PIECEOFTAPE
SHELFSPACERWITH TOEGRILLE
1 PIECEOFTAPE
3 PIECESOFTAPE
1 PIECEOFTAPE
1 PIECE OF FOAM
OR CARDBOARD
2 WIRE TIES
{Allwire baskets
will have2 wire
_es)
SHIPPING MATERIAL
i!i!ili!i!iiiii!!!!@!i i
Remove Shipping material. (Features
LEVELING AND ADJUSTING
All four comers of refrigerator must rest firmly on a solid
floor.Your refrigeratorhas adjustablerollersto help level it
and to adjustthe doors.
To level cabinet or change door height:
1. Remove toe grille.
2. Use a screwdriver, 3/8"wrench,ornutddver to adjustthe
rollers.To raise cabinet or door, turn screw clockwise. To
lower cabinet ordoor,turn screw counterclockwise.
may vary per model.)
3
%i_!%!_%__ •iii_!i_iiiii_ii_
€
If you need to remove the doors to get your refrigerator in the house, please See
Door Removal Instructions in your Use & Care Manual.
6
co. =s i iiii!i!i ili!iiii
o o
Wh_] changint_wntrol _et_n_._,_vait24 hou_ b_,foremaking _i_]al a0_u_lflei_t_, ,,_
_/ See "Normal Operating Sights & Sounds" in the
Manual so you understand the sounds you may hear once
your refrigerator is running.
Please read entire Use & Care Manualto become aware of
important safety instructions and to become familiar with your
new refrigerator.
_/ Send in Registration card to register your refrigerator.
_/ Congratulations! You are ready to enjoy your new refrigerator.
IF YOU ARE DISSATISFIED WITH THE INSTALLATION OF YOUR REFRIGERATOR, PLEASE CALL THE STORE YOU PURCHASED IT FROM. P/N:240566400

A SER RETIRADO POR EL CLIENTE CUANDO SE COMPLETE LA INSTALACION. (Veaetotroladoparalaversininglesa.)
[] LISTA DE VERIFICACION DE LA INSTALACION
[]
[]
Puertas
[] Las manijas estan aseguradas y apretadas
[] La puerta cierra hermeticamente en todos los lados del gabinete
[] Las puertas est_n nivetadas a traves de la parte superior
Nivelacibn
[] Et refrigerador esta nivelado de lado a lado e inclinado 1/4"
(6 mm) desde adelante hacia atr_s
[] La rejilla inferior esta correctamente instalada en el refdgerador
[] El gabinete descansa firmemente en todas las esquinas
Energia Eldctrica
La energia electrica de la casa esta conectada
El refdgerador est_ enchufado
M_quina de Hacer Hielo
[] El suministro de agua del hogar esta conectado al refdgerador
[] Los acopiamientos del agua y de la energia estan conectados en la puerta
[] No hay escape de agua en ninguna de las conexiones - verifique
nuevamente dentro de 24 horas
[] La m_quina de hacer hieto esta ACTIVADA
[] El dispensador de hielo y de agua funciona correctamente
[] El fittro delantero debe quedar al ras con la caja del filtro (algunos modetos)
Verificaciones Finales
TRANSPORTE CON CARRETILLA
• Cargue el refrigerador por el lado del gabinete
solamente.
• No pase lascorreas porencima de las manijas.
• No apriete demasiado lascorreas.
• Nunca use las manijas del refrigerador para
moverto.
• Retire la cinta de las puertas despu6s que el
refngerador este instaladoen su lugar.
[] Se retiraron los materiales de embarque
[] Se ajustaron los controles del refrigerador y del congelador
[] Se ajustaron los controles de humedad det caj6n de las verduras
[] Se envi6 la Tarjeta de Registro
MATERIALES DE EMBARQUE
1 PEDAZO DE ESPUMA _
1 PEDAZO DE CINTA
O CARTON _ __ 1 PEDAZO DE CINTA
1 PEDAZODE CINTA
ESPACIADOR DE IA
2 ATADURAS
DE ALAMBRE _11_ I_1 BANDEJA CON REJILLA
1 PEDAZODE CINTA
ESPACIOS LIBRES PARA LA Retire los materiales de embarque.
INSTALACION , (La caracteristicas pueden variar segl3n el modelo.)
Dejelossiguientesespacioslibrespara facilitarla circulaci6nde _ GdlledeprotectionRejillaInferior
aire adecuada durante la instalaci6n y para las conexiones _ NIVELADO Y AJUSTE __
ili!!hiii!
el_ctricasde fontaneria:
Ladosy parte superior....3/8" Lascuatroesquinasdelreffigeradordebendescansarfirmemente
Partetrasera.....................1" sobre suelo firme. Su refdgeradortiene rodillosajustables para
facilitarel nivelado y para ajustarlas puertas.
NOTA: Si instalael refdgerador junto a una pared, deje un
espaciominimo de 12,7mm (1/2pulg.)entrelasbisagrasy la Paraajustar el gabinete o cambiarla altura de las puertas: CaisseGabinete
pared para permitir que la puertase puedaabdr. 1. Retirela rejillainferior.
• 2. Use un destomillador, una llave de 3/8" o una Uavepara
tuercasparaajustar losrodillos. Para elevar el gabineteo la
............ puerta,gire eltornilloa la derecha.Para bajarel gabineteo la
puerta,gire eltomilloa la izquierda.
Hielo Agua
Asegt_resede que lam_quinade hacer hieloest6 ACTIVADA.
Verifique para comprobar de que el dispensador de hielo y
de agua est6 funcionandocorrectamente. (Ver Caracteristicas
del DispensadorAutom_tico de Hielo yAgua en el Manual de
Use y Cuidado.) la secci6nInstrucciones Jso
3
Herromienlos necesodos:
Oulils n_cessaires:
Tourn_ PhillipsTM
de cubo
Ensem_e de
cl6sb doullles
J
tuber[a del agua
SUMINISTRO DE AGUA
Conecte el suministro de agua -verifique si hay escapes de agua
APAGUE la m_quina de hacer hielo si el suministro de agua
no es conectado inmediatamente. No se recomienda la
conexibn a un sistema de osmosis inversa.
6
CONTROLES
9 F( (( (( (( (( (( (
Cuando ajuste de controles, espere 24 horas para que la temperatura se
estabilice antes de hacer cambios adicionales.
Vea la secci6n "Sonidos Normales del
funcionamiento.
su nuevo refrigerador,
refrigerador,
SI NO ESTA SATISFECHO CON LA INSTALACION DE SU REFRIGERADOR, POR FAVOR PONGASE EN CONTACTO CON LA TIENDA DONDE LO COMPRO. P/N:240566400
 Loading...