

Frigidaire FRS26ZXHW2 User Manual

Versión en español ..................................... 2
Product Registration................................... 2
Important Safety Instructions ................2-3
First Steps ................................................3-4
Energy Saving Ideas................................... 5
Setting the Controls .................................... 5
Fresh Food Storage..................................... 6
Automatic Ice and Water Dispenser ......7-9
Care and Cleaning .............................. 10-11
Removing the Handles and Doors .... 11-12
Avoid Service Checklist...................... 13-16
Normal Operating Sounds ....................... 16
Warranty .................................................... 17
Service Information (Canada).................. 18
P/N 218955101 (0101)

Product Registration
Versión en español
Si desea obtener una copia en español de
este Manual del Usuario, sírvase escribir la
dirección que se incluye a continuación.
Solicite la P/N 218955200.
Record Your Model and Serial Numbers
Record the Model No. and Serial No. of this refrigerator in the spaces provided
below. These numbers are found on the serial plate located on the ceiling of the
refrigerator compartment.
Model No. __________________________________________________
Serial No. ___________________________________________________
Spanish Owner's Guides
Electrolux Home Products
P.O. Box 212378
Augusta, GA 30917
Important Safety
Instructions
Read all instructions before
using this refrigerator.
Proper Disposal of Your
Refrigerator/Freezer
Risk of child entrapment.
Child entrapment and suffocation are
not problems of the past. Junked or
abandoned refrigerators are still
dangerous - even if they will sit for "just
a few days." If you are getting rid of
your old refrigerator, please follow
instructions below to help prevent
accidents.
BEFORE YOU THROW
AWAY YOUR OLD
REFRIGERATOR OR
FREEZER:
• Take off doors.
• Leave shelves in
place, so children
may not easily
climb inside.
Register Your Product
The self-addressed PRODUCT REGISTRATION CARD should be filled in completely,
signed and returned to the Electrolux Home Products.
For Your Safety
Do not store or use gasoline or other flammable vapors and liquids in the vicinity of
this, or any other appliance. Read product labels for flammability and other warnings.
Child Safety
• Destroy carton, plastic bags, and any exterior wrapping material immediately
after the refrigerator is unpacked. Children should never use these items for play.
Cartons covered with rugs, bedspreads, plastic sheets, or stretch wrap may
become airtight chambers that can quickly cause suffocation.
• Remove all staples from the carton. Staples can cause severe cuts, and ruin
finishes if they come in contact with other appliances or furniture.
• An empty, discarded ice box, refrigerator, or freezer is a very dangerous attraction
to children. Remove door of any appliance that is not in use, even if it is
being discarded.
Electrical Information
These guidelines must be followed to ensure that safety mechanisms in the
design of this refrigerator will operate properly.
• Refrigerator must be plugged into its own 115 Volt, 60 Hz, AC only
electrical outlet. The power cord of the appliance is equipped with a three-
prong grounding plug, for your protection against shock hazards. It must be
plugged directly into a properly grounded three-prong receptacle. The receptacle
must be installed in accordance with local codes and ordinances. Consult a
qualified electrician. Do Not Use An Extension Cord Or An Adapter Plug.
• If voltage varies by 10 percent or more, performance of your refrigerator may be
affected. Operating the refrigerator with insufficient power can damage the
compressor. Such damage is not covered under your warranty. If you suspect your
voltage is high or low, consult your power company for testing.
• To prevent the refrigerator from being turned off accidentally, do not plug the unit
into an outlet controlled by a wall switch or pull cord.
• Do not pinch, knot, or bend the power cord in any manner.
© 2001 White Consolidated Industries, Inc.
All rights reserved.
Avoid fire
hazard or electric shock. Do
not use an extension cord or
an adapter plug. Do not
remove any prong from
power cord.
2
Important Safety
Instructions (continued)
Other Precautions
• Never unplug the refrigerator by pulling on the power cord. Always grip the plug
firmly, and pull straight out from the receptacle.
• To avoid electrical shock, unplug the refrigerator before cleaning and before
replacing a light bulb. NOTE: Turning the control to OFF turns off the compressor,
but does not disconnect power to the light bulb or other electrical components.
• Do not operate the refrigerator in the presence of explosive fumes.
• Avoid contact with any moving parts of the automatic ice maker.
First Steps
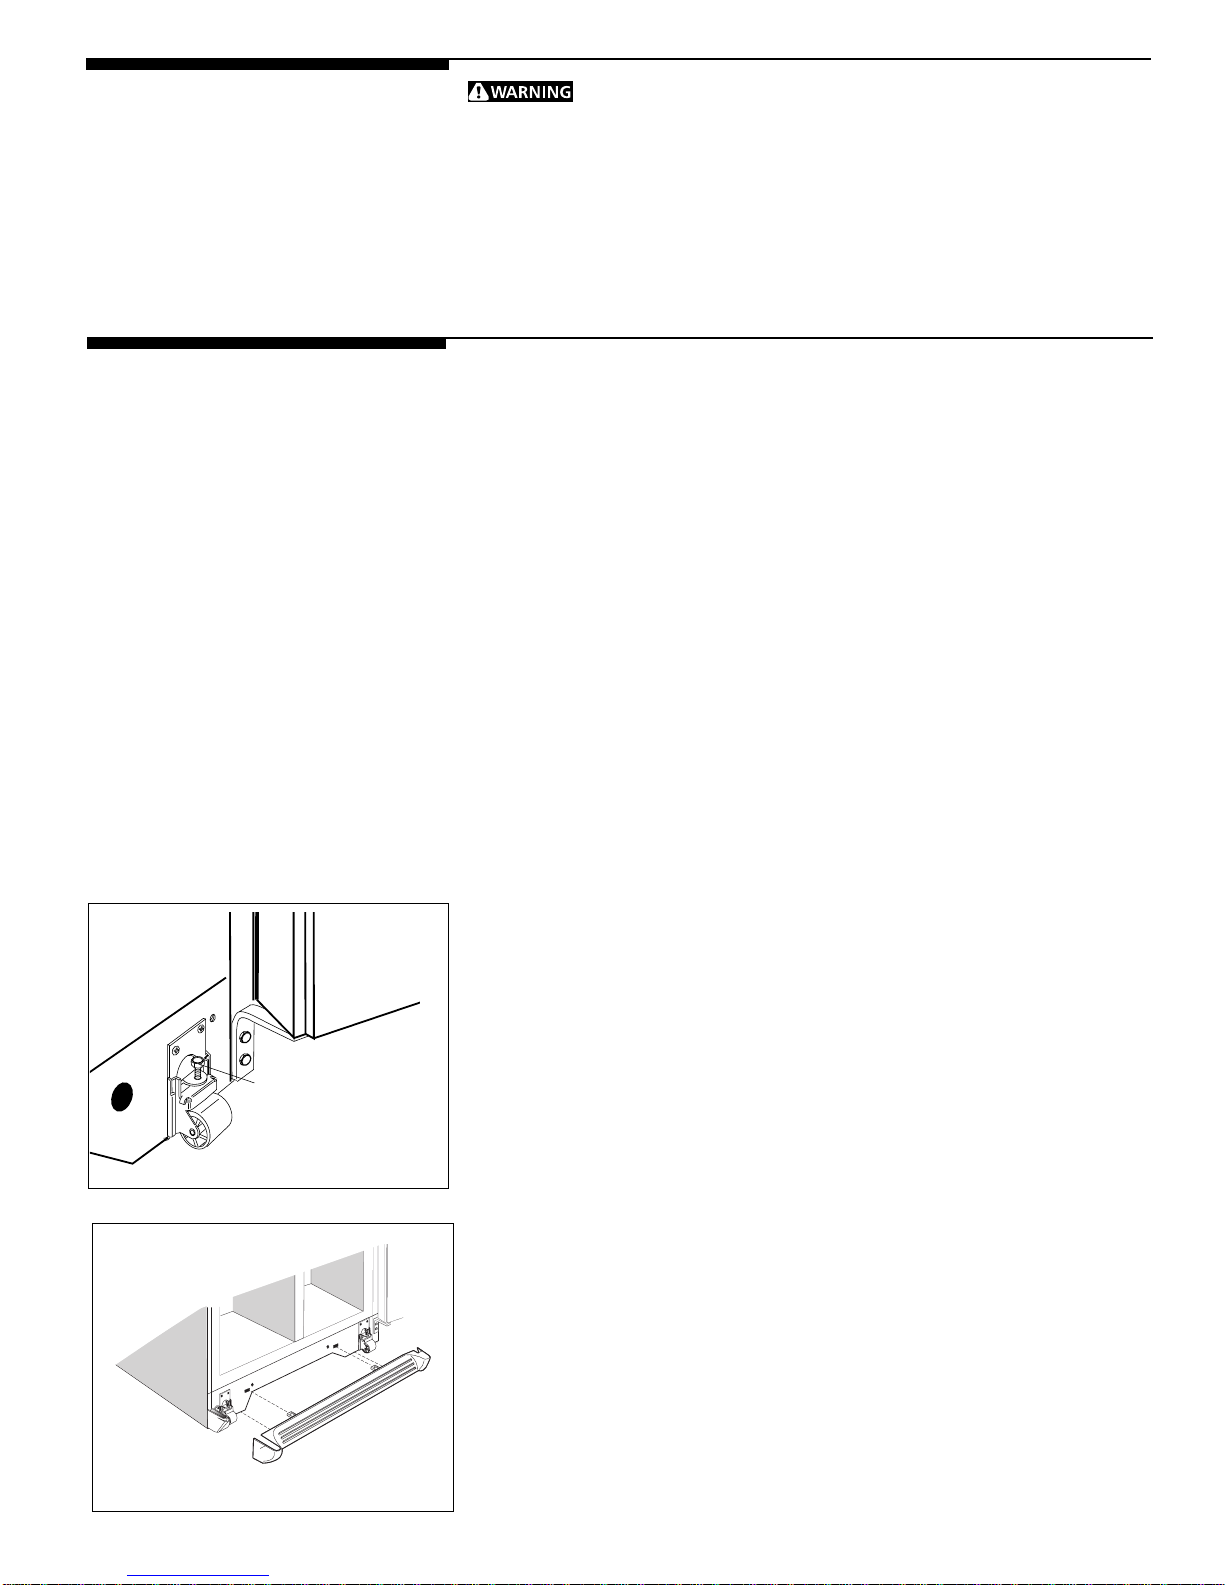
Adjusting Front Rollers
ROLLER ADJUSTING
BOLT
This Owner’s Guide provides specific operating instructions for your model. Use
refrigerator only as instructed in this Owner’s Guide. Before starting refrigerator,
follow these important first steps:
Location
Install refrigerator:
• near a grounded electrical outlet. DO NOT use an extension cord or an adapter plug.
• out of direct sunlight and away from range, dishwasher, or other heat sources,
if possible.
• on a floor that is level and strong enough to support a fully loaded refrigerator.
• where a water supply is available for automatic ice maker.
Installation
• Do not install refrigerator where temperature will drop below 60°F (15°C), or
rise above 110°F (43°C). Compressor will not be able to maintain proper
temperatures.
• In a recessed installation, allow an extra 1/2 inch (10-15 mm) on each side for
ease of installation.
• If the hinge side of the unit will be placed against a wall, allow a 1-3/4 inch (44
mm) space between wall and refrigerator to permit proper door swing.
Door Opening
For best use of drawers and freezer basket, refrigerator should be in a position
where both the refrigerator and freezer doors can be opened about 135°.
Leveling
• Refrigerator must be leveled with all bottom corners resting firmly on a solid
floor. Adjust front rollers to level cabinet both front-to-rear and side-to-side.
Keep cabinet as low as possible for stability. Never adjust cabinet rollers so front
is lower than rear.
• To adjust front rollers: Open refrigerator and freezer doors. Remove toe grille
by pulling it straight out. Adjust rollers by turning each roller adjusting bolt with
an adjustable wrench, a socket wrench, or a nutdriver until refrigerator is level
and stable. Rear rollers are not adjustable.
• Check both doors to be sure seals touch cabinet evenly on all four sides.
• If freezer door is higher than refrigerator door, raise right corner and/or lower left
corner until doors align across top of cabinet.
• If refrigerator door is higher than freezer door, raise left corner and/or lower right
corner until doors align across top of cabinet.
• To replace toe grille: Line up tabs with holes, and push grille straight on.
Replacing Toe Grille
Cleaning
• Wash the inside, all removable parts, and the outside with mild detergent and
warm water. Wipe dry. Do Not Use Harsh Cleaners On These Surfaces.
• Do Not use razor blades or other sharp instruments that can scratch appliance
surface, when removing adhesive labels. Any glue left from the tape or energy
label can be removed with a mixture of warm water and mild detergent, or touch
glue with sticky side of tape already removed.
• Do Not Remove Serial Plate.
3

First Steps
(continued)
Figure 1
Connecting Ice Maker to Water Supply
Do Not Install Ice Maker Tubing Where Temperature May
Fall Below Freezing.
Check to be sure your water connection will comply with local plumbing codes.
Water quality determines your ice quality. It is best to connect the ice maker to
water that is not softened. Chemicals from a malfunctioning softener can
damage the ice maker. If the ice maker is connected to soft water, ensure that
the softener is maintained and working properly .
The ice maker requires a 1/4 inch (6.4 mm) copper water supply line (with
shutoff) from your household water system. Allow enough tubing behind your
refrigerator to permit moving out to clean floor .
Water line kit 5308950117 is available through your dealer at extra charge. This
kit includes 25 feet (7.6 meters) of 1/4 inch diameter copper tubing, plus parts to
connect to your cold water line, including a saddle valve assembly. You will need
to purchase a 1/4 inch brass compression nut and ferrule from your local hardware or plumbing store.
1. Turn ON water supply and flush out copper tubing. Turn off water supply .
2. Unplug refrigerator .
3. Install WATER SUPPLY LINE as follows (figure 2):
• Slide brass nut, then ferrule, onto copper tubing.
Figure 2
Figure 3
Figure 4
• Push end of copper tubing as far into the metal water valve fitting as it will
go (1/4 inch). Slide ferrule into fitting and thread brass nut onto inlet,
tighten finger tight plus 1/2 turn with wrench.
NOTE: Some models may have a cap on the valve. Unscrew the cap and
discard.
4. Secure copper tubing with STEEL CLAMP and screw to rear panel at location
shown (Figure 3).
5. Coil water supply tubing as shown (figure 3).
NOTE: To prevent vibration noise and wear, leave a space between all tubing
and other surfaces.
6. Turn on water supply and check all connections for leaks (figure 3).
7. Plug refrigerator cord into wall outlet.
8. To begin ice pr oduction, lower the Wire Signal Arm to the “down” or “ON”
position (Figure 4).
IMPORT ANT
Ice production will begin when freezer reaches normal operating temperature.
Air in new plumbing lines may cause ice maker to cycle two or three times
before making a full tray of ice.
New plumbing may cause ice to be discolored or have poor flavor. Discard ice
made during the first 24 hours. After installation, if you wish to shut the ice
maker off, lift the Wire Signal Arm until it clicks and locks in the “UP” position.
4
Energy Saving Ideas
• Install the refrigerator in the most cool part of the room, out of direct sunlight and
away from heating ducts or registers. Do not place the refrigerator next to heatproducing appliances such as a range, oven or dishwasher. If this is not possible,
a section of cabinetry or an added layer of insulation between the two appliances
will help the refrigerator operate more efficiently.
• Level the refrigerator so the doors close tightly.
• Refer to this Owner's Guide for the suggested refrigerator settings.
• Periodic cleaning of the condenser will help the refrigerator run more efficiently.
See Outside in the Care and Cleaning section.
• Do not overcrowd the refrigerator or block cold air vents. Doing so causes the
refrigerator to run longer and use more energy. Shelves should not be lined with
aluminum foil, wax paper or paper toweling. Liners interfere with cold air
circulation, making the refrigerator less efficient, which could cause food
spoilage.
• Cover foods and wipe containers dry before placing them in the refrigerator. This
cuts down on moisture build-up inside the unit.
• Organize the refrigerator to reduce door openings. Remove as many items as
needed at one time and close the door as soon as possible.
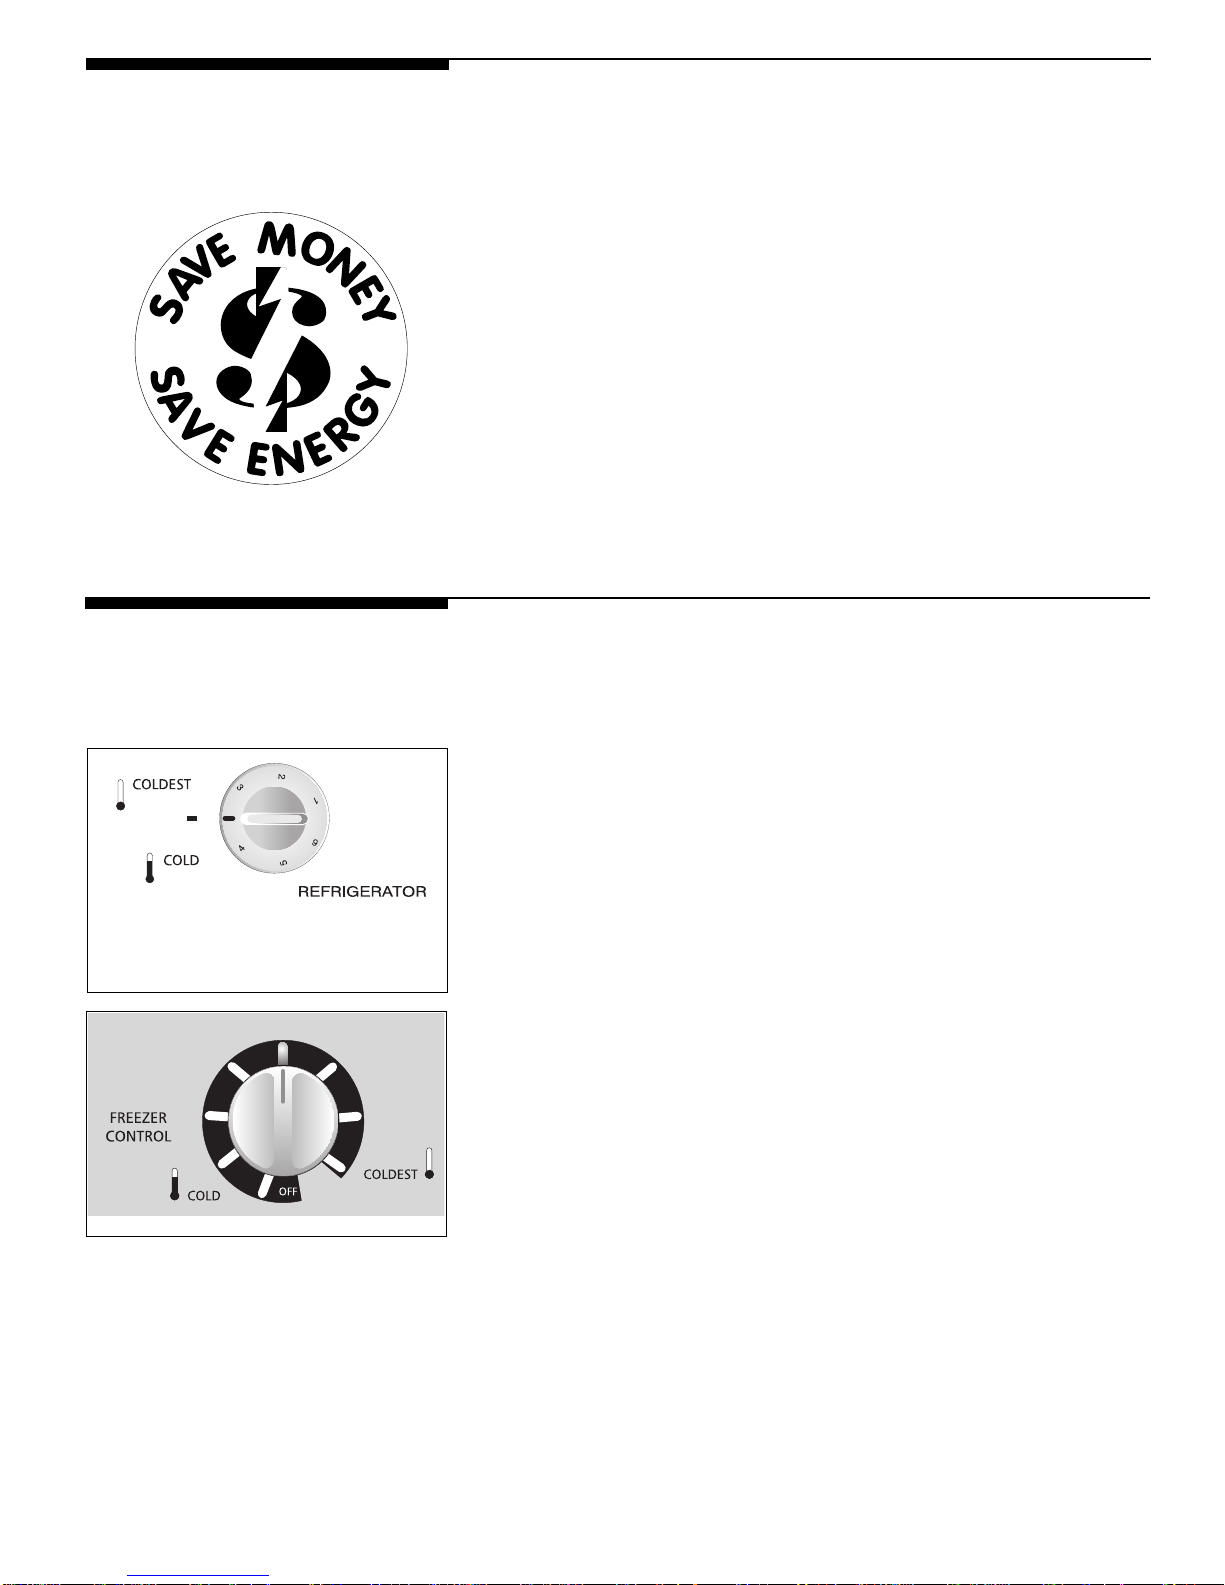
Setting the Controls
Refrigerator midpoint
Freezer midpoint
Cool Down Period
To ensure safe food storage, allow the refrigerator to operate with the doors closed
for at least 8 to 12 hours before loading with food.
Refrigerator Control
• The refrigerator control should be set at the midpoint of the dial for a trial period
of 24 hours.
• After 24 hours, adjust the control as needed. For colder temperatures, turn the
dial a notch toward COLDEST. For warmer temperatures, turn the dial a notch
toward COLD. Adjust temperatures by one increment at a time.
Freezer Control
• The freezer control should be set at the midpoint of the dial for a trial period of
24 hours.
• After 24 hours, adjust the control as needed. For colder temperatures, turn the
C05C0063
dial a notch toward COLDEST. For warmer temperatures, turn the dial a notch
toward COLD. Adjust temperatures by one increment at a time.
NOTE: When first setting the controls or when changing a setting, wait 24 hours for
the temperature to stabilize before making additional changes.
Turning the freezer control may change temperatures in both compartments. For
example, if the freezer control is turned to a colder setting, the refrigerator control
may have to be adjusted to a warmer one. Turning the refrigerator control will
change only the refrigerator temperature.
IMPORTANT: If the freezer control is turned to OFF, cooling stops in both
compartments.
You may hear the "Frost Free" system working. A fan circulates air in the
refrigerator and freezer compartments. For good circulation and maintenance of
proper cooling temperatures, do not block cold air vents with food items. Water
draining into the defrost water pan and hissing sounds are normal during the
automatic "Frost Free" cycle.
5
Fresh Food Storage
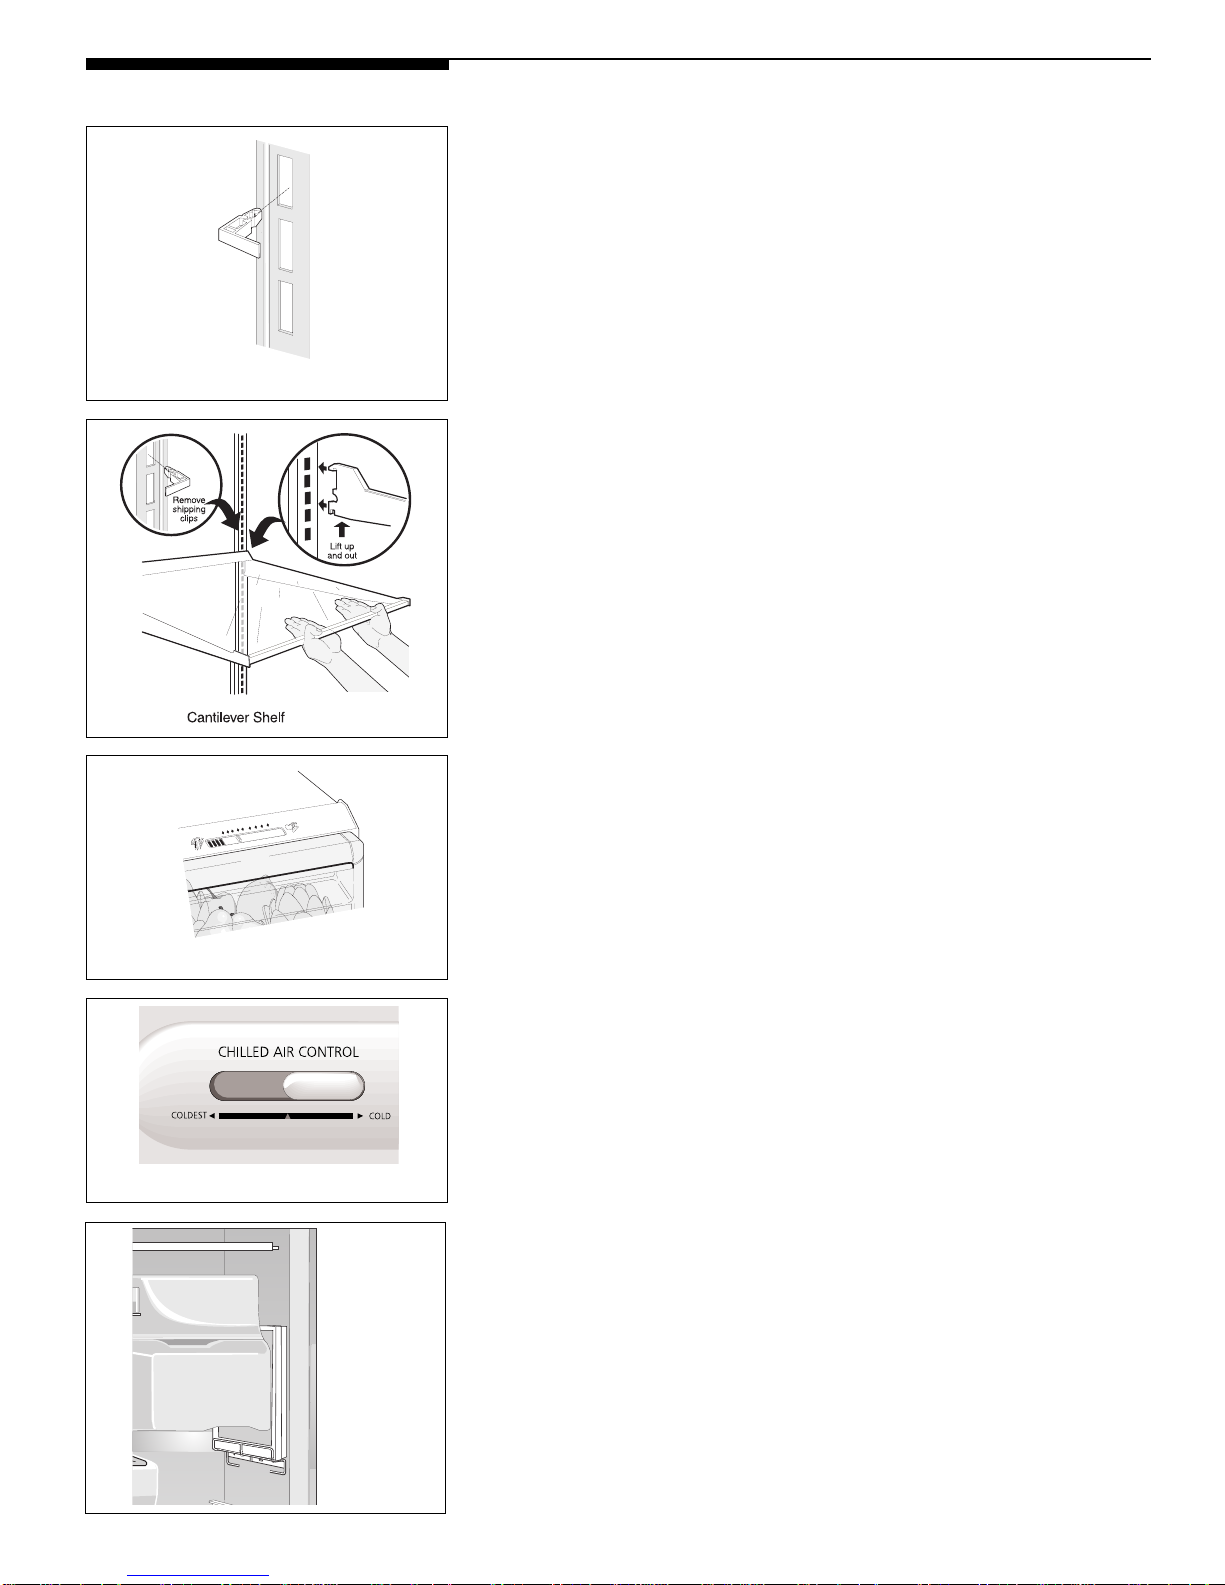
Remove Shipping Clips
Shelf Adjustment
Refrigerator shelves are easily adjusted to suit individual needs. Before adjusting
shelves, remove all food. The shipping clips which stabilize the shelves for shipping
may be removed and discarded.
To adjust the cantilever shelves (shelves supported at the rear of the refrigerator),
lift the back of the shelf up and out. Replace shelf by inserting hooks at rear into
slots. Lower and lock into position. Some models have Spillsafe™ glass shelves,
which catch and hold accidental spills.
Door Storage
Door bins and shelves are provided for convenient storage of jars, bottles and cans.
Items used often are available for quick selection.
The door bins can be moved to suit individual needs. Remove bins by lifting straight
up. Place bins in the desired position and lower over the supports.
The Dairy compartment is warmer than the general food storage section and is
intended for short term storage of cheese, spreads, or butter.
Crisper
The Crisper drawer, located under the bottom refrigerator shelf, is for storing fruits
and vegetables. Most produce should be washed in clear water and drained before
placing in this drawer. Items with strong odors or high moisture should be wrapped
before storing.
HIGHER
VEGETABLES
Humidity Control
Chilled Air Control
LOWER
HUMIDITYCONTROL
FRESH FRUITS &VEGETABLES
FRUITS
The Humidity Control (some models) allows you to adjust the humidity within the
Crisper drawer. This can extend the life of fresh vegetables which keep best in high
humidity. Leafy vegetables, however, keep best when stored with the Humidity
Control set on HIGHER, or in a drawer without a Humidity Control. This keeps
incoming air to a minimum and maintains maximum moisture content.
Meat Keeper
The Meat Keeper is located at the bottom of the refrigerator. The temperature in
this compartment can be made colder than the rest of the refrigerator compartment by sliding the Chilled Air Control knob within the COLDEST or COLD range.
Meat will be partially frozen and may be kept fresh longer than if stored on a
refrigerator shelf.
Before placing items in the Meat Keeper, follow these steps to keep the meat fresh:
1. Carefully handle meat with clean hands and always keep the compartment
clean.
2. Store meat in its original wrapper. If necessary, overwrap in plastic wrap or foil
to prevent drying. Wrap fish tightly to prevent odor transfer to other foods.
3. If spoilage ever occurs, disinfect the compartment with liquid chlorine bleach
following label directions. Then rinse with a solution of baking soda and water.
Rinse with clear water and dry.
Freezer Basket
A slide-out wire basket (some models have two) hangs below the bottom freezer
shelf. This basket provides easy access to frozen food packages.
Tall Storage
Compartment
Tall Storage Compartment (some models)
A shelf is attached to the freezer wall just below the ice server. This allows for
convenient storage of tall items placed vertically between the ice server and the
freezer wall.
6
 Loading...