

Frigidaire FRA124HT10, CRA144HT210, FRA123HT20, FAH10ET2T0, FAH106T2T0 Installation Instructions Manual
...
READ BEFORE INSTALLING UNIT
For Through-the-Wall Air Conditioners
Carefully read the installation manual before beginning.
Follow each step as shown.
Observe all local, state, and national electrical codes and by qualified, licensed, authorized personnel only.
Pay attention to danger and safety notices.
To avoid risk of personal injury, property damage, or product damage due to the weight of this device and sharp edges that may
be exposed:
Air conditioners covered in this manual pose an excessive weight hazard. Two or more people are needed to move and install
the unit. Wear protective gloves whenever lifting or carrying the unit. AVOID the sharp metal fins of front and rear coils. To
prevent injury or strain, use proper lifting and carrying techniques when moving unit.
Carefully inspect location where air conditioner wilt be installed. Be sure it wilt support the weight of the unit overan extended
period of time.
Handle air conditioner with care.
Make sure air conditioner does not fall during installation.
Do This First (for existing sleeve)
Note that the air conditioner dimensions are: 24" wide,14" high, and 19" deep (without front). Install Air Conditioner
according to these installation instructions to achieve the best performance. Save these installation instructions for
future reference.
• DO NOT USE ANY SCREWS OTHER THAN THOSE SPECIFIED HERE
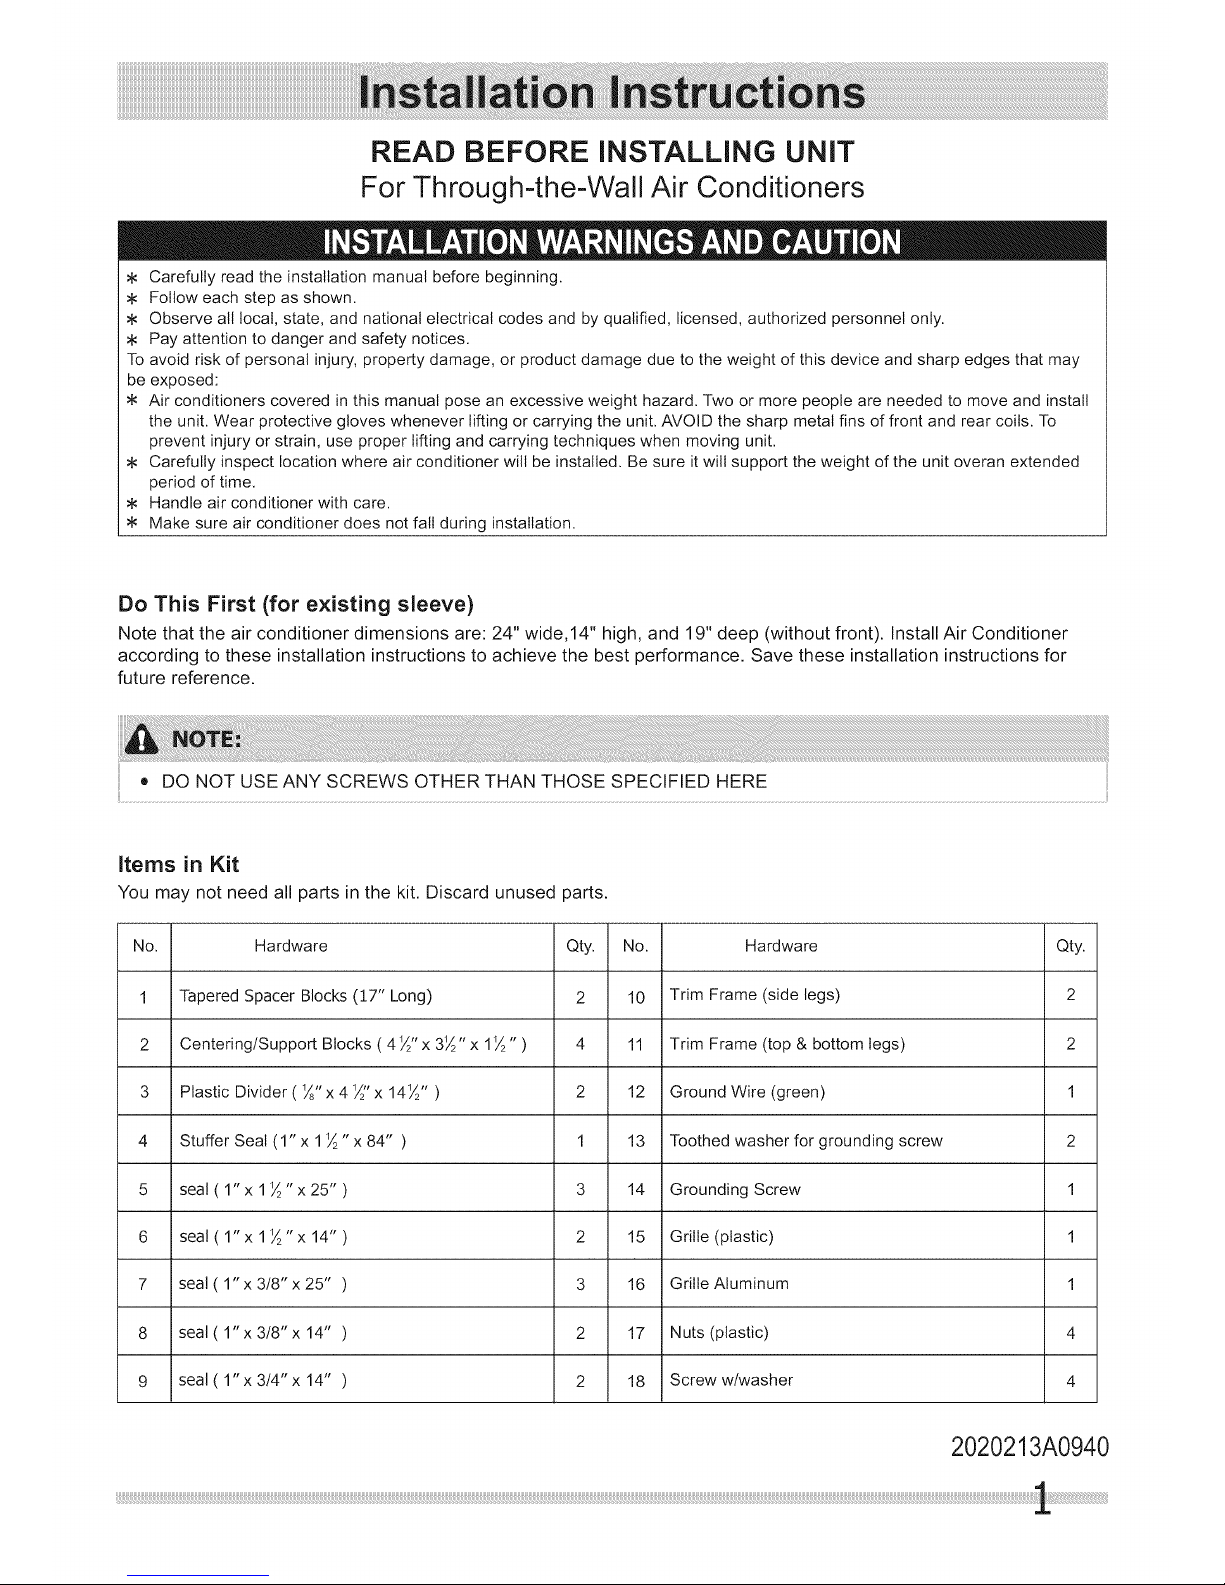
Items in Kit
You may not need all parts in the kit. Discard unused parts.
No.
1
2
3
4
5
6
7
8
9
Hardware
Tapered Spacer Blocks (17" Long)
Centering/Support Blocks ( 4 _" x 3_" x 1_" )
Plastic Divider ( _" x 4 _" x 14_" )
Stuffer Seal (1" x 1_" x 84" )
seal(l"x l_"x 25")
seal(l"x l_"x 14")
seal ( 1" x 318" x 25" )
seal( l"x 3/8"x 14" )
seal ( l"x 3/4" x 14" )
Qty.
2
4
2
1
3
2
3
2
2
No.
10
11
12
13
14
15
16
17
18
Hardware
Trim Frame (side legs)
Trim Frame (top & bottom legs)
Ground Wire (green)
Toothed washer for grounding screw
Grounding Screw
Grille (plastic)
Grille Aluminum
Nuts (plastic)
Screw w/washer
Qty.
2
2
1
2
1
1
1
4
4
2020213A0940
How to Install
1. Identify the wall-sleeve brand for your installation, from the chart below.
Wall Sleeve Dimensions
Brand
White-Westinghouse
Frigidaire
Carrier (52F Series)
Width
Height
251½ 151/4
25½ 15}/4
251½ 151/4
General Electric/Hotpoint 26 15% 157/8
Whirlpool 257/'8 161½ 171/8or 23
Fedders/Emerson* 27 163/4 163/4or 193/4
Sears/Ken more 25 3/4 167/8 18%
Emerson/Fedders* 263/4 153/4 15
Carrier (51S Series) 253/4 167/'8 18%
Fried rich* 27 163/4 163/4
For larger sleeves, an adaptor trim kit (EA120T) is available.
Depth
16, 171½ 0r22
16, 171½ or22
16, 171½ or22
iiiii@;ii@i_¸;_:_;_il¸;(_i,i(,i(,i(,)))))))))))i_i_i!!i{_!i;_;;i_!iii%;ii@ii;¸i;i;ii:i!i!i¸i;i_il;iiiii;!;!;!;!;!;!;!;!;!;!;!;!;!;!;!;!;!;!;!;!;!;i@il;iii!_}i¸ili¸I;¸i;!;;i¸i¸I;¸i;!;;i¸i¸I;¸i;!;;i¸i¸I;¸i;!;;i¸i¸I;¸i;!;;i¸i¸I;¸i;!;;i¸i¸I;¸_;_;_;_;_;_;_;_;_;_;_;_;_;_;_;_;_;_;_;_;_;_;_;_;_;_;_;_;_;_;_;_;_;_;_;_;_;_;_;_;_;_;_;_;_;_;_;_;_;_;_;_;_;_;_;_;_;_;_;_;_;_;_;_;_;_;_;_;_;_;_;_;_;_;_;_;_;_;_;_;_;_;_;_;_;_;_;_;_;_;_;_;_;_;_;_;_;_;_;_;_;_;_;_;_;_;_;_;_;_;_;_!_!!;!i!_¸i;i_ii!_i¸_!iii_!_;!;;_;;!;!i_!i;;;;;;;;;;;;;;;;;;;;;;;;;;;;;;;;;;;;;;;;;;;;;;;;;;;;;;;;;;;;;;;;;;;!!_¸iiii!i¸!!i;!;i@!!i;!;i@!!i;!;i@!!i;!;i_!!;(_;i}_;}i@!!i!_i!!i!_i!!i!_i!!i!_i!!i!{¸i_i¸@!!i;!;i@!!i;!;i@!!i;!;i@!!i;!;i@!!i;!;i@!!i;!;i!@i_@i!!_ii!i_!_ii;{_!i@;£i!¸!!i;!;i@!!i;!;i@!!i;!;i@!!i;!;i@!!i;!;i@!!i;!;i@!!i;!;i@!!i;!;i@!!i;!;i!i!!i;!;i_¸¸¸!I¸@!!i;!;i!ii;i_i_¸II(;2_Ii!¸:;I_£_I¸¸¸((ii¸@_!;i!i¸!!i;!;i@!!i{_i!ii_iiii¸!i!!i;!;¸_;_s;_i}_}_
• All wall sleeves used to mount the new Air Conditioner must be in sound structural condition and have a rear
grille that securely attaches to sleeve, or rear flange that serves as a stop for the Air Conditioner.
For new !nstal!at!onsi a Fdgida!re sIeeve K!t (EA 108T)i s recQ end ed:..........................................................................................................................................................................
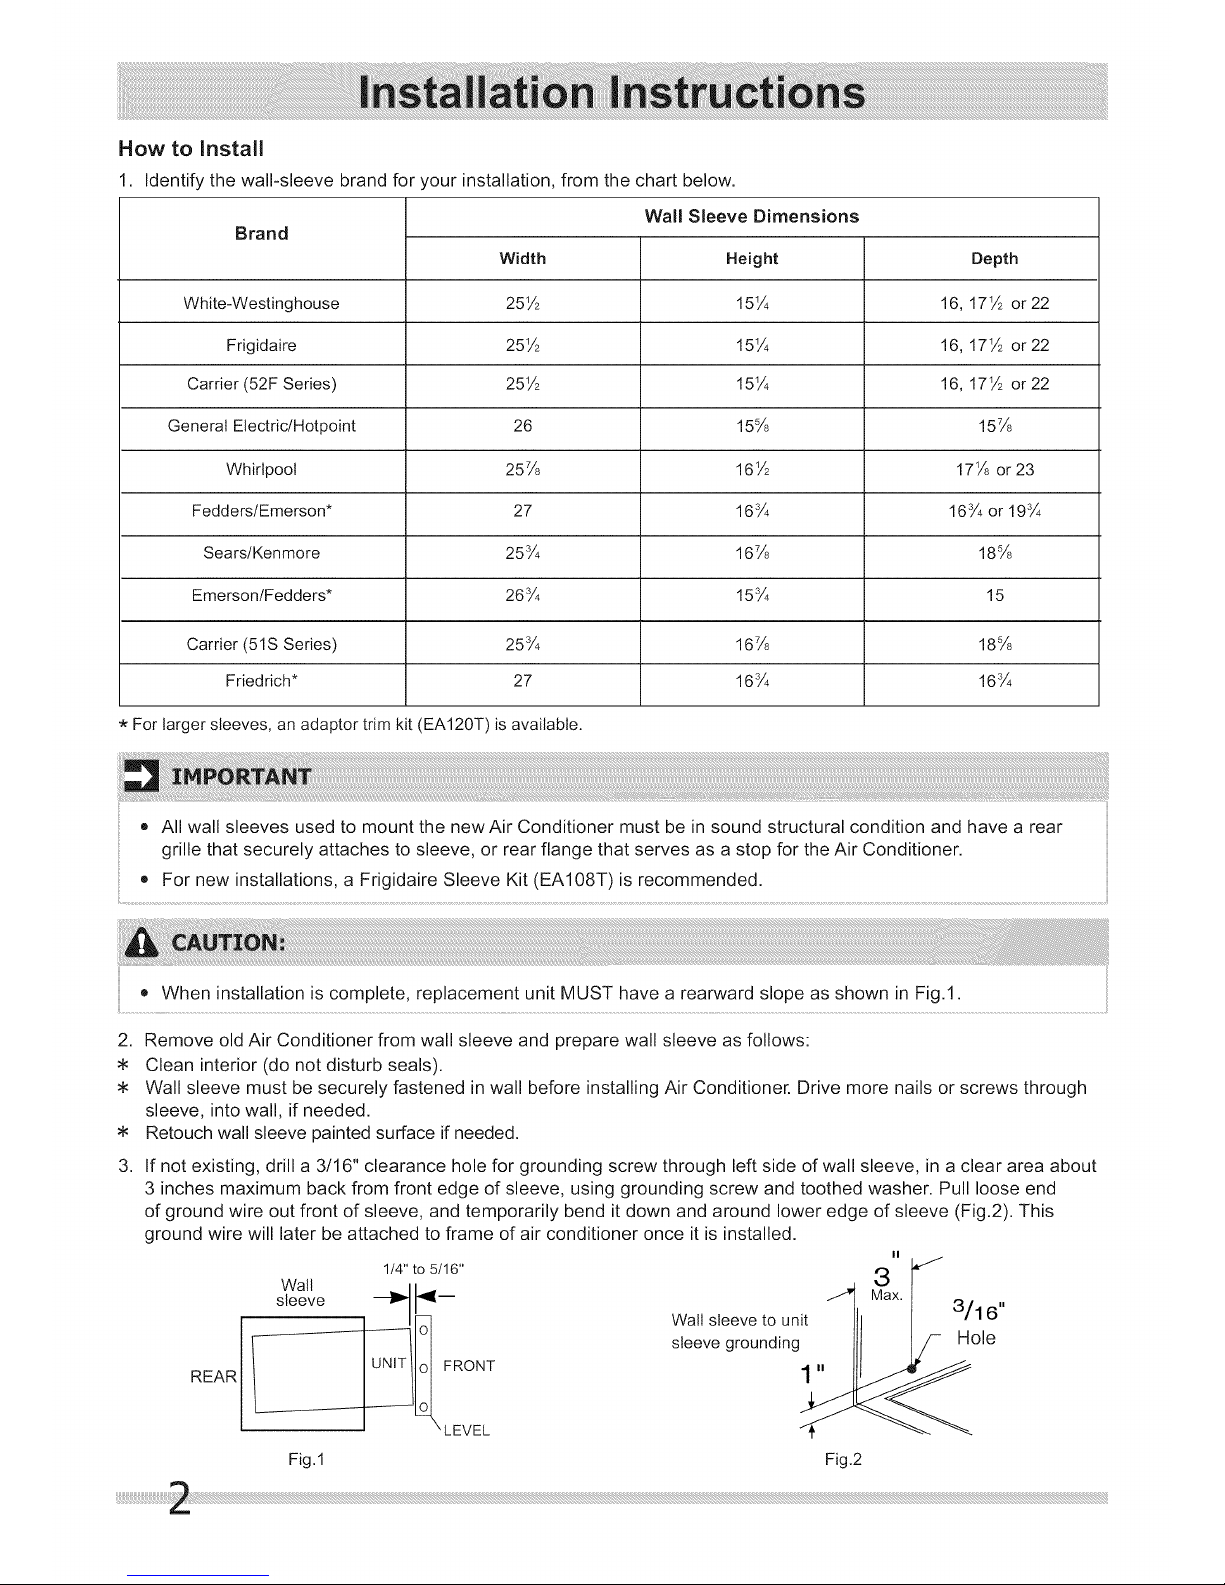
When installation is complete, replacement unit MUST have a rearward slope as shown in Fig.1.
2. Remove old Air Conditioner from wall sleeve and prepare wall sleeve as follows:
Clean interior (do not disturb seals).
Wall sleeve must be securely fastened in wall before installing Air Conditioner. Drive more nails or screws through
sleeve, into wall, if needed.
Retouch wall sleeve painted surface if needed.
3.
If not existing, drill a 3/16" clearance hole for grounding screw through left side of wall sleeve, in a clear area about
3 inches maximum back from front edge of sleeve, using grounding screw and toothed washer. Pull loose end
of ground wire out front of sleeve, and temporarily bend it down and around lower edge of sleeve (Fig.2). This
ground wire will later be attached to frame of air conditioner once it is installed.
REAR
1/4" to 5/16"
Wall _ II
sleeve _I_--
_XLEVEL
II
J_ M3ax 3""
Wallsleeve to unit !h /16
sleeve grounding Ill - Hole
Fig.1 Fig.2
qi
.
#1 Emerson
#2 Fedders
#3 Fedders or Friedrich
#4 General Electric/Hotpoint
#5 Sears or Carrier(51S Series)
#6 Whirlpool
#7 Whirlpool
#8 White-Westinghouse/Frigidaire/
Carrier(52F Series)
#9 White-Westinghouse/Frigidaire
Prepare the wall sleeve for installation of the new unit per the following Brand instructions.
15" Deep
19%" Deep
16¾" Deep
167/8"Deep
18_8" Deep
171/8"Deep
23" Deep
16"+ 17W' Deep
22" Deep
5. Identify your wall sleeve type and follow the instructions for that type in the following pages.
• This unit's increased performance characteristics result from having two rear air intakes.
• It is very important that these installation instructions are followed so your unit can operate at maximum
efficiency.
• Ifthere is an existing sleeve, and there is an existing rear grille, it needs to be replaced by one that has been
shipped with the unit in the accessory kit.
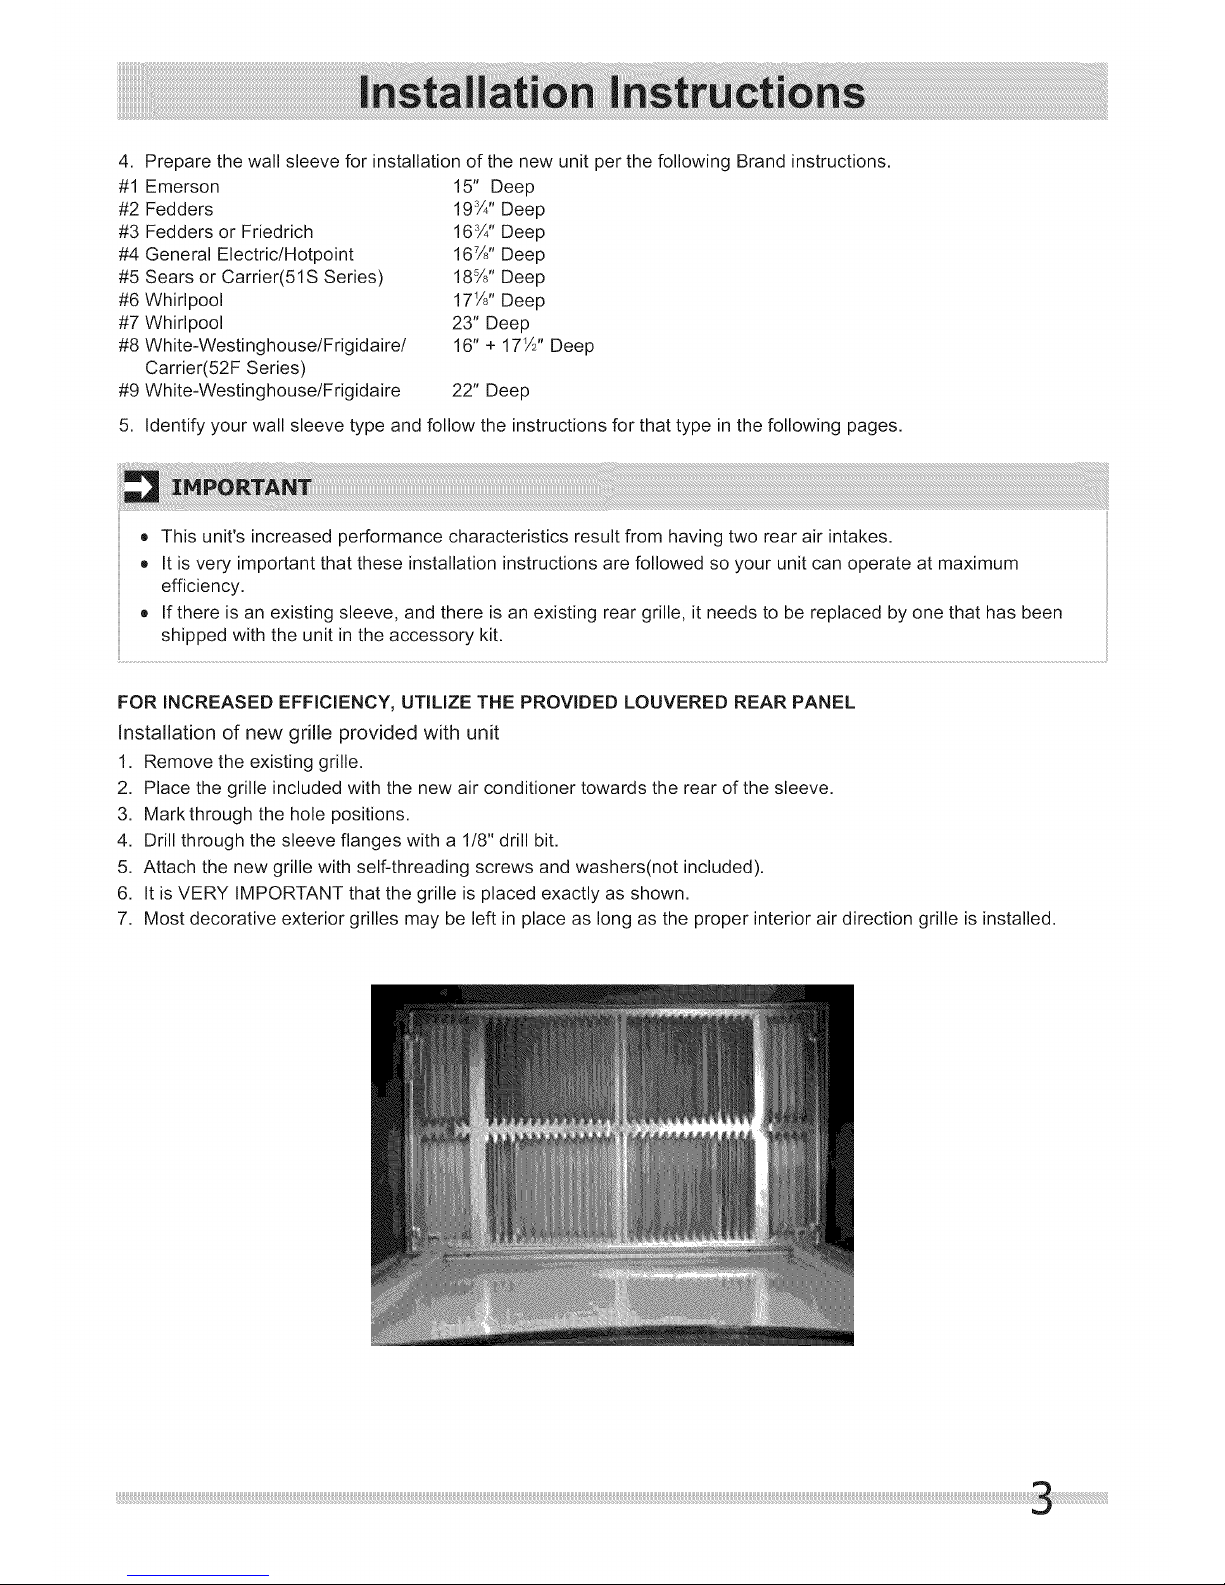
FOR INCREASED EFFiCiENCY, UTILIZE THE PROVIDED LOUVERED REAR PANEL
Installation of new grille provided with unit
1. Remove the existing grille.
2. Place the grille included with the new air conditioner towards the rear of the sleeve.
3. Mark through the hole positions,
4. Drill through the sleeve flanges with a 1/8" drill bit.
5. Attach the new grille with self-threading screws and washers(not included).
6. It is VERY IMPORTANT that the grille is placed exactly as shown.
7. Most decorative exterior grilles may be left in place as long as the proper interior air direction grille is installed.
Wall Sleeve Brands:
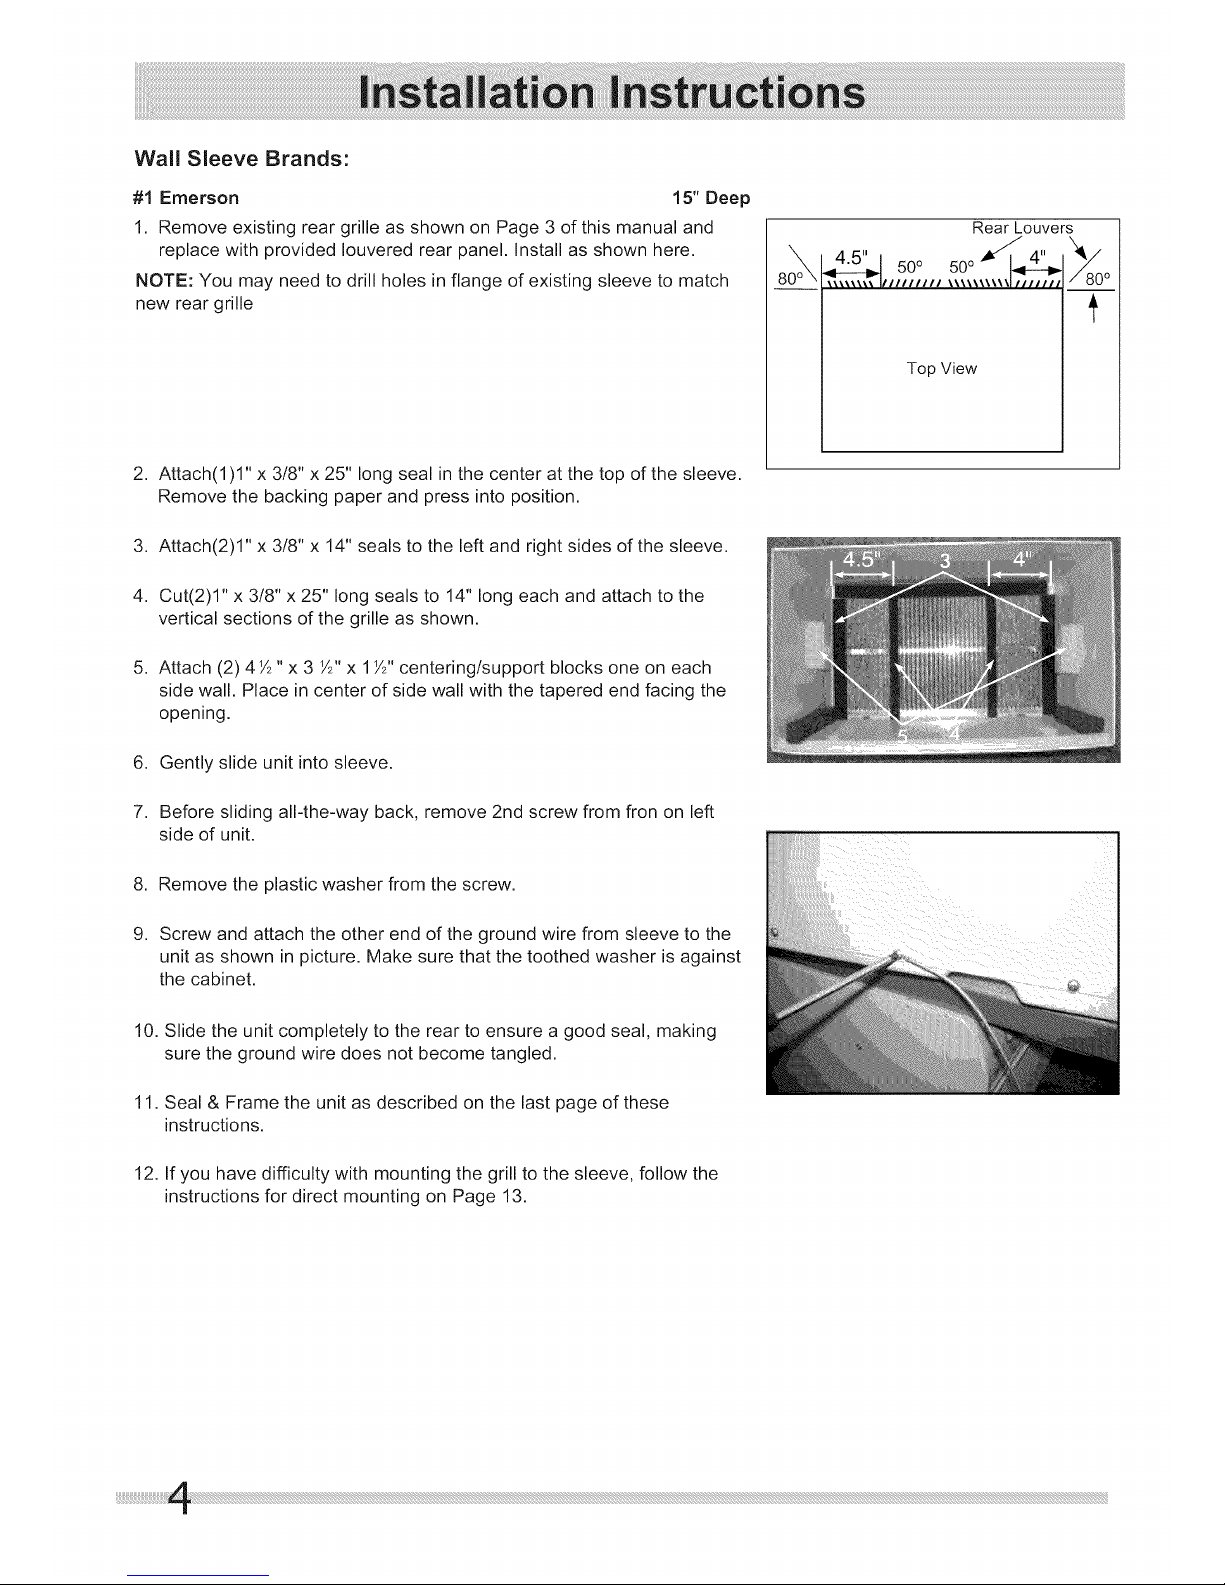
#1 Emerson 15" Deep
1. Remove existing rear grille as shown on Page 3 of this manual and
replace with provided Iouvered rear panel. Install as shown here.
NOTE: You may need to drill holes in flange of existing sleeve to match
new rear grille
80° \
Rear Louvers
"
50o
Top View
2. Attach(I)1" x 3/8" x 25" long seal in the center at the top of the sleeve.
Remove the backing paper and press into position.
3. Attach(2)1" x 3/8" x 14" seals to the left and right sides of the sleeve.
4. Cut(2)1" x 3/8" x 25" long seals to 14" long each and attach to the
vertical sections of the grille as shown.
5. Attach (2) 4½ "x 3 ½" x 1Y," centering/support blocks one on each
side wall. Place in center of side wall with the tapered end facing the
opening.
6. Gently slide unit into sleeve.
7. Before sliding all-the-way back, remove 2nd screw from fron on left
side of unit.
8. Remove the plastic washer from the screw.
9. Screw and attach the other end of the ground wire from sleeve to the
unit as shown in picture. Make sure that the toothed washer is against
the cabinet.
10. Slide the unit completely to the rear to ensure a good seal, making
sure the ground wire does not become tangled.
11. Seal & Frame the unit as described on the last page of these
instructions.
12. If you have difficulty with mounting the grill to the sleeve, follow the
instructions for direct mounting on Page 13.
Wall Sleeve Brands:
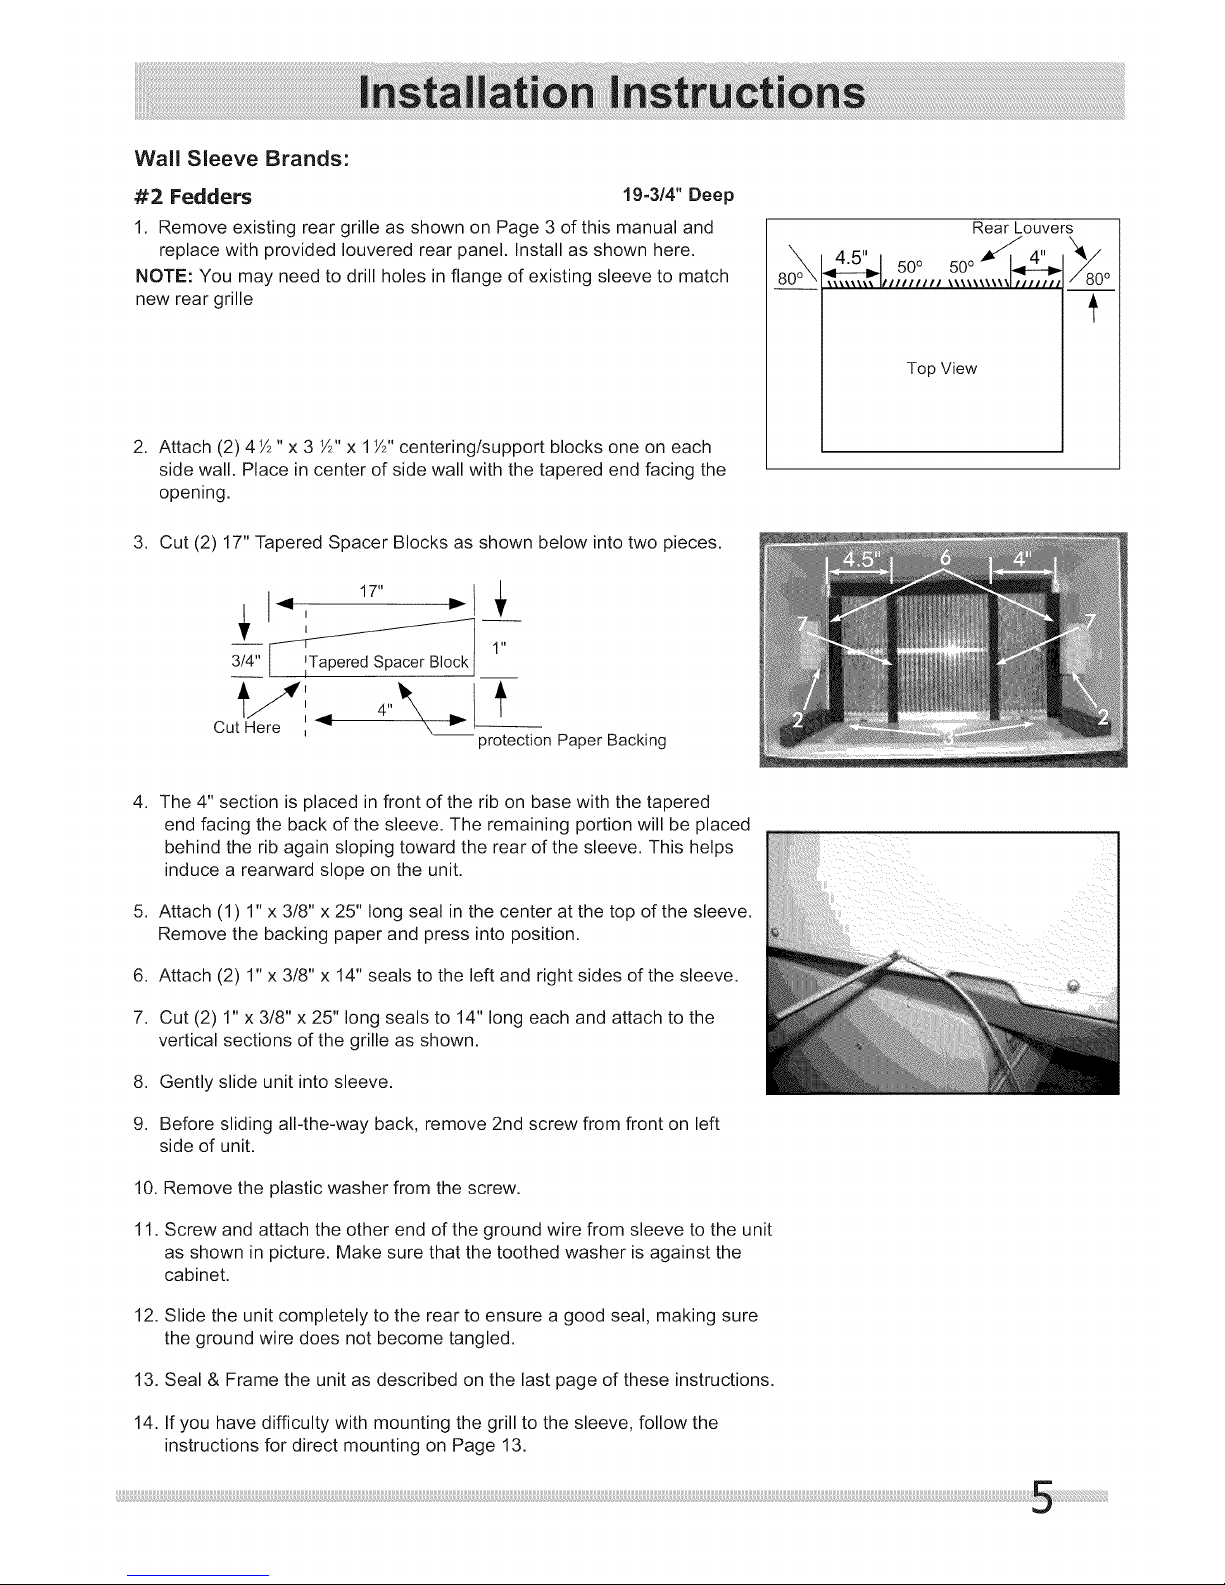
#2 Fedders 19=3/4" Deep
1. Remove existing rear grille as shown on Page 3 of this manual and
replace with provided Iouvered rear panel. Install as shown here.
NOTE: You may need to drill holes in flange of existing sleeve to match
new rear grille
2. Attach (2) 4½ "x 3 ½" x 1Y," centering/support blocks one on each
side wall. Place in center of side wall with the tapered end facing the
opening.
3. Cut (2) 17" Tapered Spacer Blocks as shown below into two pieces.
1 7"
1''
3/4"
t/'_'Here I - _ I t
I 4"
Cut
' -- protection Paper Backing
80° \
Rear Louvers
"
500
Top View
.
The 4" section is placed in front of the rib on base with the tapered
end facing the back of the sleeve. The remaining portion will be placed
behind the rib again sloping toward the rear of the sleeve. This helps
induce a rearward slope on the unit.
5. Attach (1) l"x 3/8" x 25" long seal in the center at the top of the sleeve.
Remove the backing paper and press into position.
6. Attach (2) l"x 3/8" x 14" seals to the left and right sides of the sleeve.
7. Cut (2) 1" x 3/8" x 25" long seals to 14" long each and attach to the
vertical sections of the grille as shown.
8. Gently slide unit into sleeve.
9. Before sliding all-the-way back, remove 2nd screw from front on left
side of unit.
10. Remove the plastic washer from the screw.
11. Screw and attach the other end of the ground wire from sleeve to the unit
as shown in picture. Make sure that the toothed washer is against the
cabinet.
12. Slide the unit completely to the rear to ensure a good seal, making sure
the ground wire does not become tangled.
13. Seal & Frame the unit as described on the last page of these instructions.
14. If you have difficulty with mounting the grill to the sleeve, follow the
instructions for direct mounting on Page 13.
 Loading...